Canon Powershot A720 IS Motherboard Replacement
|
|
|
- Alyson Miles
- 5 years ago
- Views:
Transcription

1 Canon Powershot A720 IS Motherboard Replacement This guide will show how to replace the motherboard. Written By: Jamie ifixit CC BY-NC-SA Page 1 of 16
2 INTRODUCTION This guide will allow the user to replace the motherboard. Please make sure that you are certain that the motherboard is the correct part that needs to be replaced. TOOLS: Magnetic Project Mat (1) Phillips #00 Screwdriver (1) ifixit Opening Tools (1) Soldering Station (1) Spudger (1) Static Bracelet (1) Tweezers (1) ifixit CC BY-NC-SA Page 2 of 16


3 Step 1 Motherboard If the initial shutter button dislodge does not work, we have to disassemble the camera. On the bottom of the camera, use your thumb and push the battery lock up to open. The battery compartment door should then spring open and batteries will slide out. Step 2 Place the camera down so that the lens is facing up. Next, use the Phillips #00 Precision Screwdriver to unscrew the inner most 4 mm phillips head screw. This will remove the door from the camera. Always place screws on the the Magnetic Mat and write the size and location of where they were removed from with a dry erase marker. ifixit CC BY-NC-SA Page 3 of 16


4 Step 3 Remove the six 4 mm phillips head screws that are found on both the sides and bottom of the camera with the Phillips #00 Precision Screwdriver. Step 4 Slowly and gently pry open with your hands to separate the back case panel from the rest of the camera. The gray rubber cover labeled DC IN DIGITAL A/V OUT may fall out. ifixit CC BY-NC-SA Page 4 of 16

5 Step 5 Unscrew the two 3 mm screws that are below the LCD Screen Mount with the Phillips #00 Precision Screwdriver. Unscrew the top 4 mm screw with the Phillips #00 Precision Screwdriver. ifixit CC BY-NC-SA Page 5 of 16


6 Step 6 Carefully lift and turnover the LCD Screen so that you are able to see the motherboard. Treat the motherboard with care since it is very sensitive to static discharge. Remain grounded to avoid the release of static discharge by wearing a static bracelet. Carefully disconnect the LCD Screen ribbon cable away from its ZIF connector with your thumb and index finger. You must make sure to have your thumb and index finger cover as much of the ribbon's width and as close to the ZIF connector as possible without touching the motherboard while pulling the ribbon out. line. Be careful to not rip the ribbon wire or the red and black power wires when pulling the LCD screen out. Use the soldering iron to separate the black and red power wires from the motherboard. Make sure to note the location of where each wire was attached to. The black wire is the negative power wire and the red wire is the positive power wire. Not knowing where the power wires go could disrupt the power distribution and lead to power outages and damage to the motherboard. ifixit CC BY-NC-SA Page 6 of 16


7 Step 7 Remove the 3 mm phillips head screw that is between the circuit boards. The other screw was the 4 mm screw that was between the circuit boards was taken off during step five of this guide. Remove the next three 3.5 mm phillips head screws that are on the button circuit board. Step 8 Use the spudger to unclip both wires from underneath the shutter button and settings dial housing unit. Be careful not apply too much force on wires with spudger because you may rip them off. ifixit CC BY-NC-SA Page 7 of 16


8 Step 9 Turn the camera over and unscrew 4.5 mm Phillips head screw that is by the Settings Dial. From the metal frame, unscrew the 3 mm Phillips screw head to begin to detachment of the battery housing unit. ifixit CC BY-NC-SA Page 8 of 16


9 Step 10 Use the plastic opening tool to begin separating the user button circuit board from the shutter button and settings dial housing unit. Carefully disconnect the ribbon cable that is attached to the user buttons circuit board away from the ZIF connector that is attached to the motherboard with your thumb and index finger. Get as close to the ZIF connector as possible without touching the motherboard. Be careful not the rip the ribbon cable out of the ZIF connector when removing. Remove the user button circuit board. ifixit CC BY-NC-SA Page 9 of 16


10 Step 11 Use the spudger to carefully remove the attached ribbon cable. Alternate on both sides of ribbon cable to remove evenly from the ZIF connector every time you use a spudger. Be careful not to rip ribbon cable attached to motherboard out of the ZIF connector. ifixit CC BY-NC-SA Page 10 of 16


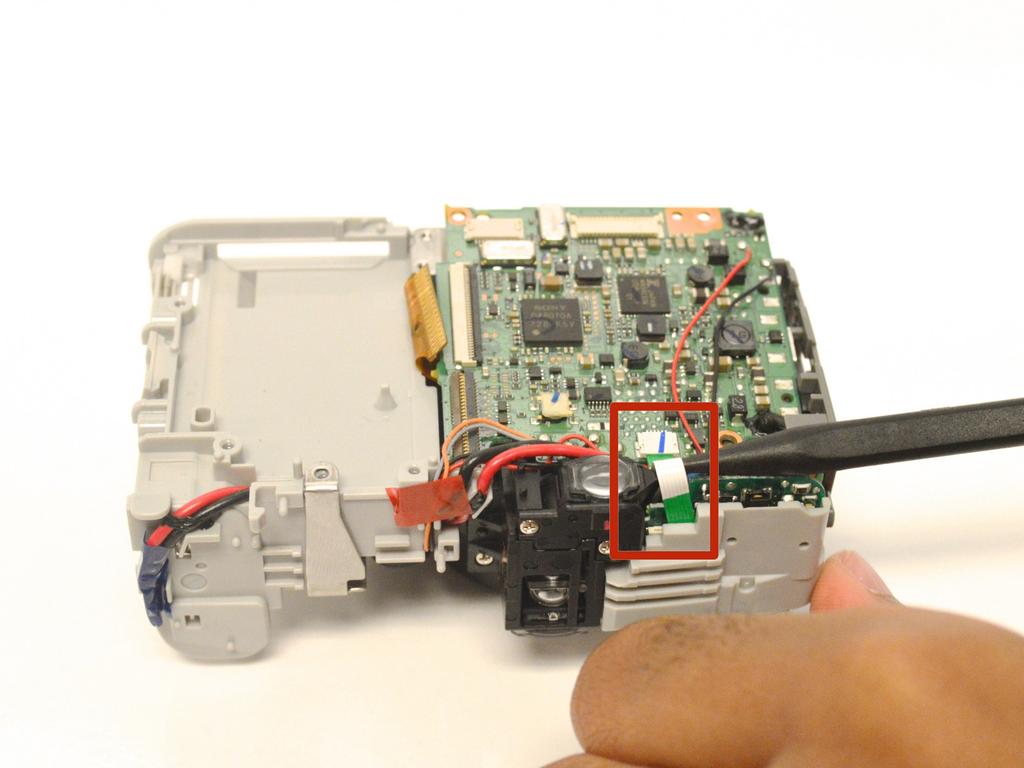
11 Step 12 Next, use the spudger to remove the pictured ribbon from the ZIF connector. Alternate on both sides of ribbon cable to remove evenly from the ZIF connector every time you use a spudger. Be careful not to rip the ribbon cable out of the ZIF connector while removing. Step 13 Next, use the spudger to remove the green ribbon from the attached ZIF connector. Alternate on both sides of ribbon cable to remove evenly from the ZIF connector every time you use a spudger. Be careful not to rip the ribbon cable out of the ZIF connector while removing. ifixit CC BY-NC-SA Page 11 of 16


12 Step 14 Unsolder all of the wires attached to the motherboard and move them aside with the tweezers. Be observant of where you are soldering because you can easily disrupt the power distribution. Step 15 After all of ribbons have been disconnected, gently lift the motherboard to expose the ribbon cable that connects the motherboard to the lens. Use the spudger to remove the the ribbon cable attached to the motherboard. Be sure to alternate both sides of ribbon cable to evenly remove. Be careful not to rip the ribbon cable out from the ZIF connector the ribbon cable is attached to. ifixit CC BY-NC-SA Page 12 of 16


13 Step 16 With the lens facing up, remove the 3 mm phillips head screw that attaches the bottom of the battery housing unit to the lens. Turn the camera over so the bottom is now facing up to remove the 3 mm Phillips head screw to disassemble the battery housing unit from the camera. ifixit CC BY-NC-SA Page 13 of 16


14 Step 17 Remove the metal frame from battery housing unit manually. Separate the lens from the motherboard and put the lens housing unit aside for later use. Be careful not to apply to much force when pulling apart the metal frame. You may cause damage to nearby wires and/or stretch the metal frame. ifixit CC BY-NC-SA Page 14 of 16


15 Step 18 Use the tweezers to remove the tape and rubber strap to begin unraveling the wires from the plastic hooks. Step 19 Use the soldering iron to remove the red and black wires from the battery contacts. Be aware of the placement of the red and black power wires during reassembly. Misplacement can cause further damage to you camera. ifixit CC BY-NC-SA Page 15 of 16


16 Step 20 Finally, use the soldering iron once more to melt the wire contact points and detach the motherboard. To reassemble your device, follow these instructions in reverse order. This document was last generated on :49:35 PM. ifixit CC BY-NC-SA Page 16 of 16
Canon EOS 70D Camera Motherboard
 Canon EOS 70D Camera Motherboard Replacement This guide will show you how to replace the main motherboard on a EOS 70D. Written By: Tyler Baker ifixit CC BY-NC-SA www.ifixit.com Page 1 of 11 INTRODUCTION
LG Xenon Front Case/Screen Replacement
 Removing the Front Case/Screen. Written By: Micaela Saqui ifixit CC BY-NC-SA www.ifixit.com Page 1 of 12 INTRODUCTION If you have broken or scratched your screen you may want to replace it with a new one.
Written By: Sydney Dye
 Disassembling Panasonic LUMIX DMC-LX100 This guide will show you how to take apart your entire Panasonic LUMIX DMC-LX100. Written By: Sydney Dye ifixit CC BY-NC-SA www.ifixit.com Page 1 of 15 INTRODUCTION
Canon Powershot A70 Button Flex Assembly Replacement
 Canon Powershot A70 Button Flex Assembly Replacement Written By: Brian ifixit CC BY-NC-SA www.ifixit.com Page 1 of 15 INTRODUCTION This guide will walk through the process of removing the button flex assembly
Canon EOS Rebel XTi Tripod mount
 Canon EOS Rebel XTi Tripod mount Replacement This guide will show how to replace the tripod mount if the mount threads strip. Written By: Tyler percy ifixit CC BY-NC-SA www.ifixit.com Page 1 of 11 INTRODUCTION
Canon EOS 6D Front and Top Body Panel Replacement
 Canon EOS 6D Front and Top Body Panel Replacement Replace the front and top body panels of the EOS 6D. Written By: Justin Thomas ifixit CC BY-NC-SA www.ifixit.com Page 1 of 14 INTRODUCTION Use this guide
Canon PowerShot SX50 HS Eyepiece Replacement
 Canon PowerShot SX50 HS Eyepiece Replacement This guide will explain how to remove and replace the eyepiece. Written By: Megan Rund ifixit CC BY-NC-SA www.ifixit.com Page 1 of 10 INTRODUCTION Replace the
Written By: Brittany K
 Nintendo DS Lite Motherboard Replacement Written By: Brittany K ifixit CC BY-NC-SA www.ifixit.com Page 1 of 11 INTRODUCTION This guide has been updated by ifixit staff! Read the new, official guide here.
Canon PowerShot A80 Flash Assembly Replacement
 Canon PowerShot A80 Flash Assembly Replacement This guide allows you to remove and replace the light bulb in the flash assembly. Written By: ryne contreras ifixit CC BY-NC-SA www.ifixit.com Page 1 of 14
Acer One 10 S M Rear Camera
 Acer One 10 S1003-114M Rear Camera Replacement Replace your broken camera on your Acer One 10 S1003-114M to restore picture quality using this replacement guide. Written By: Rachel Harrison ifixit CC BY-NC-SA
Samsung Galaxy Tab Speaker
 Samsung Galaxy Tab 2 10.1 Speaker Replacement This guide will show you how to replace a broken speaker in your tablet. Written By: Matthew Weeman ifixit CC BY-NC-SA www.ifixit.com Page 1 of 11 INTRODUCTION
Nintendo 3DS XL Upper LCD Display
 Nintendo 3DS XL Upper LCD Display Replacement This guide is going to help you take apart the Upper LCD screen so you will be able to once again play your favorite games on your Nintendo 3DS XL! Written
Ematic Genesis Screen Replacement
 Screen replacement for the Ematic Genesis tablet Written By: Justin Rohrman ifixit CC BY-NC-SA www.ifixit.com Page 1 of 11 INTRODUCTION If the screen is cracked or damaged it may need to be replaced. This
Written By: Shanmei Zheng
 Olympus Stylus 1030 SW LCD Replacement Written By: Shanmei Zheng ifixit CC BY-NC-SA www.ifixit.com Page 1 of 10 TOOLS: T6 Torx Screwdriver (1) Phillips #00 Screwdriver (1) Spudger (1) ifixit Opening Tools
Nikon Coolpix AW130 Motherboard
 Nikon Coolpix AW130 Motherboard Replacement If your camera fails to turn on, despite a previous battery replacement and continual charging, it may be in need of a motherboard replacement. Written By: Lauren
Olympus Stylus 1030 SW Camera Lens Replacement
 Olympus Stylus 1030 SW Camera Lens Replacement Written By: Shanmei Zheng ifixit CC BY-NC-SA www.ifixit.com Page 1 of 11 TOOLS: Phillips #00 Screwdriver (1) ifixit Opening Tools (1) Spudger (1) T6 Torx
Insignia Flex 10.1 NS-P16AT10 Screen Replacement
 Insignia Flex 10.1 NS-P16AT10 Screen Replacement This guide will instruct you on how to replace the screen on the Insignia Flex 10.1 NS-P16AT10. Written By: Morgan Kidd ifixit CC BY-NC-SA www.ifixit.com
Canon EOS Rebel T4i Motherboard
 Canon EOS Rebel T4i Motherboard Replacement This guide will show you how to replace the motherboard on your Canon Rebel T4i. Written By: Jordan Rabold ifixit CC BY-NC-SA www.ifixit.com Page 1 of 10 INTRODUCTION
Sony Ericsson W810I Vibration Cell
 Sony Ericsson W810I Vibration Cell Replacement How to install a new vibration cell in your Sony Ericsson W810I. Written By: Lucy Bowen ifixit CC BY-NC-SA www.ifixit.com Page 1 of 11 TOOLS: Heavy-Duty Spudger
Canon PowerShot SD 600 Rear Control Board Replacement
 Canon PowerShot SD 600 Rear Control Board Replacement This guide is about how to remove the orange rear control board. Be aware that this board is connected to the speaker, top controls and the optical
Samsung Galaxy Tab Motherboard
 Samsung Galaxy Tab 2 10.1 Motherboard Replacement This guide will show you how to replace the motherboard of your tablet. Written By: Gabriel Rodarte ifixit CC BY-NC-SA www.ifixit.com Page 1 of 13 INTRODUCTION
Panasonic Lumix DMC-FZ1000 Lens Replacement
 Panasonic Lumix DMC-FZ1000 Lens Replacement Replace your malfunctioning or inferior Leica lens with a working or alternative one. Written By: Robseth Taas ifixit CC BY-NC-SA www.ifixit.com Page 1 of 14
Nintendo DSi Wi-Fi Antenna Board
 Nintendo DSi Wi-Fi Antenna Board Replacement Replace your Nintendo DSi's Wi-Fi antenna. Written By: Andrew Bookholt ifixit CC BY-NC-SA www.ifixit.com Page 1 of 16 INTRODUCTION Use this guide to replace
Olympus TG-820 ihs Lens Replacement
 Olympus TG-820 ihs Lens Replacement This guide will provide step by step instructions on how to replace the lens in the Olympus TG-820 ihs camera. Written By: Leslie Cade ifixit CC BY-NC-SA www.ifixit.com
Nikon D610 Flash Capacitor Replacement
 Nikon D610 Flash Capacitor Replacement This guide will help to show you how to replace the D610's Flash Capacitor. Written By: Daniel Eagan ifixit CC BY-NC-SA www.ifixit.com Page 1 of 10 INTRODUCTION In
HP Flyer Red Hard Disc Drive Replacement
 HP Flyer Red Hard Disc Drive Replacement This guide will show you how to remove your hard drive. Written By: Anthony Ciotti ifixit CC BY-NC-SA www.ifixit.com Page 1 of 12 INTRODUCTION This guide is helpful
Canon EOS Rebel T5 SD Card Reader
 Canon EOS Rebel T5 SD Card Reader Replacement This guide will show the reader how to remove and replace the SD card reader for their Canon EOS Rebel T5 camera. Written By: Tyler Brown ifixit CC BY-NC-SA
ASUS D550MA-DS01 Motherboard
 ASUS D550MA-DS01 Motherboard Replacement This guide will show you how to remove the motherboard from the laptop. Steps included in this process are removing the screws, disconnecting cables, and removing
Written By: Brendan Kelly
 Game Boy Micro LCD Screen Replacement Written By: Brendan Kelly ifixit CC BY-NC-SA www.ifixit.com Page 1 of 13 INTRODUCTION In this guide, we'll show you how to change the LCD Screen. TOOLS: Phillips #00
Zune Flash 2nd Generation Battery and Memory Board Replacement
 Zune Flash 2nd Generation Battery and Memory Board Replacement Written By: killdashnine ifixit CC BY-NC-SA www.ifixit.com Page 1 of 11 INTRODUCTION This will serve as a guide for the replacement of a Zune
Olympus Stylus Tough TG-2 ihs Lens Assembly Replacement
 Olympus Stylus Tough TG-2 ihs Lens Assembly Replacement This guide will illustrate how to access and remove the lens box. Written By: Amanda ifixit CC BY-NC-SA www.ifixit.com Page 1 of 11 INTRODUCTION
Written By: Jonathan Wear
 JBL Flip 2 MicroUSB Port Replacement This guide will walk you through replacing the microusb port for this device. Written By: Jonathan Wear ifixit CC BY-NC-SA www.ifixit.com Page 1 of 12 INTRODUCTION
Written By: Chi Huynh
 HP Pavilion 17-f004dx Screen Replacement This guide will show you how to replace your device's screen. Written By: Chi Huynh ifixit CC BY-NC-SA www.ifixit.com Page 1 of 16 INTRODUCTION This guide outlines
Canon Powershot SD550 Zoom Lens Assembly Replacement
 Canon Powershot SD550 Zoom Lens Assembly Replacement This repair guide will show you how to take apart the PowerShot SD550 and replace the zoom lens. Written By: Matthew Theiss ifixit CC BY-NC-SA www.ifixit.com
Dell Inspiron Screen Replacement
 Must know how to remove the battery, hard drive, and cooling fan. Learn how to remove the screen from your laptop and replace it with a new one. Written By: Austin Navarro ifixit CC BY-NC-SA www.ifixit.com
Canon PowerShot S500 Flash Assembly Replacement
 Canon PowerShot S500 Flash Assembly Replacement Replace the Flash Assembly in your Canon PowerShot S500. Written By: Nathan Balcom ifixit CC BY-NC-SA www.ifixit.com Page 1 of 22 INTRODUCTION This guide
LG Vu CU920 LCD Screen Replacement
 LG Vu CU920 LCD Screen Replacement This guide shows how to remove a cracked or broken LCD screen on the LG Vu CU920. Written By: Alan Reeve ifixit CC BY-NC-SA www.ifixit.com Page 1 of 11 INTRODUCTION Use
Dell Inspiron N4010 Hard Disk Drive
 Dell Inspiron N4010 Hard Disk Drive Replacement Replacing the Hard Drive for a laptop can speed it up and add more storage. Written By: Jonathan Sellier ifixit CC BY-NC-SA www.ifixit.com Page 1 of 15 INTRODUCTION
HP Mini 210 Fan Replacement
 HP Mini 210 Fan Replacement This is a step by step on how to replace the fan on a HP Mini 210. Written By: Irakoze Vincent ifixit CC BY-NC-SA www.ifixit.com Page 1 of 11 INTRODUCTION This guide will teach
Game Boy Micro Motherboard Replacement
 Game Boy Micro Motherboard Replacement Written By: Brendan Kelly ifixit CC BY-NC-SA www.ifixit.com Page 1 of 12 INTRODUCTION In this guide, we will show you how to remove and replace the motherboard and
ASUS D550MA-DS01 Screen Replacement
 ASUS D550MA-DS01 Screen Replacement This guide will show you how to replace your laptop screen. Written By: Calvin Wieczorek ifixit CC BY-NC-SA www.ifixit.com Page 1 of 12 INTRODUCTION Many people will
Olympus TG-820 ihs LCD Screen Replacement
 This guide will provide step by step instructions on how to replace the LCD screen in the Olympus TG-820 ihs camera. Written By: Leslie Cade ifixit CC BY-NC-SA www.ifixit.com Page 1 of 11 INTRODUCTION
JVC GR-D72U Cassette Holder Replacement
 JVC GR-D72U Cassette Holder Replacement Replacement Guide for the cassette holder which is used for storing the recording of video. Written By: Jonah Powers ifixit CC BY-NC-SA www.ifixit.com Page 1 of
Kodak EasyShare M381 Lens/Optics Replacement
 Kodak EasyShare M381 Lens/Optics Replacement Use this guide to replace the lens. Written By: Christina Hamby ifixit CC BY-NC-SA www.ifixit.com Page 1 of 10 INTRODUCTION Technology in the lens can often
Motorola Droid X Motherboard Replacement
 Motorola Droid X Motherboard Replacement Written By: Yong hoon choun ifixit CC BY-NC-SA www.ifixit.com Page 1 of 19 TOOLS: ifixit Opening Tools (1) ifixit CC BY-NC-SA www.ifixit.com Page 2 of 19 Motorola
Toshiba Satellite A210 Fan Replacement
 Toshiba Satellite A210 Fan Replacement In the guide you will learn how to remove the fan from the Toshiba Satellite A210. Written By: Youlen ifixit CC BY-NC-SA www.ifixit.com Page 1 of 9 INTRODUCTION Before
Toshiba Satellite E105-S1602 Front Panel Replacement
 Toshiba Satellite E105-S1602 Front Panel Replacement Use this guide to replace/remove the front panel. Prerequisite to removing the front panel for more detailed work. Written By: Ian Washburne INTRODUCTION
Written By: John Sutton
 Replacing the fan on your HP g7-2275 dx. Written By: John Sutton ifixit CC BY-NC-SA www.ifixit.com Page 1 of 20 INTRODUCTION Laptop cooking your lap? This guide will walk you through replacing your fan.
Asus Chromebook C300SA-DS02 VECO Speakers Replacement
 Asus Chromebook C300SA-DS02 VECO Speakers Replacement This guide will teach you how to remove the speakers from the device. Written By: Sam LaBelle ifixit CC BY-NC-SA www.ifixit.com Page 1 of 9 INTRODUCTION
Asus G53JW-A1 CD/DVD Optical Disk Drive
 Asus G53JW-A1 CD/DVD Optical Disk Drive Replacement This guide explains how to replace the CD/DVD Optical Disk Drive on an Asus G53JW-A1 computer. Written By: Tim Cedar ifixit CC BY-NC-SA www.ifixit.com
Panasonic Toughbook CF-29 Motherboard Replacement
 Panasonic Toughbook CF-29 Motherboard Replacement Written By: Dylan Bloom ifixit CC BY-NC-SA www.ifixit.com Page 1 of 14 INTRODUCTION This guide will tell you how to gain access to and remove the motherboard.
LG Chocolate Touch VX-8575 LCD Screen
 LG Chocolate Touch VX-8575 LCD Screen Replacement This guide shows how to remove a cracked or broken LCD screen on the LG Chocolate Touch VX- 8575. Written By: Lana Hodzic ifixit CC BY-NC-SA www.ifixit.com
JBL Flip 2 Battery Replacement
 JBL Flip 2 Battery Replacement This guide will walk you through replacing the battery for this device. Written By: Jonathan Wear ifixit CC BY-NC-SA www.ifixit.com Page 1 of 12 INTRODUCTION This guide will
Amazon Fire 5th Generation Rear Camera
 Amazon Fire 5th Generation Rear Camera Replacement Replace the rear-facing camera on your Amazon Fire 5th Generation tablet. Written By: Maximilian Plavcan ifixit CC BY-NC-SA www.ifixit.com Page 1 of 9
Nikon D5000 Viewfinder Replacement
 Nikon D5000 Viewfinder Replacement Disassembly down to the viewfinder hood and to the screen itself. Written By: Jacob Rardin ifixit CC BY-NC-SA www.ifixit.com Page 1 of 9 INTRODUCTION If there is dust
Toshiba Satellite A105-S4011 Touchpad
 Toshiba Satellite A105-S4011 Touchpad Replacement This guide will instruct you on how to remove the current touchpad from this laptop and how to reinstall another. This is a straightforward process and
Asus Transformer T100 Motherboard
 Asus Transformer T100 Motherboard Replacement Replace the motherboard of your Asus Transformer T100. Written By: Taylor Pantiga ifixit CC BY-NC-SA www.ifixit.com Page 1 of 13 INTRODUCTION The motherboard
Zune Flash 2nd Generation Teardown
 Zune Flash 2nd Generation Teardown Written By: killdashnine ifixit CC BY-NC-SA www.ifixit.com Page 1 of 12 INTRODUCTION This is a guide to taking apart a Zune Flash 2nd Generation media player TOOLS: ifixit
Nintendo 3DS XL 2015 Upper Screen
 Nintendo 3DS XL 2015 Upper Screen Replacement Showing how to replace the Upper Screen of the Nintendo 3DS XL. Written By: Ryan Butler ifixit CC BY-NC-SA www.ifixit.com Page 1 of 13 INTRODUCTION This guide
Written By: Joel groff
 Replace the lens of the camera. Written By: Joel groff ifixit CC BY-NC-SA www.ifixit.com Page 1 of 17 INTRODUCTION This guide shows how to replace the Lens of the Canon PowerShot SX 530 HS. TOOLS: Phillips
Dell Inspiron Mini 10 RAM Replacement
 Upgrade or replace RAM to boost speed and performance. Written By: Danielle Jarecki ifixit CC BY-NC-SA www.ifixit.com Page 1 of 12 INTRODUCTION This guide will give step-by-step instructions on how to
Written By: justin chadwick
 Disassembling Nintendo DS Lite Lower Screen How to remove the DS Lite lower screen. Written By: justin chadwick ifixit CC BY-NC-SA www.ifixit.com Page 1 of 10 INTRODUCTION This guide has been updated by
Redigido por: Ricky Wai
 LG CF360 LCD Screen Replacement Did your phone take a fall? Use this guide to replace your LCD screen. Redigido por: Ricky Wai ifixit CC BY-NC-SA pt.ifixit.com Página 1 de 12 INTRODUÇÃO This guide will
Canon PowerShot SD500 Digital ELPH LCD Replacement
 Canon PowerShot SD500 Digital ELPH LCD Replacement This guide shows how to disassemble the Powershot SD500 Digital ELPH camera and replace the LCD screen. Written By: Taylor Shields ifixit CC BY-NC-SA
Asus Tablet MeMo Pad 7 ME7000C Rear Camera Replacement
 Asus Tablet MeMo Pad 7 ME7000C Rear Camera Replacement Use this guide to replace a cracked or non-working rear-facing camera lens in your Asus Tablet MeMo Pad 7 ME7000C. Written By: Katie ifixit CC BY-NC-SA
Sony NEX-7 Screen Replacement
 Sony NEX-7 Screen Replacement If your camera's screen is broken or non functioning, this guide will show you how you can replace the screen. Written By: Jay Miley ifixit CC BY-NC-SA www.ifixit.com Page
Written By: Brittany McCrigler
 PlayStation Vita Right Joystick Replacement Install the right joystick on the PlayStation Vita. Written By: Brittany McCrigler ifixit CC BY-NC-SA www.ifixit.com Page 1 of 13 INTRODUCTION This guide takes
Written By: Margarita
 Sonos Play 1 Motherboard Replacement This guide will demonstrate how to deconstruct and remove the motherboard from the device( requires driver kit, tweezers, plastic opening tools, and metal spudger)
Written By: Phillip Takahashi
 Kindle Fire Ambient Light Sensor Replacement Remove the ambient light sensor in an Amazon Kindle Fire. Written By: Phillip Takahashi ifixit CC BY-NC-SA www.ifixit.com Page 1 of 11 INTRODUCTION Use this
Dell Inspiron 1525 Upper Case Replacement
 Dell Inspiron 1525 Upper Case Replacement Replace the upper case on a Dell Inspiron 1525. Written By: Miroslav Djuric ifixit CC BY-NC-SA www.ifixit.com Page 1 of 13 INTRODUCTION Use this guide to help
Alcatel One Touch Pop 7 Display Assembly Replacement
 Alcatel One Touch Pop 7 Display Assembly Replacement This guide will show you how to replace the display panel and the digitizer. Written By: Riley Cooper ifixit CC BY-NC-SA www.ifixit.com Page 1 of 9
Motorola Droid X Camera Replacement
 Motorola Droid X Camera Replacement Written By: Gage ifixit CC BY-NC-SA www.ifixit.com Page 1 of 24 TOOLS: 64 Bit Driver Kit (1) ifixit Opening Tools (1) ifixit CC BY-NC-SA www.ifixit.com Page 2 of 24
HP 15-r137wm TouchSmart Screen
 HP 15-r137wm TouchSmart Screen Replacement How to safely disconnect and remove the screen from your HP 15-r137wm device. Written By: Ross B Jacques ifixit CC BY-NC-SA www.ifixit.com Page 1 of 10 INTRODUCTION
LG Chocolate Touch VX-8575 Side Buttons Replacement
 LG Chocolate Touch VX-8575 Side Buttons Replacement This guide shows how to remove the five side buttons (camera, speaker, volume, music, and lock/unlock) on the LG Chocolate Touch VX-8575. Written By:
Disassembling Dell Vostro V13
 A complete guide on how to remove/replace any part on a Dell Vostro V13 Written By: Kevin Dookharan ifixit CC BY-NC-SA www.ifixit.com Page 1 of 10 INTRODUCTION Shows how to remove/replace any part on a
HP TouchPad USB Connector Board Replacement
 HP TouchPad USB Connector Board Replacement Replace the USB connector board on your HP TouchPad. Written By: Andrew Bookholt ifixit CC BY-NC-SA www.ifixit.com Page 1 of 12 INTRODUCTION Use this guide to
Written By: Gilbert Han
 This guide will replace the screen Written By: Gilbert Han ifixit CC BY-NC-SA www.ifixit.com Page 1 of 9 INTRODUCTION If your screen is cracked, malfunctioning, or not showing anything when the computer's
Sony Handycam CX260V Camera Lens
 Sony Handycam CX260V Camera Lens Replacement This guide will allow people to be able to replace the camera lens to the CX260V. The guide gives detailed instructions on how to take apart the camera to access
Nintendo 3DS XL 2015 Directional Pad Replacement
 Nintendo 3DS XL 2015 Directional Pad Replacement This guide will give instruction on how to replace the directional pad on a Nintendo 3DS XL 2015 Written By: Thomas Cho ifixit CC BY-NC-SA www.ifixit.com
Acer Aspire One A Speaker
 Acer Aspire One A150-1570 Speaker Replacement This guide will explain and demonstrate how to replace the Speakers safely for you and your device. Written By: Briana Naranjo ifixit CC BY-NC-SA www.ifixit.com
Motorola Cliq LCD Screen Replacement
 Motorola Cliq LCD Screen Replacement Use this guide to replace or upgrade the LCD screen in your Motorola Cliq. Written By: Tony Tran ifixit CC BY-NC-SA www.ifixit.com Page 1 of 15 INTRODUCTION Does your
Written By: Nicole Welter
 HP Pavilion G60-630US Screen Replacement In this guide, we will be replacing a faulty or unresponsive screen. Written By: Nicole Welter ifixit CC BY-NC-SA www.ifixit.com Page 1 of 14 INTRODUCTION The screen
Asus Q550LF-BBI7T07 MotherBoard Replacement
 Asus Q550LF-BBI7T07 MotherBoard Replacement Replacing Asus Q550LF-BBI7T07 MotherBoard. Written By: Chance Woudenberg ifixit CC BY-NC-SA www.ifixit.com Page 1 of 13 INTRODUCTION If your laptop screen does
Canon PowerShot SX530 HS Shutter Release Cover Replacement
 Canon PowerShot SX530 HS Shutter Release Cover Replacement Replacement instructions to the plastic cover holding the shutter release button, the button typically used to take pictures. Written By: Aaron
ipod Touch 1st Generation Logic Board Replacement
 ipod Touch 1st Generation Logic Board Replacement Written By: Miroslav Djuric ifixit CC BY-NC-SA www.ifixit.com Page 1 of 11 INTRODUCTION This guide shows how to remove the logic board from the ipod Touch
LG G4 LCD Screen and Digitizer Assembly Replacement
 LG G4 LCD Screen and Digitizer Assembly Replacement This guide will instruct you on how to replace a cracked or damaged LCD screen and digitizer assembly in the LG G4 smartphone. Written By: Richard Suovanen
Canon Powershot S200 Camera lens Replacement
 Canon Powershot S200 Camera lens Replacement This guide will walk you through the process of removing the camera's lens for replacement. Written By: Joseph Melo Page 1 of 16 INTRODUCTION The lens is used
Toshiba Satellite A210 Motherboard
 Toshiba Satellite A210 Motherboard Replacement In this guide you will learn how to properly remove the Motherboard. Written By: Devin ifixit CC BY-NC-SA www.ifixit.com Page 1 of 12 INTRODUCTION Before
Asus ROG G751JL-BB17T29 Battery Replacement
 Asus ROG G751JL-BB17T29 Battery Replacement This guide will teach the user how to safely remove the battery from this laptop model. Written By: Kristofer Cesaroni ifixit CC BY-NC-SA www.ifixit.com Page
Ematic eglide 4 Screen Replacement
 This guide will help you remove the screen from the Emetic eglide 4. Written By: Bailey Hughes ifixit CC BY-NC-SA www.ifixit.com Page 1 of 11 INTRODUCTION This replacement guide will help you replace a
Canon PowerShot SD850 IS Camera Lens Replacement
 Canon PowerShot SD850 IS Camera Lens Replacement Rédigé par: Peter Tran ifixit CC BY-NC-SA fr.ifixit.com Page 1 de 13 INTRODUCTION Use this guide to remove a broken camera lens from your Canon PowerShot
Insignia Flex 10.1 Motherboard Replacement
 Replace the motherboard of your Insignia Flex 10.1 tablet. Written By: William Boyden ifixit CC BY-NC-SA www.ifixit.com Page 1 of 9 INTRODUCTION This guide shows how to replace the motherboard of your
LG Escape (p870) LCD Screen Replacement
 LCD Screen Replacement") LG Escape (p870) LCD Screen Replacement This guide will show you how to replace the LCD screen on your LG Escape (p870). Written By: Brad ifixit CC BY-NC-SA www.ifixit.com Page 1 of 12 TOOLS: Phillips
LG Escape (p870) LCD Screen Replacement This guide will show you how to replace the LCD screen on your LG Escape (p870). Written By: Brad ifixit CC BY-NC-SA www.ifixit.com Page 1 of 12 TOOLS: Phillips
Written By: Colin Glaves
 Written By: Colin Glaves ifixit CC BY-NC-SA www.ifixit.com Page 1 of 9 INTRODUCTION Please try our Troubleshooting Guide prior to replacing your Display Assembly. This guide covers the detachment and assembly
Nikon Coolpix S9700 Screen Replacement
 Replace your screen if it is cracked, scratched, pixels are dead, or completely not working. Written By: Matt Staubus ifixit CC BY-NC-SA www.ifixit.com Page 1 of 10 INTRODUCTION If the screen on the S9700
Apex Tablet 7 Battery Replacement
 Apex Tablet 7 Battery Replacement This guide will instruct you on how to replace the lithium-ion battery inside the Apex 7" Tablet. Written By: Corrine Nief ifixit CC BY-NC-SA www.ifixit.com Page 1 of
Nexus 7 2nd Generation Micro USB/Daughterboard Replacement
 Nexus 7 2nd Generation Micro USB/Daughterboard Replacement Replace the Micro USB/Daughterboard on your Nexus 7 2nd Generation. Written By: Simon Krauter ifixit CC BY-NC-SA www.ifixit.com Page 1 of 11 INTRODUCTION
Asus ZenFone 2 Motherboard Replacement
 Asus ZenFone 2 Motherboard Replacement If you have problems with your phone rebooting at random times, you could have a faulty motherboard in your phone. Written By: Eduardo Nodarse ifixit CC BY-NC-SA
Acer Iconia A100 Speakers Replacement
 Acer Iconia A100 Speakers Replacement This guide will explain how to replace the speakers of the Acer Iconia A100. Written By: Omar Acosta ifixit CC BY-NC-SA www.ifixit.com Page 1 of 10 INTRODUCTION If
Acer Aspire 7736Z-4809 LCD Module Replacement
 Acer Aspire 7736Z-4809 LCD Module Replacement The monitor does not work properly. Replacing the LCD module may solve this problem. Written By: Pnithan Jantarakolica ifixit CC BY-NC-SA www.ifixit.com Page