MIDI/Audio control surface with motorized faders for production. User manual
|
|
|
- Kerrie Harmon
- 5 years ago
- Views:
Transcription

1 MIDI/Audio control surface with motorized faders for production User manual
2 Important Safety Instructions. Read this manual thoroughly before using this unit. 2. Keep this manual for future reference. 3. Take notice of and comply with all warnings included in the user's manual or indicated on the appliance.. Follow all instructions included in this manual.. Do not expose this unit to rain or moisture. Avoid having water or other liquids spilled on this unit.. When cleaning the cabinet or other parts of this appliance, use only a dry or slightly damp soft cloth. 7. Do not block any ventilation openings or interfere with the proper ventilation of this unit. Install in accordance with the manufacturer's instructions. 8. Do not use or store near any heat sources such as radiators, heat registers, stoves, or other heatproducing appliances. 9. Do not interfere with the safety purpose of the polarized or grounding-type plug. A polarized plug has two blades with one wider than the other. A grounding-type plug has two blades and a third grounding prong. These are designated for your safety. If the provided plug does not fit into your outlet, consult an electrician. 0. Protect the power cord from being walked on or otherwise damaged by items placed on or against them. Particular attention should be given to the plugs, receptacles, and the point where the cord exits the appliance.. To avoid the risk of electrical shock, do not touch any exposed wiring while the unit is in operation. 2. Only use attachments/accessories specified by the manufacturer. 3. Unplug this unit and all connected electrical equipment during lightning storms or when left unused a long period of time.. Refer all servicing to qualified service personnel. Servicing is required when the appliance has been damaged in any way or fails to operate normally. WARNING: To reduce the risk of fire or electric shock, do not expose this unit to rain or moisture
3 Contents Introduction... What's in the package?... Features... Top Panel Layout... Rear Panel Layout... Bottom Panel Layout...2 Getting Started (Connected with QconEX G2 ( - 3units))...3 Cubase...7 Logic Pro...9 Pro Tools...2 Getting Started (Standalone device)...23 Cubase...2 Nuendo...2 Logic Pro...27 Samplitude...28 Bitwig...30 Reason...3 Reaper...32 Studio One...33 Ableton Live...3 Pro Tools...3 Audition...3 Sonar...37 imap TM Software for Mac OS X...39 Installing imap TM Software for Windows...0 Firmware upgrade...2 Restore the factory default settings... Specifications... Services...7
4 Introduction Thank you for purchasing the ICON ProAudio QconPro G2 Midi/Audio control surface. We sincerely trust this product will provide years of satisfactory service, but if anything is not to your complete satisfaction, we will endeavor to make things right. In these pages, you'll find a detailed description of the features of the QconPro G2, as well as a guided tour through its front and side panels, step-by-step instructions for its setup and use, and full specifications. You'll also find a warranty card enclosed - please don't forget to fill it out and mail it so that you can receive online technical support at: and so we can send you updated information about these and other ICON ProAudio products in the future. As with most electronic devices, we strongly recommend you retain the original packaging. In the unlikely event the product must be returned for servicing, the original packaging (or reasonable equivalent) is required. With proper care and adequate air circulation, your QconPro G2 will operate without any trouble for many years. We recommend that you record your serial number in the space provided below for future reference. Please write your serial number here for future reference: Purchased at: Date of purchase: What's in the package? QconPro G2 USB-MIDI Controller x pc CD x App software imap (Mac & Windows) User manual & QSG Quick Start Guide x Screwdriver x USB2.0 Cable x AC adaptor x pc

5 Features 8 touch-sensitive motorized channel faders 2-segment LED level metering for channels touch-sensitive motorized fader for master channel 8 x dual function encoder knobs (Enter & rotate) -segment LED surrounding the encoders to indicate the rotating position Large backlit LCD to display channel name, control values etc. for each channel 2-segment LED display showing time location of your project in either SMPTE or Midi beat clock (bars:beats:ticks) format 78 assignable buttons for user define mode Jog wheel shuttle for fast search and control Illuminated buttons for each channel including Rec-enable, Solo, Mute, Select and Monitor illuminated transport buttons including Play, Stop, Rec, Rewind, Fast forward and Loop lluminated zoom key with direction keys MackieControl and HUI Universal emulation imap - Self midi mapping software is provided for user-defined mode (MIDI Learn) Expandable to 32-channel control surface with 3units of QconEX G2 User A & User B / TRS connectors for connecting with pedals Class-compliant with Windows XP, Vista (32-bit), Windows 7/8/0 (32-bit & - bit), and Mac OS X (IntelMac) USB 2.0 high speed connectivity Firmware upgrade available simply via USB connection and imap software Different DAW overlay are included - Cubase/Nuendo, LogicPro, Digital Performer, FL Studio, Samplitude, Reaper, Studio One, Bitwig, Reasons, ProTools, Sonar, Audition, Ableton Live and User define Robust aluminum and metal casing with Kensington lock port


6 Top Panel Layout 8b 8a 7 8f 0 9a 9b 8e 2 3 8c 8d Note: Functions operate slightly differently between DAWs. Please refer to your DAW manual for each function and overlap the provided labeling template according to your currently used DAW. The following description is based on the functions that operate in Apple Cubase.. LCD backlit display The two-line backlit LCD display shows the parameter values as you adjust them and also provides feedback about channel selections, operating modes, and more. 2. Channel faders The eight 00mm motorized faders are generally used for controlling the track volume of your DAW. Depending on your DAW, you may use the Flip button to switch the function of these faders to change other settings. They are all touch sensitive to allow override automation the moment you touch a fader. Also, they are motorized; they will automatically move to reflect the current level of the selected channels in your DAW application. Any automation recorded in a project will be reflected by the fader positions. Any parameter adjustments made with these faders will be displayed directly above on the LCD display.
7 3. Master fader This 00mm motorized fader operates the same as the other 8 faders. It controls your DAW software's master channel fader. Any parameter adjustments made with this fader will be displayed directly above on the LCD display.. Channel level metering The 2-led meter shows the associated channel level.. Dual function encoders The dual function encoders act as push-button and rotary controls. When an encoder is pressed, it may be used to change modes of operation or to change what appears in the display above the channel strips. When an encoder is rotated, depending on its assigned function, it can be used to adjust a channel s pan, send level, or plug-in parameters.. Encoder LED The -LED s surrounding the encoder light up to indicate the relative position of the rotation without having to look at your computer. 7. Time display This display shows the time location of your project in either SMPTE or Midi beat clock format. 8. Control buttons 8a) Recording channel control buttons section REC buttons - Activate and deactivate the recording state of the associated channel. The switch will light red when the channel is armed. SOLO buttons - Activate and deactivate the solo state of the associated channel. The switch will light green when the channel solo state is on and other channels will be muted. You can solo multiple channels by pressing SOLO buttons on additional channels. MUTE buttons - Activate and deactivate the mute state of the associated channel. The switch will light blue when the channel is muted. SEL buttons - The SEL buttons activate the associated channels in the DAW software in order to perform a specific operation (for example, when adjusting EQ with the ASSIGNABLE ENCODERS, the SEL switch will be used to choose the channel you want to adjust). The switch will light red when the channel is selected. 8b) Motorized fader control buttons section LOCK button - Activate to lock all motorized faders. FLIP button - Press the FLIP button to swap the parameter settings of the motorized faders and the rotary encoder knobs. 7
8 UP button - Shift one channel up for all faders (except the master channel). DOWN button - Shift one channel down for all faders (except the master channel). BANK UP button - Shift eight channels up for all faders (except the master channel). BANK DOWN button - Shift eight channels down for all faders (except the master channel). 8c) Zoom control buttons section ZOOM button - The ZOOM button is typically used in conjunction with the ARROW buttons described below to zoom in and out within windows in the DAW application. UP button - The UP button is used to navigate (up movement) through the Graphical User Interface (GUI) of the DAW application. DOWN button - The DOWN button is used to navigate (down movement) through the Graphical User Interface (GUI) of the DAW application. LEFT button - The LEFT button is used to navigate (left movement) through the Graphical User Interface (GUI) of the DAW application. RIGHT button - The RIGHT button is used to navigate (right movement) through the Graphical User Interface (GUI) of the DAW application. 8d) Jog wheel section Jog wheel - The jog wheel is used for various purposes specific to the DAW application, including shuttle and scrubbing functions. Scrub button - The SCRUB button is typically used in conjunction with the jog wheel to scrub selected audio tracks for editing and auditioning purposes. 8e) Transport control buttons section PLAY button - Activate the play function of the DAW. STOP button - Activate the stop function of the DAW. REC button - Activate the record function of the DAW. REWIND button - Activate the rewind function of the DAW. FAST FORWARD button - Activate the fast forward function of the DAW. LOOP button - Activate the loop function of the DAW. Marker button - Toggle small Marker mode. 8
9 Nudge - Toggle small Nudge mode. Click - Toggle playback or record metronome click. Drop - Toggle Drop. Replace - Toggle Replace. Solo - Toggle track solo (of selected track). 8f) DAW Selector section QconPro G2 has built-in Mackie Control, LogicPro protocols & HUI for different DAW s such as Cubase TM, Samplitude TM, Ableton Live TM, Logic Pro TM and ProTools TM. By selecting the correct DAW and Mackie control (HUI/LogicPro) protocol, QconPro G2 will automatically map the major functions and work seamlessly with that DAW. << / >> buttons - These arrow buttons are used to scroll through the mode list. The name of the mode will display on the LCD. DAW button - Press to enter the mode selection. To change your QconPro G2 Control mode, turn the power switch off and on to enter the Control selection mode. Select your desired mode from the list with the << / >> buttons. Tips: The DAW button cannot be activated if DAW software is running. Tips: QconPro G2 will memorize your last selected mode and re-enter the same mode a few seconds after it has been switched on. (i.e. mode selection is not needed if the last mode is being used.) 9. Sub-control buttons This section of control buttons varies in different DAWs. QconPro G2 is based on Cobase TM for the settings. (Note: For different DAWs the labeling may not be perfectly matched.) 9a) Assignment section TRACK button - Activate the track parameters of the software. PAN/EQ/Send/Plug- in/instrument buttons - These buttons are used to activate the corresponding effect function of the DAW. They are typically used in conjunction with the rotary encoder knobs. The button illuminates when pressed. Then rotate the rotary encoder knob to adjust the value, which will display on the LCD directly above. 9b) Automation section 9
10 GROUP - Press to enter Group edit mode. READ/Off button - Press the READ button to activate the read function of the current audio track. WRITE button - Press the WRITE button to activate the write function of the current audio track. TOUCH button - Press to set selected track s automation to Touch. LATCH - Press to set selected track s automation to Latch. TRIM - Currently unassigned. 0. User-defined control buttons This section of control buttons is user-defined in Mackie control mode. You may set their parameters according to your personal needs. PVC labeling mask is included for noting the set parameters. 0
 to activate your selected functions.")

11 Rear Panel Layout 3 2. User A / User B / TRS connectors These / TRS connectors are able to connect to foot pedals (SPD-0) to activate your selected functions. To set their parameters, select USER A and USER B parameters in Mackie control mode. 2. USB port Connect your QconPro G2 to your Mac/PC via this USB port. 3. 2V/2.A power adapter Connect the provided power adapter here. (Note: QconPro G2 is not able to work without the provided power adapter connected. The USB bus power is not able to provide sufficient power supply for QconPro G2.)
12 Bottom Panel Layout. LCD contrast adjustment Rotate the adjustment knob with the provided screwdriver to adjust the contrast of the LCD. Rotate anticlockwise to reduce the contrast and clockwise will increase. 2
) Connecting Your QconPro G2 Controller.")
13 intel ` ~ Tab CapsLook Shift Esc F F2 F3 F F F F7 F8 F9 F0 F F2 Prtsc! # % * # # ) ) * - + Q W E R T Y U I O P { } A S D F G H J K L : ; Z X C V B N M < >? Ctrl Alt AltGr Ctrl = [ ] Shift sysrq Enter pause Break Backspace $ Lns Del End Pgup PgDN Home Getting Started (Connected with QconEX G2 ( - 3units)) Connecting Your QconPro G2 Controller. Connect the QconPro G2 to your Mac/PC via the USB port Choose a USB port on your Mac/PC and insert the wide (flat) end of the USB cable. Connect the cable s other end to the QconPro G2. Your Mac/PC should automatically detect the new hardware and notify you that it is ready to use. (Tips: We recommended that you use ICON s OneHub USB hub, which allows you to connect up to 3 units of QconEX G2, if you are not connecting QconEX G2 directly to your computer s USB port.) QconEX G2 () QconEX G2 (2) QconEX G2 (3) + QconPro G2 or QconPro G2 QconEX G2 (3) QconEX G2 (2) QconEX G2 () + 3
14 2. Select the DAW. Press <</>> to scroll through the mode list after pressed the DAW button to make the selection. QconEX G2 () Press " << " & " >> "to select your expansion unit. (): Expansion unit Press " << " & " >> "to select your expansion unit. (): Expansion unit 2 Press " << " & " >> "to select your expansion unit. Unit selected Press " << " & " >> "to select your expansion unit. Unit 2 selected (): Mackie Control 2 QconEX G2 (2) (): Mackie Control

: Mackie Control")
15 3 QconEX G2 (3) QconPro G2 Press " << " & " >> "to select your expansion unit. (): Expansion unit 3 (): Mackie Control Press " << " & " >> "to select your expansion unit. Unit 3 selected (): Mackie Control


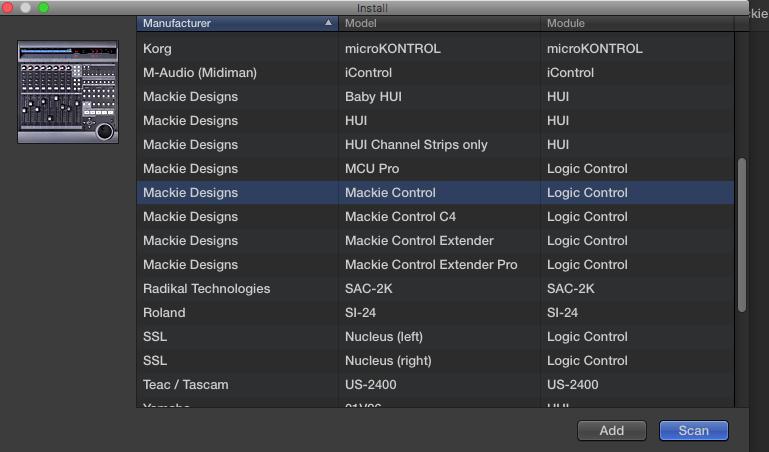
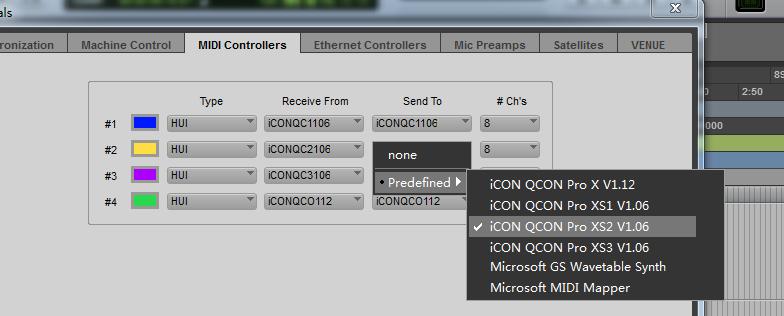
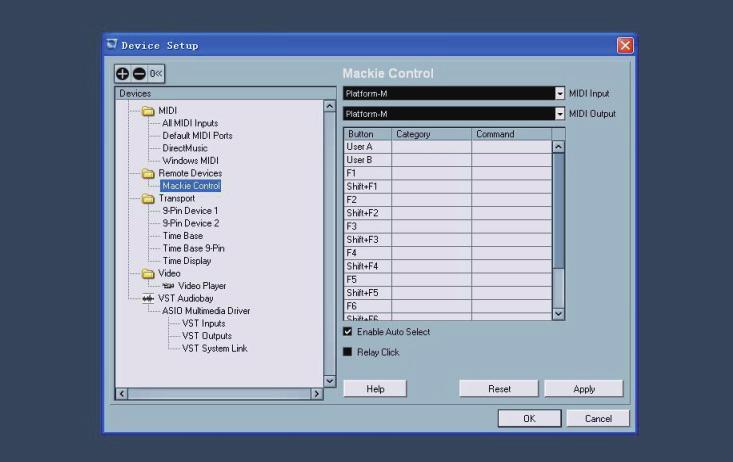
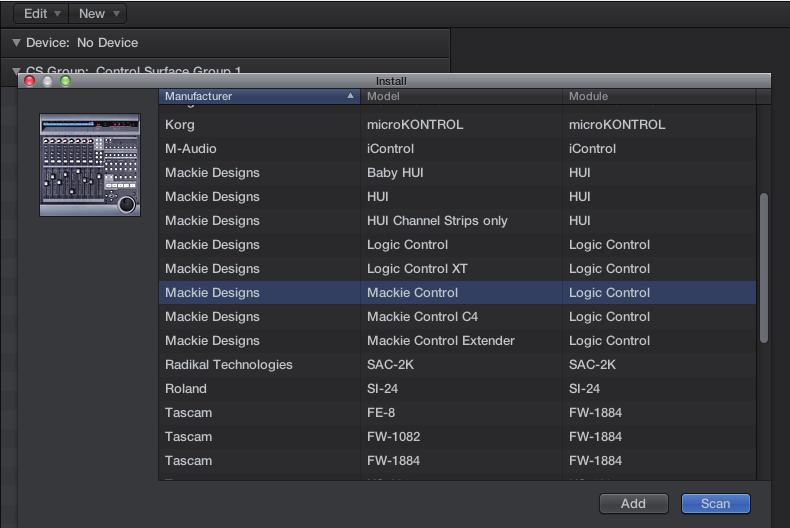
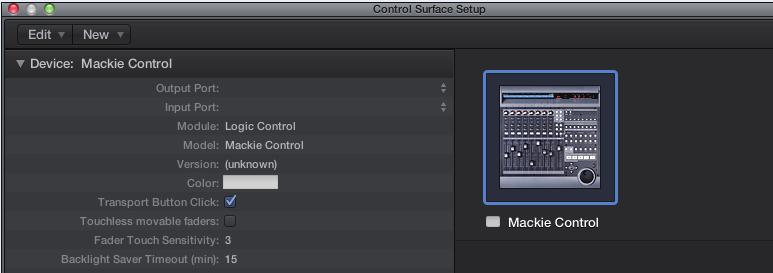
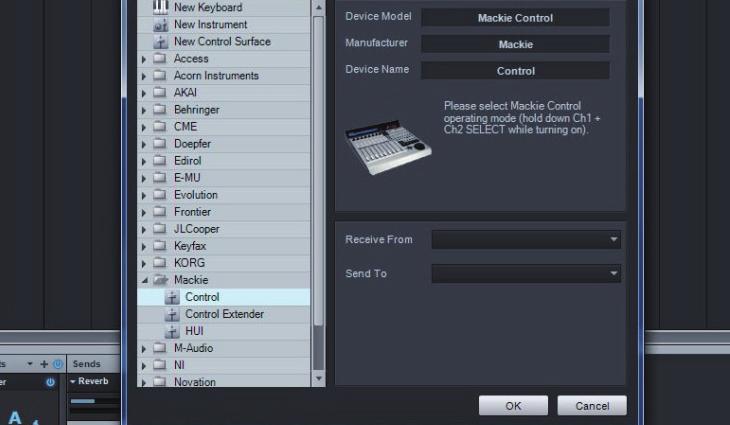
16 3. Setup your DAW The QconPro G2 has built-in Mackie Control, LogicPro and HUI protocol which will save you considerable trouble in setting up the device at your DAW. Simply add the Mackie Control or HUI device under the MIDI Controller on your software. After the Mackie Control or HUI device has been added, select QconPro G2 controller as your MIDI input and output device in your DAW. For the software below, please use Mackie Control Nuendo/Cubase TM, Logic Pro TM, Samplitude TM, Bitwig TM, Reason TM, Reaper TM, Studio One TM and Ableton Live TM. The software below,please use Logic Pro Mackie Control Logic Pro. or the software below, please use HUI Pro Tools TM. (Tips: You may also refer to our website at where you ll find set up illustrations for different DAW s in each controller (QconPro G2) product page s Setup demo section. For DAW s not on our setup demo list, please refer to your software user manual for hardware setup.) Cubase 2 3 icon QCON EX3 G2 V.00 icon QCON EX3 G2 V.00

17 8 9 icon QCON EX2 G2 V.00 icon QCON EX2 G2 V icon QCON EX G2 V.00 icon QCON EX G2 V


18 Logic Pro icon QCON EX G2 V.00 icon QCON EX G2 V.00 8


19 8 9 icon QCON EX2 G2 V.00 icon QCON EX2 G2 V.00 0 icon QCON EX3 G2 V.00 icon QCON EX3 G2 V


20 Pro Tools 2 3 icon QCON EX G2 V.00 icon QCON EX2 G2 V.00 icon QCON EX3 G2 V.00 icon QCON EX G2 V.00 icon QCON EX2 G2 V.00 icon QCON EX3 G2 V icon QCON EX G2 V.00 icon QCON EX2 G2 V.00 icon QCON EX3 G2 V icon QCON EX G2 V.00 icon QCON EX2 G2 V.00 icon QCON EX3 G2 V.00 20


21 2 3 icon QCON EX G2 V.00 icon QCON EX2 G2 V.00 icon QCON EX3 G2 V.00 icon QCON EX G2 V.00 icon QCON EX2 G2 V.00 icon QCON EX3 G2 V icon QCON EX G2 V.00 icon QCON EX2 G2 V icon QCON EX G2 V.00 icon QCON EX2 G2 V

22 Getting Started (Standalone device) Connecting Your QconPro G2 Controller 3 2 Esc F ~ ` Tab Q CapsLook Shift Ctrl A Z F2 2 W F3 F F # 3 E F % F7 R D F G C V B F8 U H N F 0 O K M # # 9 I J F0 F9 * 78 7 Y T S X Alt ; > AltGr F2 * P L < Prtsc sysrq pause Break + [ ] } Home Pgup PgDN Enter? Del Lns Backspace = { : End Shift Ctrl $ intel.1 Connect the QconPro G2 to your Mac/PC via the USB port Choose a USB port on your Mac/PC and insert the wide (flat) end of the USB cable. Connect the cable s other end to the QconPro G2. Your Mac/PC should automatically detect the new hardware and notify you that it is ready to use. 2 Select the DAW 2. Press <</>> to scroll through the mode list after pressed the DAW button to make the selection. (): Mackie Control 22 Tips: QconPro G2 will memorize your last selected mode and re-enter the same mode few seconds after it s been switched on. (i.e. mode selection is not needed if last mode is being used.)


23 3. 3 Setup your DAW The QconPro G2 has built-in Mackie Control, Logic Pro and HUI protocol which will save you considerable trouble in setting up the device at your DAW. Simply add the Mackie Control or HUI device under the MIDI Controller on your software. After the Mackie Control or HUI device has been added, select QconPro G2 controller as your MIDI input and output device in your DAW. For the software below, please use Mackie Control Nuendo/Cubase TM, Logic Pro TM, Samplitude TM, Bitwig TM, Reason TM, Reaper TM, Studio One TM and Ableton Live TM. The software below,please use Logic Pro Mackie Control Logic Pro For the software lelow Logic Pro or the software below, please use HUI Pro Tools TM. (Tips: You may also refer to our website at where you ll find set up illustrations for different DAW s in each controller (QconPro G2) product page s Setup demo section. Cubase For DAW s not on our setup demo list, please refer to your software user manual for hardware setup.)

24 Nuendo

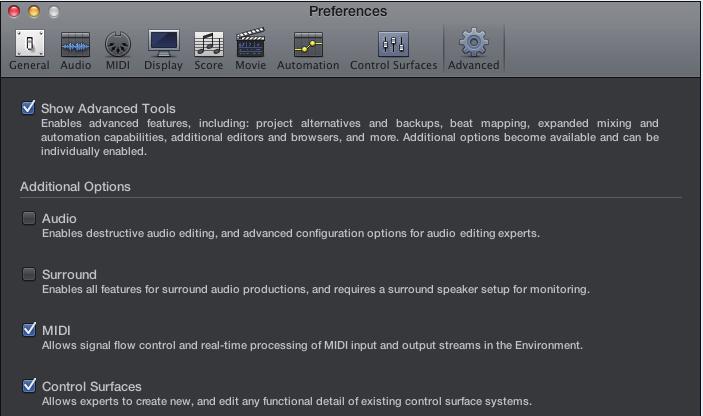
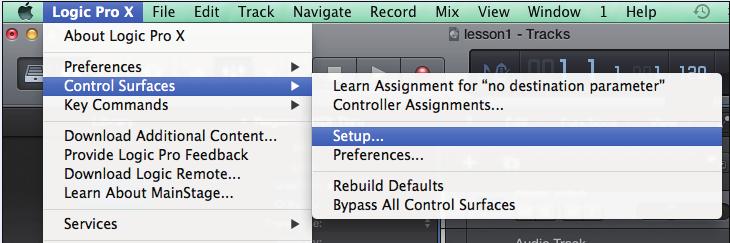
25 Logic Pro
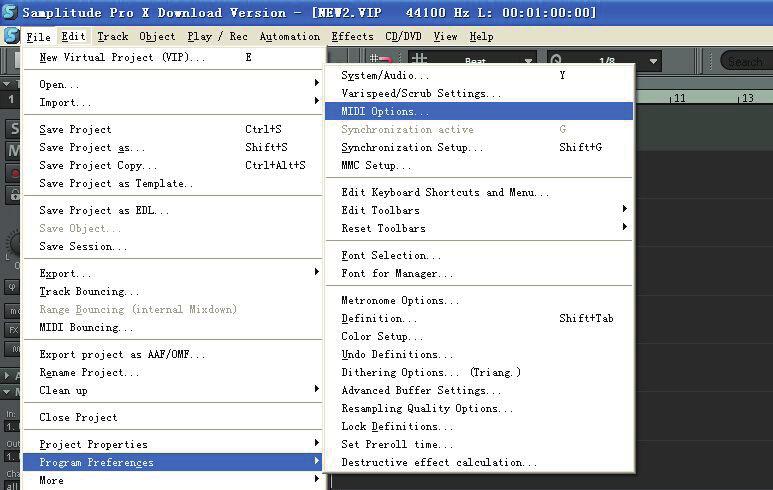
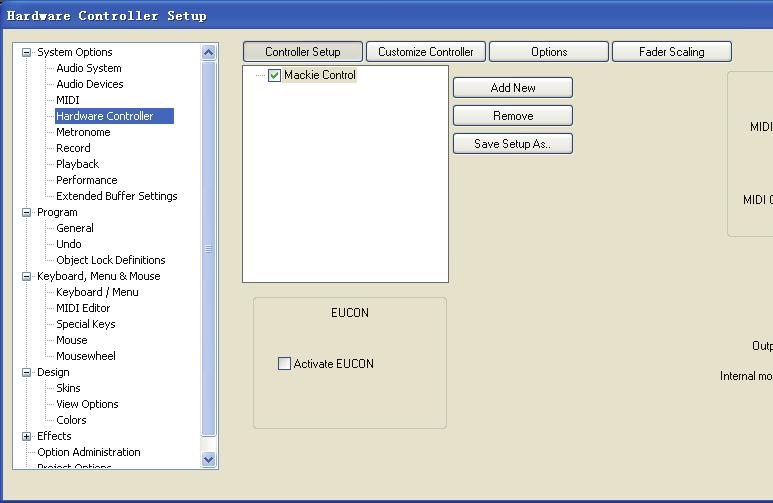
26 2 3 Samplitude 3 2 2


27 Microsoft GS Wavetable Synth

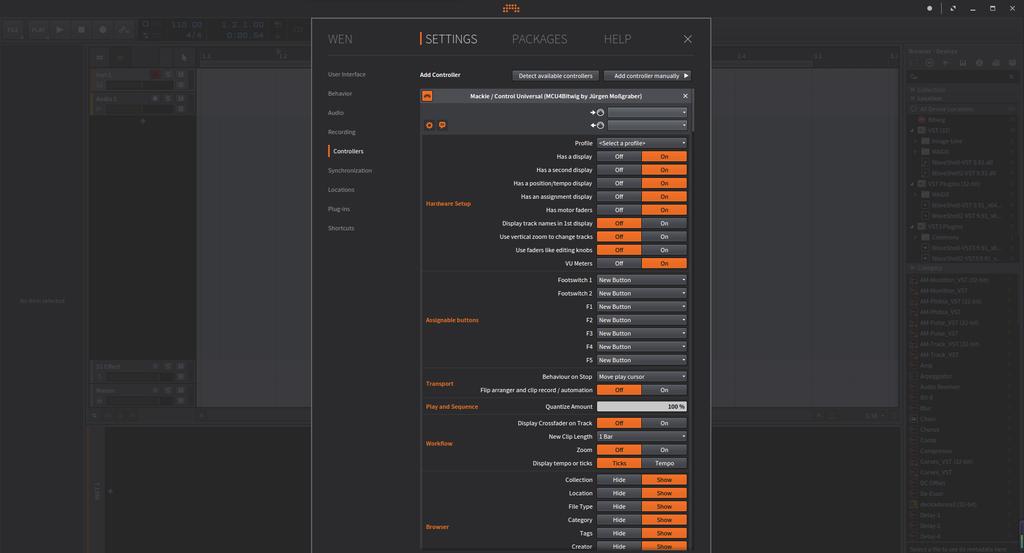
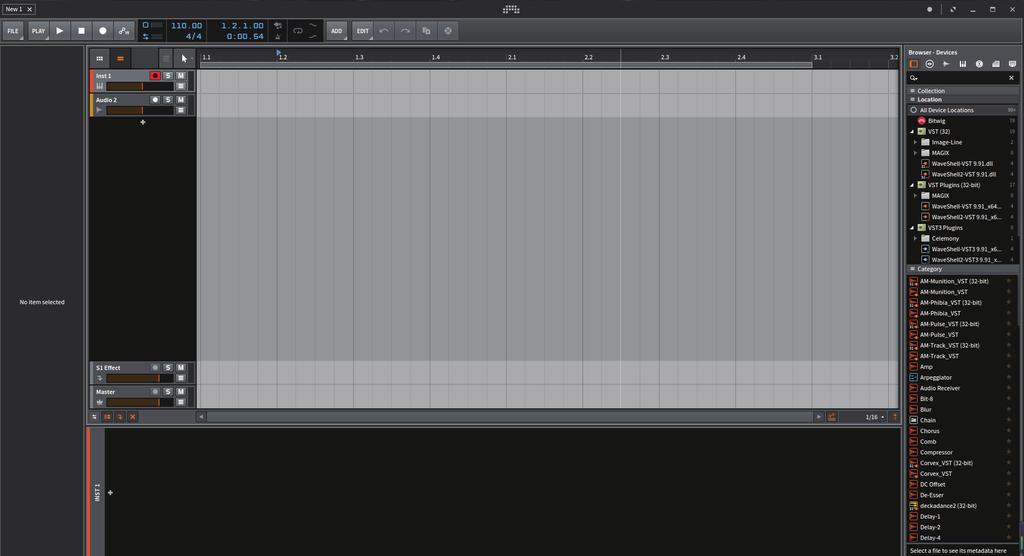
28 Bitwig


29 Reason

")
30 Reaper 2 3 Mackie Control (Klinke)

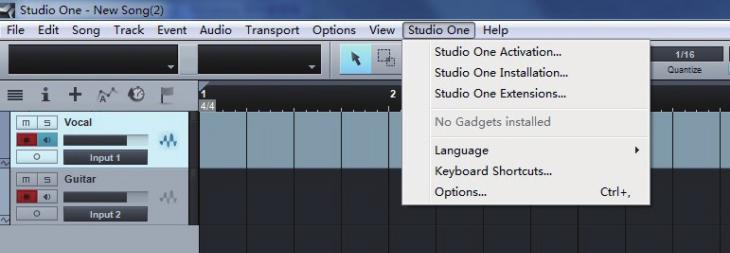
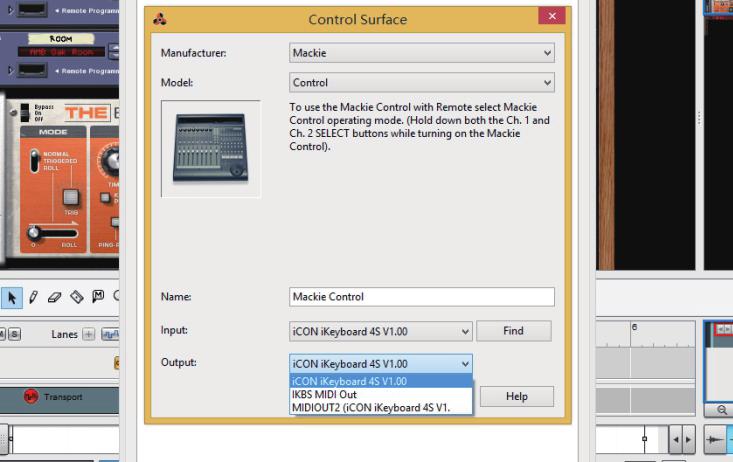
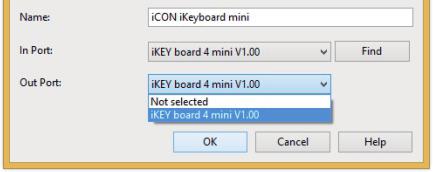
31 Studio OneOne Studio

 Output: Microsoft GS Wavetable Synth Automap")
32 Ableton Live 2 3 Mackie Control icon QCON Pro G2 icon QCON Pro G2 Input: MackieControl Input (icon QCONPRO G2 V.00) Output: MackieControl Output (icon QCONPRO G2 V.00) Output: Microsoft GS Wavetable Synth Automap Propellerhead Automap MIDI 32


33 ProPro Tools Tools 3 7 Platform B+ V 8 Automap HUI Automap MIDI Automap Propellerhead Microsoft GS Wavetable Synth Microsoft MIDI Mapper icon QCON 9 icon QCON

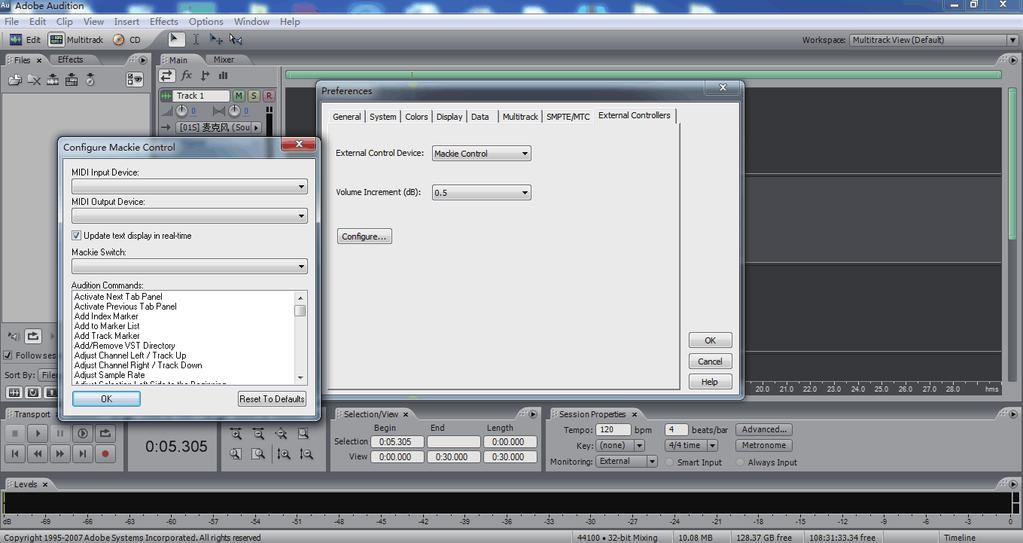
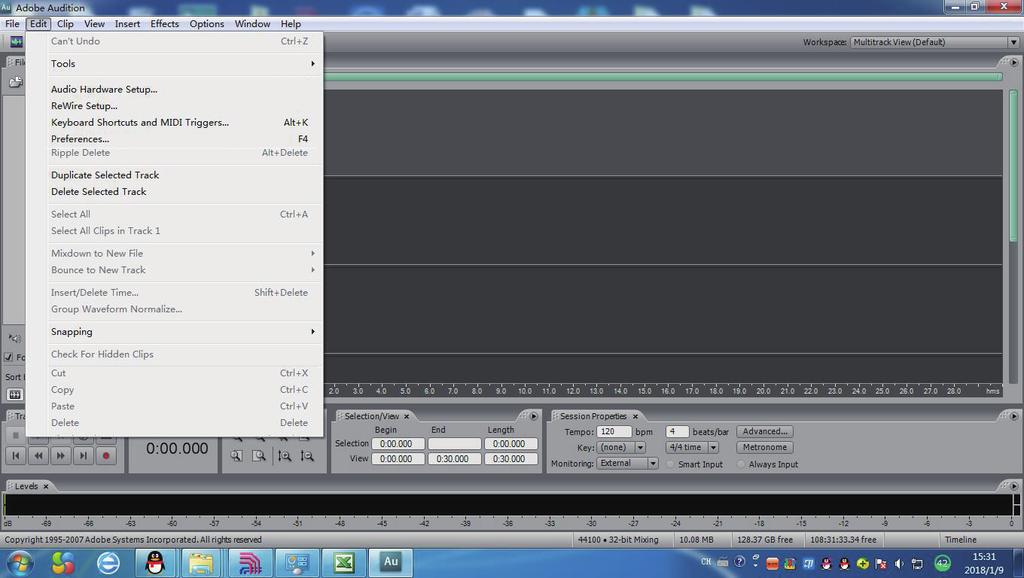
34 3 Automap HUI Automap MIDI Automap Propellerhead Audition Audition

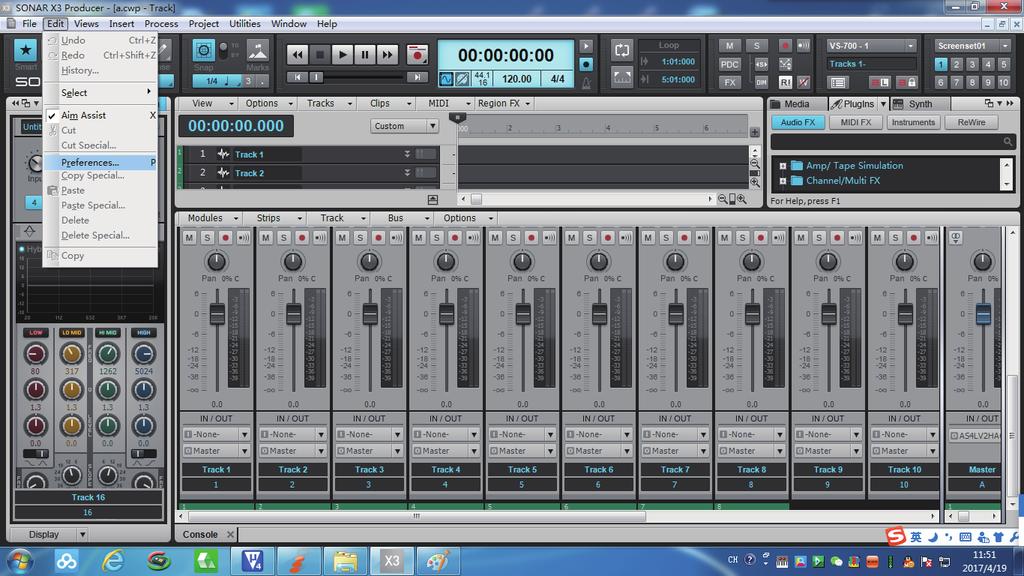
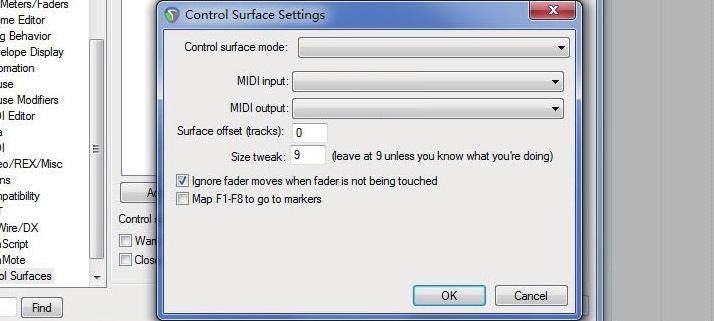
35 Sonar 2 3 3


36 8 icon QCONPRO G2 V icon QCONPRO G2 V Mackie control 3 7 3

37 imap TM Software for Mac OS X Please follow the procedures below step-by-step to launch your imap TM software to Mac OS X.. Insert the Utility CD in your CD-Rom and double click QconPro G2 imap icon. QconProG2/QconExG2 imap QconProG2_QconExG2 Firmware imap.dmg QconProG2_QconExG2 Firmware imap.dmg Tip: By drag and drop the QconPro G2 icon into the Applications folder, you could create a imap shortcut on your Mac s desktop. 37


38 Installing imap TM Software for Windows Please follow the procedures below step-by-step to install your imap TM software.. Turn on your PC. 2. Insert the Utility CD in your CD-Rom. After you have inserted the CD into your CD-Rom, an installation screen should appear as shown in diagram ; click Install. (Note: If the Installation screen do not appaer automatically. Go to the CD folder and double click "Setup".) (Note: If the file was downloaded from our website, please unzip the file and click the setup icon.) Diagram 3. Choose Install Location Choose your preferred install location for imap TM or use the default location and click Next. Diagram 2. Select shortcut Select the start menu folder in which you would like to create the imap TM shortcut. Then click Next. 38 Diagram 3


39 . Create a shortcut on your desktop Please untick the box if you do not want to place a shortcut icon on your desktop for imap TM, otherwise click Install. Diagram. imap TM started to install The imap TM installation has now started, wait for it to finish. Then click Finish. Diagram 7. Click the imap logo on your desktop to launch the imap software. Diagram 39

40 3 ~ ` Tab CapsLook Shift Ctrl Q A Z 2 W S X Alt ON Mac/PC Firmware upgrade QconPro G2 functional firmware2 upload procedure Esc F ~ ` Tab CapsLook Shift Ctrl Q A Z F2 F3 3 F7 F % D F G C V B F2 ; Prtsc sysrq [ ] } Home Pgup PgDN Enter? Del Lns Backspace = { : > QconPro G2 fu End Shift Ctrl AltGr pause Break + - P L < Alt * 0 O K M N # # 9 I J H F F0 * 78 U Y T S X F9 F8 7 R E QconPro G2 functional firmware upload procedure F F # 2 W $ 3 Mac/PC oad procedure ON 2 Esc F ~ ` Tab CapsLook Shift Ctrl Q A Z F2 2 W F3 F F # 3 E T G X C V B H N F9 * I J M # 0 O K ; > AltGr F2 * P L < F F0 # 9 78 U Y F F8 7 D Alt F7 F % R S Prtsc sysrq pause Break + [ ] } Ctrl Home Pgup PgDN Enter? Del Lns Backspace = { : End Shift $ Mac/PC Esc F ~ ` Tab CapsLook Shift Q A Z Ctrl F3 F2 F F # 2 3 E W F7 F % F G C V B H N ; > AltGr F2 * P L < F 0 O K M # # 9 I J F0 F9 * 78 U Y T D F8 7 R S X Alt Prtsc sysrq pause Break + [ ] } Ctrl Home Pgup PgDN Enter? Del Lns Backspace = { : End Shift $ icon Qcon Pro V QconProG2_QconExG2_Firmware are 8 QconProG2_QconExG2_V.0.bin icon Qcon Pro V bin QconProG2_QconExG2_V.0.bin

41 2 Mac/PC 2 Esc F ~ ` Tab CapsLook Shift Ctrl Q A Z F2 2 W F3 F F # 3 E D F G C V B H N M 0 O < ; > AltGr F2 * P L K J # # 9 I U Y T R S * 78 F F0 F9 F8 7 X Alt F7 F % Prtsc sysrq [ pause Break + { ] : } Ctrl Home Pgup PgDN Enter? Del Lns Backspace = End Shift $ 9 icon Qcon Pro V QconProG2_QconExG2_Firmware 8 QconProG2_QconExG2_V.0.bin QconProG2_QconExG2_V.0.bin
42 9 2 QconProG2_QconExG2_Firmware 8 QconProG2_QconExG2_V.0.bin 2 7 QconProG2_QconExG2_V.0.bin
43 Restore the factory default settings To restore your QconPro G2 settings to factory default, simply launch imap and import the original settings (i.e. without making any changes) to the device through the following steps.. Connect QconPro G2 with the provided USB cable and launch imap software. 2. Click the MIDI Device button and select QconPro G2 as the MIDI input and output device. Note: If QconPro G2 does not appear on the pull down menu, select USB audio as the MIDI I/O device. 3. Click Send Data to upload the setting to your QconPro G2.. Close imap, and then turn the QconPro G2 power of off & on again. 3
44 Specifications Connector: To computer USB connector (standard type) To extender USB connector (B-Type) Power supply: 2V/2.A DC Current consumption: 2A or less Weight:.kg (.lb) Dimensions: 0(L) x 37(W) x 3(H)mm 20. (L) x.7 (W) x.3 (H)
45 Services If your QconPro G2 needs servicing, follow these instructions. Check our online help centre at for information, knowledge, and downloads such as:. FAQ 2. Download 3. Learn More. Forum Very often you will find solutions on these pages. If you don t find a solution, create a support ticket at our online ACS (Auto Customer Support) at the below link, and our technical support team will assist you as soon as we can. Navigate to QR code and then sign in to submit a ticket or click Submit a ticket without the need to sign in. As soon as you have submitted an enquiry ticket, our supporting team will assist you to resolve the problem with your ICON ProAudio device as soon as possible. To send defective products for service:. Ensure the problem is not related to operation error or external system devices. 2. Keep this owner's manual. We don't need it to repair the unit. 3. Pack the unit in its original packaging including end card and box. This is very important. If you have lost the packaging, please make sure you have packed the unit properly. ICON ProAudio is not responsible for any damage that occurs due to non-factory packing.. Ship to the ICON ProAudio tech support center or the local return authorization. See our service centres and distributor service points at the link below: If you are located in Hong Kong Send the product to: ASIA OFFICE: Unit F, /F., Fu Cheung Centre, No. -7 Wong Chuk Yueng Street, Fotan, Sha Tin, N.T., Hong Kong. If you are located in Europe Send the product to: ICON Europe GmbH Am Spitzberg 3 83 Rangsdorf Germany Telephone: +9-(0) Fax: +9-(0) info@sound-service.eu If you are located in US Send the product to: ICON ProAudio Service Centre > Potomac Place; STE 02 > Smyrna, TN 377. For additional update information please visit our website at:


46 support.iconproaudio.com o
MIDI/Audio control surface with motorized faders for production. User manual
 MIDI/Audio control surface with motorized faders for production User manual Important Safety Instructions. Read this manual thoroughly before using this unit. 2. Keep this manual for future reference.
User manual. MIDI/Audio control surface with motorized faders for production N1630
 User manual MIDI/Audio control surface with motorized faders for production N630 Important Safety Instructions. Read this manual thoroughly before using this unit.. Keep this manual for future reference.
25/37/49/61-note velocity-sensitive piano-style keys USB MIDI controller keyboard. ikeyboard 3. ikeyboard 4. ikeyboard 5. ikeyboard 6.
 25/37/49/61-note velocity-sensitive piano-style keys USB MIDI controller keyboard ikeyboard 3 ikeyboard 4 ikeyboard 5 ikeyboard 6 User manual Important Safety Instructions 1. Read this manual thoroughly
25/37-note velocity-sensitive piano-style keys USB MIDI controller keyboard
 25/37-note velocity-sensitive piano-style keys USB MIDI controller keyboard User manual Important Safety Instructions 1. Read this manual thoroughly before using this unit. 2. Keep this manual for future
2 Mic/1-Guitar in, 2 Line out recording USB Interface with DSP effect built-in. User manual
 2 Mic/1-Guitar in, 2 Line out recording USB Interface with DSP effect built-in. User manual Important Safety Instructions 1. Read this manual thoroughly before using this unit. 2. Keep this manual for
4-In / 2-Out with +48V Phantom Power Recording USB Interface. User manual
 4-In / 2-Out with +48V Phantom Power Recording USB Interface User manual Important Safety Instructions 1. Read this manual thoroughly before using this unit. 2. Keep this manual for future reference. 3.
1 Mic-In / 2-Out Professional Vocal Recording USB Interface. User manual
 1 Mic-In / 2-Out Professional Vocal Recording USB Interface User manual Important Safety Instructions 1. Read this manual thoroughly before using this unit. 2. Keep this manual for future reference. 3.
1 Mic-In / 1 Guitar-In, 2-Out Professional vocal recording USB Interface. User manual
 1 Mic-In / 1 Guitar-In, 2-Out Professional vocal recording USB Interface User manual Important Safety Instructions 1. Read this manual thoroughly before using this unit. 2. Keep this manual for future
2 Mic/1-Guitar in, 2 Line out recording USB Interface. User manual
 2 Mic/1-Guitar in, 2 Line out recording USB Interface User manual Important Safety Instructions 1. Read this manual thoroughly before using this unit. 2. Keep this manual for future reference. 3. Take
2 Mic/1-Guitar in, 2 Line out recording USB Interface with DSP effect built-in. User manual
 2 Mic/1-Guitar in, 2 Line out recording USB Interface with DSP effect built-in. User manual Important Safety Instructions 1. Read this manual thoroughly before using this unit. 2. Keep this manual for
Cubase SX3 / DM2000 V2 Setup and Operation
 Cubase SX3 / DM2000 V2 Setup and Operation Page 1 Cubase SX3 / DM2000 V2 Setup and Operation This document describes setup and operation for remote control of Cubase SX from the DM2000 digital mixing console.
Dual Link DVI Extender
 2x Dual Link DVI Extender EXT-2DVI-CATDL User Manual Release A4 2x Dual Link DVI Extender Important Safety Instructions 1. Read these instructions. 2. Keep these instructions. 3. Heed all warnings. 4.
FaderPort. Quick Start Guide. English.
 FaderPort www.presonus.com English Table of Contents 1 Introduction 1 1.1 About This Guide 1 1.2 What s in the Box 1 2 Hookup 2 2.1 Getting Started 2 3 Connections and Controls 3 3.1 Controls 3 3.2 Connections
Cubase SX / 02R96 Setup and Operation V2
 Page 1 Cubase SX / 02R96 Setup and Operation This document describes setup and operation for remote control of Cubase SX from the 02R96 digital mixing console. These instructions apply to 02R96 V2.0 or
HDMI to 3GSDI Converter
 HDMI to 3GSDI Converter EXT-HD-3G-C User Manual Release A2 Important Safety Instructions 1. Read these instructions. 2. Keep these instructions. 3. Heed all warnings. 4. Follow all instructions. 5. Do
USB 2.0 SR. Extender over one CAT-5 Cable. User Manual EXT-USB2.0-SR. Version A1
 USB 2.0 SR Extender over one CAT-5 Cable EXT-USB2.0-SR User Manual Version A1 Important Safety Instructions 1. Read these instructions. 2. Keep these instructions. 3. Heed all warnings. 4. Follow all instructions.
Audio. one CAT-5 EXT-DVI-1CAT5-SR. User Manual. Release A2
 Audio DVI 3GSDI ELR Lite Embedder Extender over one CAT-5 EXT-DVI-1CAT5-SR User Manual Release A2 DVI ELR Lite Extender over one CAT-5 Important Safety Instructions 1. Read these instructions. 2. Keep
THANK YOU FOR BUYING HEIMDALL A CLINT HI-FI STREAMING ADAPTER
 ENGLISH THANK YOU FOR BUYING HEIMDALL A CLINT HI-FI STREAMING ADAPTER Welcome to the world of Clint Asgard. Designed and developed with elegance and simplicity by Danish designer Phillip Bodum. Our Asgard
DVI ELR Extender over one CAT5
 DVI ELR Extender over one CAT5 EXT-DVI-1CAT5-ELR User Manual Important Safety Instructions 1 Read these instructions 2 Keep these instructions 3 Heed all warnings 4 Follow all instructions 5 Do not use
FaderPort 8 8-channel Production Controller
 FaderPort 8 8-channel Production Controller www.presonus.com English Table of Contents 1 Overview 1 1.1 Introduction 1 1.2 About this manual 1 1.3 FaderPort 8 Features 2 1.4 Studio One Artist Features
Audio. one CAT-5 EXT-DVI-1CAT5-SR. User Manual. Release A2
 Audio DVI 3GSDI ELR Lite Embedder Extender over one CAT-5 EXT-DVI-1CAT5-SR User Manual Release A2 DVI ELR Lite Extender over one CAT-5 Important Safety Instructions 1. Read these instructions. 2. Keep
1:4 3GSDI Splitter. User Manual EXT-3GSDI-144. Release A5
 1:4 3GSDI Splitter EXT-3GSDI-144 User Manual Release A5 Important Safety Instructions 1. Read these instructions. 2. Keep these instructions. 3. Heed all warnings. 4. Follow all instructions. 5. Do not
PORTABLE WIRELESS PA SYSTEM WITH LITHIUM -ION RECHARGEABLE BATTERY AWP6042 OWNER S MANUAL. Handheld Microphone Headset Transmitter
 PORTABLE WIRELESS PA SYSTEM WITH LITHIUM -ION RECHARGEABLE BATTERY AWP6042 OWNER S MANUAL X1 Headset Microphone AWX6042H VHF Wireless Headset Transmitter Handheld Microphone Headset Transmitter Thank you
NEUPANEL SERIES. User Manual for Neutrino/Uno/Rio
 NEUPANEL SERIES User Manual for Neutrino/Uno/Rio 1 Important Safety Information 1. READ THESE INSTRUCTIONS All the safety and operating instructions should be read before the product is operated. 2. KEEP
DM-3200 SONAR. DM-3200 DAW Control. Mackie Control emulation for SONAR 4.x. Version 1.11 DM-3200 SONAR 1/8
 DM-3200 DAW Control Mackie Control emulation for SONAR 4.x Version 1.11 1/8 1. Summary... 3 2. Setting up the DM-3200... 3 2.1 Enabling MIDI devices in SONAR... 3 2.2 Adding a Control Surface... 3 2.3
RIO R22 & R44. Quick Start Guide for all variants
 RIO R22 & R44 Quick Start Guide for all variants Important Safety Information 1. READ THESE INSTRUCTIONS All the safety and operating instructions should be read before the product is operated. 2. KEEP
IMPORTANT! USER MANUAL. LPU192CD Hi-Fi Turntable Stereo System WARRANTY INFORMATION INSIDE. PLEASE READ.
 LPU192CD Hi-Fi Turntable Stereo System USER MANUAL IMPORTANT! WARRANTY INFORMATION INSIDE. PLEASE READ Trademark of TEAC Corporation JAPAN www.teac.com.au 1 1 Read these Instructions. 2 Keep these Instructions.
DVI ELR Extender over one CAT5
 DVI ELR Extender over one CAT5 EXT-DVI-1CAT5-ELR User Manual Release A3 Important Safety Instructions 1. Read these instructions. 2. Keep these instructions. 3. Heed all warnings. 4. Follow all instructions.
HSC-42. HDMI 4k2k Video Up/Down Scaler
 INSTRUCTION MANUAL HSC-42 HDMI 4k2k Video Up/Down Scaler SAFETY AND NOTICE 1. Read these instructions. 2. Keep these instructions. 3. Heed all warnings. 4. Follow all instructions. 5. Do not use this apparatus
Splitter for HDMI 1.3 with Digital Audio
 Splitter for HDMI 1.3 with Digital Audio Audio 3GSDI Embedder EXT-HDMI1.3-142D User Manual Release B4 1:2 Splitter for HDMI 1.3 with Digital Audio Important Safety Instructions 1. Read these instructions.
DVI Detective. User Manual EXT-DVI-EDIDN. Release A3
 DVI Detective EXT-DVI-EDIDN User Manual Release A3 Important Safety Instructions 1. Read these instructions. 2. Keep these instructions. 3. Heed all warnings. 4. Follow all instructions. 5. Do not use
AUDIO VIDEO MEDIA CONTROLLERS. EuCon Application Setup Guide. Document Revision: K
 EuCon Application Setup Guide Document Revision: K MC Control, MC Mix, MC Transport, Studio Monitor Express, Studio Monitor Pro, EuControl, EuCon and EuCon Powered are trademarks of Euphonix Inc. All other
EUCON Application Setup
 EUCON Application How to install EuControl Software to use Avid media controllers with applications from Avid and our EUCON Development Partners Introduction Overview of Avid Media Controllers Avid Pro
HDMI MATRIX SWITCHER B-120-HDMATRIX-4x4/8x8 CONFIGURATION UTILITY MANUAL
 HDMI MATRIX SWITCHER B-120-HDMATRIX-4x4/8x8 CONFIGURATION UTILITY MANUAL IMPORTANT SAFETY INSTRUCTIONS To reduce the risk of fire or electric shock, read and follow all instructions and warnings in this
PAM-CDA Compact Disc Module. Copyright 2004 Inter-M Corporation
 Copyright 2004 Inter-M Corporation Contents Welcome... 3 Unpacking... 3 Warnings... 3 Features... 5 Front Panel Controls... 6 Connections... 8 Block Diagram... 9 Specifications... 10 2 Welcome A personal
USER S MANUAL. Dual Channel 15 Band EQ USB. 19" DIGITAL (482mm) DS-EQ215 PARAMETER OUT EQUALIZER ESCAPE
 DS-EQ215 PARAMETER OUT EQUALIZER ESCAPE") DS-EQ215 USER S MANUAL IN PARAMETER DS-EQ215 OUT EQUALIZER ESCAPE Dual Channel 15 Band EQ 19" DIGITAL (482mm) USB Contents Introduction...1 Safety Instructions... 2 Getting Started with Front Panel Controls...
DS-EQ215 USER S MANUAL IN PARAMETER DS-EQ215 OUT EQUALIZER ESCAPE Dual Channel 15 Band EQ 19" DIGITAL (482mm) USB Contents Introduction...1 Safety Instructions... 2 Getting Started with Front Panel Controls...
Always there to help you. Register your product and get support at SPA1330. Question? Contact Philips.
 Always there to help you Register your product and get support at www.philips.com/welcome Question? Contact Philips SPA1330 User manual Contents 1 Important 2 Safety 2 Notice 3 English 2 Your multimedia
DVI KVM. Extra Long Range Extender Over One CAT5. User Manual EXT-DVIKVM-ELR. Release A8
 DVI KVM Extra Long Range Extender Over One CAT5 EXT-DVIKVM-ELR User Manual Release A8 Important Safety Instructions 1 Read these instructions 2 Keep these instructions 3 Heed all warnings 4 Follow all
Here's a summary of the SONAR features you can control from the Mackie Control:
 Page 1 of 37 Mackie Control Surfaces Help Working with the Mackie Control Configuring XT Units Mackie Control C4 Working with the Mackie Control When you install SONAR, you also install special software
Pro Tools. Automation & Control Surface Manual. Version: 1.0
 Pro Tools Automation & Control Surface Manual Version: 1.0 Contents Control 2802 Fader Automation Page 3 Automation Overview Page 3 Automation Setup Page 3 Recording & Editing Automation Data Page 4 Automation
Quick Guide. ENC-H Video Encoder XX
 Quick Guide ENC-H264-16 Video Encoder XX298-20-00 Vicon Industries Inc. does not warrant that the functions contained in this equipment will meet your requirements or that the operation will be entirely
1/4 Guitar / Mic input
 1/4 Guitar / Mic input Important Safety Instructions 1) Read these instructions All the safety and operating instructions should be read before this product is operated. 2) Keep these instructions The
Mytek DIO DANTE Card. User Manual
 Mytek DIO DANTE Card User Manual ver. 1.2 / March 2015 Mytek 2015 Page: 1 / 25 This manual may be updated Download the newest version at: http:///download_library/ For technical support, technical tips
Kogan Bluetooth Karaoke System with Dual Microphones KAKAR2MICA
 Kogan Bluetooth Karaoke System with Dual Microphones KAKAR2MICA K TABLE OF CONTENTS SAFETY & WARNINGS...1 IMPORTANT SAFETY INSTRUCTIONS...1 AC CONNECTION...2 LOCATION OF CONTROLS...3 ASSEMBLY AND CONNECTIONS...4
User's manual Studio 22 Pro USB
 User's manual Studio 22 Pro USB Precaution Thank you for purchasing this digital appliance. To ensure perfect operation and security, please read the manual carefully and retain it for future reference.
Ares. Modular Audiophile System. by Thrax Audio. Operating Manual. Manual issued 15/03/2018 CAUTION
 Ares Modular Audiophile System by Thrax Audio Operating Manual Manual issued 15/03/2018 CAUTION THE UNIT CONTAINS NO USER SERVICEABLE PARTS. DO NOT REMOVE THE COVERS. LETHAL VOLTAGES ARE PRESENT WITHIN
EASY FIREWIRE Audio Interface
 EASY FIREWIRE Audio Interface ENGLISH USER S MANUAL IMPORTANT SAFETY INSTRUCTIONS shall be placed on the apparatus. The MAINS plug is used as the disconnect device, the disconnect device shall remain readily
SOUNDSTICKS WIRELESS. Setup Guide. Downloaded from
 SOUNDSTICKS WIRELESS Setup Guide English Japanese Simplified Chinese 2 SOUNDSTICKS WIRELESS 1. Read these instructions. 2. Keep these instructions. 3. Heed all warnings. 4. Follow all instructions. 5.
Us U er e r G u G i u de d AX A 3 X DA D N A T N E T I/O / O Car a d r d
 User Guide AX32 DANTE I/O Card IMPORTANT SAFETY INSTRUCTIONS READ AND KEEP THESE INSTRUCTIONS WARNING when using electric products, basic precautions should be followed, including the following: Read all
BS 181 SINGLE CHANNEL POWER SUPPLY USER MANUAL
 BS 181 SINGLE CHANNEL POWER SUPPLY USER MANUAL August 2016 This product is designed and manufactured by: ASL Intercom B.V. Zonnebaan 42 3542 EG Utrecht The Netherlands Phone: +31 (0)30 2411901 Fax: +31
DUAL LASER PACK & CONTROLLER USERS MANUAL
 DUAL LASER PACK & CONTROLLER USERS MANUAL www.venuelightingeffects.com 89.0 Venue PP laser Instr.indd 5//08 6:09:5 PM SAFETY INFORMATION Never operate this unit if it has a damaged cord or plug. Keep the
VeniceU16/VeniceU24/VeniceU32
 VeniceU16/VeniceU24/VeniceU32 Quick Start Guide midasconsoles.com 2 VeniceU16/VeniceU24/VeniceU32 Quick Start Guide VeniceU16/VeniceU24/VeniceU32 Quick Start Guide 3 Important Safety Instructions Terminals
BS 181 SINGLE CHANNEL POWER SUPPLY USER MANUAL
 BS 181 SINGLE CHANNEL POWER SUPPLY USER MANUAL Issue 2011 ASL Intercom BV DESIGNED & MANUFACTURED BY: ASL Intercom B.V. Zonnebaan 42 3542 EG Utrecht The Netherlands Tel: +31 (0)30 2411901 Fax: +31 (0)30
BS 287 DUAL CHANNEL POWER SUPPLY. User Manual. January 2017 V1.0
 BS 287 DUAL CHANNEL POWER SUPPLY User Manual January 2017 V1.0 Table of contents 1.0 SAFETY INSTRUCTIONS... 3 2.0 GENERAL DESCRIPTION PS 289... 4 3.0 MECHANICAL INSTALLATION... 5 4.0 MAINS POWER & SAFETY
VeniceF16/VeniceF16R/ VeniceF24/VeniceF32
 VeniceF16/VeniceF16R/ VeniceF24/VeniceF32 Quick Start Guide midasconsoles.com 2 VeniceF16/VeniceF16R/VeniceF24/VeniceF32 Quick Start Guide VeniceF16/VeniceF16R/VeniceF24/VeniceF32 Quick Start Guide 3 Important
OWNER S MANUAL CD-2 V 1.3
 OWNER S MANUAL CD-2 V 1.3 2 TABLE OF CONTENTS WARNINGS... 3 ACCESSORIES... 4 REMOTE CONTROL... 5 FRONT PANEL... 6 REAR PANEL... 7 MENU SYSTEM... 8 NOTES OF IMPORTANCE... 10 CONNECTORS... 11 TECHNICAL SPECIFICATIONS...
VOICE-ACTIVATED INTERCOM SYSTEM
 VOICE-ACTIVATED INTERCOM SYSTEM Owner s Manual For Wireless Intercom Model WHI-4CUPG EXPLANATION OF GRAPHIC WARNING SYMBOLS This symbol is intended to alert the user to the presence of un-insulated dangerous
PREMIUMAUDIOVIDEOLIGHTINGANDPOWERPRODUCTS
 FACTOR ELECTRONICS PREMIUMAUDIOVIDEOLIGHTINGANDPOWERPRODUCTS V-RVC Owners Manual IMPORTANT NOTE: THIS OWNER'S MANUAL IS PROVIDED AS AN INSTALLATION AND OPERATING AID. FACTOR ELECTRONICS DOES NOT ASSUME
User Manual ABS Molded Powered Loudspeaker MODEL: PB15PKG. QUESTIONS / COMMENTS CALL or pr o.com
 User Manual ABS Molded Powered Loudspeaker MODEL: PB15PKG QUESTIONS / COMMENTS CALL 888-842-6277 or email info@t pr o.com PB15PKG WARNING! CAUTION: TO REDUCE THE RISK OF ELECTRIC SHOCK, DO NOT REMOVE THE
DP-152. Digital Picture Viewer. Instruction Manual. Please read this manual carefully before operation 152SX
 DP-152 Digital Picture Viewer Instruction Manual Please read this manual carefully before operation 152SX Precautions For Customer Use: Enter below the serial number that is located on the bottom of the
DPR-39. GB Revision 1
 DPR-39 GB Revision 1 Important Safety Instructions 1. Read these instructions. 2. Keep these instructions. 3. Heed all warnings. 4. Follow all instructions. 5. Do not use this apparatus near water. 6.
DPR-34+ GB Revision 2
 DPR-34+ GB Revision 2 1. 2. 3. 4. 5. 6. 7. 8. 9. Important Safety Instructions Read these instructions. Keep these instructions. Heed all warnings. Follow all instructions. Do not use this apparatus near
Beamforming Microphone Array 2 Group Microphone for Professional Conferencing. Quick-Start Guide
 Beamforming Microphone Array 2 Group Microphone for Professional Conferencing Quick-Start Guide Table of Contents IMPORTANT SAFETY INSTRUCTIONS... 1 THE BEAMFORMING MICROPHONE ARRAY 2... 2 QUICK-START
Integrated Amplifier with USB / SD Inputs IA1200
 Integrated Amplifier with USB / SD Inputs WARNING! CAUTION: TO REDUCE THE RISK OF ELECTRIC SHOCK, DO NOT REMOVE THE COVER OF THIS UNIT. THERE ARE NOUSER-SERVICEABLE PARTS INSIDE. REFER ALL SERVICING TO
Yamaha DM1000/Nuendo Setup and Control
 Yamaha DM1000/Nuendo Setup and Control The information in this document is subject to change without notice and does not represent a commitment on the part of Steinberg Media Technologies GmbH. The software
Remote Control Devices
 Remote Control Devices Manual by Ludvig Carlson, Anders Nordmark, Roger Wiklander Quality Control: C. Bachmann, H. Bischoff, S. Pfeifer, C. Schomburg The information in this document is subject to change
FW Release Notes Version TEAC Professional Division. FireWire Audio MIDI Interface / DAW Control Surface
 TEAC Professional Division FW 1082 FireWire Audio MIDI Interface / DAW Control Surface Release Notes Version 1.50 032105 FW 1082 v1.50 Release Notes... 2 Fixed Since v1.50 Public Beta... 2 Installation...
USO RESTRITO. Yamaha 01V96/Nuendo Setup and Control
 Yamaha 01V96/Nuendo Setup and Control The information in this document is subject to change without notice and does not represent a commitment on the part of Steinberg Media Technologies GmbH. The software
Switcher for HDMI 1.3
 Switcher for HDMI 1.3 Audio 3GSDI Embedder EXT-HDMI1.3-442 User Manual Release B6 4x2 Switcher for HDMI 1.3 Important Safety Instructions 1. Read these instructions. 2. Keep these instructions. 3. Heed
PS 289 DUAL CHANNEL POWER SUPPLY USER MANUAL
 PS 289 DUAL CHANNEL POWER SUPPLY USER MANUAL August 2016 This product is designed and manufactured by: ASL Intercom B.V. Zonnebaan 42 3542 EG Utrecht The Netherlands Phone: +31 (0)30 2411901 Fax: + 31
English Manual.
 English Manual tech@vestax.com CONGRATULATIONS Thank you for purchasing the Vestax VCI-100. Please read through the users manual thoroughly to use the VCI-100 safely and at its best performance. Features
Introduction. Specifications. Network
 Introduction When it comes to control hardware, it is necessary to provide an easy yet powerful interface for the personnel in charge. XPanel Touch is created with this purpose in mind. The menu names
OWNER S MANUAL SINGLE CAT5E/6 3D EXTENDER B-320-1CAT-HDIR
 OWNER S MANUAL SINGLE CAT5E/6 3D EXTENDER B-320-1CAT-HDIR IMPORTANT SAFETY INSTRUCTIONS WARNING: To reduce the risk of fire or electric shock, do not expose this apparatus to rain or moisture. 1. Read
Mytek DIO MADI Card User Manual. Mytek DIO MADI Card. User Manual. ver. 1.6 / August 2014
 Mytek DIO MADI Card User Manual ver. 1.6 / August 2014 Mytek 2014 Page: 1 / 22 This manual may be updated Download the newest version at: http:///download_library/ For technical support, technical tips
User s Guide. Digital Whole Home Audio Distribution System
 User s Guide Digital Whole Home Audio Distribution System Document Number 62R00-1 Rev A October, 2006 Copyright 2006 Home Automation, Inc. All Rights Reserved Precautions Exposure to extremely high noise
MODEL 805 USER MANUAL
 MODEL 805 USER MANUAL All Rights Reserved Page 1 of 12 UNPACKING & INSPECTION Save all packing materials they are required for returns and warranty service. Inspect the 805 and packing materials for any
FOOT CONTROLLER FCV100
 CV NORM OUTPUT2 OUTPUT1 MIN VOL 0 10 User Manual FOOT CONTROLLER FCV100 Ultra-Flexible Dual-Mode Foot Pedal for Volume and Modulation Control 2 FOOT CONTROLLER FCV100 User Manual Table of Contents Thank
Professional Digital Audio Processor. SOLTON DSP 206 Operation Manual
 Professional Digital Audio Processor SOLTON DSP 206 INPORTANT SAFETY INSTRUCTIONS TO PREVENT ELECTRIC SHOCK DO NOT REMOVE TOP OR BOTTOM COVERS.NO USER SERVICEABLE PARTS INSIDE.REFER SERVICING TO QUALIFIED
OWC Mercury Helios 2 ASSEMBLY MANUAL & USER GUIDE
 OWC Mercury Helios 2 ASSEMBLY MANUAL & USER GUIDE TABLE OF CONTENTS 1. INTRODUCTION...1 1.1 MINIMUM SYSTEM REQUIREMENTS 1.1.1 Apple Mac Requirements 1.1.2 PC Requirements 1.1.3 Supported PCIe Cards 1.2
Quick Start Guide Rio Series R22 and R44 Models
 Rio Series R22 & R44 Dante Interface Models - Quick Start Guide 1. What s in the Box The Rio Series R22-P, or R44-P, or R22-WP-X, or R22-WP-M, Dante interface device hardware This hard copy of the Quick
OWNER S MANUAL SINGLE CAT5E/6 3D EXTENDER B-200-1CAT-HDIR. Receiver
 OWNER S MANUAL SINGLE CAT5E/6 3D EXTENDER B-200-1CAT-HDIR Receiver IMPORTANT SAFETY INSTRUCTIONS WARNING: To reduce the risk of fire or electric shock, do not expose this apparatus to rain or moisture.
PREMIUMAUDIOVIDEOANDPOWERPRODUCTS V-RVC-PRO. Owners Manual
 PREMIUMAUDIOVIDEOANDPOWERPRODUCTS V-RVC-PRO Owners Manual IMPORTANT NOTE: THIS OWNER'S MANUAL IS PROVIDED AS AN INSTALLATION AND OPERATING AID. FACTOR ELECTRONICS DOES NOT ASSUME ANY RESPONSIBILITY AS
X-TOUCH Firmware V (January 2016)
") X-TOUCH Firmware V 1.15 - (January 2016) Behringer X-TOUCH Universal Control Surface Firmware V 1.15 The X-TOUCH Firmware Update V 1.15 includes new functionality for your control surface operating system.
X-TOUCH Firmware V 1.15 - (January 2016) Behringer X-TOUCH Universal Control Surface Firmware V 1.15 The X-TOUCH Firmware Update V 1.15 includes new functionality for your control surface operating system.
QSW16M 16 Chn PoE managed switch
 QSW16M 16 Chn PoE managed switch 1 Before You Begin Read these instructions before installing or operating this product. Note: This installation should be made by a qualified service person and should
3. This unit should not be exposed to dripping, splashing or excessive moisture or objects filled with liquid.
 Before using your new speaker system please review all information and instruction found in this user manual for the safety of the operator and optimum device performance. Caution: To reduce the risk of
SONOS BRIDGE. Product Guide
 SONOS BRIDGE Product Guide THIS DOCUMENT CONTAINS INFORMATION THAT IS SUBJECT TO CHANGE WITHOUT NOTICE. No part of this publication may be reproduced or transmitted in any form or by any means, electronic
Mackie Control emulation for Digital Performer 4.x
 DM-3200 DAW Control Mackie Control emulation for Digital Performer 4.x Version 1.10 1/6 1. Summary... 3 2. Setting up the DM-3200... 3 2.1 Setting up the Mac... 3 2.1.1 Audio MIDI settings... 3 2.1.2 Control
Always there to help you. Register your product and get support at AS130. Question? Contact Philips.
 Always there to help you Register your product and get support at www.philips.com/support Question? Contact Philips AS130 User manual Contents 1 Important 2 Important Safety Instructions 2 2 Your docking
C ookie User Manual BC
 Cookie User Manual BC Cookie Please follow the instruction in this guide to enjoy the best sound. Cookie User Manual Hold "O" button to power on and off Press "O" button to play/pause music (for compatible
PLTT21BT CLASSICAL TURNTABLE WITH USB PLAYER, BLUETOOTH INSTRUCTIONS MANUAL
 PLTT21BT CLASSICAL TURNTABLE WITH USB PLAYER, BLUETOOTH INSTRUCTIONS MANUAL CAUTION TO PREVENT FIRE OR SHOCK HAZARD, DO NOT USE THIS PLUG WITH AN EXTENSION CORD, RECEPTACLE OR OTHER OUTLET UNLESS THE BLADES
Elation Professional Los Angeles, Ca
 DMX Partner USER MANUAL Version 1.0 24-004-1631 Elation Professional Los Angeles, Ca 90058 www.elationlighting.com Table of contents 1. General Introduction...3 2. Safety Information & Maintenance...3
Mercury Helios ASSEMBLY MANUAL & USER GUIDE
 Mercury Helios ASSEMBLY MANUAL & USER GUIDE TABLE OF CONTENTS INTRODUCTION...1 1.1 MINIMUM SYSTEM REQUIREMENTS 1.1.1 Apple Mac Requirements 1.1.2 PC Requirements 1.1.3 Supported PCIe Cards NOTE: Boot Camp
INSTALLATION MANUAL. HDMI 1x4 Splitter B-230-HDSPLTR-1x4. B-230-HDSPLTR-1x4 HDMI OUT 4 HDMI OUT 3 HDMI OUT 2 HDMI OUT 1 HDMI OUT 4 HDMI IN
 HDMI 1x4 Splitter B-230-HDSPLTR-1x4 INSTALLATION MANUAL HDMI OUT 4 HDMI OUT 3 HDMI OUT 2 HDMI OUT 1 HDMI OUT 1 B-230-HDSPLTR-1x4 HDMI OUT 2 HDMI OUT 3 HDMI OUT 4 HDMI IN HDMI IN 2 IMPORTANT SAFETY INSTRUCTIONS
This manual describes the installation, setup and operation of this equipment in details.
 About This Manual This manual describes the installation, setup and operation of this equipment in details. Please read it carefully to make sure you can operate the multiplexer correctly. Important Avoid
dedicated KVM switch and rackmount screen technology User Manual CV-801 PS/2 DB-15 KVM Designed and manufactured by Austin Hughes
 dedicated KVM switch and rackmount screen technology User Manual PS/2 DB-15 KVM Designed and manufactured by Austin Hughes 751 Legal Information First English printing, October 2002 Information in this
AudioCast Transmitter Owners Manual
 AudioCast Owners Manual Thank you for purchasing a Soundcast Systems wireless product. Soundcast products offer the highest quality, interference free wireless audio transmission system available today.
INSTALLATION MANUAL. HDMI 1x8 Splitter B-230-HDSPLTR-1x8 B-230-HDSPLTR-1X8
 HDMI 1x8 Splitter B-230-HDSPLTR-1x8 INSTALLATION MANUAL HDMI OUT 8 HDMI OUT 7 HDMI OUT 6 HDMI OUT 5 HDMI OUT 4 HDMI OUT 3 HDMI OUT 2 HDMI OUT 1 B-230-HDSPLTR-1X8 HDMI OUT 1 HDMI OUT 2 +5 VDC HDMI OUT 3
Classic Kiosk. User Guide. Before operating the unit, please read this manual thoroughly, and retain it for future reference
 User Guide Before operating the unit, please read this manual thoroughly, and retain it for future reference Notice 1. When disconnecting the display from an electrical outlet, the plug must be pulled
NUAGE MASTER Ncs500-CT
 CONTROL SURFACE NUAGE MASTER Ncs500-CT Operation Manual Using this manual This operation manual supports keyword searching and linking as follows. Keyword searching Searching for keywords is performed
MERCURY PRO. Assembly Manual & User Guide
 MERCURY PRO Assembly Manual & User Guide CONTENTS Introduction... 1 1.1 Minimum System Requirements 1.1.1 Apple Mac Requirements 1.1.2 PC Requirements 1.1.3 Supported Optical Drives 1.2 Package Contents