To ensure safety while driving. and to comply with laws, drivers should not watch video or. operate the video device while driving.
|
|
|
- Brenda Barber
- 5 years ago
- Views:
Transcription
1
2 To ensure safety while driving and to comply with laws, drivers should not watch video or operate the video device while driving.
3 Unit Installation Wires Connection Description 25 26
4 BV9976B 85W*4 85W*4 178*50*160
5


6 Cable Mounting Strap/Release Key /Mounting Sleeve Screw PM4*5mm 4pcs Flat gasket M5Φ10X1.0mm 2pcs Hex nut 8.0 mmφ5.0x1.0mm 1pc
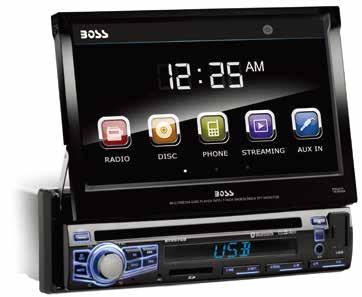
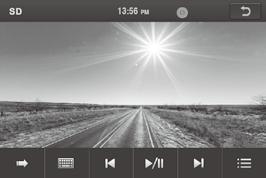
7 OPEN key Press to make the screen stretching out or go back.
8 SD/USB page Short press to mute the unit. Long press to make panel go dark, and press any empty place, will run the unit. DISC/SD/USB
9 UNIT INSTALLATION THE UNIT IS INSTALLED TO BE AN ANTI-THEFT ONE. THE CHASSIS OF THE UNIT WEARS A SLIDING METAL HOUSING. PLEASE DO THE CONNECTION OF THE POWER, SPEAKERS AND ANTENNA ACCORDING TO THE REQUIREMENT OF THE INSTRUCTION BOOK, THEN INSTALL THE SLIDING METAL HOUSING IN THE CAR AS FOLLOWS. METAL STRAP TO BOOST UP THE CAPABILITY OF ANTI-JAMMING, PLEASE FIX THE METAL STRAP ON THE METAL CONNECTED TO THE BOTTOM BRACKET OF THE CAR. SELECT THE PROPER TAB FOR FIXING THE SLIDING METAL HOUSING. UNIT CHASSIS DASH BOARD SLIDING METAL HOUSING PLASTIC TRIM OUT TO DRAW THE CHASSIS OUT OF THE SLIDING METAL HOUSING, INSERT THE LEFT AND RIGHT KEY PLATES INTO THE RIGHT POSITION OF THE 2 SIDES OF CHASSIS.
10 WIRES CONNECTION DESCRIPTION ANTENNA JACK FIXING SCREW BOLT STEERING WHEEL KEY A GRAY STEERING WHEEL KEY B BLUE STEERING WHEEL KEY GND BLACK USB JACK SOCKET A SOCKET B SOCKET A YELLOW CAMERA YELLOW VIDEO OUT 1 YELLOW VIDEO OUT 2 YELLOW VIDEO LINE OUT LINE OUT REAR FROUT RED WHITE RED WHITE RED WHITE AV IN LINE OUT SUB OUT1 BROWN SUB OUT2 BROWN SOCKET B YELLOW MEMORY B+ 15A BLUE BLACK RED P.ANT GND ACC LIGHT GREEN BRAKE PURPLE/WHITE REVERSE FRONT LEFT SPK WHITE WHITE/BLACK GRAY GRAY/BLACK RIGHT SPK FRONT REAR GREEN GREEN/BLACK VLOLET VLOLET/BLACK REAR
11 4 2 3 BV9976B SOURCE key & TURN ON/OFF Short press to select system mode(radio/disc/phone/stream/aux/ USB-F/USB-R/SD/AV IN/CAMERA).Long press to turn ON/OFF the unit. 3.MUTE key Press to Press again to restore sound.long press to turn off the backlight; then press any place of the TFT LCD to restore the backlight. 4.EQ Press to enter into EQ setup menu. 5. BAND Under RADIO mode, press to change band between FM1/FM2/FM3/ AM1/AM2. 6. & button Press to choose previous/next song under Disc/SD/USB mode. Press to choose previous/next page under music list menu. Press to search frequency forward/backward under radio mode. 7.VOLUME UP/DOWN & Talking Calls & HANG UP Rotate to adjust the output volume UP or DOWN. Press the volume button to take incoming calls under Bluetooth mode; Press the volume button to hang up the phone calls during phone calls. Long press to reject incoming calls.

12


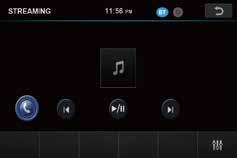
13 5 6.Streaming BOSS AUDIO BV9976B 7.AUX IN Interface SD Interface CAMERA Interface 13
14

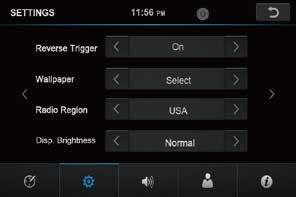
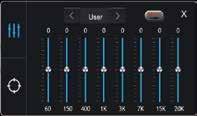
15 5 8 Screen Angle: select an optimal angle of the monitor. Sliding Left or right 8.Touch to enter into RGB SETUP menu
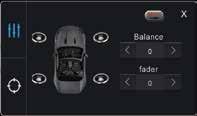
16 Fade
17


18 Press to enter into EQ menu.

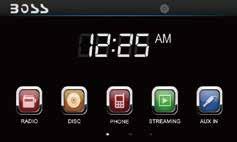
19 Press this area in any interface, you will see below present time standby mode: A B A.Press any empty area in this menu to go back to last source menu. B.Press to dim the unit.
20 st

21
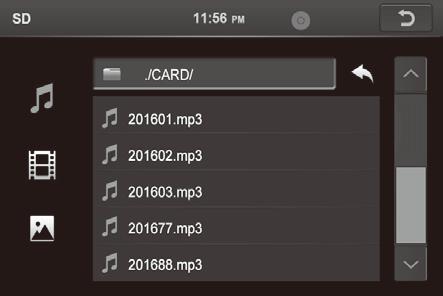

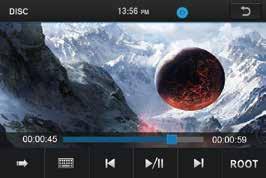
22 DISC SD

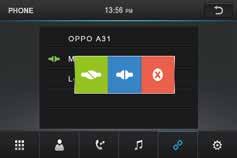
23 BOSS AUDIO BV9976B f BOSS AUDIO BV9976B. d. Bluetooth music f

24 5.Show talking time. 5
25

26
27
28
29
30
31 28
32 29
33
CONTENTS. Next/Previous Track... 4 Fast Forward/Backward... 4 Set the Clock (CLK)... 4 Insert SD Card... 4
... 4 Insert SD Card... 4") CONTENTS Precautions... 1 Lithium Battery Cell Warnings... 1 Take Precaution...1 Installation...2-3 Installation Procedures... 2 Installation Opening... 2 Wiring Connections... 3 Remove of the Main Unit...3
CONTENTS Precautions... 1 Lithium Battery Cell Warnings... 1 Take Precaution...1 Installation...2-3 Installation Procedures... 2 Installation Opening... 2 Wiring Connections... 3 Remove of the Main Unit...3
PRECAUTIONS. Lithium Battery Cell Warnings. Take Precaution. Cell leakage may cause damage to the remote control. Do not throw cells into
 PRECAUTIONS Lithium Battery Cell Warnings Cell leakage may cause damage to the remote control. Do not throw cells into as this may cause an explosion. Keep battery cells out of reach of children. Take
Precautions... 1 Lithium Battery Cell Warnings... 1 Take Precaution...1 Installation Installation Procedures... 2 Installation Opening...
 CONTENTS Precautions... 1 Lithium Battery Cell Warnings... 1 Take Precaution...1 Installation...2-3 Installation Procedures... 2 Installation Opening... 2 Wiring Connections... 3 Remove of the Main Unit...
6 Track/Folder Navigation... 6 Mute... 6
 CONTENTS Precautions... 1 Lithium Battery Cell Warnings... 1 Use Cautions...1 Installation... 2 Installation Procedures... 2 Installation Opening... 2 Wiring Connections... 3 Uninstall the Main Unit...
CONTENTS. Store/Recall Preset Stations (1-6) Next/Previous Track...
 Next/Previous Track...") CONTENTS Precautions... 1 Lithium Battery Cell Warnings... 1 Use Cautions...1 Installation...2 Installation Procedures...2 Installation Opening... 2 Wiring Connections... 3 Remove of the Main Unit... 3
CONTENTS Precautions... 1 Lithium Battery Cell Warnings... 1 Use Cautions...1 Installation...2 Installation Procedures...2 Installation Opening... 2 Wiring Connections... 3 Remove of the Main Unit... 3
PRECAUTIONS. How to Handle Discs. Lithium Battery Cell Warnings
 CONTENTS Precautions... 1 How to Handle Discs... 1 Lithium Battery Cell Warnings... 1 Installation... 2 Prepare Radio... 2 Mount Radio... 2 Wiring Connections... 3 Uninstall the Main Unit... 4 Control
CONTENTS. Store/Recall Preset Stations (1-6)... 5 Next/Previous Track...
... 5 Next/Previous Track...") CONTENTS Precautions... 1 Lithium Battery Cell Warnings... 1 Use Cautions...1 Installation... 2 Installation Procedures... 2 Installation Opening... 2 Wiring Connections... 3 Uninstall the Main Unit...4
CONTENTS Precautions... 1 Lithium Battery Cell Warnings... 1 Use Cautions...1 Installation... 2 Installation Procedures... 2 Installation Opening... 2 Wiring Connections... 3 Uninstall the Main Unit...4
PRECAUTIONS. Lithium Battery Cell Warnings. Use cautions
 PRECAUTIONS Lithium Battery Cell Warnings Cell leakage may cause damage to the remote control. Do not throw cells into as this may cause an explosion. Keep battery cells out of reach of children. Use cautions
CONTENTS. Store/Recall Preset Stations (1-6) Next/Previous Track...
 Next/Previous Track...") CONTENTS Precautions... 1 Lithium Battery Cell Warnings... 1 Use Cautions...1 Installation... 2 Installation Precedures... 2 Installation Opening... 2 Wiring Connections... 3 Remove of the Main Unit...4
CONTENTS Precautions... 1 Lithium Battery Cell Warnings... 1 Use Cautions...1 Installation... 2 Installation Precedures... 2 Installation Opening... 2 Wiring Connections... 3 Remove of the Main Unit...4
PRECAUTIONS. Lithium Battery Cell Warnings. Use cautions. Cell leakage may cause damage to the remote control. Do not throw cells into
 CONTENTS Precautions... 1 Lithium Battery Cell Warnings... 1 Use Cautions...1 Installation... 2 Installation Precedures... 2 Installation Opening... 2 Wiring Connections... 3 Uninstall the Main Unit...
PRECAUTIONS. How to Handle Discs. Lithium Battery Cell Warnings
 CONTENTS Precautions... 1 How to Handle Discs... 1 Lithium Battery Cell Warnings... 1 Installation... 2 Prepare Radio... 2 Mount Radio... 2-3 Wiring Connections... 3 Removal of the Main Unit... 4 Control
Precautions... 1 Take Precaution...1 Installation Installation Procedures... 2 Installation Opening...
 CONTENTS Precautions... 1 Take Precaution...1 Installation... 2-3 Installation Procedures... 2 Installation Opening... 2 Wiring Connections... 3 Remove of the Main Unit...3 Control Panel Button Locations...
PRECAUTIONS. How to Handle Discs. Lithium Battery Cell Warnings
 PRECAUTIONS How to Handle Discs Handle a disc by its edges. Do not touch the playing side. Before inserting a disc, wipe the disc outward from the disc center with a clean, soft, dry and lint-free cloth.
To ensure safety while driving. and to comply with laws, drivers should not watch video or. operate the video device while driving.
 To ensure safety while driving and to comply with laws, drivers should not watch video or operate the video device while driving. INSTRUCTIONS CONTENTS General Information 1 Safety Notice 2 Accessories
CONTENTS. Fast Forward/Backward... Change Bands (BAND) Automatic Music Search (AMS)... 6 Track Search... Mute... 6
 Automatic Music Search (AMS)... 6 Track Search... Mute... 6") CONTENTS Precautions... 1 Lithium Battery Cell Warnings... 1 Use Cautions...1 Installation... 2 Installation Procedures... 2 Installation Opening... 2 Wiring Connections... 3 Uninstall the Main Unit...
CONTENTS Precautions... 1 Lithium Battery Cell Warnings... 1 Use Cautions...1 Installation... 2 Installation Procedures... 2 Installation Opening... 2 Wiring Connections... 3 Uninstall the Main Unit...
Accessories Unit Installation..03. Wire Connection 03. Parking Brake Connection 04. Speaker connection.05. Button Description.
 Content Accessories...02 Unit Installation..03 Wire Connection 03 Parking Brake Connection 04 Speaker connection.05 Button Description.06 Remote Control..07 Main Menu...09 Radio Operation.09 USB /SD Operation..10
PRECAUTIONS. How to Handle Discs. Lithium Battery Cell Warnings
 CONTENTS Precautions... 1 How to Handle Discs... 1 Lithium Battery Cell Warnings... 1 Installation... 2 Prepare Radio... 2 Mount Radio... 2-3 Wiring Connections... 3 Removal of the Main Unit...3 Control
Quick Reference Guide For
 Quick Reference Guide For GPS Navigation Model : VTG43/ VTG43A 1.Rear-view mirror 2.GPS navigation system 3.Bluetooth hands free system 4.Media center 5.Rear view visual system (with AV-IN) Clip the clamp
Register your product and get support at CEM2000. Quick Start Guide
 Register your product and get support at CEM2000 EN Quick Start Guide 1 a b c d e f g 2 3 4 5 B a b c d a a a b c d b b A e f c c g h d d 6 5mm 5mm Overview of parts 1 These are the supplied parts needed
AX1300BT SPECIFICATIONS: MECHLESS AM/FM MULTIMEDIA PLAYER RECEIVER BLUETOOTH w BUILT-IN SPEAKERS DESIGNED FOR AUSTRALASIAN CONDITIONS
 MECHLESS AM/FM MULTIMEDIA PLAYER RECEIVER BLUETOOTH w BUILT-IN SPEAKERS SPECIFICATIONS: GENERAL: Mechless Fixed Face Panel Ultra Memory Power Backup Built-In Speakers ISO DIN Mounting ISO Wiring harness
USER'S MANUAL 610UA MP3-COMPATIBLE DIGITAL MEDIA AM/FM RECEIVER BO S AUDIO SYSTEMS
 USER'S MANUAL 610UA MP3-COMPATIBLE DIGITAL MEDIA AM/FM RECEIVER BOS AUDIO SYSTEMS CONTENTS Precautions... 1 Lithium Battery Cell Warnings... 1 Take Precaution...1 Installation...2 3 Installation Procedures...
PRECAUTIONS. How to Handle Discs. Lithium Battery Cell Warnings
 CONTENTS Precautions... 1 How to Handle Discs... 1 Lithium Battery Cell Warnings... 1 Installation... 2 Prepare Radio... 2 Mount Radio... 2-3 Wiring Connections... 3 Removal of the Main Unit...3 Control
 6. To transfer the audio of a file played by Mobile Phone to the Car Audio Player If the mobile phone supports A2DP and could play audio or video files, when the Mobile Phone plays an audio (For some Mobile
CONTENTS. Fast Forward/Backward... 5 Change Bands (BAND)... 6 Automatic Music Search (AMS)...6 Track Search... 6 Mute... 6
... 6 Automatic Music Search (AMS)...6 Track Search... 6 Mute... 6") CONTENTS Precautions... 1 Lithium Battery Cell Warnings... 1 Use Cautions...1 Installation... 2 Installation Procedures... 2 Installation Opening... 2 Wiring Connections... 3 Uninstall the Main Unit...3
CONTENTS Precautions... 1 Lithium Battery Cell Warnings... 1 Use Cautions...1 Installation... 2 Installation Procedures... 2 Installation Opening... 2 Wiring Connections... 3 Uninstall the Main Unit...3
Precautions... 1 Take Precaution...1 Installation Installation Procedures... 2 Installation Opening...
 CONTENTS Precautions... 1 Take Precaution...1 Installation...2-3 Installation Procedures... 2 Installation Opening... 2 Wiring Connections...3 Removal of the Main Unit... 3 Overview of the Components...
INSTRUCTIONS INSTRUCTIONS CONTENTS ACCESSORY. DVD Parental control function. DVD Parental control function. Accessory. Quantity 1PC.
 CONTENTS Panel Introduction 02 Basic Functions 03 Remote Control Function 05 Turn the Unit On/Off 07 Enter into the Main Interface 07 Play SD card/usb memory device 07 Radio Function Operation 08 Disc
FUSION MS-RA70/MS-RA70N Installation Instructions
 FUSION MS-RA70/MS-RA70N Installation Instructions Important Safety Information WARNING Failure to follow these warnings and cautions could result in personal injury, damage to the vessel, or poor product
INSTALLATION METHOD. Press the RPT button twice to play the current folder repeatedly, and the. RPT ONE will be visible on the LCD.
 INSTALLATION METHOD This is an anti-theft installation method. The main unit wears a METAL MOUNTING SLEEVE. Please connect the wiring, eg, the Power supply, the Speakers and the Antenna according to the
PRECAUTIONS. How to Handle Discs. Lithium Battery Cell Warnings
 CONTENTS Precautions... 1 How to Handle Discs... 1 Lithium Battery Cell Warnings... 1 Installation... 2 Prepare Radio... 2 Mount Radio... 2-3 Wiring Connections... 3 Removal of the Main Unit...3 Control
WITH DUAL ( FRONT AND REAR) AND SD MEMORY CARD PORT AND SIDE PANEL AUX INPUT MEMORY CARD PORT AND SIDE PANEL AUX INPUT PWR
 AND SD MEMORY CARD PORT AND SIDE PANEL AUX INPUT MEMORY CARD PORT AND SIDE PANEL AUX INPUT PWR") WITH DUAL (FRONT AND REAR) USB AND SD MEMORY CARD PORT AND SIDE PANEL AUX INPUT PWR WITH DUAL ( FRONT AND REAR) USB AND SD MEMORY CARD PORT AND SIDE PANEL AUX INPUT 12-2012 CONTENTS Panel Introduction
WITH DUAL (FRONT AND REAR) USB AND SD MEMORY CARD PORT AND SIDE PANEL AUX INPUT PWR WITH DUAL ( FRONT AND REAR) USB AND SD MEMORY CARD PORT AND SIDE PANEL AUX INPUT 12-2012 CONTENTS Panel Introduction
TOYOTA YARIS HATCHBACK Preparation
 Preparation Part Number: PT546-52120 (Base Grade) Kit Contents 1 1 Receiver Assembly, Radio Unit 2 1 Owner s Manual 3 1 Hardware Bag NOTE: Part number of this accessory may not be the same as the part
To ensure safety while driving. and to comply with laws, drivers should not watch video or. operate the video device while driving.
 To ensure safety while driving and to comply with laws, drivers should not watch video or operate the video device while driving. R Congratulations on your purchase of a Boss Audio Systems Multimedia Receiver.
INSTRUCTIONS INSTRUCTIONS CONTENTS ACCESSORY. DVD Parental control function. Accessory. DVD Parental control function
 INSTRUCTIONS CONTENTS Panel Introduction 02 Basic Function 03 Remote Control Operation 04 Turn on/off Access main interface USB/SD Card Operation Radio Operation 07 Disc Operation 08 Play/Eject Disc 08
INSTRUCTION MANUAL. AM/FM Digital Tuning Radio W/ USB/SD/MP3 & Hands-Free Bluetooth + SEL 5 * 9 0 # T-M TEL CLEAR LOUD PTY TA AF RPT RDM EON TP POWER
 BND MOD AP INSTRUCTION MANUAL MIC LOUD PTY TA AF RPT RDM EON TP POWER A.P SCN DN MODE BND TOP 1 5 * MUTE + SEL CLK INT RPT 2 3 6 7 8 9 0 # T-M TEL CLEAR CAR AUDIO REMOTECONTR OLLER UP ST LOC LOUD RDM 4
PLMR7BTW OWNER S MANUAL. Mobile Audio System
 PLMR7BTW OWNER S MANUAL Mobile Audio System PLL Synthesizer Stereo Radio Automatic Memory Storing USB Interface SD Interface 3.5mm Input Jack Bluetooth Function 1 CONTENTS Installation... 3 Take out screw
Troubleshooting. Installation Instructions. Advisory Name. Recommended Description Check Antenna. Check Tuner. No Signal. Subscription Updated
 Troubleshooting The following information helps you self-diagnose common issues without the need for contacting SiriusXM support. Installation Instructions Advisory Name 1 Recommended Description Check
Specifications. General and Radio Controls
 General and Radio Controls 2 7 6 4 AUX IN BAND LOUDNESS Specifications Supply voltage : 12V DC(11V-15V) Current consumption : Less than 10A Audio Signal Output : 2ch line out Characteristics : (1) Frequency
INSTRUCTIONS CONTENTS
 INSTRUCTIONS CONTENTS Panel Introduction 02 Basic Function 03 Remote Control Operation 04 Turn on/off Access main interface USB/SD Card Operation Radio Operation 07 Disc Operation 08 Play/Eject Disc 08
WALLMOUNT Entertainment System
 Wiring Diagram AV IN AV OUT SUBWOOFER OUT HDMI JACK R R R L L L IR REMOTE JACK AUDIO IN ANTENNA WIRING CONNECTING SOCKET Specification GENERAL Supply Voltage Current Consumption Power Output Number of
Gauge Mount Radio PRIMARY FEATURES. Marine & Powersports Bluetooth Source Units
 R MUSIC.DEFINED. Gauge Mount Radio Marine & Powersports Bluetooth Source Units Thank you for choosing the MB Quart Nautic GMR Marine & Powersports Source Units. With proper installation, you are on the
INSTRUCTIONS Please read all instructions carefully before using
 INSTRUCTIONS Please read all instructions carefully before using CONTENTS 1.Basic Operation Panel Introduction 02 Remote control function 04 Turn the Unit On/Off 06 Access main interface 06 U Disc/SD Card
AM/FM/USB CD/MP3 PLAYER WITH BLUETOOTH
 INSTALLATION NOTES AM/FM/USB CD/MP3 PLAYER WITH BLUETOOTH 1. Please read these installation and operation instructions before installation. 2. Make sure to connect all other wires before power connection.
To ensure safety while driving. and to comply with laws, drivers should not watch video or. operate the video device while driving.
 To ensure safety while driving and to comply with laws, drivers should not watch video or operate the video device while driving. INSTRUCTIONS CONTENTS General Information 1 Safety Notice 2 Accessories
To ensure safety while driving. and to comply with laws, drivers should not watch video or. operate the video device while driving.
 To ensure safety while driving and to comply with laws, drivers should not watch video or operate the video device while driving. Congratulations on your purchase of a Planet Audio Multimedia Receiver.
Navigation interface for Jeep GC 5 RA2 NTV-KIT581
 3950 NW 120 th Ave, Coral Springs, FL 33065 TEL 561-955-9770 FAX 561-955-9760 NNG-Jeep GC Navigation interface for Jeep GC 5 RA2 NTV-KIT581 NNG-JEEP GC Kit Content 5 1 6 4 7 2 3 1. 2. 3. 4. 5. 6. 7. 8.
Coastal Electronic Technologies, Inc. GM LOCKPICK GMX-320 Installation and Operation Instructions
 Coastal Electronic Technologies, Inc. GM LOCKPICK GMX-320 Installation and Operation Instructions Thank you for your purchase of the Coastal Electronic Technologies, Inc. GM LOCKPICK GMX- 320. The GMX-320
INSTRUCTION MANUAL CD MP3 WMA USB SD AUX-IN
 NA305i Car Audio System Player INSTRUCTION MANUAL CD MP3 WMA USB SD AUX-IN ipod/iphone Safety WARNING Stop the car before operating the unit. Important to know... To prevent a short circuit, never put
Working power 11-16V DC Allowable,Negative Ground MPEG/AC-3 MPEG-4 O MPEG/AAC AVC X MPEG/AC-3 MPEG-1/2 O AAC AVC X
 PNV9650 SPECIFICATIONS Model No. PNV9650 General features DVD ±R/RW Audio & Video CD ±R/RW Audio & Video FM/AM Tuner (Switchable Tuner) USB Port SD Port (64GB Max) USB Charging (1A) A/V In/Out Rear Camera
USER S MANUAL. BV9362BI BLUETOOTH DVD/MP3/CD AM/FM RECEIVER FEATURING 6.2" (157 mm) WIDESCREEN TOUCHSCREEN DIGITAL TFT LCD MONITOR USER S MANUAL
 WIDESCREEN TOUCHSCREEN DIGITAL TFT LCD MONITOR USER S MANUAL") USER S MANUAL BV9362BI BLUETOOTH DVD/MP3/CD AM/FM RECEIVER USER S MANUAL BV9362BI BLUETOOTH DVD/MP3/CD AM/FM RECEIVER FEATURING 6.2" (157 mm) WIDESCREEN TOUCHSCREEN DIGITAL TFT LCD MONITOR BOSS Audio Systems
USER S MANUAL BV9362BI BLUETOOTH DVD/MP3/CD AM/FM RECEIVER USER S MANUAL BV9362BI BLUETOOTH DVD/MP3/CD AM/FM RECEIVER FEATURING 6.2" (157 mm) WIDESCREEN TOUCHSCREEN DIGITAL TFT LCD MONITOR BOSS Audio Systems
Accessories Unit Installation..03. Wire Connection 03. Parking Brake Connection 04. Speaker connection.05. Button Description.
 Content Accessories...02 Unit Installation..03 Wire Connection 03 Parking Brake Connection 04 Speaker connection.05 Button Description.06 Remote Control..07 Main Menu...10 Radio Operation.10 DVD Operation..11
INSTRUCTIONS PANEL INTRODUCTION. 1. / SRC button 2. IR 3. EQ button 4. MENU button 5. VOL / MUTE button 6. SD slot 7. USB slot 8.
 INSTRUCTIONS PANEL INTRODUCTION 1. / SRC button 2. IR 3. EQ button 4. MENU button 5. VOL / MUTE button 6. SD slot 7. USB slot 8. AUX slot 9. RESET 10. 11. 12. 13. 14. 15. Disk load slot BASIC FUNCTION
Disconnect the battery to ensure there will be no shorted wires during the installation procedure.
 The round-style headunit receiver radio features Bluetooth technology allowing music to wirelessly stream from your compatible Bluetooth-enabled device. Control the audio from a distance -- all from your
INSTALLATION. Remove the Old Unit from the Dashboard. DIN Front Mount. 1. Remove the outer trim frame.
 INSTALLATION Tools for Installation Use the 2 removal wrenches of the old unit to take out the old unit and place with this brand new car radio. The following tools and supplies may also be needed for
INSTRUCTION MANUAL CD MP3 WMA USB AUX-IN
 NA99i Car Audio System Player INSTRUCTION MANUAL CD MP3 WMA USB AUX-IN ipod/iphone Safety WARNING Stop the car before operating the unit. Important to know... To prevent a short circuit, never put or leave
INSTRUCTIONS INSTRUCTIONS PANEL INTRODUCTION
 INSTRUCTIONS INSTRUCTIONS Warning: To ensure safety while driving and to comply with laws, drivers should not watch video or operate the video device while driving. PANEL INTRODUCTION 1. PWR/VOL button
CINEMA SB200 powered soundbar speaker
 CINEMA SB200 powered soundbar speaker quick-start guide Thank You For Choosing This JBL Product The JBL Cinema SB200 powered soundbar speaker is a complete, integrated sound system that will dramatically
USER S MANUAL. BV9358B BLUETOOTH DVD/MP3/CD AM/FM RECEIVER FEATURING 6.2" (157 mm) WIDESCREEN TOUCHSCREEN DIGITAL TFT LED MONITOR USER S MANUAL
 WIDESCREEN TOUCHSCREEN DIGITAL TFT LED MONITOR USER S MANUAL") USER S MANUAL BV9358B BLUETOOTH DVD/MP3/CD AM/FM RECEIVER USER S MANUAL BV9358B BLUETOOTH DVD/MP3/CD AM/FM RECEIVER FEATURING 6.2" (157 mm) WIDESCREEN TOUCHSCREEN DIGITAL TFT LED MONITOR BOSS Audio Systems
USER S MANUAL BV9358B BLUETOOTH DVD/MP3/CD AM/FM RECEIVER USER S MANUAL BV9358B BLUETOOTH DVD/MP3/CD AM/FM RECEIVER FEATURING 6.2" (157 mm) WIDESCREEN TOUCHSCREEN DIGITAL TFT LED MONITOR BOSS Audio Systems
MARINE. Operation Manual. Model No.: MBB-3. Effective from 31 / May / x210mm
 MARINE Operation Manual Model No.: MBB-3 Effective from 31 / May / 07 145x210mm Mounting the Black Box 1. Precautions Choose the mounting location carefully so that the unit will not interfere with the
USER S MANUAL. BV9358B BLUETOOTH DVD/MP3/CD AM/FM RECEIVER FEATURING 6.2" (157 mm) WIDESCREEN TOUCHSCREEN DIGITAL TFT LED MONITOR USER S MANUAL
 WIDESCREEN TOUCHSCREEN DIGITAL TFT LED MONITOR USER S MANUAL") USER S MANUAL BV9358B BLUETOOTH DVD/MP3/CD AM/FM RECEIVER USER S MANUAL BV9358B BLUETOOTH DVD/MP3/CD AM/FM RECEIVER FEATURING 6.2" (157 mm) WIDESCREEN TOUCHSCREEN DIGITAL TFT LED MONITOR BOSS Audio Systems
USER S MANUAL BV9358B BLUETOOTH DVD/MP3/CD AM/FM RECEIVER USER S MANUAL BV9358B BLUETOOTH DVD/MP3/CD AM/FM RECEIVER FEATURING 6.2" (157 mm) WIDESCREEN TOUCHSCREEN DIGITAL TFT LED MONITOR BOSS Audio Systems
PLMR18 OWNER S MANUAL. Mobile Audio System.
 PLMR18 OWNER S MANUAL Mobile Audio System PLL Synthesizer Stereo Radio Automatic Memory Storing Preset Equalization USB/ SD Interface 3.5mm Jack input www.pyleaudio.com 1 CONTENTS Installation... 3 Take
Accessories Unit Installation..03. Wire Connection 03. Parking Brake Connection 04. Speaker connection.05. Button Description..
 Content Accessories...02 Unit Installation..03 Wire Connection 03 Parking Brake Connection 04 Speaker connection.05 Button Description..06 Remote Control..07 Main Menu...10 Radio Operation.10 DVD Operation..11
CD / SD / USB / MP3 / AM / FM / BLUETOOTH RECEIVER QA30BT CD / SD / USB / MP3 / AM / FM / BLUETOOTH RECEIVER MP3 / WMA CALLS & MUSIC STREAMING
 TM CD / SD / USB / MP3 / AM / FM / BLUETOOTH RECEIVER MODE SD USB AMS RST QA30BT MUTE BND CLK 1/ 2/INT 3/RPT 4/RDM 5 6 AUX QA30BT CD / SD / USB / MP3 / AM / FM / BLUETOOTH RECEIVER Bluetooth MP3 / WMA
Entertainment System. Specification GENERAL SCREW SCREW PLASTIC FRAME OF THE FRONT PANEL. Current Consumption FM SECTION
 SCREW Specification GENERAL Supply Voltage Current Consumption Power Output Number of channels Unit Dimensions FM SECTION Frequency range Effective sensitivity I.F Frequency DC 12V Max.5A 2x 20W RMS 2
1. INSTALLATION. Trim Plate. Bend the appropriate tabs to hold the sleeve firmly in place.
 0 R - 0 0896 . INSTALLATION The following illustration shows a typical installation. If you have any questions or require information regarding installation kits, consult your customer car audio dealer
ADDITIONAL CAM POWER REVERSE CAM POWER BLUETOOTH MUTE AUDIO + IN AUDIO - IN 12V ACC OUTPUT 12V CONSTANT GROUND
 UNPLUG ORIGINAL RADIO CONNECTORS THEN PLUG IN HERE PLUG AND PLAY NO OTHER CONNECTIONS ARE NECESSARY USE HANDSFREE KIT MICROPHONE IPOD/IPHONE/ITOUCH/IPAD CONNECTION USB INPUT ADD YOUR BLUETOOTH HANDSFREE
NNG Toyota 3/3s Navigation System for select Toyota NTV-KIT553/598
 3950 NW 120 th Ave, Coral Springs, FL 33065 TEL: 561-955-9770 FAX: NNG Toyota 3/3s Navigation System for select Toyota NTV-KIT553/598 NNG-Toyota 3/3s Kit Content 1 4 9 5 6 2 3 8 1. 2. 3. 4. 5. 6. 7. 8.
ipod + MP3 INSTRUCTION MANUAL ipod touch 8G, 16G ipod classic 80G, 160G AQ-DM-2B Keep Dry
 R ipod + MP3 INSTRUCTION MANUAL ipod nano 3G 4G, 8G ipod touch 8G, 16G ipod classic 80G, 160G ipod 5G 30G, 60G, 80G AQ-DM-2B Model AQ-DM-2B Water/Dust Proof MP3/iPod Digital Media Locker With Floating
W205-RVC NTV-KIT580. Overview
 3950 NW 120 th Ave, Coral Springs, FL 33065 TEL 561-955-9770 FAX 561-955-9760 www.nav-tv.com info@nav-tv.com W205-RVC NTV-KIT580 Overview The W205-RVC Kit allows the user to add a backup camera input (with
Apollo MANUAL. This package includes 4 components: Main unit. Rotating sunvisor clip. Car Charger. Plastic Clip adaptor. Page 2.
 ENGLISH Page 1 Apollo MANUAL Thank you for selecting The Apollo Bluetooth portable handsfree car kit. It is a rechargeable speakerphone which is easy to operate and portable to use anywhere. It is specially
Installation Instructions
 Installation Instructions 1 2 3 4 6 7 5 Instructions: 1. Install jamb nuts (4) loosely on mounting studs (3), so they will not touch mounting brackets (5) when installed. 2. Slip mounting bracket (5) on
CAR MULTIMEDIA OSLO 370 DAB
 Subject to availability and technical modification. CAR MULTIMEDIA OSLO 370 DAB Sales Start JULY 2017 Order Number 2 002 017 000 003 EAN-Code 4260 499 850 302 Highlights High-End CODEM Automotive Tuner
1080P. FULL HD DVR mirror. User manual
 1080P FULL HD DVR mirror User manual Features General Description 1080P DVR mirror is the updated version of 720P DVR mirror. It has a front camera with wide angle which is 40% wider than normal one. And
USER S MANUAL. BV9371BD BLUETOOTH DVD/MP3/CD AM/FM RECEIVER FEATURING DETACHABLE 6.2" (157 mm) WIDESCREEN TOUCHSCREEN DIGITAL TFT LED MONITOR
 WIDESCREEN TOUCHSCREEN DIGITAL TFT LED MONITOR") USER S MANUAL BV9371BD BLUETOOTH DVD/MP3/CD AM/FM RECEIVER USER S MANUAL BV9371BD BLUETOOTH DVD/MP3/CD AM/FM RECEIVER FEATURING DETACHABLE 6.2" (157 mm) WIDESCREEN TOUCHSCREEN DIGITAL TFT LED MONITOR BOSS
USER S MANUAL BV9371BD BLUETOOTH DVD/MP3/CD AM/FM RECEIVER USER S MANUAL BV9371BD BLUETOOTH DVD/MP3/CD AM/FM RECEIVER FEATURING DETACHABLE 6.2" (157 mm) WIDESCREEN TOUCHSCREEN DIGITAL TFT LED MONITOR BOSS
4 x 8 DSP DIGITAL SIGNAL PROCESSOR FOR HOME AND CAR AUDIO. Model: DSP-408 User Manual
 4 x 8 DSP DIGITAL SIGNAL PROCESSOR FOR HOME AND CAR AUDIO Model: DSP-408 User Manual Table of Contents 2. Table of Contents 3. Product Overview/General Safety Instructions/Box Contents 4. DSP Features
CAR RADIO SAN MARINO 500
 CAR RADIO SAN MARINO 500 Operating and Installation Instructions CAUTIONS Safety Notes This car radio has been manufactured according to established safety guidelines. However, dangers may still occur
Parts Identification Page 1 Vehicle Preparation Page 3 Programming Switch Settings Page 3 Installation Page 4. Form #5420,
 SoftTouch Navigation System 250-7613 2012-2013 Toyota Camry Installation Instructions General Applicability: Toyota 2012-2013 Prius/Prius V, 2013 Venza, 2013 Avalon, 2013 Highlander, 2013 Tacoma For video
INSTRUCTIONS CONTENTS
 0514 CONTENTS INSTRUCTIONS Panel Introduction 02 Basic Function 03 Remote Control Operation 05 Turn on/off Host Access main interface USB/SD Card Operation Radio Operation 08 Disc Operation 09 Play/Eject
FDS3NAV2. For Ford Vehicles Equipped With SYNC3. Installation Instructions. Calibration and Setup Guide. Page 1 of 14
 FDS3NAV2 For Ford Vehicles Equipped With SYNC3 Installation Instructions Calibration and Setup Guide Page 1 of 14 Please read this manual thoroughly before installation. This manual illustrates a typical
USER S MANUAL P9630B USER S MANUAL P9630B.
 USER S MANUAL USER S MANUAL P9630B BLUETOOTH DVD/MP3 AM/FM RECEIVER 6.2" (157 mm) WIDESCREEN TOUCHSCREEN DIGITAL TFT LED MONITOR www.planetaudiousa.com TELEPHONE 888-990-1236 US Toll-free 805-751-4854
Canon PowerShot SD850 IS Camera Lens Replacement
 Canon PowerShot SD850 IS Camera Lens Replacement Rédigé par: Peter Tran ifixit CC BY-NC-SA fr.ifixit.com Page 1 de 13 INTRODUCTION Use this guide to remove a broken camera lens from your Canon PowerShot
GSMR30 OWNER S MANUAL
 GSMR30 OWNER S MANUAL Version 1.0 MP4/MP3/Photo Playback Gauge Series Marine Radio FEATURES 4 Channel Full Range, Class A/B 45W x 4 @ 4Ω IPX5 Water proof INPUTS AND OUTPUTS Bluetooth Audio Streaming Easy
Precautions...1 Lithium Battery Cell Warnings... 1 Take Precaution...1 Installation Installation Procedures... 2 Installation Opening...
 CONTENTS Precautions...1 Lithium Battery Cell Warnings... 1 Take Precaution...1 Installation...2-3 Installation Procedures... 2 Installation Opening... 2 Wiring Connections...3 Removal of the Main Unit...3
NNG-Toyota 6. Navigation interface for Toyota Sienna NTV-KIT625 BHM 11/02/15 NTV-DOC237
 3950 NW 120 th Ave, Coral Springs, FL 33065 TEL 561-955-9770 FAX 561-955-9760 NNG-Toyota 6 Navigation interface for 15-16 Toyota Sienna NTV-KIT625 BHM 11/02/15 NTV-DOC237 Toyota 6 navigation system application
FUSION MS-UD/AV650/755 Installation Instructions
 FUSION MS-UD/AV650/755 Installation Instructions Important Safety Information WARNING Failure to follow these warnings and cautions could result in personal injury, damage to the vessel, or poor product
USER S MANUAL P9640B USER S MANUAL P9640B.
 USER S MANUAL USER S MANUAL P9640B BLUETOOTH DVD/MP3 AM/FM RECEIVER 6.2" (157 mm) WIDESCREEN TOUCHSCREEN DIGITAL TFT LED MONITOR www.planetaudiousa.com TELEPHONE 888-990-1236 US Toll-free 805-751-4854
FN-MAZDA3 Installation Manual
 Manual Version: V20150401 FN-MAZDA3 Installation Manual Product Name: FN-Mazda3 Product Type: Interface with build in navigation Application: All Mazda 2014/2015 cars with new Mazda Connect systems What's
Automotive Navigation System
 Automotive Navigation System User s Manual Please read user manual carefully before installation Contents Standard accessories---------------------------------------------------------2 Quick guide for
INSTRUCTION MANUAL LTC CDD SUPPORT USB/SD INTERFACE AND FRONT AUX ipod/iphone FULL CONTROL RDS MP3/WMA PLAYER/RECEIVER
 INSTRUCTION MANUAL LTC CDD-080 SUPPORT USB/SD INTERFACE AND FRONT AUX ipod/iphone FULL CONTROL RDS MP/WMA PLAYER/RECEIVER MODE MUTE LOCAL EQ ESC XBS INFO ipod CTR AUDIO MENU . INSTALLATION. CONNECTING
NNG-Ford V1 NTV-KIT558. Navigation interface for FORD vehicles equipped with 8.4 MyTouch NTV-DOC218
 3950 NW 120th Ave, Coral Springs, FL 33065 TEL 561-955-9770 FAX 561-955-9760 NNG-Ford V1 Navigation interface for FORD vehicles equipped with 8.4 MyTouch NTV-KIT558 NTV-DOC218 SoftTouch Navigation System
FUSION MS-UD/AV650/755 Installation Instructions
 FUSION MS-UD/AV650/755 Installation Instructions Important Safety Information WARNING Failure to follow these warnings and cautions could result in personal injury, damage to the vessel, or poor product
BMW12-DYNAMIC KIT NTV-KIT462
 3950 NW 120 th Ave, Coral Springs, FL 33065 TEL 561-955-9770 FAX 561-955-9760 www.nav-tv.com info@nav-tv.com BMW12-DYNAMIC KIT NTV-KIT462 Overview The BMW12 kit allows the user to add up to 3 video inputs
USER S MANUAL. SD726MB BLUETOOTH DVD/MP3/CD AM/FM RECEIVER FEATURING 7" (178 mm) MOTORIZED WIDESCREEN TOUCHSCREEN DIGITAL TFT LCD MONITOR SD726MB
 MOTORIZED WIDESCREEN TOUCHSCREEN DIGITAL TFT LCD MONITOR SD726MB") SOUND STORM LABORATORIES 3451 Lunar Court, Oxnard CA 93030 TECHNICAL ASSISTANCE www.soundstormlab.com/customer-support 888-387-8676 US Toll-free 805-751-4855 Customer Service USER S MANUAL SD726MB BLUETOOTH
SOUND STORM LABORATORIES 3451 Lunar Court, Oxnard CA 93030 TECHNICAL ASSISTANCE www.soundstormlab.com/customer-support 888-387-8676 US Toll-free 805-751-4855 Customer Service USER S MANUAL SD726MB BLUETOOTH
GMNAV1 Advent Integrated Navigation
 GMNAV1 Advent Integrated Navigation This interface is designed to integrate Navigation into select Buick and Chevrolet Systems. INSTALLATION MANUAL What s in the Box The following items are supplied with
INSTALLATION. Remove the Old Unit from the Dashboard. DIN Front Mount. 1. Remove the outer trim frame.
 INSTALLATION Tools for Installation Use the 2 removal wrenches of the old unit to take out the old unit and place with this brand new car radio. The following tools and supplies may also be needed for
GM3x-HF Installation Guide for GM Class II Radios with XM Tuner
 Courtesy of:discountcarstereo.com Driving without distraction is a necessity for a safer driving experience GM3x-HF Installation Guide for GM Class II Radios with XM Tuner Created July 19, 2016 Revised:
Courtesy of:discountcarstereo.com C5CD-HF. Quick Start Bluetooth Installation Guide for select Corvette with 12-Disc CD Changer
 Courtesy of:discountcarstereo.com C5CD-HF Quick Start Bluetooth Installation Guide for select 1997-04 Corvette with 12-Disc CD Changer Created January 16, 2013 Revised March 12, 2019 Introduction: If your
Contents. PyleAudio.com 1. Thank you for choosing Pyle Audio!
 Thank you for choosing Pyle Audio! To enjoy of the unit's features, along with proper and safe operation, please be sure to read through this manual before use. It is especially important to thoroughly
Model No.: MIL-MR70BT
 Model No.: MIL-MR70BT This product is sold and serviced exclusively by Prospec Electronic Inc. and must be returned to Prospec for in and out of warranty repairs. It can not be serviced under warranty
INSTALLATION INSTRUCTIONS FOR PART HYKIA-01 HYKIA-01. *Read Important Warning on page 1 before attempting any installation*
 6 2.5 ISO 1.5 M4 M5 M3 WIRE CUTTER INSTALLATION INSTRUCTIONS FOR PART HYKIA-01 HYKIA-01 *Read Important Warning on page 1 before attempting any installation* Hyundai and Kia 2010-up SPDIF amplifier interface
OWNER S MANUAL 810DBI. Mobile Audio System
 810DBI OWNER S MANUAL Mobile Audio System PLL Synthesizer Stereo Radio Automatic Memory Storing Detachable Control Panel RBDS Operation Bluetooth Hands-free function & A2DP (Advanced Audio Distribution