Getting Started Guide. AT&T Tilt
|
|
|
- Preston Wells
- 5 years ago
- Views:
Transcription


1 Getting Started Guide AT&T Tilt
2 Table of Contents Set Up Your AT&T Tilt 4 What s in the Box? 4 Insert Battery 5 Insert SIM Card 6 Charge the Battery 7 Get to Know Your AT&T Tilt 8 Get to Know Your AT&T Tilt 8 Learn to Navigate and Type 10 Check Your Wireless Connection 14 Use the Phone 15 Make a Phone Call 15 Set Up Your Voic 16 Use Text/Multimedia Messaging & IM 17 Send a Text/Multimedia Message 17 Instant Messaging 18 Browse the Web and Shop Online 19 Go to Web Pages 19 AT&T MEdia TM Net 20 AT&T MEdia TM Mall 21 Set Up Your 22 Set Up 22 Personal Setup with Xpress Mail 23 Send and Receive Personal 25 Corporate Setup 26 2 AT&T Tilt
3 Sync Your Device with Your PC 28 Set up and Sync Using ActiveSync 28 Set up and Sync Using Windows Mobile Device Center 29 Push to Talk 30 Set Up Push to Talk 30 Add a Push to Talk Contact 31 Make a Push to Talk Call 32 Listen to Music & Watch TV & Video 33 AT&T Mobile Music 33 Transfer Music & Video to Your Device 34 CV (video) 35 Use the Camera 36 Take and Send a Picture 36 Take and Send a Video 37 Office Mobile 38 Microsoft Office Mobile 38 Manage Contacts and Appointments 39 Add a Contact 39 Schedule an Appointment 41 Frequently Asked Questions 42 Tips and Tricks 44 AT&T Tilt 3


4 Set Up Your AT&T Tilt What s in the Box? Remove the following items from the box to help you set up your AT&T device. Getting Started CD Includes User Manual, Getting Started Guide, Microsoft ActiveSync, and Warranty information for your AT&T device. AC Charger USB Sync Cable AT&T Tilt Rechargeable Battery Extra Stylus 4 AT&T Tilt
5 Insert Battery 1. Remove battery cover by pressing down and sliding away from you as shown in the illustration. Steps? 4 Takes? 1 minute 2. Insert the battery so that its exposed copper contacts are aligned with the copper conductors on the upper right side of the battery compartment. BATTERY Tip: Your battery comes partially charged. To find out how to charge your device, see Charge the battery section later in this document. 3. Insert the right side of the battery first, then gently push the battery into place. 4. Place the cover back on the device and slide it toward you until it clicks. AT&T Tilt 5
6 Insert the SIM Card Steps? 5 Takes? 1 minute Tip: You ll also see an illustration on how to insert the SIM card on the SIM card door. 1. Make sure your device is turned off. 2. Slide out the hardware keyboard. 3. Slide the SIM card door lock to the left and then open the SIM card door. 4. Hold the SIM card with its gold contacts facing down and its cut-off corner facing toward outside of the slot. Insert the SIM card by sliding it into the slot. 2 3 LOCK 4 5. After inserting the SIM card, close the SIM card door and then lock it by sliding the lock to the right. 6 AT&T Tilt
7 Charge the Battery New batteries are shipped partially charged. Before you start using your device, it is recommended that you install and charge the battery. Some batteries perform best after several full charge/discharge cycles. You can charge the battery in two ways: Charging the device s battery by connecting the power adapter. Connecting your device to a PC via the provided USB Sync cable. Charging is indicated by a solid amber light on the left LED indicator. As the battery is being charged while the device s power is on, a charging icon ( ) will be shown on the Today screen. After the battery has been fully charged, the left LED becomes green and a full battery icon ( ) appears on the Today screen. Note: Only the AC adapter and USB cable provided with your device should be used to charge the device. Warning: Do not remove the battery from the device while you are charging it using the AC or car adapter. As a safety precaution, the battery stops charging when it overheats. AT&T Tilt 7
 and hold (about 3 seconds) to turn on your device Takes?")
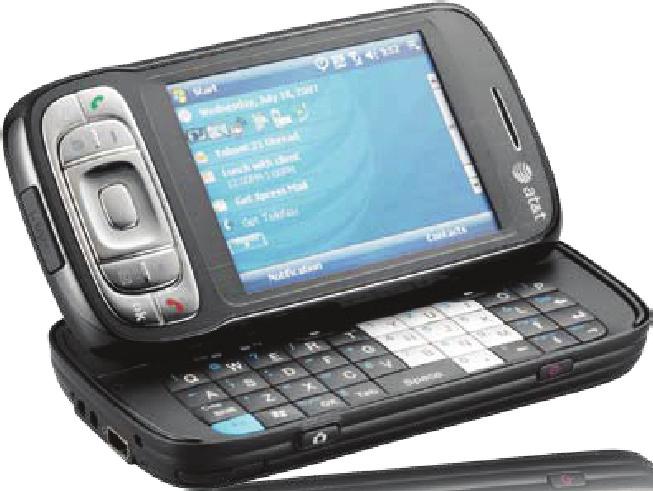
8 Get to Know Your AT&T Tilt Get to Know Your AT&T Tilt Note: To turn your device off, press POWER and hold (about 5 seconds). Turn On Your AT&T Tilt Press the power button ( ) and hold (about 3 seconds) to turn on your device Takes? 7 minutes Align Your Screen When you turn on your device for the first time, you will be asked to complete a screen calibration process. Use your stylus to tap the crosshairs and follow the on screen prompts. The initialization process takes about three minutes and when it s complete your device will display the Today screen. POWER Stylus 8 AT&T Tilt

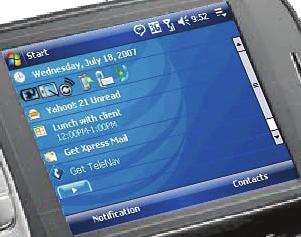
9 Take a few minutes now to familiarize yourself with the general navigation of your AT&T Tilt. The steps for accessing menus and entering information will be used consistently across many of the device s functions. The Today Screen The Today screen displays important information, such as upcoming appointments and status indicators. You can tap a section on the touchscreen to open the associated program. Tap Start to see a list of programs, recently used applications, settings, and help. Sleep Mode Your device will go to sleep mode after 30 seconds or more of inactivity. Sleep mode suspends your device to a low power state while the display is off in order to save battery power. You will still be able to receive messages and calls while your device is in Sleep mode. Pressing the POWER button again or new incoming calls/ messages will wake up your device. Note: You can customize your Tilt s Today screen, including the background image by tapping Start > Settings > Personal tab > Today. Tip: You can change how long before your device goes into sleep mode by tapping Start > Settings > System > Backlight > Battery Power. AT&T Tilt 9
10 Learn to Navigate and Type Check out the Jog Wheel Scroll up or down to navigate through menus, program instructions; press the wheel to carry out selection. Slide Open the Keyboard Slide the device s main screen to the left to reveal the keyboard. During a call or playing music, scroll up or down to adjust the sound volume. When receiving an incoming call, scroll down to decrease the audio notification volume. Jog Wheel After sliding out the keyboard, tilt the angle of the device display to minimize glare and reflection. Refer to the Adjust the display angle section of your User Manual (on the CD) for details. 10 AT&T Tilt
 to open a menu where you can select a text input method and customize input options.")

11 Enter Information When you start a program or select a field that requires text or numbers, the Input Panel icon becomes available on the menu bar. Tap the Input Selector arrow (that appears next to the Input Panel icon) to open a menu where you can select a text input method and customize input options. After selecting a text input method, the corresponding Input Panel is then displayed and you can use it to enter text. To toggle between showing and hiding the Input Panel, simply tap the Input Panel icon. Input Panel (Keyboard) Input Panel icon Input Selector arrow Note: Some text input methods may not be available in certain language versions of the device. For more information, please refer to Chapter 2 of the User Manual (on the CD). AT&T Tilt 11
12 Type on the Keyboard Press the Left/Right SOFT KEY ( above the key. ) to perform the command shown in the label To type lowercase letters, press the keys using your thumbs or fingers. To use all uppercase letters, press first, then press. To change back to all lowercase letters, press again. To use a single uppercase letter, press and then press the corresponding key. To enter a number or symbol (labeled at the upper left of each key in blue), press and then press the corresponding key. Press twice to enter all numbers or symbols. To open the Symbol Pad, press and then press. Press Press to verify your data entries or exit the program in use. to open the Start menu. For directional movement, press the arrow keys. 12 AT&T Tilt

13 AT&T Tilt 13
14 Check your Wireless Network Connection More help? Refer to Chapter 10 of the User Manual (on the CD) for more information about wireless network connections. Verify if your device is connected to a wireless network by checking the signal strength icon and the data connection icon on the title bar of the device screen. Connection Status Indicators GPRS available. EDGE available. UMTS available. HSDPA available. Maximum signal strength. No signal. Phone is turned off. No wireless service. 14 AT&T Tilt
. AT&T Tilt Enter the phone number Tap Talk Steps? 3 Takes?")
15 Use the Phone Make a Phone Call 1. From any screen, press the green phone button (TALK) to open the Phone screen. 2. On the Phone screen, tap the desired phone number using the Phone keypad. 3. Tap Talk or press the green phone button (TALK). AT&T Tilt Enter the phone number Tap Talk Steps? 3 Takes? 1 minute Tip: You can also use your slide out keyboard to enter the phone number you wish to dial. Did you know? You can maintain your data connection when connected to a voice call. You can quickly access numbers in your call history log by tapping the Call History icon ( ) on the Today screen. 15
16 Set Up Your Voice Mail Steps? 3 Takes? 1 minute From any screen, press the green phone button, then tap and hold the 1 key for several seconds. You will be connected to the voic system, which will then ask you to: 1. Create your password. 2. Record your name. 3. Record a greeting. Check Your Voice Mail Messages From Your Device 1. Press and hold the 1 key. 2. Follow the voice prompts. Check Your Voice Mail Messages from Other Phones (All locations except Puerto Rico) 1. Dial your 10-digit wireless number. 2. Press the * key when you hear your personal greeting. 3. Enter your personal pass code. 4. Follow the voice prompts. (For Puerto Rico, press the # key in step 2.) 16 AT&T Tilt

17 Use Text/Multimedia Messaging and IM Send a Text/Multimedia Message Your device is capable of sending and receiving , text messages (SMS), and Multimedia (MMS) messages as long as your device is connected to the network. Compose and send a text message 1. Tap the New Text Message icon on the Today screen. 2. Slide open the keyboard to enter text and numbers. 3. Enter the mobile phone number of one or more recipients, separating them with a semicolon. To access mobile phone numbers from Contacts, tap To. 4. Enter your message. To quickly add common messages, tap Menu > My Text and tap a desired message. To check the spelling, tap Menu > Spell Check. 5. Tap Send. Steps? 5 Takes? 1 minute Tip: If you want to know when a text message is received, before sending the message that you are composing, tap Menu > Message Options then select the Request message delivery notification check box. AT&T Tilt 17

18 Instant Messaging If you subscribe to an instant messaging (IM) service, such as Yahoo!, AOL, or Windows Live, you can take the convenience and fun of IM on the go with your Tilt Steps? 3 Takes? 3 minutes Tip: Refer to Type on the Keyboard section on page 12 for information on entering symbols. Sign In 1. On the Today screen, tap Instant Messaging. 2. Tap the icon for your desired IM service. 3. Enter your user name and password and tap Sign In. Add an IM Contact 1. Tap the group that you want to add the contact to. 2. From the IM main screen, tap Menu > Add Contact. 3. Type in the ID of the contact you wish to add and then tap Add. 18 AT&T Tilt
 on your phone. 2. In the address bar that appears at the top of the screen, enter the URL you want to connect to. 3.")
19 Browse the Web and Shop Online Go to Web Pages Use Internet Explorer Mobile to directly access the wireless web on your device. Use MEdia Net to access AT&T s premium content service. Browse the Internet 1. Press the Internet Explorer Mobile Quick key ( ) on your phone. 2. In the address bar that appears at the top of the screen, enter the URL you want to connect to. 3. Tap the green arrow or press ENTER. Steps? 3 Takes? 2 minutes Tip: If you do not have a data plan associated with your phone go to wireless.att. com/support or call 611 from your wireless phone ( from a landline) to add, upgrade, or change your data plan. For functions such as web browsing and , AT&T recommends a data rate plan, a feature you can add to your account, so that you are not charged for web browsing and on a pay per session/use basis. AT&T Tilt 19

20 Steps? 3 Takes? 2 minutes Important Note: On your device, you can also look up information on the Web while you re on a call. AT&T MEdia TM Net MEdia Net is the AT&T content service for multimedia options like ringtones, games and other cool content. Browse MEdia Net 1. Press the Internet Explorer Mobile Quick key ( ) on your phone. 2. Tap Favorites. 3. Tap Media Net on the screen. Personalize your MEdia Net Home Page 1. From MEdia Net home page, tap Customize MEdia Net. 2. Tap Edit Categories. 3. Select the categories you would like to appear on your home page. 4. Tap Save. 20 AT&T Tilt

21 AT&T MEdia TM Mall AT&T Mall is your launch pad for shopping for several types of content for your device, like applications, games, graphics, ringtones and other multimedia content. Accessing AT&T Mall 1. From the Today screen, tap Start > Programs > AT&T Mall. 2. Tap the icon on the screen for the type of content you are interested in. Steps? 2 Takes? 2 minutes Important Note: On your device, you can also look up information on the Web while you re on a call. AT&T Tilt 21
22 Set Up Your Set Up Note: For functions such as web browsing and , AT&T recommends a data plan, a feature you can add to your account, so that you are not charged for web browsing and on a pay per session/use basis. Choose the best option for you Your device can connect to: Personal Accounts (like Yahoo!, AOL or Comcast) See the Personal Setup section on the next page to get started. Corporate Accounts (like Microsoft Exchange or Lotus Notes) >> Flip to page 26 of this guide to get started on Corporate Setup. If you do not have a data plan associated with your phone go to wireless.att. com/support or call 611 from your wireless phone ( from a landline) to add, upgrade, or change your data plan. 22 AT&T Tilt
. Microsoft Outlook Mobile (manual setup). AT&T recommends Xpress Mail because it: Automates the setup process.")
23 Personal Setup with Xpress Mail Personal accounts include accounts you have with services like Yahoo!, AOL or Comcast. There are two ways to get personal on your device: Xpress Mail (recommended). Microsoft Outlook Mobile (manual setup). AT&T recommends Xpress Mail because it: Automates the setup process. Includes features such as synchronization. (This means changes made on the device, including deletes, are automatically reflected in your personal account.) Xpress Mail (will work with the majority of services) 1. Tap Get Xpress Mail on the Today screen. 2. Tap Install Now to launch the Xpress Mail download site. 3. Tap Download Now on the download page. 4. Tap Yes (Open file after download should be checked) and then Yes again to continue. Steps? 12 Takes? 5 minutes AT&T Tilt 23
24 Note: If your provider is not listed on the two screens described here, go to wireless.att. com/xpressmail. 5. Tap OK to accept the license agreement. 6. Confirm your 10 digit mobile (cell) number (numbers only) and tap Next. 7. Select Portal or ISP and tap Next. 8. Choose your provider and tap Next. (If your provider is not listed, tap More to view an additional list of personal providers.) Tap Accept to agree to the ISP terms of use, if applicable. 9. Enter your User Name and Password and Tap Next to continue. 10. Tap Register and wait for the registration process to complete. 11. When the process is complete, tap OK when the message appears telling you the device has been successfully registered. Click on OK to go to your settings. 12. After successfully registering, your device will automatically display the Xpress Mail Settings screen. 24 AT&T Tilt

25 Send and Receive Personal 1. Tap the Inbox and select your provider. 2. To compose a new , tap Menu > New. 3. When you are finished composing your message, tap Send. Steps? 3 Takes? 1 minute Tip: Refer to Type on the Keyboard section on page 12 for information on entering text. AT&T Tilt 25
26 Corporate Setup Steps? 6 Takes? 7 minutes A Corporate account (like Microsoft Exchange or Lotus Notes) is an account managed by a company s IT organization. Xpress Mail can provide wireless access to your corporate from your device without support from IT. 1. Open Internet Explorer on your work computer and go to 2. Follow the instructions to install and connect Xpress Mail to your corporate account. 3. You will receive a notification message confirming that your software is installed and you are now connected to Xpress Mail. 4. Set up access to your corporate from your device by tapping the Xpress Mail icon on the Today screen. 5. When prompted, select Work > Professional Edition > Register Device. 6. Enter the name and password you created when you signed up on your computer to complete the process. Remember, the computer you use to access your corporate must remain on and connected to the corporate network. For help on this process, go to wireless.att.com/xpressmail or to the AT&T Web tutorials page. 26 AT&T Tilt
27 IT Managed IT managed means your company supports Microsoft Direct Push or BlackBerry Connect to enable wireless synchronization of corporate . You need to have an account established on that server by an IT administrator before you get set up. Microsoft Direct Push provides wireless access to your corporate Microsoft , contacts, calendar and tasks. Your Exchange Admin needs to enable Mobile Services on the Exchange Server. Activate a PDA Enterprise for Microsoft Direct Push data plan on your wireless account from AT&T before using Direct Push. BlackBerry Connect for Windows Mobile provides access to BlackBerry wireless push and more, including BlackBerry Enterprise Server for corporate and BlackBerry Internet Service for personal/isp . You will need to have a BlackBerry Connect data plan provisioned on your wireless service. To learn more, please visit att.com/blackberry. AT&T Tilt 27
28 Sync Your Device with Your PC Set up and Sync Using ActiveSync Steps? 7 Takes? 5 minutes Important: Do not connect your device to your PC until step #3. Tip: Syncing your device with your PC lets you synchronize Outlook e- mail, calendar, contacts and notes. It is also used to transfer documents, music, video and applications to and from your PC. If you are using Windows XP or other compatible Windows systems, the Getting Started CD that comes with your device contains Microsoft ActiveSync 4.5 or later. Follow the steps below to install and set up ActiveSync on Windows XP or other compatible Windows systems. 1. Insert the Getting Started CD into the CD drive of your PC. 2. Select Setup and Installation and follow the on-screen instructions to install ActiveSync. 3. After installation is completed, connect your device to your PC using the sync cable. 4. The Synchronization Setup Wizard automatically starts and guides you to create a synchronization relationship. Click Next to proceed. 5. To synchronize your device with your computer, clear the Synchronize directly with a server running Microsoft Exchange Server check box, and then click Next. 6. Select the information types that you want to synchronize, and then click Next. 7. Click Finish. When you finish the wizard, ActiveSync synchronizes your device automatically. For a list of compatible Windows systems, please go to: 28 AT&T Tilt

29 Set up and Sync Using Windows Mobile Device Center If you have Windows Vista you can use Microsoft Windows Mobile Device Center to easily sync with your computer. When you connect your device to your Windows Vista PC and start Windows Mobile Device Center for the first time, you will be asked to create a Windows Mobile partnership with your device. 1. Connect your device to your PC. Windows Mobile Device Center configures itself and then opens. 2. On the license agreement screen, click Accept. 3. On the Windows Mobile Device Home screen, click Set up your device. 4. Select the information types that you want to synchronize, and then click Next. 5. Enter a device name and click Set Up. When you finish the wizard, Windows Mobile Device Center synchronizes your device automatically. Steps? 5 Takes? 5 minutes Note: Some versions of Windows Vista come with Windows Mobile Device Center already installed. If Windows Mobile Device Center is not available on your Windows Vista, you can install it from the Getting Started CD that came with your device. AT&T Tilt 29
 service is initializing the phone. 1. Press the PTT button on the left side of the handheld. 2. Tap Yes when prompted to initialize PTT. 3.")
30 Push to Talk Set up Push to Talk Steps? 5 Takes? 4 minutes Your phone offers an exciting new Push to Talk (PTT) service. The first step in using the Push to Talk (PTT) service is initializing the phone. 1. Press the PTT button on the left side of the handheld. 2. Tap Yes when prompted to initialize PTT. 3. Type a name that is up to 20 characters (this will be your PTT user name) and tap OK. 4. Once the initialization process is complete (it may take several minutes), a message box will appear and then the Available icon will appear in the title bar. 5. You will receive a notification when the PTT service is initialized successfully. 30 AT&T Tilt

31 Add a Push to Talk Contact After initializing PTT, you must add individuals or groups to your PTT contact list before you can place a PTT call. Individuals and group members must subscribe to the AT&T PTT service. 1. On the Today screen, tap Start > Programs > Push to Talk. 2. On the PTT Menu screen, tap Add Contacts. 3. You may now enter the new contact s name and wireless number. Enter the number, press OK. 4. The phone will now send the invitation to your new contact. You will see an icon while the invitation is in progress. Steps? 4 Takes? 3 minutes AT&T Tilt 31

32 Make a Push to Talk Call Steps? 6 Takes? 3 minutes The Push to Talk feature allows you to talk to friends who have the same feature on their phones. 1. Press the PTT button located on the left side of the phone. 2. The PTT Contacts Screen will appear. Use the navigation keys to highlight the contact you would like to reach. 3. Press and hold the PTT button to establish a connection. 4. A moment later, your phone will sound a beep. You may begin talking. When the connection is established, your screen will change to include a timer for the duration of your connection. 5. Hold the key down while speaking and release it when you are not. 6. To end a PTT session, press END. You will be automatically disconnected if the call has no activity for 30 seconds. 32 AT&T Tilt

33 Listen to Music & Watch TV & Video AT&T Mobile Music AT&T Music provides the ultimate music experience with the push of the music button. Listen to your favorite music, watch the latest video, and stay in the know with music, news and more. Transfer and listen to your music with the integrated Music Player. Purchase and load tracks from digital music stores like Napster to your phone. Personalize with ringtones and Answer Tones under ShopMusic. Instantly ID the title and artist of a song with MusicID. Stream dozens of commercial free XM music stations with Streaming Music. On the Today screen, tap Start > Programs > AT&T Music. Highlight the application you wish to choose and press ENTER. Play Music 1. Open 1 Music Player from AT&T Music. 2. Tap Menu > Update Library. Tap Done once the library is updated. 3. Select My Music, All Music, scroll to the song you want to play, and tap Play. 4. Select the clip you want to play and press ENTER. AT&T Tilt Note: If you are downloading 50 or more songs to your handheld, it will most likely time-out. To correct this, please visit att.com/ WirelessTutorials. Select AT&T Tilt and look under FAQs. 33
34 Transfer Music & Video to Your Device Note: The number of music files you can store on your phone depends on the size and format options of the microsd card installed. To play a song, first copy some music files to your phone. To copy the songs to your phone, you will need the following: Music on your PC in one of these formats: MP3, WMA, AAC. A microsd card is preferable to copy songs to your phone for extra storage (32MB or larger is recommended). Windows Mobile Device Center or Microsoft ActiveSync software loaded onto your PC. During the setup process, choose Connect without setting up your device for Windows Mobile Device Center or click Cancel when the Sync Setup Wizard opens for ActiveSync. Windows Media Player 10 You are now ready to transfer music to your phone. Connect the phone to the PC via the USB Cable. On the PC, open Windows Media Player 10 and click on the Sync tab. Drag the MP3 or other music files you want to load on your phone to the Sync list. (You can move MP3, WMA, GCP, M4A, AWB, AMR, MID, MIDI, and RMI music files from your PC.) Click Start Sync to start loading the music files on to your phone. 34 AT&T Tilt

35 CV (video) CV (video) brings your phone to life. Watch news, sports, weather, and entertainment clips via AT&T s high-speed data network while on the go. 1. On the Today screen, tap Start > Programs > Cellular Video. Steps? 2 Takes? 1 minute 2. Once connected, select the program options you wish to view and press ENTER. AT&T Tilt 35
 to send it as an attachment. 5. Tap Send. 6. Compose the message with a subject and tap Send.")
36 Use the Camera Take and Send a Picture Steps? 6 Takes? 5 minutes 1. Press Camera button on lower right of the phone to turn on Camera. 2. Press Camera button again to take photo. 3. Tap on Mail icon. 4. Select Send via MMS to send it via MMS or Send via (if you have set up an account) to send it as an attachment. 5. Tap Send. 6. Compose the message with a subject and tap Send. 36 AT&T Tilt

37 Take and Send a Video 1. Press Camera button on lower right of the phone to turn on Camera. 2. Tap the arrow on the icon in the upper left corner of the screen to change the capture mode from Still to Video. 3. Press the Camera button to begin recording, press the Camera button again to stop. 4. Tap the Mail icon. 5. Choose an account on the Select an account screen. Select Multimedia Message (Messages) to send it via MMS or select Outlook to send it as an attachment via Compose the message with a subject and tap Send. Steps? 6 Takes? 5 minutes AT&T Tilt 37
38 Microsoft Office Mobile Microsoft Office Mobile Office Mobile consists of three applications that let you create, edit and view Microsoft documents. These three applications are: Microsoft Office Word Mobile is a streamlined version of Microsoft Word. Word documents created on your PC can be opened and edited on your device. You can also create and edit documents and templates in Word Mobile and save them as *.doc, *.rtf, *.txt, and *.dot files. Microsoft Office Excel Mobile makes it easy for you to open and edit Excel workbooks and templates created on your PC. You can also create new workbooks and templates on your device. Microsoft Office PowerPoint Mobile lets you open and view (not create) slide show presentations, *.ppt and *.pps formats, created on your PC. To open a Office Mobile program, do the following: From the Today screen, tap Start > Office Mobile and then select the Office Mobile program you want to open. 38 AT&T Tilt

39 Manage Contacts and Appointments Add a Contact To add a contact on your device, do the following: 1. From the Today screen, tap Start > Contacts. 2. Tap New, select Outlook Contact, and enter the contact information. 3. In the File as field, choose how you want the contact name to appear in the contact list. 4. When finished, tap OK. Steps? 6 Takes? 5 minutes Tip: By syncing with your PC, you can add your Outlook contacts onto your AT&T Tilt. AT&T Tilt 39
40 Schedule an Appointment Steps? 6 Takes? 5 minutes To schedule an appointment on your device, do the following: 1. From the Today screen, tap Start > Calendar. 2. Tap Menu > New Appointment. 3. Enter a name for the appointment. 4. Do one of the following: If it is a special occasion such as a birthday or a whole-day event, set the All Day option to Yes. If there is a time frame for the appointment, select the start and end dates and time. 5. Specify the type of category for your appointment, so that it can be grouped with other related appointments. Tap categories, then select a preset category (Business, Holiday, Personal, or seasonal), or tap New to create your own category. 6. When finished, tap OK to return to the calendar. 40 AT&T Tilt
41 Frequently Asked Questions How long should it take to charge my battery? Your battery can take up to 3 hours to fully charge using the AC charger. It will take much longer using the USB as that is the trickle charge function. Why won t my device power on? Your battery may be drained or is not seated correctly. Try removing and reinserting the battery. If no success, try charging the device using the AC Charger. You will see an Amber LED on the device if it is charging. What does a Hard Reset do and how is it performed? A Hard Reset restores the device to its default settings the way it was when you first purchased it and turned it on. Any programs you installed, data you entered, and settings you customized on the device will be lost. Only Windows Mobile software and other pre-installed programs will remain. To perform a hard reset: 1) Power the device ON 2) Press Start > Settings > System tab > Clear Storage. When I try to download a lot of songs, I always get timed out and the download stops. If you are downloading 50 or more songs to your handheld, the handheld may timeout. To bypass this: Select Start > Settings > Connections tab > USB to PC. Select the Enable advanced Network Functionality check box and tap OK. You may want to deselect this box if you are getting corporate , as it may cause issues with VPN s and servers. AT&T Tilt 41
42 When should I perform a Hard Reset? A Hard Reset should only be performed after all other troubleshooting options have been exhausted. What is needed to use the built in GPS on my device? All you need to use the built in GPS in the device is a subscription with a GPS provider and the GPS application installed on your device, Which GPS providers support my device? TeleNav is currently the only GPS solution that has been tested and certified for use with this device. How do I turn on/off Wi-Fi? Go to Wireless Manager (Start > Settings > Connections tab > Wireless Manager). Tap the WLAN (Wi-Fi) icon to turn Wi-Fi on/off. To enter in the Wi-Fi networks settings, go to Start > Settings > Connections tab > Wireless LAN and input the settings provided by the service provider. Why can t I connect to the internet when using Wi-Fi? The proxy server must be turned off in order to connect to Wi-Fi. You can change the proxy server setting by performing the following: Start > Settings > Connections Tab > Connections > Set up my proxy server. Ensure the box This network uses a proxy server to connect to the Internet is unchecked. 42 AT&T Tilt
43 Tips and Tricks Set an MP3 song as your ringtone 1. Copy the MP3 music file to the My Documents folder on your phone. 2. Tap Start > Settings > Phone. 3. In the Ring type list, select the MP3 song as your ringtone. Assign a ringtone to a contact 1. Tap Start > Contacts. 2. Tap a contact to open. 3. Tap Menu > Edit. 4. Scroll down and tap the Ring Tone field. 5. Select the desired ringtone. Assign a picture to a contact 1. Tap Start > Contacts. 2. Tap a contact to open. 3. Tap Menu > Edit. 4. Tap Select a picture in the Picture field. 5. Select the desired picture and tap OK. OR 1. Go to Start > Programs > Pictures & Videos. 2. Select the picture you want to assign. 3. Tap Menu > Save to Contact. 4. Choose the desired contact and tap Select. AT&T Tilt 43
44 Add / Remove items from the Today screen 1. Tap Start > Settings > Personal tab > Today. 2. On the Items tab, check / uncheck the items from the list. 3. Change the order of appearance by selecting the item and tapping Move up / Move down. Change the Today screen background 1. Tap Start > Settings > Personal tab > Today. 2. On the Appearance tab, check Use this picture as the background. 3. Tap Browse and navigate to the desired picture. 4. Tap to select the picture. Modify the date / time settings 1. Tap Start > Settings > System tab > Clock and Alarms. 2. Tap Home or Visiting. 3. Select the appropriate time zone and change the time or date. Assign programs to device shortcut buttons 1. Tap Start > Settings > Personal tab > Buttons. 2. On the Program Buttons tab, tap a button you want to reassign. 3. In the Assign a program box, tap the program or shortcut you want to assign. 4. Tap OK. 44 AT&T Tilt
45 The Bluetooth wordmark and logos are owned by the Bluetooth SID, Inc. and any use of such marks by Wireless is under license. Microsoft, Windows, Windows Mobile, Active- Sync, Excel, Internet Explorer, MSN, Outlook, PowerPoint, Windows Media and Word are registered trademarks or trademarks of Microsoft Corporation in the United States and/ or other countries. The GSM letter mark is a trademark of the GSM Association. MicroSD is a trademark of SD Card Association. The BlackBerry and RIM families of related marks, images, and symbols are the exclusive properties of Research in Motion Limited AT&T Knowledge Ventures. All rights reserved. AT&T and the AT&T logo are trademarks of AT&T Knowledge Ventures. AT&T Tilt September 2007 Getting Started Guide
46 Find More Information att.com/wirelesstutorials 91H M Rev.A
47 AT&T Tilt Features Jog Wheel SIM Card Slot (Open the keyboard to reveal the SIM) Push to Talk Button OK key Left soft key Talk button 5-Way Navigation Camera on the back (for AT&T Tilt only*) Touchscreen Right soft key End button Messaging Quick key Stylus Power Camera button Internet Explorer Mobile Quick key Sync connector/ Stereo headset jack microsd TM Card Slot *Note: The AT&T 8900 is a non camera version of the AT&T Tilt. All functionality is the same, except that the 8900 does not allow you to take pictures. However, you can view, send and receive pictures that you receive from another source.
48 Frequently Used Application Icons Icon Description ActiveSync Synchronize information between your device and a PC or the Exchange Server. Calendar Keep track of your appointments and create meeting requests. Contacts Keep track of your friends and colleagues. Instant Messaging This is the mobile version of instant messenger that supports multiple IM services, such as from AOL, Yahoo!, and Windows Live. Internet Explorer Mobile Browse Web and WAP sites as well as download new programs and files from the Internet. Messaging Send and receive , MMS, and text messages. Office Mobile Use the complete suite of Microsoft Office applications for your mobile device. Phone Make and receive calls, switch between calls, and set up conference calling. Push to Talk Provide you with a walkie-talkie like feature that allows you to instantly talk to the others by simply pressing one button. Windows Media Player Mobile Play back audio and video files. Wireless Manager Manage your device s connections (including Wi-Fi, GPRS, Bluetooth, Modem, and ActiveSync), turn the phone on or off, switch to ringer/ vibration mode, and enable or disable the Direct Push function.
Getting Started Guide
 Getting Started Guide Cingular 3125 C I N G U L A R M A K E S B U S I N E S S R U N B E T T E R Table of Contents Welcome to Cingular 2 What s in the Box? 2 Get To Know Your 3 Set Up Your 4 Insert Battery
Quick Start Guide C E 1 1 0
 Quick Start Guide Use your phone for more than just talking Music Player with External Touch Pad CV 1.3 Megapixel Camera with Video Record Video Share TM See User Manual for Spanish Instructions Additional
Quick Start Guide CU920. Use your phone for more than just talking Touch Screen AT&T Mobile TV Music Player 2.0 Megapixel Camera Video Share
 CU920 Quick Start Guide Use your phone for more than just talking Touch Screen AT&T Mobile TV Music Player 2.0 Megapixel Camera Video Share See User Manual for Spanish Instructions Additional charges may
Quick Start Guide C E 1 1 0
 Quick Start Guide Use your phone for more than just talking Music Player with External Touch Pad CV 1.3 Megapixel Camera with Video Record Video Share TM See User Manual for Spanish Instructions Additional
Quick Start Guide Use your phone for more than just talking
 Quick Start Guide Use your phone for more than just talking Mobile Email Cingular Video Cingular Music 1.3 Megapixel Camera Instant Messaging See User Manual for Spanish Instructions Additional charges
A quick guide to your. Xda Stellar
 A quick guide to your Xda Stellar Contents Section 1 Getting started 02 Install the SIM card 02 Install the MicroSD card 03 Installing the battery 04 To turn the device on or off 05 Synchronise your PDA
Quick Start Guide Use your phone for more than just talking
 Quick Start Guide Use your phone for more than just talking Music Player with 3D Stereo Sound Cellular Video 1.3 Megapixel Rotating Camera with Video Mobile Email Instant Messaging (IM) MEdia TM Net See
ipaq Glisten Quickstart
 ipaq Glisten Quickstart 1 Welcome to AT&T Use this Quickstart to get a brief overview of the major features and services available with your smartphone OR use our Interactive Web Tutorial available at
Quick Start Guide. Use your phone for more than just talking CV Music Player 2.0 Megapixel Camera with Video Record Video Share
 Quick Start Guide Use your phone for more than just talking CV Music Player 2.0 Megapixel Camera with Video Record Video Share See User Manual for Spanish Instructions Additional charges may apply. Visit
Quick Start Guide Use your phone for more than just talking
 Quick Start Guide Use your phone for more than just talking Music Player with 3D Stereo Sound Cingular Video TM 1.3 Megapixel Rotating Camera with Video Mobile Email Instant Messaging (IM) MEdia TM Net
Smart. Quick Start Guide
 Smart Quick Start Guide 2 Contents 1. What s in the Box?...3 2. Your Phone at a Glance...4 3. Setting up your Phone...9 4. Setting up an E-mail Account...12 5. Personalizing your Phone...13 6. Browsing
PHAROS. GPS Phone 600 Series. Hardware Quick Start Guide. Travel with ease and confidence
 R PHAROS GPS Phone 600 Series Hardware Quick Start Guide Travel with ease and confidence Pharos GPS Phone 600 Series Quick Start Guide GPRS / EDGE Settings for AT&T / Cingular 1. Tap Start, Settings >
Quick Start Guide. Use your phone for more than just talking. Mobile Messaging with QWERTY Keyboard. AT&T Mobile Music.
 Quick Start Guide Use your phone for more than just talking. Mobile Messaging with QWERTY board AT&T Mobile Music AT&T Navigator Video Share and CV Actual color of the phone may vary. See User Manual for
Quick Start Guide Use your phone for more than just talking
 Quick Start Guide Use your phone for more than just talking Email Text Messaging MEdia Net Music Take a picture Software and Games Additional charges may apply. Visit www.cingular.com for more details.
Aero. Quickstart. Important Icons
 Important Icons Icon Description AGPS is available Missed call Outgoing call Silent mode is enabled Vibrate mode is enabled Battery charge level is 60% Battery is charging Icon Description Wi-Fi is in
Welcome to AT&T 4 What s in the Box? 4 Insert the SIM Card & Battery 5 Charge the Battery 5 Insert a Memory Card 6 Turn On Your MOTO Q 9h global 7
 Table of Contents Table of Contents Welcome to AT&T 4 What s in the Box? 4 Insert the SIM Card & Battery 5 Charge the Battery 5 Insert a Memory Card 6 Turn On Your MOTO Q 9h global 7 Set Up Your MOTO Q
GU292 Quick Start Guide
 GU292 Quick Start Guide Use your phone for more than just talking. AT&T Navigator AT&T Mobile Music Mobile Email/Instant Messaging Text Messaging Multitasking Actual color of the phone may vary. See User
Getting Started Guide. Palm Treo 750 smart device
 Getting Started Guide Palm Treo 750 smart device Table of Contents Welcome to AT&T 1 Overview: Your Palm Treo 750 smart device 1 Take advantage of fast broadband speeds 2 Setup 3 Insert the battery 3 Complete
Frequently Asked Questions. Nokia E71x
 Frequently Asked Questions Nokia E71x general Is the Nokia E71x a quad band device? Yes. What is the battery life of the Nokia E71x? The Nokia E71x offers up to 4.5 hours of 3G talk time*. * Talk and standby
Quick Start Guide Use your phone for more than just talking
 Quick Start Guide Use your phone for more than just talking Email Text Messaging MEdia Net Music GPS Navigation BlackBerry 8800 See User Manual on BlackBerry User Tools CD for Spanish Instructions. Additional
Quick Start Guide Use your phone for more than just talking
 Quick Start Guide Use your phone for more than just talking Email Text Messaging MEdia Net Music Camera See User Manual on BlackBerry User Tools CD for Spanish Instructions. Additional charges may apply.
STUDIO 7.0 USER MANUAL
 STUDIO 7.0 USER MANUAL 1 Table of Contents Safety Information... 3 Appearance and Key Functions... 4 Introduction... 5 Call Functions... 6 Notifications Bar... 7 Contacts... 8 Messaging... 9 Internet Browser...
Contents. Introduction
 Page 1 of 15 Contents Introduction Getting Started Your Device at a Glance Charging Assembling the Power Adapter Turning On/Off, Unlocking Setting to Sleep and Waking Up Inserting and Removing a microsd
HELLOMOTO. contents MOTO U9
 HELLOMOTO MOTO U9 Feel It, See It, Hear It! Your MOTO U9 phone is made to be held, and made to be seen! Transfer your favorite quickly and easily with Microsoft Windows Media Player 11. Control playback
Getting Started. Parts & Functions Handset Status Bar
 Getting Started 1 Parts & Functions... 1-2 Handset... 1-2 Status Bar... 1-4 Memory Card... 1-6 Enabling Automatic Backup... 1-6 Restoring Backed Up Data to Handset... 1-6 Memory Card Installation... 1-6
Get started. All you need to know to get going with your BlackBerry Style 9670 Smartphone.
 Get started All you need to know to get going with your BlackBerry Style 9670 Smartphone. Welcome! Sprint is committed to developing technologies that give you the ability to get what you want when you
Getting Started Guide BLACKBERRY PEARL 8120
 Getting Started Guide BLACKBERRY PEARL 8120 Table of Contents Welcome to AT&T 5 What you will find in the box 5 Set up Your BlackBerry Pearl 8120 6 Insert the Battery 6 Charge the Battery 6 Insert a Media
Studio 5.5. User Manual
 Studio 5.5 User Manual 1 Table of Contents Safety Information... 3 Appearance and Key Function... 4 Introduction... 5 Call Functions... 6 Contacts... 7 Messaging... 8 Internet Browser... 9 Bluetooth...
Quick Start Guide A PD
 Quick Start Guide DA 2 Contents 1. What s in the Box?...3 2. The PDA Phone...4 3. Getting Ready...9 4. Making a Call...13 5. Text Messages...14 6. Synchronizing Outlook Information...15 7. E-mail...17
Contents. Introduction. Getting Started. Navigating your Device. Customizing the Panels. Pure Android Audio. E-Books. Browsing the Internet
 Contents Introduction Getting Started Your Device at a Glance Charging Assembling the Power Adapter Turning On/Off, Unlocking Setting to Sleep and Waking Up Connecting to a Computer Navigating your Device
Contents. Introduction. Getting Started. Navigating your Device. Customizing the Panels. Pure Android Audio. E-Books
 Contents Introduction Getting Started Your Device at a Glance Charging Assembling the Power Adapter Turning On/Off, Unlocking Setting to Sleep and Waking Up Inserting and Removing a microsd Card Connecting
NEO 4.5. User Manual
 1 NEO 4.5 User Manual Table of Contents Safety Information... 3 Appearance and Key Function... 4 Introduction... 5 Call Functions... 6 Contacts... 7 Messaging... 8 Internet Browser... 9 Bluetooth & Wi-Fi...
Copyright 2012 ZTE CORPORATION.
 Quick Guide LEGAL INFORMATION Copyright 2012 ZTE CORPORATION. All rights reserved. No part of this publication may be quoted, reproduced, translated or used in any form or by any means, electronic or mechanical,
QUICK START GUIDE MCDD (1.4) H. Voyager is a trademark of Plantronics, Inc. used under license by Verizon Wireless.
 H. Voyager is a trademark of Plantronics, Inc. used under license by Verizon Wireless.") QUICK START GUIDE MCDD0014801 (1.4) H Voyager is a trademark of Plantronics, Inc. used under license by Verizon Wireless. Getting to Know Your Phone BACK SIDE FRONT SIDE LEFT SIDE RIGHT SIDE Camera Headset
QUICK START GUIDE MCDD0014801 (1.4) H Voyager is a trademark of Plantronics, Inc. used under license by Verizon Wireless. Getting to Know Your Phone BACK SIDE FRONT SIDE LEFT SIDE RIGHT SIDE Camera Headset
Quick Start Guide Use your phone for more than just talking
 Quick Start Guide Use your phone for more than just talking Cellular Video Taking Pictures/Recording Video Text Messaging Instant Messaging (IM) Mobile Email Games and Applications MEdia Net Downloadable
GET STARTED. ALL YOU NEED TO KNOW TO GET GOING.
 GET STARTED. ALL YOU NEED TO KNOW TO GET GOING. Your Samsung Instinct WELCOME Getting to know your Instinct And thank you for choosing Sprint. Finally, an amazing touchscreen phone with a network to back
Quick Start Guide. Use your phone for more than just talking VGA Camera Text Messaging Mobile Instant Messaging
 Quick Start Guide Use your phone for more than just talking VGA Camera Text Messaging Mobile Email Instant Messaging See User Manual for Spanish Instructions Additional charges may apply. Visit att.com
Dash 4.0. User Manual
 1 Dash 4.0 User Manual Table of Contents Safety Information... 3 Appearance and Key Function... 4 Introduction... 5 Call Functions... 6 Contacts... 7 Messaging... 8 Internet Browser... 9 Bluetooth... 10
F7200. Get Started Guide. Push to Talk Capable. Mobile Instant Messaging (IM) Stylish Slider Keypad. Speakerphone
 Stylish Slider Keypad. Speakerphone") Get Started Guide Push to Talk Capable Speakerphone Mobile Instant Messaging (IM) Stylish Slider Keypad e www.lgusa.com PHONE OVERVIEW D U A L- B A N D PTT Key Earpiece Speakerphone Key Headset Jack Text
Get Started Guide Push to Talk Capable Speakerphone Mobile Instant Messaging (IM) Stylish Slider Keypad e www.lgusa.com PHONE OVERVIEW D U A L- B A N D PTT Key Earpiece Speakerphone Key Headset Jack Text
Getting Started Guide. BlackBerry 8820
 Getting Started Guide BlackBerry 8820 Table of Contents Welcome to AT&T 5 What s in the Box? 5 Set up Your BlackBerry 6 Insert the Battery 6 Charge the Battery 6 Insert a microsd Card 7 Learn to Navigate
Get. Started. All you need to know to get going.
 Get Started All you need to know to get going. Welcome! Sprint is committed to developing technologies that give you the ability to get what you want when you want it, faster than ever before. This booklet
VEGA. Operation Manual T A B L E T P C. advent vega operation manaul_new.indd 1
 VEGA T A B L E T P C Operation Manual advent vega operation manaul_new.indd 1 advent vega operation manaul_new.indd 2 CONTENTS SETTING UP YOUR TABLET FOR THE FIRST TIME... 4 USING THE DEVICE S BUTTONS
Get started. All you need to know to get going.
 Get started. All you need to know to get going. 2009 Sprint. Sprint and the logo are trademarks of Sprint. Other marks are the property of their respective owners. Samsung Instinct s30 is a registered
BlackBerry Wireless Handheld Getting Started Guide
 BlackBerry Wireless Handheld Getting Started Guide Phone button Open the phone screen Earpiece Headset jack USB port Notification LED Trackwheel Select or click an item Escape button Exit a screen Alt
Getting Started Select Wireless Manager. Wireless Manager Window. To enable or disable a wireless connection, tap the specific button.
 Getting Started 1-11 Select Wireless Manager. Figure 1-10 Wireless Manager Window To enable or disable a wireless connection, tap the specific button. To enable or disable all wireless connections, tap
Start Here BlackBerry Curve 9300 Series
 Welcome to BlackBerry! Get to know your new BlackBerry Curve smartphone. Explore the keys 2010 Research In Motion Limited. All rights reserved. BlackBerry, RIM, Research In Motion, SureType, SurePress
LIFE PURE User Manual
 LIFE PURE User Manual 1 Table of Contents Safety Information... 3 Appearance and Key Function... 4 Introduction... 5 Call Functions... 6 Contacts... 7 Messaging... 8 Internet Browser... 9 Bluetooth...
2.8" QUICK START GUIDE 4044V. rd ④. Removing or installing the back cover. Removing or installing battery. Charging the battery.
 ① Removing or installing the back cover. QUICK START GUIDE ② 2.8" Removing or installing battery. Charging the battery. SIM ③ ca rd ④ SD ca ⑤ rd To insert a SIM or MicroSD card, push the SIM or MicroSD
BlackBerry Wireless Handheld Getting Started Guide
 BlackBerry Wireless Handheld Getting Started Guide Headset jack Earpiece Notification LED Phone button Open the phone screen Trackwheel Select or click an item Escape button Exit a screen Alt key Type
Get started. All you need to know to get going. MOTOROLA ES400S
 Get started All you need to know to get going. MOTOROLA ES400S Welcome! Sprint is committed to developing technologies that give you the ability to get what you want when you want it, faster than ever
Table of contents. 2 Samsung Care. 3 Know Your Device. 5 S Pen. 7 Device Setup. 12 Home Screen. 18 Apps. 19 Calls. 20 Voic .
 Table of contents 2 Samsung Care 3 Know Your Device 5 S Pen 7 Device Setup 12 Home Screen 18 Apps 19 Calls 20 Voicemail 21 Contacts 22 Messages 24 Camera 25 Internet 26 Connections 27 Security Samsung
Getting Started Guide Palm Treo 680 smart device
 Getting Started Guide Palm Treo 680 smart device Table of Contents Welcome to Cingular 1 Overview: Your Palm Treo 680 smart device 1 Setup 2 Insert the battery 2 Complete setup 3 Navigation 4 Wake up the
Take and Send a Picture. To send the picture, press. Send Send To. Tip: To store or discard the picture, press Options and select Store Only.
 Take and Send a Picture This feature is network/ subscription dependent and may not be available in all areas. Contact your service provider for more details. Press the centre key, then select Camera.
BlackBerry Wireless Handheld Getting Started Guide
 BlackBerry Wireless Handheld Getting Started Guide Phone button Open the phone screen Earpiece Headset jack USB port Notification LED Trackwheel Select or click an item Escape button Exit a screen Alt
Please read before operating your device.
 Smart User Manual Congratulations on the purchase of your new Windows Mobile Smartphone! Microsoft, MS-DOS, Windows, Windows NT, Windows Server, Windows Mobile, ActiveSync, Excel, Internet Explorer, MSN,
Get started. All you need to know to get going.
 Get started All you need to know to get going. Welcome! Your Device Sprint is committed to developing technologies that give you the ability to get what you want when you want it, faster than ever before.
Troubleshooting basics
 Welcome to BlackBerry! Troubleshooting basics I cannot make or receive calls Verify that your BlackBerry device is connected to the wireless network. Verify that your wireless service plan includes phone
AUDIO AND CONNECTIVITY
 AUDIO AND CONNECTIVITY Learn how to operate the vehicle s audio system. Basic Audio Operation Connect audio devices and operate buttons and displays for the audio system. USB Port Connect a USB flash drive
Setting Up Your Sprint Power Vision SM Smart Device Treo TM 700p by Palm
 Setting Up Your Sprint Power Vision SM Smart Device Treo TM 700p by Palm 2006 Sprint Nextel. All rights reserved. SPRINT, the Going Forward logo, and other trademarks are trademarks of Sprint Nextel. June
<,W,EϬϱ E USER MANUAL
 USER MANUAL GETTING STARTED To get started with the Agora handset, please take both the phone and the battery out of the box. On the rear of the phone you will find a plastic backing cover with a small
Welcome! Note: Available applications and services are subject to change at any time.
 Get Started Welcome! Thank you for choosing Sprint. This guide helps you get started with your new KYOCERA DuraXTP. ReadyNow For more help in getting up and running with your new phone, take advantage
Get. Started. All you need to know to get going.
 Get Started All you need to know to get going. Thanks for choosing Sprint. This booklet introduces you to the basics of getting started with Sprint and your Sonim XP STRIKE IS. ReadyNow For more help in
DASH 4.5 user manual 1
 DASH 4.5 user manual 1 Table of Contents Safety Information... 3 Appearance and Key Function... 4 Introduction... 4 Call Functions... 6 Contacts... 6 Messaging... 8 Internet Browser... 9 Bluetooth... 10
PS236. Extended SKU USER MANUAL. Rugged Mobile Computing Solutions
 PS236 Extended SKU USER MANUAL Rugged Mobile Computing Solutions May 2011 Trademarks Microsoft, Windows, the Windows logo, Windows Media, Outlook and ActiveSync are registered trademarks or trademarks
User Guide CDM _CDM8975_RAP_REV00.indd _CDM8975_RAP_REV00.indd :35:46 AM :35:46 AM
 User Guide CDM8975 Contents CHAPTER 1. BEFORE USING CDM8975 BEFORE USING... 6 INSIDE THE PACKAGE... 6 HANDSET DESCRIPTIONS... 7 KEYS DESCRIPTIONS... 8 DISPLAY INDICATORS... 10 INSTALL BATTERY... 13 REMOVE
Tips and Tricks BASICS. Slide to the three different panels of your Home screen. Check out notifications to stay informed
 Tips and Tricks BASICS Slide to the three different panels of your Home screen Yes, basically you have three Home screens. Slide your finger left across the screen and then right to see the different panels.
Breeze III FB201N User Manual
 Breeze III FB201N User Manual Table of Contents Getting Started... 3 Insert the SIM Card and Battery... 3 Insert the Media Card... 4 Keys and Parts... 5 Basics... 6 Display Indicators... 6 Home Screen...
Getting Started Guide. BlackBerry Pearl
 Getting Started Guide BlackBerry Pearl Table of Contents Welcome to AT&T! 4 Remove These Items From the Box 4 BlackBerry Pearl TM Key Functions 5 Set Up Your BlackBerry Pearl TM 6 Insert the Battery 6
User Guide. Welcome to HUAWEI
 User Guide Welcome to HUAWEI Contents Introduction.................................... 1 Installation..................................... 2 Keys and Functions.................................. 2 Installing
Get. Started. All you need to know to get going.
 Get Started All you need to know to get going. Special note for Sprint As You Go customers With Sprint As You Go you can free yourself from long-term contracts and enjoy more wireless flexibility. Some
Get. Started. All you need to know to get going.
 Get Started All you need to know to get going. Welcome! Thanks for choosing Sprint. This booklet introduces you to the basics of getting started with Sprint Prepaid and your LG G Stylo. For ongoing support
User Guide PUSH TO TALK PLUS. For Android
 User Guide PUSH TO TALK PLUS For Android PUSH TO TALK PLUS For Android Contents Introduction and Key Features...4 PTT+ Calling to Individuals and Groups...4 Supervisory Override...4 Real-Time Presence...4
Get. Started. All you need to know to get going.
 Get Started All you need to know to get going. Welcome! Sprint is committed to developing technologies that give you the ability to get what you want when you want it, faster than ever before. This booklet
HP ipaq Additional Product Information
 HP ipaq Additional Product Information Learning the Basics Viewing the Operating System Information Adjusting the Volume Changing Power Management Settings Dimming or Adjusting the Brightness of the Backlight
Package Contents. Firmware Updates. Device Overview
 1 This Quick Start Guide covers the basics for initial setup and usage of your SuperNova. For complete instructions on all features and functionality, refer to the device User Guide (preloaded in the device)
This device has been tested and found to comply with the standards for a Class B digital device, pursuant to article 15 of the FCC Rules.
 Copyright 2012 Burg, Inc. All Rights Reserved. This document may not be copied, disclosed, transferred, or modified without the prior written consent of Burg, Inc. Burg, Inc. assumes no responsibility
T-Mobile G2. User s Guide
 2 Trademarks and copyrights Copyright 2010 T-Mobile. All Rights Reserved. T-Mobile is a federally registered trademark of Deutsche Telekom AG. Copyright 2010 Google Inc. Used with permission. Google, the
BlackBerry Curve TM 8530 Smartphone
 BlackBerry Curve TM 8530 Smartphone 2010 Sprint. SPRINT and the logo are trademarks of Sprint. Other marks are the property of their respective owners. 2/1/10 Table of Contents Getting Started With Your
Sony Ericsson W880i Quick Start Guide
 Sony Ericsson W880i Quick Start Guide In just a few minutes we ll show you how easy it is to use the main features of your phone. This is a Vodafone live! with 3G phone, so you can take advantage of the
Get. Started All you need to know to get going.
 Get Started All you need to know to get going. Welcome! Thanks for choosing Sprint. This booklet introduces you to the basics of getting started with Sprint and your Samsung Galaxy S 4 mini. ReadyNow For
Troubleshooting basics
 Welcome to BlackBerry! Troubleshooting basics I cannot make or receive calls Verify that your BlackBerry device is connected to the wireless network. Verify that your wireless service plan includes phone
Quick Start Guide D502PB. U.S Service Hotline : More support at
 Quick Start Guide D502PB U.S Service Hotline : 1-888-863-0138 More support at www.d2pad.info Overview ENGLISH 1 2 3 8 7 4 5 6 1 2 3 4 5 6 7 8 Volume Keys Status Bar Front Camera Menu Key Home Key Back
congratulations! motorola hint TM QA30
 motorola hint TM QA30 Quick Start Guide congratulations! Congratulations on your new Motorola hint TM QA30 CDMA wireless phone, with all the features you want in a sleek, stylish design. Navigation Left
Get. Started. All you need to know to get going.
 Get Started All you need to know to get going. Special note for Sprint As You Go customers With Sprint As You Go you can free yourself from long-term contracts and enjoy more wireless flexibility. Some
Setting Up Your BlackBerry 8703e TM, Powered by Sprint PCS
 Setting Up Your BlackBerry 8703e TM, Powered by Sprint PCS 2006 Sprint Nextel. All rights reserved. SPRINT, the Going Forward logo, and other trademarks are trademarks of Sprint Nextel. The BlackBerry
ipod classic User Guide
 ipod classic User Guide Contents 4 Chapter 1: ipod classic Basics 5 ipod classic at a glance 5 Using ipod classic controls 7 Disabling ipod classic controls 8 Using ipod classic menus 8 Adding or removing
Get. Started. All you need to know to get going.
 Get Started All you need to know to get going. Welcome! Sprint is committed to developing technologies that give you the ability to get what you want when you want it, faster than ever before. This booklet
BlackBerry Bold 9650
 BlackBerry Bold 9650 The only time a Tata phone won t be accessible. Please switch off your mobile phones during presentations. Be safe and help create a safe environment. Acquaint all on Safety. Take
Get. Started. All you need to know to get going.
 Get Started All you need to know to get going. Special note for Sprint As You Go customers With Sprint As You Go you can free yourself from long-term contracts and enjoy more wireless flexibility. Some
F58.fm Page 1 Thursday, June 21, :19 PM MOTORAZR 2
 6803570F58.fm Page 1 Thursday, June 21, 2007 3:19 PM MOTORAZR 2 V8 6803570F58.fm Page 2 Thursday, June 21, 2007 3:19 PM 6803570F58.fm Page 3 Thursday, June 21, 2007 3:19 PM welcome Your MOTORAZR 2 V8 phone
Inesoft Phone v.7 Inesoft Phone
 Inesoft Phone v.7 Inesoft Phone Copyright Kim Tkhe Sik, Alex Galamdinov, Lukiyanov Maxim, 1998-2010. All rights reserved. User manual by Wasyl Dolgow Inesoft Phone is a trademark of Inesoft. Microsoft
This guide describes features that are common to most models. Some features may not be available on your tablet.
 User Guide Copyright 2014 Hewlett-Packard Development Company, L.P. Bluetooth is a trademark owned by its proprietor and used by Hewlett-Packard Company under license. Google, Google Now, Google Play,
Get. Started. All you need to know to get going.
 Get Started All you need to know to get going. Welcome! Sprint is committed to developing technologies that give you the ability to get what you want when you want it, faster than ever before. This booklet
Dell Streak 7. User's Manual COMMENT
 Dell Streak 7 User's Manual COMMENT Notes, Cautions, and Warnings NOTE: A NOTE indicates important information that helps you make better use of your device. CAUTION: A CAUTION indicates potential damage
MANUAL PELITT MINI 1
 MANUAL PELITT MINI 1 TABLE OF CONTENTS 1. Warnings 3 2. Getting Started 3 3. Your Phone 4 4. File Manager 4 5. Phone book 4 6. Fun&Games 4 7. Call center 4 8. Messaging 4 9. Multimedia 5 10. Organizer
Package Contents. Device Overview. Unlocking the Screen
 1 This Quick Start Guide covers the basics for initial setup and usage of your Pandigital Planet. For complete instructions on all features and functionality, refer to the User Guide after you have completed
MH132 USER MANUAL. Rugged Mobile Computing Solutions
 MH132 USER MANUAL Rugged Mobile Computing Solutions March 2011 Trademarks Microsoft, Windows, the Windows logo, Windows Media, Outlook and ActiveSync are registered trademarks or trademarks of Microsoft
KYOCERA CADENCE LTE USER GUIDE
 KYOCERA CADENCE LTE USER GUIDE Table of Contents Get Started... 1 Your Phone at a Glance... 1 Key Functions... 2 Set Up Your Phone... 5 Insert the Battery... 5 Charge the Battery... 6 Battery Capacity...
Features Guide. Get the most from your phone.
 Features Guide Get the most from your phone. It s all on the Now Network. This Features Guide has everything you need to get the most from your new Sprint phone. Just go directly to any feature that interests
Sony Ericsson W850i Quick Start Guide
 Sony Ericsson W850i Quick Start Guide In just a few minutes we ll show you how easy it is to use the main features of your phone. This is a Vodafone live! with 3G phone, so you can take advantage of the