User s Manual. 4 Channel Digital Video Recorder
|
|
|
- Anissa Berry
- 5 years ago
- Views:
Transcription
1 Thank you for purchasing our product. Please read this User s Manual before using the product. Change without Notice 4 Channel Digital Video Recorder User s Manual 1
2 Safety Precautions CAUTION RISK OF ELECTRICAL SHOCK. DO NOT OPEN! CAUTION: TO REDUCE THE RISK OF ELECTRICAL SHOCK, DO NOT REMOVE COVER (OR BACK), NO USER SERVICEABLE PARTS REFER SERVICING TO QUALIFIED SERVICE PERSONNEL. This label may appear on the bottom of the unit due to space limitations. The lightning flash with arrowhead symbol, within an equilateral triangle, is intended to alert the user to the presence of insulated dangerous Voltage within the product s enclosure that may be sufficient magnitude to constitute risk of electrical shock to persons. The exclamation point within an equilateral triangle is intended to alert the user to the presence of important operation and maintenance (servicing) instructions in the literature accompanying the appliance. WARNING: TO PREVENT FIRE OR SHOCK HAZARD, DO NOT EXPOSE UNITS NOT SPECIFICALLY DESIGNED FOR Attention: installation should be performed by qualified service Personnel only in accordance with the National Electrical Code or applicable local codes. Power Disconnect. Units with or without ON-OFF switches have power supplied to the unit whenever the power cord is inserted into the power source; however, the unit is operational only when the ON-OFF switch is the ON position. The power cord is the main power disconnect for all unites. CAUTION: Danger of explosion if battery is incorrectly replaced. Replace only with the same or equivalent type recommended by the manufacturer. Dispose of used batteries according to the manufacturer s instruction. Warranty and Service During the warranty period (one year), we will repair or replace the DVR free of charge. Be sure to have the model number, serial number and vendor stick on hard disk for service representative. 2
3 About this document Before installing stand alone DVR, be sure to thoroughly review and follow the instructions in this Users Manual. Pay particular attention to the parts that are marked NOTICE. Also, when connecting with external application, first turn the power OFF and follow manual instruction for appropriate installation. Before reading this document 1. This document is intended for both the administrator and users of stand alone DVR Model. 2. This manual contains information for configuring, managing and using stand alone DVR Model. 3. To prevent fire or electrical shock, do not expose the product to heat or moisture 4. Be sure to read this manual before using stand alone DVR Model. 5. For questions and technical assistance of this product, contact your local dealer. Strong recommendation on installation of the DVR unit 1. Check electricity at the place you want to install the DVR unit is stable and meets our electricity requirements. Unstable electricity will cause malfunction of the unit or give critical damage to the unit. 2. Several chips on the main board of the DVR unit and hard disk drive inside the unit generate heat, and it must be properly discharged. Do not put any objects just beside exhaust port(fan) on the left side of the unit and do not close up an opening (fresh air in-take) on the right side of the unit.. 3. Put the DVR unit at well-ventilated place and do not put heat-generating objects on the unit. When it is installed inside 19 inch mounting rack together with other devices, please check built-in ventilation fan of the rack is properly running. 3
4 Content Safety Precautions 2 About this document. 3 Before reading this document. 3 Unite Description of Front Panel 5 Unit Description of Rear Panel 6 Installation.. 7 Procedure. 7 Picture 9 Playback 12 Function Setup.. 14 Login. 14 Basic Operation.. 15 HDD Information 16 Date-Time Setup 17 Display Setup. 18 Camera Setup 19 Buzzer Setup...24 System Setup. 25 Advanced Setup 26 CF Card Data Read on PC. 35 Hard Disk Data Read.. 49 Record Time Table: 80 GB HD.. 51 VGA Description (Optional) 52 Additional 53 4
5 Unit Description of Front Panel 1. : 4 quad screen mode button / Mode function key / 4 or 9 split display on playback mode 2. CHANNEL 1 : Channel 1 full screen button 3. CHANNEL 2 : Channel 2 full screen button 4. CHANNEL 3 : Channel 3 full screen button 5. CHANNEL 4 : Channel 4 full screen button 6. FREEZE : Picture freeze mode button 7. ZOOM : Picture zoom x2 mode button 8. AUTO / W.MARK : Auto sequence mode / Water Mark function button. 9. PIP / BACKUP : Picture in picture mode button / Image backup button 10. UP / STOP : Direction button UP / Playback stop button / 11. REW : Reverse playback choose button / Still playback / 12. DOWN / PAUSE : Direction button down / Playback pause / 13. FF : Forward playback choose button / Still playback / 14. ENTER / AUDIO : Sub-menu enter button / Audio on or off button 15. MENU BUTTON : Press this button to display the menu setup 16. ESC/LOCK : Press this button to Key Lock function / Sub-MENU exit button 17. T-SRH : Press this button to playback time search 18. PLAY BUTTON : Press this button to playback 19. DIRECTION BUTTON : Playback speed choose. (Increase) or values change. 20. REC BUTTON : Press this button to start recording image 21. DIRECTION BUTTON : Playback speed choose.(reduce) or values change. 22. CF Card Slot : Compact Flash Card insert 5
6 Unit Description of Rear Panel Power code in 12V/5A, power switcher (ON / OFF) Camera 1 ~ 4 in and looping out 75 Ohm ON/OFF (high/low adjust) Audio channel input x 1 and output x 1 Monitor out S-Video (Y/C) monitor VGA VGA output. PC monitor connector. (Optional) RS-485 control keyboard connector RS-232 connector (ISP. Firmware upgrade port) Alarm connector LAN (Not available) 6
7 Installation Procedure 1) Camera Connection Connect the camera to the CAMERA INPUT CH1 CH2 CH3 CH4 DC LEVEL V.P VIDEO on the Rear Panel of the 4 CH DVR. CH1 CH2 CH3 CH4 MONITOR DC VIDEO LENS AC24V/DC12 Rear part of CAMERA 2) Monitor Connection (Composite Connection Method) Connect the monitor to the MONITOR OUT on CH1 CH2 CH3 CH4 CH1 CH2 CH3 CH4 MONITOR the Rear Panel of the 4 CH DVR. VIDEO A IN OUT 3) Monitor Connection Connect S-VIDEO Monitor to MONITOR OUT CH1 CH2 CH3 CH4 MONITOR on the Rear Panel of the 4 CH DVR. CH1 CH2 CH3 CH4 VIDEO A IN OUT 4) Sensor Connection Connect the Sensor to the SENSOR INPUT/ OUTPUT on the Rear Panel of the system 13,12,11,10,9,8,7,6,5,4,3,2,1 25,24,23,22,21,20,19,18,17,16,15,14 1.ALARM0 2.ALARM1 3.ALARM2 4.ALARM3 23.ALARM NC 24.ALARM NO 25.ALARM COM 5. ~ 19. GND Relay output : COM+NC, COM+NO Alarm input : Short-circuit between Alarm0, Alarm1, Alarm2 or Alarm3 and GND is recognized as alarm by default.alarm0~3 will be corresponding to Camera1~4. 7
8 NOTICE: Sensor input is RECOGNIZED as LOW when alarm signal is on a level with GND, and it is recognized as HIGH when alarm signal is FLOATING or 5V. Following is internal circuit. 5 V Internal Circuit D1 Thus, there is a danger of damage, when the sensor input goes to a Negative level or voltage higher than 5V. 5) HDD connection 1 How to connect single HDD 2 How to connect 2 HDD I/O BOARD 1 2 MAIN BOARD tie 3 MASTER HDD 1 2 I/O BOARD MAIN BOARD 2 1 MASTER HDD1 SLAVE HDD2 Set the drive jumpers as specified by hard disk drive manufacturer. Set the drive jumpers as specified by hard disk drive manufacturer. 1. Make sure the HDD is MASTER. 2. Make sure the cable connector is correct. 3. Please check the HDD panel for Master set up. 1. Make sure the HDD is MASTER and SLAVE. 2. Make sure the cable connector is correct. 3. Please check the HDD panel for Master and Slave set up. Notice: -Maximum 2 internal hard drives installed. -Hard Disk Master and Slave jumper pin must be set correctly, otherwise it makes DVR react faulty. Hard Disk testing table: Brand Model Capacity Notice Seagate Barracuda 80 GB IBM DeskStar 80 GB WD2000 Caviar 200 GB Hitachi DeskStar 80 GB Maxtor MaxLineII 300 GB 8
9 Picture Full screen or quad screen display Press quad button to display 4 quad screen. Press numeric 1 / 2 / 3 / 4 buttons to display a desired camera image in full screen. 1.) FREEZE Mode 1. In live and the quad mode press (FREEZE) button to freeze image. Press again to cancel freeze mode. 2. On the full screen display, press (FREEZE) button to freeze full screen image. 2.) Zoom Mode(Display Enlargement.) Go to full screen mode with numeric buttons at live or playback mode, then press ZOOM button to display screen Enlargement. Use button to move position. 3.) Auto Mode Press (AUTO) button to start screen auto sequencing, and press it again to cancel auto mode. 4.) W.MARK. Water Mark mode. Water Mark protection function on or off. To prevent hacker using special software to modify the image data. System Setup Watermark Check mode On. Press W.Mark button to on or off. (Playback mode only) 5.) PIP (PICTURE IN PICTURE) 1.) Press (PIP) button. Press (AUTO) button to start sub-screen auto sequencing. Main picture Sub picture 2) With button, select the main channel screen, press button to select desired camera channel in small screen. 9
10 6.) BACKUP / PIP. Image backup mode.(image back up must be done on playback mode only.) Locate the playback point of which you want. Press BACKUP, the BACKUP CAUTION window pop-up. Press ENTER to begin data back up. Capacity of CF card is not limit, but the maximum capacity display is 9999MB. On playback mode, presses BACKUP: Lower-Right corner of the screen: ** BACKUP CAUTION ** ALL DATA IN THE CF CARD WILL BE CLEARED. PRESS [ENTER] TO BACKUP. PRESS [BACKUP] TO CANCLE. 0000M / 0256M 0000M / 0256 (Presently back up progress / Total capacity of CF card) Important: If the CF card contains old data, please format CF card to FAT or FAT 32 on computer before insert to DVR CF card slot. Otherwise, DVR would not detect correct CF card format. Any brand of CF card is acceptable. Additional: During playback, CF card is full or user press BACKUP button screen display a PAUSE caption, User takes out the CF to computer USB slot then save data to hard disk. After, re- insert CF card to DVR slot, user press BACKUP again. Press ENTER to continue backup or backup button to cancel. PAUSE ** BACKUP CAUTION ** ALL DATA IN THE CF CARD WILL BE CLEARED. PRESS [ENTER] TO BACKUP. PRESS [BACKUP] TO CANCEL. CF card testing table: Brand Model Capacity Notice Cannon FC-8M 8 MB PQI 32/128 MB Nikon 16 MB KingMax 16 MB Apacer 1 GB Sandisk F1 x MB Transcend F1 x MB 10
11 7.) Alarm Sensor Recording >See the alarm recording setup page 8.) Scheduled Recording >See the scheduled recording setup page 9.) Motion detection Recording >See the motion detection recording setup page 10.) Key Lock function >On the Live or Playback mode, press (lock), Only, numeric, freeze, auto, pip, and zoom buttons could work. Press lock key again to enter the login-in window. Enter admin or user password to unlock. Key lock function only accept password correct log in even re-boot DVR power. 11.) AUDIO function )))) )))) xxxxxxxxx Audio playback: Press AUDIO / ENTER, ))))))displays on the Upper-left of screen. At that time, audio will playback. Press it again to turn it off. Notice Audio playback only on normal( x 1 ) playback. 11
12 Playback 1. Playback Mode 1) Press PLAY button to begin playback. (System playback the images backward) 2. T-SRH button 1) T-SRH: Playback by time search. Press T-SRH button to active playback function. Press direction button UP/DOWN to choose items. MAIN PLAY PAGE 1.MASTER TIME LIST 2.SLAVE TIME LIST 3.MASTER EVENT LIST 4.SLAVE EVENT LIST 5.GOTO DATE: 2004/12/31 6.GOTO TIME: 12:12 7.GOTO PLAY 1) TIME LIST (Playback image by Time-Search): Recorded images list (by hours) Y / M / D / H TIME LIST Y / M / D / H Y / M / D / H (Beginning of recording time) Y / M / D / H (End of recording time) Every playback data list displays by an hour. No page display limit. 10 items display on each page. Press direction button UP/DOWN to choose items. Press values change button to change to previous / next page. 12
13 2) EVENT LIST (Alarm List): Event source- Video loss / Alarm trigger / Motion / Record EVENT LIST NO Y / M / D / H Motion 10 items display on each page / Total 5000 items display for 500 pages. When event list is out of compass, the total items are less then Y / M / D / M : Year / Month / Day Hour / Minute >Event happens time. : Event Channel Display. >1 CH, 2 CH, 3 CH, 4 CH. Motion: Event type. >Includes Motion / Alarm / V-Loss / Record Press direction button UP/DOWN to choose items. Press playback. values change button to change page. Press ENTER to start >Special time search playback: Go TO DATE -Choose year / month / day >Press direction button Left / Right to choose items, press values change button GOTO TIME -Choose hour and minute >Press direction button Left / Right to choose items, press values change button GOTO PLAY -Press ENTER button to start playback. Notice: Playback speed change by. Speed is x 1, x 2, x 4, x 8, x 16. to change value. to change value. 13
14 Function Setup LOGIN 1) Press MENU button to enter into menu. You could do the system function setup in MENU. 2) Password enter window pop-up: CHECK PASSWORD MENU PASSWORD (*****) Default password (Account-Admin) : Default password (Account-User) : ) Press numeric (1 ~ 4 )button or remote controller ( 1 ~ 4 )to choose password. 4) Remote controller function buttons are same as DVR panel function buttons. 14
15 Basic Operation Press MENU button to enter MAIN SETUP PAGE. MAIN SETUP PAGE 1. HDD INFORMATION 2. DATE-TIME SETUP 3. DISPLAY SETUP 4. CAMERA SETUP 5. BUZZER SETUP 6. SYSTEM SETUP 7. ADVANCED SETUP MENU, ESC: EXIT, ENTER: RUN 1) Use direction button up/down button to select setup item. 2) Press button to enter into sub-menu function setup. 3) Press sub-menu item with direction button up/down or left/right button. And change the value with values change button or turn inner-shuttle. 4) Press ESC to go back to main / sub menu or exit menu. Notice: 1. ADMIN level can setup all DVR menu functions. 2. USER level cannot setup ADVANCED page of DVR main menu function. 15
16 1. HDD INFORMATION MAIN SETUP PAGE 1. HDD INFORMATION 2. DATE-TIME SETUP 3. DISPLAY SETUP 4. CAMERA SETUP 5. BUZZER SETUP 6. SYSTEM SETUP 7. ADVANCED SETUP POSITION SIZE USED BRAND MASTER LAST TIME SLAVE LAST TIME MENU, ESC: EXIT, :PAGE MENU, ESC: EXIT, ENTER: RUN - 2 hard disk information display. Information display: POSITION SIZE USED BRAND >POSITON: Master / Slave >SIZE: Hard Disk capacity. xxgb. Maximum display is 999MB >USED: 00 ~ 100 %. Hard disk overwrites always on 100 %. >BRAND: DVR auto detect hard disk brand. >LAST TIME: The last record time display. 16
17 2. DATE-TIME SETUP MAIN SETUP PAGE 1. HDD INFORMATION 2. DATE-TIME SETUP 3. DISPLAY SETUP 4. CAMERA SETUP 5. BUZZER SETUP 6. SYSTEM SETUP 7. ADVANCED SETUP DATE-TIME SETUP PAGE 1. DATE 2000 / 00 / TIME 3. DISPLAY AT xx LINE(S) 4. DAYLIGHT SAVING MENU, ESC:EXIT, :MODIFY MENU, ESC: EXIT, ENTER: RUN 1. DATE 2. TIME: > Use direction button up/down choose position, values change button to change date and time values. 3. DISPLAY AT xx LINE(S) -Date and Time position on screen xx line(s). 00 ~ DAY LIGHT SAVING: -Day light saving function on or off. The Day light Savings function that enable two special updates when it sets to ON. On the first Sunday in April, the time increments from 1:59:59 AM to 3:00:00 AM. On the last Sunday in October when the time first reaches 1:59:59 AM, it changes to 1:00:00 AM. Press direction button up/down/left/right to choose items or move date-time position. 17
18 3. DISPLAY SETUP MAIN SETUP PAGE 1. HDD INFORMATION 2. DATE-TIME SETUP 3. DISPLAY SETUP 4. CAMERA SETUP 5. BUZZER SETUP 6. SYSTEM SETUP 7. ADVANCED SETUP MENU, ESC: EXIT, ENTER: RUN DISPLAY SETUP PAGE 1. DATE-TIME ON 2. CAMERA TITLE ON 3. PB DATE-TIME ON 4. PB CAMERA TITLE ON 5. DVR STATUS ON 6. BORDER SET WHITE MENU, ESC:EXIT, :MODIFY 1. DATE-TIME: Date and Time caption display mode on or off setup. >ON / OFF 2. CAMERA TITLE: Camera Title caption display mode on or off setup. >ON / OFF 3. PB DATE-TIME: Play back date and time caption display mode on or off setup. >ON / OFF 4. PB CAMERA TITLE: Play back camera title caption display mode on or off setup. >ON / OFF 5. DVR STATUS: DVR system, record, playback, audio caption display mode on or off setup. >ON / OFF 6. BORDER SET: Border color WHITE / DARK / BLACK / GRAY. Press direction button up/down to choose the desired item. Press values change button to change values. 18
19 4. CAMERA SETUP MAIN SETUP PAGE 1. HDD INFORMATION 2. DATE-TIME SETUP 3. DISPLAY SETUP 4. CAMERA SETUP 5. BUZZER SETUP 6. SYSTEM SETUP 7. ADVANCED SETUP CAMERA SETUP PAGE 1. COLOR SETUP 2. TITLE SETUP 3. SCREEN POSITION SETUP 4. V-LOSS DISPLAY SETUP 5. VIDEO MASK SETUP MENU, ESC: EXIT, ENTER: RUN MENU, ESC: EXIT, ENTER: RUN (1.) COLOR SETUP CAMERA SETUP 1. COLOR SETUP 2. TITLE SETUP 3. SCREEN POSITION SETUP 4. V-LOSS DISPLAY SETUP 5. VIDEO MASK SETUP CAMERA-COLOR SETUP PAGE ** CH CAMERA BRIGHTNESS CONTRAST SATURATION HUE GAIN 00 >>DEFAULT RESET<< MENU,ESC:EXIT, :MODIFY CAMERA-COLOR SETUP : Adjust Camera Image CH NUMBER : Select camera BRIGHTNESS : Adjust screen brightness (-31~ +32) CONTRAST : Adjust color contrast (-31~ +32) SATURATION : Adjust color saturation (-31~ +32) HUE : Adjust color hue (-31~ +32) GAIN : Adjust image signal level (-31~ +32) >>DEFAULT RESET<< : Press ENTER button to reset DVR values. Press direction button up/down to choose items. Press values change button to change values. >Right adjustment of each element in COLOR setup will increase picture quarterly displayed. We recommend you to adjust each element of COLOR SETUP for cameras and monitor to be connected to the DVR unit. 19
20 (2.) TITLE SETUP: Input TITLE of each camera. 18 characters can be input. CAMERA SETUP 1. COLOR SETUP 2. TITLE SETUP 3. SCREEN POSITION SETUP 4. V-LOSS DISPLAY SETUP 5. VIDEO MASK SETUP CAMERA-TITLE SETUP PAGE CH1 (CAM01 ) CH2 (CAM02 ) CH3 (CAM03 ) CH4 (CAM04 ) MENU, ESC: EXIT: : MODIFY Press direction button up/down/left/right to choose items and position. Press values change button to change values. Characters choose: Numeric: 0 / 1 / 2 / 3 / 4 / 5 / 6 / 7 / 8 / 9 Capital letter: A / B / C / D / E / F / G / H / I / J / K / L / M / N / O / P / Q / R / S / T / U / V / W / X / Y / Z 20
21 (3.) SCREEN POSITION SETUP **** SCREEN POSITION**** UP CAMERA SETUP 1. COLOR SETUP 2. TITLE SETUP 3. SCREEN POSITION SETUP 4. V-LOSS DISPLAY SETUP 5. VIDEO MASK SETUP LEFT DOWN ENTER for Default ESC to QUIT RIGHT 1. Press direction buttons up/down/left/right to move screen position. 2. Press ENTER button for default. 3. Press ESC button to quit. 21
22 (4.) V-LOSS DISPLAY SETUP CAMERA SETUP 1. COLOR SETUP 2. TITLE SETUP 3. SCREEN POSITION SETUP 4. V-LOSS DISPLAY SETUP 5. VIDEO MASK SETUP VLOSS SETUP PAGE **VLOSS FUNCTION: CH1 VLOSS DISPLAY CH2 VLOSS DISPLAY CH3 VLOSS DISPLAY CH4 VLOSS DISPLAY MENU, ESC: EXIT: : MODIFY ** VLOSS FUNCTION: ON / OFF CH1 VLOSS DISPLAY: ON / OFF CH2 VLOSS DISPLAY: ON / OFF CH3 VLOSS DISPLAY: ON / OFF CH4 VLOSS DISPLAY: ON / OFF Press direction buttons up/down/left/right to choose items. Press values change button to change values. 22
23 (5.) VIDEO MASK SETUP VIDEO MASK SETUP PAGE CAMERA SETUP 1. COLOR SETUP 2. TITLE SETUP 3. SCREEN POSITION SETUP 4. V-LOSS DISPLAY SETUP 5. VIDEO MASK SETUP CH1 VIDEO MASK CH2 VIDEO MASK CH3 VIDEO MASK CH4 VIDEO MASK MENU, ESC: EXIT: : MODIFY CH1 VIDEO MASK: ON / OFF CH2 VIDEO MASK: ON / OFF CH3 VIDEO MASK: ON / OFF CH4 VIDEO MASK: ON / OFF MASK means this channel would not display on the live screen, but it still recording. Press direction buttons up/down/left/right to choose items. Press values change button to change values. 23
24 5. BUZZER SETUP MAIN SETUP PAGE 1. HDD INFORMATION 2. DATE-TIME SETUP 3. DISPLAY SETUP 4. CAMERA SETUP 5. BUZZER SETUP 6. SYSTEM SETUP 7. ADVANCED SETUP BUZZER SETUP PAGE **SYSTEM BUZZER ON BUTTON BUZZER ON ALARM BUZZER ON MOTION BUZZER ON VLOSS BUZZER ON MENU, ESC: EXIT: : MODIFY MENU, ESC: EXIT, ENTER: RUN **SYSTEM BUZZER: Buzzer function >ON / OFF 1. BUTTON BUZZER? > ON / OFF 2. ALARM BUZZER? > ON / OFF 3. MOTION BUZZER? > ON / OFF 4. VLOSS BUZZER? > ON / OFF Press direction buttons up/down to BUZZER SETUP items. Press values change button to change values. 24
25 6. SYSTEM SETUP MAIN SETUP PAGE 1. HDD INFORMATION 2. DATE-TIME SETUP 3. DISPLAY SETUP 4. CAMERA SETUP 5. BUZZER SETUP 6. SYSTEM SETUP 7. ADVANCED SETUP SYSTEM SETUP 1. DWELL INTERVAL 2. LANGUAGE 3. VIDEO INPUT 4. WATERMARK CHECK 5. RS-485 ID 6. RS-485 PROTOCOL 7. RS-485 BAUD RATE MENU, ESC: EXIT, ENTER: RUN MENU, ESC: EXIT: : MODIFY SYSTEM SETUP 1. DWELL INTERVAL: - 0 ~ 999SEC 2. LANGUAGE - ENGLISH / CHINESE / JAPANESE 3. VIDEO INPUT: NTSC / PAL system detection, - AUTO / NTSC / PAL 4. WATERMARK CHECK: -ON/ OFF 5. RS-485 ID: - 01 ~ RS-485 PROTOCOL - KEYBOARD / LILIN / PELCO-P / PELCO-D / NICECAM 7. RS-485 BAUD RATE / 2400 / 4800 / 9600 RS-485 ID and protocol is the command for system control keyboard. If user has no keyboard to control then does not have to care. Press direction buttons up/down to choose items. Press values change button to change values. 25
26 8. ADVANCED SETUP MAIN SETUP PAGE 1. HDD INFORMATION 2. DATE-TIME SETUP 3. DISPLAY SETUP 4. CAMERA SETUP 5. BUZZER SETUP 6. SYSTEM SETUP 7. ADVANCED SETUP ADVANCED SETUP PAGE 1. ALARM SETUP 2. MOTION SETUP 3. RECORD SETUP 4. PASSWORD SETUP 5. HDD FORMAT 6. FACTORY DEFAULT MENU, ESC: EXIT, ENTER: RUN ADVANCED SETUP PAGE 1. ALARM SETUP 2. MOTION SETUP 3. RECORD SETUP 4. PASSWORD SETUP ALARM SETUP PAGE 1. ALARM FUNCTION ON / OFF 2. ALARM DURATION 3. ALARM RELAY SETUP< 4. ALARM POLARITY SETUP< 5. HDD FORMAT 6. FACTORY DEFAULT MENU, ESC: EXIT: : MODIFY 1. Alarm function: ON / OFF 2.Alarm duration: 0 ~ 999 ALARM RELAY SETUP PAGE ALARM01 : ON / OFF ALARM02 : ON / OFF ALARM03 : ON / OFF ALARM04 : ON / OFF ALARM POLARITY SETUP PAGE ALARM01: NO / NC / OFF ALARM02: NO / NC / OFF ALARM03: NO / NC / OFF ALARM04: NO / NC / OFF Press direction buttons up/down to choose items. Press values change button to change values. 26
27 2. MOTION SETUP ADVANCED SETUP PAGE 1. ALARM SETUP 2. MOTION SETUP 3. RECORD SETUP 4. PASSWORD SETUP 5. HDD FORMAT 6. FACTORY DEFAULT MOTION SETUP PAGE **MOTION FUNCTION ON **MOTION DURATION **CHANNEL NUMBER 1. SENSITIVITY 2. VELOCITY 3. MOTION ACTIVE 4. MOTION RELAY 5. MOTION AREA SETUP MENU, ESC: EXIT: : MODIFY MOTION SETUP **MOTION FUNCTION (For all channel) -ON / OFF **MOTION DURATION -0 ~ 999 **CHANNEL NUMBER Ch 1 / Ch 2 / Ch 3 / Ch 4 1. SENSITIVITY Adjusts motion Detection Sensitivity. -1 ~ 32 (low high) 2. VELOCITY Adjusts motion object slow /fast speed detection -1 ~ 10 (slow speed fast speed) 3. MOTION ACTIVE (For each channel) -ON / OFF. The function only for channel motion detect active, not for motion record per each. 4. MOTION RELAY -ON/ OFF 5. >MOTION AREA SETUP< Press direction buttons up/down to choose items. Press values change button to change values. 27
28 > MOTION AREA SETUP < All area detect with factory default. Press quad button to change mode and then increase or reduce. For example: Clear lattices Press value change button to reduce. Add lattices Press value change button to reduce. Icon: Press to increase all area, press to reduce all area. Icon: Press Up / Down / Left / Right direction key to move, press to increase lattices; press to reduce lattices. Icon: + Press Up / Down / Left / Right direction key to move and increase area. Icon: X Press Up / Down / Left / Right direction key to move and reduce area. 28
29 3. RECORD SETUP ADVANCED SETUP PAGE 1. ALARM SETUP 2. MOTION SETUP 3. RECORD SETUP 4. PASSWORD SETUP 5. HDD FORMAT 6. FACTORY DEFAULT RECORD SETUP 1. HDD FULL 2. RECORD SPEED 3. RECORD MODE 4. RECORD AUDIO 5. QUALITY 6. SCHEDULE SETUP MENU, ESC: EXIT: : MODIFY RECORD SETUP 1) HDD FULL: When hard disk is full, DVR next step is kept overwrite record or stop record? -OVERWRITE / STOP REC 2) RECORD SPEED: Record FPS setup -1/30(1/30), 1/15(1/15), 1/10(1/10), 1/5 (1/5), 1/3 (1/3), 1/2 (1/2), 1(1), 2(2), 3(3.13), 5(5), 10 (8.33), 15(12.5), 30(25), 60(50), 120(100). 3) RECORD MODE: Record mode setup. -ALWAYS / SCHEDULE / EVENT / EVENT ON SCHEDULE / EVENT + SCHEDULE 4) RECORD AUDIO: Audio record setup -ON / OFF 5) QUALITY: Record image quality setup - SUPER / HIGH / FINE / NORMAL / LOW 6) SCHEDULE SETUP Press direction buttons up/down to choose items. Press values change button to change values. 29
30 Additional: 2. RECORD SPEED. 1/30(1/30), 1/15(1/15), 1/10(1/10), 1/5 (1/5), 1/3 (1/3), 1/2 (1/2), 1(1), 2(2), 3(3.13), 5(5), 10 (8.33), 15(12.5), 30(25), 60(50), 120(100) for the real time recording. When playback, it displays 30 frames per each channel on FULL screen, 15 frames per each channel on 4-split screen. 3. RECORD MODE. ALWAYS / SCHEDULE / EVENT / EVENT ON SCHEDULE / EVENT + SCHEDULE. -Always: 24 hours recording. Manual record or stop. -Schedule: Date and time schedule recording mode. -Event: Alarm / Motion / V-Loss event mode recording. -Event on schedule: Event record only on schedule time. -Event + Schedule: Except event on schedule recording, it would still do record if event happens not on schedule time. 4. RECORD AUDIO: ON / OFF. -Choose on, DVR would do audio recording. 30
31 >SCHEDULE SETUP< RECORD SETUP 1. HDD FULL 2. RECORD SCHEDULE 3. RECORD MOTION 4. RECORD ALARM 5. RECORD POWER ON 6. RESOLUTION >SCHEDULE SETUP< >RECORD SPEED SETUP< Press direction buttons up/down to SCHEDULE items. Press values change button to change values. Factory default is everyday all schedules time on recording. SCHEDULE SETUP CURSOR STEP SUN 30MIN / 6MIN MON TUE WED THU FRI SAT Press direction buttons up/down/left/right to see date and time difference. Press values change left/right button to change 30MIN or 6 MIN Mode function button + + increase - - reduce ++ / - - : Increase / Reduce. Every day record with factory default. On, use up/down button to choose date, press mode button to change on + + or - -. After, use direction left / right button to start increase or reduce time area. 31
32 SCHEDULE SETUP 30MIN CURSOR STEP SUN 00:00 01:00 02:00 03:00 04:00 05:00 06:00 07:00 08:00 09:00 10:00 11:00 12:00 13:00 14:00 15:00 16:00 17:00 18:00 19:00 20:00 21:00 22:00 23:00 MON 00:30 01:30 02:30 03:30 04:30 05:30 06:30 07:30 08:30 09:30 10:30 11:30 12:30 13:30 14:30 15:30 16:30 17:30 18:30 19:30 20:30 21:30 22:30 23:30 00:00 01:00 02:00 03:00 04:00 05:00 06:00 07:00 08:00 09:00 10:00 11:00 12:00 13:00 14:00 15:00 16:00 17:00 18:00 19:00 20:00 21:00 22:00 23:00 TUE 00:30 01:30 02:30 03:30 04:30 05:30 06:30 07:30 08:30 09:30 10:30 11:30 12:30 13:30 14:30 15:30 16:30 17:30 18:30 19:30 20:30 21:30 22:30 23:30 00:00 01:00 02:00 03:00 04:00 05:00 06:00 07:00 08:00 09:00 10:00 11:00 12:00 13:00 14:00 15:00 16:00 17:00 18:00 19:00 20:00 21:00 22:00 23:00 WED 00:30 01:30 02:30 03:30 04:30 05:30 06:30 07:30 08:30 09:30 10:30 11:30 12:30 13:30 14:30 15:30 16:30 17:30 18:30 19:30 20:30 21:30 22:30 23:30 00:00 01:00 02:00 03:00 04:00 05:00 06:00 07:00 08:00 09:00 10:00 11:00 12:00 13:00 14:00 15:00 16:00 17:00 18:00 19:00 20:00 21:00 22:00 23:00 THU 00:30 01:30 02:30 03:30 04:30 05:30 06:30 07:30 08:30 09:30 10:30 11:30 12:30 13:30 14:30 15:30 16:30 17:30 18:30 19:30 20:30 21:30 22:30 23:30 00:00 01:00 02:00 03:00 04:00 05:00 06:00 07:00 08:00 09:00 10:00 11:00 12:00 13:00 14:00 15:00 16:00 17:00 18:00 19:00 20:00 21:00 22:00 23:00 FRI 00:30 01:30 02:30 03:30 04:30 05:30 06:30 07:30 08:30 09:30 10:30 11:30 12:30 13:30 14:30 15:30 16:30 17:30 18:30 19:30 20:30 21:30 22:30 23:30 00:00 01:00 02:00 03:00 04:00 05:00 06:00 07:00 08:00 09:00 10:00 11:00 12:00 13:00 14:00 15:00 16:00 17:00 18:00 19:00 20:00 21:00 22:00 23:00 SAT 00:30 01:30 02:30 03:30 04:30 05:30 06:30 07:30 08:30 09:30 10:30 11:30 12:30 13:30 14:30 15:30 16:30 17:30 18:30 19:30 20:30 21:30 22:30 23:30 00:00 01:00 02:00 03:00 04:00 05:00 06:00 07:00 08:00 09:00 10:00 11:00 12:00 13:00 14:00 15:00 16:00 17:00 18:00 19:00 20:00 21:00 22:00 23:00 00:30 01:30 02:30 03:30 04:30 05:30 06:30 07:30 08:30 09:30 10:30 11:30 12:30 13:30 14:30 15:30 16:30 17:30 18:30 19:30 20:30 21:30 22:30 23:30 For example: TUE ~ SAT, all day schedule time recording, but SUN 07:00 ~ 22:00 and MON 01:30 ~ 11:30 do schedule recording. User can press ENTER to see the schedule time area difference. 32
33 5. PASSWORD SETUP ADVANCED SETUP PAGE 1. ALARM SETUP 2. MOTION SETUP 3. RECORD SETUP 4. EVENT 5. PASSWORD SETUP 6. HDD FORMAT 7. FACTORY DEFAULT PASSWORD SETUP PAGE 1. LEVEL:( ) 2. ADMIN:( ) 3. USER :( ) 1) LEVEL (Log In level ID type setup) >NONE / ADMIN / USER Press direction buttons up/down/left/right to Choose items position. -ADMIN: -USER Press values change button to change values. -NONE, user does not need to insert password before enter in MENU. 2) ADMIN password >44444 (Factory Default) 3) USER password >11111 (Factory Default) Notice: Password always 5 character input, cannot < 5 characters Press direction buttons up/down/left/right to choose items position. Press numeric (1 ~ 4 )button or remote controller ( 0 ~ 9 )to choose password. Choose ADMIN: Only admin password can login advance menu. Choose User: Both user and admin password can login menu but can not go advance menu. 33
34 6. HDD FORMAT ADVANCED SETUP PAGE 1. ALARM SETUP 2. MOTION SETUP 3. RECORD SETUP 4. EVENT 5. PASSWORD SETUP 6. HDD FORMAT 7. FACTORY DEFAULT Press direction buttons up/down to HDD FORMAT items position. Press ENTER to format all HDD. Caution: User can format HDD only when all HDD stop record or playback. HDD FORMAT CAUTION!! : ** HDD FORMAT CAUTION!!** ALL DATA IN HDD WILL BE DESTROYED!! Press ENTER button to format hard disk. PRESS [ENTER] TO FORMAT. PRESS [ESC] TO CANCEL. Press ESC button to cancel hard disk format 7. FACTORY DEFAULT ADVANCED SETUP PAGE 1. ALARM SETUP 2. MOTION SETUP 3. RECORD SETUP 4. EVENT 5. PASSWORD SETUP 6. HDD FORMAT 7. FACTORY DEFAULT Press direction buttons up/down to FACTORY DEFAULT items position. Press ENTER to restore. ** CAUTION!!** ALL SETUP VALUE WILL BE CLEAR, AND RESTORE FACTORY DEFAULT!! Press ENTER button to restore. PRESS [ENTER] TO RESTORE. PRESS [ESC] TO CANCEL. Press ESC button to cancel. 34

35 CF Card Data Read on PC 1. CD folder, save setup.exe to PC hard disk or double click it. 2. Acrobat Adobe PDF installed in PC is necessary 2. Install Shield Wizard processing. 35

36 3. Click Next. 4. Choose folder. 36


37 5. After choose folder, click OK. 6. Click install to start. 37
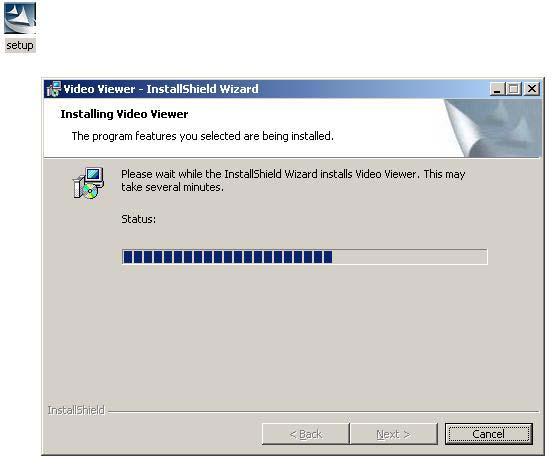

38 7. Installing 8. Click Finish 38
39 Start Program Video Viewer Video Viewer Click Local Search. Left key of mouse click Local Search. 39

40 Choose folder Click folder. Choose new removable hard disk BACKUP.DVR file. OPEN. 40

41 Start to playback Left key of mouse click play Icon: Folder Play Stop First Forward / Reverse End Still playback 41
 Only camera full channel save, no quad pictures save.")

42 Picture capture save. (.JPG file saves.) Only camera full channel save, no quad pictures save. For example: Channel 1.jpg save. Mouse click 1 channel once, then click mouse right button. Choose save as choose the folder you want to save. Type any file name you want, and then click save. 42

43 Or choose save all. Save all cameras full channel picture. Choose folder and type file name. 43

44 Click mouse left button, blue bar display. Click mouse right button to choose 1 ~ 4 cameras to change position. Icon function: Setting: Video Format: NTSC or PAL. Choose Codec: AVI encode format. Show Watermark: Water mark function on or off. 44


45 Video Format: Chose NTSC or PAL. Choose Codec: File format. We strongly recommend user to choose Microsoft Windows Media Video 9. Confirm Cancel Information Half and Full screen choose and Record frame rate 1 ~ 30 45


46 Show Watermark: Water mark function or off. To check file has been modify or not. AVI file save: AVI button: AVI file save. Choose folder and type file name 46


47 Click save: Choose 1 ~ 4, and then click OK. Click OK, and then AVI red light on: Click play button to start record, Click AVI button to stop. AVI red light on, start to record. 47

48 JPG file save: Help Choose folder and type file name Choose camera 1 ~ 4 or save all. 48
49 Hard Disk Data Read 1. Take HDD out from DVR to personal computer. Make sure hard disk in PC is Master or Slave, switch hard disk jumper to Master or Slave. 2. Computer power on, do not need to BIOS setup, just login Windows system. 3. Start Program Video Viewer Video Viewer 4. Click HDD Scan. Left key of mouse click HDD Scan. Click here, hard disk list on. Click the correct DVR hard disk, data will not loose if choose wrong HDD. 49

50 Hard Disk list on: Click here, hard disk list on. Click the correct DVR hard disk, data will not loose if choose wrong HDD. Click correct hard disk model, after function on, user can start to data read. Function access is same as prior pages. 50
51 Record Time Table: 80GB HD Record Quality: Low. KB Range: Lowest: 13, Highest: 20. Average: 17. REC FPS REC Hour REC FPS /2 REC Hour REC FPS 1/3 1/5 1/10 1/15 1/30 REC Hour Record Quality: Normal. KB Range: Lowest: 14, Highest: 25. Average: 20. REC FPS REC Hour REC FPS /2 REC Hour REC FPS 1/3 1/5 1/10 1/15 1/30 REC Hour Record Quality: Fine. KB Range: Lowest: 15, Highest: 28. Average: 22. REC FPS REC Hour REC FPS /2 REC Hour REC FPS 1/3 1/5 1/10 1/15 1/30 REC Hour Record Quality: High. KB Range: Lowest: 17, Highest: 30. Average: 24. REC FPS REC Hour REC FPS /2 REC Hour REC FPS 1/3 1/5 1/10 1/15 1/30 REC Hour Record Quality: Super. KB Range: Lowest: 19, Highest: 45. Average: 32. REC FPS REC Hour REC FPS /2 REC Hour REC FPS 1/3 1/5 1/10 1/15 1/30 REC Hour
52 VGA Description (Optional) Accessories: PIN Male to Female D-SUB pin cable X 1 2. VGA PCB bracket X1 3. Screws X4 (only fit on product serials Z7-00-VGA0-00) 1. VGA board introduction. VGA connector Socket Resolution and NTSC/PAL switcher 3. Resolution and NTSC/PAL switcher table Pin 4 Resolution Pin 1 Pin 2 Pin 3 PAL -----ON 640X480 60HZ ON ON ON NTSC ---OFF 800X600 60HZ ON ON OFF 1024X768 60HZ ON OFF ON 640X480 75HZ ON OFF OFF 800X600 75HZ OFF ON ON 1024X768 75HZ OFF ON OFF Resolution and NTSC/PAL switcher description Step. 1 Step. 2 Step. 3 Step. 4 DVR Power off Pin 4 switcher to NTSC or PAL DVR Power on Pin 1 ~3 switcher resolution. can not be power off DVR. 52
53 Additional Hard Disk x 2 can be installed on DVR base. Both are 2-iron slices immobile type. 2 Iron slices are in the accessories box, please tell supplier if slices are not exist 2-iron slices immobile type: Slices immobile type: 4 screws hole on each slice. 2 for DVR base fixed. Another 2 for hard disk fixed. Hard disk install.: Locking hard disk screws, then locking DVR base screws to fixed on. 53
User s Guide. Combo DVR. Thank you for purchasing our product. Please read this User s Manual before using the product. Change without Notice
 Thank you for purchasing our product. Please read this User s Manual before using the product. Change without Notice Combo DVR User s Guide User please operate according to the DVR model that you purchased
User s Manual. 4 Channel Digital Video Recorder
 T-SRH Thank you for purchasing our product. Please read this User s Manual before using the product. Change without Notice 4 Channel Digital Video Recorder User s Manual / / / / 1 Safety Precautions CAUTION
User s Manual. 4 Channel Mobile DVR
 Thank you for purchasing our product. Please read this User s Manual before using the product. Change without Notice 4 Channel Mobile DVR User s Manual Safety Precautions CAUTION RISK OF ELECTRICAL SHOCK.
User s Manual. 8 Channel Digital Video Recorder
 Thank you for purchasing our product. Please read this User s Manual before using the product. Change without Notice 8 Channel Digital Video Recorder User s Manual Safety Precautions CAUTION RISK OF ELECTRICAL
User s Manual. 16 Channel Digital Video Recorder
 Thank you for purchasing our product. Please read this User s Manual before using the product. Change without Notice 16 Channel Digital Video Recorder User s Manual 1 Safety Precautions CAUTION RISK OF
User s Manual. Combo DVR. Thank you for purchasing our product. Please read this User s Manual before using the product. Change without Notice
 Thank you for purchasing our product. Please read this User s Manual before using the product. Change without Notice Combo DVR User s Manual User please operate according to the DVR model that you purchased
User s Manual. 8 Channel Digital Video Recorder. User Manual
 Thank you for purchasing our product. Please read this User s Manual before using the product. Change without Notice 8 Channel Digital Video Recorder User s Manual Safety Precautions CAUTION RISK OF ELECTRICAL
4CH Real Time DVR. User Guide INFORMATION MAY CHANGE WITHOUT NOTICE. Digital Video Recorder
 User Guide INFORMATION MAY CHANGE WITHOUT NOTICE. Table of Contents Caution... 4 Package Contents... 4 Introduction... 5 1. Product Overview...5 2. Front Panel...5 3. Rear Panel...6 4. IR Remote Controller
User s Manual. 16 Channel Digital Video Recorder
 Thank you for purchasing our product. Please read this User s Manual before using the product. Change without Notice 16 Channel Digital Video Recorder User s Manual 1 Safety Precautions CAUTION RISK OF
8/16 Channel MPEG4 Digital Video Recorder DVR8MP4 DVR16MP4
 Thank you for purchasing our product. Please read this User s Manual before using the product. Change without Notice 8/16 Channel MPEG4 Digital Video Recorder User s Manual for model numbers: DVR8MP4 DVR16MP4
Chapter 1 Features FEATURES
 Chapter 1 Features Operation Playback, recording and network transmission simultaneously Real time full screen or quad screen display 2X digital zoom and Picture-in-picture display Easy operations by shuttle
USER GUIDE STAND-ALONE. 4 channel MPEG-4 Triplex DVR V Stand-Alone DVR User Guide
 USER GUIDE STAND-ALONE 4 channel MPEG-4 Triplex DVR V. 1.4 This document contains preliminary information and subject to change without notice. SAFETY PRECAUTIONS EXPLANATION OF SYMBOLS This symbol is
4Ch Real time / Triplex / Mux Stand Alone DVR
 4Ch Real time / Triplex / Mux Stand Alone DVR User s Manual VER 1.2 VSD-31 4 Channel Stand Alone DVR USB Backup available The most stable and reliable real stand alone Digital Video Multiplex Recorder
261Z. DR040_Quick_V1.0 PLAY RE C
 261Z MPEG4 4CH DVR Quick Guide REC PLAY PA USE ST OP REW FF HDD HD D Fu ll ALAR M TIMER PLAY RE C MENU ENTER LIST SLOW ZOOM SEQ Please read instructions thoroughly before operation and retain it for future
Digital Video Recorder
 Digital Video Recorder User Manual Please read this instructions thoroughly before operation and retain it for future reference. 720 V 1.2 WARNING DVR All the safety and operating instructions should be
H.264 Network DVR. Quick Start
 341Z H.264 Network DVR Quick Start GUI Display with USB Mouse Control Please read instructions thoroughly before operation and retain it for future reference. For the actual display & operation, please
4 CH Digital Quad Recorder
 4 CH Digital Quad Recorder VT-DVR04Q Please read this instructions thoroughly before operation and retain it for future reference. User Manual V 1.0 WARNING DQR All the safety and operating instructions
H.264 Network DVR. Quick Start
 H.264 Network DVR Quick Start GUI Display with USB Mouse Control Please read instructions thoroughly before operation and retain it for future reference. For the actual display & operation, please refer
2009 JAN. Ver ch XGA LAN Remote OPTION
 4CH STANDALONE DVR MANUAL 2009 JAN. Ver 1.1 4ch MOTION XGA LAN Remote OPTION HDD SUPPORT LIST SATA Warning: Should you wish to install a new hard drive in this unit, a list of tested hard drives shown
H.264 Network DVR. Quick Start. GUI Display with USB Mouse Control 336Z
 336Z H.264 Network DVR Quick Start GUI Display with USB Mouse Control Please read instructions thoroughly before operation and retain it for future reference. For the actual display & operation, please
SE Series DVR Manual
 2 Table of Contents General Safety Precautions 4 About This Manual 5 Front Panel Layout 7 Rear Panel Layout 8 Main Screen Layout 9 Mouse Control 10 Operation using Front Panel Buttons/IR Remote Control
Downloaded from manuals search engine
 INDEX 1. DVR Features...1 2. Layout 2.1 Front Panel...1 2.2 Rear Panel...2 2.3 Remote Control...2 3. Installation 3.1 Installing the Hard Drive...3 3.2 Connecting Camera and Monitor...3 3.3 Connecting
Mini DVR Module U S E R M A N U A L
 Mini DVR Module U S E R M A N U A L Contents 1. SAFETY PRECAUTIONS... 1 2. FEATURES... 2 3. PACKAGE CONTENT... 3 4. MINI DVR MODULE... 4 4.1 About the Mini DVR Module... 4 4.2 Mini DVR Module Layout...
VIDEO WEB SERVER. User s Manual. Please read instructions thoroughly before operation and retain it for future reference. PATENT 732 V1.
 VIDEO WEB SERVER PATENT User s Manual Please read instructions thoroughly before operation and retain it for future reference. 732 V1.0 WARNING The apparatus shall not be exposed to dripping or splashing
4 CHANNEL MPEG4 DVR. Thank you for purchasing our product. Please read this User*s Manual before using the product
 4 CHANNEL MPEG4 DVR Thank you for purchasing our product. Please read this User*s Manual before using the product USER S MANUAL CONTENTS 1. SAFETY PRECAUTIONS... 2 2. FEATURES... 3 3. NAME AND FUNCTION
Digital Video Recorder
 http://www.cpcamcctv.com Digital Video Recorder User s s Manual Please read instructions thoroughly before operation and retain it for future reference. 1 CPD507, 505_V0.985 Thank-You Note Before You Get
4 Channel Digital Video Recorder / Camera Kit. Model No QV-3024 USER S MANUAL
 4 Channel Digital Video Recorder / Camera Kit Model No QV-3024 USER S MANUAL 1 Important Note: Please keep this manual in a safe location in case you need to refer to it at a later date. 1 INDEX CHAPTER
Quick Guide. ENC-H Video Encoder XX
 Quick Guide ENC-H264-16 Video Encoder XX298-20-00 Vicon Industries Inc. does not warrant that the functions contained in this equipment will meet your requirements or that the operation will be entirely
SmartWatch Eco/Eco Compact
 SmartWatch Eco/Eco Compact Digital Video Recorders SmartWatch Eco SmartWatch Eco Compact Quick User Guide Index Box Contents...3 Front Panel Controls...4-5 SmartWatch Eco Compact...4 SmartWatch Eco...5
MDVR-14 SOLID STATE MINI DVR User Guide
 MDVR-14 SOLID STATE MINI DVR User Guide 1 Contents 1. SAFETY PRECAUTIONS...3 2. FEATURES...4 3. PACKING LIST...4 4. MDVR DESCRIPTION... 5 5. BASIC CONFIGURATION...7 6. DISPLAY...8 7. OPERATION...9 8. MAIN
User s s Manual 4CH 16CH / 8CH / 4CH. 16CH / 8CH / 4CH Built-in in DVD-RW Writer or CD-RW Writer 150Z
 150Z 4CH 16CH / 8CH / 4CH 16CH / 8CH / 4CH Built-in in DVD-RW Writer or CD-RW Writer User s s Manual Please read instructions thoroughly before operation and retain it for future reference. MPEG4 DVR SERIES_Z_V1.1
DVR CH Digital Video Recorder SW242-LP4 / SW242-LPN
 DVR4-1100 4CH Digital Video Recorder SW242-LP4 / SW242-LPN User Manual INDEX 1. DVR Features... 1 2. Layout 2.1 Front Panel...1 2.2 Rear Panel...2 2.3 Remote Controller...2 3. Installation 3.1 Installing
MDR616, 608, 604 manual_v0.95
 256Z MANUAL Please read instructions thoroughly before operation and retain it for future reference. The image shown above may differ from the actual product appearance. MDR616, 608, 604 manual_v0.95 IMPORTANT
CONTENTS Chapter 1: DVR Features... 4 Chapter 2: Overview... 5 Chapter 3: Starting the DVR... 8
 1 CONTENTS Chapter 1: DVR Features... 4 Chapter 2: Overview... 5 2.1 Front Panel... 5 2.2 Rear Panel... 6 2.3 Remote Control... 7 Chapter 3: Starting the DVR... 8 3.1 Firmware Version... 8 3.2 Detecting
USER GUIDE VCT-STDDVR9-1 = /16 channel MPEG-4 Triplex DVR V. 1.0
 USER GUIDE VCT-STDDVR9-1 = 16-1 9/16 channel MPEG-4 Triplex DVR V. 1.0 This document contains preliminary information and subject to change without notice. 2 SAFETY PRECAUTIONS EXPLANATION OF SYMBOLS This
SINGLE CHANNEL DVR. Instruction Manual DXR1000 / SXR1000 Series DVR without Audio DXR1100 / SXR1100 / DGR1100 Series DVR with Audio
 SINGLE CHANNEL DVR Instruction Manual DXR1000 / SXR1000 Series DVR without Audio DXR1100 / SXR1100 / DGR1100 Series DVR with Audio www.strategicvista.com Please be sure to read carefully and follow all
Quick Start. H.264 Network DVR 303Z
 303Z H.264 Network DVR Quick Start Please read instructions thoroughly before operation and retain it for future reference. The image shown above may differ from the actual product appearance. 792_Quick_V0.9
User s s Manual. Please read instructions thoroughly before operation and retain it for future reference.
 User s s Manual Please read instructions thoroughly before operation and retain it for future reference. Thank-You Note Before You Get Start First of all, we would like to express our gratitude to you
HIGH STORAGE MODELS WITH CD-RW DRIVE
 209 HIGH STORAGE MODELS WITH CD-RW DRIVE The image shown above may differ from the actual product appearance. 505HC_507HC_V1.1 IMPORTANT SAFEGUARD CAUTION RISK OF ELECTRIC SHOCK CAUTION: To reduce the
Video Web Server. User s s Manual MPEG-4 VIDEO WEB SERVER. Please read instructions thoroughly before operation and retain it for future reference.
 13 Video Web Server MPEG-4 VIDEO WEB SERVER User s s Manual Please read instructions thoroughly before operation and retain it for future reference. 733_V0.95 Thank-You Note Before You Get Start First
Please read instructions thoroughly before operation and retain it for future reference.
 DIGITAL VIDEO RECORDER USER MANUAL Please read instructions thoroughly before operation and retain it for future reference. KD673_672_671_670_AC791_790_CD540_MR673_manual_V1.1 IMPORTANT SAFEGUARD CAUTION
Before using the product, please read this manual carefully. TeleEye RM134
 Before using the product, please read this manual carefully. TeleEye RM134 Notice: Signal Communications Limited reserves the right to make improvements to the product described in this manual at any time
DVAA Series Disk Array for DVR1 Series Digital Video Recorder
 DVAA Series Disk Array for DVR1 Series Digital Video Recorder Eng Installation Instructions Philips Communication, Security & Imaging Warning! To prevent fire and electronic shock, do not expose this product
209Z. The image shown above may differ from the actual product appearance. CPD505ZHC_507ZHC / 507ZHD_505ZHD_V1.4
 209Z The image shown above may differ from the actual product appearance. CPD505ZHC_507ZHC / 507ZHD_505ZHD_V1.4 CAUTION RISK OF ELECTRIC SHOCK CAUTION: To reduce the risk of electric shock, do not expose
DVR-Q4 DVR-Q4/80 DVR-Q4/120. Operating Instructions. Four Camera DVR System
 DVR-Q4 DVR-Q4/80 DVR-Q4/120 Operating Instructions Four Camera DVR System Speco Technologies 200 New Highway Amityville. NY 11701 Tel. 631-957-8700 Fax. 631-957-9142 www.specotech.com Contents 1. Features
Triplex MPEG-4 DVR. OSD Setup Guide
 Triplex MPEG-4 DVR OSD Setup Guide 00940A01 Version 1.1 00940A01 Table of Content Menu System Overview...5 ...5 Key Usage in OSD Menu...5 Key Usage in Virtual Keyboard...6 System Setup...8 ...8
AVerMedia. AverDiGi EH5116 PRO. Quick Installation Guide
 AVerMedia AverDiGi EH5116 PRO Quick Installation Guide i SPECIFICATIONS ARE SUBJECT TO CHANGE WITHOUT PRIOR NOTICE THE INFORMATION CONTAINED HEREIN IS TO BE CONSIDERED FOR REFERENCE ONLY WARNING TO REDUCE
NVR User Manual. NVR User Manual For further help, please visit
 NVR User Manual NVR User Manual For further help, please visit www.zmodo.com Introduction This product series is a 4 channel embedded NVR with pentaplex functionality: the product will perform video audio
264Z. CPD531_535_537manual_V1.2
 264Z BEST DIGITAL SECURITY GUARD SERIES Please read instructions thoroughly before operation and retain it for future reference. The image shown above may differ from the actual product appearance. CPD531_535_537manual_V1.2
Lorex Client 7.0 & Lorex Message Master
 Lorex Client 7.0 & Lorex Message Master Software Manual English Version 1.0 MODELS: L19WD Series www.lorexcctv.com Includes L19WD800 & L19WD1600 Copyright 2008 Lorex Technology Inc. Table of Contents Table
USER S MANUAL ENGLISH 782, 781, 760, 761, 782A / 502, 501, 560, 561, 502A_V1.5
 205 USER S MANUAL Please read instructions thoroughly before operation and retain it for future reference. The image shown above may differ from the actual product appearance. ENGLISH 782, 781, 760, 761,
8Channel Stand Alone DVR Audio, USB Backup available VER1.0
 8Channel Stand Alone DVR Audio, USB Backup available VER1.0 Installation & Safeguards INSTALLATION & SAFEGUARDS All the safety and operating instructions should be read before the unit is operated. Environment
4CH H.264 Multiplex DVR
 4CH H.264 Multiplex DVR User Manual VER.:1.0, P/N: R040199A This symbol is intended to alert the user to the presence of unprotected Dangerous voltage" within the product's enclosure that may be strong
H.264 4/8/10/16-Channel High-Definition DVR Quick Start Guide
 H.264 4/8/10/16-Channel High-Definition DVR Quick Start Guide Products: BLK-HD4D, BLK-HD4E, BLK-HD8D, BLK-HD10D, BLK-HD16D BLK-HD4E (upper) BLK-HD4D and BLK-HD8D (middle) BLK-HD10D and BLK-HD16D (lower)
Keyboard User s Manual
 Keyboard User s Manual Version 1.0.0 1 Table of Contents 1 Features and Specifications... 7 1.1 Features... 7 1.2 Front Panel... 7 1.3 Rear Panel... 9 1.3.1 NKB1000 Series... 9 1.3.2 KB1000 Series... 9
760A_760AS_761AS_761ASV_560A_560AS_561AS_561ASV_Manual_V1.2
 272Z 4CH MPEG4 DVR USER MANUAL Please read instructions thoroughly before operation and retain it for future reference. The image shown above may differ from the actual product appearance. 760A_760AS_761AS_761ASV_560A_560AS_561AS_561ASV_Manual_V1.2
Intelligent Security & Fire
 Digital Video Recorder User Manual CBC V 0.1 Table of Contents 1. Introduction 1-1 Safety Warning 3 1-2 Features 4 1-3 Specifications... 5 2. Installation 2-1 Package contents. 6 2-2 Connection. 6 2-3
H.264 Network DVR. User Manual
 340Z H.264 Network DVR User Manual GUI Display with USB Mouse Control Please read instructions thoroughly before operation and retain it for future reference. For the actual display & operation, please
Digital Video System. User s s Manual.
 http://www.cpcamcctv.com Digital Video System User s s Manual Please read instructions thoroughly before operation and retain it for future reference. CPD507 V0.97 Thank-You Note Before You Get Start First
DIGITAL VIDEO RECORDER
 DIGITAL VIDEO RECORDER USER MANUAL Please read instructions thoroughly before operation and retain it for future reference. 717ASV_715ASV_MANUAL_V0.9 IMPORTANT SAFEGUARD CAUTION RISK OF ELECTRIC SHOCK
USER MENU Chapter 1: Features...4 Chapter 2: Layout...5 Chapter 3: DVR Installation...7 Chapter 4: DVR Boot up...8 Chapter 5 DVR Menu...
 + USER MENU 0 CONTENTS 1 USER MENU Chapter 1: Features...4 DVR Features...4 Chapter 2: Layout...5 2.1 Front Panel (Details please refer to the real product)...5 2.2 Rear Panel (Details please refer to
RUGGED MOBILE 4CH STANDALONE DVR SYSTEM. MANUAL 2010 Feb. V1.0
 RUGGED MOBILE 4CH STANDALONE DVR SYSTEM MANUAL 2010 Feb. V1.0 CONTENTS A FEATURE...3 B SPECIFICATIONS...3 C FRONT PANEL...4 D REAR PANEL...5 E OPERATING MANUAL...6 1 Main Menu...6 2 Camera Setup...6 3
411ZA/811ZA/611Z/611ZA (N04) Quick Start Guide
 Quick Start Guide") 411ZA/811ZA/611Z/611ZA (N04) Quick Start Guide 1. Packing...P2 2. Hard Disk Installation...P3 3. DVD-RW Installation...P4 3. Front Panel Controls...P5 4. Rear Panel Connectors...P6 5. Live Operations...P8
411ZA/811ZA/611Z/611ZA (N04) Quick Start Guide 1. Packing...P2 2. Hard Disk Installation...P3 3. DVD-RW Installation...P4 3. Front Panel Controls...P5 4. Rear Panel Connectors...P6 5. Live Operations...P8
TVV421S 1 channel digital videorecorder
 TVV421S 1 channel digital videorecorder User Manual Table of Contents 1. Introduction 1-1 Safety Warning 1-2 Features 1-3 Specifications... 2. Installation 2-1 Package contents. 2-2 Connection. 6 6 2-3
USER GUIDE. EST9120/EST /16 channel MPEG-4 Triplex DVR V. 1.5
 EST9120/EST16120 User Guide USER GUIDE EST9120/EST16120 9/16 channel MPEG-4 Triplex DVR V. 1.5 This document contains preliminary information and subject to change without notice. EST9120/EST16120 User
Introduction to Digital Video Recorder
 1 CONTENTS Introduction to Digital Video Recorder-----------------------------------------------------------------3 Front panel buttons-----------------------------------------------------------------------------------------4
DVR4MQAEE DIGITAL 4-CHANNEL MULTIPLEXER QUAD MPEG-4 RECORDER + ETHERNET
 DVR4MQAEE DIGITAL 4-CHANNEL MULTIPLEXER QUAD MPEG-4 RECORDER + ETHERNET USER MANUAL - 2 - DVR4MQAEE DIGITAL 4-CHANNEL MULTIPLEXER QUAD MPEG-4 RECORDER + ETHERNET 1. Introduction To all residents of the
DDR-08 DDR-16 Full D1 Realtime H.264 DVR 8 / 16 CH. Quick Setup Guide
 DDR-08 DDR-16 Full D1 Realtime H.264 DVR 8 / 16 CH. Quick Setup Guide PACKAGE CONTENTS A. One (1) DDR-08 / DDR-16 DVR B. One (1) Remote Controller C. Two (2) AAA Battery for Remote Controller D. One (1)
DIGITAL VIDEO RECORDER
 DIGITAL VIDEO RECORDER USER MANUAL Please read instructions thoroughly before operation and retain it for future reference. CPD537ASV_535ASV_MANUAL_V0.95 IMPORTANT SAFEGUARD CAUTION RISK OF ELECTRIC SHOCK
User Manual. H.264 Network DVR. Please read instructions thoroughly before operation and retain it for future reference.
 H.264 Network DVR User Manual Please read instructions thoroughly before operation and retain it for future reference. AV798(D)_797_796(D)_795_792(D)_CD541(D)_manual_V1.3 IMPORTANT SAFEGUARD CAUTION RISK
NVR&IPCAM USER MANUAL V1.0 (USER MANUAL) V1.0. Thanks for choosing our products, please read this manual carefully before use!
 V1.0. Thanks for choosing our products, please read this manual carefully before use!") NVR&IPCAM (USER MANUAL) V1.0 Thanks for choosing our products, please read this manual carefully before use! NOTICE Installation condition 1) In order to ensure your rights, please read this manual carefully
NVR&IPCAM (USER MANUAL) V1.0 Thanks for choosing our products, please read this manual carefully before use! NOTICE Installation condition 1) In order to ensure your rights, please read this manual carefully
HIGH STORAGE MODELS WITH CD-RW DRIVE
 207Z HIGH STORAGE MODELS WITH CD-RW DRIVE The image shown above may differ from the actual product appearance. 715ZC_717ZC_V1.3 IMPORTANT SAFEGUARD CAUTION RISK OF ELECTRIC SHOCK CAUTION: To reduce the
CCTVPROM4 DVR + 4 CAMERAS + ACCESSORIES
 CCTVPROM4 DVR + 4 CAMERAS + ACCESSORIES USER MANUAL DIGITAL 4-CHANNEL MULTIPLEXER QUAD MPEG-4 RECORDER + ETHERNET 1. Introduction To all residents of the European Union Important environmental information
4 CH Vehicle Mobile DVR
 4 CH Vehicle Mobile DVR TAYPE A: Without 3G Module TAYPE B: 3G Module 2012 APR V1.1 TAYPE B OPTIONAL Index A. Features... 1 B. Specification... 2 C. Product Appearance... 3 D. Installation 2.5 HDD... 4
User s Manual November 2004 V 1.1
 User s Manual Please read instructions thoroughly before operation and retain it for future reference. November 2004 V 1.1 WS2 WARNING The apparatus shall not be exposed to dripping or splashing and that
4CH/ 8CH/ 16CH Digital Video Recorder
 4CH/ 8CH/ 16CH Digital Video Recorder DVR204B/ 208B/ 216B INSTRUCTION MANUAL DIRECTORY CHAPTER 1 Hard Disk Installing (Standard shipping products include neither HDD or R/W)...2 CHAPTER 2 Panel Appearance...4
HLong Asia Industrial
 SDI DVR Stand alone digital video recorder HLong Asia Industrial Thank you for using the company's products! This manual describes only the host functions basic operation. Product design and specification
4-CH STANDALONE DVR PDR-400/400IP INSTRUCTION MANUAL
 4-CH STANDALONE DVR PDR-400/400IP INSTRUCTION MANUAL CAUTION RISK OF ELECTRIC SHOCK CAUTION TO REDUCE THE RISK OF ELECTRIC SHOCK, DO NOT OPEN COVER. NO USER SERVICEABLE PARTS INSIDE. REFER SERVICING TO
H.264 Network DVR. User Manual
 H.264 Network DVR User Manual GUI Display with USB Mouse Control Please read instructions thoroughly before operation and retain it for future reference. For the actual display & operation, please refer
9 Channel Multiplex Digital Video Recorder
 9 Channel Multiplex Digital Video Recorder Model: DGN209 Installation / User Manual Digimerge Technologies Inc. Under the copyright laws, this documentation may not be copied, photocopied, reproduced,
TABLE OF CONTENTS 1. INTRODUCTION PHYSICAL UNIT Front Panels Rear Panel Remote Control GETTING STARTED...
 TABLE OF CONTENTS 1. INTRODUCTION...3 2. PHYSICAL UNIT...3 2.1 Front Panels...3 2.2 Rear Panel...3 2.3 Remote Control...4 3. GETTING STARTED...6 4. HARDWARE SETUP...7 4.1 Hard Disk Drive Installation...7
Real Time Triplex Stand Alone DVR. User's Manual. Real Time Triplex Stand Alone DVR. [ TITAN 4 / 8 / 16 Channel DVR ] V 1.19
![Real Time Triplex Stand Alone DVR. User's Manual. Real Time Triplex Stand Alone DVR. [ TITAN 4 / 8 / 16 Channel DVR ] V 1.19](/thumbs/74/70354128.jpg "Real Time Triplex Stand Alone DVR. User's Manual. Real Time Triplex Stand Alone DVR. [ TITAN 4 / 8 / 16 Channel DVR ] V 1.19") User's Manual Real Time Triplex Stand Alone DVR [ TITAN 4 / 8 / 16 Channel DVR ] V 1.19 1 Contents SAFETY WARNING AND CAUTION.... 5 CHAP 1. INTRODUCTION.. 11 1. Overview..... 11 2. Common Features... 11
User's Manual Real Time Triplex Stand Alone DVR [ TITAN 4 / 8 / 16 Channel DVR ] V 1.19 1 Contents SAFETY WARNING AND CAUTION.... 5 CHAP 1. INTRODUCTION.. 11 1. Overview..... 11 2. Common Features... 11
Four Channel Digital Video Recorder
 Four Channel Digital Video Recorder Models: DGR104 Installation / User Manual Digimerge Technologies Inc. Under the copyright laws, this documentation may not be copied, photocopied, reproduced, translated,
CAUTION RISK OF ELECTRIC SHOCK
 DIGITAL VIDEO RECORDER USER MANUAL Please read instructions thoroughly before operation and retain it for future reference. The image shown above may differ from the actual product appearance. 792D-C_manual_V1.0
DIGITAL VIDEO RECORDER
 DIGITAL VIDEO RECORDER USER MANUAL Please read instructions thoroughly before operation and retain it for future reference. KPD678_676_CPD536_538_manual_V1.0 IMPORTANT SAFEGUARD CAUTION RISK OF ELECTRIC
DVR DVR VENEZIA series
 DVR DVR VENEZIA series Main features - Real Esaplex (Recording, Live, Play, Control, Backup, Network) - Quick connection by mobile/ PDA phone without using any software - H264 compression - Real time Recording,
HIGH STORAGE MODELS WITH CD-RW DRIVE
 208 CPD HIGH STORAGE MODELS WITH CD-RW DRIVE CPD505HC_CPD507HC_QUICK_V1.2 1. OVERVIEW 1.1 Product Description With the high storage capacity feature, this MPEG-4 DVR model is designed to accommodate up
Analog High Definition DVR. Stand alone digital video recorder. User Manual H.264 AHD DVR
 Analog High Definition DVR Stand alone digital video recorder User Manual H.264 AHD DVR WARNING To reduce the risk of fire or electric shock, do not expose this appliance to rain or moisture. All the safety
INSTALLATION & SAFEGUARDS All the safety and operating instructions should be read before operation.
 Ver 1.400 INSTALLATION & SAFEGUARDS All the safety and operating instructions should be read before operation. Environment Condition for Installation 1. To prevent electric shock or other hazard, do not
Stand-Alone 4 Ch Real Time Record Mobile DVR
 Stand-Alone 4 Ch Real Time Record Mobile DVR User Manual (460CF/460CFS-V2) Please read this user manual completely before operating this DVR system and keep it in a safe place for future reference. TABLE
16Channel Stand-alone DVMR
 VER1.02 VER1.0 16Channel Stand-alone DVMR Installation & Safeguards INSTALLATION & SAFEGUARDS All the safety and operating instructions should be read before the unit is operated. Environment Condition
9/16CH Triplex MPEG-4 DVR
 DVR 9CH User Guide 9/16CH Triplex MPEG-4 DVR Release Version : 1.4 This document contains preliminary information and subject to change without notice. 目录. THE LIST OF CONTENTS DVR SET CLIENT SOFTWARE
Hybrid DVR Quick Start Guide
 Hybrid DVR Quick Start Guide Thank you for purchasing our product. If there is any question or request, please do not hesitate to contact dealer. This manual is applicable to most Hybrid DVR models. DVR
QSD2308L/QSD2316L DVR User s Manual
 QSD2308L/QSD2316L DVR User s Manual NOTE: We use two different front panel designs on these models. They have the same function buttons but they are arranged differently. Please match the front panel on
DIGITAL VIDEO RECORDER
 DIGITAL VIDEO RECORDER USER MANUAL Please read instructions thoroughly before operation and retain it for future reference. KD678_677_676_675_AC758D_757_756D_755_CD536_538_manual_V1.2 IMPORTANT SAFEGUARD
SPECIFICATIONS ARE SUBJECT TO CHANGE WITHOUT PRIOR NOTICE. THE INFORMATION CONTAINED HEREIN IS TO BE CONSIDERED FOR REFERENCE ONLY.
 COPYRIGHT 2010 by AVerMedia Information, Inc. All right reserved. Reproduction without permission is prohibited. No part of this document may be reproduced or transmitted in any form, or by any means without
Digital Video Surveillance System Engineering Service Manual
 Digital Video Surveillance System Engineering Service Manual The picture might differ according to the specification and model. Contents of this manual are protected under copyrights and computer program
5 B&W Rear View System Camera
 5 B&W Rear View System Camera Instruction Manual MODEL: CA453 www.lorexcctv.com Copyright 2007 LOREX Technology Inc. Thank you for purchasing the Lorex 5 Black & White Rear View System Camera. This system
User s Manual of DVR ULTIMAX. Remote Client Software V wersja 2.40
 User s Manual of DVR ULTIMAX Remote Client Software V 4.0.1 ULTIMAX-304 ULTIMAX-308 ULTIMAX-316 ULTIMAX-504 ULTIMAX-508 ULTIMAX-516 ULTIMAX-704 ULTIMAX-708 ULTIMAX-716 wersja 2.40 Index 1 Software Install,
H.264 DVR. User Manual
 H.264 DVR User Manual GUI Display with USB Mouse Control Please read instructions thoroughly before operation and retain it for future reference. For the actual display & operation, please refer to your