INSTRUCTION MANUAL NAGRA LB NAGRA LB USER MANUAL
|
|
|
- Anabel Aubrey Summers
- 5 years ago
- Views:
Transcription

1 NAGRA LB USER MANUAL PN: December 15, 2010
2 DELIVERED WITH... 5 QUICK START... 6 INSTALLING BATTERIES...6 TURNING ON THE FIRST TIME...6 STORAGE MEMORY... 6 COMPACT FLASH CARDS... 7 INPUT SELECTION... 7 INPUT SENSITIVITY... 7 FILE SETTINGS... 7 RECORD... 7 PLAYBACK... 8 PAUSE... 8 ALL PANELS... 9 FRONT PANEL MAIN SELECTOR REWIND / FORWARD SKIP BACK / SKIP FORWARD MULTIFUNCTION SWITCH BACKLIGHT / BATTERY STEREO / MONO INTERNAL MIC DISPLAY /12 LED INPUT LEVEL /14 INPUT POTENTIOMETERS REFERENCE GENERATOR INTERNAL MIC CUE CLUTCH LEFT PANEL BUFFER SWITCH CF SLOT EJECT BUTTON /5 INPUT SENSITIVITY SELECTOR /7 PHANTOM POWER DIGITAL INPUT /10 ANALOG INPUTS RIGHT PANEL /2 ANALOG OUTPUTS DIGITAL OUTPUT USB HOST PC USB ETHERNET EXTENSION CONNECTOR TOP PANEL DISPLAY SPEAKER FUNCTION KEYS JOG WHEEL MULTIFUNCTION KEYS SHIFT KEY HOLD KEY DISPLAY...16 Page 2 of 49
3 ACTUAL SETTINGS...17 SETTING UP THE LB...18 NAVIGATING THROUGH THE FULL SETUP (TOP PANEL)...18 NAVIGATING THROUGH THE SIMPLIFIED SETUP (FRONT PANEL)...18 FULL SETUP TREE...19 DIRECTORIES...22 DIRECTORIES...23 PLAYING AN INDEX EDITING AN INDEX DELETING AN INDEX DELETING A FOLDER WORKING DIRECTORY RENAMING A FOLDER OR AN INDEX ESCAPE FROM DIRECTORIES CREATING A NEW FOLDER COPYING AN INDEX BETWEEN THE CF CARD, INT. MEMORY COPYING AN INDEX TO A FTP CLIENT COPYING AN INDEX FROM AN ARES-M, ARES-MII or ARES-ML COPYING AN INDEX BETWEEN THE NAGRA LB AND A MEMORY STICK / HDD RECEIVING AN INDEX USB TRANSFER TO PC / MAC COMMUNICATION...25 SETTINGS...26 TEMPLATES STORAGE RECORD FILE SET FILE TYPE...27 FILE EXTENSION NAME...28 FILE PREFIX...28 REC FILE SPLIT...28 LOUDSPEAKER LOW CUT FILTER LIMITER PRE-RECORD INPUT DEVICE MATRIX MS DECODER OUTPUT MODE OUTPUT LEVEL INT. MIC GAIN MISCELLANEOUS...30 FORMAT DATABASE SYNC POWER DOWN NIGHT MODE LANGUAGES VERSION DATE & TIME AUTO SKIP RED LED LEVEL BEEP BEEP VOLUME Page 3 of 49
4 REFERENCE GENERATOR FILE COUNTER POWER ON COUNTER SYSTEM UPDATE SYSTEM RESET DEFAULT SETTINGS SYSTEM INFO CF CARD TEST REMOTE WIRING OF THE EXTENSION CONNECTOR SIMPLIFIED SETUP TREE (FRONT PANEL)...36 BLUETOOTH & ETHERNET COMMUNICATIONS...37 BLUETOOTH & ETHERNET COMMUNICATIONS...38 BLUETOOTH BLUETOOTH NAME SENDING...38 RECEIVING...38 BLACKBERRY 9000 BLUETOOTH PAIRING EXAMPLE...39 BLACKBERRY BLUETOOTH TRANSFER EXAMPLE...40 ETHERNET FTP SETTINGS (PULL MODE)...41 FTP CLIENT SETTINGS (PUSH MODE)...41 DEFAULT ETHERNET SETTINGS...42 ETHERNET CONNECTION EXAMPLE (PULL MODE)...43 ETHERNET CONNECTION EXAMPLE (PUSH MODE)...43 EDITING BASIC EDITING PRINCIPLES FUNCTIONS IN THE DIRECTORY FIELD...45 FUNCTIONS DURING PLAYBACK IN BOTH FIELDS...45 FUNCTIONS IN THE EDITING FIELD...45 FUNCTIONS IN THE DIRECTORY FIELD WITH SHIFT...45 FUNCTIONS IN THE EDITING FIELD WITH SHIFT...45 ZOOM FUNCTIONS...45 INSERTING AN AUDIO PORTION OR FULL INDEX MODIFYING THE LENGTH OF AN IMPORTED PORTION IN THE EDITING FIELD UNDO FUNCTION EXPORT, SAVE, EXIT FUNCTIONS EDITING OF NAGRA LB RECORDED RAW FILES EDITING OF IMPORTED FILES ALARMS...47 LOOSING POWER DURING RECORD...47 TECHNICAL SPECIFICATIONS Page 4 of 49
5 DELIVERED WITH Nagra LB including the battery box for 8 AA cells. Carrying case Carrying strap AC/DC converter V AC, 15V DC, 0.7A including AC plug adapters Bluetooth dongle Standard USB cable CD including the user manual Optional: Additional headphone amplifier (+12dB) WARNING Headphones are rated in db SPL at 1mW, and this amplifier (like many other similar headphone amps) is capable of producing extreme SPLs. The levels obtainable are sufficient to cause almost instantaneous permanent hearing damage! Never operate the amp at very high levels, and never switch the amplifier on with signal while wearing you headphones. Always start with the volume control at minimum, and gradually increase the level until it is comfortable, but not too loud. Because of the very low distortion, it is easy to increase the level too far without noticing. Your ears are precious - safeguard them at all times. Note the warning above - this is serious. Most headphones are capable of at least 94dB SPL at 1 mw, with some as high as 107dB SPL. Even 10mW is enough to create sound levels capable of causing hearing damage, so you must be very careful to avoid damaging levels. Continuous db SPL Maximum Exposure Time 85 8 hours 88 4 hours 91 2 hours 94 1 hour minutes minutes minutes 106 < 4 minutes 109 < 2minutes 112 ~ 1 minute 115 ~ 30 seconds Maximum Exposure to SPL Note that the exposure time is for any 24 hour period, and is halved for each 3dB SPL above 85dB. The above shows the accepted standards for recommended permissible exposure time for continuous time weighted average noise, according to NIOSH (National Institute for Occupational Safety and Health) and CDC (Centers for Disease Control). Although these standards are US based, they apply pretty much equally in most countries - hearing loss does not respect national boundaries. Page 5 of 49
 to the corresponding battery type: If the switch is set as shown in the picture (to the right), dry cells are selected.")


6 QUICK START INSTALLING BATTERIES The battery box is made to hold 8 dry cells or rechargeable batteries. Beware to correctly set the switch (1) to the corresponding battery type: If the switch is set as shown in the picture (to the right), dry cells are selected. If a power supply is connected to the battery box (connector 3), the Nagra LB will run from the external power without charging the cells. If the switch is set to the left side, rechargeable cells are selected. When external power is connected, the machine will run from the external power and simultaneously, the NiMH cells will be charged. The red LED on the battery box starts blinking indicating that the batteries are in the charge mode. The charge current is approx 715 ma. The charge time for empty NimH cells is approx 3 to 4 hours for 2500 ma types. The red LED will stay ON once the batteries are fully charged. If the batteries are making a mechanical noise when shaking the machine, glue the additional Millar film inside the compartment. With fresh dry cells, the consumption in record is approx. 215 ma (display brightness max). In power OFF, the consumption is 0.22 ma. To know the status of the batteries, pull the switch (front panel 5) to the left and a sub window appears. Open the battery box by sliding the cover. Install the 8 AA cells as shown on the cover. Close the battery box and verify that the switch is in the correct position. Fix the battery box with the 2 screws to the Nagra LB (observing the correct position of connector 2). Wait a few seconds before turning on the Nagra LB. This permits to charge the super capacitor inside the machine (date & time counter). TURNING ON THE FIRST TIME When turning on the Nagra LB by setting the main selector to TEST, a RTC (Real Time Clock) window will appear for a few seconds. This means that date and time need to be set. To do this, refer to NAVIGATING THROUGH THE MENUS and the menus MISCELLANEOUS paragraph. Afterwards appears the main test display. STORAGE MEMORY As the Nagra LB has a 2GB internal memory as well as Compact Flash slot and a USB host, the memory area must be selected once. Beware that the CF card as well as the USB memory MUST BE FORMATTED IN FAT32. In the case shown on the picture, the internal memory is selected. If the CF card should be used, it can be selected from the menus on the front panel. Press and hold the multifunction button until the menus appear. If the memory selection is made from the front panel, the default working folder will be /RECORD. Other working folders can only be created from the top panel menus. By pushing down the multifunction button, select Storage and push the multifunction button to the right side. Select CF card and press the center key to confirm. To escape from the menus, push several times the multifunction button to the left until the main test display appears. Page 6 of 49
 INPUT SELECTION Nagra LB has one digital")
7 COMPACT FLASH CARDS Not all flash cards on the market can be used. Nagra proposes the following types: Kingston technology 266X type SanDisk Extreme IV type For other cards, execute first a CF Card test (see Miscellaneous) INPUT SELECTION Nagra LB has one digital input (AES) as well as two analog line or mic. inputs. The front display shows the sine icon, meaning that the machine is set to analog input. If the digital input is needed, select again the menus on the front panel, go to Input Device and select digital. The sine icon will be replaced by a square wave indication. Beware that the LB will not automatically select the incoming digital clock. Select the corresponding sampling rate from the Record File Set sub-menu. In the analog domain, set the switches on the left panel for each channel if the input needs to be line or mic. For the mics, 2 sensitivities are available: 2 mv/pa for dynamic mics and 15 mv/pa for condenser mics. If Phantom power (48V) is needed, set the switches to on. INPUT SENSITIVITY Check that the main selector is still in TEST mode. Now the sensitivity can be adjusted with the 2 front potentiometers. Ensure that the switch between the 2 potentiometers is set to the right side (clutch disengaged). Connect a headphone to the machine and adjust the headphone output level with the potentiometer just above the jack connector. The start of the red area on the display area as well as the red LED s above each input potentiometer can be preset to a certain value via the main menu settings on the top panel. FILE SETTINGS The recorder still needs to be set for the PCM, MP2 or MP3 standard. This can not be done from the front panel except if the settings were previously saved in a template. To change the file type, see paragraph RECORD FILE SET. If the machine still has its default settings, then the bottom line on the test display should show WAV-PCM24-ST-48K explaining that the Nagra LB will start the record in Broadcast Wave Format, PCM (Linear), 24 bits, Stereo at 48kHz sampling rate. RECORD Now, the machine is ready to record. Turn the main selector to the Record position. The yellow ring icon on the display becomes a full red circle and the record LED turns on. Simultaneously the counter starts incrementing and the remaining time decrementing. As an example, the picture shows that the recording is running since 34 seconds and the remaining time is reduced by 34 seconds. The marker or cue indicator is still at 00/00. If a cue point is needed during record, activate the Cue switch and the indicator will show 01/01 etc. Afterwards during playback, it s easy to locate by skipping (<, >) a cue position. If during record the >> switch is pressed, a new seamless file will be created. If a reference level is needed at the beginning of the recording, push the Ref Gen switch. A 1 khz sine wave on both channels will be recorded. This reference signal can also be level adjusted in the top panel menus. If any additional commentary needs to be added to the recording, push the INT MIC (Internal Mic.). This will mute the inputs and the additional mono sound track will be added on both channels. Page 7 of 49
8 To stop the recording, return the main selector to TEST. PLAYBACK Turn the main selector to the PLAY position. It will instantaneously playback the last index. Use the >> or << switches on the front panel to fast forward or fast rewind. Use the < or > to skip backwards or forwards to a cue point or other index. PAUSE When during playback the main selector is set to STOP, the playback goes in PAUSE mode. During the PAUSE mode it is possible to increment or decrement the counter by turning the jog wheel. Page 8 of 49
 will have no effect. TEST: Standby prior to record position.")
. PLAY: Playback position. Plays back the last recorded index.")
9 ALL PANELS FRONT PANEL 1 MAIN SELECTOR OFF: Power off position. Power off function activates after 3 seconds. All files will be correctly closed prior to power off. Passing quickly over the OFF position from TEST to STOP (or vice versa) will have no effect. TEST: Standby prior to record position. The LB is in EE mode (Electronic-Electronic) All electronics are active allowing level adjust, machine set-up and monitoring. When pre-record is activated, the red record led starts blinking. REC: Record position according to menu set-up. The LB records with or without pre-record buffer (max 3 seconds in 16 bit PCM stereo). PLAY: Playback position. Plays back the last recorded index. Continue to playback from the previous paused position playback was interrupted by the STOP position. STOP: Pause the playback if the previous position of the switch was in the PLAY. 2 REWIND / FORWARD Active only in PLAY and STOP and RECORD. In the play mode when held, the rewind or forward search speed starts at 4 times the nominal speed increments to 10 times nominal speed after 3 seconds. Rewind / Forward stops as soon as the switch is released. In the stop mode when held, rewind or forward search at 20 times nominal speed. Rewind / Forward stops when the switch is released. When pressed (>>) in record, a new seamless file is created. 3 SKIP BACK / SKIP FORWARD In PLAY mode when moved a single time to the left, it returns to the beginning of the index and play starts over. If markers are present, it jumps to the previous marker position of the current index. Moving the switch to the right will jump to the beginning of the next index, or marker in the current index. In the stop mode, the same action as described above should take place but without automatic playback. Page 9 of 49
 intensity when set to the sun icon. Sets low backlight (contrast) intensity when set to the cloud icon.")
. Toggling once more brings it back to stereo.")
10 4 MULTIFUNCTION SWITCH This 5 position selector is used to enter into the menu mode and surf through the different displays and menus. Pressing the key is the EXECUTE position to validate a selection. 5 BACKLIGHT / BATTERY Shows the battery status on the display. Sets high backlight (contrast) intensity when set to the sun icon. Sets low backlight (contrast) intensity when set to the cloud icon. 6 STEREO / MONO When the switch is released (Stereo position), the headphones receive the left and right channel (shows ST on the display). When the switch is toggled once to mono, both channels are mixed and delivered to the left and right headphone channels (shows MO on the display). Toggling once more brings it back to stereo. At power on, it s always reset to stereo. Selecting the mono position has no influence for monophonic recordings. 7 HEADPHONE JACK 6.3 mm stereo headphone jack connector. When the headphone output is used, the speaker is automatically off. 8 HEADPHONE LEVEL Headphone level (and speaker if set in the menu) output control. 9 INTERNAL MIC. Internal Electret mono mic. activated by pressing switch 16. The microphone sensitivity is adjusted in the menu mode. When active it will record on both channels. 10 DISPLAY Color display 3.5 inch 176 x 117 dots 11/12 LED INPUT LEVEL Two input level indicators situated above the input level potentiometers. The yellow led turns on from -20 db, the red turns on from -10 db (default setting), the red one can be programmed by menu from -2 db to -18 db in steps of 2 db. (0 db corresponds to FF for the AD converter). Page 10 of 49

11 13/14 INPUT POTENTIOMETERS For adjusting the input levels. Between 0.5 db and 0 db, the input is muted. 15 REFERENCE GENERATOR When pressed, generates a sine wave 1 khz. The level can be adjusted via menu from 0 db to -30 db in steps of 2 db. The signal will be recorded on both channels. 16 INTERNAL MIC. When the internal mic. switch is set to the right, the built-in mic. becomes active and is recorded on both channels in the case of a stereo recording. The sensitivity can be set in the menus. 17 CUE The cue ( Markers ) switch can be used during record to add a cue position. All cue positions are saved in the chunk of the file and will be recognized on most of the existing computer based digital editing and playout systems. 18 CLUTCH The clutch locks the 2 input potentiometers together electronically. If an offset was present before the clutch was engaged, the offset will remain in memory. The adjustment of both channels, once the clutch is active, is made using the left potentiometer only, the right potentiometer will have no effect. Page 11 of 49
 Once pushed and the red led starts blinking, and the card can be replaced.")

12 LEFT PANEL 1 BUFFER SWITCH The buffer push-button permits replacement of the almost full CF card by a BLANK formatted CF card without loosing any information without stopping the recording. (Within a time of max. 32 seconds) Once pushed and the red led starts blinking, and the card can be replaced. The front display shows the remaining time left in which to replace the card (maximum 32 seconds). Once the card is replaced and the green led starts blinking, which means that the card is being accessed. The card starts to record the data seamlessly, continuing from the last recorded index from the previous CF card. For 192 khz = 7 seconds, 96 khz = 14 seconds, 48 & 44.1 khz = 28 seconds, others = 32 seconds. 2 CF SLOT This slot accepts only Compact Flash cards type I and II. 3 EJECT BUTTON Push the eject button to remove the CF card. 4/5 INPUT SENSITIVITY SELECTOR Selects the input sensitivity between line input level, dynamic or condenser type mikes for each channel. 6/7 PHANTOM POWER Turns on the +48 V Phantom power supply. 8 DIGITAL INPUT AES XLR input connector 9/10 ANALOG INPUTS Analog input XLR connectors for mic. or line level Page 12 of 49


13 RIGHT PANEL 1/2 ANALOG OUTPUTS Analog line output XLR connectors. 3 DIGITAL OUTPUT Digital AES XLR output connector. 4 USB HOST Used for the Bluetooth USB key as well as for an USB memory stick. 5 PC USB USB output connector for connection to a PC or Mac for audio transfer. PC or Mac recognizes the item as an external memory device. 6 ETHERNET Ethernet connection for transferring files etc. 7 EXTENSION CONNECTOR RS232 Start / stop remote Start / stop monitoring Page 13 of 49
 on the front panel should be set to STOP.")

14 TOP PANEL When the Nagra LB is used to record or to playback from the front panel, the top panel is totally turned off (except the use of the HOLD switch). To turn on the functions of the top panel, the main selector (1) on the front panel should be set to STOP. On the front panel press the execute key for 3 seconds (front panel, key 4) and the display turns on. 1 DISPLAY Identical type as the front display. 2 SPEAKER Can be turned on automatically during playback via menus selected from the front panel. Can be turned on automatically if the top panel is active for editing or if the Ethernet connection is running via menus. The speaker level can be adjusted via the headphone potentiometer from the front panel. 3 FUNCTION KEYS To be selected according to the indication on the display above each key. Used for editing and for Ethernet connection. Page 14 of 49
15 4 JOG WHEEL Multi function depending on the status of the LB (editing, pause, menus, etc). On the first series of machines, pushing the jog wheel jumps between the editing field and the directory field. Starting from serial number , this push function is not available anymore but it can still be executed with the up and down arrow keys. 5 MULTIFUNCTION KEYS Multi function depending on the status of the LB (editing, pause, menus, communication, etc). 6 SHIFT KEY To add more functions mainly for editing directories etc. 7 HOLD KEY This switch permits to lock the front panel completely during power off, record or play. In the case that the switch is in the lock position and the main switch is turned to test or play, a message appears on the front display indicating that the machine is locked and will turn off in 3 seconds. If the hold key is turned on when front panel is active, the HOLD will be shown in the lower left area of the screen. Page 15 of 49


16 DISPLAY When turning on the machine in test mode: 1 Indicates the file type that will be recorded. In this example it shows that the recording will be in MP3, Stereo, 48 khz sampling and at a bit rate of 160 kb/s. 2 The first number indicates the index that could be played back if the machine was set to play and not to test. The second number is the total quantity of files in the working folder. 3 Gives a virtual status of the total memory available versus the used memory. 4 In test mode, indicates the name of the next index that will be recorded. 5 Status icon. TEST mode RECORD mode STOP mode PLAY mode FORWARD mode REWIND mode PAUSE mode after the first playback, coming back to the stop mode 6 Cue counter: the first 2 digits show how many cue points (Markers) are already played back. The last 2 digits show the total quantity of cue points in the index. 7 Modulometer for left (top) and right (bottom) channel. 8 Icon indicating if the input is analog (sine wave icon) or digital (square wave icon). 9 Record counter in hours, minutes and seconds. 10 Internal mic icon appearing when the internal microphone is active. 11 Memory icon indicating if the working drive is internal (IC icon), Compact Flash (CF icon) or a USB device. If a red cross appears on the CF icon, it means that the CF card was selected but the card is not inserted. If a USB device was selected as the target for recording but no device is connected, the icon will be shown with red characters (USB). 12 Memory remaining counter. Indicates in hours, minutes and seconds how much recording time is left on the working drive. 13 Shows ST (stereo) or M (mono) for the headphone output. 14 Appears if the limiters are turned on. 15 Appears if the MS decoder is turned on. Page 16 of 49

 briefly, and the following display will appear: The status window will disappear after a few")
17 When turning one of the sensitivity potentiometers, a sub-window appears, for a few seconds, showing the actual gain. In this example, the left channel is set to 2mV/Pa and the right channel to line input. ACTUAL SETTINGS To view the current settings of the Nagra LB, in the TEST mode, press the multifunction switch (4) briefly, and the following display will appear: The status window will disappear after a few seconds. Page 17 of 49


18 SETTING UP THE LB The setup of the machine is made via the menus. Two menus can be found on the NAGRA LB: The complete setup menus can only be found on the top panel display. The simplified setup can be accessed from the front panel. The simplified setup tree is extracted from the full tree and concerns mainly the settings for recording. To access the simplified setup, the NAGRA LB must be in the TEST mode. By pressing the center key for at least one second, the menus will appear on the front display. The simplified setup gives access to the menus shown in the picture. To set the time, date or formatting or program templates the full menus on the top panel must be accessed. To access the full setup, the NAGRA LB must be in the STOP mode. By pressing the center key on the front panel for at least one second, the menus will appear on the top display. The full setup menu gives access to all the settings, including those from the front panel. NAVIGATING THROUGH THE FULL SETUP (TOP PANEL) This can be made with the up / down keys or the jog wheel for a vertical movement and with the left / right keys for a horizontal movement. If after a selection the indicator > on the right side of the display disappears, the EXE (center) key can be pressed to execute this selection. In other cases, a text will appear at the bottom line of the display just above the 5 function keys (F1 to F5). In the case that characters need to be entered, the up / down keys or jog wheel is used to make the character selection. The right key is used to jump to the next character position. Once all characters entered, press the center key to confirm. A horizontal or vertical black connection line between to blocks in the associated diagrams, means that the next block can be reached using the up / down / left / right key. A horizontal or vertical red connection line means that the center key needs to be pressed to jump to the next position. To escape from the menus and to turn off the top panel, press several times the < key. NAVIGATING THROUGH THE SIMPLIFIED SETUP (FRONT PANEL) This is made using up / down and left / right movements of the multi-function switch. If after a selection the indicator > on the right side of the display disappears, the EXE (center) key can be pressed to execute this selection. In the case that characters need to be entered, the up / down keys or jog wheel is used to make the character selection. The right key is used to jump to the next character position. Once all characters entered, press the center key to confirm. Watching the tree, a horizontal or vertical black connection line between the blocks, means that the next block can be reached using the up / down / left / right keys to jump to it. A horizontal or vertical red connection line means that the center key needs to be pressed to jump to the next position. To escape from the menus, pull several times the multi-function selector to the left side. Page 18 of 49
19 FULL SETUP TREE Page 19 of 49


20 Page 20 of 49


21 Page 21 of 49

22 Page 22 of 49


23 DIRECTORIES The directory is the first menu that can be selected from the full setup tree. From this position, the internal memory, the present CF card and even the USB memory stick or external HDD can be selected to show the folders and indexes stored. Scrolling to the right side, by using the right arrow key shows the date and time the recording was made, the size and the duration of the index as well as the file format. Several functions become available: EDT, DEL, TTL, PLY, RET, <<, >>, <, >, STP, NEW, CPY, RCV, REC and will be explained below. The last 4 functions appear when the shift key is pressed. Scrolling through the directories is made by using the up, down, left, right keys or with the jog wheel. PLAYING AN INDEX PLY From this point, any index can be selected and played back (F4 = PLY). At the moment that an index is selected, a small square icon will appear in front of it: If the icon is green, it means that it is corresponding to the actual settings of the NAGRA LB. If the square icon is red, it means that it is not corresponding to the actual settings of the machine but when pressing the PLY (F4) key it can be played back. If the square icon in front of the selection is green, the machine starts playing the index immediately until the end except if during the playback process the STP (F5) is pressed. During the playback, 5 other classic functions are available: <<, >>, <, >, STP permitting fast rewind, fast forward, skip backwards, skip forwards and STOP playback. The consecutive playback depends also on the setting of the Auto skip sub menu. If the square icon is red, the NAGRA LB will change momentarily the internal settings to the settings of the index and starts the playback. If a X is pressed just before the index name, it means that the index contains the waveform for editing. EDITING AN INDEX EDT Starts editing. An index with a green icon and a cross X can be selected to start editing immediately. Red icons can not. The NAGRA LB must first be set to the settings of this index before editing can be started. Indexes without a cross can not be edited. Editing is explained in a separate chapter. Important note: Indexes recorded on the USB host device must first be imported, on the internal memory or CF card, before editing can become available. DELETING AN INDEX DEL Delete the selected index. When pressing F2, the NAGRA LB shows a sub menu asking if you are sure to delete the file from the memory and still gives the possibility to escape (RET) or to accept the action. RET returns to the previous step, YES erases the index. DELETING A FOLDER If a folder is highlighted and DEL is pressed, the folder and all the files included will be erased if it has no subfolders. If it had sub-folders, a warning will appear and nothing will be erased. Sub folders must be erased first. Page 23 of 49

: Select the memory device, press the SHIFT key once and the functions NEW, CPY & RCV are shown.")
 appears. Press REC and the folder becomes the working folder (a message appears on the screen.")

24 WORKING DIRECTORY The working directory is the folder that will be used to store the recordings. If no working directory was created, by default the directory RECORD will be selected. If the working directory was made inside one memory type and the other memory is suddenly selected, the same working folder will be selected. If the folder doesn t exist, it will be automatically created. To make a new working directory, create a new folder in the root (first level only): Select the memory device, press the SHIFT key once and the functions NEW, CPY & RCV are shown. Press NEW and a folder NEW0000 is created. Press the SHIFT key once more, highlight the NEW0000 folder and press TTL for changing the name. Enter the folder name. Press execute (center key). Press the SHIFT key once more and the function REC (F5) appears. Press REC and the folder becomes the working folder (a message appears on the screen. When selecting again the folder, the yellow icon in front of the folder name became red. RENAMING A FOLDER OR AN INDEX TTL Modify the index or folder name (Title). When pressing F3, A sub window appears permitting to enter maximum 8 characters. By turning the jog wheel or the up / down keys, the first character can be selected. Press the right key to jump to the next character or the left key to return to the previous position. Once all characters are entered, press F1 OK. This example shows an index renaming. The same renaming can be made for a folder. ESCAPE FROM DIRECTORIES RET RETURN escapes from the directory menu (1 step backwards). CREATING A NEW FOLDER By pressing the SHIFT key in the directory, 4 other functions become available: NEW, CPY, RCV, and REC. NEW To create a new folder, select the internal or CF card and eventually the next folder. Press the NEW function key to create a new folder. A new folder called NEW0000 is created. Afterwards it can be renamed as explained above with TTL. COPYING AN INDEX BETWEEN THE CF CARD, INT. MEMORY CPY Permits to copy an index from one memory to another memory or to a FTP client. To do so, select the index that needs to be copied and press F2 CPY. A new window appears. Select the desired memory support and press F1 OK. The copying starts and indicates the transfer speed as well as the copy remaining time. If the folder doesn t exist on the target memory, it will be automatically created. Folders can not be copied. COPYING AN INDEX TO A FTP CLIENT Before this can be correctly executed beware that the FTP client information must be filled in (see communication) and the Ethernet cable must be connected. Once this is done, select an index in the directory, press the SHIFT key and select FTP Client. Press OK and the following window appears: Page 24 of 49

25 COPYING AN INDEX FROM AN ARES-M, ARES-MII or ARES-ML The Ares-M, Ares-MII or Ares-ML can be directly connected to the Nagra LB USB host. When copying files from those machines into the LB, they can be played back for as long as the format is PCM, MPEG 1-LII or MPEG 1-LIII. Beware that editing on imported files from those machines is not possible. If the folder that contains the file to be copied doesn t exist on the Nagra-LB, it will be automatically created. When copying a file from the Nagra-LB to the Ares-M, Ares-MII, Ares-ML and the folder containing this file doesn t exist, it will be automatically created. Beware that the Ares-ML can not select this folder. Only the folder ARESM can be accessed. If any files need to be copied to the Ares-ML, they must already be created or stored on the LB in a folder called ARESM. COPYING AN INDEX BETWEEN THE NAGRA LB AND A MEMORY STICK / HDD The USB host can also receive a memory stick or external HDD and the indexes can be copied in both directions combined with the internal memory and the CF card. If the folder containing the file to be copied doesn t exist, it will be automatically created. Beware that the USB memory must originally be formatted in FAT 32. RECEIVING AN INDEX RCV Receiving an index via Bluetooth is explained in the paragraph Bluetooth & Ethernet communications. USB TRANSFER TO PC / MAC To connect a PC or MAC to the Nagra LB, set the machine to the STOP position and the top panel must be disabled. Connect the USB cable between the 2 items and after a while, the Nagra LB front display will show that it is in USB transfer mode. The PC or MAC will show the 2 available memories from the Nagra LB. Do not forget after transferring to safely remove the Nagra LB from the PC using the PCMCIA icon in the right lower corner of your screen (for both memories) or eject the memories on a MAC. COMMUNICATION The communication menu allows an FTP (File Transport Protocol) connection on a local or Internet network. The different memories and corresponding folders as well as the indexes will be seen via Ethernet FTP and can be downloaded if the NAGRA-LB is declared as a FTP Server (PULL mode). The communication menu allows also delivering indexes to an end user. In this case the FTP Client sub-menu needs to be filled in first (PUSH mode). It s also the area were the Bluetooth name of the LB can be changed. A separate paragraph explains how to setup and to connect to Ethernet. Page 25 of 49

 Input Selection (Ana.")
26 SETTINGS As shown in the picture, several sub menus can be accessed. TEMPLATES When a new full setup is made on the NAGRA LB, it can be stored in a template. Maximum 4 templates can be stored. Templates make it fast and easy to change the different settings at once. Once a template is selected, it can be stored again if any changes took place, it can be recalled and it can be renamed. The following functions and settings are saved in a template: Template Name File Type MS Decoder Mode File Prefix Name Pre Record Buffer Red Led Level Wave Extension Name Record File Split Mode Internal Mike Gain MP2 Extension Name File Time Prefix Mode Beep MP3 Extension Name Matrix Mode Output Level Bit Rate Filter Output Mode Channels (1 or 2) Input Selection (Ana. Or Dig) Speaker Sample Rate Limiter The templates can also be saved on the CF card. To do this, select Save to CF card. Afterwards, they can be restored on any Nagra LB by selecting Load from CF card. Beware after a software update that the templates, saved on the CF card and created with a previous version may not be stored in the machine with the newer version. This could create strange side effects. Beware that after a system reset, all templates will be named Empty and will take the settings as shown in the Default Settings table. See DEFAULT SETTINGS. STORAGE The storage sub menu permits to select the working memory on the NAGRA LB. Internal memory (Nand flash 2 GB) or compact flash cards. Once the selection made, the main display will show the IC icon, the CF icon or the USB icon If the CF card is selected but the card is not inserted, a red cross will appear on the CF icon If USB is selected but nothing is connected, the USB icon becomes red. Page 26 of 49
, 16 or 24 bit format, BWF (Broadcast Wave Format), WAV or RAW header format, the sampling")
, it is possible to select a 16 or 24 bit audio format.")


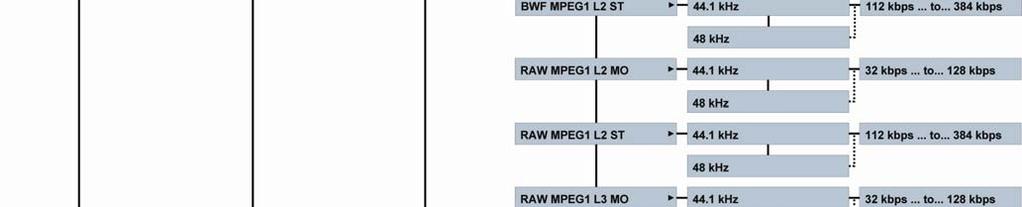
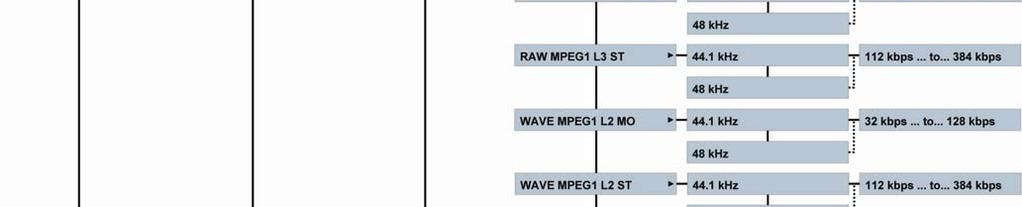
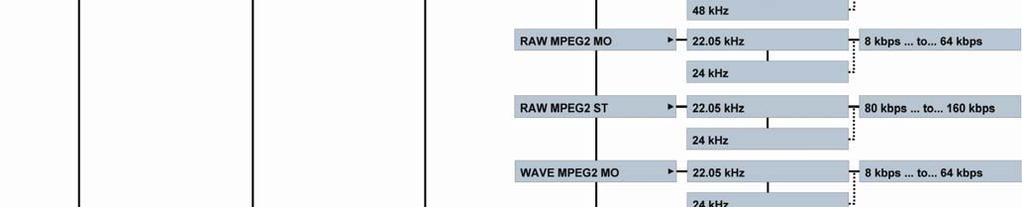
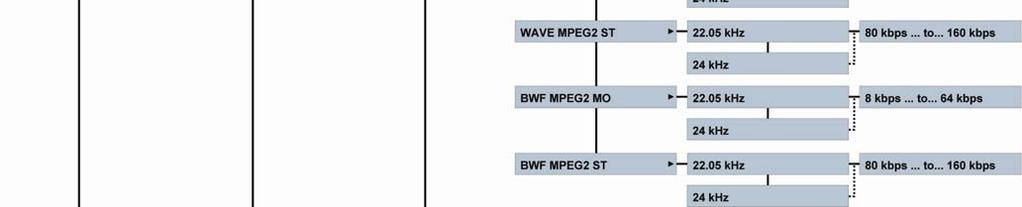
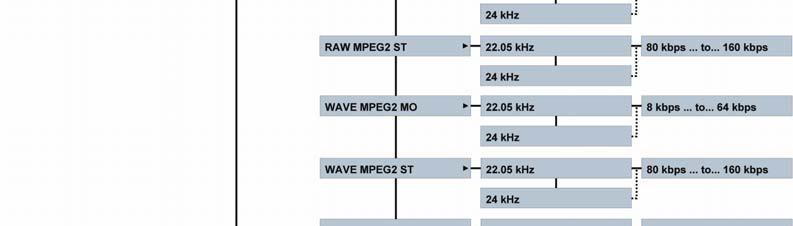
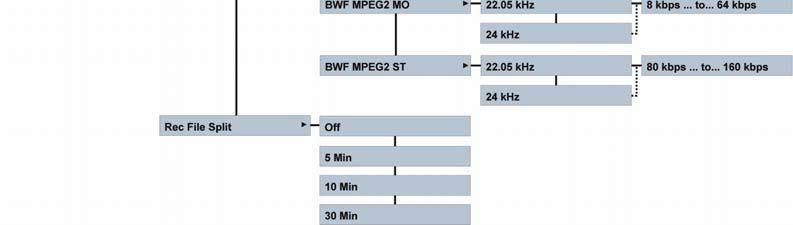
27 RECORD FILE SET FILE TYPE The record file set sub menu permits to select the type of compression (PCM, MPEG 1 L II or MPEG 1 L III), 16 or 24 bit format, BWF (Broadcast Wave Format), WAV or RAW header format, the sampling frequency, the eventual bit rate and the selection of a mono or stereo recording. In the PCM format (Linear none compressed), it is possible to select a 16 or 24 bit audio format. In all others only 16 bit is available. The sampling rate can be selected between 44.1 khz up to 192 khz for PCM recordings. For all compressed selections, the sampling frequency choice can be made between 44.1 khz or 48 khz. In the compressed domain, mono files bit rate starts from 32 kbps up to 192 kbps. For stereo files, it starts from 112 kbps up to 384 kbps. The full range is 32, 48, 56, 64, 80, 96, 112, 128, 160, 192, 224, 256, 320, 384 kbps. PCM recordings can obtain the BWF or the WAV header. MPEG 1L II can obtain a BWF, WAV header or simply RAW (no header). MPEG 1 L III is only available in RAW format. RAW, WAVE, or BWF MPEG2 Mono or stereo permits to select the sampling frequencies or 24 khz. Page 27 of 49


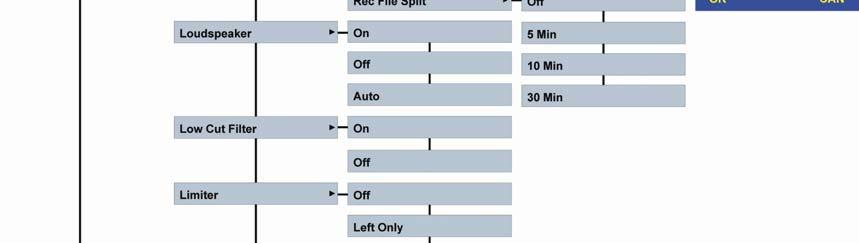
28 FILE EXTENSION NAME Normally the extension name of an index should not be changed. Most of the editors will accept the default extension; however in some cases it s a must to change it. As an example, do not use xxx.wav for an MPEG file if it needs to be played back on a Mac. If MPEG files are transferred for playback to a portable phone via Bluetooth, keep the MP2 or MP3 extension. FILE PREFIX As default the first 4 characters of the index name are USER but it can be personalized with this sub menu. If Time Prefix is turned on, the next recorded file name becomes YYMMDD_HHMMSS_USER0001. Example: _074512_USER0002, means that the file was recorded on the 27 th of May, 2009 at 7h45 and 12 seconds. This kind of file naming is recognized by the NAGRA CBR independent PC player that will indicate the real time instead of a relative time. REC FILE SPLIT This menu gives the possibility to reduce long recordings into several seamless recorded files of max. 5, 10 or 30 minutes. In the case of a default file prefix, only the file counter number will increase: Example USER0001.wav, USER0002.wav etc. In the case that Time Prefix was selected and the max length was set to 5 minutes, the file counter number will not increase. Only time and date in the file name will increase. Example _065006_USER0003.wav as the first 5 minutes file, _065506_USER0003.wav as the second file, _065700_USER0003.wav as the next one etc. LOUDSPEAKER The NAGRA LB has a built-in speaker for audio monitoring. The speaker can be turned On always, Off always or set to Auto. In the Auto mode the speaker is active during playback or editing only. During record or test (EE) mode, the speaker is turned off. The speaker turns off if a headphone is connected. LOW CUT FILTER A filter can be selected for the mic. inputs. Two possibilities are available: Flat (20-20kHz) or Low cut (100-20kHz). LIMITER When using the limiter with the mic. inputs, the high input levels will be smoothly reduced so that no clipping appears. The limiter can be turned on for a single channel or for both channels. When set to ganged, the limiter acts on both channels if one channel receives a high signal level. The limiter becomes active at -6 db level. (Limits to maximum 6 db). PRE-RECORD The pre-record buffer permits to start the recording 3 seconds before the machine was set from TEST to RECORD mode. If pre-record is turned on and the machine is set to TEST, the red record led will start flashing slowly. Page 28 of 49
 means that the machine is locked on his internal master clock Analog (AES Sync) means that the machine is locked for analog inputs on the incoming AES bus (digital")
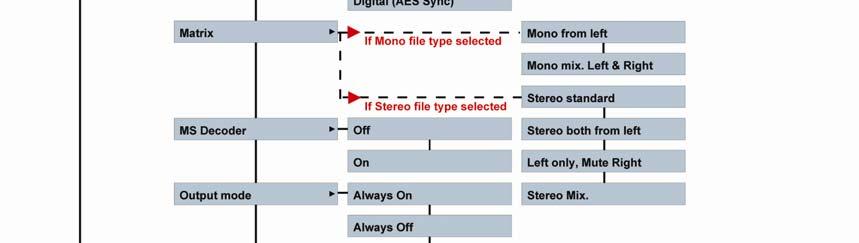
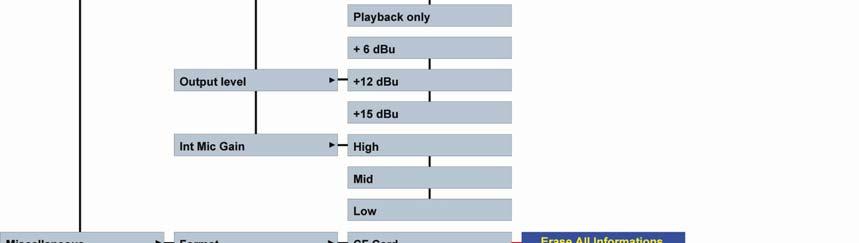
29 INPUT DEVICE Permits the selection between digital or analog input. This selection is also permanently shown on the main display by an icon. Analog Digital Analog (Int Sync) means that the machine is locked on his internal master clock Analog (AES Sync) means that the machine is locked for analog inputs on the incoming AES bus (digital input). Digital (AES Sync) means that the machine is locked for a digital input on the incoming AES bus. MATRIX The input matrix permits the selection to deliver the analog input signal to the left and or right recording channel. As an example: After having selected Stereo both from left, making a stereo recording with only one microphone connected to the left input will record the same signal on the left and right channels. Matrix mode Record file set Output L Output R Mono from left Mono Input L No signal Mono Mix. Left & Right Mono Input L &R No signal Stereo standard Stereo Input L Input R Stereo both from left Stereo Input L Input L Left only, Mute Right Stereo Input L No signal Stereo mix. Stereo Input L&R Input L & R MS DECODER Permits to turn off or on the MS decoder on the headphone output only. OUTPUT MODE The digital & analog output signals can be always available or only during playback or not at all. OUTPUT LEVEL The analog output can be set to 3 different levels. INT. MIC GAIN Permits to adjust the sensitivity of the built-in microphone. Page 29 of 49
30 MISCELLANEOUS Each sub menu is described below. FORMAT The internal memory as well as the CF card or USB host disk can be formatted directly via this sub menu. It is advised to format the CF card and a USB HDD device via the NAGRA LB and not via a PC or Mac. The format is based FAT32. DATABASE SYNC If files are eventually lost on the NAGRA LB due to a power fall (Damaged FAT info) or if files are added to the CF card, the USB stick or USB HDD via a PC, it can happen that not all files are detected in the directories of the NAGRA LB. In this case, to recover them, a Database Sync can be executed on the selected working memory, meaning the memory that includes the working directory for new index recordings. In the worse case if indexes are not recovered, then via PC, a CHKDSK needs to be executed on the memory having the problems. POWER DOWN The power down menu permits to shut down automatically the NAGRA LB in the case that the machine stays in a pause or stop mode for a certain time. If the top cover display was activated, then the auto power down function is disabled. The power down function can be totally disabled or enabled. When enabled, it can be set from 2, 5, 10 or 30 minutes before power off. NIGHT MODE When Night Mode is switched on, the led s above the 2 potentiometers as well as the recording led will be turned off immediately once the machine is set to record. 5 seconds later, the display will turn off. Touching any button or potentiometers on the front display will turn on the display for 5 more seconds. Page 30 of 49
, concerning date and time.")

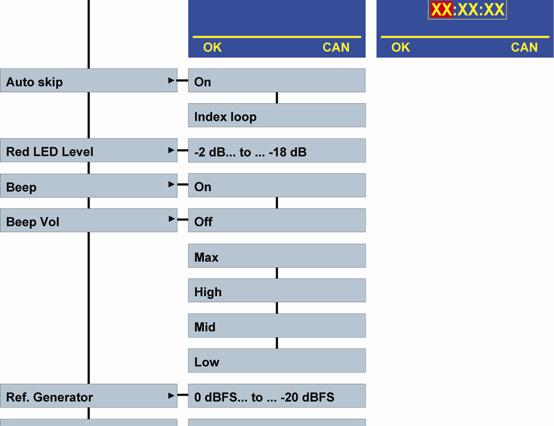
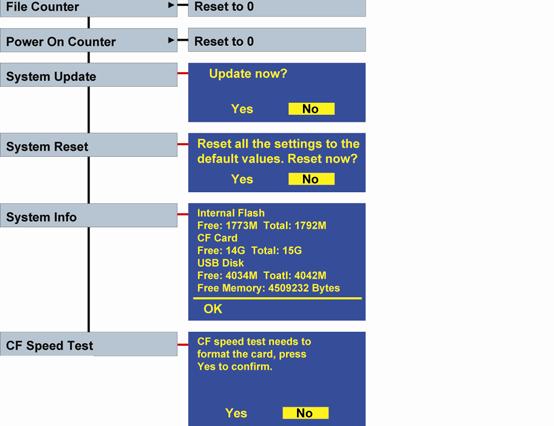
31 LANGUAGES Permits to select the display language in English, French or German. VERSION This sub menu shows the software version of the machine. Use F3 to obtain the status of the different firmware versions. DATE & TIME Permits to adjust the RTC (Real Time Clock), concerning date and time. The date is inscribed as YYYY-MM-DD (Year, Month Day). The time is based on a 24hour clock as HH- MM-SS. If the power for the Nagra LB is removed for a long period, the correct date and time will be lost. When turning on the Nagra LB, a sub-window appears automatically showing RTC Error!. This reminds to select the date & time menu for entering the correct info. AUTO SKIP When playing back from the front panel, the NAGRA LB only plays the indexes that have the same format as the actual settings of the machine. The playback of the indexes can be made in 2 different ways: At the end of the index starts over the same index (Index Loop) or jumps to the next index with the same settings as the machine (On). RED LED LEVEL The red LED as well as the red area on the modulometer can start lighting from -2 db up to -18 db. Sometimes people prefer to use the red led as an alarm (-2 db close to clipping) or prefer to set it to their reference level. BEEP This sub menu permits to turn on or off the beep signal on the speaker and the headphone. Beware that 2 kinds of beeps are existing: A frequency up going double beep indicating an action like pressing the execute key. A frequency down going double beep indicating that the machine falls on an error. In this case a sub window will be shown except when the machine is turned off. BEEP VOLUME This sub menu permits to select the volume level for the beeps on the speaker and the headphone. REFERENCE GENERATOR The built-in 1 khz reference generator level can be set from 0 db down to -20 db in steps of 2 db. FILE COUNTER The file counter resets the auto incrementing (0001 to 9999) counter to Older indexes can not be overwritten. Example: if index USER0001 was existing and the counter is reset, the next recording will be called USER Once inside this menu, press the center key (EXE) to reset. Page 31 of 49

32 POWER ON COUNTER The power on counter starts incrementing at the moment that the machine is switched on and can be used to verify how long the machine runs on a battery pack. SYSTEM UPDATE Verify on a regular basis our site for new firmware. To install the new firmware on the NAGRA LB, copy the file LBAPP.COE in the root of the compact flash card. Attention: the card must have a minimum size of 512 MB and must be formatted FAT 32, otherwise, the update will fail. Insert the card in the machine, turn on in STOP mode, activate the top panel, select Miscellaneous followed by System update. Press Yes to update the NAGRA LB. Afterwards, turn off and on again the NAGRA LB for activating the new version. It s important, after a system update, to save the templates on a CF card and to execute a system reset. In the case that the update failed and the machine can not be powered on, follow the next steps: Set the main selector to OFF. Press and hold the SHIFT key on the top panel, together with the Ref Gen switch on the front panel and put the main selector to STOP. Release the SHIFT key as well as the Ref Gen switch once a special display will appear on the top panel. Pressing F1 will start again an update from the Flashcard. The LBAPP.COE software must be stored in the root. Once pressed, select F1 for Update. Once Update is pressed, the update starts and the machine will power off after a few seconds. Put the main selector back to OFF and turn on again for verifying. Pressing F2 will start an update via the USB connection to a PC. On the PC, select the new USB memory and open the folder. Copy the LBAPP.COE software in the root of this memory and remove the USB cable. Follow the description on the LB display to continue. Once the machine is powered off automatically, set the main selector back to OFF and turn on again for verifying. Pressing F3 has no action (disabled) Pressing F4 cancels the update and the machine shuts down. Beware after a software update that the templates, saved on the CF card and created with a previous version may not be stored in the machine with the newer version. SYSTEM RESET The system reset sub menu permits to reset the NAGRA LB to its factory default settings. If any templates are stored on the machine, before executing a system reset, save them on a CF card and restore afterwards. System reset is automatically executed after an update since version V1.107 Beware that, after a system reset, the record counter is reset to Page 32 of 49
33 DEFAULT SETTINGS Templates: Item Description Default Value Template Name EMPTY File Prefix USER WAVE Ext WAV MP2 Ext MP2 MP3 Ext MP3 Bit rate 2304 KB/s Channels 2 Sampling rate 48K File type PCM WAVE 24 bit Pre record buffer OFF Record file split OFF Prefix recording time OFF Matrix mode Stereo one file Filter OFF Input Analog Limiter OFF MS decoder OFF Red led level -10 db Internal mike gain Mid Beep ON Output level +6 dbu Output mode Always on Speaker OFF Miscellaneous: Remote REC_NEWINDEX Auto power down OFF Dhcp On Netmask Gateway Local IP FTP username USER FTP password pass Auto skip ON Storage Internal flash Working directory /RECORD Reference generator -4 db Language Eng Bluetooth name Nagra LB Record file counter 1 Night mode OFF SYSTEM INFO Gives information about the memory use of the internal NAND flash as well as the CF card, if it was previously inserted. CF CARD TEST This sub menu permits to test any CF card concerning the read and write speed that it can reach. During the test, 256 MB will be written and read on the inserted CF card. ATTENTION: Beware that the CF card will be formatted before the test starts. Page 33 of 49
34 Once YES is selected and executed, the card is formatted and the write test starts, indicating the current speed, the minimum detected speed, the maximum speed as well as the average speed (picture 2). Afterwards it starts to test the read speed and indicates the same information as for the write window (picture 3). At the end of the test, it will create an Excel file on the CF card. The test runs for about 2.5 minutes and at the end the machine will be turned OFF automatically. Chart example from a Sandisk Extreme IV (series1) and an old Pretec 80x (series 2): This chart was made from maximum 256 data info saved in the Excel file after a CF test. Vertical scale: For the Sandisk, it shows that the average W/R is about 6.3 MB/s with 2 drops below 5 MB. For the Pretec, the average is close to 4 MB/s but a lot of drops touching 1.3 MB Series1 Series2 Horizontal scale: Measurements are made at a rate of 250 ms. Below is a table showing, in the yellow area, the bytes per second created depending on the sample rate: Sampling 16 bit 16 bit B/s B/s kb/s kb/s MB/s MB/s MB/h MB/h GB/h GB/h Hz 1 CH 2 CH 1 CH 2 CH 1 CH 2 CH 1 CH 2 CH 1 CH 2 CH 1 CH 2 CH Sampling 24 bit 24 bit B/s B/s kb/s kb/s MB/s MB/s MB/h MB/h GB/h GB/h As an example, a stereo recording 16 bits at 48 khz sampling frequency will use Bytes/s. To guarantee the recording on a flash card, the min speed after the CF test should be 2.2 times higher (min Bytes/s or bits/s). In the case that a 24 bit, 192 khz would be recorded with the Pretec card ( x 2.2 = Bytes/s or bits/s), it becomes critical. REMOTE The remote control is accessed via the extension connector (pin 4 & 8) and permits the following fader start possibilities. In Record mode: Open switch: the Nagra LB is recording. Closed switch: the recording is paused (see picture). Page 34 of 49

35 In Play mode: Open switch: the Nagra LB is playing. Closed switch: the playback is paused (see picture). WIRING OF THE EXTENSION CONNECTOR 1. Vcc: 3.3V 2. Tx: Transmit data 3. Rx: Receive data 4. Gnd: Ground 5. Remote: Multi application 6. Vcc: 3.3V 7. Gnd: Ground 8. Remote in 9. Remote return 10. NC: Not connected Pins 11 to 20 are not used Page 35 of 49
 All available sub menus")


36 SIMPLIFIED SETUP TREE (FRONT PANEL) All available sub menus are identical to those in the full tree except for templates were it is only possible to recall a template. Page 36 of 49


37 Page 37 of 49
 and is recognized as a telephone.")

38 BLUETOOTH & ETHERNET COMMUNICATIONS BLUETOOTH Indexes can be transferred via Bluetooth to your mobile phone. To do so, the Bluetooth USB dongle (delivered with the machine) must be inserted. The Nagra LB Bluetooth name is CSR-bc4 (default) and is recognized as a telephone. Don t forget to check the MAC in the version display: Some PC s or GSM s will first show this number as the identification number. Example: e-5f-a0-ab shown in the bottom line of the version window. BLUETOOTH NAME As default, the Bluetooth name is 2CSR-bc4. Via the Bluetooth menu in communications, this name can be changed (max. 8 characters). SENDING Set the NAGRA LB to the STOP mode and activate the top panel (center key on the front panel). Select in the directory the index that needs to be transferred. Press the SHIFT key once and the text in the lower line will change to NEW, CPY, RCV. Press the CPY function key. Select Bluetooth and press OK. The Bluetooth device starts scanning and a list will be created of all Bluetooth items in the area. Select the corresponding phone and press OK. If in the list, unused available connections are present, they can be selected one by one and by pressing DEL, they will be deleted. Once the first connection is made the password needs to be entered in the phone as well as in the NAGRA LB and the transfer starts. To escape from Bluetooth, press CAN (Cancel) to return to the directory sub-menu. Press the SHIFT key followed by the RET (Return) key. RECEIVING To receive an index, act for the first part in the same way as for sending until the selected memory and folder is obtained where into the new index needs to be saved. Press the SHIFT key followed by RCV (Receiving). Select the memory in which the incoming index needs to be saved and press OK. During pairing, the common password between the machine and the other Bluetooth equipment needs to be entered and press OK. The file transfer starts. Page 38 of 49
 to RCV (Receive from ).")

39 BLACKBERRY 9000 BLUETOOTH PAIRING EXAMPLE The easiest (or the least difficult ) way to pair with a BlackBerry telephone is to simulate the delivery of a file to the Nagra LB. Enable the Bluetooth option on the telephone and set the LB (with the Bluetooth dongle inserted) to RCV (Receive from ). This is done from the directory window once the destination folder is entered followed by pressing the SHIFT key and pressing RCV. The destination folder needs to be re-confirmed and the message Waiting for Receiving Files is shown. 1. On the BlackBerry, select in the applications Manage Connections (lower left corner on picture 1) and enter. 2. A sub window appears: Select Set Up Bluetooth and enter. 3. In the next sub window, select Search and enter. 4. The BlackBerry starts the scanning and will shown phone. 5. Wait until the scanning is terminated and the BlackBerry will show the found items. One will be called CSR-bc4. Select it and enter. 6. Enter a numeric code on the BlackBerry (Example: 999) and enter. 7. The BlackBerry shows Waiting for CSR-bc4 8. On the Nagra LB, a new sub window appears asking to enter the same password and press OK. 9. For a short moment, the BlackBerry shows that the pairing is completed. 10. The last window shows the list of paired items on the BlackBerry Page 39 of 49
40 BLACKBERRY BLUETOOTH TRANSFER EXAMPLE 1. With the Bluetooth dongle inserted on the LB, select a file in the directory for transferring. 2. Press the SHIFT key followed by CPY. A new window appears. 3. Select in this window Bluetooth and the Nagra LB starts scanning. 4. On the BlackBerry, select Applications and enter. 5. Select Media and enter. 6. Select Music and enter. 7. Press the first left button from the roller. 8. Select in this sub-menu Receive Using Bluetooth and enter. A new sub-window appears Waiting for connection. 9. On the LB, select the BlackBerry and press OK. 10. On the BlackBerry, enter the numeric passkey for CSR-bc4 (example: type 999 and press enter). 11. On the LB, once the password window appears, enter the same numeric passkey and press OK. 12. On the BlackBerry, accept the connection requested by selecting Yes and enter. 13. On the BlackBerry, select the memory area where the file needs to be saved. 14. Once selected and confirmed, the file transfer starts. On the LB as well as on the BlackBerry, the transfer window appears. If afterwards the file needs to be delivered to the end user, via an attachment on an , select the media application, highlight the file that needs to be attached, press the first left key and select Send As followed by enter. Automatically the mailbox opens and the file is already attached. Beware that there is no size limitation to transfer from the Nagra LB to the BlackBerry except for the free memory space available, but the problem rises when an with attachment needs to be delivered from the BlackBerry to an end user. Verify with the IT department what maximum size is accepted by the BlackBerry server. At NagraVision, the limitation is 3 MB (BlackBerry to Server, 10 MB from Server to BlackBerry). 3MB corresponds to approx. 6 minutes of mono recording MP2 or MP3 at 64 kb/s or 3 minutes of stereo recording at 128 kb/s. In the case that a file needs to be sent from a GSM to an end-user, before transferring files to the GSM, verify the size of the selected file in the directory of the LB. If a Bluetooth transferred file needs to be played back on a GSM, the recording must be in MP3 and the extension name must be xxx.mp3. Page 40 of 49
. FTP SETTINGS (PULL MODE) Before a connection can be created the FTP settings must be made.")


41 ETHERNET Via Ethernet, the machine can be seen as a server and shows the internal as well as the CF card folders and indexes (Pull mode). So it becomes possible to copy them. Or the Nagra LB can also deliver an index to a FTP client (Push mode). FTP SETTINGS (PULL MODE) Before a connection can be created the FTP settings must be made. USER NAME Select User name and enter a server name. Maximum 8 characters can be entered. PASS WORD If a password needs to be used to access, select this position and enter a password. Maximum 8 characters can be entered. MANUAL or AUTOMATIC To simplify, start with Automatic setup. In the case this doesn t work select manual: IP ADDRESS, SUBNET MASK, GATEWAY Enter each of them ( Gateway is not always needed). 4 times 3 numbers can be entered for each of them. Once all this done, select and execute FTP CONNECTION. A message Cable is plugged!, IP xxx.xxx.xxx.xxx, FTP server started. Check that the yellow LED turns on above the Ethernet connector. The green LED above the same connector confirms communication. The maximum transfer speed is 2.5 MB / sec. If the cable is not connected, an error message will appear. FTP CLIENT SETTINGS (PUSH MODE) Before a connection can be created with a client, the FTP client settings must be made. SERVER IP ADDRESS Enter the IP address of the client. Page 41 of 49
42 USER NAME Enter the client User name. Maximum 8 characters can be entered. PASS WORD If a password needs to be used to access, select this position and enter the client password. Maximum 8 characters can be entered. FTP PATH If this area stays empty, the indexes will be delivered in the root of the client server. Maximum 8 characters can be entered to declare in which folder the indexes must arrive. FTP PORT By default it is set to 0021 Important: Only one user can be connected (point-to-point). Multi user is not implemented. DEFAULT ETHERNET SETTINGS FTP SERVER SETTING User name: USER User pass: pass IP Address: Subnet mask: Gateway: Manual / Automatic: Automatic FTP CLIENT SETTINGS User name: user User pass: pass IP Address: FTP path: upload FTP Port: 0021 Page 42 of 49

 ready for transfer. This is simply done by drag & drop from area 5.")
43 ETHERNET CONNECTION EXAMPLE (PULL MODE) The PC software used is called FileZilla. It s a free software package that can be downloaded from their web site. Area 1 shows the communication between the Nagra LB and the PC. Area 2 shows the destination folder for downloading the files. Area 3 shows the CF card folder as well as the Nandflash folder (internal LB memory). Area 4 shows the destination folder items on the PC. Area 5 shows the files inside the selected RECORD folder of the CF card inside the Nagra LB. Area 6 shows the file(s) ready for transfer. This is simply done by drag & drop from area 5. Once all this configured, it s time to press Transfer and the files will be transferred to the destination folder on the PC. The picture above shows that a transfer has been made to C:\Documents and Settings\... (See lower left corner). ETHERNET CONNECTION EXAMPLE (PUSH MODE) Before this can be correctly executed beware that the FTP client information must be filled in and the Ethernet cable must be connected. Once this is done, select an index in the directory, press the SHIFT key and select FTP Client. Press OK, select FTP and press OK once more. The transferring starts. The bottom line in the last window shows the status of transfer: 1204 K delivered on a total of 1350 K. Page 43 of 49

. 24 bit as well as sampling rates above 48 khz can not be edited. MPEG 1-LIII can not be edited for the moment.")
.")
44 EDITING To start editing, turn on the top panel and select in directories the desired folder and index. Beware that if the small icon in front of the selected index is red, the editing can not be started. The machine must first be set to the same settings as for the selected index. If the icon is green, press F1 EDT. Important: Beware that editing is only possible on files that were recorded on the Nagra-LB if the record format was PCM 16 bit or MPEG 1-LII up to 48 khz (44.1 khz excluded). 24 bit as well as sampling rates above 48 khz can not be edited. MPEG 1-LIII can not be edited for the moment. RAW files can be edited but without the waveform (replaced by a large tape). The first display appearing is the directory: the middle of the screen corresponds to the start position of the selected index (vertical black line). The vertical red lines show the end of the previous index. 1. Index name and playback position. 2. Directory area (above the yellow line). 3. Editing area 4. Selected index 5. Next available index having the same settings as the first one 6. Green line: Marker created during record or playback 7. Playback position The display is divided into 3 parts: The upper part (almost 2/3 of the total vertical display size) shows the selected index graphically as well as all other indexes having the same settings as for the selected index. The middle part (almost 1/3 of the total vertical display size) shows the editing area. All selected indexes or portions selected from the directory will be shown in this area. The bottom line of the display shows the available functions. To jump from the directory area to the editing area, press the down key once. The directory becomes 1/3 of the screen and the editing area becomes 2/3 of the screen and the yellow line becomes red. To return to the directory area, press the up key once. If there is a preference to work on a full display instead of a 2/3 1/3 display, the shift key can be pressed and hold showing other functions. If at that moment 1TR (F5) is pressed, the directory or editing area takes the display height. 1TR means 1 track, 2TR means 2 tracks. Jumping from the directory to the editing area in this case is still made by using the down and up keys. BASIC EDITING PRINCIPLES The editing on the Nagra LB permits to cut, copy, insert indexes or selected audio portions. Two ways can be applied: To cleanup long indexes, it s preferable to select the full index and drop it in the editing field. Afterwards the different cuts can be made. In the case that only short audio portions are needed from one or more indexes, it s preferable to select the portions straight from the directory and drop them in the editing field. Watching the picture, the audio was played back via the jog wheel and afterwards ALL (F1) was pressed. Automatically the whole index is copied to the editing field. Referring to the picture, the IN (F2) was pressed after 23 seconds and OUT (F2) was pressed after playing back 46 seconds. Automatically the audio portion between 23 and 46 seconds is copied to the editing field. The vertical yellow dotted line shows the position Page 44 of 49
45 were the IN was first pressed. Once the first portion selected, the index takes the EDL name USER Observe that the yellow horizontal line becomes red when in the editing field and that the functions changes. FUNCTIONS IN THE DIRECTORY FIELD ALL Selects the index that is in front of the play position and copy it into the editing area. IN Marks the cue in point (yellow dot line). OUT Marks the cue out point and copy the portion between the 2 markers into the editing area. END Stops the directory window for Export, Save, Exit or Return. PLY Starts the playback from the current position. FUNCTIONS DURING PLAYBACK IN BOTH FIELDS << Fast rewind >> Fast forward < Skip backwards to previous index or cue point > Skip forwards to next index or cue point STP Stops the playback FUNCTIONS IN THE EDITING FIELD CUE Inserts a cue point (full vertical yellow line) IN Marks the cue in point (full vertical red line) OUT Marks the cue out point (full vertical red line) DEL Deletes the portion between to IN points END Leave the editing for exporting, saving, Exit or returning back to editing PLY Starts the playback from the current position FUNCTIONS IN THE DIRECTORY FIELD WITH SHIFT 1TR Toggles between full screen or 1/3 2/3 screen UN The UNDO (1 level) appears if a portion was deleted and permits to restore the deleted part. FUNCTIONS IN THE EDITING FIELD WITH SHIFT Moves the original directory marker for the audio portion on the right side (only shown when pointing on a marker). Turning the jog wheel will increase or decrease the size of the selected portion. Moves the original directory marker for the audio portion on the left side (only shown when pointing on a marker). Turning the jog wheel will increase or decrease the size of the selected portion. OK When F1 is pressed, the new size will be confirmed. 1TR Toggles between full screen or 1/3 2/3 screen (1TR or 2TR). UN The UNDO (1 level) appears if a portion was deleted and permits to restore the deleted part. ZOOM FUNCTIONS SHIFT & UP or DOWN key: Increments or decrements the graphic amplitude. SHIFT & LEFT or RIGHT key: Increments or decrements the timeline. Page 45 of 49

.")
, the second position is trimmed to 25 seconds.")

46 INSERTING AN AUDIO PORTION OR FULL INDEX. To insert in the editing field a full index or a portion from it, trim in the editing field by using the jog wheel to the position where the insert should start, jump back to the directory field and select the index or the portion. The first picture shows that in the edit field, the sound track is trimmed to 12 seconds. This is the position to start the insert. Pressing the up key returns the display to the directory field (picture 2). In picture 3, via the jog wheel or the PLAY function key, the index USER137 is selected and a first IN marker is placed at approx. 12 seconds (yellow dotted line), the second position is trimmed to 25 seconds. At the moment that the OUT key is pressed, the portion from USER137 between 12 and 25 seconds is inserted at the edit start position of index USER135 (figure 4). If the full index USER0137 was supposed to be inserted, select the index from the directory field and press ALL. MODIFYING THE LENGTH OF AN IMPORTED PORTION IN THE EDITING FIELD If one of the inserted portions in the editing field is just too short or too long, it is possible to make the corrections without cutting the existing one. To do this by using the left or right arrow key, jump to the closest marker where the portion needs to be modified. The red dotted line (or the beginning or the end of a portion) must be on top of the play head position. Press and hold the SHIFT key and F1 or F2 until OK appears, release the keys and turn the jog wheel to increase or decrease the length of the portion. In the above shown example, the right side of the green portion was too small. The closest marker was selected. In the second picture, the SHIFT key and the F2 key (left side) were pressed and hold and the jog wheel was turned to increase the length of this portion. UNDO FUNCTION After having deleted a portion in the editing field, it is possible to use the undo function (only one level). To access to the undo key, press and hold the SHIFT key: UN appears above F3. EXPORT, SAVE, EXIT FUNCTIONS When during editing the END (F4) function key is pressed, exporting, saving or exit becomes available. If the Return is selected, the display returns to editing. EXPORT The full editing is saved as a new index ready to be transferred. The name of the exported index is based on the name of the index of the first selection made in the editing. In the case as shown on the picture above the, the exported index will be called USER WAV. Beware that an exported file can not be edited anymore. SAVE Saves the editing as an EDL (Edit Decision List). In the case of the above picture, the saved project name would be USER EDL. This index will be seen in the directory and can be re-called for editing. Page 46 of 49

47 EXIT Leaves the editing. If not previously saved, the editing will be lost. RETURN Turns back to the editing. EDITING OF NAGRA LB RECORDED RAW FILES Raw Files recorded on the Nagra LB do not contain the envelop information. For this reason the envelop in the editing is simulated by a tape. All editing possibilities as shown above can be applied in the same way. EDITING OF IMPORTED FILES Importing files from Ares P, PII, PII+, Ares BB, Ares BB+, Ares M, MII, ML BWF MPEG, Wav MPEG, RAW MPEG & BWF PCM 16, Wav PCM 16 bit files can be imported to the internal memory or CF card and can be edited in the same way as shown in the previous paragraph (tape simulation). ALARMS Low battery A beep is given in the headphones and a message low batt. appears on the screen. If this happens during record, the machine will after a moment (depending on the type of batteries) stop the recording, save the recording and turn off. The same happens during editing. The project will be automatically saved. Low memory A beep is heard in the headphones and a message xxxxx appears on the screen 1 minute before the end. Too slow Unknown CF Input clock un. Disk full Record start err. No CF card USB Host disk not found. Open playback file error. A beep is heard in the headphones and a message Media is too slow. Part of the recording may be lost appears on the screen. The CF card does not accept the data stream speed. A beep is heard in the headphones and a message Unknown CF card appears on the screen. This means that the card is not recognized or not formatted. The record led starts blinking quickly. A message Input clock unsynchronized appears on the screen. This means that the digital input is selected and no AES input is present or the clock is out of range. A beep is heard in the headphones and a message Disk full. Record is stopped appears on the screen. Problems with the memory. This message appears when the Nagra LB is set to record on the CF card but the card is not present. Appears if the USB disk is selected as recording media but the USB connector is not Inserted or has the wrong formatting (NTFS). Apply a database sync to recover. LOOSING POWER DURING RECORD If suddenly the power falls away (mainly in the case if external power was used) the recording in process can only loose maximum 30 seconds of the recording. A FAT update (on the internal memory, the CF card or the USB device) takes place every 30 seconds. In this case the RTC will be lost as well. It s also possible that the file is not shown anymore on the machine. If this happens, proceed with a database sync to find back the lost file. The waveform will be lost but it is still possible to edit the file. Page 47 of 49
NAGRA ARES-M USER MANUAL
 NAGRA ARES-M USER MANUAL Software version V3.18 Build 0724 July 26, 2007 P/N : 2070 001 150 Copyright NAGRAVISION S.A. 2005-2007 1 GUARANTEE... 5 2 DELIVERED WITH... 6 3.1 Front panel key functions...
CalArts Film/Video Sound Quick Start for Sound Devices 744T Time Code Hard Drive Field Recorder:
 CalArts Film/Video Sound Quick Start for Sound Devices 744T Time Code Hard Drive Field Recorder: Front Panel Descriptions 1) Digital Input LEDs! Indicates the presence of digital signal on the respective
NAGRA-SD PROVISIONAL USER MANUAL
 NAGRA-SD PROVISIONAL USER MANUAL Copyright NAGRAVISION S.A.2010 1 GUARANTEE... 4 2 DELIVERED WITH... 4 3 PANEL DESCRIPTION... 5 3.1 Front panel key functions... 5 3.2 Rear side... 5 3.3 Left side... 6
NAGRA ARES-BB + MANUAL
 NAGRA ARES-BB + MANUAL PN 2019 616 150 Version: October 4, 2005 CONTENTS Page 1DELIVERED WITH.... 4 2 INSTALLING THE BATTERIES (NB-BB OPTION).... 4 3 INSTALLING THE FLASHCARD... 5 4 POWER ON, POWER OFF...
NAGRA ARES-BB MANUAL. Version: Sept.6, 2004
 NAGRA ARES-BB MANUAL Version: Sept.6, 2004 WARNING: The ARES-BB has a built-in charger (charge current = 300mA). NiCd or Ni-Metal-Hydride cells can be used. PN 2019 615 150 CONTENTS Page 1DELIVERED WITH....
NAGRA-SD USER MANUAL. Software version V
 NAGRA-SD USER MANUAL Software version V1.2.0.12 Copyright AUDIO TECHNOLOGY SWITZERLAND SA S.A.2013 1 GUARANTEE... 3 2 DELIVERED WITH... 3 3 PANEL DESCRIPTION... 4 3.1 Front panel key functions... 4 3.2
Features. Warnings and Precautions READ BEFORE OPERATING EQUIPMENT SAVE THESE INSTRUCTIONS
 SENTA Warnings and Precautions READ BEFORE OPERATING EQUIPMENT SAVE THESE INSTRUCTIONS To prevent damage to your radio or possible injury to you or others, read these safety precautions and instructions
NAGRA VI Six-track digital recorder
 NAGRA VI Six-track digital recorder Swiss Made Nagra next generation technology The best specs ever for pure audio quality Reliable technology The NAGRA VI has been designed for professional use as an
-You will need to provide 2 AA batteries and an SD card to use the recorder.
 ZOOM H4N - USER GUIDE SETTING UP: -You will need to provide 2 AA batteries and an SD card to use the recorder. -The batteries go into the compartment on the back of the recorder. If you turn the switch
NAGRA ARES-ML USER MANUAL
 NAGRA ARES-ML USER MANUAL Software version V3.24 Build 0218 April 28, 2009 P/N CD : 7070 104 000 Copyright NAGRAVISION S.A. 2005-2009 1 GUARANTEE... 4 2 DELIVERED WITH... 5 3 PANEL DESCRIPTION... 6 3.1
The Nagra VI Six channel digital audio recorder Digital Location Recorder
 The Nagra VI Six channel digital audio recorder Digital Location Recorder Features 6 channels (4 Mic + 2 Line) 24 bit, 96 khz AD / DA Post-production compatible (BWF files)(ixml compatible) SMPTE / EBU
ProHD1 Portable Audio HardDisk Recorder. Manual 1.40 ( )
") 1 (6) ProHD1 Portable Audio HardDisk Recorder Manual 1.40 (05-10-20) ProHD1 is a powerful, yet easy to use, recording unit intended for professional use in challenging environments. It is a heavy-duty
1 (6) ProHD1 Portable Audio HardDisk Recorder Manual 1.40 (05-10-20) ProHD1 is a powerful, yet easy to use, recording unit intended for professional use in challenging environments. It is a heavy-duty
MP3 HARD DISK. User Manual V1.0
 User Manual V1.0 Contents Before Using the Product 1 Introduction 1 System Requirements 1 Charging the Battery 2 Transferring Music Files 3 Music File Transferring Example 4 Basic Functions 5 Components
Software Bulletins for NAGRA VI
 Addition of the Default settings menu. Number of indexes limited to 299. Addition of the index RENUMBER feature. Software Bulletins for NAGRA VI VERSION V1.01 (17/06/2008) VERSION V1.02 (25/06/2008) Display
And you thought we were famous
 And you thought we were famous for our cassette recorders! Pro-Installation Solid-State Recorder PMD570 For years, Marantz Professional has led the industry in the recording and gathering of audio for
Quick Guide 2017 ZOOM CORPORATION. You must read the Usage and Safety Precautions before use.
 Quick Guide You must read the Usage and Safety Precautions before use. The Operation Manual can be downloaded from the ZOOM website (www.zoom.co.jp). 2017 ZOOM CORPORATION Copying or reprinting this manual
D C DR-70D. Linear PCM Recorder for DSLR. Reference Manual
 D01244120C DR-70D Linear PCM Recorder for DSLR Reference Manual Contents 1 Introduction...4 Features... 4 Conventions used in this manual... 4 About SD cards... 5 Precautions for use... 5 2 Names and Functions
NAGRA VI Eight-track digital recorder
 NAGRA VI Eight-track digital recorder Swiss Made Nagra next generation technology The best specs ever for pure audio quality Reliable technology The NAGRA VI has been designed for professional use as
PXR 1506 / WATT MIXER AMPLIFIER
 PXR 1506 / 1508 150-WATT MIXER AMPLIFIER Operating Manual www.peavey.com ENGLISH PXR 1506 / 1508 150-Watt, 8-Channel Mixer Amplifier Designed with the latest Peavey technology, the PXR 1506 / 1508 powered
HS-P82. Contents. New functions in firmware V2.00
 Contents New functions in firmware V2.00...1 Improved operation when the REC MODE page REC Mode item is set to Mirror...2 Mirror DELETE MODE setting added...2 Changing the names of a take recorded at the
Table of Contents. Taking a First Look 2 Intelligent Remote Control 2 Before You Start 4
 Table of Contents Taking a First Look 2 Intelligent Remote Control 2 Before You Start 4 Getting Started 6 Activating the Remote Control 6 Defining the Brands of Your Devices 7 Working with the Home Panel
 Content 1 Welcome 24 1.1 Product features 24 2 Important 25 2.1 Safety 25 2.2 Hearing protection 25 3 Your recorder 26 3.1 What s in the box? 26 3.2 Overview 26 4 Start to use 27 4.1 Power on/off 27 4.2
TV1 Digital Player User s Manual
 TV1 Digital Player User s Manual Note: Screen shots taken in this manual may appear different on the player itself. Table of Content: Computer System requirements... 1 Notes... 2 Product Introduction...
Table of Contents. Introduction 2 1. Intelligent Remote Control 2 2. Charging the Remote Control 3
 Table of Contents Introduction 2 1. Intelligent Remote Control 2 2. Charging the Remote Control 3 Getting Started 6 1. Activating the Remote Control 6 2. Selecting a Device 7 3. Operating a Device 8 4.
EasyStart. The MR Recorders support multiple recording formats, bit.192 khz
 EasyStart MR 1 / MR 1000 Main Features The hand held MR 1 provides high quality 1 bit/2.8 MHz recording and playback in a shirt pocket portable package perfect for location recording, broadcast journalism,
NUAGE MASTER Ncs500-CT
 CONTROL SURFACE NUAGE MASTER Ncs500-CT Operation Manual Using this manual This operation manual supports keyword searching and linking as follows. Keyword searching Searching for keywords is performed
USER MANUAL NAGRA PICO
 Audio Technology Switzerland 2012 USER MANUAL NAGRA PICO - 1 - CONTENT MAIN FEATURES - 4 - PICO STANDARD PACKAGE - 5 - IMPORTANT - : - 1 PARTS DESCRIPTIOIN - 8-2 BATTERIES - 11-3 HOLD - 13-4 SWITCH - 14-5
DVR 505 Digital Camcorder
 DVR 505 Digital Camcorder User Manual 2016 Sakar International, Inc. All rights reserved. Windows and the Windows logo are registered trademarks of Microsoft Corporation. All other trademarks are the property
Compact Linear PCM Recorder with XLR Connector
 SR-VRM1 Compact Linear PCM Recorder with XLR Connector User Manual Statement Please read this manual carefully before using. Strictly operate and store in accordance with the instructions. For further
Register your product and get support at LFH0612 LFH0617 LFH0632 LFH0633. EN User manual
 Register your product and get support at www.philips.com/welcome LFH0612 LFH0617 LFH0632 LFH0633 EN User manual Table of contents 1 Welcome 3 Product highlights 3 2 Important 4 Safety 4 Hearing safety
ProntoPro Intelligent Remote Control. User Guide
 ProntoPro Intelligent Remote Control User Guide Table of Content Taking a First Look... 3 Intelligent Remote Control... 3 Before You Start... 5 Getting Started... 7 Activating the Remote Control... 7 Defining
WARNING: The ARES-BB has a built-in charger (charge current = 300mA). NiCd or Ni-Metal-Hydride cells can be used.
. NiCd or Ni-Metal-Hydride cells can be used.") NAGRA ARES-BB MANUAL Version: Jun. 2004 WARNING: The ARES-BB has a built-in charger (charge current = 300mA). NiCd or Ni-Metal-Hydride cells can be used. WHEN USING THE EXTERNAL POWER SUPPLY, CHECK THAT
NAGRA ARES-BB MANUAL Version: Jun. 2004 WARNING: The ARES-BB has a built-in charger (charge current = 300mA). NiCd or Ni-Metal-Hydride cells can be used. WHEN USING THE EXTERNAL POWER SUPPLY, CHECK THAT
Rec Manager for EDIC-mini Tiny
 Rec Manager for EDIC-mini Tiny User Manual Version August, 2010-1 - Contents Overview...3 Glossary...3 What is Rec Manager Program...3 Main Program Features:...4 Starting the Program...4 Program s Interface...5
Hidden Video Recording System Manual
 Hidden Video Recording System Manual Patent No. M356942 P/N: F40072B00 Thank you for purchasing our Hidden Video Recorder System. Please read this manual before installation. For customer support, please
EVOBOOK 2. User s Manual.
 EVOBOOK 2 User s Manual www.evolio.ro 0 User s Manual Content Page Introduction.... 2 Parts and Controls.... 3 Getting Started...... 6 Turning On/Off EvoBook2. 6 Charging EvoBook2... 6 Inserting SD card....
Happy Recording with Your TOOBOM Voice Recorder
 Enjoy Recording, No cumbersome recorder Simple Tutorials, Happy recording Still have unexpected issues with the voice recorder? No worry. Phone support at your available time REQUEST PHONE CALL or CUSTOM
SD CARD DVD/VCD/CD/MP3/DIVX/MPEG-4 XO1525 USB MOD D200P. User s Manual
 USB SD CARD DVD/VCD/CD/MP3/DIVX/MPEG-4 XO1525 MOD D200P User s Manual 9.1 Rear Panel Connections: 19 BEFORE USING: To ensure the safety of the products during transportation, The internal mechanism was
MDVR-14 SOLID STATE MINI DVR User Guide
 MDVR-14 SOLID STATE MINI DVR User Guide 1 Contents 1. SAFETY PRECAUTIONS...3 2. FEATURES...4 3. PACKING LIST...4 4. MDVR DESCRIPTION... 5 5. BASIC CONFIGURATION...7 6. DISPLAY...8 7. OPERATION...9 8. MAIN
OVERVIEW SYSTEM REQUIREMENTS
 USER GUIDE OVERVIEW The AI-1 USB Audio Interface adds studio-quality Input and Output capabilities to your PC or Mac, turning your recording software into a full recording setup. With its high quality
RSE Overview > > > > > Fig. 1 RSE features (5 seat vehicle shown) > > > >
 > > > >") RSE Overview The Rear Seat Entertainment system (RSE) allows passengers in the rear compartment to access multimedia content and basic Infotainment functions using the Touch Screen Remote (TSR) or a suitable
RSE Overview The Rear Seat Entertainment system (RSE) allows passengers in the rear compartment to access multimedia content and basic Infotainment functions using the Touch Screen Remote (TSR) or a suitable
FIRESTORM AP1 AUDIO PLAYER USER GUIDE
 FIRESTORM AP1 AUDIO PLAYER USER GUIDE Introduction The FireStorm AP1 Audio Player is an Audio Player for the FireStorm Firing System. The Audio Player allows you to easily play a music track in perfect
Sound Lab by Gold Line. Noise Level Analysis
 Sound Lab by Gold Line Noise Level Analysis About NLA The NLA module of Sound Lab is used to analyze noise over a specified period of time. NLA can be set to run for as short as one minute or as long as
SecureShot HC Quick Start Instruction Page
 SecureShot HC Quick Start Instruction Page Your new SecurShot HC has been factory pre-programmed and tested to fit most applications. It is ready-to-go right out of the box. An SD card is installed, and
DR-100)# Linear PCM Recorder
# Linear PCM Recorder") D01303820A DR-100)# Linear PCM Recorder Reference Manual Contents 1 Introduction...4 Features... 4 Conventions used in this manual... 4 Recycling lithium-ion rechargeable batteries... 4 Trademarks and
D01303820A DR-100)# Linear PCM Recorder Reference Manual Contents 1 Introduction...4 Features... 4 Conventions used in this manual... 4 Recycling lithium-ion rechargeable batteries... 4 Trademarks and
 Content 1 Welcome 37 Safety 38 Hearing safety 38 3 Your Voice Tracer digital recorder 39 What s in the box? 39 Overview 39 4 Start To Use 41 Power On/Off 41 Recharge 42 Key Lock (HOLD Function) 43 PC Connection
PROFESSIONAL VOICE RECORDER SKU: VR4GBPRO
 PROFESSIONAL VOICE RECORDER SKU: VR4GBPRO THANK YOU FOR PURCHASING THE VOICE RECORDER PRO Please read this manual before operating the professional voice recorder and keep it handy. The VR4GBPro is a professional
user manual EASYCORDER Software version 6.1
 user manual EASYCORDER Software version 6.1 INTRODUCTION 3 FEATURES 4 1 PREPARATION 5 1.1 CONVENTIONS 5 1.2 UNPACKING 6 1.3 GETTING STARTED 7 1.4 CONTROLS 8 1.5 DISPLAY INFORMATION 11 1.6 CONNECTORS 12
Hi-Res 8 Wi-Fi Digital Picture Frame with MP3 player Table of Contents
 Hi-Res 8 Wi-Fi Digital Picture Frame with MP3 player Table of Contents Before Using the Digital Picture Frame...3 Introduction...3 Features and Specs...3 Package contents...4 Digital Picture Frame Layout...5
Mp3 Player with Speaker. Instruction Manual FOR MODEL NO FIESTA2. Please read this instruction carefully before the operation
 Mp3 Player with Speaker FOR MODEL NO FIESTA2 Instruction Manual Please read this instruction carefully before the operation EN User Manual KEY DEFINITIONS 9 1 3 2 5 6 4 8 7 Power ON/OFF Play: Play/Pause
Line_In (Audio) Recording...
 Recording...") Contents Features... Warning... Introduction... Active Matrix OLED Display Screen... How to Use with PC System... Charging the MP3 Player... Files, Upload and Download... Formatting... Software Installation...
Contents Features... Warning... Introduction... Active Matrix OLED Display Screen... How to Use with PC System... Charging the MP3 Player... Files, Upload and Download... Formatting... Software Installation...
DVR 520 / 1.8 Digital Video Recorder
 DVR 520 / 1.8 Digital Video Recorder User Manual 2010 Sakar International, Inc. All rights reserved. Windows and the Windows logo are registered trademarks of Microsoft Corporation. All other trademarks
615HD Digital Video Camera
 615HD Digital Video Camera User Manual 2009-2011 Sakar International, Inc. All rights reserved. Windows and the Windows logo are registered trademarks of Microsoft Corporation. All other trademarks are
BOX CONTENTS REGISTRATION QUICK SETUP CONNECTION DIAGRAM POWER HOUSE AMP MIXER
 QUICKSTART GUIDE BOX CONTENTS MP10USB Power cable Stereo RCA cable Quickstart Guide Safety & Warranty Information Booklet REGISTRATION Please go to http://www.numark.com to register your MP10USB. Registering
CONTENTS CHAPTER I: BEFORE USE I. BEFORE USE
 I. BEFORE USE Foreword 1. Features 2. Accessories 3. Product Safety Information 4. Illustrations and Functions II. FAST OPERATION 1. Startup 2. Shutdown 3. Lock 4. Reset 5. Pause 6. Music File Select 7.
TL240C/TL321C Transparent Display User Manual
 TL240C/TL321C Transparent Display User Manual Disclaimer BenQ Corporation makes no representations or warranties, either expressed or implied, with respect to the contents of this document. BenQ Corporation
Saber Hand Wind Audio Player User Guide
 Saber Hand Wind Audio Player User Guide February 2014 globalrecordings.net/saber Table of Contents 1.Introduction...3 1.1 Before You Start...3 1.2 Other information available...3 1.3 Contact Details...3
Overview 1. Foreword 2. Warnings
 Overview 1. Foreword Thank you for choosing our product. Please read this manual carefully before using the product. Specifications and software updates may be subject to change without notice. Some pictures
Blue Point Engineering
 Blue Point Engineering Board - Pro Module (E) Instruction Pointing the Way to Solutions! Controller I Version 2.1 The Board Pro E Module provides the following features: Up to 4 minutes recording time
DVR 560HD Digital Video Recorder
 DVR 560HD Digital Video Recorder User Manual 2010 Sakar International, Inc. All rights reserved. Windows and the Windows logo are registered trademarks of Microsoft Corporation. All other trademarks are
Hi-Res Audio Recorder
 Stereo Turntable System Application Hi-Res Audio Recorder About Hi-Res Audio Recorder What Is Hi-Res Audio Recorder? [1] Supported Stereo Turntable System [2] Audio File Formats Supported for Recording
Lotoo PAW 5000 USER GUIDE
 Lotoo PAW 5000 USER GUIDE Index 1. What is the Lotoo PAW 5000 2. What s in the box? 3. Key definitions 4. Getting started 5. Connections 6. Navigation 7. Random play 8. Playlists 9. PMEQ 10. Function button
XEMIO-950 MP5 PLAYER / 4GB MEMORY / TOUCH SCREEN. For information and support,
 XEMIO-950 MP5 PLAYER / 4GB MEMORY / TOUCH SCREEN For information and support, www.lenco.eu To the customer: Thank you for purchasing this MP5 player. When opening the box for the first time, please check
Instruction Manual. Version 1.1.6
 Version 1.1.6 Trajet GmbH July 2008 Contents 1 General 4 1.1 Warranty conditions 5 1.2 Safety notice 5 2 Controls and connections 6 3 Installing and charging batteries 7 3.1 Installing 7 3.2 Charging condition
PORTABLE VIDEO RECORDER AND CASSETTE CONVERTER. Item No User Guide
 PORTABLE VIDEO RECORDER AND CASSETTE CONVERTER Item No. 206557 User Guide Thank you for choosing the Sharper Image Portable Video Recorder and Cassette Converter. Please take a moment to read this guide
D C. TASCAM PCM Recorder. iphone/ipad/ipod touch Application USER'S GUIDE
 D01167420C TASCAM PCM Recorder iphone/ipad/ipod touch Application USER'S GUIDE Contents Introduction...3 Trademarks... 3 What's in the Main Window...4 What's in the Settings Window...6 The Sharing Window...7
Quick Guide. You must read the Usage and Safety Precautions before use.
 Quick Guide You must read the Usage and Safety Precautions before use. The Operation Manual can be downloaded from the ZOOM website (https://www.zoom.jp/docs/l-0). 018 ZOOM CORPORATION Copying or reprinting
ipod shuffle User Guide
 ipod shuffle User Guide 2 Contents Chapter 1 3 About ipod shuffle Chapter 2 4 ipod shuffle Basics 4 ipod shuffle at a Glance 5 Using the ipod shuffle Controls 6 Connecting and Disconnecting ipod shuffle
Quickstart Guide (English)
") Quickstart Guide (English) Introduction 1. Make sure all items listed in the Box Contents are included in the box. Look in the box under the foam sheet for the speaker stand rubber feet, speaker stand
Quickstart Guide (English) Introduction 1. Make sure all items listed in the Box Contents are included in the box. Look in the box under the foam sheet for the speaker stand rubber feet, speaker stand
RR-XR800 VQT3C55. Owner s Manual IC Recorder. Model No. The warranty can be found on pages 58 and 59.
 Owner s Manual IC Recorder Model No. RR-XR800 If you have any questions contact 1-800-561-5505 Dear customer Thank you for purchasing this product. For optimum performance and safety, please read these
DVR 710HDv2 Digital Video Recorder
 DVR 710HDv2 Digital Video Recorder User Manual 2009-2011 Sakar International, Inc. All rights reserved. Windows and the Windows logo are registered trademarks of Microsoft Corporation. All other trademarks
Using the Olympus WS-110 Digi-Recorder. Part A - Setting it Up. Introduction. A1. Inserting the Battery. A2. Turning On and Off
 Using the Olympus WS-110 Digi-Recorder Model: Olympus WS-110 (256MB, Mono, white casing) Ralph Cullimore, e-learning Co-ordinator Devon ACL Dec 2008 Introduction The Olympus WS-110 is a digital voice recorder
MicroTrack 24/96. Quick Start Guide. Professional 2-Channel Mobile Digital Recorder
 MicroTrack 24/96 Professional 2-Channel Mobile Digital Recorder Quick Start Guide This guide is intended to help get you started quickly. In order to achieve optimal usage of your new MicroTrack, we recommend
Pronto. User Guide. User Guide
 Pronto EN 1 Pronto Copyright 2005 Royal Philips Electronics, Interleuvenlaan 72-74, 3000 Leuven (Belgium) Remark: All rights are reserved. Reproduction in whole or in part is prohibited without prior consent
Help. About Hi-Res Audio Recorder. Getting Ready to Use Your Computer. Operation Flow from Recording to Editing to Saving
 This Help describes the features of and provides the instructions on using it. In this Help, screens that appear on a Windows computer connected with the turntable are used as examples. About What Is?
Precautions... 1 Take Precaution...1 Installation Installation Procedures... 2 Installation Opening...
 CONTENTS Precautions... 1 Take Precaution...1 Installation...2-3 Installation Procedures... 2 Installation Opening... 2 Wiring Connections...3 Removal of the Main Unit... 3 Overview of the Components...
Professional Level Compact Handheld Audio Recorder. User s Guide
 Professional Level Compact Handheld Audio Recorder User s Guide - Copyright 2010 Revision 1, May 2010 www.esi-audio.com INDEX 1. Introduction... 4 2. Description of... 4 Accessories... 5 LCD display...
Micro Hi-Fi Component System
 4-230-234-13(1) Micro Hi-Fi Component System Operating Instructions CMT-SP55MD 2000 Sony Corporation Do not install the appliance in a confined space, such as a bookcase or built-in cabinet. Table of Contents
Installation Manual for 22HFL4373D/10 26HFL4373D/10 32HFL4373D/10 42HFL4373D/10
 Philips Hospitality TV Installation Manual for 22HFL4373D/10 26HFL4373D/10 32HFL4373D/10 42HFL4373D/10 Version 1.0 Contents 1. Requirements before starting the installation... 2 2. Find out the state of
F8 Control Version 2.0 Operation Manual
 F8 Control Version 2.0 Operation Manual 2018 ZOOM CORPORATION Copying or reprinting this manual in part or in whole without permission is prohibited. Contents Introduction...........................................................
March 2016 Rev. 1.3 Last valid version 2.0.5
 March 2016 Rev. 1.3 Last valid version 2.0.5 Index Index 2 What s Quantum LITE 4 I.1 Introduction... 4 I.2 Quantum Lite Features... 5 Quick quide 6 II.1 Handheld codec. Power On.... 6 II.2 Main menu...
The Discrete DAC. User Guide. Check our website for the most recent user guides, firmware, and drivers:
 The Discrete DAC User Guide Check our website for the most recent user guides, firmware, and drivers: www.msbtechnology.com Technical support email is: techsupport@msbtech.com 05.21.18 Technical specifications
Quick Start. H.264 Network DVR 303Z
 303Z H.264 Network DVR Quick Start Please read instructions thoroughly before operation and retain it for future reference. The image shown above may differ from the actual product appearance. 792_Quick_V0.9
D D DR-22WL. Linear PCM Recorder REFERENCE MANUAL
 D01244520D DR-22WL Linear PCM Recorder REFERENCE MANUAL Contents 1 Introduction...4 Features... 4 Conventions used in this manual... 4 About microsd cards... 4 Precautions... 4 2 Names and functions of
Selection tool - for selecting the range of audio you want to edit or listen to.
 Audacity Quick Guide Audacity is an easy-to-use audio editor and recorder. You can use Audacity to: Record live audio. Convert tapes and records into digital recordings or CDs. Edit sound files. Cut, copy,
Kanguru Micro MP3 Player User Manual
 Kanguru Micro MP3 Player User Manual Copyright 2008, All Rights Reserved. Before first Use Before First Use Copyright 2008, Kanguru Solutions. All rights reserved. DOS, Windows 95, Windows 98, Windows
K-framework 2 User Guide English
 K-framework 2 User Guide English System requirements Operating System: Windows XP / Vista / 7 / 8 / 10 CPU: Intel Pentium Dual Core Memory: 2 GB 1 TABLE of CONTENTS 1. software installation and settings...
Mark the beginning and ending of a particular recorded passage and the recording will be played over and over again- great for language learning.
 ICD-SX712 Digital Flash Voice Recorder The ICD-SX712 is loaded with features ideal for frequent and professional users. The unique 2-position microphone offers powerful recording capability while the Sony
Integrating Sound Level Datalogger Model
 User's Guide Integrating Sound Level Datalogger Model 407780 Introduction Congratulations on your purchase of the Extech 407780 Integrating Sound Level Meter. The 407780 with programmable integrating time
Help Guide. Getting started. Use this manual if you encounter any problems, or have any questions. What you can do with the Bluetooth function
 Use this manual if you encounter any problems, or have any questions. Getting started What you can do with the Bluetooth function About voice guidance Supplied accessories Checking the package contents
Mark the beginning and ending of a particular recorded passage and the recording will be played over and over again- great for language learning.
 ICD-SX712D Digital Flash Voice Recorder Feature packed the ICD-SX712D delivers. Combining flexibility and capability with convenience for musicians, business people and students the ICDSX712D offers: a
K-framework 2 User Guide English
 K-framework 2 User Guide English System requirements Operating System: Windows XP / Vista / 7 / 8 CPU: Intel Pentium Dual Core Memory: 2 GB 1 TABLE of CONTENTS 1. software installation and set up... 4
STING II Digital Video Recorder/Player. User s Guide
 STING II Digital Video Recorder/Player User s Guide Table of Contents Introduction... 2 STING II Description... 2 Package Contents... 6 Connecting the A/V Cable... 7 Getting Started... 8 Charging the Battery...
2. Choose R-07 as the product name.
 Owner s Manual Check the contents of the package The R-07 comes with the following items. As soon as you open the package, please check that all these items are present. If anything is missing, please
H.264 Network DVR. Quick Start
 341Z H.264 Network DVR Quick Start GUI Display with USB Mouse Control Please read instructions thoroughly before operation and retain it for future reference. For the actual display & operation, please
Help Guide. Preparation
 Use this when you have any questions on how to use your linear PCM recorder. The contents of the may be subject to change without notice due to updates to the product's specifications. Preparation Parts
DVR 548HD Digital Video Recorder
 DVR 548HD Digital Video Recorder User Manual 2009-2011 Sakar International, Inc. All rights reserved. Windows and the Windows logo are registered trademarks of Microsoft Corporation. All other trademarks
Show Designer 1. Software Revision 3.11
 Show Designer 1 Software Revision 3.11 OVERVIEW The Show Designer 1 is a lighting controller based on the successful and simple to use Show Designer. The Show Designer 1 adds to the existing features of
INSTRUCTION MANUAL 2.4G Wireless DVR SB-WDVR50
 INSTRUCTION MANUAL 2.4G Wireless DVR SB-WDVR50 Revised: April 26, 2013 Thank you for purchasing from SafetyBasement.com! We appreciate your business. We made this simple manual to help you enjoy your new
NAGRA LINO USER MANUAL Audio Technology Switzerland S.A.
 NAGRA LINO USER MANUAL - 1 - Contents Package contents... - 6 - IMPORTANT... - 7 - Understanding the LINO...- 8-1 Front view...- 9-2 Rear view...- 10-3 Left and right side views...- 11 - Getting Started...
M2DIS. User Manual.
 M2DIS User Manual www.audac.eu 2 Index Introduction 4 Caution servicing 4 User interface 5 Login screen 5 Main screen 6 Output settings 8 Test signals 10 Sound settings 11 Settings screen 12 Input Configuration