Step 1 - Hardware Connections
|
|
|
- Curtis Lindsey
- 6 years ago
- Views:
Transcription


* Power Adaptor(s) (for camera*) * NOTE: The antenna cosmetics are different for the LW00 vs. LW00P.")


, however this can be adjusted to ~0 seconds.")
.")

.")
 Helpful Tips: Better reception can often be accomplished by changing the position of the Receiver unit or changing the position of")


, however the MAXIMUM RANGE is up to 00 feet in optimal conditions.")

 Hi Speed B - Wireless Camera Installation * Number of cameras may vary by model.")


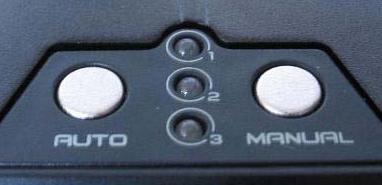
1 under 5 minutes under 0 minutes Tools Skills - Easy Under 5 Minutes* The LW00 series product is expandable. To order additional cameras please visit our website at Step - Connections * Installation time may vary based on application and camera cabling Includes: NOTE: AVOID INSTALLING IN A LOCATION WHICH REQUIRES THE WIRELESS SIGNAL TO PASS THROUGH CEMENT, CONCRETE AND METAL STRUCTURES. THIS WILL REDUCE THE TRANSMISSION RANGE. x Wireless Receiver x Power Adaptor (for receiver) x RCA Video Cable x USB Cable x Software CD Camera Battery Adaptor Cable(s)* Wireless Camera(s)* Power Adaptor(s) (for camera*) * NOTE: The antenna cosmetics are different for the LW00 vs. LW00P. These instructions however apply to both series of products. A - Wireless Receiver Set-up Installation The Camera can be powered either by using the provided Power Adaptor, or using a 9V battery (not included) in combination with the Battery Adaptor Cable. Connecting Camera to Power Adaptor Connect one end of the AV Cable to the back of the receiver. Connect the other end to the Video IN (Yellow) and Audio IN (White) ports on the TV or Monitor for viewing and VCR or DVD Recorder for recording. Plug the Receiver power cable into the 9V POWER input. Plug the power adaptor into a wall outlet or surge protector. How to use the Control Buttons: LW00P LW00 * Requires viewing/recording device with RCA. Viewing/Recording device sold separately. *Additional receivers and/or cameras sold wseparately. See product manual for details. AUTO BUTTON When the receiver is set to AUTO Mode, it will continuously switch between the cameras that are set to ON. The dwell time is set to 4 seconds per camera (by default), however this can be adjusted to ~0 seconds. To adjust the dwell time, press and hold both the AUTO and MANUAL buttons at the same time this will produce beeps indicating one second increments (i.e. each beep represents one second in dwell time). Once the desired dwell time has been reached, release the buttons. MANUAL BUTTON Press the MANUAL button to switch between available cameras. The Receiver will switch to a different camera (if available and configured) each time the MANUAL button is pressed. Place the receiver in a place that will have clear reception to your camera(s). Try to avoid placing the receiver near other 900MHz devices (such as older cordless phones, etc.) Helpful Tips: Better reception can often be accomplished by changing the position of the Receiver unit or changing the position of the Camera. The Receiver is a wireless product, and is subject to a number of environmental conditions. Walking between the receiver and camera may cause temporary interference. The optimal distance of the camera (during low light / nighttime use) from the person or object is 4~6 feet (up to meters). The picture may become grainy beyond this distance due to lack of light an additional light source in the room, such as a night light or illuminator may improve the picture quality. During low light / night use, the closer the Receiver is to the Camera, the better the picture quality. The picture may become grainy at farther distances. The optimal distance for normal home use is 5~60 feet (~8 meters), however the MAXIMUM RANGE is up to 00 feet in optimal conditions. Audio feedback may appear when the receiver and cameras are too close (under 5 feet / meters). Plug & Play connectors, On screen set up Did you know? You can move your camera around the house or from one room to another with the use of the included battery adaptor cable. TV (not included) Hi Speed B - Wireless Camera Installation * Number of cameras may vary by model. Check your package for specific content information. * Connect power adapter to local AC power outlet * of each provided with the LW00 System/ of each provided with the LW0 System. REMOTE COLOR WIRELESS SURVEILLANCE SYSTEM LW00 Series - quick start guide Connect the Power Adaptor to the Female Barrel Power termination on the camera. C - Viewing your System Turn on TV or Observation Monitor, and switch the video channel that the receiver has been connected to. Tip: If your TV has a PIP feature, you can have the camera images displayed in the PIP window. Check your TV manual for info on PIP feature (if available). Connecting Camera to the Battery Adaptor Cable (optional) Connect the Camera Battery Adaptor cable to the Female Barrel Power termination on the camera. Connect a battery to the cable. NOTE: The new 9V battery should last for approximately 4 hours without the IR LEDs in use. NOTE: Before you install the camera(s), carefully plan where and how it will be positioned, and where you will route the cable that connects the camera to the power adaptor or battery adaptor. Before starting permanent installation, verify its performance by observing the image on a monitor. When camera is positioned in same location/position where it will be permanently installed. NOTE: Wireless cameras require a power source (either an electrical outlet or battery power) to operate. If you plan to permanently mount the camera in a location, it is recommended to use the included Camera Power adaptor to prevent interruptions in the image, as the battery adaptor is intended as a temporary power solution. LW00P ONLY - Optimizing Wireless Signal In order to provide the best wireless transmission, you will need to adjust the antenna of the camera and receiver as follows.. Position the receiver s patch antenna to face the direction of the camera. Position the camera s patch antenna to face the direction of the receiver. Adjust the direction as necessary while observing the screen. Patch Antenna LW00 Series QSG_EN_R Page


2 REMOTE COLOR WIRELESS SURVEILLANCE SYSTEM Skills - LW00 Series - quick start guide Under 0 Minutes* Computer & Plug & Play connectors, On screen set up Step - Viewing on your PC Driver Installation - on Windows XP Insert the included CD into your PC s CD-ROM drive. A Lorex Software Installation Menu will appear on your screen as per image shown. Click USB Driver to install the driver called Usbvm6. Follow steps in installation wizard. Press Continue Anyways when prompted by the software installation screen. You will be prompted to install Microsoft DirectX. Please proceed with the install as this is required to run the software. Next you will be prompted to restart your PC. Please do so. NOTE: Notice upon restarting your computer that a file called AMCAP W has been added to your desktop. See Step-5 for further details. cable and connect one end 4 Take the included USB to the back of the wireless receiver and the other end to your PC. The New Wizard will appear on screen. Select No, not this time to find the driver manually. Click Next. Select Install from a list or specific location (Advanced). Click Next. Select Search Removable Media and click Next. At this point make sure the CD is still inside the CD-ROM drive. The driver will automatically be found. A Confirm File Replace box will appear. Click No. NOTE: You may be prompted by the Windows alert. Press Continue Anyways and press Finish to continue. 5 Check to see if the receiver and camera have been properly installed by double clicking the AMCAP W icon found on your desktop. NOTE: Make sure the camera is powered up and within range of the receiver or else you will not see a picture when you start AMCAP W Viewer software. Driver installation is now completed. Driver Installation - on Windows Vista Insert the included CD into your PC s CD-ROM drive. CD Click on Open folder to view files to access the CD content. Click on folder called Software and double click USB Driver. NOTE: A warning will pop-up stating Windows cant verify the publisher of this driver software. Click Install this driver software anyway. You will be prompted to install Microsoft DirectX. Please proceed with the install as this is required to run the software. Next you will be prompted to restart your PC. Please do so. NOTE: Notice upon restarting your computer that a file called AMCAP W has been added to your desktop. See Step-6 for further details. Take the included USB cable and connect one end to the back of the wireless receiver and the other end to your PC. The driver installation will be completed automatically. 4 Check to see if the receiver and camera have been properly installed by double clicking the AMCAP W icon found on your desktop. NOTE: Make sure the camera is powered up and within range of the receiver or else you will not see a picture when you start AMCAP W Viewer software. LW00 Series QSG_EN_R Page

.")


.")
3 under 5 minutes REMOTE COLOR WIRELESS SURVEILLANCE SYSTEM under 0 minutes Skills - Hi Speed LW00 Series - quick start guide Under 0 Minutes* Yoics Software Installation - on Windows XP Your Internet Browser will open up and direct Go back to the Lorex you to the download page within the Yoics Software Installation Plug & Play connectors, On screen set up Step - Viewing on your PC (continued) Menu by clicking on My Computer and double clicking on the Lorex icon. Computer & website (appears as a blank page). The Web Browser may warn you about the download. Click Download File to proceed. NOTE: Yoics software requires Microsoft.NET software. If this software is not already installed on your PC, you will be prompted to install this. Click on Software Installation and select Yoics Software Download Latest Version to download Yoics remote viewing application. When prompted by the software, press Run to proceed and complete the installation of the Yoics software. Continue to Step-4 on the next page Yoics Software Installation - on Windows Vista Make sure if the CD is still inside the CD-ROM drive. On your desktop click on Computer to access the CD-ROM drive and select Run Lorex.exe Click on Software Installation and select Yoics Software - Download Latest Version to download Yoics remote viewing application. Your Internet Browser will open up and direct you to the download page within the Yoics website (appears as a blank page). The Web Browser may warn you about the download. Click Download File to proceed to Step -4. Continue to Step-4 on the next page LW00 Series QSG_EN_R Page
 4 After a minute or two the Yoics login screen will appear.")


.")

. Press Ok.")


4 COLOR WIRELESS SURVEILLANCE SYSTEM LW00 Series - quick start guide Step - Viewing on your PC (continued) 4 After a minute or two the Yoics login screen will appear. Click on Register a new Yoics account to setup a Yoics account. 5 Click on Click here to register new Yoics account check box. 6 Proceed to fill in all the required information. Click Register. When the Yoics setup wizard appears, check Do not ask me about this when Yoics starts checkbox. Press Skip Setup. 7 The Yoics desktop software will now open after a few minutes. Click on Web Cam to add the camera to the list of items you would like to view. 8 the installed devices list. It will show up as Wireless PC-Camera. Enter a name for the camera in the Alias field (e.g. Wireless). NOTE: Before you proceed, note the options that are checked by default. Uncheck any that you do not require. Press Change to select the camera from Press Change and select a folder to save the camera images to (i.e. desktop or my pictures ). Press Ok. Wireless 9 After a minute, the Yoics Share Registration is Complete message appears. Press OK. The camera will appear in the Yoics desktop application under the Alias setup as in step section 8 -. TIP Once the Yoics login screen reappears, press Login. Find below the status of the connected devices 0 Right click on the Alias of the camera and select Connect. The status of the device will change to orange to indicate that is now ready to be viewed locally or remotely. blue means that your device is on-line and available. green means a device from another user is online and available to you for sharing orange means that you are connected to the device grey means a device which is currently off-line and not available. An Internet browser window will pop-up and show a live image from the camera. Click on the image to see streaming video from the camera local viewing on a PC LW00 Series QSG_EN_R Page


5 under 5 minutes under 0 minutes COLOR WIRELESS SURVEILLANCE SYSTEM Hi Speed- Basic Skills LW00 Series - quick start guide 5 Minutes Step - Remote Viewing on a Web Browser / iphone / ipod touch Once logged in to your account, you will notice the camera appearing in My Stuff. Click on the link to view the camera. Basic Computer Skills Remote Viewing on a Web Browser (PC & Mac) Open up your web browser and visit and enter your /ID and Password in the top right corner of the page to login to your online account. Computer & Click on the image to view live streaming video from the camera NOTE: Video streaming performance is directly related to factors such as local and network internet speed. remote viewing on any PC Remote Viewing from iphone or ipod touch Using Safari, go to and login using username and password. Click the camera you want to view. OPTIONAL: In newer versions of iphone/ipod itouch, you can bookmark the Yoics website for quick access. Alternatively create a shortcut on the application screen for access. Check the reference materials that came with your iphone / ipod touch for further details. ipod touch and ipod are trademarks of Apple Computers, Inc. Registered in the USA and other countries. remote viewing on your iphone or ipod touch. It s all on the Web For detailed setup information, please refer to your User s Manual. For additional information, please visit our website /support LW00 Series QSG_EN_R Page
NET-DYN USB Dual Band (Mediatek) Installation Guide. This manual is divided into three parts: Windows XP, Windows 7 / 8 / 8.
 Installation Guide. This manual is divided into three parts: Windows XP, Windows 7 / 8 / 8.") Installation Guide NET-DYN USB Dual Band (Mediatek) Installation Guide This manual is divided into three parts: Windows XP, Windows 7 / 8 / 8.1 /10, and Mac 1.Windows XP Please do the following steps to
Installation Guide NET-DYN USB Dual Band (Mediatek) Installation Guide This manual is divided into three parts: Windows XP, Windows 7 / 8 / 8.1 /10, and Mac 1.Windows XP Please do the following steps to
Networking the printer
 Networking the printer General networking Networking overview A network is a collection of devices such as computers, printers, Ethernet hubs, wireless access points, and routers connected together for
B5010/ B5111/ B
 B5010/ B5111/ B5210 0 8608551000030 Zavio B5010/ B5111/ B5210 Quick Installation Guide Please follow the installation steps below to set up your B5010/ B5111/ B5210 Bullet IP Camera. Check the package
Zavio P5111/ P5116/ P5210 Quick Installation Guide
 86085M2000010 Zavio P5111/ P5116/ P5210 Quick Installation Guide Installation Steps Please follow the installation steps below to set up your P5111 / P5116/ P5210 Day/Night Pan/Tilt IP Camera. Check the
XDR Installation. USB Driver Installation and Testing
 XDR Installation The installation and configuration of Sopro inter-oral cameras with XDR version 3.2.1 is a three step process. The first step is to install the USB 2.0 driver and test the camera functionality.
LW2730 & LW2930 LIVE SD+ Series - Frequently Asked Questions
 LW2730 & LW2930 LIVE SD+ Series - Frequently Asked Questions Relevant Models / Series: LW2730 Series (LW2732, LW2731), LW2930 Series (LW2932) Q: How do I install USB drivers for remote viewing using Skype?
Model Numbers: DPC3939, TC8707C. Quick Start Guide. Wi-Fi Devices. Wireless Gateway 2
 Wireless Gateway 2 Model Numbers: DPC3939, TC8707C Quick Start Guide Wi-Fi Devices Wireless Gateway 2 ENG_WG2XB3_QSG_1013.indd 1 About the Wireless Gateway 2 (Model Numbers: DPC3939, TC8707C) The Wireless
QUICK START GUIDE QT IP CAMERA & NVR BUNDLE ENGLISH
 QUICK START GUIDE QT IP CAMERA & NVR BUNDLE ENGLISH Table of Contents Welcome What s Included...3 Understanding your NVR...4 Get Connected Registration...5 Connect Your Cameras...5 Connect NVR to Display...6
WNVR SERIES. QUICK SETUP GUIDE CONTACT US. PHONE (English & Spanish) WEBSITE
 WEBSITE") QUICK SETUP UIDE CONTACT US PHONE (English & Spanish) Sales Support 1.866.390.1303, Option 3 9:00 am 6:00 pm EST Monday Friday Technical Support 1.866.390.1303, Option 4 Live Chat 24/7, 365 days a year
QUICK SETUP UIDE CONTACT US PHONE (English & Spanish) Sales Support 1.866.390.1303, Option 3 9:00 am 6:00 pm EST Monday Friday Technical Support 1.866.390.1303, Option 4 Live Chat 24/7, 365 days a year
GATEKEEPER. Protect Your Privacy. User Manual v2.0. Untethered Labs, LLC GATEKEEPER USER MANUAL V2.0 1
 GATEKEEPER Protect Your Privacy User Manual v2.0 WWW.GKCHAIN.COM Untethered Labs, LLC GATEKEEPER USER MANUAL V2.0 1 Product Overview Package Contents GateKeeper Key GateKeeper USB Lock CR2032 Battery Key
Insert the D-Link CD-ROM Into Your Computer
 This product works with the following operating system software: Windows XP, Windows 2000, Windows Me, Windows 98SE DWL-G520 Xtreme G 2.4GHz Wireless PCI Adapter Before You Begin You must have at least
Part # Quick-Start Guide. SpeedStream 4200 Modem PPPoE Modem Router
 Part # 007-0-00 Quick-Start Guide SpeedStream 00 Modem PPPoE Modem Router Before you begin, Verify that the following items came with your DSL kit: Step > Install Line Filters 7 SpeedStream Device Documentation
Instructions for installing and using the High Power USB WiFi adapter for Optional Wireless Access to the AntennAlign Alignment Tool (AAT)
") CD 7003, ISSUE 2, 2/24/2012 PAGE 1 of 11 Sunsight Instruments 3335 Bartlett Blvd Orlando, FL 32811 321-244-9443 www.sunsight.com Instructions for installing and using the High Power USB WiFi adapter for
CD 7003, ISSUE 2, 2/24/2012 PAGE 1 of 11 Sunsight Instruments 3335 Bartlett Blvd Orlando, FL 32811 321-244-9443 www.sunsight.com Instructions for installing and using the High Power USB WiFi adapter for
System Requirements. Package Contents
 System Requirements System Requirements Computer with Windows Vista or XP SP2 PC with 1.3GHz or above; at least 128MB RAM Internet Explorer 6.0 or Netscape Navigator 7.0 and above Existing 10/100 Ethernet-based
Classroom Technology: MH201, 203, 205
 Classroom Technology: MH201, 203, 205 3/29/2018 Scan QR code for more Classsroom resources! ACCESS THE WINDOWS DESKTOP Login to the Classroom Workstation Press CTRL+ALT+DEL to open the login screen Enter
Setting up Your Brand New ipad for Individual Use
 Setting up Your Brand New ipad for Individual Use A Basic Setup Guide for NEW ipads Instructional Technology May 2012 HCPS Page 1 I Have an ipad... So Now What? ipad Setup This setup requires that you
Classroom Technology: Extron Podium Controls
 Classroom Technology: Extron Podium Controls 03/29/2018 Scan QR code for more Classsroom resources! ACCESS THE WINDOWS DESKTOP Login to the Classroom Workstation Press CTRL+ALT+DEL to open the login screen
Installation & Quick Start Guide WL400 Wireless Adaptor/Antenna
 Installation & Quick Start Guide WL400 Wireless Adaptor/Antenna QUICK START WL400-01- VR1.1 1. Introduction Congratulations on the purchase of your WL400 Wireless Adaptor/Antenna. This unit is designed
F3102 / F3107 / F3110 / F3115 / F3210 / F3215 PN: 86085K K
 F3102 / F3107 / F3110 / F3115 / F3210 / F3215 0 86085K3000020 PN: 86085K3000020 Zavio F3102/F3107/F3110/F3115/F3210/F3215 Quick Installation Guide Please follow the installation steps below to set up
Quick Start XLe Source Expansion Kit
 Quick Start XLe Source Expansion Kit Caution: Before touching the supplied audio card, ground yourself by touching an unpainted metal surface. While working on your computer you should periodically touch
Insert the D-Link CD-ROM Into Your Computer
 This product works with the following operating system software: Windows XP, Windows 2000, Windows Me, Windows 98SE DWL-G520+ AirPlus G+ 2.4GHz Wireless PCI Adapter Before You Begin You must have at least
Zavio F3100 / F3105 Quick Installation Guide
 Zavio F3100 / F3105 Quick Installation Guide Please follow the installation steps below to set up F3100 / F3105 IP Camera. Check the package contents against the list below. See P.1 Physical overview.
VC500. Quick Installation Guidance
 VC500 Quick Installation Guidance System requirement Inter Pentium4 1.4G CPU, recommended Pentium4 2.0G or higher Windows 7, 8, 8.1 and 10 Memory 128M min, recommend 256M or higher A high speed USB2.0
Wireless N USB Adapter. User Guide
 Wireless N USB Adapter User Guide Part#: PL-18N Model: Hermes V. 0613 Contents Chapter 1 Getting Start...3 Chapter 2 Installation Guide...5 Installing the Drivers for Mac OS X...10 Uninstall the Drivers
Installation & Quick Start Guide WL410 Wireless Adaptor/Antenna
 Installation & Quick Start Guide WL410 Wireless Adaptor/Antenna QUICK START WL410-01- VR1.0 1. Introduction Congratulations on the purchase of your WL410 Wireless Adaptor/Antenna. This unit is designed
DWL-122. Before You Begin. Check Your Package Contents. 2.4GHz USB Wireless Adapter. DWL-122 Wireless USB Adapter
 This product works with the following operating system software: Windows XP, Windows 2000, Windows Me, Windows 98SE, Macintosh OS X (10.2.x or later) DWL-122 2.4GHz USB Wireless Adapter Before You Begin
Zavio M511E / M511W Quick Installation Guide
 Zavio M511E / M511W Quick Installation Guide Please follow the installation steps below to set up your M511E / M511W IP Camera. Check the package contents against the list below. See P.1 Physical overview.
Wireless IP Bird Box Camera
 Wireless IP Bird Box Camera Model: 4901-18 Operation and Installation Manual 1 WELCOME... 3 PRODUCT OVERVIEW... 4 HARDWARE INSTALLATION... 4 Attach the External Power Adapter... 4 SMARTPHONE OR TABLET
User Manual. Unpacking and Setup
 User Manual USB Print Server LPV2-USB-TX1 Unpacking and Setup This section provides unpacking and setup information for the USB Print Server. Unpacking Open the shipping carton of the Switch and carefully
Version /20/2012. User Manual. PowerLine AV 500 Network Starter Kit DHP 501AV
 Version 1.10 09/20/2012 User Manual PowerLine AV 500 Network Starter Kit DHP 501AV Table of Contents Table of Contents Product Overview...3 Package Contents... 3 System Requirements... 3 Introduction...
QUICK START GUIDE. QC IP Camera & NVR Bundle ENGLISH
 QUICK START GUIDE QC IP Camera & NVR Bundle ENGLISH Table of Contents Welcome Welcome What s Included...3 Understanding Your NVR...4 Get Connected Registration...5 Connect Your Cameras...5 Connect NVR
Connect the other end of the ethernet cable to your broadband router (not included)
") 10:00 Step 1 should take approximately 5-10 minutes SETTING UP YOUR SYSTEM Step 1 - Set Up Your Camera First System Contents 1 - Color Camera 1 - Power Supply 1 - Camera Stand (with screws) 1 - Ethernet
10:00 Step 1 should take approximately 5-10 minutes SETTING UP YOUR SYSTEM Step 1 - Set Up Your Camera First System Contents 1 - Color Camera 1 - Power Supply 1 - Camera Stand (with screws) 1 - Ethernet
AIRNET 54Mb b/g High Power USB Adapter. User s Manual
 AIRNET 54Mb 802.11b/g High Power USB Adapter User s Manual FCC Certifications Federal Communication Commission Interference Statement This equipment has been tested and found to comply with the limits
Bluetooth Application Note
 Bluetooth Application Note FCC Interference Statement This equipment has been tested and found to comply with the limits for a Class B digital device pursuant to Part 15 of the FCC Rules. These limits
SKYROS SERIES Megapixel Outdoor Bullet PoE IP Camera with IR LED and IR-cut Filter DG-SC5800PI
 SKYROS SERIES Megapixel Outdoor Bullet PoE IP Camera with IR LED and IR-cut Filter DG-SC5800PI V1.0 2012-05-25 1 This equipment has been tested and found to comply with the limits for a class B digital
QUICK SETUP GUIDE WNVR201 SERIES. Specifically Designed for Tablets. Specifically Designed for Smart Phones.
 QUICK SETUP GUIDE WNVR201 SERIES www.nightowlsp.com Specifically Designed for Smart Phones Specifically Designed for Tablets RESET LAN1 LAN2 LAN3 LAN4 WAN What s in the Box Package Contents Disclaimer:
USB DVR Starter Guide
 USB DVR Starter Guide You must install the software bundled on the Install CD before connecting the USB DVR to the computer. 1 Install the software Connect the USB DVR to 2 the computer. This guide explains
Wireless N Megapixel Network Camera F3101/3106
 Wireless N Megapixel Network Camera F3101/3106 86085L1000020 Package Contents Camera F3101/3106 Network Camera Quick Installation Guide To provide brief product information and quick installation and wireless
Classroom Technology: MH 119 O Leary Auditorium
 Classroom Technology: MH 119 O Leary Auditorium 3/29/2018 Scan QR code for more Classsroom resources! ACCESS THE WINDOWS DESKTOP Login to the Classroom Workstation Press CTRL+ALT+DEL to open the login
USB 3.0 Universal Dual Video Docking Station Installation Guide
 Introduction USB 3.0 Universal Dual Video Docking Station Installation Guide The USB 3.0 Universal Dual Video Docking Station is designed for a computer that has multiple connectivity demands. Features
D G
 D7210 0 86085G6000010 Zavio D7210 Quick Installation Guide Please follow the installation steps below to set up your D7210 Dome IP Camera. Check the package contents against the list below. See P.1 Physical
Level 3 XpressMeet SM Solutions
 Level 3 XpressMeet SM Solutions User Guide January 2017 1 Table of Contents Level 3 SM XpressMeet Outlook... 3 Add-In Overview... 3 Features... 3 Download and install instructions... 5 Customize your Level
Wireless USB To VGA Adapter Kit Model No
 Wireless USB To VGA Adapter Kit Model No. 29572 User s Manual TABLE OF CONTENTS Introduction...2 Features...2 System Requirements...2 Package Contents...2 Device Overview...3 Wireless USB Host Adapter...3
AKG K912 Cordless Stereo 900MHz Headphone System
 AKG K912 Cordless Stereo 900MHz Headphone System INTRODUCTION This 900Mhz compact stereo headphone takes advantage of the very latest wireless transmission technology so that you can listen to music or
IP Cam EdiLife Quick Installation Guide
 IP Cam EdiLife Quick Installation Guide 08-2018 / v1.0 CONTENTS l. Product Information... 3 I-1 System Requirements... 3 II Camera Setup... 4 II-1 Hardware Setup... 4 II-2 EdiLife App... 6 II-2-1 Android
DSL-G624T. Wireless ADSL Router. If any of the above items is missing, please contact your reseller. This product can be set up using any
 This product can be set up using any current web browser, i.e., Internet Explorer 6x or Netscape Navigator 7x. DSL-G624T Wireless ADSL Router Before You Begin 1. If you purchased this Router to share your
enablegames New User Guide v1.0
 enablegames New User Guide v1.0 enablegames New User Guide... 1 Signing Up for enablegames... 2 Create Account... 3 Player Portal... 5 Connecting the Equipment... 6 Installing Games... 8 Running Games...
Wireless USB to HDMI with Audio Kit Installation Guide
 Wireless USB to HDMI with Audio Kit Installation Guide Introduction The Wireless USB to HDMI with Audio Kit adds an HDMI port to your USB enabled system. Key Features and Benefits Up to 10 meters wireless
APC-100. IEEE g Wireless USB Adapter. User s Guide v1.0
 APC-100 IEEE 802.11g Wireless USB Adapter User s Guide v1.0 FCC Certifications Federal Communication Commission Interference Statement This equipment has been tested and found to comply with the limits
Wireless USB to HDMI with Audio Kit Quick Installation Guide
 Wireless USB to HDMI with Audio Kit Quick Installation Guide Introduction The Wireless USB to HDMI with Audio Kit adds an HDMI port to your USB enabled system. Key Features and Benefits Up to 10 meters
Outdoor Wireless USB Adapter User Guide
 Outdoor Wireless USB Adapter User Guide FCC STATEMENT This equipment has been tested and found to comply with the limits for a Class B digital device, pursuant to part 15 of the FCC Rules. These limits
ClimaxDigital USB 2.0 Video Capture
 ClimaxDigital USB 2.0 Video Capture Model: VCAP301/VCAP302/VCAP303 Thank you for purchasing ClimaxDigital USB 2.0 Video Capture. Should you need any assistance in using this product, please do contact
USB Adapter Raytown Road Kansas City, MO U.S.A. Tel.: Fax:
 USB Adapter 5615 Raytown Road Kansas City, MO 64133 U.S.A. Tel.: 816-353-4787 Fax: 816-358-5072 email: flexcam@ken-a-vision.com www.ken-a-vision.com 800-171-318 Table of Contents Table of Contents Introduction..............................................
GV-Keyboard Instruction Manual
 Instruction Manual 005/03 Before attempting to connect or operate this product, please read these instructions carefully and save this manual for future use. Table of Contents RX TX Introduction P P P3
Quick Installation Guide
 Quick Installation Guide Full HD WDR Day & Night Outdoor Network Camera This document will guide you through the basic installation process for your new D-Link Network Camera. DCS-7513 Documentation also
QOMO PRODUCTS TROUBLE SHOOTING QUICK GUIDE
 QOMO PRODUCTS TROUBLE SHOOTING QUICK GUIDE QOMO HITEVISION PRODUCTS TROUBLESHOOTING GUIDE This guide is intended to assist in the troubleshooting of common product and operator errors for QOMO HiteVision
Classroom Technology Touch Panel
 Classroom Technology Touch Panel 03/29/2018 Scan QR code for more Classsroom resources! ACCESS THE WINDOWS DESKTOP Login to the Classroom Workstation Press CTRL+ALT+DEL to open the login screen Enter your
Quick Start Guide. GV-Video Server
 Quick Start Guide GV-Video Server Thank you for purchasing GV-Video Server. This guide is designed to assist the new user in getting immediate results from the GV-Video Server. For advanced information
Classroom Technology: HM 001
 Classroom Technology: HM 001 03/29/2018 Scan QR code for more Classsroom resources! ACCESS THE WINDOWS 8 DESKTOP Login to the Classroom Workstation Press CTRL + ALT + DEL to open the Login Screen Enter
HD WiFi Outdoor Camera. Quick Start Guide. Connect with Beam VER-Z3
 HD WiFi Outdoor Camera Quick Start Guide Connect with Beam VER-Z3 1 Mobile Setup This quick start guide will help you configure your WiFi camera kit for initial use. Before performing any permanent installation,
NVR Management Software
 NVR Management Software Quick Installation Guide Ver. 1.0 User Interface Overview 1 Live Video This is the section where the live videos are displayed Menu Bar This is where all functions can be accessed
Renaming the Projector Adapter Advanced Settings Troubleshooting... 25
 010-0730-00 Contents Contents... 2 Introduction... 4 Wireless Range... 4 System Requirements... 4 What's in the Box... 4 Adapter Status Indicators and Details... 5 What s the difference between Wireless
Instructions for inland 8412 USB to IDE/SATA adapter.
 Instructions for inland 8412 USB to IDE/SATA adapter. 1 The included CD is ONLY used for Windows 98se. If you are running any newer system (including Vista and Mac,) then you don t need the CD. There are
SPK User Manual. 900MHz Wireless Stereo Headphones INTRODUCTION FEATURES IMPORTANT SAFETY INFORMATION
 INTRODUCTION Thank you for purchasing our 900Mhz compact cordless stereo headphone system that takes advantage of the very latest advances in wireless transmission technology so you SPK-9100 900MHz Wireless
NETGEAR genie Apps. User Manual. 350 East Plumeria Drive San Jose, CA USA. August v1.0
 User Manual 350 East Plumeria Drive San Jose, CA 95134 USA August 2012 202-10933-03 v1.0 Support Thank you for choosing NETGEAR. To register your product, get the latest product updates, get support online,
Table of Contents. Troubleshooting Guide for Home Users
 Table of Contents Introduction... 1 Chapter 1: System Requirements... 2 Recommended and Minimum Supported Requirements... 2 Additional Information... 3 Internet Connectivity... 3 Tablet Compatibility...
STEP 1 GETTING STARTED
 GETTING STARTED STEP 1 Check Package Contents for: 1.) One HMPS2U Wireless Multifunction USB Device Server 2.) Setup CD with Wireless Multifunction USB Device Server Software 3.) One DC 12V/1.5A Power
Version /25/2017. User Manual. DAP-1665 AC1200 Wi-Fi Range Extender/Access Point DAP-1665
 Version 2.00 01/25/2017 User Manual DAP-1665 AC1200 Wi-Fi Range Extender/Access Point DAP-1665 D-Link reserves the right to revise this publication and to make changes in the content hereof without obligation
Index Step 1 Setting up your surveillance system Step 2 Recording and accessing video on your DVR Step 3 Accessing your DVR from a Local Computer PC
 Talos DVR Quick Reference Guide 12-2011 Step 1 Setting up your surveillance system Designing your surveillance system 3 Installing the hard drive 4 Connecting a monitor 5 Initializing (turning on) your
TABLE OF CONTENTS COPYRIGHT INTRODUCTION...3 PRODUCT OVERVIEW...3 COMPONENTS AND FEATURES...3 HARDWARE INSTALLATION
 TABLE OF CONTENTS COPYRIGHT...2 1. INTRODUCTION...3 PRODUCT OVERVIEW...3 COMPONENTS AND FEATURES...3 HARDWARE INSTALLATION...3 2. MFP SERVER INSTALLATION...5 PREPARATION...5 CONFIGURATION SOLUTION TABLE...5
START HERE. Wireless USB Wired. Do you want to connect the printer to a wireless network? Use the Wireless Setup and Connection.
 START HERE If you answer yes to any of these questions, turn to the section indicated for Setup and Connection instructions. Do you want to connect the printer to a wireless network? Use the Wireless Setup
PhotoKeeper User s Manual
 PhotoKeeper User s Manual 20071226 20080404 Table of Contents CONGRATULATIONS on your purchase of a Polaroid PhotoKeeper. Please read carefully and follow all instructions in the manual and those marked
USB 3.0 to Video Slim Adapter Installation Guide
 Introduction USB 3.0 to Video Slim Adapter Installation Guide The USB 3.0 to Video Slim Adapter allows you to connect an additional display to your desktop or notebook PC and use it as an extended desktop
+Cam Quick Start Guide
 CAUTION RISK OF ELECTRIC SHOCK DO NOT OPEN CAUTION TO REDUCE THE RISK OF ELECTRIC SHOCK, DO NOT REMOVE COVER (OR BACK). NO USER SERVICEABLE PARTS INSIDE, REFER SERVICING TO QUALIFIED SERVICE PERSONNEL.
1. Installing the Drivers for Windows
 For Ralink chipset products, please kindly refer to the following steps. 1. Installing the Drivers for Windows 1. Power on your PC, let the operating system boot up completely, and login as needed. 2.
BiPAC BiPAC User Manual
 BiPAC 2071 HomePlug AV 200 Ethernet Adapter BiPAC 2072 HomePlug AV 200 Ethernet Bridge with AC-Pass Through User Manual Table of Contents Chapter 1...1 Introduction...1 Specifications...2 Features...3
AirDrop Cheat Sheet. AirDrop files between your devices In OS X Yosemite, AirDrop helps you quickly transfer files between your Mac and nearby Mac
 AirDrop Cheat Sheet Mac Basics: AirDrop lets you send files from your Mac to nearby Macs and ios devices AirDrop makes it easy to send files wirelessly from your Mac to other Mac computers, and with OS
Longshine Technologie Europe GmbH
 Longshine Technologie Europe GmbH www.longshine.de TABLE OF CONTENTS COPYRIGHT...2 1. INTRODUCTION...3 PRODUCT OVERVIEW...3 COMPONENTS AND FEATURES...3 HARDWARE INSTALLATION...3 2. MFP SERVER INSTALLATION...5
IEEE g Wireless PC Card. User s Guide
 IEEE 802.11g Wireless PC Card User s Guide FCC Certifications Federal Communication Commission Interference Statement This equipment has been tested and found to comply with the limits for a Class B digital
Lab - Install Windows 7 or Vista
 Introduction In this lab, you will install the Windows 7 or Vista operating system. Recommended Equipment A computer with a blank hard disk drive Windows 7 or Vista installation DVD or USB flash drive
SET UP YOUR MONITOR FIRST
 STEP 1 SET UP YOUR MONITOR FIRST PACKAGE CONTENTS 1 CONNECT CAMERAS TO MONITOR 1-14 Color Quad Monitor 4 - Color Cameras 4-57 ft. Extension Cables 4 - Camera Brackets 1 - Remote Control with Batteries
Ethernet Powerline Adaptor. User Manual
 Ethernet Powerline Adaptor User Manual Copyright The contents of this publication may not be reproduced in any part or as a whole, stored, transcribed in an information retrieval system, translated into
Tracker/ChairSide Imaging Installation
 Tracker/ChairSide Imaging Installation The installation and configuration of Sopro inter-oral cameras with ChairSide Imaging 10.50 is a three step process. The first step is to install the USB 2.0 driver
Wired / Wireless IR IP Camera ICA-108 / ICA-108W. Quick Installation Guide
 Wired / Wireless IR IP Camera ICA-108 / ICA-108W Quick Installation Guide Table of Contents Chapter 1. Introduction... 3 1.1 Before Installation... 3 1.2 System Requirements... 3 1.3 Package Content...
Ebrary User Guide. Downloading a Book: Reading ebrary books online: Accessing BookShelf: Using the Bookshelf:
 Ebrary User Guide Downloading a Book: Reading ebrary books online: Accessing BookShelf: Using the Bookshelf: ebrary Mobile App Installation and Sign in procedure: Using ebrary App in ipad iphone ipod:
1080p HD Outdoor WiFi IP Camera
 1080p HD Outdoor WiFi IP Camera Quick Start Guide Connect with Beam VER-Z3 1 Mobile Setup This quick start guide will help you configure your WiFi camera for initial use. Please plug in and complete this
Lorex Client 7.0 & Lorex Message Master
 Lorex Client 7.0 & Lorex Message Master Software Manual English Version 1.0 MODELS: L19WD Series www.lorexcctv.com Includes L19WD800 & L19WD1600 Copyright 2008 Lorex Technology Inc. Table of Contents Table
D4210 PN: 86085A
 D4210 1 PN: 86085A2000000 Zavio D4210 Quick Installation Guide Please follow the installation steps below to set up D4210 IR Dome IP Camera. Check the package contents against the list below. See P.1
Quick Installation Guide
 Model: FI8916W Quick Installation Guide Indoor Pan/Tilt Wireless IP Camera Black White For Windows OS ------- Page 1 For MAC OS ------- Page 16 ShenZhen Foscam Intelligent Technology Co., Ltd Quick Installation
Business Internet Video Camera with Audio
 Business Internet Video Camera with Audio Quick Install Guide Package Contents WVC210 Camera Stand Power Supply (5V 2A) 6 Ethernet Cable Setup CD Antenna Quick Install Guide BUSINESS SERIES Model: WVC210
HD WiFi Indoor / Outdoor Camera Kit. Quick Start Guide
 HD WiFi Indoor / Outdoor Camera Kit Quick Start Guide 1 Mobile Setup This quick start guide will help you configure your WiFi camera kit for initial use. Note: Please download and install App and connect
PTZ NETWORK CAMERA SERIES
 353Z PTZ NETWORK CAMERA SERIES INSTALLATION GUIDE Please read instructions thoroughly before operation and retain it for future reference. N244_245_V0.9 Powerful Remote Surveillance Distance makes no difference
Bluetooth Micro Dongle User s Guide. Rating: 5V DC 80mA Made in China
 Bluetooth Micro Dongle User s Guide Rating: 5V DC 80mA Made in China Introduction Package Contents USB Bluetooth adapter x 1 Installation CD x 1 (includes Bluetooth software and User s Guide) User s Guide
AC2600 MU-MIMO Wi-Fi Router QUICK INSTALL GUIDE
 AC2600 MU-MIMO Wi-Fi Router QUICK INSTALL GUIDE DIR-882 Package Contents DIR-882 AC2600 High Power Wi-Fi Gigabit Router Power Adapter Ethernet Cable Wi-Fi Configuration Card Quick Install Guide If any
Wireless transfer of screening data from ALGO 3i Screener to PC
 Wireless transfer of screening data from ALGO 3i Screener to PC This technical notice provides information on transmitting screening results from your ALGO 3i Newborn Hearing Screener to a personal computer
P6210 PN: 86085A A
 P6210 1 PN: 86085A1000010 86085A1000000 Zavio P6210 Quick Installation Guide Please follow the installation steps below to set up P6210 Pan/Tilt IR Dome IP Camera. Check the package contents against the
Install Windows 2000 Drivers and Utilities for the Cisco Aironet 340/350 Series Client Adapters
 Install Windows 2000 Drivers and Utilities for the Cisco Aironet 340/350 Series Client Adapters Document ID: 9214 You need a valid Cisco.com account in order to download Cisco Aironet drivers, firmware,
Internet Browsers with CYBER
 Internet Browsers with CYBER Updated 5/29/2018 CYBER is an internet-based application that enables multiple users in many locations to access medical records. The application s software is powered by Microsoft
Information Technology Help Desk George Washington Hall B College Avenue Fredericksburg, VA 22401
 Crestron TO START THE SYSTEM: Touch the screen on the small black Crestron box located on the lectern s desktop, this will wake up the system. On the system s start up screen, touch the Touch Here To Start
Getting Started. Read Me First. series. Photo Printer
 Photo Printer series Getting Started Read Me First Make sure to read this manual before using the printer. Please keep it in hand for future reference. Symbols Used in This Document Instructions including