Turns your Wallbox into a Complete Jukebox
|
|
|
- Terence Berry
- 6 years ago
- Views:
Transcription


1 JukeMP3 Wallbox Controller Turns your Wallbox into a Complete Jukebox
2 JukeMP3 Features: 1. The JukeMP3 kit includes everything you need to turn your wallbox into a complete jukebox, except speakers and MP3 files. 2. The JukeMP3, a set of speakers and your wallbox make up an entire jukebox system. 3. Easy installation, just connect the included 3 connection cable to your wallbox. 4. Songs are easily added by downloading.mp3 files from your computer. 5. Windows based software allows easy song selection. 6. Label software Included! Our software allows you to printout colorful labels for your wallbox. 7. Simple computer connection via USB port. 8. Built in amplifier is ready to hook up to your bookshelf speakers. 9. Affordable cost, only $359 + $10 shipping / handling for the JukeMP3, software and interconnection cable. 10. Complete Systems available, including the wallbox from $529

3 Connecting Your JukeMP3 to your Computer / Speakers Shown below is a picture of the rear panel of your JukeMP3 player. In order to get started with its operation you will need to connect the following items to the JukeMP3: 1. Power Connect a standard computer style IEC power cord to the 115 VAC power receptacle. 2. Speakers In order to listen to the songs that you have downloaded to your JukeMP3, you will need to connect a pair of speakers. The JukeMP3 produces approx 10 watts of audio power, per channel, when connected to a 4 ohm speaker load. You may also use an 8 ohm speaker, but you will realize slightly less audio. A pair of old stereo bookshelf speakers is ideal, although most of the new mini speaker systems will also provide great audio. If you feel your smaller speakers are lacking in bass, or presence try adding a small sub-woofer in conjunction with the normal stereo speakers. You have the option to listen to songs that you have downloaded to the JukeMP3 while you are connected to your computer, so it is nice to connect a set of speakers from the start. 3. USB- Use a USB A-B cable to connect the JukeMP3 to your computers USB interface. Installing the USB Drivers The first time you plug your JukeMP3 into your computers USB port, assuming that the JukeMP3 is turned on, you will be prompted by the Windows operating system to provide the appropriate drivers for the USB serial port. Skip to the appropriate section for XP/2000 or Win9X/WinME and follow the instructions. WinXP / Win2000 Make sure that you insert the installation CD into your computers CDRom drive. If a found driver window pops up, cancel it and proceed as indicated below. When you see the Welcome to the Found New Hardware Wizard pops up, click the Install from a list of specific location radio button and then click next.

4 Check the Search for the best driver in these locations radio button, check the Include this location in the search check box, and enter D:\usb\xp_2000 in the data box. Note: the D: is the drive letter that identifies your CDRom drive. If yours is other than D replace the D with the appropriate letter. Click Next. After the system finds the appropriate driver you will see the Completeing the Found New Hardware Wizard window. Click the Finish button.


5 The system will now prompt with the Welcome to the Found New Hardware Wizard again. Proceed as before..

6 Win9x / WinME Make sure that you insert the installation CD into your computers CDRom drive. If a found driver window pops up, cancel it and proceed as indicated below. When you see the Add New Hardware Wizard pops up, click the Specify the location of the driver" radio button and then click next. Check the Search for the best driver for your device radio button, check the Specify a location check box, and enter D:\usb\WinME in the data box. Note: the D: is the drive letter that identifies your CDRom drive. If yours is other than D replace the D with the appropriate letter. Click Next


7 Click the Next button to continue Finish the installation by pressing the Finish button.

8
, proceed up to and press the Run selection of the pop-up menu.")
9 Software Installation The JukeMP3 Software is intended for operation under the Windows XP, 2000, 95/98 or Windows ME operating system. Install the software by placing the provided CD in your CDROM drive, press the Start Icon (usually in the lower left of your desktop), proceed up to and press the Run selection of the pop-up menu. In the open dialog box type: D:JukeMP3\Setup Where D is the drive designator for your CDROM drive After entering the command line press enter, and the system software will be loaded. Software Operation Make sure that your JukeMP3 is powered up and connected to your computers USB port. If this is the first time that you have attached the USB cable to the JukeMP3, you will need to follow the driver installation instructions outlined earlier. With power applied to the JukeMP3, start the JukeMP3 program by pressing the Start Icon and following the pop up menus to Programs, or All Programs for XP users, and finally click the Shortcut to JukeMP3. If all is connected properly the JukeMP3 window will appear on you screen after 30 seconds or so. If this is the first time you have run the program the main information will be blank until you have transferred some songs to your JukeMP3.

10 Basic Windows Operation, Moving and Resizing Windows If you are familiar with basic windows operation, skip this part of the instructions. If you don t know how to resize, move highlight and cut and paste items in Windows, please spend the few minutes it takes to understand these operations. If you can do these few, simple Windows operations, using the JukeMP3 program, as well as many other windows applications, will be much easier! Generally, when a windows application, like JukeMP3, is running it will present itself to the user as viewable entity or window. This window has a size, the width and height it occupies on the screen, and a position. The position, and often but not always, the size of the window can be changed. Your ability to change the window will make operation of the program easier because you can set the size and position of the window to best suit your system configuration (viewable area of the screen) as well as accommodating multiple applications that depend on each other for their operation. Moving the JukeMP3 window Shown below is the top left corner of the JukeMP3 window along with its Controls dialog box. The top bar of the window, the bar that has the JukeMP3 V1.0 text in it as well as
 your mouse. 4.")
11 the PIEXX logo, is known as the Title Bar. You can change the position of the JukeMP3 window, as well as most other windows, by: 1. Position your mouse pointer in the title bar. 2. Press down and hold the left button on your mouse. 3. While holding the mouse button down, slide (referred to as dragging) your mouse. 4. When the JukeMP3 window is positioned where you want it, release the left mouse button. You can also move the Controls dialog box, and a good many of the other windows and icons on your desktop for that manner, using the same technique. Give it a try. Re-sizing the JukeMP3 window You can also change the size of most widows by: 1. Place your mouse pointer on one of the corners of the window. The bottom right corner of a window is often ndicated by 3 slanted lines, as shown in the picture below. 2. When you move the mouse pointer to the appropriate spot on the corner of the window, the mouse pointer will change to diagonal pointer line. This pointer cursor lets you know that the mouse is in the appropriate location to effect a change to the window size. Press down and hold the left button on your mouse. 3. While holding down the left mouse button, drag your mouse. You should notice that the window changes size. 4. When the JukeMP3, or other, window is at the size you like, release the left mouse button that you where holding in the previous step. Some windows items, like the Contols dialog box, have a fixed size; you can t resize them. If you put the mouse cursor in the corners of the Controls box, the cursor pointer doen t change to the diagonal pointer line.


12 Selecting a Wallbox type In order for the JukeMP3 to properly display information about the songs you will be downloading soon, it must know the style of wallbox that you intend to use with it. To setup this information, press the Setup button on the toolbar and then select Wall Box from the drop down. You will see the Wall Box Setup dialog as shown below: Click the pull down arrow next to the wall Box Type and click the appropriate wall box entry. Once you have made this selection, press the OK button.

13 When performing data transfer and manipulations with the files on the JukeMP3, never turn off or unplug either your computer or the JukeMP3 player while the JukeMP3 application is running on your computer. Doing so will most likely result in data corruption on the JukeMP3!!!! Downloading Songs Once you have attached your JukeMP3 to your computer, you will probably want to start uploading.mp3 songs to your system. We will present two approaches to uploading songs to your JukeMP3. The first method requires that you select a song from a known directory location on your computer. Start by clicking the File menu button on the JukeMP3 menu bar then select Load MP3 from the drop down menu. As an alternative to using the menus, you can also get to this same point by pressing and holding the Ctrl button on your keyboard, and then, while holding the Ctrl button down, press the O key on your keyboard. Whichever way you do it you should see the Open dialog box as shown below. Click the drop-down arrow next to the Look in data box and work your way through your computers directory structure until you locate your cache of.mp3 files. When you find the song that you would like to download, click on it, to select it, and then press the Open button. This will start the upload process transferring the song to your JukeMP3. In the bottom right corner of the JukeMP3 application window, you will see the Uploading progress bar. This progress bar will show you the transfer status of the song. After the transfer has completed, the new song will show up in the JukeMP3 applications window.

14 You can start a new file transfer as soon as the last one completes. Each new song will be added to the JukeMP3 window as it is downloaded. Another, simpler, way to upload songs to your JukeMP3 is to Drag and Drop the songs from a windows explorer window onto the JukeMP3 application window. To do this start by moving and resizing your JukeMP3 window to a convenient spot on your desktop. The JukeMP3 window doesn t have to be very large to perform the following task. Next open a windows explorer window to the directory that contains your library of.mp3 files. Do this by double clicking the My Computer icon and then clicking the drive that holds your.mp3 files. On our system the.mp3 files live in a JukeMP3Songs folder on the C: drive, so, to get to them I would double click My Computer, double click the C: drive, and finally double click the JukeMP3Songs folder. Now resize and position the Windows Explorer window so it is convenient to work with as shown below. Next select the song or songs that you would like to upload from the list of songs showing in your Windows Explorer window. You can select songs in several ways: 1. Single left click on a single file to select it and deselect all others. 2. Single left click on a file, while simultaneously holding the Ctrl key down on your computers keyboard, will select or deselect the file from a group of files that hasl already been selected. 3. Single left click on a single file to select it and then, while holding the Shift key down, single left click on another, different file. This process will select all of the songs between the first and last file selected. 4. Drag draw a box over a group of files. To do this, move your cursor just outside of the text of a file name, press and hold the left mouse button, and then drag (a highlighted box will grow as you do) a box to encompass those songs of interest. Release the left mouse button when you have boxed what you want. Once you have selected a file or files, position your mouse cursor over one of the selected files, press and hold the left mouse button down, and while holding the left mouse button down drag the mouse cursor over until it is positioned over the data window of the JukeMP3 application. Make sure that it is in the data area of the JukeMP3 window, not over the tool bars or the Controls dialog. Now release the left mouse button. The group of songs selected will begin to upload to the JukeMP3. As before the progress bar will show the status of a given file transfer while the status bar, located in the bottom left hand corner of the JukeMP3 window, will outline the overall status of all of the files being
15 uploaded. In addition, you will see a red circular button show up on the tool bar. This red button will stop the transfer of subsequent files after the currently loading file has completed its transfer. In other words, press the red circle to abort the upload process. Using either of the techniques just mentioned, upload as many songs to your JukeMP3 as your wallbox can select. You can load more than this number, up to 1000 songs, if you like, but your wallbox can only select as many songs as it is capable of. Changing Song / Artist Names After you upload songs into your JukeMP3s memory you may want to modify the Title of the song or the Artist name. The JukeMP3 software determines these two items from the file name uploaded to the JukeMP3..MP3 files use a convention of : ArtistName SongName.mp3 for filenames. If the filenames you uploaded don t conform to these conventions, then you probably won t care for the Artist name and Song name that JukeMP3 found. To modify these names click on the song, in the JukeMP3s data window, whose info you want to change. The song will change color, and you will see the Title / Artist name fields in the Controls dialog box change to those of the selected song. Update either of these data boxes by clicking your mouse in their text and modifying the text appropriately. When you are finished with your changes, press the Apply button. Changing the Order of Songs in your Wallbox If you examine the song names in the JukeMP3s data window tou will notice that to the far left of each artist name is the wallbox selection identifier. This will be the number / letter sequence you will need to press on your wall box to call up the indicated song. Don t bother trying it now, even if you have already connected your wallbox. The wallbox functions are disabled while you are in the PC Link mode. The next task you will perform is rearranging the songs so they will show up in the appropriate selection spots on your wallbox. Before starting, it is a good idea to resize the JukeMP3 window so that you can see as many songs as possible. That is, make it tall. Undoubtedly there will be more songs on the JukeMP3 than you can see on the page. Drag the scroll bar on the right side of the JukeMP3 window to see song selections that fall out of the window viewing area.

16 You will notice as scroll down through the list of songs, at a certain point the wallbox selection identifier changes to a. This indicates that the selection is past the point that is selectable with your wallbox. You will need to move songs, that you would like to be able to select from your wallbox, that are prefixed with the up higher in the list. Moving songs is most easily done with a cut and paste method which requires these four steps: 1. Highlight the songs you want to move by clicking them, dragging a selection box over them or using the Ctrl click or Shift click techniques discussed earlier. 2. Cut the selected song(s) to the end of the list. Do this by pressing the scissors button on the toolbar, selecting Edit and then Cut to End from the drop down menus, or by typing Ctrl X. 3. Position your cursor to the spot you want to move the songs to and click the song that is just below the insertion point. The song you clicked will highlight, and the insertion point will be just above this song. 4. Paste the cut songs above the highlighted song by pressing the clipboard button, just to the right of the scissors button on the toolbar. Alternatively you can paste by selecting Edit and Paste from the drop down menu or typing Ctrl V. When you cut songs to the end of the list, the cut songs will have a > to the left of the Artist name indicating that the song is ready to be pasted. Alternatively, you can simply drag a single song to a new location or, if the Swap Last radio button is selected in the Controls dialog box, double clicking a song will swap it with the last song in the list. Playing a Song

17 If you would like to check what a song sounds like that has been uploaded to your JukeMP3, click on the song of interest and then press the Play/Stop button in the Controls dialog box. When the JukeMP3 is in the PC Link mode, as indicated on the front panel display on the JukeMP3, none of the regular control buttons on the JukeMP3 player are active. Backing up Songs After you have uploaded your songs to the JukeMP3, it would be a good idea to back them up to your computer. To perform this task you must first select which songs you would like to backup. You can use any of the previously mentioned selection techniques, or you can choose Edit and Select All from the drop down menu. The Edit + Select All technique is particularly handy because usually you will want to back up all of the songs uploaded on the JukeMP3. Next, select File and then Backup from the pull down menu. A dialog will appear requesting the Destination of Backup Files. Update the Save in field to indicate the directory of destination for your backup set. You can use this standard file dialog box to create a new directory if you wish, press the folder button that has the little twinkle symbol in its upper right corner to do this. The default File name is Log.txt. This file will receive a list of all of the selected songs in this backup set. You may select a different name for this log file if you wish. After you have the backup directory and File name selected, press the Save button, the backup process will begin. As with the upload functions, you can see the status of the backup in the Status bar at the bottom of the JukeMP3 window. Also, you can terminate the backup, after the current transfer has completed, by pressing the red circular menu button.

18 The backup process will generate a new.mp3 file for each song that is highlighted unless that song already exists on your computer system in the backup directory that you specified. Restoring Songs Restoring songs will allow you to automatically upload songs to your JukeMP3 as well as setting the order of the songs as indicated in the selected Log file, usually log.txt. Start the restore process by selecting File and Restore from the pull down menus. You will see a Destination of Restore Files dialog appear, select the directory of your files you wish to restore and the name of the log file, usually log.txt. When you have selected the source of the restore, click the Open button; the JukeMP3 will begin the restore process. The restore process proceeds in two steps. First, the program scans the log file to determine which songs need to be loaded onto your JukeMP3. Only songs that aren t already on the JukeMP3 are uploaded to it. Secondly, the songs on the JukeMP3 are rearranged so they are in the same order as they appear in the log file. Printing the Wallbox Labels After you have uploaded and arranged the songs on your JukeMP3 you will probably want to print the labels for your wallbox. If you have certain songs selected, you will be prompted as to whether to print only the selected song labels or all of the labels for your wallbox. You can clear all selected songs by pressing the Esc key on your keyboard. Start the label printing process by selecting File then Print Preview from the pull down menu. If you have songs selected you will see the following prompt: Answering Yes will show only the selected songs labels, this is convenient for updating a few songs on your wallbox. If you answer no, or there are no songs selected you will be previewing the full set of labels.

19 Use the various Print Preview buttons to view all of your labels for accuracy. If there are mistakes in spelling or title names, press the close button and correct the errors. You will notice that there are two songs per label. If the two songs have the same artist name then the artist name shows in a shadow box in the center of the label. If the artist name is different for the two songs, then there is a divider line between the two songs on the label and the two different artist names are shown. It is a good idea to try and group songs together with the same artist name. When you view the song info on the JukeMP3 data window, you will see that the names are grouped two blue then two green then two blue ect. This alternating groups of two is intended to help you keep the artist names grouped together. The two blue will fall on one label, then the next two green will fall on the next label.
20 Once the labels appear as you like, you can print them from either the Print Preview screen or from File and Print in the drop down menus. JukeMP3 Player Operation Operation of the JukeMP3 player is very intuitive. The various fuctions of the buttons is outlined below: Reset- Pressing the reset button will terminate the currently playing song. If you have selected multiple songs from your wallbox, Reset will terminate only the currently playing song allowing the other selections to proceed in order. If you press and hold the Reset button for about ½ second, all of the queued up songs will be cancelled. Play / Pause Pressing the Play button will cause the JukeMP3 player to play a song in random order from the songs loaded onto it. If a song is playing, pressing the Play button will pause the playing of the song until another key is pressed. Function If there are no songs currently playing, pressing the Function button will display a menu of adjustable parameters such as Balance and Loudness. Use the Volume + and keys to select the menu choice and the Play button to enter the particular menu. If a song is playing, pressing Function will stop the current song and start playing the next song loaded in the JukeMP3. Volume +/ - Use these keys to step the volume up or down. You can repeatedly press the volume buttons, or you can hold the button in to slew the volume.

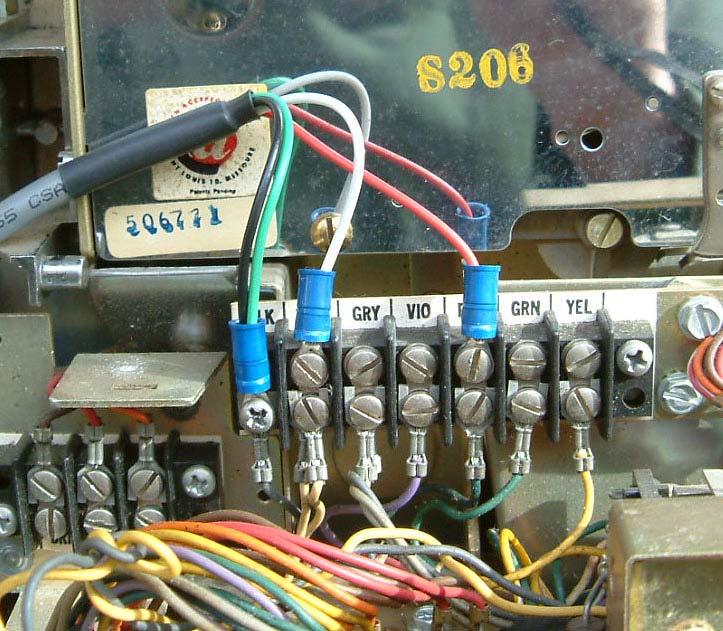
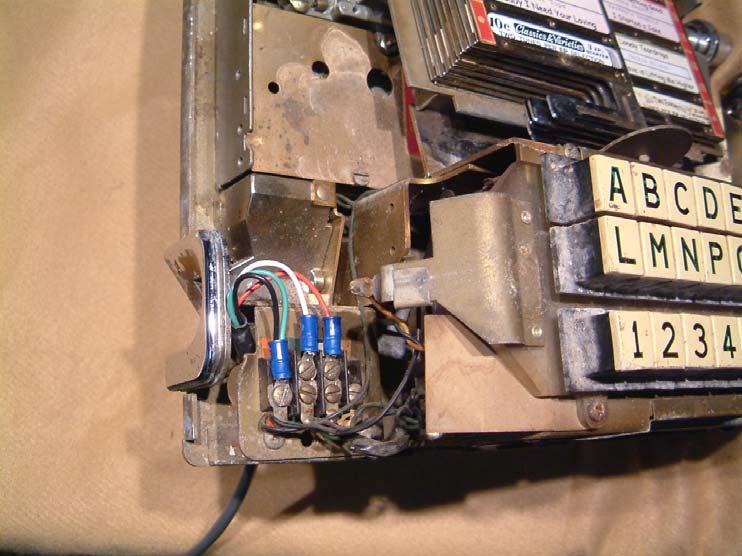
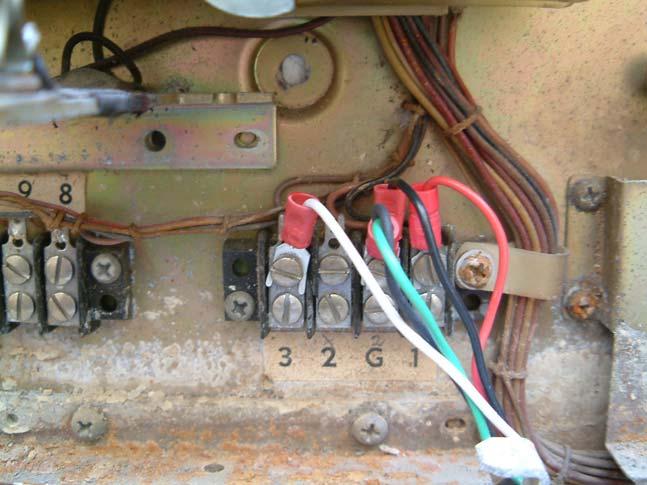
21 Connecting your Wallbox Connecting your wallbox to the JukeMP3 is very straightforward. The JukeMP3 comes with a 4-conductor cable that is terminated into 3 spade lugs. One lug has both the green ground wire and the black 24 VAC wire connected to it and this lead connects to your wallboxs ground terminal. The white wire is the other 24 VAC power lead and it connects to your wallboxs power terminal. The last lead, red is the wallbox signal lead. These are the only 3 wires that you have to connect to your wallbox! Wire Color Green Black White Red Purpose Signal Ground 24 VAC 24 VAC Select Signal Find your wallbox in the following section and connect the three spade lugs to the indicated points.

22 Seeburg SC Selection


23 Seeburg 3W Selection

24 Seeburg S-3W 200 Selection


25 AMI WQ Selection Notice on the AMI-WQ-200 there is a jumper wire from the right hand most terminal to the second terminal from the left. The white wire is also connected to the second terminal from the left.


26 Rowe WRA/B/C Selection Notice on the Rowe WRA/B/C-200 there is a jumper wire from the fourth terminal from the left to the second terminal from the left. The white wire is also connected to the second terminal from the left.

27 Wurlitzer Selection

28 Re-Initializing the Hard drive in your JukeMP3 In the event that the hard drive in your JukeMP3 becomes corrupted, you can force the JukeMP3 player to reformat the drive with the following technique: 1. Turn off the main power switch on the rear of the JukeMP3 player. 2. Press and hold the Volume button on the player. 3. While holding the Volume button, turn on the power to the JukeMP3 player. Continue holding the Volume button until the message Disk needs to be Formatted appears on the JukeMP3 s screen. 4. After several seconds the message Press Play to format the disk message appears. Press the Play (green) button on the JukeMP3 player. 5. The message All data will be lost Are you sure? will appear on the display. Press the Play (green) button again. 6. Formatting OK will be displayed, followed by JukeMP3 Stop. This completes the formatting of the hard drive. 7. After formatting the hard drive in the JukeMP3 player, the JukeMP3 windows application will show the following message the next time it is started: Press the Yes button to allow the windows application to high level format the hard disk drive in the JukeMP3 player. This may take a minute or so, so be patient. Links: PIEXX Order Page
Easy Windows Working with Disks, Folders, - and Files
 Easy Windows 98-3 - Working with Disks, Folders, - and Files Page 1 of 11 Easy Windows 98-3 - Working with Disks, Folders, - and Files Task 1: Opening Folders Folders contain files, programs, or other
The CD100MP3 is a micro-computer based hard disk player that replaces the entire CD mechanism and decoder in your ROWE/AMI CD100 jukebox.
 The CD100MP3 is a micro-computer based hard disk player that replaces the entire CD mechanism and decoder in your ROWE/AMI CD100 jukebox. The hard disk player works with any jukebox that uses the 408322xx
There are six main steps in creating web pages in FrontPage98:
 This guide will show you how to create a basic web page using FrontPage98 software. These instructions are written for IBM (Windows) computers only. However, FrontPage is available for Macintosh users
Introduction to Microsoft Office PowerPoint 2010
 Introduction to Microsoft Office PowerPoint 2010 TABLE OF CONTENTS Open PowerPoint 2010... 1 About the Editing Screen... 1 Create a Title Slide... 6 Save Your Presentation... 6 Create a New Slide... 7
Basic Concepts. Launching MultiAd Creator. To Create an Alias. file://c:\documents and Settings\Gary Horrie\Local Settings\Temp\~hh81F9.
 Page 1 of 71 This section describes several common tasks that you'll need to know in order to use Creator successfully. Examples include launching Creator and opening, saving and closing Creator documents.
Windows XP. A Quick Tour of Windows XP Features
 Windows XP A Quick Tour of Windows XP Features Windows XP Windows XP is an operating system, which comes in several versions: Home, Media, Professional. The Windows XP computer uses a graphics-based operating
Introduction to MS Word XP 2002: An Overview
 Introduction to MS Word XP 2002: An Overview Sources Used: http://www.fgcu.edu/support/office2000/word/files.html Florida Gulf Coast University Technology Skills Orientation Word 2000 Tutorial The Computer
INTRODUCTION TO COMPUTER CONCEPTS CSIT 100 LAB: MICROSOFT POWERPOINT (Part 2)
") INTRODUCTION TO COMPUTER CONCEPTS CSIT 100 LAB: MICROSOFT POWERPOINT (Part 2) Adding a Text Box 1. Select Insert on the menu bar and click on Text Box. Notice that the cursor changes shape. 2. Draw the
INTRODUCTION TO COMPUTER CONCEPTS CSIT 100 LAB: MICROSOFT POWERPOINT (Part 2) Adding a Text Box 1. Select Insert on the menu bar and click on Text Box. Notice that the cursor changes shape. 2. Draw the
Publishing Electronic Portfolios using Adobe Acrobat 5.0
 Step-by-Step Publishing Electronic Portfolios using Adobe Acrobat 5.0 2002, Helen C. Barrett Here is the process we will use to publish a digital portfolio using Adobe Acrobat. The portfolio will include
Using the Web in Mathematics Foundations Course An Introduction to Microsoft PowerPoint Sarah L. Mabrouk, Framingham State College
 Using the Web in Mathematics Foundations Course An Introduction to Microsoft PowerPoint Sarah L. Mabrouk, Framingham State College Overview: MS PowerPoint is powerful presentation software that enables
POWERPOINT BASICS: MICROSOFT OFFICE 2010
 POWERPOINT BASICS: MICROSOFT OFFICE 2010 GETTING STARTED PAGE 02 Prerequisites What You Will Learn USING MICROSOFT POWERPOINT PAGE 03 Microsoft PowerPoint Components SIMPLE TASKS IN MICROSOFT POWERPOINT
Windows Movie Maker / Microsoft Photo Story Digital Video
 Windows Movie Maker / Microsoft Photo Story Digital Video http://intranet/technology/index.html TRC HELP DESK X5092 April 2006 Photo Story and Movie Maker Microsoft Photo Story 3 allows you to create fantastic
Advice for How To Create a Film Project in Windows MovieMaker
 Advice for How To Create a Film Project in Windows MovieMaker This document was compiled to provide initial assistance to teachers and/or students to create a movie project using the Windows MovieMaker
CHAPTER 1 COPYRIGHTED MATERIAL. Getting to Know AutoCAD. Opening a new drawing. Getting familiar with the AutoCAD and AutoCAD LT Graphics windows
 CHAPTER 1 Getting to Know AutoCAD Opening a new drawing Getting familiar with the AutoCAD and AutoCAD LT Graphics windows Modifying the display Displaying and arranging toolbars COPYRIGHTED MATERIAL 2
The Fundamentals. Document Basics
 3 The Fundamentals Opening a Program... 3 Similarities in All Programs... 3 It's On Now What?...4 Making things easier to see.. 4 Adjusting Text Size.....4 My Computer. 4 Control Panel... 5 Accessibility
Session 7 MS Word. Graphics. Inserting Clipart, and Graphics Modify graphics Position graphics
 Session 7 MS Word Graphics Inserting Clipart, and Graphics Modify graphics Position graphics Table of Contents Session 7 Working with Graphics... 1 The Toolbar... 1 Drawing Toolbar... 1 Picture Toolbar...
Microsoft PowerPoint 2010 Beginning
 Microsoft PowerPoint 2010 Beginning PowerPoint Presentations on the Web... 2 Starting PowerPoint... 2 Opening a Presentation... 2 File Tab... 3 Quick Access Toolbar... 3 The Ribbon... 4 Keyboard Shortcuts...
7 For Seniors For Dummies
 Windows 7 For Seniors For Dummies Chapter 16: Making Windows 7 Easier to Use ISBN: 978-0-470-50946-3 Copyright of Wiley Publishing, Inc. Indianapolis, Indiana Posted with Permission Making Windows 7 Easier
Microsoft PowerPoint 2013 Beginning
 Microsoft PowerPoint 2013 Beginning PowerPoint Presentations on the Web... 2 Starting PowerPoint... 2 Opening a Presentation... 2 File Tab... 3 Quick Access Toolbar... 3 The Ribbon... 4 Keyboard Shortcuts...
Beginning PowerPoint XP for Windows
 Beginning PowerPoint XP for Windows Tutorial Description This course introduces you to the PowerPoint program basics for creating a simple on-screen presentation. Intended Audience Individuals interested
PowerPoint for Art History Presentations
 PowerPoint for Art History Presentations For PC computers running Microsoft Office 2007+ Adapted by The University of California, Berkeley from the Institute of Fine Arts document by Elizabeth S. Funk
Windows Me Navigating
 LAB PROCEDURE 11 Windows Me Navigating OBJECTIVES 1. Explore the Start menu. 2. Start an application. 3. Multi-task between applications. 4. Moving folders and files around. 5. Use Control Panel settings.
How to Get Started. Figure 3
 Tutorial PSpice How to Get Started To start a simulation, begin by going to the Start button on the Windows toolbar, then select Engineering Tools, then OrCAD Demo. From now on the document menu selection
Work Smart: Windows 7 New Features
 About Windows 7 New Features The Windows 7 operating system offers several new features to help you work faster and more efficiently, and enable you to access the files, folders, programs, and applications
Introduction to Microsoft PowerPoint 2000
 Introduction to Microsoft PowerPoint 2000 TABLE OF CONTENTS Accessing PowerPoint 2000... 3 Starting a Presentation... 3 About the Editing Screen in Normal Screen View... 4 About Menu Displays in PowerPoint
You ll notice at the bottom of the file menu there is a list of recently opened files. You can click a file name in the list to re-open that file.
 Using Microsoft Word A word processor is all about working with large amounts of text, so learning the basics of text editing is essential to being able to make the most of the program. The first thing
The American University in Cairo. Academic Computing Services. Word prepared by. Soumaia Ahmed Al Ayyat
 The American University in Cairo Academic Computing Services Word 2000 prepared by Soumaia Ahmed Al Ayyat Spring 2001 Table of Contents: Opening the Word Program Creating, Opening, and Saving Documents
Cassette2CD Wizard 2.05 User's Manual
 Cassette2CD Wizard 2.05 User's Manual Table of Contents 1. Installation Instructions a. Connecting tape-deck to the computer b. Installing the Software 2. Using Cassette2CD Wizard a. Setting up and Testing
Keynote 08 Basics Website:
 Website: http://etc.usf.edu/te/ Keynote is Apple's presentation application. Keynote is installed as part of the iwork suite, which also includes the word processing program Pages and the spreadsheet program
PowerPoint 2016 Building a Presentation
 PowerPoint 2016 Building a Presentation What is PowerPoint? PowerPoint is presentation software that helps users quickly and efficiently create dynamic, professional-looking presentations through the use
Microsoft Windows 10. Quick Reference. Watsonia Publishing 47 Greenaway Street Bulleen VIC 3105 Australia
 Watsonia Publishing 47 Greenaway Street Bulleen VIC 3105 Australia www.watsoniapublishing.com info@watsoniapublishing.com Quick Reference Course Code: INF1440 Table of Contents Chapter 1: Starting With
Center for Faculty Development and Support Creating Powerful and Accessible Presentation
 Creating Powerful and Accessible Presentation PowerPoint 2007 Windows Tutorial Contents Create a New Document... 3 Navigate in the Normal View (default view)... 3 Input and Manipulate Text in a Slide...
Microsoft Word: Steps To Success (The Bare Essentials)
") Microsoft Word: Steps To Success (The Bare Essentials) Workbook by Joyce Kirst 2005 Microsoft Word: Step to Success (The Bare Essentials) Page Contents 1 Starting Word 2 Save 3 Exit 5 Toolbars, Alignment,
Microsoft Word: Steps To Success (The Bare Essentials) Workbook by Joyce Kirst 2005 Microsoft Word: Step to Success (The Bare Essentials) Page Contents 1 Starting Word 2 Save 3 Exit 5 Toolbars, Alignment,
ECDL Module 6 REFERENCE MANUAL
 ECDL Module 6 REFERENCE MANUAL Presentation Microsoft PowerPoint XP Edition for ECDL Syllabus Four PAGE 2 - ECDL MODULE 6 (USING POWERPOINT XP) - MANUAL 6.1 GETTING STARTED... 4 6.1.1 FIRST STEPS WITH
INSTALLING THE PS3 XBOX READY SOFTWARE:
 INSTALLING THE PS3 XBOX READY SOFTWARE: 1. Insert the Installation CD to CD-ROM drive and execute Ready_Setup.exe NOTE: If it is the first time for the target USB disk using under this software, the software
Working with Screencast-O-Matic (SOM)
") Working with Screencast-O-Matic (SOM) Screencast-O-Matic (SOM) is a fast and easy browser-based screen capture and editing program used to create and share screen recordings. PREPARATIONS There are a few
Working with Screencast-O-Matic (SOM) Screencast-O-Matic (SOM) is a fast and easy browser-based screen capture and editing program used to create and share screen recordings. PREPARATIONS There are a few
Introduction to Microsoft Office 2016: Word
 Introduction to Microsoft Office 2016: Word Last Updated: September 2018 Cost: $2.00 Microsoft Word is a word processing software. You can use it to type letters, reports, and other documents. This class
Table of Contents Lesson 1: Introduction to the New Interface... 2 Lesson 2: Prepare to Work with Office
 Table of Contents Lesson 1: Introduction to the New Interface... 2 Exercise 1: The New Elements... 3 Exercise 2: Use the Office Button and Quick Access Toolbar... 4 The Office Button... 4 The Quick Access
Application of Skills: Microsoft PowerPoint 2013 Tutorial
 Application of Skills: Microsoft PowerPoint 2013 Tutorial Throughout this tutorial, you will progress through a series of steps to create a presentation about yourself. You will continue to add to this
Epilog Laser Cutter Instructions (Only the Essentials)
") Epilog Laser Cutter Instructions (Only the Essentials) How to export a file for SKETCHUP put it on the server, open it in Illustrator, and Prepare it for the Epilog Laser Cutter 1. In Sketchup: Draw a
Epilog Laser Cutter Instructions (Only the Essentials) How to export a file for SKETCHUP put it on the server, open it in Illustrator, and Prepare it for the Epilog Laser Cutter 1. In Sketchup: Draw a
Microsoft PowerPoint 2007 Beginning
 Microsoft PowerPoint 2007 Beginning Educational Technology Center PowerPoint Presentations on the Web... 2 Starting PowerPoint... 2 Opening a Presentation... 2 Microsoft Office Button... 3 Quick Access
Lesson 4 - Creating a Text Document Using WordPad
 Lesson 4 - Creating a Text Document Using WordPad OBJECTIVES: To learn the basics of word processing programs and to create a document in WordPad from Microsoft Windows. A word processing program is the
User Guide 701P Wide Format Solution Wide Format Scan Service
 User Guide 701P44865 6204 Wide Format Solution Wide Format Scan Service Xerox Corporation Global Knowledge & Language Services 800 Phillips Road Bldg. 845-17S Webster, NY 14580 Copyright 2006 Xerox Corporation.
Understanding File Management
 UNIT B Windows 2007 Understanding File Management Files You Will Need: Win B-1.bmp Win B-2.bmp Most of your work on a computer involves using programs to create files. For example, you might use WordPad
PowerPoint Spring 2002
 PowerPoint 2000 Spring 2002 Table of Contents I. INTRODUCTION... 1 II. GETTING STARTED... 1 A. Opening PowerPoint... 1 B. The Mouse Pointer... 1 C. Working with Text... 2 1. Windows Control Buttons...
SOFTWARE SKILLS BUILDERS
 CREATING AN ALL Hyperstudio is an easy to use but powerful multimedia authoring tool that lets you and your students create a series of linked cards, called a stack. Each card can contain text, graphics,
Display Systems International Software Demo Instructions
 Display Systems International Software Demo Instructions This demo guide has been re-written to better reflect the common features that people learning to use the DSI software are concerned with. This
For additional information, please consult the Read-Me and Help documentation or contact Electro-Voice or Dynacord technical support.
 Quick Start Guide Hello, and welcome to IRIS-Net software. We want you to get the most from your IRIS-Net projects and encourage you to explore the additional Read-Me and Help documentation provided with
Introduction to the. Managed XP Service (For Students) Mark Morley Bob Booth December 2004 AP-Win7. University of Sheffield.
 Mark Morley Bob Booth December 2004 AP-Win7. University of Sheffield.") Introduction to the Managed XP Service (For Students) Mark Morley Bob Booth December 2004 AP-Win7 Contents University of Sheffield 1. INTRODUCTION... 4 2. USING A MANAGED SERVICE MACHINE... 5 2.1 LOGGING
Introduction to the Managed XP Service (For Students) Mark Morley Bob Booth December 2004 AP-Win7 Contents University of Sheffield 1. INTRODUCTION... 4 2. USING A MANAGED SERVICE MACHINE... 5 2.1 LOGGING
Creating Interactive PDF Forms
 Creating Interactive PDF Forms Using Adobe Acrobat X Pro for the Mac University Information Technology Services Training, Outreach, Learning Technologies and Video Production Copyright 2012 KSU Department
XnView 1.9. a ZOOMERS guide. Introduction...2 Browser Mode... 5 Image View Mode...15 Printing Image Editing...28 Configuration...
 XnView 1.9 a ZOOMERS guide Introduction...2 Browser Mode... 5 Image View Mode...15 Printing... 22 Image Editing...28 Configuration... 36 Written by Chorlton Workshop for hsbp Introduction This is a guide
Chapter 9 Slide Shows
 Impress Guide Chapter 9 Slide Shows Transitions, animations, and more Copyright This document is Copyright 2007 2011 by its contributors as listed below. You may distribute it and/or modify it under the
PowerPoint Essentials 1
 PowerPoint Essentials 1 LESSON SKILL MATRIX Skill Exam Objective Objective Number Working with an Existing Presentation Change views of a presentation. Insert text on a slide. 1.5.2 2.1.1 SOFTWARE ORIENTATION
Computer Basics Written by Brian O'Rooney. Copyright 2000 Nanaimo Literacy Association All rights reserved
 Written by Brian O'Rooney Copyright 2000 Nanaimo Literacy Association All rights reserved Windows is a registered trademark of Microsoft Corporation. This product/publication includes images from WordPerfect
Introducing Gupta Report Builder
 Business Reporting Chapter 1 Introducing Gupta Report Builder You can use Report Builder to design reports. This chapter describes: Our approach to building reports. Some of the reports you can build.
Dreamweaver Handout. University of Connecticut Prof. Kent Golden
 Dreamweaver Handout University of Connecticut Prof. Kent Golden Kent@GoldenMultimedia.com www.goldenmultimedia.com Main goal of this handout: To give you the steps needed to create a basic personal website
MindView Online - Quick Start Guide
 MindView Online - Quick Start Guide Overview MindView Online is an online concept mapping program that allows users to organize their thoughts visually to create, share, and export mind maps to Microsoft
MICROSOFT WORD 2010 Quick Reference Guide
 MICROSOFT WORD 2010 Quick Reference Guide Word Processing What is Word Processing? How is Word 2010 different from previous versions? Using a computer program, such as Microsoft Word, to create and edit
HAPPY HOLIDAYS PHOTO BORDER
 HAPPY HOLIDAYS PHOTO BORDER In this Photoshop tutorial, we ll learn how to create a simple and fun Happy Holidays winter photo border! Photoshop ships with some great snowflake shapes that we can use in
Using Microsoft Word. Getting Started With Word. Exercise 1 Starting the Program
 Using Microsoft Word Getting Started With Word Exercise 1 Starting the Program There are several ways to start a program in Microsoft Windows and they may include the following: Clicking an icon on the
Adobe Acrobat Pro DC for Windows
 Adobe Acrobat Pro DC for Windows Creating Interactive PDF Forms University Information Technology Services Learning Technologies, Training & Audiovisual Outreach Copyright 2017 KSU Division of University
User Guide. FTR Reporter For more information, visit
 FTR Reporter 5.7.1 For more information, visit www.fortherecord.com TABLE OF CONTENTS INTRODUCTION... 5 Overview... 5 About This Document... 5 GETTING STARTED... 6 Installation... 6 Starting Reporter...
BUCKVIEW Advanced. User Guide
 BUCKVIEW Advanced User Guide Inside This Manual I. Inside This Manual... 2 II. Viewing and Managing Your Images... 3 Manage Image Folders...5 Manage Sites...6 Manage Locations...10 Erase Memory Card...14
Gloucester County Library System. Microsoft 2010 PowerPoint
 Gloucester County Library System Microsoft 2010 PowerPoint PowerPoint 2010 is a presentation software that allows you to create dynamic slide presentations that may include animation, narration, images,
6. Essential Spreadsheet Operations
 6. Essential Spreadsheet Operations 6.1 Working with Worksheets When you open a new workbook in Excel, the workbook has a designated number of worksheets in it. You can specify how many sheets each new
This guide will show you how to create a basic multi-media PowerPoint presentation containing text, graphics, charts, and audio/video elements.
 This guide will show you how to create a basic multi-media PowerPoint presentation containing text, graphics, charts, and audio/video elements. Before starting the steps outlined in this guide, it is recommended
Microsoft Excel 2007
 Learning computers is Show ezy Microsoft Excel 2007 301 Excel screen, toolbars, views, sheets, and uses for Excel 2005-8 Steve Slisar 2005-8 COPYRIGHT: The copyright for this publication is owned by Steve
Using Flash Animation Basics
 Using Flash Contents Using Flash... 1 Animation Basics... 1 Exercise 1. Creating a Symbol... 2 Exercise 2. Working with Layers... 4 Exercise 3. Using the Timeline... 6 Exercise 4. Previewing an animation...
Microsoft Word 2010 Basics
 1 Starting Word 2010 with XP Click the Start Button, All Programs, Microsoft Office, Microsoft Word 2010 Starting Word 2010 with 07 Click the Microsoft Office Button with the Windows flag logo Start Button,
Lehigh University Library & Technology Services
 Lehigh University Library & Technology Services Start Word Open a file called day2 Microsoft WORD 2003 Day 2 Click the Open button on the Standard Toolbar Go to the A: drive and highlight day2 and click
Voyant Connect User Guide
 Voyant Connect User Guide WELCOME TO VOYANT CONNECT 3 INSTALLING VOYANT CONNECT 3 MAC INSTALLATION 3 WINDOWS INSTALLATION 4 LOGGING IN 4 WINDOWS FIRST LOGIN 6 MAKING YOUR CLIENT USEFUL 6 ADDING CONTACTS
BASIC MICROSOFT POWERPOINT
 BASIC MICROSOFT POWERPOINT PART ONE PHONE: 504-838-1144 IT Training Team Jefferson Parish Library EMAIL: jpltrain@jplibrary.net In this class you will learn to: Launch, close, and interact with Microsoft
The Mathcad Workspace 7
 For information on system requirements and how to install Mathcad on your computer, refer to Chapter 1, Welcome to Mathcad. When you start Mathcad, you ll see a window like that shown in Figure 2-1. By
ipod Tutorial Includes lessons on transferring music to ipod, playing music, and storing files on ipod
 ipod Tutorial Includes lessons on transferring music to ipod, playing music, and storing files on ipod apple Apple Computer, Inc. 2004 Apple Computer, Inc. All rights reserved. Apple, the Apple logo, Apple
PowerPoint Basics. Getting Started
 PowerPoint Basics Getting Started 1. Open up PowerPoint. 2. The following window will appear. 3. Select Template. 4. Click the OK button. 5. A new window appears. Click on the Presentation Design tab to
This book is about using Microsoft Excel to
 Introducing Data Analysis with Excel This book is about using Microsoft Excel to analyze your data. Microsoft Excel is an electronic worksheet you can use to perform mathematical, financial, and statistical
Premiere - Jazz Video Project Tutorial
 -Open Premiere and set up the Premiere Project -At the bottom left of the Project bin change the view from icon view to list view -Import all audio and video clips to the Project Bin window -Right Click
Selection tool - for selecting the range of audio you want to edit or listen to.
 Audacity Quick Guide Audacity is an easy-to-use audio editor and recorder. You can use Audacity to: Record live audio. Convert tapes and records into digital recordings or CDs. Edit sound files. Cut, copy,
Introduction to Personal Computing
 Introduction to Personal Computing Academic Computing Services www.ku.edu/acs Abstract: This document explains the basics of the Microsoft Windows operating system. It is intended for users who are either
What can Word 2013 do?
 Mary Ann Wallner What can Word 2013 do? Provide the right tool for: Every aspect of document creation Desktop publishing Web publishing 2 Windows 7: Click Start Choose Microsoft Office > Microsoft Word
zuvo User Guide For zuvo -D Speech-Generating Devices Find more resources online:
 zuvo User Guide TM For zuvo -D Speech-Generating Devices Find more resources online: www.talktometechnologies.com/support/ Table of contents Technical Hardware and features... 2 Speech settings... 3 Take
Handout created by Cheryl Tice, Instructional Support for Technology, GST BOCES
 Handout created by Cheryl Tice, Instructional Support for Technology, GST BOCES Intro to FrontPage OVERVIEW: This handout provides a general overview of Microsoft FrontPage. AUDIENCE: All Instructional
Sample Chapters. To learn more about this book, visit the detail page at: go.microsoft.com/fwlink/?linkid=192147
 Sample Chapters Copyright 2010 by Online Training Solutions, Inc. All rights reserved. To learn more about this book, visit the detail page at: go.microsoft.com/fwlink/?linkid=192147 Chapter at a Glance
Using Microsoft Word. Text Editing
 Using Microsoft Word A word processor is all about working with large amounts of text, so learning the basics of text editing is essential to being able to make the most of the program. The first thing
Word - Basics. Course Description. Getting Started. Objectives. Editing a Document. Proofing a Document. Formatting Characters. Formatting Paragraphs
 Course Description Word - Basics Word is a powerful word processing software package that will increase the productivity of any individual or corporation. It is ranked as one of the best word processors.
Microsoft Office 2010 consists of five core programs: Word, Excel,
 Chapter 1 Introducing Microsoft Office 2010 In This Chapter Starting an Office 2010 program Learning the Microsoft Office Backstage View Using the Quick Access toolbar Learning the Ribbon Customizing an
Boise State University. Getting To Know FrontPage 2000: A Tutorial
 Boise State University Getting To Know FrontPage 2000: A Tutorial Writers: Kevin Gibb, Megan Laub, and Gayle Sieckert December 19, 2001 Table of Contents Table of Contents...2 Getting To Know FrontPage
Opening Screen When you first enter Slick!, a blank opening screen will appear as shown below.
 Quick Start This will provide you an overview on how to:?? select and view a file?? zoom in an out of the graphics window?? panning around the graphics window?? zoom to the extents of graphics window??
DRAFT. Table of Contents About this manual... ix About CuteSITE Builder... ix. Getting Started... 1
 DRAFT Table of Contents About this manual... ix About CuteSITE Builder... ix Getting Started... 1 Setting up... 1 System Requirements... 1 To install CuteSITE Builder... 1 To register CuteSITE Builder...
Libraries. Multi-Touch. Aero Peek. Sema Foundation 10 Classes 2 nd Exam Review ICT Department 5/22/ Lesson - 15
 10 Classes 2 nd Exam Review Lesson - 15 Introduction Windows 7, previous version of the latest version (Windows 8.1) of Microsoft Windows, was produced for use on personal computers, including home and
NiceForm User Guide. English Edition. Rev Euro Plus d.o.o. & Niceware International LLC All rights reserved.
 www.nicelabel.com, info@nicelabel.com English Edition Rev-0910 2009 Euro Plus d.o.o. & Niceware International LLC All rights reserved. www.nicelabel.com Head Office Euro Plus d.o.o. Ulica Lojzeta Hrovata
1. Step-by-Step: Change Fonts and Font Sizes a. Before you begin these steps, be sure to LAUNCH Microsoft Word. b. Connect your USB flash drive to
 1. Step-by-Step: Change Fonts and Font Sizes a. Before you begin these steps, be sure to LAUNCH Microsoft Word. b. Connect your USB flash drive to one of the USB ports on your computer. c. Click the File
PowerPoint 2010 Level 1 Computer Training Solutions Student Guide Version Revision Date Course Length
 Level 1 Computer Training Solutions Version 1.2 Revision Date Course Length 2012-Feb-16 6 hours Table of Contents Quick Reference... 3 Frequently Used Commands... 3 Manitoba ehealth Learning Management
Word Processing. 2 Monroe County Library System
 2 Monroe County Library System http://monroe.lib.mi.us Word Processing Word Pad Quick Guide... 4 Help Menu... 6 Invitation... 7 Saving... 12 Printing... 13 Insert a Picture... 14 Saving to a CD... 15 In
These are meant to be used as desktop reminders or cheat sheets for using Read&Write Gold. To use. your Print Dialog box as shown
 These are meant to be used as desktop reminders or cheat sheets for using Read&Write Gold. To use them Print as HANDOUTS by setting your Print Dialog box as shown Then Print and Cut up as individual cards,
FTR Player 6.2. User Guide. Windows 8.1 x64. For Windows 7 x86 Windows 7 x64 Windows 10 x64 Windows 10 x32.
 Windows 8.1 x64 FTR Player 6.2 User Guide For Windows 7 x86 Windows 7 x64 Windows 10 x64 Windows 10 x32 www.fortherecord.com For more information visit www.fortherecord.com Page i User Guide Table of Contents
Adobe Illustrator. Quick Start Guide
 Adobe Illustrator Quick Start Guide 1 In this guide we will cover the basics of setting up an Illustrator file for use with the laser cutter in the InnovationStudio. We will also cover the creation of
Access Review. 4. Save the table by clicking the Save icon in the Quick Access Toolbar or by pulling
 Access Review Relational Databases Different tables can have the same field in common. This feature is used to explicitly specify a relationship between two tables. Values appearing in field A in one table
Introduction to Excel 2007
 Introduction to Excel 2007 These documents are based on and developed from information published in the LTS Online Help Collection (www.uwec.edu/help) developed by the University of Wisconsin Eau Claire
PART 7. Getting Started with Excel
 PART 7 Getting ed with Excel When you start the application, Excel displays a blank workbook. A workbook is a file in which you store your data, similar to a three-ring binder. Within a workbook are worksheets,