TECHNOLOGIES. P2jr Pico Projector. User Guide
|
|
|
- Phebe Goodwin
- 6 years ago
- Views:
Transcription

1 aaxa TECHNOLOGIES P2jr Pico Projector User Guide
2 Caution! WARNING: Please use this product as instructed. Misuse may cause injury or death. DO NOT use while driving DO NOT expose to water or wet surfaces. Electric shock may occur DO NOT expose the LED to your eyes or the eyes of others Caution for Battery Use Do not pierce or puncture the battery with sharp objects Do not heat the product or expose it to high temperature. Do not wet it or place it in any liquid DO NOT block or restrict airflow from ventilation holes as this may cause the projector to overheat Keep the projector, battery, or charger away from any heat sources
3 Table of Contents Chapter 1: P2jr at a glance Main Unit Keypad Accessories Chapter 2: Getting Started Powering On / OFF Focus Adjustment / Throw Distance External Inputs /Output Sources Connecting to a Computer Connecting to Composite Video Connecting to HDMI Video Connecting a Micro SD Card Connecting to a USB drive Chapter 3: Menu Screens Main menu File Menu System Video Player Menu Photo Viewer Menu Music Player Menu Text Viewer Menu Setup Menu Chapter 4: Technical Details Troubleshooting Specifications 1


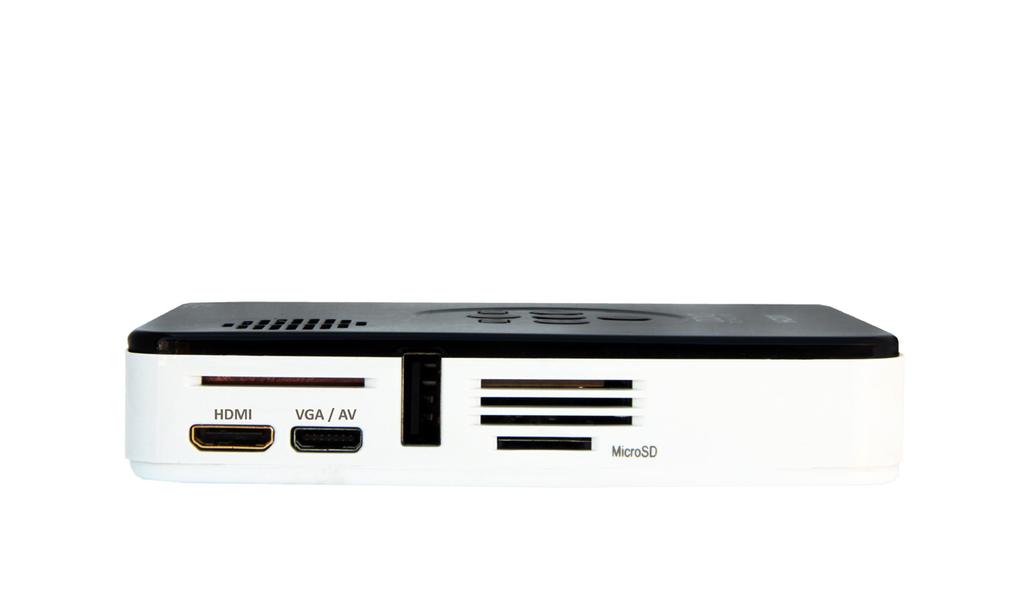
4 P2jr at a Glance Directional Pad Confirm Selection Charge Indicator Power Input Main Unit Chapter 1 Back Button Cooling Fan Power Button Speaker Projection Lens Focus Adjustment Mini HDMI Mini A/V / VGA Input USB Port MicroSD Card Slot 2

5 Keypad Exit/Back This key allows you to return to the previous menu or exit from the media player option. Power ON / OFF Holding down the power button for 3 seconds will either turn the P2Jr ON or OFF. Directional Keypad Use these keys in highlight the selection you which to choose. Confirm Selection Use this key to select the current highlighted option. *More detailed direction of the keypad will be discussed in individual subsections. 3


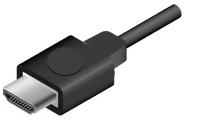
6 Accessories Standard Accessories Sold Separately Power Adapter VGA Cable Mini-Full HDMI Composite A/V Cable *Under various circumstances, the actual accessories may be different from those shown in the pictures above. 4
7 Getting Started Chapter 2 Powering ON the projector 1. Connect the power cord to the P2jr. 2. Connect the wall plug into the wall power source. 3. Press the POWER button and hold for 2-3 seconds to switch on or switch off the power The LED turns red while charging. The LED turns green when charging is finished. 4 hours of charge time is required to reach a full charge. Powering OFF the projector 1. Press and hold the power button for 3 seconds. 2. The optical engine should power off and the fan should stop spinning. Note: The P2jr Projector battery does not charge when it is in operation. 5
 Diagonal Inch ( ) 10 8 15 12 20 16 30 24 40 31 50 39 60 47 70 55 DIAGONAL SCREEN SIZE 4:3 Aspect Ratio Throw Ratio *minimum throw distance: 10 inches")
8 Focus Adjusment / Throw Distance Focus Adjustment 1. Spin the focus wheel up or down until the image becomes clear. 2. The recommended focus distance for this projector is 12 to infinity. Throw Distance Chart Distance inch ( ) Diagonal Inch ( ) DIAGONAL SCREEN SIZE 4:3 Aspect Ratio Throw Ratio *minimum throw distance: 10 inches 6


9 External Inputs/Outputs Composite Cable HDMI Cable Micro SD Card Laptop Desktop USB Stick 7


10 Connecting to a Computer via VGA Step 1: Connect the large end of the to your computer s Step 2: VGA Cord VGA Adapter Connect the small end of the to your P2jr s Step 3: In the Main Menu VGA Cord VGA Adapter Select VGA icon 8
11 Connecting to a Computer Cont. Step 4: Enabling VGA or HDMI output on your Computer To enable VGA or HDMI output on your computer most computers require turning on the video output feature. Each computer is different. Please consult your owner s manual for instructions to enable VGA or HDMI output. Below are standard instructions for a Windows XP computer not all systems are the same. Step 5: Press function & F5 to instruct the computer to enable multiple displays. You can also press Windows+P to toggle through display settings. *NOTE: different operating systems may differ Step 6: 1. Right click on computer desktop and select Properties 2. Display Properties window will pop up 3. Click on the Settings Tab 4. If a secondary monitor is grayed out, click on it and check Extend my Windows Desktop onto this monitor 5. If the image is blurry or the text is not legible, adjust the screen resolution. We recommend 800x600 or 1024x768. 9
12 Connecting to a Computer via HDMI Step 1: Connect the large end of the to your computer s Step 2: HDMI Cord HDMI Adapter Connect the small end of the to your P2jr s Step 3: In the Main Menu HDMI Cord Select HDMI icon HDMI Adapter The P2jr requries a mini to full HDMI cable 10


13 Connecting to a Computer Cont. Step 4: Enabling VGA or HDMI output on your Computer To enable VGA or HDMI output on your computer most computers require turning on the video output feature. Each computer is different. Please consult your owner s manual for instructions to enable VGA or HDMI output. Below are standard instructions for a Windows XP computer not all systems are the same. Step 5: Press function & F5 to instruct the computer to enable multiple displays. You can also press Windows+P to toggle through display settings. *NOTE: different operating systems may differ Step 6: 1. Right click on computer desktop and select Properties 2. Display Properties window will pop up 3. Click on the Settings Tab 4. If a secondary monitor is grayed out, click on it and check Extend my Windows Desktop onto this monitor 5. If the image is blurry or the text is not legible, adjust the screen resolution. We recommend 800x600 or 1024x


14 Connecting to Composite Video Step 1: Connect one end of the to your P2jr s Composite A/V Cord A/V Adapter Step 2: Connect opposite end of to your devices Composite A/V Cord Composite A/V Cord 12
15 Connecting to Composite Video Cont. Step 3: In the Main Menu Select AV icon Step 4: Turn on your multimedia device. Connectivity with multimedia devices The P2jr can connect to many media devices including: ipod, iphone, ipad, VHS players, DVD players, smart phones, cameras, video game consoles and other peripherals with ease. *Apps on smart phones require video out capabilities to be displayed with the P2jr. 13


16 Connecting to HDMI Video Step 1: Connect one end of the Step 2: Mini-HDMI to your P2jr s HDMI Adapter Connect opposite end of HDMI to your devices HDMI Adapter 14
17 Connecting to HDMI Video Cont. Step 3: In the Main Menu Select HDMI icon Step 4: Turn on your multimedia device. Connectivity with multimedia devices The P2jr can connect to many media devices including: ipod, iphone, ipad, VHS players, DVD players, smart phones, cameras, video game consoles and other peripherals with ease. *Apps on smart phones require video out capabilities to be displayed with the P2jr. 15
18 Micro SD Card How to insert your Micro SD Card Slide in your SD card into the SD card slot on the side of the P2jr. (as shown in picture) Gently slide the SD card until it *clicks* into place. How to access your Micro SD Card Once your SD card has been inserted, you can view the files located in SD card icon in the main menu. After selecting SD card mode you should now be able to access the data on the SD device through the onboard media player. *Review the Specification section of this manual to read about the supported file formats. 16
19 Micro SD Card Cont. 1) 2) Select the microsd icon Media Player menu In the Media Player selection you can choose from the options: Photo, Music, Video, Text Select the appropriate menu for the type of file you wish to view. File Menu System The P2jr will show all folders and files you have on your SD Card. Use the directional buttons to navigate to different folders or files. Return: Brings you back to the main menu Up Folder: Brings you back to the previous folder 17
 Gently slide the drive until it cannot go in any further How to access your USB Drive Once your USB")

20 USB Reader How to insert your USB Drive Slide your USB Drive into P2jr. (as shown in picture) Gently slide the drive until it cannot go in any further How to access your USB Drive Once your USB Drive has been inserted, you can navigate to the USB icon in the main menu. After selecting USB Drive Mode you should now be able to access the data on the USB drive through the onboard media player. *Review the Specification section of this manual to read about the supported file formats. 18
 2) Select the USB icon Media Player menu In the Media Player selection you can choose from the options: Photo, Music, Video, Text Select the appropriate menu for the type of file you wish to view.")
21 USB Reader Cont. 1) 2) Select the USB icon Media Player menu In the Media Player selection you can choose from the options: Photo, Music, Video, Text Select the appropriate menu for the type of file you wish to view. File Menu System The P2jr will show all folders and files you have on your USB Drive. Use the directional buttons to navigate to different folders or files. Return: Brings you back to the main menu Up Folder: Brings you back to the previous folder 19

22 Menu Screens Main Menu Chapter 3 To access the main menu simply turn on the projector by pressing and holding the Power button for 3 seconds. Scroll Left/Right by pressing buttons on the keypad. To select a submenu, highlight the desired submenu and press the located in the middle of the keypad. To go back to the previous page while in a submenu, press the back button button. 20

23 File Menu System The P2jr will show all folders and files you have on your USB or microsd Drives. Use the directional buttons to navigate to different folders or files. Opening a file: Choose Movie, Music, Photo or Text Select device file is stores on Select file from within folders, or current list Return: Brings you back to the main menu Up Folder: Brings you back to the previous folder Previewing Files: Press the directional keys to highlight the item of interest Wait 2-3 seconds and a preview of the video will show on the screen 21
24 Video Player Menu Viewing Videos To adjust the volume simply press the or keys on the projector. For more options, press the to reveal more options. Move selection left Move selection right Confirm selection To open the video player menu, press OK on projector. To close the video player menu, hit back on projector. Play Video Rewind Video Fastforward Video Previous video Next Video Stop Video Repeat Video 22
25 Video Playback FAQ How do I loop a video? 1. Choose either USB or SD Card for playback 2. Navigate the folders until you reach the file you wish to play. 3. Highlight the file you want to play, then confirm the selection. 4. Move selection on video player menu to repeat, and confirm the selection. 5. The video will now loop after playback is finished. How do I preview a video? 1. Choose the video option from the main menu 2. Navigate using onboard buttons to the file you wish to preview. 3. Highlight the file. *Do not select the file, just highlight it. 4. Wait for 3-4 seconds. 5. A preview screen will pop up on the lower right for the video. 23
26 Photo Menu Viewing Pictures To use the photo controls, use the directional keys to highlight the option you wish to choose. Move selection left Move selection right Confirm selection To open the photo player menu, press OK on projector. To close the photo player menu, hit back on projector. Start Slideshow Previous Photo Next Photo Stop Slideshow Repeat Photo Stop Music Show Photo Playlist Show Info 24
27 Photo Slideshow FAQ How do I play a slideshow? 1. Choose either USB or SD Card for playback 2. Navigate to the folder that contains the pictures you wish to see in the slideshow 3. Confirm selection of the first picture. 4. Press play in the photo menu 5. Slideshow will not play. 6. NOTE: Selecting repeat will loop slideshow. How do I manually control the slideshow? 1. After selecting the photo you wish to be displayed, you can press play to start the slideshow (as outlined in the previous FAQ). 2. To manually control the slideshow, you must stop the slideshow with the stop button. 3. Controls on top of the P2Jr allow you to manually flip through the pictures in the current playlist. 25
28 Music Player Menu Listening to Audio To adjust the volume simply press the or keys on the projector. For more options, press the to reveal more options. Move selection left Move selection right Confirm selection To open the music menu, press OK on projector. To close the music menu, hit back on projector. Play / Pause Rewind Fastforward Previous Track Next Track Stop Playback Repeat Track Mute Sound 26


29 Music Playback FAQ How do I loop a song? 1. Choose either USB or SD Card for playback 2. Navigate the folders until you reach the file you wish to play. 3. Highlight the file you want to play, then confirm the selection. 4. Move selection on music player menu to repeat, and confirm the selection. 5. The song will now loop after playback is finished. How do I create a song playlist? 1. Insert your media device (either microsd card or USB) into computer. 2. Make a new folder on media device (folder name will be the name of the playlist). 3. Transfer songs from computer to the new folder, name accordingly. 4. Remove media device from computer and insert into projector. 5. Navigate to Audio section, then choose appropriate media device. 6. Navigate to your playlist folder. 7. Start at first song. 8. Playback will follow each successive song on the list. *To create a special order for the list, add numerical numbering to the beginning of each file. 27

30 Text Viewer Menu Opening a file: Choose Open File option Select device file is stored on Select file from list The P2jr will show all folders and files you have on your USB or SD Drives. Use the directional buttons to navigate through different folders or files. Previewing Files: Press the directional keys to highlight the item of interest Wait 2-3 seconds and a preview of the song will show on the screen Viewing text files The P2jr Pico Projector allows you to view text files. Select the file you want to view in the file menu for the particular storage device on which the file is stored. You can press the left and right arrow buttons on the directional pad to flip through the pages you have in the present folder. *Review Specification section of this manual for supported Text formats. 28


31 Setup Menu The Settings Menu can be accessed by selecting Settings on the main Within the Setting Options, there are a few sets of submenus including: Picture Picture mode Adjusts Contrast, Brightness, Color, Sharpness & Tint Color Temperature Adjusts Color ratio of red green and blue Aspect Ratio Choose between 16:9, 4:3, Zoom and more PC setup Additional options are available when connected to PC via HDMI or VGA Backlight Adjust low or high brightness modes. Higher brightness increases fan noise. 29

32 Setup Menu Cont. Sound Sound Mode Adjust Treble and Bass levels Time Clock Adjust current time Off timer Adjust time when P2jr will turn off after being idle Sleep timer Set timer for P2 to automatically turn off 30

33 31 Setup Menu Cont. Option OSD Language Change Language to English, French, Dutch, Spanish, Portuguese or Chinese Restore Factory Default Reset P2jr back to default settings Blending Adjust the blending option OSD Duration Adjust automatic timer to return to main screen when idle.
34 Technical Details Chapter 4 Troubleshooting IMAGE IS BLURRED Possible Causes The Projector is not in focus Solution Adjust the focus with the focus adjustment dial until the image comes into focus The Projector is offset from plane / angle of operation Move the projector so that it is both 180 degrees and on an even plane with the screen. No Sync, No Signal 1. Be sure to setup the computer to enable a video signal output. On some laptops this is done by pressing and holding Function F5 key. If using the P2jr as an external monitor on Windows based systems, this can be done by selecting extend my desktop to this monitor. 2. Depending on the video driver different resolutions may need to be selected for proper output. 32
35 Technical Details Troubleshooting THE PROJECTOR DOES NOT TURN ON Possible Causes There is no power The power button was not held long enough NO PICTURE / FILE NOT SUPPORTED Possible Causes The video source is not properly connected or selected Solution Check to ensure the power outlet or battery source is good. Check the power adapter to ensure a proper connection with the wall outlet as well as the projector. Confirm that the unit is charged and has enough power To power on the projector, the power button needs to be depressed for a full 3 seconds. Try holding the power button until the optical engine turns on Solution Check the video source signal to ensure that it is properly connected. Select the current input source by choosing the input desired from the main menu Incorrect file extension / Video is encoded with incorrect codec Please refer to Specifications page to see which file types and codec are supported. Verify that the file was encoded properly. 33
36 Specifications Brightness Maximum Resolution Contrast Ratio Projection Lens: Battery life: Image Size: Lamp: Video in: Audio Output: SD Card: USB: Dimensions: Weight: Supported File Formats: 55 Lumens WXGA(1920x1080) 1000:1 Manual Focus 120 minutes 10~60 inches 15,000 hour RGB Triple LEDs Composite A/V VGA(mini-VGA) HDMI(mini-HDMI) 1.0 W stereo speaker 3.5 mm audio jack SD-HC Card Slot (16 GB maximum) USB (Memory Sticks) (16 GB maximum) 4.2 x 2 9 x 0.82 inch 0.3 lbs AVI, MPG, MP4, MP3, JPG, TXT 34
37
38 Please direct all customer service inquiries to: AAXA Technologies, Inc Parkway Loop Suite F Tustin, CA (714) info@aaxatech.com
aaxa P4X Pico Projector TECHNOLOGIES User Guide
 aaxa TECHNOLOGIES P4X Pico Projector User Guide Caution! WARNING: Please use this product as instructed. Misuse may cause injury or death. DO NOT use while driving DO NOT expose to water or wet surfaces.
aaxa TECHNOLOGIES User Guide
 aaxa TECHNOLOGIES User Guide Caution! WARNING: Please use this product as instructed. Misuse may cause injury or death. DO NOT use while driving DO NOT expose to water or wet surfaces. Electric shock may
aaxa Pico Projector TECHNOLOGIES User Guide
 aaxa TECHNOLOGIES Pico Projector User Guide Caution! WARNING: Please use this product as instructed. Misuse may cause injury or death. DO NOT use while driving. DO NOT expose to water or wet surfaces.
aaxa P3OO Pico Projector TECHNOLOGIES User Guide
 aaxa TECHNOLOGIES P3OO Pico Projector User Guide Caution! WARNING: Please use this product as instructed. Misuse may cause injury or death. DO NOT use while driving DO NOT expose to water or wet surfaces.
aaxa TECHNOLOGIES PICO PROJECTOR User Guide
 aaxa TECHNOLOGIES PICO PROJECTOR User Guide Caution! WARNING: Please use this product as instructed. Misuse may cause injury or death. DO NOT use while driving DO NOT expose to water or wet surfaces. Electric
aaxa TECHNOLOGIES User Guide
 aaxa TECHNOLOGIES User Guide Caution! WARNING: Please use this product as instructed. Misuse may cause injury or death. DO NOT use while driving DO NOT expose to water or wet surfaces. Electric shock may
aaxa P3 Pico Projector TECHNOLOGIES User Guide
 aaxa TECHNOLOGIES P3 Pico Projector User Guide Caution! WARNING: Please use this product as instructed. Misuse may cause injury or death. *Do not operate the Projector in direct sunlight or near heat sources
aaxa TECHNOLOGIES User Guide
 aaxa TECHNOLOGIES User Guide Caution! WARNING: Please use this product as instructed. Misuse may cause injury or death. DO NOT use while driving DO NOT expose to water or wet surfaces. Electric shock may
aaxa TECHNOLOGIES User Guide
 aaxa TECHNOLOGIES User Guide Caution! WARNING: Please use this product as instructed. Misuse may cause injury or death. DO NOT use while driving DO NOT expose to water or wet surfaces. Electric shock may
aaxa TECHNOLOGIES User Guide
 aaxa TECHNOLOGIES User Guide Caution! WARNING: Please use this product as instructed. Misuse may cause injury or death. DO NOT use while driving DO NOT expose to water or wet surfaces. Electric shock may
aaxa TECHNOLOGIES User Guide
 aaxa TECHNOLOGIES User Guide Caution! WARNING: Please use this product as instructed. Misuse may cause injury or death. DO NOT use while driving DO NOT expose to water or wet surfaces. Electric shock may
aaxa TECHNOLOGIES User Guide
 aaxa TECHNOLOGIES User Guide Vertical Operation The HD Pico can be used for vertical operation (Ceiling projection). To use the HD Pico for Ceiling projection set the HD Pico in "Eco mode". Only an TF
aaxa P4 Pico Projector TECHNOLOGIES User Guide
 aaxa TECHNOLOGIES P4 Pico Projector User Guide Caution! WARNING: Please use this product as instructed. Misuse may cause injury or death. DO NOT use while driving DO NOT expose to water or wet surfaces.
*Do not operate the projector near water such as by the sink or bathtub as this may cause electric shock.
 Table of Contents Table of Contents 1 Warnings 2 Overview 3 Remote Control Functions 4 Packing List 5 General Operation 6 Startup and control Shutdown Positioning / Throw Distance / Focus 7 Connecting
WARNINGS. *Do not operate the Projector in direct sunlight or near heat sources such as heaters, fires, and stoves as this may cause a fire hazard.
 WARNINGS *Do not operate the Projector in direct sunlight or near heat sources such as heaters, fires, and stoves as this may cause a fire hazard. *Do not operate the projector close to sources of steam
TECHNOLOGIES. User Guide
 aaxa TECHNOLOGIES User Guide Quick Start Guide Step 4: Settings Button Step 1: Power Adapter Port Step 2: Power Button Step 3: Adjust Focus Step 1: Connect the power adapter Step 2: Press the Power button
aaxa TECHNOLOGIES User Guide
 aaxa TECHNOLOGIES User Guide Caution! WARNING: Please use this product as instructed. Misuse may cause injury or death. DO NOT use while driving. DO NOT expose to water or wet surfaces. Electric shock
aaxa TECHNOLOGIES User Guide
 aaxa TECHNOLOGIES User Guide Caution! WARNING: Please use this product as instructed. Misuse may cause injury or death. DO NOT use while driving. DO NOT expose to water or wet surfaces. Electric shock
User s Manual BeamPod User Manual
 User s Manual BeamPod General Safety Information 1. Keep the device and packaging materials out of reach of infants and children. 2. Keep the power adapter and other contacts from water, Dry your hands
aaxa TECHNOLOGIES User Guide
 aaxa TECHNOLOGIES User Guide Caution! WARNING: Please use this product as instructed. Misuse may cause injury or death. DO NOT use while driving. DO NOT expose to water or wet surfaces. Electric shock
AAXA Technologies P700 HD LED Pico Projector - Troubleshooting & Firmware Update Guide
 Troubleshooting: Image is blurred/picture not bright enough The Projector is not in focus Adjust the focus with the focus adjustment dial until the image comes into focus. Move the projector so that it
aaxa TECHNOLOGIES User Guide
 aaxa TECHNOLOGIES User Guide Caution! WARNING: Please use this product as instructed. Misuse may cause injury or death. DO NOT use while driving. DO NOT expose to water or wet surfaces. Electric shock
aaxa TECHNOLOGIES User Guide
 aaxa TECHNOLOGIES User Guide Caution! WARNING: Please use this product as instructed. Misuse may cause injury or death. DO NOT use while driving. DO NOT expose to water or wet surfaces. Electric shock
Ultra High Brightness Professional Monitor User Manual
 Manual Version UHBA1.0 Safety Instructions Please keep the display away from any heat sources. Place the display in a stable and well-ventilated place. Please handle with care as product contains glass.
Portable Hi-Res Movie Projector
 Care Instructions Portable Hi-Res Movie Projector Instructions Part No. COMP9256 B Portable Hi-Res Movie Projector Projector - Accessories 1 Projector 2 Lens cover 3 Remote control 4 Speaker 5 AV cable
CONTENT COMPONENTS OF PROJECTOR... 2 SPECIFICATION... 3 INSTRUCTION MANUAL... 3 CHARGING THE PROJECTOR... 3 SET UP... 4
 MP50M User Manual CONTENT COMPONENTS OF PROJECTOR... 2 SPECIFICATION... 3 INSTRUCTION MANUAL... 3 CHARGING THE PROJECTOR... 3 SET UP... 4 POWERING UP AND VIEWING MEDIA... 4 ADJUSTING VOLUME... 5 ADJUSTING
Chapter 1: Introduction. Chapter 2: Getting Started
 Chapter 1: Introduction Media Player 200 is a Digital Media Player that includes a connector for a USB storage device and card reader. The Media Player 200 connects to your home entertainment center allowing
/ QUICK START GUIDE. Mobile Projector
 / QUICK START GUIDE Mobile Projector 1 STEP 1 - POWER UP Power Button Press and hold the power buttons for 5 seconds to turn on the device. (It may take a few seconds for the Cube to start projecting an
FEATURES: Screen. Return Direction and OK button On/Off Audio Play Mode Record Button POWER and DATA
 With PVRC49 AV Recorder, you can convert your old video tapes or camcorder tapes to digital format with one click of button, record and digitalize video from VHS, VCR's, DVD Players, DVR's, Camcorders,Hi8,
IP65 Rated Freestanding Outdoor Monitor User s Manual
 IP65 Rated Freestanding Outdoor Monitor User s Manual Manual Version OTA1.0 Safety Instructions Please handle with care so as to not damage the LCD panel. The holes or openings on the display are designed
 Glossary Warranty and support information Introduc tion ------------------------------------------------------------------------------ Safety instructions ----------------------------------------------------------------------
PORTABLE VIDEO RECORDER AND CASSETTE CONVERTER. Item No User Guide
 PORTABLE VIDEO RECORDER AND CASSETTE CONVERTER Item No. 206557 User Guide Thank you for choosing the Sharper Image Portable Video Recorder and Cassette Converter. Please take a moment to read this guide
DVR 514 Digital Video Recorder
 DVR 514 Digital Video Recorder User Manual 2010 Sakar International, Inc. All rights reserved. Windows and the Windows logo are registered trademarks of Microsoft Corporation. All other trademarks are
Adapt ADPP-305 Projector User Manual
 Adapt ADPP-305 Projector User Manual I IMPORTANT: Please read before use Before using the product, please read the manual carefully. This product has 4GB memory, and can receive an additional TF/Micro
EziNav G3 User Manual
 EziNav G3 User Manual 4.3 Touchscreen GPS with Bluetooth About this User Manual Congratulations on your purchase of your Kogan EziNav G3 GPS. This user manual provides information regarding the various
Slimline Digital Advertising Display - Standalone (ANDROID) Hardware User Manual
 Hardware User Manual") Slimline Digital Advertising Display - Standalone (ANDROID) Hardware User Manual Manual Version PFHD5.3 Safety Instructions Please keep the display away from any heat sources. Place the display in a stable
Slimline Digital Advertising Display - Standalone (ANDROID) Hardware User Manual Manual Version PFHD5.3 Safety Instructions Please keep the display away from any heat sources. Place the display in a stable
quick start Multi_3M-MP220-QSG-4-75x7.indb 1 11/29/2011 5:38:44 PM
 quick start quick start... 4 démarrage rapide... 14 kurzanleitung... 24 inicio rápido... 34 guida rapida... 44 snelstartgids... 54 快速入门指南... 64 快速入門指引... 74 クイックスタートガイド... 84 빠른시작가이드... 94 3 English Français
49BDL5055P/11 V User Manual (English)
") /11 V1.10 www.philips.com/welcome User Manual (English) Safety Instructions Safety precautions and maintenance shock, electrical hazards and/or mechanical hazards. Read and follow these instructions when
/11 V1.10 www.philips.com/welcome User Manual (English) Safety Instructions Safety precautions and maintenance shock, electrical hazards and/or mechanical hazards. Read and follow these instructions when
700TSU INSTALLATION MANUAL
 M 700TSU INSTALLATION MANUAL 2 Table of Contents Features...03 Specifications...04 Quick-Start...05 Remote Control...07 Hardware Installation...10 Software Installation...14 Touch Screen Driver Installation
Network Digital Menu Board Hardware User Manual
 Network Digital Menu Board Hardware User Manual Manual Version DMA1 Safety Instructions Please keep the display away from any heat sources. Place the display in a stable and well-ventilated place. Please
EYEZONE B1080PAM. User Manual CONTENTS. Feb 24, 11
 EYEZONE B1080PAM User Manual CONTENTS 1. Package Contents...... 1 2. Introduction...... 1 3. Features 1 4. Hardware Overview..... 2 5. Remote Control.... 3 6. Using the B1080PAM...... 4 6.1 Start the B1080PAM.....
15" HD Digital Photo Frame
 15" HD Digital Photo Frame Table of Contents 2 SAFETY INFORMATION...3 PACKAGE CONTENTS...3 FEATURES...4 REMOTE...5 QUICK START...6-7 PHOTO PLAYBACK...8-9 MUSIC PLAYBACK...10-11 MOVIE PLAYBACK...12-13 CALENDAR...14
XEMIO-950 MP5 PLAYER / 4GB MEMORY / TOUCH SCREEN. For information and support,
 XEMIO-950 MP5 PLAYER / 4GB MEMORY / TOUCH SCREEN For information and support, www.lenco.eu To the customer: Thank you for purchasing this MP5 player. When opening the box for the first time, please check
IMPECCA DFM-1512 USER S MANUAL
 IMPECCA DFM-1512 USER S MANUAL Table of Contents Introduction... 3 Installing your Unit... 3 Connecting to a computer... 4 Using Your Remote Control... 5 Using Your Digital Photo Frame... 6 Browsing Images...
PCAP Multi Touch Screen Display with Dual OS User s Manual
 PCAP Multi Touch Screen Display with Dual OS User s Manual Manual Version AOE1.0 Safety Instructions Please keep the display away from any heat sources such as electric radiators or direct sunlight. Place
HELLOMOTO. contents MOTO U9
 HELLOMOTO MOTO U9 Feel It, See It, Hear It! Your MOTO U9 phone is made to be held, and made to be seen! Transfer your favorite quickly and easily with Microsoft Windows Media Player 11. Control playback
IR Freestanding Multi Touch Screen Display with Dual OS User s Manual
 IR Freestanding Multi Touch Screen Display with Dual OS User s Manual Manual Version LE2-T1.0 Safety Instructions Please keep the display away from any heat sources such as electric radiators or direct
Operation Manual Defender Car Vision 2020 HD Car DVR
 Operation Manual Defender Car Vision 2020 HD Car DVR 1 Thank you for buying Defender Car Vision 2020 HD car DVR. Before using the device read carefully this manual. mini-usb connector HDMI connector Function
Innovative K5 Palm Size LED Projector.
 Innovative K5 Palm Size LED Projector www.innovative.com.sg 1 CONTENT COMPONENTS OF PROJECTOR... 2 SPECIFICATIONS... 3 CHARGING THE PROJECTOR... 3 SET UP... 4 POWERING UP AND VIEWING MEDIA... 4 ADJUSTING
ADPF10XN Instruction Manual
 ADPF10XN Instruction Manual 1 ADPF10XN Digital Photo Frame User Guide Thank you for purchasing the ADPF10XN 10.4 digital photo frame (DPF). Before operating your new digital photo frame please carefully
III INDEX. Product List 1. Overview 1. Projector Specification 2. Basic Functions: 2. MP4 key functions description: 3.
 Version A I IMPORTANT This product is a micro projector with MP4 player function that can connect to mobile/iphone, MP4/iPod, PSP, PDA, DVD, PC/Notebook and other digital products which have video and
Overview 1. Foreword 2. Warnings
 Overview 1. Foreword Thank you for choosing our product. Please read this manual carefully before using the product. Specifications and software updates may be subject to change without notice. Some pictures
Hi-Res 8 Wi-Fi Digital Picture Frame with MP3 player Table of Contents
 Hi-Res 8 Wi-Fi Digital Picture Frame with MP3 player Table of Contents Before Using the Digital Picture Frame...3 Introduction...3 Features and Specs...3 Package contents...4 Digital Picture Frame Layout...5
MICRO 2+ USER MANUAL
 MICRO2+ USER MANUAL Wintal MICRO2+ USER MANUAL Contents BRIEF INTRODUCTION... 1 FEATURE... 1 BASIC PERFORMANCE... 1 PRODUCT DETAILS... 2 PACKING LIST... 2 FRONT VIEW... 2 BACK VIEW... 3 REMOTE CONTROL...
USER MANUAL
 USER MANUAL R emote C ontrol F unc tions Most of your television s functions are available via the menus that appear on the screen. The remote control supplied with your set can be used to navigate
Freestanding Infrared Multi Touch Screen Display. User s Manual. Manual Version LHD T1.0
 Freestanding Infrared Multi Touch Screen Display User s Manual Manual Version LHD T1.0 Our Full Product Range Page 1 Safety Instructions Please keep the display away from any heat sources such as radiators
Bringing memories to life!
 The moment keeps going Jackie on holidays - Great ocean road, Melbourne 15" Mirage Series Bringing memories to life! Product User Manual (Model No's: DF-F1504b & F1506t) 1. Welcome! Congratulations on
Features. Warnings and Precautions READ BEFORE OPERATING EQUIPMENT SAVE THESE INSTRUCTIONS
 SENTA Warnings and Precautions READ BEFORE OPERATING EQUIPMENT SAVE THESE INSTRUCTIONS To prevent damage to your radio or possible injury to you or others, read these safety precautions and instructions
 Glossary Warranty and support information Introduc tion ------------------------------------------------------------------------------ Safety instructions ----------------------------------------------------------------------
Complete User Guide. X1 Action Camera
 1 Complete User Guide X1 Action Camera x1 DISCOVER: ADVENTURE Contents Share your footage with us on social media #KBdiscover To view the entire Kaiser Baas product range visit: www.kaiserbaas.com Join
Mini Projector User s Guide with Integrated Multimedia Player
 Mini Projector User s Guide with Integrated Multimedia Player Please read this manual before Model P50M Table of Contents 1. Table of Contents---------------------------------1 2. Warnings-----------------------------------------2
19 32 Slimline High Definition Digital Advertising Display User s Manual
 19 32 Slimline High Definition Digital Advertising Display User s Manual Manual Version PF19-32HD2.0 Our Full Product Range Page 1 Safety Instructions Please keep the display away from any heat sources.
Sigma Simplicity Light & Café
 Sigma Simplicity Light & Café Digital Display Frame Issue 2 0 Contents Westomatic 12 Digital Display Frame User Guide ( Sigma Simplicity and Light ) Westomatic 12 Digital Display Frame User Guide... 2
Visual Land V TOUCH PRO
 Visual Land V TOUCH PRO Information in this manual are subject to change without notice. FEATURES 2.8 inch wide touch screen, 320X240 dot matrix full color high speed TFT screen Support MP3, WMA, RA, WAV
12.1 Digital Photo Frame
 12.1 Digital Photo Frame KGNDPFC12 Instruction Manual TABLE OF CONTENTS SAFETY INFORMATION. 1 PACKAGE CONTENTS....1 SPECIFICATION SUMMARY 2 DPF INTRODUCTION... 3 QUICK START.. 4 OPERATION GUIDE.. 5 Movie
DVR 520 / 1.8 Digital Video Recorder
 DVR 520 / 1.8 Digital Video Recorder User Manual 2010 Sakar International, Inc. All rights reserved. Windows and the Windows logo are registered trademarks of Microsoft Corporation. All other trademarks
TL240C Transparent Display User Manual
 TL240C Transparent Display User Manual Disclaimer BenQ Corporation makes no representations or warranties, either expressed or implied, with respect to the contents of this document. BenQ Corporation reserves
Before Operation. Basic Operation. Operating Instructions
 PF1501 14 Before Operation Basic Operation 2 3 3 6 6 7 Connect to PC 7 Operating Instructions Set-Up... 9 Selecting Which Media to View... 9 Viewing Photos... 9 Adjust Speed of Slideshow... 10 Adjust the
QPC80H2 Portable Visualizer. Quick Guide. This document is subject to change without notice.
 QPC80H2 Portable Visualizer Quick Guide This document is subject to change without notice. Contents Warnings... 1 Parts Identification... 2 Control Panel... 3 Remote Control... 4 Portable Visualizer...
705 INSTALLATION MANUAL
 705 INSTALLATION MANUAL 2 Table of Contents Features...03 Specifications...04 Quick - Start...05 Remote Control...07 Hardware Installation...10 705 Models Additional Info...14 Owner s Record...15 3 Features
Contents FCC COMPLIANCE STATEMENT PRECAUTIONS GETTING READY
 USER MANUAL Contents FCC COMPLIANCE STATEMENT PRECAUTIONS GETTING READY Package Contents Knowing the device BASIC OPERATIONS OF THE PROJECTOR Turning On/Off the Projector Adjusting Focus Resizing the Projection
English. If the time arises to throw away your product, please recycle all the components possible.
 Welcome: Thank you kindly for purchasing this fine product. Much investment in time and effort has gone into its development, and it is our hope that it will give you many years of trouble-free service.
MimioDisplay 550T, MimioDisplay 650T MimioDisplay 700T, and MimioDisplay 840T. MimioDisplay. Installation Guide. mimio.com
 MimioDisplay 550T, MimioDisplay 650T MimioDisplay 700T, and MimioDisplay 840T MimioDisplay Installation Guide Contents IMPORTANT SAFETY INSTRUCTIONS...3 Read these instructions carefully and keep them
High Definition AD Players. Universal User s Manual. L Series and PF Series
 High Definition AD Players Universal User s Manual L Series and PF Series Cautions 1. Do not install and use the unit in moisture, high temperature, outdoor, and closed environment. 2. Please turn off
RAVE MANUAL. 607 Series
 RAVE MANUAL 607 Series TABLE OF CONTENTS Table Of Contents Basic Features Caution Adding Files and Connecting Buttons Powering On/Off the Player Charging the Player Main Menu Music Video Pictures FM Radio
PRESTIGIO LIBRETTO. e-book Reader PER307.
 PRESTIGIO LIBRETTO e-book Reader PER307 www.prestigio.com Table of Contents Disclaimer 3 Introduction 3 Package Content 3 Getting Started 4 Charging the Reader 5 Power On/Off, Reset Device, Insert MicroSD
TL240C/TL321C Transparent Display User Manual
 TL240C/TL321C Transparent Display User Manual Disclaimer BenQ Corporation makes no representations or warranties, either expressed or implied, with respect to the contents of this document. BenQ Corporation
Quick Start Guide Use your phone for more than just talking
 Quick Start Guide Use your phone for more than just talking Music Player with 3D Stereo Sound Cellular Video 1.3 Megapixel Rotating Camera with Video Mobile Email Instant Messaging (IM) MEdia TM Net See
EYEZONE P User Manual. FCC Notices
 FCC Notices It s herewith confirmed to comply with the requirements of FCC Part 15 Rules. Operation is subject to the following two conditions: EYEZONE P102-6 User Manual This device may not cause harmful
10.1 HD Memory View Instruction Manual
 10.1 HD Memory View Instruction Manual Cautions Precautions and maintenance For indoor use only To avoid risk of fire or electric shock, do not expose the unit to moisture or condensation. To avoid overheating,
Help Guide MP-CL1A m. 120 inches. 2.3 m. 80 inches m. 40 inches. 3-MP Sony Corporation
 Help Guide MP-CL1A 3.45 m 120 inches 2.3 m 80 inches 1.15 m 40 inches 3-MP0-107-02 2016 Sony Corporation Parts and Controls CAUTION Do not point the laser light directly at eyes or people, nor look into
Multi-Function Digital Viewer
 Multi-Function Digital Viewer User Manual About this Manual Preface This manual describes how to get the most out of the Multi-Function Digital Viewer. You should read through this manual before using
Quick Start Guide Use your phone for more than just talking
 Quick Start Guide Use your phone for more than just talking Music Player with 3D Stereo Sound Cingular Video TM 1.3 Megapixel Rotating Camera with Video Mobile Email Instant Messaging (IM) MEdia TM Net
OPR 3040 PROJECTOR // PROJECTOR // PROJEKTOR // PROJECTEUR // MANUALE DELL UTENTE USER GEBRAUCHSANWEISUNG GEBRUIKSAANWIJZING INSTRUKCJA OBSŁUGI
 OPR 3040 PROJECTOR // PROJECTOR // PROJEKTOR // PROJECTEUR // USER GEBRAUCHSANWEISUNG MANUAL 1 GEBRUIKERSHANDLEIDING ΟΔΗΓIΕΣ ΧΡΗΣΗΣ 8 GEBRAUCHSANWEISUNG USER MANUAL 15 MODE MANUAL D EMPLOI DE INSTRUCCIONES
iq DIGITAL PICTURE FRAME iq Digital Picture Frame DPF701SB USER GUIDE
 iq Digital Picture Frame DPF701SB USER GUIDE 1 Table of Contents Important Safety Precautions... 3 Cleaning the LCD Screen... 3 Cleaning the Digital Picture Frame... 3 Introduction... 4 What s in the Box...
TABLE OF CONTENTS Chapter 1 Helpful Tips 3 Features 3 PC Requirements 4 Accessories 6 Basic Functions 7 Basic Operation 9
 User s Manual 1 TABLE OF CONTENTS Chapter 1 Helpful Tips 3 Features 3 PC Requirements 4 Accessories 6 Basic Functions 7 Basic Operation 9 Chapter 2 Music Mode 10 Movie Mode 15 Record Mode 17 Converting
USER MANUAL Digital Screen
 USER MANUAL Digital Screen RBDIG7 Cautions Precautions and Maintenance For indoor use only To avoid risk of fire or electric shock, do not expose the unit to moisture or condensation. To avoid overheating,
FOR FURTHER ASSISTANCE, PLEASE CALL:
 USER MANUAL Welcome Thank you for choosing TeeVee. To set up your TeeVee box and enjoy all of the features available with your device, please review the user manual. Follow all steps before using this
1020 / 1022 INSTALLATION MANUAL
 1020 / 1022 INSTALLATION MANUAL 2 Table of Contents Features...03 Specifications...04 Quick - Start...05 Remote Control...07 Hardware Installation...10 1020TSV, 1022TSV, 1020YV, 1022YV, 1020TSH, 1022TSH
USER MANUAL MINI WILDLIFE CAMERA
 USER MANUAL MINI WILDLIFE CAMERA INTRODUCTION Thank you for purchasing our mini wildlife camera. This device is a special camera designed specifically for recording and observing wildlife. These easy to
SC600W WIFI IP HIDDEN CAMERA
 USER MANUAL SC600W WIFI IP HIDDEN CAMERA 1 YEAR WARRANTY All RecorderGear brand products are backed by our 1 Year Warranty. For full details visit WWW.RECORDERGEAR.COM This Device is Compliant with USA
UJS 4000 Action Camera Manual
 UJS 4000 Action Camera Manual Warning 1. It is a high-precision product, do not fall or crash. 2. Do not expose the unit to strong magnetic objects, such as magnet and electrical motor. Avoid strong radio
TV1 Digital Player User s Manual
 TV1 Digital Player User s Manual Note: Screen shots taken in this manual may appear different on the player itself. Table of Content: Computer System requirements... 1 Notes... 2 Product Introduction...
DVR 560HD Digital Video Recorder
 DVR 560HD Digital Video Recorder User Manual 2010 Sakar International, Inc. All rights reserved. Windows and the Windows logo are registered trademarks of Microsoft Corporation. All other trademarks are
DVR 710HDv2 Digital Video Recorder
 DVR 710HDv2 Digital Video Recorder User Manual 2009-2011 Sakar International, Inc. All rights reserved. Windows and the Windows logo are registered trademarks of Microsoft Corporation. All other trademarks
MOTO MOTOSTA MOTOST RT ART
 MOTOSLVR L72 MOTOSTART essentials Note: Before using your phone for the first time, be sure to review the important safety information in the user's guide. Periodically review this information so you
ipod classic User Guide
 ipod classic User Guide Contents 4 Chapter 1: ipod classic Basics 5 ipod classic at a glance 5 Using ipod classic controls 7 Disabling ipod classic controls 8 Using ipod classic menus 8 Adding or removing
55" 10-point Multi-touch Commercial Display
 55" 10-point Multi-touch Commercial Display CDM5500T 24 hours a day 7 days a week operations Built-in Quad Core Media Player with 16GB Storage Embedded LAN and Wi-Fi Internal Scheduler Content Management
MP3 HARD DISK. User Manual V1.0
 User Manual V1.0 Contents Before Using the Product 1 Introduction 1 System Requirements 1 Charging the Battery 2 Transferring Music Files 3 Music File Transferring Example 4 Basic Functions 5 Components
USER MANUAL. Please read this user manual carefully before using your unit.
 USER MANUAL MULTIMEDIA LED PROJECTOR Please read this user manual carefully before using your unit. CONTENTS Contents...1 Caution... 2 What's in the box...3 Product Introduction...4 Remote Control Introduction...5