Adafruit Speaker Bonnet for Raspberry Pi
|
|
|
- Colin West
- 6 years ago
- Views:
Transcription

1 Adafruit Speaker Bonnet for Raspberry Pi Created by lady ada Last updated on :16:12 PM UTC
2 Guide Contents Guide Contents Overview Assembly And Solder! Pinouts Power Supply 5V 2.4A Switching Power Supply with 20AWG MicroUSB Cable 5V 4A (4000mA) switching power supply - UL Listed MicroUSB Plug to 5.5/2.1mm DC Barrel Jack Adapter I2S Audio Data Pins Speaker Outputs Stereo Enclosed Speaker Set - 3W 4 Ohm Speaker - 3" Diameter - 4 Ohm 3 Watt Speaker - 3" Diameter - 8 Ohm 1 Watt Medium Surface Transducer with Wires - 4 Ohm 3 Watt Raspberry Pi Setup Fast Install Detailed Install Update /etc/modprobe.d (if it exists) Disable headphone audio (if it's set) Create asound.conf file Add Device Tree Overlay Raspberry Pi Test Speaker Tests! Simple white noise speaker test Simple WAV speaker test Simple MP3 speaker test Volume adjustment I2S Tweaks Reducing popping Step 1 Add software volume control I2S Audio FAQ Adafruit Industries Page 2 of 32
3 Play Audio with PyGame Install PyGame Run Demo Downloads Datasheets & Files Schematic Fabrication Print Adafruit Industries Page 3 of 32
 It's the exact same size as a Raspberry Pi Zero but works with any and all Raspberry Pi computers with a 2x20 connector - A+, B+, Zero, Pi 2, Pi 3, etc.")
4 Overview Hey Mr. DJ! Turn up that Raspberry Pi mix to the max with this cute 3W Stereo Amplifier Bonnet for Raspberry Pi. (It's not big enough to be an official HAT, so we called it a bonnet, you see?) It's the exact same size as a Raspberry Pi Zero but works with any and all Raspberry Pi computers with a 2x20 connector - A+, B+, Zero, Pi 2, Pi 3, etc. We've tested it out with Raspbian (the offical operating system) and Retropie. This Bonnet uses I2S a digital sound standard, so you get really crisp audio. The digital data goes right into the amplifier so there's Adafruit Industries Page 4 of 32

5 no static like you hear from the headphone jack. And it's super easy to get started. Just plug in any 4 to 8 ohm speakers, up to 3 Watts, run our installer script on any Raspberry Pi, reboot and you're ready to jam! Each order comes as a fully assembled PCB with a 2x20 header and 2x terminal blocks. Some light soldering is required to attach the header onto PCB so you can plug it into your Raspberry Pi. Once that's done either plug one of our enclosed speaker sets ( right into the JST jack in the middle or you can solder the terminal blocks in and then connect any speaker you like. Don't forget to make sure you have a good strong 5V power supply - especially if you're using the 3W 4 ohm speakers! Our 2.4A power plug is recommended ( Adafruit Industries Page 5 of 32

6 Assembly Place the 2x20 female header in so the connector is on the bottom. To make it easier to keep it in place, you can use some tape. Tacky clay also works, whatever you've got handy! Adafruit Industries Page 6 of 32


7 And Solder! Be sure to solder all pins for reliable electrical contact. (For tips on soldering, be sure to check out our Guide to Excellent Soldering ( Start by soldering the first row of header Adafruit Industries Page 7 of 32


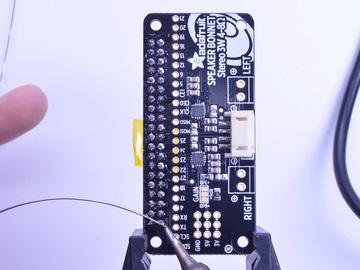
8 Now flip around and solder the other row completely Adafruit Industries Page 8 of 32


9 You're done with the header strips. Check your solder joints visually and continue onto the next steps Next we will solder in the 2 3.5mm terminal blocks used to connect speakers to the Speaker Bonnet. Make sure the open parts of the terminals face outwardsso you can easily connect wires. To make it easier to keep these in place, you can use some tape to hold down the two header pieces. Tacky clay also works, whatever you've got handy! Adafruit Industries Page 9 of 32


10 Solder in each block, make sure you get to each of the 4 pins Now that you're done with the terminal blocks, check your work make sure that each solder joint is done and looks shiny OK you're done! Adafruit Industries Page 10 of 32


11 Pinouts Power Supply The two amplifier chips use the 3V + 5V + GND power pin at the 'top' of the 2x20 header. If using 3W speakers, you can draw a significant amount of current, over 1.5 Amps! Make sure you power your Pi with a good wall adapter like our 2.4A microusb power plug. 5V 2.4A Switching Power Supply with 20AWG MicroUSB Cable PRODUCT ID: 1995 Our all-in-one 5V 2.4 Amp + MicroUSB cable power adapter is the perfect choice for powering single-board computers like Raspberry Pi, BeagleBone or anything else that's power hungry!... $7.50 OUT OF STOCK Alternatively, if you really need a lot of power, use a 5V 4A power adapter and then a DC to micro USB adapter Adafruit Industries Page 11 of 32


12 5V 4A (4000mA) switching power supply - UL Listed PRODUCT ID: 1466 Need a lot of 5V power? This switching supply gives a clean regulated 5V output at up to 4 Amps (4000mA). 110 or 240 input, so it works in any country. The plugs are "US 2-prong" style so... $14.95 IN STOCK MicroUSB Plug to 5.5/2.1mm DC Barrel Jack Adapter PRODUCT ID: 2727 The premise of this MicroUSB Plug to 5.5/2.1mm Jack adapter is simple. There's a MicroUSB plug on one end and a 5.5mm/2.1mm DC barrel jack with center positive polarity on... $1.95 IN STOCK I2S Audio Data Pins Adafruit Industries Page 12 of 32

13 The Bonnet uses 3 data pins and they cannot be changed! Pins #18, #19 and #21 are used. All other pins are available Speaker Outputs This is the fun part, you get stereo output - one left and one right channel. Each one is Bridge-Tied-Load so do not connect both outputs together to get more volume! You can use the JST 4-pin plug in the center if you're going to just plug in one of our enclosed speaker kits: Stereo Enclosed Speaker Set - 3W 4 Ohm PRODUCT ID: 1669 Listen up! This set of two 2.8" x 1.2" speakers are the perfect addition to any audio project where you need 4 ohm impedance and Adafruit Industries Page 13 of 32


14 3W or less of power. We particularly like these... $7.50 IN STOCK OR You can use the terminal block spots on the left & right to connect regular speaker cones. You'll need to solder wires on and such but this way you can use whatever speaker you like! We suggest 8 ohm 1W or 4 ohm 3W. For louder audio, but more power usage, use the 4 ohm speakers. For quieter audio, but less power usage, use the 8 ohm speakers Speaker - 3" Diameter - 4 Ohm 3 Watt PRODUCT ID: 1314 Listen up! This 3" diameter speaker cone is the perfect addition to any audio project where you need an 4 ohm impedance and 3W or less of power. We particularly like this cone as it... $1.95 OUT OF STOCK Speaker - 3" Diameter - 8 Ohm 1 Watt PRODUCT ID: 1313 Listen up! This 3" diameter speaker cone is the perfect addition to any audio project where you need an 8 ohm impedance and 1W or less of power. We particularly like this cone as it... $1.95 OUT OF STOCK You can also use other 'audio' devices like sonic transducers! These are devices you can put down onto a surface like a table, to make it into a speaker. Adafruit Industries Page 14 of 32

15 Medium Surface Transducer with Wires - 4 Ohm 3 Watt PRODUCT ID: 1785 Turn any surface/wall/table etc into a speaker with a surface transducer. This type of speaker does not have a moving cone like most speakers you've seen. Instead, a small metal rod... $14.95 OUT OF STOCK Adafruit Industries Page 15 of 32

16 Raspberry Pi Setup At this time, Jessie Raspbery Pi kernel does not support mono audio out of the I2S interface, you can only play stereo, so any mono audio files may need conversion to stereo! Fast Install Luckily its quite easy to install support for I2S DACs on Raspbian Jessie. These instructions are totally cribbed from the PhatDAC instructions at the lovely folks at Pimoroni!( Run the following from your Raspberry Pi with Internet connectivity: curl -ss bash You will need to reboot once installed. You must reboot to enable the speaker hardware! After rebooting, log back in and re-run the script again...it will ask you if you want to test the speaker. Say yes and listen for audio to come out of your speakers... Adafruit Industries Page 16 of 32

17 In order to have volume control appear in Raspbian desktop or Retropie you must reboot a second time after doing the speaker test, with sudo reboot You can then go to the next page on testing and optimizing your setup. Skip the rest of this page on Detailed Installation if the script worked for you! Detailed Install If, for some reason, you can't just run the script and you want to go through the install by hand - here's all the steps! Update /etc/modprobe.d (if it exists) Log into your Pi and get into a serial console (either via a console cable, the TV console, RXVT, or what have you) Edit the raspi blacklist with sudo nano /etc/modprobe.d/raspi-blacklist.conf If the file is empty, just skip this step However, if you see the following lines: blacklist i2c-bcm2708 blacklist snd-soc-pcm512x blacklist snd-soc-wm8804 Adafruit Industries Page 17 of 32

18 Update the lines by putting a # before each line Save by typing Control-X Y <return> Disable headphone audio (if it's set) Edit the raspi modules list with sudo nano /etc/modules If the file is empty, just skip this step However, if you see the following line: snd_bcm2835 Adafruit Industries Page 18 of 32

19 Put a # in front of it and save with Control-X Y <return> Create asound.conf file Edit the raspi modules list with sudo nano /etc/asound.conf This file ought to be blank! Copy and paste the following text into the file pcm.speakerbonnet { type hw card 0 pcm.dmixer { type dmix ipc_key 1024 ipc_perm 0666 slave { pcm "speakerbonnet" Adafruit Industries Page 19 of 32
20 period_time 0 period_size 1024 buffer_size 8192 rate channels 2 ctl.dmixer { type hw card 0 pcm.softvol { type softvol slave.pcm "dmixer" control.name "PCM" control.card 0 ctl.softvol { type hw card 0 pcm.!default { type plug slave.pcm "softvol" Save the file as usual Add Device Tree Overlay Edit your Pi configuration file with sudo nano /boot/config.txt And scroll down to the bottom. If you see a line that says: dtparam=audio=on Adafruit Industries Page 20 of 32

21 Disable it by putting a # in front. Then add: dtoverlay=hifiberry-dac dtoverlay=i2s-mmap on the next line. Save the file. Reboot your Pi with sudo reboot Adafruit Industries Page 21 of 32
22 Raspberry Pi Test Speaker Tests! OK you can use whatever software you like to play audio but if you'd like to test the speaker output, here's some quick commands that will let you verify your amp and speaker are working as they should! Simple white noise speaker test Run speaker-test -c2 to generate white noise out of the speaker, alternating left and right. Since the I2S amp merges left and right channels, you'll hear continuous white noise Simple WAV speaker test Once you've got something coming out, try to play an audio file with speaker-test (for WAV files, not MP3) speaker-test -c2 --test=wav -w /usr/share/sounds/alsa/front_center.wav You'll hear audio coming from left and right alternating speakers Simple MP3 speaker test If you want to play a stream of music, you can try sudo apt-get install -y mpg123 mpg123 If you want to play MP3's on command, check out this tutorial which covers how to set that up( At this time, Jessie Raspbery Pi kernel does not support mono audio out of the I2S interface, you can only play stereo, so any mono audio files may need conversion to stereo! Volume adjustment Many programs like PyGame and Sonic Pi have volume control within the application. For other programs you can set the volume using the command line tool called alsamixer. Just type alsamixer in and then use the up/down arrows to set the volume. Press Escape once its set Adafruit Industries Page 22 of 32

23 In Raspbian PIXEL you can set the volume using the menu item control. If it has an X through it, try restarting the Pi (you have to restart twice after install to get PIXEL to recognize the volume control Adafruit Industries Page 23 of 32
24 I2S Tweaks Reducing popping For people who followed our original installation instructions with the simple alsa config, they may find that the I2S audio pops when playing new audio. The workaround is to use a software mixer to output a fixed sample rate to the I2S device so the bit clock does not change. I use ALSA so I configured dmixer and I no longer have any pops or clicks. Note that the RaspPi I2S driver does not support dmixer by default and you must follow these instructions provided ( to add it. Continue on for step-by-step on how to enable it! Step 1 Start by modify /boot/config.txt to adddtoverlay=i2s-mmap Run sudo nano /boot/config.txt and add the text to the bottom like so: Save and exit. Then change /etc/asound.conf to: pcm.speakerbonnet { type hw card 0 pcm.!default { type plug slave.pcm "dmixer" pcm.dmixer { type dmix ipc_key 1024 ipc_perm 0666 slave { pcm "speakerbonnet" period_time 0 period_size 1024 buffer_size 8192 rate channels 2 ctl.dmixer { Adafruit Industries Page 24 of 32
25 type hw card 0 By running sudo nano /etc/asound.conf This creates a PCM device called speakerbonnet which is connected to the hardware I2S device. Then we make a new 'dmix' device (type dmix) called pcm.dmixer. We give it a unique Inter Process Communication key (ipc_key 1024) and permissions that are world-read-writeable (ipc_perm 0666) The mixer will control the hardware pcm device speakerbonnet (pcm "speakerbonnet") and has a buffer set up so its nice and fast. The communication buffer is set up so there's no delays (period_time 0, period_size 1024 and buffer_size 8192 work well). The default mixed rate is 44.1khz stereo (rate channels 2) Finally we set up a control interface but it ended up working best to just put in the hardware device here ctl.dmixer - { type hw card 0 Save and exit. Then reboot the Pi to enable the mixer. Also, while it will greatly reduce popping, you still may get one once in a while - especially when first playing audio! Add software volume control The basic I2S chipset used here does not have software control built in. So we have to 'trick' the Pi into creating a software volume control. Luckily, its not hard once you know how to do it( Create a new audio config file in ~/.asoundrc with nano ~/.asoundrc and inside put the following text: pcm.speakerbonnet { type hw card 0 pcm.dmixer { type dmix ipc_key 1024 ipc_perm 0666 slave { pcm "speakerbonnet" period_time 0 period_size 1024 buffer_size 8192 rate channels 2 Adafruit Industries Page 25 of 32
26 ctl.dmixer { type hw card 0 pcm.softvol { type softvol slave.pcm "dmixer" control.name "PCM" control.card 0 ctl.softvol { type hw card 0 pcm.!default { type plug slave.pcm "softvol" This assumes you set up the dmixer for no-popping above! Save and exit Now, here's the trick, you have to reboot, then play some audio through alsa, then reboot to get the alsamixer to sync up right: speaker-test -c2 --test=wav -w /usr/share/sounds/alsa/front_center.wav Then you can type alsamixer to control the volume with the 'classic' alsa mixing interface Adafruit Industries Page 26 of 32
27 Just press the up and down arrows to set the volume, and ESC to quit Adafruit Industries Page 27 of 32
28 I2S Audio FAQ Hey in Raspbian Pixel desktop, the speaker icon is X'd out! Try rebooting once after playing some audio. Also make sure you have our latest alsa configuration (check the detailed install page on the Raspberry Pi Setup page for the /etc/asound.conf! If its still not working, you can still change the volume, just use alsamixer from a Terminal command prompt. Even with dmixer enabled, I get a staticy-pop when the Pi first boots or when it first starts playing audio Yep, this is a known Raspbian Linux thing. Yay Linux! We don't have a fix for it. If it makes you feel better, my fancy Windows development computer does the same thing with my desktop speakers. Does this work with my favorite software? It will work with anything that has alsa audio support. There's thousands of linux programs so we can't guarantee all of them will work but here's what we found does for sure! PyGame - see our page on playing audio with PyGame ( for example code. Volume can be controlled within pygame mpg123 - command line mp3 audio playback. use alsamixer to control the volume aplay - for playing wav files on the command line Sonic Pi - tested in the Pixel Desktop. Use the Sonic Pi settings panel to change the volume - it does not seem to care about what global audio volume you set! Scratch 2 - tested in the Pixel Desktop. Works fine but may have a delay and make a popping sound the first time you play audio. You can set volume with alsamixer and also via the app by using the set volume to nn% block Scratch 1 - doesn't work, something not set up with Scratch 1 to use alsa? RetroPie/Emulation Station - audio works within games (we tested NES and MAME libretro) but does not work in the 'main screen' (selecting which game to play interface) Adafruit Industries Page 28 of 32
29 Play Audio with PyGame You can use mpg123 for basic testing but it's a little clumsy for use where you want to dynamically change the volume or have an interactive program. For more powerful audio playback we suggest using PyGame to playback a variety of audio formats (MP3 included!) Install PyGame Start by installing pygame support, you'll need to open up a console on your Pi with network access and run: sudo apt-get install python-pygame Next, download this pygame example zip to your Pi Click to download PyGame example code & sample mp3s On the command line, run wget ( unzip pygame_example.zip ( Run Demo Inside the zip is an example called pygamemp3.py This example will playback all MP3's within the script's folder. To demonstrate that you can also adjust the volume within pygame, the second argument is the volume for playback. Specify a volume to playback with a command line argument between 0.0 and 1.0 For example here is how to play at 75% volume: python pygamemp3.py 0.75 Here's the code if you have your own mp3s! ''' pg_midi_sound101.py play midi music files (also mp3 files) using pygame tested with Python273/331 and pygame192 by vegaseat ''' #code modified by James DeVito from here: #!/usr/bin/python import sys import pygame as pg import os import time def play_music(music_file): ''' stream music with mixer.music module in blocking manner this will stream the sound from disk while playing ''' clock = pg.time.clock() try: pg.mixer.music.load(music_file) print("music file { loaded!".format(music_file)) except pygame.error: Adafruit Industries Page 29 of 32
30 print("file { not found! {".format(music_file, pg.get_error())) return pg.mixer.music.play() # If you want to fade in the audio... # for x in range(0,100): # pg.mixer.music.set_volume(float(x)/100.0) # time.sleep(.0075) # # check if playback has finished while pg.mixer.music.get_busy(): clock.tick(30) freq = # audio CD quality bitsize = -16 # unsigned 16 bit channels = 2 # 1 is mono, 2 is stereo buffer = 2048 # number of samples (experiment to get right sound) pg.mixer.init(freq, bitsize, channels, buffer) if len(sys.argv) > 1: try: user_volume = float(sys.argv[1]) except ValueError: print "Volume argument invalid. Please use a float ( )" pg.mixer.music.fadeout(1000) pg.mixer.music.stop() raise SystemExit print("playing at volume: " + str(user_volume)+ "\n") pg.mixer.music.set_volume(user_volume) mp3s = [] for file in os.listdir("."): if file.endswith(".mp3"): mp3s.append(file) print mp3s for x in mp3s: try: play_music(x) time.sleep(.25) except KeyboardInterrupt: # if user hits Ctrl/C then exit # (works only in console mode) pg.mixer.music.fadeout(1000) pg.mixer.music.stop() raise SystemExit else: print("please specify volume as a float! ( )") Adafruit Industries Page 30 of 32
31 Downloads Datasheets & Files MAX98357 Datasheet ( EagleCAD PCB files ( Fritzing object in Adafruit Fritzing library ( Schematic Fabrication Print Dims in mm Adafruit Industries Page 31 of 32

32 Adafruit Industries Last Updated: :16:11 PM UTC Page 32 of 32
Adafruit I2S Audio Bonnet for Raspberry Pi Created by lady ada. Last updated on :04:10 PM UTC
 Adafruit I2S Audio Bonnet for Raspberry Pi Created by lady ada Last updated on 2019-03-12 05:04:10 PM UTC Overview Add some easy-listenin' tunes to your Raspberry Pi using this basic audio bonnet. It'll
Adafruit MAX98357 I2S Class-D Mono Amp
 Adafruit MAX98357 I2S Class-D Mono Amp Created by lady ada Last updated on 2018-02-09 12:43:07 AM UTC Guide Contents Guide Contents Overview Pinouts Speaker Output Power Pins I2S Pins Other Pins Gain SD
Adafruit I2S Stereo Decoder - UDA1334A
 Adafruit I2S Stereo Decoder - UDA1334A Created by lady ada Last updated on 2017-11-27 10:57:29 PM UTC Guide Contents Guide Contents Overview Pinouts Power Pins I2S Pins Audio Outputs Optional Control Pins
Adafruit MAX98357 I2S Class-D Mono Amp
 Adafruit MAX98357 I2S Class-D Mono Amp Created by lady ada Last updated on 2016-06-14 02:09:38 PM EDT Guide Contents Guide Contents Overview Pinouts Speaker Output Power Pins I2S Pins Other Pins Gain SD
USB Audio Cards with a Raspberry Pi
 USB Audio Cards with a Raspberry Pi Created by lady ada Last updated on 2017-07-15 12:17:57 AM UTC Guide Contents Guide Contents Instructions Pre-requisites Figure out your chipset Figure out your chipset
Adafruit PiUART - USB Console and Power Add-on for Raspberry Pi
 Adafruit PiUART - USB Console and Power Add-on for Raspberry Pi Created by lady ada Last updated on 2017-08-29 10:20:23 PM UTC Guide Contents Guide Contents Overview Pinouts Enabling Serial Console Option
Adding a Real Time Clock to Raspberry Pi
 Adding a Real Time Clock to Raspberry Pi Created by lady ada Last updated on 2016-11-03 01:44:48 AM UTC Guide Contents Guide Contents Overview Wiring the RTC Adafruit DS1307 Real Time Clock Assembled Breakout
Adafruit DPI Display Kippah
 Adafruit DPI Display Kippah Created by lady ada Last updated on 2018-08-22 03:47:33 PM UTC Guide Contents Guide Contents Overview Installation Connect Display Update & Upgrade Install and Try raspi-gpio
Adafruit VL53L0X Time of Flight Micro-LIDAR Distance Sensor Breakout
 Adafruit VL53L0X Time of Flight Micro-LIDAR Distance Sensor Breakout Created by lady ada Last updated on 2016-12-05 06:40:45 PM UTC Guide Contents Guide Contents Overview Sensing Capablities Pinouts Power
Adafruit PowerBoost Charger
 Adafruit PowerBoost 500 + Charger Created by lady ada Last updated on 2017-06-01 04:08:36 PM UTC Guide Contents Guide Contents Overview Pinouts Power Pins Control Pins LEDs Battery and USB connection On/Off
Adafruit Terminal Block Breakout FeatherWing
 Adafruit Terminal Block Breakout FeatherWing Created by lady ada Last updated on 2017-01-04 04:53:26 AM UTC Guide Contents Guide Contents Overview Pinouts Assembly Downloads Datasheets & Files Schematic
Adafruit Powerboost 1000 Basic
 Adafruit Powerboost 1000 Basic Created by lady ada Last updated on 2018-08-22 03:42:57 PM UTC Guide Contents Guide Contents Overview Pinouts Power Pins Control Pins (https://adafru.it/dlz)leds Battery
Adafruit PiOLED - 128x32 Mini OLED for Raspberry Pi
 Adafruit PiOLED - 128x32 Mini OLED for Raspberry Pi Created by lady ada Last updated on 2017-06-02 04:28:36 AM UTC Guide Contents Guide Contents Overview Usage Step 1. Dependencies Step 2. Enable i2c Step
Adafruit PowerBoost Charger
 Adafruit PowerBoost 500 + Charger Created by lady ada Last updated on 2015-10-21 12:44:24 PM EDT Guide Contents Guide Contents Overview Pinouts Power Pins Control Pins LEDs Battery and USB connection On/Off
Adafruit DPI Display Kippah
 Adafruit DPI Display Kippah Created by lady ada Last updated on 2016-10-01 06:36:56 PM UTC Guide Contents Guide Contents Overview Installation Connect Display Update & Upgrade Install and Try raspi-gpio
Adafruit I2S MEMS Microphone Breakout
 Adafruit I2S MEMS Microphone Breakout Created by lady ada Last updated on 2017-04-03 08:44:00 PM UTC Guide Contents Guide Contents Overview Assembly Prepare the header strip: Add the breakout board: And
IES-PI-HIFI Quick Start Guide
 IES-PI-HIFI Quick Start Guide Connection: The PIFI should be connected to the Raspberry-Pi board using the supplied USB A to Micro B cable (or to a different platform / PC using a standard USB A to Micro
Adafruit Powerboost 1000C
 Adafruit Powerboost 1000C Created by lady ada Last updated on 2017-03-10 08:56:30 PM UTC Guide Contents Guide Contents Overview Pinouts Power Pins Control Pins LEDs Battery and USB connection Assembly
Adafruit HMC5883L Breakout - Triple-Axis Magnetometer Compass Sensor
 Adafruit HMC5883L Breakout - Triple-Axis Magnetometer Compass Sensor Created by lady ada Last updated on 2016-09-14 07:05:05 PM UTC Guide Contents Guide Contents Overview Pinouts Assembly Prepare the header
Adafruit 20W Stereo Audio Amplifier - MAX9744
 Adafruit 20W Stereo Audio Amplifier - MAX9744 Created by lady ada Last updated on 2017-07-14 06:10:43 AM UTC Guide Contents Guide Contents Overview Pinouts Power connections Audio Inputs Speaker outputs
Adafruit 20W Stereo Audio Amplifier - MAX9744
 Adafruit 20W Stereo Audio Amplifier - MAX9744 Created by lady ada Last updated on 2015-09-14 05:12:41 PM EDT Guide Contents Guide Contents Overview Pinouts Power connections Audio Inputs Speaker outputs
Adafruit Metro Mini. Created by lady ada. Last updated on :12:28 PM UTC
 Adafruit Metro Mini Created by lady ada Last updated on 2018-01-24 08:12:28 PM UTC Guide Contents Guide Contents Overview Pinouts USB & Serial converter Microcontroller & Crystal LEDs Power Pins & Regulators
Adafruit BME280 Humidity + Barometric Pressure + Temperature Sensor Breakout
 Adafruit BME280 Humidity + Barometric Pressure + Temperature Sensor Breakout Created by lady ada Last updated on 2017-01-11 09:01:04 PM UTC Guide Contents Guide Contents Overview Pinouts Power Pins: SPI
Adafruit DS3231 Precision RTC Breakout
 Adafruit DS3231 Precision RTC Breakout Created by lady ada Last updated on 2016-02-05 04:43:25 PM EST Guide Contents Guide Contents Overview Pinouts Power Pins: I2C Logic pins: Other Pins: Assembly Prepare
Adafruit MAX31865 RTD PT100 or PT1000 Amplifier
 Adafruit MAX31865 RTD PT100 or PT1000 Amplifier Created by lady ada Last updated on 2017-12-02 12:08:40 AM UTC Guide Contents Guide Contents Overview Pinouts Power Pins: SPI Logic pins: Sensor Terminal
Adafruit NFC/RFID on Raspberry Pi
 Adafruit NFC/RFID on Raspberry Pi Created by Kevin Townsend Last updated on 2018-08-22 03:31:24 PM UTC Guide Contents Guide Contents Overview Freeing UART on the Pi Step One: Run raspi-conf Step Two: Disable
Cabinet features. Display features. Picade X HAT features
 Picade PIM305 The ultimate desktop retro arcade machine! Picade is a Raspberry Pi-powered mini arcade that you build yourself, with authentic arcade controls, a high resolution 4:3 display that's ideal
Adafruit BME280 Humidity + Barometric Pressure + Temperature Sensor Breakout
 Adafruit BME280 Humidity + Barometric Pressure + Temperature Sensor Breakout Created by lady ada Last updated on 2018-08-22 03:49:22 PM UTC Guide Contents Guide Contents Overview Pinouts Power Pins: SPI
2.2" TFT Display. Created by lady ada. Last updated on :19:15 PM UTC
 2.2" TFT Display Created by lady ada Last updated on 2017-12-22 11:19:15 PM UTC Guide Contents Guide Contents Overview Pinouts Assembly Arduino Wiring Arduino UNO or Compatible Wiring Wiring for Other
Adafruit 5" and 7" 800x480 TFT HDMI Backpack
 Adafruit 5" and 7" 800x480 TFT HDMI Backpack Created by lady ada Last updated on 2017-10-22 09:01:29 PM UTC Guide Contents Overview Pinouts EDID EEPROM Port Backlight Control Power Output Raspberry Pi
Adafruit BMP280 Barometric Pressure + Temperature Sensor Breakout
 Adafruit BMP280 Barometric Pressure + Temperature Sensor Breakout Created by lady ada Last updated on 2017-12-09 06:21:37 PM UTC Guide Contents Guide Contents Overview Pinouts Power Pins: SPI Logic pins:
Adafruit Ultimate GPS on the Raspberry Pi
 Adafruit Ultimate GPS on the Raspberry Pi Created by Kevin Townsend Last updated on 2017-07-28 03:08:38 PM UTC Guide Contents Guide Contents Introduction What you'll need: Setting Everything Up Hooking
Adafruit Mini TFT " 160x80
 Adafruit Mini TFT - 0.96" 160x80 Created by lady ada Last updated on 2017-07-14 05:24:22 AM UTC Guide Contents Guide Contents Overview Pinouts Assembly Prepare the header strip: Add the board: And Solder!
Adafruit NFC/RFID on Raspberry Pi
 Adafruit NFC/RFID on Raspberry Pi Created by Kevin Townsend Last updated on 2016-11-03 06:36:54 AM UTC Guide Contents Guide Contents Overview Freeing UART on the Pi Step One: Run raspi-conf Step Two: Disable
Adafruit HTU21D-F Temperature & Humidity Sensor
 Adafruit HTU21D-F Temperature & Humidity Sensor Created by lady ada Last updated on 2014-07-26 01:30:08 PM EDT Guide Contents Guide Contents Overview Pinouts Power Pins: I2C Logic pins: Assembly Prepare
Adafruit 1-Wire Thermocouple Amplifier - MAX31850K
 Adafruit 1-Wire Thermocouple Amplifier - MAX31850K Created by lady ada Last updated on 2018-08-22 03:40:09 PM UTC Guide Contents Guide Contents Overview Pinouts Power Pins Address Pins Data Pin Themocouple
Grand Central Soundboard in Ten Minutes Created by Mike Barela. Last updated on :11:24 PM UTC
 Grand Central Soundboard in Ten Minutes Created by Mike Barela Last updated on 2019-04-04 07:11:24 PM UTC Overview The Adafruit Grand Central is arguably one of the most feature-rich boards Adafruit produces.
Adafruit HUZZAH32 - ESP32 Feather
 Adafruit HUZZAH32 - ESP32 Feather Created by lady ada Last updated on 2017-09-03 05:32:24 PM UTC Guide Contents Guide Contents Overview Pinouts Power Pins Logic pins Serial pins I2C & SPI pins GPIO & Analog
Adafruit SHT31-D Temperature & Humidity Sensor Breakout
 Adafruit SHT31-D Temperature & Humidity Sensor Breakout Created by lady ada Last updated on 2016-09-16 07:45:55 PM UTC Guide Contents Guide Contents Overview Pinouts Power Pins: I2C Logic pins: Other Pins:
Adafruit's Raspberry Pi Lesson 6. Using SSH
 Adafruit's Raspberry Pi Lesson 6. Using SSH Created by Simon Monk Last updated on 2017-08-16 01:12:07 AM UTC Guide Contents Guide Contents Overview Enabling SSH Using a blank boot file Using Raspi-Config
Adafruit's Raspberry Pi Lesson 1. Preparing an SD Card for your Raspberry Pi
 Adafruit's Raspberry Pi Lesson 1. Preparing an SD Card for your Raspberry Pi Created by Simon Monk Last updated on 2016-12-03 03:20:15 AM UTC Guide Contents Guide Contents Overview You Will Need Downloading
Adafruit MAX31865 RTD PT100 or PT1000 Amplifier
 Adafruit MAX31865 RTD PT100 or PT1000 Amplifier Created by lady ada Last updated on 2018-08-22 03:57:30 PM UTC Guide Contents Guide Contents Overview Pinouts Power Pins: SPI Logic pins: Sensor Terminal
Adafruit BME680. Created by lady ada. Last updated on :10:23 AM UTC
 Adafruit BME680 Created by lady ada Last updated on 2018-01-22 05:10:23 AM UTC Guide Contents Guide Contents Overview Pinouts Power Pins: SPI Logic pins: I2C Logic pins: Assembly Prepare the header strip:
Experimental Procedure. Frequently Asked Questions (FAQ) Kit General Questions. Setting Up and Using Your Raspberry Pi Projects Kit
 Kit General Questions. Setting Up and Using Your Raspberry Pi Projects Kit") 1 of 11 9/13/2018, 2:31 PM https://www.sciencebuddies.org/science-fair-projects/project-ideas/compsci_p059/computer-science/design-your-own-video-game (http://www.sciencebuddies.org/science-fairprojects/project-ideas/compsci_p059/computer-science/design-your-own-video-game)
1 of 11 9/13/2018, 2:31 PM https://www.sciencebuddies.org/science-fair-projects/project-ideas/compsci_p059/computer-science/design-your-own-video-game (http://www.sciencebuddies.org/science-fairprojects/project-ideas/compsci_p059/computer-science/design-your-own-video-game)
Adafruit Ultimate GPS on the Raspberry Pi
 Adafruit Ultimate GPS on the Raspberry Pi Created by Kevin Townsend Last updated on 2016-03-28 04:33:14 PM EDT Guide Contents Guide Contents Introduction What you'll need: Setting Everything Up Hooking
Introducting Itsy Bitsy 32u4
 Introducting Itsy Bitsy 32u4 Created by lady ada Last updated on 2018-01-03 05:47:20 AM UTC Guide Contents Guide Contents Overview Pinouts Which do you have? Power Pins Adafruit Pro Trinket LiIon/LiPoly
Zero2Go. User Manual (revision 1.03) Wide Input Range Power Supply for Your Raspberry Pi. Copyright 2017 UUGear s.r.o. All rights reserved.
 Wide Input Range Power Supply for Your Raspberry Pi. Copyright 2017 UUGear s.r.o. All rights reserved.") Zero2Go Wide Input Range Power Supply for Your Raspberry Pi User Manual (revision 1.03) Copyright 2017 UUGear s.r.o. All rights reserved. Table of Content Product Overview... 1 Product Details... 3 Package
Zero2Go Wide Input Range Power Supply for Your Raspberry Pi User Manual (revision 1.03) Copyright 2017 UUGear s.r.o. All rights reserved. Table of Content Product Overview... 1 Product Details... 3 Package
Adafruit's Raspberry Pi Lesson 1. Preparing an SD Card for your Raspberry Pi
 Adafruit's Raspberry Pi Lesson 1. Preparing an SD Card for your Raspberry Pi Created by Simon Monk Last updated on 2013-07-08 12:15:38 PM EDT Guide Contents Guide Contents Overview You Will Need Downloading
Adafruit TB A DC/Stepper Motor Driver Breakout Board
 Adafruit TB6612 1.2A DC/Stepper Motor Driver Breakout Board Created by lady ada Last updated on 2016-10-01 06:35:33 PM UTC Guide Contents Guide Contents Overview Pinouts Power Pins Signal in Pins Motor
AlaMode User Manual Revision
 AlaMode User Manual Revision 1.0 www.wyolum.com info@wyolum.com 1 Introduction The AlaMode is an integrated Arduino compatible board. It is designed as versatile, general purpose data acquisition and control
Native MP3 decoding on Arduino
 Native MP3 decoding on Arduino Created by Dean Miller Last updated on 2017-11-14 06:21:16 PM UTC Guide Contents Guide Contents Overview TODO Compatible Microcontrollers Microchip ATSAMD51 Chip & Dev Boards
Microcontroller Compatible Audio File Conversion
 Microcontroller Compatible Audio File Conversion Created by Mike Barela Last updated on 2018-06-07 09:10:45 PM UTC Guide Contents Guide Contents Convert Sound Files in Audacity Audacity Download Audacity
AUDIO AMPLIFIER PROJECT
 Intro to Electronics 110 - Audio Amplifier Project AUDIO AMPLIFIER PROJECT In this project, you will learn how to master a device by studying all the parts and building it with a partner. Our test subject:
RETROPIE INSTALLATION GUIDE
 RETROPIE INSTALLATION GUIDE CONTENTS THE FOLLOWING GUIDE WILL COVER THE INSTALLATION, SETUP AND CONFIGURATION OF THE RASPBERRY PI, RASPBIAN OS AND RETROPIE Author: http://rpiarcadebuild.wordpress.com/
1.5" & 2.1" Monochrome 128x64 OLED Display Module
 1.5" & 2.1" Monochrome 128x64 OLED Display Module Created by lady ada Last updated on 2018-11-29 04:47:33 PM UTC Guide Contents Guide Contents Overview Pinouts Power Pins Signal Pins Remaining Pins Assembly
Proper Debugging of ATSAMD21 Processors
 Proper Debugging of ATSAMD21 Processors Created by lady ada Last updated on 2017-06-08 06:47:17 PM UTC Guide Contents Guide Contents Overview Install Software Arduino IDE J-Link Software Atmel Studio 7
Adafruit 1-Wire Thermocouple Amplifier - MAX31850K
 Adafruit 1-Wire Thermocouple Amplifier - MAX31850K Created by lady ada Last updated on 2015-04-09 03:45:15 PM EDT Guide Contents Guide Contents Overview Pinouts Power Pins Address Pins Data Pin Themocouple
Adafruit DotStar FeatherWing
 Adafruit DotStar FeatherWing Created by lady ada Last updated on 2018-08-22 04:03:05 PM UTC Guide Contents Guide Contents Overview Pinouts Power Pins Data Pins Usage DotMatrix Usage Downloads Files Schematic
ugreen DAB Board Instructions v6
 ugreen Instructions v6 1 Introduction The v4 is a revised and more efficient new version of the. Its smaller layout allows a better integration into most Raspberry Pi enclosures. It is available in two
FruitBox Sequencer: Musically Delicious Step Pattern Generator
 FruitBox Sequencer: Musically Delicious Step Pattern Generator Created by John Park Last updated on 2018-02-27 09:07:25 AM UTC Guide Contents Guide Contents Overview Parts Materials Code with CircuitPython
Bill of Materials: Turn Off the Lights Reminder PART NO
 Turn Off the Lights Reminder PART NO. 2209650 Have you ever woke up early in the morning to find out that the kids (or adults) in your home forgot to turn off the lights? I've had that happen a number
Lab 0: Intro to running Jupyter Notebook on a Raspberry Pi
 Lab 0: Intro to running Jupyter Notebook on a Raspberry Pi Nick Antipa, Li-Hao Yeh, based on labs by Jon Tamir and Frank Ong January 24, 2018 This lab will walk you through setting up your Raspberry Pi
Adafruit CAP1188 Breakout
 Adafruit CAP1188 Breakout Created by lady ada Last updated on 2014-05-14 12:00:10 PM EDT Guide Contents Guide Contents Overview Pinouts Power pins I2C interface pins SPI inteface pins Other interfacing
Circuit Playground Express: Piano in the Key of Lime
 Circuit Playground Express: Piano in the Key of Lime Created by Kattni Rembor Last updated on 2017-10-21 09:59:14 PM UTC Guide Contents Guide Contents Overview Required parts Meet Circuit Playground Express
Raspberry Pi Kernel-o-Matic
 Raspberry Pi Kernel-o-Matic Created by Todd Treece Last updated on 2016-09-25 04:20:07 AM UTC Guide Contents Guide Contents Overview Installing Dependencies Starting the VM Build the Kernel Custom PiTFT
Adafruit WebIDE. Created by Tyler Cooper. Last updated on :29:47 PM UTC
 Adafruit WebIDE Created by Tyler Cooper Last updated on 2018-03-12 08:29:47 PM UTC Guide Contents Guide Contents Overview Installation Easy installation: Manual Installation: Uninstallation: Getting Started
Setting up a Raspberry Pi as a WiFi access point
 Setting up a Raspberry Pi as a WiFi access point Created by lady ada Last updated on 2018-08-22 03:36:03 PM UTC Guide Contents Guide Contents Overview What you'll need Preparation Check Ethernet & Wifi
Using the Android CircuitPython Editor
 Using the Android CircuitPython Editor Created by Timothy Cocks Last updated on 2018-12-18 09:48:51 PM UTC Guide Contents Guide Contents Overview Android Circuit Python Editor Going Mobile Parts List Circuit
Raspberry Pi NTP Clock Setup Guide
 Raspberry Pi NTP Clock Setup Guide Several steps are involved in getting your Raspberry Pi to operate as a NTP Clock. To begin with, you must obtain a LCD Plate (www.adafruit.com) and build it. You must
Networked Thermal Printer using Raspberry Pi and CUPS
 Networked Thermal Printer using Raspberry Pi and CUPS Created by Phillip Burgess Last updated on 2017-12-18 09:16:47 PM UTC Guide Contents Guide Contents Overview First-Time System Setup Connect and Configure
Blue Point Engineering
 Blue Point Engineering Board - Pro Module (E) Instruction Pointing the Way to Solutions! Controller I Version 2.1 The Board Pro E Module provides the following features: Up to 4 minutes recording time
RAL-24192DM1 Setup Guide
 RAL-24192DM1 Setup Guide Rev. 1.0 15/June/2012 RATOC Systems, Inc. www.ratocsystems.com Osaka, Japan Index 1. Introduction -------------------------------------------------------------------------- 3 1-1.
36mm LED Pixels. Created by Phillip Burgess. Last updated on :45:20 PM EDT
 36mm LED Pixels Created by Phillip Burgess Last updated on 2013-07-26 03:45:20 PM EDT Guide Contents Guide Contents Overview Project Ideas Wiring Powering Code Installation Using the Library Troubleshooting
Adafruit USB Power Gauge Mini-Kit
 Adafruit USB Power Gauge Mini-Kit Created by Bill Earl Last updated on 2017-07-14 11:55:04 PM UTC Guide Contents Guide Contents Overview Assembly Basic Assembly Solder the female connector. Solder the
Gooligum Electronics 2015
 The Wombat Prototyping Board for Raspberry Pi Operation and Software Guide This prototyping board is intended to make it easy to experiment and try out ideas for building electronic devices that connect
OPERATING MANUAL Manual Version 1.4 (Sep 11, 2017) Tel: or
 Tel: or") BooTunes Amped OPERATING MANUAL Manual Version 1.4 (Sep 11, 2017) Tel: 1-877-815-5744 or 1-905-803-9274 www.frightideas.com Getting Familiar with your BooTunes Amped BooTunes Amped FI-418 Operating Manual
BooTunes Amped OPERATING MANUAL Manual Version 1.4 (Sep 11, 2017) Tel: 1-877-815-5744 or 1-905-803-9274 www.frightideas.com Getting Familiar with your BooTunes Amped BooTunes Amped FI-418 Operating Manual
Stand-alone programming AVRs using CircuitPython
 Stand-alone programming AVRs using CircuitPython Created by lady ada Last updated on 2018-01-25 11:53:17 PM UTC Guide Contents Guide Contents Overview Supported Chips Wiring Power Pins Data Pins Wiring
Adafruit 2.2" PiTFT HAT - 320x240 Display
 Adafruit 2.2" PiTFT HAT - 320x240 Display Created by lady ada Last updated on 2018-02-12 03:39:33 AM UTC Guide Contents Guide Contents Overview Easy Install Installer script PiTFT Selection Rotation Configuring
Power over Ethernet (PoE) Adaptor
 Adaptor") Power over Ethernet (PoE) Adaptor For the Raspberry Pi model B+, Pi2 and Pi3 User Manual www.circuitsurgery.com Page 1 of 6 Description N.B.: In this manual the term "Raspberry Pi" will refer to the Raspberry
Power over Ethernet (PoE) Adaptor For the Raspberry Pi model B+, Pi2 and Pi3 User Manual www.circuitsurgery.com Page 1 of 6 Description N.B.: In this manual the term "Raspberry Pi" will refer to the Raspberry
Pianoteq 6 Raspberry Pi 3 Station. By Edgar Bustamante
 Pianoteq 6 Raspberry Pi 3 Station By Edgar Bustamante 1 Contents 1 Introduction...4 2 Parts...5 2.1 Raspberry Pi 3...5 2.2 Fan/Heat Sinks...5 2.3 Digital to Analog Converter (DAC)...5 2.4 Micro SD Card
TLC5947 and TLC59711 PWM LED Driver Breakouts
 TLC5947 and TLC59711 PWM LED Driver Breakouts Created by Bill Earl Last updated on 2016-03-01 07:38:00 PM EST Guide Contents Guide Contents Overview Assembly Assembly: Soldering the Headers Position the
LEGO BB-8 Release: LEGO BB-8. Learn how to automate a LEGO BB-8for motion, light, and sound using Crazy Circuits. Written By: Joshua
 LEGO BB-8 Learn how to automate a LEGO BB-8for motion, light, and sound using Crazy Circuits. Written By: Joshua 2018 browndoggadgets.dozuki.com/ Page 1 of 18 INTRODUCTION We absolutely LOVE the new LEGO
VLSI AppNote: VSx053 Simple DSP Board
 : VSx053 Simple DSP Board Description This document describes the VS1053 / VS8053 Simple DPS Board and the VSx053 Simple DSP Host Board. Schematics, layouts and pinouts of both cards are included. The
2.3" Monochrome 128x32 OLED Display Module
 2.3" Monochrome 128x32 OLED Display Module Created by lady ada Last updated on 2018-08-22 03:49:39 PM UTC Guide Contents Guide Contents Overview Pinouts Power Pins Signal Pins Remaining Pins Assembly Changing
A Slice of Raspberry Pi
 A Slice of Raspberry Pi Roadmap Introduction to the Raspberry Pi device What can you use a Raspberry Pi for? Talking to the Hardware A Raspberry Pi Arcade table Q & A Raspberry Pi Introduction What is
User-space SPI TFT Python Library - ILI9341
 User-space SPI TFT Python Library - ILI9341 Created by Tony DiCola Last updated on 2015-04-09 03:44:11 PM EDT Guide Contents Guide Contents Overview Wiring Raspberry Pi BeagleBone Black Usage Dependencies
Adafruit seesaw. Created by Dean Miller. Last updated on :30:23 AM UTC
 Adafruit seesaw Created by Dean Miller Last updated on 2018-03-17 12:30:23 AM UTC Guide Contents Guide Contents Overview Pinouts Power Pins: Logic Pins: GPIO Pins: Neopixel Pins: Address Pins: ADC Pins:
ELK. Computer Sound Card Interface ELK-129. Features. Specifications / Requirements
 Computer Sound Card Interface ELK-129 The ELK-129 Computer Sound Card Interface allows a computer s speaker output to be used as one of the tools for programming the ELK Recordable Modules, such as the
Midi2Org 64 and 32. An electronic board for automating a musical instrument. User Manual
 Midi2Org 64 and 32 An electronic board for automating a musical instrument User Manual Orgautomatech Christian Blanchard 113 rue Champommier 79000 Niort FRANCE 33(0)9 63 45 61 45 chris@orgautomatech.fr
XLink Kai Raspberry Pi Beginners Tutorial
 XLink-Kai-Raspberry-Pi-Beginners-Tutorial.md XLink Kai Raspberry Pi Beginners Tutorial Hi! This tutorial will guide you through setting up XLink Kai on a Raspberry Pi to play multiplayer system link Xbox
BeagleBone Black: Installing Operating Systems
 BeagleBone Black: Installing Operating Systems Created by Justin Cooper Last updated on 2017-12-05 07:31:58 PM UTC Guide Contents Guide Contents Overview Choosing an Operating System Angstrom Download
Back to the main page Back to the Tutorial Page Digital Audio Rules of Audacity Setup, Audio Import and Playback Recording with Audacity
 Back to the main page Back to the Tutorial Page Digital Audio Rules of Audacity Setup, Audio Import and Playback Recording with Audacity Tutorial - I.Basics Part 4 - Recording with Audacity - Part 4 1.
Freeduino USB 1.0. Arduino Compatible Development Board Starter Guide. 1. Overview
 Freeduino USB 1.0 Arduino Compatible Development Board Starter Guide 1. Overview 1 Arduino is an open source embedded development platform consisting of a simple development board based on Atmel s AVR
RedBoard Hookup Guide
 Page 1 of 11 RedBoard Hookup Guide CONTRIBUTORS: JIMB0 Introduction The Redboard is an Arduino-compatible development platform that enables quick-and-easy project prototyping. It can interact with real-world
Setting up a Raspberry Pi as a WiFi access point
 Setting up a Raspberry Pi as a WiFi access point Created by lady ada Last updated on 2017-09-02 03:30:02 AM UTC Guide Contents Guide Contents Overview What you'll need Preparation Check Ethernet & Wifi
Adafruit 2.4" Color TFT Touchscreen Breakout
 Adafruit 2.4" Color TFT Touchscreen Breakout Created by lady ada Last updated on 2016-09-30 12:51:56 AM UTC Guide Contents Guide Contents Overview Pinouts SPI Mode Resistive touch pins 8-Bit Mode Assembly
Using the BMP085/180 with Raspberry Pi or Beaglebone Black
 Using the BMP085/180 with Raspberry Pi or Beaglebone Black Created by Kevin Townsend Last updated on 2014-06-28 08:31:07 PM EDT Guide Contents Guide Contents Overview A Note on Distributions Configuring
Adafruit Feather 32u4 Basic Proto
 Adafruit Feather 32u4 Basic Proto Created by lady ada Last updated on 2018-05-27 09:32:48 PM UTC Guide Contents Guide Contents Overview Pinouts Power Pins Logic pins Other Pins! Assembly Header Options!
Adafruit PDM Microphone Breakout
 Adafruit PDM Microphone Breakout Created by lady ada Last updated on 2018-01-10 10:25:53 PM UTC Guide Contents Guide Contents Overview Pinouts Wiring & Test Available I2S Pins Install Library Downloads
MACCHIATO. S.T.E.M. Pack MINI DIGITAL SYNTHESIZER
 MACCHIATO S.T.E.M. Pack MINI DIGITAL SYNTHESIZER 032317 MACCHIATO MINI-SYNTH DIGITAL SYNTHESIZER S.T.E.M. Pack IINTRODUCTION... 3 DESCRIPTION... 3 HOW IT WORKS... 4 QUICK START GUIDE... 5 SCHEMATIC...