This symbol indicates that dangerous voltage constituting a risk of electric shock is present within this unit.
|
|
|
- Ami Neal
- 6 years ago
- Views:
Transcription
1 TPF X70
2 This symbol indicates that dangerous voltage constituting a risk of electric shock is present within this unit. This symbol indicates that there are important operating and maintenance instructions in the literature accompanying this unit. IMPORTANT SAFETY INFORMATION Read these instructions. Keep these instructions. Heed all warnings. Follow all instructions. Do not use this apparatus near water. Clean only with a slightly damp lint free cloth. Do not block any ventilation openings. Install in accordance with the manufacturer s instructions. Do not install or operate near any heat sources such as radiators, stoves, or other apparatus that produce heat. Unplug this apparatus during lightning storms or when unused for long periods of time. Refer all servicing to qualified service personnel. Servicing is required when the apparatus has been damaged in any way, such as the power-supply cord or plug is damaged, liquid has been spilled or objects have fallen into the apparatus, the apparatus has been exposed to rain or moisture, does not operate normally, or has been dropped. Warning: To reduce the risk of fire or electrical shock, do not expose this product to rain or moisture. The product must not be exposed to dripping and splashing and no object filled with liquids such as a vase of flowers should be placed on the product. No naked flame sources such as candles should be placed on the product. Caution: Changes or modifications not expressly approved by the manufacturer could void the user s authority to operate this device. Caution: Usage of controls or adjustments or performance of procedures other than those specified herein may result in hazardous exposure. IMPORTANT Use this appliance with the supplied AC convertor. Using non-approved power supplies will void the warranty. This equipment generates, uses and can radiate radio Page 2 frequency energy and, if not installed and used in accordance with the instructions, may cause harmful interference to radio communication. However, this is no guarantee that interference will not occur in a particular installation. If this equipment does cause harmful interference to radio or television reception, which can be determined by turning the equipment off and on, the user is encouraged to try to correct the interference by one of the following measures: - Reorient or relocate the receiving antenna. - Increase the separation between the equipment and receiver. - Connect the equipment into an outlet on a circuit different from that to which the receiver is connected. - Consult the dealer or an experienced technician for help.
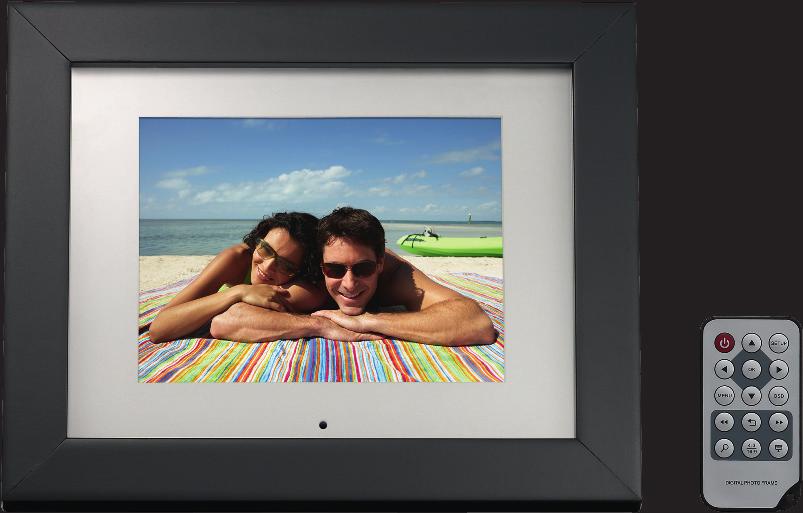
3 INTRODUCTION FEATURES Operation via controls on the rear of the Digital Picture Frame (DPF) or remote control. Automatic slide show with multiple transition effects and variable interval timings. Compatible with SD/SDHC/MMC and MS memory cards. USB 2.0 Host for connecting a USB device. Auto Rotate sensor. Just rotate the picture frame and the photo will automatically change to landscape or portrait. You can copy files from any connected media device to any other connected media device. Direct deletion of files from any connected media device. PICTURE FORMATS The DPF will play pictures conforming to the.jpg (jpeg) standard. Other picture formats must be converted to jpgs via photo editing software (not supplied). The player will take time to load and display pictures. Lots of high resolution pictures will slow loading times considerably. FILES AND FOLDERS You may group your pictures into Albums (folders) with several pictures inside each album. You can choose to play all the pictures on the media device or you can select individual folders, and play the contents. UNPACKING The box should contain: Photo Frame Power Adapter Remote Control User Guide Stand If any items are missing or damaged, contact your nearest TESCO store for a replacement. Have your receipt ready when you call. Retain the packaging. If you dispose of it, do so having regard to any recycling regulations in your area. Before using the DPF carefully remove any protective film covering the screen. Take care not to press on the screen. Page 3
4 CONTROLS AND FUNCTIONS 1 SD/MMC/MS-card slot 2 [ ] Down button 3 [ ] Up button 4 [ ] Right/Next button 5 [ ] Previous/Left button 6 [ ] Exit button 7 [ M ] Menu button 8 [ ] Play/Pause/Confirm button 9 Thumbscrew 10 USB Port 11 On/Off switch 12 5V DC Input socket 13 Stand Page 4
5
6 GETTING STARTED INSTALLING THE REMOTE BATTERY Remove the protective strip from the battery compartment to activate the battery. The remote control is now ready for use. If the remote control behaves erratically or fails to operate, the battery should be replaced. To replace the battery: 1. Press the catch at the side of the battery compartment. Slide out the battery cage. 2. Remove the old battery. Place the new battery in the cage with the polarity as shown in the diagram. Insert the cage. There is a risk of fire and burns if the battery is handled improperly. Do not disassemble, crush, puncture, short external contacts, or dispose of in fire or water. Do not attempt to open or service the battery. CR2025 Replace only with the battery designated for this product. Discard used batteries in accordance with recycling regulations in force in your area. FITTING THE STAND Screw the stand into the threaded insert at the rear right of the DPF. Do NOT overtighten. Stand the frame on a level solid surface where it is unlikely to fall or get knocked over. Page 6
7 WALL MOUNTING As an alternative the frame can be wall mounted via the slots in the rear of the DPF. CONNECTING THE POWER SUPPLY Use the two slots annotated (50mm apart) to mount the DPF in the vertical (portrait) view. Use the two slots annotated (50mm apart) to mount the DPF in the horizontal (landscape) view. Plug the DC power jack of the adapter into the DC socket in the DPF. Plug the power adapter into the mains socket. Switch on at the mains. You can leave the power switch on, and use the button on the remote control to turn the frame on or set it to Standby mode. To turn off the power off completely, slide the switch to OFF. SWITCHING ON When switching on for the first time it will be necessary to set display language. Slide the ON/OFF switch to the ON position. The DPF will power up and display the list of language options. Page 7
8 Use the [ ] or [ ] buttons to select required language, press the [ ] button to confirm. To set up your DPF Press the [M] button. Press the [ ] or [ ] button and press the [ ] button to select Setup. A submenu will appear. Photo setup Press the [ ] button to select. A sub menu will appear displaying the following choices: Slideshow time Allows you to select the time the photos will be displayed for. The choices are 3, 5, 15 seconds, 1 minute or 15 minutes. Press the [ ] or [ ] button to select and then press the [ ] button. Photo Mode Allows you to move between full screen and standard screen. Press the [ ] or [ ] button to select and then press the [ ] button. Transition Effect Allows you to change effect between photos. The choices are: Off, Random, Bottom to top, top to bottom, Left to right, Right to left, Top left to bottom right, Top right to bottom left, Bottom left to top right, Bottom right to top left, Horizontal door close, Horizontal door open, Horizontal inter cross, Vertical inter cross, Fadeout in. Press the [ ] or [ ] button to select and then press the [ ] button. Page 8
9 Date Stamp Allows you to display the date and time the photos were taken. Press the [ ] or [ ] button to select and then press the[ ] button. Shuffle Displays the photos in a random order. Press the [ ] or [ ] button to select and then press the [ ] button. Clock / Calendar setup Press the [ ] or [ ] button to select clock / calendar set up press the [ ] button. A sub menu will appear displaying the following choices: Time Mode Press the [ ] button to select. Allows you select digital or analogue time display. Show Photo Press the [ ] button to select. Allows you to display a photo or slideshow next to the clock. Background colour Press the [ ] button to select. Allows you to select the background colour, the choices are: Black Blue Gray Set Time Press the [ ] button to select. Press the [ ] or [ ] button to set the hour, press the [ ] button to move cursor to set the minutes, press the [ ] or [ ] button until required minutes are displayed. Press the [ ] button. Set Time Format Press the [ ] button to select. Allows you to choose 12 or 24 hour clock display. Set Date Press the [ ] button to select. Press the [ ] or [ ] button to set the year. Press the [ ] button to move cursor to set the month, press the [ ] or [ ] button until the correct month is set. Press the [ ] button to move cursor to set the day, press the [ ] or [ ] button until the correct day is set. Press the [ ] button. Set Date format Press the [ ] or [ ] button to select the date format required. Press the [ ] button. Page 9
10
11
12 Note: The current time must be set correctly before setting up this feature. Hint time Allows you to set how long to display the hint for button operation while playing a slideshow. Press the [ ] button. Press [ ] or [ ] button to select the required amount of time. The available options are: 0s, 5s, 10s, 20s. Press the [ ] button to confirm or press the [ ] button to exit. Default Reset all settings to the default settings. Press the [ ] button. Press [ ] or [ ] to select Yes or No. Press the [ ] button to confirm or press the [ ] button to exit. INSTALLING A USB DEVICE OR MEMORY CARD To insert a memory card. Position the card with the cropped corner facing down and press gently in. To release a memory card. Grip both sides of the card and gently pull out. When first switched on the pictures will display as a Slide Show. Thereafter the display will depend on the setup you have customised. NOTES: You should only insert one media source at any time. If you switch on the DPF with a USB drive and a memory card inserted in the frame, the memory card photos will be displayed. If you have a USB drive inserted then insert a media card the DPF will play the media card and vice versa. Page 12
13 VIEWING PHOTOS MAIN MENU When a USB device or memory card is inserted into the DPF, the corresponding icon and description appears on the main menu. From the main menu, you can select the connected source to view photos, change the settings, or display the calendar and clock. 1. Press the [ M] button to access the main menu. All connected media sources, clock, calendar and setup icons and descriptions are displayed. Note: If you insert a USB device or memory card into to the DPF after switching on the frame, the DPF will start a slideshow automatically. 2. Press the [ ] or [ ] button to select the media source, and then press the [ ] button. The mode menu appears. Use the [ ] or [ ] button to select Photo, or Files. SD/MMC/MS USB Clock Calendar Setup Appears when you insert a SD, SDHC, MMC or MS card. Appears when you inserted a USB device. To display the Clock on the screen. To display the Calendar on the screen. To customize the settings of DPF. Photo Files Start a slideshow or viewing photos of the media source manually. Browse all files of the media source; and copy, copy all or delete files (refer to Managing files on page 15). Page 13
![VIEWING THUMBNAILS In photo mode, the photos on the selected media device can be displayed on the screen as thumbnails. Up to 15 photos are displayed at a time. 1. Select a media source from the main menu and press the [ ] button.](/docs-images/72/67908613/images/14-0.jpg "The mode menu appears. 2. To skip to the previous or next photo, press the [ ] or [ ] button 3. To return to the thumbnail view, press the [ ] button.")
14 VIEWING THUMBNAILS In photo mode, the photos on the selected media device can be displayed on the screen as thumbnails. Up to 15 photos are displayed at a time. 1. Select a media source from the main menu and press the [ ] button. The mode menu appears. 2. To skip to the previous or next photo, press the [ ] or [ ] button 3. To return to the thumbnail view, press the [ ] button. While viewing a single photo, press the [ ] button to start the slide show from the current photo. To pause the slideshow and view a single photo, press the [ ] button. To resume the slideshow, press the [ ] button again. Press the [ ] button to exit the slideshow and view the photos in thumbnail. Press the [ M] button to open the OSD menu. 2. Press the [ ] or [ ] button to select Photo, and then press the [ ] button. The photos are displayed on the screen as thumbnails. 3. To navigate through the thumbnails or move to the next or previous page of thumbnails, press the [ ], [ ], [ ] or [ ] buttons. VIEWING A SINGLE PHOTO You can select a single photo to be displayed on the screen: 1. Select a photo in the thumbnail view, and press the [ ] button. The selected photo is displayed on the screen. Note: Do not set hint time to 0 in setup menu, if you want the DPF to display instructions for button operation. PLAYING A SLIDESHOW You can play a slide show using any of the following methods. 1. Insert a media device when the DPF is switched on, the slideshow will automatically start. 2. Press the [ ] button on the remote control will start a slideshow from anywhere within the menu structure. 3. From the thumbnail screen press the [ ] button will start a slideshow from the position of the photo selected at the time. Page 14
![USING THE OSD MENU You can also use the OSD menu to manually view the photos one by one. 1. Press the [ M] button whilst viewing a photo or slideshow.](/docs-images/72/67908613/images/15-0.jpg "The OSD menu appears on the screen and the slideshow will be paused. The II icon is shown in the top right hand corner of the frame.")
![Exit and return to thumbnail screen, highlight and press the [ ] button. MANAGING FILES You can view all playable files and folders on the media device.](/docs-images/72/67908613/images/15-1.jpg "You can also copy files from one media device to another media device or delete the files. 1. Select a media device (e.g. USB, SD/MMC/MS) in the main menu and press the [ ] button.")
15 USING THE OSD MENU You can also use the OSD menu to manually view the photos one by one. 1. Press the [ M] button whilst viewing a photo or slideshow. The OSD menu appears on the screen and the slideshow will be paused. The II icon is shown in the top right hand corner of the frame. Exit and return to thumbnail screen, highlight and press the [ ] button. MANAGING FILES You can view all playable files and folders on the media device. You can also copy files from one media device to another media device or delete the files. 1. Select a media device (e.g. USB, SD/MMC/MS) in the main menu and press the [ ] button. The mode menu appears. 2. Press the [ ] or [ ] button to navigate between the icons on the OSD menu. To start or resume slideshow from the current photo, highlight and press the [ ] button, the icon is changed to II icon. To zoom in, highlight and press the [ ] button repeatedly to magnify. The magnification options are: X2, X4, X8, X16. When a photo is magnified, after the OSD menu has closed, press the [ ], [ ], [ ] or [ ] button to view the other parts of the photo. To Rotate a photo, highlight and press the [ ] button repeatedly. The options are: 90, 180, 270. Page Press the [ ] or [ ] button to select Files, and press the [ ] button. The file list appears. 3. Use the [ ] or [ ] button to navigate between files and folders. To open a folder, highlight it and press the [ ] button or [ ] button. To return to the previous directory, press the [ ] button. To play a file, highlight it and press the [ ] button. To step to the next file press the [ ] or [ ] button. To return to file list, press the [ ] button.
![COPYING FILES 1. Highlight a file by using the [ ] or [ ] button and press the [ ] button. A check mark is displayed next to the file. To select more files, repeat the above step. 2.](/docs-images/72/67908613/images/16-0.jpg "Press the [ M] button or press the [OSD] button on the remote control. A window with Copy, Copy all and Delete options will be displayed on the screen. 3.")
16 COPYING FILES 1. Highlight a file by using the [ ] or [ ] button and press the [ ] button. A check mark is displayed next to the file. To select more files, repeat the above step. 2. Press the [ M] button or press the [OSD] button on the remote control. A window with Copy, Copy all and Delete options will be displayed on the screen. 3. Use the [ ] or [ ] button to select Copy or Copy all and press the [ ] button. The media devices connected to the unit are displayed. 4. Use the [ ], [ ], [ ] or [ ] button to select the required media device. 5. Press the [ ] button to start copying files. Note: If your required media device is not shown, it could be write protected. Please unlock and try again. DELETING FILES 1. Highlight a file by using the [ ] or [ ] button and press the [ ] button. A check mark is displayed next to the file. To select more files, repeat the above step. 2. Press the [ M] button or press the [OSD] button on the remote control. A window with Copy, Copy all and Delete options will be displayed on the screen. 3. Use the [ ] or [ ] button to select Delete, and then press the [ ] button. 4. Use the [ ] or [ ] button to select Yes or No to delete the file or exit without deleting. 5. Press the [ ] button to confirm. DISPLAYING THE CLOCK OR CALENDAR You can switch your DPF to Clock or Calendar mode where the current time of the calendar is displayed on the screen together with a slideshow. 1. Select the Clock or Calendar icon in the main menu and press the [ ] button. The Clock or Calendar is displayed on the screen and photos in the media device start slideshow in thumbnail. Page 16
![2. To exit the Clock or Calendar mode, press the[ ] button. Note: The date, time, date format and time format can be adjusted in Setup mode.](/docs-images/72/67908613/images/17-0.jpg "You can choose to display digital clock or analogue clock in Setup mode. You can choose to display photos in thumbnail or not in Setup mode. CLEANING THE GLASS PANEL 1.")
17 2. To exit the Clock or Calendar mode, press the[ ] button. Note: The date, time, date format and time format can be adjusted in Setup mode. You can choose to display digital clock or analogue clock in Setup mode. You can choose to display photos in thumbnail or not in Setup mode. CLEANING THE GLASS PANEL 1. With the DPF facing down on a hard surface remove 2 x thumb screws and carefully lift the display unit from the frame. Note: Do not touch the display unit screen with your fingers. 2. Clean the glass panel using a lint free cloth. 3. Replace the display unit into the frame. 4. Replace the 2 x thumb screws and tighten up finger tight. TROUBLESHOOTING If your DPF seems not to be working as well as you might expect, please work through this checklist before returning the product to Tesco. The DPF will not switch on. Switch off, Check the power supply connections, switch on again. The DPF will not play pictures on a media device. The pictures must be in jpg form and smaller than 8000 x 8000 pixels. The DPF will not copy pictures to a media device. The media device is full. The media device is write-protected. The media device will need re-formatting even though you can play pictures from the media device on the DPF. The remote control is erratic. The remote control is too far from the DPF. There is something between the remote control and the DPF. Replace the battery. Page 17
18 AFTER USE Switch the DPF off using the ON/OFF switch. Unplug the adaptor from the mains and then unplug the adaptor from the DPF. Remove any media device. Store the unit and power adaptor in a cool dry place, out of the reach of children and pets. Note: Though you can leave the frame in Standby indefinitely we do not recommend this for the following reasons: The USB ports are powered in standby mode. The connected AC adaptor cable could be a source of danger. You will consume power unnecessarily. Further Information The screen resolution is 800x600 pixels. This is a total resolution of 480,000 pixels (0.480MP). High resolution pictures will slow loading times without improving viewability. After extended use, the frame may get warm. This is normal and not a cause for concern. Contrary to popular belief, if you leave a static picture on the screen for a long time you may leave a permanent after image on the screen. Slide show mode stops this from occurring. Page 18
19 Page 19
20 Care and Cleaning Care and cleaning operations should be carried out with the unit unplugged from the mains. Clean the plastic parts with a barely damp cloth and then dry carefully. Do NOT touch the screen with bare fingers, hard or pointed objects. Clean the screen carefully with a special cloth, such as a Calotherm cloth available from chemists and opticians. Specifications Power Supply: DC 5V, 2A Power adaptor: AC V~50/60Hz, 0.4A Screen Resolution: 800x600 pixels Picture Format: JPEG, 8000*8000 pxl USB Compliance: USB 1.1or higher Memory Card: SD/MMC/MS Weight: 811 grams Warranty Your Technika appliance is covered by a warranty for 12 months from the date of purchase. If a fault develops during this period, please contact the TESCO electrical help line on Please have your original purchase receipt with you when you call. This warranty in no way affects your consumer rights. UK: Waste electrical products should not be disposed of with household waste. Separate disposal facilities exist, for your nearest facilities see or in-store for details. ROI: Produced after 13th August Waste electrical products should not be disposed of with household waste. Please recycle where facilities exist. Check with your Local Authority or retailer for recycling advice. Tesco Stores Ltd, Delamare Road, Cheshunt, Herts, EN8 9SL
7" Heart Digital Photo Frame
 WG07 7" Heart Digital Photo Frame This symbol indicates that dangerous voltage constituting a risk of electric shock is present within this unit. This symbol indicates that there are important operating
User Guide. KR07 7 Digital Photo Frame
 User Guide KR07 7 Digital Photo Frame This symbol indicates that dangerous voltage constituting a risk of electric shock is present within this unit. This symbol indicates that there are important operating
User Guide. MA-129 ipod & iphone docking station
 User Guide MA-129 ipod & iphone docking station IMPORTANT SAFETY INFORMATION CAUTION! RISK OF ELECTRIC SHOCK DO NOT OPEN TO REDUCE THE RISK OF ELECTRIC SHOCK DO NOT REMOVE COVER (OR BACK) This symbol
User Guide. BB-111 Cassette Boombox
 User Guide BB-111 Cassette Boombox IMPORTANT SAFETY INFORMATION CAUTION! RISK OF ELECTRIC SHOCK DO NOT OPEN TO REDUCE THE RISK OF ELECTRIC SHOCK DO NOT REMOVE COVER (OR BACK) This symbol indicates that
7 Digital Photo Frame
 7 Digital Photo Frame Instruction manual L7DPF17 12 month manufacturer's warranty -------------------------------------------------------------------------- --------------------------------------------------------------------------
MC123. Owner s Handbook. Micro Hi-Fi
 MC123 Owner s Handbook Micro Hi-Fi IMPORTANT SAFETY INFORMATION CAUTION such as the power-supply cord or plug is IMPORTANT damaged, liquid has been spilled or objects RISK OF ELECTRIC SHOCK This equipment
9.7 Digital Photo Frame
 Instruction Manual 9.7 Digital Photo Frame S10DPF13 Contents Safety Warnings...4 Unpacking...5 Product Overview...6 Front & Rear View...6 Top View...6 Preparations...7 Connecting to the Mains Power...7
Always there to help you. Register your product and get support at SPA1330. Question? Contact Philips.
 Always there to help you Register your product and get support at www.philips.com/welcome Question? Contact Philips SPA1330 User manual Contents 1 Important 2 Safety 2 Notice 3 English 2 Your multimedia
WIRELESS BLUETOOTH BOOMBOX
 G-BOOM WIRELESS BLUETOOTH BOOMBOX Wireless Bluetooth Rugged Construction Rechargeable Battery USB Device Charging G-650 Welcome to G-PROJECT Thanks for purchasing G-BOOM and joining G-Project. With just
Digital Photo Frame With Alarm Clock Model DPF-363
 Digital Photo Frame With Alarm Clock Model DPF-363 Transformer 100-240V~ 50Hz, 2.5W Frame input 5V 500mA Please read these instructions before use and retain for future reference Table of Contents 1. Safety.....3
AZATOM iflute 2. Portable Lightning Docking Station. User Manual. This manual is available to download online at
 AZATOM iflute 2 Portable Lightning Docking Station User Manual This manual is available to download online at www.azatom.com Thank you for shopping with AZATOM Please read this manual carefully before
 POWER + - + + - INPUT 2010 INNOVAGE LLC All Rights Reserved. Project Name: ProjectorS35_IM Designer/Studio: INNOVAGE Revision: SET UP AND INSTALLATION RCA cables generally cannot be connected to a TV (unless
Wireless Audio Soundbar
 SKIDDAW Wireless Audio Soundbar SKD-BAR-BLK Instructions Guide Contents Controls And Functions... 1 What s In The Box?... 4 Support...5 Instructions Guide... 6 Fixing the Soundbar... 6 Mode Indicator lights...
Always there to help you Register your product and get support at SBT300/12. Question? Contact Philips.
 Always there to help you Register your product and get support at www.philips.com/welcome Question? Contact Philips SBT300/12 User manual Contents 1 Important 3 Safety 3 Notice 3 2 Your Bluetooth Speaker
12.1 Digital Photo Frame
 12.1 Digital Photo Frame KGNDPFC12 Instruction Manual TABLE OF CONTENTS SAFETY INFORMATION. 1 PACKAGE CONTENTS....1 SPECIFICATION SUMMARY 2 DPF INTRODUCTION... 3 QUICK START.. 4 OPERATION GUIDE.. 5 Movie
C ookie User Manual BC
 Cookie User Manual BC Cookie Please follow the instruction in this guide to enjoy the best sound. Cookie User Manual Hold "O" button to power on and off Press "O" button to play/pause music (for compatible
Daily use. indicating that the loud speakers
 BeoLab 8002 Guide WARNING: To reduce the risk of fire or electric shock, do not expose this appliance to rain or moisture. Do not expose this equipment to dripping or splashing and ensure that no objects
USER MANUAL KGNDPF8VAA
 USER MANUAL KGNDPF8VAA TABLE OF CONTENTS SAFETY INFORMATION. 2 PACKAGE CONTENTS....2 SPEC SUMMARY... 2 DPF INTRODUCTION...... 3 REMOTE CONTROL OVERVIEW.....4 QUICK START..... 4 OPERATION GUIDE.. 4 Picture
AZATOM StreetDance Mini 2. Portable Lightning Docking Station. User Manual. This manual is available to download online at
 AZATOM StreetDance Mini 2 Portable Lightning Docking Station User Manual This manual is available to download online at www.azatom.com Thank you for shopping with AZATOM Please read this manual carefully
SPOTTER the multipurpose sensor
 SPOTTER the multipurpose sensor OVERVIEW Part of the Quirky + GE collection of smart products, Spotter is a multipurpose sensor that keeps you updated on what s going on at home from anywhere. Monitor
USER MANUAL KADPF10XXXA
 USER MANUAL KADPF10XXXA Safety Information Keep away from water, moisture and dusty areas. Working temperature of 0-40 C. Never store in a very hot or very cold place. Be careful not to drop or knock the
Instruction manual. DAB+/DAB FM Radio DENVER DAB-40. denver-electronics.com
 denver-electronics.com Instruction manual DAB+/DAB Radio DENVER DAB-40 COPYRIGHT DENVER ELECTRONICS A/S www.denver-electronics.com www.facebook.com/denverelectronics ENG-1 IMPORTANT SAFETY INFORMATION
MP-329. Owner s Handbook. MP3 Player with FM radio
 MP-329 Owner s Handbook MP3 Player with FM radio IMPORTANT SAFETY INFORMATION IMPORTANT SAFETY INFORMATION Read these instructions. Keep these instructions. Heed all warnings. Follow all instructions.
Always there to help you. Register your product and get support at SBT300/37. Question? Contact Philips.
 Always there to help you Register your product and get support at www.philips.com/welcome Question? Contact Philips SBT300/37 User manual Contents 1 Important 2 Safety 2 Notice 3 2 Your Bluetooth Speaker
8 Digital Photo Frame
 8 Digital Photo Frame KGNDPFC8 Instruction Manual 0 TABEL OF CONTENTS SAFETY INFORMATION... 1 PACKAGE CONTENTS....1 SPECIFICATION SUMMARY. 2 DPF I NTRODUCTION... 3 Q U I C K S TA R T.. 5 OPERATION GUIDE....
USER MANUAL KADPF12XXXA
 USER MANUAL KADPF12XXXA Safety Information: Keep away from water, moisture and dusty areas. Working temperature 0-40. Never store in a hot or very cold place. Be careful not to drop or knock the photo
HP-101 HEADPHONE AMPLIFIER
 HP-101 HEADPHONE AMPLIFIER User s Guide Before using your headphone amplifier, please read this User s Guide thoroughly and keep it for future reference. IMPORTANT Safety Instructions Please read these
Always there to help you. Register your product and get support at SPA4270BT. Question? Contact Philips.
 Always there to help you Register your product and get support at www.philips.com/welcome Question? Contact Philips SPA4270BT User manual Contents 1 Important 2 Safety 2 Notice 4 English 2 Your multimedia
cenomax F350 User Manual 使用手冊 3.5 Digital Photo Frame Revision 1.0a
 cenomax F350 3.5 Digital Photo Frame User Manual 使用手冊 Revision 1.0a FCC compliance statement Note: This equipment has been tested and found to comply with the limits for a Class B digital device, pursuant
User s Manual BeamPod User Manual
 User s Manual BeamPod General Safety Information 1. Keep the device and packaging materials out of reach of infants and children. 2. Keep the power adapter and other contacts from water, Dry your hands
Media Drive 600 User Guide
 Media Drive 600 User Guide EN Important safety instructions Read these instructions. Keep these instructions. Heed all warnings. Follow all instructions. Do not use this apparatus near water. Clean only
Table Of Contents. The images in this manual are for reference only and may differ from your model.
 Table Of Contents Important Safety Instructions...2 View of Unit...4 Front Panel... 4 Rear Panel... 5 Remote Control...6 Remote Control Drawing... 6 Preparation of Remote Control... 8 Using of Remote control...
ADPF10XN Instruction Manual
 ADPF10XN Instruction Manual 1 ADPF10XN Digital Photo Frame User Guide Thank you for purchasing the ADPF10XN 10.4 digital photo frame (DPF). Before operating your new digital photo frame please carefully
User Guide. Digital Picture Key Chain NS-DKEYBK10/ NS-DKEYRD10
 User Guide Digital Picture Key Chain NS-DKEYBK10/ NS-DKEYRD10 Digital Picture Key Chain Contents Introduction............................... 3 Safety information......................... 3 Features..................................
SBW-175. Audio Soundbar & Subwoofer. Instructions Guide
 SBW-175 Audio Soundbar & Subwoofer Instructions Guide Contents Controls And Functions... 1 What s In The Box?... 6 Instructions Guide...7 Connections... 8 Optional: Using a Optical Input... 9 Bluetooth
Always there to help you. Register your product and get support at SB365B. Question? Contact Philips.
 Always there to help you Register your product and get support at www.philips.com/support Question? Contact Philips SB365B User manual Contents 1 Important 2 Safety 2 2 Your Bluetooth speaker 3 Introduction
2.0 Channel Sound Bar. Instruction Manual L20SB17 12 Month Manufacturer s Warranty
 2.0 Channel Sound Bar Instruction Manual L20SB17 12 Month Manufacturer s Warranty Table of Contents Sound Bar Overview 2 Remote Control Overview 4 Important Safety Instructions 5 Caring for the Environment
CANTEEN 6000 Portable Battery Pack NAP-30. Instruction Manual Please read carefully before use and keep for future reference.
 CANTEEN 6000 Portable Battery Pack NAP-30 Instruction Manual Please read carefully before use and keep for future reference. Thank You We know you have many choices when it comes to technology; thank you
Instruction Manual. 14 Portable DVD Player - BPDVD14
 Instruction Manual 14 Portable DVD Player - BPDVD14 CONTENTS General Safety 4 Product Overview 7 Remote Control 9 Getting Started 10 Setup 11 Troubleshooting 13 Specifications 13 Support 16 GENERAL SAFETY
Always there to help you. Register your product and get support at DS3150/12. Question? Contact Philips.
 Always there to help you Register your product and get support at www.philips.com/welcome Question? Contact Philips User manual DS3150/12 Contents 1 Important 3 Risk of swallowing coin battery 4 2 Your
Network Camera. Quick Guide DC-B1203X. Powered by
 Network Camera Quick Guide DC-B1203X Powered by Safety Precautions English WARNING RISK OF ELECTRIC SHOCK DO NOT OPEN WARNING: TO REDUCE THE RISK OF ELECTRIC SHOCK, DO NOT REMOVE COVER (OR BACK). NO USER-SERVICEABLE
1GB/2GB/4GB MP3 Player. Instruction Manual L1GMP309 L2GMP309 L4GBMP310
 1/2/4 MP3 Player Instruction Manual L1GMP309 L2GMP309 L4MP310 Congratulations on the purchase of your new Logik MP3 Player. It has many exciting features to make your listening to music experience more
< W&ϭϱyyy USER MANUAL
 USER MANUAL Safety Information Keep away from water, moisture and dusty areas. Working temperature of 0-40 C. Never store in a very hot or very cold place. Be careful not to drop or knock the Digital Photo
Register your product and get support at. AS111. User manual
 Register your product and get support at www.philips.com/welcome AS111 User manual Contents 1 Important 3 Safety 3 Notice 3 English 2 Your docking speaker for Android 5 Introduction 5 What's in the box
Always there to help you. Register your product and get support at BT3080. Question? Contact Philips.
 Always there to help you Register your product and get support at www.philips.com/support Question? Contact Philips BT3080 User manual Contents 1 Important 2 Safety 2 2 Your Bluetooth speaker 3 Introduction
MAJORITY PETERSFIELD. Digital & FM Pocket Radio. Instructions Guide CB1A-DAB-BLK
 MAJORITY PETERSFIELD Digital & FM Pocket Radio CB1A-DAB-BLK Instructions Guide Contents Box Contents... 1 Controls And Functions...2 Navigation Controls 3 Basic Operation 4 Instructions Guide...5 DAB/DAB+
Multi-touch Touch-Screen. Installation Guide
 Multi-touch Touch-Screen Installation Guide Table of Contents Read before use...3 Safety and troubleshooting information...4 Installing Software...8 Connecting Cables... 13 Calibrating the Touch Screen...
MODEL: CH196B/R. 3-Speed Stereo Turntable With Built-in Speakers
 MODEL: CH196B/R 3-Speed Stereo Turntable With Built-in Speakers WARNINGS To reduce the risk of fire or electric shock, do not expose this appliance to rain or moisture. To reduce the risk of electric shock,
KS-SB200 BOOM BOX INSTRUCTIONS LVT B [J]
![KS-SB200 BOOM BOX INSTRUCTIONS LVT B [J]](/thumbs/72/66806114.jpg "KS-SB200 BOOM BOX INSTRUCTIONS LVT B [J]") BOOM BOX KS-SB200 INSTRUCTIONS For Customer Use: Enter below the Model No. and Serial No. which are located either on the rear, bottom or side of the cabinet. Retain this information for future reference.
BOOM BOX KS-SB200 INSTRUCTIONS For Customer Use: Enter below the Model No. and Serial No. which are located either on the rear, bottom or side of the cabinet. Retain this information for future reference.
Always there to help you. Register your product and get support at DS1600. Question? Contact Philips.
 Always there to help you Register your product and get support at www.philips.com/support Question? Contact Philips DS1600 User manual Contents 1 Important 2 Safety 2 Notice 2 2 Your Docking Speaker 4
MAJORITY TOWERS. DVD Player. Instructions Guide TOW-DVD-BLK
 MAJORITY TOWERS DVD Player TOW-DVD-BLK Instructions Guide Contents Controls And Functions... 1 What s In The Box?... 4 Instructions Guide...5 Getting Started 5 Operations 6 Setup Options 7 General Setup
EXCLUSIVELY FROM. User guide DAB211PT. Portable DAB radio
 EXCLUSIVELY FROM User guide DAB211PT Portable DAB radio INDEX Safety information... 2 Introduction... 3 Unpacking... 4 Key to controls... 5 DAB station display... 6 FM station display... 7 Status display...
W10 PRO QUICK START GUIDE
 W10 PRO QUICK START GUIDE GETTING STARTED Thank you for purchasing a Hipstreet product and we hope you enjoy using it. Please visit our website at www.hipstreet.com IMPORTANT SAFETY PRECAUTIONS Always
7-Port Fast Charging Station NAP Instruction Manual Please read carefully before use and keep for future reference.
 7-Port Fast Charging Station NAP-7000 Instruction Manual Please read carefully before use and keep for future reference. Thank You We know you have many choices when it comes to technology; thank you for
Chant. Portable Bluetooth Audio System
 Chant Portable Bluetooth Audio System Greetings and Welcome to the House of Marley We are pleased and honored you have selected this Marley product to become a part of your music experience. What You Get
VeniceU16/VeniceU24/VeniceU32
 VeniceU16/VeniceU24/VeniceU32 Quick Start Guide midasconsoles.com 2 VeniceU16/VeniceU24/VeniceU32 Quick Start Guide VeniceU16/VeniceU24/VeniceU32 Quick Start Guide 3 Important Safety Instructions Terminals
CD Boombox mit Uhrenradio B 5
 CD Boombox mit Uhrenradio B 5 2 3 4 5 6 7 8 CLASS 1 LASER PRODUCT KLASS 1 LASER APPARAT LUOKEN 1 LAISERLAITE KLASSE 1 LASER PRODUKT 9 10 11 12 13 14 15 16 17 18 19 20 21 22 23 24 25 26 27 28 29 30 WARNING
Portable Digital & FM Radio
 LITTLE SHELFORD Portable Digital & FM Radio LSH-DAB-CRM Instructions Guide Contents Box Contents... 1 Controls And Functions...2 Support... 4 Instructions Guide...5 Basic Operation... 5 DAB/DAB+ Radio...
FRANÇAIS PORTUGUÊS MCD 850USB
 DEUTSCH ENGLISH FRANÇAIS NEDERLANDS ESPAÑOL PORTUGUÊS MCD 850USB WARNING 1. WARNING:Please refer the information on exterior bottom enclosure for electrical and safety information before installing or
Always there to help you. Register your product and get support at AEA2000. Question? Contact Philips.
 Always there to help you Register your product and get support at www.philips.com/support Question? Contact Philips AEA2000 User Manual Contents 1 Important 3 Important Safety Instructions 3 2 Your Bluetooth
Always there to help you. Register your product and get support at AS130. Question? Contact Philips.
 Always there to help you Register your product and get support at www.philips.com/support Question? Contact Philips AS130 User manual Contents 1 Important 2 Important Safety Instructions 2 2 Your docking
Bluetooth Karaoke Stage with Dual Microphones and Light Effects
 KSAI567 Bluetooth Karaoke Stage with Dual Microphones and Light Effects Owner s Manual Please keep these instruction for future reference as they contain important information CAUTION: THIS IS NOT A TOY!
BLUETOOTH CLOCK RADIO
 BLUETOOTH CLOCK RADIO SCR1989BT OPERATING INSTRUCTIONS Please read and follow this instruction manual carefully before using the unit and retain it for future reference SYLVANIA is a registered trademark
BeoLink Active. Setting-up Guide
 BeoLink Active Setting-up Guide 2 CAUTION RISK OF ELECTRIC SHOCK DO NOT OPEN CAUTION: To reduce the risk of electric shock, do not remove cover (or back). No User-serviceable parts inside. Refer servicing
7" Digital Photo Frame with Interchangeable Frames
 7" Digital Photo Frame with Interchangeable Frames PF-A720C/PF-A720CE GB User Manual Thank you for purchasing this Digital Photo Frame. You can play your favorite JPEG files directly from a memory card
 Register your product and get support at www.philips.com/welcome DS3600 EN User manual Contents 1 Important 3 2 Your Docking Speaker 4 Introduction 4 What s in the box 4 Overview of the main unit 5 Overview
NIMBUS a personal dashboard for your digital life
 INVENTED BY REAL PEOPLE LIKE YOU Ryan Pendleton NIMBUS a personal dashboard for your digital life OVERVIEW Part of the Quirky + GE collection of smart products, Nimbus is a highly customizable 4-dial clock
10.1 HD Memory View Instruction Manual
 10.1 HD Memory View Instruction Manual Cautions Precautions and maintenance For indoor use only To avoid risk of fire or electric shock, do not expose the unit to moisture or condensation. To avoid overheating,
Spectrum X5BT. User s manual
 Spectrum X5BT 1 User s manual Thank you for purchasing this product. We designed it to give you complete satisfaction. The objective of every Tangent product is that fundamentally correct design can produce
MP3/ CD/ Radio/Bluetooth Porta ble Pl a ye r With Remote Control
 GV-PS913 MP3/ CD/ Radio/Bluetooth Porta ble Pl a ye r With Remote Control R I N S T R U C T I O N MANU A L WARNING TO PREVENT FIRE OR SHOCK HAZARD DO NOT EXPOSE THIS APPLIANCE TO RAIN OR MOISTURE. CAUTION
Instruction Manual. 9 Dual Screen Portable DVD Player - BPDVD99
 Instruction Manual 9 Dual Screen Portable DVD Player - BPDVD99 CONTENTS General Safety 4 Product Overview 7 Remote Control 9 Getting Started 10 Setup 11 Troubleshooting 12 Specifications 12 Support 16
ACTIVE LOUDSPEAKER. Model: DJSP1216LBT
 ACTIVE LOUDSPEAKER Model: DJSP1216LBT PLEASE READ THIS USER MANUAL COMPLETELY BEFORE OPERATING THIS UNIT AND RETAIN THIS BOOKLET FOR FUTURE REFERENCE. WARNINGS To reduce the risk of fire or electric shock,
9 Digital Photo Frame NF-900. Instruction Manual Please read carefully before use and keep for future reference.
 9 Digital Photo Frame NF-900 Instruction Manual Please read carefully before use and keep for future reference. Table of Contents Thank You... 3 In the Box... 3 At a Glance... 4 Buttons (Rear)...4 Connections...
QAA14AV013 Instruction Manual
 QAA14AV013 Instruction Manual Contents Important Safety Instructions...2 Safety... 2 Warning... 2 Identifying the Parts...4 Main Unit:... 4 Remote Control... 4 Install remote control batteries...5 Connections...5
 Register your product and get support at www.philips.com/welcome DS3600 EN User manual Contents 1 Important 3 2 Your Docking Speaker 4 Introduction 4 What s in the box 4 Overview of the main unit 5 Overview
Table of Contents. Federal Communications Commission (FCC) Statement...2
 Statement...2") Contents Table of Contents Federal Communications Commission (FCC) Statement...2 Important Safety Instructions...3 Chapter 1 Introduction Features...6 Package Contents...7 Front View and Controls...8 Installing
Contents Table of Contents Federal Communications Commission (FCC) Statement...2 Important Safety Instructions...3 Chapter 1 Introduction Features...6 Package Contents...7 Front View and Controls...8 Installing
7 Digital photo frame Model No.: DF-704
 7 Digital photo frame Model No.: DF-704 For information and support, www.lenco.eu PARTS LIST 1 Setup 2 Exit 3 Right 4 Left 5 Play/Pause/on/off 5 4 3 2 1 OPERATION METHOD 1) Please use the 5V DC power adapter
User`s Guide SBAR-51. Sound Bar and Docking Station
 User`s Guide SBAR-51 Sound Bar and Docking Station Please read the following instructions carefully before connecting, operating or adjusting this product. Please keep this manual in a convenient place
DP-152. Digital Picture Viewer. Instruction Manual. Please read this manual carefully before operation 152SX
 DP-152 Digital Picture Viewer Instruction Manual Please read this manual carefully before operation 152SX Precautions For Customer Use: Enter below the serial number that is located on the bottom of the
Majority Longstanton. DAB / DAB+ / FM Radio LNG-DAB-BLK. User Guide
 Majority Longstanton DAB / DAB+ / FM Radio LNG-DAB-BLK User Guide Contents Controls and Functions... What s in the box?... Instruction Guide... Basic Operation... DAB Radio... Set Up of the DAB Radio Preset
AudioCast Transmitter Owners Manual
 AudioCast Owners Manual Thank you for purchasing a Soundcast Systems wireless product. Soundcast products offer the highest quality, interference free wireless audio transmission system available today.
Compliance Information
 Compliance Information DPG801BK FCC Statement This device complies with part 15 of FCC Rules. Operation is subject to the following two conditions: (1) this device may not cause harmful interference, and
AudioCast Receiver Owners Manual
 AudioCast Receiver Owners Manual Thank you for purchasing a Soundcast Systems wireless product. Soundcast products offer the highest quality, interference free wireless audio transmission system available
Industrial Worksite Outdoor Rechargeable Bluetooth Speaker with FM radio and USB/SD Flash Drive PWPBT250 INSTRUCTION MANU
 Industrial Worksite Outdoor Rechargeable Bluetooth Speaker with FM radio and USB/SD Flash Drive PWPBT250 INSTRUCTION MANU IMPORTANT SAFETY INSTRUCTIONS: 1. Read the instructions. All uses guidelines must
Audio Core 200 User Guide
 Audio Core 200 User Guide 2 EN Important safety instructions Read these instructions. Keep these instructions. Heed all warnings. Follow all instructions. Do not use this apparatus near water. Clean only
Operating Instructions 4 Quick Start 4 Password 4 Settings 5 Home screen 6 Application screen 8 Auto play 9 Playing content 10 Reccommended formats
 i VIEW User Manual Index Operating Instructions 4 Quick Start 4 Password 4 Settings 5 Home screen 6 Application screen 8 Auto play 9 Playing content 10 Reccommended formats Overview 11 Components 11 Front
DVD-209 DVD-419 PRECAUTIONS
 PRECAUTIONS The lightning flash with arrowhead symbol within an equilateral triangle is intended to alert the user to the presence of uninsulated dangerous voltage within the product s enclosure that may
Instruction Manual Please read carefully before use and keep for future reference.
 Portable Bluetooth Speaker with Colored Lights NAS-3096 Instruction Manual Please read carefully before use and keep for future reference. Important Safety Information CAUTION RISK OF ELECTRIC SHOCK DO
Bluetooth integrated amplifier. USER Guide Model s GDI-BTAR122 & GDI-BTAR502
 Bluetooth integrated amplifier USER Guide Model s GDI-BTAR122 & GDI-BTAR502 Important Safety Instructions and Warnings Please read before installation WARNING: CAUTION: To reduce the risk of fire or electrical
Instruction Manual. Portable Stereo Media Player. Never-Ending Learning Innovation
 Instruction Manual Portable Stereo Media Player Never-Ending Learning Innovation 80 Little Falls Road, Fairfield, NJ 07004 1-800-631-0868 www.hamiltonbuhl.com Contents Warnings and Precautions...3 Important
AZATOM Home Hub. Radio Alarm Docking Station with Bluetooth. User Manual. This manual is available to download online at
 AZATOM Home Hub Radio Alarm Docking Station with Bluetooth User Manual This manual is available to download online at www.azatom.com Thank you for shopping with AZATOM Please read this manual carefully
USER MANUAL VN3298TS. Home Audio System
 USER MANUAL VN3298TS Home Audio System Please retain this manual for all future use and reference CONTENTS Important Safety Instructions...3-5 Introduction...6 P r o d u c t O v e r v i e w.......................................................................................
DENVER DPF-537 User Manual. Digital Photo Frame. The power adapter cable/disconnect device shall remain easy to operate/disconnect.
 DENVER DPF-537 User Manual Digital Photo Frame WARNING The power adapter cable/disconnect device shall remain easy to operate/disconnect. 1 Introduction Congratulations on your purchase of Digital Photo
OPERATING INSTRUCTIONS POWERSMART 10 10,000 MAH PORTABLE POWER PLEASE READ BEFORE OPERATING THIS EQUIPMENT
 POWERSMART 10 10,000 MAH PORTABLE POWER OPERATING INSTRUCTIONS PLEASE READ BEFORE OPERATING THIS EQUIPMENT HALO POWERSMART 10 Thank you for choosing HALO. Innovative and easy to use, the HALO POWERSMART
PLTT21BT CLASSICAL TURNTABLE WITH USB PLAYER, BLUETOOTH INSTRUCTIONS MANUAL
 PLTT21BT CLASSICAL TURNTABLE WITH USB PLAYER, BLUETOOTH INSTRUCTIONS MANUAL CAUTION TO PREVENT FIRE OR SHOCK HAZARD, DO NOT USE THIS PLUG WITH AN EXTENSION CORD, RECEPTACLE OR OTHER OUTLET UNLESS THE BLADES
Digital Photo Frame Instruction Manual
 Digital Photo Frame Instruction Manual Model 3FMPF215BK15-R Table of Contents SAFETY INFORMATION... 4 PACKAGE CONTENTS... 4 SPECIFICATIONS SUMMARY... 5 DPF INTRODUCTION... 6 QUICK START... 8 OPERATION
W IRELESS8000 T. Powerful Universal Portable Charger PLEASE READ BEFORE OPERATING THIS EQUIPMENT
 W IRELESS8000 T M Powerful Universal Portable Charger PLEASE READ BEFORE OPERATING THIS EQUIPMENT HALO WIRELESS 8000 Thank you for choosing HALO. The HALO WIRELESS 8000 is a portable charger with 8000mAh
Majority Impington. DAB / BAB+ / FM Radio Alarm Clock IMP-DAB-WDM. User Guide
 Majority Impington DAB / BAB+ / FM Radio Alarm Clock IMP-DAB-WDM User Guide Contents Controls and Functions... What s in the box?... Instruction Guide... Basic Operation... DAB Radio... Set Up of the DAB
Voca safety instructions
 Voca Voca safety instructions 1. Read these instructions All the safety and operating instructions should be read before this product is operated. 2. Keep these instructions The safety and operating instructions
P OCKET POWER 9000 T. Powerful Universal Portable Charger PLEASE READ BEFORE OPERATING THIS EQUIPMENT
 P OCKET POWER 9000 T M Powerful Universal Portable Charger PLEASE READ BEFORE OPERATING THIS EQUIPMENT HALO POCKET POWER 9000 Thank you for choosing HALO. Innovative, fashionable and easy to use, the HALO