2017 All Rights Reserved. Windows and the Windows logo are registered trademarks of Microsoft Corporation. All other trademarks are the property of
|
|
|
- Beverly Cross
- 6 years ago
- Views:
Transcription


1 2017 All Rights Reserved. Windows and the Windows logo are registered trademarks of Microsoft Corporation. All other trademarks are the property of their respective companies.
2 1
3 2
4 Thank you for purchasing this camera. Everything you need to take quality digital photos and videos is included with your camera. Polaroid makes capturing those special moments as easy as possible. Please read this manual carefully first in order to get the most out of your digital camera. NOTE: Your camera requires a Micro SD Memory card Class 4 or higher (up to 32GB) for normal use. Micro SD Memory cards are not included and need to be purchased separately. This camera is a Plug and Play device. You can download the pictures and videos captured by your camera without the software by directly accessing the camera s memory card from your computer. It is recommended however that you install the Polaroid Instant Memories Software to enjoy the full Polaroid experience. IMPORTANT: - Do not open the battery door underwater. - Close the battery door properly for best water sealing. - Rinse the camera with clean water after use and keep dry for storage. Waterproof up to 10 ft. (3.0 meters) 18 Mega Pixels Digital Still Camera Digital Video Recorder Built-in Flash 4x Digital Zoom Dual LCD Screen: 2.8" (Rear) + 1.8" (Front) TFT Color Display Micro SD Memory Card Support Slide Lock Battery Door 2x AAA Alkaline Batteries 3


5 1. Digital Camera 2. USB Cable 3. Wrist Strap NOTE: Micro SD Memory Card Class 4 or higher and batteries not included. 4
 15. MODE Switch Button 6. Flash 16. Menu / OK / Delete Button 7. Lens 17. Battery Compartment 8. LED Busy Indicator 18.")
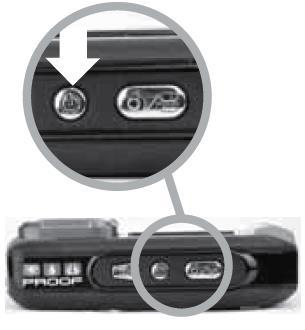
6 1. Shutter Button 11. Up / Tele - Zoom In (T) Button 2. Power On/Off Button 12. Down / Wide - Zoom Out (W) Button 3. LCD Switch Button 13. Left / Flash Light Button 4. Wrist Strap Connector 14. Right / Playback Button 5. Small LCD Monitor (front) 15. MODE Switch Button 6. Flash 16. Menu / OK / Delete Button 7. Lens 17. Battery Compartment 8. LED Busy Indicator 18. Micro SD Memory Card Slot 9. Macro/Normal Switch 19. USB Port 10. LCD Screen (back) 20. Tripod Mount 5


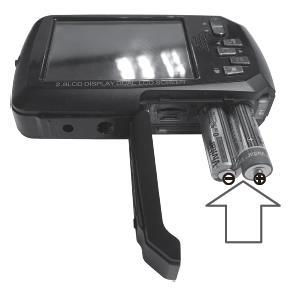
7 Insert 2 x AAA (1.5V) batteries. Alkaline batteries recommended. Batteries not included. Micro SD Memory Card Class 4 or higher (up to 32GB) needed for normal use. Micro SD Memory Card not included. 6
 Open the battery/memory card compartment door.")
 Securely close the battery/memory card compartment door.")

8 Use 2x AAA (1.5V) batteries. Alkaline batteries are recommended. Batteries not included. 1) Open the battery/memory card compartment door. 2) Insert the batteries properly into your digital camera, according to the polarity shown inside the battery compartment. 3) Securely close the battery/memory card compartment door. NOTE: Remove the batteries from the camera when not in use for an extended period. Do not mix alkaline and non-alkaline batteries. Some features, such as Flash, will not work if the battery power level is low. When the battery power is low the battery icon turns red and the camera will automatically turn off a few seconds later. The energy status of the power is displayed on LCD as shown below: Full battery power Low battery power Medium battery power Battery empty 7

 Open the battery/memory card compartment door.")
. Refer to images: 1 and 2.")


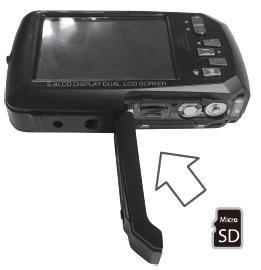
9 Make sure a Micro SD card Class 4 or higher has been properly inserted into your camera. Micro SD Memory card not included. To properly insert the Memory Card: 1) Turn off the camera. 2) Open the battery/memory card compartment door. 3) Insert the Micro SD Card into the slot in the direction shown on the camera (see SD icon by the Micro SD card slot). Refer to images: 1 and 2. 4) Push the Micro SD Card until you hear a slight clicking sound. This indicates the memory card has been inserted correctly. Refer to images: 3 and 4. NOTE: There is only one right direction to insert the Micro SD memory card into the slot. Do not force the card into the memory card slot, since it may damage both the camera and the Micro SD memory card. After the camera is powered on, a memory card icon will appear on the LCD display. If you do not see the SD icon on the display, please check if the card was inserted properly. 8
10 IMPORTANT: The Micro SD memory card must be formatted before taking photographs. Formatting the Micro SD Memory Card: 1) Press the MENU button in Photo Capture or Video Capture Mode to open the menu options. 2) Press the LEFT or RIGHT button to select the Format Memory Card option. 3) To format the memory card, press the DOWN (W) or UP (T) button to highlight and select the Yes and then press the MENU button to confirm. 4) You will be asked to reconfirm. The following options appear: Yes, No To format the Micro SD Memory Card, select Yes and press the MENU button. All data on the memory card will be automatically deleted. To exit the menu without formatting the SD Memory Card select No then press the MENU button. Press the POWER button to turn on the camera. 9
11 After powering the camera ON for the first time the camera will take you through the initial camera setup. 1) You will first be prompted to select a language for the camera. The Language selection menu will appear. Select the language of your choice by pressing the DOWN (W) or UP (T) button. 2) Then press the MENU button to confirm the selection. 3) After selecting a language, you will be asked if you would like to continue with the initial camera setup. A message will appear: Continue with Camera Setup? Select Yes to continue or No to exit the setup. Note: If you select No and decide to leave the camera setup, the camera will be set to its default settings. These settings can be adjusted at any time manually through the menus in the camera. The next step in the initial camera setup is to set the date and time on the camera. 1) Press the DOWN (W) or UP (T) button to change and set the specific time/date settings. 2) Press the LEFT or RIGHT button to move to a different part of the time/date setting options. 3) Once you have set the date and time as desired press the MENU button to confirm the setting and move to the next part of the camera setup. 10
12 Next you will be asked to set the default INSTA Share destination for photos and videos taken with your camera. The INSTA Share technology allows you to quickly and easily upload your camera s photos and videos to social networks with the accompanying software application. 1) First you will be asked to choose the default INSTA Share social network for Photos. Press the DOWN (W) or UP (T) button to highlight the desired default social network and then press the MENU button to confirm the selection. 2) Next you will be asked to choose the default INSTA Share social network for Videos. Press the DOWN (W) or UP (T) button to highlight the desired default social network and then press the MENU button to confirm the selection. Congratulations! Your camera is now ready to use. 11
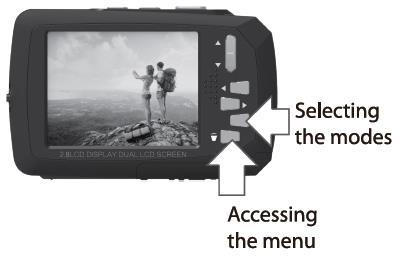
13 Your camera has different modes for the various camera functions. You can switch modes by pressing the MODE button on your camera after the camera has been powered ON. Use this mode to capture pictures with your camera. This is the default mode when the camera is powered ON. To take a picture, aim your camera as desired and press the Shutter button. The picture is automatically saved to your camera s memory card. To access the various menus for the Photo Capture mode, press the while in the Photo Capture mode. MENU button Use this mode to capture videos with your digital camera. After turning on your camera, press the MODE button once to open the Video Capture mode. To take a video, aim your camera as desired and press the Shutter button to start the record. A red record indicator will appear on the LCD screen while record is in progress. To stop recording, press the Shutter button again. The video is automatically saved to your camera s memory card. To access the various menus for the Video Capture mode, press the while in the Video Capture mode. MENU button Use this mode to view and manage the photos and videos on your camera. After turning on your camera, press the MODE button twice to open the Playback mode for photos and videos. Alternatively, press the Playback button. You can scroll through the photos and videos that you ve previously taken to view, edit or delete them as desired. To access the various menus for the Playback mode for photos and videos, press the MENU button while in the Playback mode. 12
14 Image Sensor Image Resolution Video Resolution File Format External Memory LCD Display CMOS Sensor 18MP (4896x3672), 16MP (4608x3456), 14MP (4416x3312), 12MP (4000x3000), 10MP (3648x2732), 8MP (3264x2448), 7MHD (3648x2048), 5MP (2592x1944), 3MP (2048x1536), 2MHD (1920x1080), VGA(640x480) HD (1280x720), VGA (640x480), QVGA (320x240) JPEG (Photo); AVI (Video) Micro SD Memory Card Class 4 or higher (up to 32GB) " Dual TFT screen Lens f=5.8mm, F2.8 Zoom Exposure White Balance 4X Digital Zoom -3.0EV ~ +3.0EV Auto, Daylight, Cloudy, Fluorescent, Incandescent ISO Auto, 100, 200, 400 Flash Self-Timer Macro Languages Microphone No Flash, Forced On, Auto, Red Eye Reduction 2 seconds, 5 seconds, 10 seconds, Off Yes, Manual Switch English, French, Spanish, Portuguese, German, Italian, Dutch, Polish, Greek Yes USB Interface USB 2.0 System Requirements Battery Working Temperature Microsoft Windows XP (SP 3), Vista (SP1) and Windows 7 or above ; MAC OSX v10.5.x or above 2x AAA (1.5V) Alkaline batteries 0~45C 13
15 To be able to download photos and videos to your computer using the Polaroid Instant Memories Software, you will need the following minimum configuration: MICROSOFT Windows XP with Service Pack 3, Windows Vista with Service Pack 1, Windows 7 or higher Pentium 4 processor (or above) 1 GB of RAM, with 250 MB of free hard disk space 16-bit Color monitor, 1024 X 768 recommended screen resolution CD-ROM Drive QuickTime 6 or higher MICROSOFT Internet Explorer 7 or higher Windows Media Player 10 or higher DirectX 9 or higher Internet connection required Intel processor running Mac OS X v10.5.x or later 1 GB RAM, 250 MB free hard disk space Display: 1024 x 768 or higher-resolution monitor CD-ROM Drive QuickTime 6 or higher Internet connection required NOTE: Make sure the latest compatible Adobe Flash Player is installed on your computer. 14
16 Make sure the batteries (not included) have been inserted properly into your digital camera. Make sure the Micro SD card has been inserted properly into your digital camera. Micro SD card Class 4 or higher and up to 32GB - not included. Please see Initial Camera Setup for more information. Press the Power button to turn your camera ON. After powering on, the LED light turns on briefly and the LCD screen turns on with your camera in Photo Capture Mode. While the camera is on, you can press the Power button down again for a few seconds at any point to turn your camera OFF. Your digital camera has an Auto Power Off feature that automatically turns off your camera after a specific period of time that your camera is left idle. The Auto Power Off settings can be set from the Auto Power Off settings menu in either Photo Capture Mode or Video Capture Mode. 15
17 Your camera has three main modes: 1) Photo Capture Mode - Use this mode to capture photos with your camera. 2) Video Capture Mode - Use this mode to capture videos with your camera. 3) Playback Mode (for photos and videos) - Use this mode to view the photos and videos you have already taken with your camera. When the camera is first powered ON, the Photo Capture Mode will be active. The icons that appear on the LCD screen are the best default settings so that you can begin to capture and enjoy clear quality photos and videos. To change the active camera mode, make sure the camera is powered ON and press the MODE (M) button. When in Photo Capture Mode, this icon will display on the top-left corner of the LCD display When in Video Capture Mode, this icon will display on the top-left corner of the LCD display When in Playback Mode, this icon will display on the top-left corner of the LCD display NOTE: You can also press the Mode. PLAYBACK button to easily and quickly enter the Playback 16
18 Each camera mode has a set of menus specific to that mode. 1) Press the MENU/OK button to open the menus for the current mode. NOTE: In Playback Mode only, long press the MENU/OK button for approximately 3 seconds until the menu screen appears. 2) Press the LEFT or RIGHT button to scroll between the various menus for the current mode. 3) Press the DOWN (W) or UP (T) button to highlight the desired setting. 4) Press the MENU/OK button to confirm and save the highlighted menu option. 5) A selection icon appears to the right of the selected menu option. Changes made to these options remain until you decide to change them again at a later time. NOTE: Some menu options are single-use functions that are not remembered by the camera. 6) At any time you can press the MODE (M) button to exit the menus and return to the previous screen. NOTE: At any time you can press the MODE (M) button to exit the menus and return to the previous screen. Once you change a setting, the setting is saved by your camera until you manually change the setting or restore the camera s default factory settings. After selecting your desired setting, some settings appear as an icon on the LCD screen in Capture Mode indicating the option selected. 17
19 The INSTA Share technology allows you to quickly and easily upload your camera s photos and videos to the social networks of your choice with the accompanying Polaroid Instant Memories application. An INSTA Share destination can be assigned to a photo or video in Capture mode prior to capturing your image or in Playback Mode. INSTA Share: Video or Photo Capture Mode Press the MENU/OK button and then press the LEFT or RIGHT button to select the INSTA Share menu option. Press the DOWN (W) or UP (T) button to highlight the desired setting. Press the MENU/OK button to save your selection and return to Photo/Video Capture Mode. Your selected INSTA Share destination appears as an icon on the LCD screen and your camera is now ready to capture your photo or video with the selected INSTA Share destination. NOTE: The INSTA Share feature is deactivated by default and needs to be activated prior to capturing each photo or video. INSTA Share: Playback Mode An INSTA Share destination can be added to a captured image or changed by accessing the INSTA Share menu in Playback Mode. Simply select an image, long press the MENU/OK button and then press the LEFT or RIGHT button to select the INSTA Share menu option. Press the DOWN (W) or UP (T) button to highlight the desired setting and then press the MENU/OK button to save your selection. 18
20 You can easily include yourself in your captured photos and videos by using the LCD screen on the front of the camera. 1) Before taking the photo or video, ensure that the Macro Switch on the side of the camera is up and in the MACRO ON position. The flower icon will appear on the LCD display. 2) Then simply press the LCD Switch button and hold the camera steady facing towards you at arm s length (30~45cm). 3) Make sure you can see yourself on the LCD screen on the front of the camera. 4) Look at the camera lens. 5) Press the SHUTTER button to capture your photo or video. There are several Flash options available on your camera. The options appear on the Photo Capture Mode LCD screen in sequence. To change the Flash mode, press the LEFT / Flash Quick Function button to toggle between the options until you arrive at your desired setting. IMPORTANT: When using Flash, stand between 8 to 10 feet away from the scene you would like to capture. The Macro mode must be turned OFF when you want to use the Flash. - To turn off Macro mode: Push the Macro Switch DOWN to the mountain icon. Flash Type Description Forced Off (Default) No flash will appear. Use this when you do not want to activate Flash. NOTE: A Turn On Flash message appears when the camera detects a need for flash. When this message appears, it is recommended to press the Flash/Up button and select one of the flash options: Auto Flash, Forced On or Red-Eye Reduction. 19
21 Forced On A Auto Flash Red Eye Reduction The flash is enabled for each photo. NOTE: If you use this option in a well-lit environment, your photo may be appear too bright/light (overexposed). When you want the camera to determine if Flash is needed, select Auto Flash. The flash will automatically turn on according to the lighting conditions. When the LED light stops blinking, the Flash is ready for use. NOTE: In some cameras, an initial flash appears to test your lighting conditions. If flash is needed, a second flash will appear upon taking the photo. Eliminates the red-eye effect in a photo caused by flash. 20
22 Your camera contains a MACRO feature that allows you to enable or disable the MACRO mode on your camera. When enabled, the MACRO mode allows your camera to focus on an object that is close to the camera. MACRO ON: Close-up Photographs While using the Macro mode, you can capture images at close range (11cm ~ 18 cm). To turn the Macro mode ON: Push the Macro Switch on the side of your camera UP to the flower icon. When enabled, the Macro mode will allow your camera to focus on an object that is close to the camera. The flower icon appears on the LCD and indicates that the Macro mode is ON. MACRO OFF: Normal Mode The Macro OFF feature is the normal mode for capturing images. To turn the Macro mode OFF: Push the Macro Switch on the side of the camera DOWN to the mountain icon. The mountain icon appears on the LCD display. When Macro mode is off, photos can be captured from 0.5m - (infinity). NOTE: The Macro mode must be turned OFF when you want to use the following features of your camera: Flash. 21
23 The Photo Capture mode allows you to capture pictures with your digital camera. When the camera is first powered on, the camera will be in Photo Capture Mode. 1) Power on your camera: Photo Capture Mode is the default mode that appears upon powering on your camera. 2) Select the scene with the LCD Display: Use the LCD display on the back of the camera to direct the camera at the scene you would like to capture. 3) Digital Zoom: Press the UP/T - Zoom In and DOWN/W - Zoom Out buttons to zoom in/out if desired. You can magnify your subject up to 4 times using the Digital Zoom. The zoom indicating bar moves up when you Zoom In (T) and moves down when you Zoom Out (W). 4) Capture the Photo: Press the SHUTTER button to take the picture. The picture is automatically saved to the camera s Micro SD Memory Card. You can also capture your photos using the LCD screen on the front of the camera. 1) Before taking the photo, ensure that the Macro Switch on the side of the camera is up and in the MACRO ON position. The flower icon will appear on the LCD display. 2) When you would like to quickly include yourself in the photo, simply press the LCD Switch button and hold the camera steady facing towards you at arm s length (30~45cm). 3) Make sure you can see yourself on the front LCD screen. 4) Look at the camera lens. 5) Press the SHUTTER button to take the picture. 22
24 You can also use the Self Timer feature when you would like to include yourself in the photograph. In order to see yourself and set the scene as you would like, use the LCD screen on the front of the camera. It is recommended to use a tripod in order to avoid shaking of the camera. 1) While in Photo Capture Mode, press the MENU button to open the menus options. 2) Press the LEFT or RIGHT button to select the Self Timer menu and then press the DOWN (W) button to select one of the Self Timer setting options. 3) Press the MENU button to confirm and save the highlighted option. 4) The Self-Timer feature is now ready for use. The Self-Timer icon appears on the LCD screen. 5) Set the camera in the direction you would like to capture. Press the LCD Switch button to view yourself from the camera s front LCD screen. 6) Press the SHUTTER button to take the photograph. The photo will be taken after the selected Self Timer delay. The countdown is shown on the LCD screen. The camera beeps and the LED light flashes during the countdown. NOTE: Depending on the distance to the object being photographed, use the Macro switch to adjust the distance. Select the Macro ON, the flower symbol if you wish to take a close-up photograph (11cm 18 cm). If you wish to take a photograph of surroundings or people (0.5m infinity), set the Macro switch to OFF, normal mode. See Macro Mode for more details. The Self Timer feature remains active until you manually change it to OFF by selecting this option from the Self Timer/Photo Capture Mode Menu. If you are not sure if there is enough lighting, turn on the Automatic Flash by pressing the LEFT/ Flash button. If the battery power is too low, the flash won t be activated. See Flash Options for more details. 23
25 Quick Function Description Button LEFT FLASH: Toggles the following Flash options appearing on the LCD: Forced Off, Forced On, A Auto Flash, Red Eye Reduction NAVIGATES MENU: Navigates within the Menus. RIGHT PLAYBACK: Opens the Playback Mode. NAVIGATES MENU: Navigates within the Menus. UP / T DOWN / W ZOOM: Zooms IN NAVIGATES MENU: Navigates within the Menus. ZOOM: Zooms OUT NAVIGATES MENU: Navigates within the Menus. Other SHUTTER PHOTO CAPTURE: Captures the photo ENTERS and SAVES SELECTION: Within the Menu, enters the submenu and saves the selected setting option. PHOTO CAPTURE MENU: Opens the menu options for Photo Capture MENU/OK Mode NOTE: Use the UP/DOWN/LEFT/RIGHT buttons to navigate. MODE SELECT: Toggles between the Photo Capture Mode, Video MODE (M) Capture Mode, and Playback Mode. MENU: Exits the menu screen. LCD Switch SWITCH SCREEN: Switches between the use of the front and back LCD screens. 24

26 The following are the menus that appear in your camera s Photo Capture Mode: The selection icons below appear by the default settings. Once you change a setting, the setting is saved by your camera until you manually change the setting or restore the camera s default factory settings. 25
27 INSTA Share for Photos The INSTA Share technology allows you to quickly and easily upload your camera s photos and videos to the social networks of your choice with the accompanying Polaroid Instant Memories application. 1) Press the MENU/OK button to open the menus for the current mode. 2) Press the LEFT or RIGHT button to scroll and select the INSTA Share for Photos menu. 3) Press the UP or DOWN button to highlight a specific option. 4) Press the MENU/OK button to confirm and select the highlighted menu option. A selected option icon appears on the selected item. 5) To continue within the menus and select a different menu option: Press the LEFT or RIGHT button to select the next menu item. 6) To exit the menu view: Press the MODE button to exit the menu and return to your previous mode. NOTE: An icon appears on the image with the selected INSTA Share destination site when the image is seen in the Playback Mode. Remember that the INSTA Share feature is deactivated by default. An INSTA Share destination will only be assigned to a photo or video if you manually set it from this menu or from the INSTA Share menu in Playback Mode. Changing the INSTA Share destination site will also make the selected site the new default INSTA Share option. A new default can be selected at any time through this menu. Scene Menu The Scene Menu allows you to choose scene settings that let your camera to adapt properly to your current environment. NOTE: When selecting the HIGH SENSITIVITY Option, by default the camera switches off the FLASH automatically (if it s ON) to optimize the picture quality. If however, you would like to override it and manually turn ON the flash you can do so. 1) Press the MENU/OK button to open the menus for the current mode. 26
28 2) Press the LEFT or RIGHT button to scroll and select the Scene menu. 3) Press the UP or DOWN button to highlight a specific option. 4) Press the MENU/OK button to confirm and select the highlighted menu option. A selected option icon appears on the selected item. 5) To continue within the menus and select a different menu option: Press the LEFT or RIGHT button to select the next menu item. 6) To exit the menu view: Press the MODE button to exit the menu and return to your previous mode. An icon reflecting your selection is displayed on the LCD screen. Image Resolution Menu The Image Resolution menu allows you to choose the desired size of the images taken by your camera. Keep in mind that images with a higher resolution will also take up more of your camera s memory. 1) Press the MENU/OK button to open the menus for the current mode. 2) Press the LEFT or RIGHT button to scroll and select the Image Resolution menu. 3) Press the UP or DOWN button to highlight a specific option. 4) Press the MENU/OK button to confirm and select the highlighted menu option. A selected option icon appears on the selected item. 5) To continue within the menus and select a different menu option: Press the LEFT or RIGHT button to select the next menu item. 6) To exit the menu view: Press the MODE button to exit the menu and return to your previous mode. An icon reflecting your selection is displayed on the LCD screen. Image Quality Menu The Image Quality menu allows you to select the desired quality level of the images taken by your camera. Keep in mind that images with a higher image quality level will also take up more 27
29 memory on your camera. 1) Press the MENU/OK button to open the menus for the current mode. 2) Press the LEFT or RIGHT button to scroll and select the Image Quality menu. 3) Press the UP or DOWN button to highlight a specific option. 4) Press the MENU/OK button to confirm and select the highlighted menu option. A selected option icon appears on the selected item. 5) To continue within the menus and select a different menu option: Press the LEFT or RIGHT button to select the next menu item. 6) To exit the menu view: Press the MODE button to exit the menu and return to your previous mode. An icon reflecting your selection is displayed on the LCD screen. Self-Timer Menu The Self-Timer menu allows you to set a delay between the time that the camera s Shutter button is pressed and the actual capture of the picture. This is an optimal feature if you don t just want to take the picture but would also like to be in the picture yourself. Just set the desired Self-Timer delay, press the Shutter button on your camera and position yourself in front of the camera as desired. Reminder: Press the LCD Switch button to activate the front LCD screen before taking your photo. 1) Press the MENU/OK button to open the menus for the current mode. 2) Press the LEFT or RIGHT button to scroll and select the Self-Timer menu. 3) Press the UP or DOWN button to highlight a specific option. 4) Press the MENU/OK button to confirm and select the highlighted menu option. A selected option icon appears on the selected item. 5) To continue within the menus and select a different menu option: Press the LEFT or RIGHT button to select the next menu item. 6) To exit the menu view: Press the MODE button to exit the menu and return to your previous mode. An icon reflecting your selection is displayed on the LCD screen. NOTE: If the option is set to Off, the no icon is displayed on the LCD screen. 28
30 Anti-Shake Menu The Anti-Shake feature reduces image distortion that can be caused by movement of the camera while capturing the image. 1) Press the MENU/OK button to open the menus for the current mode. 2) Press the LEFT or RIGHT button to scroll and select the Anti-Shake menu. 3) Press the UP or DOWN button to highlight a specific option. 4) Press the MENU/OK button to confirm and select the highlighted menu option. A selected option icon appears on the selected item. 5) To continue within the menus and select a different menu option: Press the LEFT or RIGHT button to select the next menu item. 6) To exit the menu view: Press the MODE button to exit the menu and return to your previous mode. An icon reflecting your selection is displayed on the LCD screen. Multi Snapshots Menu When enabled, the Multi Snapshots feature allows you to take three rapid snapshots in a row with a single click of the Shutter button. This feature can be effective when trying to capture a particular moment in a sporting event or other scenes with quick movements. 1) Press the MENU/OK button to open the menus for the current mode. 2) Press the LEFT or RIGHT button to scroll and select the Multi Snapshots menu. 3) Press the UP or DOWN button to highlight a specific option. 4) Press the MENU/OK button to confirm and select the highlighted menu option. A selected option icon appears on the selected item. 5) To continue within the menus and select a different menu option: Press the LEFT or RIGHT button to select the next menu item. 6) To exit the menu view: Press the MODE button to exit the menu and return to your previous mode. An icon reflecting your selection is displayed on the LCD screen. 29
31 White Balance Menu The White Balance feature allows your camera to adjust the coloring of the captured images depending on the type of light source in the current environment. Properly adjusting the White Balance setting to match your current environment will allow the camera to properly balance the colors in the images that are taken with your camera. 1) Press the MENU/OK button to open the menus for the current mode. 2) Press the LEFT or RIGHT button to scroll and select the White Balance menu. 3) Press the UP or DOWN button to highlight a specific option. 4) Press the MENU/OK button to confirm and select the highlighted menu option. A selected option icon appears on the selected item. 5) To continue within the menus and select a different menu option: Press the LEFT or RIGHT button to select the next menu item. 6) To exit the menu view: Press the MODE button to exit the menu and return to your previous mode. An icon reflecting your selection is displayed on the LCD screen. Color Effect Menu You can choose to add a color effect to the images taken with your camera. 1) Press the MENU/OK button to open the menus for the current mode. 2) Press the LEFT or RIGHT button to scroll and select the Color Effect menu. 3) Press the UP or DOWN button to highlight a specific option. 4) Press the MENU/OK button to confirm and select the highlighted menu option. A selected option icon appears on the selected item. 5) To continue within the menus and select a different menu option: Press the LEFT or RIGHT button to select the next menu item. 6) To exit the menu view: Press the MODE button to exit the menu and return to your previous mode. 30
32 Image Sharpness Menu You can set the level of sharpness in the images taken with your camera. The sharpness level dictates if the edges of objects in the image are more or less distinct. 1) Press the MENU/OK button to open the menus for the current mode. 2) Press the LEFT or RIGHT button to scroll and select the Image Sharpness menu. 3) Press the UP or DOWN button to highlight a specific option. 4) Press the MENU/OK button to confirm and select the highlighted menu option. A selected option icon appears on the selected item. 5) To continue within the menus and select a different menu option: Press the LEFT or RIGHT button to select the next menu item. 6) To exit the menu view: Press the MODE button to exit the menu and return to your previous mode. An icon reflecting your selection is displayed on the LCD screen. Light Exposure Menu The Light Exposure setting helps you control the amount of light that enters your camera s lens. This setting should be adjusted when the environment is lighter or darker than normal. When the environment has more light than is needed, reduce the exposure setting (by using the negative - count) to reduce the amount of light allowed into the lens by your camera. If the environment has less light (darker) than is needed, increase the exposure setting (by using the positive + count) to increase the amount of light allowed into the lens by your camera. 1) Press the MENU/OK button to open the menus for the current mode. 2) Press the LEFT or RIGHT button to scroll and select the Light Exposure menu. 3) Press the UP or DOWN button to highlight a specific option. 4) Press the MENU/OK button to confirm and select the highlighted menu option. A selected option icon appears on the selected item. 5) To continue within the menus and select a different menu option: Press the LEFT or RIGHT button to select the next menu item. 6) To exit the menu view: 31
33 Press the MODE button to exit the menu and return to your previous mode. An icon reflecting your selection is displayed on the LCD screen. ISO Menu The ISO menu allows you to set the level of sensitivity that your camera has to light in the surrounding environment. When the ISO level is increased, the image sensor in your camera will be more sensitive to light and allow you to capture images in lower-light situations. The higher sensitivity to light however, may reduce the quality of the images that are taken. When the ISO is reduced, the image sensor in your camera will be less sensitive to light and will optimize the image quality in environments with bright lighting. 1) Press the MENU/OK button to open the menus for the current mode. 2) Press the LEFT or RIGHT button to scroll and select the ISO menu. 3) Press the UP or DOWN button to highlight a specific option. 4) Press the MENU/OK button to confirm and select the highlighted menu option. A selected option icon appears on the selected item. 5) To continue within the menus and select a different menu option: Press the LEFT or RIGHT button to select the next menu item. 6) To exit the menu view: Press the MODE button to exit the menu and return to your previous mode. An icon reflecting your selection is displayed on the LCD screen. Metering Menu The Metering setting will affect how your camera focuses when capturing an image. Depending on your selection, the camera will be more sensitive to focusing on particular areas in the display and adjust the image color and lighting accordingly. Center Averages the light metered from the entire frame, but giving greater weight to the subject in the center Multi Used in standard conditions the camera divides and adjusts the settings of the image into 32
34 several zones for light metering such as complex light conditions, position of subject, brightness, background, direct light and scenes Spot Meters the area within the spot point frame at the center of the LCD to set the exposure on the subject in the center of the monitor. 1) Press the MENU/OK button to open the menus for the current mode. 2) Press the LEFT or RIGHT button to scroll and select the Metering menu. 3) Press the UP or DOWN button to highlight a specific option. 4) Press the MENU/OK button to confirm and select the highlighted menu option. A selected option icon appears on the selected item. 5) To continue within the menus and select a different menu option: Press the LEFT or RIGHT button to select the next menu item. 6) To exit the menu view: Press the MODE button to exit the menu and return to your previous mode. An icon reflecting your selection is displayed on the LCD screen. Language Menu You can select your camera s language setting by selecting the desired language from the Language menu. 1) Press the MENU/OK button to open the menus for the current mode. 2) Press the LEFT or RIGHT button to scroll and select the Language menu. 3) Press the UP or DOWN button to highlight a specific option. 4) Press the MENU/OK button to confirm and select the highlighted menu option. A selected option icon appears on the selected item. 5) To continue within the menus and select a different menu option: Press the LEFT or RIGHT button to select the next menu item. 6) To exit the menu view: Press the MODE button to exit the menu and return to your previous mode. 33
35 Date/Time Menu When you capture an image with your camera, the image will include a time stamp with the date and time that the image was taken. The Date/Time menu allows you to set your camera s date and time as desired. You can also disable the timestamp for future images that will be taken with your camera. On The timestamp will appear on photos taken Off The date stamp will not appear on photos taken To Enable/Disable the Timestamp: 1) Press the MENU/OK button to open the menus for the current mode. 2) Press the LEFT or RIGHT button to scroll and select the Date/Time menu. 3) Press the UP or DOWN button to highlight ON or OFF. ON > Displays the Date & Time on the captured image. OFF > Does not display the Date & Time on the captured image. 4) Press the MENU/OK button to confirm and select the highlighted menu option. A selected option icon appears on the selected item. 5) To continue within the menus and select a different menu option: Press the LEFT or RIGHT button to select the next menu item. 6) To exit the menu view: Press the MODE button to exit the menu and return to your previous mode. To Set the Date and Time: 1) Press the MENU/OK button to open the menus for the current mode. 2) Press the LEFT or RIGHT button to scroll and select the Date/Time menu. 3) Press the UP or DOWN direction control buttons to scroll through the menu options and highlight the Date Setup menu option. 4) Press the MENU/OK button to confirm and enter the Date Setup settings screen. 5) Scroll through the window with the RIGHT and LEFT navigation buttons. For each field in the menu, use the UP and DOWN navigation buttons to set the current time and date. 6) Press the MODE button to exit the menu and return to your previous screen. 34
36 Silent Mode Menu You have the option of activating the camera s Silent Mode to disable all of the sound effects (except for beeps heard during the Self-Timer countdown) that the camera emits when performing camera functions. NOTE: This does not affect the sound during video recording. The camera features that emit sounds include - Power On, Power Off, Shutter Click and Self-Timer. The Silent Mode Options include: Silent Mode Off (default): All camera features will emit sound when activated. Silent Mode On: All camera features will not emit sound EXCEPT for the Self-Timer and associated Shutter Click at the end of the Self-Timer countdown. 1) Press the MENU/OK button to open the menus for the current mode. 2) Press the LEFT or RIGHT button to scroll and select the Silent Mode menu. 3) Press the UP or DOWN button to highlight a specific option. 4) Press the MENU/OK button to confirm and select the highlighted menu option. A selected option icon appears on the selected item. 5) To continue within the menus and select a different menu option: Press the LEFT or RIGHT button to select the next menu item. 6) To exit the menu view: Press the MODE button to exit the menu and return to your previous mode. Auto Power Off Menu You can use the Auto Power Off feature in order to conserve you camera s battery life. The designated time represents when your camera will automatically power off. When the camera sits idle for the designated period of time, the camera will shut off completely and will need to be powered on again with the power button before the next use. 1) Press the MENU/OK button to open the menus for the current mode. 2) Press the LEFT or RIGHT button to scroll and select the Auto Power Off menu. 3) Press the UP or DOWN button to highlight a specific option. 35
37 4) Press the MENU/OK button to confirm and select the highlighted menu option. A selected option icon appears on the selected item. 5) To continue within the menus and select a different menu option: Press the LEFT or RIGHT button to select the next menu item. 6) To exit the menu view: Press the MODE button to exit the menu and return to your previous mode. Frequency Menu The options in the Frequency menu represent the frequency of the electrical current in fluorescent lighting sources in your locale. If your camera is set to a frequency that does not match your country s electric current, you may see waves on the images taken by your camera. 50Hz UK, Europe and Australia 60Hz US, Canada and South America 1) Press the MENU/OK button to open the menus for the current mode. 2) Press the LEFT or RIGHT button to scroll and select the Frequency menu. 3) Press the UP or DOWN button to highlight a specific option. 4) Press the MENU/OK button to confirm and select the highlighted menu option. A selected option icon appears on the selected item. 5) To continue within the menus and select a different menu option: Press the LEFT or RIGHT button to select the next menu item. 6) To exit the menu view: Press the MODE button to exit the menu and return to your previous mode. 36
38 Format Memory Card Menu You can use the Format Memory Card menu to delete all of the content that is currently on your camera s memory card. Keep in mind that formatting the memory card will permanently delete all of the content on your camera s memory card. This option will delete all of the content at one time. If you would like to delete individual images, use the delete menu in the camera s Playback mode. NOTE: Restoring factory defaults or formatting the camera may result in the loss of data. Please ensure you have backed up your images before you attempt this. 1) Press the MENU/OK button to open the menus for the current mode. 2) Press the LEFT or RIGHT button to scroll and select the Format Memory Card menu. 3) Press the UP or DOWN button to highlight a specific option: - CANCEL: To exit without formatting the SD Memory Card, select Cancel and press the MENU/OK button. - FORMAT: To proceed with the format, select Yes and press the MENU/OK button. You will be asked to confirm the formatting of the memory card. Select No and press the MENU/OK button to exit without formatting. Select Yes and press the MENU/OK button to begin the format. The memory card will be completely formatted. Firmware (Factory Default Settings) Menu Use this menu to view the Firmware version on your camera or to reset your camera settings to the Factory Default Settings. 1) Press the MENU/OK button to open the menus for the current mode. 2) Press the LEFT or RIGHT direction control button to scroll and select the Firmware menu. The Default Setting is selected. 3) Press the MENU/OK button to reset the camera to the factory default settings. 4) You will be asked to confirm the resetting to the factory default settings. Select No and then press the MENU/OK button to exit the menu and return to the 37
39 previous mode without resetting to the default setting. Select Yes and press the MENU/OK button to proceed with the reset. You will then automatically exit the menu and return to the previous mode with the digital camera settings set to the Factory Default Settings. NOTE: After RESETTING to the default settings, it is recommended to select your system Language, Date/Time and INSTA Share for Photos and Videos. If you do not, the next time your camera is powered on, you will be prompted to define those settings. 38
40 The Playback Mode allows you to review and edit photos and videos that you ve already taken with you camera. When you first turn on the camera, the camera will be in Photo Capture mode by default. Press the MODE button twice to enter the Playback Mode or press the PLAYBACK button to open the Playback Mode. Press the MODE button to exit the Playback Mode and return to Capture Mode. The latest captured image appears on the LCD screen. If there are no images stored, a message (No File) appears. Videos appear with an AVI icon top left of the LCD screen. Photos appear with a JPG an icon. The image counter is displayed on the top right of the LCD screen, indicating the number of the selected image and the total number of images captured. If the Date and Time Stamp was selected to be ON then the date and time the photo was captured appears on the bottom left of the photo. 1) Selecting Your Photo: Once in Playback Mode, press the LEFT or RIGHT button to scroll through the images on your camera s memory card until you find the image you would like to view. - Press the LEFT button to view the previous image. - Press the RIGHT button to view the next image. Each captured image (video and photo) is displayed on the LCD screen. 2) Magnifying of Your Selected Photo: Press the UP/T - Zoom In to Zoom In and magnify the selected photo up to 4x. Press the DOWN/W - Zoom Out button to Zoom Out of the selected photo. The magnification amount and zoomed photo orientation are shown on the LCD screen. 39
41 Use the LEFT, RIGHT, MODE (M) (move Up) and MENU (move Down) buttons to navigate around the magnified photo. Easily navigate and select the image you wish to view by using the Thumbnail View. The images on your camera will be displayed in a 3 X 3 matrix where you can use the direction buttons to scroll and select images from the thumbnails. To access the Thumbnail View: 1) Press the PLAYBACK button to open the Playback Mode. 2) Press the DOWN/W - Zoom Out button. All the images (photos and videos) on your camera will appear in the Thumbnail View. - Videos appear with AVI. - Photos appear with JPG. 3) Use the LEFT and RIGHT buttons to scroll and select the image you wish to view. 4) Press the SHUTTER button to enlarge the selected image full size. 40
42 Quick Function Description Button LEFT PREVIOUS IMAGE: Displays the previous image. NAVIGATES MENU: Navigates within the Menus and Thumbnail view. RIGHT PLAYBACK: Opens the Playback Mode. NEXT IMAGE: Displays the next image. UP / T DOWN / W NAVIGATES MENU: Navigates within the Menus and Thumbnail view. ZOOM: Zooms IN to magnified photo. NAVIGATES MENU: Navigates within the Menus. THUMBNAIL VIEW: Opens the Thumbnail View. To navigate in the Thumbnail View press the LEFT/RIGHT buttons and the SHUTTER button to select and enlarge the selected image. ZOOM: Zooms OUT of magnified photo. NAVIGATES MENU: Navigates within the Menus. Other SHUTTER MENU/OK MODE (M) IMAGE SELECTION: In Thumbnail View, confirms and opens the selected image to full size. PHOTO PLAYBACK MENU: Opens the menu options for Playback Mode. NOTE: Use the UP/DOWN/LEFT/RIGHT buttons to navigate. NAVIGATES IN ZOOM: Navigates DOWN in magnified photo. MODE SELECT: Toggles between the Photo Capture Mode, Video Capture Mode, and Playback Mode. NAVIGATES IN ZOOM: Navigates UP in magnified photo MENU: Exits the menu screen. LCD SWITCH SLIDESHOW: Begins playing photo Slideshow. 41
 Delete File Menu: Quick press the MENU/ DELETE button in Playback Mode to open the Delete File menu.")
 Photo Playback Mode Menus: Press and hold the MENU/ DELETE button in Playback Mode until the Photo Playback menu appears.")
43 The following are the menus that appear in your camera s Photo Playback Mode: Access the Menus To access the Photo Playback menus: 1) Press the Playback button to enter Playback Mode. 2) Delete File Menu: Quick press the MENU/ DELETE button in Playback Mode to open the Delete File menu. This menu allows you to delete the selected file currently viewed in Playback Mode. 3) Photo Playback Mode Menus: Press and hold the MENU/ DELETE button in Playback Mode until the Photo Playback menu appears. The following menu options appear: Delete, INSTA for Photos, Rotate, Crop Image, Protect/Lock, Print this Photo, Slide Show 42
44 Delete Menu While in the Playback Mode, you can delete pictures from your camera through the Delete menu. 1) Select the photo you would like to delete. 2) Long press the MENU button to open the menus for the current mode. 3) Press the LEFT or RIGHT button to scroll and select the Delete menu. 4) Press the UP or DOWN button to highlight a specific option. To delete the selected photo: Select Delete This Photo and press the MENU button. You will be asked to confirm the deletion of the photo. If you would like to proceed with deleting the current image, select Yes and press the MENU button to confirm. The photo will be deleted and you will exit the menu and return to the Playback mode. If you do not want to delete the current image, select No and press the MENU button. The photo will not be deleted and you will exit the menu and return to the Playback mode. To delete all the images (videos and photos) you have saved on your Memory card: Select Delete All Images and press the MENU button. If you would like to proceed with deleting all the videos and photos, select Yes and press the MENU button to confirm. All of your images will be permanently deleted. A blank No Files Exist screen will appear. Press the MODE button to exit the No Files Exist screen and return to Photo Capture mode. Remember: All images will be deleted except images that are Protected/Locked. To delete a locked image, first unlock the image, then select delete. If you do not want to delete all of your videos and photos, select No and press the MENU button. All images will remain on your memory card and you will exit the menu and return to the Playback mode. 43
45 INSTA Share for Photos The INSTA Share technology allows you to quickly and easily upload your camera s photos and videos to the social networks of your choice with the accompanying Polaroid Instant Memories application. 1) Select the photo you to which you would like to add/change an INSTA Share destination. 2) Long press the MENU button to open the menus for the current mode. 3) Press the LEFT or RIGHT button to scroll and select the INSTA Share for Photos menu. 4) Press the UP or DOWN button to highlight a specific option. 5) Press the MENU button to confirm and select the highlighted menu option. A selected option icon appears on the selected item. 6) To continue within the menus and select a different menu option: Press the LEFT or RIGHT button to select the next menu item. 7) To exit the menu view: Press the MODE button to exit the menu and return to your previous mode. NOTE: An icon appears on the image with the selected INSTA Share destination site when you return to the Playback display. Remember that the INSTA Share feature is deactivated by default. An INSTA Share destination will only be assigned to a photo or video if you manually set it from this menu or from the INSTA Share menu in Capture mode. Changing the INSTA Share destination site will also make the selected site the new default INSTA Share option. A new default can be selected at any time through this menu. Rotate Menu Use this menu to rotate the pictures that you ve taken with your camera. 1) Select the photo you would like to rotate. 2) Long press the MENU button to open the menus for the current mode. 3) Press the LEFT or RIGHT direction control button to scroll and select the Rotate menu. 4) Press the UP or DOWN direction control button to scroll through the menu options. 44
46 5) Press the MENU button to select and save the desired option. 6) The selected picture will now appear rotated in the Playback mode. Crop Image Menu You can crop any picture on your camera with the Crop feature. 1) View the photo you would like to crop. 2) Long press the MENU button to open the menus for the current mode. 3) Press the LEFT or RIGHT direction control button to scroll and select the Crop menu. 4) Press the UP or DOWN to highlight the Crop option. 5) Press the MENU button and then the MODE button to open the Crop option. 6) The Crop window will open on the selected picture. 7) Use the UP/DOWN/LEFT/RIGHT buttons to move the Crop box to define the desired crop area. 8) When you are ready to crop, press the Shutter button. 9) When you see the cropped picture appear, press the Shutter button again to save or press the MODE button to cancel and return to the previous menu. 10) If you selected to save, the cropped picture will now be saved as a new picture to your memory card. NOTE: Photos captured in VGA resolution and previously cropped photos cannot be cropped. Protect/Lock Menu Pictures and videos taken with your camera can be protected or locked to prevent any deletion or alteration being made to the files. 1) View the photo you would like to protect/lock. 2) Long press the MENU button to open the menus for the current mode. 3) Press the LEFT or RIGHT button to scroll and select the Protect/Lock menu. 4) Press the UP or DOWN button to highlight a specific option. 45
47 To Lock the Selected Image: To lock the selected image use the UP or DOWN button to highlight Lock This Photo and then press the MENU button. The image now appears in Playback Mode with the lock icon. To Unlock the Selected Image: To unlock the selected locked image use the UP or DOWN button to highlight Unlock This Photo and then press the MENU button. The image now appears in Playback Mode without the lock icon. To Lock All Images: To lock all captured videos and photos use the UP or DOWN button to highlight Lock All Images and then press the MENU button. All images now appear in Playback Mode with the lock icon. To Unlock All Images: To unlock all locked videos and photos use the UP or DOWN button to highlight Unlock All Images and then press the MENU button. The images now appear in Playback Mode without the lock icon. 5) Press the MODE button at any time to exit the menu and return to your previous mode. NOTE: Any image that is locked displays a lock symbol on the LCD screen when viewing that image in the Playback Mode. Photos that are not locked do not display the lock symbol. Remember that you cannot delete or edit photos while they are locked. Print This Photo Menu You can use the Print Photos menu to print the photos that are on your camera directly to a PictBridge compatible printer. 1) Scroll through your pictures and find the one you would like to print. 2) Long press the MENU button to open the menus for the current mode. 3) Press the LEFT or RIGHT direction control button to scroll and select the Print This Photo menu. 46
48 4) Press the UP or DOWN direction control button to scroll through the menu options. 5) Press the MENU button when highlighting the Print This Photo option to print the selected photo. 6) You will be asked to connect the camera to the PictBridge printer. 7) Connect the USB cable provided in the package from the camera to the PictBridge port of the printer. 8) Once connected, follow the instructions on the printer to proceed with the printing process. 9) Select the Cancel option to exit the menu and return to the previous mode. Slide Show Menu You can view a Slide Show of all the pictures taken with your camera by pressing the LCD Switch button while in Playback mode. The Slide Show menu allows you to set the interval length of time that each picture will display during the slide show. 1) Long press the MENU button to open the menus for the current mode. 2) Press the LEFT or RIGHT direction control button to scroll and select the Slide Show menu. 3) Setting up the Interval: Press the UP or DOWN direction control button to scroll through the menu options. Select the 3, 5, or 10 second interval option, then press MENU to confirm. 4) Beginning the Slide Show: Press the LCD Switch button. Press any button to exit the Slide Show. 5) Press the LEFT or RIGHT button to select the next menu item, if you wish to view other menus without viewing the Slide Show. 6) Press the MODE button to exit the menu and return to your previous mode. 47
49 The Video Capture Mode allows you to capture videos with your digital camera. When the camera is first powered ON, the camera will be in Photo Capture Mode. Press the MODE (M) button once to access the Video Capture Mode. 1) Power on your camera: Photo Capture Mode is the default mode that appears upon powering on your camera. Press the MODE (M) button to enter Video Capture Mode. The Video icon appears on the top left. 2) Select the Scene with the LCD Display: Use the LCD display on the back of the camera to direct the camera at the scene you would like to capture. 3) Digital Zoom: Press the UP/T - Zoom In and DOWN/W - Zoom Out buttons to zoom in/out if desired. You can magnify your subject up to 4 times using the Digital Zoom. The zoom indicating bar moves up when you Zoom In (T) and moves down when you Zoom Out (W).Video Capture: 4) Capture the Video: - START: Press the SHUTTER button to start the video capture. A blinking, red icon appears at the top of the LCD screen, indicating that the recording is in progress. The elapsed time of the recording can be seen next to the recording icon. - STOP: To stop the video recording, press the SHUTTER button. 5) The video is automatically saved to the camera s Micro SD Memory Card. 6) You can also capture your videos using the front LCD Screen. When you would like to quickly and easily include yourself in the video: - Press the LCD Switch button to activate the front LCD screen. - Hold the camera facing towards you. - Make sure you can see yourself within the scene on the LCD screen, look at the lens, then press the SHUTTER button to begin recording. 48
50 Quick Function Description Button LEFT NAVIGATES MENU: Navigates within the Menus. RIGHT PLAYBACK: Opens the Playback Mode. NAVIGATES MENU: Navigates within the Menus. UP / T DOWN / W ZOOM: Zooms IN NAVIGATES MENU: Navigates within the Menus. ZOOM: Zooms OUT NAVIGATES MENU: Navigates within the Menus. Other SHUTTER START/STOP: Starts and stops the video capture. VIDEO CAPTURE MENU: Opens the menu options for Video Capture MENU/OK Mode. NOTE: Use the UP/DOWN/LEFT/RIGHT buttons to navigate. MODE SELECT: Toggles between the Photo Capture Mode, Video MODE (M) Capture Mode, and Playback Mode. MENU: Exits the menu screen. LCD Switch SWITCH SCREEN: Switches between the use of the front and back LCD screens. 49

51 The following are the menus that appear in your camera s Video Capture Mode: The selection icons below appear by the default settings. Once you change a setting, the setting is saved by your camera until you manually change the setting or restore the camera s default factory settings. 50
52 INSTA Share for Videos The INSTA Share technology allows you to quickly and easily upload your camera s photos and videos to the social networks of your choice with the accompanying Polaroid Instant Memories application. 1) Press the MENU/OK button to open the menus for the current mode. 2) Press the LEFT or RIGHT button to scroll and select the INSTA Share for Videos menu. 3) Press the UP or DOWN button to highlight a specific option. 4) Press the MENU/OK button to confirm and select the highlighted menu option. A selected option icon appears on the selected item. 5) To continue within the menus and select a different menu option: Press the LEFT or RIGHT button to select the next menu item. 6) To exit the menu view: Press the MODE button to exit the menu and return to your previous mode. NOTE: An icon appears on the image with the selected INSTA Share destination site when the image is seen in the Playback Mode. Remember that the INSTA Share feature is deactivated by default. An INSTA Share destination will only be assigned to a photo or video if you manually set it from this menu or from the INSTA Share menu in Playback Mode. Changing the INSTA Share destination site will also make the selected site the new default INSTA Share option. A new default can be selected at any time through this menu. Scene Menu The Scene Menu allows you to choose scene settings that let your camera to adapt properly to your current environment. 1) Press the MENU/OK button to open the menus for the current mode. 2) Press the LEFT or RIGHT button to scroll and select the Scene menu. 3) Press the UP or DOWN button to highlight a specific option. 51
53 4) Press the MENU/OK button to confirm and select the highlighted menu option. A selected option icon appears on the selected item. 5) To continue within the menus and select a different menu option: Press the LEFT or RIGHT button to select the next menu item. 6) To exit the menu view: Press the MODE button to exit the menu and return to your previous mode. An icon reflecting your selection is displayed on the LCD screen. Image Resolution Menu The Image Resolution menu allows you to choose the desired size of the images taken by your camera. Keep in mind that images with a higher resolution will also take up more of your camera s memory. 1) Press the MENU/OK button to open the menus for the current mode. 2) Press the LEFT or RIGHT button to scroll and select the Image Resolution menu. 3) Press the UP or DOWN button to highlight a specific option. 4) Press the MENU/OK button to confirm and select the highlighted menu option. A selected option icon appears on the selected item. 5) To continue within the menus and select a different menu option: Press the LEFT or RIGHT button to select the next menu item. 6) To exit the menu view: Press the MODE button to exit the menu and return to your previous mode. An icon reflecting your selection is displayed on the LCD screen. Image Quality Menu The Image Quality menu allows you to select the desired quality level of the images taken by your camera. Keep in mind that images with a higher image quality level will also take up more memory on your camera. 1) Press the MENU/OK button to open the menus for the current mode. 52
54 2) Press the LEFT or RIGHT button to scroll and select the Image Quality menu. 3) Press the UP or DOWN button to highlight a specific option. 4) Press the MENU/OK button to confirm and select the highlighted menu option. A selected option icon appears on the selected item. 5) To continue within the menus and select a different menu option: Press the LEFT or RIGHT button to select the next menu item. 6) To exit the menu view: Press the MODE button to exit the menu and return to your previous mode. An icon reflecting your selection is displayed on the LCD screen. White Balance Menu The White Balance feature allows your camera to adjust the coloring of the captured images depending on the type of light source in the current environment. Properly adjusting the White Balance setting to match your current environment will allow the camera to properly balance the colors in the images that are taken with your camera. 1) Press the MENU/OK button to open the menus for the current mode. 2) Press the LEFT or RIGHT button to scroll and select the White Balance menu. 3) Press the UP or DOWN button to highlight a specific option. 4) Press the MENU/OK button to confirm and select the highlighted menu option. A selected option icon appears on the selected item. 5) To continue within the menus and select a different menu option: Press the LEFT or RIGHT button to select the next menu item. 6) To exit the menu view: Press the MODE button to exit the menu and return to your previous mode. An icon reflecting your selection is displayed on the LCD screen. 53
55 Color Effect Menu You can choose to add a color effect to the images taken with your camera. 1) Press the MENU/OK button to open the menus for the current mode. 2) Press the LEFT or RIGHT button to scroll and select the Color Effect menu. 3) Press the UP or DOWN button to highlight a specific option. 4) Press the MENU/OK button to confirm and select the highlighted menu option. A selected option icon appears on the selected item. 5) To continue within the menus and select a different menu option: Press the LEFT or RIGHT button to select the next menu item. 6) To exit the menu view: Press the MODE button to exit the menu and return to your previous mode. Image Sharpness Menu You can set the level of sharpness in the images taken with your camera. The sharpness level dictates if the edges of objects in the image are more or less distinct. 1) Press the MENU/OK button to open the menus for the current mode. 2) Press the LEFT or RIGHT button to scroll and select the Image Sharpness menu. 3) Press the UP or DOWN button to highlight a specific option. 4) Press the MENU/OK button to confirm and select the highlighted menu option. A selected option icon appears on the selected item. 5) To continue within the menus and select a different menu option: Press the LEFT or RIGHT button to select the next menu item. 6) To exit the menu view: Press the MODE button to exit the menu and return to your previous mode. An icon reflecting your selection is displayed on the LCD screen. 54
56 Light Exposure Menu The Light Exposure setting helps you control the amount of light that enters your camera s lens. This setting should be adjusted when the environment is lighter or darker than normal. When the environment has more light than is needed, reduce the exposure setting (by using the negative - count) to reduce the amount of light allowed into the lens by your camera. If the environment has less light (darker) than is needed, increase the exposure setting (by using the positive + count) to increase the amount of light allowed into the lens by your camera. 1) Press the MENU/OK button to open the menus for the current mode. 2) Press the LEFT or RIGHT button to scroll and select the Light Exposure menu. 3) Press the UP or DOWN button to highlight a specific option. 4) Press the MENU/OK button to confirm and select the highlighted menu option. A selected option icon appears on the selected item. 5) To continue within the menus and select a different menu option: Press the LEFT or RIGHT button to select the next menu item. 6) To exit the menu view: Press the MODE button to exit the menu and return to your previous mode. An icon reflecting your selection is displayed on the LCD screen. ISO Menu The ISO menu allows you to set the level of sensitivity that your camera has to light in the surrounding environment. When the ISO level is increased, the image sensor in your camera will be more sensitive to light and allow you to capture images in lower-light situations. The higher sensitivity to light however, may reduce the quality of the images that are taken. When the ISO is reduced, the image sensor in your camera will be less sensitive to light and will optimize the image quality in environments with bright lighting. 1) Press the MENU/OK button to open the menus for the current mode. 2) Press the LEFT or RIGHT button to scroll and select the ISO menu. 3) Press the UP or DOWN button to highlight a specific option. 4) Press the MENU/OK button to confirm and select the highlighted menu option. 55
57 A selected option icon appears on the selected item. 5) To continue within the menus and select a different menu option: Press the LEFT or RIGHT button to select the next menu item. 6) To exit the menu view: Press the MODE button to exit the menu and return to your previous mode. An icon reflecting your selection is displayed on the LCD screen. Metering Menu The Metering setting will affect how your camera focuses when capturing an image. Depending on your selection, the camera will be more sensitive to focusing on particular areas in the display and adjust the image color and lighting accordingly. Center Averages the light metered from the entire frame, but giving greater weight to the subject in the center Multi Used in standard conditions the camera divides and adjusts the settings of the image into several zones for light metering such as complex light conditions, position of subject, brightness, background, direct light and scenes Spot Meters the area within the spot point frame at the center of the LCD to set the exposure on the subject in the center of the monitor. 1) Press the MENU/OK button to open the menus for the current mode. 2) Press the LEFT or RIGHT button to scroll and select the Metering menu. 3) Press the UP or DOWN button to highlight a specific option. 4) Press the MENU/OK button to confirm and select the highlighted menu option. A selected option icon appears on the selected item. 5) To continue within the menus and select a different menu option: Press the LEFT or RIGHT button to select the next menu item. 6) To exit the menu view: Press the MODE button to exit the menu and return to your previous mode. An icon reflecting your selection is displayed on the LCD screen. 56
58 Language Menu You can select your camera s language setting by selecting the desired language from the Language menu. 1) Press the MENU/OK button to open the menus for the current mode. 2) Press the LEFT or RIGHT button to scroll and select the Language menu. 3) Press the UP or DOWN button to highlight a specific option. 4) Press the MENU/OK button to confirm and select the highlighted menu option. A selected option icon appears on the selected item. 5) To continue within the menus and select a different menu option: Press the LEFT or RIGHT button to select the next menu item. 6) To exit the menu view: Press the MODE button to exit the menu and return to your previous mode. Date/Time Menu When you capture an image with your camera, the image will include a time stamp with the date and time that the image was taken. The Date/Time menu allows you to set your camera s date and time as desired. You can also disable the timestamp for future images that will be taken with your camera. On The timestamp will appear on photos taken Off The date stamp will not appear on photos taken To Enable/Disable the Timestamp: 1) Press the MENU/OK button to open the menus for the current mode. 2) Press the LEFT or RIGHT button to scroll and select the Date/Time menu. 3) Press the UP or DOWN button to highlight ON or OFF. ON > Displays the Date & Time on the captured image. OFF > Does not display the Date & Time on the captured image. 4) Press the MENU/OK button to confirm and select the highlighted menu option. A selected option icon appears on the selected item. 57
59 5) To continue within the menus and select a different menu option: Press the LEFT or RIGHT button to select the next menu item. 6) To exit the menu view: Press the MODE button to exit the menu and return to your previous mode. To Set the Date and Time: 1) Press the MENU/OK button to open the menus for the current mode. 2) Press the LEFT or RIGHT button to scroll and select the Date/Time menu. 3) Press the UP or DOWN direction control buttons to scroll through the menu options and highlight the Date Setup menu option. 4) Press the MENU/OK button to confirm and enter the Date Setup settings screen. 5) Scroll through the window with the RIGHT and LEFT navigation buttons. For each field in the menu, use the UP and DOWN navigation buttons to set the current time and date. 6) Press the MODE button to exit the menu and return to your previous screen. Auto Power Off Menu You can use the Auto Power Off feature in order to conserve you camera s battery life. The designated time represents when your camera will automatically power off. When the camera sits idle for the designated period of time, the camera will shut off completely and will need to be powered on again with the power button before the next use. 1) Press the MENU/OK button to open the menus for the current mode. 2) Press the LEFT or RIGHT button to scroll and select the Auto Power Off menu. 3) Press the UP or DOWN button to highlight a specific option. 4) Press the MENU/OK button to confirm and select the highlighted menu option. A selected option icon appears on the selected item. 5) To continue within the menus and select a different menu option: Press the LEFT or RIGHT button to select the next menu item. 6) To exit the menu view: Press the MODE button to exit the menu and return to your previous mode. 58
60 Frequency Menu The options in the Frequency menu represent the frequency of the electrical current in fluorescent lighting sources in your locale. If your camera is set to a frequency that does not match your country s electric current, you may see waves on the images taken by your camera. 50Hz UK, Europe and Australia 60Hz US, Canada and South America 1) Press the MENU/OK button to open the menus for the current mode. 2) Press the LEFT or RIGHT button to scroll and select the Frequency menu. 3) Press the UP or DOWN button to highlight a specific option. 4) Press the MENU/OK button to confirm and select the highlighted menu option. A selected option icon appears on the selected item. 5) To continue within the menus and select a different menu option: Press the LEFT or RIGHT button to select the next menu item. 6) To exit the menu view: Press the MODE button to exit the menu and return to your previous mode. Format Memory Card Menu You can use the Format Memory Card menu to delete all of the content that is currently on your camera s memory card. Keep in mind that formatting the memory card will permanently delete all of the content on your camera s memory card. This option will delete all of the content at one time. If you would like to delete individual images, use the delete menu in the camera s Playback mode. Note: Restoring factory defaults or formatting the camera may result in the loss of data. Please ensure you have backed up your images before you attempt this. 1) Press the MENU/OK button to open the menus for the current mode. 2) Press the LEFT or RIGHT button to scroll and select the Format Memory Card menu. 3) Press the UP or DOWN button to highlight a specific option: - CANCEL: To exit without formatting the SD Memory Card, select Cancel and press the 59
61 MENU/OK button. - FORMAT: To proceed with the format, select Yes and press the MENU/OK button. You will be asked to confirm the formatting of the memory card. Select No and press the MENU/OK button to exit without formatting. Select Yes and press the MENU/OK button to begin the format. The memory card will be completely formatted. Firmware (Factory Default Settings) Menu Use this menu to view the Firmware version on your camera or to reset your camera settings to the Factory Default Settings. 1) Press the MENU/OK button to open the menus for the current mode. 2) Press the LEFT or RIGHT direction control button to scroll and select the Firmware menu. The Default Setting is selected. 3) Press the MENU/OK button to reset the camera to the factory default settings. 4) You will be asked to confirm the resetting to the factory default settings. Select No and then press the MENU/OK button to exit the menu and return to the previous mode without resetting to the default setting. Select Yes and press the MENU/OK button to proceed with the reset. You will then automatically exit the menu and return to the previous mode with the digital camera settings set to the Factory Default Settings. NOTE: After RESETTING to the default settings, it is recommended to select your system Language, Date/Time and INSTA Share for Photos and Videos. If you do not, the next time your camera is powered on, you will be prompted to define those settings. 60
62 The Playback Mode allows you to review and edit photos and videos that you ve already taken with you camera. When you first turn on the camera, the camera will be in Photo Capture mode by default. Press the MODE (M) button twice to enter the Playback Mode or press the PLAYBACK button to open the Playback Mode. Press the MODE button to exit the Playback Mode and return to Capture Mode. The latest captured image appears on the LCD screen. If there are no images stored, a message (No File) appears. Videos appear with an AVI icon top left of the LCD screen. Photos appear with a JPG an icon. The image counter is displayed on the top right of the LCD screen, indicating the number of the selected image and the total number of images captured. 1) Selecting Your Video: Once in Playback Mode, press the LEFT or RIGHT button to scroll through the images on your camera s memory card until you find the image you would like to view. - Press the LEFT button to view the previous image. - Press the RIGHT button to view the next image. Each captured image (video and photo) is displayed on the LCD screen. 2) Playing Your Selected Video: START: Press the Shutter button to start playing the video. PAUSE: Press the Shutter button to pause and then press again to continue playing the video. STOP: Press the LEFT (Flash) button to stop playing the video. NOTE: The camera does not include a speaker. In order to hear the audio captured with your videos, please connect to your computer using the supplied USB cable to play directly via your computer or download the file and then play from your computer. For details see the following sections: Getting Photos and Videos from your Camera to Your Computer Transferring Images from my Camera to my Computer Manually 61
63 Easily navigate and select the image you wish to view by using the Thumbnail View. The images on your camera will be displayed in a 3 X 3 matrix where you can use the direction buttons to scroll and select images from the thumbnails. To access the Thumbnail View: 1) Press the PLAYBACK button to open the Playback Mode. 2) Press the DOWN/W - Zoom Out button. All the images (photos and videos) on your camera will appear in the Thumbnail View. - Videos appear with AVI. - Photos appear with JPG. 3) Use the LEFT and RIGHT buttons to scroll and select the image you wish to view. 4) Press the SHUTTER button to enlarge the selected image full size. Once the selected video is full size you can play and view the video. 62
64 Quick Function Description Button LEFT STOP: Stops the playing video. PREVIOUS IMAGE: Displays the previous image. NAVIGATES MENU: Navigates within the Menus. RIGHT PLAYBACK: Opens the Playback Mode. NEXT IMAGE: Displays the next image. NAVIGATES MENU: Navigates within the Menus. UP / T NAVIGATES MENU: Navigates within the Menus. THUMBNAIL VIEW: Opens the Thumbnail View. To navigate in the DOWN / W Thumbnail View press the LEFT/RIGHT buttons and the SHUTTER button to select an image. NAVIGATES MENU: Navigates within the Menus. Other SHUTTER START/PAUSE: During Video Playback, stops and pauses the playing video. IMAGE SELECTION: In Thumbnail View, confirms and opens the selected image to full size. MENU/OK PLAYBACK MENU: Opens the menu options for Playback Mode. NOTE: Use the UP/DOWN/LEFT/RIGHT buttons to navigate. MODE SELECT: Toggles between the Photo Capture Mode, Video MODE (M) Capture Mode, and Playback Mode. MENU: Exits the menu screen. 63
 Delete File Menu: Quick press the MENU/ DELETE button in Playback Mode to open the Delete File menu. This menu allows you to delete the selected file currently viewed in Playback Mode.")
65 The following are the menus that appear in your camera s Video Playback Mode: Access the Menus To access the Photo Playback menus: 1) Press the Playback button to enter Playback Mode. 2) Delete File Menu: Quick press the MENU/ DELETE button in Playback Mode to open the Delete File menu. This menu allows you to delete the selected file currently viewed in Playback Mode. 3) Video Playback Mode Menus: Press and hold the MENU/ DELETE button in Playback Mode until the Video Playback menu appears. The following menu options appear: Delete, INSTA for Videos, Protect/Lock Delete Menu While in the Playback Mode, you can delete videos from your camera through the Delete menu. 1) Select the video you would like to delete. 2) Long press the MENU button to open the menus for the current mode. 3) Press the LEFT or RIGHT button to scroll and select the Delete menu. 4) Press the UP or DOWN button to highlight a specific option. To delete the selected video: Select Delete This Video? and press the MENU button. You will be asked to confirm the deletion of the video. 64
66 If you would like to proceed with deleting the current image, select Yes and press the MENU button to confirm. The video will be deleted and you will exit the menu and return to the Playback mode. If you do not want to delete the current image, select No and press the MENU button. The video will not be deleted and you will exit the menu and return to the Playback mode. To delete all the images (videos and photos) you have saved on your Memory card: Select Delete All Images? and press the MENU button. If you would like to proceed with deleting all the videos and photos, select Yes and press the MENU button to confirm. All of your images will be permanently deleted. A blank No Files Exist screen will appear. Press the MODE button to exit the No Files Exist screen and return to Photo Capture mode. Remember: All images will be deleted except images that are Protected/Locked. To delete a locked image, first unlock the image, then select delete. If you do not want to delete all of your videos and photos, select No and press the MENU button. All images will remain on your memory card and you will exit the menu and return to the Playback mode. INSTA Share for Videos The INSTA Share technology allows you to quickly and easily upload your camera s photos and videos to the social networks of your choice with the accompanying Polaroid Instant Memories application. 1) Select the video you to which you would like to add/change an INSTA Share destination. 2) Long press the MENU button to open the menus for the current mode. 3) Press the LEFT or RIGHT button to scroll and select the INSTA Share for Videos menu. 4) Press the UP or DOWN button to highlight a specific option. 5) Press the MENU button to confirm and select the highlighted menu option. A selected option icon appears on the selected item. 6) To continue within the menus and select a different menu option: Press the LEFT or RIGHT button to select the next menu item. 65
67 7) To exit the menu view: NOTE: Press the MODE button to exit the menu and return to your previous mode. An icon appears on the image with the selected INSTA Share destination site when you return to the Playback display. Remember that the INSTA Share feature is deactivated by default. An INSTA Share destination will only be assigned to a photo or video if you manually set it from this menu or from the INSTA Share menu in Capture mode. Changing the INSTA Share destination site will also make the selected site the new default INSTA Share option. A new default can be selected at any time through this menu. Protect/Lock Menu Pictures and videos taken with your camera can be protected or locked to prevent any deletion or alteration being made to the files. 1) View the video you would like to protect/lock. 2) Long press the MENU button to open the menus for the current mode. 3) Press the LEFT or RIGHT button to scroll and select the Protect/Lock menu. 4) Press the UP or DOWN button to highlight a specific option. To Lock the Selected Image: To lock the selected image use the UP or DOWN button to highlight Lock This Video and then press the MENU button. The image now appears in Playback Mode with the lock icon. To Unlock the Selected Image: To unlock the selected locked image use the UP or DOWN button to highlight Unlock This Video and then press the MENU button. The image now appears in Playback Mode without the lock icon. To Lock All Images: To lock all captured videos and photos use the UP or DOWN button to highlight Lock All Images and then press the MENU button. All images now appear in Playback Mode with the lock icon. 66
68 To Unlock All Images: To unlock all locked videos and photos use the UP or DOWN button to highlight Unlock All Images and then press the MENU button. The images now appear in Playback Mode without the lock icon. 5) Press the MODE button at any time to exit the menu and return to your previous mode. NOTE: Any image that is locked displays a lock symbol on the LCD screen when viewing that image in the Playback Mode. Videos that are not locked do not display the lock symbol. Remember that you cannot delete videos while they are locked. 67
69 You must be connected to the Internet to download, install and run the Polaroid Instant Memories software. The Polaroid Instant Memories Software can be downloaded and installed via the following online links: WINDOWS OS: MAC OS: 1) Enter the appropriate URL (shown above) into a web browser on your computer. Alternatively, click on one of the above links to open the URL in a browser. 2) The file for installing the software automatically begins to download to your computer. Please note that the web page may appear empty, however the download automatically begins. 3) Locate the downloaded application file on your computer s Downloads folder once the download is complete: On WINDOWS OS the file name is: polaroidgeneric_win.exe ON MAC OS in file name is: polaroidgeneric_mac.pkg 4) Double click on the downloaded application file to install the Vivitar Experience Image Manager Software. 5) Follow all instructions to go through the software installation. 6) Once installation is complete, the Polaroid Instant Memories application opens automatically or click the application desktop icon to launch the software. 68
 compartment cover.")
 The first time you connect the device to the computer you may have to wait a few seconds until the computer recognizes the device.")
70 1) Use the USB cable that came with your camera to connect your camera to your computer. Open the camera s USB port (also Micro SD card/battery) compartment cover. Connect the smaller end of the USB cable to your camera and the larger end to your computer s USB port. 2) Press the Power button. 3) The first time you connect the device to the computer you may have to wait a few seconds until the computer recognizes the device. An SD card needs to be inserted. Do not disconnect the cable during transfer. Doing so will cancel the transfer of any files on their way to your computer. 1) Select the Get Images button from the Main menu. 69
71 2) The Get Images from device window opens. 3) You can select to download photos, videos or both. 4) Select your camera (removable disk) from the device window. If your camera is the only USB device connected then it will be selected automatically. 5) Select a location on the computer where to place the new photo and video files. 6) Add the new photo and video files to albums if desired. 7) Select to remove the media files from the selected device (removable disk) after the import. 8) Click the Get Images button to transfer the photos and videos from your camera to your computer. 9) A media download progress bar appears on the bottom left showing the number of media files downloading to your computer. A message appears when the download is complete. 10) The photo and video files that you selected are now downloaded to your computer to the selected folder and albums ready for your use. Using the Polaroid Instant Memories, you can: Upload and manage photos and videos to and from the most popular photo sharing and social networking sites - Facebook, Flickr, Picasa, Photobucket, Twitter and YouTube Seamlessly transfer photos and videos from one social network to another Organize your images by creating offline and online albums Edit images using automatic and manual tools For more details on how to use the Polaroid Instant Memories open the Help from the menu option. 70
72 1) Use the USB cable that came with your camera to connect your camera to your computer. 2) MSDC appears on the LCD. 3) A window appears with a list of options, select Open folder to view files and click OK. 4) Open the DCIM folder and the folder inside to view the media files. 5) Select the media and copy the files from this folder into your computer. Optionally, select the files and choose Copy from the Edit menu. Then select a folder and choose Paste from the Edit menu. 6) We recommend that you copy the images into the Pictures/My Pictures folder and the videos into the Videos/My Videos folder. 7) Do not disconnect the cable during transfer. Doing so will cancel the transfer of any files on their way to your computer. 1) Use the USB cable that came with your camera to connect your camera to your computer. 2) MSDC appears on the LCD. 3) The camera s device icon appears on the desktop. 4) Click on the device icon and open the DCIM folder and the folder inside to view the media files. 5) Select the files and drag them into your computer. Optionally, select the files and choose Copy from the Finder s Edit menu. Then select a folder and choose Paste from the Edit menu. 6) We recommend that you copy the images into the Pictures folder and the videos into the Movies folder. 7) Do not disconnect the cable during transfer. Doing so will cancel the transfer of any files on their way to your computer. 71
73 NOTE: Please check your device packaging for compatibility with the ipad. Apple ipad Camera Connection: For models that are compatible with the ipad, photos and videos can be imported from your digital camera to your ipad by following either one of the options below: 1) Connecting your digital camera to your ipad using an ipad Camera Connector: Plug the Camera Connector into the dock connector port on your ipad, and then attach your digital camera using a USB cable (included) to the Camera Connector. NOTE: The ipad Camera Connector is not included. This item may be purchased separately. 2) Using an ipad SD Card Reader: Connect the SD Card Reader to your ipad, then insert your digital camera's SD Memory card into the slot to import photos and videos directly from your camera's SD card. NOTE: The ipad SD Card Reader is not included. This item may be purchased separately. After you make the connection, your ipad automatically opens the Photos application. This allows you to choose which photos and videos to import and to organize them into albums. The digital camera is a delicate device. Please handle your camera with care to avoid damaging it. Do not expose your camera to heat sources. 72
74 This warranty covers the original consumer purchaser only and is not transferable. This warranty covers products that fail to function properly UNDER NORMAL USAGE, due to defects in material or workmanship. Your product will be repaired or replaced at no charge for parts or labor for a period of one year. Damages or malfunctions not resulting from defects in material or workmanship and damages or malfunctions from other than normal use, including but limited to, repair by unauthorized parties. Call or Visit our website at To receive Warranty service along with the name and address of an authorized product service center, the original consumer purchaser must contact us for problem determination and service procedures. Proof of purchase in the form of a bill of sale or receipted invoice, evidencing that the Product is within the applicable Warranty period(s), MUST be presented in order to obtain the requested service. It is your responsibility to properly package and send any defective products along with a dated copy of proof of purchase, a written explanation of the problem, and a valid return address to the authorized service center at your expense. Do not include any other items or accessories with the defective product. Any products received by the authorized service center that are not covered by warranty will be returned unrepaired. 73
75 NO WARRANTIES, WHETHER EXPRESS OR IMPLIED, INCLUDING, BUT NOT LIMITED TO, ANY IMPLIED WARRANTIES OF MERCHANTABILITY OR FITNESS FOR A PARTICULAR PURPOSE, OTHER THAN THOSE EXPRESSLY DESCRIBED ABOVE SHALL APPLY. DISTRIBUTOR FURTHER DISCLAIMS ALL WARRANTIES AFTER THE EXPRESS WARRANTY PERIOD STATED ABOVE. NO OTHER EXPRESS WARRANTY OR GUARANTY GIVEN BY ANY PERSON, FIRM OR ENTITY WITH RESPECT TO THE PRODUCT SHALL BE BINDING ON DISTRIBUTOR. REPAIR, REPLACEMENT, OR REFUND OF THE ORIGINAL PURCHASE PRICE - AT DISTRIBUTOR S SOLE DISCRETION - ARE THE EXCLUSIVE REMEDIES OF THE CONSUMER. IN NO EVENT WILL DISTRIBUTOR, ITS MANUFACTURERS, OR PLR IP HOLDINGS, LLC BE LIABLE FOR ANY INCIDENTAL, DIRECT, INDIRECT, SPECIAL, PUNITIVE OR CONSEQUENTIAL DAMAGES (SUCH AS, BUT NOT LIMITED TO, DAMAGES FOR LOSS OF PROFITS, BUSINESS, SAVINGS, DATA OR RECORDS) CAUSED BY THE USE, MISUSE OR INABILITY TO USE THE PRODUCT. EXCEPT AS STATED HEREIN, NO OTHER WARRANTIES SHALL APPLY. NOTWITHSTANDING THE FOREGOING, CONSUMER S RECOVERY AGAINST DISTRIBUTOR SHALL NOT EXCEED THE PURCHASE PRICE OF THE PRODUCT SOLD BY DISTRIBUTOR. THIS WARRANTY SHALL NOT EXTEND TO ANYONE OTHER THAN THE ORIGINAL CONSUMER WHO PURCHASED THE PRODUCT AND IS NOT TRANSFERABLE. Some countries, states or provinces do not allow the exclusion or limitation of incidental or consequential damages or allow limitations on warranties, so limitation or exclusions may not apply to you. This warranty gives you specific legal rights, and you may have other rights that vary from state to state or province to province. Contact your authorized retailer to determine if another warranty applies. This product is manufactured, distributed and sold by SAKAR International, Inc. Polaroid, Polaroid & Pixel, Made in Polaroid and Polaroid Classic Border Logo are trademarks of PLR IP Holdings, LLC, used under license. All other trademarks are the property of the respective owner, who has not sponsored, endorsed or approved this product. PLR IP Holdings, LLC does not manufacture this product or provide any Manufacturer's Warranty or support. 74
76 For technical support issues please visit our website at For further assistance, you can also call our technical support department toll free at , or for support, please contact us at Q: I have taken photos and selected the Get Images button. I get a message that the images were successfully transferred but the photos do not appear on my computer. What do I do? First ensure that you have in fact taken photos. Press the Shutter button to take some sample photos and then try downloading them again. With test photos (if applicable to your camera), if the camera's power is off before you upload them to the computer, the photos are not stored in the camera s memory. These photos should be uploaded quickly before the camera's power is off. If the photos are saved to the SD memory card, then all the photos should appear. Q: How do I make sure I don't lose important pictures? This camera requires an SD card for normal use. If the camera's power is off, nothing will happen to the images stored on the SD memory card. We recommend always downloading your photos to your computer as soon as possible to prevent unintentional data loss. Q: I deleted images using the Polaroid Instant Memories. The images were also deleted from my computer. How do I recover images that I accidently deleted? All images deleted using the Polaroid Instant Memories are sent to your computer s Recycle or Trash Bin and can be retrieved from there. 75


77 Disposal of Waste Electrical and Electronic Equipment and/or Battery by users in private households in the European Union. This symbol on the product or on the packaging indicates that this can not be disposed of as household waste. You must dispose of your waste equipment and/or battery by handling it over to the applicable take-back scheme for the recycling of electrical and electronic equipment and/or battery. For more information about recycling of this equipment and/or battery, please contact your city office, the shop where you purchased the equipment or your household waste disposal service. The recycling of materials will help to conserve natural resources and ensure that it is recycled in a manner that protects human health and environment. Battery 76
28056 Digital Camera
 28056 Digital Camera User Manual HASBRO and its logo and NERF are trademarks of Hasbro and are used with permission. 2012 Hasbro. All rights reserved. Windows and the Windows logo are registered trademarks
ViviCam S126 Digital Camera
 ViviCam S126 Digital Camera User Manual 2009-2017 Sakar International, Inc. All rights reserved. Windows and the Windows logo are registered trademarks of Microsoft Corporation. All other trademarks are
2014 All Rights Reserved. Windows and the Windows logo are registered trademarks of Microsoft Corporation. All other trademarks are the property of
 2014 All Rights Reserved. Windows and the Windows logo are registered trademarks of Microsoft Corporation. All other trademarks are the property of their respective companies. 1 2 Thank you for purchasing
2014 All Rights Reserved. Windows and the Windows logo are registered trademarks of Microsoft Corporation. All other trademarks are the property of
 2014 All Rights Reserved. Windows and the Windows logo are registered trademarks of Microsoft Corporation. All other trademarks are the property of their respective companies. 1 Thank you for purchasing
615HD Digital Video Camera
 615HD Digital Video Camera User Manual 2009-2011 Sakar International, Inc. All rights reserved. Windows and the Windows logo are registered trademarks of Microsoft Corporation. All other trademarks are
ViviCam X014N Digital Camera
 ViviCam X014N Digital Camera User Manual 2009-2011 Sakar International, Inc. All rights reserved. Windows and the Windows logo are registered trademarks of Microsoft Corporation. All other trademarks are
ViviCam S124 Digital Camera
 ViviCam S124 Digital Camera User Manual 2009-2013 Sakar International, Inc. All rights reserved. Windows and the Windows logo are registered trademarks of Microsoft Corporation. All other trademarks are
DVR 505 Digital Camcorder
 DVR 505 Digital Camcorder User Manual 2016 Sakar International, Inc. All rights reserved. Windows and the Windows logo are registered trademarks of Microsoft Corporation. All other trademarks are the property
DVR 508NHD Digital Camcorder
 DVR 508NHD Digital Camcorder User Manual 2009-2012 Sakar International, Inc. All rights reserved. Windows and the Windows logo are registered trademarks of Microsoft Corporation. All other trademarks are
ViviCam X029-10MP Digital Camera
 ViviCam X029-10MP Digital Camera User Manual 2009-2012 Sakar International, Inc. All rights reserved. Windows and the Windows logo are registered trademarks of Microsoft Corporation. All other trademarks
ViviCam S327 Digital Camera
 ViviCam S327 Digital Camera User Manual 2009-2012 Sakar International, Inc. All rights reserved. Windows and the Windows logo are registered trademarks of Microsoft Corporation. All other trademarks are
DVR 808HD Digital Camcorder
 DVR 808HD Digital Camcorder User Manual 2009-2016 Sakar International, Inc. All rights reserved. Windows and the Windows logo are registered trademarks of Microsoft Corporation. All other trademarks are
DVR 548HD Digital Video Recorder
 DVR 548HD Digital Video Recorder User Manual 2009-2011 Sakar International, Inc. All rights reserved. Windows and the Windows logo are registered trademarks of Microsoft Corporation. All other trademarks
DVR 548NHD Digital Camcorder
 DVR 548NHD Digital Camcorder User Manual 2009-2012 Sakar International, Inc. All rights reserved. Windows and the Windows logo are registered trademarks of Microsoft Corporation. All other trademarks are
VIV-CV-1225V v2 Digital Camera Binoculars. Instruction Manual
 VIV-CV-1225V v2 Digital Camera Binoculars Instruction Manual 2009-2019 Sakar International, Inc. All rights reserved Windows and the Windows logo are registered trademarks of Microsoft Corporation. All
DVR 528 Digital Video Camera
 DVR 528 Digital Video Camera User Manual 2010 Sakar International, Inc. All rights reserved. Windows and the Windows logo are registered trademarks of Microsoft Corporation. All other trademarks are the
DVR 710HDv2 Digital Video Recorder
 DVR 710HDv2 Digital Video Recorder User Manual 2009-2011 Sakar International, Inc. All rights reserved. Windows and the Windows logo are registered trademarks of Microsoft Corporation. All other trademarks
ViviCam S131 Digital Camera
 ViviCam S131 Digital Camera User Manual 2009-2012 Sakar International, Inc. All rights reserved. Windows and the Windows logo are registered trademarks of Microsoft Corporation. All other trademarks are
DVR 960HD Digital Video Recorder
 DVR 960HD Digital Video Recorder User Manual 2010 Sakar International, Inc. All rights reserved. Windows and the Windows logo are registered trademarks of Microsoft Corporation. All other trademarks are
DVR 426HDv3. Digital Camcorder
 DVR 426HDv3 Digital Camcorder User Manual 2009-2012 Sakar International, Inc. All rights reserved. Windows and the Windows logo are registered trademarks of Microsoft Corporation. All other trademarks
DVR 560HD Digital Video Recorder
 DVR 560HD Digital Video Recorder User Manual 2010 Sakar International, Inc. All rights reserved. Windows and the Windows logo are registered trademarks of Microsoft Corporation. All other trademarks are
DVR 985HD Digital Video Camera
 DVR 985HD Digital Video Camera User Manual 2009-2012 Sakar International, Inc. All rights reserved. Windows and the Windows logo are registered trademarks of Microsoft Corporation. All other trademarks
DVR 949HD Digital Video Camera
 DVR 949HD Digital Video Camera User Manual 2009-2012 Sakar International, Inc. All rights reserved. Windows and the Windows logo are registered trademarks of Microsoft Corporation. All other trademarks
DVR 520 / 1.8 Digital Video Recorder
 DVR 520 / 1.8 Digital Video Recorder User Manual 2010 Sakar International, Inc. All rights reserved. Windows and the Windows logo are registered trademarks of Microsoft Corporation. All other trademarks
ViviCam X014 Digital Camera
 ViviCam X014 Digital Camera User Manual 2010 Sakar International, Inc. All rights reserved. Windows and the Windows logo are registered trademarks of Microsoft Corporation. All other trademarks are the
DVR 584HD Digital Camcorder
 DVR 584HD Digital Camcorder User Manual 2009-2012 Sakar International, Inc. All rights reserved. Windows and the Windows logo are registered trademarks of Microsoft Corporation. All other trademarks are
ViviCam S830 Digital Camera
 ViviCam S830 Digital Camera User Manual 2009-2012 Sakar International, Inc. All rights reserved. Windows and the Windows logo are registered trademarks of Microsoft Corporation. All other trademarks are
DVR 514 Digital Video Recorder
 DVR 514 Digital Video Recorder User Manual 2010 Sakar International, Inc. All rights reserved. Windows and the Windows logo are registered trademarks of Microsoft Corporation. All other trademarks are
DVR 1440HD Digital Camcorder
 DVR 1440HD Digital Camcorder User Manual 2009-2013 Sakar International, Inc. All rights reserved. Windows and the Windows logo are registered trademarks of Microsoft Corporation. All other trademarks are
ViviCam F529 Digital Camera
 ViviCam F529 Digital Camera User Manual 2010 Sakar International, Inc. All rights reserved. Windows and the Windows logo are registered trademarks of Microsoft Corporation. All other trademarks are the
ViviCam T027 Digital Camera
 ViviCam T027 Digital Camera User Manual 2010 Sakar International, Inc. All rights reserved. Windows and the Windows logo are registered trademarks of Microsoft Corporation. All other trademarks are the
ViviCam T026 Digital Camera
 ViviCam T026 Digital Camera User Manual 2010 Sakar International, Inc. All rights reserved. Windows and the Windows logo are registered trademarks of Microsoft Corporation. All other trademarks are the
DVR 1080HD Digital Camcorder
 DVR 1080HD Digital Camcorder User Manual 2009-2012 Sakar International, Inc. All rights reserved. Windows and the Windows logo are registered trademarks of Microsoft Corporation. All other trademarks are
DVR 995WHD Underwater Digital Camcorder
 DVR 995WHD Underwater Digital Camcorder User Manual 2009-2012 Sakar International, Inc. All rights reserved. Windows and the Windows logo are registered trademarks of Microsoft Corporation. All other trademarks
2016 All Rights Reserved. Windows and the Windows logo are registered trademarks of Microsoft Corporation. All other trademarks are the property of
 2016 All Rights Reserved. Windows and the Windows logo are registered trademarks of Microsoft Corporation. All other trademarks are the property of their respective companies. 1 2 Thank you for purchasing
DVR 850HDv3 Underwater Digital Camcorder. User Manual
 DVR 850HDv3 Underwater Digital Camcorder User Manual 2009-2013 Sakar International, Inc. All rights reserved. Windows and the Windows logo are registered trademarks of Microsoft Corporation. All other
DVR 850HD Underwater Digital Video Camcorder
 DVR 850HD Underwater Digital Video Camcorder User Manual 2010 Sakar International, Inc. All rights reserved. Windows and the Windows logo are registered trademarks of Microsoft Corporation. All other trademarks
78056N HD Action Camcorder
 78056N HD Action Camcorder User Manual 2009-2015 Sakar International, Inc. All rights reserved. Windows and the Windows logo are registered trademarks of Microsoft Corporation. All other trademarks are
35061 Digital Camcorder
 35061 Digital Camcorder User Manual 2010 Sakar International, Inc. All rights reserved. Windows and the Windows logo are registered trademarks of Microsoft Corporation. All other trademarks are the property
ViviCam V8426v2_For 10MP Digital Waterproof. All Weather Digital Camera
 ViviCam V8426v2_For 10MP Digital Waterproof All Weather Digital Camera User Manual 2009-2012 Sakar International, Inc. All rights reserved. Windows and the Windows logo are registered trademarks of Microsoft
Vivicam F526. All Weather Waterproof Digital Camera
 Vivicam F526 All Weather Waterproof Digital Camera with Twin view Preview Screens User Manual 2009-2012 Sakar International, Inc. All rights reserved. Windows and the Windows logo are registered trademarks
INSTRUCTION MANUAL 1
 INSTRUCTION MANUAL 1 Precautions...4 Disclaimer 5 PREPARING FOR USE...6 Parts of the Camera.. 7-8 Inserting the Battery and SD Card..9-10 BASIC OPERATION.. 11 Powering the Camcorder On and Off...11 Setting
Please read this manual carefully before use and keep it for future reference. Please format your SD card first in our camera when you start to use
 1 Please read this manual carefully before use and keep it for future reference. Please format your SD card first in our camera when you start to use our camera, or format it in computer. Table of Content
Digital Camera / GVA12DC. Instruction Manual
 Digital Camera / GVA12DC Instruction Manual Introduction Thank you for purchasing the 12 Mega-Pixel Digital Camera. Everything you need to take quality digital photos and videos is included with your camera.
ViviCam 7020 Digital Camera
 ViviCam 7020 Digital Camera User Manual 2010 Sakar International, Inc. All rights reserved. Windows and the Windows logo are registered trademarks of Microsoft Corporation. All other trademarks are the
CAMERA-DC2 Digital Camera Instruction Manual
 CAMERA-DC2 Digital Camera Instruction Manual 80 Little Falls Road, Fairfield, NJ 07004 800.631.0868 www.hamiltonbuhl.com Read manual carefully before using the product and keep for future reference. 80
DVR 880HD Digital Video Camera
 DVR 880HD Digital Video Camera User Manual 2009-2011 Sakar International, Inc. All rights reserved. Windows and the Windows logo are registered trademarks of Microsoft Corporation. All other trademarks
DVR 783HD Action Camcorder
 DVR 783HD Action Camcorder User Manual 2009-2014 Sakar International, Inc. All rights reserved. Windows and the Windows logo are registered trademarks of Microsoft Corporation. All other trademarks are
DVR 794HDv4 Wi-Fi Action Camcorder
 DVR 794HDv4 Wi-Fi Action Camcorder User Manual 2009-2016 Sakar International, Inc. All rights reserved. Windows and the Windows logo are registered trademarks of Microsoft Corporation. All other trademarks
Shenzhen SUNSKY Technology Limited
 Introduction Thank you for purchasing the 15 Mega-Pixel Digital Camera w ith Auto-Focus zoom lens. Everything you need to take quality digital photos and videos is included with your camera. Your digital
Knox KN-DC20MP Instruction Manual
 Knox KN-DC20MP Instruction Manual Camera Interface, Inputs, and Outputs 1) Shutter - Press this button to take photographs or to start /stop recording a video clip, or to confirm changes in menu mode 2)
Digital Camera. VF332-GRP-TA (Rev: A00) Please read this manual carefully before using this unit and keep it for future reference
 Please read this manual carefully before using this unit and keep it for future reference") Digital Camera VF332-GRP-TA (Rev: A00) Please read this manual carefully before using this unit and keep it for future reference Table of Contents Introduction...3 Key Features...3 What your camera package
Digital Camera VF332-GRP-TA (Rev: A00) Please read this manual carefully before using this unit and keep it for future reference Table of Contents Introduction...3 Key Features...3 What your camera package
DVR 788HD Digital Camcorder
 DVR 788HD Digital Camcorder User Manual 2009-2016 Sakar International, Inc. All rights reserved. Windows and the Windows logo are registered trademarks of Microsoft Corporation. All other trademarks are
PRECAUTIONS... 1 DISCLAIMER... 1 FACTORY DEFAULT SETTINGS... 1 PREPARATION...
 CONTENTS PRECAUTIONS... 1 DISCLAIMER... 1 FACTORY DEFAULT SETTINGS... 1 PREPARATION... 2 INTRODUCTION... 2 INSERTING BATTERY... 4 INSERTING MEMORY CARD... 4 BASIC OPERATION... 5 TURN ON / OFF THE DV...
DVR 914HD WiFi Action Camcorder
 DVR 914HD WiFi Action Camcorder User Manual 2009-2015 Sakar International, Inc. All rights reserved. Windows and the Windows logo are registered trademarks of Microsoft Corporation. All other trademarks
Contents. Section 1 Getting to Know Your Digital Camera Overview...1 Front View...1 Rear View...2 Side View...2 Bottom View...
 1 Contents Section 1 Getting to Know Your Digital Camera... 1 Overview...1 Front View...1 Rear View...2 Side View...2 Bottom View...3 Section 2 Getting Up and Running... 4 Loading the Batteries...4 Inserting
Table of contents Introduction Getting Started Taking still images or videos
 User Manual Table of contents Introduction Features............................................1 Package contents.....................................2 Camera overview.....................................2
itwist DVR 613HD Digital Camcorder
 itwist DVR 613HD Digital Camcorder with 2ViewScreen User Manual 2009-2011 Sakar International, Inc. All rights reserved. Windows and the Windows logo are registered trademarks of Microsoft Corporation.
Product Manual. Intova Duo
 Product Manual Intova Duo 1 Introduction Thank you for purchasing an Intova Duo. Your Duo is a tough and robust Sports Camera with a wide range of features. Please read this manual carefully for usage
26690 Digital Camera with Water Resistant casing
 26690 Digital Camera with Water Resistant casing User s Manual 2009 Sakar International, Inc. All rights reserved. Windows and the Windows logo are registered trademarks of Microsoft Corporation. All other
98346 Digital Camera. User Manual
 98346 Digital Camera User Manual 2009-2014 Sakar International, Inc. All rights reserved. Windows and the Windows logo are registered trademarks of Microsoft Corporation. All other trademarks are the property
DV 5470 User Manual Package Contents:
 DV 5470 User Manual Package Contents: Manual Camera Pouch Installation CD Earbuds AV Cable CONTENTS 1. NOTICE...2 2. SETUP...3 2.1 BATTERY INSTALLATION...3 2.2 MEMORY CARD...4 2.3 CONFIGURATION & INSTALLATION...4
Handbuch CL 83_UK.indd :18
 1. Parts of the digital camera...30 2. Preparing for using...31 Installing the Battery... Charge the battery... Inserting the Memory Card... Format the memory card... Setting the Language... Setting the
88067 Talking Digital Camera User s Manual
 88067 Talking Digital Camera User s Manual 2010 Sakar International, Inc. All rights reserved. Windows and the Windows logo are registered trademarks of Microsoft Corporation. All other trademarks are
About this Manual Copyright Federal Communications Commission (FCC) Compliance Declaration of Conformity Trademark Recognition
 Compliance Declaration of Conformity Trademark Recognition") Preface About this Manual The contents of this manual and the bundled Basic Reference are subject to change without notice. Note that the example screens and product illustrations shown in this User s
Preface About this Manual The contents of this manual and the bundled Basic Reference are subject to change without notice. Note that the example screens and product illustrations shown in this User s
1, Key features. Preface. Notes
 Car DVR User Manual Preface Thank you for purchasing this DVR, this device has a unique ultra-portable design; it can be used in various fields, to bring you convenient, safe, colorful daily life. Please
DVR101 HD DASH CAM & 12MP CAMERA
 DVR101 HD DASH CAM & 12MP CAMERA GENERAL - Display: 3 HD LCD - Chipset: Novatek 96223 - Image Sensor: SC1143, 1.0M CMOS - Outputs: USB - PC Interface: USB - Power Supply: 12/24V Cig. Lead Charger - Input
DVR 510HD Digital Video Camcorder Owner s Manual
 DVR 510HD Digital Video Camcorder Owner s Manual 2009 Sakar International, Inc. All rights reserved. Windows and the Windows logo are registered trademarks of Microsoft Corporation. All other trademarks
TE-DVR-MM User Manual
 TE-DVR-MM User Manual 1. Components Front Back Remote Control Wiring Connections: Yellow - Battery + Red - Accessory + Black - Ground 2. ibeam Brackets (Sold Separetly) 3. Operation AV1 = Video 1 input
ViviCam 8025 Digital Camera
 ViviCam 8025 Digital Camera User s Manual CD500DOGF 2009 Sakar International, Inc. All rights reserved. Windows and the Windows logo are registered trademarks of Microsoft Corporation. All other trademarks
Xtreme Imaging. Table of Contents:
 Xtreme Imaging Table of Contents: Preface 1 Main features...1 Computer operating system requirements.....1 Prestart Guide...3 Basic installation.3 Video mode...6 Settings 13 Photo mode......17 Settings
CONTENTS I Getting to know your camera..1 II Software & Download 15 III Maintenance. 23 IV Specification and system requirement...
 CONTENTS I Getting to know your camera..1 1. Configuration & installation...1 2. Monitor screen display...2 3. Preparation before capture..2 4. Shooting 3 5. Video& Audio recording. 7 6. Audio input /output..8
DVR 936 Wi-Fi LifeCam
 DVR 936 Wi-Fi LifeCam Wearable Camcorder User Manual 2009-2015 Sakar International, Inc. All rights reserved. Windows and the Windows logo are registered trademarks of Microsoft Corporation. All other
HP Photosmart M417/M517 Digital Camera with HP Instant Share. User s Manual
 HP Photosmart M417/M517 Digital Camera with HP Instant Share User s Manual Legal and notice information Copyright 2005 Hewlett-Packard Development Company, L.P. The information contained herein is subject
Dash Camera with 2.7 Display & GPS User Manual DC-27-G
 User Manual Introduction Thank you for purchasing your EchoMaster DVR Dash Camera. Drive, record and share with geolocation. Capture that shareable moment on your next roadtrip or safeguard yourself with
ViviCam 8027 Digital Camera
 ViviCam 8027 Digital Camera User s Manual 2009 Sakar International, Inc. All rights reserved. Windows and the Windows logo are registered trademarks of Microsoft Corporation. All other trademarks are the
Polaris G50 Dash cam incident recorder.
 Polaris G50 Dash cam incident recorder. Operation manual Quick Guide Thank you for purchasing the Polaris G50 DVR. The Polaris G50 DVR is a great product for capturing adventures and incidents both on
Hamilton Electronics CAMERA-DC2. User s Manual
 Hamilton Electronics CAMERA-DC2 User s Manual 1 1. PARTS OF THE DIGITAL CAMERA...5 2. PREPARING FOR USING...6 INSTALLING THE BATTERY... 6 CHARGE THE BATTERY... 7 INSERTING THE MEMORY CARD... 9 FORMAT THE
Use Specification of Pixie Princess
 User Manual ----------------------------------------------------------------------------1/14----------------------------------------------------------------------------- Preface Thank you for purchasing
DVR 840XHD Digital Video Camcorder User s Manual
 DVR 840XHD Digital Video Camcorder User s Manual 2009 Sakar International, Inc. All rights reserved. Windows and the Windows logo are registered trademarks of Microsoft Corporation. All other trademarks
Content Prooduct Specification... 4 Getting to Know your camera... 5 Device overview... 5 battery... 7 memory card... 7 Turning your camera on...
 User Manual Content Prooduct Specification... 4 Getting to Know your camera... 5 Device overview... 5 battery... 7 memory card... 7 Turning your camera on... 9 modes... 9 Capture Mode... 10 photo... 10
Car DVR User Manual. 1, Key features. Preface. Notes
 Car DVR User Manual Preface Thank you for purchasing this DVR, this device has a unique ultra-portable design; it can be used in various fields, to bring you convenient, safe, colorful daily life. Please
AquaShot Underwater Digital Camera with Water Resistant Casing. User Manual
 AquaShot 26693 Underwater Digital Camera with Water Resistant Casing User Manual 2009-2013 Sakar International, Inc. All rights reserved. Windows and the Windows logo are registered trademarks of Microsoft
FHD Digital Video Camera. 24 Max /2.7 TFT. ActionPro FHD Digital Video Camera. Instruction Manual. Model #: HDV17BK. Never-Ending Learning Innovation
 ActionPro FHD Digital Video Camera MP 24 Max /2.7 TFT ActionPro FHD Digital Video Camera Instruction Manual Model #: HDV17BK Never-Ending Learning Innovation 2 1. About...4 1a. System Requirements...4
DVR 865HD Digital Video Camcorder User s Manual
 DVR 865HD Digital Video Camcorder User s Manual 2009 Sakar International, Inc. All rights reserved. Windows and the Windows logo are registered trademarks of Microsoft Corporation. All other trademarks
DVR510-KESA Digital Video Camcorder User s Manual
 DVR510-KESA Digital Video Camcorder User s Manual 2009 Sakar International, Inc. All rights reserved. Windows and the Windows logo are registered trademarks of Microsoft Corporation. All other trademarks
High Definition Digital Video Camera
 High Definition Digital Video Camera User Manual Contents Section 1 Getting to Know Your Camera... 2 Section 2 Getting Started... 5 Section 3 Record Mode... 8 Section 4 Playback Mode... 34 Section 5 Listening
DVR 789HD Full HD Action Camcorder
 DVR 789HD Full HD Action Camcorder User Manual 2009-2018 Sakar International, Inc. All rights reserved. Windows and the Windows logo are registered trademarks of Microsoft Corporation. All other trademarks
Complete User Guide. X1 Action Camera
 1 Complete User Guide X1 Action Camera x1 DISCOVER: ADVENTURE Contents Share your footage with us on social media #KBdiscover To view the entire Kaiser Baas product range visit: www.kaiserbaas.com Join
Function Description 3. Notice for Use...3. System Requirements.5. Start to use..6. ArcSoft PhotoImpression, VideoImpression and MediaImpression.
 0 1 Contents Function Description 3 Notice for Use...3 System Requirements.5 Start to use..6 ArcSoft PhotoImpression, VideoImpression and MediaImpression.13 Product Specifications..28 Supplied Accessories
I. Getting to know your camera 1. Configuration and installation
 I. Getting to know your camera 1. Configuration and installation 1 Display button 2 LED On / Off button 3 Mode button (DV / DSC) 4 Shutter button 5 Up button 6 OK button 7 AV / USB jack 8 Right button
IN-CAR HD Digital Video Recorder
 IN-CAR HD Digital Video Recorder USER MANUAL KPT-200 In order to ensure better use of each function of your Kapture In-Car HD DVR, it is recommended that you read these product instructions carefully before
Thank you for purchasing this digital video camera. Please carefully read through this
 0 1 Preface Thank you for purchasing this digital video camera. Please carefully read through this manual before using, and properly keep it for future reference. This manual was compiled based on updated
ACTION CAMERA INSTRUCTION MANUAL MODEL: DV6000AF. Li-ion
 ACTION CAMERA Li-ion INSTRUCTION MANUAL MODEL: DV6000AF INTRODUCTION Congratulations on the purchase of this product. This device is perfect for capturing all those important moments in stunning 4k using
Luxmedia. User Manual
 Luxmedia User Manual PRAKTICA International Ltd, 5 Century Point, Halifax Road, High Wycombe, HP12 3SL, United Kingdom www.praktica.com care@praktica.com +44(0)344 822 9940 Copyright This manual contains
Introduction Congratulations on your purchase of this digital video camera. Before using the camera, please read this user manual carefully.
 EVC1700 User Guide 2 Introduction Congratulations on your purchase of this digital video camera. Before using the camera, please read this user manual carefully. The main purpose is to shoot videos. It
HP Photosmart M22/M23 Digital Camera with HP Instant Share. User s Manual
 HP Photosmart M22/M23 Digital Camera with HP Instant Share User s Manual Legal and notice information Copyright 2005 Hewlett-Packard Development Company, L.P. The information contained herein is subject
KODAK EASYSHARE CX4200 Digital Camera. User s Guide Visit Kodak on the World Wide Web at
 KODAK EASYSHARE CX4200 Digital Camera User s Guide Visit Kodak on the World Wide Web at www.kodak.com Eastman Kodak Company 343 State Street Rochester, New York 14650 Eastman Kodak Company, 2002 Kodak
1. PARTS OF THE CAMCORDER PREPARING FOR USING... 5
 INSTRUCTION MANUAL 1. PARTS OF THE CAMCORDER... 4 2. PREPARING FOR USING... 5 INSTALLING THE BATTERY... 5 CHARGING THE BATTERY... 5 FORMAT THE MEMORY CARD... 6 SETTING THE LANGUAGE... 7 SETTING THE DATE
ViviCam S1527 Digital Camera
 ViviCam S1527 Digital Camera User Manual 2009-2012 Sakar International, Inc. All rights reserved. Windows and the Windows logo are registered trademarks of Microsoft Corporation. All other trademarks are