KM-31BK. HD-Multimedia Player & Recorder.
|
|
|
- Polly Byrd
- 6 years ago
- Views:
Transcription


1 KM-31BK HD-Multimedia Player & Recorder 1
2 1. Introduction 1.1 Preface Dear Customer, Thank you for purchasing KM-31BK. In the digital age, this product is a great home entertainment system. You can enjoy movies and music, view photos of precious moments, and record your favorite TV or movie program and view them whenever. The device can also backup the data from your digital camera without a PC. It s easy to use this product as a portable external storage device with USB 2.0 speed. This player has the following functionality: Movie Playback Support Codec s: VOB (DVD), IFO (DVD), MPG (MPEG-2/1), AVI (MPEG-4 ASP: XviD), DAT (VCD), and MPEG2 TS files; resolution up to 1080i. Video Recording supports one button recording and schedule recording in MPG format, can easily record programs from TV, DVD player and DV, and save as MPEG-2 (.mpg) format; also can edit the recorded titles. Time shifting function Music Playback Photo Playback Data Storage Network function Support Codec s: MP3, OGG, WAV and WMA* files Supports one button playlist music playback Support Codec s: JPEG, and BMP files Work as a portable hard disk using USB 2.0 port Network streaming playback We hope that this product will bring you a lot of enjoyment. We are committed to apply multimedia technology in your work, entertainment, family, daily life, car and everywhere! * WMA Pro & Advanced Profile and WMA with DRM are not supported. 1.2 Packing List Player, A/V cable, Component cable, USB cable, LAN cable, Remote Control, AC/DC adaptor, AC/DC adaptor Power Cord, User Manual, Quick Installation Guide, Driver CD Note: The actual contents in the package might be different from the packing list in this manual. 2
3 1.3 Caution This player s design and manufacture has your safety in mind. In order to safely and effectively use this player, please read the following before usage Usage cautions User should not modify this player. If a commercial hard disk is being used, the environmental temperature should be within +5 C ~ +35 C Power The player s power voltage: DC 12V. When using this player, please connect the supplied AC adapter or AC adapter cable to the player s power jack. When connecting the adapter cable, please do so with caution, or be subject to pressure. To reduce the risk of electric shock, unplug the adapter first before cleaning it. Never connect the adapter to the player in a humid or dusty area. Do not replace the adapter or cable s wire or connector Radio interference/compatibility If not properly shielded, almost all electronic devices will get radio interference. Under some conditions, your player might get interference. The design of this player has followed the FCC/CE standard, and has followed the following rules: (1) This player may not cause harmful interference; (2) This player could accept some interference received including interference that may cause undesired operation Repair If the player has a problem, you should take it to an appointed repair center and let the specialists do the repair, never repair the player yourself, you might damage the player or endanger yourself or your data Disposing of the player When you dispose the player, be sure to dispose it appropriately. Some countries may regulate disposal of electrical device, please consult with your local authority Hard disk cautions 3
4 The player uses an internal hard disk for data storage, if you have a brand new hard disk, please format first before proceed. You should carefully read the < Frequently Asked Questions > chapter, and check our website for the latest information before formatting the hard disk. If you need to format, please note the following: (1) When formatting the hard disk on a computer, remember to choose FAT32 as the system format. If you use NTFS system, the player may not operate properly in some situation. Note: NTFS partition on the hard disk is read-only when using the KM-31BK to transfer files. Physical impact may create a bad sector in the hard disk; you can use CHKDSK to fix the problem. All data stored in the player may be lost due to physical impact, electrical shock, power lost, HDD format, etc. Please backup your data. It is suggested to defrag after a long period of use. Regularly backup the data in the hard disk so that it can be recovered in the event of data corruption or loss. Our company takes no responsibility for loss of data stored on the hard disk Other Information When using this player, please do not let the player come into contact with water or other types of liquid, if water is accidentally spilled on the player, please use a dry cloth to absorb the spillage. Electronic products are vulnerable. Please avoid shaking or hitting the player, and do not press the buttons too hard. Do not let the player come into contact with water or other forms of liquid. Do not disassemble the player; repair the player or change the design of the player, any damage done will not be included in the repair policy. Do not press the buttons of the player too hard. Avoid hitting the player with hard object, avoid shaking the player, and stay away from magnetic fields. If a power surge occurs, a cold boot might be required. Cold boot can be done by turning off the power switch and unplugging the power cord. After you reconnect the cord and turning the power switch back on, the product will return to normal performance. 4
 Plug in the type A connector of the USB cable to the computer.")
5 1.4 Connection Connecting to a Computer (1) Turn on the device (2) Plug in the type B connector of the USB cable to the KM-31BK s USB DEVICE port. (3) Plug in the type A connector of the USB cable to the computer. 5
6 1.4.2 USB Mass Storage Device (Flash drive, MP3, USB HDD etc.) Connection (1) Turn on the device. (2) Plug in a Flash disk or USB HDD etc. to one of the USB host ports of this player Recording using Composite cables 1. Composite IN (1) Connect one end of the composite (Red, white, yellow) cable to the player s composite jack. (2) Connect the other end to set-top Box, Sat, cable box, etc. (see below), you can record TV programs from your Set-Top Box. 6
 Connect the other end to your television s composite jack. 3.")
7 2. TV connection using composite (Composite out) (1) Connect one end of the composite (Red, white, yellow) cable to the player s composite jack. (2) Connect the other end to your television s composite jack. 3. TV connection using Component (Y/Pb/Pr) (1) Connect one end of the component (Green, Blue, and Red) cable to the player s component jack. (2) Connect the other end to your television s component jack. *Component connection does not carry audio. Please view the next page for more details. 7
8 In this way, you can also enjoy videos, music, and photos in the player on TV. 4. Receiving audio when using component. Component connection does not carry audio. There are two ways you can receive audio when using component connection. (1) Use the audio output from the composite cables (audio is carried from the red and white cable). (2) Use the audio output from the S/PDIF Coaxial or Optical jack. *When using composite cables for audio, connect the red and white cables only. 8

 (2) Plug in the other end of the connector to your")
9 1.4.4 Digital Audio Device connection (1) Plug one end of the coaxial cable to the player s coaxial jack. If you are using an optical cable, please plug in the connector on to the player s S/PDIF Optical jack;(not supplied) (2) Plug in the other end of the connector to your digital audio device. Coaxial Jack Connection Optical Jack Connection 9
 Connect the big end of the AC adaptor to the power outlet. 1.4.6 Network connection (1) Connect one end of the Ethernet cable to the player s Ethernet socket.")
10 1.4.5 Power connection (1) Make sure the power switch is off. (2) Connect the small end of the AC adaptor to the player s DC IN jack. (3) Connect the big end of the AC adaptor to the power outlet Network connection (1) Connect one end of the Ethernet cable to the player s Ethernet socket. (2) Connect the other end of the Ethernet Cable to your networking device. 10


11 1.5 First Time Usage Format Hard disc For users who bought the player without a HDD inside, and want to install a SATA HDD, please see Formatting a hard drive on page 21 for details Remote Control Install the batteries before using the remote control. Installation is shown below Power on/off, language control 1. Power on To power on the device, turn on the power switch which is located on the back of the device. After the player is on, the power indicator on the front panel will light up. The device will then boot to the media center s user interface. 2. Power off To power off the device, press the power button that is located in front of the media center. The user interface of the media center will be off, but the unit will still be on. This is indicated when the power led light is red. To turn off the device completely, turn the power switch that is located in the back off. 3. Language control 11
12 The system language of this player can be set to English or other languages. This feature is located when you first setup the media center. 2. About the Player 2.1 Front Panel 12

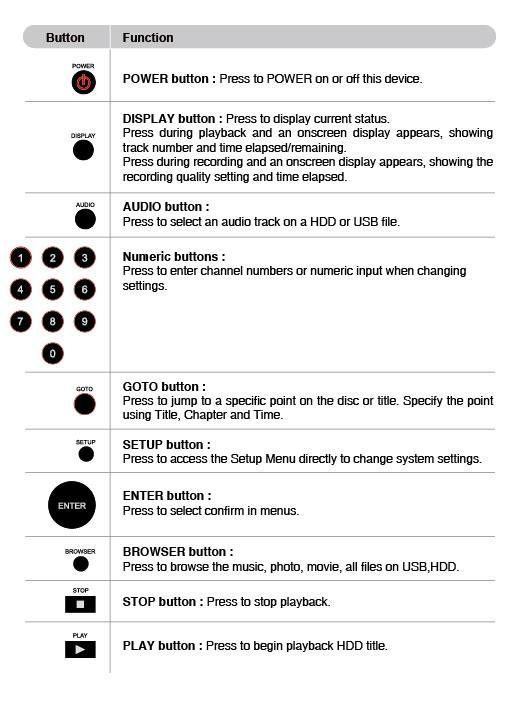
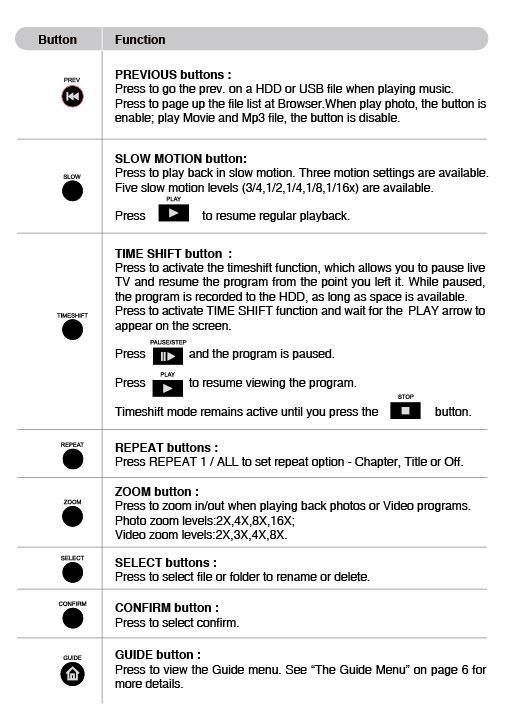
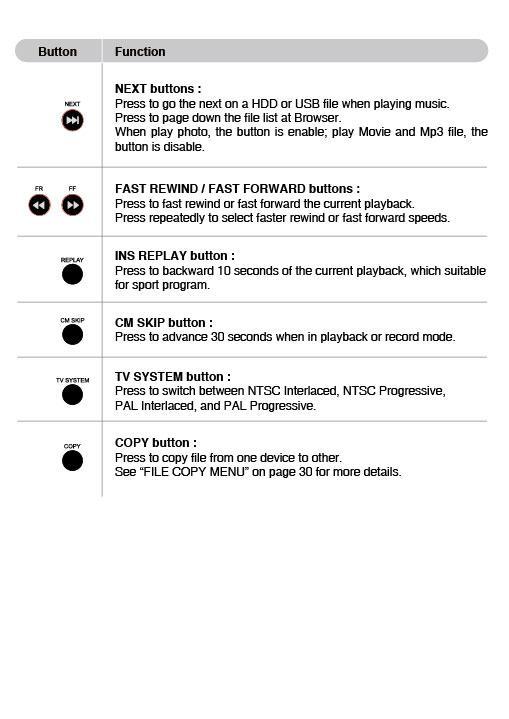
13 2.2 Remote Control All procedures in this manual can be carried out using the remote control buttons. Certain functions can also be carried out using the front panel. See the following for details on each button and its function: 13
14 14
15 15
16 16
17 17
18 2.3 Back Panel 18


19 3. Getting Started 1. Power on the KM-31BK media center. The startup logo will appear. 2. After a few second, the system will enter a guide menu. You can also enter the guide menu by pressing on the remote control. 3.1 Video In To select a recording source, select the Video In icon on the guide menu page. 19
20 3.2 File Copy This feature allows user to copy files from a variety of devices. Please view section 9 File Copy Menu for more details. 3.3 Browser This feature will enable you to browse through movies, photo, and music files stored either on a hard drive, USB flash drive, or your home network. This can be accessed by selecting the browser icon on the menu page or simply press on the browser button on your remote. 3.4 Setup To enter the setup menu, select on the menu page. on your remote control, or select the setup icon 3.5 Time REC To enter the Time REC setup page, select Timer REC button on the menu page. on your remote control or select the 20

21 4. Formatting a Hard drive Please use KM-31BK direct hook up to you TV to format your hard drive for the first time. You can use the KM-31BK formatting interface within the setup menu page. The hard drive can also be formatted through a computer. FAT32 is required for the player to work properly with the recording feature. The following image will be shown during the setup. Select the OK icon and press cancel to return to the menu page. to proceed to the next stage. Otherwise, select 4.1 Partitions (FAT32 & NTFS) If you format the drive using the KM-31BK, it will be formatted into two partitions. One partition will be FAT32 and the other partition will be NTFS. The FAT32 partition is the partition in which files can be written to*. The NTFS partition is only readable, and files cannot be written to that partition when using the KM-31BK to transfer files. You can adjust the amount of space each partition can have as it is diagramed on the next page. *FAT32 file system limits each file size to 4 GB. 21
22 Use the navigation buttons on your remote to adjust the Fat32 and NTFS partition. Once you have finished, select the next icon and press back icon to return to the previous menu.. Otherwise, select the 4.2 Formatting You will now see the Hard Disc Format guide as it is shown below. Select the Format icon by using the navigation buttons on your remote. 22
23 Press to start formatting on the hard drive. Otherwise, select the back icon to return to the previous menu. *Formatting will erase the entire drive. Please Back-up your data before proceeding. 4.3 Congratulation page Once the formatting has been completed, the Congratulation page will be displayed. Select the OK icon and Press to exit the page. 23
24 5. My Recordings The KM-31BK media center comes with a recording function. You simply press the button and a folder called My Recordings will be created on your hard drive. Movies that have been recorded will be placed in this folder. The file name will be named according to your timer settings. 5.1 REC List Menu 24
25 6. Timer Record Menu The Timer Record menu allows you to create, edit and delete recording schedules. It can also display previous recording schedules. The Timer Record page is located in the guide menu. 6.1 Creating a New Schedule (1) Navigate to the Timer REC page. (2) Use the navigation button on the remote to select the Edit tab on the menu bar. (3) Select Add a new schedule and press. (4) The schedule setting screen will appear (see the next page). 25

26 (5) Use the navigation buttons on the remote control to move between fields and to adjust each setting. Start Time Length Repeat Quality Preview Enter the date and time of the recording Enter the length of the recording Select how often you want the schedule to record. Choose from Once, Everyday, Mon-Fri, Mon-Sat or for an individual day of the week. Select the recording quality. Choose from HQ, SLP, EP, LP and SP. The higher the quality, the more space required on the hard drive. See HDD/USB Free Space on the left of the screen for details of how long you can record. This small preview window will show the current program of the selected channel 6.2 Editing Schedules (1) Select the Edit tab on the menu bar. (2) Select the schedule that you wish to be edited (see the next page for a diagram). 26
27 6.3 Deleting Schedules (1) Select the Delete tab on the menu bar. (2) Once you have selected the schedule to be deleted, press. (3) A confirmation message will appear (see below for screenshot). (4) Select CANCEL, if you choose not to delete the schedule. Select Delete the selected schedule if you wish to delete the schedules you have selected. Select Delete all schedules if you wish to delete all schedules. 27
28 (5) Press to confirm. 6.4 Schedule Status (1) Select the Status tab on the menu bar. (2) Select the schedule and press. The schedule status will be displayed. (3) Select Enable VPS, Disable VPS or Pause the selected schedule. (4) Press to confirm. 28

29 6.5 History (1) Select the History tab on the menu bar. Here you can view a complete history of your recordings. 29
 Use the navigation buttons on the remote control to select the System tab from the menu bar. (2) Select the settings you want to revise.")
30 7. Setup Menu The Setup Menu allows you to configure the KM-31BK system settings. To enter the menu, select Setup from the Guide menu. 7.1 System Settings (1) Use the navigation buttons on the remote control to select the System tab from the menu bar. (2) Select the settings you want to revise. (Details of each setting are listed on the next page). 30
31 Menu Language Select to choose the OSD (On Screen Display) language. Select the language you wish the KM-31BK to display. Press Text Encoding to confirm. Choose the text encoding language. Time Press to confirm. Select Time. To configure the time. Manual will be the default choice. Press the next page. to proceed to 31
 Format Select HDD Format under the System tab. Select Cancel if you wish not to format the drive.")
32 Use the navigation buttons on the remote control to adjust each setting. Press once you have finish. HDD(Hard drive) Format Select HDD Format under the System tab. Select Cancel if you wish not to format the drive. Select HDD Format to format the drive. Press to confirm. 32

33 Restore Default Select Restore defaults. Select Ok to restore to factory default. Select Cancel to return to the System tab. *Restoring to factory default will reset your custom system settings to its original manufacture settings. 7.2 Video Settings The KM-31BK media center allows users to configure the video output to your television. Use the navigation button on the remote control to select the Video tab from the menu bar. (Please view the next page for details on each video setting). 33
34 Aspect Ratio Select the Aspect ratio setting to configure the aspect ratio. Choose one of the following according to the type of television you have: (1) Pan Scan 4:3: Display a wide picture on the entire screen and cuts off the redundant portions. This setting is for a standard 4:3 television. (2) Letter Box 4:3: Display a wide picture with two black borders on the top and bottom of a 4:3 screen. This setting is for a standard 4:3 television. (3) 16:9: Displays a wider picture than a 4:3 television. Select this setting when a 16:9 television is connected. Press to confirm. 34

35 Brightness Select the Brightness setting under the Video tab to adjust the brightness levels. Press the up and down buttons on the remote control to adjust the brightness level. Brightness level can also be previewed. Contrast Press to confirm the brightness adjustments. Select the Contrast setting under the Video tab to adjust the contrast levels. Press the up and down buttons on the remote control to adjust the contrast level. Contrast level can also be previewed. Press to confirm the contrast adjustments. 35
36 TV System (1) Select the TV system setting under the Video tab. (2) Choose NTSC or PAL. (3) Press to confirm your selection. *Select NTSC if you live in North America, Central America and the Caribbean, South America, etc *Select PAL if you live in other countries. Please view your television manual for more information. HD Resolution (1) Select the HD Output setting under the Video tab. (2) Choose Off when not viewing any HD content. (3) Choose 720P when viewing HD content that is outputted to 720P. (4) Choose 1080i when viewing HD content that is outputted to 1080i. 36

37 (5) Press to confirm. *Please view your television manual to see what resolution your television supports. 7.3 Recording Settings The recording settings on the KM-31BK lets users configure the recording quality, time shift, and the recording and time shift device. To access the recording settings, simply select the Record tab. Please view the next page for details on the recording settings. 37
 Press to confirm. Permanent Time Shift (1) Select the Permanent time shift setting under the Record tab.")
38 Quality (1) Select the Quality setting that is located under the Record tab. (2) Choose HQ to record in high quality. This requires more storage space. The other setting reduces recording quality, but it uses less storage space. (3) Press to confirm. Permanent Time Shift (1) Select the Permanent time shift setting under the Record tab. (2) Select On or Off. (3) Press to confirm. 38
39 Recording Device (1) Select REC device under the Record tab. (2) Select HDD if you are recording your content to a hard drive. Select USB if you are recording to an external recording device that is connected to media center via USB. (3) Press to confirm. Timeshift Device (1) Select the timeshift setting under the Record tab. (2) Set the timeshift on either HDD or USB. (3) Press to confirm. 39

40 7.4 Photos Settings The KM-31BK media center also allows users to view a variety of digital pictures with their own custom settings. To access the photo settings, simply select to Photo tab in the setup menu. Please view the next page with more details for each setting. 40
41 Slide Show Time (1) Select the Slide show timing setting under the Photo tab. (2) Choose a timing interval. (3) Press to confirm. 41
42 Transition Effect (1) Select the transition effect setting under the Photos tab. (2) Choose transitions for the slideshow. The transitions options are: Cross Fade fade in and fade out Left to Right- from left to right Top to Bottom- from top to bottom Waterfall- like a steep descent of water from a height Snake like snake motion Dissolve like water dissolve Strip Left Down like strip cover from top left to bottom right Shuffle shuffle in and out (3) Press to confirm. 42
 Press to confirm. 7.")
43 Background Music (1) Select the Background music setting under the Photo tab. (2) Select Off if no music will be played during the slideshow. Select folder if music will be played from a folder. Select Playlist if music will be played from a customized playlist. (3) Press to confirm. 7.5 Network Settings The KM-31BK media center has the capability to see any computer that plug-in to your network. This feature allows you to access any multimedia files from any computer. To access the network features, simply select the Network tab in the setup menu page (as shown below). 43
44 Wired Lan Setup Before using the network functions, please follow these steps first: (1) Connect the KM-31BK media center to a router or hub using the Ethernet cable. (2) On Windows XP please enable NetBIOS of TCP/IP for your PC s network card. On OSX Leopard please enable file sharing in the system preferences panel. (3) Please turn off your computer s firewall. (4) Select the folders you wish to share. On Windows XP, right-click on the folder and select sharing and security. On OSX Leopard add the folder within in the Shared Folders. Please enable samba when using OSX Leopard. Once you have these enable please follow these next steps: (1) Select DHCP (Auto) or FIX IP (Manual). (2) Press to confirm. 44
 - This setting allows users to enter the IP address manually. For further assistant, please contact your network administrator.")
45 DHCP DNS (AUTO) This setting will automatically assign an IP address to the device. Press to automatically assign the IP address. FIX IP (MANUAL) - This setting allows users to enter the IP address manually. For further assistant, please contact your network administrator. *Please note that when accessing shared folder on OSX Leopard, the folders cannot be password protected. 45
.")
46 8. Browser Menu The Browser menu allows users to browse through photo, music, and movie files stored on a HDD, external USB device, or on your home network. To enter the menu, select Browser from the Guide menu page. Once you have entered the guide you will see a list of devices. (As shown below). (1) Use the navigation buttons on the remote control to select the device on which the media is stored. You can choose from HDD, USB (for media stored on an external flash drive or an external enclosure), and NET (home network). Press once you have selected the device. *If HDD has been selected, remember that your files are on the FAT32 partition. *When you are browsing through NET, you can choose the computer s name from the menu or you can set Specific File Server IP and access it from My Short Cut in the menu (as shown on the next page). 46

47 My Neighbors: When you are browsing through NET, you can choose the PC name from the menu or you can select My Neighbors to access it. The transcode server software must be installed on the computer you are trying to access through the network in order for it to show under the My Neighbors folders.* *If you install the Transcode Server software in your PC, the system will support H.264, RMVB, WMV, RM format playback through NET only. The Transcode Server software currently does not work on Mac OSX Leopard. 47

48 8.1 Browsing Music (1) Use the left and right navigation buttons to select the Music tab. (2) Select the folder containing your audio files. The song information will appear on the bottom. Press or the play button to start the song. The KM-31BK supports MP3, WMA, WAV and OGG format Playback. 8.2 Browsing Photos (1) Use the left and right navigation buttons to select the Photos tab. 48

49 (2) Select the folder containing the photos you wish to view. (3) Press to view the photo in full screen. Note: 1. When the photo is displayed in full screen mode, the slide show starts automatically. 2. You can browse photos and listen to music at the same time. You can also use the left or right buttons on the remote to rotate a photo towards any angle. You can also press levels that can be chosen. to zoom in/out of that photo. There are three zoom The KM-31BK supports High Definition Photo (JPG, JPEG, and BMP) Playback. 8.3 Browsing Movies (1) Use the left and right navigation buttons to select the Movies tab. (2) Select the folder that contains your movie files. (3) Select the movie that you want to play. (4) Press or the play button to the movie in full screen. 49
50 The KM-31BK supports standard definition and High Definition Video (720P, 1080i) Playback. For example: MPEG1 (DAT, MPG) MPEG2 (VOB, MPG, TS) MPEG4 (AVI, DIVX, XVID) Note: When viewing HD content, you can adjust the HD output resolution. See HD Output of SETUP menu for more details. 8.4 Browsing All This tab let s user see all their movies, music and photos at once. Simply, use the left and right navigation buttons to select the All tab. (As shown on the next Page). Now you are able to browse through photos, music, and movies on the same tab. 8.5 Editing File Folders itself. This feature allows user to rename or delete a file or folder right on the device (1) Select the file or folder to be edited. 50


51 (2)Press to display the Edit tab. Return Rename Return s to the main screen. 1. Use the left and right buttons on the remote control to select the Rename tab from the menu bar. 2. Press on the remote control. An onscreen keyboard will appears. 3. Use the left and right buttons to browse through letters and numbers. Select CAPS to toggle between uppercase and lowercase letters. Press <- to delete a letter. Press -> to insert a space. Press to input each letters or numbers. 4. Once you have entered the new name, select OK and press to confirm all changes. 51

52 Delete If you want to cancel the naming during the process, press 1.Use the left and right buttons on the remote control to select the Delete tab from the menu bar. 2. Press to confirm and delete the file. 3. A confirmation message appears. 4. Press to delete the selected file. To cancel, select Return. 52
53 9. File Copy Menu This feature allows users to copy files from NET, USB, and HDD vice versa. To enter the menu, select File Copy from the Guide menu or select remote control. Please follow these steps: on the (1) Select the source device by using the up and down buttons on your remote. (2) Select the destination source by pressing the right navigation button in order to select your destination source. 53

54 (3) Once you have selected the source and destination, you will then enter the file directory. Select a folder under the Source column. Once selected, the file or folder name will display. 54

 A confirmation window will appear.")
55 (4) Now press the right navigation button in order to select the Destination column. Select the directory the files will be transferred to. Once selected, press the right navigation button to proceed to the next step. (5) A confirmation window will appear. Select OK to copy or select No to cancel. 55

56 Once the files have been copied, the system will display File Copy Completed! If it fails, the system will display File Copy failed! Select OK to browse files or select No return the main menu. 56
57 10. Specifications USB SUPPORTED (Read Only) USB HDD USB Card reader VIDEO CODEC SUPPORTED: VOB (DVD), IFO (DVD), MPG (MPEG-2/1), AVI (MPEG-4 ASP: XVID, DIVX), DAT (VCD), and MPEG2 TS files; resolution up to 1080i for HD Content. MUSIC CODEC SUPPORTED: MP3, OGG, WAV and WMA. Maximum number of files recognizable: 9999 files Compression rate: between 32 kbps and 320 kbps PHOTO CODEC SUPPORTED: JPEG, and BMP. Maximum number of pictures recognizable: 9999 files RECORDABLE MEDIA SUPPORTED Built in HDD (DVD+VR mode) Built in USB HDD VIDEO RECORDING MODE Mode DVD 80 GB HDD 120 GB HDD 160 GBHDD HQ 1hr 16hrs 24hrs 33hrs SP 2hrs 32hrs 48hrs 66hrs LP 3hrs 48hrs 72hrs 99hrs EP 4hrs 64hrs 96hrs 132hrs SLP 6hrs 96hrs 144hrs 198hrs VIDEO RECORDING FORMAT MPEG2: DVD+VR (HQ/SP/LP/EP/S-LP mode) AUDIO RECORDING FORMAT DVD+VR (HQ/SP/LP/EP/SLP mode): MPEG2 2-chanel VIDEO OUTPUT SPECIFICATION Composite Output 1 Vpp 75 Ohm Components Output Y:1 Vpp 75 Ohm Cb:0.7 Vpp 75 Ohm Cr:0.7 Vpp 75 Ohm AUDIO PERFORMANCE DA Converter 24-bit/192kHZ AD Converter 24-bit/96kHZ 57
58 Signal-Noise (1kHZ) 95dB Dynamic Range 90dB (1kHZ) Channel 95dB Separation Total Harmonic Distortion (1kHZ) -85dB CONNECTIONS FRONT PANEL USB Port Type A x 1 BACK PANEL Video Output Audio L/R Output Video Input Audio L/R Output Component / Progressive USB Port Network Port Coaxial input SPIF/Optical DC Jack GENERAL Power Supply Power Consumption Operating Temperature Operating Humidity Dimensions (W/H/D) Net Weight RCA Connector (yellow) x 1 RCA Connector (white/red) x 1 RCA Connector (yellow) x 1 RCA Connector (white/red) x 1 Y/Pb/Pr x 1 Type B x 1 RJ45 x 1 Coaxial x1 SPIF/OPTICAL x 1 DC 12V x 1 AC 100~240V Approx. 35 W 50~60Hz +5 C to +40 C (+36 F to +104 F) 5% to 80% RH 430 x 66 x 316 mm Approx 4.3 kg Note: The specifications and design of this product are subject to change without notice. 58
Home Multimedia Center. FANTEC HDMI-miniTV. User s Manual
 Home Multimedia Center FANTEC HDMI-miniTV User s Manual Table of Contents 1. Introduction... 3 1.1 Preface... 3 1.2 Packing List... 3 1.3 Caution... 3 1.4 Connection... 5 1.5 First Time Usage... 7 2. About
USER MANUAL High Definition HDD Multimedia Player BM Feature. Installation Guide. Management Guide
 USER MANUAL High Definition HDD Multimedia Player BM 3030 Feature Installation Guide Management Guide CONTENTS 1. Before You Get Started...... 3 1.1 SAFTY INSTRUCTION.....3 1.2 TAKE A LOOK TO THE MEDIA
 Register your product and get support at www.philips.com/welcome HMP3000 EN User manual Contents 1 Trademark notice 5 English 2 Connect and play 7 3 Control and play 11 4 Options 13 Video options 13 Audio
Home Multimedia Center HMC User s Manual
 Home Multimedia Center HMC-3912 User s Manual (Version 1.0.5) Table of Contents 1. Introduction... 4 1.1 Preface... 4 1.2 Packing List... 5 1.3 Caution... 6 1.4 Connection... 8 1.5 First Time Usage...
MICRO 2+ USER MANUAL
 MICRO2+ USER MANUAL Wintal MICRO2+ USER MANUAL Contents BRIEF INTRODUCTION... 1 FEATURE... 1 BASIC PERFORMANCE... 1 PRODUCT DETAILS... 2 PACKING LIST... 2 FRONT VIEW... 2 BACK VIEW... 3 REMOTE CONTROL...
FANTEC FULL HD Media Player. Table of content
 Table of content 1. Introduction...2 1.1 Preface... 2 1.2 Packing List... 3 1.3 Cautions... 4 1.4 Connection... 6 1.5 Power On / Off... 9 2. Remote control...9 3. System Start-up... 11 3.1 TV Mode... 11
ACR-PV78100 USER MANUAL
 USER MANUAL ACR-PV78100 TABLE OF CONTENTS 1 User Information... 2 1.1 Caution... 2 1.1.1 Usage Cautions... 2 1.1.2 Radio Interference/Compatibility... 2 1.1.3 Repair... 2 1.1.4 Disposing of the player...
MP60 TABLE OF CONTENTS. HD Media Player
 INSTRUCTION L MANUAL TABLE OF CONTENTS MP60 HD Media Player 1. Caution 2. Features and Specifications 3. Unit and Accessories 4. Functions of Buttons on the Remote Control 5. Media Player s Connections
Contents V1.0. ONE Introduction TWO Installation and Instructions...06 THREE FAQ...14
 Contents V1.0 ONE Introduction...02 1.1 Features...02 1.2 Specification...03 1.3 Package Contents...03 1.4 Remote Control Guide...04 1.5 Connection Chart...05 TWO Installation and Instructions...06 2.1
The Movie what you really wanted to watch The Music which is your favorite The Photos which has your happy memories TV Drama which you would never
 The Movie what you really wanted to watch The Music which is your favorite The Photos which has your happy memories TV Drama which you would never miss Relax yourself wherever and whenever so far Ultimate
Multimedia Hard Disk Player & Recorder. User Manual PC/MAC
 Multimedia Hard Disk Player & Recorder User Manual PC/MAC Table of Contents 1. Brief introduction 3 Feature and performance 3 Basic performance 3 Specification 3 2. Product details 5 Packing list 5 Front
MP75. HD Media Player
 INSTRUCTION MANUAL MP75 HD Media Player TABLE OF CONTENTS 1. Caution 2 2. Features and Specifications 3 3. Unit and Accessories 4 4. Functions of Buttons on the Remote Control 4 5. Media Player s Connections
SD CARD DVD/VCD/CD/MP3/DIVX/MPEG-4 XO1525 USB MOD D200P. User s Manual
 USB SD CARD DVD/VCD/CD/MP3/DIVX/MPEG-4 XO1525 MOD D200P User s Manual 9.1 Rear Panel Connections: 19 BEFORE USING: To ensure the safety of the products during transportation, The internal mechanism was
Always there to help you. Register your product and get support at HMP5000. Question? Contact Philips.
 Always there to help you Register your product and get support at www.philips.com/welcome Question? Contact Philips HMP5000 User manual Contents 1 Control and play 2 11 Troubleshooting 20 12 Specification
Register your product and get support at HMP3008. EN User manual 7 ZH-CN 9
 Register your product and get support at www.philips.com/welcome HMP3008 EN User manual 7 ZH-CN 9 EN Please refer to the safety information before using the product. ZH-CN Trademark notice HDMI, the HDMI
-The plug must be accessible after installation.
 SEDVD-3600HDMI For instruction manual in another language, check online at http://manuel-utilisateur.logisav.fr -The plug must be accessible after installation. 1 2 3 4 5 6 8 9 10 11 12 13 14 15 16 1
Congratulations on the purchase of your Conceptronic Media Recorder & Player. Package Contents
 Conceptronic CM3PVR User Manual Congratulations on the purchase of your Conceptronic Media Recorder & Player. This User Manual gives you a step-by-step explanation how to install and use the Conceptronic
Ultra High Brightness Professional Monitor User Manual
 Manual Version UHBA1.0 Safety Instructions Please keep the display away from any heat sources. Place the display in a stable and well-ventilated place. Please handle with care as product contains glass.
TL240C/TL321C Transparent Display User Manual
 TL240C/TL321C Transparent Display User Manual Disclaimer BenQ Corporation makes no representations or warranties, either expressed or implied, with respect to the contents of this document. BenQ Corporation
Introduction About the Remote Control... 2 Parts and Functions... 4 Quick Start... 5 Using the AV Playback Function Setup Menu...
 User Manual V1.0 CONTENTS Introduction... 1 Features...1 System Requirements...1 About the Remote Control... 2 Parts and Functions... 4 Quick Start... 5 Using the AV Playback Function... 6 Connecting
TV1 Digital Player User s Manual
 TV1 Digital Player User s Manual Note: Screen shots taken in this manual may appear different on the player itself. Table of Content: Computer System requirements... 1 Notes... 2 Product Introduction...
USER MANUAL KADPF12XXXA
 USER MANUAL KADPF12XXXA Safety Information: Keep away from water, moisture and dusty areas. Working temperature 0-40. Never store in a hot or very cold place. Be careful not to drop or knock the photo
Model:HV0104. What is Hv0104?
 Just enjoy your movie and video files, vacation photos and digital music. Experience Real High-Definition outputs, capacity support up to 1TB, networking resource directly. Let all kinds of troublesome
Con-To-Go. Media Content Box ADSM User Guide
 Con-To-Go Media Content Box ADSM003-0 User Guide Index Description & Feature... 02 Specification... 03 Product Overview... 04 Remote Control Getting Started... 06... 07 User Interface... 16 Question/Troubleshooting...
12.1 Digital Photo Frame
 12.1 Digital Photo Frame KGNDPFC12 Instruction Manual TABLE OF CONTENTS SAFETY INFORMATION. 1 PACKAGE CONTENTS....1 SPECIFICATION SUMMARY 2 DPF INTRODUCTION... 3 QUICK START.. 4 OPERATION GUIDE.. 5 Movie
Register your product and get support at SPE9010 SPE9015 SPE9020 SPE9025 SPE9030. EN Multimedia Hard Disk
 Register your product and get support at www.philips.com/welcome SPE9010 SPE9015 SPE9020 SPE9025 SPE9030 EN Multimedia Hard Disk 1 Contents Contents... 2 Your Multimedia Hard Disk... 3 What s in the box...3
Media Player MP-2020 Specification Sheet MP Media Player for 2.5 Hard disk Specification Sheet
 MP-2020 Media Player for 2.5 Hard disk Specification Sheet 2009.10.28-1 - Table of Contents 1.0 Overview... 3 1.1.0 Features... 3 2.0 Box Contents... 4 3.0 Hardware Specification... 4 3.1.0 Assembly Viewing...
1. 2. USB 3. USB-OTG 4. AV 5. AC
 Dear Customers: Thanks for purchasing our HDD TV Recorder product. Before starting to use this product, please read this manual carefully so that you will know some tips to enjoy the fantastic functions
DVR 528 Digital Video Camera
 DVR 528 Digital Video Camera User Manual 2010 Sakar International, Inc. All rights reserved. Windows and the Windows logo are registered trademarks of Microsoft Corporation. All other trademarks are the
Table of Contents 1.SAFETY INSTRUCTIONS BOXED CONTENTS PRODUCT REVIEW HARDWARE SPECIFICATIONS BASIC SETUP...
 User Manual VER1.0 Table of Contents 1.SAFETY INSTRUCTIONS...4 2.BOXED CONTENTS...5 3.PRODUCT REVIEW...5 4.HARDWARE SPECIFICATIONS...8 5.BASIC SETUP...9 5.1 AV CABLE...10 5.2 HD CABLE... 11 5.3 NETWORK/RJ45/
Con-To-Go. Media Content Box ADSM002a-0/ADSM002b-0. User Guide
 Con-To-Go Media Content Box ADSM002a-0/ADSM002b-0 User Guide Index Description & Feature... 02 Specification... 03 Product Overview... 04 Remote Control Getting Started... 06... 07 User Interface... 15
POS Android Digital Advertising Display (Network) Hardware User Manual
 Hardware User Manual") POS Android Digital Advertising Display (Network) Hardware User Manual Manual Version POSW3.0 Safety Instructions Please keep the display away from any heat sources. Place the display in a stable and well-ventilated
POS Android Digital Advertising Display (Network) Hardware User Manual Manual Version POSW3.0 Safety Instructions Please keep the display away from any heat sources. Place the display in a stable and well-ventilated
DVP-731 USER MANUAL DVD/MPEG4/CD/MP3/PLAYER
 DVP-731 USER MANUAL DVD/MPEG4/CD/MP3/PLAYER Please read this User Manual carefully to ensure proper use of this product and keep this manual for future reference. For information and support, www.lenco.eu
FOR FURTHER ASSISTANCE, PLEASE CALL:
 USER MANUAL Welcome Thank you for choosing TeeVee. To set up your TeeVee box and enjoy all of the features available with your device, please review the user manual. Follow all steps before using this
TBF-100HD User Manual
 TBF-100HD User Manual High Definition Digital Terrestrial Receiver USB PVR-Ready Default PIN: 2010 Precautions Clean with a dry cloth only. Do not block any of the ventilation openings. When placed in
HDD Multimedia K120. User s Manual
 HDD Multimedia K120 User s Manual (Version 1.0.0) Table of Contents 1. Introduction...3 1.1 Preface...3 1.2 Packing List...4 1.3 Caution...5 1.4 Connection...7 1.5 First Time Usage...11 2. About the Player...12
MDVR-14 SOLID STATE MINI DVR User Guide
 MDVR-14 SOLID STATE MINI DVR User Guide 1 Contents 1. SAFETY PRECAUTIONS...3 2. FEATURES...4 3. PACKING LIST...4 4. MDVR DESCRIPTION... 5 5. BASIC CONFIGURATION...7 6. DISPLAY...8 7. OPERATION...9 8. MAIN
High Definition AD Players. Universal User s Manual. L Series and PF Series
 High Definition AD Players Universal User s Manual L Series and PF Series Cautions 1. Do not install and use the unit in moisture, high temperature, outdoor, and closed environment. 2. Please turn off
8 Digital Photo Frame
 8 Digital Photo Frame KGNDPFC8 Instruction Manual 0 TABEL OF CONTENTS SAFETY INFORMATION... 1 PACKAGE CONTENTS....1 SPECIFICATION SUMMARY. 2 DPF I NTRODUCTION... 3 Q U I C K S TA R T.. 5 OPERATION GUIDE....
TL240C Transparent Display User Manual
 TL240C Transparent Display User Manual Disclaimer BenQ Corporation makes no representations or warranties, either expressed or implied, with respect to the contents of this document. BenQ Corporation reserves
Archives About ARCHOS TV+ General Questions I have installed a firmware/plug-in/game file on my Archos TV+ but it is not recognized by the device. You
 About ARCHOS TV+ General Questions I have installed a firmware/plug-in/game file on my Archos TV+ but it is not recognized by the device. You may have not correctly copied your file on the device. If it
User s Manual BeamPod User Manual
 User s Manual BeamPod General Safety Information 1. Keep the device and packaging materials out of reach of infants and children. 2. Keep the power adapter and other contacts from water, Dry your hands
< W&ϭϱyyy USER MANUAL
 USER MANUAL Safety Information Keep away from water, moisture and dusty areas. Working temperature of 0-40 C. Never store in a very hot or very cold place. Be careful not to drop or knock the Digital Photo
Fusion HD. Quick Start Guide. Nixeus Technology, Inc. Version 1.1
 Fusion HD Quick Start Guide Version 1.1 About This Guide This Quick Start Guide gives you the information for you to setup your unit and enjoy viewing your multimedia files. The user manual will describe
USER GUIDE. FOR iphone/ipad. Compatibility: Apple ios 5.1 or higher
 USER GUIDE FOR iphone/ipad Compatibility: Apple ios 5.1 or higher 1. Overview... 4 2. Install and Set Up... 4 2.1. Charge your Power Connect... 4 2.2. Charge your iphone battery with Power Connect... 5
WARNINGS. *Do not operate the Projector in direct sunlight or near heat sources such as heaters, fires, and stoves as this may cause a fire hazard.
 WARNINGS *Do not operate the Projector in direct sunlight or near heat sources such as heaters, fires, and stoves as this may cause a fire hazard. *Do not operate the projector close to sources of steam
TECHNOLOGIES. P2jr Pico Projector. User Guide
 aaxa TECHNOLOGIES P2jr Pico Projector User Guide Caution! WARNING: Please use this product as instructed. Misuse may cause injury or death. DO NOT use while driving DO NOT expose to water or wet surfaces.
Directory. Product overview. Connecting your media player. Specification. Interface. Explanation of the remote control. Connector Indication
 License Notice and Trademark Acknowledgement. Manufactured under license from Dolby Laboratories. Dolby and the double-d symbol are trademarks of Dolby Laboratories. Manufactured under license under U.S.
MS30 USER MANUAL. Content
 MS30 USER MANUAL Content BRIEF INTRODUCTION... 2 FEATURE... 2 BASIC PERFORMANCE... 2 SPECIFICATION... 3 PRODUCT DETAILS... 5 PACKING LIST... 5 FRONT VIEW... 5 SIDE VIEW... 6 BACK VIEW... 7 REMOTE CONTROL...
HDD MULTIMEDIA PLAYER USER`S MANUAL
 HDD MULTIMEDIA PLAYER USER`S MANUAL Dear Customer: Thanks for choose our products.before starting use this products,please be sure to read this manual carefully so that you will know how to use the product
High Definition Freestanding Digital Poster. Universal User s Manual
 High Definition Freestanding Digital Poster Universal User s Manual L Series Version LHD1.0 Our Full Product Range Page 1 Safety Instructions Please keep the display away from any heat sources. and well-ventilated
SmartView Versa+ User Manual. Table of contents
 Table of contents Overview... 1 What s in the box?... 2 Getting to know your SmartView Versa+.. 3 Getting started... 5 Inserting the battery... 5 Charging the battery... 6 Install SD card... 7 Install
ADPF10XN Instruction Manual
 ADPF10XN Instruction Manual 1 ADPF10XN Digital Photo Frame User Guide Thank you for purchasing the ADPF10XN 10.4 digital photo frame (DPF). Before operating your new digital photo frame please carefully
Blackbird 4K Multi Format HDMI Converter with 4K Scaler
 Blackbird 4K Multi Format HDMI Converter with 4K Scaler P/N 30918 User's Manual SAFETY WARNINGS AND GUIDELINES Please read this entire manual before using this device, paying extra attention to these safety
P Digital Media Player for 3.5 SATA Hard Drives
 Digital Media Player for 3.5 SATA Hard Drives User Manual Firmware: 20080515_MPT_35_00 Date: May 22, 2008 Version: v1.1 The diagrams and images contained in this manual may not fully represent the product
Overview 1. Foreword 2. Warnings
 Overview 1. Foreword Thank you for choosing our product. Please read this manual carefully before using the product. Specifications and software updates may be subject to change without notice. Some pictures
Before Operation. Basic Operation. Operating Instructions
 PF1501 14 Before Operation Basic Operation 2 3 3 6 6 7 Connect to PC 7 Operating Instructions Set-Up... 9 Selecting Which Media to View... 9 Viewing Photos... 9 Adjust Speed of Slideshow... 10 Adjust the
Contents. Introduction Use as External USB HDD Access PC via Network Use as Multimedia Player...28
 Contents Introduction...3 Specifications... 3 Precautions... 4 System Requirements... 4 Package Content... 4 Product Overview... 5 1. Use as External USB HDD...7 1.1 Insert Hard Disk... 7 1.2 Format Built-in
Chapter 1 4 ipod Basics 5 ipod at a Glance 5 Using ipod Controls 7 Disabling ipod Controls 8 Using ipod Menus 9 Connecting and Disconnecting ipod
 ipod Features Guide 2 Contents Chapter 1 4 ipod Basics 5 ipod at a Glance 5 Using ipod Controls 7 Disabling ipod Controls 8 Using ipod Menus 9 Connecting and Disconnecting ipod Chapter 2 14 Music Features
Use_cases_English.qxd :51 Pagina 1. Use cases
 Use_cases_English.qxd 20-10-2005 16:51 Pagina 1 Media Center MCP9350i Use cases Use_cases_English.qxd 20-10-2005 16:51 Pagina 2 Online help: www.p4c.philips.com For interactive help, downloads and frequently
Overview. Declarations. Warning
 Overview Refined exterior design Unique hand fit Multi file format support This player supports MP3, WMA, WAV etc. file format. Driver free USB memory Manage your files in the USB memory without specifying
Wireless Display Receiver Quick Start Guide
 Wireless Display Receiver Quick Start Guide 1 Preface Thank you very much for purchasing our Wireless Display Receiver. We hope you will enjoy using it as meeting presentations and a great home entertainment
AMP-1033FD. Full HD Media Player. User Manual
 AMP-1033FD Full HD Media Player User Manual Content Introduction.......2 Warning......2 Chapter I Product Specification.....3 1.1 Function List......3 1.2 Parameters List. 5 1.3 Functional Feature...7
Network Digital Menu Board Hardware User Manual
 Network Digital Menu Board Hardware User Manual Manual Version DMA1 Safety Instructions Please keep the display away from any heat sources. Place the display in a stable and well-ventilated place. Please
Main function 4.3 TFT Screen, Resolution 480*272
 Main function 4.3 TFT Screen, Resolution 480*272 Support APE, FLAC, MP3, WMA, OGG, WAV etc. music play. Support TF card, capacity support 128MB~8GB Support MPEG-4(AVI), RM, RMVB, FLV, 3GP, MPG, VOB, MP4,
XEMIO-950 MP5 PLAYER / 4GB MEMORY / TOUCH SCREEN. For information and support,
 XEMIO-950 MP5 PLAYER / 4GB MEMORY / TOUCH SCREEN For information and support, www.lenco.eu To the customer: Thank you for purchasing this MP5 player. When opening the box for the first time, please check
Installation And User Guide DVR-EZ. 4 Channel Digital Video Recorder
 Installation And User Guide DVR-EZ 4 Channel Digital Video Recorder Regulatory FCC Certification This equipment has been tested and found to comply with the limits for a class A digital device, pursuant
*Do not operate the projector near water such as by the sink or bathtub as this may cause electric shock.
 Table of Contents Table of Contents 1 Warnings 2 Overview 3 Remote Control Functions 4 Packing List 5 General Operation 6 Startup and control Shutdown Positioning / Throw Distance / Focus 7 Connecting
MR Enjoy the Music. Instruction Manual DIGITAL FM, INTERNET OG DAB RADIO WITH AUDIO MEDIA STREAMING
 MR-2000 Enjoy the Music DIGITAL FM, INTERNET OG DAB RADIO WITH AUDIO MEDIA STREAMING Instruction Manual Safety Warnings Please read before installation. If MR-2000 has been moved from a cold place to a
HyperMedia User Manual
 HyperMedia User Manual Contents V3.0 Chapter 1 : HyperMedia Software Functions... 3 1.1 HyperMedia Introduction... 3 1.2 Main Panel... 4 1.2.1 Information Window... 4 1.2.2 Keypad... 4 1.2.3 Channel Index...
PU-160ETH. Ethernet and USB to HDMI Converter. Operation Manual PU-160ETH
 PU-160ETH Ethernet and USB to HDMI Converter Operation Manual PU-160ETH Trademark Acknowledgments All products or service names mentioned in this document may be trademarks of the companies with which
URAKU DVR NV-812 User s Guide
 FUDIO DIGITAL Version 2.2 Oct2010 URAKU DVR NV-812 User s Guide http://www.fudio www.fudio-digital.com digital.com 1. Product Introduction... 2 2. Safety Information... 3 3. Packing List... 3 4. Panel
DENVER DTB-136H H.265 DVB-T2 RECEIVER
 DENVER DTB-136H H.265 DVB-T2 RECEIVER USER MANUAL Table of Contents Safety Information... 1 Package Contents... 1 System Connection... 2 Remote Control... 3 First Time Installation... 4 Basic Operation...
USER MANUAL KGNDPF8VAA
 USER MANUAL KGNDPF8VAA TABLE OF CONTENTS SAFETY INFORMATION. 2 PACKAGE CONTENTS....2 SPEC SUMMARY... 2 DPF INTRODUCTION...... 3 REMOTE CONTROL OVERVIEW.....4 QUICK START..... 4 OPERATION GUIDE.. 4 Picture
1. MEDIA 1.1. INTERNAL HARD DISK Drive Installation
 1 User Manual PRECAUTIONS We strongly recommend reading the points below before operating this product. Back up the data periodically to another safe media. Under no circumstances there is any liability
CDL-160ETH. Ethernet and USB to HDMI Converter. Operation Manual CDL-160ETH
 CDL-160ETH Ethernet and USB to HDMI Converter Operation Manual CDL-160ETH Disclaimers The information in this manual has been carefully checked and is believed to be accurate. Cypress Technology assumes
Chapter 1 4 ipod Basics 5 ipod at a Glance 5 Using ipod Controls 7 Disabling ipod Controls 8 Using ipod Menus 9 Connecting and Disconnecting ipod
 ipod Features Guide 2 Contents Chapter 1 4 ipod Basics 5 ipod at a Glance 5 Using ipod Controls 7 Disabling ipod Controls 8 Using ipod Menus 9 Connecting and Disconnecting ipod Chapter 2 14 Music Features
10.1 HD Memory View Instruction Manual
 10.1 HD Memory View Instruction Manual Cautions Precautions and maintenance For indoor use only To avoid risk of fire or electric shock, do not expose the unit to moisture or condensation. To avoid overheating,
Multi-Function Digital Viewer
 Multi-Function Digital Viewer User Manual About this Manual Preface This manual describes how to get the most out of the Multi-Function Digital Viewer. You should read through this manual before using
9 Digital Photo Frame
 9 Digital Photo Frame Item Number: 61000115 Installation & User s Guide All brand names and trademarks are the property of their respective owners FCC Norm FCC This equipment has been tested and complies
CDL-160ETH. Ethernet and USB to HDMI Converter. Operation Manual CDL-160ETH
 CDL-160ETH Ethernet and USB to HDMI Converter Operation Manual CDL-160ETH Disclaimers The information in this manual has been carefully checked and is believed to be accurate. Cypress Technology assumes
ITV430. User Manual 4.3
 ITV430 KULA TV User Manual 4.3 Product Introduction Release of Liability Help Kula TV Cooler!!! Product Introduction 4 Safety Precautions 5 Parts and Components 9 Getting started Charge for your Kula TV
DVR 560HD Digital Video Recorder
 DVR 560HD Digital Video Recorder User Manual 2010 Sakar International, Inc. All rights reserved. Windows and the Windows logo are registered trademarks of Microsoft Corporation. All other trademarks are
Table. Product Package List. Chapter 1 Production Standard RM968
 Table Product Package List... 1 Chapter 1 Production Standard... 1 1.1 List Of Function... 1 1.2 Parameter... 2 Chapter 2 Remote Control... 3 Chapter 3 Explanation For Operation... 4 3.1 Main Menu... 4
D200 icapture User Manual
 D200 icapture User Manual Important Safety Instructions Before using D200 icapture, please ensure that you read and understand the safety precautions below: 1. Do not attempt to open the case of D200 icapture
Contents V1.1. ONE Introduction TWO Activating the Media Player...08 THREE FAQ...17
 Contents V1.1 ONE Introduction...02 1.1 Features...02 1.2 Specification...03 1.3 Package Contents...03 1.4 Remote Control Guide...04 1.5 Introducing the Unit...05 1.6 Connection Diagram for YPbPr...06
Manual v2.1 July 2017
 VC-HD6 Manual v2.1 July 2017 Contents Contents... 3 1. What is the VC-HD?... 4 2. Supported Media Formats... 4 3. In the Box... 5 4. Setup Instructions... 6 5. Remote Control... 9 6. Settings Options...
User Manual Trophy TA-1001HD
 Trophy TA-1001HD DVB-C HDTV digital receiver Trophy-Access decoder Personal Video Recorder Contents Trophy TA-1001HD Device Operation 3 Specification 4 Front panel 5 Back panel 5 Remote control 6 Connection
EVOBOOK 2. User s Manual.
 EVOBOOK 2 User s Manual www.evolio.ro 0 User s Manual Content Page Introduction.... 2 Parts and Controls.... 3 Getting Started...... 6 Turning On/Off EvoBook2. 6 Charging EvoBook2... 6 Inserting SD card....
INTRODUCTION. i-tech Company LLC TOLL FREE: (888) WEB:
 WEB:") Table of Contents 1. Introduction 1 1.1. About the Product...1 1.2. Features...2 1.3. Notice...3 1.4. Check List...3 2. Playing System...5 2.1. Install Battery in the Remote Control...5 2.3. To Insert
Table of Contents 1. Introduction 1 1.1. About the Product...1 1.2. Features...2 1.3. Notice...3 1.4. Check List...3 2. Playing System...5 2.1. Install Battery in the Remote Control...5 2.3. To Insert
ipod nano User Guide
 ipod nano User Guide 2 Contents Preface 4 About ipod nano Chapter 1 6 ipod nano Basics 6 ipod nano at a Glance 7 Using ipod nano Controls 11 Using ipod nano Menus 13 Disabling ipod nano Controls 14 Connecting
Chapter 1: Introduction
 Chapter 1: Introduction Introduction: TVGo A11 turns your PC into a TV set. No need to buy an additional TV in your home as this will save both space and electric consumption. It lets you watch TV or listen
Hi-Res 8 Wi-Fi Digital Picture Frame with MP3 player Table of Contents
 Hi-Res 8 Wi-Fi Digital Picture Frame with MP3 player Table of Contents Before Using the Digital Picture Frame...3 Introduction...3 Features and Specs...3 Package contents...4 Digital Picture Frame Layout...5
DV 5470 User Manual Package Contents:
 DV 5470 User Manual Package Contents: Manual Camera Pouch Installation CD Earbuds AV Cable CONTENTS 1. NOTICE...2 2. SETUP...3 2.1 BATTERY INSTALLATION...3 2.2 MEMORY CARD...4 2.3 CONFIGURATION & INSTALLATION...4
DVR 520 / 1.8 Digital Video Recorder
 DVR 520 / 1.8 Digital Video Recorder User Manual 2010 Sakar International, Inc. All rights reserved. Windows and the Windows logo are registered trademarks of Microsoft Corporation. All other trademarks
V2.0. HD60 Video Recorder Record Full HD Videos & Playback instantly
 V2.0 HD60 Video Recorder Record Full HD Videos & Playback instantly Important Safety Instruction Before using HD60 Video Recorder, please ensure that you read and understand the safety precautions below:
Game Mode...29 Settings Mode...30 Using the AVI Converter Software...36 Troubleshooting...40
 Contents Important Notice...3 Safety Instructions...4 Product feature...5 Front view...7 Minimum System Requirements...8 Connect USB...8 Get Started...9 Power ON / Power OFF...9 Set Key Lock...9 Music
ZOTAC ZBOX User s Manual
 ZOTAC ZBOX User s Manual No part of this manual, including the products and software described in it, may be reproduced, transmitted, transcribed, stored in a retrieval system, or translated into any language
Video to USB 2.0 Adaptor USB 201 Operation Manual
 Video to USB 2.0 Adaptor USB 201 Operation Manual Introduction This unit is a plug-n-play real-time video capture box with a USB 2.0 interface to PC. The user can preview, record or playback videos from
THE FUTURE OF HOME ENTERTAINMENT
 CVBS 16:9 HD OSD P+M OK VOL+ VOL MUTE MOVIE MUSIC PHOTO MENU INT. MEMORY SETUP PRO. SEARCH FILE ZOOM ROTATE USER S MANUAL DAB/DAB+ Receiver DGDAB888R THE FUTURE OF HOME ENTERTAINMENT A clever. product