AUTOMATIC VOICE LOGGING RECORDER
|
|
|
- Nigel Wiggins
- 6 years ago
- Views:
Transcription

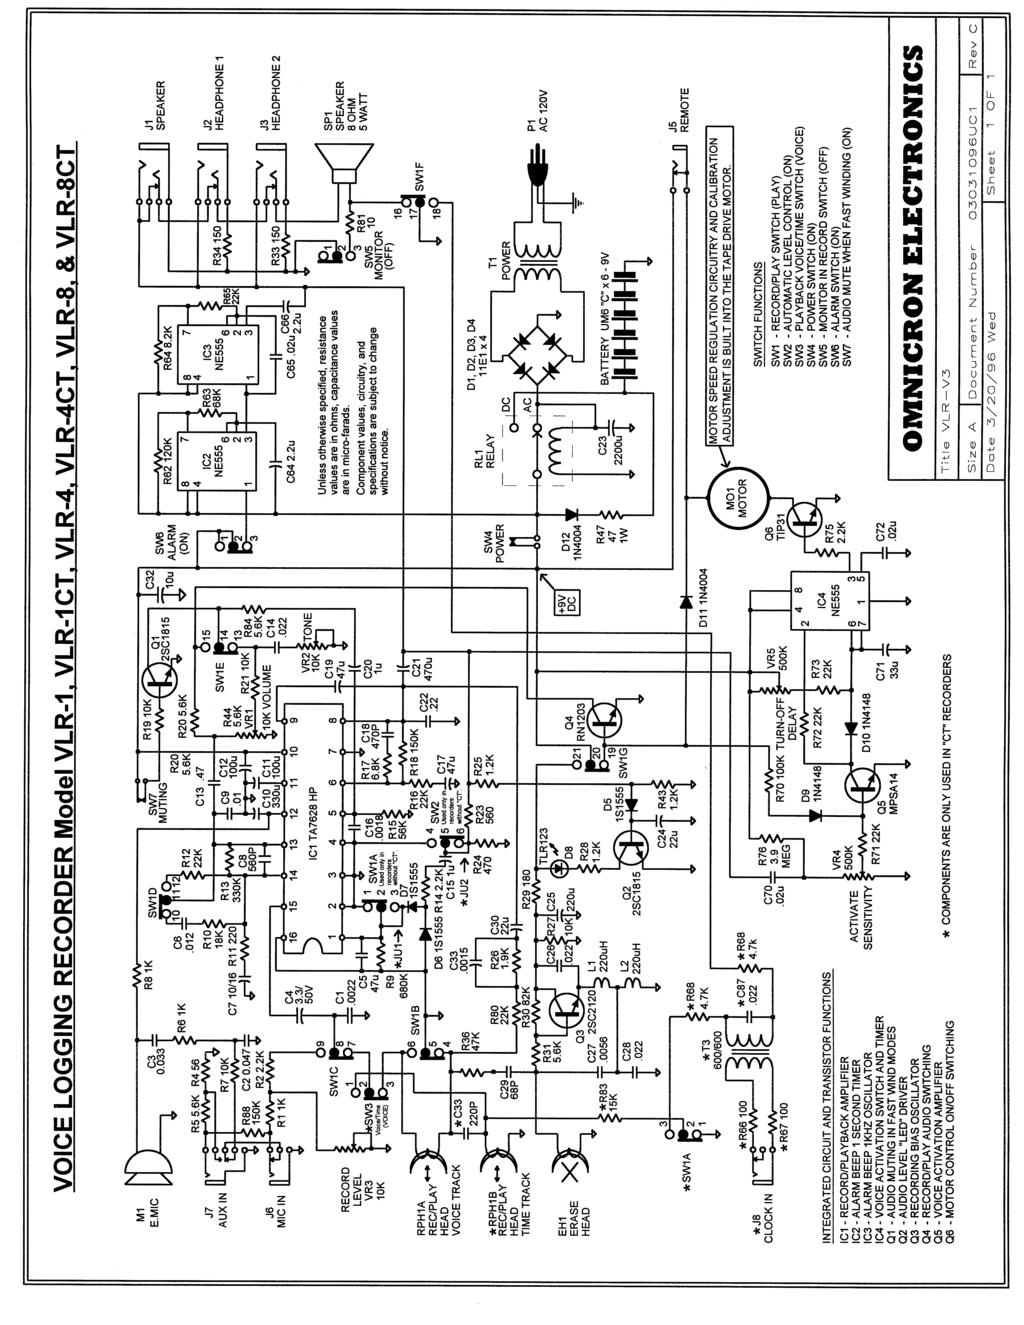
1 A AUTOMATIC VOICE LOGGING RECORDER standard speed models VLR-1 and VLR-1CT one quarter speed models VLR-4 and VLR-4CT one eighth speed models VLR-8 and VLR-8CT OWNER S REFERENCE MANUAL 5K K-2000
2 FEATURES The Omnicron VLR recorder is a versatile solid-state unit featuring voice-activated recording. This feature permits you to record conversations without having to turn the recorder on and off manually. You can make recordings directly from the built-in microphone, or you can use an optional interface coupler or cable to connect the recorder to telephone or radio circuits. Other important features include an end-of-tape alarm, review and cue capability, digital tape counter, and monitor while recording. The VLR-4 and VLR-8 recorders include slow speed drive circuitry. The VLR-4 provides up to four hours of recording time on each side of a tape. The VLR-8 provides up to 8 hours per side. Automatic level control recording assures the best performance with reduced back-ground noise and distortion. A second recording channel for use with the Omnicron Talking Clock can be found on models VLR-1CT, VLR-4CT, and VLR-8CT. The clock provides documentation of the time and date each recording takes place. When you reach the end of tape in either play, record, fast-forward, or fast-rewind, the function keys will pop up turning the power off. If the End-Of-Tape Alarm switch is ON, the recorder will emit a continuous beep tone from its speaker whenever all function keys (Play, Review, and Cue) are up. PREPARATION FOR USE AC POWER The recorder uses standard 120- volt 60 Hz AC power. On the bottom of your recorder you will find the AC power cord storage compartment. Remove the cord and plug it into an AC outlet. BATTERY POWER The recorder uses six C-size cells. To install batteries, remove the lid of the battery compartment which is on the bottom of the recorder. Insert the six batteries to match the polarity of the + and - symbols shown inside of the battery compartment. After the batteries are installed and seated correctly, replace the battery compartment lid. Incorrectly inserted batteries will not work and could cause damage to the batteries and the recorder. The recorder will trickle charge rechargeable batteries and a built-in relay will automatically switch over to battery power whenever AC power is lost. Non rechargeable batteries should be removed prior to operating the recorder on AC power. Batteries are not required for operation on AC power. CASSETTE INSERTION Open the cover of the cassette compartment by depressing the STOP-EJECT key. Insert the cassette with the tape edge toward you and the full reel to the left. Now close the cover and the recorder is ready to operate. OPERATION GENERAL You control all tape mechanism functions with the push buttons. The tape will stop, and power is off when all buttons are up. Depressing one of the PLAY, REVIEW (rewind), or CUE (fastforward) buttons turns on the power and places the tape recorder into the selected mode. You can stop the tape by pushing the STOP-EJECT key. Depress this key again to eject the cassette. The recorder has an automatic power-off circuit. When you reach the end of tape, the buttons will pop-up and power will turn off. 1 A tape COUNTER helps you quickly locate recorded material for playback. Depress the button next to the counter to reset the numerals to 000. RECORDING When recording, the tape drive motor will run only when audio is present at one of the recorder's audio input sources. You can use either the built-in microphone, an external microphone, or an auxiliary audio source. You will automatically turn off the built-in microphone when you use either the external microphone jack (MIC), or the auxiliary input jack (AUX). Audio fed into the CLOCK jack on recorders with the CT option goes directly to the time track on the recording head and will not start the recorder's voice activation circuit. You must depress both the RECORD and the PLAY keys for the recorder to be in the RECORD mode. RECORD LEVEL ADJUSTMENT On the bottom of the recorder you will find the record level control. You may increase the record level and make weak sounds louder by turning this control clockwise. If you set the control too high, your recordings could be distorted and the recorder will boost background noise excessively. Line up the blade of a small screwdriver with the slot in the control. Adjust it up or down as required for the best sound quality. DO NOT FORCE THE CONTROL. To set the level correctly, watch the Record Level indicator light. When you are recording, set the record level adjustment only as high as required to cause the red light to come on during voice peaks. If the light does not flash during conversations, the record level is too low. If it is on continuously, the record level is too high.
3 CASSETTE INSERTION Before inserting a cassette, take up any slack in the tape by inserting a pencil into the hub of the cassette and turning it a few times. Press the STOP/EJECT key to open the cassette door. Insert the cassette into the chamber with the exposed edge of the tape facing you and the full reel to your left. Close the door by pressing downward until it latches shut. To remove a cassette, press the STOP/EJECT button once to stop the recorder. Press the button a second time to open the cassette door. RECORDING WITH BUILT-IN MICROPHONE Insert a tape and simultaneously depress both the RECORD and PLAY keys. The tape will begin to move, and the machine will be recording. The recorder will continue to record as long as there is sufficient audio in the amplifier to trigger the voice-activation circuit. It stops after it is quiet for a few seconds and starts recording when you speak within a few feet of the microphone. The volume control is inoperative in the record mode. The MONITOR function should be off (MONITOR key UP) to prevent feedback during microphone recording. To end the recording, depress the STOP/ EJECT key. Depress this key a second time to EJECT the cassette. If you reach the end of the tape while recording, the recorder will shut off and the PLAY and RECORD buttons will pop up. RECORDING WITH EXTERNAL MICROPHONE Plug a suitable microphone (such as the OMNICRON RMC-8 or PZ-2LA) into the MIC or MIC and REM jacks on the left side of the recorder. The large jack (MIC) is the microphone circuit. It is also used to connect other low level audio sources to the recorder. The small jack next to the MIC jack is the remote switch circuit (REM). When the remote jack is used, the tape will not move in the RECORD mode unless the external remote switching circuit is on. The voice activation circuit also must have sufficient audio to start the motor. Operate the recorder as described in the instructions for builtin microphone recording. Increase or decrease the record level as necessary. RECORDING FROM OTHER SOURCES: RADIO, PHONE, ETC. Your recorder receives audio either by placing a microphone near the speaker of your audio source, or by connecting directly to the speaker or audio output of the device you wish to monitor. If possible, use a direct connection to prevent unnecessary noise pickup. A direct connection also will produce clearer recordings. Most telephone and some twoway radio installations require the use of an interface coupler or adapter (such as the TSA-3, LIC-390, or LIC-100) between the recorder and the audio circuit. Couplers provide isolation and a balanced line input. They also help to prevent the noise on telephone lines from reaching the recorder between conversations. Check with your Omnicron dealer or telephone company to see if you require a coupler for your application. Do not connect the recorder directly to telephone lines without a coupler. Improper operation of both your recorder and the telephone circuit could result. The recorder could also be damaged. An accessory patch cord is available (AUX-6S) for use if you will be connecting the recorder to your audio source without a coupler. It has a miniature phone plug on one end to match the auxiliary audio input jack on the recorder (AUX) and spade lugs on the other end. It is six feet long. You can shorten or lengthen it if necessary. The spade lugs can be changed, if required, to match the audio connections on your signal source (two-way radio, tone alert receiver, scanner, tape recorder, pocket pager, etc.). The cable may be special ordered to match your specific application. VOICE ACTIVATION SENSITIVITY If the recorder does not record weak conversations properly after adjusting the RECORD LEVEL, you can adjust the recorder so it will be more sensitive and start recording with weaker sound levels by turning the ACTIVATE SENSITIVITY control clockwise. You will find this screw driver adjustment on the bottom of the recorder. You can also adjust this control to make the recorder less sensitive if it runs with noise that is weaker than the normal conversation level. To make the voice activation less sensitive, turn the control counter-clockwise with a small screwdriver. Adjusting the ACTIVATE SEN- SITIVITY control too far in the clockwise direction can turn off the voice activation circuit. This will cause the unit to run continuously when it is in the record mode. Adjusting the control too far in the counter-clockwise direction will cause the recorder to remain stopped in the record mode even if there are loud sounds in the amplifier. DO NOT FORCE THE CONTROL. Since the sensitivity of the voice activation circuit is also affected by the setting of the record level adjustment, you should adjust the record level for best sound quality. Then adjust the ACTIVATE SEN- SITIVITY if necessary to insure that the recorder does not run when it should be stopped, or if it stops when it should be recording. 2
4 TURN-OFF DELAY You can adjust the length of time between the end of a conversation and the moment when the recorder stops with the TURN-OFF-DELAY control. This screw driver adjustment is on the bottom of the recorder. Adjust this control by inserting a small screwdriver in the hole indicated. If the recorder turns off too quickly during pauses, turn the control clockwise to increase the turn-off-delay. If the recorder runs too long after a conversation is over, adjust the control counter-clockwise to decrease the turn-off-delay. When you are recording room conversations, it is advisable to set this control for a long turn-off-delay. This will help to prevent the recorder from stopping during low level conversations. DO NOT FORCE THE CONTROL. PLAYBACK Insert a recorded cassette with the full reel to the left and the side you wish to play up. If the cassette you are playing was just recorded and is still in the recorder, rewind it to the beginning of the recording. Press the PLAY key. Then set the volume for the desired listening level from the speaker. To end the playback, press the STOP/EJECT key. Depress this key a second time to eject the cassette. TONE CONTROL You can use the TONE control to limit the frequency response when the recorder is in the play mode. With this control set to the low position, it will cut down on the level of high frequency sounds. Turning it to a higher position produces more high frequency sounds. Adjust the TONE control for best sound quality. MONITORING The monitor circuit lets you listen to conversations while you are recording. To activate the monitor function, depress the MONITOR key. Depress this key a second time to turn off the monitor feature. Feedback or an echo could pre-vent you from using this feature if your sound source is a microphone in the same room as the recorder. During playback, you use the VOLUME control to adjust for a comfortable listening level. The VOLUME control has no effect while recording. You can also connect an external speaker to the recorder's speaker jack. Two headphone jacks are also available for private listening. When you use either headphone jack, the built-in speaker will be disconnected. END-OF-TAPE ALARM The end-of-tape alarm switch is also located behind a hole on the bottom of your recorder. When this switch is in the ON position, a beep tone will automatically start whenever all function keys are up. It will also beep if you do not place the unit back into the auto-record mode after reviewing a recording. To deactivate the alarm, use a small screwdriver to place the switch into the OFF position. DO NOT FORCE THE SWITCH. CUE / FAST-FORWARD The CUE (fast-forward) key is a dual function key. When you depress this key while the unit is in the play mode, the tape will run forward at high speed. When you remove pressure on the key, the recorder will return to the play mode. If you depress the CUE key when the recorder is not in the play mode, the key will lock down and the tape will run forward at high speed until it reaches the end of tape, or you press the STOP key. To prevent possible tape damage, you should always depress the STOP key after locked in fast winding prior to going into the PLAY, RECORD, or REWIND modes. REVIEW / REWIND 3 The REVIEW (rewind) key is also a dual function key. To repeat something that was just played, depress the REVIEW key. The recorder will rewind the tape. Removing pressure from the key will return the recorder to playback. If you depress the REVIEW key when the recorder is off, the key will lock down, and the tape will rewind until either you press the STOP/EJECT key or you reach the beginning of the tape. COUNTER The tape counter is helpful in finding certain portions of the tape or in determining how much tape you have left. You can set it to 000 at any time by depressing the small button to the right of the counter. ALC SWITCH On recorders that do not have the CT option (Clock Track) there is a switch to turn off the Automatic Level Control. You should normally set this switch to the ON position. If you set it to the OFF position, the internal ALC circuit will be off and the recorder will not automatically adjust for sounds that are too loud. Use the record level adjustment on the bottom of the recorder to set the recording level. When the ALC switch is on, you must still turn the record level up if the sound is too weak and the record level light does not flash while recording. The ALC circuit will prevent sounds that are too loud from over driving the recorder. On recorders with the Clock Track option, this switch is used to select the time track during playback. CLOCK TRACK On recorders that have the CT Clock Track option (VLR-1CT, VLR- 4CT, or VLR-8CT), there is a jack on the side for connecting to a talking clock and a switch on top for selecting either conversation
5 (VOICE), or time and date (TIME) playback. Connect the audio from the clock (Omnicron TCC-14 or equivalent) to the CLOCK jack on the recorder and adjust the clock's output level following the instructions supplied with the clock. When you have the clock properly connected to the recorder, the time and date announcements from the clock will be recorded on the time track whenever you are recording. When you play back the tapes, you must switch the PLAYBACK switch to the TIME position to listen to recorded time announcements. If you did not have the clock connected to the recorder when you made the recording, no time announcements will be on the time track. It will be silent. TAPE ERASING When recording, you will erase the previous recording on the tape and replace it with the new recording. Only the sections of the tape where you made new recordings will be erased. Your old recordings will remain on the other sections. SAFEGUARD AGAINST ACCIDENTAL ERASING Every time you make a recording, you will erase previously recorded portions of the tape. To prevent you from accidentally erasing recordings, the cassette and the recorder have interlock devices. On the back of each cassette are two little flaps. If you want to be sure that the recorder will not erase a previously recorded tape, break out these flaps with a small screwdriver or key. You cannot depress the RECORD key unless there is a cassette in place that has an intact record interlock flap. PERIODIC MAINTENANCE With use, the record/playback head, erase head, capstan, and rubber pinch roller in your recorder will gather dirt and material transferred from the tapes as they pass through. This could reduce the reliability of the recorder and result in weak or distorted sound. To expose the heads and tape drive components for cleaning, press the STOP/EJECT key to open the cassette door. If there is a tape in the unit, remove the tape. With the door open, press the PLAY button to expose the parts that need cleaning. Use a cotton swab and a commercial tape head cleaning agent to clean the heads and rollers. Follow the instructions on the cleaner container. DO NOT try to install a cassette with the heads in the forward position. If the recordings are still distorted or weak after cleaning, you could have a badly worn or damaged head that will require replacement. You can clean the cabinet with a soft cloth. If necessary, dampen the cloth with water. Never use polish, solvents, abrasives, or strong detergents since these can damage the finish. The recorder is designed to be trouble free in normal use. If problems do occur, contact a qualified service technician or call Omnicron Electronics for help. GENERAL REMINDERS DO NOT push the RECORD button if you do not have a cassette in the recorder, or if the knockout tabs on the cassette are missing. DO NOT use excessive pressure on the function keys or adjustments. DO NOT touch the recording head with metal or magnetic objects such as a screwdriver. Remove all batteries if the recorder is not in use for an extended period. Leaking batteries could damage the recorder. Remove the AC line cord from the wall outlet if you are not going to use the recorder for an extended period. 4 WARRANTY This Omnicron product is warranted against defects in materials and workmanship for one year from the date of shipment. Omnicron will, at its option, repair or replace products that prove to be defective during the warranty period provided they are returned to Omnicron Electronics. Repairs necessitated by misuse, accident, improper installation, unauthorized modifications, or use in violation of the operating instructions, are not covered by the factory warranty, nor are cases where the serial number has been removed, defaced, or changed. No other warranties are expressed or implied, including but not limited to the implied warranties of merchantability and fitness for a particular purpose. Omnicron Electronics is not liable for consequential damages. Should your recorder become defective within the warranty period, we will repair it without charge. Should it require service that is not covered by the warranty, Omnicron will repair it for a nominal service charge plus the cost of parts and transportation. REPAIR If factory service is required, pack securely and forward by United Parcel Service (UPS), FEDEX, or insured parcel post to: OMNICRON ELECTRONICS 581 Liberty Highway P.O. Box 623 Putnam, CT Enclose a note explaining what is wrong. Include your name, address, and telephone number. Omnicron Electronics also offers telephone, web site, and help: VOICE: (860) FAX: (860) Web Site: support@omnicronelectronics.com
6 5
7 GENERAL OMNICRON VLR recorders are professional loggers designed to provide you with complete documentation of your important telephone conversations, two-way radio messages, or dictation. They have unique features which allow virtually unlimited use in a wide range of applications with top performance and minimal maintenance. Built-in voice activation circuitry expands the recording time by automatically stopping the recorder between conversations. The recorders can be ordered for either standard speed or slow speed operation. The VLR-1 recorders run at the standard cassette speed allowing you to record and play back tapes which are compatible with recorders that do not have slow speed capability. Advanced slow speed drive circuits in the VLR-4 and VLR-8 recorders expand the recording time even further to provide 8 or 16 hours of solid talk time on each cassette tape. The VLR-4 provides four times more recording and playback time per tape than the VLR-1. It packs 8 hours of conversation on each MLC-120 cassette tape. The super slow speed VLR-8 runs at 1/8 speed for 16 hours per tape with little loss in voice quality (8 hours per side with an MLC-120 cassette tape). VLR recorders with the Clock (CT) Track option (VLR-1CT, VLR-4CT, and VLR-8CT) are designed for use with the OMNICRON TCC-14 Talking Clock/Calendar. They have a second track for recording the verbal time and date announcements provided by the clock. When playing back the recorded conversations, simply switch to the Time Track and you will know exactly when that moment of conversation was recorded. One Talking Clock can provide time and date announcements for over 50 recorders. OMNICRON recorders are used in a wide variety of voice logging applications. A standard or custom audio adapter, coupler, or cable should be be ordered with the recorder to match your audio source. Contact your OMNICRON representative for assistance in selecting the equipment best suited to your application. Factory help is also available by calling (860) FEATURES ALARM Beeps when the cassette needs to be changed, or if the recorder is turned off either accidentally or by the built-in all mode motion sensing circuit. The tape automatically turns off and sounds the alarm if the tape stops when it should be moving in record, play, fastforward, or fast-rewind. MONITOR WHILE RECORDING Lets you listen to conversations while they are being recorded through the built-in speaker, through either of two 1/4" headphone jacks, or through the 1/4" external speaker jack (8 ohm). CUE AND REVIEW For rapidly finding and repeating recorded messages. AUTOMATIC RECORD LEVEL CONTROL Prevents overload on strong signals. Manually adjustable record level, activate sensitivity, and turn-off delay permit you to adjust the recorder s voice activation circuit to match your particular application. MONITOR AND ALARM ON/OFF SWITCHES SPECIFICATIONS POWER 120 VAC 50/60 Hz, 10 Watts, six C cell batteries, or optional RBC-6 rechargeable battery pack. SIZE 7-3/4" W x 11-1/2" D x 2-3/4" H, 4-1/2 lbs. INPUTS Microphone, 2k ohms, - 70dB Auxiliary, 200k ohms, - 20 db Clock, 600 ohms, -10 db AUDIO OUTPUT 1 Watt SIGNAL TO NOISE RATIO VLR-1 is 50 db, VLR-4 is 42 db, VLR-8 is 34 db. TAPE SPEED VLR-1 is 1-7/8 I.P.S., VLR-4 is 15/32 I.P.S., VLR-8 is 15/64 I.P.S. TAPE SIZE Standard Compact Audio Cassette. ERASE SYSTEM AC RECORD SYSTEM AC bias. AUTOMATIC END-OF-TAPE SHUT-OFF In record, fast-forward, and rewind. AUTOMATIC BATTERY CHARGING For optional rechargeable batteries (RBC-6), unit automatically switches to battery power if external AC power is lost. INPUT/OUTPUT JACKS Microphone, remote on/off, auxiliary audio input, remote speaker, two headphone jacks, and Talking Time Clock (with CT option). ROTARY VOLUME AND TONE CONTROLS DIGITAL INDEX COUNTER WITH RESET AC BIAS RECORDING For optimum voice frequency recording. EASY, SELF-INSTALLATION In most applications with optional adapter. MAXIMUM RECORDING TIME With MLC-120 tape: VLR-1 records 1 hour per side at 1-7/8 I.P.S., VLR-4 records 4 hours per side at 15/32 I.P.S., VLR-8 records 8 hours per side at 15/64 I.P.S. BUILT-IN SPEAKER 5", 8 ohm, 5 Watts. Each VLR recorder comes with an MLC-120 cassette tape, AC power cord, owner s manual and a limited 1 year warranty. Recorders with the CT option are also supplied with a cable for connection to the optional TCC-14 time & date source. You will also need an adapter, coupler, or cable to connect the recorder to your audio source. Order it as a separate item to match your specific requirements. Specifications are subject to change without notice.
u s e r m a n u a l Microcassette Recorder
 EN u s e r m a n u a l 3-5375 Microcassette Recorder 3-5375 US En 1 12/22/00, 11:35 AM Headset Safety Powering the Recorder Do not play your headset at a high volume. Hearing experts advise against continuous
SL1039. Portable Cassette Player / Recorder and Six Station Listening Center USER MANUAL
 SL1039 Portable Cassette Player / Recorder and Six Station Listening Center USER MANUAL Thank you for choosing the SL1039 Portable Cassette Player / Recorder from AmpliVox Portable Sound Systems. We are
CAUTION Use of controls or adjustment or performance of procedures other than those specified herein may result in hazardous radiation exposure.
 IMPORTANT NOTES INTRODUCTION Thank you for buying this product. Please read through these operating instructions, so you will know to operate your equipment properly. After you finished reading the instructions
AC OPERATION BATTERY OPERATION RADIO OPERATION Note : FM STEREO INDICATOR ANTENNAS BASS BOOST AUXILIARY (AUX) MODE
 MODE") 1. FUNCTION SWITCH AUX/CD/TAPE (OFF)/RADIO 2. BAND SWITCH 3. FM ANTENNA 4. CD DOOR 5. TUNING KNOB 6. BASS BOOST BUTTON 7. CD SKIP/SEARCH FORWARD BUTTON 8. CD SKIP/SEARCH BACKWARD BUTTON 9. CD PROGRAM BUTTON
1. FUNCTION SWITCH AUX/CD/TAPE (OFF)/RADIO 2. BAND SWITCH 3. FM ANTENNA 4. CD DOOR 5. TUNING KNOB 6. BASS BOOST BUTTON 7. CD SKIP/SEARCH FORWARD BUTTON 8. CD SKIP/SEARCH BACKWARD BUTTON 9. CD PROGRAM BUTTON
DL-4. 4 Line Telephone Digital Announcement System. Introduction
 99 Washington Street Melrose, MA 02176 Phone 781-665-1400 Toll Free 1-800-517-8431 Visit us at www.testequipmentdepot.com "Telecommunication Products to solve Telecommunication Problems" DL-4 4 Line Telephone
PORTABLE CASSETTE PLAYER / RECORDER
 PORTABLE CASSETTE PLAYER / RECORDER USER MANUAL MCR-100 PLEASE READ THIS USER MANUAL COMPLETELY BEFORE OPERATING THIS UNIT AND RETAIN THIS BOOKLET FOR FUTURE REFERENCE. COMPLIANCE WITH FCC REGULATIONS
Dh Steno-Cassette 30. Dh2094. Handdiktiergerät Portable dictation machine Machine à dicter portable
 Dh 2220 Dh2094 Steno-Cassette 30 Handdiktiergerät Portable dictation machine Machine à dicter portable Dh 2220 The product is in accordance with following EC-Directives: 89/336/CEE, 73/23/CEE, 93/68/CEE
CORDLESS ANSWERING SYSTEM TELEPHONE 7620
 CORDLESS ANSWERING SYSTEM TELEPHONE 7620 Installation Telephone Operation Memory Answering System Operation Installation Table Installation 1. Choose a spot near an electrical outlet and a telephone jack.
BrassHat Announcer Message & Sound Player Model No. BH-21A
 BrassHat Announcer Message & Sound Player Model No. BH-21A 10-Track On-Demand Recorder/Player Record up to 10 messages/sounds and play automatically or on-demand Perfect for passenger station, yard and
User Guide. Monitor 420. Digital Answering Machine
 Monitor 420 Digital Answering Machine User Guide If you have any problems with your answering machine, firstly refer to the Troubleshooting section of this User Guide or call our TecHelp line on 1300 369
CL210A TELEPHONE & ANSWERING MACHINE
 CL210A TELEPHONE & ANSWERING MACHINE CONTENTS CONTENTS CONTENTS 1 INTRODUCTION 3 Unpacking the Telephone 4 DESCRIPTION 5 General Description 5 INSTALLATION 7 Setting Up 7 Wall Mounting 7 SETTINGS 8 Ringer
DIN T. Dh 2094
 Dh 2094 Dh2094 4 3 1 2 3 4 5 6 0 5 10 15 20 25 30 DIN 32 750-T Dh 2094 7 8 9 0 5 10 15 20 25 30 DIN 32 750-T steno-cassette 30 o p 0 5 DIN 32 750 steno 0 5 10 15 20 25 30 DIN 32 750-T steno-cassette 30
CANARY AUDIO. Vacuum Tube Compact Disc Player CD-100 OWNER S MANUAL. Handcrafted in California MADE IN USA
 CANARY AUDIO Vacuum Tube Compact Disc Player Handcrafted in California CD-100 OWNER S MANUAL MADE IN USA Dear Customer: Please allow us to take this opportunity to thank you for purchasing this CANARY
INTERPRETER CONTROL UNIT MODEL PL ICU 2 2 (2 INPUTS 2 OUTPUTS) INSTRUCTION MANUAL Technical Data Warranty Information
 INSTRUCTION MANUAL Technical Data Warranty Information") INTERPRETER CONTROL UNIT MODEL PL ICU 2 2 (2 INPUTS 2 OUTPUTS) INSTRUCTION MANUAL Technical Data Warranty Information 2 INTERPRETER CONTROL UNIT - MODEL PL ICU 2 2 INSTRUCTION MANUAL Congratulations on
INTERPRETER CONTROL UNIT MODEL PL ICU 2 2 (2 INPUTS 2 OUTPUTS) INSTRUCTION MANUAL Technical Data Warranty Information 2 INTERPRETER CONTROL UNIT - MODEL PL ICU 2 2 INSTRUCTION MANUAL Congratulations on
Supply Voltage. Battery, rechargeable battery, mains operation
 Supply Voltage Battery, rechargeable battery, mains operation Battery/rechargeable battery condition indicator (plus recording indicator): Lights up when recording. Goes out when the batteries/rechargeable
XC4100 INSTALLATION/OWNER'S MANUAL AM/FM/Cassette Receiver
 XC4100 INSTALLATION/OWNER'S MANUAL AM/FM/Cassette Receiver Preparation XC4100 INSTALLATION Please read entire manual before installation. Before You Start Disconnect negative battery terminal. Consult
MiniVox. Owner s Manual. Troubleshooting Guide. Having trouble with the sound system? Having trouble with the wireless system? (model PB-25W only)
") Troubleshooting Guide Having trouble with the sound system? Condition No sound (LED not lit): No sound (LED flashes): No sound when using CD input: Distorted sound: Shortened battery life: Possible Solution
Troubleshooting Guide Having trouble with the sound system? Condition No sound (LED not lit): No sound (LED flashes): No sound when using CD input: Distorted sound: Shortened battery life: Possible Solution
Karaoke with Voice Canceller
 3201168 OWNER'S MANUAL Please read before using this equipment. Karaoke with Voice Canceller FEATURES Your Nexxtech Karaoke with Voice Canceller lets you be the "star" as you sing along with your favorite
Color profile: Disabled Composite Default screen Front Cover I:...JRT2001 Map OM.vp Mon Jun 28 16:22:
 Front Cover Contents Introduction...2 Features...2 Included with Your JRT 2001 Phone...3 Controls and Functions....4 Installation...5 Charging the Battery Pack...5 Charging the Handset...5 Low Battery
Dh Steno-Cassette 30. Dh2094. Handdiktiergerät Portable dictation machine Machine à dicter portable
 Dh 2230 Dh2094 Steno-Cassette 30 Handdiktiergerät Portable dictation machine Machine à dicter portable Dh 2230 The product is in accordance with following EC-Directives: 89/336/CEE, 73/23/CEE, 93/68/CEE
Model XL-2 - Fluid Leak Detector
 Model XL-2 - Fluid Leak Detector Model XL-2 Includes: (A) Instrument All controls and connections are made with the instrument, using the control panel. The instrument is housed in a rugged outdoor use
SPK User Manual. 900MHz Wireless Stereo Headphones INTRODUCTION FEATURES IMPORTANT SAFETY INFORMATION
 INTRODUCTION Thank you for purchasing our 900Mhz compact cordless stereo headphone system that takes advantage of the very latest advances in wireless transmission technology so you SPK-9100 900MHz Wireless
INFORMATION AMPLIFIER TA-102 OPERATING INSTRUCTIONS TABLE OF CONTENTS
 OPERATING INSTRUCTIONS INFORMATION AMPLIFIER TA-102 INFORMATION AMPLIFIER TA-102 MIC AUX POWER TABLE OF CONTENTS 1. SAFETY PRECAUTIONS... 2 2. GENERAL DESCRIPTION... 4 3. EACH PART NAME AND FUNCTIONS Top
VOICE-ACTIVATED INTERCOM SYSTEM
 VOICE-ACTIVATED INTERCOM SYSTEM Owner s Manual For Wireless Intercom Model WHI-4CUPG EXPLANATION OF GRAPHIC WARNING SYMBOLS This symbol is intended to alert the user to the presence of un-insulated dangerous
Secured Series: Hub Plus Kit Single Door Controller Package Installation Manual
 Secured Series: Hub Plus Kit Single Door Controller Package Installation Manual This package is designed to simplify the connections to our Secured Series Hub Plus Controller. This will translate into
DT-200X GB Revision 1
 DT-200X GB Revision 1 Limited Warranty Sangean America, Inc. warrants this product to be free from defects in material and workmanship under normal use and conditions for a period of 90 (Ninety) days from
PXR 1506 / WATT MIXER AMPLIFIER
 PXR 1506 / 1508 150-WATT MIXER AMPLIFIER Operating Manual www.peavey.com ENGLISH PXR 1506 / 1508 150-Watt, 8-Channel Mixer Amplifier Designed with the latest Peavey technology, the PXR 1506 / 1508 powered
1.8 INCH MODEL: MR41806BT. Wireless Technology. with Bluetooth OWNER'S MANUAL PLEASE READ BEFORE OPERATING THIS EQUIPMENT.
 8 INCH DUAL ALARM CLOCK with Bluetooth Wireless Technology OWNER'S MANUAL PLEASE READ BEFORE OPERATING THIS EQUIPMENT. MODEL: MR41806BT Size: 148.5(W) x 210(H)mm (A5) LOCATION OF CONTROLS (1) (2) (3)
Operating Instructions
 M inicassette Voice Processor Operating Instructions 1244 CONTENTS Machine Layout..................iv Description......................1 Getting Started...................2 Recording and Editing.............3
REMOTE RELEASE BIRD LAUNCHER SYSTEMS
 REMOTE RELEASE BIRD LAUNCHER SYSTEMS OWNER S MANUAL 22912 Lockness Avenue Torrance, CA 90501 U.S.A. telephone (310) 534-0101 fax (310) 534-9111 toll free 1-888- 811-9111 Copyright c 2008 Dogtra Company
microcassette Euro 1 Handdiktiergerät Ideal für Spracherkennung For Use with Speech to Text Compatibilité reconnaissance vocale
 Dh stenorette 2028 STT 20 microcassette Handdiktiergerät Portable Portable dictation Dictation machine Machine Machine Machine à dicter dicter portable portable Euro 1 Ideal für Spracherkennung For Use
PREMIUMAUDIOVIDEOANDPOWERPRODUCTS V-RVC-PRO. Owners Manual
 PREMIUMAUDIOVIDEOANDPOWERPRODUCTS V-RVC-PRO Owners Manual IMPORTANT NOTE: THIS OWNER'S MANUAL IS PROVIDED AS AN INSTALLATION AND OPERATING AID. FACTOR ELECTRONICS DOES NOT ASSUME ANY RESPONSIBILITY AS
900 MHz Digital Two-Line Cordless Speakerphone with Answering System 9452 with Caller ID/Call Waiting
 USER S MANUAL Part 2 900 MHz Digital Two-Line Cordless Speakerphone with Answering System 9452 with Caller ID/Call Waiting Please also read Part 1 Important Product Information AT&T and the globe symbol
Four-Line Intercom/ Speakerphone 954
 1 USER S MANUAL Part 2 Four-Line Intercom/ Speakerphone 954 Please also read Part 1 Important Product Information AT&T and the globe symbol are registered trademarks of AT&T Corp. licensed to Advanced
Clock Radio with USB
 8007366 OPERATING INSTRUCTIONS Bluetooth Clock Radio with USB The Bluetooth word mark and logos are owned by the Bluetooth SIG, Inc. All other trademarks and trade names are those of their respective owners.
MP3 Speaker USER GUIDE
 MP3 Speaker USER GUIDE Jazwares, Inc. 2012 CONTENTS Please read the instructions along with the Speaker carefully before you use it, so that you can operate it conveniently. WELCOME, Warnings & Safety
PREMIUMAUDIOVIDEOLIGHTINGANDPOWERPRODUCTS
 FACTOR ELECTRONICS PREMIUMAUDIOVIDEOLIGHTINGANDPOWERPRODUCTS V-RVC Owners Manual IMPORTANT NOTE: THIS OWNER'S MANUAL IS PROVIDED AS AN INSTALLATION AND OPERATING AID. FACTOR ELECTRONICS DOES NOT ASSUME
Instructions Telephone Headset Patch THP 700SY
 DynaMetric 717 SOUTH MYRTLE AVENUE MONROVIA, CALIFORNIA 91016-3422 626-358-2559 FAX 626-359-5701 800-525-6925 Instructions The THP-700SY is an interface for recorders from telephones and Automatic Call
GSMR20 OWNER S MANUAL
 GSMR20 OWNER S MANUAL Version 1.0 FEATURES AM/FM/Radio/Preset 180 Watts Max Power Pre-Amplifier Outputs Splash Proof LCD Display Bluetooth Audio Streaming (Bluetooth 3.0) A2DP Audio Streaming USB/AUX Input
S300i. Two Channel Integrated Audio Amplifier
 User's Guide S300i e.one Two Channel Integrated Audio Amplifier Series Bel Canto Design, LTD. 212 Third Avenue North Minneapolis, MN 55401 Phone: (612) 317.4550 Fax: (612) 359.9358 www.belcantodesign.com
HeadAmp6 PROFESSIONAL SIX CHANNEL HEADPHONE AMPLIFIER OPERATION MANUAL
 HeadAmp6 PROFESSIONAL SIX CHANNEL HEADPHONE AMPLIFIER OPERATION MANUAL 1 IMPORTANT SAFETY INSTRUCTIONS READ FIRST This symbol, wherever it appears, alerts you to the presence of uninsulated dangerous voltage
AQ Memo Recorder FLAT MIC VOICE ACT BNS BNS AQ6345 MEMO RECORDER BACKGROUND NOISE SUPPRESSION COUNTER RESET REC
 BACKGROUND NOISE SUPPRESSION BACKGROUND NOISE SUPPRESSION MEMO RECORDER AQ6345 FLAT MIC M M I I C C REC REC VOLUME VOLUME Memo Recorder VOICE ACT REC COUNTER RESET TAPE TAPE SPEED SPEED AQ 6345 English
Emergency Dialer DIAL-ALERT MODEL: ED
 www.skylinkhome.com Emergency Dialer TM DIAL-ALERT MODEL: ED-100 101A083-002 FEB, 2006. CUSTOMER SERVICE 17 Sheard Avenue, Brampton, Ontario, Canada L6Y 1J3 Tel : (905) 456-8883 Fax : (905) 456-7819 Email
Operating Instruction Manual POWERED MIXER. Model MX-401. Toa Electric Co., Ltd. KOBE, JAPAN
 Operating Instruction Manual POWERED MIXER Model MX-401 Toa Electric Co., Ltd. KOBE, JAPAN Contents General Description Features Front Panel [Names of components & their usage] Rear Panel [Names of components
V-9939B MICROPHONE ADAPTER
 Issue 10 INTRODUCTION These instructions provide identification, installation, connection, operation and maintenance information for the Microphone Adapter. The is a Microphone Adapter designed to be used
Automatic Phone-Out Home Monitoring System
 Automatic Phone-Out Home Monitoring System Freeze Alarm Model Number: THP217 Product Description This product is intended to monitor homes, cabins, and other premises for low temperature conditions. It
PLMRMBT5B / PLMRMBT5S 600 Watt 2 Channel Bluetooth Enabled Marine Grade Amplifier
 PLMRMBT5B / PLMRMBT5S 600 Watt 2 Channel Bluetooth Enabled Marine Grade Amplifier PLMRMBT7B / PLMRMBT7S 1200 Watt 4 Channel Bluetooth Enabled Marine Grade Amplifier It s compact, waterproof design allows
Gauge Mount Radio PRIMARY FEATURES. Marine & Powersports Bluetooth Source Units
 R MUSIC.DEFINED. Gauge Mount Radio Marine & Powersports Bluetooth Source Units Thank you for choosing the MB Quart Nautic GMR Marine & Powersports Source Units. With proper installation, you are on the
900MHz CORDLESS STEREO HEADPHONE SYSTEM. User s Manual. Please read before using the equipment.
 3319666 900MHz CORDLESS STEREO HEADPHONE SYSTEM User s Manual Please read before using the equipment. Table of Contents Introduction... 2 Features... 2 Headphone System Parts...3-4 Important Safety Information...
V-9941A ONE ZONE HANDSFREE TALKBACK CONTROL UNIT
 VSP- Issue 4 ONE ZONE HANDSFREE TALKBACK CONTROL UNIT INTRODUCTION The is a One Zone Handsfree Page Unit for use on an Electronic Key system line key position, a PABX loop start trunk port, a dedicated
Stereo Radio Cassette Recorder
 Stereo Radio Cassette Recorder AQ7170 Register your product and get support at www.philips.com/welcome User Manual 1 2 3 4567 8 9 0 1! @ ^% $# * & English Congratulations on your purchase and welcome to
MA V 30W Mixer Amplifier Order code: CRAM02 MA V 60W Mixer Amplifier Order code: CRAM03 USER MANUAL
 www.cleveracoustics.co.uk MA 130 100V 30W Mixer Amplifier Order code: CRAM02 MA 160 100V 60W Mixer Amplifier Order code: CRAM03 USER MANUAL WARNING FOR YOUR OWN SAFETY, PLEASE READ THIS USER MANUAL CAREFULLY
MODEL EJ-10. Multi-Input Adapter Box. Solve Your Sound Connection Problems The Easy Way
 MODEL EJ-10 Multi-Input Adapter Box Solve Your Sound Connection Problems The Easy Way The EJ-10 Table of Contents Controls and Functions Basic Information Read this section for basic information on what
VM SERIES Rackmount 100V mixer-amplifiers
 VM SERIES Rackmount 100V mixer-amplifiers VM60, VM120, VM240Z Caution: Please read this manual carefully before operating Damage caused by misuse is not covered by the warranty Introduction Thank you for
BASIC PA AMPLIFIER A-1031 A-1061 A-1121 OPERATING INSTRUCTIONS TABLE OF CONTENTS
 OPERATING INSTRUCTIONS BASIC PA AMPLIFIER A-1031 A-1061 A-1121 Please follow the instructions in this manual to obtain the optimum results from this unit. We also recommend that you keep this manual handy
1738 Digital Answering System USER S MANUAL. Visit us at Part 2
 1738_Panels 120904 12/9/04 8:25 AM Page 1 Visit us at www.telephones.att.com 2004 Advanced American Telephones. All Rights Reserved. AT&T and the Globe Design are trademarks of AT&T Corp., licensed to
Telex Operating Instructions
 Telex Operating Instructions Echelon ANR TM 150 Headset Figure 1 Note: See page 7 for available replacement parts. General Description The Echelon ANR 150 is a medium-weight aircraft communications headset.
AZ CD Radio Cassette Recorder. Toll Free Help Line DBB. Ligne d'assistance en service libre Linea de ayuda telefónica sin cargo
 AZ 1008 Toll Free Help Line Ligne d'assistance en service libre Linea de ayuda telefónica sin cargo 800-531-0039 Radio Cassette Recorder RADIO CASSETTE RECORDER / PAUSE TRACK BASS REFLEX SPEAKER SYSTEM
MIKE di Y gital USER GUIDE
 IKEY digital USER GUIDE UP CLOSE WITH MIKEY D. FEATURES 1 2 3 4 5 6 7 8 Recording Side Pivoting Head Sensitivity Selector Switch Sensitivity Switch Indicator Lights Connector for iphone or ipad Stereo
Instruction Manual NPB-425. Instruction Manual
 Thank you For purchasing this Portable CD MP audio system. This uniquely designed product has a built-in CD Mp player with programmable memory and repeat playback. It also features a great sounding AM/FM
Emergency Dialer DIAL-ALERT MODEL: AD
 www.skylinkhome.com Emergency Dialer TM DIAL-ALERT MODEL: AD-103 If you would like to order Skylink s products or have difficulty getting them to work or download information and user manual, please :
Stereo Cassette Deck
 4-230-237-11(1) Stereo Cassette Deck Operating Instructions TC-SP55 2000 Sony Corporation Do not install the appliance in a confined space, such as a bookcase or built-in cabinet. This system is equipped
01 St 3211,D :16 Uhr Seite 2 St 3211 HEADSET FOOT CONTROL ac 9V-10V~ ǵ
 St 3211 HEADSET FOOT CONTROL ac 9V-10V~ St 3211 1 2 HEADSET FOOT CONTROL ac 9V-10V~ 0 5 10 15 20 25 30 3 S teno-cassette 30 ßW ßQ ß` ß? ßI EJECT SPEAKER/EAR REWIND ERASE FFWD St 3211 POWER STOP/PLAY 4
Omni Verifier User s Manual
 Omni Verifier User s Manual 363325 Rev. 01 Page 1 of 9 Packing List (see Figure 1) 1. Omni Verifier 2. Docking Station 3. Universal Power Supply 4. Mounting Hardware (2 screws and 2 wall anchors shown
PLMRMP2A FEATURES: ACCESSORIES:
 Enjoy convenient music streaming from a universal mount audio system with the Pyle Compact Marine Amplifier Kit. It s compact, waterproof design allows for flexible mounting possibilities, and makes it
S1008 STEREO BLUETOOTH SPEAKER SET
 S1008 STEREO BLUETOOTH SPEAKER SET 1 INSTRUCTION MANUAL PLEASE READ ALL INSTRUCTIONS CAREFULLY AND RETAIN FOR FUTURE USE Getting Started Remove the unit from the box. Remove any packaging from the product.
USER MANUAL GOLDMUND TELOS Integrated Amplifier
 USER MANUAL GOLDMUND TELOS 390.5 Integrated Amplifier INTRODUCTION Thank you for purchasing the Goldmund TELOS 390.5 Integrated Amplifier. You have acquired one of the best integrated amplifiers ever made
PS8 - II. Professional Power Sequencer. User s Manual
 PS8 - II Professional Power Sequencer User s Manual IMPORTANT SAFETY INSTRUCTIONS READ FIRST This symbol, whenever it appears, alerts you to the presence of uninsulated dangerous voltage inside the enclosure.
DT-307C CD Player. Instruction Manual
 DT-307C CD Player Instruction Manual Thank you for purchasing this Mistral DT 307C CD Player. This instruction manual contains all the information you need to know about your MISTRAL DT-307C. Please read
2014 Cadillac Escalade Rear Seat Entertainment M
 2014 Cadillac Escalade Rear Seat Entertainment M Infotainment System...... 3 Rear Seat Infotainment.... 3 Rear Seat Entertainment (RSE) System....................... 3 Index..................... i-1 Rear
PWRguard PLUS Spring City Drive Waukesha, WI
 PWRguard PLUS www.westmountainradio.com 1020 Spring City Drive Waukesha, WI 53186 262-522-6503 sales@westmountainradio.com 2016, All rights reserved. All trademarks are the property of their respective
LOCATION OF CONTROLS. English - 1
 LOCATION OF CONTROLS 1. Power Button 2. Function Switch (CD,MP3 / TAPE /RADIO) 3. Band Switch 4. Bass Boost Button 5. Volume Control Knob 6. Tuning Knob 7. CD/MP3 LED Display 8. Dial Pointer 9. CD/MP3
Blonde On Blonde OWNER S MANUAL SWR SCOTTSDALE, AZ USA
 Blonde On Blonde OWNER S MANUAL SWR SCOTTSDALE, AZ USA IMPORTANT SAFETY INSTRUCTIONS CAUTION: TO REDUCE RISK OF ELECTRIC SHOCK, DO NOT REMOVE THE COVER OR BACK. NO USER-SERVICEABLE PARTS INSIDE. PLEASE
Smartphone Docking Station with Speaker and Bed Shaker
 TM WARRANTY The Silent Call AlarmDock is warranted for (see individual items for length of warranty) from the day of purchase to be free of defects in material and workmanship. This warranty is limited
PORTABLE WIRELESS PA SYSTEM WITH LITHIUM -ION RECHARGEABLE BATTERY AWP6042 OWNER S MANUAL. Handheld Microphone Headset Transmitter
 PORTABLE WIRELESS PA SYSTEM WITH LITHIUM -ION RECHARGEABLE BATTERY AWP6042 OWNER S MANUAL X1 Headset Microphone AWX6042H VHF Wireless Headset Transmitter Handheld Microphone Headset Transmitter Thank you
On-Line CardioTheater Instruction Manual for Amplifier Models 800 and 1600 (wired)
") On-Line CardioTheater Instruction Manual for Amplifier Models 800 and 1600 (wired) Full installation instructions accompany your Cardio Theater equipment order. This On-Line version of our Installation/Instruction
On-Line CardioTheater Instruction Manual for Amplifier Models 800 and 1600 (wired) Full installation instructions accompany your Cardio Theater equipment order. This On-Line version of our Installation/Instruction
EcoXBT. Models: GDI-EGBT User Guide
 EcoXBT Models: GDI-EGBT500-510 User Guide Control Buttons & Operations On/Off Press button once to Power ON/OFF. Green LED turns on & unit beeps within 2-4 seconds indicating power fully initiated and
TELIKOU Intercom System
 TELIKOU Intercom System MS-800 Main Station Instruction Manual 2006 TELIKOU Systems All Rights Reserved While TELIKOU makes every attempt to maintain the accuracy of the information contained in its product
Emergency Dialer DIAL-ALERT MODEL: AD-433S.
 www.skylinkhome.com Emergency Dialer TM DIAL-ALERT MODEL: AD-433S 101A118 FEB, 2000 SKYLINK TECHNOLOGIES INC., 2213 Dunwin Drive, Mississauga, Ontario L5L 1X1 CANADA Tel : (905) 608-9223 (800) 304-1187
User Guide. 50 Watt Portable PA System with
 User Guide 50 Watt Portable PA System with Thank you for choosing the S222A / SW222A / SW223A / SW224A Portable PA System from AmpliVox Portable Sound Systems. We are excited in introducing this truly
Controls...Inside Front Cover. Introduction to your New Phone...2 Welcome...2 Features...2 Included in your Package...3
 CONTENTS Controls.................Inside Front Cover Introductionxxx CONTENTS OF YOUR REFERENCE GUIDE Introduction to your New Phone............2 Welcome....................................2 Features.....................................2
AT&T. ZoneMate 3 Service Manual. PagePac 20 Voice Paging System. MERLIN CS Connection And Operation
 AT&T PagePac 20 Voice Paging System ZoneMate 3 Service Manual MERLIN CS Connection And Operation ZoneMate 3 Service Manual For PagePac 20 Voice Paging System and Merlin* Communications System Models 1030
ULTRALIGHT OP HEADSET TOPS
 ULTRALIGHT OP HEADSET TOPS S I N G L E USER GUIDE D U A L Thank you for buying your Ultralight OP headset top from Hello Direct. You ve made a wise choice in selecting an Ultralight OP headset. This is
DVD System Owner s Manual
 DVD System Owner s Manual Publication Part No. LRL 0482 Published by Land Rover Land Rover 2001 All rights reserved. No part of this publication may be reproduced, stored in a retrieval system or transmitted
GPS163R CD MW/FM Stereo Cassette Player/Recorder
 GPS163R CD MW/FM Stereo Cassette Player/Recorder INSTRUCTION MANUAL Before operating this unit, please read this Owner s Manual carefully WARNING: UNDER NO CIRCUMSTANCES MUST THE LIVE OR NEUTRAL WIRES
INFRARED WIRELESS HEADPHONES
 INFRARED WIRELESS HEADPHONES 3319131 OWNER S MANUAL INTRODUCTION This system gives you complete freedom to enjoy your music without the inconvenience and limitations of headphone cables. To ensure the
Stenorette Sh 23. Steno-Cassette 30 ENGLISH.
 ENGLISH Stenorette Sh 23 Steno-Cassette 30 www.grundig-gbs.com Sh 23 CE The product is in accordance with following EC-Directives: 89/336/CEE, 73/23/CEE, 93/68/CEE INDEX MIC. VOL 4 DICT. 1 2 1 3 4 5 6
PO Box 409 Hanover, MD TEL (410)
") ME-50 Expansion Amplifier 1 ME-50 Expansion Amplifier Introduction: The ME-50 is a 2 channel audio amplifier capable of delivering up to 25W RMS per channel. It s compact, waterproof design allows for
ME-50 Expansion Amplifier 1 ME-50 Expansion Amplifier Introduction: The ME-50 is a 2 channel audio amplifier capable of delivering up to 25W RMS per channel. It s compact, waterproof design allows for
HDTV SWITCH with Analog and Digital Audio SW204HD
 Component Video/Audio INSTRUCTION MANUAL 4 x 2 Matrix HDTV SWITCH with Analog and Digital Audio Model: SW204HD * Allows you to connect 4 HD sources to either of the two outputs without having to swap cables.
ACTIVE LOUDSPEAKER. Model: DJSP1216LBT
 ACTIVE LOUDSPEAKER Model: DJSP1216LBT PLEASE READ THIS USER MANUAL COMPLETELY BEFORE OPERATING THIS UNIT AND RETAIN THIS BOOKLET FOR FUTURE REFERENCE. WARNINGS To reduce the risk of fire or electric shock,
BTH-900. Wireless Ear Muff headset w/dual Connections
 BTH-900 Wireless Ear Muff headset w/dual Connections The MobilitySound BTH-900 s a wireless microphone/headset designed for using the MobilitySound two way radio audio adapter and smart phone at the same
EPS Power Supply
 EPS - 600 Power Supply Installation and Operation Manual Version 1.0 *This instrument is intended for laboratory use only Index A. Important Notice ----------------------------------------------------------------
Delta 40. This user guide will ensure you obtain the best use of your answer machine. USER GUIDE
 Delta 40 Thank you for choosing a Delta 40 Answer Machine. You have selected a carefully designed answer machine that incorporates the latest technology giving 40 minutes total recording time, a unique
Operation Manual. Concorde 600 Power Supply. *This instrument is intended for laboratory use only.
 Concorde 600 Power Supply Operation Manual Cat.no. R10-1001011 *This instrument is intended for laboratory use only http://www.recenttec.com E-mail : support@recenttec.com Version 1.1 Packing List x 1
4DLX CLASSIC USERS GUIDE
 4DLX CLASSIC USERS GUIDE INSTALLATION Insert the larger plug into the jack marked headphone or phone. Insert the smaller plug into the jack marked microphone or mic. Set the stereo/mono switch on the cable
Wildtronics, LLC Amplified Omni Microphone Instruction Manual
 Wildtronics, LLC Amplified Omni Microphone Instruction Manual Thank you for purchasing the versatile Wildtronics Amplified Omni Microphone. This innovative microphone has built-in, adjustable preamplifiers
CONTENTS. INTRODUCTION 3 Unpacking the Telephone 4. DESCRIPTION 5 General Description 5. INSTALLATION 10 Setting Up 10 Wall Mounting 11
 CONTENTS CONTENTS 1 INTRODUCTION 3 Unpacking the Telephone 4 DESCRIPTION 5 General Description 5 INSTALLATION 10 Setting Up 10 Wall Mounting 11 SETTINGS 12 Ringer Settings 12 Flash (Recall) Setting 12
I1000M Operation Manual
 I1000M Operation Manual Table of Contents TOPIC Page Cover 1 Table of Contents 2 Safety 3 FCC 3 Introduction 4 System overview 5 Operation controls 6 Docking station 6 / buttons 6 Volume up/down buttons
200B-G Tone Probe. 200EP-G Tone Probe INSTRUCTION MANUAL. with Adjustable Volume
 INSTRUCTION MANUAL English...1 Français...9 Español...17 Deutsch...25 Italiano...33 Português do Brasil...41 200B-G Tone Probe with Adjustable Volume 200EP-G Tone Probe with Adjustable Volume, Visual Signal
Owner s Manual AWM910 JENSEN AWM910 COMPACT DISC PLAYER RADIO CD COMPACT MUSIC SYSTEM MUTE AUX BAND AUX IN PUSH PUSH PWR VOL ALARM T/F AUD SPK A SPK B
 AWM910 Owner s Manual COMPACT DISC PLAYER PUSH 1 2 3 4 5 6 RPT SCAN RDM H M PUSH PWR VOL ALARM SET ON/OFF EQ T/F AUD RADIO CD COMPACT MUSIC SYSTEM MUTE AUX BAND CD AUX IN A B A+B JENSEN AWM910 Thank You!