Panasonic. DVD/DVC Camera Seminar VDR-D100/200/300 and PV-GS29/39
|
|
|
- Amelia Foster
- 6 years ago
- Views:
Transcription

1 Panasonic DVD/DVC Camera Seminar VDR-D100/200/300 and PV-GS29/39
2 Features (VDR-D100~300) DVD Multi DVD-RAM/R/-RW DSC Feature (Disc & SD Card) One Touch Navigation & Joystick Built in Video Light (D105&D200 Only) Multi Language OSD High Zoom Ratio USB2.0 HS Mode Zoom Microphone SD Slot (D200 Only) 30X Zoom

3 DVD Camera Comparison
")
4 Recording/Playback Media (DVD Camera)
5 Discs that can not be used in this unit

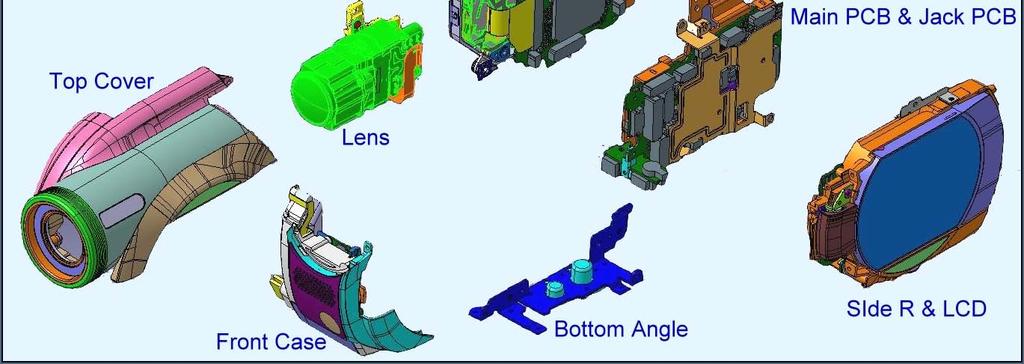
6 Camera Structure VDR-D100/200

7 Camera Structure VDR-D300

8 Camera Structure VDR-D300


9 Extension Cables for VDR-D Also used for VDR-D300 Also used for VDR-D300 Also used for VDR-D300 Adjustment procedure for the DVD and the DVC Cameras is the same


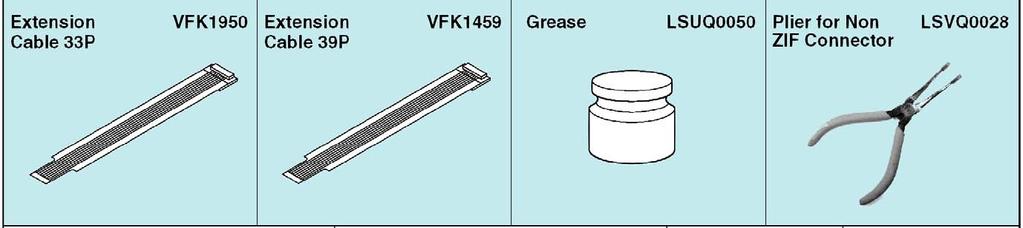
10 Extension Cables for VDR-D300 Also used for VDR-D100/200 Also used for VDR-D100/200 Also used for VDR-D100/200


11 Light box, Charts, etc for all DVD Cameras Adjustment procedure for the DVD and the DVC Cameras is the same

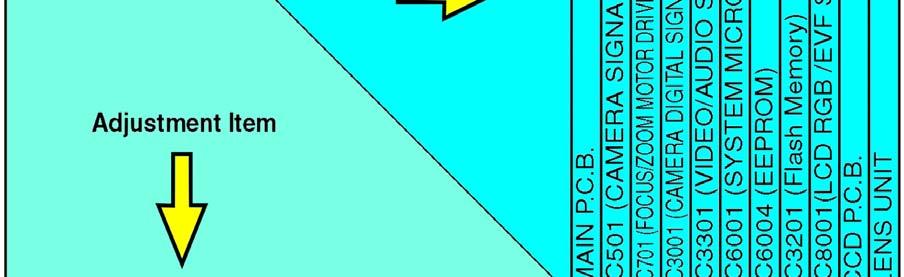


12 Adjustment Necessary After Board Replacement

13 Reset If the unit displays PUSH THE RESET SWITCH, press the reset switch to restart the unit. NOTE: The unit turns off automatically if the Reset switch is not pressed within 1 minute. Reset Button


14 Service Mode To Enter: 1. Turn the Power SW ON. 2. Press DELETE, RECORD and Push the JOYSTICK to the left together for 3 seconds without a Disk or SD Card inserted. To Exit: Unplug the AC Cord.
 Item 1: Factory settings (Reset)")

15 Service Mode Use the joystick to select items in page 1/2. (Page 2/2 is not used) Item 1: Factory settings (Reset) Item 2: DVD Drive information Item 3: Reset the total power-on time Item 4: Item 5: Camera information To select YES

![Region code For reference For reference Item 5: Camera information [Hour Meter] PWR: Total power on time EE : [Error Code] Camera](/docs-images/74/71315637/images/16-2.jpg "Error code :51 52 00 Record TEMP: The number of time Temp message display No use for service DRV: No use for service Before Previous")
16 DVD Drive/Camera information Item 2: DVD Drive information 1.DVD drive F/W Version 2.Drive Serial No 3.BER DVD ERR Code LASER current/temp 6.Function 7.Region code For reference For reference Item 5: Camera information [Hour Meter] PWR: Total power on time EE : [Error Code] Camera Error code : Record TEMP: The number of time Temp message display No use for service DRV: No use for service Before Previous code Previous code Latest code CAN NOT OPERATE. TEMPARATURE IS HIGH. PLEASE TURN OFF AND WAIT A WHILE.
17 List of Error Codes DVD Drive information : No error : Laser Error : Spindle Servo Error : Eject Motor Lock : Temperature Error 02 3A 02 : Tray open w/o Eject Camera Error Code 00 : No error 51 : Zoom Motor Lock 52 : Focus Motor Lock To clear error code, select Item 1: Factory setting (Reset)

18 How to Read The Error History When an error occurs, PUSH THE RESET SWITCH is displayed on the screen. The Service Mode can not be entered at this time. To read error code, perform the following. Connect the PC to the unit. Run the adjustment software. Select the Lock Info in diagnosis. The Error codes are displayed (See picture to the right).


19 Troubleshooting hint for DVD Error Code 00 XX XX: No error (X: any NO) : Laser Error : Spindle Servo Error : Temperature Error DVD Drive Unit If any of these Error Codes appears, Replace the DVD Drive Unit : Eject Motor Lock 02 3A 02 : Tray open w/o Eject Disc Cover Unit If any of these Error Codes appears, Replace the Disc Cover Unit
20 Troubleshooting hint for Camera Error Code 00 : No error 51 : Zoom Motor Lock 52 : Focus Motor Lock Replace the Lens Assembly

21 Troubleshooting Hint If the unit displays THE DISK IS INCOMPATIBLE Check if flat cable on DVD Drive Unit is seated properly.
 from the DVD video Camera before")
22 Service Position Staring at the light from the laser may cause eyesight loss. For safety, be sure to remove any power supply (AC adaptor or battery) from the DVD video Camera before beginning to work on the camera.

23 How to Eject the DVD Tray Manually 1. Remove the 6 Screws, and remove the Top Cover Unit. 2. Slide the Lock Lever to open the Disc Cover.

24 Service Position VDR-D100/200
 automatically and you can check Main CBA while monitoring LCD Monitor or AV")
25 Service Position II This unit will work without DVD Drive (U). The unit will be in SD mode (EE) automatically and you can check Main CBA while monitoring LCD Monitor or AV out picture. NOTE: No other mode will be operative.

26 Auto Ground-directional Standby (AGS) (VDR-D300 only) This function prevents unnecessary recording when you forget to pause recording and walk with the unit tilted upside down while recording continues. If the unit continues to be tilted upside down from the normal horizontal position while recording on a disc, it is automatically set to recording pause.

27 To turn the AGS function on/off 1. Rotate the mode dial to select. 2. Press the MENU button, then select SETUP. 3. Scroll down to AGS and select ON or OFF and press the joystick. Note: The AGS function may activate and cause the unit to pause the recording if you are recording a subject right above or right below you. In these cases, set AGS to OFF then continue the recording. Use the recording start/stop button to pause the recording. The AGS function is only a backup function for when you forget to pause the recording. The time it takes the unit to be put into recording pause after being tilted upside down varies depending on the operating conditions.
28 Update Procedure for ARM FW


29 Update Procedure for ARM FW Install USB Driver and Reboot the PC. Click "SETUP EXE" and follow the procedure. Make sure there s no disc inside the Camera. Make sure the power switch is set to the OFF position. Use the AC Adapter. Note: Don't connect the Camera to the PC using the USB cable.
 2. Confirm that Power LED is on and LCD Panel is off. Note: If the LCD is still on, turn the power off and repeat steps 1 and 2.")
30 Update Procedure for FW 1. Press and hold "MENU" Button and the JOYSTICK to the left at the same time and then turn Power SW ON and wait for a few seconds. (ARM F/W update mode) 2. Confirm that Power LED is on and LCD Panel is off. Note: If the LCD is still on, turn the power off and repeat steps 1 and

31 Update Procedure for FW 3. Connect DVD-CAM to PC with USB cable. 4. Click "FW_UPDATE.exe" Confirm that the Port indicated is COM3 or higher. These versions are an example of file names Click "Update File Open".


32 Update Procedure for FW 7. Select "Mpeg2Movie" and click "Open". "Mpeg2Movie" is an example of file name. It will use a name of F/W version Confirm that "FILE DATA OK" is indicated Click "Update Start". 8
33 Update Procedure for FW 10. Confirm that "FILE DATA OK" changed to " ". 11. Click "OK" after "F/W UPDATE COMPLETE!!" is indicated. This normally takes approximately five minutes
34 Update Procedure for FW 12. Click "END" to finish. 13. Disconnect the USB Cable. Disconnect the DC Cord before turning the Power SW off. 12
35 Update Procedure for DVD Drive F/W PC with WindowsXP No Disc inserted in Camera Connect to DC Cord (AC Adaptor)

36 Update Procedure for DVD Drive F/W 1. Set the Mode Dial to "DISC PLAYBACK MODE". 2. Turns Power SW ON. 3. Connect DVD-CAM to the PC with USB cable. 4. Confirm that LCD screen is off. If PC is requested to re-boot, please do it according to the information from PC. 2 Mode Dial Wheel 4 1
. 6.")
37 Update Procedure for DVD Drive F/W 5. Click "DWL2WIN" (double click). 6. Click "DownLoad" icon. 6 5


38 Update Procedure for DVD Drive F/W 7. Select "FRS35" and click "Open". "FRS35" is an example of file name. These versions are an example of file names Click "OK" after "Download complete" is indicated. It normally takes approximately one minute for downloading. 9. Click "Exit" to finish Disconnect the USB Cable. 9 Disconnect the DC Code before turn Power SW off.
39 Service Mode (Version Check) Make sure that the USB Cable is disconnected.

40 Service Mode (F/W Version Check) 1. Turn the Power SW ON. 2. Set the Mode Dial to "DISC PLAYBACK MODE". 1 2 Mode Dial Wheel 3. Go into the Service Mode by Pressing and holding the "TRASH" and RECORD" buttons and the "JOYSTCK to the LEFT" at the same time for a few seconds. 3

41 Service Mode (F/W Version Check) 4. Verify the ARM Version and Drive Version. ARM = 043B Drive = RS35 These versions are an example of file names. ARM DRIVE
42 Troubleshooting

43 VDR-D100/105/200 IC/Connectors Location Foil Side

44 VDR-D100/105/200 IC/Connectors Location Component Side


45 VDR-D300 IC/Connectors Location
46 VDR-D300 IC/Connectors Location
47 VDR-D300 IC/Connectors Location
48 VDR-D300 IC/Connectors Location
49 System Control (VDR-D100/105/200)
")
50 Standby Circuit (VDR-D100/105/200) V

51 Power Supply Components Location
52 Power ON (VDR-D100/105/200)
53 Power ON (VDR-D100/105/200)

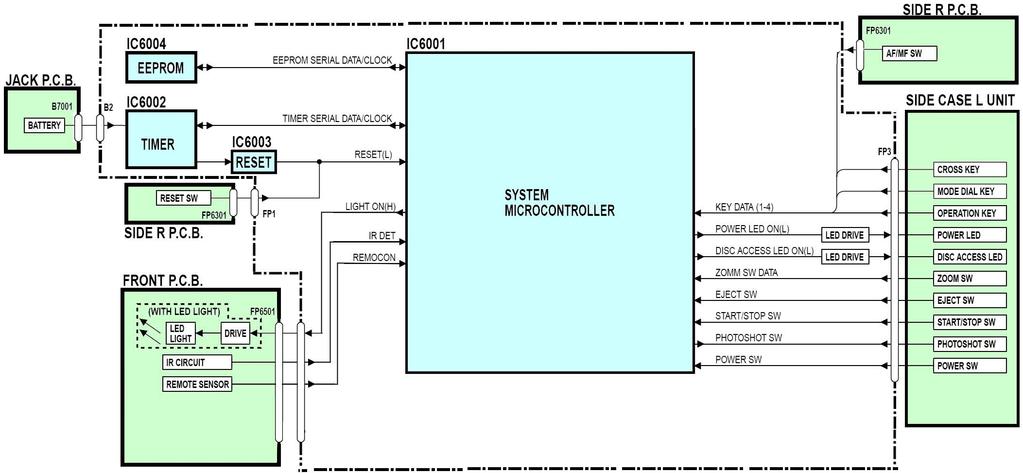
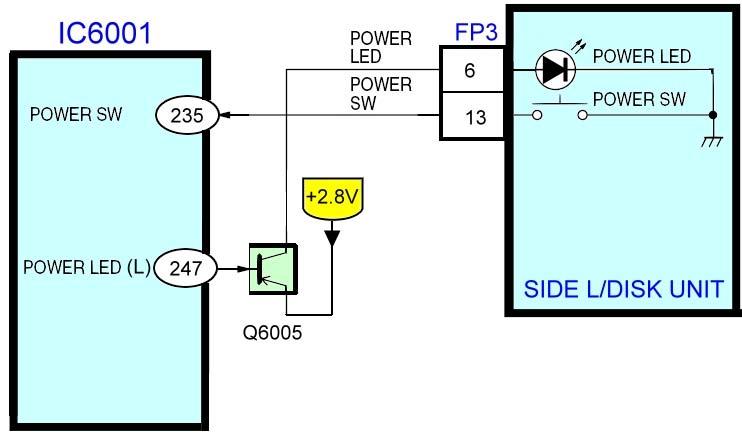
54 Overall Diagram (VDR-D300)
")
55 Camera Video 1 (VDR-D300)

56 Video Signal Process (VDR-D300)

57 Digital Signal Process (VDR-D300)

58 Audio Video Processor (VDR-D300)
59 DVC Camera DVC Camera
60 Service Menu PV-GS39 Service Menu Automatic diagnosis code will be displayed. (Service Menu) To enter the Service Menu Push the [PHOTO SHOT], [JOYSTICK CONTROL LEFT] and [RECORDING START/STOP] simultaneously for 3 seconds (with no SD Card inserted). Note: If a Tape or SD Card is inserted, the above operation will not work. To select the Item: 1. Press the [JOYSTICK CONTROL UP/DOWN] to select item [3]. 2. Press the [JOYSTICK CONTROL RIGHT] to display [YES/NO] screen. 3. Press the [JOYSTICK CONTROL UP/DOWN] to select [YES]. 4. Press the [JOYSTICK CONTROL CENTER]. Note: Only perform items 3 in the Service Menu. To exit the Service Menu Unplug the AC Cord.
")
61 Service Menu To enter the Service Menu Push the PHOTO SHOT, JOYSTICK CONTROL LEFT and RECORDING START/STOP simultaneously for 3 seconds. (With no tape or SD Card inserted)


62 Service Menu Only perform items 3 in the Service Menu.


63 Service Menu 1. Press the JOYSTICK CONTROL UP/DOWN to select item [3]. 2. Press the JOYSTICK CONTROL RIGHT to display YES/NO screen. 3. Press the JOYSTICK CONTROL UP/DOWN to select YES. 4. Press the JOYSTICK CONTROL CENTER.

64 Service Menu
65 Service Fixture and Tools

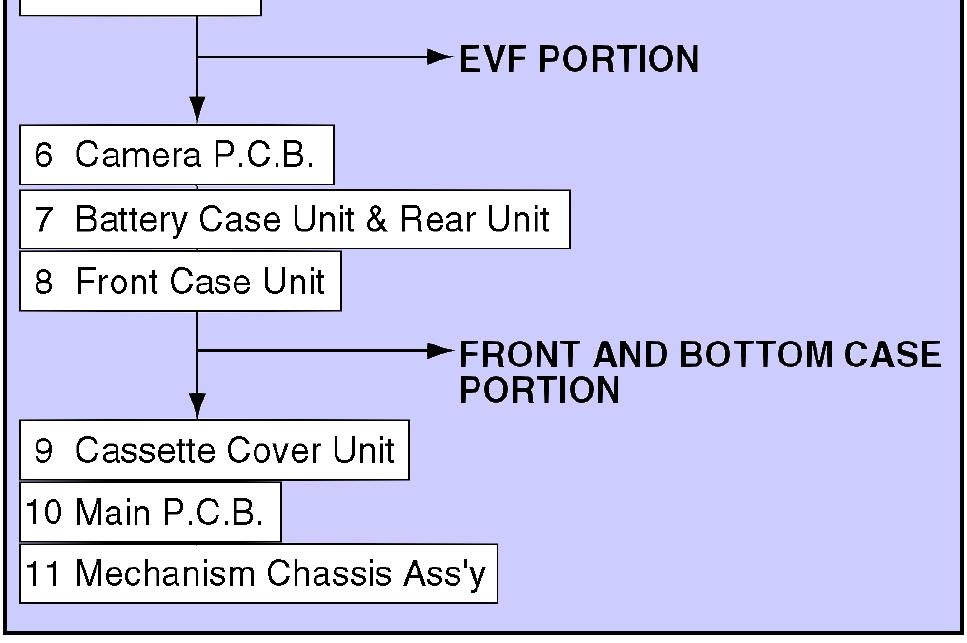
66 Disassembly Flowchart
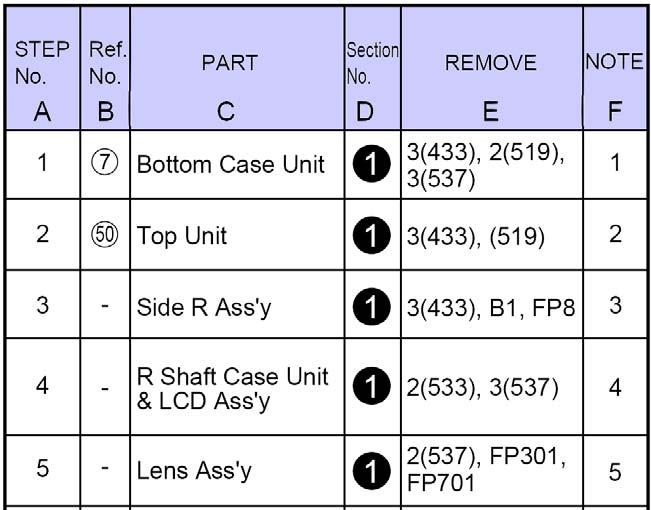

67 Disassembly Flowchart
")
, - 3(537),")
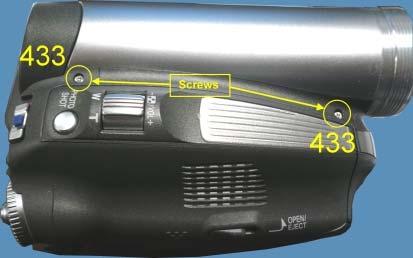
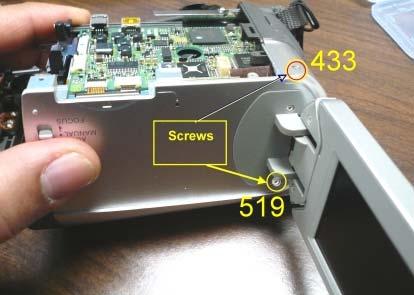
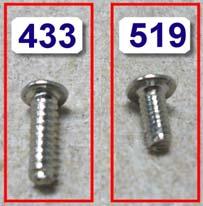
68 Bottom Case Unit Removal (Ref # 7) Remove Screws 3(433), - 3(537), - 2(519)

")

69 Top Unit Removal (Ref # 50) Remove Screws:3(433), - 1(519) Pull the Top Unit toward the front


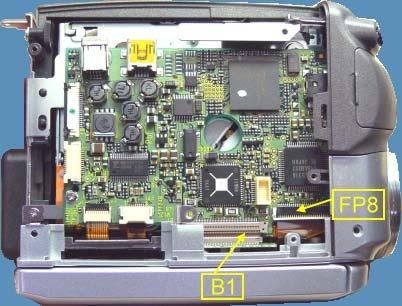
70 Right Side Assembly Removal 1. Remove 3(433) Screws. 2. Unplug the push-on connector B1. 3. Release the lock from the Flip-up connector FP8.


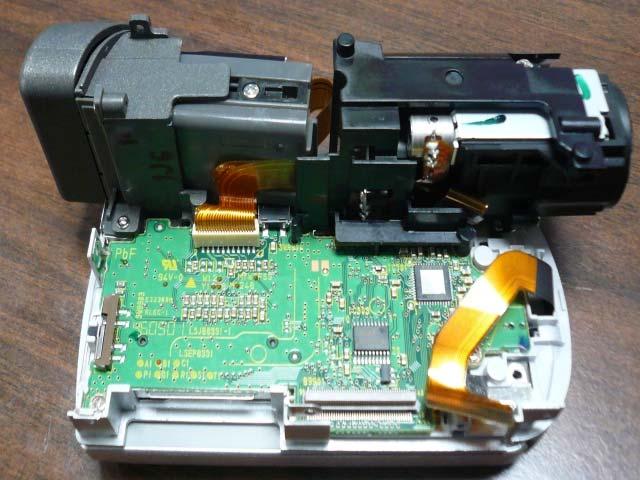
71 Right Side Assembly Removal
 Open")
.")

72 Removal of Battery Case Unit & Rear Unit 1) Open the Cassette Cover and remove the 2 Screws (540). 2) Disconnect the F.P.C.s from Connectors FP10 and P1001.
 Remove the 3 Screws")
 Disconnect the Front F.P.")
73 Removal of Front Case Unit 1) Remove the 3 Screws 2(433), 1(519). 2) Disconnect the Front F.P.C. from Connector FP6.
74 Com Mode Remove Tape and SD Card Install the USB-SERIAL driver. (Execute the Setup.exe" file in "ComMass" folder). To enter the PC connection (COM) mode, push the PHOTO SHOT, RECORDING START/STOP and JOYSTICK CONTROL UP simultaneously for 3 seconds without connecting the USB Cable


75 PC-EVR Adjustment Program Set-up 1. Turn on the PC and install the PC- EVR Adjustment Program into the PC. 2. Execute the "kdv2006.exe" file by double clicking to start up the PC- EVR Adjustment Program. The main menu will be displayed. 3. Select the model. 5. When the communication is complete, the dialog will appear. Click "Yes," and "Save" to save the EEPROM data. 4. Turn on the camcorder and set to PC connection (COM) mode. Then click "Start"


76 PC-EVR Adjustment Program Set-up 6. When saving EEPROM data is complete, the menu will appear. To perform each adjustment, display the adjustment menu by selecting from "Camera Adjust," "Vcr Adjust," "LCD Adjust" or "EVF Adjust" and select each adjustment item. Note: The adjusted data is stored in the EEPROM IC after each adjustment. 7. To close the program after adjustment, select "Exit" in the File menu or close the window. 8. To exit the PC connection (COM) mode, push the PHOTO SHOT, RECORDING START/STOP and JOYSTICK CONTROL UP simultaneously for 3 seconds with USB Cable disconnected.
77 Main PCB (Foil Side) PV-GS29, 36, 39, 59

78 Overall Block Diagram PV-GS29, 36, 39, 59


79 Overall Block Diagram PV-GS29, 36, 39, 59


80 Overall Block Diagram PV-GS29, 36, 39, 59

81 System Control Block PV-GS29, 36, 39, 59 CAUTION: Save the EEPROM data using PC-EVR Adjustment Program before service and adjustment in order to to avoid accidental data loss, etc.

82 STB Block PV-GS29, 36, 39, 59
 Test Point")
83 TP20 (+Batt.) Test Point Location

84 Power On Block PV-GS29, 36, 39, 59

85 TP15 (Power On (L)) Test Point Location

86 Video Signal Process PV-GS29, 36, 39, 59


87 Video Signal Output Test Point Location MAIN PCB (Foil Side)


88 PLAY/REC. Signal (PV-GS29, 36, 39, 59 )


89 PLAY Signal TP (PV-GS29, 36, 39, 59 ) MAIN PCB (Foil Side)
90 The End
700TSU INSTALLATION MANUAL
 M 700TSU INSTALLATION MANUAL 2 Table of Contents Features...03 Specifications...04 Quick-Start...05 Remote Control...07 Hardware Installation...10 Software Installation...14 Touch Screen Driver Installation
Proficiency Required
 Proficiency Required Operating Guide for SD Palmcorders Media Loan Operating Guides are also available online at www.evergreen.edu/media/ml/. Standard Definition (SD) Palmcorders There are a variety of
A. Features 1. Suitable for all personal vehicles, taxi, buses, trucks and etc. 2. Easy to install and compact size to prevent blocking the driver's
 Index A. Features... 1 B. Specifications... 2 C. Product Appearance... 3 D. Product Dimensions... 4 E. Installation Instructions... 5 F. Start / Stop Recording... 6 G. Playback... 8 1. Onsite Playback...
Canon VIXIA HF-M300 Quick Start Guide
 Canon VIXIA HF-M300 Quick Start Guide Overview Please use this unit in the Dual Shot Mode which is the green icon on the Operating Mode Switch. This mode will provide the greatest ease of use. While the
Copyright 2007 Hewlett-Packard Development Company, L.P.
 Drives User Guide Copyright 2007 Hewlett-Packard Development Company, L.P. The information contained herein is subject to change without notice. The only warranties for HP products and services are set
1. Parts of the camcorder 1: Preview button 2: Menu button 3: LCD screen 4: HDMI jack 5: Mode dial 6: Power LED 7: Shutter button 8: Charging LED 9:
 USER MANUAL 1. Parts of the camcorder 1: Preview button 2: Menu button 3: LCD screen 4: HDMI jack 5: Mode dial 6: Power LED 7: Shutter button 8: Charging LED 9: Up/Exposure button 10: Right button 11:
DVR 514 Digital Video Recorder
 DVR 514 Digital Video Recorder User Manual 2010 Sakar International, Inc. All rights reserved. Windows and the Windows logo are registered trademarks of Microsoft Corporation. All other trademarks are
A Guide on How to use the Canon Power Shot A 95 Digital Camera
 A Guide on How to use the Canon Power Shot A 95 Digital Camera Preparing the Camera: 1. Open the battery cover and insert the batteries in the correct position. NEVER THROW THE BATTERIES AWAY. THEY ARE
Firmware update procedure
 Firmware update procedure Recording module: AU-VREC1, Camera module: AU-V23HS1, AU-V35C1 NOTE: AU-V35C1 only After the camera is updated to Ver. 4.xx no matter which version it is updated from, please
User manual RIDER F120 FHD
 User manual RIDER F120 FHD www.iget.eu SUPPORT: http://www.iget.eu/helpdesk Dear Users: Thank you for buying this high-resolution car DVR. This product is characterized by advanced technology, unique appearance,
DVR CH Digital Video Recorder SW242-LP4 / SW242-LPN
 DVR4-1100 4CH Digital Video Recorder SW242-LP4 / SW242-LPN User Manual INDEX 1. DVR Features... 1 2. Layout 2.1 Front Panel...1 2.2 Rear Panel...2 2.3 Remote Controller...2 3. Installation 3.1 Installing
Insert the Micro SD Card to the slot. the setting; Menu Clock Settings. and press "OK" 00 : 00 : 00. to setup date: "YYYY/MM/DD", OK
 Hit Record Dash Cam & User s Manual Thank you for purchasing Hit&Record Dash Cam A60, please read the user s manual and make sure the package content is complete without missing before using the
Table of Contents 1 Features and Specifications Functions Technical Specifications Appearance and Accessories
 Table of Contents 1 Features and Specifications... 2 1.1 Functions... 2 1.2 Technical Specifications... 3 2 Appearance and Accessories... 4 2.1 Appearance... 4 2.2 Accessories... 6 3 Preparations before
English 1. Package Contents. The package contains the following items. In case there is any missing or damaged item, contact your dealer immediately.
 1. Package Contents The package contains the following items. In case there is any missing or damaged item, contact your dealer immediately. Car Recorder Bracket Quick Start Guide Car adapter 1 2. Product
SmartWatch Eco/Eco Compact
 SmartWatch Eco/Eco Compact Digital Video Recorders SmartWatch Eco SmartWatch Eco Compact Quick User Guide Index Box Contents...3 Front Panel Controls...4-5 SmartWatch Eco Compact...4 SmartWatch Eco...5
In-Car DVR KPT-700 User Manual
 Full HD In-Car DVR KPT-700 User Manual Product Picture & Function 2 a) Device Introduction... 2 b) Button Function... 3 c) LED Light Status List... 5 d) Product Accessories... 5 Basic Operation 5 a) Micro
Vividia HM-250 HDMI/LCD/USB/TV Portable. Digital Measurement Microscope
 Vividia HM-250 HDMI/LCD/USB/TV Portable Digital Measurement Microscope Table of Contents 1. Precaution. 3 2. Preparation..5 Package Contents.. 6 Part Names & Functions..6 3. Specifications.... 7 4. Use
High Definition VideoScope
 User Manual High Definition VideoScope Model HDV600 Additional User Manual Translations available at www.extech.com Introduction Congratulations on your purchase of this Extech HDV600 series Video Borescope.
WEASEL N/B MAINTENANCE
 2. System Assembly & Disassembly 2.1 System View 2.1.1 Front View ❶ Microphone Connector ❷ Audio Input Connector ❸ Audio Output Connector ❹ Top Cover Latch ❹ ❶ ❸ ❷ 2.1.2 Left-Side View ❶ VGA Port ❷ S-Video
Firmware update procedure
 Firmware update procedure Recording module: AU-VREC1, Camera module: AU-V23HS1, AU-V35C1 NOTE: AU-V35C1 only 1. If you update the firmware version 7.50-00-0.00 or lower, perform ABB after the update is
4CH Real Time DVR. User Guide INFORMATION MAY CHANGE WITHOUT NOTICE. Digital Video Recorder
 User Guide INFORMATION MAY CHANGE WITHOUT NOTICE. Table of Contents Caution... 4 Package Contents... 4 Introduction... 5 1. Product Overview...5 2. Front Panel...5 3. Rear Panel...6 4. IR Remote Controller
TravelMate 6493 Series Disassembly Instruction
 TravelMate 6493 Series Disassembly Instruction please refer to http://csd.acer.com.tw PRINTED IN TAIWAN Chapter 3 Machine Disassembly and Replacement This chapter contains step-by-step procedures on how
CCT-5001 MK2 USER MANUAL
 CCT-5001 MK2 USER MANUAL www.facebook.com/denverelectronics ENG-1 Part of the camcorder Preparing for using 1. HDMI port 6. Screen 11. Protector 16. UP 2. Micro SD card slot 7. Busy indicator light 12.
Basic guide to Canon EOS C
 Basic guide to Canon EOS C100 2017 This guide is designed to take you through the basic and essential functions of the Canon C100 camcorder. Battery insertion Have the camera in the off position. The power
Technical Guide Plasma (GPH10DU Chassis) Troubleshooting Handbook
 Troubleshooting Handbook") Technical Guide Plasma (GPH10DU Chassis) Troubleshooting Handbook Model : TH-42PX75U TH-50PX75U TH-42PX77U TH-50PX77U Panasonic Services Company National Training Prepared by Panasonic Service and Technology
Technical Guide Plasma (GPH10DU Chassis) Troubleshooting Handbook Model : TH-42PX75U TH-50PX75U TH-42PX77U TH-50PX77U Panasonic Services Company National Training Prepared by Panasonic Service and Technology
SD CARD DVD/VCD/CD/MP3/DIVX/MPEG-4 XO1525 USB MOD D200P. User s Manual
 USB SD CARD DVD/VCD/CD/MP3/DIVX/MPEG-4 XO1525 MOD D200P User s Manual 9.1 Rear Panel Connections: 19 BEFORE USING: To ensure the safety of the products during transportation, The internal mechanism was
Dear Users: Install and remove memory card
 Dear Users: Thank you for buying this high-resolution car DVR. This product is characterized by advanced technology, unique appearance, strong function and can realize the dual-camera synchronous real-time
AK-C6A In Car Dash Camera. Instruction Manual Model Ref: MM347
 AK-C6A 20032017 In Car Dash Camera Instruction Manual Model Ref: MM347 Introduction Thank you for choosing this In Car Dash Camera. This product is manufactured to the highest standards of performance
RECO Smart Cam. Quick Start Guide
 RECO Smart Cam Quick Start Guide E11074 / Revised Edition V2 / November 2015 NOTE: The screenshots in this Quick Start Guide are for reference only. 2 Hardware Micro USB port MicroSD card slot GPS port
Table of Contents Welcome 1 Safety Notice 1 Table of Contents 2 Camera Parts 5 Getting Started 6 Loading the batteries 6 Inserting the SD/MMC card (op
 Welcome Dear user, thanks for purchasing this product. Much investment in time and effort has gone into its development, and it is our hope that it will give you many years of trouble-free service. Safety
Operation Manual PORTABLE DVD PLAYER Model: D705
 Operation Manual PORTABLE DVD PLAYER Model: D705 READ THESE INSTRUCTIONS THOROUGHLY PRIOR TO CONNECTING AND OPERATING YOUR DVD PLAYER. PLEASE RETAIN THIS MANUAL IN CASE YOU NEED IT FOR FUTURE REFERENCE.
FTM 131 CANON EOS C100 WALKTHROUGH, PART I: 10 Steps to Record a Moving Image
 FTM 131 CANON EOS C100 WALKTHROUGH, PART I: 10 Steps to Record a Moving Image Step 1: TRIPOD - Perform the following steps on your tripod, before you place the camera on it: - Extend the legs to set the
User Manual V K Camera with an Integrated 3-axis Gimbal
 User Manual V 1.1 4K Camera with an Integrated 3-axis Gimbal Table of Contents Introduction 3 At a Glance 3 Charging the Battery 4 Status Battery LED Indicator Description 4 Check the Battery Level 5 Insert
Front View Rear View PLCMDVR47
 Front View Rear View Mode Down Switch Menu/Emergency Up OK Host Keys OK: In the video mode, short press the key to start recording and short press the key again to stop recording; In the photo mode,
AV-REC100 HDMI RECORDER USER MANUAL V1.2.
 AV-REC100 HDMI RECORDER USER MANUAL V1.2 www.avonic.eu INTRODUCTION The Avonic AV-REC100 is an HD Video Recorder that employs HDMI technology to receive video & audio from HDMI input. It can store the
Operation Manual Defender Car Vision 2020 HD Car DVR
 Operation Manual Defender Car Vision 2020 HD Car DVR 1 Thank you for buying Defender Car Vision 2020 HD car DVR. Before using the device read carefully this manual. mini-usb connector HDMI connector Function
midi LOGGER 900 SERVICE MANUAL GL900-UM-251 GL900-UM
 midi LOGGER 900 GL900-UM-251 SERVICE MANUAL GL900-UM-251-01-9370 HISTORY OF REVISIONS No. Date issued Description of revision Page Edition 1 08.07.26 First Printing All 01 GL900-UM-251-9370 i TO ENSURE
1. Introduction P Package Contents 1.
 1 Contents 1. Introduction ------------------------------------------------------------------------------- P. 3-5 1.1 Package Contents 1.2 Tablet Overview 2. Using the Tablet for the first time ---------------------------------------------------
VC2100 / VC MB Digital Event Recorder
 VC2100 / VC2100 32MB Digital Event Recorder Product Description: This system includes one VS2100 single channel digital event recorder and one color camera. It will automatically have image capture or
Safety and Maintenance You can use your Tablet PC under a wide range of environmental conditions. However, to ensure long use and continued high
 EVG7 DL46 Getting Started Congratulations on your purchase of a Tablet PC. The Tablet PC is a fully functional PC with built-in LAN, and wireless connectivity. With your Tablet PC you will be able to organize
* IMPORTANT * REGISTERING YOUR MACHINE
 * IMPORTANT * REGISTERING YOUR MACHINE Thank you for your purchase of the Keyline 994 Laser. Before continuing with machine setup and use, please complete the following; COMPLETE PRODUCT REGISTRATION FORM
Chapter 1: Introduction. Chapter 2: Getting Started
 Chapter 1: Introduction Media Player 200 is a Digital Media Player that includes a connector for a USB storage device and card reader. The Media Player 200 connects to your home entertainment center allowing
If technical support is required, please contact Advent Technical Support at
 Document 128-9011 Created 11/21/11 Kit Contents: Item # Qty. Component Description 1 2 Monitor Assembly 2 2 Remote Control 3 1 Cables # 3 4 1 Metal Wire Puller 5 1 Power Cord # 9 6 1 Owners Manual 7 2
SET-UP OF PANASONIC AG-HMC150P VIDEO CAMERA
 SCHOOL OF FILMMAKING 1533 S. Main Street Winston-Salem, North Carolina 27127 SET-UP OF PANASONIC AG-HMC150P VIDEO CAMERA The following pages contain basic instructions on the setup of the video camera
USER MANUAL Digital Screen
 USER MANUAL Digital Screen RBDIG7 Cautions Precautions and Maintenance For indoor use only To avoid risk of fire or electric shock, do not expose the unit to moisture or condensation. To avoid overheating,
MOBILE SAFETY DVR1543K. CLIP ON REARVIEW MIRROR KIT with 4.3-INCH LCD MONITOR FRONT & REAR CAR CAMCORDER with DUAL MOUNTING REVERSING CAMERA
 MOBILE SAFETY DVR1543K REARVIEW MIRROR CAR DRIVING RECORDER KIT CLIP ON REARVIEW MIRROR KIT with 4.3-INCH LCD MONITOR FRONT & REAR CAR CAMCORDER with DUAL MOUNTING REVERSING CAMERA 3.0 MEGA PIXEL CAMERA
Panasonic Broadcast. AG-DVC30 Menu Information
 Panasonic Broadcast AG-DVC30 Menu Information Menu operations Using menus, you can change the camera-recorder s settings to suit the scenes to be shot or material to be recorded. O You cannot perform menu
I. User Guide. 1. Structure. HD Lens. Speaker USB/TV port. 360 rotating clip Video/Confirm. Photo. OK/Menu. Audio. Reset. Up/Infrared HD 2 LCD.
 Body-Cam User Manual PPBCM9 Warning: 1. Be careful not to use this product in strong magnetic fields, which may cause image interference or cause product fault. 2. Be careful not to direct sunlight for
USER MANUAL. Please read this user manual carefully before using your unit.
 USER MANUAL MULTIMEDIA LED PROJECTOR Please read this user manual carefully before using your unit. CONTENTS Contents...1 Caution... 2 What's in the box...3 Product Introduction...4 Remote Control Introduction...5
FEATURES: Screen. Return Direction and OK button On/Off Audio Play Mode Record Button POWER and DATA
 With PVRC49 AV Recorder, you can convert your old video tapes or camcorder tapes to digital format with one click of button, record and digitalize video from VHS, VCR's, DVD Players, DVR's, Camcorders,Hi8,
PhotoScanner. User Guide
 User Guide Contents 1. Introduction 1. Features 2. Safety 3. Product Specifications 4. Package Contents 5. Product Description 6. Settings 7. Settings 8. Settings 9. Settings 10. Settings 11. Using the
Table of Conten. Main Feature Install and Use Camera body buttons Remote controller Install Battery... 7
 \ User Manual ~ 1 ~ Table of Conten Main Feature... 4 Install and Use... 5 Camera body buttons... 5 Remote controller... 6 Install Battery... 7 Close back cover... 7 Install Memory Card... 8 Install waterproof
Instructions for D-55IRXT GameSpy Digital Camera
 Instructions for D-55IRXT GameSpy Digital Camera THANK YOU for your purchase of the D-55IRXT GameSpy Digital Camera. Please read this booklet before using the unit. If you should have any questions about
DVR 710HDv2 Digital Video Recorder
 DVR 710HDv2 Digital Video Recorder User Manual 2009-2011 Sakar International, Inc. All rights reserved. Windows and the Windows logo are registered trademarks of Microsoft Corporation. All other trademarks
Vertiv Local Rack Access 18.5" LED LCD Console
 Vertiv Local Rack Access 18.5" LED LCD Console With Integrated Keyboard, Touchpad and Dual USB 2.0 Ports Installer/User Guide Technical Support Site If you encounter any installation or operational issues
D11VR. USER MANUAL DVR Camera
 D11VR USER MANUAL DVR Camera WHAT S INCLUDED D11VR WINDSHIELD BRACKET DC POWER CORD USB CABLE OWNER S MANUAL Welcome Thank you for choosing a Whistler product. We are dedicated to providing products that
10.1 HD Memory View Instruction Manual
 10.1 HD Memory View Instruction Manual Cautions Precautions and maintenance For indoor use only To avoid risk of fire or electric shock, do not expose the unit to moisture or condensation. To avoid overheating,
Network Video Recorder Quick Operation Guide
 Network Video Recorder Quick Operation Guide UD.6L0202B1351A01 TABLE OF CONTENTS NVR Pre-Installation... 2 NVR Installation... 2 Hard Disk Installation... 2 Front Panels... 6 DS-9500NI-ST/RT Front Panel...
ELECTRONIC CLASSROOM OPERATIONS GUIDE Room 502 V4.1
 1 ELECTRONIC CLASSROOM OPERATIONS GUIDE Room 502 V4.1 Under Construction CONTENTS Under Construction I. START OF CLASS/START OF DAY PROCEDURES... 2 II. CHANGING BETWEEN DISPLAY OR AUDIO SOURCES... 5 CHANGING
TruVision DVR 60 Quick Start Guide
 Content Package contents 1 Installation environment 1 Setting up the TVR 60 1 Connecting the devices 2 Turning on and off the TVR 60 2 Operating the TVR 60 3 DDNS settings 5 Live mode 5 Quick Archive 5
Contents. General Notes 2. External Lights 2. Buttons 3. Modes 3. Icons 4. Camera Operation 6. Setup Menu 9. Smart Device 12. General Information 15
 AC1000 Contents General Notes 2 External Lights 2 Buttons 3 Modes 3 Icons 4 Camera Operation 6 Setup Menu 9 Smart Device 12 General Information 15 Accessories 16 1 ParkPlay AC1000 Manual GENERAL NOTES
GPSDvr M9 GPS. This M9 recorder may not record all events, incidents, or accidents. It is not guaranteed.
 GPSDvr M9 GPS Dual Camera Driving Recorder User Manual This manual is for both M9 Standard and M9 GPS model. M9 Standard does not have GPS module inside. All GPS related functions will not be working in
FN-MAZDA3 Installation Manual
 Manual Version: V20150401 FN-MAZDA3 Installation Manual Product Name: FN-Mazda3 Product Type: Interface with build in navigation Application: All Mazda 2014/2015 cars with new Mazda Connect systems What's
midi LOGGER 820 GL820-UM-251
 midi LOGGER 820 GL820-UM-251 SERVICE MANUAL GL820-UM-251-02-9370 HISTORY OF REVISIONS No. Date issued Description of revision Page Edition 1 10.02.18 First Printing All 01 2 10.04.06 The size of screws
4 Channel Digital Video Recorder / Camera Kit. Model No QV-3024 USER S MANUAL
 4 Channel Digital Video Recorder / Camera Kit Model No QV-3024 USER S MANUAL 1 Important Note: Please keep this manual in a safe location in case you need to refer to it at a later date. 1 INDEX CHAPTER
Room Classroom Technology Updated March 4, 2019
 Room 19-215 Classroom Technology Updated March 4, 2019 Table of Contents TURN CLASSROOM LIGHTS ON/OFF...1 EQUIPMENT LOCATION...2 LOGIN TO THE COMPUTER...2 Unsuccessful Login...3 TURN ON AND CONTROL THE
Copyright 2007 Hewlett-Packard Development Company, L.P.
 Drives User Guide Copyright 2007 Hewlett-Packard Development Company, L.P. The information contained herein is subject to change without notice. The only warranties for HP products and services are set
3700 SERIES USER MANUAL
 SAFETY GUIDE This manual contains the precautions necessary to ensure your personal safety as well as for protection for the products and the connected equipment. These precautions are highlighted with
ideapad 100S-14IBR User Guide
 ideapad 100S-14IBR User Guide Read the safety notices and important tips in the included manuals before using your computer. Notes Before using the product, be sure to read Lenovo Safety and General Information
Simple Instructions for 808 HD Car Key Micro Camera (#16)
") Simple Instructions for 808 HD Car Key Micro Camera (#16) Thank you for your purchase of our 808 Car Key Micro-camera (#16). If this is the first time you are using a product of this kind, please follow
Simple Instructions for 808 HD Car Key Micro Camera (#16) Thank you for your purchase of our 808 Car Key Micro-camera (#16). If this is the first time you are using a product of this kind, please follow
Home Movie Duplication Video8 Tape to DVD (using the computer)
") Home Movie Duplication Video8 Tape to DVD (using the computer) The Sony CCD TR70 Camcorder is connected to the Sanyo DVD Recorder, and can be used to copy home movies from Video8 tape to DVD. The Sony
Home Movie Duplication Video8 Tape to DVD (using the computer) The Sony CCD TR70 Camcorder is connected to the Sanyo DVD Recorder, and can be used to copy home movies from Video8 tape to DVD. The Sony
Technology Classrooms Podium at Community College of Philadelphia
 1. Quick Start Guide 2. Unlocking the Podium 3. Typical podium configuration 4. Step 1 Start up: Main Power Controls 5. Step 2 Start Up: Graphic Indicator Display Panel 6. Step 3 Start Up: Computer, Monitor,
PORTABLE VIDEO RECORDER AND CASSETTE CONVERTER. Item No User Guide
 PORTABLE VIDEO RECORDER AND CASSETTE CONVERTER Item No. 206557 User Guide Thank you for choosing the Sharper Image Portable Video Recorder and Cassette Converter. Please take a moment to read this guide
Copyright 2007 Hewlett-Packard Development Company, L.P. Windows is a U.S. registered trademark of Microsoft Corporation.
 Drives User Guide Copyright 2007 Hewlett-Packard Development Company, L.P. Windows is a U.S. registered trademark of Microsoft Corporation. The information contained herein is subject to change without
DPP-1080I Digital Photo Player
 DPP-1080I Digital Photo Player Operation Manual DPP-1080i TABLE OF CONTENTS 1. Introduction... 1 2. Main Features... 1 3. Package Contents... 1 4. Hardware Description... 2 4.1 Front Panel... 2 4.2 Rear
Quickstart Guide DVCAM DSR-PD150
 Quickstart Guide DVCAM DSR-PD150 Don t Do This Do not let the camera get wet. DO NOT LEAVE THE CAMERA IN A PARKED CAR! Do not leave the camera in direct sunlight Do not point the camera directly at the
User's Manual. Car DVR Prestigio Roadrunner 520 with display
 (044)361-05-06 (067)469-02-12 (099)048-99-03 (093)672-77-76 ICQ:495-089-192 ICQ:613-211-859 User's Manual Car DVR Roadrunner 520 with display In the online store you also can buy car DVR Roadrunner 520.
Thanks for purchasing this EVOLVE 4000HD v2 Sport.
 Thanks for purchasing this EVOLVE 4000HD v2 Sport. - Please read this instruction manual to ensure correct use of the product prior to use. - Please keep this instruction manual in a safe place. - Please
Digital Photo Navigator
 Digital Photo Navigator ENGLISH INSTRUCTIONS LYT0961-001A 2 EN CONTENTS INTRODUCTION... 4 Reading this document... 4 Loading Still Images (Windows )... 5 CAPTURING IMAGES... 6 Capturing still images from
Lenovo ideapad D330-10IGM
 Lenovo ideapad D330-10IGM User Guide Read the safety notices and important tips in the included manuals before using your computer. Notes Before using the product, be sure to read Lenovo Safety and General
2 Channel MDVR Manual
 2 Channel MDVR Manual STOP ESC PLAY DEL. Content Attention 1 Accessories 1 Device instruction 2 Connection 4 Icons instruction 6 Set up Time setting 7 Video setting 8 Record setting 9 Snap shot 9 card
Information Technology Help Desk George Washington Hall B College Avenue Fredericksburg, VA 22401
 Crestron TO START THE SYSTEM: Touch the screen on the small black Crestron box located on the lectern s desktop, this will wake up the system. On the system s start up screen, touch the Touch Here To Start
Getting Started Guide FLIR Bxxx series FLIR Txxx series
 Getting Started Guide FLIR Bxxx series FLIR Txxx series 4 2011, FLIR Systems, Inc. All rights reserved worldwide. Rear view A14 Hand strap. Front view A1 Touch screen LCD. A2 Cover for the SD memory card
Lenovo ideapad 110S. User Guide. ideapad 110S-11IBR. Read the safety notices and important tips in the included manuals before using your computer.
 Lenovo ideapad 110S ideapad 110S-11IBR User Guide Read the safety notices and important tips in the included manuals before using your computer. Notes Before using the product, be sure to read Lenovo Safety
Winthrop University - Using the Video Camera for your edtpa Folio
 Prior to Filming Check out a Video Camera and Other Items for your edtpa Video from the Instructional Technology Center (ITC) in 307 Withers Purchase a 16 GB SD Card from the ITC. SD Card will cost about
mobilecam GM-GV3 mobilecam & Viewer Software User Guide
 GM-GV3 & Viewer Software User Guide 1 Table of Contents Chapter 1 GM-GV3 Overview 1.1 Package contents. 1.2 GM-GV3 overview.. 1.3 peripheral connection diagram.. Chapter 2 Install the Program & Setup the.
Printing Your First Page. Attaching the Paper Support. Plugging in the Printer. Checking the Printer
 Printing Your First Page Attaching the Paper Support Checking the Printer Plugging in the Printer Installing the Ink Cartridges Installing the Printer Software Connecting the Printer 4011307 XXX-00 Attaching
Drive. User Manual. HD Vehicle Accident Camera USB. Version 1 Video Video 1920x x LCD Screen. Night Operation
 Drive HD Vehicle Accident Camera HD User Manual Version 1 Video Video 1920x1080 1280x720 Supports up to 32GB USB Windows Compatible 2.0 Mac Built-in and Windows Microphone Compatible Night Operation 16.9
DVR 528 Digital Video Camera
 DVR 528 Digital Video Camera User Manual 2010 Sakar International, Inc. All rights reserved. Windows and the Windows logo are registered trademarks of Microsoft Corporation. All other trademarks are the
PANASONIC NV-GS90 DV CAMCORDER
 PASONIC NV-GS90 DV CAMCORDER LED Video Light When illumination is insufficient, turn on the built-in LED video light to take crisp, colourful movies. The LED (light emitting diode) has low power consumption,
Before Operation. Basic Operation. Operating Instructions
 PF1501 14 Before Operation Basic Operation 2 3 3 6 6 7 Connect to PC 7 Operating Instructions Set-Up... 9 Selecting Which Media to View... 9 Viewing Photos... 9 Adjust Speed of Slideshow... 10 Adjust the
TVR 12 Quick Start Guide
 TVR 12 Quick Start Guide Figure 1: Back panel connections 1. Loop through for up to 16 analog cameras (depends on DVR model). 2. Connect to a RS-232 device. 3. Connect up to four alarm inputs. 4. Connect
XPS 15 2-in-1. Service Manual. Computer Model: XPS Regulatory Model: P73F Regulatory Type: P73F001
 XPS 15 2-in-1 Service Manual Computer Model: XPS 15-9575 Regulatory Model: P73F Regulatory Type: P73F001 Notes, cautions, and warnings NOTE: A NOTE indicates important information that helps you make better
Lenovo ideapad 500. User Guide. ideapad ISK/ideapad ISK
 Lenovo ideapad 500 ideapad 500-14ISK/ideapad 500-15ISK User Guide Read the safety notices and important tips in the included manuals before using your computer. Notes Before using the product, be sure
GV-590 User Manual. Version 0.3
 GV-590 User Manual Version 0.3 Table of Content Chapter 1 Features and Specification... 3 Features... 3 Specification... 4 Accessories... 7 Overview... 8 Chapter 2 Getting Started... 11 Download Application
f200 English User Manual Contents
 f200 English User Manual Contents About this Guide...3 FCC Statement...3 WEEE Notice...3 CE Regulatory Notice...4 Notes on Installation...4 Caution...4 1 Introduction...5 1.1 Features...5 1.2 Package Contents...5
G-SHOT5030Z. (User Guide)
") G-SHOT5030Z Multi-Functional ZOOM Digital Camera (User Guide) Specifications Specifications Digital Still Camera Digital Camcorder Resolution : Fine: 2912 x 2208 Fine: 640 x 480 (H/W enhancement) Normal:
G-SHOT5030Z Multi-Functional ZOOM Digital Camera (User Guide) Specifications Specifications Digital Still Camera Digital Camcorder Resolution : Fine: 2912 x 2208 Fine: 640 x 480 (H/W enhancement) Normal:
Instructions for M100 GameSpy Digital Camera
 Instructions for M100 GameSpy Digital Camera THANK YOU for your purchase of the. Please read this booklet before using the unit. If you should have any questions about this product or any other Moultrie
Drives. Document Part Number: This guide explains the computer hard drive and optical disc drive. October 2005
 Drives Document Part Number: 393498-001 October 2005 This guide explains the computer hard drive and optical disc drive. Contents 1 Drive Care 2 IDE drive light 3 Hard drive Replacing the primary hard
INTRODUCTION. i-tech Company LLC TOLL FREE: (888) WEB:
 WEB:") Table of Contents 1. Introduction 1 1.1. About the Product...1 1.2. Features...2 1.3. Notice...3 1.4. Check List...3 2. Playing System...5 2.1. Install Battery in the Remote Control...5 2.3. To Insert
Table of Contents 1. Introduction 1 1.1. About the Product...1 1.2. Features...2 1.3. Notice...3 1.4. Check List...3 2. Playing System...5 2.1. Install Battery in the Remote Control...5 2.3. To Insert