CONTENTS 1.0 BASIC MODE 1.1 MAIN MENU 1.2 NEW RELEASES 1.3 SPECIAL TRACKS 1.4 SEARCH TRACKS 1.5 BROWSE ARTIST 1.6 GENRES 1.7 FAVOURITE PLAYLISTS
|
|
|
- Philip Smith
- 6 years ago
- Views:
Transcription


1 I ONBGM USER MANUAL
2 CONTENTS 1.0 BASIC MODE 1.1 MAIN MENU 1.2 NEW RELEASES 1.3 SPECIAL TRACKS 1.4 SEARCH TRACKS 1.5 BROWSE ARTIST 1.6 GENRES 1.7 FAVOURITE PLAYLISTS 2.0 ADVANCED MODE 2.1 MAIN MENU 2.2 NOW PLAYING 2.3 PLAYLISTS 2.4 MUSIC MIXERS 2.5 SCHEDULES 2.6 SPECIAL TRACKS 3.1 SETTINGS 4.0 FAQ 4.1 How do I play music instantly? 4.2 How do I lock the unit? 4.3 How do I add a single track to what s playing? 4.4 How do I create my own playlist? 4.5 How do I add a new music mix? 4.6 How do I edit a music mix? 4.7 How do I rename a music mix? 4.8 How do I add a new schedule?

3 1.1 BASIC MODE - MAIN MENU OVERVIEW The basic mode main menu is a simplified easy to use front end screen which presents the most used functionality. The following chapter will explain each of the pages which subsets the basic mode main menu. Lock - The lock button locks the unit and prevents any functionality Settings - Will take the unit into service mode. Advanced Mode - Switches the main menu for the advanced main

4 1.2 BASIC MODE - NEW RELEASES OVERVIEW New releases will display the 40 latest released tracks that the BGM has. They are displayed in alphabetical order and can be scrolled through using the scroll bar on the right hand side. Selecting is as easy as pressing each track you wish to play and when finished press the Play Selections button down the bottom right of the screen. This will launch the Now Playing screen and will instantly start playing.

5 1.3 BASIC MODE - SPECIAL TRACKS OVERVIEW Special Tracks are 8 instantly playable tracks that can be used to interrupt anything that is currently playing. This is useful for special occasions and celebrations. You can select which songs are on this page by going into service mode and the special tracks section. To use it simply press the desired track and it will instantly start playing.

6 1.4 BASIC MODE - SEARCH TRACKS OVERVIEW Search tracks is a simple way of searching through the entire catalogue of music on the BGM. Type in the artist name or track title and the dynamic search will narrow the results with each press. Often only part of the search text is required to find the track that you are looking for. Once youve found the tracks you wish to play, press them and then hit play. This will then launch the Now Playing screen.

7 1.5 BASIC MODE - BROWSE ARTIST OVERVIEW Browse Artist allows you to see all the artists that exist on the BGM, by pressing on the image of the artist will display all the tracks by that artist in the right window. Select the tracks you wish to play, then either select another artist to make more selections or hit play. Should you wish to Select All or Un Select all then hit the relevant button.

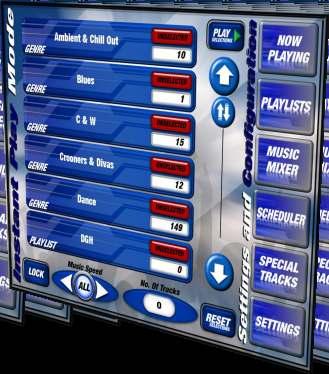
8 1.6 BASIC MODE - GENRES OVERVIEW The Genre screen displays all the musical categories that are on the BGM. Selections can be made by pressing on the relevant genre buttons. You can also define the speed of the music by using the music speed scroller at the bottom of the screen. Note each time you adjust the speed of the music the amount of tracks in each genre button and any selections made will change. The total amount of tracks in your selection will be displayed in the bottom left hand corner. You can also reset all the selections by pressing the reset selections button.

9 1.7 BASIC MODE - FAVOURITE PLAYLISTS OVERVIEW The Favourite Playlist screen allows you to see all the playlists that have been setup on the BGM. To select them simply press one or more of the desired playlists and hit play You can also define the speed of the music by using the music speed scroller at the bottom of the screen. Note each time you adjust the speed of the music the amount of tracks in each playlist button and any selections made will change. The total amount of tracks in your selection will be displayed in the bottom left hand corner. You can also reset all the selections by pressing the reset selections
10 ADVANCED MODE - MAIN MENU 2.1 The Main Menu, is the central screen where all features and functions can be accessed from. This module will focus on explaining how it works. By default out the box the unit will automatically play music randomly from its database. This is not configured and will play any track from any genre. This is the Main Menu and will be the first screen that you will see after the unit has powered on. The screen is divided into 2 sections. On the left you have the Instant Play Mode and on the right the Settings and Configuration represented by 6 navigation buttons. INSTANT PLAY MODE Instant Play Mode is a very easy way of selecting music quickly and instantly. The large buttons down the middle of the screen are the collections of music on the unit. Out the box there will be a list of all the Genres by default, and as you make your own Playlists and Music Mixes they will appear here too. As you make multiple selections it will estimate the total number of tracks selected, shown bottom centre of the screen. This is a Music Collection button By pressing this button you would be selecting the entire Dance genre. The number represents how many tracks are contained within that collection.

11 2.2 ADVANCED MODE - NOW PLAYING OVERVIEW The Now Playing screen is the control centre of the BGM system; here you control your music as it s playing. In the middle of the screen you have your list of music, along the bottom you have all the play controls that directly control the tracks. You can also add music tracks on the fly without interrupting the current queue of music. Please refer to the picture below for function information about each of the buttons. The # Tracks shows the number of tracks in the current music queue. The BGM button will return the unit to scheduled play. NOW PLAYING This shows the current track, and artist info, plus artist image. This is the area which shows the track listing. From here you can see what s playing, what s next and what was last. The songs play in number order. A/V stands for Audio or Video These are the play control buttons. From left to right. 1. Repeat - will repeat the list once complete 2. Volume - Only functions with an amp 3. Previous - Will select the previous track 4. Stop - This will stop music 5. Play - This will play selected track 6. Next - This will skip to the next track 7. Mute - This will mute the output 8. Shuffle - This will mix up the entire list 9. Delete - This will remove the track
12 ADVANCED MODE - PLAYLISTS 2.3 Definition - A collection of music selected track by track, saved and given a name. (e.g John s Favourite Songs ) Playlists is accessed by selecting Playlists from the Main Menu. You will be presented with the screen below. This is where you will see all the Playlists that have been made. There is no limit on how many Playlists can be made. At this point you have 5 options: NEW Displays a screen to create a new Playlist COPY Copies the selected Playlist (the selected Playlist will always be highlighted in Yellow). EDIT Displays a screen so you can edit the name of the selected playlist and then the tracks in that Playlist. RENAME Allows the name of an existing Playlist to be changed. DEL Deletes the selected Playlist

13 ADVANCED MODE - MUSIC MIX SELECTOR 2.4 Definition: A collection of varied types of music which have been grouped by Artist, Genre & Year When the Mucic Mixer button is selected from the main BGM screen - the following screen appears: This button appears on every menu section and sub-menus on the BGM and will return you to the previous screen. In this instance it will return you to the BGM main screen The Up and Down arrows will allow you to scroll through the list of music mixes 1 at a time. If there are more than 10 music mixes in the list a slider control appears which allows you to scroll through the list quicker as you drag it up or down. All the Music Mixes are displayed in a table. Each mix is given an ID number and name. The last column on the table displays the number of tracks in that given Music Mix. The list of Music Mixes in the table will always be arranged in ascending order by ID and Alphabetically by name. Any new Music Mixes created will be automatically incremented after the last ID number. The 5 buttons at the bottom of the page perform the same functions as the buttons located on the Playlists screen. The COPY and DELETE buttons will copy or delete any selected playlist. Make sure you are certain you want to delete any music mix as your music selections will be deleted!
14 ADVANCED MODE - SCHEDULE SELECTOR 2.5 Definition: A collection of set schedules which include Playlists and/or Music Mixes to be played at a given date and time When the Scheduler button is selected from the main BGM screen - the screen below will be displayed. The Up and Down arrows can be used to scroll the list and when there are more than 10 Schedules in the list a Slider control appears. The ID is generated automatically when a new schedule is created The table is sorted alphabetically by Name. the names can always be edited without fear of losing the music As with most of the main screens, the standard NEW, EDIT, RENAME and DELETE buttons are displayed to allow you to add or amend a current schedule. However there is a SHOW button which will display the date and time each schedule in the list will commence. It does not have any functionality - you will have to edit a specific schedule to arrive at the screen to alter the date and time of each schedule

15 When you click the SHOW button, any schedules you have created will appear on the screen below. It is designed to give you an indication of what schedules are being played on a specific date and time. If you are happy with the schedules as they are you can click the FINISH button to return you the main schedule screen 2.5 The CLR (clear) button clears the entire row of set schedule for that day The Padlock symbol on the BPM blocks indicate that an existing schedule is allocated to run on that date and time. If you have to overwrite this, the only way you can do so is by pressing the CLR button There are 4 main types of BPM (Beats Per Minute) categories that the BGM uses. These are ALL, SLOW, MED, FAST. Each category contains a group of BPM s. The ALL category contains all the BPM s from The SLOW category contains BPM s from The MED category contains BPM s from and the FAST category contains BPM s from These numbers can be altered in the settings section of the BGM. You can press a corresponding BPM category to insert the BPM blocks for that type of BPM on a specific date and time when you edit or create a schedule. The current selected BPM category will have a green indicator within its button. Each time you press a different BPM category button you will see the indicator change to green to show you that you are currently inserting BPM blocks for this schedule when editing or creating a schedule.
16 ADVANCED MODE - SPECIAL TRACKS 2.6 Definition - A small number of tracks pre selected in service mode which can be quickly selected for a special event. e.g Happy Birthday, A Wedding Song, Football Song Special Tracks are accessed by pressing the Special Track Button on the main menu. Once loaded you will be presented with 8 Tracks. By pressing the desired track it will immediately interrupt both scheduled music and instant play music and start playing. Once complete, the music will continue as it previously was.


17 SERVICE MODE CONTENTS 3.1 Main Menu 3.2 Touchscreen Calibration 3.3 Update Content 3.4 Special Tracks 3.5 Play Settings 3.6 Scrolling Message 3.7 Track Lockouts 3.8 Category Lockouts 3.9 BPM Settings 3.10 Admin Settings

18 SETTINGS 3.1 Definition - The service mode section is a submenu which includes all the system settings, updates and lockout information and allows for many changes that fundamentally effect how the unit works. WARNING - Before you enter into the Settings section be aware that it will stop any music playing: this is to allow any changes to take effect. The first thing to make a note of is the UNIT ID: this code is unique to that unit and allows it to be registered. WARNING - No unit will function unregistered Each of the buttons will now be explained in turn.
19 3.2 CONFIGURE TOUCHSCREEN Definition - To configure the screen to make it more accurate. 1. Press Settings, and press Yes to this will stop the music. Continue? 2. Press The TOUCHSCREEN CALIBRATION button in the top left. 3. It will then prompt you to touch the screen in 9 places, one after the other, indicated by 4. Press CONFIRM The Screen is now calibrated.

20 UPDATE CONTENT 3.3 Definition - How the unit is updated, either via USB Storage device or CD / DVD Ensure the USB storage device is entered into the USB slot or ensure the CD / DVD is entered into the optical drive thats located on the right hand side of the unit. Press the appropriate button, either CD / DVD or USB and the blue area above will report back the status of the update. The update log will show previous updates and the dates they were applied.

21 SPECIAL TRACKS 3.4 Definition - How to select the 8 tracks that are available in the special tracks section on the main menu. Special tracks are selected by using the keyboard to search for track names or artist names. Type in the part of the track name or artist name and the results will automatically narrow. Once you have found your track, select it by pressing it. It will then highlight. The buttons on the right hand side allow you to sort by track or artist, also allow you to toggle between viewing all the tracks and only those selected. Information You can only have 8 special tracks, once all 8 are selected you will need to unselect some before further selections can be made. Press the respective button either CD / DVD or USB and the blue area above will report back the status of the update. The update log will show previous updates and the dates they were applied.

22 PLAY SETTINGS 3.5 Definition - How to set the volume levels of the system. Information The Volume Levels, Maximum Volume Levels, Bass, and Treble values are only applicable to units with built in amplifiers. Volume Levels control the master volume of those zones. Master Volume Levels cap how high the volume can be turned up. Bass and Treble merely adjust those levels respectively Amp Output toggles between Mono And Stereo AVC will automatically adjust volume track to track AUX mode will allow the aux mode to be off or idle. To test how these settings are effected there is a PLAY TEST TRACK at the top left of the page, this will play a random track from the database. Click Save when complete.

23 SCROLLING MESSAGE 3.6 Definition - How to edit the scolling message that appears on video output displays Use the QWERTY keyboard to enter the message you wish to display on the video units. This will not display on the main unit display itself. Click Save when complete.

24 TRACK LOCKOUTS 3.7 Definition: To lock out specific tracks from the BGM music database e.g. if certain tracks contain foul or abusive language. If you wish to lock specific tracks from the database of music that is stored in the BGM, press the TRACK LOCKOUTS button in the Settings screen. The screen below will be displayed. It contains a scroll and slider control to browse through the tracks and also contains a touchscreen QWERTY keyboard to search for specific track names or artists. To lock tracks, simply browse to a track you wish to be locked and press it in the table. It will highlight in RED. Once you are happy with you selections you press the EXIT button which will save the changes and return you to the main Settings screen. Unlocking a track is the reverse of locking a track. Or if you wish to unlock all the tracks you have selected you can simply press the UNLOCK ALL button.

25 CATEGORY LOCKOUTS 3.8 Definition: To lock out specific genres from the BGM music database e.g. to lock out all Easy Listen songs if the venue does not require this. If you wish to lock specific genres from the database of music that is stored in the BGM you press the CATEGORY LOCKOUTS button in the Settings screen. The screen below will be displayed. It contains a scroll and slider control to browse through the genres. To lock a genre, simply browse to a genre you wish to be locked and press it in the table. It will highlight in RED. Once you are happy with you selections you press the EXIT button which will save the changes and return you to the main Settings screen. NOTE: Any genre you lock will remove ALL the tracks allocated to that genre. To unlock a genre is the reverse of locking a genre. Or if you wish to unlock all the genres you have selected you can simply press the UNLOCK ALL button.

26 BPM SETTINGS 3.9 Definition: To setup and configure which tracks are grouped in the three main BPM categories e.g. to to make all tracks with a BPM over 130 (such as dance music) to be put in the FAST category. The BPM settings you see when you first enter this screen are the DEFAULT settings. You can alter the numbers if you wish in the three categories by using the numerical keypad provided for you at the bottom of the screen. To alter any of the BPM settings press one of the 2 numbered boxes in a BPM category. This will display a RED border around the box. Then simply do the following: 1. Press the Yellow CLEAR button on the numerical keypad to delete the number currently in the box. 2. Enter a number of your choice in the empty box using the numerical keypad 3. Press the SAVE button to save your changes and return you back to the Settings screen. IMPORTANT NOTICE: If you alter one box in one BPM category, you have to alter ALL the boxes is EVERY category so that no discrepancies appear and so that they follow a logical order. So you have to repeat steps 1 AND 2 until ALL the boxes have been altered BEFORE you press the SAVE button.

27 ADMIN SETTINGS - Operators Only 3.10 Definition: To control advanced settings in the BGM music database. Requires authentication - for operators ONLY If you wish to control master settings in the BGM you have to press the ADMIN SETTINGS button in the Settings screen. This will present you with a screen with a touchscreen QWERTY keyboard and a box to enter the password. You will need to enter ADMIN for the password and then press the LOGIN button. This will display the screen as displayed below. Here you are presented with 5 main buttons (MANUAL ACTIVATION, PRE PAY ACTIVATION, CHANGE BOX TYPE, UPDATE CONTENT and MASTER RESET) and a numerical keypad. Each button you press will display 2 boxes, with 1 containing a number and the other one left blank for a number to be entered using the numerical keypad. This number can only be obtained by calling NSM Music before you proceed. Once you receive this number you press the SUBMIT button to proceed further.

28 HOW DO I PLAY MUSIC INSTANTLY? 1. Press the music collection buttons of your choice, the unselected light will change to SELECTED. Press one or more as required Select music speed using the arrows at the bottom left of the screen. 3. Press Play Selections. The NOW PLAYING screen will now load with your selections, the music will start playing immediately from a shuffled list of tracks selected. This will override any scheduled music. HOW DO I LOCK THE UNIT? 1. Press on the lock button in the bottom left of this screen, the unit will then lock. 2. To unlock the unit type in the unlock code and the unit will return to working order WARNING The override code is 1234 this code must not be disclosed to unauthorised personnel as it cannot be changed or modified.
29 HOW DO I ADD A SINGLE TRACK TO WHAT S PLAYING? Press on ADD TRACKS button in the top right hand corner. 2. Type in the name of the track or artist, touch on all the tracks you wish to enter into the list 3. Click Save when done. 4. The music in the Now Playing screen will continue, but the added tracks will appear at the bottom of the list. 5. Select the track and click play, the previous track will fade out and new track will play. * Information * The search screen uses intelligent filtering technology. As you type the search will automatically change to only include what you have typed in. Often only part (any part) of the track name or artist name is sufficient to find the result you need.


30 HOW DO I CREATE MY OWN PLAYLIST? Press the Playlists Button on the Main Menu 2. Press the New Button 3. Enter the Playlists name e.g My Party Tunes 4. Press Save 5. Use the search to find your tracks, press the track and it will highlight green. (Press CLR to reset and continue searching) 6. Click Save when complete. 7. Return to the Main Menu to instantly play it or can be used later in the schedule section. MAKE SELECT PLAY

31 4.4 HOW DO I ADD A NEW MUSIC MIX? 1. Press the NEW button in the Music Mix Selector screen 2. Type in a name of your choice using the touchscreen QWERTY keyboard 3. Press the SAVE button 4. Select the music you want to add to the music mix by pressing on the artists in the table provided (each artist selected will be highlighted in green. Or you can click the Genres/Years buttons to add music by that category or by clicking the SELECT ALL button which will add all the tracks in whatever category you have currently selected (i.e. Artists/Genres/Years) 5. Type in a search field of your choice if you wish to search for particular Artists/Genres/Years using the touchscreen QWERTY keyboard 6. Press the SAVE button
32 HOW DO I EDIT A MUSIC MIX? Select the music mix you wish to edit by pressing it to highlight it in green or by using the Up and Down arrows 2. Press the EDIT button in the Music Mix Selector screen 3. You can add or delete any music from this mix either by Artist/Genre/Year by simply going to your choice of category and select/deselecting the items you wish by pressing on the item in the list is to either highlight it in green to mark it as selected, or pressing a current highlighted item to mark it as deselected. There is also a REMOVE ALL button which will deselect all items in the list. If you do not want to Add/Delete music from the music mix go to Press the SAVE button HOW DO I RENAME A MUSIC MIX? 1. Select the Music Mix you wish to rename by pressing it to highlight it in yellow or by using the Up and Down arrows 2. Press the RENAME button in the Music Mix Selector screen 3. You can now alter the name of the music mix to whatever you wish using the touchscreen QWERTY keyboard 4. Press the SAVE button


33 HOW DO I ADD A NEW SCHEDULE? Press the NEW button in the Schedule Selector screen 2. Type in a name of your choice using the touchscreen QWERTY keyboard 3. Press the SAVE button 4. Select the Playlists and/or Music mixers you want to add to the music mix by clicking on the individual Playlists and Mixers in the 2 tables provided (each playlist or mixer selected will be highlighted in yellow. 5. Press the NEXT button 6. Using the BPM category buttons at the bottom insert the BPM blocks of your choice by pressing in the blank fields to allow the playing of certain tracks within that BPM range to commence playing at a given time on a specific day 7. Press FINISH. Your new schedule is now set to commence playing as you have set CREATE SELECT SCHEDULE
MUSIC SYSTEMS OF THE FUTURE. apollo. apollo. icon
 MUSIC SYSTEMS OF THE FUTURE apollo icon USER apollo MANUAL icon apollo apollo Jukebox User Manual Table of Contents USER INTERFACE 1.0 Main Menu... 1 1.1 Search...2 1.2 Artists... 6 1.3 Charts... 8 1.4
Decisionmark is the service provider of analog and digital TV off-air cable and satellite channel list.
 Disclaimer Trademarks Legal Notice Copyright Control4 makes no representations or warranties with respect to this publication, and specifically disclaims any express or implied warranties of merchantability
UNDOK. End-User Manual. Android remote control application. End-User Manual
 Android remote control application Contents 1 Introduction... 3 2 Getting Started... 4 2.1 Network Connection Setup... 4 3 How to... 5 4 Operation... 6 4.1 Navigation Menu options:... 6 5 My Home... 7
and close the various Traktor Panels. Setup: click on the setup icon to open the setup dialog. Close: clicking this icon will close TRAKTOR DJ Studio.
 Welcome... TRAKTOR DJ Studio 2 Quick Reference...to TRAKTOR DJ Studio 2, the latest and most advanced version of the software that changed the way DJs think about computers. We ve introduced a number of
Garageband Basics. What is GarageBand?
 Garageband Basics What is GarageBand? GarageBand puts a complete music studio on your computer, so you can make your own music to share with the world. You can create songs, ringtones, podcasts, and other
Use_cases_English.qxd :51 Pagina 1. Use cases
 Use_cases_English.qxd 20-10-2005 16:51 Pagina 1 Media Center MCP9350i Use cases Use_cases_English.qxd 20-10-2005 16:51 Pagina 2 Online help: www.p4c.philips.com For interactive help, downloads and frequently
Section EE - 1. Service Console. - Service Console Map - Navigating the Service Console
 Section Service Console - Service Console Map - Navigating the Service Console EE - 1 Service Console Programming and Auditing the Ecast system is accomplished via its Touchscreen. To access the Service
UNDOK. End-User Manual. ios remote control application. End-User Manual
 ios remote control application Contents 1 Introduction... 3 2 Getting Started... 4 2.1 Network Connection Setup... 4 2.2 Navigating around the App... 4 3 How to... 5 4 My Home... 6 4.1 My Home... 6 4.2
TRAKTOR DJ Studio 2 Quick Reference. Welcome... The TRAKTOR Panels
 Welcome... TRAKTOR DJ Studio 2 Quick Reference...to TRAKTOR DJ Studio 2, the latest and most advanced version of the software that changed the way DJs think about computers. We ve introduced a number of
Getting Started Movies MediaPlayer is required to use Maestro for movies. Note: Live Search: Main Movie Menu List / Cover View: Sort:
 Maestro QuickStart Guide Getting Started Open your mobile device s web browser and browse to your ReQuest server IP address. The first time you visit this URL, Maestro will display a pop up with instructions
Airtime Streaming Server Programming Handbook
 Airtime Streaming Server Programming Handbook 27 May 2017 - Version 2.0 The Peach City Radio Airtime Server is a computer running a Linux operating system (Ubuntu 12.04 LTS). The physical computer is currently
djay 2 for iphone - Quick Start Guide
 djay 2 for iphone - Quick Start Guide BPM (1) Settings (3) Info (5) Load Song (2) Record (4) Waveform view (6) Key (7) Speed Slider (9) Tools (11) (1) BPM Field - After the song has been analyzed, the
M2DIS. User Manual.
 M2DIS User Manual www.audac.eu 2 Index Introduction 4 Caution servicing 4 User interface 5 Login screen 5 Main screen 6 Output settings 8 Test signals 10 Sound settings 11 Settings screen 12 Input Configuration
Helium Streamer for ios Version 2.0 User Manual
 Helium Streamer for ios Version 2.0 User Manual Page 2 2011 Imploded Software AB V2.0 Contents Overview... 5 Features... 5 Set-Up... 7 Requirements... 7 Helium Music Manager Options... 7 Helium Streamer
MANUAL DE INICIO RÁPIDO ESPAÑOL ( ) GUIDE D UTILISATION RAPIDE FRANÇAIS ( ) MANUALE RAPIDO DI UTILIZZAZIONE ITALIANO ( )
 GUIDE D UTILISATION RAPIDE FRANÇAIS ( ) MANUALE RAPIDO DI UTILIZZAZIONE ITALIANO ( )") QUICKSTART GUIDE ENGLISH ( 3 11 ) MANUAL DE INICIO RÁPIDO ESPAÑOL ( 12 20 ) GUIDE D UTILISATION RAPIDE FRANÇAIS ( 21 29 ) MANUALE RAPIDO DI UTILIZZAZIONE ITALIANO ( 30 38 ) KURZANLEITUNG DEUTSCH ( 39 47
QUICKSTART GUIDE ENGLISH ( 3 11 ) MANUAL DE INICIO RÁPIDO ESPAÑOL ( 12 20 ) GUIDE D UTILISATION RAPIDE FRANÇAIS ( 21 29 ) MANUALE RAPIDO DI UTILIZZAZIONE ITALIANO ( 30 38 ) KURZANLEITUNG DEUTSCH ( 39 47
OPEL INSIGNIA Infotainment Manual
 OPEL INSIGNIA Infotainment Manual Contents Touch R700 IntelliLink / Navi 900 IntelliLink... 5 R300 Color / R400 Color... 87 Touch R700 IntelliLink / Navi 900 IntelliLink Introduction... 6 Basic operation...
Using the AMX Landmark Interface
 ReQuest Interface Guide #4A Using the AMX Landmark Interface Version: 2.1.0 Last Modified: 03/04/03 Added 1.8.1 commands 11/05/02 Initial Version Page 1/6 Introduction: Working closely with AMX we have
version 7.6 user manual
 version 7.6 user manual 2 Copyright JAVS 1981-2014 Table of Contents Introduction... 4 Getting Started... 5 Login... 5 JAVS Publisher 7 Overview... 6 Search Tool Overview... 7 Search Tool-Detailed Operation...
Professional Jukebox Software
 Professional Jukebox Software Exclusively distributed by Contents Security devices Page 3 The Load program Page 4 Music encryption Page 5 Splash screen Page 6 Main screen Page 7 Button Mode Page 8 Selecting
ASTRA Infotainment Manual
 ASTRA Infotainment Manual Contents Navi 900 IntelliLink... 5 R 4.0 IntelliLink... 89 R300 BT... 131 Phone holder... 161 Navi 900 IntelliLink Introduction... 6 Basic operation... 15 Radio... 32 CD Player...
IP4 - Running reports
 To assist with tracking and monitoring HRIS recruitment and personnel, reports can be run from Discoverer Plus. This guide covers the following process steps: Logging in... 2 What s changed? Changed reference
USER MANUAL Table of Contents Slide 00 of 66
 USER MANUAL 1.5 www.dgflick.com Table of Contents Slide 00 of 66 Table of Contents Table of Contents... 1 1.0. Getting Started... 2 1.1. What is Video Xpress Suite?... 3 1.2. System Requirements to Run
IPTV Middleware Remote Control & DVR User Guide
 IPTV Middleware Remote Control & DVR User Guide Version 12 The information presented in this document is written for the default settings of the system. The IPTV Middleware Remote Control & DVR User Guide
Remote Control & PVR User Guide Version 12
 Remote Control & PVR User Guide Version 12 Some features described in this guide may not be available depending on the setup of your system. If you have any questions, contact WTC Technical Support at
VERSION 1.0 SERATO DJ 1.0 MANUAL
 SERATO DJ 1.0 SOFTWARE MANUAL 1 Contents 7 Introduction 7 Hardware 7 Minimum System Requirements 7 Software Installation 8 Getting Started 8 Starting the Software 9 Software Overview 12 Using The Tool
OPEL Insignia Infotainment Manual
 OPEL Insignia Infotainment Manual Contents Touch R700 / Navi 900... 5 R300 Color / R400 Color... 103 Touch R700 / Navi 900 Introduction... 6 Basic operation... 14 Radio... 47 CD Player... 52 External
DIGITAL TV USER GUIDE
 DIGITAL TV USER GUIDE Television Version 12.0 Page 1 662-1100 www.gondtc.com Table of Contents The Remote... 5 Backlit... 5 Big Button... 6 Playback Controls... 7 What s on TV?... 8 OK Button (Now Playing)...
ADDITIONAL CAM POWER REVERSE CAM POWER BLUETOOTH MUTE AUDIO + IN AUDIO - IN 12V ACC OUTPUT 12V CONSTANT GROUND
 UNPLUG ORIGINAL RADIO CONNECTORS THEN PLUG IN HERE PLUG AND PLAY NO OTHER CONNECTIONS ARE NECESSARY USE HANDSFREE KIT MICROPHONE IPOD/IPHONE/ITOUCH/IPAD CONNECTION USB INPUT ADD YOUR BLUETOOTH HANDSFREE
About Wireless Audio Device Manager (WADM)
") About Wireless Audio Device Manager (WADM) With Wireless Audio Device Manager (WADM),you can: Connect Philips Wireless Music Center/Station and your PC through the supplied Ethernet cable (see the manual
About Wireless Audio Device Manager (WADM) With Wireless Audio Device Manager (WADM),you can: Connect Philips Wireless Music Center/Station and your PC through the supplied Ethernet cable (see the manual
Contents. Sat-Nav for DJs 3. Setting up Pioneer s rekordbox software 4. RekordKrate First Run 5. Active Playlists 5. Setting The Search Filter 6
 1 2 Contents Introduction Sat-Nav for DJs 3 Set Up Setting up Pioneer s rekordbox software 4 Using RekordKrate RekordKrate First Run 5 Active Playlists 5 Setting The Search Filter 6 Tracks Window 7 Sorting
Helium Remote for ios Version 1.4 User Manual
 Helium Remote for ios Version 1.4 User Manual Page 2 2011 Imploded Software AB V1.4 Contents Overview... 4 Features... 4 Set-Up... 5 Requirements... 5 Helium Music Manager Options... 5 Helium Remote Settings...
Remote Control & DVR User Guide
 Remote Control & DVR User Guide Page 1 Contents Introduction... 4 The Remote... 5 Playback Controls... 6 What s on TV?... 7 Using the OK Button (Now Playing)... 7 Using the INFO Button... 8 Using the Channel
Contents. Overview...3. Song Editor Clip Editor Browser and Rytmik Cloud Keyboard Controls Support Information...
 User Manual Contents Overview...3 Song Editor...4 Clip Library...4 Song Playback...4 Tracks...5 Export...5 Clip Editor...6 Note Sequence...6 Instrument...7 Instrument Effects...7 Tempo Setting...8 Other
CONTENTS. Login View Toggle Full Screen Camera Views Switching Cameras...2. Picture in Picture (PIP)... 3
... 3") Training Guide CONTENTS Login View... 1 Toggle Full Screen... 1 Camera Views... 2 Switching Cameras...2 Picture in Picture (PIP)... 3 Picture and Picture (PAP)... 4 POS Transactions on Live Camera Feed...
Training Guide CONTENTS Login View... 1 Toggle Full Screen... 1 Camera Views... 2 Switching Cameras...2 Picture in Picture (PIP)... 3 Picture and Picture (PAP)... 4 POS Transactions on Live Camera Feed...
Quick Start Guide - Contents. Opening Word Locating Big Lottery Fund Templates The Word 2013 Screen... 3
 Quick Start Guide - Contents Opening Word... 1 Locating Big Lottery Fund Templates... 2 The Word 2013 Screen... 3 Things You Might Be Looking For... 4 What s New On The Ribbon... 5 The Quick Access Toolbar...
Quick Start Guide CU920. Use your phone for more than just talking Touch Screen AT&T Mobile TV Music Player 2.0 Megapixel Camera Video Share
 CU920 Quick Start Guide Use your phone for more than just talking Touch Screen AT&T Mobile TV Music Player 2.0 Megapixel Camera Video Share See User Manual for Spanish Instructions Additional charges may
MADI-X8 User Guide MADI-X8. This is SSL.
 www.solidstatelogic.com MADI-X8 User Guide MADI-X8. This is SSL. Passwords: Initially, the MADI-X8 passwords are: admin level: user level: admin user (all lower case) Document History October 2010 82BSXM01A
ipod classic User Guide
 ipod classic User Guide Contents 4 Chapter 1: ipod classic Basics 5 ipod classic at a glance 5 Using ipod classic controls 7 Disabling ipod classic controls 8 Using ipod classic menus 8 Adding or removing
SERATO DJ MANUAL
 SERATO DJ 1.9.10 SOFTWARE MANUAL 1 Contents 7 Introduction 7 Hardware 7 Minimum System Requirements 8 Software Installation 8 Installation (Mac OSX) 8 Installation (PC) 9 Activation 9 Subscriptions 9 Try
Apple idvd 11 Tutorial
 Apple idvd 11 Tutorial GETTING STARTED idvd is a program that allows you to create a DVD with menus and graphics of a professionally made commercial disc to play on your home DVD player. To Begin your
WIGHTMAN TV Remote Control & DVR User Guide
 WIGHTMAN TV Remote Control & DVR User Guide Version 13 The information presented in this document is written for the default settings of the system. The IPTV Middleware Remote Control & DVR User Guide
MPC4-D s IKIS Automation Installation Manual Version December 06, 2005
 MPC4-D s IKIS Automation Installation Manual Version 1.04 December 06, 2005 2 IKIS User s Manual Table of Contents 1.0 Getting Started (Starting IKIS) 2.0 Quick Reference Guide 3.0 Graphical User Interface
Contents. Navi 900 IntelliLink... 5 R 4.0 IntelliLink... 85
 Contents Navi 900 IntelliLink... 5 R 4.0 IntelliLink... 85 Navi 900 IntelliLink Introduction... 6 Basic operation... 14 Radio... 31 External devices... 36 Navigation... 42 Speech recognition... 61 Phone...
New to the Mac? Then start with this lesson to learn the basics.
 Mac 101: Mac essentials If you're brand new to the world of computers and are just starting to get up and running, relax using a Mac is simple. This lesson introduces you to the basic principles of interacting
Set Up Guide MOOD: Connect Set Up Listen. USING YOUR MOOD PROFUSION io FOR SIMPLE PERSONALIZED UNLIMITED ECONOMICAL LICENSED
 Set Up Guide USING YOUR MOOD PROFUSION io FOR 1 2 3 Connect Set Up Listen MOOD: SIMPLE PERSONALIZED UNLIMITED ECONOMICAL LICENSED Welcome Thank you for choosing Mood to provide your Pandora listening experience
For VW new Polo: Slide the 1 switch to the ON position or DOWN position. : Slide the 1 switch to the OFF position or UP position.
 This interface can be worked for two kinds of car: For VW new Polo: Slide the 1 switch to the ON position or DOWN position. For VW Golf 7 : Slide the 1 switch to the OFF position or UP position. Starting
IPTV Middleware Remote Control & DVR User Guide. Version 4.0
 IPTV Middleware Remote Control & DVR User Guide Version 4.0 The information presented in this document is written for the default settings of the system. The IPTV Middleware Remote Control & DVR User Guide
Figure 3.3 Click+drag the right edge of the main Live screen to access Help View.
 Figure 3.3 Click+drag the right edge of the main Live screen to access Help View. things basic. Use the Session View to construct your musical ideas by importing and recording audio and MIDI into tracks.
imagine the possibilities
 Multiroom App Guide imagine the possibilities Thank you for purchasing this Samsung speaker. To receive more complete service, please register your speaker at www.samsung.com/register -- This Multiroom
Emote 1.0 Users Manual
 Emote 1.0 Users Manual Part No: 141318 Rev A 2018 Eventide Inc., One Alsan Way, Little Ferry, NJ, 07643 USA 1 Table of Contents Introduction... 3 Downloading the Installer... 3 Making Sure Your H9000 Hardware
A new clients guide to: Activating a new Studio 3.0 Account Creating a Photo Album Starting a Project Submitting a Project Publishing Tips
 Getting Started With Heritage Makers A Guide to the Heritage Studio 3.0 Drag and Drop Publishing System presented by Heritage Makers A new clients guide to: Activating a new Studio 3.0 Account Creating
Intelligent Security & Fire Ltd
 Copyright 2007-2009 Cortex Global Table of contents: Introduction... 3 1. Login... 3 1.1 Advanced login options... 4 2. Preview... 5 2.1 Main menu... 6 2.2 Camera list... 6 2.3 Main display... 6 2.4 Maps...
Welcome to Selector2GO Help
 Welcome to Selector2GO Help World Headquarters 445 Hamilton Avenue, 7th floor, White Plains, New York 10601 United States of America Support: +1 914 259 4900 support@rcsworks.com 2004-2018. All Rights
FUSION MS-NRX300 ENGLISH
 FUSION MS-NRX300 MARINE WIRED REMOTE OWNER S MANUAL ENGLISH FUSIONENTERTAINMENT.COM 2016 2017 Garmin Ltd. or its subsidiaries All rights reserved. Under the copyright laws, this manual may not be copied,
dcs Vivaldi HD App Network Control Point Application User Manual Software Release 1.0.x March 2014
 dcs Vivaldi HD App Network Control Point Application User Manual Software Release 1.0.x Data Conversion Systems Ltd. 2014 Price UK 8.00 / Euro 12.00 All rights reserved. No part of this publication may
IPTV Middleware Remote Control & DVR User Guide. Version 5.0
 IPTV Middleware Remote Control & DVR User Guide Version 5.0 The information presented in this document is written for the default settings of the system. The IPTV Middleware Remote Control & DVR User Guide
Important Note: Not all features described in this guide are available to WCTA customers.
 Important Note: Not all features described in this guide are available to WCTA customers. IPTV Middleware Remote Control & DVR User Guide Version 6.0 The information presented in this document is written
DJ INTRO MANUAL
 SERATO DJ INTRO 1.3.0 SOFTWARE MANUAL Contents 5 INTRODUCTION 6 HARDWARE 6 Minimum System Requirements 7 SOFTWARE INSTALLATION 7 Installation (Mac OSX) 7 Installation (PC) 8 GETTING STARTED 8 Starting
QUICKSTART GUIDE ENGLISH ( 3 12 ) INICIO RÁPIDO ESPAÑOL ( ) UTILISATION SIMPLIFIÉ FRANÇAIS ( ) KURZANLEITUNG DEUTSCH ( )
 INICIO RÁPIDO ESPAÑOL ( ) UTILISATION SIMPLIFIÉ FRANÇAIS ( ) KURZANLEITUNG DEUTSCH ( )") QUICKSTART GUIDE ENGLISH ( 3 12 ) INICIO RÁPIDO ESPAÑOL ( 13 22 ) UTILISATION SIMPLIFIÉ FRANÇAIS ( 23 22 ) KURZANLEITUNG DEUTSCH ( 33 42 ) GUIDA RAPIDA ITALIANO ( 43 52 ) BOX CONTENTS Please make sure
QUICKSTART GUIDE ENGLISH ( 3 12 ) INICIO RÁPIDO ESPAÑOL ( 13 22 ) UTILISATION SIMPLIFIÉ FRANÇAIS ( 23 22 ) KURZANLEITUNG DEUTSCH ( 33 42 ) GUIDA RAPIDA ITALIANO ( 43 52 ) BOX CONTENTS Please make sure
Bosch Recording Station. Operating Manual
 Bosch Recording Station en Operating Manual Bosch Recording Station Table of Contents en 3 Table of Contents 1 Program Start/Login 5 1.1 Starting the Program 5 1.2 Logging on to the System 5 1.2.1 Logging
Mac OS X. Starting Up. The Menulets/ Menu Extras. The Menu Bar. The Apple Menu. The Disk/Hard Drive. The Dock. The Finder
 Mac OS X Starting Up How to Turn on the Mac Press the button on the lower left hand corner in the back of the monitor (if you have the newest model) or press the power button on the CPU box if you have
Quantum 3.2 Software. User Manual
 Quantum 3.2 Software User Manual Contents Quantum Vue 1 Main Dashboard 2 How much energy am I saving system-wide? Do I have any system alerts? How can I view/edit scheduled events? Energy 4 How do I view
SSC32 SERVO SEQUENCER GUIDE
 SSC32 SERVO SEQUENCER GUIDE C O N T E N T S CHAPTER 1 1 Overview 3 INTRODUCTION... 4 USER INTERFACE... 5 CONNECTING... 6 CONNECTING VIA SERIAL CABLE...6 SERVO CONTROLS... 7 SERVO CONFIGURATION...8 CONTROL
Unpacking... 3 Getting Started... 3 Tour of the Remote... 4 Hard keys...4 Interactive LCD screen...5
 UNO Owners Manual Contents Unpacking... 3 Getting Started... 3 Tour of the Remote... 4 Hard keys...4 Interactive LCD screen...5 Home Screen... 6 Devices... 6 What is Quick Power?...6 Activities... 7 Setting
MP3/MP4 Digital Player User s Manual
 MP3/MP4 Digital Player User s Manual Caution Note:...2 Caution Note:...2 Please Note:...2 Components:...3 Functions:...3 Introduction to your MP3/MP4 Digital Player...4 Automatic Shutdown...5 Setting the
BOX CONTENTS REGISTRATION QUICK SETUP CONNECTION DIAGRAM POWER HOUSE AMP MIXER
 QUICKSTART GUIDE BOX CONTENTS MP10USB Power cable Stereo RCA cable Quickstart Guide Safety & Warranty Information Booklet REGISTRATION Please go to http://www.numark.com to register your MP10USB. Registering
] GUIDE D UTILISATION (FRANÇAIS) ::::: ] MANUALE DI RIFERIMENTO (ITALIANO) ::::: ] BEDIENUNGSANLEITUNG (DEUTSCH) :::::
![] GUIDE D UTILISATION (FRANÇAIS) ::::: ] MANUALE DI RIFERIMENTO (ITALIANO) ::::: ] BEDIENUNGSANLEITUNG (DEUTSCH) :::::](/thumbs/90/101370781.jpg "] GUIDE D UTILISATION (FRANÇAIS) ::::: ] MANUALE DI RIFERIMENTO (ITALIANO) ::::: ] BEDIENUNGSANLEITUNG (DEUTSCH) :::::") ] REFERENCE MANUAL (ENGLISH) ::::: 2 42 ] MANUAL DE REFERENCIA (ESPAÑOL) ::::: 43 85 ] GUIDE D UTILISATION (FRANÇAIS) ::::: 86 136 ] MANUALE DI RIFERIMENTO (ITALIANO) ::::: 137 179 ] BEDIENUNGSANLEITUNG
] REFERENCE MANUAL (ENGLISH) ::::: 2 42 ] MANUAL DE REFERENCIA (ESPAÑOL) ::::: 43 85 ] GUIDE D UTILISATION (FRANÇAIS) ::::: 86 136 ] MANUALE DI RIFERIMENTO (ITALIANO) ::::: 137 179 ] BEDIENUNGSANLEITUNG
Intuition ReAct Content Manager PC Application
 Intuition ReAct Content Manager PC Application PRODUCT MANUAL MTI P/N 063-1200-00 Rev A Release Date: May 2011 Software Version: v1.9.0.0 2011 MTI. All Rights Reserved. 1050 NW 229th Avenue, Hillsboro,
IPTV Middleware Remote Control & DVR User Guide
 IPTV Middleware Remote Control & DVR User Guide Version 12 The information presented in this document is written for the default settings of the system. The IPTV Middleware Remote Control & DVR User Guide
Maxwell RSC Tablet PC Configuration Manual for use with Windows 8 Operating System
 Maxwell RSC Tablet PC Configuration Manual for use with Windows 8 Operating System TM537 1/18 Table of Contents 1 Maxwell RSC Instrument and Tablet PC...1 2 Glossary...3 3 Adjusting Volume Settings...5
TECHNOLOGIES. P2jr Pico Projector. User Guide
 aaxa TECHNOLOGIES P2jr Pico Projector User Guide Caution! WARNING: Please use this product as instructed. Misuse may cause injury or death. DO NOT use while driving DO NOT expose to water or wet surfaces.
RSE Overview > > > > > Fig. 1 RSE features (5 seat vehicle shown) > > > >
 > > > >") RSE Overview The Rear Seat Entertainment system (RSE) allows passengers in the rear compartment to access multimedia content and basic Infotainment functions using the Touch Screen Remote (TSR) or a suitable
RSE Overview The Rear Seat Entertainment system (RSE) allows passengers in the rear compartment to access multimedia content and basic Infotainment functions using the Touch Screen Remote (TSR) or a suitable
Chapter 3. Using the System CHANGING CHANNELS USING THE MENUS OPENING THE MENUS CLOSING THE MENUS MENU OPTIONS
 CHANGING CHANNELS There are three basic ways to change channels while watching a program: Press the remote control UP or DOWN ARROW button to get to the desired channel. Use the remote control number pad
uremote User Manual Version 1.3 Jan 2017
 Version 1.3 Table of Contents Table of Contents... 2 1 Introduction... 3 1.1. Operating Systems and Installations:... 3 1.2. How to Use this Manual Effectively... 4 2 WHERE TO USE UREMOTE... 4 2.1. Remote
Remote Control & Cloud DVR User Guide
 Remote Control & Cloud DVR User Guide IPTV Middleware Version 12 Page 1 Contents The Remote... 4 Playback Controls... 5 What s on TV?... 6 Using the OK Button (Now Playing)... 6 Using the INFO or Browse
USER GUIDE Remote Control and DVR
 USER GUIDE Remote Control and DVR Version 12 Venture Communications is an equal opportunity provider and employer. IPTV Middleware Version 12 - Page 1 Table of Contents Introduction...4 The Remote...5
GarageBand 3 Getting Started Includes a complete tour of the GarageBand window, plus step-by-step lessons on working with GarageBand
 GarageBand 3 Getting Started Includes a complete tour of the GarageBand window, plus step-by-step lessons on working with GarageBand 1 Contents Chapter 1 7 Welcome to GarageBand 8 What s New in GarageBand
OUTLOOK TIPS AND TRICKS GINI COURTER, M.B.A., TRIAD CONSULTING
 1 OUTLOOK TIPS AND TRICKS GINI COURTER, M.B.A., TRIAD CONSULTING DISPLAYING THE ADVANCED TOOLBAR (2007) The Advanced toolbar isn t advanced; it s just the commands that they couldn t fit on the Standard
Avigilon Control Center Web Client User Guide
 Avigilon Control Center Web Client User Guide Version: 4.12 Standard PDF-WEBCLIENT-S-E-Rev2 Copyright 2013 Avigilon. All rights reserved. The information presented is subject to change without notice.
Quick Start Guide. Use your phone for more than just talking. Mobile Messaging with QWERTY Keyboard. AT&T Mobile Music.
 Quick Start Guide Use your phone for more than just talking. Mobile Messaging with QWERTY board AT&T Mobile Music AT&T Navigator Video Share and CV Actual color of the phone may vary. See User Manual for
Installation Manual for. 22HFL30x7x/10. 26HFL30x7x/10. 32HFL30x7x/10. 42HFL30x7x/10
 Philips Hospitality TV Installation Manual for 22HFL30x7x/10 26HFL30x7x/10 32HFL30x7x/10 42HFL30x7x/10 Version 1.1 Contents 1. Requirements before starting the installation... 2 2. Find out the state of
Secure Guard Central Management System
 Speco Technologies, Inc. Secure Guard Central Management System Usage Information Contents 1 Overview... 7 2 Installation... 7 2.1 System Requirements... 7 2.2 System Installation... 7 2.3 Command Line
User Manual. Eventide Inc. April 15, 2008
 MediaWorks TM User Manual Eventide Inc. April 15, 2008 New to MediaWorks? A handy Quick Start guide will help you install the software and begin monitoring your Eventide recorders right away. Familiar
SoundBridge Helpful Tips. For customers who want to use Roku SoundBridge with the SlimServer music server
 SoundBridge Helpful Tips For customers who want to use Roku SoundBridge with the SlimServer music server Revision 1.2 October 25, 2004 1 I. Setting Up Your SlimServer-based Network Choosing Your Software
Digital TV. Quick Reference Guide
 Digital TV Quick Reference Guide CONTENTS Remote Control... 4 Playback Controls.... 4 What s on TV?.... 6 Using the OK Button.... 6 Using the Info Button.... 6 Using the Browse Button.... 7 Using the Channel
Breeze III FB201N User Manual
 Breeze III FB201N User Manual Table of Contents Getting Started... 3 Insert the SIM Card and Battery... 3 Insert the Media Card... 4 Keys and Parts... 5 Basics... 6 Display Indicators... 6 Home Screen...
BGB2 ibridge Bay Instruction Manual
 BGB2 ibridge Bay Instruction Manual Safety Precautions 1. Read these instructions. 2. Keep these instructions. 3. Heed all warnings. 4. Follow all instructions. 5. Do not use this apparatus near water.
Freegal Music Help Guide. April 2018
 Freegal Music Help Guide April 2018 0 Table of Contents Welcome 2 What is Freegal Music? 2 Freegal Music Offerings to Patrons 2 Accessing Freegal Music 3 Logging into Freegal Music 4 Freegal Music Website
Amplifier Description & Operation
 Amplifier Description & Operation Amplifier Description Indicator LEDs Signal Inputs & Outputs Amplifier Feature Description Setting the Amplifier D - 1 E-Rock-PV Figure 1D - Rock-Ola / Peavey Sound System
Chapter 1 4 ipod Basics 5 ipod at a Glance 5 Using ipod Controls 7 Disabling ipod Controls 8 Using ipod Menus 9 Connecting and Disconnecting ipod
 ipod Features Guide 2 Contents Chapter 1 4 ipod Basics 5 ipod at a Glance 5 Using ipod Controls 7 Disabling ipod Controls 8 Using ipod Menus 9 Connecting and Disconnecting ipod Chapter 2 14 Music Features
Parish . User Manual
 Parish Email User Manual Table of Contents LOGGING IN TO PARISH EMAIL... 3 GETTING STARTED... 3 GENERAL OVERVIEW OF THE USER INTERFACE... 3 TERMINATE THE SESSION... 4 EMAIL... 4 MESSAGES LIST... 4 Open
Harmony Touch User Guide
 Harmony Touch User Guide Version 5 (2013-11-14) Harmony Touch User Guide Table of Contents About this Manual... 6 Terms used in this manual... 6 At a Glance... 6 Features... 6 Know your Harmony Touch...
USING GARAGE BAND. Creating a new project
 USING GARAGE BAND Creating a new project 1. Open GarageBand by clicking on the guitar icon on the dock. 2. In the project chooser select the type of project you want to create. Choose any instrument or
How to use this manual
 How to use this manual This document has been designed to provide you with complete product knowledge. You can resize the document window, print this document, access linked web sites and get information
User Guide Release 6.5.1, v. 1.2
 User Guide Release 6.5.1, v. 1.2 Introduction The set-top box is your gateway to Skitter TV s interactive television services including TV Guide Favorite Channels DVR Parental Controls Caller ID This manual
Instant Teambuilding, v3.0. User s Manual. Instant Teambuilding 2012, 2017 Kagan Publishing
 , v3.0 User s Manual 2012, 2017 Kagan Publishing www.kaganonline.com 1.800.933.2667 2 Table of Contents GAME OVERVIEW... 3 Setup... 3 Spotlight Introduction... 4 Timed RoundRobin Introduction... 4 GENERAL
Hosted IP Phone System Administrator Portal Reference Manual (Polycom)
") Hosted IP Phone System Administrator Portal Reference Manual (Polycom) POPP.com, Inc. All rights reserved. Service 24x7 @ 763-797-7900 or 1-800-234-POPP Page 1 of 50 9/27/18 Table of Contents 1 Introduction
Hosted IP Phone System Administrator Portal Reference Manual (Polycom) POPP.com, Inc. All rights reserved. Service 24x7 @ 763-797-7900 or 1-800-234-POPP Page 1 of 50 9/27/18 Table of Contents 1 Introduction
Registration Register/Purchase Teacher Click Register Request Validation Submit Back
 Teacher manual Table of contents Table of contents... 1 Registration... 2 Login / Logout... 3 Login... 3 Logout... 3 Trouble signing in / forget your password?... 3 Creating a course... 4 Hiding and viewing
Title: Sonos module V1.8 December 14, 2009
 Introduction The Sonos ProntoScript module is a plug & play solution for Pronto that allows you to browse through and play music from a Sonos system, including the search function and cover art. How does
Microsoft Windows 10. Quick Reference. Watsonia Publishing 47 Greenaway Street Bulleen VIC 3105 Australia
 Watsonia Publishing 47 Greenaway Street Bulleen VIC 3105 Australia www.watsoniapublishing.com info@watsoniapublishing.com Quick Reference Course Code: INF1440 Table of Contents Chapter 1: Starting With