NETWORK PRODUCTS. Owner s Manual for using the ipad -App
|
|
|
- Drusilla Shields
- 6 years ago
- Views:
Transcription


1 NETWORK PRODUCTS Owner s Manual for using the ipad -App
2 Dear Music Enthusiast, Congratulations on your selection and thank you for your trust. You have chosen a product that combines absolute fidelity and uncompromising quality with technical innovation and maximum flexibility. Please read through these operating instructions at least once before initially installing the product so you can fully benefit from all the functions of this truly high-fidelity device. Should any of your questions remain unanswered, please contact your specialist dealer or us directly. Talk to us about any special requests you may have even if they seem exceptional. We love accepting technically feasible challenges. We wish you many hours of high-fidelity listening. The Burmester Team ipad is a registered trademark of Apple Inc., registered in the USA and in other countries. All named trademarks are the property of the respective legal owners. Using third-party services (Internet radio, music streaming services) with the Musiccenter or Network Player is subject to any terms of use of those suppliers, as well as technical requirements for the user such as Internet access and service availability over which Burmester Audiosysteme GmbH has no control. Music selections shown in this user guide are examples and are not part of the accessories of the Musiccenter. App version / Software version 2.51
3 Table of Content What is the BurmesterMC App? How to use this manual? Getting started with the ipad How to use the standby (locking) mode?...7 Where do I find detailed instructions for the ipad?....8 How to install the App on the ipad?... 9 How to connect the ipad to my Burmester device? How to start and use the App? How to select and play Audio Sources? How to play a CD? (111, 151 only) How to play music stored in the Musiccenter? (111, 151 only) Overview of the Player menu...17 Create, edit and save playlists How to load a saved playlist...20 How to play a playlist...20 Searching saved content and loading saved playlists. 21 How to copy (rip) a CD into Internal Memory? (111,151 only) How to display information about the current song? How to listen to Internet radio? How to play music from a USB storage device? How to play music from devices in my home network? How to play music from a music streaming service? How to copy content from a player to a USB storage device? (111, 151 only) How to use the ipad as a music player? How to use other devices as content servers? How to select a digital signal source (111 only)? Owner's Manual for using the ipad -App 3
4 How to select an analog signal source (111 only)? How to change settings and query device information? Power: Switching off and server mode...36 Info: Information about the device Copyright /About: Copyright and App-Version...37 Usage: Information about internal memory and data base (111, 151 only) Display: Changing the screen brightness (111,151 only)...38 Messages: Online Services: Managing music download services and music streaming services...39 Audio Profiles: Select an audio profile Troubleshooting-What to do if something does not work? No direct Wi-Fi connection to the Musiccenter...42 Activating the ipad from sleep mode
5 What is the BurmesterMC App? What is the BurmesterMC App? BurmesterMC is an application developed by Burmester to enable the Apple ipad to operate the Burmester audio devices Network Player and Musiccenter. The App may be downloaded free of charge from the Apple App Store and installed on the ipad. The App offers a multitude of operating functions in clear and easy to navigate menus: Selecting devices over which to playback content from the Burmester component. Selecting content for playback from the Musiccenter or the UPnP /DLNA server (for example from a CD, from internal memory, from a music streaming service or Internet radio). Creating and playing playlists. Easy scrolling through the music library stored in the Musiccenter. Changing device settings. How to use this manual? This manual describes how to operate the Burmester Network Player and the Musiccenter models with an Apple ipad tablet (referred to simply as ipad ) and the BurmesterMC App. The user interface of the App is the same for all models. Therefore, we refer generically to the Burmester device. Differences occur, however, in the extent of the available functions in the various devices. In case of deviation we refer to the model it applies to (for example 111 only). Basic functions of the ipad are explained only to the extent that they are necessary to operate the Burmester devices. For more detailed instructions on how to use and customize your ipad please consult the ipad user guide issued by Apple. How to do that is explained in the chapter "Where do I find detailed instructions for the ipad?" on page 8. Owner's Manual for using the ipad -App 5
.")
6 Getting started with the ipad Getting started with the ipad 1. Remove the ipad from the box. 2. Read the user guide supplied by Apple. 1 On/Off, Standby Long press turns the ipad on or off. Short Press switches the ipad to Standby mode. Use the Standby mode. ª ª It allows you to quickly turn on the ipad. 2 Volume 3 Home-Button Return to the Desktop view (shown in the image to the right). 4 Docking connection Connect a USB cable to charge your ipad or to connect it to a computer (Your customized Multi-Touch display may look different.) 3. If necessary charge the ipad battery with the supplied USB power adapter. Connect the Lightning connector (5) via the USB cable with the power adapter and plug the adapter into an AC. 4. Switch the ipad on by pressing the sleep/wake button (1) for a few seconds until the Apple logo appears. 6
7 Getting started with the ipad How to use the standby (locking) mode? We recommend leaving the ipad in standby mode when not in use. When needed it will be available immediately without waiting for the operating system to load. The ipad will automatically return to standby when not in use or when the Sleep/Wake button (1) is pressed briefly. How to switch the ipad to standby mode: Briefly press the On/Off, Standby button (1). How to switch the ipad out of standby mode: 1. Briefly press the On/Off, Standby button (1) or the Home button (3). 2. Drag the slider that appears onscreen to the right. ª ª The Multi-Touch display appears. For more detailed instructions on how to use and customize your ipad please consult the user guide issued by Apple. The following chapter provides a few pointers. Owner's Manual for using the ipad -App 7

8 GeTTInG STArTeD WITH THe IPAD Where do I find detailed instructions for the ipad? A detailed description of all features and functions of the ipad can be found in the User Guide issued by Apple. You can open this guide online on the ipad or download it as PDF from the Internet. How to open it online: 3 The ipad must be connected to the Internet. 1. Open the Safari web browser. 2. Open the bookmarks menu and tap on the ipad User Guide. ª The User Guide opens. How to download the User Guide as PDF file: You can download the PDF file on the ipad or on a computer. To access a PDF file on a computer you need a PDF reader, for a Windows PC for example a free Adobe Reader. 3 ipad or computer are connected to the Internet. 1. Open the page and choose ipad User Guide. 2. If using a computer select a folder to save the PDF. 3. After the PDF has been saved you can access it at any time or print it out. Starting with operating system version ios 8 you may download the guide directly via the ibooks App to your ipad. 8


9 How to install the App on the ipad? How to install the App on the ipad? In case of the Musiccenter 111 an ipad with the App already installed is supplied. Therefore, you don t need to install the App. However, this description may be useful if you install the App on a new ipad, for example. To use the BurmesterMC App it must first be downloaded from the Apple App Store and installed on the ipad. The download is free (unless you have to pay for using the Internet). This is how you install the App: Installation of the App requires at least the operating system ios 6.1 and an Apple ipad Connect your ipad to the Internet. Instructions for establishing an Internet connection con be found in the ipad User Guide. 2. Tap on he Multi-Touch display the Icon App Store. Multi-Touch display for supplied ipad View of a customized ipad ª ª This will connect you directly with the App Store. Even though the App is free you still need an account with the App Store to download and install it. If you don t have an account you will be asked to open one. Simply follow the instructions. Owner's Manual for using the ipad -App 9

10 How to install the App on the ipad? 3. Type BurmesterMC into the search box on the right top. ª ª The choices for Burmester are displayed. 4. Tap one of the displayed icons (any of them open the App). ª ª The App icon appears. 5. Tap DOWNLOAD. 6. Tap INSTALL. ª ª The App is downloaded and installed. Right after installation you can start the App by tapping OPEN in the App Store. On your Multi-Touch display you start the App by tapping the icon 10
11 How to connect the ipad to my Burmester device? How to connect the ipad to my Burmester device? In order to operate your Burmester device with the ipad you have to establish a Wi-Fi connection between the devices. If you have problems establishing a network connection you may consult your Burmester dealer. He will be glad to assist you with the installation. There are two ways to establish a Wi-Fi connection: 1. The Burmester device is connected to your home network via an Ethernet cable or over Wi-Fi. 33 You have a Wi-Fi home network. 33 The Burmester device has to be set to Standard operating mode (this is the factory default setting). Information on how to select the correct operating mode can be found in the Owner s Manual of your Burmester device. In this operating mode the ipad receives a network ID from your network. This offers the alternative to select your router or the Burmester device as an access point. The selection of the access point does not influence the operational possibilities with the ipad. This type of connection may be necessary if you are too far away from your Burmester device and get signal only via your Wi-Fi router. Instructions how to connect your Burmester device with a network can be found in the respective Owner s Manual. If the Burmester device has been connected to the Wi-Fi network via a router it is no longer possible to establish a direct Wi-Fi connection between ipad and Burmester device. In that case a Wi-Fi connection between the two need a router. 2. The Burmester device is not connected to your home network (111 and 151 only). 33 In this case the Burmester device has to be set to stand-alone operating mode. Information on how to change the operating mode can be found in the Owner s Manual of your Burmester device. In this instance the Burmester device functions as access point and enables the ipad to connect directly to it. Owner's Manual for using the ipad -App 11

12 How to connect the ipad to my Burmester device? Here s how to establish a Wi-Fi connection between ipad and Burmester device: 33 The Burmester device has been switched on and the Wi-Fi antennas have been installed (see the respective Owner s Manual). 1. Open the ipad home screen and tap the icon Settings. ª ª The menu for changing settings pops up. 2. In the left menu column tap on Wi-Fi. ª ª The available Wi-Fi networks pop up. 3. Tap on the name of your Burmester device if you intend to connect it directly with the ipad. Type in your password. The standard password from the factory is Burmester plus the model number of your device with no space in between, such as Burmester111, Burmester151 or Burmester150. ª ª A blue checkmark denotes the selected connection. Alternately, tap the name of your router if your Burmester device has been connected to your home network and you wish to select your router as access point. Type in the Wi-Fi password of your router. ª ª A blue checkmark denotes the selected connection. 4. Close the menu and start the App as described below. Please keep in mind that Bluetooth and Wi-Fi connections use the same frequencies and thus may interfere with each other. 12
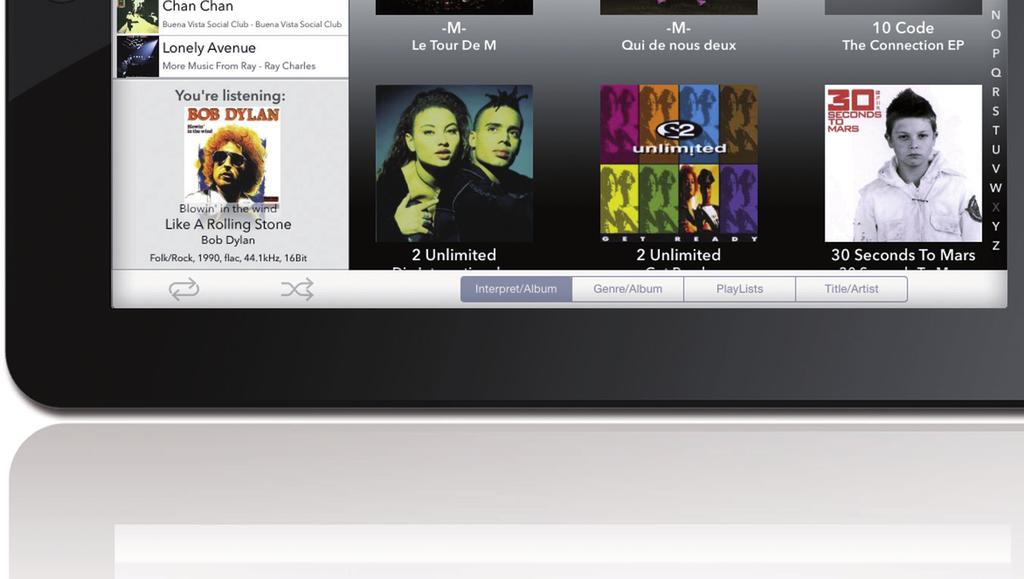
13 How to start and use the App? How to start and use the App? On the Multi-Touch display tap the icon BurmesterMC. ª ª The start screen opens. The screen is divided into four sections: Menu window, control bar at the top, main screen and the bottom bar. The menu window 1 Devices Tap to select the device for playing back content. If the ipad has been connected to your Burmester device via Wi-Fi you can select the ipad or your Burmester component as playback source. Information on how to use the ipad as playback source can be found on page 33. In case the Burmster device has been connected to a network together with other devices on the same network these will also displayed in the menu. 1 After selecting a playback device the following functions are displayed: INPUTS Here you select the desired audio source. The selection of an audio source will be explained in detail in the following chapters. SETTINGS For each playback device you may select an individual audio source and start them independently. Tap here to open the menu for changing the device settings. Instructions on how to change device settings can be found on page 36 Owner's Manual for using the ipad -App 13
14 How to start and use the App? The main screen 2 After selecting an audio source the main screen displays depending on the selected Audio source the available content, in case of the Player: albums, playlists and songs. 4 Changing the view Tap the icons Selecting an album Double-tap the album., to switch between Cover Flow and Grid View. 2 The bottom bar 3 Here you can select one of the available filters. 3 Detailed descriptions of all options can be found in the following chapters. In case of Internet radio the bottom bar acquires a different function (See also "How to listen to Internet radio?" on page 28). The status bar 4 Playback volume Tap the volume button and drag it right or left to change playback volume. Playback control CAUTION! You could skip to maximum volume accidentally by touching the volume button. This could damage your audio system. Instructions on how to limit the output volume can be found under "Audio Profiles: Select an audio profile" on page 40. With these buttons you can control playback. These functions are (with the exception of Internet radio) identical to those on the Burmester device. Search box Type in search words to look for content in your Player. ª ª Tapping the search box brings up filters in the bar above the keyboard to limit the search. Tapping Other brings up additional search criteria such as Orchestra, Composer or Genre. (The selection is dependent upon the selected search filter). 14
15 How to select and play Audio Sources? How to select and play Audio Sources? These audio sources are available for playback in the INPUTS menu: Source Function Where to find the instructions? Audio CD (111, 151 only) Player Internet radio USB Player Digital Inputs (111 only) Analog Inputs (111 only) Musiccenter, UPnP /DLNAserver Music Streaming Service Audio CD plays music from CDs. Player plays music stored in your device. It requires that stored music is available from the device. The menu Internet radio is for listening to radio stations over the Internet. For this function the Musiccenter must be connected to the Internet. USB Player plays back music from a USB device (this item appears only when a USB device is recognized by the Musiccenter). Serves to play back content from connected digital audio sources such as CD player or DAB tuner. Serves to play back content from connected analog audio sources. Serves to listen to content from Musiccenters and UPnP/DLNA servers Service to stream music over an existing Internet connection. Information on playing music from CDs can be found in the chapter "How to play a CD? (111, 151 only)" on page 16. Information on how to store music in your device can be found in the chapter "How to play music stored in the Musiccenter? (111, 151 only)" on page 16. Information on how to play back stored music can be found in the chapter "How to play music stored in the Musiccenter? (111, 151 only)" on page 16. Information on how to listen to Internet radio can be found in the chapter "How to listen to Internet radio?" on page 28. Information on how to play back music from a USB device can be found in the chapter "How to play music from a USB storage device?" on page 29. Information on how to play music from digital audio sources can be found in chapter "How to select a digital signal source (111 only)?" on page 34. Information on how to play music from analog audio sources can be found in the chapter "How to select an analog signal source (111 only)?" on page 35. Information on how to play music from other Musiccenters and UPnP/DLNA servers can be found in the chapter "How to play music from devices in my home network?" on page 30. Information on how to play content from a music streaming service can be found in the chapter "How to play music from a music streaming service?" on page 31. Owner's Manual for using the ipad -App 15
16 How to play a CD? (111, 151 only) How to play a CD? (111, 151 only) 1. Insert a CD into the CD slot on the front panel. ª ª Insert the CD until you feel noticeable resistance. At that point it will be drawn in automatically. The CD is read and playback starts immediately. 2. Tap Audio CD in the main menu. ª ª The screen shows the content of the CD. 3. Use the control bar at the top of the screen to operate the CD-Player. 4. Tap the button Eject CD to eject the CD. How to play music stored in the Musiccenter? (111, 151 only) Before playing stored music you have to first import it into the Musiccenter. Information on how to do that can be found in the chapter "How to copy (rip) a CD into Internal Memory? (111,151 only)" on page 24. Playback of the stored music is controlled by the Player menu. For you to be able to test playback we have stored an album with songs from the music portal HIGHRESAUDIO ( on your Musiccenter. In case you have connected several Burmester devices to your network you may also use your Musiccenter or Network Player to access music on another connected Musiccenter and use its playlists. Detailed instructions can be found in the chapter "How to play music from devices in my home network?" on page

17 How to play music stored in the Musiccenter? (111, 151 only) Overview of the Player menu Tap on Player in the INPUTS menu. ª ª The Player menu pops up The menu has various display and select options. The options are described briefly here and explained in detail on the following pages. The example on top shows the Player menu after the first start with the album downloaded from HIGHRESAUDIO and the created playlist. The example below shows the Player menu with additional stored albums in grid view, active playlist and currently playing song. 1 Playlist: Before a song can be played back it has to be saved in the playback playlist. At the initial startup you will find the HIGHRESAUDIO playlist. The example below shows the screen with songs saved in the playlist and information about the currently playing song. 2 Currently playing song: As soon as a song starts playing this section displays information about the song and the album. 3 Main screen: Depending on the selected 4 filter this space displays the available albums or songs. Of course, this selection is dependent upon the content you have saved in internal memory. 4 Display filter: You have several options to filter stored music. After choosing one type of filter you have additional options to refine your selection. (see page 21). 5 Playback mode: You have the choice of Repeat (repeat the playlist) and Shuffle (play the playlist in random order) Owner's Manual for using the ipad -App 17


: 1.")
18 HoW To PlAy MUSIC SToreD In THe MUSICCenTer? (111, 151 only) Create, edit and save playlists To play back an album (or just a single song) you have to create a playback playlist first. The playback playlist is a compilation of any songs stored on your device. Single songs as well as complete albums can be saved to the playback playlist and organized in an order of your choice. But this list is only temporary and is lost when a new playlist is created. If you want to keep it you can save a playback playlist under a file name of your choice. Instructions on how to use these saved playlists can be found under "PlayLists load and edit saved playlists" on page 22. The process of saving songs in the playback playlist differs slightly in the various display filters. The following description is based on the display filter Artist /Album. Information on other display filters can be found under "Searching saved content and loading saved playlists" on page 21. How to create a playback playlist (using the example Artist /Album): 1. Double-tap the desired album cover. ª The cover is turned and the list of songs pops up. By tapping the i icon on the right upper side of the title bar you can obtain information about the artist (however, not all albums offer this feature). To preview a song before saving it: a. Tap on the song (not on the +-icon). ª Playback starts and stops automatically at the end of the song. b. To stop playback tap the song again. 2. Tap the + icon after the song title to save a single song; or tap the grey + icon in the title bar to save all songs. ª The selected songs are displayed in the playlist. You have now created a playback playlist and you may play it immediately (see page 20). But keep in mind that you have not yet saved the playlist. It will be lost if you create another playlist without saving the previous one first. 18


19 How to play music stored in the Musiccenter? (111, 151 only) How to edit and save a playlist: 33 You have created a playback playlist or loaded a saved playlist (see page 22). Tap the Edit item. ª ª The selection menu pops up. To move a song: 1. Tap on Move & Delete. ª ª All songs are marked with the icons and. 2. At the song you wish to move put your finger on the icon and drag the song to where you want it. 3. Tap Edit again to close the menu. To delete a song: 1. Click on Move & Delete. ª ª All songs are marked with the icons and. 2. Next to the song to be deleted tap the and then Delete. ª ª The song is deleted. Hint: Alternatively, without opening the Edit menu, you can also swipe over the song from right to left and tap the Delete button that appears. To delete the complete playlist: 1. Tap on Clear List. ª ª Clear List is marked with the icon. 2. Tap the icon and then the Delete button. ª ª The playlist is deleted. To save a playlist: 1. Tap the Save as button... ª ª A box to type in a name in opens. 2. Type in a name and tap the Save button. ª ª The playlist is saved and can be pulled up via the Playlists filter. (see also the chapter "PlayLists load and edit saved playlists" on page 22). Owner's Manual for using the ipad -App 19

20 How to play music stored in the Musiccenter? (111, 151 only) How to load a saved playlist Saved playlists are loaded with the Playlists filter. Instructions on pulling up and editing stored playlists are therefore found in the chapter "PlayLists load and edit saved playlists" on page 22. How to play a playlist 33 You have created a playback playlist (see page 18) or loaded a saved playlist (see page 22). Here s how to play the playlist: Tap the song you want to play first. If not all songs are displayed scroll up through the playlist. ª ª Playback starts. All songs on the playlist, starting with the first song selected, are played one after the other. After the last song has ended playback stops. How to use the Repeat function: Tap the icon at the bottom of the screen. ª ª After the last song in your playlist has ended playback starts again from the beginning. Tap the icon again to cancel the Repeat function. ª ª The remaining songs in your playlist will be played in sequence. After the last song has ended playback stops. How to use the Random function: Tap the icon at the bottom of the screen. ª ª All songs in your playlist are played back in random order. Playback stops after the last song has been played. Tapping the icon again will cancel the Random function. ª ª The remaining songs in your playlist will be played back in sequence. After the last song has ended playback will stop. You can also combine the Repeat and Random functions. All songs in your playlist will then be played in random order until all songs have been played once. After that random playback begins anew until it is stopped. 20
 Searching saved content and loading saved playlists The search buttons at the bottom of the screen allow you to display and sort saved content according to different categories.")
21 How to play music stored in the Musiccenter? (111, 151 only) Searching saved content and loading saved playlists The search buttons at the bottom of the screen allow you to display and sort saved content according to different categories. In this way you will find songs quickly and are able to transfer them to the playback playlist. Four search criteria are available: Artist /Album, Genre /Album, Playlists and Song /Artist. Artist /Album searching for artist The search button Artist /Album displays albums alphabetically according to artist. Tap on the icons In Cover Flow:, to switch between Cover Flow and Grid View. Swipe your finger horizontally over the covers to scroll through the albums. To jump directly to a certain letter tap a letter at the bottom of the screen. Letters without content appear in grey. In Grid View: Swipe your finger up or down over the covers. To jump directly to a certain letter tap a letter at the bottom of the screen. Letters without content appear in grey. Genre /Album searching genres The search button Genre /Album displays albums of the selected genre in alphabetical order. 1. Scroll through the available displayed genres in pop-up menu 1. ª ª The albums available in the selected genre are displayed immediately. Same as the search button Artist /Album you can switch the view between Cover Flow and Grid View (see above). 2. Scroll through the displayed albums or tap on a letter to jump directly to a certain location. 1 Owner's Manual for using the ipad -App 21

22 How to play music stored in the Musiccenter? (111, 151 only) PlayLists load and edit saved playlists The search button Playlists displays the saved playlists. It requires that at least one playlist has been saved. Information about creating and saving a playlist can be found in chapter "Create, edit and save playlists" on page 18. Scroll through the available playlists in the pop-up menu 1. ª ª All songs on the selected playlist are displayed. A saved playlist only brings up the songs included in it. To actually play the songs they have to be transferred to a playback playlist. Here s how you do that: 1. Tap the + button in the upper left corner. ª ª A menu pops up. 2. Select Add all Titles to add the songs of the selected playlist to the existing playback playlist. or Select Load Playlist to delete the existing playback playlist and replace it with the selected playlist. ª ª The box on top of the playback playlist shows the name of the selected playlist. How to delete individual songs from a saved playlist: Individual songs can only be deleted from a playback playlist and not directly from a saved playlist. In a second step you will then have to save the playlist again under the existing name. 1. Select a playlist and tap the + button top left. 2. Select Load Playlist to delete the existing playback playlist and to replace it with the songs of the selected playlist. 3. Delete one or several songs as desired (see "Create, edit and save playlists" on page 18). 4. Tap Edit (on top of the playlist) and select Save. ª ª The edited playlist will be saved under the existing name. How to delete a saved playlist: 1. Bring up the playlist you wish to delete. 2. Tap the trash can icon top right and confirm your selection by tapping Delete. ª ª The playlist is deleted. 1 22

23 How to play music stored in the Musiccenter? (111, 151 only) Song /Artist searching for song titles The search button Song /Artist displays all songs in alphabetical order. After the App has been started it may take some time until all songs are loaded into the list. The Icon _- next to the Title /Artist screen indicates the loading progress. Swipe your finger up or down over the list to scroll through songs. To jump directly to a certain letter tap on the letter at right border of the screen. Letters without saved content appear in grey. Here s how to save songs to a playlist: Tap the + button after the desired song. ª ª The song is saved in the playlist. Information on how to edit playlists can be found in the chapter "Create, edit and save playlists" on page 18. Owner's Manual for using the ipad -App 23
 To play back music with the player it is necessary to first save content in the Musiccenter.")

24 HoW To CoPy (rip) A CD InTo InTernAl MeMory? (111,151 only) How to copy (rip) a CD into Internal Memory? (111,151 only) To play back music with the player it is necessary to first save content in the Musiccenter. This can be done by importing (ripping) a CD or by directly importing files via a Web browser. (see the Owner s Manual on How to operate the Musiccenter via a Web-Browser ). Copying music from a data source to the internal memory of a computer is called ripping. After the CD has been analyzed its data is imported and supplemented with information on the album and artist and saved in internal memory in the FLAC audio format. How to rip a CD: 1. Insert the CD into the CD slot. ª When you feel noticeable resistance the CD is then automatically pulled in. The CD is read and playback starts immediately. 2. Tap on Audio CD in the main menu. ª The screen displays the content of the CD. 3. Tap the icon. ª The analyses starts. ª When the pertinent information on the album has been found you will be prompted to confirm the album. It is possible that you may have to choose between several related albums. Album information can only be downloaded via an existing Internet connection. Without it the album information (without cover art) will be retrieved from a local data base. 24


25 How to copy (rip) a CD into Internal Memory? (111,151 only) 4. After selecting an album the album itself and all the songs on it will be displayed. You now have the following options: a. Album cover: Click the i icon on the right lower corner of the cover and make a selection in the menu. Using Extended Search you can search for other hits on the Internet, possibly from other artists or albums. b. Album, Artist, Year: Tap the appropriate box and edit the information. Activate the function Match to all Tracks if you want to assign the name of the artist to all songs. c. Genre: Tap the Genre pad and select a genre from the menu list. d. Orchestra Information: Tap on...more orchestra tags and fill in the boxes as desired. e. Tracks: You can edit song and artist for each individual track. (if you have activated Match to all Tracks you can not change information about the artist). Tap on one of the boxes to manually change the information. f. Exclude songs from ripping: Tap on the respective switch next to the song to exclude it from ripping. 5. Tap on Start Ripping. ª ª A window opens for the selection of ripping quality. FAST: Use FAST for CDs which show no or few scratches. The CD is copied without measures to improve the sound quality. ACCURATE: Choose ACCURATE for CDs which are severely scratched. The read data are checked along to defined criteria and even the smallest imperfections are eliminated already during ripping. Of course, true to Burmester s creed, without adulterating the sound. Ripping using ACCURATE takes almost twice as long as with FAST. The approximate length of time is displayed in both cases. 6. Tap the desired option. Owner's Manual for using the ipad -App 25


26 How to copy (rip) a CD into Internal Memory? (111,151 only) ª ª Ripping starts. A moving bar shows the ripping progress for each song. If ACCURATE has been selected a star valuation indicates after the ripping process the quality of the original data: 5 stars indicate highest quality. After finalizing the process the album is permanently available on the device. You can subsequently play the album from the Player (see also "How to play music stored in the Musiccenter? (111, 151 only)" on page 16). 26


27 How to display information about the current song? How to display information about the current song? While a song is being played a box under the playlist shows information about the song and the album. Tap the small album cover below the playlist. ª ª A new page pops up. It displays the same information but much larger. Furthermore, you see: Remaining playing time and total playing time of the current song Buttons to control playback The "i" touch pad to call up information about the artist Particularly useful is the much bigger representation of the volume control. Under some circumstances its use in the Player menu can be somewhat random. The larger scale on the information page allows a much more precise volume setting. Tap the arrow button on the left top corner of the screen to close the information page. Owner's Manual for using the ipad -App 27

28 How to listen to Internet radio? How to listen to Internet radio? The operating mode Internet radio gives you access to a variety of radio stations which broadcast their program over the Internet. In this mode the Burmester device accesses a list of stations which has been created by Burmester and which is edited and updated on a regular basis. This minimizes the possibility of radio stations that are not available on the Internet or stations with very poor broadcasting quality. Listening to an Internet radio station is not different from listening to a song from the Player: You select one of the available stations, save it to the playback playlist and start playback. Here s how to listen to an Internet radio station: 1. In the main menu select Internet radio. 2. Select a country. 3. Select a genre. 4. Double-tap the desired station. ª ª The station cover turns. 5. Tap the + button to save the station to a playlist. 6. Tap in your playlist on the name of the station to start playback The operating mode Internet radio is not available in stand-alone mode or without an Internet connection. 28
 is as simple as playing back internal memory.")
29 How to play music from a USB storage device? How to play music from a USB storage device? Playing back music from a USB storage device (for example a USB stick) is as simple as playing back internal memory. It does not matter how the music has been organized on the USB device (for example in folders). Only with the Musiccenter it is also possible to transfer music from internal memory to a USB device. However, this requires the use of a Web browser. Detailed information on how to operate the Musiccenter via a Web browser can be found in the separate Owner s Manual User Guide for Operation via a Web browser. Here s how to play back music from a USB storage device: 1. Plug the USB device into the USB slot on the front panel (if available) or into one of the USB slots on the back panel. ª ª The LED USB Access on the front panel lights up green if the player recognizes playable content. ª ª The player changes to USB mode and the available content is displayed. 2. In the menu window tap a folder or additional folders (when present) until the desired song is displayed. ª ª Tapping on the arrow icon puts you one level back, tapping the folder icon next to the arrow icon displays the folder organization up to the selected folder 3. Tap the song to start playback. How to select another audio source: Starting from the current position tap < Back and then in the INPUTS menu on the desired audio source. How to change back from another audio source to the USB device: Tap the Burmester Player in the menu Devices and then tap USBPlayer in the INPUTS menu. Owner's Manual for using the ipad -App 29


30 HoW To PlAy MUSIC from DevICeS In My HoMe network? How to play music from devices in my home network? In this operating mode you can access music from other devices in your home network. Possible sources could be Burmester Musiccenter or UPnP / DNLA server in the network. How to access music on other Musiccenters in my home network: In the INPUTS menu tap on item with the following icon:. ª The Player menu pops up. Streaming music from a connected Musiccenter does not differ from playing back a song with the Player. Starting with Software Version 2.30 it is possible to save playlists on a connected Musiccenter (see also "How to play music stored in the Musiccenter? (111, 151 only)" on page 16). Here s how to access music from a UPnP /DLNA server on your home network: If a UPnP/DLNA server from another manufacturer has been connected to your home network the screen view of the Player may be slightly different. Navigation is done via a folder display. Depending on the manufacturer the available menu options may also differ somewhat. 1. In the INPUTS menu tap the displayed name of a UPnP/DLNA-Servers. 2. In the menu window tap a folder or further folders if necessary until the desired song is displayed. ª Tapping the arrow button puts you one level back. 3. Tap the + button to save the desired song in your playback list or tap the song directly (not the +button) to preview the song on your ipad. 4. Tap the grey + button in the top of the screen to save all songs. How to change the audio source: Starting from the current position tap < Back and then in the INPUTS menu on the desired audio source. How to change back to the UPnP /DLNA server from another audio source: In the menu Devices tap the Burmester device and then in the INPUTS menu the name of the UPnP /DLNA server. 30
31 How to play music from a music streaming service? How to play music from a music streaming service? Using an existing Internet connection you can stream high-resolution music from providers such as TIDAL. In this operating mode you can listen to audio any time you like. In contrast to downloads from download portals this audio data is played in real time on your device. On your command you can stop the data stream any time or start from the beginning. Here s how to access content from a music streaming service: 1. To save or edit the settings of a respective streaming service tap on your Burmester device in the menu Devices and then in the sub-menu Settings on the Online Services. 2. In the INPUTS menu tap on the music streaming service to be able to use it. The operation of the music streaming service has been fully integrated into the ipad -App. 3. The operation is similar to that of the Player. Detailed information on how to use TIDAL can be found in a separate user guide. Owner's Manual for using the ipad -App 31
 You can copy content stored in your Player onto a USB storage device.")
 into one of the available USB slots. ª ª As soon as the USB device has been recognized the LED USB ACCESS on the front panel lights up green. 2.")
32 How to copy content from a player to a USB storage device? (111, 151 only) How to copy content from a player to a USB storage device? (111, 151 only) You can copy content stored in your Player onto a USB storage device. This enables you to play the content in your car, for example, or over another USB-ready device ( You can only copy content from playlists). Here s how to copy content to a USB storage device: 1. Plug a USB device (for example a USB stick) into one of the available USB slots. ª ª As soon as the USB device has been recognized the LED USB ACCESS on the front panel lights up green. 2. Create a playlist with desired songs or open a saved playlist. 3. Tap Edit and then select Export to USB Choose the desired quality: High Quality: The data files are exported in high-resolution format (FLAC). This guarantees the highest sound quality. However, it uses a lot of memory. There is also the risk that a number of playback devices will not be able to read this data format. Standard: The data files are exported in the mp3 format. This data format needs much less memory space and can be read by all playback devices. ª ª After tapping one of the options the copying process begins. ª ª A pop-up window indicates the successful conclusion of the process. Content will be saved on the stick in the folder BurmesterSamples. A new export deletes all previously exported content. 5. To close the pop-up window tap Close. 6. Remove the USB device. ª ª You are now able to play the content over other USB-ready devices or over your Burmester device. You have to remove the USB device and plug it back in even if you want to use it immediately on the Musiccenter. This is necessary for the device to recognize the content. 32
 and you have the same functions available as with a Burmester device.")
33 How to use the ipad as a music player? How to use the ipad as a music player? The ipad itself can be used as a playback device. With the ipad you can access the same audio sources (for example Player, Internet radio, UPnP/DLNA server) and you have the same functions available as with a Burmester device. How to play content from the ipad : 1. Open the start screen (Devices). ª ª The ipad and the Burmester device are displayed. Depending on your environment other devices may also be displayed. 2. Select an audio source. ª ª The audio sources (for example Player, Internet radio) are displayed. 3. Select an audio source. The operation is identical to the Burmester devices: Information about the Player can be found in the chapter "How to play music stored in the Musiccenter? (111, 151 only)" on page 16. Information about Internet radio can be found in the chapter "How to listen to Internet radio?" on page Control the volume with the volume control top left on the screen or in the bigger display of the album information on the information screen (see also "How to display information about the current song?" on page 27). How to use other devices as content servers? Besides the ipad you can also use other devices such as network-ready TVs or radios as content servers. This requires that these devices as well as the Burmester Player have been connected to your home network. Information on how to connect these devices with your home network can be found in the Owner s Manuals of these devices. Information about the Burmester devices can be found in their manuals. To enable seamless operation among devices of different manufacturers on a network the Burmester components are certified for the UPnP and DLNA standards. A trouble-free operation can only be expected with other devices that conform to at least one of these standards. How to play content from another device: Select from the Devices menu the desired device. After that proceed the same way as playing back from the ipad. Owner's Manual for using the ipad -App 33

34 How to select a digital signal source (111 only)? How to select a digital signal source (111 only)? This function is only available with the Musiccenter 111. In the main menu select Digital Inputs. ª ª The screen for selecting and setting digital inputs pops up. How to select an input: Tap on the sliding switch of the desired input. ª ª The switch slides to ON. First, it is orange and then green when the input is activated. To select another input simply tap on the according sliding switch. The input selected before is automatically switched off. For each input you can type in a name and adjust the input level as well as phase and the sampling frequency. How to change the settings: 1. Select an input by tapping it. 2. Tap the box Name and type in a name. 3. Move the controller in the Gain window to the desired setting. This way you can level volume differences. 4. In the box Phase tap 0 Degrees or 180 Degrees to shift the phase. Select the setting which sounds better to you. 5. In the box SRC tap 96 khz or 192 khz for the desired sampling frequency. 34


35 How to select an analog signal source (111 only)? How to select an analog signal source (111 only)? This function is available only on the Musiccenter 111. In the main menu select Analog Inputs. ª ª The screen for selecting and setting analog inputs pops up. How to select an input: Tap the sliding switch of the desired input. ª ª The switch shows ON, first in orange and then in green when the input has been activated. To choose a different input just tap the according sliding switch. The input selected before will automatically be switched off. For each input you can individually select a name, the input volume and the phase. How to change the settings: 1. Tap the input to select it. 2. Tap the box Name and type in a name. 3. Drag the controller in the box Gain to the desired value. This way you can level volume differences. 4. Tap in the box Phase on 0 degrees or 180 degrees to shift the phase. Select the setting that sounds better to you. Owner's Manual for using the ipad -App 35

36 How to change settings and query device information? How to change settings and query device information? In the settings menu you may change some basic settings and query information about the system. When using the Web browser you can access additional settings and information about the device (see the separate user guide Instructions on operation via a Web browser ). In the main menu select Settings. ª ª The screen to change general settings pops up. Power: Switching off and server mode POWER STATE / Switch Power Tap on the sliding switch (left position: Off) to switch the device into standby mode. This also interrupts the Wi-Fi connection to the Burmester device. Using the ipad to switch a Burmester device on is not possible. Use the POWER switch on the device or on the remote control to switch a Burmester device on again. AUDIO UNIT / Server Mode (111, 151 only) Information about the Server Mode you will find in the Owner s Manual of the Musiccenter. Tap the switch (position right: ON) to switch the device into Server mode. In Server Mode the Wi-Fi connection to the Musiccenter stays active. You can use the ipad to switch it back into normal operation. UPTIME Displays the running time of the device: System Uptime: Running time since that last switch-on Total Uptime: Total running time 36


37 How to change settings and query device information? Info: Information about the device Upper Info block Name: Network name of the Burmester device To change the name tap the box and type in the desired name. Version: Software Version of the device Address: IP adress in the network Serialnumber: Serial number Memory Total: Total RAM capacity Free: Free RAM capacity Temperature System: System Temperature Harddrive: Harddrive Temperature Copyright /About: Copyright and App-Version This page shows the copyright information and the installed App version. Since ios 8 the App version can be controlled via the ipad in settings / BurmesterMC. There you can also select if a UPnP player should be displayed in the App or not. Owner's Manual for using the ipad -App 37
 Disc Usage Information about memory usage: Music: Memory used by music Free: free memory Data: Memory used by data System:")

38 How to change settings and query device information? Usage: Information about internal memory and data base (111, 151 only) Disc Usage Information about memory usage: Music: Memory used by music Free: free memory Data: Memory used by data System: reserved memory Total: memory capacity This information is also displayed as a chart. Database Information about the number of saved content: Artists: Number of artists Albums: Number of Albums Titles: Number of songs Playlists: Number of playlists Display: Changing the screen brightness (111,151 only) Display Allows setting the brightness of the screen. Tap a value to set the desired brightness. If the brightness is set to 0% the display lights up for a few seconds after an operational command and then goes dark again. LED-Frame (111 only) Allows setting the brightness of the illumination around the display frame of the Musiccenter. Tap a value to set the desired brightness. 38

39 How to change settings and query device information? Messages: This page displays messages sent by Burmester to your device, for example a notice about an available software update. Tapping the message brings up the full text. Deleting messages: Tap Clear Messages. This will also delete unread messages. Online Services: Managing music download services and music streaming services On this page you can register an account with a music download service or music Streaming service or sign into an existing account. Music download services (111, 151 only) Music download services are pay-per-use services to download music. As always, Burmester demands the very best sound quality and, therefore, enters into partnership only with providers of high-resolution music such as HIGHRESAUDIO. Having an account with a music download provider such as HIGHRESAUDIO means you can download purchased music directly onto your Musiccenter and play back immediately. Music streaming services Music streaming services are subscription services for streaming music over the internet. Enjoy any time high-resolution music on demand from providers such as TIDAL. Here you manage your user information for music streaming services and change the settings of your subscription. Owner's Manual for using the ipad -App 39

40 How to change settings and query device information? How to register an account with HIGHRESAUDIO: Tap on Create an Account and follow the instructions of the provider. How to sign in to an existing account: Type in your login information and tap Login. Audio Profiles: Select an audio profile Audio profiles let you adjust the maximum signal output level of your Burmester device. This gives you the option to adapt the output level to the sensitivity of your existing audio components and thus perfectly integrate the Burmester component into your existing audio system. 40
41 How to change settings and query device information? Which audio profile is right for me? When you connected the Burmester device to a power amplifier: When you connected the Burmester device to a preamplifier and you would like to use the volume control of the Burmester device: Select a suitable output level from the appropriate range: Select a profile from the range IS THE... CONNECTED TO A POWER AMPLIFIER? Select a profile from the range IS THE... CONNECTED TO ANOTHER PREAMPLIFIER?... with LOW output power... with MEDIUM output power... with HIGH output power... with VERY HIGH output power CAUTION Danger due to maximum volume Using the sliders for volume control may accidentally lead to sudden maximum volume setting. This may damage your hearing as well as your audio system. Especially at the settings HIGH and VERY HIGH increase volume levels only incrementally. If you connected your Burmester device to a preamplifier and would like to use the volume control of the Burmester component: Select FIX OUTPUT (NO VOLUME FUNCTION AND NO VOLUME CORRECTION) CAUTION Danger due to maximum output level In this profile the maximum output level is fixed. When connected to a power amplifier maximum output level could damage your hearing as well as your audio system. Select this profile only if your Burmester component is connected to a preamplifier. Owner's Manual for using the ipad -App 41
Short Operation Guide
 151 MUSICCENTER Short Operation Guide Dear Music Enthusiast, Congratulations on your selection and thank you for your trust. You have chosen a product that combines absolute fidelity and uncompromising
Chapter 1 4 ipod Basics 5 ipod at a Glance 5 Using ipod Controls 7 Disabling ipod Controls 8 Using ipod Menus 9 Connecting and Disconnecting ipod
 ipod Features Guide 2 Contents Chapter 1 4 ipod Basics 5 ipod at a Glance 5 Using ipod Controls 7 Disabling ipod Controls 8 Using ipod Menus 9 Connecting and Disconnecting ipod Chapter 2 14 Music Features
ipod classic User Guide
 ipod classic User Guide Contents 4 Chapter 1: ipod classic Basics 5 ipod classic at a glance 5 Using ipod classic controls 7 Disabling ipod classic controls 8 Using ipod classic menus 8 Adding or removing
Chapter 1 4 ipod Basics 5 ipod at a Glance 5 Using ipod Controls 7 Disabling ipod Controls 8 Using ipod Menus 9 Connecting and Disconnecting ipod
 ipod Features Guide 2 Contents Chapter 1 4 ipod Basics 5 ipod at a Glance 5 Using ipod Controls 7 Disabling ipod Controls 8 Using ipod Menus 9 Connecting and Disconnecting ipod Chapter 2 14 Music Features
ipod nano User Guide
 ipod nano User Guide 2 Contents Preface 4 About ipod nano Chapter 1 6 ipod nano Basics 6 ipod nano at a Glance 7 Using ipod nano Controls 11 Using ipod nano Menus 13 Disabling ipod nano Controls 14 Connecting
Revox S235 Joy Android App E 1.0
 4 E 1.0 1 Revox Joy S235 App Contents Welcome......3 Installation... 3...... 12 Last listened to... 13 Local inputs... 13 Play view... 14 My Files... 14...... 3 Version number... 4 Scope of function...
Welcome Operation Installation... 3 Scope of function... 3 Pre-requirements... 3 Number of clients... 4 Version number...
 Contents Revox Joy S232 App 1 4 network receiver Contents Welcome... 3 Installation... 3 Scope of function... 3 Pre-requirements... 3 Number of clients... 4 Version number... 4 Operation... 5 Switching
ipod Tutorial Includes lessons on transferring music to ipod, playing music, and storing files on ipod
 ipod Tutorial Includes lessons on transferring music to ipod, playing music, and storing files on ipod apple Apple Computer, Inc. 2004 Apple Computer, Inc. All rights reserved. Apple, the Apple logo, Apple
ipod nano User Guide
 ipod nano User Guide 2 Contents Chapter 1 4 ipod nano Basics 4 ipod nano at a Glance 5 Using ipod nano Controls 9 Using ipod nano Menus 12 About the ipod nano Internal Speaker 13 Connecting and Disconnecting
Quick Start Guide. Getting Started. Controls and Connections. Before you begin, please make sure that you have the following available:
 Quick Start Guide Getting Started Before you begin, please make sure that you have the following available: A computer network with 2.4GHz WiFi or Ethernet One of the following devices: An Apple iphone,
Tutorial. Includes lessons on transferring music to ipod, playing music, and storing files on ipod
 Tutorial Includes lessons on transferring music to ipod, playing music, and storing files on ipod The information in this document is subject to change without notice. Hewlett-Packard Company makes no
RSE Overview > > > > > Fig. 1 RSE features (5 seat vehicle shown) > > > >
 > > > >") RSE Overview The Rear Seat Entertainment system (RSE) allows passengers in the rear compartment to access multimedia content and basic Infotainment functions using the Touch Screen Remote (TSR) or a suitable
RSE Overview The Rear Seat Entertainment system (RSE) allows passengers in the rear compartment to access multimedia content and basic Infotainment functions using the Touch Screen Remote (TSR) or a suitable
ESOTERIC Sound Stream. User s Manual
 ESOTERIC Sound Stream User s Manual Layout Now Playing This is the main screen of the ESOTERIC Sound Stream app. Now Playing: Use to show the current file and control its playback. Playlist: This shows
ipod nano Features Guide
 ipod nano Features Guide 2 Contents Chapter 1 4 ipod nano Basics 5 ipod nano at a Glance 5 Using ipod nano Controls 7 Disabling ipod nano Buttons 8 Using ipod nano Menus 9 Connecting and Disconnecting
Listening to Music and Other Audio Files
 17 Listening to Music and Other Audio Files If you have an ipod or other portable digital music player, you can put it aside because your ipad essentially duplicates all the features of an ipod (except
Revox Joy S232 App Operating Instructions D 1.0 2
 Operating Instructions Revox Joy App S232 1 Revox Joy S232 App Operating Instructions D 1.0 2 Operating Instructions Revox Joy App S232 Welcome...2 Installation... 2 Requirements... 2 Number of clients...
TIBO app User Manual
 TIBO app User Manual Contents Introduction First time app setup Amazon Alexa setup Navigating the TIBO app Playing music via Spotify Storing Pre-sets Radio Storing Pre-sets Online Playlists Product Settings
imagine the possibilities
 Multiroom App Guide imagine the possibilities Thank you for purchasing this Samsung speaker. To receive more complete service, please register your speaker at www.samsung.com/register -- This Multiroom
Contents. Introduction. Getting Started. Navigating your Device. Customizing the Panels. Pure Android Audio. E-Books
 Contents Introduction Getting Started Your Device at a Glance Charging Assembling the Power Adapter Turning On/Off, Unlocking Setting to Sleep and Waking Up Inserting and Removing a microsd Card Connecting
Operation Guide NWZ-A815 / A816 / A Sony Corporation (1)
") Operation Guide NWZ-A815 / A816 / A818 2007 Sony Corporation 3-293-630-12 (1) About the Manuals The following manuals are included with the player. Additionally, after installing software from the supplied
Operation Guide NWZ-A815 / A816 / A818 2007 Sony Corporation 3-293-630-12 (1) About the Manuals The following manuals are included with the player. Additionally, after installing software from the supplied
NPM Network Player Module. User Manual
 NPM Network Player Module User Manual Gato Audio NPM - Network Player Module Contents Package contents 3 Overview 4 Roon Ready 4 Bluetooth Upgrade 4 The NET input - Volume Control 4 Button Light Patterns
Chapter 1 Preparing Your ipads for Q-interactive
 Chapter 1 Preparing Your ipads for Q-interactive Q-interactive User Guide December 2016! Configuring Your ipad Settings for Q-interactive Before you can administer tests with Q-interactive, you need complete
Contents. Introduction. Getting Started. Navigating your Device. Customizing the Panels. Pure Android Audio. E-Books. Browsing the Internet
 Contents Introduction Getting Started Your Device at a Glance Charging Assembling the Power Adapter Turning On/Off, Unlocking Setting to Sleep and Waking Up Connecting to a Computer Navigating your Device
Contents. Introduction
 Page 1 of 15 Contents Introduction Getting Started Your Device at a Glance Charging Assembling the Power Adapter Turning On/Off, Unlocking Setting to Sleep and Waking Up Inserting and Removing a microsd
Use_cases_English.qxd :51 Pagina 1. Use cases
 Use_cases_English.qxd 20-10-2005 16:51 Pagina 1 Media Center MCP9350i Use cases Use_cases_English.qxd 20-10-2005 16:51 Pagina 2 Online help: www.p4c.philips.com For interactive help, downloads and frequently
Setting up Your Brand New ipad for Individual Use
 Setting up Your Brand New ipad for Individual Use A Basic Setup Guide for NEW ipads Instructional Technology May 2012 HCPS Page 1 I Have an ipad... So Now What? ipad Setup This setup requires that you
Lexar Media Manager User Guide
 Lexar Media Manager User Guide Lexar Media Manager User Guide Lexar Media Manager app overview...2 Setting up the Lexar Mobile Manager app...3 Navigating the Home screen...5 Navigating the Settings screen...7
Hip Smarthome - Systems User Manual
 Hip Smarthome - Systems User Manual Contents 1. Hip SmartHub Connection / Setup... 3 1.1. Setup Guide... 3 2. Hip SmartTV Connection / Setup... 5 2.1. Setup Guide... 5 3. Hip SmartMusic Connection / Setup...
MR Enjoy the Music. Instruction Manual DIGITAL FM, INTERNET OG DAB RADIO WITH AUDIO MEDIA STREAMING
 MR-2000 Enjoy the Music DIGITAL FM, INTERNET OG DAB RADIO WITH AUDIO MEDIA STREAMING Instruction Manual Safety Warnings Please read before installation. If MR-2000 has been moved from a cold place to a
AwoX StriimLIGHT Wi-Fi LED light with Wi-Fi speaker SL-W10. User Guide
 AwoX StriimLIGHT Wi-Fi LED light with Wi-Fi speaker SL-W10 User Guide Contents Getting started with AwoX StriimLIGHT Wi-Fi... 3 Before you begin... 4 Starting your product... 6 AwoX Striim CONTROL setup...
Operation Guide NW-A805 / A806 / A Sony Corporation (1)
") Operation Guide NW-A805 / A806 / A808 2007 Sony Corporation 2-896-041-11 (1) To use the buttons in the Operation Guide Click the buttons located in the upper right of this manual to jump to Table of Contents,
Operation Guide NW-A805 / A806 / A808 2007 Sony Corporation 2-896-041-11 (1) To use the buttons in the Operation Guide Click the buttons located in the upper right of this manual to jump to Table of Contents,
A18 User Manual. Please contact us via when anything comes to your mind, we urge
 AGPTek Longevity Music Player A18 User Manual Please contact us via support@agptek.com, when anything comes to your mind, we urge to turn this little thing into the best music player in the world and in
2005 Sony Corporation Printed in China (1) Quick Start Guide NW-A1000 series / A3000 series
 Quick Start Guide NW-A1000 series / A3000 series") 2005 Sony Corporation Printed in China 2-660-897-11 (1) Quick Start Guide NW-A1000 series / A3000 series Table of Contents Introduction...6 Getting Started...8 Supplied Items... 8 Installing CONNECT Player...
2005 Sony Corporation Printed in China 2-660-897-11 (1) Quick Start Guide NW-A1000 series / A3000 series Table of Contents Introduction...6 Getting Started...8 Supplied Items... 8 Installing CONNECT Player...
ipod shuffle User Guide
 ipod shuffle User Guide 2 Contents Chapter 1 3 About ipod shuffle Chapter 2 4 ipod shuffle Basics 4 ipod shuffle at a Glance 5 Using the ipod shuffle Controls 6 Connecting and Disconnecting ipod shuffle
Operation Guide NWZ-S515 / S516 / S615F / S616F / S618F Sony Corporation (1)
") Operation Guide NWZ-S515 / S516 / S615F / S616F / S618F 2007 Sony Corporation 3-219-717-14 (1) About the Manuals The following manuals are included with the player. Additionally, after installing software
Operation Guide NWZ-S515 / S516 / S615F / S616F / S618F 2007 Sony Corporation 3-219-717-14 (1) About the Manuals The following manuals are included with the player. Additionally, after installing software
SoundBridge Helpful Tips. For customers who want to use Roku SoundBridge with the SlimServer music server
 SoundBridge Helpful Tips For customers who want to use Roku SoundBridge with the SlimServer music server Revision 1.2 October 25, 2004 1 I. Setting Up Your SlimServer-based Network Choosing Your Software
Getting to know your ipad exploring the settings, App store, Mail
 Getting to know your ipad exploring the settings, App store, Mail Exploring the settings Open the settings app from your homepage Wi-Fi Turn Wi-Fi on/off Add new Wi-Fi Connection Enter Network Name, any
STUDIO 7.0 USER MANUAL
 STUDIO 7.0 USER MANUAL 1 Table of Contents Safety Information... 3 Appearance and Key Functions... 4 Introduction... 5 Call Functions... 6 Notifications Bar... 7 Contacts... 8 Messaging... 9 Internet Browser...
Contents. Important! Make sure you register your purchase. Visit: By registering, you'll be the first to know about:
 CXN NETWORK PLAYER Contents Rear panel connections... 3 Front panel controls... 3 Remote control... 4 Getting connected... 5 Network connections... 5 Character entry... 5 Operating instructions... 6 Inputs...
GentivaLink ipad 4 Training Guide
 GentivaLink ipad 4 Training Guide Version 1.0 Box Contents Your ipad 4 device comes with the following: ipad 4 ipad 4 Wall Charger ipad 4 Lightning Data Cable Car Charger Targus Stylus Please ensure all
Quick Start Guide CU920. Use your phone for more than just talking Touch Screen AT&T Mobile TV Music Player 2.0 Megapixel Camera Video Share
 CU920 Quick Start Guide Use your phone for more than just talking Touch Screen AT&T Mobile TV Music Player 2.0 Megapixel Camera Video Share See User Manual for Spanish Instructions Additional charges may
FUSION MS-BB100 B L A C K B O X E N T E R T A I N M E N T S Y S T E M O W N E R S M A N U A L ENGLISH
 FUSION MS-BB100 B L A C K B O X E N T E R T A I N M E N T S Y S T E M O W N E R S M A N U A L ENGLISH FUSIONENTERTAINMENT.COM 2015 2016 Garmin Ltd. or its subsidiaries All rights reserved. Under the copyright
Music Store. User Guide
 Music Store Listen to streaming services or purchase music from the Store when connected to a wireless network. (Streaming services and ability to purchase music vary by country. Not all services are available
User manual. Version /2014. elektroakustik GmbH & Co. KG
 TA Control Application for Apple ipad User manual Version 1.0 05/2014 elektroakustik GmbH & Co. KG 2 Contents Page Page General information Functions... 4 Hard- and software... 4 Creating a connection...
Operation Guide NWZ-A815 / A816 / A Sony Corporation (1)
") Operation Guide NWZ-A815 / A816 / A818 2007 Sony Corporation 3-270-663-14 (1) About the Manuals The following manuals are included with the player. Additionally, after installing software from the supplied
Operation Guide NWZ-A815 / A816 / A818 2007 Sony Corporation 3-270-663-14 (1) About the Manuals The following manuals are included with the player. Additionally, after installing software from the supplied
Helium Streamer for ios Version 2.0 User Manual
 Helium Streamer for ios Version 2.0 User Manual Page 2 2011 Imploded Software AB V2.0 Contents Overview... 5 Features... 5 Set-Up... 7 Requirements... 7 Helium Music Manager Options... 7 Helium Streamer
ORB / SPHERA Manual
 ORB / SPHERA Manual 020818 2 Table of Contents Welcome... 4 Guide to Features... 5 Top Panel... 5 Rear Panel... 6 WiFi Mode...7 Setup... 7 Creating a Zone... 10 Selecting Speaker or Speakers for a Zone...
2005 Sony Corporation Printed in Malaysia (1) Quick Start Guide NW-A1000 series / A3000 series
 Quick Start Guide NW-A1000 series / A3000 series") 2005 Sony Corporation Printed in Malaysia 2-657-722-13 (1) Quick Start Guide NW-A1000 series / A3000 series Table of Contents Introduction...8 Owner s Record The model and serial numbers are located on
2005 Sony Corporation Printed in Malaysia 2-657-722-13 (1) Quick Start Guide NW-A1000 series / A3000 series Table of Contents Introduction...8 Owner s Record The model and serial numbers are located on
VEGA. Operation Manual T A B L E T P C. advent vega operation manaul_new.indd 1
 VEGA T A B L E T P C Operation Manual advent vega operation manaul_new.indd 1 advent vega operation manaul_new.indd 2 CONTENTS SETTING UP YOUR TABLET FOR THE FIRST TIME... 4 USING THE DEVICE S BUTTONS
UNDOK. End-User Manual. Android remote control application. End-User Manual
 Android remote control application Contents 1 Introduction... 3 2 Getting Started... 4 2.1 Network Connection Setup... 4 3 How to... 5 4 Operation... 6 4.1 Navigation Menu options:... 6 5 My Home... 7
8. How to use social networks (Skype, Facebook)
") ipad Manual Contents 1. Turning on and off the ipad 2. Charging the ipad 3. How to email 4. How to delete unwanted emails 5. Set up an Apple ID 6. Buy apps 7. Access/ buy music 8. How to use social networks
ipad Manual Contents 1. Turning on and off the ipad 2. Charging the ipad 3. How to email 4. How to delete unwanted emails 5. Set up an Apple ID 6. Buy apps 7. Access/ buy music 8. How to use social networks
HELLOMOTO. contents MOTO U9
 HELLOMOTO MOTO U9 Feel It, See It, Hear It! Your MOTO U9 phone is made to be held, and made to be seen! Transfer your favorite quickly and easily with Microsoft Windows Media Player 11. Control playback
MODEL SUB Manual
 MODEL SUB Manual 020818 Table of Contents Welcome... 4 Guide to Features... 5. WiFi Mode...6 Setup... 6 Creating a Zone... 9 Selecting Speaker or Speakers for a Zone... 10 All Zones Page... 11 Zone Player
Owner s Manual. Network Player
 G Network Player Owner s Manual This product is designed for use at home to enjoy listening to audio. Before using this product, read the safety instructions described in the supplied Quick Start Guide.
Helium Remote for ios Version 1.4 User Manual
 Helium Remote for ios Version 1.4 User Manual Page 2 2011 Imploded Software AB V1.4 Contents Overview... 4 Features... 4 Set-Up... 5 Requirements... 5 Helium Music Manager Options... 5 Helium Remote Settings...
Navi 900 IntelliLink, Touch R700 IntelliLink Frequently Asked Questions
 Index 1. Audio... 1 2. Navigation (only Navi 900 IntelliLink)... 2 3. Phone... 3 4. Apple CarPlay... 4 5. Android Auto... 6 6. Speech recognition... 8 7. Color instrument panel... 9 8. Favourites... 9
Operation Guide. NW-A1000 series / A3000 series Sony Corporation (1)
") Operation Guide NW-A1000 series / A3000 series 2006 Sony Corporation 2-683-714-11 (1) 2 About the Manuals Included with the player are the Quick Start Guide and this PDF-format Operation Guide. Additionally,
Operation Guide NW-A1000 series / A3000 series 2006 Sony Corporation 2-683-714-11 (1) 2 About the Manuals Included with the player are the Quick Start Guide and this PDF-format Operation Guide. Additionally,
Getting Started Movies MediaPlayer is required to use Maestro for movies. Note: Live Search: Main Movie Menu List / Cover View: Sort:
 Maestro QuickStart Guide Getting Started Open your mobile device s web browser and browse to your ReQuest server IP address. The first time you visit this URL, Maestro will display a pop up with instructions
Studio 5.5. User Manual
 Studio 5.5 User Manual 1 Table of Contents Safety Information... 3 Appearance and Key Function... 4 Introduction... 5 Call Functions... 6 Contacts... 7 Messaging... 8 Internet Browser... 9 Bluetooth...
Help Guide. Getting started. Use this manual if you encounter any problems, or have any questions. What you can do with the Bluetooth function
 Use this manual if you encounter any problems, or have any questions. Getting started What you can do with the Bluetooth function About voice guidance Supplied accessories Checking the package contents
Connecting your smartphone or tablet to the HDD AUDIO PLAYER through a Wi-Fi (wireless LAN) network [6]
![Connecting your smartphone or tablet to the HDD AUDIO PLAYER through a Wi-Fi (wireless LAN) network [6]](/thumbs/87/97060717.jpg "Connecting your smartphone or tablet to the HDD AUDIO PLAYER through a Wi-Fi (wireless LAN) network [6]") A specialized application for HDD AUDIO PLAYER HDD Audio Remote About the HDD Audio Remote Features of HDD Audio Remote [1] System requirements [2] Compatible HDD AUDIO PLAYER models [3] Trademarks [4]
A specialized application for HDD AUDIO PLAYER HDD Audio Remote About the HDD Audio Remote Features of HDD Audio Remote [1] System requirements [2] Compatible HDD AUDIO PLAYER models [3] Trademarks [4]
Lenovo Miix User Guide. Read the safety notices and important tips in the included manuals before using your computer.
 Lenovo Miix 2 11 User Guide Read the safety notices and important tips in the included manuals before using your computer. Notes Before using the product, be sure to read Lenovo Safety and General Information
ipad and iphone Basics
 ipad and iphone Basics 1 Physical Attributes On/Off Sleep/Wake Silent/ Screen rotation Lock Sight/Camera Or On/Off Sleep/Wake iphone 10 has no home button! Volume: Up/Down Not all 2 Multitasking The multitasking
Appendix B. GETTING STARTED WITH itunes 11
 Appendix B GETTING STARTED WITH itunes 11 In late-november 2012, Apple released a revamped version of its popular itunes software for the Mac and PC. itunes 11, which is currently available as a free download
For VW new Polo: Slide the 1 switch to the ON position or DOWN position. : Slide the 1 switch to the OFF position or UP position.
 This interface can be worked for two kinds of car: For VW new Polo: Slide the 1 switch to the ON position or DOWN position. For VW Golf 7 : Slide the 1 switch to the OFF position or UP position. Starting
DASH 4.5 user manual 1
 DASH 4.5 user manual 1 Table of Contents Safety Information... 3 Appearance and Key Function... 4 Introduction... 4 Call Functions... 6 Contacts... 6 Messaging... 8 Internet Browser... 9 Bluetooth... 10
Dash 4.0. User Manual
 1 Dash 4.0 User Manual Table of Contents Safety Information... 3 Appearance and Key Function... 4 Introduction... 5 Call Functions... 6 Contacts... 7 Messaging... 8 Internet Browser... 9 Bluetooth... 10
Control4 Smart Home Entertainment Guide
 Control4 Smart Home Entertainment Guide Contents My Movies menu overview........................ 2 Watching movies........................... 3 Channels menu overview.........................4 Watching
 Use apps Tap an app to open it. Customize the unit Arrange apps Touch and hold any app on the Home screen, then drag the app around. Drag an app to the edge of the screen to move it to a different Home
UVO SYSTEM USER'S MANUAL
 UVO SYSTEM USER'S MANUAL Congratulations on the Purchase of your new UVO system! Your new UVO system allows you to enjoy various audio and multimedia features through the main audio system. For the latest
Product Information. Phase 3
 Product Information Phase 3 Phase 3 BURMESTER PHASE 3 RETRO STYLE: PHASE 3 is an extension to the traditional product lines of our house, joining ultimate demands on sound quality with musical culture
Breeze III FB201N User Manual
 Breeze III FB201N User Manual Table of Contents Getting Started... 3 Insert the SIM Card and Battery... 3 Insert the Media Card... 4 Keys and Parts... 5 Basics... 6 Display Indicators... 6 Home Screen...
Maxwell RSC Tablet PC Configuration Manual for use with Windows 8 Operating System
 Maxwell RSC Tablet PC Configuration Manual for use with Windows 8 Operating System TM537 1/18 Table of Contents 1 Maxwell RSC Instrument and Tablet PC...1 2 Glossary...3 3 Adjusting Volume Settings...5
Chapter 1: Preparing Your ipad for Optimal Assessment Experience
 Chapter 1: Preparing Your ipad for Optimal Assessment Experience Q-interactive User Guide April 014 Copyright 013. NCS Pearson, Inc. or its affiliate(s). All rights reserved. Q-interactive is a trademark
Browse the internet, send and receive s and text messages, play music and movies, take and display photos and videos, and more.
 What is an ipad? The ipad is a tablet computer designed and sold by Apple Inc. What can it do? Browse the internet, send and receive emails and text messages, play music and movies, take and display photos
Setting your PC for operating from a smartphone, iphone, etc. as a controller (Windows 8.1)
") Help Guide Home Audio System MHC-V90DW The following explains how to use this home audio system. Listening to music from an Internet streaming service (music service) Listening to music from an Internet
Help Guide Home Audio System MHC-V90DW The following explains how to use this home audio system. Listening to music from an Internet streaming service (music service) Listening to music from an Internet
Wireless-B. User Guide. Media Link for Music. GHz b WML11B/WMLS11B. A Division of Cisco Systems, Inc. WIRELESS. Model No.
 A Division of Cisco Systems, Inc. GHz 2.4 802.11b WIRELESS Wireless-B Media Link for Music User Guide Model No. WML11B/WMLS11B Copyright and Trademarks Linksys is a registered trademark or trademark of
USER GUIDE DX100 Digital Audio Player by ibasso
 USER GUIDE DX100 Digital Audio Player by ibasso This manual is composed of two parts, the first of which will specifically address the features and operation of the ibasso Music Player while the second
IdeaTab A1000L-F. User Guide V1.0. Please read the Important safety and handling information in the supplied manuals before use.
 IdeaTab A1000L - UserGuide IdeaTab A1000L-F User Guide V1.0 Please read the Important safety and handling information in the supplied manuals before use. file:///c /Users/xieqy1/Desktop/EN UG/index.html[2013/8/14
Table of Contents. Manual Overview
 Table of Contents Manual Overview D-Link reserves the right to revise this publication and to make changes in the content hereof without obligation to notify any person or organization of such revisions
Hi-Res Audio Recorder
 Stereo Turntable System Application Hi-Res Audio Recorder About Hi-Res Audio Recorder What Is Hi-Res Audio Recorder? [1] Supported Stereo Turntable System [2] Audio File Formats Supported for Recording
Get. Started. All you need to know to get going.
 Get Started All you need to know to get going. Special note for Sprint As You Go customers With Sprint As You Go you can free yourself from long-term contracts and enjoy more wireless flexibility. Some
Mac OS X Handbook MacBook Westhampton Beach School District
 Mac OS X Handbook MacBook Westhampton Beach School District www.westhamptonbeach.k12.ny.us Table of Contents Features and Design! 3 The Downloads Stack! 4 Customization! 5 Finder! 6 Cover Flow! 7 Icons!
NEO 4.5. User Manual
 1 NEO 4.5 User Manual Table of Contents Safety Information... 3 Appearance and Key Function... 4 Introduction... 5 Call Functions... 6 Contacts... 7 Messaging... 8 Internet Browser... 9 Bluetooth & Wi-Fi...
Salesforce Classic Mobile Guide for iphone
 Salesforce Classic Mobile Guide for iphone Version 41.0, Winter 18 @salesforcedocs Last updated: November 30, 2017 Copyright 2000 2017 salesforce.com, inc. All rights reserved. Salesforce is a registered
ipad Basics Table of Contents
 ipad Basics Atomic Learning was used to make this handout. Wherever you see the icon throughout the handout, it will list the section and item where it can be found on the Atomic Learning web site: http://www.atomiclearning.com/k12/ipad
ipad for Beginners How to Work the ipad Buttons
 ipad for Beginners How to Work the ipad Buttons The On/Off, Sleep/Wake button: This button is on the top of your ipad, and you use it to put your ipad's screen to sleep or wake it up. Home button: No matter
Working with cloudlibrary and Downloadable Content
 Grande Prairie, Alberta www.peacelibrarysystem.ab.ca Working with cloudlibrary and Downloadable Content Prepared by Samantha Mercer, Digital Trainer & IT Assistant August 2016 Table of Contents 1 Definitions...
2017 NMUG CLASSES MANAGING THE IPHONE AND IPAD IN IOS 10
 2017 NMUG CLASSES MANAGING THE IPHONE AND IPAD IN IOS 10 1 iphone Overview Your Apple ID is the account you use for just about everything you do with Apple. If you already have an Apple ID use it when
Point of View SmartTV-500 Center - Android 4.2. General notices for use...2 Disclaimer...2 Box Contents...2
 Point of View SmartTV-500 Center - Android 4.2 English Table of Contents General notices for use...2 Disclaimer...2 Box Contents...2 1.0 Product basics...3 1.1 Buttons and connections... 3 1.2 Connecting
Help Guide. Getting started. Use this manual if you encounter any problems, or have any questions. What you can do with the BLUETOOTH function
 Use this manual if you encounter any problems, or have any questions. Getting started What you can do with the BLUETOOTH function About voice guidance Supplied accessories Checking the package contents
Decisionmark is the service provider of analog and digital TV off-air cable and satellite channel list.
 Disclaimer Trademarks Legal Notice Copyright Control4 makes no representations or warranties with respect to this publication, and specifically disclaims any express or implied warranties of merchantability
Help Guide. Getting started
 Use this manual if you encounter any problems, or have any questions. This Help Guide is also available as a PDF, which can be downloaded here. Getting started What you can do with the BLUETOOTH function
Manual Does Ipod Shuffle 4th Generation Hold Play Button
 Manual Does Ipod Shuffle 4th Generation Hold Play Button ipod nano (6th or 7th generation) Move the switch on the ipod shuffle to Off. When it's set to Off, you won't be able to see the green stripe. Press
LIFE PURE User Manual
 LIFE PURE User Manual 1 Table of Contents Safety Information... 3 Appearance and Key Function... 4 Introduction... 5 Call Functions... 6 Contacts... 7 Messaging... 8 Internet Browser... 9 Bluetooth...
Manual Does Ipod Shuffle 2nd Generation Have Voice Over
 Manual Does Ipod Shuffle 2nd Generation Have Voice Over VoiceOver describes aloud what appears onscreen, so that you can use ipod VoiceOver may tell you the action of the item or provide instructions (for
Help. About Hi-Res Audio Recorder. Getting Ready to Use Your Computer. Operation Flow from Recording to Editing to Saving
 This Help describes the features of and provides the instructions on using it. In this Help, screens that appear on a Windows computer connected with the turntable are used as examples. About What Is?
Salesforce Classic Guide for iphone
 Salesforce Classic Guide for iphone Version 35.0, Winter 16 @salesforcedocs Last updated: October 27, 2015 Copyright 2000 2015 salesforce.com, inc. All rights reserved. Salesforce is a registered trademark
dcs Vivaldi HD App Network Control Point Application User Manual Software Release 1.0.x March 2014
 dcs Vivaldi HD App Network Control Point Application User Manual Software Release 1.0.x Data Conversion Systems Ltd. 2014 Price UK 8.00 / Euro 12.00 All rights reserved. No part of this publication may
HOW TO DOWNLOAD ELECTRONIC BOOKS ONTO YOUR E-BOOK READER
 HOW TO DOWNLOAD ELECTRONIC BOOKS ONTO YOUR E-BOOK READER From the Peoria Public Library homepage http://library.peoriaaz.gov Click on Digital Downloads, listed on the top of the screen. Click on Greater