PROBLEM CAUSE SOLUTION
|
|
|
- Judith Melton
- 5 years ago
- Views:
Transcription
1
2 CONTENTS To use this product safely and properly, be sure to read this maual carefully before use and keep it safe for future reference As we constantly keep improving our products, function and appearance are subject to updates without prior notice Trouble Shooting PROBLEM CAUSE SOLUTION Precautions Safety 3 Cleaning Device 3 Lens Mist 3 World Area Codes 4 Function Operation Radio Function Operation 13 RDS Function Operation 14 Multifunction Operation 15 DVD/VCD/CD Function Operation 16 MP3 Function Operation 18 Cannot power on After ignition switch off, setting information all lose Poor performance of radio station Check whether power fuse melt or not Some factors cause MPU wrong operation Change battery or fuse Weak signal Change fuse same as the old one Press RES button on the panel by penpoint, then, power on Reset information and save Move the car to another place,then research Basic Operaion Panel Introduction 5 8 Reset Device 10 Analog TV touch Operation19 Bluetooth Function Operation 20 Other Functions Operation 22 Cannot load disc There is a disc inside Eject disc,then,slot in new disc Cannot play disc Disc is scratched Put wrong side of disc into the unit Change new disc Slot in the disk with sign side up Turn On/Off Host 10 Volume Control 10 Sound Effect Setup 10 Turn On/Off Equal Loudnes 10 Additional Information Trouble Shooting 23 Cannot switch language/subtitle No image Lens has dirty There is only one language/ subtitle in disc Other factors cause MPU wrong operation Clean lens by lens clean disc If disc is not with multi-language/ subtitle, it cannot switch language/ subtitle Press [RES] button on the panel by penpoint, then,power on EQ Setup 10 Setup Operation 10 Cannot watch image during driving It's not allowed to watch image during driving Park the car in a safe place, Put the car stall in P postion, pull upthe hand brake 02 23

3 Other Functions Operation CCD In any running mode, the video signal will switch to CCD status when backing the car, after backing it resumes to its previous status Analog on-site backup Backup rearview! Warm: Do not rely entirely on CCD, plese confirm safety of the environment with naked eyes while you are driving CCD only assists the drive to park the car Due to the limits in CCD range and distance, it may cause traffic accident if the drive relys entirely on CCD Precaution Safety To ensure driving safety, please follow the guide given below: 1The unit is installed in car with 12V power supply 2Connect each wire as the manual suggests, any wrong connection may cause dysfunction or damage to the electical system 3Be sure the speaker(-) lead is connected to the speaker(-) terminal instead of the body of car Speakers are not allowed to interconnected 4Make sure all the wires are correctly connected befor turning on the unit 5When you change a blown fuse, replace it with a new one of same speci facation 6Do not block the blowhole or heat sink to avoid fire hazard caused by overheating inside the unit 7After completing installation you can use the product(including changing the car battery); Press (RESET) button on the panel with penpoint (sharp,prong objects not allowed) to set the system in initial status 8To ensure driving safety and avoid breaking traffic regulation, drivers should not watch program or operate this device while driving Cleaning Device If any stains are found on the front panel, use clean soft cloth (such as cleaning cloth)to wipe them off If the front panel is too much dirty, use neutral cleaning fluid to wipe it, then clean the left fluid with clean soft cloth! Directly spray the cleaning fluid onto the device may effect mechanical parts Use rough cloth or volatile fluid(such as thinner or alchhol) may scratch the surface or remove the chara cters Lens Mist In cold weather, mist occurs on the lens of disc player when heat is open This is called lens mist which may effect the disc play In that case, dject the disc and wait until the condensate fully evaporates, then you can play it again 22 03

4 World's Area Codes As the below map shows, we set area codes for DVD player according to various countries and regions
5 Panel Introduction 20 05
6 Panel Function introduction Analog TV Function Operation Touch [ TV ]icon in main interface to open analog TV mode 0:4425 2:6225 4:9125 1:5575 3:7625 5:10925 SECAM-DK CH:0 1 CH-/CH+ Page down/up to select channels and play 2 AMS Search channel automatically 3 SEEK-/SEEK+ Search channel manually 4 SETUP Access setup interface 5 Sound System Switch Press to switch sound system Auto Search/Store Channel You may need to search station before using TV Press [AMS] button on remote control, or touch [AMS] button on TV interface to search for TV channel automatically in the whole TV channel range Effective TV channels that searched will be automatically memorized in preset channel in ascending order During the search, retouch [ AMS ] button can stop searching Manual Search Short press[ SEEK+] [SEEK-] button on remote control, or touch [SEEK+ ][SEEK-] button on the display screen to single-step search Long press [SEEK+][ SEEK- ]button on remote control, or hold SEEK+ SEEK- button on the display screen for 2 seconds or more will automatically search effective station in direction of frequency increasing/decreasing During the search, repress SEEK+ SEE- can stop searching Select/Play Channel Touch [CH+][ CH-] button on display screen to select previous/next stored channel and play Press number button on remote control or directly press number button in TV mode, the unit skips to selected channel and play For example: press button 6 on remote control or directly touch number[ 6] in TV mode can switch to channel [6] Press [GOTO] button on remote control - - appears in the upper left corner on screen, then press button 3 and 9 can switch to channel 39 Sound System Switch Touch the area of sound system switch on display screen to switch TV sound system in the sequence shown below: The sound of a certain channel may sound abnormal, probably because sound system is wrongly set and need to be reset (sound systems adopted in China: Mainland areas except for few cities such as Shenzhen use 1 ; other areas generally use DK ; Hongkong uses 1 Users should pay special attention to this) After the unit searching TV signals and enters into TV play status, touch middle area on the screen to pop up function menu as shown below 06 19


7 MP3 Function Operation After inserting SD card, U disc or the Mp3 disc playing MP3 files, you will enter the interface as below: You need to press REL button on the front panel to release the panel, insert SD card on the base This function can also be achieved by screen operation Press number button 10+ once to get 10+, press it twice to get 20+, the rest may be deduced by analogy Stop Touch button on the remote control to stop playing MP3 files This function can also be achieved by screen operation In MP3 play, if it contains file folder, press button on the screen and use to access preferred folder, then press [ENTER] button on the remote control to confirm Touch button on the screen to access previous/next track Touch to play Skip/Speed forward/backward In playback mode, short press SEEK-/SEEK+ on the remote control to skip play, long press it to speed forward/backward play The speed changes as below: X2 X4 X8 X16 X32 This function can also be achieved by screen operation or pressing relative buttons on the panel Pause In the mp3 file Touch button on the remote control to switch betwon play and pause This function can also be achieved by screen operation Repeat Play In MP3 play, press [RPT] button on the remote control to choose repeat mode: single repeat After you select single repeat, the unit will play the current song repeatedly Select Song In playback mode, directly press number buttons 1-9 on the remote control to input the serial number of the song, the unit will play the corresponding program automaticlly For the discs have more then 10 songs, use number button 10+ and 0-9 on the remote control to choose 18 07
8 08 Then insert the serial number of title and chapter by using number button on the remote control and up/down/left/right button, move the cursor to PLAY, press ENTER button on the contro to complete programmed play This function can only be achieved with remote control Change Subtitle Language (multi subtitles) For DVD disc recorded with multi subtitles, you can change subtitle language during play Press [SUB-T] button repeatedly can change subtitle language during play This function can only be achieved by remote control This function is only for DVD discs recorded with multi subtitles The number in the 2 sign on the DVD disc cover indicates how many languages the subtitle is recorded with Change Dialogue Language (multi-tone) Audio play can has various dialogue languages and audio systems If the disc is recorded with multi tones, you can change dialogue language and audio system during play In play mode, press [AUDIO] button on the remote control repeatedly can change dialogue language This function can only be achieved by remote control This function is only for DVD disc recorded with multi tones The number in the 2 sign on the DVD disc cover indicates how many languages the subtitle is recorded with Title Select In DVD mode, press [TITLE] button on the remote control can return to the title menue All titles in the disc are displayed Use up/down /left/right button or number button on the control to choose prefered chapter, then press [ENTER] or button to play the chapter This function can only be achieved by remote control Menu Select In playback mode, press PBC button on the remote control to back to the main menu, all chapters are displayed on the screen Use direction button or number button on the control to select preferred chapter, then press or ENTER button to play selected chapter 17 This function can only be achieved by remote control Video Play When you are driving, the screen displays You cannot watch video files during driving Please park your car in a safe area and pull up the hand brake before watching Back rearview switch When you are backing the car, the unit will automaticlly switch to back mode; after backing the system will switch to its previous running status Select Sound Output Mode In VCD mode, repeatedly press [AUDIO] button on the remote control to switch the sound track in the following sequenc: Left track right track stereo Change the Angle (multi-angle) For DVD discs recorded from multi angles, you can press ANGLE button on the remote control to change the visual angle Switch is done in the following sequence: ANGLE 1 (visual angle 1) ANGLE 2 (visual angle 2) ANGLE 3 (visual angle 3) This function can only be achieved by remote control This function is only for DVD discs recorded with multi angles 3 The symbol on the disc cover indicates multi-angle scene The number in 3 Sign indicates number of the angles You cannot switch visual angle in slow play
9 DVD/VCD/CD Founction Operation DVD Play (1) Insert DVD disc into disc loader then it plays automaticlly If there is a disc in the unit, directly touch the DVD icon on the main menu to access play mode (2) Press [VOL-/+] on the screen to adjust the volume level Rotate[ VOL] knob or touch [VOL+/-] button on the screen can also adjust the volume Skip /Speed forward/backward In play mode, short press SEEK button on the remote control to skip to previous track/next track; long press it to access speed forward/ backward play Each time you press the button, the speed changes in the flowing sequence: X2 X4 X8 X16 X32 play This function can also be achieved by operating on the screen or using relative button on the panel Stop In DVD mode, press / button once on the control to access prestop status, when press button on the control can continue to play; press / twice to completely stop, then press the disc is played from the first song This function can also be achieved by screen operation or pressing relative button on the front panel Random Play In VCD/DVD mode, press [RDM] on the remote control to random play, repress [RDM] to return to the normal play mode In VCD mode, this function can only be achieved when PBC is off In VCD/CD mode, press [RPT] to start repeat function of the following contents: Single repeat off Slow Play In VCD mode, press [SLOW] button on the remote control to access slow play The speed changes as below: Slow ½ slow 1/3 slow 1/4 play In DVD mode, press SLOW to slow frontward /backward, the speed changes as below: Slow frontward ½ slow frontward 1/4 slow frontward 1/8 slow frontward 1/16 Slow backward ½ slow backward 1/4 slow backward 1/8 slow backward 1/16 play This function can only be achived by remote control Image Zoom In/Out During play, press ZOOM on the remote control to zoom in/out image in the following sequence: ½ 1/3 1/4 off This function can only be achieved with remote control Reduced image cannot be moved on the screen Display In playback mode, press[ OSD] button on the remote control to display all information about the currently played disc Only use remote control can this function be achieved Programmed play In DVD mode, you can set playing sequence of your favorate songs by progremmed play Press [PROG] button on the remote control and the screen displays program-edit menu as below: Repeat Playback In DVD mode, press[ RPT] button on the remote control to start repeating function of the following contents: Chapter title off 16 09


10 Reset Device If the unit or its connected device does not work normally, use prong tool to press the reset button, after it restarts, the unit resumes to its initial setup Turn on/off Host On When the ignition switch is put in ACC or ON position, press [ ] button on the front panel to turn on the unit Off After the host starts, hold [ ] button for 3 seconds or longer, the host will turn off After turning the unit on, put ignition switch in LOCK or take out the key, then the host will turn off automaticlly Next time put ignition switch in ACC or ON place, the unit will turn on automaticlly Volume Control Press [VOL] button on the remote control can increase/decrease volume level Rotate VOL knob on the front panel, or touch [VOL+/-] on the panel also can adjust the volume Sound Effect Setup Press [SEL] button on the remote control or [SEL]button on the front panel to switch sound effect as below shows: Bass Trebel Balance Fader Bright Hue Contrast Shart Volume After choose the mode, you can use [VOL] button on the remote control to adjust the parameters If you do not adjust the mode within 3 seconds, the system will return to it previous status Turn on/off Equal Loudness Short press the [LOUD ]button on the remote control to turn on equal loudness, repress it to turn off EQ Setup When listening music, you can choose preset mode (POP, CLASSIC, ROCK) By pressing EQ on the remote control to switch as blow : POP CLASSIC ROCK OFF Setup Operation The unit will resume to it previous running status if none operation is performed with 5 seconds Audio Touch the [AUDIO] icon to enter the Interface below Press this button to INFO You can adjust the following sound effect on the interface: volume, bass, treble, balance, FAD Touch to switch among these sound effects Touch[ -/+] to adjust selected sound effect Multifunction Operation In DVD mode, touch the top center of the screen will display the following menu 1 Play/Pause 2 Stop play 3 Next track/previous track 4 To enter DVD setup interface, refer to System Setup below for detailed information 5Number Button Touch [TA ]area on the screen and the number button pops up, touch the button to choose song and play 6Exit Touch the top right corner on the screen to exit DVD play mode 10 15

11 RDS Function Operation RDS provides series information(traffic information, name of station), and can auto maticlly switch to the station with stronger signal of the same program Additional Information RDS datas contain the following contents: P1---program identify code PS---program name AF---switch frequency list TP---traffic program TA---traffic announcement PTY---program type EON---strengthen other networks FM P1 MONO 875MHZ EQ:OFF LOUD:OFF 1AF Touch the button to turn on/off AF function When the receiving station signal becomes weak, it will automaticlly switch to other frequencies When receiving urgent program, the screen will display ALARM Receiving Traffic Radio: 1 Press [TA] button to open TA mode 2 The radio will automaticlly search traffic stations when the traffic station is On The screen will display TP character after searching is completed Only when the traffic information is radioed can it be received, after the traffic radio is completed, it automaticlly switches to the previous mode 3 Repress TA button to close TA function In other modes, the traffic announcement can automaticlly swich to radio mode After it is completed, it will switch to the previous mode and then play 14 2 PTY PTY allows searching for a given program type 1 Touch PTY button to select searched program type 2 3 seconds after the selecting program type, the radio will automaticlly search the radio of set program type 3 EON ON: Open EON functon and the radio will receive another AF chart OFF: Close REG function 4REG ON: Open REG function can only receive local RDS stations OFF: Close REG function 5SEEK-\SEEK+ Short press the button to manually search a station up forward/down forward; long press it to automaticlly search station up forward/ down forward 2 Video Setup Touch [VIDEO ]icon to enter the interface below You can adjust the following video effect on the interface: Bright, Hue, Contrast, Sharp 3 System Setup Touch[ SETUP] icon to enter the system setup interface Clock sys Choose time display mode(24h/12h system) Key Beep To open/close touch tone BEEP ON: open touch tone BEEP OFF: close touch tone Radio Area Select To select radio area of your country on the interface Back Bright To select screen brightness: 100%, 75%, 50%, 25% Backlight INFO To set the highlighting time of backlight: off, 15s, 30s, 60s 11 Clock Adjust Touch and move the cursor to hour, minute, second Touch second to adjust hour, minute and Touch Adust If deviation occurs in touch, or if it's the first time to use the unit, you need to calculate thescreen Use touch pen to click the center of x for 2s or longer until the screen displays successful calculation
![INFO 4 Return Touch [RETURN] Iicon can return to the previous working mode INFO INFO Radio Function Operation Touch [RADIO] icon to enter the radio interface as below 1 Preset Station Button To](/docs-images/82/85053273/images/12-0.jpg "display preset station list (long press the button to store the current frequency onto the prestored list) 2 BAND Touch the button to swich band 3LOC Ttouch the button to switch between remote and")
12 INFO 4 Return Touch [RETURN] Iicon can return to the previous working mode INFO INFO Radio Function Operation Touch [RADIO] icon to enter the radio interface as below 1 Preset Station Button To display preset station list (long press the button to store the current frequency onto the prestored list) 2 BAND Touch the button to swich band 3LOC Ttouch the button to switch between remote and local 4AMS Short press to browse the stations in sequence for 6 seconds each, long press to search stationau tomaticlly 5EQ Press the button to select preset balance mode 6LOUD Press the button to turn on/off equal loudness 7SEEK-\SEEK+ Short press it toadjust station frequency manually, long press it to browse station upforward/downforward automaticlly 8DN-PAGE Touch the button to switch to RDS operation interface (For detailed information please refer to RDS Function Operation ) Band Switch Touch the BAND button on the screen to swich band in the following sequence Fm1 Fm2 Fm3 Nw1 Nw2 Press remote control or [BAND] button on the panel also achieves this function Manually/Automaticlly Search Station 1Manual Search Short press SEEK button on the screen to adjust frequency and search stations up forward/ down forward 2Automatic Search Long press SEEK button on the screen to seach station up forward/down forward While searching, Retouch it to stop press the remote control or SEEK button on the front panel also achieves this function Manual Preset Station 30 stations can be stored in the radio(18 FM bands, 12 AM bands) Search a station by manual searching Long press any number button in 1-6 on the radio main interface, the station will be stored in the appointed position in radio (such as: 6 875M) If the prestored position has been stored, after executing store operation, the original station will be replaced by the new Browse Station/Select Station Browse Station After searching and storing station, short press [AMS] icon to browse, 6s for each During browsing,repress [AMS] if you find favorate program and need to stop browsing Select Station After searching and storing station, short press [AMS] icon to browse, 6s for each station During browsing,repress [AMS ]if you find favorate program and need to stop browsing Directly touch number button 1-6 on the screen to play Press the remote contro or [AMS ]button on the panel can also achieve this function
INSTRUCTIONS Please read all instructions carefully before using
 INSTRUCTIONS Please read all instructions carefully before using CONTENTS 1.Basic Operation Panel Introduction 02 Remote control function 04 Turn the Unit On/Off 06 Access main interface 06 U Disc/SD Card
INSTRUCTIONS INSTRUCTIONS PANEL INTRODUCTION
 INSTRUCTIONS INSTRUCTIONS Warning: To ensure safety while driving and to comply with laws, drivers should not watch video or operate the video device while driving. PANEL INTRODUCTION 1. PWR/VOL button
INSTRUCTIONS PANEL INTRODUCTION. 1. / SRC button 2. IR 3. EQ button 4. MENU button 5. VOL / MUTE button 6. SD slot 7. USB slot 8.
 INSTRUCTIONS PANEL INTRODUCTION 1. / SRC button 2. IR 3. EQ button 4. MENU button 5. VOL / MUTE button 6. SD slot 7. USB slot 8. AUX slot 9. RESET 10. 11. 12. 13. 14. 15. Disk load slot BASIC FUNCTION
INSTRUCTIONS INSTRUCTIONS CONTENTS. Panel Introduction
 0814 CONTENTS Panel Introduction 02 Basic Function 03 Remote Control Operation 05 Turn on/off Host Access main interface USB/SD Card Operation Radio Operation 08 Disc Operation 09 Play/Eject Disc 09 DVD/VCD
P9756. One Din In-Dash 7" (178mm) Digital with dual (front and rear)usb and SD Memory card port and AUX Input
 Digital with dual (front and rear)usb and SD Memory card port and AUX Input") P9756 One Din In-Dash 7" (178mm) Digital with dual (front and rear)usb and SD Memory card port and AUX Input Planet Audio is not affiliated with Apple, Inc CONTENTS Panel Introduction 02 Basic Function
P9756 One Din In-Dash 7" (178mm) Digital with dual (front and rear)usb and SD Memory card port and AUX Input Planet Audio is not affiliated with Apple, Inc CONTENTS Panel Introduction 02 Basic Function
INSTRUCTIONS CONTENTS
 0514 CONTENTS INSTRUCTIONS Panel Introduction 02 Basic Function 03 Remote Control Operation 05 Turn on/off Host Access main interface USB/SD Card Operation Radio Operation 08 Disc Operation 09 Play/Eject
INSTRUCTIONS CONTENTS
 INSTRUCTIONS CONTENTS Panel Introduction 02 Basic Function 03 Remote Control Operation 04 Turn on/off Access main interface USB/SD Card Operation Radio Operation 07 Disc Operation 08 Play/Eject Disc 08
INSTRUCTIONS INSTRUCTIONS CONTENTS ACCESSORY. DVD Parental control function. Accessory. DVD Parental control function
 INSTRUCTIONS CONTENTS Panel Introduction 02 Basic Function 03 Remote Control Operation 04 Turn on/off Access main interface USB/SD Card Operation Radio Operation 07 Disc Operation 08 Play/Eject Disc 08
PROBLEM CAUSE SOLUTION
 CONTENTS Panel Introduction 02 Remote control function 04 Turn on/off Host 06 Main interface 06 Radio Function Operation 06 Wiring Diagram This player is equipped with ISO standard connector, Please follow
Panel Introduction CONTENTS. Panel Introduction 02. Remote control function. Turn on/off Host 06. Main interface 06. Radio Function Operation 06
 CONTENTS Panel Introduction Panel Introduction 02 Remote control function 04 Turn on/off Host 06 2 10 9 8 Main interface 06 Radio Function Operation 06 Disc Function Operation 07 Play SD/external memory
CONTENTS. Panel Introduction. Remote control function. Turn on/off Host. Main interface. Radio Function Operation. Disc Function Operation
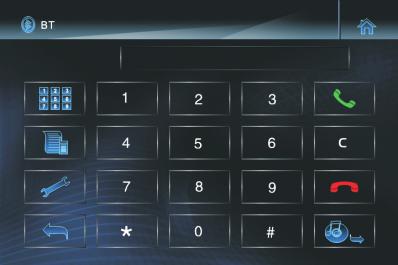
 CONTENTS Panel Introduction Remote control function Turn on/off Host Main interface Radio Function Operation Disc Function Operation Play SD/external memory device BT Function Operation External input
WITH DUAL ( FRONT AND REAR) AND SD MEMORY CARD PORT AND SIDE PANEL AUX INPUT MEMORY CARD PORT AND SIDE PANEL AUX INPUT PWR
 AND SD MEMORY CARD PORT AND SIDE PANEL AUX INPUT MEMORY CARD PORT AND SIDE PANEL AUX INPUT PWR") WITH DUAL (FRONT AND REAR) USB AND SD MEMORY CARD PORT AND SIDE PANEL AUX INPUT PWR WITH DUAL ( FRONT AND REAR) USB AND SD MEMORY CARD PORT AND SIDE PANEL AUX INPUT 12-2012 CONTENTS Panel Introduction
WITH DUAL (FRONT AND REAR) USB AND SD MEMORY CARD PORT AND SIDE PANEL AUX INPUT PWR WITH DUAL ( FRONT AND REAR) USB AND SD MEMORY CARD PORT AND SIDE PANEL AUX INPUT 12-2012 CONTENTS Panel Introduction
Warm note: The functions described in this manual may differ from the actual functions. The actual functions are the standards. (UI-48A Interface)
") Warm note: The functions described in this manual may differ from the actual functions. The actual functions are the standards. (UI-48A Interface) CONTENTS Panel Introduction 02 Remote controller operation
Warm note: The functions described in this manual may differ from the actual functions. The actual functions are the standards. (UI-48A Interface) CONTENTS Panel Introduction 02 Remote controller operation
INSTRUCTIONS INSTRUCTIONS CONTENTS ACCESSORY. DVD Parental control function. DVD Parental control function. Accessory. Quantity 1PC.
 CONTENTS Panel Introduction 02 Basic Functions 03 Remote Control Function 05 Turn the Unit On/Off 07 Enter into the Main Interface 07 Play SD card/usb memory device 07 Radio Function Operation 08 Disc
AM/FM/USB CD/MP3 PLAYER WITH BLUETOOTH
 INSTALLATION NOTES AM/FM/USB CD/MP3 PLAYER WITH BLUETOOTH 1. Please read these installation and operation instructions before installation. 2. Make sure to connect all other wires before power connection.
Table of contents. Precautions. Media and Data Type. Menu operation. 1. Radio. 2.Multimedia player. Play disc. Play SD/USB. 4.Bluetooth (optional)
") DD-6442B T Table of contents Precautions Media and Data Type Menu operation 1. Radio 2.Multimedia player Play disc Play SD/USB 3.GPS navigation system (optional) 4.Bluetooth (optional) 5.TV function (optional)
DD-6442B T Table of contents Precautions Media and Data Type Menu operation 1. Radio 2.Multimedia player Play disc Play SD/USB 3.GPS navigation system (optional) 4.Bluetooth (optional) 5.TV function (optional)
PRECAUTIONS. How to Handle Discs. Lithium Battery Cell Warnings
 CONTENTS Precautions... 1 How to Handle Discs... 1 Lithium Battery Cell Warnings... 1 Installation... 2 Prepare Radio... 2 Mount Radio... 2 Wiring Connections... 3 Uninstall the Main Unit... 4 Control
OWNER S MANUAL M3-TFT DAB+
 OWNER S MANUAL M3-TFT DAB+ INSTALLATION... 3-4 WIRING CONNECTION... 5 OPERATION... 6 LOCATION OF THE KEYS... 6 POWER ON/OFF THE UNIT... 7 MAIN MENU... 7 SETUP... 7 RESET FUNCTION... 9 SLIGHTFOG AFTER OPERATION...
MOBILE AUDIO SYSTEM PATVR14 USER MANUAL
 MOBILE AUDIO SYSTEM PATVR14 USER MANUAL CONTENTS Installation... 3 Mounting... 4 Wiring Connection... 5 Operation... 6 Location of the keys... 6 Power on/off the unit... 7 Main menu... 7 Setup... 7 Reset
PRECAUTIONS. How to Handle Discs. Lithium Battery Cell Warnings
 CONTENTS Precautions... 1 How to Handle Discs... 1 Lithium Battery Cell Warnings... 1 Installation... 2 Prepare Radio... 2 Mount Radio... 2-3 Wiring Connections... 3 Removal of the Main Unit...3 Control
OWNER S MANUAL G4-RM55OO
 OWNER S MANUAL G4-RM55OO INSTALLATION... 3-4 WIRING CONNECTION... 5 OPERATION... 6 LOCATION OF THE KEYS... 6 POWER ON/OFF THE UNIT... 7 MAIN MENU... 7 SETUP... 7 RESET FUNCTION... 9 SLIGHTFOG AFTER OPERATION...9
European frequency range USA frequency range. European frequency range USA frequency range 2 CHANNEL VIDEO OUT kHz kHz
 e1 European frequency range USA frequency range 522-1620kHz 530-1710kHz European frequency range USA frequency range 87.5-107.9MHz 2 CHANNEL VIDEO OUT 19 WIRING DIAGRAM This player is equipped with ISO
Specifications. General and Radio Controls
 General and Radio Controls 2 7 6 4 AUX IN BAND LOUDNESS Specifications Supply voltage : 12V DC(11V-15V) Current consumption : Less than 10A Audio Signal Output : 2ch line out Characteristics : (1) Frequency
Contents. Precaution. Before installing this product. Precaution... Main Menu... Radio... Play DVD... USB/SD Important safety information
 USER MANUAL Thank you for buying this XTRONS product. Please read through these instructions so you will know how to operate this unit properly. After you have finished reading the instructions, keep this
PRECAUTIONS. How to Handle Discs. Lithium Battery Cell Warnings
 CONTENTS Precautions... 1 How to Handle Discs... 1 Lithium Battery Cell Warnings... 1 Installation... 2 Prepare Radio... 2 Mount Radio... 2-3 Wiring Connections... 3 Removal of the Main Unit... 4 Control
OPERATION MANUAL MM1C25 DIGITAL AUDIO PLAYER AM/FM STEREO USB BLUETOOTH CAPABLE HEADPHONE OUTPUT
 OPERATION MANUAL MM1C25 DIGITAL AUDIO PLAYER AM/FM STEREO USB BLUETOOTH CAPABLE HEADPHONE OUTPUT CONTENTS CONTENTS. 1 CONTROL PANEL ILLUSTRATION 2 WIRE DIAGRAM 3 INSTALLATION.. 4 BASIC OPERATION... 5 RADIO
PRECAUTIONS. How to Handle Discs. Lithium Battery Cell Warnings
 PRECAUTIONS How to Handle Discs Handle a disc by its edges. Do not touch the playing side. Before inserting a disc, wipe the disc outward from the disc center with a clean, soft, dry and lint-free cloth.
Precautions... 1 Take Precaution...1 Installation Installation Procedures... 2 Installation Opening...
 CONTENTS Precautions... 1 Take Precaution...1 Installation... 2-3 Installation Procedures... 2 Installation Opening... 2 Wiring Connections... 3 Remove of the Main Unit...3 Control Panel Button Locations...
INSTRUCTION MANUAL DECKLESS CAR AUDIO PLAYER CA-2787SU. Please read the instruction manual before used.
 INSTRUCTION MANUAL DECKLESS CAR AUDIO PLAYER CA-2787SU Please read the instruction manual before used. Key Function: 1. Mode Button Press to switch between RADIO/USB/SD-MMC/Aux-In Card mode. The unit preset
PLMR7BTW OWNER S MANUAL. Mobile Audio System
 PLMR7BTW OWNER S MANUAL Mobile Audio System PLL Synthesizer Stereo Radio Automatic Memory Storing USB Interface SD Interface 3.5mm Input Jack Bluetooth Function 1 CONTENTS Installation... 3 Take out screw
RFX9500DVD Car Stereo DVD/SVCD/VCD/CD/MP3/MP4 Player with PLL AM/FM Stereo Radio ipod Compatible Front Aux Input Flip Down Front Panel
 RFX9500DVD Car Stereo DVD/SVCD/VCD/CD/MP3/MP4 Player with PLL AM/FM Stereo Radio ipod Compatible Front Aux Input Flip Down Front Panel BEFORE YOU BEGIN PRECAUTIONS: CAUTION: USE OF CONTROLS OR ADJUSTMENT
Contents. Precaution Main Menu Radio Play DVD... 8 USB/SD AUX Input Bluetooth Navigation VMCD...
 USER MANUAL Thank you for buying this XTRONS product. Please read through these instructions so you will know how to operate this unit properly. After you have finished reading the instructions, keep this
JRV4100 Owner s Manual
 JRV4100 Owner s Manual Content Button Description.02 Remote Control..03 Main Menu...04 Radio Operation.04 USB /SD Operation..06 Settings Operation..06 Bluetooth Operation..08 Aux-In Operation 09 Troubleshooting..11
PRECAUTIONS. How to Handle Discs. Lithium Battery Cell Warnings
 CONTENTS Precautions... 1 How to Handle Discs... 1 Lithium Battery Cell Warnings... 1 Installation... 2 Prepare Radio... 2 Mount Radio... 2-3 Wiring Connections... 3 Removal of the Main Unit...3 Control
Accessories Unit Installation..03. Wire Connection 03. Parking Brake Connection 04. Speaker connection.05. Button Description..
 Content Accessories...02 Unit Installation..03 Wire Connection 03 Parking Brake Connection 04 Speaker connection.05 Button Description..06 Remote Control..07 Main Menu...10 Radio Operation.10 DVD Operation..11
Contents. Precaution. Before installing this product. Precaution... Main Menu... Radio... Play DVD... USB/SD Important safety information
 USER MANUAL Thank you for buying this XTRONS product. Please read through these instructions so you will know how to operate this unit properly. After you have finished reading the instructions, keep this
MR100 INSTALLATION/OWNER'S MANUAL Digital Media Marine Receiver
 MR100 INSTALLATION/OWNER'S MANUAL Digital Media Marine Receiver Preparation MR100 INSTALLATION Please read entire manual before installation. Before You Start Disconnect negative battery terminal. Consult
INSTRUCTION MANUAL CD MP3 WMA USB AUX-IN
 NA99i Car Audio System Player INSTRUCTION MANUAL CD MP3 WMA USB AUX-IN ipod/iphone Safety WARNING Stop the car before operating the unit. Important to know... To prevent a short circuit, never put or leave
Precautions... 1 Take Precaution...1 Installation Installation Procedures... 2 Installation Opening...
 CONTENTS Precautions... 1 Take Precaution...1 Installation...2-3 Installation Procedures... 2 Installation Opening... 2 Wiring Connections...3 Removal of the Main Unit... 3 Overview of the Components...
Accessories Unit Installation..03. Wire Connection 03. Parking Brake Connection 04. Speaker connection.05. Button Description.
 Content Accessories...02 Unit Installation..03 Wire Connection 03 Parking Brake Connection 04 Speaker connection.05 Button Description.06 Remote Control..07 Main Menu...10 Radio Operation.10 DVD Operation..11
PLMR18 OWNER S MANUAL. Mobile Audio System.
 PLMR18 OWNER S MANUAL Mobile Audio System PLL Synthesizer Stereo Radio Automatic Memory Storing Preset Equalization USB/ SD Interface 3.5mm Jack input www.pyleaudio.com 1 CONTENTS Installation... 3 Take
T718DVPL HEADREST DVD PLAYER
 Notice to Customers T718DVPL This unit is manufactured with precision elements. Pay attention to protection against dampness. Prevent the hard object from scratching LCD suface. LCD may have a few color
MOBILE AUDIO SYSTEM PLRVST300 USER MANUAL
 MOBILE AUDIO SYSTEM PLRVST300 USER MANUAL PLL Synthesizer Stereo Radio Automatic Memory Storing DVD/CD-R/RW and MP3 Compatible Alarm Clock Auxiliary Audio/Video Input USB Interface Headphone Output 6 Speaker
Contents. Precaution. Before installing this product. Precaution... Main Menu... Radio... Play DVD... Important safety information USB/SD...
 USER MANUAL Thank you for buying this XTRONS product. Please read through these instructions so you will know how to operate this unit properly. After you have finished reading the instructions, keep this
NOTICES NOTICE OF INTENDED USE
 USER MANUAL Thank you for buying this XTRONS product. Please read through these instructions so you will know how to operate this product properly. After you have finished reading the instructions, keep
USER S MANUAL P9630B USER S MANUAL P9630B.
 USER S MANUAL USER S MANUAL P9630B BLUETOOTH DVD/MP3 AM/FM RECEIVER 6.2" (157 mm) WIDESCREEN TOUCHSCREEN DIGITAL TFT LED MONITOR www.planetaudiousa.com TELEPHONE 888-990-1236 US Toll-free 805-751-4854
DNX531VBT DNX531VBTM DNX4310DAB
 DNX531VBT DNX531VBTM DNX4310DAB GPS NAVIGATION SYSTEM INSTRUCTION MANUAL What Do You Want To Do? Thank you for purchasing the KENWOOD GPS NAVIGATION SYSTEM. In this manual, you will learn various convenient
USERS MANUAL 7 INCH DASH MP5 PLAYER
 USERS MANUAL 7 INCH DASH MP5 PLAYER Summarizes the basic functions This product uses high-definition digital touch screen, Fine bright image, Coupled with high-quality audio processing chip, Has reached
SM-CDM1032 CD/MP3-RECEIVER CD/MP3-
 SM-CDM1032 CD/MP3-RECEIVER Instruction manual CD/MP3- Dear customer! Thank you for purchasing our product. For safety, it is strongly recommended to read this manual carefully before connecting, operating
INSTRUCTION MANUAL. AM/FM Digital Tuning Radio W/ USB/SD/MP3 & Hands-Free Bluetooth + SEL 5 * 9 0 # T-M TEL CLEAR LOUD PTY TA AF RPT RDM EON TP POWER
 BND MOD AP INSTRUCTION MANUAL MIC LOUD PTY TA AF RPT RDM EON TP POWER A.P SCN DN MODE BND TOP 1 5 * MUTE + SEL CLK INT RPT 2 3 6 7 8 9 0 # T-M TEL CLEAR CAR AUDIO REMOTECONTR OLLER UP ST LOC LOUD RDM 4
DNX7210BT DNX5210BT DNX5510BT DNX4210BT
 DNX7210BT DNX5210BT DNX5510BT DNX4210BT GPS NAVIGATION SYSTEM INSTRUCTION MANUAL What Do You Want To Do? Thank you for purchasing the KENWOOD GPS NAVIGATION SYSTEM. In this manual, you will learn various
LOCATION OF PARTS AND CONTROLS
 LOCATION OF PARTS AND CONTROLS 3 1 15 9 5 11 14 16 6 6 RCD 66 4x 75WATT 7 8 13 10 19 0 1 3 4 7 1 5 4 (1-6) 1. POWER ON/OFF ( ). FUNCTION ECT BUTTON: BASS/TREBLE/BALANCE/FADER / SEEK/PI SOUND/ RETUNE/MASK
CAR RADIO LIVERPOOL 110
 CAR RADIO LIVERPOOL 110 Operating and installation instruction 1. PWR(power)/MUTE 2. (release button) 3. SEL/VOL 4. DISC slot 5. LCD 6. TA 7. AF/T-MENU 8. (eject button) 9. USB interface 10. AUX IN 11.
USER S MANUAL. BV9362BI BLUETOOTH DVD/MP3/CD AM/FM RECEIVER FEATURING 6.2" (157 mm) WIDESCREEN TOUCHSCREEN DIGITAL TFT LCD MONITOR USER S MANUAL
 WIDESCREEN TOUCHSCREEN DIGITAL TFT LCD MONITOR USER S MANUAL") USER S MANUAL BV9362BI BLUETOOTH DVD/MP3/CD AM/FM RECEIVER USER S MANUAL BV9362BI BLUETOOTH DVD/MP3/CD AM/FM RECEIVER FEATURING 6.2" (157 mm) WIDESCREEN TOUCHSCREEN DIGITAL TFT LCD MONITOR BOSS Audio Systems
USER S MANUAL BV9362BI BLUETOOTH DVD/MP3/CD AM/FM RECEIVER USER S MANUAL BV9362BI BLUETOOTH DVD/MP3/CD AM/FM RECEIVER FEATURING 6.2" (157 mm) WIDESCREEN TOUCHSCREEN DIGITAL TFT LCD MONITOR BOSS Audio Systems
PRECAUTIONS. How to Handle Discs. Lithium Battery Cell Warnings
 CONTENTS Precautions... 1 How to Handle Discs... 1 Lithium Battery Cell Warnings... 1 Installation... 2 Prepare Radio... 2 Mount Radio... 2-3 Wiring Connections... 3 Removal of the Main Unit...3 Control
USER S MANUAL. BV9358B BLUETOOTH DVD/MP3/CD AM/FM RECEIVER FEATURING 6.2" (157 mm) WIDESCREEN TOUCHSCREEN DIGITAL TFT LED MONITOR USER S MANUAL
 WIDESCREEN TOUCHSCREEN DIGITAL TFT LED MONITOR USER S MANUAL") USER S MANUAL BV9358B BLUETOOTH DVD/MP3/CD AM/FM RECEIVER USER S MANUAL BV9358B BLUETOOTH DVD/MP3/CD AM/FM RECEIVER FEATURING 6.2" (157 mm) WIDESCREEN TOUCHSCREEN DIGITAL TFT LED MONITOR BOSS Audio Systems
USER S MANUAL BV9358B BLUETOOTH DVD/MP3/CD AM/FM RECEIVER USER S MANUAL BV9358B BLUETOOTH DVD/MP3/CD AM/FM RECEIVER FEATURING 6.2" (157 mm) WIDESCREEN TOUCHSCREEN DIGITAL TFT LED MONITOR BOSS Audio Systems
OWNER S MANUAL. Mobile Video System
 OWNER S MANUAL Mobile Video System TABLE OF CONTENTS Safety Information..2 Features...3 Accessories..4 Front Panel.5 Rear Panel.5 Remote Control...6 Installation 8 Unit Removal..9 Wire Connection 10 Disc
USER S MANUAL. BV9358B BLUETOOTH DVD/MP3/CD AM/FM RECEIVER FEATURING 6.2" (157 mm) WIDESCREEN TOUCHSCREEN DIGITAL TFT LED MONITOR USER S MANUAL
 WIDESCREEN TOUCHSCREEN DIGITAL TFT LED MONITOR USER S MANUAL") USER S MANUAL BV9358B BLUETOOTH DVD/MP3/CD AM/FM RECEIVER USER S MANUAL BV9358B BLUETOOTH DVD/MP3/CD AM/FM RECEIVER FEATURING 6.2" (157 mm) WIDESCREEN TOUCHSCREEN DIGITAL TFT LED MONITOR BOSS Audio Systems
USER S MANUAL BV9358B BLUETOOTH DVD/MP3/CD AM/FM RECEIVER USER S MANUAL BV9358B BLUETOOTH DVD/MP3/CD AM/FM RECEIVER FEATURING 6.2" (157 mm) WIDESCREEN TOUCHSCREEN DIGITAL TFT LED MONITOR BOSS Audio Systems
MT2108. Operating and Installation Guide SUB PWR BAND MD REL TUNE/ TRACK AF 1 PAU 2 INT 3 RPT 4 RDM 5 6 COMPACT DIGITAL AUDIO
 MT08 SUB PWR BAND MD REL COMPACT DIGITAL AUDIO TUNE/ TRACK SCN A/PS DISP PTY TA AF PAU INT 3 RPT 4 RDM 5 6 Operating and Installation Guide LOCATIONS OF CONTROLS 0 9 3 4 5 SUB PWR BAND MD REL COMPACT DIGITAL
HD829THD USER MANUAL
 HD829THD USER MANUAL Thank you for buying this XTRONS product. Please read through these instructions so you will know how to operate this product properly. After you have finished reading the instructions,
OWNER'S MANUAL MODEL: PLCDUSB78MP3
 OWNER'S MANUAL MOTORIZED SLIDE DOWN DETACHABLE PANEL FM/AM BAND RADIO RECEIVER ELECTRONIC ANTI-SHOCK CD / MP3 PLAYER CD CHANGER / AUXILIARY INPUT CONTROL USB HOST DRIVE ON FRONT PANEL ENCODER AUDIO CONTROL
Accessories Unit Installation..03. Wire Connection 03. Parking Brake Connection 04. Speaker connection.05. Button Description.
 Content Accessories...02 Unit Installation..03 Wire Connection 03 Parking Brake Connection 04 Speaker connection.05 Button Description.06 Remote Control..07 Main Menu...09 Radio Operation.09 USB /SD Operation..10
AX1300BT SPECIFICATIONS: MECHLESS AM/FM MULTIMEDIA PLAYER RECEIVER BLUETOOTH w BUILT-IN SPEAKERS DESIGNED FOR AUSTRALASIAN CONDITIONS
 MECHLESS AM/FM MULTIMEDIA PLAYER RECEIVER BLUETOOTH w BUILT-IN SPEAKERS SPECIFICATIONS: GENERAL: Mechless Fixed Face Panel Ultra Memory Power Backup Built-In Speakers ISO DIN Mounting ISO Wiring harness
USER S MANUAL P9640B USER S MANUAL P9640B.
 USER S MANUAL USER S MANUAL P9640B BLUETOOTH DVD/MP3 AM/FM RECEIVER 6.2" (157 mm) WIDESCREEN TOUCHSCREEN DIGITAL TFT LED MONITOR www.planetaudiousa.com TELEPHONE 888-990-1236 US Toll-free 805-751-4854
MARINE. Operation Manual. Model No.: MBB-3. Effective from 31 / May / x210mm
 MARINE Operation Manual Model No.: MBB-3 Effective from 31 / May / 07 145x210mm Mounting the Black Box 1. Precautions Choose the mounting location carefully so that the unit will not interfere with the
Owner s Manual AWM910 JENSEN AWM910 COMPACT DISC PLAYER RADIO CD COMPACT MUSIC SYSTEM MUTE AUX BAND AUX IN PUSH PUSH PWR VOL ALARM T/F AUD SPK A SPK B
 AWM910 Owner s Manual COMPACT DISC PLAYER PUSH 1 2 3 4 5 6 RPT SCAN RDM H M PUSH PWR VOL ALARM SET ON/OFF EQ T/F AUD RADIO CD COMPACT MUSIC SYSTEM MUTE AUX BAND CD AUX IN A B A+B JENSEN AWM910 Thank You!
KIV-BT901 KIV-701 DIGITAL MEDIA RECEIVER INSTRUCTION MANUAL. Register Online Register your Kenwood product at
 KIV-BT901 KIV-701 DIGITAL MEDIA RECEIVER INSTRUCTION MANUAL Before reading this manual, click the button below to check the latest edition and the modified pages. Take the time to read through this instruction
DNX7280BT DNX5280BT DNX4280BT DNX5580BT
 DNX7280BT DNX5280BT DNX4280BT DNX5580BT GPS NAVIGATION SYSTEM INSTRUCTION MANUAL Before reading this manual, click the button below to check the latest edition and the modified pages. 2010 Kenwood Corporation
Locations and Names of the Controls
 Locations and Names of the Controls 1 2 3 4 5 6 20 19 18 7 8 9 10 11 12 13 14 15 16 17 1. NFC DETECTION AREA 2. IR REMOTE CONTROL SENSOR 3. 1/2/3 BUTTON 1 TEL /REDIAL BUTTON 2 HANG UP BUTTON 4. ZONE 1/2
CAD-471 INSTRUCTION MANUAL
 CAD-471 INSTRUCTION MANUAL Car Stereo CD/CDR/CDRW/MP3 Player with PLL FM Stereo Radio RDS USB / MMC / SD Card Input Bluetooth Function in Mobile Phone Flip Down and Detachable Front Panel System LOCATION
USER OPERATION MANUAL
 SM-30BT USER OPERATION MANUAL TABLE OF CONTENTS Safety Information. 1 Park/Brake wire.. 1 Installation/Removal... 2 Playable Disc, DVD Care, MP3... 3 Maintenance. 3 Replacing Remote Control Battery...
Operating Manual. 7" Motorized DVD Micro System with AM/FM Radio, USB & SD inputs. Model: NDL-431
 Operating Manual 7" Motorized DVD Micro System with AM/FM Radio, USB & SD inputs Model: NDL-431 READ THESE INSTRUCTIONS INCLUDED IN THIS IM THOROUGHLY PRIOR TO CONNECTING AND OPERATING. PLEASE RETAIN THIS
User Manual. Portable DVD Player with AM/FM Radio and USB/SD/MMC Inputs. Model: NDL-252
 User Manual Portable DVD Player with AM/FM Radio and USB/SD/MMC Inputs Model: NDL-252 Before attempting to connect, operate or adjust this player, please read these instructions completely. And then put
648UA. User s Manual IN-DASH SINGLE-DIN MP3-COMPATIBLE CD AM/FM RECEIVER WITH USB AND SD MEMORY CARD PORTS AND FRONT PANEL AUX INPUT
 User s Manual 648UA IN-DASH SINGLE-DIN MP3-COMPATIBLE CD AM/FM RECEIVER WITH USB AND SD MEMORY CARD PORTS AND FRONT PANEL AUX INPUT Boss Audio Systems is not affiliated with Apple, Inc. LOCATION AND FUNCTION
PLRDD19UB OWNER S MANUAL. Mobile Audio System
 PLRDD19UB OWNER S MANUAL Mobile Audio System PLL Synthesizer Stereo Radio MP3/WMA Player Automatic Memory Storing Preset Equalization USB/SD card Interface 1 CONTENTS Installation... 3 Wiring Connection...
WIRES CONNECTION SPECIFICATION GENERAL. Preface
 WIRES CONNECTION Preface RED R WHITE L RCA LINE OUT Thank you for purchasing this car audio product. Please read this manual carefully before operating this car audio product. Please keep this manual for
XEMIO-950 MP5 PLAYER / 4GB MEMORY / TOUCH SCREEN. For information and support,
 XEMIO-950 MP5 PLAYER / 4GB MEMORY / TOUCH SCREEN For information and support, www.lenco.eu To the customer: Thank you for purchasing this MP5 player. When opening the box for the first time, please check
DESCRIPTION OF BUTTONS ON REMOTE CONTROL
 DESCRIPTION OF BUTTONS ON REMOTE CONTROL 1. POWER button 2. A.P button 3. SCN(SCAN) button 4. CLK button 5. MODE button 6. BND(BAND) button 7. Number(0~9) buttons 8. * button 9. MUTE button 10. T-M button
PLRRR18U OWNER S MANUAL. Mobile Audio System
 PLRRR18U OWNER S MANUAL Mobile Audio System PLL Synthesizer Stereo Radio MP3/WMA Player Automatic Memory Storing Preset Equalization USB/MICRO SD Interface 1 CONTENTS Installation... 3 Wiring Connection...
USER S MANUAL. BV9371BD BLUETOOTH DVD/MP3/CD AM/FM RECEIVER FEATURING DETACHABLE 6.2" (157 mm) WIDESCREEN TOUCHSCREEN DIGITAL TFT LED MONITOR
 WIDESCREEN TOUCHSCREEN DIGITAL TFT LED MONITOR") USER S MANUAL BV9371BD BLUETOOTH DVD/MP3/CD AM/FM RECEIVER USER S MANUAL BV9371BD BLUETOOTH DVD/MP3/CD AM/FM RECEIVER FEATURING DETACHABLE 6.2" (157 mm) WIDESCREEN TOUCHSCREEN DIGITAL TFT LED MONITOR BOSS
USER S MANUAL BV9371BD BLUETOOTH DVD/MP3/CD AM/FM RECEIVER USER S MANUAL BV9371BD BLUETOOTH DVD/MP3/CD AM/FM RECEIVER FEATURING DETACHABLE 6.2" (157 mm) WIDESCREEN TOUCHSCREEN DIGITAL TFT LED MONITOR BOSS
Rear Panel RockOnRoller
 Getting Connected The Karaoke RockOnRoller is an all-in-one karaoke solution, there were no additional connections required to use the system. The additional connections that can be made are the AV Output
XMD1 XMD2. Owner s manual AM/FM CD PLAYER WITH CD CHANGER CONTROL (XMD1 ONLY)
") Owner s manual XMD1 XMD2 Contents 1. PRECAUTIONS... 2 2. FEATURES... 2 3. CONTROLS... 3 4. BUTTON TERMINOLOGY... 3 5. WIRED REMOTE CONTROL UNIT OPERATIONS... 4 6. HANDLING COMPACT DISCS... 5 7. OPERATION...
Owner s manual XMD1 XMD2 Contents 1. PRECAUTIONS... 2 2. FEATURES... 2 3. CONTROLS... 3 4. BUTTON TERMINOLOGY... 3 5. WIRED REMOTE CONTROL UNIT OPERATIONS... 4 6. HANDLING COMPACT DISCS... 5 7. OPERATION...
INSTRUCTION MANUAL LTC CDD SUPPORT USB/SD INTERFACE AND FRONT AUX ipod/iphone FULL CONTROL RDS MP3/WMA PLAYER/RECEIVER
 INSTRUCTION MANUAL LTC CDD-080 SUPPORT USB/SD INTERFACE AND FRONT AUX ipod/iphone FULL CONTROL RDS MP/WMA PLAYER/RECEIVER MODE MUTE LOCAL EQ ESC XBS INFO ipod CTR AUDIO MENU . INSTALLATION. CONNECTING
In-Dash AM/FM Receiver with MP3 Playback & USB/SD/AUX Inputs. Receiver Models: PLMRB29W/PLMRB29B MIC USER S MANUAL
 In-Dash AM/FM Receiver with MP3 Playback & USB/SD/AUX Inputs Receiver Models: PLMRB29W/PLMRB29B MIC USER S MANUAL COTENTS COTENTS... 1 PRECAUTIONS... 2 Precautions & Warnings... 2 Lithium Battery Cell
DESCRIPTION OF BUTTONS ON REMOTE CONTROL
 DESCRIPTION OF BUTTONS ON REMOTE CONTROL 1. POWER button 2. A.P button 3. SCN(SCAN) button 4. CLK button 5. SRC button 6. BND(BAND) button 7. Number(0~9) buttons 8. * button 9. MUTE button 10. T-M button
Audio System. Audio System. The in-dash CD changer holds up to six discs. You operate the CD changer with the same controls used. changer operation.
 Without Navigation System AM/FM/CD Changer For EX, EX-V6, and LX-V6 models Your Honda s audio system provides clear reception on both AM and FM bands, while the preset bars allow you to easily select your
ipod Digital Media Center AM / FM Radio
 INSTRUCTION MANUAL MULTI- ENVIRONMENT PLAYER AQ-IP-3B- AQ-IP-3B-X ipod Digital Media Center AM / FM Radio INFO TOP 1. MOUNTING PRECAUTIONS The AQ-IP-3B-X is designed for a multi environment application.
Working power 11-16V DC Allowable,Negative Ground MPEG/AC-3 MPEG-4 O MPEG/AAC AVC X MPEG/AC-3 MPEG-1/2 O AAC AVC X
 PNV9650 SPECIFICATIONS Model No. PNV9650 General features DVD ±R/RW Audio & Video CD ±R/RW Audio & Video FM/AM Tuner (Switchable Tuner) USB Port SD Port (64GB Max) USB Charging (1A) A/V In/Out Rear Camera
BAND AST USB VOL PWR/SEL RESET
 1 2 4 BAND AST VOL PWR/SEL 5 6-10 +10 USB RESET 04.2011 Panel Function 5 4 9 6 7 1 14 1 2 INT 4 MODE CLK BAND AST RPT 5 RDM 6 VOL PWR/SEL -10 +10 RESET USB 1 2 8 10 11 12 15 1. PWR/SEL/VOL (power/mode
DESCRIPTION OF CONTROLS ON THE FRONT CONTROL PANEL
 DESCRIPTION OF CONTROLS ON THE FRONT CONTROL PANEL Front Control Panel Front Cabinet after removing Front Control Panel 1. RELEASE button 2. SEL & VOL knob 3. POWER & MUTE button 4. LCD 5&6. >> And
To ensure safety while driving. and to comply with laws, drivers should not watch video or. operate the video device while driving.
 To ensure safety while driving and to comply with laws, drivers should not watch video or operate the video device while driving. INSTRUCTIONS CONTENTS General Information 1 Safety Notice 2 Accessories
VOLVO AUDIO SYSTEM. Operating Instructions. Radio AM/FM/CD MP3/USB/iPod Delphi part number
 VOLVO AUDIO SYSTEM Operating Instructions Radio AM/FM/CD MP3/USB/iPod Delphi part number 2823960 Radio AM/FM/CD MP3/USB/iPod/Bluetooth Delphi part numbers 2823962, 2823964 2 Table of Contents Table of
DNX7310BT DNX7310BTM DNX5310BT DNX5310BTM DDX7031BT
 DNX7310BT DNX7310BTM DNX5310BT DNX5310BTM DDX7031BT What Do You Want To Do? Thank you for purchasing the KENWOOD GPS NAVIGATION SYSTEM/ MONITOR WITH DVD RECEIVER. In this manual, you will learn various
Functions of Remote Control Unit Buttons
 Functions of Remote Control Unit Buttons Mode Button Radio CD MP3 [SRC] Turns power on and off. When press and held for 1 second: Turns power off. Switches between radio and CD/MP3. [BND] Switches reception
DRS-1908 User Manual MIC1 MIC2 1 MIC VOL 2 POWER
 /BAND DVD/RADIO VOL- VOL+ DRS-1908 User Manual MIC1 MIC2 1 MIC VOL 2 POWER Safety Information...2-3 Notes on Discs...4-5 Preparation...6 Identification of Control...7 Remote Control...8 Getting Started...9-12
INTEGRATIVE USER'S MANUAL USER'S MANUAL CAR GPS.CAR.AUDIO.CAR.VIDEO. Before operating this set, please read these instructions completely
 CAR GPS.CAR.AUDIO.CAR.VIDEO INTEGRATIVE USER'S MANUAL USER'S MANUAL Before operating this set, please read these instructions completely CONTENT 1. Safety precautions 1 2. Wiring & connections 2 3. Front
CAR MULTIMEDIA SYSTEM (USER MANUAL)
") CAR MULTIMEDIA SYSTEM (USER MANUAL) SAFETY The power supply of this unit is 12V only (negative ground), please don t connect it to 24V, otherwise it will damage this unit. Don t operate the machine during
CAR MULTIMEDIA SYSTEM (USER MANUAL) SAFETY The power supply of this unit is 12V only (negative ground), please don t connect it to 24V, otherwise it will damage this unit. Don t operate the machine during
Information contained herein is subject to change without prior notice.
 COPYRIGHT Information contained herein is subject to change without prior notice. Any contents and information in this manual may not be reproduced or transmitted in any form either electronically or mechanically
CONTENTS. Troubleshooting.27 Specifications...30
 CONTENTS Cautions...1 Disc Notes....2 Installation..3 Connections...8 Front panel...9 Remote control 11 Operation..14 Radio operation.14 AV in and AV out.15 DVD operation 16 CD/VCD/SVCD disc playback...18
1. INSTALLATION. Trim Plate. Bend the appropriate tabs to hold the sleeve firmly in place.
 0 R - 0 0896 . INSTALLATION The following illustration shows a typical installation. If you have any questions or require information regarding installation kits, consult your customer car audio dealer