OPERATION MANUAL GOOD DESIGN PRODUCT. Design Award. HKEIA AWARD For Outstanding Innovation and Technology Products IT'S VERY WELL MADE IN TAIWAN
|
|
|
- Clarence Sherman
- 5 years ago
- Views:
Transcription

1 OPERATION MANUAL GOOD DESIGN PRODUCT IT'S VERY WELL MADE IN TAIWAN Design Award HKEIA AWARD For Outstanding Innovation and Technology Products GREEN PRODUCT It has been RoHS Compliant
2 Challenger 1000 Operation Manual Congratulation and thank you for the purchase of this all-in-one portable sound system. To ensure a trouble-free operation, please read the manual thoroughly to fully understand its controls and functions. Followings are various Challenger 1000 variants : 1. Challenger 1000 portable sound system only.( Fig. 1 ) 2. Challenger 1000 with CD / USB Player.( Fig.2 ) 3. Challenger 1000 with Tape Deck.( Fig.3 ) 4. Challenger 1000 with CD / USB Player & Digital Recorder.( Fig.4 ) All the above versions, except Fig.3, can be installed with up to 4 receiver modules, among which one can be transmitter module. The wireless receiver/transmitter module can be in either UHF or VHF band and is a PLL synthesized type with 16 preset frequencies. Configuration : All versions of Challenger 1000 series come equipped with the following : 1. AC power cord. 2. 1~4 or no wireless receiver/transmitter module(s). 3. 1~4 transmitters, either handheld or bodypack transmitter ( except version with no module installed ). Optional accessories : 1. Weather proof dust cover. 2. Tripod stand 3. Companion powered speaker ( Slave speaker ).( Fig. 5 ) 4. Companion passive speaker C-SP.( Fig. 6 ) 5. Wired microphone. Remark: Manufacturer reserves the rights to change the above combinations without prior notice. 1
3 Challenger 1000 ( Master ) ( Basic configuration ) A,B&D. Receiver modules C. Transmitter module AC IN~ 90~260 VAC(150W) 47~63Hz 5A Max 1. MIC IN. 2. LINE-IN VOL. 3. TAPE CONTROL 4. BASS 5. TREBLE 6. MASTER VOL. 7. MIC IN 8. LINE IN / OUT 9. VOICE PRIORITY 10. ACTIVE OUT ( MASTER OUT ) 11. BATTERY LOW LED 12. CHARGING INDICATOR 13. FUSE ~32V DC-IN 15. AC-IN 16. POWER 17. EXT.SP Fig. 1 2
4 Challenger 1000 ( Master ) (CD / USB Player version ) 1. LCD DISPLAY 2. PLAY/PAUSE 3. STOP 4. SKIP 5. EJECT 6. CD SELECTOR 7. USB SELECTOR 8. FOLDER SKIP 9. IR LED 10. USB INPUT 11. POWER/VOL CD player remote control. 14 AC IN~ 90~260 VAC(150W) 47~63Hz 5A Max Fig. 2 3
5 Challenger 1000 ( Master ) (Tape Deck Version ) 5 a. EJECT KEY b. COUNTER c. VARIABLE SPEED CONTROL d. AUTO REVERSE INDICATOR e. SINGLE REVERSE INDICATOR f. SINGLE SIDE INDICATOR g. MODE SELECTOR h. FAST FORWARD i. FORWARD PLAY j. STOP k. REVERSE PLAY l. FAST REVERSE m. REC AC IN~ 90~260 VAC(150W) 47~63Hz 5A Max Fig. 3 4

 47~63Hz 5A Max Fig. 4 5")
6 Challenger 1000 ( Master ) (CD / USB Player & Digital Recorder version ) a. POWER b. LCD DISPLAY c. EAR d. USB e. SD CARD SLOT f. LINE g. EQ h. REPEAT i. REWIND j. FORWARD k. REC l. STOP m. MODE. n. PLAY ll o. MIC VOL p. MIC IN q. VOL AC IN~ 90~260 VAC(150W) 47~63Hz 5A Max Fig. 4 5
7 Challenger Slave The Challenger Slave is an active ( powered ) speaker unit with built-in switching power supply as well as rechargeable batteries, complete with similar charging circuit as that of the Challenger 1000 Master unit. It is an extended and indispensable member of the Challenger Audio Link system. A. Slot for receiver module B. slot for receiver/transmitter module 11. SPEAKER OUT (SWITCHED) 12. SPEAKER OUT V DC INPUT 14. FUSE 15. BATTERY LOW INDICATOR 16. BATTERY STATUS INDICATOR 17. AC INPUT 18. CHARGING INDICATOR 19. SLAVE IN 20. SLAVE OUT 21. SLAVE VOL. 6 Fig. 5
8 Challenger Speaker ( C-SP ) The Challenger Speaker is a passive companion speaker for the Challenger 1000 series. It is for connection to the switched or unswitched speaker outs of the Challenger 1000 ( Master ) or the Challenger Slave units. 22. SPEAKER IN 23. SPEAKER OUT 7 Fig. 6
9 Operating procedures After unpacking the unit for the first time, please charge the unit for about 4-5 hours before any operation. This is absolutely necessary as the built-in rechargeable battery might have been discharged naturally due to long shipment and storage time, even though it has been fully charged in the factory prior to shipment. To operate this portable sound unit, switch on the main POWER switch, the GREEN LED above it will glow. However, if the RED LED also glows at the same time, it means the battery is getting weak and a recharge of the battery is necessary. The main POWER switch does NOT switch on the Wireless receiver module and Tape/CD Player/Digital Recorder as each of them has dedicated Power / Volume control switch on its panel. To operate each of them, you must switch them on accordingly. Operating the dynamic wired microphone. To use a cable microphone, simply plug it into any MIC IN socket. The mic sockett accepts both phone and Cannon jack. Rotate the dedicated volume control knob and master volume control, amplified sound could be heard from the speaker when voice is spoken into the cable microphone. When a full range high fidelity sound is emphasized, the mode selector (3) should be put to MUSIC. For vocal frequencies where better clarity and projection is emphasized, put the mode selector to SPEECH and this will produce more mid-range frequency. Operating the Wireless Microphone System. To operate the wireless system, just switch on the power/volume control on the module panel and the matching transmitter. Please have the channel setting on both the transmitter and receiver module be the same before operation. Please as well make sure that master volume control is set to minimum level before turning the unit on, especially working on a wireless version! Set the Master volume control to the mid position. Rotate the volume control knob on receiver panel clockwise to the desired levels. When voice is spoken into the microphone, amplified sound should be heard over the built-in speaker. SDR-6216m/SDR-6116m receiver modules 1 2 UHF SDR-6216m TRUE DIVERSITY RECEIVER PWR/Min Max 1. Channel Indicator 2. Power switch/volume control 3. Channel Selector 4. Transmitter battery weak indicator 5. Diversity A/B Indicator 6. SCAN 7. Squelch control


10 First turn on the Power of the main unit. Then turn on the individual power of the SDR-6216m/ SDR-6116m receiver module. Select a desired channel by pressing the? or? button and the corresponding channel on the Transmitter. When transmitter is turned on, either A or B diversity indicator will flash to indicate that signal has been received. Turning the volume control in clockwise direction can increase the audio output. Once the power volume on the transmitter is too low, the LED indicator (4) on this panel grow will grow to remind. Frequency scanning It is the automatic scan function key. To perform the scan function, the transmitter must be switched off. Once the key is being pressed, the unit will do an auto scan and the next clean channel will be displayed. Change the transmitter channel setting to this setting for an interference- free operation. Squelch(SQ) setting When a channel is in use and undesired interference signal is received, turn the SQ in clockwise direction to make the receiver less sensitive and thus less susceptible to interference. If this still does not solve the problem, it means this frequency is not applicable at current position. Please switch over to the next channel. SDR-216M receiver module SDR-216M VHF PLL TRUE DIVERSITY RECEIVER PWR/Min 1 Max 1. Power switch/volume control 2. Channel selector 3. Diversity A/B Indicator 4. Power-on LED 5. TEST 6. Squelch control First turn on the Power of the main unit. Then turn on the individual power of the SDR-216M receiver module. Select a desired channel by pressing the or button and the corresponding channel on the Transmitter. Switch on the corresponding transmitter. RF or Diversity indicator A or B will light up when both are of the same channel. The movement of the transmitter causes diversity indicator A or B to light up alternately. When both transmitter and receiver are on, speak into the microphone and rotate the separate volume control and main unit volume control, amplified sound could be heard from the speaker. Squelch(SQ)setting When interference occurs, turning the SQ switch in clockwise direction can make it diminish or disappear completely. Frequency testing However if interference noise persists even though SQ is at max. position, then switch to another channel and press the TEST button. When neither RF A nor B indicator light up, then this particular channel is considered clean. The corresponding transmitter channel setting must also be changed accordingly to match the receiver selection. 9
11 R E P E A T E R RP-6016 Transmitter module Channel indicator 2. Antenna socket(tnc type) 3. Channel selectors: Press up) (down) to increase/decrease channel number. Please select a non-interfering frequency channel to those used in the receiver modules. 4. Power on/off 5. Audio sensitivity: Clockwise to increase its sensitivity level and anticlockwise to reduce. 6. Output power switch. L for LOW output power and H for high output power. LOW output power will reduce the RF transmission distance and HIGH output power will extend the possible RF transmission distance. However, if RP-6016m is installed in portable amplifiers, HIGH output power will reduce more operation time than LOW output power since it requires more power for longer RF transmission. Operation of system with CD / USB Player. This operation is valid for version of Challenger 1000 with built-in " CD / USB Player" To operate, push the Power/Vol button to turn on the player. The LCD panel on the player will be lighted up and normal operation is ready. To insert a CD, just push it into the CD slot and the mechanism will suck it in automatically. Rotate the volume control knob to adjust the volume of the player. For Bass and Treble setting, adjust the individual Bass and Treble controls. For more details, please refer to the instruction on " CD / USB Player" controls and functions. Operation of system with Digital Recorder. This operation is valid for version of Challenger 1000 with built-in " Digital Recorder " To operate, first turn on the Master power switch and then press the designated power button of this module. The LCD display will be lighted up and Volume setting can be done by rotating the knob. For Bass and Treble setting, adjust the designated controls respectively. For more details, please refer to the instruction of " Digital Recorder " controls and functions. 10
12 Operation of system with Tape Deck. This operation is valid for version of Challenger 1000 with built-in " Tape Deck ".Rotate the volume control knob of the TAPE / CD control to adjust the volume of the Tape deck. For Bass and Treble setting, adjust the designated controls respectively. For more details, please refer to the instruction of " Tape Deck " Controls and functions. Voice Priority ( Ducking ) operation Voice Priority operation is only necessary when Cassette tape or CD is playing. When the Voice Priority switch ( 9 ) is put to ON position, the ducking function will be activated. While the music is playing, a voice input from either a Wired or Wireless Microphone will temporary override and turn down the volume of the background music and voice could be heard clearly. Background music will return to its original setting when no audio input is entering the microphone for a certain time. However, if the microphone is not switch off, the reentering of music into the microphone will also activate the voice priority function. So, Voice priority is best operated using microphones with on / off switch. However, in an aerobic operation, Voice Priority should NOT be activated! Wired Audio Link MASTER SLAVE SLAVE SLAVE Wir ed Audio Lin k Connectio n SLAVE SLAVE SLAVE The Challenger 1000 could be operated as MASTER only. The Challenger Slave can only be operated as SLAVE. In order to operate Audio Link, you must have a Challenger 1000 unit that operates as a MASTER. Only one unit is allowed to act as MASTER and the other(s) MUST operate as SLAVE(s). A MASTER unit is capable of connecting up to about 20 SLAVE units. To operate Audio Link, connect the Active Out ( 10 ) of the MASTER to the Audio Link IN ( 19 ) of the 1st SLAVE unit. The Out ( 20 ) of this SLAVE should be connected to the IN jack ( 19 ) of the 2nd SLAVE unit. Similar connection shall continue as such for the following SLAVE units. 411

 : For crowds of over 3000. Application: For crowds of 1000 to 2000, ex.speeches or forums.")
13 Volume Control ( 6 ) for MASTER or ( 21 ) for SLAVE. When used on the MASTER, it controls the MASTER as well as all the SLAVE units. When used on the SLAVE unit, it only controls that particular SLAVE unit volume. Maximum number of SLAVE units to be connected with a MASTER is about 20. Wireless Audio Link Different from Wired Audio Link, with new SLAVE's capability of installation of receiver and transmitter modules it eliminates all cable connection and largely extends the number limit of SLAVEs. One Master + several SLAVEs (with receiver and transmitter modules built in) : For crowds of over Application: For crowds of 1000 to 2000, ex.speeches or forums. Configuration: One Master + several SLAVEs (with receiver module built in) R1 T2 R2 T1 R2 Application: For crowds of over ex.stadiums. Configuration: One Master + several SLAVEs (with receiver and transmitter module built in) R7 section 2 section 4 R4 T7 R6 section 2 section 5 T4 R3 T6 R2 section 1 PLATFORM section 6 T3 R2 T2 R1 T:Transmitter R: Receiver Channel:1,2,3,... T1 matches R1, T2 matches R2, T3 matches R3, T4... T1 12
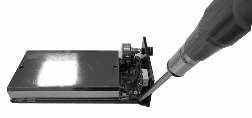
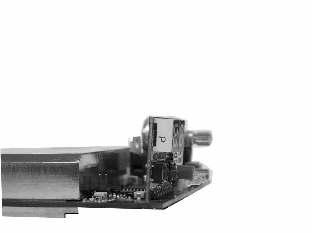
14 Battery Charging Internally, the Challenger 1000 contains 2 pcs of 12V / 5AH maintenance free lead acid battery, which has no memory effect. When the batteries are weak, the power indicator ( 11) LED will keep lighted still. To charge the batteries, simply plug in the AC power supply, the charging process will start automatically. While charging, the charging indicator ( 12 ) will flash GREEN. When batteries are fully charged, the charging indicator ( 12 ) will keep lighted GREEN. External speaker ( 17 ) For audio output connection to another speaker system. Replacement of the covers of receiver module To identify different matches of receiver and transmitter, there are 4 extra sets of button covers with different colors available for replacement. STEP 1: Adjust the PWR/VOL knob to OFF position. After the replacement is completed, just put it back accordingly. STEP 2: Screw off the panel. STEP 3: Separate the panel and the board as demonstrated. STEP 4: Use clamps to hold the button and remove the cover. STEP 5: Repeat STEP 4 to remove the other 2 covers. When the replacement is complete, please assemble the module reversely. REMARK: This procedure is strongly recommended to be operated by technician of importer or dealer. 13
15 Operating the Tape Deck To begin operation switch on the TAPE Power after the main power of Challenger 1000 has been turned on. Keys Functions FF Fast Forward FP Forward Play Stop RP Reverse Play FR Fast Reverse Record Mode selector Speed Control Eject Press this key for fast forward. Press this key for play in forward direction. Press this key to stop the tape. Press this key for play in reverse direction. Press this key for fast reverse. Press this key together with FP or RP key for recording. This key is pressed to select one of the following three modes. Active in Forward nor Reverse direction, the cassette tape will play to the end and stop automatically. This mode may be used for Record and Play. The cassette tape will play to the end, stop, reverse direction to the end of the second side and stop. This mode may be used for Record and Play. This mode provides continuous " Play " operation. It is not operable in Record mode, however, it will record one complete cycle if the recording is begun in the Forward direction. Normal tape speed at center position. Clockwise direction increases tape speed. Counter-clockwise direction reduces tape speed. This key is pressed for ejecting the tape. Rotate the volume control knob ( 8 ) of the TAPE control panel to adjust the volume of the Cassette deck. For Bass and Treble setting, adjust "TREBLE"( 9 ) and "BASS"( 10 ) knobs. 14
16 Operating the CD / USB Player Front remotable is an unique feature of Challenger User can easily control this CD player by clicking its remote from both front and rear Challenger To begin operation switch on the CD Power after the main power of Challenger 1000 has been turned on. Keys Functions Panel Remote PLAY/ When this key is pushed during CD stop, play will start after track search. PAUSE When this key is pushed during CD is playing, then it is changed to pause. When this key is pushed during CD is pausing, then it is changed to play. STOP When CD is not stop, if this key is pushed then CD will stop. CD When press this key will change to cd-mp3 mode. USB When press this key will changed to USB mode. In stop mode: Change the starting play track(file) during stop mode, cyclic to the first track, SKIP+ if it is in the last track. UP/CUE In program entry mode: Change to the next track(file) for program select. In play mode, pause mode, program play mode, random play mode: Single pressed, skip the playing track(file) to next track(file) for normal play/pause mode, to next program index track(file) for program play/pause mode, to next random track(file) for random play /pause mode. Continue pressed, fast forward during play/pause when pressed more than 0.7sec. In stop mode: Change the starting play track (file) during stop mode, cyclic to the last track, SKIP- if it is in the first track. DONW/REV In program Entry mode: Change to the previous track (file) for program select. In play mode, pause mode, program play mode: Single pressed, skip the playing track (file) to precious track(file) for normal play/pause mode, to previous program index track(file) for program play/pause mode. Continue pressed, fast reverse during play/pause when pressed more than 0.7sec. FOLDER-UP In stop mode: Skip the starting play folder to next folder during stop mode, cyclic to the first folder if it is in the last folder. In program entry mode: Change the file for program select to next folder's first file, cyclic to the first folder if it is in the last folder. In normal play mode: Skip the playing file to the next folder's first file. 15
17 EJECT PROG MUTE POWER ESP FIND 0~10; VOL.- VOL.+ FOLDER- DOWN PLAY MODE In stop mode: Skip the starting play folder to previous folder during stop mode, cyclic to the last folder if it is in the first folder. In program entry mode: Change the file for program select to previous folder's first file, cyclic to the last folder if it is in the first folder. In normal play mode: Skip the playing file to the previous folder's first file. In mp3 mode and in USB mode. If this key is pushed, PLAY mode is changed cyclically shown below. PLAY ALL RANDOM REPEAT TRACK REPEAT FOLDER REPEAT ALL RANDOM REPEAT PLAY ALL IN CD mode If this key is pushed, PLAY mode is changed cyclically shown below PLAY ALL RANDOM REPEAT TRACK REPEAT ALL RANDOM REPEAT PLAY ALL. When this key is pushed, door is moved out. Set to programming mode. When programming mode, "stop" key is pushed then program is all cleared. When this key is pushed during CD is playing, the set will mute the output. Push again, will recovery the output. Power SW of the set. In CDDA mode, Press"ESP" key, The ESP display lighted and the set is in electronic anti-shock state. The electronic anti-shock time is about 40 seconds. Press "ESP" key again, cancel the ESP function. In MP3 mode : Press this key once FILE search mode changed. Press this key twice ALBUM search mode changed.if press this key long time once track is displayed.press twice ID3 TAG is displayed. You can use these keys to select the track you want directly. When this key is pushed, the volume will decrease by 1dB per step, the min. volume is 0dB. When this key is pushed, the volume will increase by 1dB per step, the max. volume is 30dB. option ENCODE ENCODE Caution: This player does not accept 8-cm diameter CD. User is advised to have the USB 2.0 formatted in " FAT " or " FAT 32 ". The built-in USB 2.0 player can not be able to read the MP3 files stored in your USB if it is not formatted by either " FAT " or " FAT-32 ". To avoid damage to the USB, remember to detach it only after switching off the player. 16
18 Operating the Digital Recorder Product Features : 1.Digital record to MP3 compression format 2.Highest sample rate at 44.1KHz, 128Kbps (as CD quality) recording tracks. 4.Equiped with 128MB flash memory for 60 min. recording time. 5.Available expanded memory socket of SD card. Up to 512MB ( When using 512 MB SD card, the recording time is available for over 8 hours.) ( If using 1G MB SD card, it will be divided into 99 recording tracks, each track with recording time less than 9:59:59 will be able to display time function on LCD.) 6.USB port to PC for easy download or duplication. 7.EQ mode selection (5 modes: Normal, Classic, Pop, Rock, Jazz) 8.REPEAT function (A-B Repeat, Repeat, Repeat All).. 9.Time counting 10.Two MIC-IN (L/L+R, R) jacks. 11.Line-in control key. 12.Stereo earphone jack. 13.Tack select, Play, Stop, Pause, Forward & Rewind control keys. 14.Mode control keys. 15.Rotary Volume Control for MIC REC. and Volume Level. Usual manual of Digital Recorder & Player 1.Key---Power,REC,PLAY(ll),,MODE,?,? (/LINE IN), A-B(/EQ), ( ), <<(/VOC,/ MP3), >>(/DEL.) 2. Tracks----1~99 tracks. May store 99 tracks both in VOC mode and MP3 Mode, flash memory or SD card. Built-in 128MB NAND flash memory has a capacity of approx. 60 min. recording time. 3.LCD: 3-1 MODE key 3-2 EQ select(classic, POP, ROCK, JAZZ) 3-3 VOC mode 3-4 MP3 mode 17
19 4.Key control 4-1 Power key 4-2 Upper key Upper key for track selection. Track number will move quickly when push still for two seconds (this function will not work in MP3 mode). 4-3 Down key Down key for track selection. Track number will move quickly when push still for two seconds (this function will not work in MP3 mode). 4-4 REC key Record key. Select track no. in VOC mode in advance, push REC key to record, then push? key to stop record. If the track you want to record is occupied, the LCD will show "?? " you must delete the content of the track before you record. When the memory is with 30 seconds left, the LCD will start to count 30,29,28, ,5,4,3,2,1,0 You can use microphones LINE IN audio source or both mixed source for recording source. 4-5 Play/ ll key Play key. Select the track no. you want to play, then push PLAY key to play. Push PLAY key during playing will pause play, then push PLAY key again to start playing. Push STOP Key to stop play. 4-6? key STOP key. Push the key to stop all the motions, ex.: recording, playing, track selection key(forward) Forward key. The playing will move forward when press the key, back to normal speed when release the key. 4-8 key(rewind) Rewind Key. The playing will move rewind when press the key, back to normal speed when release the key. 4-9 A-B repeat key During playing, push this key to indicate any point as start point (A point) and finish point(b point) on a track, the machine will repeat from A to B point until you push the key again to release the function and continue to play & Repeat key In MP3 mode during playing, push REPEAT key once to"epeat the track" the LCD will show, and push REPEAT key twice to"repeat all the track", the LCD will show. Push the key at the third time to release repeat function. The "Repeat all " function can not be used in VOC mode. 18
20 5. MODE key Push the MODE key with another key for special function selection. The LCD will show "MODE" when push MODE key, you shall push another function key to perform the function. If you does not push another function key within 5 seconds, the machine will back to idle mode. Following is the detail of special function keys. 5-1 MODE key +? (/LINE IN) key:lcd will show "LINE IN", and select line in audio source as recording source. 5-2 MODE key + A-B(/EQ) key :For EQ select function. EQ sequence is Normal Classic Pop Rock Jazz. (Normal EQ will not be shown on LCD) 5-3 MODE key + (/VOC,/MP3) key: To select VOC mode (Record from microphone or LINE IN source) or MP3 mode (Download *.mp3 files from PC). 5-4 MODE key + (/Del.) key : When push these two keys, the LCD will show DEL,you must push (/Del.) key again to delete the track. The LCD will show"del" until the delete process is finished. 5-5 MODE key + key :Change flash and SD card under PLAY and Idle modes. 6. The machine offers extended connectors: 6-1 EAR :for earphone 6-2 :USB connector to PC 6-3 SD card:for extended SD memory card,up to 512MB (When use 512 MB SD card, the recording time is available for over 8 hours) ( If use 1GMB SD card, it will be divided into 99 tracks recording, each track of recording time no more than 9:59:59 will be able to display time function on LCD) 6-4 MIC IN connect to two microphones 7. ROTARY VOLUME CONTROL 7.1 MIC REC. Rotary Volume Control 7.2 Level Rotary Volume Control. 8. USB CONNECTION : You can easily copy MP3 files from computer to the machine through USB connection. A. Install Hardware: Connect the machine and your computer with a USB cable. You computer will recognize a new removable storage device automatically. You can add, delete, copy, and preview files. (If the operation system of your computer is Window 98 or below, you must install USB driver for first use. The USB driver is included.) B. Store new files to VOC mode: MP3 files on the computer can be stored to VOC mode. However, the file names must be renamed as following format: B-1 If you want to store the file to flash memory in VOC mode, you must rename it asm_int _XX.MP3 (XX stands for track location) B-2 If you want to store the file to SD card in VOC mode, you must rename it as M_EXT_XX. MP3 (XX stands for track location) File format must be MP3 to work. C. Store new files to MP3 mode: *mp3 or *wma files on the computer can be stored to MP3 mode, no need to rename the file, it will store to MP3 mode automatically. E: After completing all operations on computer, please detect the USB connection then to operate the machine. * * * NOTICE Please read the following notice before you use our DIGI- REC Series. 19
21 9. Please use the one with cooperate specification (marks on the back of the machine). Please turn off the power when you do not use the machine for a period of times. * To keep stable data transmission, please do not twist the USB cable during data transmission. * Please do not press the LCD monitor heavily, or touch it with finger or sharp articles. * Please prevent water leak into the machine. 10. The SD card is a very precise electronic part, please use it according to the following notice: *To prevent taking the SD card out of the machine during data transmission. *Do not bend, strike, drop or take apart the SD card. *To prevent to place the SD card in a high temperature, high humidity, dusty place, or a place full with static electricity. *Please make sure the SD card you are using has been format. *Make sure the write protection switch of the SD card is released when you are recording. *Our product will process large amount of messages during recording and playing, we strongly suggest you to use high speed SD card as extension memory card, to prevent noise, data lose or any transmission problem. * We have tested and approval the following brands of SD card for our machine, they are: Toshiba SD-M51225R2W 512MB Apacer SD 120X 1GB Apacer SD 256MB 11. We do not guarantee the function, operation, or life of any SD card is used in our machine. We do not also take any responsibility of indemnity for the damage of SD cards. 12. Same as other digital stock products, user must save the inner documents from time to time. This product will not take any responsibility due to documents lost directly or indirectly damage caused. 20
 7. Lock / Unlock 8. Set 9. Up 10. Down 11. Charging port 12.")
22 UHF Handheld Transmitter SQ-5016 Parts and functions 1. Microphone capsule module 2. Battery status LED 3. ON/OFF switch 4. LCD 5. Battery compartment 6. Rotating protective cap for controls (also serves as color identification cap) 7. Lock / Unlock 8. Set 9. Up 10. Down 11. Charging port 12. Name plate Changing of capsule First unscrew the metal grill from the housing and take out the capsule to be replaced. Then insert a new capsule. Either dynamic or condenser type can be chosen from location to location. Battery installation SQ-5016 microphone requires 2 pieces of " AA " size batteries to operate. Please insert the batteries according to the correct polarity as indicated. Caution Many batteries are known to have leakage problem of conductive and corrosive liquid. Please observe the rule to remove the batteries if they are not to be used for a longer period. Due to various unstandardized sizes ( diameters ) of " AA " batteries, this battery compartment is designed to accommodate the most common Alkaline batteries only. 21


23 22
24 UHF HANDHELD MICROPHONE SQ-1016 Parts and functions 1. Mic capsule module 2. Battery low indicator 3. Power on/off 4. Channel selector 5. Battery compartment 6. Charging port Changing mic capsule & Battery installation First unscrew the metal grill from the housing, take out the capsule and then replace it with a new one. Either dynamic or condenser type can be chosen to fit your requirement for any application. SQ-1016 uses 2 pieces of " AA " size batteries (Alkaline battery is recommended ). To install or remove the batteries, rotate its battery compartment from the housing and then place the batteries into it according to correct polarity. Please remove the batteries if SQ-1016 is going to be unused for over a couple of days. Just place them back to the compartment when you are using it next time. Changing channels Channel selection can be made by rotating the selector(4) with a small screw driver. User can easily tell which channel has been chosen by referring to the number above the selector. 23

25 Handheld Transmitter SQ-816(UHF) / SQ-216(VHF) Parts & functions 1. Capsule with metal grille 2. Battery normal indicator (Green) 3. Battery low indicator (Red) 4. Power on/off switch 5. Channel switch 6. Charging port Battery installation SQ-816/SQ-216 transmitter requires 3 pieces of " AA " size battery to operate. Please insert the batteries according to the correct polarity as indicated. To open the battery compartment, press and slide down the cover until it clicks and locks. Further sliding movement will remove the cover. 24
26 VHF Handheld Transmitter SQ-316 Parts & functions 1. Capsule with metal grille 2. Battery indicator 3. Sensitivity switch 4. Power on/off switch 5. Battery cover 7. Color cap Battery installation SQ-316 use a 9V battery for power. To change or replace the battery, please remove the color cap first, then press the bottom of battery compartment to release the cover as shown below. Press Sensitivity switch This microphone has a sensitivity switch, For close mouth singing or normal speech, please put the switch to L ( Low ) position. For tripod-mount speech, please put the switch to N ( Normal ) position. L N L N Low Sensitivity Normal Sensitivity 25
27 UHF Beltpack Transmitter SM-5016 Parts & Functions Antenna Battery weak / audio mute indicator Audio mute switch Mini-XLR connector Power ON / OFF switch LCD display 7 Charging port 8 Cover release button 9 Charging contacts 10 Lavalier microphone 11 Mic clip SET 13 UP DOWN GT MT Battery installation SM-5016 uses 2 pieces of " AA " size batteries (Alkaline battery is recommended ). To install or remove the batteries, press the release buttons at the edges of the transmitter to open or close the cover as illustrated below. 26
28 27

 at the edges of the transmitter to open or close the cover.")
29 UHF Beltpack Transmitter SM-1016 Parts and functions 1 1. Antenna 2. Battery low indicator 3. Power on/off 4. Mini XLR connector 5. Cover-release button 6. Battery compartment 7. Charging contacts 8. Lavalier microphone 9. Mic clip 10. Channel selector 11. GT control 12. MT control Battery Installation SM-1016 uses 2 pieces of " AA " size batteries (Alkaline battery is recommended ). To install or remove the batteries, press the release buttons(5) at the edges of the transmitter to open or close the cover. Please remove the batteries if SM-1016 is going to be unused for over a couple of days. Just place them back to the compartment when you are using it next time. Channel selection and gain adjust Channel selector and gain adjust are hidden in the battery compartment. Channel selection can be made by rotating the selector with a small screw driver. Gain adjust for Lavalier and Headset microphones can be done by adjusting the MT switch, whereas GT switch is for the gain adjust of electric Guitar and other high-impedance line level inputs. 28


30 Beltpack Transmitter SM-816(UHF) / SM-216(VHF) Battery installation This transmitter uses 3 pieces of " AA " size batteries (Alkaline battery is recommended ). To install or remove the batteries, press the release buttons at the edges of the transmitter to open or close the cover as illustrated ( Fig.1 ). Fig.1 Beltclip installation This specially designed detachable beltclip allows the user to wear the transmitter with antenna pointing upward or downward as illustrated. To wear the transmitter with the transmitter pointing upward, install the belt-clip as in Fig.2. To wear the transmitter with the antenna pointing downward, please install the belt-clip as in Fig.3. Chargi ng point s Fig.2 Chargi ng point s Fig.3 Channel selection and gain adjust Channel selector and gain adjust are hidden in the designated cover of the front as illustrated. To make channel selection and gain adjust, please press the designated cover and flip it open as illustrated. Channel selection can be made by rotating the selector with a small screw driver. Gain adjust for Lavalier and Headset microphones can be done by adjusting the MT switch, whereas GT switch is for the gain adjust of electric Guitar and other highimpedance line level inputs. MT Channel Selector GT 29
31 Beltpack Transmitter SM-316(VHF) Battery installation SM-316 use a 9V battery. To insert the battery, first open the battery compartment cover by pressing the cover downward till the door flips open by itself (see below picture). When installing the battery, please beware of correct polarity. To put back the cover of the battery compartment, one has to press the cover in upward direction until it is locked. Antenna(SM-916) Battery status Indicator Power switch Audio input Connector Mike clip Capsuale Cable restraint Battery Compartment Fig.1 Channel selection and gain adjust Channel selector and gain adjust are hidden in the designated cover of the front as illustrated. To make channel selection and gain adjust, please press the designated cover and flip it open as illustrated. Channel selection can be made by rotating the selector with a small screw driver. Gain adjust for Lavalier and Headset microphones can be done by adjusting the MT switch, whereas GT switch is for the gain adjust of electric Guitar and other high- impedance line level inputs. MT Channel Selector GT 30

 + base 2. 3V DC/500mA charging adaptor Optional Items 1. NiMH battery (1.")
32 Gooseneck Transmitter GMW-216(UHF) 1. Gooseneck microphone input 2. LCD display 3. UP button 4. DOWN button 5. SET button 6. TALK button: Push to talk, for short speaking. 7. LOCK button: Switch of long/temporary speaking. 8. POWER on/off LED 9. POWER on/off switch 10. Gain control: User can rotate the knob until a desired acoustic quality is reached 11. Audio output connector. 12. DC in/charging port 13. Battery compartment Standard Configuration 1. GN-43 Gooseneck microphone (43cm) + base 2. 3V DC/500mA charging adaptor Optional Items 1. NiMH battery (1.2V / 2600 mah) 2. GN-30 gooseneck microphone (30cm) 31
33 Making changes to various settings in GMW Changing CHANNEL / FREQUENCY: Use UP or DOWN button to go to the CHANNEL / FREQUENCY page. The cursor will flash to allow changes to be made. Pressing UP or DOWN button will increase or decrease the channel number. The corresponding frequency will change accordingly. When a desired channel(frequency) is being selected, it will be automatically saved and stored in the memory. Remark : When changing transmitter frequencies, user should take care not to cause interference to other channels / users. 2. Changing Battery selection: Use UP or DOWN button to go to the Battery selection page. Press SET for about 2 seconds to activate the cursor. Press UP or DOWN button to move the cursor to either NiMH ( rechargeable battery ) or AKLN ( Alkaline battery ) position. When the desired option has been selected, press SET for about 2 seconds to save and store the data in the memory. Remark : Do not connect the adaptor when AKLN batteries are being used. Wrong selection of battery will cause battery sensing electronics to display wrong information and mislead charging status. Application GMW-216 is compatible with any of CHIAYO's UHF 16-channel receivers and portable PA system whichever is equipped with built-in 16/100- channel wireless receiver module. Besides handheld and beltpack types, it is another stylish hands free alternative. 32
34 Operation of wireless microphones Chiayo Transmitters and Receivers have factory preset to allow immediate use after switchon. However, please note that the transmitter Sensitivity function is dependent on application such as close proximity singing or tripod mouth speech. To avoid over-modulation and distortion, please check whether the preset sensitivity level is suitable for your particular application. For close proximity singing purposes, please select the lowest sensitivity level whereas for tripod mount speech purposes, please select a higher sensitivity level. If you have made changes to the setting, after making proper selection on Transmitter and Receiver settings the system is ready for operation. However, both antennas of the receiver must be installed to assure a good reception. Caution and tips on how to obtain the best results. 1. Before making any channel change on transmitters, please switch off the power supply. The synthesized program works in such a way that a change of channel will only take place after a power off and on action. Otherwise, the previously selected frequency will stay unchanged. 2.After making a channel change, please make sure that the corresponding change is made on the matching receiver as well. To be exact, changes MUST be made at both the transmitter and receiver. 3.The audio cable of VHF transmitters also serve as antenna. The length of the cable is cut according to the specific frequency range. Do not alter the length or mix around the cable of different transmitters. The use of wrong audio cable will affect the antenna efficiency of the transmitter! 4.Position the receiver such that it has the least possible obstructions between it and the transmitter. Line of sight is best! 5.The transmitter and the receiver should be as close as possible but not less than 1m. 6.A receiver cannot receive signals from two or more transmitters simultaneously. 7.Turn the transmitter off when it is not in use. Remove the batteries if it is not to be used for a period of time. FCC Caution To assure continued compliance, any changes or modifications not expressly approved by the party responsible for compliance could avoid the user's authority to operate this equipment. (Example - use only shielded interface cables when connecting to computer or peripheral devices. This device complies with Part 15 of the FCC Rules. Operation is subject to the following two conditions: (1)This device may not cause harmful interference, and (2)this device must accept any interference received, including interference that may cause undesired operation. 33
35 Maintenance-free Lead Acid battery Guidelines for maintenance-free Batteries: 1. Battery should operate at temperatures between 15 C ~ 50 C. To ensure a longer life span, it should be kept between 5 C ~ 35 C. For optimum result, 20 C ~ 25 C will be ideal. When temperature falls 15 degrees below zero, battery will undergo some changes in its chemical contents and therefore cannot be recharged. Operating the battery at higher temperature will result in higher capacity but shorter lifespan, whereas lower temperatures operation has a longer lifespan but less capacity. 2. If the battery is not recharged 72 hrs after it is completely used, it will be permanently damaged. 3. When the battery is being charged, the internal gases will be electrolyzed into water at the negative charge, maintaining the battery s storage abilities with no water added. However, erosion at the charged ends of the battery will cause poor performance. 4. The battery s cycle lifespan ( no. of charge and discharge cycle ) is determined by the degree at which power is dissipated., especially the degree of discharged each time it is used and the recovery charging method. For normal use, the battery can be used for longer hours when less power is dissipated each time and vice versa. At 25 C, maintenance-free batteries could be charged 150 ~ 200 times at 100% discharge each time. 5. Decrease in capacity, internal short circuit, deformation in appearance, erosion of charged ends and decrease in open circuit voltage are symbols indicating battery is approaching the end of its life cycle. 6. When two batteries are used in parallel connection, the resistance of the cables should be kept equal. Properties of the Lead Acid Battery: 1. Has no memory effect. Can be charged at anytime, even when the recharge indication light is not on. 2.Performance and efficiency are affected by changes in the environment, especially temperature and humidity. (Best operated between 20 C ~ 25 C) 3. Battery discharge naturally according to a certain pattern even not in use. For best performance and a prolonged lifespan, it should be recharged every month even when not in use. 4. Under normal circumstances, battery could last for about a year. 5. When the battery s life expires, possible indicators include internal short-circuit, decrease in capacity, deformation in appearance, erosion of charged ends and decrease in operating voltage. User s Precautions: 1. For first-time use, charge the battery for 10 hrs until it is fully charged. 2. To maintain performance and lifespan, if product has not been used for 3 months after the initial shipment, please fully charge the battery. 3. Before each use, it s advisable to charge the battery to its full capacity. 4. The average lifespan of the battery is one year. The user is advised to change the battery after one year of use. 5. The current consumption is in direct ratio with load current. The more current consumption, the less the operation time. 6. SMART and FOCUS operate on one 12V/2.9AH battery. ADVENTURE, CHALLENGER, and VICTORY operate on two 12V/5AH batteries. 34
36 CHIAYO ELECTRONICS CO., LTD. OFFICE: 30, LANE 27, SEC.4. JEN-AL ROAD, TAIPEI, TAIWAN / TEL: FAX: FACTORY: 88, CHUNG HSIAO STREET 2, CHIAYI, TAIWAN. / TEL: FAX: Printed in Taiwan, February 2010
Portable Sound System
 Portable Sound System Portable OPERATION Sound System MANUAL GOOD DESIGN PRODUCT IT'S VERY WELL MADE IN TAIWAN Design Award HKEIA AWARD For Outstanding Innovation and Technology Products GREEN PRODUCT
WPSS150M. Portable Sound System. Operation Manual TO REDUCE THE RISK OF FIRE OR ELECTRIC SHOCK. DO NOT EXPOSE THIS APPLIANCE TO RAIN OR MOISTURE.
 WPSS150M Portable Sound System Operation Manual Manual OM 237 REV. 1.0 CAUTION TO REDUCE THE RISK OF FIRE OR ELECTRIC SHOCK. DO NOT EXPOSE THIS APPLIANCE TO RAIN OR MOISTURE. WPSS150M Operation Manual
MMA Channel Multimedia Mixer Amplifier Operation manual ISO 9001 ISO OHSAS GREEN PRODUCT
 MMA-3000 2.1-Channel Multimedia Mixer Amplifier Operation manual ISO 9001 REGISTERED ISO 14001 ISO 14001 REGISTERED OHSAS 18001 OHSAS 18001 GREEN PRODUCT Thank you for your purchase of this CHIAYO product.
QR-2000N. UHF Dual Channel Wireless Microphone/Transporter System Operation manual ISO 9001 ISO OHSAS GREEN PRODUCT
 QR-2000N UHF Dual Channel Wireless Microphone/Transporter System Operation manual ISO 9001 REGISTERED ISO 14001 ISO 14001 REGISTERED OHSAS 18001 OHSAS 18001 GREEN PRODUCT Thank you purchasing CHIAYO s
Multifunctional Wireless Mixer Amplifier System Operation manual
 Multifunctional Wireless Mixer Amplifier System Operation manual ISO 900 REGISTERED INTERNATIONAL ISO 400 ISO 400 REGISTERED INTERNATIONAL OHSAS 800 OHSAS 800 GREEN PRODUCT World Genius Convention Silver
USER S MANUAL NOTES. Techniques Audio Groupe Route de Lavérune Montée du Terral Saint Jean de Védas FRANCE
 NOTES USER S MANUAL Example of one PA-223 Techniques Audio Groupe Route de Lavérune Montée du Terral 34430 Saint Jean de Védas FRANCE Tel : +33 (0)4 67 27 43 05 Fax : +33 (0)4 67 27 85 64 contact@tag-fr.com
USER S MANUAL. Techniques Audio Groupe Route de Lavérune Montée du Terral Saint Jean de Védas FRANCE
 USER S MANUAL Example of one PA-223 Techniques Audio Groupe Route de Lavérune Montée du Terral 34430 Saint Jean de Védas FRANCE Tel : +33 (0)4 67 27 43 05 Fax : +33 (0)4 67 27 85 64 contact@tag-fr.com
RR-2000 RCC Extra Long Range (XLR) Wireless Microphone System Operation manual ISO 9001 ISO OHSAS GREEN PRODUCT ISO REGISTERED
 Wireless Microphone System Operation manual ISO 9001 ISO OHSAS GREEN PRODUCT ISO REGISTERED") RR-2000 RCC-2000 Extra Long Range (XLR) Wireless Microphone System Operation manual ISO 9001 REGISTERED INTERNATIONAL ISO 14001 ISO 14001 REGISTERED INTERNATIONAL OHSAS 18001 OHSAS 18001 GREEN PRODUCT
RR-2000 RCC-2000 Extra Long Range (XLR) Wireless Microphone System Operation manual ISO 9001 REGISTERED INTERNATIONAL ISO 14001 ISO 14001 REGISTERED INTERNATIONAL OHSAS 18001 OHSAS 18001 GREEN PRODUCT
Modulized Wireless Portable Amplifier System Operation manual
 Modulized Wireless Portable Amplifier System Operation manual ISO 9001:2008 IF DESIGN AWARD HKEIA AWARD TAIWAN EXCELLENCE TAIWAN GOOD DESIGN GREEN PRODUCT ICTORY 2000 (Master) A,B&D. Slot for receiver/mp3/bluetooth
Modulized Wireless Portable Amplifier System Operation manual
 Modulized Wireless Portable Amplifier System Operation manual ISO 9001:2008 IF DESIGN AWARD HKEIA AWARD TAIWAN EXCELLENCE TAIWAN GOOD DESIGN GREEN PRODUCT IC: 3563A-CHALLENGER I C : 3 5 6 3 A - S Q 5 0
Multifunctional Wireless Mixer Amplifier System Operation manual
 Multifunctional Wireless Mixer Amplifier System Operation manual ISO 9001 REGISTERED ISO 14001 ISO 14001 REGISTERED OHSAS 18001 OHSAS 18001 GREEN PRODUCT World Genius Convention Silver Medal Congratulations
Professional Wireless Portable Amplifier Operation manual
 Professional Wireless Portable Amplifier Operation manual ISO 9001:2008 GREEN PRODUCT World Genius Convention Silver Medal Congratulations and thank you for purchasing this all-in-one portable sound system.
DWR-2468/DB GHz Digital True Diversity Wireless System Operation manual ISO 9001 ISO OHSAS GREEN PRODUCT ISO REGISTERED
 DWR-2468/DB-2420 2.4GHz Digital True Diversity Wireless System Operation manual ISO 9001 REGISTERED INTERNATIONAL ISO 14001 ISO 14001 REGISTERED INTERNATIONAL OHSAS 18001 OHSAS 18001 GREEN PRODUCT Thank
USER S MANUAL NOTES. Techniques Audio Groupe Route de Lavérune Montée du Terral Saint Jean de Védas FRANCE
 NOTES USER S MANUAL Techniques Audio Groupe Route de Lavérune Montée du Terral 34430 Saint Jean de Védas FRANCE Tel : +33 (0)4 67 27 43 05 Fax : +33 (0)4 67 27 85 64 contact@tag-fr.com www.tag-fr.com 24
VENU-80A INSTRUCTION MANUAL. Portable PA Amplifier System PRODUCT REGISTRATION
 PRODUCT REGISTRATION Visit: www.hamiltonbuhl.com 1. Click on Customer Care 2. Click on Product Registration Icon 3. Please fill out all fields marked with * to register WARRANTY: INSTRUCTION MANUAL VENU-80A
Multifunctional Wireless Mixer Amplifier System Operation manual
 Multifunctional Wireless Mixer Amplifier System Operation manual ISO 9001 REGISTERED INTERNATIONAL ISO 14001 ISO 14001 REGISTERED INTERNATIONAL OHSAS 18001 OHSAS 18001 GREEN PRODUCT World Genius Convention
3. Parts description (Switches, Connectors, and Buttons) 4. Power on Recording Playback Specification...
 4. Power on Recording Playback Specification...") DEL / User s Guide 1. Introduction 4 2.Notice 5 3. Parts description (Switches, Connectors, and Buttons) 5 4. Power on........8 5. Operate MENU setup................8 6.Recording...9 7.Playback........12
DEL / User s Guide 1. Introduction 4 2.Notice 5 3. Parts description (Switches, Connectors, and Buttons) 5 4. Power on........8 5. Operate MENU setup................8 6.Recording...9 7.Playback........12
Scan700 Professional Wireless by Ansr Audio
 Scan700 Professional Wireless by Ansr Audio s equipment equipment s To avoid potential damage from a leaking battery, remove batteries if the transmitters will not be used for a long period of time. more
MEGAMOUTH MK3 Portable PA System
 MEGAMOUTH MK3 Portable PA System Introduction Thank you for choosing the Megamouth portable PA unit. This product has been designed to provide convenient sound reinforcement for teaching, demonstrations
IMPORTANT. Operating Instructions. Maintenance / Operation Guidelines
 IMPORTANT Maintenance / Operation Guidelines Avoid excessive heat Do not leave transmitters or portable PA receiver in direct sun for extended periods, in front of heaters or any source of high temperature
BUSKER Portable PA Units
 BUSKER Portable PA Units Order ref: BUSKER-12 (178.866UK) BUSKER-15 (178.868UK) User Manual VERSION 2.0 Introduction Caution: Please read this manual carefully before operating Damage caused by misuse
INSTRUCTION MANUAL VENU100A. Portable PA Amplifier System. Never-Ending Learning Innovation
 INSTRUCTION MANUAL VENU100A Portable PA Amplifier System Never-Ending Learning Innovation 80 Little Falls Road, Fairfield, NJ 07004 1-800-631-0868 www.hamiltonbuhl.com www.hamiltonbuhl.com Contents Table
SPK User Manual. 900MHz Wireless Stereo Headphones INTRODUCTION FEATURES IMPORTANT SAFETY INFORMATION
 INTRODUCTION Thank you for purchasing our 900Mhz compact cordless stereo headphone system that takes advantage of the very latest advances in wireless transmission technology so you SPK-9100 900MHz Wireless
QUEST Portable PA Units
 QUEST Portable PA Units Order ref: QUEST-12 (178.886UK) QUEST-15 (178.888UK) User Manual VERSION 1.0 Introduction Caution: Please read this manual carefully before operating Damage caused by misuse is
AKG K912 Cordless Stereo 900MHz Headphone System
 AKG K912 Cordless Stereo 900MHz Headphone System INTRODUCTION This 900Mhz compact stereo headphone takes advantage of the very latest wireless transmission technology so that you can listen to music or
QRPA Portable PA Units
 QRPA Portable PA Units Order ref: QR12PA (178.843) QR15PA (178.846) User Manual VERSION 4. Caution: Please read this manual carefully before operating Damage caused by misuse is not covered by the warranty
PWMA-820 OPERATING INSTRUCTIONS SINGLE VHF WIRELESS BATTERY POWERED PA SYSTEM WITH MP3 PLAYER
 PWMA-820 OPERATING INSTRUCTIONS SINGLE VHF WIRELESS BATTERY POWERED PA SYSTEM WITH MP3 PLAYER WWW.PYLEAUDIO.COM WWW.PYLEAUDIO.COM MENU USB DIGITAL MP3 PLAYER ENTER PLAY/PAUSE PREVIOUS SD/MMC FLASH DRIVER
US-9001D US-901D UHF PLL WIRELESS SYSTEMS. Instruction Manual
 UHF PLL US-9001D US-901D WIRELESS SYSTEMS Instruction Manual Thank you for choosing the JTS wireless system. In order to obtain the best efficiency from the system, you are recommended to take few minutes
PLLSYNTHESIZED WIRELESSMICROPHONESYSTEM USERMANUAL
 PLLSYNTHESIZED WIRELESSMICROPHONESYSTEM USERMANUAL UHF 1 1 1 1 5.1 Receiver 5.2 Handheld Transmitter Microphone 5.3 Bodypack Transmitter 6.1 Connecting the Receiver 6.2 Setting up channel on receiver 6.2.1
UHF WIRELESS MICROPHONE WM-4310A WM-4310H
 OPERATING INSTRUCTIONS UHF WIRELESS MICROPHONE WM-4310 WM-4310A WM-4310H Please follow the instructions in this manual to obtain the optimum results from this unit. We also recommend that you keep this
Owner s Manual AWM910 JENSEN AWM910 COMPACT DISC PLAYER RADIO CD COMPACT MUSIC SYSTEM MUTE AUX BAND AUX IN PUSH PUSH PWR VOL ALARM T/F AUD SPK A SPK B
 AWM910 Owner s Manual COMPACT DISC PLAYER PUSH 1 2 3 4 5 6 RPT SCAN RDM H M PUSH PWR VOL ALARM SET ON/OFF EQ T/F AUD RADIO CD COMPACT MUSIC SYSTEM MUTE AUX BAND CD AUX IN A B A+B JENSEN AWM910 Thank You!
USER S MANUAL NOTES. Techniques Audio Groupe Route de Lavérune Montée du Terral Saint Jean de Védas FRANCE
 NOTES USER S MANUAL Techniques Audio Groupe Route de Lavérune Montée du Terral 34430 Saint Jean de Védas FRANCE Tel : +33 (0)4 67 27 43 05 Fax : +33 (0)4 67 27 85 64 contact@tag-fr.com www.tag-fr.com 24
DEUTSCH ENGLISH MCD4850
 DEUTSCH ENGLISH MCD4850 BATTERY INSTALLATION The battery compartment is located on the back of the remote control. 1. Remove the battery compartment door by pressing in on the tab and lifting it off. 2.
PA-85 OPERATION MANUAL
 Hamilton PA-85 OPERATION MANUAL SPECIFICATIONS AMPLIFIER Power supply: AC120V/60Hz built-in 3x6V 7A rechargeable batteries Frequency response: 35-20000Hz SPL: db(1w/m) T.H.D.:
DH GHz Digital Wireless Headphone. User s Manual. Please read before using the equipment. Please visit for details.
 ` DH100 2.4GHz Digital Wireless Headphone User s Manual Please read before using the equipment. Please visit www.promowide.com for details. INTRODUCTION This 2.4GHz Digital Wireless Headphone uses latest
PORTABLE WIRELESS PA SYSTEM WITH LITHIUM -ION RECHARGEABLE BATTERY AWP6042 OWNER S MANUAL. Handheld Microphone Headset Transmitter
 PORTABLE WIRELESS PA SYSTEM WITH LITHIUM -ION RECHARGEABLE BATTERY AWP6042 OWNER S MANUAL X1 Headset Microphone AWX6042H VHF Wireless Headset Transmitter Handheld Microphone Headset Transmitter Thank you
PXR 1506 / WATT MIXER AMPLIFIER
 PXR 1506 / 1508 150-WATT MIXER AMPLIFIER Operating Manual www.peavey.com ENGLISH PXR 1506 / 1508 150-Watt, 8-Channel Mixer Amplifier Designed with the latest Peavey technology, the PXR 1506 / 1508 powered
AC OPERATION BATTERY OPERATION RADIO OPERATION Note : FM STEREO INDICATOR ANTENNAS BASS BOOST AUXILIARY (AUX) MODE
 MODE") 1. FUNCTION SWITCH AUX/CD/TAPE (OFF)/RADIO 2. BAND SWITCH 3. FM ANTENNA 4. CD DOOR 5. TUNING KNOB 6. BASS BOOST BUTTON 7. CD SKIP/SEARCH FORWARD BUTTON 8. CD SKIP/SEARCH BACKWARD BUTTON 9. CD PROGRAM BUTTON
1. FUNCTION SWITCH AUX/CD/TAPE (OFF)/RADIO 2. BAND SWITCH 3. FM ANTENNA 4. CD DOOR 5. TUNING KNOB 6. BASS BOOST BUTTON 7. CD SKIP/SEARCH FORWARD BUTTON 8. CD SKIP/SEARCH BACKWARD BUTTON 9. CD PROGRAM BUTTON
BRS 2001 Portable Audio System
 Samson Electronics Inc. 3400 E. Slauson Ave. Maywood, CA 90270 Ph: 323.585.6393 Fax: 323.585.6202 Web: http://www.blackmoremobile.com Introduction: BRS 2001 Portable Audio System FCC ID: 2AHR7 BRS 2000
Turntable/Cassette /CD Player/Radio/USB/SD Audio System with Speakers
 Turntable/Cassette /CD Player/Radio/USB/SD Audio System with Speakers Bluetooth In & OUT BT-22-B INSTRUCTION MANUAL Parts List 1) Dust cover 2) Revolving shaft 3) Turntable 4) Mode(USB/SD) /BT IN 5) Function
BASIC PA AMPLIFIER A-1031 A-1061 A-1121 OPERATING INSTRUCTIONS TABLE OF CONTENTS
 OPERATING INSTRUCTIONS BASIC PA AMPLIFIER A-1031 A-1061 A-1121 Please follow the instructions in this manual to obtain the optimum results from this unit. We also recommend that you keep this manual handy
SoundRanger MICRO Model RPA-20 (40SFRPA20) Portable Public Address System User Guide
 Portable Public Address System User Guide") SoundRanger MICRO Model RPA-20 (40SFRPA20) Portable Public Address System User Guide Introduction Used with a radio microphone (e.g. the SoundRanger RMH-203 / 40SFXMH*), the SoundRanger MICRO is a compact,
SoundRanger MICRO Model RPA-20 (40SFRPA20) Portable Public Address System User Guide Introduction Used with a radio microphone (e.g. the SoundRanger RMH-203 / 40SFXMH*), the SoundRanger MICRO is a compact,
UHF Wireless Microphone System UwMic9
 UHF Wireless Microphone System UwMic9 User Manual Statement Please read this manual carefully before using and strictly operate and store in accordance with the instructions. Please save it for your future
PORTABLE AMPLIFIER EMPP-88UDMKIII USER'S MANUAL
 PORTABLE AMPLIFIER EMPP-88UDMKIII USER'S MANUAL BASIC SET 8. Parts Included Component (1) Portable Amplifier (2) AC Cord (3) User's Manual Quantity 1 PC 1 PC 1 PC Designs and specifications are subject
UHF WIRELESS MICROPHONE WM-5320 WM-5320A WM-5320H
 OPERATING INSTRUCTIONS UHF WIRELESS MICROPHONE WM-5320 WM-5320A WM-5320H Thank you for purchasing TOA's UHF Wireless Microphone. Please carefully follow the instructions in this manual to ensure long,
Owner s Manual. MWBPT UHF 100 Frequency Wireless Belt Pack Transmitter. MWBPT Wireless Belt Pack Transmitter. AtlasIED.com
 Owner s Manual UHF 100 Frequency 1 AtlasIED.com Owner s Manual Description The AtlasIED wireless belt pack transmitter is the ideal choice for a variety of applications ranging from classrooms and conference
Voice Rover. User Guide English ( 2 9 ) Guía del usuario Español ( ) Guide d utilisation Français ( ) Guida per l uso Italiano ( )
 Guía del usuario Español ( ) Guide d utilisation Français ( ) Guida per l uso Italiano ( )") Voice Rover User Guide English ( 2 9 ) Guía del usuario Español ( 10 17 ) Guide d utilisation Français ( 18 25 ) Guida per l uso Italiano ( 26 33 ) Benutzerhandbuch Deutsch ( 34 41 ) Appendix English (
Voice Rover User Guide English ( 2 9 ) Guía del usuario Español ( 10 17 ) Guide d utilisation Français ( 18 25 ) Guida per l uso Italiano ( 26 33 ) Benutzerhandbuch Deutsch ( 34 41 ) Appendix English (
REPLACEMENT OF BATTERY 5. POWER AND VOLUME IDENTIFICATION UHF PLL Non-Diversity receiver module 7
 INSTRUCTION MANUAL PORTABLE AMPLIFIER WA-Z0SD-AS PORTABLE AMPLIFIER Caution : To reduce the risk of electric shock, do not remove cover ( or back). No user-serviceable parts inside. Refer servicing to
Quick Guide 2017 ZOOM CORPORATION. You must read the Usage and Safety Precautions before use.
 Quick Guide You must read the Usage and Safety Precautions before use. The Operation Manual can be downloaded from the ZOOM website (www.zoom.co.jp). 2017 ZOOM CORPORATION Copying or reprinting this manual
PPHP1235WMU - PPHP1535WMU
 PPHP1235WMU - PPHP1535WMU Wireless BT Streaming PA Loud-Speaker System Includes (2) UHF Wireless Microphones INDEX OPERATION... 1 GENERAL USE INSTRUCTIONS... 2 CONTROLS AND CONNECTIONS... 3 FEATURES...
Goodmans 2719 STEREO 3CD MINI HI-FI SYSTEM WITH RADIO AND DOUBLE CASSETTE
 English 1 2 English Goodmans 2719 STEREO 3CD MINI HI-FI SYSTEM WITH RADIO AND DOUBLE CASSETTE INSTRUCTION MANUAL Please read this instruction manual carefully and familiarize yourself with your new HIFI
PARTY SPEAKER SRO6163
 PARTY SPEAKER SRO6163 Contents Description of Remote Control...2 The Main Technical Parameter...2 Safety Warning...2 To Customer...3 System Connection...3 Panel Instruction...4-5 Precaution...5 Getting
2.4GHz Wireless Handheld Microphone System & 2.4GHz Wireless Belt Pack Microphone System
 Models: PWM24-HH & PWM24-LAV-HSM 2.4GHz Wireless Handheld Microphone System & 2.4GHz Wireless Belt Pack Microphone System 1 IMPORTANT SAFETY INFORMATION Please read these instructions carefully before
WDH11 2.4GHz Digital Wireless Headphone
 WDH11 2.4GHz Digital Wireless Headphone User Manual Please read before using this headphone. INTRODUCTION This 2.4GHz Digital Wireless Headphone uses latest digital wireless technology that enables you
VM SERIES Rackmount 100V mixer-amplifiers
 VM SERIES Rackmount 100V mixer-amplifiers VM60, VM120, VM240Z Caution: Please read this manual carefully before operating Damage caused by misuse is not covered by the warranty Introduction Thank you for
3. This unit should not be exposed to dripping, splashing or excessive moisture or objects filled with liquid.
 Before using your new speaker system please review all information and instruction found in this user manual for the safety of the operator and optimum device performance. Caution: To reduce the risk of
MA V 30W Mixer Amplifier Order code: CRAM02 MA V 60W Mixer Amplifier Order code: CRAM03 USER MANUAL
 www.cleveracoustics.co.uk MA 130 100V 30W Mixer Amplifier Order code: CRAM02 MA 160 100V 60W Mixer Amplifier Order code: CRAM03 USER MANUAL WARNING FOR YOUR OWN SAFETY, PLEASE READ THIS USER MANUAL CAREFULLY
User Guide Power Pod - SWB245 Wireless PA with USB / SD Media Player and Bluetooth Receiver
 User Guide Power Pod - SWB245 Wireless PA with USB / SD Media Player and Bluetooth Receiver Thank you for choosing the SW245 / SWB245 Wireless PA from AmpliVox Portable Sound Systems. We are excited in
User Guide S805A / SW805A
 User Guide S805A / SW805A 50 Watt Stereo Amplifier PA System Thank you for choosing the S805A / SW805A Stereo Amplifier PA System from AmpliVox Portable Sound Systems. We are excited in introducing this
PPHP210AMX. Stage & Studio PA Speaker & DJ Mixer Bundle Kit
 PPHP210AMX Stage & Studio PA Speaker & DJ Mixer Bundle Kit (2) 10 Bluetooth PA Loud-Speakers with Built-in LED Lights, 8-Ch. Audio Mixer, Speaker Stands, Wired Microphone (600 Watt) WARNING! CAUTION: TO
QXPA-PLUS-plus Portable PA Units with Bluetooth and UHF
 QXPA-PLUS-plus Portable PA Units with Bluetooth and UHF Order ref: QX12PA+ (178.854UK) QX15PA+ (178.857UK) User Manual VERSION 1. Caution: Please read this manual carefully before operating Damage caused
Rear Panel RockOnRoller
 Getting Connected The Karaoke RockOnRoller is an all-in-one karaoke solution, there were no additional connections required to use the system. The additional connections that can be made are the AV Output
Operating Instructions
 Operating Instructions C 7180 C 7182B C 7184B C 7185B C 7192B C 7193B C 7195B Basic PA PA with UHF Wireless Mic Receiver PA with UHF Wireless Mic Receiver & CD Player PA with UHF Wireless Mic Receiver,
SPECIAL PROJECTS 3800 Hwy 271 North Powderly, TX Phone: Fax: Aqua 20/20 OWNER S MANUAL
 SPECIAL PROJECTS 3800 Hwy 271 North Powderly, TX 75473 Phone: 866-491-2677 Fax: 866-746-4366 Aqua 20/20 OWNER S MANUAL AQUA 808 Beltpack Transmitter Power Indication Low Battery Indicator Power Button
OPERATING INSTRUCTIONS PA AMPLIFIER P-1812
 OPERATING INSTRUCTIONS PA AMPLIFIER P-1812 Please follow the instructions in this manual to obtain the optimum results from this unit. We also recommend that you keep this manual handy for future reference.
LOCATION OF CONTROLS. English - 1
 LOCATION OF CONTROLS 1. Power Button 2. Function Switch (CD,MP3 / TAPE /RADIO) 3. Band Switch 4. Bass Boost Button 5. Volume Control Knob 6. Tuning Knob 7. CD/MP3 LED Display 8. Dial Pointer 9. CD/MP3
User Guide S610A / SW610A / SW615A
 User Guide S610A / SW610A / SW615A Wired / Wireless Half Mile Hailer PA System Thank you for choosing the S610A / SW610A / SW615A Half Mile Hailer PA System from AmpliVox Portable Sound Systems. We are
Acesonic PK-1248 Road Master Pro
 Acesonic PK-1248 Road Master Pro 1 2 0 W K a r a o k e / PA / G u i t a r P o r t a b l e S o u n d S y s t e m With 7"LCD Touch Screen, Recording Function and Wireless Mic USER S STARTING MANUAL NOTE:
MP3 HARD DISK. User Manual V1.0
 User Manual V1.0 Contents Before Using the Product 1 Introduction 1 System Requirements 1 Charging the Battery 2 Transferring Music Files 3 Music File Transferring Example 4 Basic Functions 5 Components
MR100 INSTALLATION/OWNER'S MANUAL Digital Media Marine Receiver
 MR100 INSTALLATION/OWNER'S MANUAL Digital Media Marine Receiver Preparation MR100 INSTALLATION Please read entire manual before installation. Before You Start Disconnect negative battery terminal. Consult
TPM4200FX MKII V2 24- BIT EFFECTS PROCESSOR MAIN MID LOW FOOT SW FX RETURN FX SEND OUT. 12KHz. 2.5KHz USB PLAYER CH4 OFF COMP./LIM.
 .5KHz TPM400FX MKII V KHz MID LOW 80Hz CH4 OFF COMP./LIM. 88 FOOT SW PHANTOM FX RETURN FX SEND MAIN 4- BIT EFFECTS PROCESSOR MAIN OUT MONITOR OUT 9 . INTRODUCTION...4. FEATURES...4. USEFULL DATA...4 4.CONTROL
PSUFM1280B. Portable PA Speaker System Bundle Kit
 Portable PA Speaker System Bundle Kit PSUFM1280B with Built-in LED Lights, Rechargeable Battery, Bluetooth Wireless Streaming, Handheld Microphone, MP3/USB/Micro SD/FM Radio (12 -inch, 700 Watt) To be
Quickstart Guide (English)
") Quickstart Guide (English) Introduction 1. Make sure all items listed in the Box Contents are included in the box. Look in the box under the foam sheet for the speaker stand rubber feet, speaker stand
Quickstart Guide (English) Introduction 1. Make sure all items listed in the Box Contents are included in the box. Look in the box under the foam sheet for the speaker stand rubber feet, speaker stand
SPORTS FIELD PLAYGROUND STAGE HALL
 SPORTS FIELD PLAYGROUND STAGE HALL WIRELESS PORTABLE PA SOUND SYSTEMS - August 2014 PORTABLE PA SYSTEMS PORTABLE PA SYSTEM - STAGE PRO 1500 FLEXIBLE, POWERFUL, PORTABLE, PROFESSIONAL WIRELESS AMPLIFIER
Wireless Microphone Package
 4-530-735-12 (1) Wireless Microphone Package Operating Instructions Before operating the unit, please read this manual thoroughly and retain it for future reference. UWP-D11/D12/D16 2014 Sony Corporation
Instruction Manual. for. Audio Ape Remotes. 1
 TM TM Instruction Manual for Audio Ape Remotes www.audioaperemote.com 1 Congratulations on acquiring your fine Audio Ape product Let s dive right in, getting up and running is a snap. Here are the components:
FM ADA KIT 37. FM ADA Compliance Kit FM SPECIFICATION DATA. System includes:
 FM SPECIFICATION DATA Jury Rooms Small Meeting Rooms Council Chambers Parent/Teacher Conferences Libraries Small Conference Rooms Consultation Rooms Information Desks FM ADA KIT 37 FM ADA Compliance Kit
Bluetooth Stereo Headset icombi TM AH20 User s Manual
 Bluetooth Stereo Headset icombi TM AH20 User s Manual icombi AH20 Index 1. Product introduction 2. What is included in icombi AH20 package 3. Headset features 4. Battery charging 5. Headset pairing and
CD BOOMBOX USER MANUAL MODEL: GPS05BLK/PNK PROG. ECO PWR POWER MODE ST.
 CD BOOMBOX PROG. L: BLK/PNK USER MANUAL 1 Welcome 2 Your CD Boombox 2.1 In The Box 2.2 Front View 2.3 Rear View 3 Quick Setup 3.1 Power On/Off and Function Selection 3.2 Standby & Auto Standby 3.3 Adjusting
TV WIRELESS HEADPHONES
 TV WIRELESS HEADPHONES Item No. 206077 Owner s Manual Thank you for purchasing the Sharper Image TV Wireless Headphones. This updated version has a new design with new features, including a digital audio
PCMX265B PORTABLE SOUND SYSTEM FOR USB AND SD CARD.
 PCMX265B PORTABLE SOUND SYSTEM FOR USB AND SD CARD USER'S MANUAL www.pyleaudio.com 110-T750mAL 250V 100-120V-60Hz 20W 230-T315mAL 250V 220-240V-50Hz 20W QUICK SETUP GUIDE 1. Make sure all items listed
CONFIGURATIONS & PRICING
 Victory P.A. with Plug in microphone Largest Wireless Portable PA System BUILT FOR THE LARGEST AUDIENCES. THIS PORTABLE PA IS THE KING OF THE PORTABLE PA KINGDOM! 10" woofer and 1" tweeter driven by a
CONFIGURATIONS & PRICING
 Victory P.A. with Plug in microphone Largest Wireless Portable PA System BUILT FOR THE LARGEST AUDIENCES. THIS PORTABLE PA IS THE KING OF THE PORTABLE PA KINGDOM! 10" woofer and 1" tweeter driven by a
fault. The warranty excludes damage by misuse, neglect, shipping accident, incorrect installation
 Operating Instructions C 7217 PA With UHF Wireless Mic Receiver C 7220 PA With UHF Wireless Mic Receiver & CD/MP3/USB Player C 7192 Wireless Handheld Mic C 7193 Wireless Handheld Condenser Mic C 7195A
On the right side, you will find a headphone jack closest to you, followed by Volume Down and Volume Up buttons.
 8GB Micro-Speak Plus User Guide Thank you for purchasing the Micro-Speak Talking Digital Voice Recorder from Talking Products Limited and A T Guys. Let s get you oriented so you can use your new recorder
A120 A W/240W PA Mixer-Amplifier 70V/100V
 A120 A240 120W/240W PA Mixer-Amplifier 70V/100V User Manual TABLE OF CONTENTS 1. SAFETY PRECAUTIONS...3 2. GENERAL DESCRIPTION......5 3. FEATURES AND FUNCTIONS 3. 1 Front Panel...6 3.2 Rear Panel... 6 4.
HG-21B. Digital Over-Ear Headphones. User Manual
 HG-21B Digital Over-Ear Headphones User Manual Congratulations! Thank you for choosing AudioMX HG-21B Digital Over- Ear Headphones. To get familiar with this product, please read this manual carefully
DIGITAL VOICE RECORDER VN-180
 DIGITAL VOICE RECORDER VN-80 Instruction VN-90 Always do a test recording to avoid recording problems. CONTENTS BEFORE YOUR FIRST RECORDING... 3 Parts Identification... 3 Liquid Crystal Display (LCD)...
Ref. No " DUAL CD PLAYER, MIXER AND CASE USER MANUAL
 Ref. No. 170.408 19" DUAL CD PLAYER, MIXER AND CASE USER MANUAL 1 CAUTION RISK OF ELECTRIC SHOCK DO NOT OPEN To prevent electric shock, do not remove top or bottom covers. No user serviceable parts inside.
Powerful RMS 150 Watt Output UHF MHz 16-Preset Frequency Wireless Microphone (Other frequencies are Optional)
") RMS-150 watt PA amplifier and wireless microphone system together with wide range variable pitch controlled DVD/CD/USB/SD-Card player, particularly ideal for aerobics, language tuition, dance, etc. The
RMS-150 watt PA amplifier and wireless microphone system together with wide range variable pitch controlled DVD/CD/USB/SD-Card player, particularly ideal for aerobics, language tuition, dance, etc. The
SpectraPulse Ultra Wideband Wireless Microphone System
 SpectraPulse Ultra Wideband Wireless Microphone System Wireless XLR Desk Stand Set-up and Operation 2 3 This device complies with Part 15 of the FCC rules. Operation is subject to the following conditions:
User Guide S1234 / SS1234 / SW1234 Line Array Speakers
 User Guide S1234 / SS1234 / SW1234 Line Array Speakers S1234 Passive Speaker SS1234 Amplified Speaker SW1234 Amplified Speaker with 16 Channel UHF Wireless Microphone Thank you for choosing the S1234 /
User Guide. 50 Watt Portable PA System with
 User Guide 50 Watt Portable PA System with Thank you for choosing the S222A / SW222A / SW223A / SW224A Portable PA System from AmpliVox Portable Sound Systems. We are excited in introducing this truly
ODCR2110 WD TURNTABLE WITH CD/MP3 PLAYER, DOUBLE CASSETTE DECK, RADIO, BLUETOOTH & CD/USB/SD RECORDER INSTRUCTION MANUAL
 ODCR2110 WD TURNTABLE WITH CD/MP3 PLAYER, DOUBLE CASSETTE DECK, RADIO, BLUETOOTH & CD/USB/SD RECORDER INSTRUCTION MANUAL READ THIS INSTRUCTION MANUAL CAREFULLY BEFORE USE 1 PRODUCT FEATURES - 33/45/78
XEMIO-950 MP5 PLAYER / 4GB MEMORY / TOUCH SCREEN. For information and support,
 XEMIO-950 MP5 PLAYER / 4GB MEMORY / TOUCH SCREEN For information and support, www.lenco.eu To the customer: Thank you for purchasing this MP5 player. When opening the box for the first time, please check
 Content 1 Welcome 37 Safety 38 Hearing safety 38 3 Your Voice Tracer digital recorder 39 What s in the box? 39 Overview 39 4 Start To Use 41 Power On/Off 41 Recharge 42 Key Lock (HOLD Function) 43 PC Connection
CAUTION Use of controls or adjustment or performance of procedures other than those specified herein may result in hazardous radiation exposure.
 IMPORTANT NOTES INTRODUCTION Thank you for buying this product. Please read through these operating instructions, so you will know to operate your equipment properly. After you finished reading the instructions
User s Manual BeamPod User Manual
 User s Manual BeamPod General Safety Information 1. Keep the device and packaging materials out of reach of infants and children. 2. Keep the power adapter and other contacts from water, Dry your hands
2. Choose R-07 as the product name.
 Owner s Manual Check the contents of the package The R-07 comes with the following items. As soon as you open the package, please check that all these items are present. If anything is missing, please
Table of Contents. Major Functions 02. Description of Buttons/Interfaces..03. Description of Display Screen 04. Basic Operation 07
 Table of Contents Major Functions 02 Description of Buttons/Interfaces..03 Description of Display Screen 04 Basic Operation 07 Master Interface 09 Music Mode 10 Video Playing 12 FM Radio 14 Picture Browse