Choose the mounting location where the unit will not interfere with the normal driving function.
|
|
|
- Garey Johnson
- 5 years ago
- Views:
Transcription
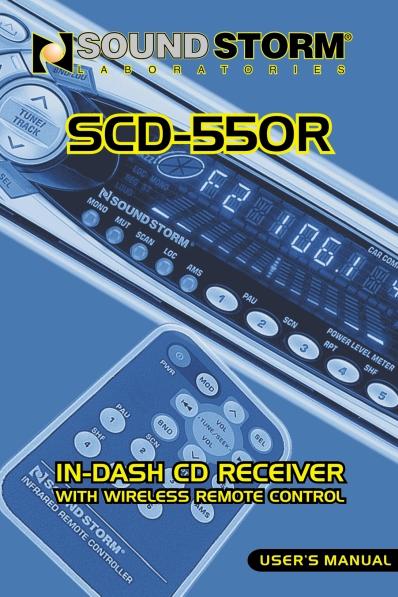
1
2 INSTALLATION Notes: Choose the mounting location where the unit will not interfere with the normal driving function. Before final installation, connect the wiring temporarily and make sure the unit and the system work properly. Use only the parts included with the unit to ensure proper installation. The use of unauthorized parts can cause malfunctions. Consult with your nearest dealer if installation requires the drilling of holes or other modifications of the vehicle. Install the unit where it does not get in the driver s way and cannot injure the passenger if there is a sudden stop, like an emergency stop. If installation angle exceeds 30 from horizontal, the unit might not give its optimum performance. 30 Avoid installing the unit where it would be subject to high temperature, such as from direct sunlight, from hot air of the heater, or where it would be subject to dust, dirt or excessive vibration. DIN FRONT/REAR-MOUNT This unit can be properly installed either from Front (conventional DIN Front-mount) or Rear (DIN Rear-mount installation, utilizing threaded screw holes at the sides of the unit chassis). For details, refer to the following illustrated installation methods. DIN FRONT-MOUNT (Method A) Installation of the unit Dashboard 2. Mounting Bracket After inserting the mounting bracket into the dashboard, select the appropriate tabs according to the thickness of the dashboard material and bend them outward to secure the holder in place. 3. Screw (Fig. 1) 2
3 (Fig. 2) Removing the unit Dashboard 2. Nut (5mm) 3. Spring washer 4. Screw (5 x 25mm) 5. Screw (5 x 28mm) 6. Backstrap Be sure to use the backstrap to secure the back of the unit in place. The strap can be bent by hand to the desired angle. 7. Plain washer 1. Frame 2. Insert fingers into the groove in the front of frame and pull out to remove the frame. (When reattaching the frame, point the side with groves downward and attach it.) 3. Lever Insert the levers supplied with the unit into the grooves at both sides of the unit as shown in figure until they click. Pulling the levers makes it possible to remove the unit from the dashboard. DIN REAR-MOUNT (Method B) Installation using the screw holes on the sides of the unit. 1 Fastening the unit to the factory radio mounting bracket Select a position where the screw holes of the bracket and the screw holes of the main unit become aligned (are fitted), then tighten the screws at 2 places on each side. Use either truss screws (5 x 5mm) or flush surface screws (4 x 5mm), depending on the shape of the screw holes in the bracket Screw 5 3. Factory radio mounting bracket 4. Dashboard or Console 5. Hook (Remove this part) Note: The trim piece, backstrap, and mounting bracket are not used for method B installation. 3
4 USING THE DETACHABLE FRONT PANEL To Detach the Front Panel 1. Press the release button (REL), the front panel will drop down. REL 2. Remove the front panel by pulling it outward. 3. For safekeeping, store the front panel in the supplied protective case immediately after being removed. Protective Case Front Panel 4. Push the front metal plate that holds the front panel into the main body. A click sound should be heard. 4
5 To Reinstall the Front Panel 1. Push the front panel into the main body. A click sound should be heard. 2. Note that if the front panel fails to lock in position properly, control buttons may not function and the display may be missing some segments. Push the release button and reinstall the front panel again. Precautions when Handling 1. Do not drop the front panel. 2. Do not put pressure on the display or control buttons when detaching or reinstalling the front panel. 3. Do not touch the contacts on the front panel or on the main unit body. It may result in poor electrical contact. 4. If any dirt or foreign substances adhere to the contacts, they can be removed with a clean and dry cloth. 5. Do not expose the front panel to high temperatures or direct sunlight. 6. Keep away any volatile agents (e.g. benzene, thinner, or insecticides) from touching the surface of the front panel. 7. Do not attempt to disassemble the front panel. 5
6 WIRING CONNECTION MAIN UNIT ANTENNA CONNECTOR AUX. AUDIO IN (BLACK) Rch RED IGNITION SWITCH (B+) MEMORY BACK-UP RED YELLOW FUSE FUSE FRONT RCA CABLE Lch WHITE (GREEN) SUBWOOFER CABLE (BROWN) Rch RED GROUND (B ) POWER ANTENNA BLACK BLUE REAR RCA CABLE Lch WHITE (GREY) Rch RED Lch WHITE 2-SPEAKERS SYSTEM WHITE Lch SPK. GREEN/BLACK 4-SPEAKERS SYSTEM WHITE FRONT Lch SPK. WHITE/BLACK REAR Lch SPK. GREEN GREEN/BLACK 4-SPEAKERS SYSTEM GREY GREY/BLACK VIOLET VIOLET/BLACK FRONT Rch SPK. REAR Rch SPK. 2-SPEAKERS SYSTEM GREY VIOLET/BLACK Rch SPK. Note: 1. For 2-speakers system, green, violet, white/black and grey/black wire leads are unconnected and isolated. 2. For 2-speakers system, keep the fader indicator at center position to maintain the existing volume level. 6
7 OPERATION GENERAL OPERATION ON/OFF/ILLUMINATE Switch on the unit by pressing any button [except EJECT button (4) and REL button (7)]. When system is on, press ILL/PWR button (9) shortly to control the brightness of VFD. Hold it for several seconds to turn off the unit. FACEPLATE RELEASE Press REL button (7) to detach the removable faceplate. SOUND ADJUSTMENT Press SEL button (10) to select the desired adjustment mode. 7
8 The adjustment mode will change in the following order. Volume Bass Treble Balance Fader By pressing VOL button (11) or VOL button (12), it is possible to adjust the desired level. LOUDNESS Press BND/LOU button (13) for several seconds to reinforce the bass output. The display will show LOUD. Press it for several seconds again to defeat this function. SET THE CLOCK Hold down the DSP button (15) until the clock is shown on the display and flashes. Then press the TUNE/TRACK button (17) to change hours or TUNE/TRACK button (16) to change minutes. SELECT MODE Press MOD/SW button (6) to choose desired listening mode. SUBWOOFER Press MOD/SW button (6) for several seconds to toggle subwoofer output. When subwoofer is on, display will show SW. Press it again for several seconds to release this mode. MUTE Press MUT button (3) to silence the receiver. Press it again to resume listening. VACUUM FLUORESCENT DISPLAY Exhibit current frequency and activated functions on the display (8). EQUALIZATION Press EQ button (19) to turn on equalization function and to select desired audio mode. There are five modes: FLAT CLASSICS POP JAZZ DSP OFF REMOTE SENSOR Point the remote control handset to the remote sensor RX (24). Press the function keys on the handset to control the system. FLASHING LED If the front panel does not install in the unit, the LED (27) will flash. RESET The RESET button (26) must be activated with either a ball point pen or thin pointed metal object. RESET button (26) is to be activated for the following reasons: - Initial installation of the unit when all wiring is completed. - All the function buttons do not operate. - Error symbol on the display. Note: If pressing the RESET button (26) doesn t work, please use a cotton swab soaked in isopropyl alcohol to clean the socket on the front panel. 8
9 RADIO OPERATION BAND SELECTION For tuner mode, press BND/LOU button (13) briefly to select the desired band. The reception band will change in the following order: FM1 FM2 FM3 AM STATION SELECTION Press TUNE/TRACK button (17) or TUNE/TRACK button (16) briefly to activate automatic seek function. Press for several seconds until MANUAL appears on the display. The manual tuning mode is now active. If both buttons have not been pressed for several seconds, they will return to seek tuning mode and AUTO will appear on the display. LOCAL/DISTANCE Press LOC button (1) briefly to select between local and distant stations. Local setting is for reception of strong stations, and distant setting is for reception of weaker stations. This function is in during AUTO SEEK operation. AUTOMATIC MEMORY STORING & PROGRAM SCANNING - Automatic Memory Storing Press AMS button (18) for several seconds. The radio searches from the current frequency and checks the signal strength until one cycle search is finished. The 6 strongest stations are stored into the location corresponding to the preset buttons. - Program Scanning Press AMS button (18) briefly to scan preset stations. When the field strength level is more than the tuners threshold sensitivity level, the tuner will hold at that preset number for several seconds with muting released, then searches again. STATION STORING Select a station. Then press any one of the preset buttons (14) (M1 to M6) to store a station into memory. Press this button for several seconds, the station is then stored into the number button. MONO/STEREO Press MONO button (25) to select mono or stereo mode. You can sometimes improve reception of distant stations by selecting mono operation. SCAN Press SCAN button (2) to set the function to scan mode. The tuner will stop at each station with a receivable signal and will stay tuned for several seconds, long enough to decide whether to stop at that station or to let the tuner continue to scan. 9
10 CD OPERATION SELECT TRACKS During CD operation, press TUNE/TRACK button (16) or TUNE/TRACK button (17) to move to the previous track or the following track. Track number shows on the display. During CD operation, hold TUNE/TRACK button (16) or TUNE/TRACK button (17) to fast reverse or fast forward. CD play starts from when you release the button. PAUSE PLAYING Press PAU button (20) to pause CD player. Press it again to resume play. REPEAT THE SAME TRACK During CD operation, press RPT button (22) to continuously repeat the same track. Press again to stop repeat. PREVIEW ALL TRACKS During CD operation, press SCN button (21) to play first several seconds of each track on the current disc. Press again to stop intro and listen to track. PLAY ALL TRACKS During CD operation, press SHF button (23) to play all tracks on CD in random order. Press again to cancel the function. EJECT Press EJECT button (4) to stop CD play and eject the disc from the slot (5). NOTE ON CD-R/CD-RW DISCS On this unit, in addition to an audio CD, you can play your original CD-R or CD-RW discs that contain audio titles. However, depending on the condition of the recording equipment or the CD-R or CD-RW itself, some CD-Rs or CD-RWs may not play in this unit. DO NOT stick paper or tape, etc, onto label side or the recorded side of any CD-R/CD-RW, as it may cause a malfunction. 10
11 REMOTE CONTROL HANDSET FUNCTION KEYS & CONTROL 1. PWR = Power ON/OFF Button 2. DSP = Display Button 3. SEL = Select Button 4. VOL = Volume Up Button 5. VOL = Volume Down Button 6. BND = Band Select Button 7. MOD = Mode Button 8. TUNE/SEEK = Tune/Seek Down Button 9. TUNE/SEEK = Tune/Seek Up Button 10. AMS = Automatic Memory Storing & Program Scanning Button 11. M1 - M6 = Preset Buttons 12. PAU = Pause Button 13. SCN = Scanning Button 14. RPT = Repeat Button 15. SHF = Shuffle Button 11
12 SPECIFICATION GENERAL Power Supply Requirements Chassis Dimensions : DC 12 Volts, Negative Ground : 178 (W) x 165 (D) x 50 (H) mm 7 x 6.1 x 1.9 Tone Controls - Bass (at 100 Hz) : + 10 db / 10 db - Treble (at 10 KHz) : + 10 db / 10 db Maximum Output Power Current Consumption Weight : 60W x 4 (ch) : 5 Amperes : 2 KG 4.4 lb CD PLAYER Signal to Noise Ratio Channel Separation Frequency Response : More than 60 db : More than 60 db : 20 Hz - 20 KHz RADIO FM Frequency Coverage : 87.5 to MHz IF : 10.7 MHz Sensitivity (S/N = 30 db) : 3 µv Stereo Separation : > 30 db Frequency Coverage IF Sensitivity (S/N = 20 db) AM : 530 to 1710 KHz : 450 KHz : 32 dbu 12
13 TROUBLE SHOOTING Before going through the check list, check wiring connection. If any of the problems persist after check list has been made, consult your nearest service dealer. Symptom Cause Solution No power. The car ignition switch is If the power supply is properly not on. connected to the car accessory circuits, but the engine is not running, switch the ignition key to ACC. The fuse is blown. Replace the fuse. Disc cannot be Presence of disc already Remove the disc in the player, loaded or ejected. inside the player. then put a new one in. Inserting the disc in reverse direction. Compact disc is extremely dirty or scratched. Temperature inside the car is too high. Condensation. Insert the compact disc with the label facing upward. Clean the disc or replace with a new one. Cool off until the ambient temperature returns to normal. Leave the player off for an hour or so, then try again. No sound. Volume is too low. Adjust volume to a desired level. Wiring is not properly connected. Check wiring connection. Sound skips. The installation angle is Adjust the installation angle less more than 30 degrees. than 30 degrees. The disc is extremely dirty or defective. Clean the compact disc, then try to play again. The operation keys The built-in microcomputer Press the RESET button. do not work. is not operating properly Front panel might not be due to noise. properly fixed into its place. The radio does not The antenna cable is not Insert the antenna cable firmly. work. The radio connected. station automatic selection does not The signals are too weak. Select a station manually. work. 13
14 88-C
OWNER S MANUAL VBD 1600 PLL SYNTHESIZER STEREO RADIO WITH COMPACT DISC PLAYER DIGITAL
 OWNER S MANUAL VBD 1600 PLL SYNTHESIZER STEREO RADIO WITH COMPACT DISC PLAYER DIGITAL INSTALLATION Notes: Choose the mounting location where the unit will not interfere with the normal driving function
OWNER S MANUAL. Mobile Audio System PLCD87
 PLCD87 OWNER S MANUAL Mobile Audio System PLL Synthesizer Stereo Radio Digital Compact Disc Player Automatically Memory Storing Fold Down Detachable Panel Preset Equalization Auxiliary Input Function Remote
OWNER S MANUAL VBD Mobile Audio System
 VBD 1400 OWNER S MANUAL Mobile Audio System PLL Synthesizer Stereo Radio Digital Compact Disc Player Automatically Memory Storing Preset Equalization Remote Control Electronic Detachable Panel CONTENTS
OWNER S MANUAL PLCD9MR. Mobile Audio System
 PLCD9MR OWNER S MANUAL Mobile Audio System CD Player PLL Synthesizer Stereo Radio Compact Disc Player Automatic Memory Storing Full Detachable Panel Preset Equalization Electronic Shockproof (ESP) Function
MOBILE AUDIO SYSTEM CD PLAYER. Instruction Manual PLCD21
 MOBILE AUDIO SYSTEM CD PLAYER Instruction Manual PLCD WWW.PYLEAUDIO.COM AM/FM Band Radio Anti-Shock Mechanism LCD Digital Display Semi-Detachable Front Panel Auto Power On RCA Line Out CONTENTS Installation.
OWNER S MANUAL PLCD10MR. Mobile Audio System
 PLCD10MR OWNER S MANUAL Mobile Audio System MP3/CD Player PLL Synthesizer Stereo Radio Compact Disc Player Automatic Memory Storing Full Detachable Panel Preset Equalization Electronic Shockproof (ESP)
PLRRR18U OWNER S MANUAL. Mobile Audio System
 PLRRR18U OWNER S MANUAL Mobile Audio System PLL Synthesizer Stereo Radio MP3/WMA Player Automatic Memory Storing Preset Equalization USB/MICRO SD Interface 1 CONTENTS Installation... 3 Wiring Connection...
PLMR18 OWNER S MANUAL. Mobile Audio System.
 PLMR18 OWNER S MANUAL Mobile Audio System PLL Synthesizer Stereo Radio Automatic Memory Storing Preset Equalization USB/ SD Interface 3.5mm Jack input www.pyleaudio.com 1 CONTENTS Installation... 3 Take
PLMR7BTW OWNER S MANUAL. Mobile Audio System
 PLMR7BTW OWNER S MANUAL Mobile Audio System PLL Synthesizer Stereo Radio Automatic Memory Storing USB Interface SD Interface 3.5mm Input Jack Bluetooth Function 1 CONTENTS Installation... 3 Take out screw
640CA OWNER S MANUAL. Mobile Audio System
 640CA OWNER S MANUAL Mobile Audio System PLL Synthesizer Stereo Radio CD/WMA Player Automatic Memory Storing Full Detachable Panel Preset Equalization Electronic Shockproof (ESP) Function Auxiliary Input
OWNER S MANUAL. Marine Audio System SEA9526 AM/FM/MPX WITH SINGLE CD PLAYER RCA LINE OUT. HIGH POWER 4 X 35 Watts Max.
 SEA9526, OWNER S MANUAL Marine Audio System PWR VOL- VOL+ MUT OPEN DIRECT-IN PLAY POWER LOADING TOP/REPEAT/RANDOM/ 3-BEAMLASER TRACKING SYSTEM DUAL 1-BIT D/A CONVERTERS 24AM/FMPRESETSTATIONS SEEK UP/DOWN
OWNER S MANUAL PLCD19XMR. Mobile Audio System
 PLCD19XMR OWNER S MANUAL Mobile Audio System PLL Synthesizer Stereo Radio Digital Compact Disc Player XM Ready Function Automatic Memory Storing Slide Down Detachable Panel Direct Track Access Program
Specifications. General and Radio Controls
 General and Radio Controls 2 7 6 4 AUX IN BAND LOUDNESS Specifications Supply voltage : 12V DC(11V-15V) Current consumption : Less than 10A Audio Signal Output : 2ch line out Characteristics : (1) Frequency
OWNER S MANUAL MR2180UA. Mobile Audio System
 MR2180UA OWNER S MANUAL Mobile Audio System PLL Synthesizer Stereo Radio CD/MP3/WMA Player RBDS Operation Automatic Memory Storing Preset Equalization Electronic Shockproof (ESP) Function USB Interface
644UA OWNER S MANUAL. Mobile Audio System
 644UA OWNER S MANUAL Mobile Audio System PLL Synthesizer Stereo Radio CD/MP3/WMA Player Automatic Memory Storing Full Detachable Panel Preset Equalization Electronic Shockproof (ESP) Function Memory Card
PLRDD19UB OWNER S MANUAL. Mobile Audio System
 PLRDD19UB OWNER S MANUAL Mobile Audio System PLL Synthesizer Stereo Radio MP3/WMA Player Automatic Memory Storing Preset Equalization USB/SD card Interface 1 CONTENTS Installation... 3 Wiring Connection...
AX1300BT SPECIFICATIONS: MECHLESS AM/FM MULTIMEDIA PLAYER RECEIVER BLUETOOTH w BUILT-IN SPEAKERS DESIGNED FOR AUSTRALASIAN CONDITIONS
 MECHLESS AM/FM MULTIMEDIA PLAYER RECEIVER BLUETOOTH w BUILT-IN SPEAKERS SPECIFICATIONS: GENERAL: Mechless Fixed Face Panel Ultra Memory Power Backup Built-In Speakers ISO DIN Mounting ISO Wiring harness
SEL MENU BAND MONO MODE 1 2 SCN 3 RPT 4 SHF 5 DISC- 6 DISC+ AMS DISP
 MS1550 MS1550B OWNER S MANUAL Marine Audio System POWER VOL MS 1550 4 x 40W MUT EQ SEL MENU BAND MONO LOUD VOL SCAN SHIFT MODE 1 2 SCN 3 RPT 4 SHF 5 DISC- 6 DISC+ AMS DISP Electronic AM/FM tuner with US/Euro
PLCD3MR OWNER S MANUAL. Mobile Audio System.
 PLCD3MR OWNER S MANUAL Mobile Audio System PLL Synthesizer Stereo Radio CD/MP3/WMA Player Automatic Memory Storing Fold Down Detachable Panel Preset Equalization Electronic Shockproof (ESP) Function USB
PRECAUTIONS. How to Handle Discs. Lithium Battery Cell Warnings
 CONTENTS Precautions... 1 How to Handle Discs... 1 Lithium Battery Cell Warnings... 1 Installation... 2 Prepare Radio... 2 Mount Radio... 2 Wiring Connections... 3 Uninstall the Main Unit... 4 Control
Minute, Second Track Display Built-in Weatherband. Auto Best Station Memory 3-Beam Laser Tracking. Loudness Mute Button 8x Oversampling
 PLCD34MRW-PLCD36MRW OWNER S MANUAL Marine Audio System In-Dash Marine CD/MP3 Player Auto Power Loading PLL Synthesizer Stereo Radio Auxiliary Input Function AM/FM MPX Electronic Tuning Receiver USB/SD/MMC
PLMR17BTS OWNER S MANUAL. Mobile Audio System.
 PLMR17BTS OWNER S MANUAL Mobile Audio System PLL Synthesizer Stereo Radio Automatic Memory Storing Auxiliary Input Function Preset Equalization USB/ SD Interface Bluetooth function Detachable Panel www.pyleaudio.com
BLUETOOTH AMPLIFIER PLMRM4BTA USER MANUAL. Bluetooth A2DP Function USB Interface AUX IN function
 BLUETOOTH AMPLIFIER PLMRM4BTA USER MANUAL Bluetooth A2DP Function USB Interface AUX IN function CONTENTS Installation... 3 Wiring Connection....... 5 Operation......6 USB play operation... 6 BT operation.......6
MXD50 INSTALLATION/OWNERS MANUAL AM/FM/CD
 MXD50 INSTALLATION/OWNERS MANUAL AM/FM/CD Marine Receiver MARINE MXD50 INSTALLATION Preparation Please read entire manual before installation. Before You Start Disconnect negative battery terminal. (consult
MOBILE AUDIO SYSTEM PLCDBT95MRB USER MANUAL. PLL Synthesizer Stereo Radio CD/MP3/WMA Player Automatic Memory Storing Fixed Panel
 MOBILE AUDIO SYSTEM PLCDBT95MRB USER MANUAL PLL Synthesizer Stereo Radio CD/MP3/WMA Player Automatic Memory Storing Fixed Panel Bluetooth function Preset Equalization Electronic Shockproof (ESP) Function
INSTRUCTION MANUAL CD MP3 WMA USB AUX-IN
 NA99i Car Audio System Player INSTRUCTION MANUAL CD MP3 WMA USB AUX-IN ipod/iphone Safety WARNING Stop the car before operating the unit. Important to know... To prevent a short circuit, never put or leave
AX1201 MP3 CD MULTIMEDIA RECEIVER USB / SD-MMC INPUT - FRONT PANEL AUX-IN SPECIFICATIONS: DESIGNED FOR AUSTRALASIAN CONDITIONS
 MP3 CD MULTIMEDIA RECEIVER USB / SD-MMC INPUT - FRONT PANEL AUX-IN SPECIFICATIONS: GENERAL: Detachable Face Panel Ultra Memory Power Circuit LCD Display Illuminated Controls (Blue) ISO DIN Mounting ISO
Disconnect the battery to ensure there will be no shorted wires during the installation procedure.
 The round-style headunit receiver radio features Bluetooth technology allowing music to wirelessly stream from your compatible Bluetooth-enabled device. Control the audio from a distance -- all from your
PRECAUTIONS. How to Handle Discs. Lithium Battery Cell Warnings
 CONTENTS Precautions... 1 How to Handle Discs... 1 Lithium Battery Cell Warnings... 1 Installation... 2 Prepare Radio... 2 Mount Radio... 2-3 Wiring Connections... 3 Removal of the Main Unit...3 Control
PRECAUTIONS. How to Handle Discs. Lithium Battery Cell Warnings
 CONTENTS Precautions... 1 How to Handle Discs... 1 Lithium Battery Cell Warnings... 1 Installation... 2 Prepare Radio... 2 Mount Radio... 2-3 Wiring Connections... 3 Removal of the Main Unit... 4 Control
OWNER S MANUAL VBD-1700 FULL LOGIC MOTORIZED SLIDE DOWN & FULL DETACHABLE PANEL COMPACT DISC PLAYER / RECEIVER AMS MUTE PEQ DISP
 C O N T R O L OWNER S MANUAL VBD-1700 RX VOLUME MUTE PEQ ST LOUD TUNNG SUB-W DISP SEL VBD-1700 CAR COMPACT DISC PLAYER / RECEIVER MODE AMS 1 3 PAU SCN RPT 4 5 6 SHF BND/LUD FULL LOGIC MOTORIZED SLIDE DOWN
PLCD14MRKT OWNER S MANUAL. Mobile Audio System
 PLCD14MRKT OWNER S MANUAL Mobile Audio System PLL Synthesizer Stereo Radio CD/MP3/WMA Player Automatic Memory Storing Full Detachable Panel Preset Equalization Electronic Shockproof (ESP) Function USB
Precautions... 1 Take Precaution...1 Installation Installation Procedures... 2 Installation Opening...
 CONTENTS Precautions... 1 Take Precaution...1 Installation...2-3 Installation Procedures... 2 Installation Opening... 2 Wiring Connections...3 Removal of the Main Unit... 3 Overview of the Components...
AM/FM/USB CD/MP3 PLAYER WITH BLUETOOTH
 INSTALLATION NOTES AM/FM/USB CD/MP3 PLAYER WITH BLUETOOTH 1. Please read these installation and operation instructions before installation. 2. Make sure to connect all other wires before power connection.
OWNER S MANUAL 810DBI. Mobile Audio System
 810DBI OWNER S MANUAL Mobile Audio System PLL Synthesizer Stereo Radio Automatic Memory Storing Detachable Control Panel RBDS Operation Bluetooth Hands-free function & A2DP (Advanced Audio Distribution
PRECAUTIONS. How to Handle Discs. Lithium Battery Cell Warnings
 PRECAUTIONS How to Handle Discs Handle a disc by its edges. Do not touch the playing side. Before inserting a disc, wipe the disc outward from the disc center with a clean, soft, dry and lint-free cloth.
STA-3168M3 MP3 PLAYER / RECEIVER USB/SD/MMC/AUX SLOT
 STA-168M DISP MU MOD BND STA-168M MP PLAYER / RECEIVER USB/SD/MMC/AUX SLOT Installation 0 Additional information 04 General operations 05 Radio operations 09 USB/SD operations 10 Specification 11 MP New
FM/AM Compact Disc Player
 3-858-494-11 (1) FM/AM Compact Disc Player Operating Instructions For installation and connections, see the supplied Installation/Connections manual. CDX-3107 1996 by Sony Corporation Actual total number:
INSTRUCTION MANUAL 160WATTS PLCD46
 PLCD46 INSTRUCTION MANUAL OPEN Detachable Front Panel CAR Radio & CD Player ROCK POP FLAT CLASS RPT RDM INT TRACK CH CDP EJECT BND SEL DSP COMPACT DIGITAL AUDIO MUTE CLK M1/TOP M2/RPT M3/INT POWER LUD
PRECAUTIONS. Lithium Battery Cell Warnings. Use cautions
 PRECAUTIONS Lithium Battery Cell Warnings Cell leakage may cause damage to the remote control. Do not throw cells into as this may cause an explosion. Keep battery cells out of reach of children. Use cautions
Owner s Manual AWM910 JENSEN AWM910 COMPACT DISC PLAYER RADIO CD COMPACT MUSIC SYSTEM MUTE AUX BAND AUX IN PUSH PUSH PWR VOL ALARM T/F AUD SPK A SPK B
 AWM910 Owner s Manual COMPACT DISC PLAYER PUSH 1 2 3 4 5 6 RPT SCAN RDM H M PUSH PWR VOL ALARM SET ON/OFF EQ T/F AUD RADIO CD COMPACT MUSIC SYSTEM MUTE AUX BAND CD AUX IN A B A+B JENSEN AWM910 Thank You!
ipod Digital Media Center AM / FM Radio
 INSTRUCTION MANUAL MULTI- ENVIRONMENT PLAYER AQ-IP-3B- AQ-IP-3B-X ipod Digital Media Center AM / FM Radio INFO TOP 1. MOUNTING PRECAUTIONS The AQ-IP-3B-X is designed for a multi environment application.
BEAT 485 OWNER S MANUAL
 BEAT 485 OWNER S MANUAL Mobile Audio System PLL Synthesizer Stereo Radio RDS (Radio Data System) Operation DAB (Digital Audio Broadcasting) Operation CD/MP3/WMA Player Automatic Memory Storing Full Detachable
MOBILE AUDIO SYSTEM PATVR14 USER MANUAL
 MOBILE AUDIO SYSTEM PATVR14 USER MANUAL CONTENTS Installation... 3 Mounting... 4 Wiring Connection... 5 Operation... 6 Location of the keys... 6 Power on/off the unit... 7 Main menu... 7 Setup... 7 Reset
Car Stereo Receiver and Audio Player
 Car Stereo Receiver and Audio Player USER MANUAL AND INSTALLATION INSTRUCTIONS Sondpex Corporation of America Model: MRDP-C01 Thanks for your purchase! Our car audio equipment lets you enjoy diversified
Operation Manual for Users
 COMPACT MARINE DIGITAL AUDIO EST.JBL(MR-7)-00-I/M Operation Manual for Users Model No.: MR-7 MR-7 MARINE 0. LD INT RPT RDM HI - POWER xwatts This product is sold and serviced exclusively by Prospec Electronics
MARINE. Operation Manual. Model No.: MBB-3. Effective from 31 / May / x210mm
 MARINE Operation Manual Model No.: MBB-3 Effective from 31 / May / 07 145x210mm Mounting the Black Box 1. Precautions Choose the mounting location carefully so that the unit will not interfere with the
OPERATION MANUAL MM1C25 DIGITAL AUDIO PLAYER AM/FM STEREO USB BLUETOOTH CAPABLE HEADPHONE OUTPUT
 OPERATION MANUAL MM1C25 DIGITAL AUDIO PLAYER AM/FM STEREO USB BLUETOOTH CAPABLE HEADPHONE OUTPUT CONTENTS CONTENTS. 1 CONTROL PANEL ILLUSTRATION 2 WIRE DIAGRAM 3 INSTALLATION.. 4 BASIC OPERATION... 5 RADIO
OWNER S MANUAL G4-RM55OO
 OWNER S MANUAL G4-RM55OO INSTALLATION... 3-4 WIRING CONNECTION... 5 OPERATION... 6 LOCATION OF THE KEYS... 6 POWER ON/OFF THE UNIT... 7 MAIN MENU... 7 SETUP... 7 RESET FUNCTION... 9 SLIGHTFOG AFTER OPERATION...9
Model No.: MIL-MR70BT
 Model No.: MIL-MR70BT This product is sold and serviced exclusively by Prospec Electronic Inc. and must be returned to Prospec for in and out of warranty repairs. It can not be serviced under warranty
CONTENTS. Store/Recall Preset Stations (1-6) Next/Previous Track...
 Next/Previous Track...") CONTENTS Precautions... 1 Lithium Battery Cell Warnings... 1 Use Cautions...1 Installation... 2 Installation Precedures... 2 Installation Opening... 2 Wiring Connections... 3 Remove of the Main Unit...4
CONTENTS Precautions... 1 Lithium Battery Cell Warnings... 1 Use Cautions...1 Installation... 2 Installation Precedures... 2 Installation Opening... 2 Wiring Connections... 3 Remove of the Main Unit...4
MD 4295 Autoradio BDA_GB :27 Uhr Seite 1 C M Y CM MY CY CMY K FUNCTIONS
 MD 4295 Autoradio BDA_GB 06.12.2002 12:27 Uhr Seite 1 FUNCTIONS 1. PTY: Programme Type Code Includes programmes such as news, music, sport, etc., dependent on the radio station. 2. TA: Traffic Announcement
Precautions... 1 Take Precaution...1 Installation Installation Procedures... 2 Installation Opening...
 CONTENTS Precautions... 1 Take Precaution...1 Installation... 2-3 Installation Procedures... 2 Installation Opening... 2 Wiring Connections... 3 Remove of the Main Unit...3 Control Panel Button Locations...
FXD-785GD. (English) OPERATING INSTRUCTIONS... GB-1~GB-18
 OPERATING INSTRUCTIONS... GB-1~GB-18") FXD-785GD REL ATP FM /AM CD RECEIVER FXD-785GD 50W x 4 VOL TUN TRK LO/DX LOUD SHF 1 2 3 4 5 6 AUDIO RPT MUTE POWER Full Panel Detachable High Power FM/AM Stereo Receiver Compact Disc Player ISO Mounting
FXD-785GD REL ATP FM /AM CD RECEIVER FXD-785GD 50W x 4 VOL TUN TRK LO/DX LOUD SHF 1 2 3 4 5 6 AUDIO RPT MUTE POWER Full Panel Detachable High Power FM/AM Stereo Receiver Compact Disc Player ISO Mounting
CONTENTS. Fast Forward/Backward... Change Bands (BAND) Automatic Music Search (AMS)... 6 Track Search... Mute... 6
 Automatic Music Search (AMS)... 6 Track Search... Mute... 6") CONTENTS Precautions... 1 Lithium Battery Cell Warnings... 1 Use Cautions...1 Installation... 2 Installation Procedures... 2 Installation Opening... 2 Wiring Connections... 3 Uninstall the Main Unit...
CONTENTS Precautions... 1 Lithium Battery Cell Warnings... 1 Use Cautions...1 Installation... 2 Installation Procedures... 2 Installation Opening... 2 Wiring Connections... 3 Uninstall the Main Unit...
CONTENTS. Store/Recall Preset Stations (1-6)... 5 Next/Previous Track...
... 5 Next/Previous Track...") CONTENTS Precautions... 1 Lithium Battery Cell Warnings... 1 Use Cautions...1 Installation... 2 Installation Procedures... 2 Installation Opening... 2 Wiring Connections... 3 Uninstall the Main Unit...4
CONTENTS Precautions... 1 Lithium Battery Cell Warnings... 1 Use Cautions...1 Installation... 2 Installation Procedures... 2 Installation Opening... 2 Wiring Connections... 3 Uninstall the Main Unit...4
User / Installation Manual Marine CD/MP3 Receiver MS-CD80
 User / Installation Manual Marine CD/MP3 Receiver MS-CD80 Specifications and design are subject to change without notice. Contents Installation 1 Button Description 4 General Operation 5 Menu Selection
PRECAUTIONS. Lithium Battery Cell Warnings. Use cautions. Cell leakage may cause damage to the remote control. Do not throw cells into
 CONTENTS Precautions... 1 Lithium Battery Cell Warnings... 1 Use Cautions...1 Installation... 2 Installation Precedures... 2 Installation Opening... 2 Wiring Connections... 3 Uninstall the Main Unit...
Precautions... 1 Lithium Battery Cell Warnings... 1 Take Precaution...1 Installation Installation Procedures... 2 Installation Opening...
 CONTENTS Precautions... 1 Lithium Battery Cell Warnings... 1 Take Precaution...1 Installation...2-3 Installation Procedures... 2 Installation Opening... 2 Wiring Connections... 3 Remove of the Main Unit...
INSTRUCTION MANUAL DECKLESS CAR AUDIO PLAYER CA-2787SU. Please read the instruction manual before used.
 INSTRUCTION MANUAL DECKLESS CAR AUDIO PLAYER CA-2787SU Please read the instruction manual before used. Key Function: 1. Mode Button Press to switch between RADIO/USB/SD-MMC/Aux-In Card mode. The unit preset
XD1215 INSTALLATION/OWNER'S MANUAL AM/FM/CD Receiver with Detach Face
 XD1215 INSTALLATION/OWNER'S MANUAL AM/FM/CD Receiver with Detach Face XD1215 INSTALLATION Preparation Please read entire manual before installation. Before You Start Disconnect negative battery terminal.
1. INSTALLATION. Trim Plate. Bend the appropriate tabs to hold the sleeve firmly in place.
 0 R - 0 0896 . INSTALLATION The following illustration shows a typical installation. If you have any questions or require information regarding installation kits, consult your customer car audio dealer
6 Track/Folder Navigation... 6 Mute... 6
 CONTENTS Precautions... 1 Lithium Battery Cell Warnings... 1 Use Cautions...1 Installation... 2 Installation Procedures... 2 Installation Opening... 2 Wiring Connections... 3 Uninstall the Main Unit...
MR100 INSTALLATION/OWNER'S MANUAL Digital Media Marine Receiver
 MR100 INSTALLATION/OWNER'S MANUAL Digital Media Marine Receiver Preparation MR100 INSTALLATION Please read entire manual before installation. Before You Start Disconnect negative battery terminal. Consult
CONTENTS. Next/Previous Track... 4 Fast Forward/Backward... 4 Set the Clock (CLK)... 4 Insert SD Card... 4
... 4 Insert SD Card... 4") CONTENTS Precautions... 1 Lithium Battery Cell Warnings... 1 Take Precaution...1 Installation...2-3 Installation Procedures... 2 Installation Opening... 2 Wiring Connections... 3 Remove of the Main Unit...3
CONTENTS Precautions... 1 Lithium Battery Cell Warnings... 1 Take Precaution...1 Installation...2-3 Installation Procedures... 2 Installation Opening... 2 Wiring Connections... 3 Remove of the Main Unit...3
CONTENTS. Store/Recall Preset Stations (1-6) Next/Previous Track...
 Next/Previous Track...") CONTENTS Precautions... 1 Lithium Battery Cell Warnings... 1 Use Cautions...1 Installation...2 Installation Procedures...2 Installation Opening... 2 Wiring Connections... 3 Remove of the Main Unit... 3
CONTENTS Precautions... 1 Lithium Battery Cell Warnings... 1 Use Cautions...1 Installation...2 Installation Procedures...2 Installation Opening... 2 Wiring Connections... 3 Remove of the Main Unit... 3
MS30. Owner s Manual + FOLDER VOL+ VOL- >ll MUTE. >>l. l<< MS30 MODE FOLDER
 Owner s Manual MS30 VOL- + FOLDER VOL+ lll MUTE >>l l FOLDER CONTENTS Introduction... 1 Features... 1 Box Contents... 1 Compliance... 1 Safety Information... 2 Installation... 3 Mounting the
LOCATION OF CONTROLS REMOTE CONTROL DSP BUTTON POWER BUTTON MODE BUTTON DISPLAY/ ID3 TAG INFORMATION BUTTON FUNCTION SELECT BUTTON
 LOCATION OF CONTROLS POWER BUTTON DSP BUTTON TUNING / SEEK / CD TRACK UP / DOWN BUTTON BAND / LOUDNESS / MP3 ENTER BUTTON VOLUME UP / DOWN BUTTONS CD PAUSE BUTTON CD SHUFFLE BUTTON LOCAL/DX BUTTON FM STEREO
MT2108. Operating and Installation Guide SUB PWR BAND MD REL TUNE/ TRACK AF 1 PAU 2 INT 3 RPT 4 RDM 5 6 COMPACT DIGITAL AUDIO
 MT08 SUB PWR BAND MD REL COMPACT DIGITAL AUDIO TUNE/ TRACK SCN A/PS DISP PTY TA AF PAU INT 3 RPT 4 RDM 5 6 Operating and Installation Guide LOCATIONS OF CONTROLS 0 9 3 4 5 SUB PWR BAND MD REL COMPACT DIGITAL
Installation and Operations Manual
 R Installation and Operations Manual POWER EJECT IR SEL/ 4 X 50 WATTS ELAPSE DIM / II LOUD MUTE EQ DISP 2 3 4 5 ENTER PROGRAM REPEAT SHUFFLE INTRO DISC/CAT M9900CDS AM / FM / WB and CD Stereo Receiver
INSTRUCTION MANUAL 160WATTS. PLCD34
 K PLCD34 INSTRUCTION MANUAL OPEN LUD DSP FLIP DOWN DETACHABLE CD PLAYER FLAT CLASS ROCK POP TRACK CH RPT RDM INT BD power CLK CDP - SEL TOP LO 1 RPT 2 INT 3 RDM 4 AP COMPACT DIGITAL AUDIO 5 6 MU DN UP
CDC-X217 YU OPERATING INSTRUCTIONS MANUAL DE INSTRUCCIONES MODE D EMPLOI OWNER S RECORD
 OPERATING INSTRUCTIONS MANUAL DE INSTRUCCIONES MODE D EMPLOI CDC-X217 YU STEREO CAR CD RECEIVER RADIO-TOCADISCOS DE CD ESTEREOFONICO PARA AUTOMOVIL ENGLISH ESPAÑOL FRANÇAIS OWNER S RECORD For your convenience,
PRECAUTIONS. Lithium Battery Cell Warnings. Take Precaution. Cell leakage may cause damage to the remote control. Do not throw cells into
 PRECAUTIONS Lithium Battery Cell Warnings Cell leakage may cause damage to the remote control. Do not throw cells into as this may cause an explosion. Keep battery cells out of reach of children. Take
PRECAUTIONS. How to Handle Discs. Lithium Battery Cell Warnings
 CONTENTS Precautions... 1 How to Handle Discs... 1 Lithium Battery Cell Warnings... 1 Installation... 2 Prepare Radio... 2 Mount Radio... 2-3 Wiring Connections... 3 Removal of the Main Unit...3 Control
Sondpex Corporation of America. Digital Media Player Receiver Bluetooth Handsfree USER MANUAL AND INSTALLATION INSTRUCTIONS
 Digital Media Player Receiver Bluetooth Handsfree USER MANUAL AND INSTALLATION INSTRUCTIONS Model: RUS-121B Sondpex Corporation of America Monmouth Jct., NJ 08852, USA 1-877-997-7888 732-940-4430 support@sondpex.com
OWNER S MANUAL BZC-1802MP SLIDE DOWN SYSTEM BZC-1802MP CAR CD / MP3 PLAYER RECEIVER
 OWNER S MANUAL BZC-1802MP MUTE SLIDE DOWN SYSTEM LOC (9) ST LOUD (7) SUB-W DISP ID3 (0) PEQ MENU AMS VBD-1700 CAR COMPACT DISC PLAYER / RECEIVER BZC-1802MP CAR CD / MP3 PLAYER RECEIVER PAU SCN RPT SHF
INSTRUCTION MANUAL. Fold Down Full Detachable PLL Electronic Tuning Stereo AM/FM Radio, MP3/CD Player & Remote Control MODEL: NCA-681
 MODEL: NCA-681 INSTRUCTION MANUAL IMPORTANT INFORMATION REQUIRED BY THE FCC This device complies with Part 15 of the FCC Rules. Operation is subject to the following two conditions: (1)this device may
Operation Manual for Users
 EST.JBL(MR8)-06060-I/B COMPACT DIGITAL AUDIO Operation Manual for Users Model No.: MR-8 This product is sold and serviced exclusively by Prospec Electronics Inc. and must be returned to Prospec for in
MARINE AUDIO SYSTEM Installation and Operation Manual
 MARINE AUDIO SYSTEM Installation and Operation Manual POWER MODE SEL + MSR007 EQ IX BASS INFO SCROLL AUDIO MENU MUTE 2 INT RPT 4 RDM 40Wx4 BAND SEARCH AS/PS AUX IN SAFETY INFORMATION When Boating Keep
DESCRIPTION OF CONTROLS ON THE FRONT CONTROL PANEL
 DESCRIPTION OF CONTROLS ON THE FRONT CONTROL PANEL Front Control Panel Front Cabinet after removing Front Control Panel 1. RELEASE button 2. SEL & VOL knob 3. POWER & MUTE button 4. LCD 5&6. >> And
MXD25 INSTALLATION/OWNER'S MANUAL AM/FM/CD Marine Receiver with Auxiliary Input, USB Charging Port and Detachable Face
 MXD25 INSTALLATION/OWNER'S MANUAL AM/FM/CD Marine Receiver with Auxiliary Input, USB Charging Port and Detachable Face Charge Port Preparation MXD25 INSTALLATION Please read entire manual before installation.
CD / SD / USB / MP3 / AM / FM / BLUETOOTH RECEIVER QA30BT CD / SD / USB / MP3 / AM / FM / BLUETOOTH RECEIVER MP3 / WMA CALLS & MUSIC STREAMING
 TM CD / SD / USB / MP3 / AM / FM / BLUETOOTH RECEIVER MODE SD USB AMS RST QA30BT MUTE BND CLK 1/ 2/INT 3/RPT 4/RDM 5 6 AUX QA30BT CD / SD / USB / MP3 / AM / FM / BLUETOOTH RECEIVER Bluetooth MP3 / WMA
PRECAUTIONS. How to Handle Discs. Lithium Battery Cell Warnings
 CONTENTS Precautions... 1 How to Handle Discs... 1 Lithium Battery Cell Warnings... 1 Installation... 2 Prepare Radio... 2 Mount Radio... 2-3 Wiring Connections... 3 Removal of the Main Unit...3 Control
FXD-RS60M. (English) OPERATING INSTRUCTIONS. 2~26
 OPERATING INSTRUCTIONS. 2~26") FXD-RS60M Fold Down Panel Detachable High Power FM/MW/LW Stereo Receiver Compact Disc Player/MP3 Player/With ASR ISO Mounting with Removable Trim Ring CD Changer Control Remote Control CD-R/RW Compatibility
FXD-RS60M Fold Down Panel Detachable High Power FM/MW/LW Stereo Receiver Compact Disc Player/MP3 Player/With ASR ISO Mounting with Removable Trim Ring CD Changer Control Remote Control CD-R/RW Compatibility
USER'S MANUAL 610UA MP3-COMPATIBLE DIGITAL MEDIA AM/FM RECEIVER BO S AUDIO SYSTEMS
 USER'S MANUAL 610UA MP3-COMPATIBLE DIGITAL MEDIA AM/FM RECEIVER BOS AUDIO SYSTEMS CONTENTS Precautions... 1 Lithium Battery Cell Warnings... 1 Take Precaution...1 Installation...2 3 Installation Procedures...
AX430 AM/FM CASSETTE PLAYER WITH CD CHANGER CONTROL
 Ω Ω 2002/11 (C/A) Ω Ω Ω (155 mm) (19 mm) (178 mm) (188 mm) Clarion Co., Ltd. All Rights Reserved. Copyright 2002: Clarion Co., Ltd. (50 mm) (58 mm) PE-1712K-E 280-7890-00 Owner s manual AX430 AM/FM CASSETTE
INSTRUCTION MANUAL CAR RADIO RECEIVER / MP3 PLAYER WITH BULETOOTH HAND FREE SYSTEM DSP LOUD LOC TUNING / SEEK UP/DOWN NEXT/BACK PLAY/ PAUSE BUTTON
 DSP INSTRUCTION MANUAL CAR RADIO RECEIVER / MP3 PLAYER WITH BULETOOTH HAND FREE SYSTEM BAND MUTE LCD DISPLAY DSP C LOUD LOC CANCEL/ MENU AMS SRC INFO POWER EQ AUDIO TUNING / SEEK UP/DOWN NEXT/BACK PLAY/
INSTRUCTION 1 MANUAL
 MA1801 WATERTIGHT MARINE AM/FM RADIO BLUETOOTH MULTIMEDIA SYSTEM SPECIFICATIONS GENERAL - USB Input (Rear) - 2ch Aux Inputs (Rear) - LCD Display - Clock - IP66 Watertight - Water & Salt Protection PCB
IF ADDITIONAL INSTALLATION COMPONENTS ARE NECESSARY, CONTACT YOUR REI SALES REP FOR:
 50W X 4 R-9 05 Thank you for purchasing this AM/FM/CD/MP3 Weather Band Receiver from REI. This product is designed and tested to withstand temperature and vibration extremes. Please read the owner's manual
INSTRUCTION MANUAL CD MP3 WMA USB SD AUX-IN
 NA305i Car Audio System Player INSTRUCTION MANUAL CD MP3 WMA USB SD AUX-IN ipod/iphone Safety WARNING Stop the car before operating the unit. Important to know... To prevent a short circuit, never put
GSMR20 OWNER S MANUAL
 GSMR20 OWNER S MANUAL Version 1.0 FEATURES AM/FM/Radio/Preset 180 Watts Max Power Pre-Amplifier Outputs Splash Proof LCD Display Bluetooth Audio Streaming (Bluetooth 3.0) A2DP Audio Streaming USB/AUX Input
MDM300 INSTALLATION/OWNER'S MANUAL. CD Marine Receiver
 MDM300 INSTALLATION/OWNER'S MANUAL CD Marine Receiver Preparation MDM300 INSTALLATION Please read entire manual before installation. Before You Start Disconnect negative battery terminal. Consult a qualified
AUDIO SYSTEM Quick reference for your audio system
 AUDIO SYSTEM Quick reference for your audio system The CD button works only when your Lexus is equipped with an automatic changer. 99 Turning the system on and adjusting volume (See page 101 for details.)
WIRES CONNECTION SPECIFICATION GENERAL. Preface
 WIRES CONNECTION Preface RED R WHITE L RCA LINE OUT Thank you for purchasing this car audio product. Please read this manual carefully before operating this car audio product. Please keep this manual for
INSTALLATION METHOD. Press the RPT button twice to play the current folder repeatedly, and the. RPT ONE will be visible on the LCD.
 INSTALLATION METHOD This is an anti-theft installation method. The main unit wears a METAL MOUNTING SLEEVE. Please connect the wiring, eg, the Power supply, the Speakers and the Antenna according to the
Gauge Mount Radio PRIMARY FEATURES. Marine & Powersports Bluetooth Source Units
 R MUSIC.DEFINED. Gauge Mount Radio Marine & Powersports Bluetooth Source Units Thank you for choosing the MB Quart Nautic GMR Marine & Powersports Source Units. With proper installation, you are on the
CONTENTS. Fast Forward/Backward... 5 Change Bands (BAND)... 6 Automatic Music Search (AMS)...6 Track Search... 6 Mute... 6
... 6 Automatic Music Search (AMS)...6 Track Search... 6 Mute... 6") CONTENTS Precautions... 1 Lithium Battery Cell Warnings... 1 Use Cautions...1 Installation... 2 Installation Procedures... 2 Installation Opening... 2 Wiring Connections... 3 Uninstall the Main Unit...3
CONTENTS Precautions... 1 Lithium Battery Cell Warnings... 1 Use Cautions...1 Installation... 2 Installation Procedures... 2 Installation Opening... 2 Wiring Connections... 3 Uninstall the Main Unit...3
Operation and Installation Manual
 Operation and Installation Manual DIM ST IPOD M1-CD AM/ FM/ WB Stereo Receiver with CD Player U.S. PATENT NO.: D173 Introduction Please take the time to read all of the information in this manual. Familiarity
WALLMOUNT Entertainment System
 Wiring Diagram AV IN AV OUT SUBWOOFER OUT HDMI JACK R R R L L L IR REMOTE JACK AUDIO IN ANTENNA WIRING CONNECTING SOCKET Specification GENERAL Supply Voltage Current Consumption Power Output Number of
KDC-C712 KDC-C662 KDC-C462
 KDC-C712 KDC-C662 KDC-C462 COMPACT DISC AUTO CHANGER INSTRUCTION MANUAL B64-181- (EF) Safety precautions Take the following precautions to prevent fire and avoid personal injury : Check that no metal objects