CANTAR X3. User Manual. Software v 1.113
|
|
|
- Alexina Briggs
- 5 years ago
- Views:
Transcription

1 CANTAR X3 User Manual Software v 1.113
2 Table of Content HELP...7 HEADPHONE...8 Current Outmap...8 Name...8 Inputs...8 Other Main Selector Positions...9 LINE OUTPUTS...10 Outmaps...10 Output Level...11 Delay...11 Play Mute...11 Beep Mute...12 Current Configuration...12 Edit Outmap...12 Multiple Outmap...13 Output Levels...14 Other Main Selector Positions...15 AES OUTPUTS...16 Outmaps...16 DANTE OUTPUTS (optional)...17 Outmaps...17 Module Configuration...17 IN GRID ROUTING...18 Current Ingrid...18 Name...18 Inputs...18 Inputs to Tracks...18 Pan-Pot to Mixdown...19 Track settings...20 Declare input as Mixdown...20 PRE-RECORD (PPR)...22 Pre-Record functionality...22 Pre-Record Buffer...22 Metadata Edit...22 Previous take trash...22 Global Screen presentation...22 Media States...23 Metadata...24 Next Record...24 Previous Record...24 Completion...25 Audio Trash...25 Solo...26 Mic...26 Line...28 Track
3 AES...29 AES Outputs...31 Double Solo & Phase-meter...31 Mics...31 Tracks...32 Phase-meter...32 Levels...32 Inputs...32 Tracks...33 Locking Panels...34 Mixer Panel...34 Potentiometer Panel...35 Tone Generator...35 Talk...35 Assignation...35 Potentiometer...35 Mixer Fader...36 Cantarem...36 Cantarem II...36 Timecode...37 State...37 Internal Source Timecode Method...37 External Source...39 RECORD...40 Medias State...40 Solo...40 Metadata...40 Sync Points...40 Slate Detection...40 User Marker...41 Levels...41 Tone Generator...41 Talk...41 Timecode...41 TEST...42 Link Inputs...42 Inputs Delay...43 Line Outputs Levels...44 Idle backup...44 STOP...45 Media Free Space...45 Low Power Mode...45 Power On/Off...45 Power ON...45 Power OFF...46 Dante...46 Rescue Mode...46 PLAY
4 Commands...47 Headphone Modes...47 Recorded Mixdown...48 Tracks-Mono...48 User Outmaps...49 Solo...49 Routing...50 Sync Points...51 AUDIO FILE BROWSER...52 Browser...52 Editing Metadata...52 Single File edit...52 Multiple Takes Edition...53 Trash...53 Fix Files...54 Snap Report...54 Simple Snap...54 Export Snap...55 AUDIO & TIMECODE...56 Sample Rate...56 Bit Depth...56 Pre-Record Length...56 Timecode Settings...56 LTC Out Generator...56 LTC Out Level...56 LTC Rate...56 Timecode Source...56 Timecode User-bits...56 Timecode Fudged...57 Operator TC...57 Record-Run TC...57 Clap Detection...57 Mixer Fader Max Level...57 Phantom Mic Gain...57 Tone & Beep...57 Tone Level...57 Beep Level...57 Record Beep...57 Beep Routing...57 Remote Rec...58 Slate Mics...58 Internal slate mic...58 Jack 3,5 slate mic...58 Jack 3,5 bias pwr...58 Talk full duplex...58 Hdphn safety lvl...58 Balance Lock...58 Audio Power...58 Digital power
5 Dante power...58 TECHNICAL...59 Scene & Take Template...59 File naming...59 Vumeter Settings...59 Mxdn Shifted...59 Grid...59 Line Level...59 Gradian...59 Red Zone...59 Yellow Zone...60 Speed...60 Peek Hold...60 System Clock...60 Date...60 Time...60 Display Levels/Attenuation...60 Inputs Levels...60 Tracks attenuation...60 Light...60 Backlight...60 LED...60 Low Power in stop...60 External voltage limit...61 Keyboard layout...61 File Network access...61 Tech support...61 IP Adress...61 Diagnostic...61 Save / Load settings...62 Save...62 Load...62 Load firmware...63 SESSION...64 Record Parameters...64 Project...64 Media...65 Media erase...66 Compressed Proxy...66 Report...67 Report type...67 Setup PDF...67 BACKUP...69 Backup settings...69 Source and Target...69 Process...69 Backup processing...70 ANNEXES...72 Connectors
6 Mini Delta Ribbon...72 Headphone Jack 6.35mm & Slate Mic Jack 3.5mm...72 Cantarem Lemo Timecode Lemo 5 (F)...73 Power XLR-4 (M)...73 Mic XLR-3(F)...73 Mic XLR-5(F)...73 Line-In XLR-5(F)...74 AES-42 TA-3(F)...74 AES In/Out Dsub Analog Output Dsub Hi-Rose...74 Cantar Audio Chain...75 Software history


7 HELP In order to remind the user of the shortcuts available at any time, a quick help Menu is available by pressing three times the Shift button. This help box is available in the Record, Pre-Record, Test, Play, Browse, Outmaps, Ingrid Menus. Each item may be selected by pressing the Up and Down buttons and more details obtained by pressing the Ok button. Pict. 01 Pict. 02 Pict. 03 Pict. 04 7
: Copy and Paste. By pressing the Shift+F4 buttons, the current outmap is copied to the clipboard.")


8 HEADPHONE Headphone Outmaps can be modified while the Main Selector is in the 6 o'clock position. You can configure up to 26 Headphone Outmaps (from 'A' to 'Z'). Pict. 05 I. Current Outmap To go to the next or previous Outmap, use the Left Crown. Nota Bene (NB): Copy and Paste. By pressing the Shift+F4 buttons, the current outmap is copied to the clipboard. Paste it over any Outmap by pressing the Shift + F6 buttons. II. Name Each Outmap can be named (max: 12 characters). Press the Shift+OK buttons to modify it. Pict. 06 III. Inputs Each input can be sent to the Left and/or Right Ear. The Left Ear is represented in RED. The Right Ear is represented in GREEN. You can navigate through the input grid with the direction buttons (Left-Right-Up-Down) or using the Jog wheels. Enable or disable Left mapping by pressing the F4 button. Enable or disable Right mapping by pressing the F6 button. Toggle between Left-Center-Right-Nothing by pressing the F5 button. An input sent to Left Ear will be colored in RED. An input sent to Right Ear will be colored in GREEN. An input sent to both Left and Right Ear will be colored in both colors. Example: - In Pict 01, Outmap 'A' : Mixdown Left and Right are sent to both ears. - In Pict 03, Outmap 'C' : Mic 1 is sent to the Left Ear and Mic 2 to the Right Ear. 8
9 Pict. 07 NB: A digital gain can be applied on Digital inputs: from - to +12dB on AES inputs and from - to +36 db for AES 42. Both version of inputs (before or after gain) can be routed in an Outmap. These versions are symbolised by the letter representing the input type being capital or not: for example, for an AES input, 'd' is for the input before gain and 'D' is for the input after gain. By default with the OK and F5 buttons, the version before gain is changed, in order to cycle throught the Left, Right and Center mapping, press the Shift + F5 buttons. A track may be mapped Post-fade in an Outmap, to cycle throught the Left, Right and Center mapping, press the Shift + F5 buttons. IV.Other Main Selector Positions When the Main Selector is in the Test (10 o'clock), Pre Record (11 o'clock), or Record (12 o'clock) positions, the current Headphone Outmap is indicated bellow the media icons. Symbolised by a headphone icon, it displays the Outmap's letter and name. Pict. 08 You can change the current Headphone Outmap and go to previous or next one using the Left Crown. The letter and name will be updated. By pressing the F2 button, you will see the Outmap grid, as for the 6 o'clock position, it can be edited. Pict. 09 In that view it is also possible to go to the previous or next Outmap using the Left Crown. 9
. Outmaps can be modified while the Main Selector is in the 6 o'clock position.")
10 LINE OUTPUTS has 8 Line outputs. I. Outmaps You can configure up to 26 Outmaps (from 'a' to 'z') each applicable to one or several outputs. NB: Line and AES Outmaps are shared. (Line Outmap 'a' is the same as AES Outmap 'a'). Outmaps can be modified while the Main Selector is in the 6 o'clock position. In that position, Headphone Outmaps are displayed but by pressing the F3 button, you will access the Line Outmaps panel (pressing the F3 button again will display the AES Outmap panel). Pict. 06 Pict. 10 Pict. 11 Each row represents a Line Output. On a row, five parameters may be setup: the Attenuation Level. the Delay applied to the Output. the Play-Mute option. the Beep Mute option. the current outmap configuration of the Output. In Pict 07: Line Out 1 has the Outmap 'a' which is named «T1». Track 1 is sent to Line Out 1. You can select a row by using the Up and Down buttons. Using the Left and Right buttons or the Jog wheel enables to select among the 5 parameters. Once a row is selected, the corresponding Outmap is applied on the Headphone ouput. 10
 it is impossible to modify it using the Attenuation window. The current attenuation is grayed.")
11 1. Output Level Using the Left and Right buttons or the Jog wheel, move the light blue selection box to the first item of the wanted row and press the OK button to modify the value. Pict. 12 NB: If the output is assigned to a fader (Mixer or Cantarem) it is impossible to modify it using the Attenuation window. The current attenuation is grayed. Quick edit the current value by holding the Shift button pressed while rotating the Jog wheel. 2. Delay All the analog and digital outputs can be delayed within a range of 0 to samples (which represents nearly 910 ms with a 48kHz sample-rate). Using the Left and Right buttons or the Jog wheel, move the light blue selection box to the second item of the wanted row and press the OK button to modify the value. Pict. 13 NB: Quick edit the current value by holding the Shift button pressed while rotating the Jog wheel. 3. Play Mute When the Cantar is in the Play position, the output may be Muted using the Play Mute option. Using the Left and Right buttons or the Jog wheel, move the light blue selection box to the third item of the wanted row and press the OK button to modify the value. If the Play symbol is de-activated (emptied triangle) the output is muted in Play. In Pict 07, Line outputs 1 & 3 will be muted in Play. 11


12 4. Beep Mute Beeps (record beeps, warning beeps) may be muted on each output. Using the Left and Right buttons or the Jog wheel, move the light blue selection box to the fourth item of the wanted row and press the OK button to modify the value. If the Beep symbol is crossed, beeps won't be routed to the output In Pict 07, Beeps are enabled for outputs 2 & 3 only. 5. Current Configuration You can change the Outmap applied to an Output by selecting its row and then turning the Left Crown. Letter, name and Outmap settings are updated. A special Outmap is placed before the 'a' outmap: the Muted outmap where no input is routed. It is also possible to select an Outmap using the Left and Right buttons or the Jog wheel, in order to move the light blue selection box to the fifth item of the wanted row and press the OK button to display the Outmap selection window. Pict. 14 Using the Up and Down buttons, select the wanted Outmap and apply it by pressing the Ok button. It is also possible to edit the currently selected Outmap by pressing the F5 button. 6. Edit Outmap Press the F5 button to open the Configuration Edit window. Pict. 15 WARNING: Keep in mind that the configuration you are modifying can be applied to multiple outputs. Even more, as the Outmaps are shared between AES and Line Outputs it can also modify an AES Output. In Pict 08, Outmap 'a' is applied to Lineout 1 but also to AES-Out 1 to 8 as stated by the warning text at the left of the window. 12

13 You can change to the previous or next Outmap by turning the Left Crown. i. Name Each Outmaps can be named (max: 12 characters). Press the Shift+OK buttons to modify it. ii. Inputs Any Input can be sent to Line Output. Scroll through the grid with the direction buttons or the Jog wheel and press the OK button to enable or disable an input. iii. Talk Compared to Headphone Outmap, you can choose Tlk1 and Tlk2. It corresponds to the Talk buttons. Pressing those buttons, enables the Slate Mic and the 3,5mm jack Mic and will send the stream to the Headphones and to any Outmap (Line, AES, Dante) where the corresponding Talk function is routed. Example: if Talk1 is routed to LineOut 3 and Talk2 to LineOut 4. Pressing Talk 1 will send the Slate Mic to LineOut 3 but not to LineOut 4. Pressing Talk 2 will send the Slate Mic to LineOut 4 but not to LineOut 3. NB: Pressing the Shift + Talk buttons, routes the audio to the Outputs and to the Tracks. NB: Quick Modification > Each parameter once selected may be quickly modified by rotating the Jog wheel while holding the Shift button pressed. 7. Multiple Outmap It is possible to apply a different Outmap according to the Main Selector position. Press the Shift + OK buttons to display the Multiple Outmap window. Pict. 16 A Main Selector is represented with an Outmap letter on each position, except the Stop position where nothing is routed to the outputs. Using the Left and Right buttons, loop throught the eleven available Main Selector position. Using the Up and Down buttons, scroll through the 26 available Outmaps (plus the Muted special outmap). Save the modifications by pressing the Ok button or Cancel by pressing the Escape button. 13
. Pict. 17 NB: Using the Left Crown to select the Outmap placed before the Muted Outmap calls II.")
14 Once a Multiple Outmap is applied to an output, its outmap description is replaced by the letters corresponding to the twelve Outmaps applied in regard of the twelve Main Selector positions (the first letter being the Record position). Pict. 17 NB: Using the Left Crown to select the Outmap placed before the Muted Outmap calls II. Output Levels Outputs levels can be modified while the Main Selector is in the 10 o'clock position (TEST). Pict. 18 Press the F6 button to open the LineOut Level panel. Pict. 19 Using the direction buttons you can select the Line Ouput. Press the OK button to modify the Value. Pict
15 III. Other Main Selector Positions When the Main Selector is in the Test (10 o'clock), Pre Record (11 o'clock), or Record (12 o'clock) positions, it is also possible to modify the Line Outmaps by pressing the F2 key and then the F3 key. 15
16 AES OUTPUTS has 8 AES outputs. I. Outmaps You can configure up to 26 Outmaps (from 'a' to 'z') each applicable to one or several outputs. NB: Line and AES Outmaps are shared. ( AES Outmap 'a' is the same as Line Outmap 'a'). Outmaps can be modified while the Main Selector is in the 6 o'clock position. In that position, Headphone Outmaps are displayed but by pressing F3 button twice, you will access the AES Outmaps panel (another press on the F3 button will display the Headphone Outmap panel). Please refer to the Line Outmap section. 16
, the 8 AES Outmaps are copied (Do 1 to Do 8). II. Module Configuration Dante module can be configured using Audinate's Dante controller application.")

17 DANTE OUTPUTS (optional) optionnaly has 32 Dante outputs. I. Outmaps On the first 24 outputs (Dante Out 1 to Dante Out 24), are routed the Tracks (Track 1 to Track 24). On the last 8 outputs (Dante 25 to Dante 32), the 8 AES Outmaps are copied (Do 1 to Do 8). II. Module Configuration Dante module can be configured using Audinate's Dante controller application. It is available for Windows and Mac Os X (please visit Audinate's web site to download it). NB: While setting up your Dante network, please verify a few things: In the Dante Controller, tab Clock Status, the Cantar should be checked as Prefered Master and Enable Sync to External should also be checked. Pict. 21 In the tab Device Info, by double clicking on the (if the name was changed, refer to Product Type which should be, access the Device View where Sample Rate and Device Latency can be set up. Pict
18 IN GRID ROUTING In Grid routing can be modified while the Main Selector is in the 5 o'clock position. You can configure up to 20 InGrid (from 1 to 20). Pict. 23 I. Current Ingrid The InGrid used is changed by turning the Left Crown. Name and Tracks settings are updated. NB: Copy and Paste. By pressing the Shift+F4 buttons, the current InGrid is copied to the clipboard. You can paste it over any InGrid by pressing the Shift + F6 buttons. II. Name Each InGrid can be named (max: 12 characters). Press the Shift+OK buttons to modify it. III. Inputs The InGrid represents the 24 Tracks with 24 columns. In each column, 8 inputs can be routed represented by 8 rows. In each row can be routed the corresponding input number i.e. on row 3 > Mic-3, Ms-M-3 Line3, Digi-3, AES 42-3, Dante-3 (optional), PostFade 3. The last (9th) row displays the Pan-Pot to Mixdown. 1. Inputs to Tracks Any input can be routed to any Track (including Mixdown). i. Add input Use the direction buttons to move the yellow selection box and select the appropriate Track and the input number. Press the OK button to display the Input choice panel. Pict. 24 Use Up or Down buttons to select the appropriate input in the list and press the OK button. 18
19 NB: Quick way: Press the appropriate Solo-Track button to select the Track, then press the appropriate Input-Solo button to toggle its state (hold the Shift button for MS Mic Input). Mix Left can only be accessed through Row 1 Mix Right can only be accessed through Row 2 MS mics should be routed on adjacent Tracks: M side on an uneven Track number and S side on the following Track. When routing or removing an MS mic, the other side (M or S) is automatically routed/removed. A digital gain can be applied on Digital inputs: from - to +12dB on AES inputs and from - to +36 db for AES 42. Both version of inputs (before or after gain) can be routed in an InGrid. These versions are symbolised by the letter representing the input type being capital or not: for example, for an AES input, 'd' is for the digital input before gain and 'D' is for the digital input after gain. To toggle between the two versions: select the item and press the Right or Left button. For input number superior to 8: Dante (optional), PostFade an arrow is displayed, select the item and press Right/Left button to adjust the input number. PostFade N is the output of the track N through the attenuation applied to this track. Be careful, the PostFade has a delay of 1 sample. Refer to Annex to see the Cantar Audio Chain. ii. Remove input Use the direction buttons to move the yellow selection box and select the appropriate Track and the input number. Press the OK button to display the Input choice panel and choose Remove. Or Double press the ESC button. Or Press the Solo button of the appropriate input. NB: All inputs routed to a Track can be removed by holding the ESC button. 2. Pan-Pot to Mixdown Each Track can contribute to the Mixdown through the PanPot. Pan-pot is represented on the last row and indicates each Track contribution to the Mixdown Left and Right. L means the Track is sent to Mix-Left. R means the Track is sent to Mix-Right. C means the Track is sent to both Mix-Left and Mix-Right. X means the Track is not sent to the Mixdown. Example: on Pict.12: Track 3 is sent to Midown-Left. Tracks 4 to 10 are sent to Mixdown-Right. other Tracks are not sent to Mixdown (Track 1 and 2 cannot for obvious reason by sent to Mixdown). The F4 button toggles the Left contribution. The F6 button toggles the Right contribution. The F5 button cycles through the L, R, C, X options. 19

20 NB: If a stereo pair (MS mic) is routed and each side is sent to Mixdown respectively Left and Right or both sides to Center, then MS will be decoded into the Mixdown. It is also possible to have more precision: Fine Pan. The Pan-Pot letter is replaced by a percentage representing how the Track is sent to Mixdown Left and Right. Access the Fine Pan setting Window by pressing the Shift + F5 buttons. Pict. 25 Balance is set using the Left or Right buttons. Each Track's contribution will be displayed in percentage and db. It is not possible to send Mixdown Tracks or Postfade Tracks to Mixdown for obvious reasons. i. MS decoding into Mix: For MS pair, only 4 PanPot positions are available: M is sent to the Left and S is not sent to Mixdown. M is sent to the Right and S is not sent to Mixdown. M & S are not sent to Mixdown. M & S to the Center: the MS pair is decoded, post-fader, by changing the S-track level, the width of the decoded stereo signal is changed. 3. Track settings i. Arm/Disarm Pressing the Shift+F3 button arms or dis-arms the currently selected Track. ii. Track level For tracks with no actuator assigned, it is possible to modify the Track level directly from the Ingrid by turning the Jog wheel while holding the Shift button pressed. IV. Declare input as Mixdown In order to have an external source declared as Mixdown track, it is possible to add an input to a track with a Mix-Left or a Mix-Right already routed. 20
21 Pict. 26 In this example, the external Mixdown is sent to the Cantar using the Line inputs 3 & 4. 21
22 PRE-RECORD (PPR) I. Pre-Record functionality Pre-Record Position is at the 11 o'clock position and allows 3 important functions while displaying the main information regarding the record session. 1. Pre-Record Buffer While the Main Selector is on Pre-Record Position, the Cantar activates its pre-record buffer. This buffer stores the audio in a First-In/First-Out (FIFO) buffer memory and dumps them to the recording media as soon as Record is activated. Once the buffer is full, up to 10 48kHz, it starts discarding the oldest audio buffer. 2. Metadata Edit You can edit the previous or next Take's metadatas. 3. Previous take trash After a Record, you can simply put that last Take to a trash. NB: Unused (i.e. not routed on current Ingrid or current Outmaps {Headphone, Line, Aes}) analog inputs are automatically turned off in order to save power. If a configuration number is changed and an unused inputs become used, it will be turned on automatically. II. Global Screen presentation b 3a Pict. 27 This screen is divided into 2 parts: recorder information and Audio Vumeters. On the left part, recorder information, from top to bottom: Recording Project Name( 1 ) and Recording Date ( 2 ) Media State ( 3a ) (Internal SSD, SD 1, SD 2, USB). Remaining Time ( 3b ). The smallest remaining recording time according to the Record parameters (Track count, frequency, bit-depth) and remaining free space above the recording media. Power Informations ( 4 ): External Power, Batt-1, Batt-2. If no External Power, it displays the remaining time calculated by the batteries. Current Headphone Outmap and Heaphone Level (if Headphone button pressed) ( 5 ). Timecode Information ( 6 ). Next Record Metadata: Scene Take Notes ( 7 ). Track Mix Level: according to the Display Track Level option, fields 6 and 7 will be replaced by Track Gain. 22
23 On the right part, Vumeters are automatically displayed according to the number of Track used in current InGrid, in group of 4, with a minimum of 12. i.e if 12 or less tracks are used, 12 track are displayed then between 13 and 16 tracks used: 16 tracks displayed etc Track's number is under each Vumeter. It is the colored with the color type of the first input routed to the Track. Vumeters can be divided into 3 color zones which can be set up in the Audio-Timecode Menu. A blue line can be added to put a reference at a level which can be set up in the Audio-TC Menu. Above the Vumeter according to the Display Mix Track Level option may appear: Mix Track Gain Current Track Audio Level A Triangle above the Vumeter symbolises the Limiter (if enabled on an input routed to the Track). The triangle is grey if the Limiter is enabled but not currently in action. It blinks yellow as soon as the Limiter begins its action (it continues to blink for 3 seconds after the Limiter's action has ended). A Red square above the Vumeter symbolizes the Clip Level. If an input routed to the Track has a modifying parameter applied such as: Phantom power, Phase inversion, Preamp Filter or Digital EQ, it is displayed at the top of the vumeter with respectively a radioactive symbol ( ), a phase symbol (f), a 'fn' symbol (with n being the number of the filter) or an 'EQ' symbol. If more than one input is routed to a track, each symbol is replaced by a plus sign (+). III.Media States Grey: not present and not used. Blue: present, but not used. Blue, with a green check: present, being used by a Recording process.. Blue, with a red X: not present or faulty, while being used by a Recording process. > WARNING, please check Red and Orange: Slow media. Cantar uses its internal audio buffer to deal with slow media but if your media is not fast enough, according to the record parameters (track count, sample-rate, bit-depth), it will warn you. ൦ Orange: Warning this media is slow, end of record may take a while in order to flush the Audio buffer. ൦ Red: Alert very slow media, record may fail if the internal Audio buffer is fully filled. Idle: The media is used as an Idle Backup media. When Idle backup process is running, its progress is displayed as a percentage. NB: Red or orange may appear at the very start of a Take but should not long. WARNING: Cantar monitors the filling of its internal Audio buffer so that if a safety limit is reached, any slow media will automatically be stopped. NB: While 3 Usb ports are available, only one will be used: the first which was plugged and mounted. If a media fails during a recording (stopped due to speed issue or media filled or media error), record will continue if a mono process is still active on a media. 23
 : Directly in Pre-Record Menu Once the pink selection box is displayed (if not, press the OK button), select the appropriate field and press the OK button.")

24 IV.Metadata 1. Next Record i. Quick Edit (Scene-Take-Notes) : Directly in Pre-Record Menu Once the pink selection box is displayed (if not, press the OK button), select the appropriate field and press the OK button. Value is modified with the direction buttons or the Jog wheel. Take type: Change directly the next Take Type by pressing the F4 button. Pressing the OK button on the field symbolised with «...» opens the Full Edition panel. ii. Full Edit Press the F6 button to open the Full Metadata Edit panel. Pict. 28 Select the appropriate field and press OK to enter Edit mode. NB: The NOTES area consists of: ₒ Persistent note, that repeat from one take to the next one. ₒ Take note, that apply only to the next Take and is cleared at the end of the Take. Changing the Scene resets the Take Number to one (1). The Take Number is automatically increased after each Take. Take type: 't' = time synced; 'p' = pick-up ; 'w' = wild take ; 'a' = announce ; 'n' = no good ; 'r' = rehearsal ; 'g' = guide soundtrack. If a take is marked 'n', the next Take's number will not be increased automatically and it won't be circled. Clear field: Press Shift + ESC buttons. 2. Previous Record Press the F4 button to open the Previous Full Metadata Edit panel. Pict. 29 Select the appropriate field and press OK to edit it. NB: If the Take Type is changed to 'n', the Take is automatically automatically Un-Circled. If the Take Type is modified from 'n' to something else, the Take is automatically Circled. 24

 or new entries may be added (press the F1 button). It is also possible to activate or deactivate the Track Completion feature by pressing the F3 button.")
, press the Shift + ESC buttons. The Take is not erased, but moved to a folder name AUDIO_TRASH. The next Take will carry the same Take Number as the erased one.")
25 3. Completion i. TrackNames While typing tracknames, a list with previous entered tracknames is displayed according to the first characters typed in. Select the desired proposition using the Up and Down buttons and validate it by pressing the Ok button. Pict. 30 By pressing the F2 key, the Track Completion Management is displayed. Previous entries may be edited (select the desired entry with the Up and Down buttons and press the Ok button) or deleted (select the desired entry with the Up and Down buttons and press the F2 button) or new entries may be added (press the F1 button). It is also possible to activate or deactivate the Track Completion feature by pressing the F3 button. Once deactivated, the completion list is not displayed while tracknames are typed in and the Completion Management window is grayed. Pict. 31 V.Audio Trash Cantar lets you trash the last Take, e.g. a false start or aborted remix. In Pre-Record position (11 o'clock), press the Shift + ESC buttons. The Take is not erased, but moved to a folder name AUDIO_TRASH. The next Take will carry the same Take Number as the erased one. Pict. 32 NB: This Trash function is also available in the Browse File Menu. A trashed Take can be moved back to the day folder in the Backup Menu. 25

26 To fully erase a Take, apply the same procedure (Shift+ESC) to Takes with the folder Audio_Trash selected as source folder. VI.Solo It's possible to have a direct monitoring of each input and output through Solo. Solo patches directly to your headphones. Solos can be accessed in Record (12 o'clock), Pre-Record (11 o'clock) and Test (10 o'clock) positions. Through Solo, many parameters can also be modified (Phantom, limiter, filter). It is also a way of modifying the gain of inputs which have no actuator assigned. To activate a Solo, press the Solo button of the actuator assigned to the desired input or output. A short-press on the Solo button opens the Solo panel which is closed by pressing the Solo button or the ESC button. If the Solo button is pressed and held, the Solo panel is closed upon release of the Solo button. Press another Solo button to change the Solo or use the Left Crown to go to the next or previous Solo. 1. Mic In the Mic-Solo panel, you can: Set the Phantom Power ON/OFF, Enable or disable the Limiter or the Phase Inversion Set the Preamp parameters: ൦ Pre-Attenuation (Mic Level, Line level, High level). ൦ Filter Set the Digital filter parameters. Pict. 33 i. Phantom Toggle the Phantom Mic Power (48V) On or Off by pressing the Shift + F4 buttons. Turn it 'OFF' while using a dynamic microphone, the preamp gain will be boosted by 12dBu. ii. Limiter Toggle the Limiter On/Off by pressing the F5 button. While the Limiter is turned 'ON', a grey triangle is displayed above the Track where the Mic is routed. If the signal level reaches the limiter zone ( 6dBFS), the triangle will start blinking yellow. NB: In 24-bit recording mode, it is common practice to adjust the input gain so that a 'normal' signal does not go over the -20dBFS level. With the Limiter activated, the 32dBu head-room above the 8dBFS kick-in point gives 24dBu above the 'no-limiter' full scale. The Operator can count on a 44dBu reserve over the normal 20dBFS level. If the signal does reach the 0dBFS level, a 'clip' red level appears above the top of the Vumeter scale. To maintain equilibrium between linked channels, the same Limiter command is applied to ganged preamps. 26
.")

27 iii. Phase Inv. Toggle Phase Inversion On/Off by pressing the F6 button. NB: This action is also possible out of the Solo Window by pressing the Shift + Solo buttons. iv. Filters Change Filter with the Up or Down buttons. As a basis, implements an anti-rumble filter which is a 3 rd order filter at 30Hz (-3db attenuation and a slope of -18 db per octave). This is the neutral position. Then, three banks offer corner frequencies/slopes from 60Hz/ 6dB to 180Hz/ 12dB. v. Attenuator Cycle through Mic Level, High Level & Line Level with Shift + Up or Down buttons. Mic Level: default for all mic inputs. High Level: a 26dBu attenuator converts mic to high level inputs. Line Level: a 38dBu attenuator converts mic to line inputs. NB: Activating High Level or Line Level automatically cuts off Phantom Power. vi. Link For linked inputs, it indicates whether it is a master of other mics or it is linked to a master. For slaved inputs, Limiter, Phantom Power, attenuator and filters are set by master's parameters and cannot be changed. Pict. 34 Pict. 35 vii. Digital Filter Toggle the Digital Filters ON or OFF by pressing the Shift + F3 buttons. Three filters can be setup: Low and High Frequency and a Parametric EQ. All filters can be setup from 50Hz to 16kHz with ±15dB gain. The Parametric EQ can also has its width setup (Q). Once the digital filters enabled, access to the parameters by pressing the OK button, a field is then highlighted and a panel displays the Digital filters Frequency response graph. Select the appropriate field with the directional buttons and rotate the Jog wheel to edit it. The graph is updated as soon as the value is not modified anymore. Pict

28 NB: Copy and Paste. By pressing the F1 button, the current Digital Filters setup is copied to the clipboard. Paste it over any Digital Filters setup by pressing the F2 button. 2. Line The solo of a Line input is obtained by pressing the Solo button of the actuator assigned to the input, or it has no actuator assigned, by pressing the Solo button on the Right side of the Cantar. Pict. 37 i. Attenuation If a Line input is not assigned to an actuator (Mixer or Cantarem or Cantarem2 slider), its attenuation can be changed during Solo by rotating the Jog wheel. ii. Attenuator Toggle between High Level & Low Level with the Shift + Up or Down buttons. Low Level: default for all line inputs. High Level: a 20dBu attenuator is applied. iii. Filter Change Filter with the Up or Down buttons between Neutral, 60Hz/ 6dB and 60Hz/ 12dB. iv. Other parameters Please refer to the Solo-Mic section. 3. Track The solo of a Track is obtained by pressing the Solo button of the actuator assigned to the track, or if the input has no actuator assigned, by opening the Track-Solo panel for any Track and then rotating the Left Crown to get to the desired Track Number. Pict. 38 i. Status (Arm/Disarm Track) While being in Solo-Track, pressing the F3 button arms or dis-arms a Track. Monophonic multi-track file recording doesn't waste disk space by recording empty Tracks as it is 28
29 the case with polyphonic. It is wise to momentarily disarm a Track when there is no need for it. A disarmed Track has its Vumeter colored in grey and a red 'disarmed' icon displayed. Pict. 39 NB: It is also possible out of Solo window to toggle Track's Status, while the Main Selector is in the Test or Pre-Record positions, by pressing Shift + Solo button of the Track. ii. Mixdown PanPot Toggle between Left, Right and Center with the F4,F5 and F6 buttons. Access the Fine Pan through Shift + F5 button. NB: For Mixdown Tracks, this item is inactive. iii. Track Name Press the OK button to edit the Track Name. Once in edit mode, press the Escape button to Cancel, or the OK button to validate. iv. Attenuation If a Track is not assigned to an actuator (Mixer or Cantarem or Cantarem2 slider), its attenuation can be changed during Solo by rotating the Jog wheel. 4. AES The solo of an AES input is obtained by pressing the Solo button of the actuator assigned to the input. If the input has no actuator assigned, open the Solo panel of any input and then rotate the Left Crown while holding the Shift button pressed until the AES-Solo panel appears. Two versions of each digital input are available: the original input (symbolised by a lowercase letter) and a version with digital gain (symbolised by an uppercase letter). During the AES-Solo, the version with digital gain is sent to the headphones. In the panel is displayed: NB: The Power status of all the digital inputs (AES and AES-42). This parameter can be modified in the Audio/Timecode menu. The digital gain applied to the input. The digital filter applied to the input (refer to the Mic Solo for settings) The phase inversion applied to the input. If the input is not assigned to any actuator, the gain is setup using the Jog wheel. The range of the digital gain is from - to +12dB. 29


30 Pict AES-42 The solo of an AES-42 input is obtained by pressing the Solo button assigned to the input, or if the input has no actuator assigned, by pressing the Shift + Solo buttons of the Right side of the Cantar. Two versions of each digital input are available: the original input (symbolised by a lowercase letter) and a version with digital gain (symbolised by an uppercase letter). During the AES-42-Solo, the version with digital gain is sent to the headphones. The title displays the status of the digital stream: locked (a valid digital stream is detected) unlocked (no valid digital stream). During an AES-42 Solo you can set the AES-42 Phantom Power ON/OFF by pressing the Shift + F4 buttons. NB: The general digital Power is automatically switched On if the AES-42 Power is switched On. Pict. 41 If the AES-42 input can communicate using the AES-42 standard, the Cantar retrieves information about its capabilities. Accordingly, Limiter status, Mute status, Mic gain, Pre-Attenuation, Low cut Filter and Device information are displayed. NB: Mic gain is the gain setup directly into the AES-42 Mic, both versions of the digital inputs (with or without digital gain) are affected. If available it is setup using the Up and down buttons. Digital gain is the gain which Cantar is applying on the original digital input, for an AES-42 input its range is from - to +36dB. If the input is not assigned to any actuator, the gain is changed by rotating the Jog wheel. The Device Info field is made of information retrieved from the device: Manufacturer and Device names + Delay of the mic (in samples) Low cut filter parameter cycles through Flat, 40 Hz / -3dB, 80 Hz / -3dB and 120 Hz / -3dB. Pre-attenuation parameter cycles through 0 db, -6dB, -12dB, -18dB. Digital filter may be setup. (refer to the Mic Solo section) 30


31 Pict Outputs The solo of an Ouput is obtained by pressing the Solo button of the actuator assigned to the output. If the output has no actuator assigned, open the Solo panel of any input and then rotate the Left Crown while holding the Shift button pressed until the LineOut-Solo panel appears. Cycle through Lineout 1 to 8 and then to DigiOut 1 to 8 by rotating the Left Crown. In this panel, is reminded the current Outmap applied on the Output and its attenuation. Pict. 43 Pict. 44 VII. Double Solo & Phase-meter 1. Mics In order to compare 2 Mic inputs, it is possible to have a double Solo. It is obtained by pressing and holding both Solo buttons of the Mic inputs desired. The firstly pressed button will determine which input is monitored in the left ear, the second will be monitored in the right ear. (Another way of triggering a double Solo is to engage the first Mic Solo by a quick press on the Solo button and then once the Solo panel displayed to add a Solo by pressing the other desired Solo while holding the Shift button.) Pict. 45 At the top of the Solo panel is displayed is phase-meter representing the phase between the 2 inputs. The left side represents a phase of 180 and the right Tracks 31

32 In order to compare 2 Tracks, it is possible to have a double Solo. It is obtained by pressing and holding both Solo buttons of the Tracks desired. The firstly pressed button will determine which track is monitored in the left ear, the second will be monitored in the right ear. (Another way of triggering a double Solo is to engage the first Track Solo by a quick press on the Solo button and then once the Solo panel displayed to add a Solo by pressing the other desired Solo while holding the Shift button.) Pict. 46 At the top of the Solo panel is displayed is phase-meter representing the phase between the 2 tracks. The left side represents a phase of 180 and the right Phase-meter In the regular Pre-Record, or Record, or Test, or Play menu, the Phase-meter may be displayed or hidden by pressing the Up button. The phase is measured between the last 2 inputs or Tracks used for a double Solo. Pict. 47 VIII. Levels 1. Inputs While the Main Selector is in the Record (12 o'clock), Pre-Record (11 o'clock), and Test positions, as soon as an input's attenuation is changed, a Level panel can be displayed, replacing temporarily the metadata and timecode information. This feature can be enabled or disabled in the Technical Menu, item Display Inputs Level. If enabled, the display precision can be set: ±0,1 db; ±0,5 db; ±1dB. Pict. 48 Pict
33 NB: If an analog input is marked OFF, it is because it is not used in the current Ingrid or in any of the current Outmaps (Headphone, Line, AES). So in order to save Power, the Cantar switches this input off. Input Level is represented as a circle if the input is driven by a potentiometer (or by the Jog wheel) or as a rectangle if it is driven by a slider (Mixer, Cantarem or Cantarem 2). i. Linked Inputs Inputs can be linked (see Link Inputs in Test Menu section). Linked inputs have their lower part colored (one color per group), displaying the group number. If the balance is locked (lock/unlock Balance in the Audio/Timecode Menu), a key symbol is displayed on the side on the input level symbol. Pict. 50 Pict Tracks While the Main Selector is in the Record, Pre-Record, and Test positions, Tracks gain can be displayed as soon as it is changed. This feature can be enabled or disabled in the Technical Menu, item Display Trcks Att.. If Dedicated Panel is selected, metadata and timecode information are temporarily replaced upon change of the gain. The Track current audio level is displayed above the vumeters. Pict. 52 If Top of Vumeter is selected, Track's gain are displayed above the Vumeters. 3. Headphone i. Level To display the headphone Level, press the Headphone button at the right corner of the Cantar. This is available in all Main Selector positions. The level will be displayed aside the headphone symbol, replacing temporarily the current Headphone Outmap name. It this part of the screen is not visible (during Solo or in other Menus, a small dialog box will be displayed) The Headphone Level is protected against wrong modification by the Headphone Button, hold it press while rotating the Jog wheel in order to modify the current value. 33
34 Pict. 53 ii. Safety Level An adjustable headphone safety clamping can be enabled. Toggle the function On/Off by holding the Headphone Button pressed and then by pressing the Shift Button. When disabled, the headphone symbol is painted in White whereas once the safety is enabled the symbol is painted in Yellow. Adjust your clamping level in relation to the current headphone level. Rotate the Jog wheel while holding the Headphone and Shift buttons pressed for quick clamping level setup. When the clamp is active on too high signal, headphone audio quality is affected and the headphone symbol blinks in red during 3 seconds. Pict. 54 Pict. 55 IX. Locking Panels While the Main Selector is in the Pre-Record, and Test positions, Potentiometer and Mixer panels can be locked. Once locked, every actuator (Slider or Potentiometer) on the corresponding panel is disabled and the position at the time of the locking is saved. Actuator may be moved, it doesn't affect what it is assigned to. The locking activation and positions are saved upon Cantar shutdown. A locked actuator can be temporarily unlocked by holding the Shift button while moving it. 1. Mixer Panel The Mixer Panel is locked or unlocked by holding the Shift + Left buttons pressed during 3 seconds to avoid inadvertent locking. A dialog displays the locking procedure. 34
35 Pict. 57 Pict Potentiometer Panel The Potentiometer Panel is locked or unlocked by holding the Shift + Right buttons pressed during 3 seconds to avoid inadvertent locking. A dialog displays the locking procedure. Pict. 58 Pict. 59 X.Tone Generator While the Main Selector is in the Test, Pre-Record or Record positions, pressing the Shift + F5 buttons sends a 1kHz tone to the Tracks, and Mixdown. The level of the tone can be set in the Audio Parameters Menu. Releasing the Shift button before the F5 button locks the tone 'ON'; pressing the Shift button turns it 'OFF'. XI.Talk Pressing the Talk buttons, enables the Slate Mic and the 3,5mm Mic jack. It sends the stream to the Headphones and to any Outmap (Line, AES, AES 42, Dante) where the corresponding Talk function is routed. Pressing the Shift + Talk buttons also sends the Talk stream to the Tracks. XII. Assignation Any slider of the Mixer, Cantarem (if connected) or Cantarem2 can be assigned to any input (Mic, Line) or track or Line out level. NB: When a Cantarem is connected, its assignments override other actuators' assignments, making them unassigned. Assignations may be Left or Right shifted by pressing the Shift and Left or Right buttons. All assignations to the Left (respectively Right) of the current item, including it, are shifted to the Left (respectively Right), the last (respectively current item) becomes unassigned. 1. Potentiometer To open the Assignation panel, press and hold the Shift + Potentiometer Solo button. To go to next or previous actuator rotate the Left Crown or press the appropriate Solo button. 35

36 Assignation is changed by pressing the Up and Down buttons. Pict Mixer Fader To open the Assignation panel, press and hold the Shift + Mixer Slider Solo button. To go to next or previous actuator rotate the Left Crown or press the appropriate Solo button. Assignation is changed by pressing the Up and Down buttons. Pict Cantarem (if connected) To open the Assignation panel, press and hold the Shift (diamond button) + Slider Solo buttons on the Cantarem. To go to next or previous actuator rotate the Left Crown or press the appropriate Solo button. Assignation is changed by pressing Up and Down buttons. Pict Cantarem II (if connected) i. Sliders To open the Assignation panel, press and hold the Shift + Slider Solo buttons on the Cantarem II. To go to next or previous actuator rotate the Left Crown or press the appropriate Solo button. Pict


37 ii. Function buttons (C1 to C4) To open the Function keys Assignation panel, press the two Shift buttons + Function buttons on the Cantarem II. To go to next or previous function button press the Left or Right button or press the appropriate function button. Pict. 64 It enables to copy a function button: Talk 1, Talk 2, F1 to F6 buttons. XIII. Timecode 1. State Timecode source (Internal or External) can be chosen in the Audio & Timecode Menu. It is symbolized in the Record, Pre-Record, Test and Stop Menus by a round icon with the letter 'E' for External and 'I' for internal. This icon can be: Green: Timecode is initialized. Blinking Orange: Jamming Timecode. Red: Timecode is not initialized. At startup, the Timecode icon is red. This is to remind you to verify the Timecode state. 2. Internal Source Timecode Method i. Internal Free-Run master clock The internal TCXO 1ppm 'Sync Clock' keeps the time accurate to within ±0.5 frame in eight hours; this time is used to stamp the sound files with the very same TC as the one stamped on the camera's images (AatonCode method called 'Free-Run TC' in the video world). Once initialized Cantar behaves as a master-clock. The Internal 'Sync Clock' initialization choices are: a. Calendar init. At startup, Cantar reads the system's calendar date and time to initialize the 'Sync Clock', 'Stc' (System-TC) is displayed in the timecode area. To remind you to sync other equipment around to the Cantar 'Sync Clock', the icon stays red until you press the Shift + F3 buttons in order to confirm System Time as Timecode. Pict. 66 Pict
38 b. Operator init. If you want to set the 'Sync Clock' with your own time, go to the Audio & Timecode Menu and choose 'Set Operator Tc'. 'OTC' (Operator-TC) is displayed in the timecode area. c. LTC init. & control (from camera, GPS, or Cantar) LTC-out Pressing the F3 button for more than three (3) seconds causes the LTC received from the external source to jam the internal 'Sync Clock'. 'JTC' (Jammed-TC) is displayed in the timecode area. Pict. 67 Pict. 68 If no TC is being received, the Jam has no effect and 'Jam Failed' is displayed. Pict. 69 d. ASCII init (from Aaton OriginC) In the Stop position, the 'Sync Clock' is set by an Aaton OriginC which also initializes cameras and GMT generators. 'ATC' (ASCII-TC) appears in the timecode area. ii. internal Record-Run driving clock Go to the Audio & Timecode Menu, choose 'Set RecRun TC', 01:00:00 is proposed as the first TC of the day (it can be modified). From now on, at the beginning of each audio file Cantar will stamp a start-tc incremented by two seconds later than the preceding Take's end-tc. This clocking, called Record-Run, produces audio files which appear as if they have been recorded in continuity. If for some reason Cantar is turned 'OFF', the Record-Run TC must be initialized again. To prevent any TC overlap, Cantar proposes to start on the next hour integer, e.g. if the last recorded Take has been closed at 01:34:15, the next start-tc proposed will be 02:00:00. The Cantar Record-Run mode lets you use the pre-record buffer without creating TC overlaps. For example, if the preceding Take ends at 01:45:00, and the pre-record buffer is set at thirteen seconds, the next audio file will start at 01:45:02. iii. internal clock, AutoSlate on clapsticks If the same TC is not running in Cantar and cameras, the only way to sync pictures and audio is to use clapsticks. Forget digi-slates, they have too many drawbacks. The Cantar AutoSlate sample-accurate clapstick detection function puts a timecode crown over the simplest piece of wood. 38
39 3. External Source An externally-slaved Cantar stamps the audio files with the same TC as the one running in the video camera. This requires a link from the camera to Cantar. Set 'TC Source' to 'Ext. Clock' in the Audio & Timecode Menu. The 'E' Timecode icon will blink in the Timecode area, meaning that Cantar is waiting to be slaved to an external LTC source, e.g. a video camera. Cantar is usually in the Record position before the camera, so it monitors the LEMO-5 for incoming LTC and grabs it when coherent TC is received. That is why the Timecode icon keeps blinking orange indicating a Timecode Jam, until the camera is up to speed. Before closing the audio file, Cantar stamps the TC by using the latest valid Timecode so as to eliminate spurious transmission errors and false camera starts. If there is no external timecode signal, an 'LTC Not Detected' warning appears. Nevertheless, the external TC is grabbed if it is received before the Take's end. 39
40 RECORD Record is at the 12 o'clock position. The background of the screen is Red during the whole recording Session and the LED of the Heaphone button is flashing while the Cantar is writing on Recording media(s). NB: Be careful that after cutting the record and going back to the Pre-Record or Test positions, the screen may remain red as Cantar is flushing its internal Audio Buffers to the record media. Monophonic Recording: As basis of the sound, monophonic recording is mandatory. The Cantar won't let a record begin if not at least one monophonic process is selected on a media. Pict. 70 I. Medias State Please refer to the Pre-Record section. II. Solo Please refer to the Pre-Record section. III.Metadata During Record, only the Take Type can be modified, by pressing the F5 button. IV.Sync Points 1. Slate Detection This is the most precise and simplest method ever invented to sync images and sounds. In the Audio Menu, select the slate detection channel. While in Record, press the F4 button within six seconds after a clapstick; the most plosive event preceding the button press creates a Slate Mark. The successive slates generated by a multicamera shoot are labeled SA, SB... SG. A maximum of 10 slates can be recorded. The clapstick quality is displayed in the rectangular screen, 25% should be a minimum; at 75% score, you can congratulate the slateman! If you forget to press the F4 button, AutoSlate detects the most plosive sound of the take with a 95% chance of selecting the clapstick; in this case the Sound-Report's Slate-TC appears in 'Italic' to show it must be either confirmed or ignored. 40
41 2. User Marker Press the F6 button to create tabs labeled UM1, UM2... UM10 on wind clicks, boom noise, dialogue slip, etc.. V.Levels Please refer to the Pre-Record section. VI.Tone Generator Please refer to the Pre-Record section. VII. Talk Please refer to the Pre-Record section. VIII.Timecode Please refer to the Pre-Record section. 41
42 TEST Test is at the 10 o'clock position. This menu enables to: set up each input's parameters (Phantom Power, Phase Inversion, Filter). All analog inputs can be powered 'ON': unused inputs powered 'OFF' are powered during a Solo (in contrast with the Pre-Record Menu where only the used inputs are powered on). I. Link Inputs You can slave one or multiple analog inputs to a master by declaring a Link group. A total of 6 Link groups can be declared, 4 for the Mics and 2 for the Lines. Each group as a master: Group-1: Mic-1 master; Group-2: Mic-3; Group-3: Mic-5; Group-4: Mic-7. Group-5: Line-1; Group-6: Line-3. A master can be linked to the superior inputs (e.g. M-3 can be linked to M-4 to M-8). NB: Stereo-pairs 1>2; 3> 4; 5>6; 7>8 Surround: 1> Double M/S: 1>2 & 3>4.5 Phantom, Limiter and filter are applied on slaves identically to the linked master. Phase inverters remain independent. For a stereo pair, slaved input is the balance. Before its actuator middle-point (potentiometer, fader, cantarem) the slave's level is attenuated, after the middle-point, the master's level is attenuated. If there is more than one slave, the slave's actuator position determines the ±12dB gain applied from it's master value. To display the Link Panel, press the F5 button. Pict. 71 Pict. 72 The group is selected with Left and Right buttons. Editing is enabled through the OK button. 42
. Sound speed (0.")

43 Depending on the Group Number, a slave list is built. Pict. 73 II. Inputs Delay All the analog and digital inputs can be delayed within a range of 0 to 2047 samples (which represents 42 ms with a 48kHz sample-rate). Sound speed (0.3 m/ms) or signal processing lag (up to 3.8 ms in some wireless kits) generate 'phasing' between mics placed around a single source. Close sounds contributing to the live mixdown must wait in buffers for the time it takes for the 'late-sound' to arrive. Cantar automatically applies the value entered on the late sound input to all other inputs. NB: The value specified in the delay field for an input is the delay of this input, no need to calculate the delay according to other inputs, Cantar will do it, just specify the compensation needed. Press the F4 button to display the Delay panel. Using the direction buttons select the appropriate input. Pressing the OK button opens a dialog box where the delay can be set. It either can be set in time unit (milliseconds) or in distance unit (meters using a sound speed of 340 m/s). To toggle between units, use the Left or Right button and modify the value by pressing the Up or Down buttons or by rotation the Jog wheel. Pict. 74 Pict

44 III. Line Outputs Levels Please refer to the Line Outputs section. IV.Idle backup This mode can be activated any time, the earlier in the day, the better it is. The setup of this mode is done in the SESSION Menu on each recording Media. While the Main Selector is in the TEST position, if the recording media is not on duty, Cantar incrementally, backs up the audio files onto idle target media(s) (SD card and/or USB). Note that a three seconds delay lets you go through the Test Menu without immediately triggering the process. A percentage of completed idle process will be displayed in green above the media icon. End will be displayed when the process is finished. The process will be automatically interrupted when exiting from the Test Menu. The unfinished copy is erased and will be restarted when re-entering the Test Menu. If a metadata of a take is modified, the modification is as well reflected on the idle target media if it is still available. Before removing the target media, take time to run Snap report [F6] into the Audio & Browsing Menu in order to create reports if needed. If the idle media is full, insert another media and the Idle Backup process will continue from where it previously stopped. This function is useful, when a media is too slow to work in mirroring. Pict. 76 Pict


45 STOP Stop Menu is while the Main Selector is at the 9 o'clock position. This position is a low-power position. Pict. 78 I. Media Free Space The remaining free space on each media is displayed. By pressing the Up or Down buttons, it is possible to toggle between remaining space and remaining time which is calculated according to the recording configuration used on each media ( N.A is displayed if the media is not used, and -- if the media is not present). II. Low Power Mode While the Main Selector is in the Stop position, if the low power option was activated in the Technical Menu, according to the time set up, the Cantar will go in low power mode. 5 seconds before engaging the low power mode, a message is displayed. Pict. 79 In that mode, in order to save energy many things are powered-off: Inputs and outputs: Mic, Lines, Dante, Aes, Aes42 The screen While being asleep the Cantar, in order to signal that it is still alive, have the F1 to F3 buttons alternatively lit. To get out of the low power mode, either press the Power or the F1 or the F2 or the F3 buttons or simply change the Main Selector's position. III. Power On/Off 1. Power ON Press the Power ON/OFF button to power up your Cantar. A few LEDs should be illuminated symbolising the startup sequence. 45


46 The logo is then displayed above a progress bar indicating the status of the system startup. Pict Power OFF While in the Stop Menu, press the Power ON/OFF button. Press the OK button to accept the confirmation window. Your recorder powers down. Pict. 81 NB: Emergency Shutdown: Cantar can also be powered down by holding the Power ON/OFF button pressed for more than 10 seconds. IV. Dante According to the presence of the Dante option, a Dante icon if displayed in the top right corner of the Cantar picture. V. Rescue Mode Power failure or low battery Emergency Shutdown System problem the next time the Cantar is powered On, it launches a special startup mode with minimum system loading. It displays a dialog box with the following choices: Reboot Shut down Load firmware Choose the appropriate option with the Up and Down buttons and press the OK button to execute it. In case of a wrong shutdown: 46
 and the possible sync points marked. Pict. 82 I. Commands During Stop or Pause, the background of the timeline is blue (Pict.")
47 PLAY Play Menu is while the Main Selector is in the 8 o'clock position. This Menu enables to play the audio files contained in the Project and Day Folder chosen into Browse File Menu. For Cantar-X3 files, it displays a waveform (calculated while recording) and the possible sync points marked. Pict. 82 I. Commands During Stop or Pause, the background of the timeline is blue (Pict. 59), during play it's green (Pict. 60). Pict. 83 Toggle Play-Pause: press the OK button. Stop: press the ESC button. Scroll in file: rotate the Jog wheel. Next/Previous file: press the Up or Down buttons. Go to next/previous sync point: press the Left or Right buttons. Change Headphone Mode: rotate the Left Crown. View current Headphone Outmap: press the F2 button. Pre / Post fader monitoring: press the Shift + F2 buttons. Edit Metadata: press the F4 button. View Take's Ingrid: press the F1 button. II. Headphone Modes In Play, 3 Headphone Outmap modes are available: Recorded Mixdown : Mixdown Tracks, Mono Tracks--Mono : Non-Mixdown Tracks, Mono User Outmaps A to Z : Tracks according to User defined Outmap. Tracks are played Pre or Post fader according to the selected mode (Shift + F2 buttons to toggle). 47
48 1. Recorded Mixdown In this mode, are sent to headphone, Tracks corresponding to Mixdown-Left and Mixdown-Right. Tracks will be routed Mono (to both left and right ears), Vumeters from other Tracks than Mixdown are darken. Pict. 84 This mode is symbolized on the Headphone Outmap grid by Xl and Xr inputs being active, at Center. Pict Tracks-Mono In this mode, are sent to headphone, all Tracks that are not Mixdown Tracks. Tracks will be routed Mono (to both left and right ears). NB: On top of the Vumeters is displayed Track's attenuation. If no actuator is assigned to a played Track, its attenuation can still be changed by Solo-ing the Track (Solo of any Track, then rotate the Left Crown to access the desired Track) and then while holding the Shift button press, rotate the Jog wheel. Pict. 86 This mode is symbolized on the Headphone Outmap grid by playback Tracks being active, at Center. Tracks are labelled according to the chosen monitoring mode: P to emphasize the PostFader property or T for PreFader mode. 48

49 Pict User Outmaps In this mode, all Tracks routed into the current User defined Outmap are sent to the headphones. Tracks will be routed according to the Outmap. Tracks are played Post-Play-Fader, meaning you can change the playback Track Level, using the actuator assigned to the Track in order to modify the attenuation. Pict. 88 NB: On top of the Vumeters is displayed Track's attenuation. If no actuator is assigned to a played Track, its attenuation can still be changed by Solo-ing the Track (Solo of any Track, then rotate the Left Crown to access the desired Track) and then while holding the Shift button press, rotate the Jog wheel. This mode is symbolized on the Headphone Outmap grid by playback Tracks being active, at the side designated in the Outmap. Tracks are labelled according to the chosen monitoring mode: P to emphasize the PostFader property or T for PreFader mode. NB: Only Tracks can be activated, other inputs than tracks are marked inactive, except for Mixdown: if a Mixdown type input is routed on the Outmap, then the Cantar will automatically play the first track corresponding to the routed Mix input. Pict Solo Solo of one or multiple tracks is available. Track(s) is(are) played Mono (to both left and right ears), Pre-Fader (Track level as it was recorded). The timeline displays only the waveform(s) corresponding to the selected Track(s). 49
 solo-ed(s) are darkened. Pict. 90 This mode is symbolized on the Headphone Outmap grid by playback Tracks being active, at Center.")
50 Press the Solo button corresponding to the Track on the assigned actuator to toggle the corresponding Track-Solo ON/OFF. Press Esc to go back to normal Headphone Mode. On Vumeters, other Tracks than the one(s) solo-ed(s) are darkened. Pict. 90 This mode is symbolized on the Headphone Outmap grid by playback Tracks being active, at Center. Tracks are labelled according to the chosen monitoring mode: P to emphasize the PostFader property or T for PreFader mode. Pict. 91 To add another Solo: while holding the Shift button press another Solo button. Pict. 92 Pict. 93 III.Routing Recorded take's routing can be viewed by pressing the F1 button, showing how inputs were routed during record and the way tracks were sent to Mixdown. Pict
51 IV.Sync Points Sync points are displayed on the timeline as vertical dotted lines. White: Slate sync point. Black: User marker. To go to the previous or next sync point, press the Left or Right buttons. 51


52 AUDIO FILE BROWSER Main Selector is in the 7 o'clock position. This position enables to: Browse Takes on all media. View and/or modify Metadata. Trash, untrash or delete Takes. Fix improperly closed files. Pict. 95 I. Browser In the top part, Media, Project folder and Day folder can be modified. Select the desired field with the Left and Right buttons and press the OK button. NB: It is possible to refresh the Project list, by re-selecting the Media, as well as refreshing the Day list by re-selecting the Project. II. Editing Metadata 1. Single File edit Select one file with the Up and Down buttons. In the top part, select 'EDIT' field and press the OK or the F4 buttons to open the Edit panel. Pict. 96 Select the appropriate field with the Left and Right buttons, and press the OK button to begin edition. Once in edition: Press the ESC button to leave Edit mode (and then once again to close the panel). Press the F4 button to directly close the Edit panel. Press the OK button to validate modification and to move focus to the next field. Press the Right and Left buttons or the Jog wheel to change the current selected character (moving before the first character or after the last, changes the active field to the next or to the previous one). Modifications are applied once the Edit panel is closed. 52


53 NB: Take Circled: from the Single/Multiple editing panel or even from the Take list, Circle parameter is toggled pressing the Shift + F3 buttons. Take Type: from the Single edition panel, the Take Type is cycled through by pressing the F5 button. 2. Multiple Takes Edition Select multiple Takes by holding the Shift button and pressing the Up or Down buttons. In the top part, select the 'EDIT' field and press the OK button OR press the F4 button. Pict. 97 The fields are filled with Metadata from the last Take of the selection. Depending on how fast is the media, how many modifications are needed, the Cantar will display a progress bar displaying the application of Metadata modifications. Pict Trash Select one or multiple Takes Press the Shift + Escape buttons. Pict

54 4. Fix Files When a Take is improperly closed (upon power failure, system error, or media error), the Take is colored in Red. Metadata editing is not possible as the files are missing the ixml data. Pict. 100 It is possible to try to fix the Take by pressing the F2 button. The original Take (improperly closed) is copied in the Audio_Trash as a backup and the fixed files are put into the current Day folder. Pict. 101 III.Snap Report In the Audio Browser menu, the Audio Sound Report is generated by pressing the F6 button. 1. Simple Snap The Snap Report process, for each media detected, scans the current selected Project and Day folder looking for Mono, Stereo and Poly folder, in order to create a report representing the media state at the moment. Pict. 102 For each media, the Report process state is displayed: Scheduled : at least one Sound folder was found (.AAD,.AAX,.AAN) Non active : no Sound folder found. Processing Report. Report process finished. 54


55 The Snap Report Process may filter takes according to their type. Select the Take field and press the Ok button to display a choice list where desired take types may be selected. Scroll throught the types using the Up and Down buttons and select or deselect by pressing the Left and Right buttons. Validate the selecting by pressing the Ok button. Pict. 103 > Press the F5 button to start the process. NB: The Snap Report Process may scans through all the days present in the current Project by opening the Snap Report dialog box by pressing the Shift + F6 buttons. Pict Export Snap The Snap Report process may also be specified a source and target in order for example to export a report based on the content of a media to another media. To activate this option, press the F3 button. (F3 button again to go back to the simple snap process) Select the Source and Target fields using the Up and Down buttons and validate by pressing the Ok button, a list of choice is then displayed in order to select the desired media. Pict

56 AUDIO & TIMECODE Audio & Timecode parameters are modified while the Main Selector is in the 4 o'clock position. The Menu is made of items and their description on the right part of the screen. Use the Up or Down buttons to select the appropriate item and press the OK button to edit it. Pict. 106 I. Sample Rate Digitizing audio sample rate -1/1000 such as 47952, can be used with picture recorded at and play back at 24. Digitizing audio sample rate +1/1000 such as 48048, can be used with picture recorded at 24 and play back at II. Bit Depth Bit depth is the number of bits of information in each sample. It directly corresponds to the resolution of each sample. III. Pre-Record Length Audio buffering duration in seconds when the Cantar is in the Pre-Record position. IV.Timecode Settings 1. LTC Out Generator Enable or disable LTC output generator: duplicates the in-coming TC in Record or generates audio files Timecode during playback. 2. LTC Out Level LTC output level. 3. LTC Rate Timecode frame rate df 30 are dedicated to corresponding accurate camera speeds. Timecode will be separated with ':' 23/29 ndf A,B,C mode are dedicated to HD and HD29.97 camera speeds. By default select the C mode. Timecode will be separated with '*'. 4. Timecode Source Internal: Timecode runs on internal precise master clock. External: Timecode will be grabbed from LTC input at each start in Record. 5. Timecode User-bits Define the content of LTC user-bits. 56
57 Hexa by user: the user-bits are manually entered the same way as to other metadatas (scene, take...) Hexa LTC: The field is automatically updated with incoming LTC User-bits, at each Jam. Jam can be activated pressing F3 or at each new record in external LTC Tape ref Ascii: the first 4 characters of tape ID rare encoded as ASCII characters (e.g. A123 will be inserted in User-bits as 'A'=41 '1'=31...) Tape ref. hexa: The first 4 characters NNNN set 0000NNNN User-Bits (numeric value are recommended). Date BCD: Audio date automatically sets up the User-Bits field with iso format. (e.g. Audio date 25/02/2016 will be inserted as User-Bits). 6. Timecode Fudged The audio-file time stamps correct the TC flaw of some HD cameras. WARNING: TC will be artificially shifted of 60 ms. To prevent trouble this choice is not saved at power off. 7. Operator TC The Operator entered TC becomes the next recording session reference. 'OTC' is displayed as timecode flag. 8. Record-Run TC Record-Run is activated for the full session until another timecode Source is selected; in that case the clock goes back to its default Free-Run mode. 'RTC' is displayed as timecode flag. V.Clap Detection Selects the AutoSlate detection channel. VI. Mixer Fader Max Level Mixer's faders top position gain. VII. Phantom Mic Gain Let the user decide whether to add an analog gain (+6dB) when the Phantom Mic Power is ON. VIII. Tone & Beep 1. Tone Level 1kHz tone level. 2. Beep Level Headphone beep level. 3. Record Beep Single beep on 'start', double beep on 'stop'. Double beep is useful to warn you when the video camera stops, while recording in Remote Roll by LTC. 4. Beep Routing Let the user decide whether to route the beeps to the outputs or not. (Line outputs, AES outputs, 57
58 Dante outputs). Headphone is always enabled and cannot be changed. IX.Remote Rec Enable or disable Remote Rec. When enabled, Record may be started and stopped while the Main Selector is in the Ppr Position using the Option socket. 0 V = stop ; 5 V = start. X. Slate Mics 1. Internal slate mic Internal slate mic level adjustement. 2. Jack 3,5 slate mic Jack 3,5 slate mic attenuation adjustement.taggle jack 3,5 slate mic biais Power ON or OFF. Set to ON for electret mics. 3. Jack 3,5 bias pwr Taggle jack 3,5 slate mic biais Power ON or OFF. Set to ON for electret mics. 4. Talk full duplex Select how the talkback activation impacts the headphones: if ON, during a talkback, the current headphone monitoring stays active ; if OFF, during a talkback, only the talkback is sent to the headphones. XI. Hdphn safety lvl Let the user decide the level of the headphone safety clamping in relation to the current Headphone level (see Headphone Level section). XII. Balance Lock Slaved fader balance action (see Mic Link). XIII. Audio Power 1. Digital power Toggle AES Inputs & Outputs Power ON or OFF in order to save power. 2. Dante power Toggle Dante module ON or OFF in order to save power. 58

59 TECHNICAL Technical parameters are modified while the Main Selector is in the 3 o'clock position. The Menu is made of items and their description on the right part of the screen. Use the Up or Down buttons to select the appropriate item and press the OK button to edit it. Pict. 107 I. Scene & Take Template NNNx/NNx.tNN template fits the mostly used Sequence/Scene. The 'all X' template is totally open, giving the Operator maximum flexibility. The default template is nnna/nna.nn for 'sequence, scene, Take Type and Take Number'. Sequence: three digits, followed by one character*. Scene: two digits, followed by one character*. *'space', 'A' to 'Z', 'a' to 'z', '0' to '9'. Take Type: 't' = time sync; 'p' = pick-up ; 'w' = wild take ; 'a' = announce ; 'n' = no good (keeps the take # for the next file); 'r' = rehearsal ; 'g' = sound guide. Take Number: two digits. II. File naming Sets the way Cantar names audio-files: Cantar original: XXnnnn==SSSSSSSStNN==_TT Underscore only: every '=' and space characters are replaced by a '_' character. III.Vumeter Settings 1. Mxdn Shifted Display all mixdown tracks vumeter at the right of the screen. 2. Grid Toggle the horizontal scale ON/OFF. 3. Line Level Sets the level of the blue line. 4. Gradian Vumeters are displayed with a smooth color gradient from green to red. When ON, red zone and yellow zone have no more effect. 5. Red Zone 59
60 Sets the level above which the Vumeter is painted in red. 6. Yellow Zone Sets the level above which the Vumeter is painted in yellow. 7. Speed Sets the update speed of the Vumeters, 1 is the slowest, 5 the fastest. 8. Peek Hold Sets the duration of peak hold in seconds. IV. System Clock 1. Date The system date is used to create the Day folder name (YYYY-MM-DD) which contains the files for that workday. NB: The workday folder can contain hours past midnight, if the recording session is not interrupted. The workday is also used to fill the default MMDD name of the tape reference field. 2. Time Enter the time from your watch, especially if you just started working in a new time zone. It should not be confused with the timecode which is used for syncing picture and audio. V. Display Levels/Attenuation 1. Inputs Levels In Record, Ppr, and Test positions, inputs levels can be displayed, as soon as a change occurs, replacing temporarily the metadata and timecode informations. If enabled, precision can be set: +/-0,1 db; +/-0,5 db; +/-1dB. 2. Tracks attenuation In Record, Ppr, and Test positions, tracks attenuation can be displayed as soon as it changes. If Dedicated Panel is selected, the metadata and timecode information are temporarily replaced when the Track attenuation is changed. The Track Audio Level is in that case displayed above the Vumeters. If Top of Vumeter is selected, Track's attenuation will be displayed above Vumeters and Track audio level is not displayed. VI. Light 1. Backlight Adjusts the screen's backlight brightness. Keep in mind high brightness are power hungry. 2. LED Adjusts the brightness of the backlit buttons. VII. Low Power in stop 60

61 Adjusts the duration before the low power state is activated while the Main Selector is in the Stop position: OFF (never activated), 15 seconds, 30 seconds, 1 minute, 2 minutes. VIII.External voltage limit In order to avoid problems with low battery levels on the external power input of the Cantar, a warning limit can be setup. Once the limit is reached, a warning message will be displayed, asking if the external source may be disabled. Pict. 108 IX. Keyboard layout Sets the mechanical arrangements of the keys. X. File Network access Allows Read only access to the internal SSD and to the SD cards using the Network connection. If enabled, a computer can be connected to the Ethernet plug. Disks are accessed by: On a Mac computer: Connecting to the adress smb://cantarx3_nn (with NN being the Cantar Number). On a Windows computer: Connecting to the adress \\CANTARX3_NN (with NN being the Cantar Number). The credentials are: User=cantar and Password=x3 NB: If the Cantar is directly connected to the computer without a DHCP server in between, the Cantar will automatically be assigned an Auto-IP address ( XX.XX). For a Windows computer, according to the OS version, it can take about 1 minute to toggle to Auto-IP, in the mean time, it is not possible to connect it to the Cantar. XI. Tech support 1. IP Adress Displays Cantar's IP Addresses. 2. Diagnostic Generates a diagnostic file on a designed media. A diagnostic file is particularly useful in case of a problem on the Cantar, sent to the Cantar support team, it will help to solve the issue. 61

62 XII. Save / Load settings Pict Save Generates a configuration file ( extension.cfg) on a designed media. Pict. 110 Change the media by selecting the Media field with the Up and Down buttons and then pressing the Left and Right buttons. A name is automatically generated based upon the current Filetag followed by the date and time, but it can be personalized by selecting the Name field with the Up and Down buttons and then pressing the Ok button. Press the F5 button to save the whole configuration of the Cantar. 2. Load Pict. 111 Change the media by selecting the Media field with the Up and Down buttons and then pressing the Left and Right buttons.select the Name field and press the Ok button to display a list of all detected configuration files on the selected media. Pict
 In-Grid: the 26 Ingrids presets.")
63 Select the desire file and press the Ok button. The file is loaded and based on its content, the available settings are enabled: Parameters: General settings of the Cantar (sample rate, vumeters etc ) In-Grid: the 26 Ingrids presets. Headphone Outmaps: the 26 Headphone presets. Line / Aes Outmaps: the 26 Line and Aes outputs presets. Assignment: Potentiometers, Mixer sliders and Cantarems (I & II) assignments. Completion: Trackname completion. Each type of settings can be individually activated or not. Using the Up and Down buttons, select the type and toggle the state by pressing the Ok button. Pict. 113 Press the F5 button to start loading the selected settings. NB: If the Parameters setting is selected, a reboot of the Cantar will be automatically performed at the end of the Loading procedure. Pict. 114 Pict. 115 XIII. Load firmware Access to the firmware loading Window. 1 Get the latest firmware version from the Aaton Support web site. ( 2 The firmware file (extension.csw) is contained in a zip, extract it onto an USB or a SD card. 2 Before loading, ensure you have reliable power. 3 Open the load firmware dialog box, select the firmware and press the OK button. WARNING 1 Loading a new version can update the FPGA content. After a software update, Cantar will reboot and update the FPGA. A dedicated screen with progress bar will appear. As written DO NOT POWER OFF Cantar during this step. For safety, please use at least 2 power sources during update (e.g. 2 batteries or 1 external power on the XLR4 and 1 battery) 2 Cantar's operating system is contained on a MicroSD on the mother board, DO NOT REMOVE IT from the Cantar and try to plug it on a computer. Just by accessing it, the computer can damage the card, and thereby preventing the Cantar to boot. 63


64 SESSION Session menu is accessed while the Main Selector is in the 2 o'clock position. This menu enables the setup of the Recording Session parameters and of the Report generation. Use the direction buttons to select the appropriate field and press the OK button to edit it. Pict. 116 I. Record Parameters 1. Project i. Select a project Pict. 117 Selects the current recording Project through a List built from the first enabled recording media. ii. Create a new project Pict. 118 Opens the New Project dialog to enter the new project's name. NB: If they don't already exist, the Project and Day folders are created the next time recorder goes into Record. 64


65 iii. Erase a project from SSD Pict. 119 This feature is protected from any unwanted action: to confirm the desire to irreversibly delete an entire project from the SSD media, enter the Cantar Number and valid by pressing the Shift + F3 buttons. 2. Media Pict. 120 For each media, 3 modes are available: Live rec.: the media is a record media. Idle: the media is a backup media and backup will be performed while the Main Selector is in the Test position. Disable: Unused media. For each media, the Cantar can record: Monophonic files: one file per Track, named as XXnnnn==SSSSSSSStNN==_TT.wav XXnnnn: Cantar's unique FileTag ==: Separator (can be '=' or '_' according to file naming parameter in the Technical menu). SSSSSSSStNN: Scene and Take Type. _: Track Number Separator. TT: Track number from '01' to '24'. Stereo Mixdown file: Stereo file of Mixdown left and right interleaved. PolyPhonic file: Polyphonic file of all Tracks interleaved. The number of channels is determined by the highest Track number used. All unused Tracks will be replaced with blank channels. Example: If Tracks 1, 5 and 8 are recorded, only 3 monophonic files are created but the polyphonic file will contain 8 channels preserving Track 8 on the 8 th channel. Please refer to Media State in the Pre-Record section for media icon. 65

66 3. Media erase Select the field beneath the appropriate media to format it. Press the OK button, a confirmation Window will open. Confirm by pressing the Shift + F3 buttons. WARNING: All information contained on the media is erased. Pict. 121 NB: In order to prevent mistakes, formatting the internal Drive is protected by the need to enter the Cantar number with the Up and Down buttons. Pict Compressed Proxy In addition to the main recording processes (Monophonic, Stereo Mixdown, Polyphonic), a compressed file can be generated. Two formats are available: Ogg-Vorbis and Mp3. Both formats can contain Stereo Mixdown. Ogg-Vorbis can also contain Polyphonic channels. Each format can be recorded on USB or SD media. Compression is lossy and can be set up between, Low, Middle and High quality. 66

67 II. Report Reports are processed at the end of the backup (when a file is copied). 1. Report type Choose whether to generate (or not) PDF, CSV or ALE reports. Pict Setup PDF Header and Data parts of the Sound Report can be customized. Select the appropriate field and press the OK button to edit it. Pict. 124 i. Header The header of the PDF report is made of 5 lines and 7 columns. NB: During Report generation, if one parameter along the header data is different from one take to another (for example Digit or TC Fps), a new page is added. Use the direction buttons to select a cell and press the OK button to edit it. (Pict. 89). Some data types are 2 cells wide (for example Prod, Title etc...), other only 1. NB: While changing a cell type, if a 2-cell wide field got its second field replaced by another field, the first field is painted in dotted red to highlight that it will be erased if the current change is confirmed (Pict. 90). If a 2-cell wide field is placed on the last column, it's painted in red to show that it is not possible (Pict. 91). To change the customized text of a field, re-select the first cell and apply the same type. To reset to default settings, press the Shift + Escape buttons. Pict


68 Pict. 127 Pict. 126 ii. Data Each Take can have one or two data lines plus eventually a note line. Pict. 128 Each data line can have up to 16 columns, given the first column is necessarily the Take index on the current page and the second column of the first line of the Take is the FileID. Circled takes may also be reported in the Pdf report with a red circle around the Filetag field or around the take number field. Pict

69 BACKUP Backup parameters can be setup while the Main Selector is in the 1 o'clock position. This position enables to: Copy from one media to another. Apply interleave process (Stereo or Polyphonic). Restore trashed Takes. Pict. 130 The screen is divided into two parts: the left part is about the Source and the right part about the Target. I. Backup settings The top part enables to setup the Source and Target parameters: Media and Day Folder, as well as to setup the Backup process. 1. Source and Target Select the appropriate field with the Left and Right buttons, then press the OK button to edit it. NB: A full Project can be selected in the Day Folder field (at the top of the list of days). (Pict. 94) A project report (if enabled) is generated at the end of the backup. The current Project is displayed in the top-middle part of the screen, it can be changed in the Session Menu or in the Audio File Browser. Takes lists are updated on each sides upon folder choice. It can also be manually refreshed by pressing the F5 button. Pict Process The process applied during backup can also be set up: Copy Monophonic files/clone: copy files from Source to Target. Copy Polyphonic files: creates Polyphonic files from the Monophonic ones. Copy Stereo Mixdown: creates a Stereo Mixdown files from the Monophonic Mixdown files. 69


70 Combination of 2 process. Copy Reports. Pict. 132 II. Backup processing It is possible to copy one or multiple Takes. One Take can be selected by using the Up or Down buttons. To select multiple Takes, hold the Shift button while pressing the Up or Down buttons. To select all Takes, press the F2 buttons. Pict. 133 While browsing the source list with the Up and Down buttons, if a Take is also on the target list, it is automatically highlighted. The backup process can be started into two modes: Copy: by pressing the F4 button Overwrite: by pressing the F6 button. In Copy mode, if a Take already exists in the Target, it won't be overwritten, thereby saving time. In Overwrite mode, it forces to overwrite already existing files. Pict. 134 At the end of the backup, if enabled, are processed the sound reports (only if at least one Take was copied). There is one sound report per Day Folder, gathering information about the takes present in that folder. 70
71 71
 Pin description: - 1, 2: Ground 3: LTC In 4: Ascii 9: World clock out 10 & 23: Tally (no polarity) 11: Cantarem 12: AES-6 Out 13: AES-6 Out +")
72 ANNEXES I. Connectors 1. Mini Delta Ribbon As seen from the outside (user's side) Pin description: - 1, 2: Ground 3: LTC In 4: Ascii 9: World clock out 10 & 23: Tally (no polarity) 11: Cantarem 12: AES-6 Out 13: AES-6 Out + 14 & 15: V Batt 16: LTC Out 21: World clock In 22: Ground 24: Power On/Off 25: AES-5 Out 26: AES-5 Out + - Other pins: reserved for future use, do not connect. 2. Headphone Jack 6.35mm & Slate Mic Jack 3.5mm Cantar uses: - a generic sound connector for its Jack 6,35mm headphone connector. - a Nokia type headset connector for its Slate Mic Jack 3,5mm, 4 points, connector. 72
 4. Timecode Lemo 5 (F) Lemo 5 wiring: - 1 Ground - 2 LTC-In - 3 Ascii - 4 N.C - 5 LTC-Out 5. Power XLR-4 (M) External power: 13 to 18 V 4 Amps - 1 2 3 4 Ground NC NC + Batt 6.")
73 3. Cantarem Lemo 8 Lemo 8 wiring: - 1 Ground (to Pin 1 of Mini Delta Ribbon) - 2: Ltc Out (to Pin 16 of MDR) - 3: Cantarem (to Pin 11 of MDR) - 4: V Batt (to Pin 14 of MDR) - 7: Ltc In (to Pin 3 of MDR) 4. Timecode Lemo 5 (F) Lemo 5 wiring: - 1 Ground - 2 LTC-In - 3 Ascii - 4 N.C - 5 LTC-Out 5. Power XLR-4 (M) External power: 13 to 18 V 4 Amps Ground NC NC + Batt 6. Mic XLR-3(F) Symmetrical transformer (max+24dbu) - 1 Ground - 2 Hot - 3 Cold 7. Mic XLR-5(F) Symmetrical transformer (max. +24dBu) Ground Hot Cold Ground Hot Cold Mic 3 / Mic 7 Mic 4 / Mic 8 73
74 8. Line-In XLR-5(F) Symmetrical (max. +24dBu) Ground Hot Cold Ground Hot Cold Line 1 / Line 3 Line 2 / Line 4 9. AES-42 TA-3(F) - 1 Ground - 2 Hot - 3 Cold 10. AES In/Out Dsub-25 Tascam TD 88 standard AES Inputs Channel Pairl Hot + AES Outputs Cold - Gnd Channel Pairl Hot + Cold - Gnd Analog Output Dsub-25 Output Channel Hot + Cold - Gnd Hi-Rose Tension: V-batt. Current limitation: 500 ma, protected by a thermo-fuse. 74
 Track name auto completion, a tool tip list displays the suggestions From editing metadata screen, press F2 to open completion management (edit, delete, ON/OFF).")
75 II. Cantar Audio Chain III.Software history version (June 23, 2016) Track name auto completion, a tool tip list displays the suggestions From editing metadata screen, press F2 to open completion management (edit, delete, ON/OFF). Into edit fields, the cursor goes to the next/previous field with Left and Right key Double press on Left / Right while on the first / last character of a field or hold the Left/Right key pressed The all Cantar settings can be saved and restored using save/load settings into technical menu. At restore step, Cantar user can select between all, Ingrid, Outmap... Low power is available in stop position. The duration before starting the low power mode can be adjusted into technical settings. Cantarem II Function Button assignment Press Cantarem II Left Shift and Right Shift and a function key (e.g C1) to display Assignment Panel Press Left-Right (or C1 to C4) Keys to select Cantarem II Function Button Press Up/Down keys to choose the action emulated (F1 to F6 ; Talk 1 & 2) Press Ok to validate In PPR position, on "delete last take", a confirmation is now requested before moving the last take to the trash. In BROWSER position on delete take, you can clean the other media(s) at the same time. 75
76 During restore from audio trash, the files are moved when the target drive matches with the audio trash drive. The files are copied when the target drive differs from the audio trash drive. A management of USB port overcurent is now available from interface (overcurent notification and reset). Bug fix on The phase correlator labels are not updated Line level can't be adjusted (in a link situation) without actuator assigned. A message about the samba server is displayed at Cantar start up. The erase project process returns an error before finishing The limiter triangle blinks on the disarmed tracks The pink Oops screen is briefly displayed at the end of the Cantar boot sequence. The unused named tracks are registred into the CSV report The start to record with (mono+stero on SSD and a faulty removable media) is not possible. Scrolling through the configuration editing, the display settings is not accurate. While in Test Menu if a sub section is activated (Delay, Link, Lineout level) and Lineout or Digiout configuration is displayed (F2 then F3), keys (Return etc..) are handled by the sub section and not by Lineout Config Menu as it should be. Rotating the Left crown while the Multiple Outmap dialog box is opened was changing the selected outmap index on the currently selected output In some situations, interface crash while modifying the Pdf Header or at startup Going from customisable field to single not customisable one was leaving the custom text version (May 02, 2016) Compatibility with the 12 faders Cantarem 2. The assignation for the Cantarem 2 is availabe holding [Shift+Solo Cantarem 2]. The Phase correlator based on tracks is available during playback Continuous play in playback (jumps to the next file at the end of the play). It can be activated pressing [Shfit+Ok] in play screen. The internal mixdown (Xl Xr) can be combined with an external input. This function is useful for people using an external mixing table. InGrid and Headphone Outmaps modifications are enabled from PPR,TEST screens (press F1 for Ingrid, F2 for Headphone) Arm or Disarm track from InGrid view by pressing [Shift + F3] with the cursor on the desired track. Modify the track Level of non assigned tracks (no fader to trim) from InGrid view. (Hold the Shift button while rotating the Jog wheel) In solo, with gangabled mics or lines, master level and lock are displayed. The circle takes are labeled in pdf (like on Majax). The circle takes column is added in CSV file. Bug fix on The Ms mic color was not displayed in solo screen The main selector management have changed The timecode behavior is improved if several system time initialisation are requested. Space characters were introduced during the scene/take field edition Headphone adjustment was not working in a solo mic dialog box 76
77 Circle field was modified during metadata edit. version (April 21, 2015) Double solo on mic inputs and tracks (press and hold 2 solo buttons at the same time). Phase correlation in double Solo. Last phase correlation is displayed in Test/Record/Ppr Menus. Dante option icon in Stop Menu In play position, output configurations using Mix Left and Mix right stay valid. (Recorded Mixdown down tracks are monitored on the corresponding output). Bug fix on Lock up in Solo mode Level display jittering for potentiometers and sliders Error message starting on record immediately after startup Page breaks in the pdf report version 1.94 (March 23, 2015) User assignation is now available for rotating potentiometers. Assignation is managed in the same way as the top panel sliders or the cantarem. Long press on [Shift+Solo pot] to open the assignation dialog box. Pre fade and Post fade monitoring are available in play (press [Shift+F2] to toggle between the two modes) A full duplex mode was added for talk back (during talkback, current headset monitoring stay active) An external low voltage alarm can be setup into TECHNICAL SETTINGS (11V - 15V) When alarm pops up, press ESC to ignore the message press OK to disable external input power and switch to internal battery (if there is a battery) To enable external power, just unplug or switch off the external power source a few seconds. CSV file format added to audio reports (PDF and ALE). Enhanced report tools (in audio browser page : take type filters, and target can be defined by user) In copy/backup menu, reports can be managed like audio takes MS and mixdown tracks are automatically labelled into the PDF report track name field. Multiple edit is available to modify the scene number (like notes, track names ). Mixdowm tracks vumeters can be shifted to the right of the screen This function is useful for a friendly interface when Mixdown tracks are located on Tracks 1&2. (see. TECHNICAL SETTINGS / Vum. mdxn shifted for setup) Delay and Phantom power indicator added to the vumeter background. Disarmed track label color over vumeter changed to grey. The external Jam OK message is hidden in record position. User bits are grabbed automatically from incoming LTC (see AUDIO & TIMECODE PARAMETERS / Timecode Ubits for setup). When the last take is deleted, monophonic files are moved to the audio trash and on USB,SD1,SD2 the same take is definitively erased. Arm/Disarm track from IN GRID screen (short press [Shift+solo track]. Erase in grid configuration (no more M1 M2 by default into the grid). 77
78 Monophonic audio file recorded on Cantar X1/X2 can be merged into day folder (Project name needs to be the same on both equipments). In record position : direct access to Clap detection [F4] and Marker [F6]. Erase project funtion on SSD added in SESSION page. Please note, all audio data into the project will be erased from SSD without possible recovery. Contextual help [triple shift] added in PLAY/TEST/STOP/AUDIO BROWSER/IN GRID... Have a look, you may find unknown shortcuts and hidden functions. Bug fix on Shifted configuration in multiple outmap dialog box In multiple field editing, the original field content indicator was wiped during navigation Scene modification lost in PPR position if F5 short cut pressed while modifying from edit fields On line out level when they are driven by Cantar slider 1 to 8 In timecode record run mode, LTC out Timecode was running when Cantar was not recording Tape ref management for AVID if it was modified by the user System time not updated into technical settings Dialog assignation list incoherency Circle status changed on take type edition Lock panel triggered during the solo Lag when exiting from TEST position if idle mode is enabled. Confict between level display panel during metadata edit in PPR. AES gain adjustement using jog Short audio file names are created instead of long name using "underscore only" mode version 1.90 (January 05, 2016) Analog input status (phase inversion, analog filters, and EQ) added to the top of vumeters (for Mics, lines, Aes and Aes42). Line out and digital out new Interface: delay, play mute, beep mute, and multiple outmap. (multiple outmap: The Outmap used on an output can be defined according to the position of the main selector). Adjustable headphone safety clamping. Phase inversion on AES and AES42 inputs. Digital EQ available for AES and AES42 inputs. (Available even without smart AES42 communication). Very low backlight level for night environment. Contextual help in all solo dialogs (Line, Mic, AES and AES42). Bug fix on Update Track LED for disarmed tracks. Family UID. Conflict between lock panel field move into metadata edit window. version 1.86 (November 25, 2015) Idle backup mode. The setup of this mode is done in SESSION screen on recording Media. In TEST position, while the recording media is not busy, Cantar incrementally, backs up the audio files onto idle target media SD card and/or USB. Note that a three seconds delay lets you go through TEST without triggering the process. 78
79 A percentage of completed idle process will be displayed in green above the media icon, up to End when it's finished. The process will be automatically interrupted when exiting from TEST position. The unfinished copy is erased. If you modify the metadata of a take, it is modified on the idle target media if it is still available. Before removing target media, take time to run Snap report [F6] into BROWSING position to create reports if needed. If media is full, insert another media and Idle Backup will continue from where it previously stopped. This function is useful, when media is too slow to work in mirroring. For external slate mic, bias power ON/OFF is now available (see bias power into AUDIO PARAMETERS page). Delay on inputs are displayed at the top of solo dialog box. IN PLAY position F3 switch between timecode and elapse under the wave form. By default, all new takes are not circled. Phantom power on Mic inputs stay ON when switching between Mic level and high level. EQ gain (low, mid and High) are quickly adjusted (+1dB step) with (SHIT+Jog). In Playback mode track names are displayed over the wavform during solo You got the remaining time on each media according to the current configuration. version 1.84 (November 03, 2015) Free media size is displayed in stop position pressing the Up or down buttons. Remaining time on each media is displayed according to the current record configuration. Bug fix on Stability improvements (all previous versions were affected). version 1.83 (October 22, 2015) Headphone stay active in all positions of the main selector (except in STOP and IN GRID ROUTING) In COPY/BACKUP, if target free size is lower than the size of selected Takes, user is still allowed to start the backup. (useful if you backup at midday and in the evening on the same card and if the total backup size is close to the target media size) Bug fix on Edit of last Take's metadata in the Audio Browser Menu automatically updates next Take's metadata. Jog conflict in Solo Line during EQ setup. Assignation dialog box (down key on Digital input). Improved improperly closed file algorithm. Various small bug fixes. version 1.82 (October 14, 2015) Circle takes management Circle status displayed in Audio & Backup Browsers Menu [Shift+F3] in Audio Browser Menu (directly or in Edit screen) toggles the circle status (available in multi selection ; change is automatically reflected on all available media Locked panel and disarmed Tracks settings are saved in case of a Cantar Power OFF/ON. Detection of SD card Lock switch. Improperly closed audio files (power failure, media error, system error) may be fixed 79
80 in the AUDIO BROWSER position by pressing F2 key. Digital gain on AES3 inputs -inf +12dB Please note 2 version of the input are available for IN-GRID a1: original digital level of corresponding input (no additional gain) A1: (capital letter) digital input modified by the new digital gain Use the Left/right buttons to make your choice into IN-GRID Drive (Internal SSD and SD card) access from your computer through Ethernet socket (See TECHNICAL SETTINGS / File network access help for details) EQ display frequency response EQ log frequency adjustment and field navigation improved (Arrow to change filed, jog to modify the value) EQ maximum frequency moved up to 16 khz Metadata direct edition in Ppr Menu behaves like full fields edit. New units for input delay setup (ms / meters / samples). Factory test procedure were hidden Ready for the new 12 sliders USB Cantarem. Ninja rooting mode into IN-GRID screen (Do not cover all combinations). Pressing SOLO TRACK 1 then solo MIC 3, the result is: Mic 3 is toggled on Track 1. Bug fix on Shortcut in solo mic F4-F5-F6 MS decoding in Mix down version 1.80 (September 29, 2015) AES42 control (KMD) of internal digital mic parameters Digital gain on AES42 inputs -inf +36dB Digital gain on AES3 inputs -inf +12dB Please note 2 version of the input are available for IN-GRID a1: original digital level of corresponding input (no additional gain) A1: (capital letter) digital input modified by the new digital gain Use the Left/right buttons to make your choice into IN-GRID Drive (Internal SSD and SD card) access from your computer through Ethernet socket (See TECHNICAL SETTINGS / File network access help for details) EQ display frequency response EQ log frequency adjustment and field navigation improved (Arrow to change filed, jog to modify the value) EQ maximum frequency moved up to 16 khz Metadata direct edition in Ppr Menu behaves like full fields edit. New units for input delay setup (ms / meters / samples). Factory test procedure were hidden Ready for the new 12 sliders USB Cantarem. Ninja rooting mode into IN-GRID screen (Do not cover all combinations). Pressing SOLO TRACK 1 then solo MIC 3, the result is: Mic 3 is toggled on Track 1. Bug fix on Shortcut in solo mic F4-F5-F6 MS decoding in Mix down Exit by esc key from back light or led level adjustment Close dialog Setup Report using the Main Selector version 1.71 (August 28, 2015) Digital filters/eq on analog inputs 80
81 Delay on inputs Into ingrid, routing of mono post fade (P1..P24) Into outmaps, highlite a T1..T24 position, press shift+f5 to map post fade (P1..P24) Backup of a full project MS decoded or balanced in mixdown Accurate timecode is maintaibed about 20 minutes in case of Cantar power off After Cantar power on, a green timecode indicator means the last timecode is still valid. Tripple shift provide of contextual help (available only in PPR & solo mic for now) Extended PPR duration (up to 30s at 48kHz) Remote rec through MDR connector/tally Related Fields editable Up and down key are available for meta data field navigation Right key at end of field select next field Left key at start of field select previous filed Into edit fields (OK -> validate and select next field) F4/F6 validate and close the corresponding dialog box F5 shortcut for take type indicator is available Shift+ok switch insert/overwrite mode Update play screen metadata field after edition from play screen using F4 Bug fix on New management of "lazy" external media (SD/USB) Line, Aes, Dante out are included into reset factory configuration Balance lock are saved when power off Display limiters status End of play on mixdown and polyphonic files Display limiters status Desarmed track 11 creates an empty file for this track Firmware version loader version 1.62 (July 22, 2015) Media formatting improved for better record performance specially with monophonic files (80% faster). Audio file larger than 2 GB are now supported (in all cases audio files stay smaller than 4GB). Beep Routing to all selected outputs (Menu Audio / Beep routing) Track Solo button + Left Crown accessible while assignation in Play Reset parameters to factory settings (Menu Technical / Reset Factory) Attribute reset more verbose Bug fix on Battery communication Audio file size in Pdf report Track name visibility in Previous Edit for Track count of 9 and 17 Solo track input reminder includes Ms type version 1.61 (June 15, 2015) Audio stream control has been improved and new messages have been added in case of trouble. version 1.53 (June 12, 2015) 81
82 New control added on audio stream integrity. Bug fix: Lag of interface in record vumeters and play back position. version 1.52 (June 10, 2015) Mic inputs have now 3 predefined inputs level Mic level / High level(-26db) / line level(38db). +6dB gain booster with phantom mics available (AUDIO & TIMECODE PARAMETERS/Phantom Mic gain) Fader scale have been modified to be more comfortable for mix +12dB mixdown capability (AUDIO & TIMECODE PARAMETERS/Fader Max Level) Inputs (mics, lines...) directly rooted on line out are working in all position except in stop. Switching to REC position, RECORD will start even if a media is missing (e.e SdCard). Note: A monophonic audio file record is mandatory on one of the remaining media. In browser position a snap report (F6) have been added. It creates pdf/ale file on all removable media inserted into the Cantar. It has to be done at before removing the media when recording in mirror. Avid compatibility on track name into bext for numbers over 9 At start up, with new day accepted, Tape id is automatically setup as MMDD (month-day) In edit fields, SHIFT+Left arrow erase filed content without confirmation Bug fix: Remaining size when a track is manually disarmed Bug fix: Critical error on audio stream fixed (happens very rarely). Bug fix: the date stay correct when Audio TC jump over midnight Bug fix: Read only attribute removed on recorded audio files version 1.44 (May 25, 2015) Monophonic file naming change to _NN (NN start at 01 for first track to _24 for last track) for avid monophonic import compatibility. User warning added in case of trouble with the recorder (important for the safety of your records). Phase inverse identifier (bar at the bottom of vu-meter) only available if a single analog Shift+F2 solo line out access Digital out in headphone during setup Pdf track name repeated on sequence change Bug fix (phase invers link, empty timeline...) version 1.43 Slate mic level adjustment. In solo, unused vumeter are darker. Bug fix TalkBack release and "black screen" in case of mistake in backup 82
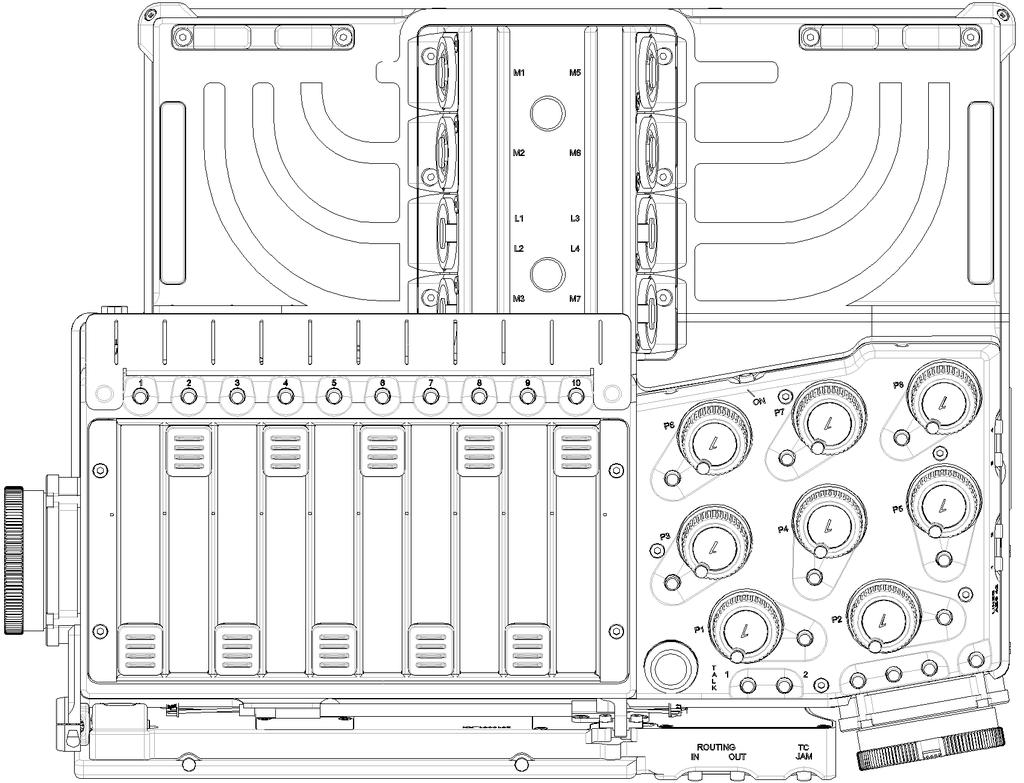


83 83
CANTAR X3. User Manual. Software v 1.90
 CANTAR X3 User Manual Software v 1.90 Table of Content HEADPHONE...6 Current Outmap...6 Name...6 Inputs...6 Other Main Selector Positions...7 LINE OUTPUT...8 Outmaps...8 Output Level...9 Delay...9 Play
Software Bulletins for NAGRA VI
 Addition of the Default settings menu. Number of indexes limited to 299. Addition of the index RENUMBER feature. Software Bulletins for NAGRA VI VERSION V1.01 (17/06/2008) VERSION V1.02 (25/06/2008) Display
HS-P82. Contents. New functions in firmware V2.00
 Contents New functions in firmware V2.00...1 Improved operation when the REC MODE page REC Mode item is set to Mirror...2 Mirror DELETE MODE setting added...2 Changing the names of a take recorded at the
CalArts Film/Video Sound Quick Start for Sound Devices 744T Time Code Hard Drive Field Recorder:
 CalArts Film/Video Sound Quick Start for Sound Devices 744T Time Code Hard Drive Field Recorder: Front Panel Descriptions 1) Digital Input LEDs! Indicates the presence of digital signal on the respective
Premiere Pro Desktop Layout (NeaseTV 2015 Layout)
") Premiere Pro 2015 1. Contextually Sensitive Windows - Must be on the correct window in order to do some tasks 2. Contextually Sensitive Menus 3. 1 zillion ways to do something. No 2 people will do everything
Premiere Pro 2015 1. Contextually Sensitive Windows - Must be on the correct window in order to do some tasks 2. Contextually Sensitive Menus 3. 1 zillion ways to do something. No 2 people will do everything
788T. High Resolution Digital Audio Recorder with Time Code User Guide and Technical Information for 788T and 788T-SSD Recorders firmware rev. 1.
 788T High Resolution Digital Audio Recorder with Time Code User Guide and Technical Information for 788T and 788T-SSD Recorders firmware rev. 1.71 Sound Devices, LLC 300 Wengel Drive Reedsburg, WI USA
USER GUIDE 1 of 26 STAGEGRID 4000 User Guide rev.01 abr-18
 USER GUIDE 1 of 26 STAGEGRID 4000 User Guide rev.01 abr-18 SUMÁRIO About... 2 STAGEGRID 4000... 2 SoundGrid... 3 System Requirements... 3 Hardware... 4 Package Contents... 4 Rack Installation... 5 Setups...
Table of Contents GETTING STARTED...4 RECORDING...11 PLAYING BACK...14
 USER GUIDE Table of Contents GETTING STARTED...4 Main Window Essentials...5 Operation Modes...7 Setup...8 RECORDING...11 Tracks... 11 > Track Names... 11 > Adding Tracks... 11 > Master Bus... 11 > Track
788T. High Resolution Digital Audio Recorder with Time Code User Guide and Technical Information firmware rev USB 2.0
 788T High Resolution Digital Audio Recorder with Time Code User Guide and Technical Information firmware rev. 1.65 Sound Devices, LLC 300 Wengel Drive Reedsburg, WI USA +1 (608) 524-0625 fax: +1 (608)
and close the various Traktor Panels. Setup: click on the setup icon to open the setup dialog. Close: clicking this icon will close TRAKTOR DJ Studio.
 Welcome... TRAKTOR DJ Studio 2 Quick Reference...to TRAKTOR DJ Studio 2, the latest and most advanced version of the software that changed the way DJs think about computers. We ve introduced a number of
VirtualDJ 8 Rane TTM57 MKII 1
 VirtualDJ 8 Rane TTM57 MKII 1 Table of Contents Installation... 3 Connections... 3 Drivers... 4 VirtualDJ 8 Setup... 4 Advanced Setup... 5 VirtualDJ & Hardware Functionality... 6 A. Volume Mixer... 7 B.
Version 3.0 Supplementary Manual
 Version 3.0 Supplementary Manual 2016 ZOOM CORPORATION Copying or reprinting this manual in part or in whole without permission is prohibited. Contents Contents Functions added in Version 3.0 Monitoring
NUAGE MASTER Ncs500-CT
 CONTROL SURFACE NUAGE MASTER Ncs500-CT Operation Manual Using this manual This operation manual supports keyword searching and linking as follows. Keyword searching Searching for keywords is performed
Quick Guide. You must read the Usage and Safety Precautions before use.
 Quick Guide You must read the Usage and Safety Precautions before use. The Operation Manual can be downloaded from the ZOOM website (https://www.zoom.jp/docs/l-0). 018 ZOOM CORPORATION Copying or reprinting
788T. High Resolution Digital Audio Recorder with Time Code User Guide and Technical Information for 788T and 788T-SSD Recorders firmware rev. 2.
 788T High Resolution Digital Audio Recorder with Time Code User Guide and Technical Information for 788T and 788T-SSD Recorders firmware rev. 2.15 Sound Devices, LLC 300 Wengel Drive Reedsburg, WI USA
User Guide FFFA
 User Guide FFFA001508-01 www.focusrite.com Contents Introduction... 3 About this User Guide...3 System Requirements........................................................ 4 Software Installation... 4
VirtualDJ 8 Rane Sixty-Two 1
 VirtualDJ 8 Rane Sixty-Two 1 Table of Contents Installation... 3 Connections... 3 Drivers... 4 VirtualDJ 8 Setup... 4 Advanced Setup... 5 VirtualDJ & Hardware Functionality... 6 A. Volume Mixer... 7 B.
DIGITAL AUDIO PROCESSOR
 SOFTWARE SETUP MANUAL DIGITAL AUDIO PROCESSOR DP-K1 (Version 1.05) This book supports the following software versions. Firmware: Version 2.00 or later DP-K1 setting software: Version 2.00 or later [Instruction
unify Control Panel V3.2.1 Configuration and Monitoring for Dante devices
 Configuration and Monitoring for Dante devices Date 07/9/2018 Revision 01_f Attero Tech, LLC 1315 Directors Row, Suite 107, Ft Wayne, IN 46808 Phone 260-496-9668 Fax 260-496-9879 www.atterotech.com 614-00045
F8 Control Version 2.0 Operation Manual
 F8 Control Version 2.0 Operation Manual 2018 ZOOM CORPORATION Copying or reprinting this manual in part or in whole without permission is prohibited. Contents Introduction...........................................................
Show Designer 1. Software Revision 3.11
 Show Designer 1 Software Revision 3.11 OVERVIEW The Show Designer 1 is a lighting controller based on the successful and simple to use Show Designer. The Show Designer 1 adds to the existing features of
User Guide FFFA
 User Guide FFFA001508-02 www.focusrite.com Contents INTRODUCTION... 3 About this User Guide...3 SYSTEM REQUIREMENTS........................................................ 4 SOFTWARE INSTALLATION... 4
Version 4 Software. Version 4 - Supplement. Issue A, August 2007 for Version 4.0+ Software. D5 V4 Supp 1-1
 Version 4 - Supplement Issue A, August 2007 for Version 4.0+ Software D5 V4 Supp 1-1 D5 V4 Supp 1-2 Contents 1.0 Introduction... 1-4 1.1 Hardware Configuration Options... 1-4 1.2 Audio Sync Options...
Bose ControlSpace Designer Software. User Guide
 Bose ControlSpace Designer Software User Guide 2005 Bose Corporation. No part of this work may be reproduced, modified, distributed or otherwise used without prior written permission. Contents Introduction
SOUND BROWSER SYSTEM PROTOTYPES SOUND FILE WINDOW. Click to update the list when files or directories have been added or removed by other programs.
 Each Sound in the list that is preceded by a cyan arrow (->) performs processing on an input (the replaceable input). These Sounds come with a default input, but a replacement input can be substituted
USER MANUAL. Published November 2014 Software Version Maxx Zaxcom Zax-Max. Mixer Recorder - Transmitter
 USER MANUAL Published November 2014 Software Version Maxx 2.13 Zaxcom Zax-Max Mixer Recorder - Transmitter 1 KNOW YOUR MAXX... 6 FRONT PANEL... 6 LEFT SIDE... 9 RIGHT SIDE... 10 REAR... 11 HOME SCREEN
uremote User Manual Version 1.3 Jan 2017
 Version 1.3 Table of Contents Table of Contents... 2 1 Introduction... 3 1.1. Operating Systems and Installations:... 3 1.2. How to Use this Manual Effectively... 4 2 WHERE TO USE UREMOTE... 4 2.1. Remote
VirtualDJ 8 Rane Sixty-Four 1
 VirtualDJ 8 Rane Sixty-Four 1 Table of Contents Installation... 3 Connections... 3 Drivers... 4 VirtualDJ 8 Setup... 4 Advanced Setup... 5 A. Deck Controls... 7 HotCues (Layer 1)... 8 Sampler (Layer 2)...
QUICKSTART GUIDE ENGLISH ( 3 9 ) MANUAL DE INICIO RÁPIDO ESPAÑOL ( ) GUIDE D UTILISATION RAPIDE FRANÇAIS ( )
 MANUAL DE INICIO RÁPIDO ESPAÑOL ( ) GUIDE D UTILISATION RAPIDE FRANÇAIS ( )") QUICKSTART GUIDE ENGLISH ( 3 ) MANUAL DE INICIO RÁPIDO ESPAÑOL ( 11 17 ) GUIDE D UTILISATION RAPIDE FRANÇAIS ( 1 25 ) MANUALE RAPIDO DI UTILIZZAZIONE ITALIANO ( 27 33 ) KURZANLEITUNG DEUTSCH ( 35 41 )
QUICKSTART GUIDE ENGLISH ( 3 ) MANUAL DE INICIO RÁPIDO ESPAÑOL ( 11 17 ) GUIDE D UTILISATION RAPIDE FRANÇAIS ( 1 25 ) MANUALE RAPIDO DI UTILIZZAZIONE ITALIANO ( 27 33 ) KURZANLEITUNG DEUTSCH ( 35 41 )
Nortel IP Phone 1120E/1140E User Guide (CICM).
.") Nortel IP Phone 1120E/1140E User Guide (CICM). Overview Nortel IP Phone 1120E/1140E brings voice and data to the desktop by connecting directly to a Local Area Network (LAN) through an Ethernet connection.
Nortel IP Phone 1120E/1140E User Guide (CICM). Overview Nortel IP Phone 1120E/1140E brings voice and data to the desktop by connecting directly to a Local Area Network (LAN) through an Ethernet connection.
How You Use the Timeline
 How You Use the Timeline The Timeline and the Canvas display two different views of the same sequence. The Timeline shows the chronological arrangement of clips and layered video and audio clip items,
USER MANUAL. Published October 2018 Software Version Nomad Zaxcom Nomad. Sound bag audio redefined
 USER MANUAL Published October 2018 Software Version Nomad 8.01 Zaxcom Nomad Sound bag audio redefined 1 KNOW YOUR NOMAD... 7 FRONT PANEL... 7 LEFT SIDE... 9 RIGHT SIDE... 11 REAR... 12 HOME SCREEN / METERS...
TRAKTOR DJ Studio 2 Quick Reference. Welcome... The TRAKTOR Panels
 Welcome... TRAKTOR DJ Studio 2 Quick Reference...to TRAKTOR DJ Studio 2, the latest and most advanced version of the software that changed the way DJs think about computers. We ve introduced a number of
Hindenburg Journalist Guide - Windows
 Hindenburg Journalist! 1 Hindenburg Journalist Guide - Windows Introduction! 4 Overview! 5 Menu Bar! 5 Tool Bar! 5 Tracks! 5 Workspace! 5 Transport bar! 6 QPPM Meter & Counter! 6 Clipboard! 6 Favorites!
K-framework 2 User Guide English
 K-framework 2 User Guide English System requirements Operating System: Windows XP / Vista / 7 / 8 / 10 CPU: Intel Pentium Dual Core Memory: 2 GB 1 TABLE of CONTENTS 1. software installation and settings...
High Resolution Digital Audio Recorder User Guide and Technical Information rev. 1.15
 722 High Resolution Digital Audio Recorder User Guide and Technical Information rev. 1.15 1.8" HDD 2.5" HDD Sound Devices, LLC 300 Wengel Drive Reedsburg, WI USA +1 (608) 524-0625 fax: +1 (608) 524-0655
Controlling the JBL Professional DSC260 System Controller Using SIA-Smaart Pro
 Controlling the JBL Professional DSC260 System Controller Using SIA-Smaart Pro SIA Software Company, Inc. an EAW Company The SIA-Smaart Pro Real-Time module can control crossover and delay functions on
The Nagra VI Six channel digital audio recorder Digital Location Recorder
 The Nagra VI Six channel digital audio recorder Digital Location Recorder Features 6 channels (4 Mic + 2 Line) 24 bit, 96 khz AD / DA Post-production compatible (BWF files)(ixml compatible) SMPTE / EBU
Software Revision 1.13
 Software Revision 1.13 OVERVIEW...1 REAR PANEL CONNECTIONS...1 TOP PANEL...1 MENU AND SETUP FUNCTIONS...3 CHOOSE FIXTURES...3 PATCH FIXTURES...4 PATCH CONVENTIONAL DIMMERS...4 COPY FIXTURE...5 LOAD FIXTURE
Keyboard Shortcuts & Hints
 K Service Source Keyboard Shortcuts & Hints System 7.5 Keyboard Shortcuts & Hints Introduction - 1 Introduction This document presents many key combination shortcuts that will increase your productivity
744T. High Resolution Digital Audio Recorder with Time Code User Guide and Technical Information rev. 1.15
 744T High Resolution Digital Audio Recorder with Time Code User Guide and Technical Information rev. 1.15 1.8" HDD 2.5" HDD Sound Devices, LLC 300 Wengel Drive Reedsburg, WI USA +1 (608) 524-0625 fax:
Waves GTR3 ToolRack Manual
 Waves GTR3 ToolRack Manual Waves GTR ToolRack Manual 1 TABLE OF CONTENTS CHAPTER 1 INTRODUCTION...3 1.1 WELCOME...3 1.2 PRODUCT OVERVIEW...3 1.3 COMPONENTS...4 1.4 AUTOMATION...4 MIDI Automation...4 CHAPTER
ADR Standard Procedure (Revised 3/09)
") ADR Standard Procedure (Revised 3/09) (All personnel performing ADR on DMA projects should follow this prescribed procedure in order to ensure optimum quality of results and to maintain consistency across
ADR Standard Procedure (Revised 3/09) (All personnel performing ADR on DMA projects should follow this prescribed procedure in order to ensure optimum quality of results and to maintain consistency across
CL series Live Recording with Nuendo Live. Using Steinberg Nuendo Live
 CL series Live Recording with Nuendo Live Using Steinberg Nuendo Live 2nd Edition: April 2013 Summary: This guide will show how quick and easy it is to achieve a high quality, live multi-track recording
GETTING STARTED WITH THE SADIE LRX2
 2 GETTING STARTED WITH THE SADIE LRX2 CONNECTING THE LRX2 Your LRX2 will be supplied with a USB2 (A to B) cable, and a 12V DC power supply (PSU), with a mains plug appropriate to your geographical location.
-You will need to provide 2 AA batteries and an SD card to use the recorder.
 ZOOM H4N - USER GUIDE SETTING UP: -You will need to provide 2 AA batteries and an SD card to use the recorder. -The batteries go into the compartment on the back of the recorder. If you turn the switch
K2 Dyno S. Replay Controller. User Manual. Software Version
 K2 Dyno S Replay Controller User Manual Software Version 3.1 071-8909- 00 20130719 K2 Dyno S Replay Controller User Manual Software Version 3.1 071-8909- 00 20130719 Contents Introduction...9 What is
USER MANUAL. Published May 2016 Software Version Nomad 7.81 Touch 86.07
 USER MANUAL Published May 2016 Software Version Nomad 7.81 Touch 86.07 interstage Phistersvej 31, 2900 Hellerup, Danmark Telefon 3946 0000, fax 3946 0040 www.interstage.dk - pro audio with a smile Nomad
DER OTO. With this firmware revision, you can use your Biscuit as a standard one (Revision 1.2) or as Der OTO.
 or as Der OTO.") User Manual Rev 2.3 February 2012 1 DER OTO PRESENTATION Der OTO is the new Biscuit firmware (revision 2) and turns your Biscuit into a monophonic synth. You can play Der OTO with a standard MIDI keyboard,
User Manual Rev 2.3 February 2012 1 DER OTO PRESENTATION Der OTO is the new Biscuit firmware (revision 2) and turns your Biscuit into a monophonic synth. You can play Der OTO with a standard MIDI keyboard,
AEQ CAPITOL SCREEN USER S MANUAL ED. 04/18 Firmware Version: PBA Base CPU v1.73 or higher Software Version: AEQ CAPITOL SCREEN v1.
 USER S MANUAL ED. 04/18 V. 1.0-26/04/2018 Firmware Version: Software Version: PBA Base CPU v1.73 or higher v1.31 or higher CONTENTS 1. INSTALLING AND RUNNING THE APPLICATION.... 3 1.1. Installation. System
PXR 1506 / WATT MIXER AMPLIFIER
 PXR 1506 / 1508 150-WATT MIXER AMPLIFIER Operating Manual www.peavey.com ENGLISH PXR 1506 / 1508 150-Watt, 8-Channel Mixer Amplifier Designed with the latest Peavey technology, the PXR 1506 / 1508 powered
Setup and Configuration
 Setup and Configuration OmniStream TM Solution Guide OmniStream Atlona Setup Guide Version Information Version Release Date Notes 1 02/19 Initial release 2 03/19 Audio added 3 03/19 USB added OmniStream
soothe audio processor
 soothe audio processor Manual Thank you for using soothe! soothe is a spectral processor for suppressing resonances in the mid and high frequencies. It works by automatically detecting the resonances in
788T USB. High Resolution Digital Audio Recorder with Time Code User Guide and Technical Information for 788T and 788T-SSD Recorders Version
 788T High Resolution Digital Audio Recorder with Time Code User Guide and Technical Information for 788T and 788T-SSD Recorders Version 3.00 Sound Devices, LLC E7556 State Rd. 23 and 33 Reedsburg, WI USA
Operation Manual. You must read the Usage and Safety Precautions before use ZOOM CORPORATION
 Operation Manual You must read the Usage and Safety Precautions before use. 2018 ZOOM CORPORATION Copying or reprinting this manual in part or in whole without permission is prohibited. Product names,
WAVES CLA UNPLUGGED USER GUIDE
 WAVES CLA UNPLUGGED USER GUIDE Table of Contents Chapter 1 Introduction...3 1.1 Welcome...3 1.2 Product Overview...3 1.3 Concepts and Terminology...4 1.4 A Few Words from CLA...4 1.5 Components...5 Chapter
Here's a summary of the SONAR features you can control from the Mackie Control:
 Page 1 of 37 Mackie Control Surfaces Help Working with the Mackie Control Configuring XT Units Mackie Control C4 Working with the Mackie Control When you install SONAR, you also install special software
V3.1 Supplementary Manual
 This supplementary manual explains mainly the functions that have been added or changed in QL5/QL1 firmware V3.1. Use it in conjunction with the QL5/QL1 V3 Owner's Manual and Reference Manual. EN Contents
Quick Reference Guide to the Sony I & II MiniDV Camera
 I. CAMERA MODE / VTR MODE Quick Reference Guide to the Sony I & II MiniDV Camera BE CAREFUL WHEN INSERTING AND EJECTING TAPES FROM THE CAMERA. FOLLOW ALL LABELS ON THE CAMERA ITSELF AND THESE DIRECTIONS.
CL-12 Linear Fader Controller for the 688. User Guide
 CL-12 Linear Fader Controller for the 688 User Guide Legal Notices Product specifications and features are subject to change without prior notification. Copyright 2015 Sound Devices, C. All rights reserved.
High Resolution Digital Audio Recorder User Guide and Technical Information firmware rev. 2.00
 722 High Resolution Digital Audio Recorder User Guide and Technical Information firmware rev. 2.00 1.8" HDD 2.5" HDD Sound Devices, LLC 300 Wengel Drive Reedsburg, WI USA +1 (608) 524-0625 fax: +1 (608)
CHANGING VIEWS AND SCREEN MODES
 In Lightroom 4 it is possible to edit the keyboard shortcuts and assign your own shortcuts or change or replace existing shortcuts. This list is based on the default shortcuts for Lightroom 4. NAPP members
Operating Manual. Genelec Loudspeaker Manager GLM 2.0 System
 Operating Manual Genelec Loudspeaker Manager GLM 2.0 System 1 Genelec SAM GLM 2.0 System Operating Manual page 2 of 39 Table of Contents Introduction... 4 Glossary... 5 System Components... 6 SAM Monitors...
WAVES BASS RIDER USER GUIDE
 WAVES BASS RIDER USER GUIDE TABLE OF CONTENTS Chapter 1 Introduction...3 1.1 Welcome...3 1.2 Product Overview...3 1.3 Concepts and Terminology...4 1.4 Components...5 Chapter 2 Quick Start Guide...6 Chapter
Zaxcom Deva User s Manual TABLE OF FIGURES TABLE OF TABLES... 18
 Zaxcom Deva User s Manual Table of Contents TABLE OF FIGURES... 17 TABLE OF TABLES... 18 CHAPTER 1 INTRODUCTION... 19 OVERVIEW... 19 USER MANUAL CONVENTIONS... 19 SYSTEM FEATURES... 19 Deva-5.8 Specific...
Installation (Mac) Contents. Introduction. Installation (Windows) System Requirements
 Contents. Introduction. Installation (Windows) System Requirements") USER GUIDE V1.0 2004 Focusrite Audio Engineering Ltd. Disclaimer: FOCUSRITE, the FF Logo, LIQUID CHANNEL, LIQUID TECHNOLOGY, LIQUIDCONTROL, EVERYONE NEEDS LIQUID, and the LIQUID CHANNEL Logo are trademarks
USER GUIDE V1.0 2004 Focusrite Audio Engineering Ltd. Disclaimer: FOCUSRITE, the FF Logo, LIQUID CHANNEL, LIQUID TECHNOLOGY, LIQUIDCONTROL, EVERYONE NEEDS LIQUID, and the LIQUID CHANNEL Logo are trademarks
OPERATING INSTRUCTIONS AND REFERENCE MANUAL NAGRA-VI
 OPERATING INSTRUCTIONS AND REFERENCE MANUAL NAGRA-VI NAGRAVISION SA, Kudelski Group, Rte. de Génève 22, 1033 Cheseaux, Switzerland. Tel :+41 21 732 0101 Web : www.nagraaudio.com e-mail: audio_pro@nagra.com
ACN Antenna: for wireless sync with other Lockits. Lemo Connector: TC (and metadata) interface. Status LED. Green Button Red Button Power Button
 interface. Status LED. Green Button Red Button Power Button") QUICK START GUIDE QUICK START GUIDE Explanation Green Button Red Button Power Button Lemo Connector: TC (and metadata) interface ACN Antenna: for wireless sync with other Lockits Status LED Micro USB:
QUICK START GUIDE QUICK START GUIDE Explanation Green Button Red Button Power Button Lemo Connector: TC (and metadata) interface ACN Antenna: for wireless sync with other Lockits Status LED Micro USB:
633 Field Production Mixer with Integrated Recorder. User Guide
 633 Field Production Mixer with Integrated Recorder User Guide Legal Notices Product specifications and features are subject to change without prior notification. Copyright 2017 Sound Devices, C. All rights
WAVES CLA BASS USER GUIDE
 WAVES CLA BASS USER GUIDE Table of Contents Chapter 1 Introduction...3 1.1 Welcome...3 1.2 Product Overview...3 1.3 Concepts and Terminology...4 1.4 A Few Words from Chris...4 1.5 Components...5 Chapter
Chapter 3 Operating instructions
 Chapter 3 Operating instructions Summary This chapter describes the how to control and navigate through the TVR 30 s menus and options. Content Control interfaces 10 Controlling the TVR 30 10 Front panel
Version 2.0 Supplementary Manual
 Version 2.0 Supplementary Manual 2015 ZOOM CORPORATION Copying or reprinting this manual in part or in whole without permission is prohibited. Contents Contents Functions added in Version 2.0 Quickly adjusting
NAGRA VI Six-track digital recorder
 NAGRA VI Six-track digital recorder Swiss Made Nagra next generation technology The best specs ever for pure audio quality Reliable technology The NAGRA VI has been designed for professional use as an
K-framework 2 User Guide English
 K-framework 2 User Guide English System requirements Operating System: Windows XP / Vista / 7 / 8 CPU: Intel Pentium Dual Core Memory: 2 GB 1 TABLE of CONTENTS 1. software installation and set up... 4
AUDIO MANAGEMENT CONTROLLER (AMC) MANUAL
 MANUAL") AUDIO MANAGEMENT CONTROLLER (AMC) MANUAL Page 1 Description The Blue Sky Audio Management Controller (AMC) is an 8-channel audio DSP platform with both 24-bit digital and analog I/O. Each channel of the
AUDIO MANAGEMENT CONTROLLER (AMC) MANUAL Page 1 Description The Blue Sky Audio Management Controller (AMC) is an 8-channel audio DSP platform with both 24-bit digital and analog I/O. Each channel of the
Aaton Cantar-X1&2. tarkan the cantar mirror
 p.1 tarkan the cantar mirror s o f t w a r e v 2. 1 4 l t c t r i g g e r e d r e m o t e. r o l l p. 1 8 t h e m a g i c a u t o. s l a t e p. 2 2 m i c d i r e c t t o t r a c k 7 p. 2 6 w i l d & a
Chapter 3 User Interface Basics
 Chapter 3 User Interface Basics Mode Buttons Navigation The Display Chapter 3 will show you how to get around the front panel of your K2500. Your interactions can be divided into three primary operations:
StepPolyArp Unit. Step Polyphonic Arpeggiator / Sequencer App & Audio Unit MIDI effect for ios
 StepPolyArp Unit Step Polyphonic Arpeggiator / Sequencer App & Audio Unit MIDI effect for ios Presentation... 1 Application setup... 2 MIDI connections between ios applications... 2 MIDI over WiFi on macos...
M2DIS. User Manual.
 M2DIS User Manual www.audac.eu 2 Index Introduction 4 Caution servicing 4 User interface 5 Login screen 5 Main screen 6 Output settings 8 Test signals 10 Sound settings 11 Settings screen 12 Input Configuration
Recording. The Mixing Desk. Overview the Soundtrack Pro workspace
 Drama Sound Studios Using Soundtrack Pro 3 (v.03 updated 18 November 2010) You cannot use this system without training and a username. These notes are designed to remind you what you were shown in training.
The Fundamentals. Document Basics
 3 The Fundamentals Opening a Program... 3 Similarities in All Programs... 3 It's On Now What?...4 Making things easier to see.. 4 Adjusting Text Size.....4 My Computer. 4 Control Panel... 5 Accessibility
PowerShare Editor User's Guide. Version 2.0
 PowerShare Editor User's Guide Version 2.0 08.01.2017 Table of Contents Table of Contents 2 Introduction 5 Install PowerShare Editor 6 Minimum System Requirements 6 Installation Steps 6 Windows Display
Location Sound Recorder. Operations Manual
 Location Sound Recorder Operations Manual Version 1.01 February 2004 PORTADRIVE KEY FEATURES Rugged, all in one, portable 8-channel hard disk (HD) audio recorder 3 comprehensively equipped 6-into-2 digital
Preliminary USER MANUAL mymix CONTROL. Version 1.51
 Preliminary USER MANUAL mymix CONTROL Version 1.51 Remote Configuration and Editing Software mymix CONTROL operates on web browsers and allows you to control individual parameters of mymix devices as well
688 Field Production Mixer with Integrated Recorder and MixAssist. User Guide
 688 Field Production Mixer with Integrated Recorder and MixAssist User Guide Legal Notices Product specifications and features are subject to change without prior notification. Copyright 2017 Sound Devices,
Sony HDR-FX1 Consumer Camcorder vs. Sony HVR-Z1U HDV Professional Camcorder
 Sony HDR-FX Consumer Camcorder vs. Sony HVR-ZU HDV Professional Camcorder Sony HDR-FX Consumer Sony HVR-ZU Professional 60i / 50i switchable White Balance HyperGain Setup Level Select Date Record CinemaTone
744T. High Resolution Digital Audio Recorder with Time Code User Guide and Technical Information firmware rev. 2.10
 744T High Resolution Digital Audio Recorder with Time Code User Guide and Technical Information firmware rev. 2.10 1.8" HDD 2.5" HDD Sound Devices, LLC 300 Wengel Drive Reedsburg, WI USA +1 (608) 524-0625
Quick Installation Guide
 Quick Installation Guide For Bundles Featuring the QC4098 or QC4096 Network DVR 8 and 6 Channel H.64 Compression All-in-One DVRs with Variable CIF and D Recording Options PART - PACKAGE CONTENTS QC4098
NAGRA VI Eight-track digital recorder
 NAGRA VI Eight-track digital recorder Swiss Made Nagra next generation technology The best specs ever for pure audio quality Reliable technology The NAGRA VI has been designed for professional use as
LSMCONNECT VIDEO TUTORIAL
 LSMCONNECT 2.7.1 VIDEO LSMCONNECT VIDEO VOICE OVER 1. Introduction Welcome to the LSM Connect tutorial. The aim of this tutorial is to introduce the LSM Connect and describe its main operations. The LSM
Introduction to Using the Canon VIXIA HFM31
 Introduction to Using the Canon VIXIA HFM31 Video Formats and Approximate Record Times Memory è Recording Mode ê MXP (High- quality) 24 Mbps 1920 x 1080 resolution; 30 fps FXP (High- quality) 17 Mbps 1920
SwitchMan Quartet. Preliminary User s Guide. Dec. 08, 2000 Firmware revisions: Main v1.3, Remote v1.1
 SwitchMan Quartet Preliminary User s Guide Dec. 08, 2000 Firmware revisions: Main v1.3, Remote v1.1 Table of Contents SwitchMan Quartet... 1 Table of Contents... 2 1. Product Brief... 3 Product changes
SYNAPSE. High Channel Density Networked Audio Interfaces AES67. Common Features DM 1. D32 o. D32 i. Product Family Overview. Applications.
 High Channel Density Networked Audio Interfaces Product Family Overview Product The Synapse product family adds high performance, high channel density analog and digital audio connectivity, monitoring
WNS Waves Noise Suppressor
 WNS Waves Noise Suppressor Table of Contents Chapter 1 Introduction... 3 1.1 Welcome...3 1.2 Product Overview...3 1.3 Concepts and Terminology...4 1.4 Components...5 Chapter 2 Quick Start Guide... 6 Chapter
NETWORK THE HOME 10 FOLDERS APPS
 NID-7006 NAXA NID Tablet User s Guide Table of Contents GETTING STARTED 4 CONNECTING TO A WIRELESS NETWORK 4 USING THE TOUCHSCREEN 4 USING THE HOME SCREENS 5 USING THE NAVIGATION ICONS 6 USING THE ALL
GANG STOMPS. user manual
 GANG STOMPS user manual loops de la Crème - Feb 2017 1 Thank you for purchasing GANG STOMPS! This Kontakt library lets you easily play and control a group of 24 musicians stomping together in a room with
MV360 User Manual. MV360 User Manual 1
 MV360 User Manual MV360 User Manual 1 Table of Contents Chapter 1 Introduction... 3 1.1 Welcome...3 1.2 Product Overview...3 1.3 Concepts and Terminology...3 High Level Compressor...4 Link Modes...4 Dither...5
QUICK-START GUIDE ROLAND DJ-808
 QUICK-START GUIDE ROLAND DJ-808 Installation and Setup The Roland DJ-808 requires drivers for both Windows and MacOS operating systems. IMPORTANT NOTE: Please ensure you have the latest available drivers
3. Suggested Use and Configurations Multiple Computers with a Single DiGiGrid M... 11
 D Table of Contents Introduction...4 1. GETTING STARTED...5 1.1 System Requirements...5 1.2 Registration...5 1.3 Software Installation...5 1.4 Licenses...6 2. Hardware...7 3. Suggested Use and Configurations...8
The first time you open Word
 Microsoft Word 2010 The first time you open Word When you open Word, you see two things, or main parts: The ribbon, which sits above the document, and includes a set of buttons and commands that you use