High Quality 24-bit 192kHz 4x4 reference audio interface with swappable I/O socket. User s Guide
|
|
|
- Rosa Baker
- 5 years ago
- Views:
Transcription

1 High Quality 24-bit 192kHz 4x4 reference audio interface with swappable I/O socket User s Guide
2 - Copyright 2004, 2005, 2006 Revision 5, November
3 INDEX 1. Introduction... 5 Key Features Description of... 6 * TIP. How to swap the Connectors? Hardware Installation System Recommendation Minimum System Requirement Preparation for Hardware Installation Driver Installation PC Macintosh Console PC Pull down Menu Input Panel Output Panel Sample Rate and Clock Macintosh Pull down Menu Block Diagram Setting in Applications PC Windows Multimedia setup Tracktion Cubase Cakewalk SONAR Wavelab Giga Studio (v or higher) Macintosh Audio MIDI setup Cubase SX Tracktion Tassman ESI
4 5. DSP Quattro SE DirectWIRE 3.0 (PC only) Specifications General Information Trademarks The FCC and CE Regulation Warning Correspondence Disclaimer
5 1. Introduction Congratulations on your purchase of by ESI High Quality 24-bit 192kHz 4x4 reference audio/midi interface with swappable I/O socket. is the perfect reference audio interface for home studio recording applications. This audio card provides support for 24-bit 192kHz on 2 analog input and 2 analog output channels with a special swappable I/O socket. You can choose between 10 dbv RCA type unbalanced I/O and +4 dbu quarter inch TRS balanced I/O - depending on your requirement. Others features are S/PDIF input clock detection, auto sync and individual real time monitoring support for analog and digital input signals. provides 24bit 192kHz coaxial digital I/O and a 24-bit 96 khz optical output, 16 channel MIDI I/O and an EWDM driver with DirectWIRE 3.0 functionality. Key Features - Depending on the I/O requirements, the user can select between balanced (+4dBu nominal) and unbalanced (-10dBV nominal) connectors (both cannot be used simultaneously). - S/PDIF digital signal input clock detection - Shutter type optical output jack - DirectWIRE 3.0 (PC only) - 4x4 up to 24-bit/192kHz, full-duplex recording interface with MIDI I/O - Universal Board (compatible for both of 3.3V and 5V PCI slots) - Independent monitoring control for analog in, digital in and digital out signals - 16 Channel MIDI I/O channel Digital Pass thru - Supports EWDM driver: MME, DirectSound, ASIO 2.0 and GigaStudio support - OS: Microsoft Windows XP/2000/ME/98SE, Mac OS 10.2 or better 5
 and unbalanced (-10dBV nominal RCA) connectors (both cannot be used simultaneously). 3.")
6 2. Description of Here is a short description of s connectors Analog Inputs 1/2 (top) and Analog Outputs 1/2 (bottom) These are analog Line inputs and outputs. Depending on the your requirements, you can select between balanced (+4dBu nominal TRS) and unbalanced (-10dBV nominal RCA) connectors (both cannot be used simultaneously). 3. Breakout cable connection This port allows you to connect s breakout cable. 4. S/PDIF Optical Output This port allows you to transfer s audio data digitally without loss, directly to devices like a DAT, MD, CD-recorder with digital input. The optical output sends out signals from output channel 3/4 ( 3/4 ) from your audio applications. The maximum sample rate for the optical output is 96kHz. 6
7 5. breakout cable The PCI card comes with a special breakout cable. This cable provides 24bit/192kHz coaxial inputs and outputs and 16 MIDI I/O channels. The coaxial I/O port sends and receives the signals from channel 3/4 ( 3/4 ) from your audio applications. These coaxial connectors fully support up to 192 khz. 7


8 * TIP. How to swap the Connectors? The following example shows you how to change from RCA I/O to TRS I/O connectors. Usually you change the setup of the card once before you install it and before you start to use it (both I/O connector types cannot be used simultaneously). 1. First, follow the order of the pictures below to remove the 4 screws carefully. (Pic 1) (Pic 2) (Pic 3) (Pic 4) 8


9 2. Detach the metal bracket from the card. 3. Hold the edges of the card and carefully separate the PCI card like shown on this picture. Caution: Don t touch the chipsets on the card like shown on the following picture. Otherwise the card could be damaged. 9


10 4. Turn the TRS connector parts toward to the bracket. Hold the edges of the card and carefully combine PCI card like shown on the pictures below. 10


11 5. Put the metal bracket to the card. 6. Tighten screws again (in opposite order). 11
12 3. Hardware Installation 1. System Recommendation is not simply a standard digital audio interface card, but a high-resolution device capable of advanced processing of audio content. Even though is built to have low-cpu resource dependability, system specifications play a key part in the s performance. Systems with more advanced components are generally recommended. Minimum System Requirement PC - Intel Pentium III CPU or equivalent CPU - Motherboard with Pentium III support (ex: Intel 815 / 845 / 865 / 875, VIA694 / KT133 / KT266 / KT333 / KT600, etc.) - At least 256MB of RAM - One available PCI slot - Microsoft Windows 98SE/ME/2000/XP operating system - Hard Driver supporting UDMA 66/100 and 5400rpm - Active speakers or speakers with powered amplifier Mac - Mac OS 10.2 or higher only - Macintosh with G3 or better processor - One available PCI slot - At least 256MB of RAM - Active speakers or speakers with powered amplifier 12
13 2. Preparation for Hardware Installation The and other components in the computer could easily be damaged by electrical shocks. You should use an anti-static device that can discharge the static electricity of your body to avoid potential static damage to the cards. The card is shipped in an anti-static plastic pouch to protect it from static electricity - do not open the pouch before you install the card. 1. Turn off the computer power and remove the power cable from your computer power supply. Figure 1. Disconnecting the Power Cord 2. Refer to your computer user s manual and remove the computer cover. Make sure that you have an available PCI slot on your motherboard to install the. Figure 2. Removing the computer cover To avoid possible static shock damage to the computer parts, discharge it by touching the computer case or something grounded. We recommend you use an anti-static device such as an anti-static wristband. When holding the card, touch only the guide or the edge of card. Do not grab the card by the board or connector. 3. Find an empty PCI slot on the motherboard 13
14 Figure 3. Typical PC Motherboard Slot Configuration Figure 4. Removing the PCI Slot faceplate If the PCI slot is covered by a faceplate, you can remove it by removing the screw holding it in place or by prying it off with a screwdriver. Insert the card into the PCI slot, firmly pushing the card into the slot until it is seated securely. Replace the screw, and tighten it. Figure 5. Installed in a PCI slot 4. Close the computer case. 14

15 4. Driver Installation 1. PC After completing the hardware installation for, you need to install its driver software to use it. The software installation is not very complicated, even for computer beginners. Just follow the steps below and you will complete it without hassle. The installation steps under Windows 98SE, Windows ME, Windows 2000 and XP are a little bit different from each other. The installation procedure below was written for Windows XP. However, the driver installation procedure is similar in other Windows version. * Caution: Depend on your operating system, you may need your Windows install CD. Please prepare your Windows installation CD before the installation procedure begins. * Caution: Because of the driver characteristic, installs several drivers and in some cases continuously tries to reboot your system. Unless the driver installation is completely finished until the system does not detect any new devices, DO NOT reboots the system. After the drivers are installed completely, restart your computer. 1 Turn on the main power of your computer. Windows will automatically detect that a new device has been installed and shows the Found New Hardware Wizard. Choose Install from a list or specific location and click next. 2. Choose Search for the best driver in these locations and Specify the location of the driver. Insert the provided Driver CD into the CD-Rom drive and select Include this location in the 15

16 search and click Browse to find the accurate location of the driver. Then confirm your selection with Next >. 16
, so it is safe to use it. 4.")
17 3. On Windows 2000 and XP, there might appear a message about the Windows Logo test. You can simply ignore it and just select Continue Anyway. Even if Windows displays this message, the driver is completely tested and verified by us (ESI), so it is safe to use it. 4. controller driver will be installed. 17

18 5. Windows will automatically install the Audio driver now, with the same procedure. 18

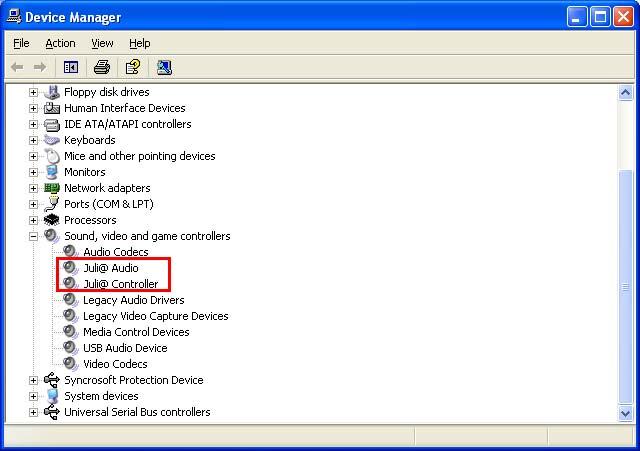
19 When your system keeps asking restart the computer, just ignores that and continue to install. When all the necessary device drivers are installed and the system is not asking you to install any further drivers, restart the computer. 6. Checking your system. After you restart Windows, please confirm if the ESI icon is on the system tray. Go to My computer -> Console -> System -> Device Manager. Check the devices under Sound, video and game controllers, if they are installed correctly. 19
20 20


21 2. Macintosh 1. After completing the hardware installation for, you need to install its driver software to use it. Drag "ESI192Driver dmg" from your driver CD:\ESI\\MAC directory to the Macintosh. 2. Double click "ESI192Driver dmg" file to expand the file. Then, Open "ESI192Driver " and double click the.pkg file inside. 3. Doubleclicking on the "ESIAudioDriver pkg" file launches the driver installation. You can see the ESIAudioDriver installer. Select the Continue button. 4. Select Continue again on the Read Me tab. The Select a Destination screen will appear. Please select the destination disk to install the drivers. You should use the same volume that you use for the system installation. Usually this volume is called Macintosh HD. Then select Continue button. 21

22 5. Please follow the instructions on screen. Then select Continue button. 6. The Authenticate windows will appear. Then please enter your Password and select OK button. Then you can see also restart information window. And select Continue Installation button for driver installation. Then files are now copied to your system. 22


23 7. After the software has been installed you must select the Restart button. 8. After the reboot, you can find the Ego Systems Control icon in the Applications directory of your HDD. It is the main control panel of. 23

24 5. Console 1. PC After you completed the hardware and driver installation for, you need to learn about the Console. This console allows you to control your setup for. is built for easy usage. All input and output controls in the console software are the same. So, if you learn about one control, you can use the others easily. After successfully installing s hardware and driver, you can see the ESI logo icon on the system tray. It is the icon and clicking on this icon will launch the console. 1. Pull down Menu The console includes a pull down menu bar that contains the configuration menus for. 24

25 1. File - Exit File Exit will close the Console window but it will not shut down the Console. You can always launch the Console by clicking ESI icon on the system tray. 2. Config Mouse Wheel Controls the increment at which the volume is adjusted when using a mouse wheel. The adjustment step is from 1 to Config Latency Adjust the latency (also often referred as buffer size) of the. A faster latency is achieved by selecting smaller sample size which is ideal for software synthesizer and precise timing recording. However, the latency is also limited by your system performance. For recording, select a sample size between 64 ~ 512, and select 128 or 256 for Pentium 4 systems. Sample sizes of 48, 1024 and 2048 are used in special circumstances of which 48 is reserved for very fast and reliable ASIO driver working environments. The factory default setting is Config Factory Default It resets the Console to default settings. 5. Config - Always On Top This enables to place the Console on top of every open window, which makes it easy to work with and other music software simultaneously. 6. Config - Link Links the L-R faders for stereo operation. Un-select the button, if you need to control the left and right levels independently. 25
.")
26 7. DirectWire (explained later in detail) 2. Input Panel Analog Input 1/2 This is where you can adjust the input monitoring level for the analog input 1/2. When you active MON button of 1/2, the input monitoring level fader appears (displayed on the right picture). Now the analog input signal is routed to output 1,2 and you can monitor (listen to) the analog input signal in real-time. The monitoring level can be set using the mouse, mouse wheel, or cursor keys. S/PDIF Input This is where you can adjust the input monitoring level of the S/PDIF input. When you active the MON button of S/PDIF, the input monitoring level fader appears (displayed on the right picture). The S/PDIF input signal is then routed to output 1,2 and you can monitor the S/PDIF input signal in real-time. The monitoring level can be set using the mouse, mouse wheel, or cursor keys. MON When you activate this button, input monitoring (for monitoring via the analog output 1,2) level fader will appear for this channel. MUTE Select this button to mute each signal source. 26

.")
27 3. Output Panel Analog Output 1/2 This is where you can control the output signal. The level can be set using the mouse, mouse wheel, or cursor keys. S/PDIF Out This is where you can adjust output-monitoring level of the S/PDIF out/playback signal. When you active MON button of S/PDIF Out, the S/PDIF output level fader will appear (displayed on the next picture). Now the S/PDIF out/playback signal will be routed to the analog output 1/2 and you can listen to the signal via the analog output in real-time. The monitoring level can be set using the mouse, mouse wheel, or cursor keys. 27
28 MASTER FADER Allows you to change the level of the final output signal. The level can be set using the mouse, mouse wheel, or cursor keys. MUTE Select this button to mute each signal source. 4. Sample Rate and Clock Sample Rate Selects the sample rate for. The green lit will indicate current sample rate. supports 44.1, 48, 88.2, 96, 176.4, 192 (khz) as sample rates. Select AUTO to match the sample rate of the played audio source automatically (a red light shows that AUTO is on). Deselecting Auto mode allows you to set the sample rate manually (red light AUTO is off). Clock Select Selects the digital clock source for the. (INT): Selects s internal clock, which becomes the master clock. This mode must be selected when is used alone or any other digital device is configured as slave device. (EXT): Selects the digital clock or audio data from an external device as the clock source. The external device will be set as the Master device and the will be set and operate as the Slave device. * In the EXT clock mode, can detect the external clock automatically. If the external clock is not correct, the Console displays the message Out Of Range like shown below. 28

29 2. Macintosh After you completed the hardware and driver installation for, you need to learn about the Ego Systems Control utility for which allows you to control the settings of the hardware. The software is built for easy usage. All input and output controls for each channel in the panel are similar. So, if you know how to control one channel, you can do that for the other channels easily as well. 1. Pull down Menu Ego Systems Control About: Ego System Control version information. Configuration Arrow key: Defines how much you can move the sliders (±1.4dB to ±12.0dB) with arrow keys. Clock Source: Allows you to select the master clock source. Sample Rate: You can select the sample rate for, the supported rates are 44.1, 48, 88.2, 96, 176.4, and 192 (khz) Cards : Normally you can select only, however if you have installed another ESI PCI card, then you can choose the card which you want to control. When you select an entry, the control panel will be displayed: You can control input and output level via the faders. The link check box allows you to control the left and right audio channels simultaneously or independently. 29

30 5. Block Diagram 30

31 6. Setting in Applications This chapter contains basic configuration examples for some popular software applications. Please also refer to the manual of every audio software you use for detailed information. 1. PC 1. Windows Multimedia setup The Windows Multimedia setup is required if you want to use as the main sound device for Windows multimedia applications. Go to My computer-> Console -> Sounds and Audio Device Properties -> Audio. Select the driver as your playback device. Ch12 needs to be selected to use the analog input or output. Ch34 needs to be used to use the S/PDIF I/O. 31
32 2. Tracktion comes bundled with Tracktion. In Tracktion, select Settings then go to the audio devices tab. Choose as Playback and Record device. You can use Tracktion as ASIO or MME/Direct sound application. 32


33 3. Cubase After launching Cubase, go to Device -> Device Setup -> VST Multitrack. Select ASIO 2.0 as ASIO device. Then go to Default MIDI Ports and select MIDI. Note: clicking ASIO Control Panel will not do anything here. Make sure you click the Apply button after changing the settings. 33
34 4. Cakewalk SONAR There are few steps to configure SONAR, which supports either WDM or ASIO drivers. After launching SONAR, go to Options > Audio 1. WDM/KS mode Change the settings as shown below. 34


35 The input and output drivers have to matching each other. Restart SONAR after the settings have changed. 2. ASIO mode *SONAR 2.2 and newer supports ASIO. With, ASIO is recommended instead of WDM when you use SONAR. First, change the Driver Mode to ASIO on the Advanced tab of as shown below. Then, restart SONAR. Then, change the settings as shown below. 35

36 *Warning: Enabling SONAR s software Input monitoring may introduce feedback loops. You MUST disable/mute input monitoring before using SONAR s software input monitoring. 36

 After launching GIGASTUDIO, select Settings")

37 5. Wavelab After launching Wave Lab, go to Options -> Preference -> Audio Card. Select either MME- WDM 1- Ch12 or ASIO Giga Studio (v or higher) After launching GIGASTUDIO, select Settings from the menu on the left. On the right section, select -GSIF for the hardware. Also, make sure to use the same sample rate and bit depth as in your sequencer software. 37


38 2. Macintosh 1. Audio MIDI setup You can find AudioMIDI Setup on your HDD in the Applications\Utilities directory. It is a basic application for audio input, output and MIDI configuration. Select ESI device as the default audio input/output device as shown below. 2. Cubase SX After launching Cubase, go to Device Setup -> VST Multitrack. Select ESI as ASIO Driver for ASIO driver. 38


39 3. Tracktion We provide Traction as bundle software. In Tracktion, select Settings then audio devices tab. Choose ESI as Output and Input Device. 4. Tassman ESI We provide Tassman ESI as bundle software. In Tassman ESI, select Preferences then you can setup Audio Settings and MIDI Settings. Choose ESI as Audio and MIDI device. 39


40 5. DSP Quattro SE We provide i3 S.r.l s DSP-Quattro as bundle software. In DSP-Quattro, select Option then Audio setting. Choose ESI as Playback and Record device. 40

41 7. DirectWIRE 3.0 (PC only) 1. What is DirectWIRE? DirectWIRE is a 100% purely digital wire! DirectWIRE is a driver technology, developed by ESI, which can be used for routing audio streams internally within applications using EWDM Audio MIDI Drivers exclusively developed by ESI. With the DirectWIRE router, an application can record from other application s audio outputs without external wiring or any loss of data when they are running at the same time. DirectWIRE also allows you to easily rip any audio stream in real time by transferring data thru DirectWIRE from MP3s, live On-line Broadcast and On-demand content, and more. 2. DirectWIRE Panel Click on DirectWIRE on the console. The DirectWIRE panel window as shown below will appear. DirectWIRE digital virtual wiring technology, developed by ESI, routes audio streams internally within applications using standard audio drivers such as WDM, ASIO and MME, even when they are running at the same time. The number on the row represents the input or output port. The columns represent ins and outs (on and off) of the respected drivers. Patch the virtual cables from one point to another as you drag your mouse point. INPUT section is a new feature of DirectWIRE 3.0. It's used to route signals from the card's hardware inputs. With, INPUT 1 and 2 are identical to the left and right channels of the analog input signal. INPUT 3 and 4 are the left and right channels of the digital input. MME section represents general application's I/O: Ex.) WinAmp, WaveLab (non ASIO mode), Cakewalk, Audition, Vegas, etc. WDM section represents Multi-MME application s I/O: Ex.) SONAR (when using WDM/KS), PowerDVD, WinDVD, etc. ASIO section represents ASIO application s I/O: Ex.) Cubase, Logic, Reason, Nuendo, SONAR (when using ASIO), Samplitude, etc. 41
 to WaveLab(MME) Caution; If you want to record what's played back in Winamp, but don't want to hear the sound, you should click the OUT button in the MME section so it'll")
42 GSIF section represents GSIF application like GigaStudio. * Some applications support multiple driver modes. 3. DirectWIRE Examples EX1. Recording from WinAmp(MME) to WaveLab(MME) Caution; If you want to record what's played back in Winamp, but don't want to hear the sound, you should click the OUT button in the MME section so it'll change to OFF, e.g.: EX2. Recording from WinAmp(MME) to SONAR(WDM) EX3. Recording from WinAmp(MME) to Cubase, Logic, Nuendo(ASIO) 42

43 EX4. Recording from GigaStudio(GSIF) to SONAR(WDM) EX5. Recording from GigaStudio(GSIF) to Cubase(ASIO) EX6. Let's say you want to quickly dub some vocal over an audio track. It's very simple with DirectWIRE 3.0, you just have to make connections similar to these. 43
44 8. Specifications <Analog Audio> 1. Analog Inputs * Unbalanced Part 1) Connector Type : Gold-plated RCA female (line in 1 and 2) 2) Peak level : +6dBV (-10dBV nominal) 3) Impedance : 10k ohms minimum * Balanced Part 1) Connector Type : 1/4" female TRS-type, balanced or unbalanced(line in 1 and 2) 2) Peak level : +20dBu (+4dBu nominal) 3) Impedance : 10k ohms minimum 2. Analog Ouputs * Unbalanced Part 1) Connector Type : Gold-plated RCA female (line out 1 and 2) 2) Peak level : 0dBFS (-10dBV nominal) 3) Impedance : 100 ohms minimum 4) Attenuation Control : -63dB ~ 0dB (0.5dB step size) * Balanced Part 1) Connector Type: 1/4" female TRS-type, balanced or unbalanced(line out 1 and 2) 2) Peak level : 0dBFS (+4dBu nominal) 3) Impedance : 100 ohms minimum 4) Attenuation Control : -63dB ~ 0dB (0.5dB step size) 3. Monitor 1) Monitor Control: Analog input, Digital input, Digital output 2) Attenuation Control : -63dB ~ 0dB (0.5dB step size) <Digital Audio> 4. Sample rate : 44.1,48,88.2,96,176.4,192KHz 5. A/D Converter (AK5385A) 1) Signal to Noise Ratio : 114dB fs=48khz 2) Dynamic Range : 114dB (-60dBFS with fs=48khz 3) Inter channel Isolation : -120dB 4) Resolution : 24-Bit 6. D/A Converter (AK4358) 1) Signal to Noise Ratio: 112dB fs=44.1khz 2) Dynamic Range (S/N) : 112dB (60dBFS with A-weighted)@ fs=44.1khz 3) THD+N : fs=44.1khz 4) Inter channel Isolation : -100dB 5) Attenuation Control : -63dB ~ +0dB (0.5dB Step Size) 6) Resolution : 24-Bit 7. Digital Input 1) Connector Type : RCA(provided via breakout cable) 2) Format : IEC Consumer(S/PDIF coaxial) 3) Sampling Rate : 44.1,48,88.2,96,176.4,192KHz 4) Resolution : 24-Bit 8. Digital Output 1)Connector Type : RCA(provided via breakout cable), Optical(on board) 2) Format : IEC Consumer(S/PDIF coaxial) 3) Sampling Rate : 44.1,48,88.2,96,176.4,192KHz(176.4,192kHz only coaxial) 4) Resolution : 24-Bit <MIDI> 9. MIDI I/O 1) 1-in, 1-out; 16 MIDI channels in and out Connector Type : Standard MIDI 5-pin DIN (provided via breakout cable) 44
45 9. General Information 1. Trademarks ESI, and are trademarks of Ego Systems Inc. and ESI Audiotechnik GmbH. Windows is a trademark of Microsoft Corporation. Other product and brand names are trademarks or registered trademarks of their respective companies. 2. The FCC and CE Regulation Warning This device complies with Part 15 of the FCC Rules. Operation is subject to the following two conditions : (1) this device may not cause harmful interference, and (2) this device must accept any interference received, including interference that may cause undesired operation. Caution : Any changes or modifications in construction of this device with are not expressly approved by the party responsible for compliance, could void the user's authority to operate equipment. Note: This equipment has been tested and found to comply with the limits for a Class A digital device, pursuant to Part 15 of the FCC Rules. These limits are designed to provide reasonable protection against harmful interference when the equipment is operated in a commercial environment. This equipment generates, uses, and can radiate radio frequency energy and, if not installed and used in accordance with the instruction manual, may cause harmful interference to radio communications. Operation of this equipment in a residential area is likely to cause harmful interference in which case the user will be required to correct the interference at his own expense. If necessary, consult an experienced radio/television technician for additional suggestions. 3. Correspondence For technical support inquiries, contact your nearest dealer, local distributor or ESI support online at 4. Disclaimer All features and specifications subject to change without notice. Parts of this manual are continually being updated. Please check our web site occasionally for the most recent update information. 45
24-bit USB Audio Interface with S/PDIF I/O. User s Guide
 24-bit USB Audio Interface with S/PDIF I/O User s Guide - Copyright 2008-2018 Revision 5, June 2018 www.esi-audio.com INDEX 1. Introduction... 4 1.1 Key Features... 4 2. Description of... 4 2.1 Front Panel...
4-in/6-out USB Recording Interface. User s Guide
 4-in/6-out USB Recording Interface User s Guide - Copyright 2007 Revision 1, June 2007 www.esi-audio.com INDEX 1. Introduction... 4 1.1 What s in the box... 4 1.2 Key Features... 4 2. Description of U46
High Quality 4-in / 4-out PCIe Audio Interface. User s Guide
 High Quality 4-in / 4-out PCIe Audio Interface User s Guide - Copyright 2008 Revision 1, December 2008 www.esi-audio.com INDEX 1. Introduction... 4 2. Description of... 4 2.1 PCIe card connectors... 4
MaXiO System Manual INDEX 1. Introduction Hardware Installation... 15
 INDEX 1. Introduction... 3 1.1 About this manual... 3 1.2 What s in the Box?... 4 1.3 Key Features... 4 1.3.1 PCI host card... 4 1.3.2 EX8000 2U Rack... 4 1.3.3 032 breakout box... 5 2.1 PCI host card...
Waveterminal 192M INDEX. 1. Introduction to Waveterminal 192M Description of Waveterminal 192M Break out box 6. 2.
 INDEX 1. Introduction to 4 2. Description of 6 1. Break out box 6 2. PCI card 6 3. Hardware Installation 8 1. System Requirement 8 2. Preparation for hardware installation 9 3. Installing PCI card 10 4.
Professional 24-bit USB Audio Interface. User s Guide
 Professional 24-bit USB Audio Interface User s Guide - Copyright 2016-2017 Revision 2, May 2017 www.esi-audio.com INDEX 1. Introduction... 4 1.1 Features... 4 2. Installation... 7 2.1 System Recommendation...
The Hard Disk Sampler Tool Kit! GIGAStation. Owner s Manual.
 The Hard Disk Sampler Tool Kit! GIGAStation Owner s Manual www.egosys.net All rights to this document are reserved. No part of this document may be copied reproduced, or distributed in any form or by any
18-in/8-out USB 2.0 Hi-Speed External Recording Interface. User s Guide
 18-in/8-out USB 2.0 Hi-Speed External Recording Interface User s Guide - Copyright 2007 Revision 1, November 2007 www.esi-audio.com INDEX 1. Introduction... 4 1.1 What s in the box... 4 1.2 Key Features...
 The FCC Regulation Warning This equipment has been tested and found to comply with the limits for a Class A digital device, pursuant to Part 15 of the FCC Rules and CISPR pursuant to subchapter EN55022
7. 22 END USER WARRANTY V.1
 INDEX 1. Introduction... 2 1.1. What s in the box... 2 1.2. Key Features... 3 2. Description of U46DJ... 4 2.1. Front Panel... 4 2.2. Rear Panel... 5 2.3. Connection with external devices... 6 3. Hardware
INDEX. * All specifications are subject to change without prior notice. v2 November 2005
 INDEX 1. Introduction... 2 Key Features... 2 2. Description of M8U... 3 Front Panel... 3 3. System Requirements... 5 PC... 5 Mac... 5 4. Installation... 6 Hardware Installation... 6 Driver Installation
Professional Level Compact Handheld Audio Recorder. User s Guide
 Professional Level Compact Handheld Audio Recorder User s Guide - Copyright 2010 Revision 1, May 2010 www.esi-audio.com INDEX 1. Introduction... 4 2. Description of... 4 Accessories... 5 LCD display...
SoundWave Pro PCI Quick Installation Guide
 SoundWave Pro PCI Quick Installation Guide Introducing the SoundWave Pro PCI The SoundWave Pro PCI uses bus mastering technology to take full advantage of the PCI bus architecture, while maintaining compatibility
RAL-24192DM1 Setup Guide
 RAL-24192DM1 Setup Guide Rev. 1.0 15/June/2012 RATOC Systems, Inc. www.ratocsystems.com Osaka, Japan Index 1. Introduction -------------------------------------------------------------------------- 3 1-1.
D i g i g r a m. VX222v2. Professional Stereo Sound Card. User s manual
 Professional Stereo Sound Card User s manual For technical support, please contact your local distributor. list available at www.digigram.com 2 Digigram S.A. Parc de Pré Milliet, 38330 Montbonnot - FRANCE
User's Guide. Analog Expansion Board for DIGI96/8 Series and Hammerfall Serie 4/8 Channels, 24 Bit
 User's Guide Analog Expansion Board for DIGI96/8 Series and Hammerfall Serie 4/8 Channels, 24 Bit Contents 1 Introduction...3 2 Package Contents...3 3 Hardware Requirements...3 4 Technical Specifications...3
SoundWave 7.1 PCI Quick Installation Guide
 SoundWave 7.1 PCI Quick Installation Guide Introducing the SoundWave 7.1 PCI The SoundWave 7.1 PCI transforms your PC into a home theater system with multi-channel surround sound. Features Compliant with
END USER WARRANTY. For technical support inquiries, contact your nearest dealer or visit online technical support at
 END USER WARRANTY EGO SYSTEMS, INC. warrants the return policy to its original purchaser as follows: All EGO SYSTEMS INC. s products, under normal use, will be free from fault as long as the purchaser
MARC 2. User s Guide
 MARC 2 User s Guide The Marc 2 conforms the following standards: EN 55022: 1998 + A1: 2000 + A2: 2003; class A EN 55024: 1998 + A1: 2000 + A2: 2003; class A In order for an installation of this product
1 Mic-In / 1 Guitar-In, 2-Out Professional vocal recording USB Interface. User manual
 1 Mic-In / 1 Guitar-In, 2-Out Professional vocal recording USB Interface User manual Important Safety Instructions 1. Read this manual thoroughly before using this unit. 2. Keep this manual for future
Port PCI Quick Installation Guide
 1394 3-Port PCI Quick Installation Guide Introducing the 1394 3-Port PCI The 1394 3-Port PCI is designed to connect DV camcorders, hard disk drives, scanners, printers and other 1394 audio/video devices
WARRANTY. EGO SYStems Inc. warrants the return policy to its original purchaser as follows; All EGO SYS products,
 WARRANTY EGO SYStems Inc. warrants the return policy to its original purchaser as follows; All EGO SYS products, under normal use, will be free from faulty as long as the purchaser owns this product. The
LoLa881 LoLa Professional Multichannel Sound Cards. User manual
 LoLa881 LoLa16161 Professional Multichannel Sound Cards For technical support please contact your system supplier Digigram S.A. 82/84 Allée Galilée, 38330 Montbonnot-Saint-Martin, FRANCE Tel: +33 (0)4
Miditerminal User's Manual 4 IN 4 OUT 64 CHANNEL MIDI/SMPTE INTERFACE
 Miditerminal 4140 4 IN 4 OUT 64 CHANNEL MIDI/SMPTE INTERFACE User's Manual COPYRIGHT 2001, EGO SYSTEMS INC. All rights in this document are reserved. No part of this document may be copied, reproduced,
User's Guide. Analog Expansion Board for DIGI96/8 Series, Hammerfall Series and HDSP /8 Channels, 24 Bit
 User's Guide Analog Expansion Board for DIGI96/8 Series, Hammerfall Series and HDSP 9652 4/8 Channels, 24 Bit Contents 1 Introduction... 3 2 Package Contents... 3 3 Hardware Requirements... 3 4 Technical
5.1.5 Digital Mixer Outputs Physical Outputs Sample Clock Generator Sample Clock Sources
 Contents 1 Introduction...5 1.1 Overview...5 1.2 Features...6 1.3 Before you begin...6 1.4 In the box...7 1.5 System requirements...7 1.5.1 Windows...7 1.5.2 Macintosh...7 1.6 Nomenclature used in this
Copyright. Warning. Warning! Communications & Safety Regulation Information
 96i I/O Copyright 2006 Digidesign, a division of Avid Technology, Inc. All rights reserved. This guide may not be duplicated in whole or in part without the express written consent of Digidesign. Avid,
Introducing the SoundWave 7.1 PCI. The SoundWave 7.1 PCI transforms your PC into a home theater system with multi-channel surround sound.
 SoundWave 7.1 PCI Quick Installation Guide Introducing the SoundWave 7.1 PCI The SoundWave 7.1 PCI transforms your PC into a home theater system with multi-channel surround sound. Features Compliant with
Summary Product Contents Specifications System Requirements Product Photography. Sound Blaster Audigy 2 ZS Platinum Pro
 Recording and production excellence for the home-studio. The is the ultimate 7.1 studio solution for musicians and audio enthusiasts. It supports ASIO 2.0 and SoundFont 2.1 and can record up to 6 simultaneous
Check the contents of the package
 Read this first! UA-4FX Owner s Manual Copyright 2005 ROLAND CORPORATION All rights reserved. No part of this publication may be reproduced in any form without the written permission of ROLAND CORPORATION.
SoundWave Pro PCI Quick Installation Guide
 SoundWave Pro PCI Quick Installation Guide Introducing the SoundWave Pro PCI The SoundWave Pro PCI provides 3D sound effects and supports DirectSound 3D TM, MPU-401, GM and is fully compatible with Sound
Digital to Analog Converter
 NuForce Optoma NuForce DAC-80 DAC80 Digital Class-leading to Analog Converter Digital to Analog Converter 44.1k 88.2k 176.4k 48.0k 96.0k 192.0k User s User s Manual Manual ALDACBZ FCC Notice - Declaration
MONTANa. User s Guide
 MONTANa User s Guide Dakota, Montana, Sierra, SoDA, Tango24, and Zulu are trademarks of Frontier Design Group, LLC. All other trademarks and registered trademarks are the property of their respective holders.
Professional Active Reference 4 Studio Monitors. User s Guide
 Professional Active Reference 4 Studio Monitors User s Guide ESI - Copyright 2011 Revision 1, October 2011 www.esi-audio.com INDEX 1. Introduction... 4 2. Basics & Installation... 4 Unpacking / Handling...
LoLa280. Professional multichannel sound card. User manual
 Professional multichannel sound card For technical support, please contact your supplier Digigram S.A. 82/84 Allée Galilée, 38330 Montbonnot-Saint-Martin, FRANCE Tel: +33 (0)4 76 52 47 47 Fax: +33 (0)
FlyTV MCE Installation Guide Animation Technologies Inc.
 FlyTV MCE Installation Guide Animation Technologies Inc. www.lifeview.com Ver: 1.0 Copyright and Trademark Notice Copyright 2005 by Animation Technologies Inc. All rights reserved. Specifications and
1 Mic-In / 2-Out Professional Vocal Recording USB Interface. User manual
 1 Mic-In / 2-Out Professional Vocal Recording USB Interface User manual Important Safety Instructions 1. Read this manual thoroughly before using this unit. 2. Keep this manual for future reference. 3.
MOTU 2408mk3 Overview
 MOTU.com - MOTU 2408mk3 Overview http://www.motu.com/products/pciaudio/2408 1 of 1 8/11/2008 1:46 PM MOTU 2408mk3 Overview This bo contains everything you need to turn your computer into a powerful 24-bit/96kHz
IN 2 USB 2.0 COMPUTER AUDIO INTERFACE OWNER S MANUAL
 IN 2 USB 2.0 COMPUTER AUDIO INTERFACE OWNER S MANUAL IN2 Safety Declarations CAUTION: For protection against electric shock, do not remove the cover. No user serviceable parts inside. WARNING: This equipment
U-DAC8. User Manual 8-CHANNEL HIGH-RESOLUTION USB DAC
 U-DAC8 8-CHANNEL HIGH-RESOLUTION USB DAC User Manual minidsp Ltd, Hong Kong / www.minidsp.com / Features and specifications subject to change without prior notice 1 Revision history Revision Description
EN-9235TX-32 Quick Installation Guide
 EN-9235TX-32 Quick Installation Guide 09-2012 / v2.0 1 COPYRIGHT Copyright Edimax Technology Co., Ltd. all rights reserved. No part of this publication may be reproduced, transmitted, transcribed, stored
Delta 44 Manual. Table of Contents
 Delta 44 Manual version: D66-021502 Table of Contents Introduction................................................2 What s in the Box?...........................................2 About the Delta 66 Digital
Quick Start Guide. Quick Start Guide - 0
 Quick Start Guide 0404 Quick Start Guide - 0 1- Introduction Creative Professional Thank you for purchasing the E-MU 0404 Digital Audio System. We ve designed this E-MU Product to be logical, intuitive
RAL-DSDHA1 Setup Guide
 RAL-DSDHA1 Setup Guide Rev. 1.0 12/Feb/2013 RATOC Systems, Inc. www.ratocsystems.com Osaka, Japan Index 1. Introduction... 3 1-1.Features...3 2. System requirements... 4 2-1. PC running on Windows 8,7,Vista,XP(SP2
Instruction Guide. 2 Channel Ultra ATA/100 PCI Card PCI2IDE100. The Professionals Source For Hard-to-Find Computer Parts. Revised: December 5, 2002
 IDE CARD 2 Channel Ultra ATA/100 PCI Card PCI2IDE100 Instruction Guide * Actual product may vary from photo Revised: December 5, 2002 The Professionals Source For Hard-to-Find Computer Parts 7 FCC COMPLIANCE
Wireless-N PCI Adapter User Manual
 Wireless-N PCI Adapter User Manual V1.0 2010-06-28 FCC Certifications Federal Communication Commission Interference Statement This equipment has been tested and found to comply with the limits for a Class
MADI-PC MADI RECORDING SYSTEM
 MADI-PC MADI RECORDING SYSTEM USER MANUAL V1.0 1 P a g e Table of Contents INTRODUCTION... 3 IMPORTANT SAFETLY PRECAUTIONS... 4 General Safety... 4 Caution... 4 Power Safety... 5 Installation Notes...
USB to Serial Converter User s Guide
 USB to Serial Converter User s Guide Important Note! In order to minimize possible installation problems and/or resource conflicts: Read Me First! About This User s Guide This User s Guide is designed
N-DAC8. User Manual 8-CHANNEL AVB/ETHERNET DAC
 N-DAC8 8-CHANNEL AVB/ETHERNET DAC User Manual minidsp Ltd, Hong Kong / www.minidsp.com / Features and specifications subject to change without prior notice 1 Revision history Revision Description Date
USB Hub-Audio Series. January 1999 A
 Series January 1999 A15-0157-110 FCC COMPLIANCE STATEMENT: This device complies with part 15 of the FCC Rules. Operation is subject to the following two conditions: (1) This device may not cause harmful
SoundWave Pro 2000 Quick Installation Guide
 SoundWave Pro 2000 Quick Installation Guide Introducing the SoundWave Pro 2000 The SoundWave Pro 2000 is a high performance multimedia sound card which takes full advantage of the PCI bus architecture,
EN-9260TX-E User Manual
 EN-9260TX-E User Manual 09-2012 / v2.0 1 COPYRIGHT Copyright Edimax Technology Co., Ltd. all rights reserved. No part of this publication may be reproduced, transmitted, transcribed, stored in a retrieval
Instruction Guide. Low-Profile 2-port IEEE 1394 FireWire PCI Card with Video Editing Software PCI1394_2LP
 FIREWIRE CARD Low-Profile 2-port IEEE 1394 FireWire PCI Card with Video Editing Software PCI1394_2LP Instruction Guide * Actual product may vary from photo The Professionals Source For Hard-to-Find Computer
 $ERXW
$ERXW DS-DAC-100 DS-DAC-100m DS-DAC-10
 DS-DAC-100 DS-DAC-100m DS-DAC-10 Owner's Manual Advanced Guide Before you connect this device You must select driver settings in order to use the DS-DAC-100, DS-DAC-100m, or DS- DAC-10. To ensure that
Sound Card Installation for Windows 95/98
 Sound Card Installation for Windows 95/98 Hardware Installation 1. Shut down Windows and power down system. Unplug power cable from the system. 2. Remove screws and open system enclosure. 3. Remove static
Introduction. What s in the Box? About the Delta 44 Digital Recording Interface
 Delta 44 Table of Contents Introduction................................................2 What s in the Box?...........................................2 About the Delta 44 Digital Recording............................2
Cyber PCI I/O Quick Installation Guide
 Cyber PCI I/O Quick Installation Guide Introducing the Cyber PCI I/O The Cyber PCI I/O high-speed serial and parallel I/O card family provides a complete solution for serial and parallel device connections.
MANUAL. Delta Table of Contents
 AUDIO TM Delta 1010 MANUAL Version D1010-092999 Table of Contents Introduction................................................................................... 2 What s in the Box..............................................................................
4-In / 2-Out with +48V Phantom Power Recording USB Interface. User manual
 4-In / 2-Out with +48V Phantom Power Recording USB Interface User manual Important Safety Instructions 1. Read this manual thoroughly before using this unit. 2. Keep this manual for future reference. 3.
Low Profile PCI I/O Quick Installation Guide
 Low Profile PCI I/O Quick Installation Guide Introducing the Low Profile PCI I/O The Low Profile PCI I/O conforms to the new PCI card form factor standard made for space constrained system designs. Since
PCX1221HR PCX1222HR. Professional Multichannel Sound Cards. User manual
 PCXHR PCXHR Professional Multichannel Sound Cards User manual For technical support, please contact your system supplier Digigram S.A. 8/84 Allée Galilée, 80 Montbonnot-Saint-Martin, FRANCE Tel: (0)4 76
EASY FIREWIRE Audio Interface
 EASY FIREWIRE Audio Interface ENGLISH USER S MANUAL IMPORTANT SAFETY INSTRUCTIONS shall be placed on the apparatus. The MAINS plug is used as the disconnect device, the disconnect device shall remain readily
OriGain Integrated Amplifier Owner s Manual
 OriGain Integrated Amplifier Owner s Manual Models: A250, AD250 Got a Question or Need Help? Email our technical support team at: support@miccatron.com for personalized assistance with the setup and use
1394 DV-Cam Kit Quick Installation Guide
 1394 DV-Cam Kit Quick Installation Guide Introducing the 1394 DV-Cam Kit The 1394 DV-Cam Kit is designed to add three 1394 (FireWire) ports to your computer for easy connection to DV camcorders, hard disk
UA-2X2 audio interface. user manual
 UA-2X2 audio interface user manual Musikhaus Thomann Thomann GmbH Hans-Thomann-Straße 1 96138 Burgebrach Germany Telephone: +49 (0) 9546 9223-0 E-mail: info@thomann.de Internet: www.thomann.de 20.06.2018,
S a l e s G u i d e E-MU 0204 USB 1
 Sales Guide E-MU 0204 USB 1 E-MU 0204 USB HIGH-RESOLUTION USB POWERED AUDIO INTERFACE Retail Street Price: US = $129.99 UK = 129.99 (including new 20% VAT from Jan. 1, 2010) Euro = 129.99 (including 20%
GAMBIT DAC2 FIREWIRE DAC OPERATING MANUAL
 GAMBIT DAC2 FIREWIRE DAC OPERATING MANUAL Daniel Weiss Engineering Ltd., Florastr. 42, CH-8610 Uster Page 1 of 7 Congratulations on purchasing the Weiss Gambit Series DAC2 D/A Converter! The DAC2 is a
E3360 First Edition August Xonar D2X. Audio Card. Quick Installation Guide
 E3360 First Edition August 2007 Xonar D2X Audio Card Quick Installation Guide 1.1 Installation requirements To ensure a successful installation of the Xonar D2X audio card, your computer must meet the
MANUAL DELTA 66. Table of Contents
 AUDIO TM DELTA 66 MANUAL Table of Contents Introduction.................................................. 2 What s in the Box?............................................. 2 About the Delta 66 Digital
Instruction Guide. 4-Port IEEE 1394 FireWire Card With Digital Video Editing Kit PCI1394_4. The Professionals Source For Hard-to-Find Computer Parts
 FIREWIRE CARD 4-Port IEEE 1394 FireWire Card With Digital Video Editing Kit PCI1394_4 Instruction Guide Revised: July 26, 2002 The Professionals Source For Hard-to-Find Computer Parts 7 FCC COMPLIANCE
Firefly 302. Portable FireWire Unit
 Portable FireWire Unit IMPORTANT SAFETY INSTRUCTIONS The apparatus shall not be exposed to dripping or splashing and that no objects with liquids, such as vases, shall be placed on the apparatus. The MAINS
PCIe Audio Card Model: SD-PEX63081
 SD-PEX63081 1 PCIe Audio Card Model: SD-PEX63081 User Manual Ver. 2.00 Chipset: CMedia CM8828, CM9882A SD-PEX63081 2 Product Introduction This Multi-Channel PCI-Express Sound Card is a versatile 24bit
Auricon 4.4. Manual ABN
 ABN 66 169 561 871 Auricon 4.4 Manual Overview The Auricon 4.4 is a professional-quality audio input-output card designed in Australia by Innes Corporation. It is supplied with a Windows WDM driver to
TF-3239DL 10/100Mbps PCI Network Adapter
 Rev: 1.1.0 1910010553 COPYRIGHT & TRADEMARKS Specifications are subject to change without notice. is a registered trademark of TP-LINK TECHNOLOGIES CO., LTD. Other brands and product names are trademarks
PCI Parallel Card. 1 Port High-Speed EPP/ECP Parallel Card PCI1P PCI1PECP3V. Instruction Manual. Actual product may vary from photo
 PCI Parallel Card 1 Port High-Speed EPP/ECP Parallel Card PCI1P PCI1PECP3V Actual product may vary from photo FCC Compliance Statement This equipment has been tested and found to comply with the limits
HDD external enclosure for data-storage mobility with LAN sharing LAN MAC. USER Manual
 HDD external enclosure for data-storage mobility with LAN sharing LAN MAC USER Manual English AKASA Company notices The information contained in this document is subject to change without notice. All rights
D i g i g r a m. VX222HR VX222HR-Mic. Professional Stereo Sound Cards. User s manual
 VX222HR VX222HR-Mic Professional Stereo Sound Cards User s manual For technical support, please contact your system supplier Digigram S.A. Parc de Pré Milliet, 38330 Montbonnot - FRANCE Tel: +33 (0)4 76
2 Mic/1-Guitar in, 2 Line out recording USB Interface. User manual
 2 Mic/1-Guitar in, 2 Line out recording USB Interface User manual Important Safety Instructions 1. Read this manual thoroughly before using this unit. 2. Keep this manual for future reference. 3. Take
PCX1221e PCX1222e. Professional Multichannel Sound Cards. User manual
 PCX11e PCX1e Professional Multichannel Sound Cards User manual For technical support, please contact your system supplier Digigram S.A. 8/84 Allée Galilée, 80 Montbonnot-Saint-Martin, FRANCE Tel: + (0)4
This device complies with Part 15 of the FCC Rules. Operation is subject to the following two conditions:
 1 FCC Statement This device complies with Part 15 of the FCC Rules. Operation is subject to the following two conditions: (1) This device may not cause harmful interference. (2) This device must accept
5.25 Bay Multi-Port Panel with a 6-in-1 Flash Card Reader/Writer
 USB 2.0 FLASH CARD READER 5.25 Bay Multi-Port Panel with a 6-in-1 Flash Card Reader/Writer 525FCREAD 525FCREADBK Instruction Guide * Actual product may vary from photo * 525FCREADBK shown The Professionals
TV Program / Digital Video / Analog Video All-in-One User s Manual
 TVDVAVCombo TV Program / Digital Video / Analog Video All-in-One User s Manual FEDERAL COMMUNICATIONS COMMISSION This device complies with Part 15 of the FCC Rules Operation is subject to the following
The SoundWave 5.1 PCI transforms your PC into a home theater system with multi-channel surround sound.
 Introduction 04-0359G SoundWave 5.1 PCI Installation Guide The SoundWave 5.1 PCI transforms your PC into a home theater system with multi-channel surround sound. Features and Benefits Customize Internet
Auricon 2.2+ Manual ABN
 ABN 66 169 561 871 Auricon 2.2+ Manual Overview The Auricon 2.2+ is a professional-quality audio input-output card designed and manufactured in Australia by Innes Corporation. It is supplied with DSP software
IDE ATA/133 Controller
 IDE ATA/133 Controller Dual Channel ATA/133 PCI Controller Card PCI2IDE133 Actual product may vary from photo FCC Compliance Statement This equipment has been tested and found to comply with the limits
a22xt artesia artesia Virgin Musical Instrument Company Inc Owners Manual professional audio interface for musicians on t~e go
 a22xt professional audio interface for musicians on te go Owners Manual artesia Virgin Musical Instrument Company Inc r POBox 2908 La Mesa CA 91943 PH: 888-999-9848 E-mail: info@virginmusicalinstruments.com
Trademarks and registered trademarks are proprietary to their respective manufactures.
 Limitation of Liability - Information presented by RATOC in this manual is believed to be accurate and reliable. RATOC assumes no responsibility for its use. No license is granted by implication or otherwise
N331 Wireless Mini Optical Mouse User s Guide
 N331 Wireless Mini Optical Mouse User s Guide Mouse 1. Left mouse button 2. Right mouse button 3. Scroll wheel 4. Charge port 5. Battery cover 6. Receiver storage compartment 7. Battery cover release button
LAYLA. 24 LAYLA LapTop GINA 24 MIA MIAMIDI. Owner s Manual Version 3.1 for Windows
 LAYLA 24 LAYLA LapTop GINA 24 MIA MIAMIDI Owner s Manual Version 3.1 for Windows Important Safety Instructions 1. Read Instructions - Be sure to read all of the safety and operating instructions before
Reference Manual Roland Corporation 01
 Reference Manual 2017 Roland Corporation 01 Panel Descriptions Rubix22 Front Panel 1 2 3 2 1 6 7 8 When connecting a guitar or bass, use the INPUT 1L jack. The sound level will be very low if you connect
100BASE-TX/10-B REX-CB81U. User Guide. November 1998 First Edition
 100BASE-TX/10-B ASE-TX/10-BASE-T Network CardBus PC Card REX-CB81U User Guide November 1998 First Edition REX-CB81U User Guide CONTENTS FCC Statement 1 1. Introduction 3 1-1. Features 3 1-2. Trademarks
If anything is damaged or missing, contact your dealer.
 User Manual ACS-1602 Read this guide thoroughly and follow the installation and operation procedures carefully in order to prevent any damage to the unit and/or any devices that connect to it. This package
USO RESTRITO. Getting Started
 Getting Started Original Manual: Synkron Revision and Quality Control: C. Bachmann, H. Bischoff, S. Pfeifer, C. Schomburg The information in this document is subject to change without notice and does not
1/2 Port High-Speed RS-232 PCI Serial Card 1/2 Port Low Profile High-Speed RS-232 PCI Serial Card PCI1S550 PCI1S550_LP PCI2S550 PCI2S550_LP
 1/2 Port High-Speed RS-232 PCI Serial Card 1/2 Port Low Profile High-Speed RS-232 PCI Serial Card PCI1S550 PCI1S550_LP PCI2S550 PCI2S550_LP *actual product may vary from photos DE: Bedienungsanleitung
USB AUDIO INTERFACE. Steinberg Web Site C.S.G., Pro Audio Division 2012 Yamaha Corporation 209MW-A0
 USB AUDIO INTERFACE EN DE FR ES IT ZH JA Steinberg Web Site http://www.steinberg.net C.S.G., Pro Audio Division 2012 Yamaha Corporation 209MW-A0 Contents Contents Contents...2 A Message From the Development
Matrix K. User's Manual. Version 1.0
 Matrix K User's Manual Version 1.0 FCC INFORMATION (U.S.A) 1. IMPORTANT NOTICE: DO NOT MODIFY THIS UNIT! This product, when installed as indicated in the instructions contained in this manual, meets FCC
GrabBeeX+ USB 2.0 AV Grabber. User's Manual
 GrabBeeX+ USB 2.0 AV Grabber User's Manual FEDERAL COMMUNICATIONS COMMISSION This device complies with Part 15 of the FCC Rules Operation is subject to the following two conditions: this device may not
Echo Digital Audio Corporation Echo Indigo Echo Indigo io Echo Indigo dj Windows driver version 7.2
 Echo Digital Audio Corporation Echo Indigo Echo Indigo io Echo Indigo dj Windows driver version 7.2 Table of Contents DISCLAIMER... 2 INTRODUCTION... 2 NEW FEATURES... 3 FIXES... 3 KNOWN ISSUES... 3 WINDOWS
PCMCIA Interface CD-ROM Drive. CD Station. User s Manual
 PCMCIA Interface CD-ROM Drive CD Station User s Manual FCC COMPLIANCE STATEMENTS This equipment has been tested and found to comply with the limits for a Class B digital device, pursuant to Part 15 of