ShoreTel, Ingate & Rogers Communications for SIP
|
|
|
- Jasmin Poole
- 5 years ago
- Views:
Transcription
 communications from Rogers Communications instead of the typical analog,")
1 I n n o v a t i o n N e t w o r k A p p N o t e IN Date : Nov 2015 Product: ShoreTel Ingate Rogers Communications System version: ShoreTel 14.2 ShoreTel, Ingate & Rogers Communications for SIP Trunking SIP Trunking allows the use of Session Initiation Protocol (SIP) communications from Rogers Communications instead of the typical analog, Basic Rate Interface (BRI), T-1 or E-1 trunk connections. Having the pure IP trunk to the Internet Telephony Service Provider allows for more control and options over the communication link. This application note provides the details on connecting the ShoreTel IP phone system through an Ingate box which is connected to both the LAN and WAN and acts as a gateway and security device to Rogers Communications for SIP Trunking. Table of Contents Overview... 2 Rogers Communications Contact... 2 Ingate Overview & Contact... 2 Architecture Overview... 4 Requirements, Certification and Limitations 5 Rogers Communications Validation Test Results... 6 Table 1-1: Initialization and Basic Calls... 6 Table 1-2: Media and DTMF Support... 7 Table 1-3: Performance & Quality of Service... 7 Table 1-4: Enhanced Services and Features... 8 Configuration Overview ShoreTel Unsupported Features ShoreTel Configuration Ingate Configuration Web Admin Connecting the Ingate Firewall/SIParator Using the Startup Tool Configure the Unit for the First Time Change or Update Configuration Network Topology IP-PBX Internet Service provider (ITSP) Upload Configuration Ingate Additional Coniguration Parameters SIP Header Configuration Configuration Troubleshooting Startup Tool Troubleshooting Status Bar Configure Unit for the First Time Change or Update Configuration Network Topology IP-PBX Internet service provider (ITSP) Apply Configuration Ingate Web GUI Configuration Network Network & Computers Basic Configuration SIParator Type SIP Services Basic SIP Traffic Filtering SIP Traffic Dial Plan SIP Trunks SIP Trunk PAGE Ingate Basic Call Troubleshooting Troubleshooting Outbound Calls Troubleshooting Inbound calls Document & Software Copyrights Trademarks Disclaimer Company Information ShoreTel tests and validates the interoperability of the Member's solution with ShoreTel's published software interfaces. ShoreTel does not test, nor vouch for the Member's development and/or quality assurance process, nor the overall feature functionality of the Member's solution(s). ShoreTel does not test the Member's solution under load or assess the scalability of the Member's solution. It is the responsibility of the Member to ensure their solution is current with ShoreTel's published interfaces. The ShoreTel Technical Support organization will provide Customers with support of ShoreTel's published software interfaces. This does not imply any support for the Member's solution directly. Customers or reseller partners will need to work directly with the Member to obtain support for their solution
2 Overview This document provides details for connecting the ShoreTel system through the Ingate SIParator / Firewall to Rogers Communications for SIP Trunking, which enables audio communications. The document specifically focuses on the configuration procedures needed to set up these systems to interoperate. Rogers Communications Support & Services Rogers Communications is a leading diversified public Canadian communications and media company. We are Canada's largest provider of wireless communications services and one of Canada's leading providers of cable television, high-speed Internet and telephony services to consumers and businesses. Through Rogers Media, we are engaged in radio and television broadcasting, televised shopping, magazines and trade publications, sports entertainment, and digital media. Our stock is publicly traded on the Toronto Stock Exchange (TSX: RCI.A and RCI.B) and on the New York Stock Exchange (NYSE: RCI). For further information about the Rogers group of companies, please visit For Sales and Technical Support: siptrunking@sip-rogers.com Ingate Overview & Contact INGATE SYSTEMS offers the only fully SIP capable security products offering features important to enterprise adoption of SIP Trunking. The Ingate Firewall offers a single device to protect the network and manage SIP traffic. The Ingate SIParator allows the enterprise to adopt SIP without replacing their existing firewall. Both products include a SIP Application Layer Gateway (ALG), proxy and registrar that enable SIP signaling to traverse the firewall, support for dynamic media port management to keep the network safe, encryption for privacy, added routing capabilities to make the installation of SIP Trunks simple and inexpensive, and remote SIP connectivity so that the enterprise can offer SIP services to their remote workers. NORTH AMERICA For general sales questions, please contact your reseller or contact Ingate directly at: Steven Johnson Steve@ingate.com Resellers who want to start selling this solution should contact: Steven Johnson Steve@ingate.com
3 EMEA For general sales questions, please contact your reseller or contact Ingate directly at: Ingate Systems HQ Resellers who want to start selling this solution should contact: Ingate Systems HQ
4 Architecture Overview SIP Trunking allows the use of Session Initiation Protocol (SIP) communications from an Internet Telephony Service Provider (ITSP) instead of the typical analog, Basic Rate Interface (BRI), T1 or E1 trunk connections. Having the pure IP trunk to the ITSP allows for more control and options over the communication link. This application note provides the details on connecting the ShoreTel IP phone system through an Ingate SIParator which is connected to both the LAN and WAN and acts as a secure gateway to Rogers Communications for SIP Trunking. ShoreTel and Ingate have teamed up to build a solid security focused solution, ShoreTel being the IP PBX which resides on the LAN and connects to the Ingate SIParator / Firewall. Providing a solution to allow customers the ability to connect to SIP Trunks offered by Rogers Communications in a secure manner is important. The Ingate then is connected to not only the LAN but also the WAN, providing the typical firewall security abilities and additionally intelligent SIP routing and SIP features such as: Registration Digest Authentication Dial Plan Modification Back to Back User Agent (Terminates SIP messaging on both LAN and WAN side for SIP Protocol Normalization) Transfer conversion of SIP REFER to SIP reinvite messaging Quick configuration templates for each of the certified ITSPs The image below shows a high level drawing of a basic ShoreTel / Ingate / ITSP design. This drawing only represents SIP and Real-time Transfer protocol (RTP) traffic. The next section of this application note covers actual deployment design options

5 FIGURE 2 ARCHITECTURAL OVERVIEW Ingate has two products for this solution, the Ingate Firewall and Ingate SIParator. From a SIP functionality point of view they are basically the same. The Ingate Firewall also provides normal data firewalling functionality and is recommended if the enterprise wants to replace the existing firewall. Ingate Firewalls handle both data and voice traffic as a single device. The Ingate SIParator is the solution for those who want the keep an existing firewall when adopting SIP. In this case the Ingate SIParator will co-exist in parallel with the normal data firewall. The routing of SIP traffic to the Ingate SIParator can be accomplished in three primary ways. The first is the most commonly deployed though each configuration offers its own advantages for the enterprise: Configuration 1: Single leg/dmz only, Firewall logs all activity Configuration 2: DMZ/LAN, Reduced load on firewall Configuration 3: Two legged/standalone, SIP traffic separate from data traffic - 5 -

6 FIGURE 3 INGATE 3 POSSIBLE CONFIGURATIONS Requirements, Certification and Limitations Any Ingate SIParator or Ingate Firewall model will work in this configuration. In a Trunking scenario it is required to have the Ingate SIP Trunking module installed. A few traversal licenses are included with the Ingate unit at delivery. Typically one traversal license will be needed for each expected concurrent phone call on the SIP Trunk. Additional licenses can be bought via your Ingate reseller. Starting with ShoreTel 14.2, ShoreTel added support for Virtual Trunk and Virtual Phone switches. This Application Note assumes the setup, configuration and licensing of the Virtual/Physical Switches has been completed. If you require additional information on Virtual Trunk Switch / Virtual Phone Switch, please refer to the ShoreTel Planning and Installation guide. Please refer to the ShoreTel Administration Guide for more details on supported and unsupported features with SIP Trunks. Only File Based Music on Hold was used for validation between ShoreTel and Rogers Communications s SIP Trunking service. Jack Based Music On Hold was not validated on the ShoreTel system, due to ShoreTel Defect An External Party may not hear Music On Hold (MOH) when a Bridge Call Appearance user places the call on hold, due to ShoreTel Defect Please note that this issue is only identified on this specific scenario. Inbound calls from an external party to a Workgroup / Hunt Group Agent which are blind transferred to another ShoreTel extension may result in no audio between the two parties, due to ShoreTel Defect ENG This issue will be addressed in a future ShoreTel Release. A possible workaround for this issue is to use Consultative Transfer instead of Blind Transfer. Inbound and Outbound faxes were validated with G.711 and a Physical ShoreGear switch. Rogers Communications s SIP Trunking service does not support T.38. At this time we are unable to provide additional information on a resolution to the issues mentioned above, but suggest to periodically refer to the ShoreTel 14.2 Software Release Notice (Build Notes) for updates, which can be found at the following location:
7 Version Support Products are certified via the Technology Partner Certification Process for the ShoreTel system. Table below contains the matrix of Ingate Firewall and Ingate SIParator versions firmware releases certified on the identified ShoreTel software releases. Ingate Firewall and Ingate SIParator version ShoreTel 14.2 Build Rogers Communications Validation Test Results Basic test plan: TABLE 1-1: INITIALIZATION AND BASIC CALLS ID Name Description Results 1.0 Configuration Innovation Network Lab will use the Application Note configuration application note provided by the vendor to configure the vendor s product to work with the ShoreTel system. 1.1 Setup and Verify successful setup and initialization 1.2 Outbound Call (Domestic) 1.3 Inbound Call (Domestic) 1.4 Device restart Power Loss 1.5 Device restart Network Loss 1.6 All Trunks Busy Inbound Callers 1.7 All Trunks Busy Outbound Callers 1.8 Incomplete Inbound Calls initialization of the SUT Verify calls outbound placed through the SUT reach the external destination. Verify calls received by the SUT are routed to the default trunk group destination. Verify that the SUT recovers after power loss to the SUT Verify the SUT recovers after loss of network link to the SUT. Verify an inbound callers hears busy tone when all channels/trunks are in use Verify an outbound callers hears busy tone when all channels/trunks are in use Verify proper call progress tones are provided and proper call teardown for incomplete inbound calls
8 TABLE 1-2: MEDIA AND DTMF SUPPORT ID Name Description Notes 2.1 Media Support ShoreTel to SUT Verify call connection and audio path from a ShoreTel phone to an external destination through the service provider using all supported codes with both sides set to a common 2.2 Media Support SIP Reference to SUT 2.3 Codec Negotiation 2.4 DTMF Transmission Out of Band 2.5 Auto Attendant Menu 2.6 Auto Attendant Menu Dial by Name 2.7 Auto Attendant Menu checking Voice Mail mailbox codec. Verify call connection and audio path from a SIP Reference phones to an external destination through the service provider using all supported codes with both sides set to a common codec. Verify codec negotiation between the SUT and the calling device with each side configured for a different codec. Verify transmission of out-of-band digits per RFC 2833 for various devices connected to the SUT. Verify that inbound calls are properly terminated on the ShoreTel Auto Attendant menu and that you can transfer to the desired extension. Verify that inbound calls are properly terminated on the ShoreTel Auto Attendant menu and that you can transfer to the desired extension using the Dial by Name feature. Verify that inbound calls are properly terminated on the ShoreTel Auto Attendant menu and that you can transfer to the Voice Mail Login Extension. See Note 1 TABLE 1-3: PERFORMANCE & QUALITY OF SERVICE ID Name Description Notes 3.1 Voice Quality Verify the SUT can provide a voice Not Tested Service Levels quality SLA across the WAN from the customer premises to the SUT SIP gateway. 3.2 Capacity Test Verify the service provider interface can sustain services through period of heavy outbound and inbound load. 3.3 Post Dial Delay Verify that post dial delay is within acceptable limits. 3.4 Billing Accuracy Verify that all test calls made are accurately reflected in the SUT s CDR and billing reports
9 TABLE 1-4: ENHANCED SERVICES AND FEATURES ID Name Description Notes 4.1 Caller ID Name and Number - Inbound Verify that Caller ID name and number is received from SIP endpoint device 4.2 Caller ID Name and Number - Outbound 4.3 Hold from SUT to SIP Reference 4.4 Call Forward - SUT 4.5 Call Forward External PSTN Number 4.6 Call Transfer blind 4.7 Call Transfer Consultative 4.8 Conference ad hoc 4.9 Inbound DID/DNIS Verify that Caller ID name and number is sent from SIP endpoint device Verify successful hold and resume of connected call Verify outbound calls that are being forwarded by the SUT are redirected and connected to the appropriate destination. Verify outbound calls that are being forwarded by the SUT are redirected and connected to the appropriate destination. Verify a call connected from the SUT to the ShoreTel phone can be transferred to an alternate destination. Verify a call connected from the SUT to the ShoreTel phone can be transferred to an alternate destination. Verify successful ad hoc conference of three parties Verify the SUT provides inbound dialed number information and is correctly routed to the configured destination Outbound 911 Verify that outbound calls to 911 are routed to the correct PSAP for the calling location and that caller ID information is delivered Operator Assisted 4.12 Inbound / Outbound call with Blocked Caller ID 4.13 Inbound call to a Hunt Group Verify that 0+ calls are routed to an operator for calling assistance. Verify that calls with Blocked Caller ID route properly and the answering phone does not display any Caller ID information. Verify that calls route to the proper Hunt Group and are answered by an available hunt group member with audio in both directions using G.729 and G.711 codecs Inbound call to a Workgroup Verify that calls route to the proper Workgroup and are answered successfully by an available workgroup agent with audio in both directions using G.729 and G.711 codecs
10 ID Name Description Notes 4.15 Inbound call to DNIS / DID and leave a voice mail message Verify that inbound calls to a user, via DID / DNIS, routes to the proper user mailbox and a message can be left with proper audio Call Forward FindMe 4.17 Call Forward Always 4.18 Inbound / Outbound Fax calls 4.19 ShoreTel Converged Conferencing Server 4.20 Inbound call to Bridged Call Appearance (BCA) extension 4.21 Inbound call to a Group Pickup extension 4.22 Office Anywhere External Verify that inbound calls are forwarded to a user s FindMe destination. Verify that inbound calls are immediately automatically forwarded to a user s external destination. Verify that inbound / outbound fax calls complete successfully. G.711 Only Verify that inbound calls are properly forwarded to the ShoreTel Converged Conferencing Server and it properly accepts the access code and you re able to participate in the conference bridge. Verify that inbound calls properly presented to all of the phones that have BCA configured and that the call can be answered, placed on-hold and then transferred. Verify that inbound calls properly presented to all of the phones that have Group Pickup configured and that the call can be answered, placed on-hold and then transferred. Verify that inbound calls are properly presented to the Office Anywhere External PSTN destination Simul Ring Verify that inbound calls are properly presented to the desired extension and the Additional Phones destinations MakeMe Conference Verify that an inbound call can be conferenced with three (or more) additional parties 4.25 Park / Unpark Verify that an inbound call can be parked and unparked 4.26 Call Recording Verify that external calls can be recorded via the SIP Trunk using ShoreTel Communicator 4.27 Silent Monitor / Barge-In / Whisper Page 4.28 Long Duration Inbound Verify that external calls can be silently monitored, barged-in and whisper paged via the SUT. Verify that an inbound call is established for a minimum of 30 minutes
11 ID Name Description Notes 4.29 Long Duration Verify that an outbound call is Outbound established for a minimum of 30 minutes Contact Center Verify that an inbound call can be established directly to the ShoreTel Contact Center, that all prompts are heard and the agent can answer the call ShoreTel Mobility Router (SMR) Table 1-5: Security Verify that the SMR can be used with the SUT Not Tested ID Name Description Notes 5.1 Registration / Digest Authentication Verify the SUT supports the use of registration / digest authentication for service access for inbound and outbound calls. Rogers Communications Authenticates off of Public IP address Note1: Only RFC2833 out of band DTMF is supported. Configuration Overview The configuration information below shows examples for configuring ShoreTel, Ingate, and Rogers Communications. Even though configuration requirements can vary from setup to set up, the information provided in these steps, along with the Planning and Installation Guide and documentation provided by Ingate and Rogers Communications should prove to be sufficient. However, every design can vary and some may require more planning than others. ShoreTel Unsupported Features Please refer to the ShoreTel Administration Guide, Chapter 18 Session Initiation Protocol, for general supported and unsupported features when utilizing SIP Trunks
 needed to support SIP Trunking.")
12 ShoreTel Configuration This section describes the ShoreTel system configuration to support SIP Trunking. The section is divided into general system settings and trunk configurations (both group and individual) needed to support SIP Trunking. Note: ShoreTel basically just points its Individual SIP Trunks to the Ingate SIParator. ShoreTel System Settings General The first settings to address within the ShoreTel system are the general system settings. These configurations include the Call Control, the Site and the Switch settings. If these items have already been configured on the system, skip this section and go on to the ShoreTel System Settings Trunk Groups section below. CALL CONTROL SETTINGS The first settings to configure within ShoreTel Director are the Call Control Options. To configure these settings for the ShoreTel system, log into ShoreTel Director and select Administration then Call Control followed by Options (Figure 4). Figure 4 - Administration Call Control Options The Call Control Options screen will then appear (Figure 5)
13 Figure 5 - Call Control Options In the General parameters, the DTMF Payload Type (96 127) defaults to a value of 102, a modification is necessary to interoperate with Rogers Communications (see above), Within the SIP parameters; confirm that the appropriate settings are made for the Realm Enable SIP Session Timer and Always Use Port 5004 for RTP parameters. The Realm parameter is used in authenticating all SIP devices. It is typically a description of the computer or system being accessed. Changing this value will require a reboot of all ShoreGear switches serving SIP extensions. It is not necessary to modify this parameter to get the ShoreTel IP PBX system functional with Rogers Communications. Verify that the Enable SIP Session Timer box is checked (enabled). Next the Session Interval Timer needs to be set. The recommended setting for Session Interval is 3600 seconds. The last item to select is the appropriate refresher (from the pull down menu) for the SIP Session Timer. The Refresher field will be set either to Caller (UAC) [User Agent Client] or to Callee (UAS) [User Agent Server]. If the Refresher field is set to Caller (UAC), the Caller s device will be in control of the session timer refresh. If Refresher is set to Callee (UAS), the device of the person called will control the session timer refresh

14 The next settings to verify are the Voice Encoding and Quality of Service, specifically the Media Encryption parameter, make sure this parameter is set to None ; otherwise you may experience one-way audio issues. Please refer to ShoreTel s Administration Guide for additional details on media encryption and the other parameters in the Voice Encoding and Quality of Service area. The ShoreTel legacy parameter Always Use Port 5004 for RTP should be disabled by default, if it s enabled you will need to disable it. Disabling is required for implementing SIP on the ShoreTel system. For SIP configurations, Dynamic User Datagram Protocol (UDP) must be used for RTP Traffic. If the parameter is disabled, Media Gateway Control Protocol (MGCP) will no longer use UDP port 5004; MGCP and SIP traffic will use dynamic UDP ports. Once this parameter is disabled (unchecked), make sure that everything (IP Phones, ShoreGear Switches, ShoreWare Server, Distributed Voice Mail Servers / Remote Servers, Conference Bridges and Contact Centers) is fully rebooted this is a one time only item. By not performing a full system reboot, one-way audio will probably occur during initial testing. SITES SETTINGS The next settings to address are the administration of sites. These settings are modified under the ShoreWare Director by selecting Administration, then Sites (Figure 6). Figure 6 Site Administration This selection brings up the Sites screen. Within the Sites screen, select the name of the site to configure. The Edit Site screen will then appear. The only changes required to the Edit Site screen are to the Admission Control Bandwidth and Intra-Site / Inter-Site Calls parameters (Figure 7)
15 Figure 7 Site Bandwidth settings Note: Bandwidth of 1024 is just an example. Please refer to the ShoreTel Planning and Installation Guide for additional information on setting Admission Control Bandwidth. Sites Edit screen Admission Control Bandwidth The Admission Control Bandwidth defines the bandwidth available to and from the site. This is important as SIP trunk calls may be counted against the site bandwidth. Bandwidth needs to be set appropriately based on site setup and configuration with Rogers Communications s SIP Trunking. See the ShoreTel Planning and Installation Guide for more information. Sites Edit screen Intra / Inter-Site Calls By default ShoreTel 14.x has 12 built-in codecs, these codecs can be grouped as Codec Lists and defined in the sites page for Inter-site and Intra-site calls. Configure the "Intra-Site Calls" option to a Codec List that contains the desired codecs and save the change. Codec lists are found under Call Control, then Codec Lists. The site that the SIP Trunk Group belongs to will determine which Intra-Site Codec List will be utilized be sure to move the desired codec up the list for higher priority. Please refer to the ShoreTel Planning and Installation Guide for additional information. Switch Settings Allocating Ports for SIP Trunks The final general settings to input are the ShoreGear switch settings. These changes are modified by selecting Administration, then Platform Hardware, then Voice Switches / Service Appliances followed by Primary in ShoreWare Director (Figure 8)
.")
 to be played when calls are on hold, then the MOH source needs to be the same ShoreGear switch as the SIP Trunks.")

16 Figure 8 - Administration Switches This action brings up the Switches screen. From the Switches screen simply select the name of the switch to configure. The Edit ShoreGear Switch screen will be displayed. Within the Edit ShoreGear Switch screen, select the desired number of SIP Trunks from the ports available (Figure 9). Figure 9 - ShoreGear Switch Settings Each port designated as a SIP Trunk enables the support for 5 individual trunks. Note: If you would like Music On Hold (MOH) to be played when calls are on hold, then the MOH source needs to be the same ShoreGear switch as the SIP Trunks. This is only applicable to ShoreTel physical switches. Starting with ShoreTel 13 and up through release 14.2, an additional option was added to the Port Type of halfwidth ShoreGear switches. The new selection is SIP Media Proxy, it ensures that the ShoreTel system that is using SIP Trunks to have feature parity with PRI trunks. These include RFC 2833 DTMF detection for Office Anywhere External or Simultaneous Ring calls, three party mesh conferencing (without needing to configure MakeMe conference ports), call recording, Silent Monitoring, Barge-In, Whisper Page, Invites with no SDP and when there s no common codec between ITSP and the local extension. With the introduction of ShoreTel 14.2, ShoreTel Virtual Trunk Switches include SIP Media Proxy resources, therefore, no configuration is required. With physical ShoreGear switches, SIP Media Proxy resources are not

17 allocated by default and must be reserved/enabled to support various SIP features and functions (described in the previous paragraph). For further information on SIP Media Proxy please refer to Chapter 18 of the ShoreTel 14.2 System Administration Guide. If you are using the older full-width ShoreGear switches and you want perform 3 (or more) party conference calls with Rogers Communications s SIP Trunking service, please make sure that you have enabled a minimum of four MakeMe conference port resources. Conference resources are required with ShoreTel 14.2 on full-width ShoreGear switches for 3-way conference calls to function as expected. These resources may be on any switch that has spare ports and supports MakeMe conference resources. ShoreTel System Settings Trunk Groups ShoreTel Trunk Groups only support Static IP Addresses for Individual Trunks. In trunk planning, the following needs to be considered: - Ingate SIParator LAN and WAN interfaces should always be configured to use a Static IP Address. The settings for Trunk Groups are changed by selecting Administration, then Trunks followed by Trunk Groups within ShoreWare Director (Figure 13). Figure 13 Administration Trunk Groups

18 This selection brings up the Trunk Groups screen (Figure 14). Figure 14 - Trunk Groups Settings From the pull down menus on the Trunk Groups screen, select the site desired and select the SIP trunk type to configure. Then click on the Go link from Add new trunk group at site. The Edit SIP Trunk Group screen will appear (Figure 15). Figure 15 Edit SIP Trunk Group The next step within the Edit SIP Trunks Group screen is to input the name for the trunk group. In the example in Figure 15, the name Sip trunks has been created. The Enable SIP Info for G.711 DTMF Signaling parameter should not be enabled (checked). Enabling SIP info is currently only used with SIP tie trunks between ShoreTel systems. In the Profile: parameter, select the down arrow (pull-down menu) and select Default ITSP. The Enable Digest Authentication parameter defaults to <None> and modification is not required when connecting to Rogers Communications SIP Trunking. Digest Authentication is configured on the Ingate SIParator, which is described later in the Ingate configuration (ITSP section). The next item to change in the Edit SIP Trunks Group screen is to make the appropriate settings for the Inbound: parameters. (Figure 16)
19 Figure 16 Inbound Within the Inbound: settings, ensure the Number of Digits from CO: is configured to a value of 10, this is the number of digits that the ShoreGear SIP trunk switch will be receiving from Rogers Communications. Enable (check) the DNIS or DID parameters as needed. It is no longer needed to enable the Extension parameter or the Tandem Trunking parameter. Finally, be sure to specify the proper User Group: that has access to the correct trunks. For additional information on these parameters please refer to the ShoreTel Administration Guide. Note: The following section is configured no different than any normal Trunk Group
20 Figure 17 Outbound and Trunk Services: If outbound call service is required, enable (check) the Outbound parameter and define a Trunk Access Code and Local Area Code as appropriate. In addition you should also define the Billing Telephone Number with the appropriate main number provided by Rogers Communications SIP Trunking service. In the Trunk Services: area, make sure the appropriate services are enabled or disabled based on what Rogers Communications supports and what features are needed from this Trunk Group. The parameter Caller ID not blocked by default determines if the call is sent out as <unknown> or with caller information (Caller ID). User DID will impact how information is passed out to the SIP Trunk group. After these settings are made to the Edit SIP Trunk Group screen, select the Save button to input the changes. The next parameter for configuration in the Trunk Group is Trunk Digit Manipulation (Figure 18):
21 Figure 18 Trunk Digit Manipulation: The only parameter that requires adjustment (from default) to interface with Rogers Communications is: Dial 7 digits for Local Area Code. Disable (uncheck) the Dial 7 digits for Local Area Code parameter. After these settings are made to the Edit SIP Trunk Group screen, click the Save button to input the changes. The final parameter setting for the Trunk Group will remove the leading +1 from dialed numbers within all SIP headers. This parameter can only be changed by logging into ShoreTel Director in the Support Entry mode. Logout of ShoreTel Director, you will then be presented with the ShoreTel Director login page. On your keyboard, hold down the <CTRL> and <Shift> keys and with the mouse pointer click on the Username: field, then log into ShoreTel Director with your normal administration user credentials. This will enable the Support Entry mode of the ShoreTel Director, as referenced below in (Figure 19)

 (Figure 20).")
22 Figure 19 ShoreTel Director Support Entry: Navigate to the SIP trunk group you ve configured and scroll to the bottom of the page, to the right of the Custom entry click on the Edit button and enter the parameter ;10E in the Webpage Dialog (note: the E is case sensitive and must be capitalized) (Figure 20). Figure 20 Trunk Groups Dialing Rules Webpage Dialog:

.")
 to be added and select the appropriate trunk group from the pull down menu")
23 Click the Save button to input the changes. This will remove the + and the Country Code, for US and Canada, and the outbound Caller ID numbers will be represented as10 digits. System Settings Individual Trunks This section covers the configuration of the individual trunks. Select Administration, then Trunks followed by Individual Trunks to configure the individual trunks (Figure 21). Figure 21 Individual Trunks The Trunks by Group screen that is used to change the individual trunks settings then appears (Figure 22). Figure 22 Trunks by Group: Select the site for the new individual trunk(s) to be added and select the appropriate trunk group from the pull down menu in the Add new trunk at site area. In this example, the site is Headquarters and the trunk group is Rogers Communications / Ingate, as created above, see Figure 12. Click on the Go button to bring up the Edit Trunk screen
24 (Figure 23). Figure 23 - Edit Trunks Screen for Individual Trunks From the individual trunks Edit Trunk screen, input a Name: for the individual trunks, then select the appropriate Switch. When selecting a name, the recommendation is to name the individual trunks the same as the name of the trunk group so that the trunk type can easily be tracked. Select the switch upon which the individual trunks will be created. For the parameter IP Address, define the IP address of the Ingate SIParator product. The last step is to select the number of individual trunks desired Number of Trunks (1 220) (each one supports one audio path example if 10 is configured, then 10 audio paths can be up at one time). Once these changes are complete, select the Save button to commit changes. Note: Individual SIP Trunks cannot span networks. SIP Trunks can only terminate on the switch selected. There is no failover to another switch. For redundancy, two trunk groups will be needed with each pointing to another Ingate SIParator just the same as if PRI were being used. After setting up the trunk groups and individual trunks, refer to the ShoreTel Product Installation Guide to make the appropriate changes for the User Group settings. This completes the settings for the ShoreTel system side
25 Ingate Configuration Ingate products are compatible with communications equipment from other vendors and service providers who support the SIP Protocol. The Ingate products are a security device designed to sit on the enterprise network edge, an ICSA Labs Certified security product, focused on SIP communications security and network security for the enterprise. Ingate products are designed to solve the issues related to SIP traversing the NAT (Network Address Translation) which is a part of all enterprise class firewalls. The NAT translates between the public IP addresses of the enterprise, and the private IP addresses which are only known on the inside LAN. These private IP addresses are created and assigned to devices on the enterprise LAN, and provide one of the security layers of the enterprise network. In addition, the Ingate products provide routing rules that assign a SIP traffic flow that ensures only allowed SIP traffic will pass. Ingate Startup Tool The Ingate Startup Tool is an installation tool for Ingate Firewall and Ingate SIParator products, and facilitates the out of the box set up of SIP Trunking solutions with ShoreTel and various Internet Telephony Service Providers. Designed to simplify SIP trunk deployments, the tool will automatically configure a user s Ingate Firewall or SIParator to work with ShoreTel and the SIP Trunking service provider of your choice. With the push
 they use; the configuration tool will automatically apply the correct settings to the Ingate")
26 of a button, the configuration tool will automatically create a SIP trunk deployment designed to the user s individual setup. Users can select ShoreTel from a drop-down menu and the Internet Telephony Service Provider (ITSP) they use; the configuration tool will automatically apply the correct settings to the Ingate Firewall or SIParator to work seamlessly with that vendor or service provider. A list of SIP Trunking service providers that have demonstrated interoperability with the Ingate products is incorporated into the interface. Please note that not all SIP Trunking service providers listed in this interface have been certified by ShoreTel. Consult the ShoreTel Certified Technology Partner list of vendors for a current list. ( The configuration tool is available now as a free download for all Ingate Firewalls and SIParators. It can be found at Also available here is a Startup Tool Getting Started Guide to assist in using the Startup Tool. WEB ADMIN By default the Ingate units does not come pre-assigned with an IP Address or word, once these are assigned by the Startup Tool or Console Port, the Ingate units can be administered via the web. Using a Browser, simply enter the IP Address assigned to the unit, this will launch the Web Administration GUI. CONNECTING THE INGATE FIREWALL/SIPARATOR From the factory the Ingate Firewall and SIParator does not come preconfigured with an IP address or word to administer the unit. Web administration is not possible unless an IP Address and word are assigned to the unit via the Startup Tool or Console port. The following will describe a process to connect the Ingate unit to the network then have the Ingate Startup Tool assign an IP Address and word to the Unit. Configuration Steps: 1. Connect Power to the Unit. 2. Connect an Ethernet cable to Eth0. This Ethernet cable should connect to a LAN network. Below are some illustrations of where Eth0 are located on each of the Ingate Model types. On SIParator SBE connect to ET1. Ingate SIParator SBE (Back)


27 Ingate 1190 Firewall & SIParator 19 (Back) Ingate 1500/1550/1650 Firewall & SIParator 50/55/65 Ingate 1900 Firewall & SIParator The PC/Server with the Startup Tool should be located on the same LAN segment/subnet. It is required that the Ingate unit and the Startup Tool are on the same LAN Subnet to which you are going to assign an IP Address to the Ingate Unit. Note: When configuring the unit for the first time, avoid having the Startup Tool on a PC/Server on a different Subnet, or across a Router, or NAT device, Tagged VLAN, or VPN Tunnel. Keep the network Simple

28 4. Proceed to Section 3: Using the Startup Tool for instructions on using the Startup Tool. USING THE STARTUP TOOL There are three main reasons for using the Ingate Startup Tool. First, the Out of the Box configuration of the Ingate Unit for the first time. Second, is to change or update an existing configuration. Third, is to register the unit, install a License Key, and upgrade the unit to the latest software. CONFIGURE THE UNIT FOR THE FIRST TIME From the factory the Ingate Firewall and SIParator does not come preconfigured with an IP address or word to administer the unit. Web administration is not possible unless an IP Address and word are assigned to the unit via the Startup Tool or Console port. In the Startup Tool, when selecting Configure the unit for the first time, the Startup Tool will find the Ingate Unit on the network and assign an IP Address and word to the Ingate unit. This procedure only needs to be done ONCE. When completed, the Ingate unit will have an IP Address and word assigned. Note: If the Ingate Unit already has an IP Addressed and word assigned to it (by the Startup Tool or Console) proceed directly to Section 4.2: Change or Update Configuration. Configuration Steps: 1. Launch the Startup Tool


29 2. Select the Model type of the Ingate Unit, and then click Next. 3. In the Select first what you would like to do, select Configure the unit for the first time. 4. Other Options in the Select first what you would like to do,

30 a. Select Configure SIP Trunking if you want the tool to configure SIP Trunking between a IP- PBX and ITSP. b. Select Configure Remote SIP Connectivity if you want the tool to configure Remote Phone access to an IP-PBX c. Select Register this unit with Ingate if you want the tool to connect with to register the unit. If selected, see Section 4.3: Licenses and Upgrades. d. Select Upgrade this unit if you want the tool to connect with to download the latest software release and upgrade the unit. If selected, see Section 4.3: Licenses and Upgrades. e. Select Backup the created configuration if you want the tool to apply the settings to an Ingate unit and save the config file. f. Select Creating a config without connecting to a unit if you want the tool to just create a config file. g. Select The tool remembers passwords if you want the tool to remember the passwords for the Ingate unit. 5. In the Inside (Interface Eth0), a. Enter the IP Address to be assigned to the Ingate Unit. b. Enter the MAC Address of the Ingate Unit, this MAC Address will be used to find the unit on the network. The MAC Address can be found on a sticker attached to the unit. 6. In the Select a word, enter the word to be assigned to the Ingate unit


31 7. Choose the PC interface used to connect to the unit.. 8. Once all required values are entered, the Contact button will become active. Press the Contact button to have the Startup Tool find the Ingate unit on the network, assign the IP Address and word. 9. Proceed to Section 3.3.3: Network Topology. CHANGE OR UPDATE CONFIGURATION When selecting the Change or update configuration of the unit setting in the Startup Tool the Ingate Unit must have already been assigned an IP Address and word, either by the Startup Tool Configure the unit for the first time or via the Console port. In the Startup Tool, when selecting Change or update configuration of the unit, the Startup Tool will connect directly with the Ingate Unit on the network with the provided IP Address and word. When completed, the Startup Tool will completely overwrite the existing configuration in the Ingate unit with the new settings. Note: If the Ingate Unit does not have an IP Addressed and word assigned to it, proceed directly to Section 4.1: Configure the Unit for the First Time. Configuration Steps: 1. Launch the Startup Tool 2. Select the Model type of the Ingate Unit, and then click Next


32 3. In the Select first what you would like to do, select Change or update configuration of the unit

33 4. Other Options in the Select first what you would like to do, a. Select Configure SIP Trunking if you want the tool to configure SIP Trunking between a IP- PBX and ITSP. b. Select Configure Remote SIP Connectivity if you want the tool to configure Remote Phone access to an IP-PBX c. Select Register this unit with Ingate if you want the tool to connect with to register the unit. If selected, see Section 4.3: Licenses and Upgrades. d. Select Upgrade this unit if you want the tool to connect with to download the latest software release and upgrade the unit. If selected, see Section 4.3: Licenses and Upgrades. e. Select Backup the created configuration if you want the tool to apply the settings to an Ingate unit and save the config file. f. Select Creating a config without connecting to a unit if you want the tool to just create a config file. g. Select The tool remembers passwords if you want the tool to remember the passwords for the Ingate unit. 5. In the Inside (Interface Eth0), a. Enter the IP Address of the Ingate Unit. 6. In the Enter a word, enter the word of the Ingate unit

 type.")
34 7. Once all required values are entered, the Contact button will become active. Press the Contact button to have the Startup Tool contact the Ingate unit on the network. 8. Proceed to Section 3.3.3: Network Topology. NETWORK TOPOLOGY The Network Topology is where the IP Addresses, Netmask, Default Gateways, Public IP Address of NAT ed Firewall, and DNS Servers are assigned to the Ingate unit. The configuration of the Network Topology is dependent on the deployment (Product) type. When selected, each type has a unique set of programming and deployment requirements, be sure to pick the Product Type that matches the network setup requirements. Configuration Steps: 1. In the Product Type drop down list, select the deployment type of the Ingate Firewall or SIParator. Hint: Match the picture to the network deployment. 2. When selecting the Product Type, the rest of the page will change based on the type selected. Go to the Sections below to configure the options based on your choice

35 Product Type: Firewall When deploying an Ingate Firewall, there is only one way the Firewall can be installed. The Firewall must be the Default Gateway for the LAN; it is the primary edge device for all data and voice traffic out of the LAN to the Internet. Configuration Steps: 1. In Product Type, select Firewall. 2. Define the Inside (Interface Eth0) IP Address and Netmask. This is the IP Address that will be used on the LAN side on the Ingate unit
36 3. Define the Outside (Interface Eth1) IP Address and Netmask. This is the IP Address that will be used on the Internet (WAN) side on the Ingate unit. a. A Static IP Address and Netmask can be entered b. Or select Use DHCP to obtain IP, if you want the Ingate Unit to acquire an IP address dynamically using DCHP. 4. Enter the Default Gateway for the Ingate Firewall. The Default Gateway for the Ingate Firewall will always be an IP Address of the Gateway within the network of the outside interface (Eth1). 5. Enter the DNS Servers for the Ingate Firewall. These DNS Servers will be used to resolve FQDNs of SIP Requests and other features within the Ingate. They can be internal LAN addresses or outside WAN addresses

37 Product Type: Standalone When deploying an Ingate SIParator in a Standalone configuration, the SIParator resides on a LAN network and on the WAN/Internet network. The Default Gateway for SIParator resides on the WAN/Internet network. The existing Firewall is in parallel and independent of the SIParator. Firewall is the primary edge device for all data traffic out of the LAN to the Internet. The SIParator is the primary edge device for all voice traffic out of the LAN to the Internet. Configuration Steps: 1. In Product Type, select Standalone SIParator. 2. Define the IP Address and Netmask of the inside LAN (Interface Eth0). This is the IP Address that will be used on the Ingate unit to connect to the LAN network
38 3. Define the Outside (Interface Eth1) IP Address and Netmask. This is the IP Address that will be used on the Internet (WAN) side on the Ingate unit. a. A Static IP Address and Netmask can be entered b. Or select Use DHCP to obtain IP, if you want the Ingate Unit to acquire an IP address dynamically using DCHP. 4. Enter the Default Gateway for the Ingate SIParator. The Default Gateway for the SIParator will be the existing Firewalls IP Address on the DMZ network. 5. Enter the DNS Servers for the Ingate Firewall. These DNS Servers will be used to resolve FQDNs of SIP Requests and other features within the Ingate. They can be internal LAN addresses or outside WAN addresses. Product Type: DMZ SIParator When deploying an Ingate SIParator in a DMZ configuration, the Ingate resides on a DMZ network connected to an existing Firewall. The Ingate needs to know what the Public IP Address of the Firewall. This existing Firewall must be the Default Gateway for the DMZ network; the existing Firewall is the primary edge device for all data and voice traffic out of the LAN and DMZ to the Internet. SIP Signaling and Media must be forwarded to the Ingate SIParator, both from the Internet to the SIParator and from the DMZ to the LAN

39 Configuration Steps: 1. In Product Type, select DMZ SIParator. 2. Define the IP Address and Netmask of the DMZ (Interface Eth0). This is the IP Address that will be used on the Ingate unit to connect to the DMZ network side on the existing Firewall. 3. Define the LAN IP Address Range, the lower and upper limit of the network addresses located on the LAN. This is the scope of IP Addresses contained on the LAN side of the existing Firewall
40 4. Enter the Default Gateway for the Ingate SIParator. The Default Gateway for the SIParator will be the existing Firewalls IP Address on the DMZ network. 5. Enter the existing Firewall s external WAN/Internet IP Address. This is used to ensure correct SIP Signaling and Media traversal functionality. This is required when the existing Firewall is providing NAT. 6. Enter the DNS Servers for the Ingate Firewall. These DNS Servers will be used to resolve FQDNs of SIP Requests and other features within the Ingate. They can be internal LAN addresses or outside WAN addresses. 7. On the Existing Firewall, the SIP Signaling Port and RTP Media Ports need to be forwarded to the Ingate SIParator. The Ingate SIParator is an ICSA Certified network edge security device, so there are no security concerns forwarding network traffic to the SIParator. On the existing Firewall: a. Port Forward the WAN/Internet interface SIP Signaling port of 5060 with a UDP/TCP Forward to the Ingate SIParator b. Port Forward the range of RTP Media ports of to with a UDP Forward to the Ingate SIParator c. If necessary; provide a Rule that allows the SIP Signaling on port 5060 using UDP/TCP transport on the DMZ network to the LAN network d. If necessary; provide a Rule that allows a range of RTP Media ports of to using UDP transport on the DMZ network to the LAN network

41 Product Type: DMZ-LAN SIParator When deploying an Ingate SIParator in a DMZ-LAN configuration, the Ingate resides on a DMZ network connected to an existing Firewall and also on the LAN network. The Ingate needs to know what the Public IP Address of the Firewall. This existing Firewall must be the Default Gateway for the DMZ network; the existing Firewall is the primary edge device for all data and voice traffic out of the LAN and DMZ to the Internet. SIP Signaling and Media must be forwarded to the Ingate SIParator, from the Internet to the SIParator. The voice traffic from the LAN is directed to the SIParator then to the existing Firewall. Configuration Steps: 1. In Product Type, select DMZ-LAN SIParator Define the IP Address and Netmask of the inside LAN (Interface Eth0). This is the IP Address that will be used on the Ingate unit to connect to the LAN network
42 4. Define the IP Address and Netmask of the DMZ (Interface Eth1). This is the IP Address that will be used on the Ingate unit to connect to the DMZ network side on the existing Firewall. a. A Static IP Address and Netmask can be entered b. Or select Use DHCP to obtain IP, if you want the Ingate Unit to acquire an IP address dynamically using DCHP. 5. Enter the Default Gateway for the Ingate SIParator. The Default Gateway for the SIParator will be the existing Firewalls IP Address on the DMZ network. 6. Enter the existing Firewall s external WAN/Internet IP Address. This is used to ensure correct SIP Signaling and Media traversal functionality. This is required when the existing Firewall is providing NAT. 7. Enter the DNS Servers for the Ingate Firewall. These DNS Servers will be used to resolve FQDNs of SIP Requests and other features within the Ingate. They can be internal LAN addresses or outside WAN addresses. 8. On the Existing Firewall, the SIP Signaling Port and RTP Media Ports need to be forwarded to the Ingate SIParator. The Ingate SIParator is an ICSA Certified network edge security device, so there are no security concerns forwarding network traffic to the SIParator. On the existing Firewall: a. Port Forward the WAN/Internet interface SIP Signaling port of 5060 with a UDP/TCP Forward to the Ingate SIParator b. Port Forward the a range of RTP Media ports of to with a UDP Forward to the Ingate SIParator

43 Product Type: LAN SIParator When deploying an Ingate SIParator in a LAN configuration, the Ingate resides on a LAN network with all of the other network devices. The existing Firewall must be the Default Gateway for the LAN network; the existing Firewall is the primary edge device for all data and voice traffic out of the LAN to the WAN/Internet. SIP Signaling and Media must be forwarded to the Ingate SIParator, from the Internet to the SIParator. The voice traffic from the LAN is directed to the SIParator then to the existing Firewall. Configuration Steps: 1. In Product Type, select LAN SIParator. 2. Define the IP Address and Netmask of the inside LAN (Interface Eth0). This is the IP Address that will be used on the Ingate unit to connect to the LAN network
44 3. Enter the Default Gateway for the Ingate SIParator. The Default Gateway for the SIParator will be the existing Firewalls IP Address on the DMZ network. 4. Enter the existing Firewall s external WAN/Internet IP Address. This is used to ensure correct SIP Signaling and Media traversal functionality. This is required when the existing Firewall is providing NAT. 5. Enter the DNS Servers for the Ingate Firewall. These DNS Servers will be used to resolve FQDNs of SIP Requests and other features within the Ingate. They can be internal LAN addresses or outside WAN addresses. 6. On the Existing Firewall, the SIP Signaling Port and RTP Media Ports need to be forwarded to the Ingate SIParator. The Ingate SIParator is an ICSA Certified network edge security device, so there are no security concerns forwarding network traffic to the SIParator. On the existing Firewall: a. Port Forward the WAN/Internet interface SIP Signaling port of 5060 with a UDP/TCP Forward to the Ingate SIParator b. Port Forward the a range of RTP Media ports of to with a UDP Forward to the Ingate SIParator IP-PBX The IP-PBX section is where the IP Addresses and Domain location are provided to the Ingate unit. The configuration of the IP-PBX will allow for the Ingate unit to know the location of the IP-PBX as to direct SIP traffic for the use with SIP Trunking and Remote Phones. The IP Address of the IP-PBX must be on the same network subnet at the IP Address of the inside interface of the Ingate unit. Ingate has confirmed interoperability with several of the leading IP-PBX vendors

45 Configuration Steps: 1. In the IP-PBX Type drop down list, select ShoreTel ShoreGear. Ingate has confirmed interoperability with ShoreTel, the unique requirements of the vendor testing are contained in the Startup Tool. 2. Enter the IP Address of the ShoreTel ShoreGear SIP Trunk switch. The IP Address should be on the same LAN subnet as the Ingate unit. INTERNET SERVICE PROVIDER (ITSP) The ITSP section is where all of the attributes of the Rogers Communications SIP Trunking service are programmed. Details like the IP Addresses or Domain, DIDs, Authentication Account information, Prefixes, and PBX local number. The configuration of the ITSP will allow for the Ingate unit to know the location of the ITSP as to direct SIP traffic for the use with SIP Trunking. Ingate has confirmed interoperability many of the leading ITSP vendors. Note only Innovation Network validated ITSPs are supported by ShoreTel. Click here for a current list of ShoreTel Innovation Network validated ITSPs:

46 Configuration Steps: 1. In the ITSP drop down list, select Generic (no register). Ingate has confirmed interoperability with several of the leading ITSP vendors, the unique requirements of the vendor testing are contained in the Startup Tool. Note only Innovation Network validated ITSPs are supported by ShoreTel. Click here for a current list of ShoreTel Innovation Network validated ITSPs: When you select a specific ITSP vendor, the Startup Tool will have the individual connection requirements predefined for that ITSP, the only additional entries may be the specific site requirements. 2. For the Provider address enter the IP Address provided by Rogers Communications
47 UPLOAD CONFIGURATION At this point the Startup Tool has all the information required to push a database into the Ingate unit. The Startup Tool can also create a backup file for later use

48 Configuration Steps: 1. Press the Upload button. If you would like the Startup Tool to create a Backup file also select Backup the configuration. Upon pressing the Upload button the Startup Tool will push a database into the Ingate unit


49 2. When the Startup has finished uploading the database a window will appear and once pressing OK the Startup Tool will launch a default browser and direct you to the Ingate Web GUI. 3. Although the Startup Tool has pushed a database into the Ingate unit, the changes have not been applied to the unit. Press Apply Configuration to apply the changes to the Ingate unit. 4. A new page will appear after the previous step requesting to save the configuration. Press Save Configuration to complete the saving process


50 INGATE ADDITIONAL CONIGURATION PARAMETERS The Startup Tool addresses the majority of the configuration on the Ingate SIParator, only the remaining configuration step is required to interface with Rogers Communications. Log into the Ingate Web UI, then go to SIP Trunks. SIP HEADER CONFIGURATION Select the appropriate SIP Trunk by selecting the Goto SIP Trunk page button or the Trunk 1 tab. Once in the actual Trunk Group page, scroll down to the PBX Lines parameter section:

51 Scroll to the bottom of the page and click on the Save button. Be sure to apply and save the configuration change, as noted at the end of the Startup Tool section above

52 Configuration Troubleshooting STARTUP TOOL TROUBLESHOOTING STATUS BAR Located on every page of the Startup Tool is the Status Bar. This is a display and recording of all of the activity of the Startup Tool, displaying Ingate unit information, software versions, Startup Tool events, errors and connection information. Please refer to the Status Bar to acquire the current status and activity of the Startup Tool. CONFIGURE UNIT FOR THE FIRST TIME Right Out of the Box, sometimes connecting and assigning an IP Address and word to the Ingate Unit can be a challenge. Typically, the Startup Tool cannot program the Ingate Unit. The Status Bar will display The program failed to assign an IP address to eth0. Possible Problems & Resolutions Possible Problems Ingate Unit is not Turned On. Ethernet cable is not connected to Eth0. Incorrect MAC Address An IP Address and/or word have already been assigned to the Ingate Unit Possible Resolution Turn On or Connect Power (Trust me, I ve been there) Eth0 must always be used with the Startup Tool. Check the MAC address on the Unit itself. MAC Address of Eth0. It is possible that an IP Address or word have been already been assigned to the unit via the Startup Tool or Console

53 Ingate Unit on a different Subnet or Network Despite your best efforts The Startup Tool uses an application called Magic PING to assign the IP Address to the Unit. It is heavily reliant on ARP, if the PC with the Startup Tool is located across Routers, Gateways and VPN Tunnels, it is possible that MAC addresses cannot be found. It is the intension of the Startup Tool when configuring the unit for the first time to keep the network simple. See Section Use the Console Port, please refer to the Reference Guide, section Installation with a serial cable, and step through the Basic Configuration. Then you can use the Startup Tool, this time select Change or Update the Configuration 2. Factory Default the Database, then try again. CHANGE OR UPDATE CONFIGURATION If the Ingate already has an IP Address and word assigned to it, then you should be able use a Web Browser to reach the Ingate Web GUI. If you are able to use your Web Browser to access the Ingate Unit, then the Startup should be able to contact the Ingate unit as well. The Startup Tool will respond with Failed to contact the unit, check settings and cabling when it is unable to access the Ingate unit. Possible Problems & Resolutions Possible Problems Ingate Unit is not Turned On. Incorrect IP Address Incorrect word Possible Resolution Turn On or Connect Power Check the IP Address using a Web Browser. Check the word
54 Despite your best efforts 1. Since this process uses the Web (http) to access the Ingate Unit, it should seem that any web browser should also have access to the Ingate Unit. If the Web Browser works, then the Startup Tool should work. 2. If the Browser also does not have access, it might be possible the PC s IP Address does not have connection privileges in Access Control within the Ingate. Try from a PC that have access to the Ingate Unit, or add the PC s IP Address into Access Control


55 NETWORK TOPOLOGY There are several possible error possibilities here, mainly with the definition of the network. Things like IP Addresses, Gateways, Netmask(s), and so on. Possible Problems & Resolutions Possible Problems Error: Default gateway is not reachable. Error: Settings for eth0/1 is not correct. Error: Please provide a correct netmask for eth0/1 Error: Primary DNS not setup. Possible Resolution The Default Gateway is always the way to the Internet, in the Standalone or Firewall it will be the Public Default Gateway; on the others it will be a Gateway address on the local network. IP Address of Netmask is in an Invalid format. Netmask is in an Invalid format. Enter a DNS Server IP address IP-PBX The errors here are fairly simple to resolve. The IP address of the IP-PBX must be on the same LAN segment/subnet as the Eth0 IP Address/Mask. Possible Problems & Resolutions Possible Problems Error: The IP PBX IP does not seem to be on the LAN. Error: You must enter a SIP domain. Error: As you intend to use RSC you must enter a SIP domain. Alternatively you may configure a static IP address on eth1 under Network Topology Possible Resolution The IP Address of the IP-PBX must be on the same subnet as the inside interface of the Ingate Eth0. Enter a Domain, or de-select Use Domain Enter a Domain or IP Address used for Remote SIP Connectivity. Note: must be a Domain when used with SIP Trunking module


56 INTERNET SERVICE PROVIDER (ITSP) The errors here are fairly easy to resolve. The IP address, Domain, and DID of Rogers Communications must be entered Possible Problems & Resolutions Possible Problems Error: Please enter a domain name for your provider Error: Please enter number, name and domain. Possible Resolution Enter a Domain, or de-select Use Domain Enter a DID and Domain, or de-select Use Account APPLY CONFIGURATION At this point the Startup Tool has pushed a database to the Ingate Unit, you have pressed Apply Configuration in Step 3) of Section 4.7 Upload Configuration, but the Save Configuration is never presented. Instead after a period of time the following webpage is presented. This page is an indication that there was a change in the database significant enough that the PC could no longer web to the Ingate unit. Possible Problems & Resolutions Possible Problems Eth0 Interface IP Address has changed Access Control does not allow administration from the IP address of the PC. Possible Resolution Increase the duration of the test mode, press Apply Configuration and start a new browser to the new IP address, then press Save Configuration Verify the IP address of the PC with the Startup Tool. Go to Basic Configuration, then Access Control. Under Configuration Computers, ensure the IP Address or Network address of the PC is allowed to HTTP to the Ingate unit
57 Ingate Web GUI Configuration The following example shows basic configuration parameters for the Ingate device in Firewall mode using the Web GUI. The IP-Addresses and DID s are used as an example only. Actual values will depend on what Rogers Communications assigns for your solution. Note: The Ingate Firewall screen shots in the following pages may vary from other Ingate modes of operation. Configure your Ingate Firewall or Ingate SIParator to get basic network connectivity on all applicable interfaces. Please refer to the Reference Guide and other documentation as needed. Remember to configure the following: - Assign IP addresses on the inside and outside interface. For DMZ SIParators, use one interface only. (Network -> All Interfaces) - Assign a default gateway. (Network -> Default Gateway) - Assign a DNS server address. (Basic Configuration -> Basic Configuration) - Define the IP subnet allowed to configure the Ingate and the interfaces to use for configuration. (Basic Configuration -> Access Control) First make these basic settings and then apply the configuration to have the unit working in your network environment. Then proceed with the following settings to get SIP Trunking to work with your service provider. NETWORK NETWORK & COMPUTERS - Add a network for the Service Provider (Rogers Communications). If you don t know the IP addresses used, you can put in as lower limit and as upper limit. In this way, requests from any IP address will be accepted. - Add IP for ShoreTel IP-PBX switch. - Add a network for the LAN (inside IP range) and WAN (outside IP Range) and assign to respective interface


58 BASIC CONFIGURATION SIPARATOR TYPE Use the appropriate SIParator configuration for your deployment
 and then build in your security by adding entries into Sender IP Filter Rules (taken from Networks and Computers ) and use")
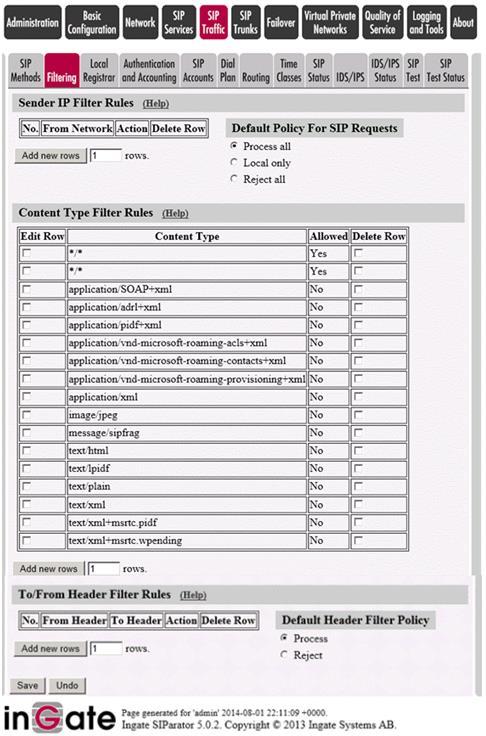
59 SIP SERVICES BASIC - SIP Module: On. SIP TRAFFIC FILTERING 1. Under Proxy Rules, change the Default Policy for SIP Requests to Reject All. NOTE: From a security perspective start by trusting no one (reject all) and then build in your security by adding entries into Sender IP Filter Rules (taken from Networks and Computers ) and use these as a starting point for further processing in a Dial Plan and Call Flow Policy. 2. Content Type: Add */* and Allow Yes
60 - 60 -

61 SIP TRAFFIC DIAL PLAN Configure the Dial Plan according to the picture below


62 SIP TRUNKS SIP TRUNK PAGE Configure the SIP Trunk according to the picture below
63 Ingate Basic Call Troubleshooting TROUBLESHOOTING OUTBOUND CALLS Symptom: When trying to make a call from an internal ShoreTel extension to PSTN, there is no ringing signal on the PSTN phone. Note: If you get a ringing signal on the PSTN phone, these troubleshooting steps will not help you to find the problem. Please contact your sales representative for support. Get a Log for the Failing Call: Outbound traffic troubleshooting overview First try to make a call to a PSTN number from a ShoreTel phone and notice the behavior on the ShoreTel phone as well as on the PSTN phone. Next step is to search the log on the Ingate. Log in to the Ingate box and navigate to the Display Log page. Make necessary settings on this page according to the picture below. Especially make sure that you have the highlighted checkboxes in the correct state. 960 Stewart Drive Sunnyvale, CA USA Phone SHORE Fax
64 Then press Display log further down on the same page. You will now see a log of all SIP packets received and sent by the Ingate, with the newest log entry on the top. Ensure the signaling is received from the ShoreTel: Localize the call initiation from the ShoreTel by searching for invite sip in your browser. You should look for the first packet coming from the ShoreTel system that starts with a recv from <IP address of the ShoreGear switch> as you can see in the example (only the first lines of the log messages are shown here). >>> Info: sipfw: recv from :5060 via UDP connection 12746: INVITE sip: @ :5060 SIP/2.0 If you cannot find a packet like the one above, the problem is in the communication from Shoregear to the Ingate. Follow these steps: 1. Make sure the Ingate SIP module is turned on, SIP Services SIP Module On. Retest if you change any setting. 2. Make sure the ShoreTel configuration is correct. Check the IP address pointing at Ingate one extra time. Retest if you change any setting. 3. Make sure there is IP connectivity between the ShoreTel and Ingate. Contact your network administrator for assistance if needed
65 If none of the steps above solves the problem, contact your sales representative for support. Ensure the signaling to Rogers Communications works: If you find the incoming packet, you should find a similar packet leaving the Ingate just above (just after in time) the incoming packet. The first rows of the outgoing packet will look something like this: >>> Info: sipfw: send sf (0x ) to :5060 via UDP connection 12748: INVITE sip: @ :5060;transport=udp SIP/2.0 If you don t see the outgoing packet, something is probably wrong with the Ingate configuration or you lack Internet connectivity: 1. Make sure that the Ingate is configured correctly. 2. Make sure the IP connectivity between the Ingate and Rogers Communications is working. Contact your network administrator for assistance if needed. If you see a packet sent from the Ingate, verify that it is sent to the IP address provided by Rogers Communications. If not, correct your configuration and retest. If none of the steps above solves the problem, contact your sales representative for support. TROUBLESHOOTING INBOUND CALLS Symptom: When trying to make an inbound call to a ShoreTel phone via the SIP Trunk there is no ringing signal on the ShoreTel phone. Note: If you get a ringing signal on the ShoreTel phone, these troubleshooting steps will not help you to find the problem. Please contact your sales representative for support

66 Get a Log for the Failing Call: First try to make a call to a ShoreTel phone from a PSTN phone and notice the behavior on the ShoreTel phone as well as on the PSTN phone. Next step is to search the log on the Ingate. Log in to the Ingate box and navigate to the Display Log page. Make necessary settings on the logging page according to the picture below. Especially make sure that you have the highlighted checkboxes in the correct state
Innovation Networking App Note
 Innovation Networking App Note G12 Communications ShoreTel and G12 Communications for SIP Trunking (Native) 1 (877) 311-8750 sales@g12com.com Jackson St. #19390, Seattle, WA 98104 Product: ShoreTel G12
ShoreTel & Windstream for SIP Trunking (Native)
") Product: ShoreTel Windstream Metaswitch Network I n n o v a t i o n N e t w o r k A p p N o t e IN-14018 Date : March, 2014 System version: ShoreTel 14.2 ShoreTel & Windstream for SIP Trunking (Native)
Product: ShoreTel Windstream Metaswitch Network I n n o v a t i o n N e t w o r k A p p N o t e IN-14018 Date : March, 2014 System version: ShoreTel 14.2 ShoreTel & Windstream for SIP Trunking (Native)
Application Note Configuration Guide for ShoreTel and Ingate
 Application Note Configuration Guide for ShoreTel and Ingate 29 August 2008 Table of Contents 1 INTRODUCTION... 1 2 SHORETEL CONFIGURATION... 2 2.1 OVERVIEW... 2 2.1.1 Version Support... 2 2.1.2 ShoreTel
Application Note Configuration Guide for ShoreTel and Ingate with PAETEC
 Application Note Configuration Guide for ShoreTel and Ingate with PAETEC 29 August 2008 Table of Contents 1 INTRODUCTION... 1 2 PAETEC CONFIGURATION... 2 2.1 CPE REQUIREMENTS... 2 2.2 PAETEC S DYNAMIC
Application Note 3Com VCX Connect with SIP Trunking - Configuration Guide
 Application Note 3Com VCX Connect with SIP Trunking - Configuration Guide 28 May 2009 3Com VCX Connect Solution SIP Trunking Table of Contents 1 3COM VCX CONNECT AND INGATE... 1 1.1 SIP TRUNKING SUPPORT...
Application Note Asterisk BE with SIP Trunking - Configuration Guide
 Application Note Asterisk BE with SIP Trunking - Configuration Guide 23 January 2009 Asterisk BE SIP Trunking Table of Contents 1 ASTERISK BUSINESS EDITION AND INGATE... 1 1.1 SIP TRUNKING SUPPORT... 2
Configuration Guide. For Use with AT&T s. IP Flexible Reach-Enhanced Features Service
 Product: ShoreTel Ingate AT&T IP Flexible Reach- Enhanced Features Service I n n o v a t i o n A p p N o t e IN-14014 Date: April, 2014 System version: ShoreTel 14.2 Ingate 5.x N e t w o r k Configuration
Application Note Asterisk BE with Remote Phones - Configuration Guide
 Application Note Asterisk BE with Remote Phones - Configuration Guide 15 January 2009 Asterisk BE - Remote SIP Phones Table of Contents 1 ASTERISK BUSINESS EDITION AND INGATE... 1 1.1 REMOTE SIP PHONE
Application Note Startup Tool - Getting Started Guide
 Application Note Startup Tool - Getting Started Guide 07 July 2008 Startup Tool Table of Contents 1 INGATE STARTUP TOOL...1 2 STARTUP TOOL INSTALLATION...2 3 CONNECTING THE INGATE FIREWALL/SIPARATOR...5
Configuration Guide For Use with AT&T s IP Flexible Reach Service. Version 1/Issue 7. July 30, 2008
 Configuration Guide For Use with AT&T s IP Flexible Reach Service Version 1/Issue 7 July 30, 2008 Page 1 of 42 TABLE OF CONTENTS 1 Introduction... 4 2 Version Information... 6 3 Special Notes... 7 ShoreTel
TPP: Date: August, 2012 Product: ShoreTel EtherSpeak System version: ShoreTel 13
 I n n o v a t i o n N e t w o r k A p p N o t e TPP: 10449 Date: August, 2012 Product: ShoreTel EtherSpeak System version: ShoreTel 13 Abstract In 2008, EtherSpeak certified the SureTrunk for ShoreTel
SHORETEL APPLICATION NOTE
 SHORETEL APPLICATION NOTE for TDS SIP Trunking Date: June 2017 App Note Number: TC - 17031 For use with: Product: TDS SIP Trunking with Cisco Cube ShoreTel Connect ONSITE System: ST Connect 21.79.9310.0
Startup Tool TG - Getting Started Guide
 Startup Tool TG - Getting Started Guide For Classic Ingate SIParator Version 5.0.10 or later Document revision 17B, February 20, 2017 1(24) Table of Contents 0 Quick Start... 2 1 Ingate Startup Tool TG...
Application Note. Microsoft OCS 2007 Configuration Guide
 Application Note Microsoft OCS 2007 Configuration Guide 15 October 2009 Microsoft OCS 2007 Configuration Guide Table of Contents 1 MICROSOFT OCS 2007 AND INGATE... 1 1.1 SIP TRUNKING SUPPORT... 2 2 INGATE
SHORETEL APPLICATION NOTE
 SHORETEL APPLICATION NOTE for IntelePeer SIP Trunking Date: August 26, 2016 App Note Number: For use with: Product: System: TC-16056 IntelePeer SIP Trunking ShoreTel Connect ONSITE ShoreTel Connect ONSITE
ShoreTel / AudioCodes
 Product: ShoreTel AudioCodes I n n o v a t i o n N e t w o r k A p p N o t e IN- 10448 Date: August, 2012 System version: ShoreTel 12.2 Application Note ShoreTel / AudioCodes Enterprise Session Border
Abstract. Innovation Network App Note
 Innovation Network App Note IN-14003 Date: January 2014 Product: Grandstream HandyTone and Enterprise Analog Gateways System version: ShoreTel 14.1 Abstract This application note provides the details on
Abstract This application note provides the details on adding the Spectralink PIVOT (87-Series) Wireless Handsets to the ShoreTel IP Phone system.
 Wireless Handsets to the ShoreTel IP Phone system.") I n n o v a t i o n N e t w o r k A p p N o t e Product: Spectralink PIVOT Wireless Handsets IN- 15069 Date: November, 2015 System version: ShoreTel 14.2 Abstract This application note provides the details
I n n o v a t i o n N e t w o r k A p p N o t e Product: Spectralink PIVOT Wireless Handsets IN- 15069 Date: November, 2015 System version: ShoreTel 14.2 Abstract This application note provides the details
SHORETEL APPLICATION NOTE
 SHORETEL APPLICATION NOTE for Gamma SIP Trunking Date: November 19, 2015 App Note Number: 16004 For use with: Product: System: Gamma SIP Trunking ShoreTel Connect Onsite ShoreTel Connect Onsite Build 21.74.5004.0
Spectrum Enterprise SIP Trunking Service ShoreTel 14.2 IP PBX Configuration Guide
 Spectrum Enterprise SIP Trunking Service ShoreTel 14.2 IP PBX Configuration Guide About Spectrum Enterprise: Spectrum Enterprise is a division of Charter Communications following a merger with Time Warner
Application Note. Mediatrix 1204 Analog Gateway (SIP) Features and Benefits. Table of Contents. Mediatrix. ST-0224 December 14, 2006
 Features and Benefits. Table of Contents. Mediatrix. ST-0224 December 14, 2006") Application Note ST-0224 December 14, 2006 Mediatrix 1204 Analog Gateway (SIP) Analog gateways provide customers the ability to connect up to Central Offices and other Gateway solutions. There maybe times
Application Note ST-0224 December 14, 2006 Mediatrix 1204 Analog Gateway (SIP) Analog gateways provide customers the ability to connect up to Central Offices and other Gateway solutions. There maybe times
Abstract. I n n o v a t i o n N e t w o r k A p p N o t e
 Product: Spectralink IP-DECT Server 400/6500 I n n o v a t i o n N e t w o r k A p p N o t e IN-15033 Date: June 2015 System version: ShoreTel 14.2 Abstract This application note provides the details on
FRAFOS ABC-SBC Generic SIP Trunk Integration Guide for ShoreTel 14.2
 FRAFOS ABC-SBC Generic SIP Trunk Integration Guide for ShoreTel 14.2 FRAFOS GmbH FRAFOS GmbH Windscheidstr. 18 10627 Berlin Germany Email: info@frafos.com WWW: www.frafos.com 11.05.2015 IN # 15023 Table
Spectrum Enterprise SIP Trunking Service ShoreTel Shoregear 90 R14.2 Build (with Ingate SIParator) IP PBX Configuration Guide
 IP PBX Configuration Guide") Spectrum Enterprise SIP Trunking Service ShoreTel Shoregear 90 R14.2 Build 19.43.1700.00 (with Ingate SIParator) IP PBX Configuration Guide About Spectrum Enterprise: Spectrum Enterprise is a division
Spectrum Enterprise SIP Trunking Service ShoreTel Shoregear 90 R14.2 Build 19.43.1700.00 (with Ingate SIParator) IP PBX Configuration Guide About Spectrum Enterprise: Spectrum Enterprise is a division
SHORETEL APPLICATION NOTE
 SHORETEL APPLICATION NOTE for Ascom i62 Date: Dec 12, 2016 App Note Number: TC-16084 For use with: Ascom i62, version 5.5.0 Product: ShoreTel Connect ONSITE System: ST Connect 21.79.9330.0 Contents Contents...
SHORETEL APPLICATION NOTE
 SHORETEL APPLICATION NOTE for Polycom VVX Business Media IP Phones Date: March 28, 2017 App Note Number: For use with: Product: TC-17021 Polycom VVX IP Phones ShoreTel Connect ONSITE System: ST Connect
TPP: Date: January, 2012 Product: ShoreTel Ascom i62 System version: ShoreTel 12.x
 I n n o v a t i o n N e t w o r k A p p N o t e TPP: 10104 Date: January, 2012 Product: ShoreTel Ascom i62 System version: ShoreTel 12.x Abstract The Ascom i62 offers a high class telephony, messaging
SHORETEL APPLICATION NOTE
 SHORETEL APPLICATION NOTE for Ascom IP-DECT Date: Dec 12, 2016 App Note Number: TC-16085 For use with: Ascom IP-DECT, version 9.0.6 Product: ShoreTel Connect ONSITE System: ST Connect 21.79.9330.0 Contents
Abstract TPP A P P N O T E
 TPP A P P N O T E TPP: 10241 Date: March 2010 Product: ShoreTel 911 Enable Emergency Gateway (EGW) System version: ShoreTel 9.2 EGW 2.5 Abstract These application notes describe the steps required to successfully
EarthLink Business SIP Trunking. Shoretel IP PBX Customer Configuration Guide
 EarthLink Business SIP Trunking Shoretel IP PBX Customer Configuration Guide Publication History First Release: Version 2.0 April 20, 2012 CHANGE HISTORY Version Date Change Details Changed By 1.0 4/16/2011
MITEL APPLICATION NOTE
 MITEL APPLICATION NOTE for ClearOne CONVERGE Pro 2 128V Date: February 23, 2018 App Note Number: TC - 18008 For use with: Product: ClearOne CONVERGE Pro 2 128V Mitel Connect ONSITE System: ST Connect 21.82.2142.0
Ingate Firewall & SIParator Product Training. SIP Trunking Focused
 Ingate Firewall & SIParator Product Training SIP Trunking Focused Common SIP Applications SIP Trunking Remote Desktop Ingate Product Training Common SIP Applications SIP Trunking A SIP Trunk is a concurrent
Avaya PBX SIP TRUNKING Setup & User Guide
 Avaya PBX SIP TRUNKING Setup & User Guide Nextiva.com (800) 285-7995 2 P a g e Contents Description... 3 Avaya IP PBX Configuration... 3 Licensing and Physical Hardware... 4 System Tab Configuration...
CCS-UC-1 SIP Endpoint with ShoreTel Connect System Configuration Guide Crestron Electronics, Inc.
 CCS-UC-1 SIP Endpoint with ShoreTel Connect System 21.80.7840.0 Configuration Guide Crestron Electronics, Inc. Crestron product development software is licensed to Crestron dealers and Crestron Service
TPP: Date: February, 2009 Product: ShoreTel Ascom IP-DECT System version: ShoreTel 8.1
 TPP APP NOTE TPP: 10111 Date: February, 2009 Product: ShoreTel Ascom IP-DECT System version: ShoreTel 8.1 Abstract The Ascom IP-DECT System is a wireless telephony system that utilizes the standard LAN/WAN
4 Port IP-PBX + SIP Gateway System
 4 Port IP-PBX + SIP Gateway System The IPG-40XG is an embedded Voice over IP (VoIP) PBX Server with Session Initiation Protocol (SIP) to provide IP extension phone connections for global virtual office
Application Notes for TelStrat Engage Record Version 3.3 with Avaya Business Communication Manger Release 6.0 VoIP Recording Issue 1.
 Avaya Solution & Interoperability Test Lab Application Notes for TelStrat Engage Record Version 3.3 with Avaya Business Communication Manger Release 6.0 VoIP Recording Issue 1.0 Abstract These Application
DSP-1282 & DSP-1283 Crestron Avia DSP with ShoreTel Connect Client Software
 DSP-1282 & DSP-1283 Crestron Avia DSP with ShoreTel Connect Client Software 21.80.7840.0 Configuration Guide Crestron Electronics, Inc. The product warranty can be found at www.crestron.com/warranty. The
Abstract. Innovation Network App Note
 Innovation Network App Note TPP: 10111 Date: July, 2014 Product: ShoreTel Ascom IP-DECT System version: ShoreTel 14.2 Abstract The Ascom IP-DECT System is a wireless telephony system that utilizes the
SHORETEL APPLICATION NOTE
 SHORETEL APPLICATION NOTE for Xima Chronicall Call Recording & Call Reporting Date: April 2017 App Note Number: TC - 17019 For use with: Product: Xima Chronicall ShoreTel Connect ONSITE System: ST Connect
Application Notes for Configuring Cablevision Optimum Voice SIP Trunking with Avaya IP Office - Issue 1.1
 Avaya Solution & Interoperability Test Lab Application Notes for Configuring Cablevision Optimum Voice SIP Trunking with Avaya IP Office - Issue 1.1 Abstract These Application Notes describe the procedures
EP502/EP504 IP PBX 1.1 Overview
 1.1 Overview The EP502/EP504 is an embedded Voice over IP (VoIP) Server with Session Initiation Protocol (SIP) to provide IP extension phone connection for global virtual office of small-to-medium business
Application Note. ShoreTel / Ingate / Verizon Business SIP Trunking. 09 June 2017 Version 1 Issue 2
 Product: ShoreTel Ingate Verizon Business I n n o v a t i o n N e t w o r k A p p N ote TPP-10466 Date: October, 2012 System version: ShoreTel 13.x Application e ShoreTel / Ingate / Verizon Business SIP
DSP-1282 & DSP-1283 Crestron Avia DSP with ShoreTel Connect Client Software Configuration Guide Crestron Electronics, Inc.
 DSP-1282 & DSP-1283 Crestron Avia DSP with ShoreTel Connect Client Software 21.80.7840.0 Configuration Guide Crestron Electronics, Inc. The product warranty can be found at www.crestron.com/warranty. The
Application Notes for Configuring SIP Trunking between CenturyLink SIP Trunk (Legacy Qwest) Service and Avaya IP Office R8.0 (16) Issue 1.
 Service and Avaya IP Office R8.0 (16) Issue 1.") Avaya Solution & Interoperability Test Lab Application Notes for Configuring SIP Trunking between CenturyLink SIP Trunk (Legacy Qwest) Service and Avaya IP Office R8.0 (16) Issue 1.0 Abstract These Application
Avaya Solution & Interoperability Test Lab Application Notes for Configuring SIP Trunking between CenturyLink SIP Trunk (Legacy Qwest) Service and Avaya IP Office R8.0 (16) Issue 1.0 Abstract These Application
Spectrum Enterprise SIP Trunking Service Vertical TM Wave IP500TM / Wave IP2500 TM Release 4.0, 4.5 IP PBX Configuration Guide
 Spectrum Enterprise SIP Trunking Service Vertical TM Wave IP500TM / Wave IP2500 TM Release 4.0, 4.5 IP PBX Configuration Guide About Spectrum Enterprise: Spectrum Enterprise is a division of Charter Communications
: Microsoft. Updated : 7/24/2009 READ THIS BEFORE YOU PROCEED
 Microsoft Exchange Server 2010 Unified Messaging SBC Configuration Notes Ingate SIParator By : Microsoft Updated : 7/24/2009 READ THIS BEFORE YOU PROCEED This document is for informational purposes only
Application Notes for Configuring Tidal Communications tnet Business VoIP with Avaya IP Office using SIP Registration - Issue 1.0
 Avaya Solution & Interoperability Test Lab Application Notes for Configuring Tidal Communications tnet Business VoIP with Avaya IP Office using SIP Registration - Issue 1.0 Abstract These Application Notes
Application Notes for OneAccess-Telstra Business SIP with Avaya IP Office Release 11 SIP Trunking - Issue 1.0
 Avaya Solution & Interoperability Test Lab Application Notes for OneAccess-Telstra Business SIP with Avaya IP Office Release 11 SIP Trunking - Issue 1.0 Abstract These Application Notes illustrate a sample
Application Notes for Configuring SIP Trunking Using Verizon Business IP Contact Center VoIP Inbound and Avaya IP Office Release 8.1 Issue 1.
 Avaya Solution & Interoperability Test Lab Application Notes for Configuring SIP Trunking Using Verizon Business IP Contact Center VoIP Inbound and Avaya IP Office Release 8.1 Issue 1.0 Abstract These
Configuration Guide. Ingate SIParator /Firewall E-SBC with Microsoft Office 365 Unified Messaging (UM)
") Configuration Guide Ingate SIParator /Firewall E-SBC with Microsoft Office 365 Unified Messaging (UM) May 2015 Page 1 of 32 Table of Contents 1 Introduction... 3 1.1 Before you begin... 3 1.2 Compatibilities
Configuration Guide Ingate SIParator /Firewall E-SBC with Microsoft Office 365 Unified Messaging (UM) May 2015 Page 1 of 32 Table of Contents 1 Introduction... 3 1.1 Before you begin... 3 1.2 Compatibilities
MITEL SIP CoE Technical. Configuration Note. Configure Mitel MiVoice Office 6.1 SP1 PR2 for use with IntelePeer SIP Trunking. SIP CoE XXX
 MITEL SIP CoE Technical Configuration Note Configure Mitel MiVoice Office 6.1 SP1 PR2 for use with IntelePeer SIP Trunking SIP CoE 12-4940-00XXX NOTICE The information contained in this document is believed
EarthLink Business SIP Trunking. ShoreTel 14.2 IP PBX Customer Configuration Guide
 EarthLink Business SIP Trunking ShoreTel 14.2 IP PBX Customer Configuration Guide Publication History First Release: Version 1.0 August 30, 2011 CHANGE HISTORY Version Date Change Details Changed By 1.0
Application Notes for Configuring Windstream SIP Trunking with Avaya IP Office - Issue 1.0
 Avaya Solution & Interoperability Test Lab Application Notes for Configuring Windstream SIP Trunking with Avaya IP Office - Issue 1.0 Abstract These Application Notes describe the procedures for configuring
TECHNICAL GUIDE to access Business Talk IP SIP IPBX Shoretel
 TECHNICAL GUIDE to access Business Talk IP SIP IPBX Shoretel versions addressed in this guide : 14.2 Information included in this document is dedicated to customer equipment (IPBX, TOIP ecosystems) connection
SoLink-Lite IP-PBX. Administrator Guide. (Version 1.0)
") SoLink-Lite IP-PBX Administrator Guide (Version 1.0) TABLE OF CONTENT 1.0 Introduction... 1 2.0 Setting Up the IP-PBX... 2 3.0 Logging On... 3 4.0 Configuring Network... 4 5.0 Configuring Hardware... 5
SoLink-Lite IP-PBX Administrator Guide (Version 1.0) TABLE OF CONTENT 1.0 Introduction... 1 2.0 Setting Up the IP-PBX... 2 3.0 Logging On... 3 4.0 Configuring Network... 4 5.0 Configuring Hardware... 5
Application Notes for Configuring EarthLink SIP Trunk Service with Avaya IP Office using UDP/RTP - Issue 1.0
 Avaya Solution & Interoperability Test Lab Application Notes for Configuring EarthLink SIP Trunk Service with Avaya IP Office using UDP/RTP - Issue 1.0 Abstract These Application Notes describe the procedures
Application Notes for Configuring CenturyLink SIP Trunking with Avaya IP Office Issue 1.0
 Avaya Solution & Interoperability Test Lab Application Notes for Configuring CenturyLink SIP Trunking with Avaya IP Office 6.1 - Issue 1.0 Abstract These Application Notes describe the procedures for configuring
Application Notes for Phonect SIP Trunk Service and Avaya IP Office 7.0 Issue 1.0
 Avaya Solution & Interoperability Test Lab Application Notes for Phonect SIP Trunk Service and Avaya IP Office 7.0 Issue 1.0 Abstract These Application Notes describe the procedures for configuring Session
Abstract. Avaya Solution & Interoperability Test Lab
 Avaya Solution & Interoperability Test Lab Application Notes for Avaya Aura Communication Manager 5.2.1, Avaya Aura Session Manager 6.1 and Avaya Aura Session Border Controller 6.0.3 with AT&T IP Toll
DSP-1282 & DSP-1283 Crestron Avia DSP with Avaya Aura 7.1 Platform
 DSP-1282 & DSP-1283 Crestron Avia DSP with Avaya Aura 7.1 Platform Configuration Guide Crestron Electronics, Inc. The product warranty can be found at www.crestron.com/warranty. The specific patents that
TPP: Date: May, 2011 Product: ShoreTel DuVoice System Version: ShoreTel 11.1
 I n n o v a t i o n N e t w o r k A p p N o t e TPP: 10321 Date: May, 2011 Product: ShoreTel DuVoice System Version: ShoreTel 11.1 Abstract DuVoice DV2000 hospitality server allows ShoreTel IP switches
Abstract. Avaya Solution & Interoperability Test Lab
 Avaya Solution & Interoperability Test Lab Application Notes for SIP Trunking Using Verizon Business IP Trunk SIP Trunk Service and Avaya IP Office Release 6.1, Using REFER and DNS SRV Issue 1.0 Abstract
EarthLink Business SIP Trunking. Allworx 6x IP PBX SIP Proxy Customer Configuration Guide
 EarthLink Business SIP Trunking Allworx 6x IP PBX SIP Proxy Customer Configuration Guide Publication History First Release: Version 1.0 August 30, 2011 CHANGE HISTORY Version Date Change Details Changed
TPP: Date: March, 2009 Product: ShoreTel Polycom System version: ShoreTel 8.1
 TPP APP NOTE TPP: 10230 Date: March, 2009 Product: ShoreTel Polycom System version: ShoreTel 8.1 Abstract Polycom's SpectraLink 8000 Series Wireless Telephones operate on converged voice and data Wi-Fi
SHORETEL APPLICATION NOTE
 SHORETEL APPLICATION NOTE for FaxCore Fax Server Date: December 2016 App Note Number: TC - 16081 For use with: Product: FaxCore Server with a T.38 FoIP drivers ShoreTel Connect ONSITE System: ST Connect
Spectrum Enterprise SIP Trunking Service Cisco Unified Communication Mgr Firmware 6.01 IP PBX Configuration Guide
 Spectrum Enterprise SIP Trunking Service Cisco Unified Communication Mgr Firmware 6.01 IP PBX Configuration Guide About Spectrum Enterprise: Spectrum Enterprise is a division of Charter Communications
Version: epbxum_
 epbx-100a-128 User s Manual Version: epbxum_128.300 CH1. Overview 5 1.1 Specifications 5 1.2 Hardware Overview 7 1.2.1 Front Panel and LED Indication...7 1.2.2 Back Panel...8 CH2. Start to configure epbx-100a-128
Application Notes for Revolabs FLX UC 1000 with Avaya Aura Communication Manager and Avaya Aura Session Manager Issue 1.0
 Avaya Solution & Interoperability Test Lab Application Notes for Revolabs FLX UC 1000 with Avaya Aura Communication Manager and Avaya Aura Session Manager Issue 1.0 Abstract These Application Notes describe
Business Communication Manager Release 5.0 Configuration Guide for Skype for SIP R1.3. Issue 1.0
 Avaya BCM Solutions Test Lab Business Communication Manager Release 5.0 Configuration Guide for Skype for SIP R1.3 Issue 1.0 Abstract This document provides guidelines for configuring a SIP Trunk between
Application Notes for Packet One SIP Trunk System Version 3.1 Interoperability with Avaya Software Communication System Release Issue 1.
 Avaya Solution & Interoperability Test Lab Application Notes for Packet One SIP Trunk System Version 3.1 Interoperability with Avaya Software Communication System Release 4.0 - Issue 1.0 Abstract These
Abstract. Avaya Solution & Interoperability Test Lab
 Avaya Solution & Interoperability Test Lab Application Notes for Uecomm/Optus Evolve SIP Trunking Service with Avaya IP Office 9.1.6 and Avaya Session Border Controller for Enterprise 7.0 - Issue 1.0 Abstract
Application Notes for Avaya IP Office Release 8.0 with AT&T Business in a Box (BIB) over IP Flexible Reach Service Issue 1.0
 over IP Flexible Reach Service Issue 1.0") Avaya Solution & Interoperability Test Lab Application Notes for Avaya IP Office Release 8.0 with AT&T Business in a Box (BIB) over IP Flexible Reach Service Issue 1.0 Abstract These Application Notes
Avaya Solution & Interoperability Test Lab Application Notes for Avaya IP Office Release 8.0 with AT&T Business in a Box (BIB) over IP Flexible Reach Service Issue 1.0 Abstract These Application Notes
Application Notes for Configuring the ADTRAN NetVanta UC Server with Avaya IP Office 6.1 Issue 1.0
 Avaya Solution & Interoperability Test Lab Application Notes for Configuring the ADTRAN NetVanta UC Server with Avaya IP Office 6.1 Issue 1.0 Abstract These Application Notes describe the procedure for
DMP 128 Plus C V DMP 128 Plus C V AT. Avaya Aura Configuration Guide REVISION: 1.1 DATE: SEPTEMBER 1 ST 2017
 DMP 128 Plus C V DMP 128 Plus C V AT Avaya Aura Configuration Guide REVISION: 1.1 DATE: SEPTEMBER 1 ST 2017 Revision Log Date Version Notes August 6 th 2017 1.0 First Release. Applies to Firmware 1.01.0004.002
Session Border Controller for UC Mobility
 Session Border Controller for UC Mobility Ingate SIParator Quick Setup Guide NEC NEC Corporation NDA-31663 Issue 1 Liability Disclaimer NEC Corporation of America reserves the right to change the specifications,
Broadvox Fusion Platform Version 1.2 ITSP Setup Guide
 November 13 Broadvox Fusion Platform Version 1.2 ITSP Setup Guide Author: Zultys Technical Support This configuration guide was created to assist knowledgeable vendors with configuring the Zultys MX Phone
Grandstream Networks, Inc. UCM6200 Basic Configuration Guide
 Grandstream Networks, Inc. Table of Contents OVERVIEW... 4 SETUP GUIDE SCENARIO... 4 QUICK INSTALLATION... 5 Connecting the UCM6200... 5 Access UCM6200 series Web Interface... 5 CREATE USER EXTENSION...
Application Notes for Configuring Fonolo In-Call Rescue with Avaya IP Office Server Edition using SIP Trunks Issue 1.0
 Avaya Solution & Interoperability Test Lab Application Notes for Configuring Fonolo In-Call Rescue with Avaya IP Office Server Edition using SIP Trunks Issue 1.0 Abstract These Application Notes describe
Dolby Conference Phone. Configuration guide for Avaya Aura Platform 6.x
 Dolby Conference Phone Configuration guide for Avaya Aura Platform 6.x Version 3.1 22 February 2017 Copyright 2017 Dolby Laboratories. All rights reserved. Dolby Laboratories, Inc. 1275 Market Street San
Abstract. Avaya Solution & Interoperability Test Lab
 Avaya Solution & Interoperability Test Lab Application Notes for Configuring SIP Trunking between Sotel IP Services SIP Edge Advanced SIP Trunking Solution and an Avaya IP Office Telephony Solution Issue
Dolby Conference Phone. Configuration guide for Avaya Aura Platform 6.x
 Dolby Conference Phone Configuration guide for Avaya Aura Platform 6.x Version 3.2 28 June 2017 Copyright 2017 Dolby Laboratories. All rights reserved. Dolby Laboratories, Inc. 1275 Market Street San Francisco,
ShoreTel with SIParator version 12.2
 ShoreTel with SIParator version 12.2 Table of Contents REVISION HISTORY.2 NON DISCLOSURE AGREEMENT 2 1 Introduction...3 2 Executive Summary..6 3 Software and Hardware Equipment Requirements for Testing
Application Notes for Configuring Avaya IP Office Server Edition 10.1 to interoperate with Zenitel Turbine - Issue 1.0
 Avaya Solution & Interoperability Test Lab Application Notes for Configuring Avaya IP Office Server Edition 10.1 to interoperate with Zenitel Turbine - Issue 1.0 Abstract These Application Notes describe
DMP 128 Plus C V DMP 128 Plus C V AT. Avaya Aura Configuration Guide REVISION: DATE: MARCH 7 TH 2018
 DMP 128 Plus C V DMP 128 Plus C V AT Avaya Aura Configuration Guide REVISION: 1.2.1 DATE: MARCH 7 TH 2018 Revision Log Date Version Notes August 6 th 2017 1.0 First Release. Applies to Firmware 1.01.0004.002
Application Notes for Configuring SIP Trunking Using Verizon Business IP Contact Center VoIP Inbound and Avaya IP Office Release 6.1 Issue 1.
 Avaya Solution & Interoperability Test Lab Application Notes for Configuring SIP Trunking Using Verizon Business IP Contact Center VoIP Inbound and Avaya IP Office Release 6.1 Issue 1.0 Abstract These
DSP-1282 & DSP-1283 Crestron Avia DSP (Secure) with Avaya Aura 7.1 Platform
 with Avaya Aura 7.1 Platform") DSP-1282 & DSP-1283 Crestron Avia DSP (Secure) with Avaya Aura 7.1 Platform Configuration Guide Crestron Electronics, Inc. The product warranty can be found at www.crestron.com/warranty. The specific patents
DSP-1282 & DSP-1283 Crestron Avia DSP (Secure) with Avaya Aura 7.1 Platform Configuration Guide Crestron Electronics, Inc. The product warranty can be found at www.crestron.com/warranty. The specific patents
Version: SIPPBXUM.100
 SIPPBX 6200A User s Manual Version: SIPPBXUM.100 CH1. Overview... - 5-1.1 Specifications... - 5-1.2 Hardware Overview... - 8-1.2.1 The Front Panel... - 8-1.2.2 The Back Panel... - 8 - CH2. Start to configure
Unofficial IRONTON ITSP Setup Guide
 September 13 Unofficial IRONTON ITSP Setup Guide Author: Zultys Technical Support This unofficial configuration guide was created to assist knowledgeable vendors with configuring the Zultys MX Phone System
ShoreTel 14.2 (without SBC)
") ShoreTel 14.2 (without SBC) Table of Contents 1 Executive Summary... 3 2 Registration Method... 5 3 XO SIP Service Packages Supported... 5 4 Software and Hardware Equipment Requirements for Testing...
ShoreTel 14.2 (without SBC) Table of Contents 1 Executive Summary... 3 2 Registration Method... 5 3 XO SIP Service Packages Supported... 5 4 Software and Hardware Equipment Requirements for Testing...
ShoreTel IPPBX with InGate SIParator version 14.2
 ShoreTel IPPBX with InGate SIParator version 14.2 Table of Contents 1. Executive Summary... 2 4. Software and Hardware Equipment Requirements for Testing... 3 5. Test Configurations... 4 5.1. Lab Configuration...
Application Notes for Configuring the XO Communications SIP Trunking Service with Avaya IP Office 10.0 Issue 1.0
 Avaya Solution & Interoperability Test Lab Application Notes for Configuring the XO Communications SIP Trunking Service with Avaya IP Office 10.0 Issue 1.0 Abstract These Application Notes describe the
Technical Note FLX UC 1000/1500 Registering with Shoretel ShoreGear
 FLX UC 1000/1500 Registering with Shoretel ShoreGear Date: February 14, 2017 This technical note gives a detailed description on how to register a Revolabs FLX UC 1000/1500 IP & USB conference phone with
Digital Advisory Services Professional Service Description SIP SBC with Field Trial Endpoint Deployment Model
 Digital Advisory Services Professional Service Description SIP SBC with Field Trial Endpoint Deployment Model 1. Description of Services. 1.1 SIP SBC with Field Trial Endpoint Deployment Verizon will assist
Configuration Guide for Integration of Spectralink PIVOT with UNIVERGE 3C
 Configuration Guide for Integration of Spectralink PIVOT with UNIVERGE 3C Version 1.0 December 19, 2014 Contents Contents Acronyms... 1 Purpose of this Document... 2 Scope of this document... 2 Configuration...
How to Install an Ingate E-SBC in Stand-alone Firewall mode or DMZ / LAN mode for an Aastra Teleworker Solution.
 How to Install an Ingate E-SBC in Stand-alone Firewall mode or DMZ / LAN mode for an Aastra Teleworker Solution. March, 2013 Ingate Systems Page: 1(11) Table of Content 1 Introduction... 3 2 10 step installation
Application Notes for Configuring SIP Trunking between the Skype SIP Service and an Avaya IP Office Telephony Solution Issue 1.0
 Application Notes for Configuring SIP Trunking between the Skype SIP Service and an Avaya IP Office Telephony Solution Issue 1.0 Abstract These Application Notes describe the steps to configure trunking
THE KEY BUILDING BLOCKS OF THE SHORETEL CONNECT PLATFORM
 Product Specifications ShoreTel ST Voice es SOLUTION BRIEF THE KEY BUILDING BLOCKS OF THE SHORETEL CONNECT PLATFORM Available as solid-state appliances or virtualized for deployment in your datacenter
IPNext 187 Hybrid IP-PBX System High-performance Hybrid IP-PBX Solution
 IPNext 187 Hybrid IP-PBX System High-performance Hybrid IP-PBX Solution IP-PBX Features www.addpac.com AddPac Technology 2011, Sales and Marketing Contents IP-PBX Features Smart Multimedia Manager VoIP
RP-FSO522 2-Line FXO, 2-Line FXS SIP IP Gateway. Feature
 RP-FSO522 2-Line FXO, 2-Line FXS SIP IP Gateway RP-FSO522 is an 2-Line FXO plus 2-Line FXS gateway with SIP protocol IP device which allows to connect 2 Lines of analog PSTN telephone line and connect