Table of Contents HOL-SDC-1315
|
|
|
- Janel George
- 5 years ago
- Views:
Transcription
1 Table of Contents Lab Overview... 2 About this Lab... 3 Module 1 - Secure and Isolate VM Traffic with Different Trust Levels Using vcloud Network and Security... 6 Verify Open (Non Firewalled) Communications... 7 Apply Network Isolation Policies in vcloud Networking and Security App Test Applied Network Isolation and Security Policies Apply a Data Security Policy to Scan for Non-Compliant Content Inside Security Groups Module 2 - Provide for and Track Compliance Using vcenter Configuration Manager and vcenter Operations Manager Leverage vcloud Networking and Security Groups in VMware vcenter Configuration Manager Set Up OS-Level Compliance for Production Virtual Machines Add Compliance Tracking in vcenter Operations Manager for the Rainpole Production Virtual Machines Remediate Compliance Issues in Production Virtual Machines and Track Changes in vcenter Operations Manager Set Up vsphere Level Compliance for the Virtual Environment Add Compliance Tracking for the Virtual Environment in vcenter Operations Manager Remediate Compliance Issues in the Virtual Environment Module 3 - Set Up Compliance Alerts in vcenter Configuration Manager Set Up an Alert for Out-of-Compliance Conditions for Production Virtual Machines Test the Out-of-Compliance Alert on Production Virtual Machines Set Up an Alert for Out-of-Compliance Conditions for the Virtual Environment Test the Out-of-Compliance Alert in the Virtual Environment Module 4 - Patch Operating System and Third-Party Applications with vcenter Configuration Manager Patch UNIX or Linux Operating System Patch Windows Operating System Patch the Java Runtime Environment on Windows Ending Notes vcloud Suite Control and Compliance End Notes Troubleshooting Troubleshooting: Cannot Access vcenter Configuration Manager Web UI Troubleshooting: Compliance Report Displays When Setting Up Production Compliance Troubleshooting: When Creating a Virtual Environment Compliance Badge Mapping the Virtual Objects Group is Empty Troubleshooting: vsphere Web Client Error # Page 1
2 Lab Overview Page 2
3 About this Lab VMware vcloud Suite Control and Compliance Lab Learn how to achieve compliance and security isolation in your environment. This lab demonstrates how VMware vcenter Configuration Manager and VMware vcloud Networking and Security App (formly known as VMware vshield App ) work together to achieve network segmentation in a mixed environment. It shows how to assess and remediate operating system and VMware vsphere settings so that your infrastructure complies with organization regulations. You will use vcloud Networking and Security App to provide isolation trust zones whereby you can create and assign resources for vcloud Networking and Security App firewall protection, establish proper firewall policies, and verify that only authorized users can access data. You will see how vcenter Configuration Manager can use VMware vcloud Networking and Security groups to dynamically populate its machine groups, capture and identify changes at the operating system and vsphere level within the infrastructure that affects compliance, and remediate identified issues. Security groups are a powerful feature of vcloud Networking and Security and can include other groupings, such as data centers, clusters, vapps and resource pools, as well as other objects, such as virtual machines, virtual network adapters, port groups, IP addresses and MAC addresses.you will also see how information can be gathered in VMware vcenter Operations Manager to achieve operational visibility. Many of the tasks in this lab (especially those involving vcenter Configuration Manager) are deliberately not automated. The purpose is to demonstrate how the steps are performed and facilitate the lab exercises. Module 1: Secure and isolate virtual machine traffic with different trust levels using vcloud Networking and Security Module 2: Provide for and track compliance using vcenter Configuration Manager and vcenter Operations Manager Module 3:(Optional) Set up compliance alerts in vcenter Configuration Manager [VCL/ FEL] Module 4:(Optional) Patch operating system and third-party applications with vcenter Configuration Manager [VCL/FEL] Notes: The lab might take up to approximately 10 minutes until it is up and running after you start the lab in the VMware NEE lab web portal. Due to time constraints in the hands-on labs, Modules 3 and 4 are optional. If you are running out of time, feel free just to review the content in the manual to learn Page 3
4 about monitoring of compliance using vcenter Operations Manager (Module 3) and patching with vcenter Operations Manager (Module 4). Important: In the app-l-01a and test-l-01a machine names, the "l" is a letter "L", not a number 1. It stands for Linux. In some exercises you will be required to type the VM name. If you do not type a lower case or uppercase letter "L" you will get an error message. Lab Leaders: Lab Author: Fabio Rapposelli Lab Co-Author: Timo Sugliani Lab Captain: Manuel Duron Page 4
5 Lab (vapp) Diagram The starting point for this lab is the Windows console of the ControlCenter virtual machine, delivered as a console view embedded into your web session. The Layer 1 virtual machines are running on the /24 network segment (also called Site A Management Network), while the Layer 2 virtual machines for production and test are running on the /24 network segment (also called Layer 2 App Network). Page 5
6 Module 1 - Secure and Isolate VM Traffic with Different Trust Levels Using vcloud Network and Security Page 6
7 Verify Open (Non Firewalled) Communications The virtual machine to which you are currently logged in (ControlCenter) can communicate with all of the virtual machines in scope with the lab (db-w8-01a, appl-01a and test-l-01a virtual machines). The lab virtual machines can communicate with each other because they reside on a single Layer 2 segment. This is in violation of Rainpole company regulations, but at this time there are no firewall rules in place, so the default vshield App rule is to allow any traffic. You will test the reachability of the virtual machines at the Layer 3 and Layer 2 levels and modify the vshield App during the next exercise. Test Remote Desktop Connection to the Production Database Server (db-w8-01a) The first task is to test connectivity from the ControlCenter virtual machine to our production database machine. Double-click the Connect to db-w8-01a link on the ControlCenter desktop. Enter Credentials to Connect to the Database Server (dbw8-01a) Log in using the following credentials: User name and domain: CORP\Administrator Page 7

8 Password: VMware1! Note: User name and domain are usually prefilled. Page 8

9 Verify Connectivity to the Database Server (db-w8-01a) Confirm that you are properly connected to the db-w8-01a virtual machine by checking the background information. Page 9


, and the connections")
10 Disconnect the Remote Desktop Connection Disconnect the Remote Desktop Connection by clicking the upper right X icon. Confirm Disconnection from Database Server (db-w8-01a) At this point you are just testing the open communications in preparation for the next exercise. Click OK to confirm. Check Connectivity Between Production and Test Virtual Machines Test connectivity between the ControlCenter virtual machine and the production test virtual machines (app-l-01a and test-l-01a), and the connections between the production and test virtual machines. Click the PuTTY link on the ControlCenter task bar to open the PuTTY Session Manager. Page 10
 1. Select app-l-01a. 2.")
11 Connect to Production Web Server (app-l-01a) 1. Select app-l-01a. 2. Click Open. Page 11
12 Enter Credentials to Connect to the Production Web Server (app-l-01a) Log in using the following credentials: 1. Log in as: root 2. Enter the password: VMware1! Note: the password characters are not displayed. Test Connectivity from the Production Web Server (appl-01a) Remember: The name use the lowercase letter L, not the number 1. Test ICMP connectivity between app-l-01a and the other two virtual machines by issuing these commands: 1. ping db-w8-01a -c 3 -q 2. ping test-l-01a -c 3 -q Each of these commands should return this message: Page 12
, it is due to the TCP/IP stack the virtual machines are using and is unrelated to the firewall rules.")
13 3 packets transmitted, 3 received, 0% packet loss The message indicates that three ICMP echo requests were sent and three echo replies were received, meaning that network communication is possible between these hosts. If the messages you observer show any packet loss (less than 100%), it is due to the TCP/IP stack the virtual machines are using and is unrelated to the firewall rules. If you experience packet loss during the tests, rerun the ping commands. Note: Do not close the PuTTY window. Page 13

14 Connect to the Test Server (test-l-01a) Open up an SSH session to test-l-01a. 1. Right-click the PuTTY top bar. 2. Select Saved Sessions 3. Select test-l-01a from the drop-down menu. Page 14
 Remember: The name use the lowercase letter L, not the number 1.")
15 Enter Credentials to Connect to the Test Server (testl-01a) Log in using the following credentials: 1. Log in as: root 2. Password: VMware1! Note: the password characters are not displayed. Test Connectivity from the Test Server (test-l-01a) Remember: The name use the lowercase letter L, not the number 1. Test ICMP connectivity between test-l-01a and the other two virtual machines by issuing these commands: 1. ping db-w8-01a -c 3 -q 2. ping app-l-01a -c 3 -q Each of these commands should return this message: 3 packets transmitted, 3 received, 0% packet loss Page 15
, it is due to the TCP/IP stack the virtual machines are using and is unrelated to the firewall rules.")
16 The message indicates that three ICMP echo requests were sent and three echo replies were received, meaning that network communication is possible between these hosts. If the messages show any packet loss (less than 100%), it is due to the TCP/IP stack the virtual machines are using and is unrelated to the firewall rules. If you experience packet loss during the tests, rerun the ping commands. Note: Do not close the PuTTY window. Page 16
17 Apply Network Isolation Policies in vcloud Networking and Security App Now that you have tested the reachability of the systems and witnessed the complete lack of security in the environment, you will populate the vcloud Network and Security security groups with virtual machines and publish a network isolation policy. The policy will create a microsegment to separate the production application (WebServers and DatabaseServers Security Groups) from the test servers (TestServers security group) even though they are on the same Layer 2 segment. vcloud Network and Security App is a native virtualization layer firewall that protects against network-based attacks. It offers protection to applications with different trust levels running in the same virtual data center. By providing deep visibility into network communications and allowing enforcement of granular security policies, vcloud Network and Security App increases security for IT operations and makes it easier and more costeffective to adopt a "defense in depth" approach. It also supports compliance, including Payment Card Industry (PCI) compliance. Launch the Web Browser From your ControlCenter desktop, click the Internet Explorer shortcut. Page 17

18 Open the vshield Manager Web UI From the Internet Explorer Favorites bar, click the vshield Manager link. Log in to the vshield Manager Log in with the following credentials: User name: admin Password: VMware1! Page 18


19 Navigate the vshield Manager Web UI The Summary page of the vshield Manager interface opens. 1. Expand the Datacenters folder hierarchy in the Inventory panel and select Datacenter Site A. 2. Select the General tab. 3. Select Grouping. Modify the Pre-Built Security Group 1. Select Rainpole DatabaseServersSecurity Group. 2. Click the Edit icon. Page 19
 in the search box. 2.")
20 Add a Virtual Machine to the Security Group 1. Enter the virtual machine name (db-w8-01a) in the search box. 2. Select Virtual Machine. 3. Click OK. Page 20

21 Populate the Remaining Security Groups Repeat the same process for the two remaining security groups with the following mappings: Rainpole DatabaseServers Security Group > db-w8-01a Rainpole TestServers Security Group > test-l-01a Rainpole WebServer Security Group > app-l-01a Note: Be careful to select the virtual machine resource when editing the security group. If done correctly, the output should look exactly like the previous screenshot. Important: Verify that the mappings are performed correctly before proceeding. Apply the Segmentation Policy Click the App Firewall tab to view the pre-built security policy with Layer 3 traffic rules. The rules do the following: 1. Permit HTTP access to the WebServer security group (the Web layer of the running production application). 2. Enable access to MySQL from the WebServer security group to the DatabaseServers security group to permit the web layer to pull data from the database layer. 3. Enable communication between vcenter Configuration Manager and its managed virtual machines. 4. Enable patch downloading from vcenter Configuration Manager to its managed virtual machines. 5. Enable SSH access from ControlCenter to the virtual machines running inside the WebServers and TestServers security groups. 6. Give DNS and Active Directory access to all the security groups. 7. Apply the default rule that manages all the unmatched traffic. Page 21

22 The next step is to block all of the unmatched traffic, leaving only traffic that is explicitly permitted per the Layer 3 policy. Modify the Layer 3 Default Rule Select rule 7 and click the + box near the Allow label in the Action column on the right. Page 22


23 Block Anything that Is Not Explicitly Permitted 1. Click Block. 2. Click OK. Publish Changes to the Distributed Firewalls After the modification is done a green box appears at the top of the rules table. Important: Click Publish Changes to activate the new configuration. Page 23

24 Verify Layer 2 Policies Click Ethernet to review the Layer 2 policies. These pre-built rules do the following: 1. Perform Layer 2 Isolation between participants in the DatabaseServers security group. 2. Perform Layer 2 Isolation between participants in the WebServers security group. 3. Perform Layer 2 Isolation between participants in the TestServers security group and the WebServers and DatabaseServers security groups. 4. Perform Layer 2 Isolation between participants in the WebServers and DatabaseServers Security Groups and the TestServers security group. 5. Apply the default rule that permits all other Layer 2 communications. This policy effectively isolates virtual machines running on the same Layer 2 network segment by filtering packets at the virtual machine level using vcloud Networking and Security App capabilities. Page 24
25 Test Applied Network Isolation and Security Policies In this exercise you will test the segmentation policy that you just applied so that communication is no longer permitted between the virtual machines. This will demonstrate the microsegmentation capabilities of vshield app and how they can be used to effectively isolate virtual machine traffic even on a shared Layer 2 segment. Page 25
26 Test Connectivity from the Production Web Server (appl-01a) Return to the app-l-01a PuTTY window to test the connections again. TIP: you can clear the screen from previous output using the clear command. Test ICMP connectivity between app-l-01a and the other two virtual machines by issuing the following commands: 1. ping test-l-01a -c 3 -q 2. ping db-w8-01a -c 3 -q Both commands should return this message: 3 packets transmitted, 0 received, 100% packet loss As you can see, ICMP communication is no longer possible between the virtual machines. app-l-01a and db-w8-01a can still communicate at Layer 2 whereas appl-01a and test-l-01a are completely isolated. To double check this, issue this command: arp -a This command shows the local ARP table. The output from the previous screen shows that the table is populated with the db-w8-01a MAC address but not with test-l-01a. This is because Layer 2 communication is denied by a vshield App rule. OPTIONAL: if you want to test for port reachability try to connect to db-w8-01a on port 3306 using the following command: telnet db-w8-01a 3306 You will see the MySQL daemon responding to your connection request. Press Enter a couple of times to exit the connection. Page 26

27 Test Connectivity from the Test Server (test-l-01a) Switch back to the test-l-01a PuTTY window to test the connections again. TIP: you can clear the screen from previous output using the clear command. Test ICMP connectivity between test-l-01a and the other two virtual machines by issuing these commands: 1. ping db-w8-01a -c 3 -q 2. ping app-l-01a -c 3 -q Both commands should return this message: 3 packets transmitted, 0 received, 100% packet loss Now not only ICMP communication is no longer possible between the virtual machines, but also they cannot communicate at Layer 2 with test-l-01a at all. To double check this, issue this command: arp -a Page 27

28 This command will show the local ARP table. The output from the previous screen shows that the table is populated with just the router MAC address (router-l-120), not with app-l-01a or db-w8-01a. This is because Layer 2 communication with the production Security Groups is denied by a vshield App rule. NOTES: The ping command might or might not return +4 errors. This is not relevant to the tests in this lab. Feel free to close close the PuTTY windows if you like. Page 28
 Connection is no longer possible from ControlCenter, because no explicit rule permits it.")
29 Test Remote Desktop Connectivity from ControlCenter to the Database Server (db-w8-01a) Switch to the ControlCenter Desktop and click double-click Connect to db-w8-01a to start a Remote Desktop Connection to db-w8-01a. Confirm failed connectivity to the Database Server (dbw8-01a) Connection is no longer possible from ControlCenter, because no explicit rule permits it. Page 29
.")
30 Test Reachability of the Production Application Switch back to Internet Explorer and open anew tab. Click Production Application on the favorites bar to open a Wordpress Web page (Wordpress is the production application for this lab). This means that the Webserver (app-l-01a) can communicate with the database server (db-w8-01a). Note: Feel free to close the tab once you successfully verify the HTTP communication with the app-l-01a VM. Page 30

31 Verify Blocked Flows from the vshield Manager Interface Switch back to the vshield Manager interface. If the previous session expired, log back in with: User name: admin / Password: VMware1! 1. Expand the Datacenters folder hierarchy in the Inventory Panel, and select the Datacenter Site A object. 2. On the Flow Monitoring tab, notice the red portion of the graph where it says Blocked By Rule. This represents the traffic flows blocked by vshield App for the entire datacenter. NOTE: The Blocked By Rule percentage might be lower than the one presented in the screenshot. Navigate to view the Blocked Flows 1. Click Details. 2. Click Blocked Flows to see a list of blocked flows, grouped by service. Page 31

32 3. Click ICMP:echo-request to inspect the blocked flows. Note: vshield Manager takes a few seconds to populate the activity from the distributed firewalls in the Flow Monitoring tab. If you do not see the ICMP: echo-request entry, wait for a minute and refresh the web page, a couple of times. Delay may due to high workload in the lab environment. If after doing the refresh still you cannot see the entry, move on with the lab (to allow time for data gathering). You will have a change to come back and review this step later on. Page 32
33 Examine Blocked Flow Details The Blocked Flows detail shows which rule blocked the flow, a Description of why it was blocked, Time stamp for the event, Source and Destination addresses of the packet flow, and Packets statistics. Page 33
 sensitive data in the DatabaseServers security group.")
34 Apply a Data Security Policy to Scan for Non-Compliant Content Inside Security Groups After securing the networking environment using vcloud Networking and Security App, you must verify that there is no undiscovered (and unprotected) sensitive data in the DatabaseServers security group. In this exercise, you will apply a data security policy that will look for sensitive data stored inside the virtual machines that are part of given security groups. Using out-of-the-box and predefined regulations and standards templates, the Data Security component scans virtual workloads for sensitive data, such as credit card information, and reports violations of regulations (such as PCI-DSS). After the scan, violations will be reported and specific action can be taken by the security administrator. Move to the Data Security Facility Inside vshield Manager Return to the vshield Manager Web UI. 1. Under Settings & Reports click Data Security. 2. Click Policy in the right pane. 3. Click the arrow for Regulations and standards to detect to expand the panel. Page 34

35 Edit the Data Security Policy Click Edit on the right side of the pan under the Regulations and standards to detect panel. Select Regulations to Apply for the Scan 1. Click All on the Select Regulations pane. 2. Scroll down to find the Credit Card Numbers entry in the Regulations violated column. 3. Select the Credit Card Numbers check box. 4. Click Next. Page 35

 1.")
36 Set the Data Pattern for Recognizing Sensitive Data Click Finish. It is not necessary to modify the setting for Set Data Patterns. Publish the Changes Click Publish Changes to make the changes effective. Define the Target for Scanning (Participating Areas) 1. To add the security groups to be scanned, expand the Participating Areas section (below Regulations and standards to detect) by clicking the small down arrow. Page 36
 in the text box. 2. Click the suggested security group name.")
37 2. Click Change on the right side of the Scan the following infrastructure section. Locate the DatabaseServers Security Group 1. Start entering the name of the security group (Rainpole DatabaseServers Security Group) in the text box. 2. Click the suggested security group name. Note: Because Data Security currently scans only Windows-based virtual machines, you will apply the scan only on Rainpole DatabaseServers Security Group. Page 37
38 Add the DatabaseServers Security Group Verify that the correct security group is selected and click Add. Page 38


39 Save the Parameters Defined for the Scan The security group appears in the list. Click Save to close the window and continue. Publish the Changes to the Data Security Policy 1. Apply the changes by clicking Publish Changes inside the green box at the top. 2. When the changes are successfully published, start the data security scan by clicking Start. Page 39


40 Monitor the Progress of the Scan If everything is correct, the scanning status will turn to In Progress. Open the Reports Section Click Reports. Refresh the Data to Show Progress of the Scan Wait approximately 30 seconds and click Refresh. Notice that the pie chart turns blue, indicating that the scan is in progress. After a couple of minutes, click Refresh again, and repeat if necessary until the pie chart turns purple. Page 40
41 Review the Results from the Completed Scan After a few minutes, Data Security will discover two violations inside the scanned security groups. Note: Verify that the chart has turned purple (meaning that the scan has ended) before continuing. Locate the Latest Report in the Scan History section 1. In the report below the chart, notice the virtual machine with two violations reported. 2. Click Download Complete Report. Page 41

42 Initiate the Report Download Click Initiate download. Download the Finished Report After a few seconds the link changes to Download. Click the new link to access the violations report. Page 42

43 Save the Report to Your Local Desktop The violation report is a CSV file. 1. Enter Violations.csv for the file name. 2. Save it on the ControlCenter desktop. Page 43


44 View the Data Security Report 1. On the ControlCenter desktop, right-click the Violations.csv file. 2. Select Edit with Notepad. Inspect the Report Notice the files that are violating the credit cards security policy you implemented. In this case, two files violate the policy. 1. C:\UnprotectedData\SensitiveExcelDataFile.csv 2. C:\UnprotectedData\SensitiveExcelDataFile.xls These files were scanned by Data Security and contain clear text credit cards information. Page 44
45 Module 2 - Provide for and Track Compliance Using vcenter Configuration Manager and vcenter Operations Manager Page 45
46 Leverage vcloud Networking and Security Groups in VMware vcenter Configuration Manager vcenter Configuration Manager is a policy-driven configuration automation solution that detects deep system changes and determines whether those changes are compliant to industry or regulatory mandates and to your own self-defined best practices. It helps avoid configuration drift by remediating systems to bring them back into compliance, managing change, controlling risk, and automating vsphere, operating systems, and software provisioning and patching. vcenter Configuration Manager is tightly integrated with VMware vcloud Suite. This exercise shows how to leverage existing vcloud Network and Security groups to populate a vcenter Configuration Manager dynamic machine group with the lab production machines. This will give you the ability to maintain consistency between the Security view in vcloud Network and Security and the Compliance view in vcenter Configuration Manager. Page 46
47 Launch the vcenter Configuration Manager Web Console On the ControlCenter Desktop, double-click the vcenter Configuration Manager shortcut. Page 47
48 Log In to vcenter Configuration Manager with Proper Credentials vcenter Configuration Manager can have multiple roles. In this lab, CORP\Administrator is assigned three different roles in vcenter Configuration Manager: Admin: General administrator with access to all vcenter Configuration Manager functions. OS Admin: Administrator for operating system level compliance and patching functions. This is the user for this exercise. VE Admin: Administrator for virtual environment compliance functions. Select OS Admin for User Role and click Login. Note: If the login screen does not open and instead you see an authentication dialog asking for credentials, see the "Troubleshooting: Cannot Access vcenter Configuration Manager Web UI" section at the end of this lab guide. General Information Bar The general information toolbar is at the top of the console and includes the following information: Page 48
49 1. The logged-in user and role. 2. Buttons to navigate, see current running jobs, collect information, and run remote commands. 3. The current machine group. Page 49
50 Sliders The left side of the console has labels for functions in vcenter Configuration Manager. The labels display only the information that you are entitled to see, in this case, for the operating system Admin role. You can click through to view each one. 1. Console is broken down into the following parts: The upper area, from Dashboards to Enterprise Applications, gives a high-level overview of how the environment is doing. Reports and graphs can be printed or exported in multiple formats. The bottom area provides point-in-time management for a Windows or UNIX environment, depending on the tab you select, and includes more detailed information about the different objects. 2. Compliance allows you to create and manage compliance rule groups and templates based on Active Directory objects, machine group data, Security Content Automation Protocol (SCAP), or virtual objects. Your view is limited to machine group data. 3. Patching allows you to review a list of patches for the various supported platforms, assess whether the patch is needed, and deploy it as required. If permitted, you can also roll back a patch that might have caused an error or was mistakenly deployed. 4. Administration is where the configuration options for vcenter Configuration Manager are managed. Here you can review licensing, manage vcenter Configuration Manager roles, configure notifications, identify and manage your machines, and establish filters to limit the data collected from machines in your environment. Note: The OS Admin role has partial access to these functions. To view the complete set of options you need to log in with the Admin role. Page 50

51 Gather Information from the Virtual Environment To gather Security Group Associations from the vcloud Networking and Security Manager Web UI, it is necessary to collect information from vcloud Networking and Security Manager. To do so, switch your machine group scope to the Rainpole virtual environment, which includes the vcloud Networking and Security Manager virtual machine vsm-l-01a. Page 51

52 1. Click Machine Group. 2. Select Rainpole Virtual Environment. 3. Click OK. Page 52

53 Collect Information from vcloud Networking and Security Manager (vsm-l-01a) 1. Verify that the scope is Rainpole Virtual Environment. 2. Click Collect in the top bar. Page 53

54 Define the Collection Type Keep the Machine Data selection and Click OK to continue. Page 54
55 Select the vcloud Networking and Security Manager and Options for the Collection This window shows the objects available for collection for the Rainpole Virtual Environment machine group. 1. Highlight vsm-l-01a, which is the vcloud Networking and Security Manager installation. 2. Click> to move vsm-l-01a to the Selected box. 3. Click Next. Page 55

56 Select Data Types to Be Collected 1. To select the data types available for collection, expand the Virtualization selection. 2. Select vshield (do not select other options). 3. Click Next. Page 56
57 Confirm the Information Collection Request Verify that there are no conflicts with other running jobs, and click Finish to start the collection. Page 57

58 Watch the Collection Job Running 1. Now that the job has been submitted, click Jobs button to spawn the Jobs Running window, which shows the jobs currently executing on the collector. 2. The Jobs Running window does not auto refresh by default. For auto refresh, select 30 Seconds from the drop-down menu. 3. You can also change auto refresh for the job summary by clicking Off and selecting 5 sec. When the job is done, the status changes to Collector Complete. 4. Watch the job status change from Preparing Document to Running. Page 58
59 Close the Jobs Running Window When the job is completed and screen refreshes, the job entry disappears. Click Close. Page 59
60 Return to the Rainpole Production Applications Machine Group Return to the Rainpole Production Applications machine group. 1. Click Machine Group. 2. Select Rainpole Production Applications. 3. Click OK. Manage the Rainpole Production Applications Machine Group The Rainpole Production Applications dynamic machine group is shown as empty because vcloud Networking and Security Manager has not provided the information yet. Page 60

, the two production application")
61 To refresh the members of the group so the vshield security group associations appear, click Administration. Refresh Members of the Administration Group 1. Select Machines Manager> Machine / Virtual Object Groups> All Machines> Rainpole Production Applications. 2. Click Members. Notice that the members list in the right is empty. 3. Click Refresh Members. Review Group Members Populated by vshield Manager After a few seconds (and perhaps a yellow window warning that the process can take some time), the two production application machines appear: Application/Web Server (app-l-01a) Database Server (db-w8-01a) You now have a populated machine group using information provided by vcloud Networking and Security Manager. Page 61

62 Optional: Under Rainpole Production Applications in the Administration slider, click Filters to see the filter that permits to automatically populate the machine group based on security group membership. Page 62

63 Set Up OS-Level Compliance for Production Virtual Machines vcenter Configuration Manager ships with compliance toolkits for a broad range of standards. These include security best practices, vendor hardening guidelines, and regulatory mandates. From a security perspective, these include DISA, NIST and CIS. Regulatory mandates such as SOX, PCI, HIPAA and FISMA are also included. Hardening guides from companies like VMware and Microsoft can be used to compare your infrastructure against their best practices. As new or updated templates are released, they can be easily downloaded using an update tool. vcenter Configuration Manager also allows you to create compliance templates to build your own internal IT standards to drive best practices in your environment. Rainpole has set up its own compliance templates that are based on a subset of the PCI- DSS regulation for Windows, Linux, and vsphere. These templates are used in these exercises to check and maintain compliance to company regulations. Set Up Compliance for the Rainpole Production Applications Machine Group 1. Verify that you are still in the Rainpole Production Applications machine group scope. 2. Click Compliance. Page 63

64 Select the Rainpole Compliance Template 1. Expand Machine Group Compliance > Templates. 2. Click Rainpole Production Application Compliance Template. Page 64
65 Run the Rainpole Compliance Template You will now run Rainpole Production Applications Compliance Template on the machine group populated by the vcloud Networking and Security Manager's security group associations. This action scans the machines for compliance to the Rainpole template. 1. Click Run Template. 2. Click OK to launch the compliance run and generate the report. Note: If you see a compliance report instead of an empty grid, see the "Troubleshooting: Compliance Report shows up when setting up Production Compliance" section at the end of this lab guide. Page 65

66 Return to the vcenter Configuration Manager Interface After the compliance run has been completed, click Close to return to the vcenter Configuration Manager interface. Page 66

67 Refresh the Data Grid View To reflect the changes: 1. Right-click in a blank space to produce a menu. 2. Select Refresh data grid view. Page 67


68 Define the Column Grouping for Better Visibility of the Data Grid The data grid now has numerous entries. For a better view of the data grid, drag the Machine/Object column and drop it in on the Column Grouping top bar. Data Grid grouped by Machine/Object column The compliance data grid is now grouped based on the different machines found in the Rainpole Production Application machine group. Examine Compliance Results in Detail Review the compliance items in detail for the filtered Machine/Object elements: 1. Expand app-l-01a to show the compliance items. 2. Expand db-w8-01a to show the compliance items. 3. Notice the different icons. Icon description: Page 68

69 Green check mark: Successful compliance rules. Red exclamation mark: Failed compliance rules that are not enforceable directly by vcenter Configuration Manager. Red exclamation mark with a small yellow sign: Failed compliance rules that are enforceable directly by vcenter Configuration Manager. Page 69

70 Add Compliance Tracking in vcenter Operations Manager for the Rainpole Production Virtual Machines vcenter Operations Manager helps automate performance, capacity, and configuration management. This exercise shows how to create a badge mapping mechanism to keep track of operating system level compliance inside the Operations dashboard in VMware vcenter Operations Manager. Add a vcenter Operations Manager Compliance Badge Mapping for the Rainpole Production Applications Compliance Template 1. Expand vcenter Operations Manager Badge Mapping. 2. Select Mappings. 3. Click Add. Define the Parameters for the New Badge Mapping This mapping provides vcenter Operations Manager with the information it needs to calculate a compliance badge for the vcenter Configuration Manager entities that are involved. The newly created mapping will be used by vcenter Operations Manager as part of its calculations for the risk factor. This showcases the integration between these two components of vcloud Suite. Page 70

71 1. Enter Rainpole Production Applications Badge Mapping as the mapping name. 2. Leave the other settings unchanged. The compliance badge uses a simple percentage in a machine group context. 3. Click Next. Page 71
72 Select the Machine Group for the Mapping 1. Select the Rainpole Production Applications machine group. 2. Click Next. Page 72

73 Specify the Compliance Template 1. Select the only template available, Rainpole Production Application Compliance Template. 2. Use the down arrow button to move the template to the selected compliance templates. 3. Click Next. Page 73
74 Confirm Creation of the Compliance Badge Mapping Click Finish to save and close the window. Page 74

75 Run the Newly Created Compliance Badge Mapping Job 1. Select the new Rainpole Production Applications Badge Mapping job. 2. Click Run. 3. Click OK. Page 75

76 Close the Mapping Running Windows After a few seconds the mapping run finishes. Click Close to return to main screen. Exit from vcenter Configuration Manager Close the vcenter Configuration Manager interface by clicking the red button on the upper right or by closing the browser window. Click OK to confirm you want to close the session. Note: Feel free to close a vcenter Configuration Manager tab in your browser or window, it there is still one available. Page 76
77 See the Compliance Badges in vcenter Operations Manager Connect to the vcenter Operations Manager Web UI to see the compliance badge. Return to the ControlCenter desktop and open Internet Explorer. Page 77

78 Log In to vcenter Operations Manager 1. Click vcenter Operations Manager in the favorites bar. 2. Enter admin. 3. Enter VMware1! as the password. 4. Click Login. Page 78

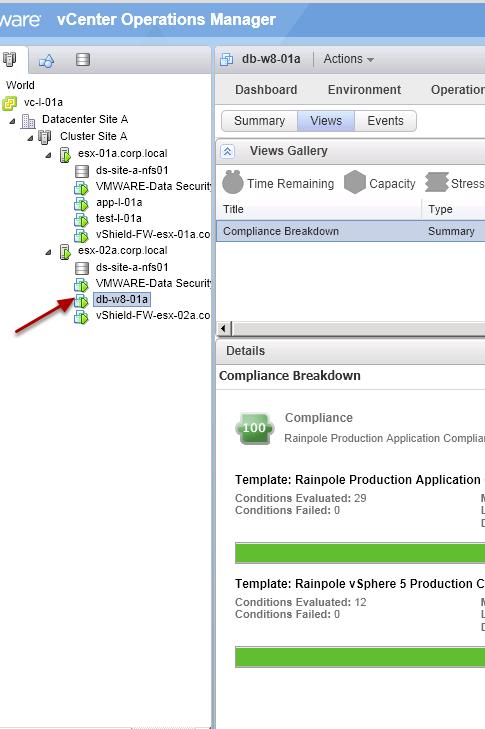
79 Expand the Virtual Infrastructure Hierarchy After a few seconds the vcenter Operations Manager Web UI is displayed. Select World> vc-l-01a> Datacenter Site A> Cluster Site A> esx-01a.corp.local and esx-02a.corp.local to select all of the virtual machines that are running in the virtual environment. Check the OS-Level Compliance Status using the Compliance Breakdown 1. Click app-l-01a. 2. Click Planning. 3. Click Views. 4. When the Views Gallery opens, click Compliance. This loads the only available compliance view, Compliance Breakdown. After a brief time, the current status of compliance for the Web server app-l-01a is displayed. Note: It can take up to two minutes for the compliance badge to appear. This is due to possible high workload in the lab environment, Tip: vcenter Operations Manager provides a color-coded badge system, which ranges from a healthy green to a health degradation status depicted in a gradual or Page 79

80 instantaneous transition to yellow, orange or red. Inside the badge, vcenter Operations Manager also presents a score, which might reflect the desired healthy state, a potential problem, or an imminent risk, depending on the badge being observed (health, risk, optimization, or compliance). In this example, notice that the Web server VM (app-l-01a) is reported non-compliant. Seven conditions were evaluated, and three of them failed. vcenter Operations calculated a score of 57 and set the color to yellow to indicate this object needs work to be compliant. Review the Compliance of the Database Server (dbw8-01a) Click db-w8-01a on the left sidebar to show the compliance view for the database server. Tip: Notice that the current compliance status is different from app-l-01a. In this case, the database server virtual machine is considered to be compliant. Only four conditions Page 80

81 failed out of 25 evaluated, with a resulting high score of 84, which in this example is considered acceptable. As a result, the compliance badge set to green. The score thresholds that trigger the color changes are customizable. Page 81

82 Remediate Compliance Issues in Production Virtual Machines and Track Changes in vcenter Operations Manager The Rainpole environment has now been tested for compliance and changes are being tracked in vcenter Operations Manager. In this exercise you will bring the Rainpole Production Applications machine group to compliance using two different approaches: Issuing a UNIX remote command with a script to fix out-of-compliance items. Enforcing compliance on Windows by leveraging the vcenter Configuration Manager agent installed on the target machine. vcenter Configuration Manager can also be integrated into your existing service desk workflow. In this exercise you will use a simple approve/deny interface for change management to verify and manually approve the actions that vcenter Configuration Manager wants to perform. Launch the Service Desk application Double-click the Service Desk icon on the ControlCenter desktop to open the Change Management Approval interface. Page 82

83 Enable Service Desk Integration Enable the Service Desk integration by clicking the Turn On Integration button. Page 83

84 Remediate Compliance Issues Starting from vcenter Operations Manager Switch back to the vcenter Operations Manager web UI. IMPORTANT: Before you execute the following steps, verify that no other vcenter Configuration Manager windows are open. 1. Select app-l-01a. 2. Click View details in VCM link near the compliance bar. Page 84
85 Log into vcenter Configuration Manager 1. Select the OS Admin role. 2. Click Login. Page 85

86 Remediate UNIX Compliance Issues Using a Remote Command 1. vcenter Configuration Manager opens within the scope of app-l-01a compliance. 2. To fix the out of compliance items, click Remote Command button on the top bar. Page 86
87 Select the Web Server (app-l-01a) for remediation 1. Verify that app-l-01a is selected. if not, select it in the top Machine Name box and click the down arrow to move it to the lower box. 2. Click Next. Page 87
88 Select the folder containing the Remote Commands to be applied 1. Click to select UNIX Remote Commands. 2. Click Next to continue. Page 88
89 Select specific Remote Commands 1. Select the Fix SUSE Server Compliance command. 2. Click the > arrow to move the command to the Selected box. Make sure that "Fix SUSE Server Compliance" is in the Selected box. 3. Click Next. Page 89
90 Define the "Run Schedule" for the Remote Command Ensure the Run Action Now option is selected and Click Next. Page 90
91 Confirm the command execution Click Finish to submit the job. Page 91
92 Service Desk Connection information Leave all the information blank. By default, the Service Desk Connector will create a ticket to correspond with this run command request. Click Finish. Approve the Job Through the Service Desk Application The job now needs to be approved in the Service Desk application. 1. Return to the Service Desk application and click Refresh to show the recently submitted job. 2. Select the lastrfc event from the RFC drop-down menu to populate the page with with information from the vcenter Configuration Manager job queue. IMPORTANT: Verify that the Job Name field contains the script name Fix SUSE Server Compliance, that the machine involved is app-l-01a, and that the Run Now check box is selected. 3. Click Approve to submit the job to the running queue. Page 92

93 NOTE: if the RFC job does not appear immediately, wait another 30 seconds and click Refresh again. If there are multiple RFC jobs in the queue, select the one with the correct job type and job name. Page 93

94 Watch the Running Job After the remote command is approved in the Service Desk application, switch back to the vcenter Configuration Manager interface and follow the job run. 1. Click Jobs button on the top bar. 2. Select an auto-refresh time. Wait until the job is complete. Page 94
95 Close the completed job Once the job is completed, the job disappears with a No data is available at this time message. Click Close. Page 95

96 Collect Updated Information from the Web Server (appl-01a) Tip: Notice that the icons still show Non-Compliant items. Now collect updated information on the machine that you fixed. 1. Click Collect in the top bar. 2. Click OK. Page 96
97 Verify the Web Server (app-l-01a) is selected The machine app-l-01a should already be selected. If not, select it from the Available box and click the > arrow button to move it to the Selected box. 1. Click Select a Collection Filter Set to apply to these machines. 2. Click Next. Page 97
98 Select a Collection Filter 1. Scroll down all the way to the bottom. 2. Select Rainpole Production Application Collection Filter. 3. Click Next to continue. This collection filter speeds up the activity by collecting only the features checked for compliance by the Rainpole template. Page 98
99 Confirm the collection execution Click Finish to submit the job. NOTE: This collection does not represent a change in the system, so it is not subjected to the approval workflow with the Service Desk application. Page 99

100 Watch the Running Collection Job Clicking the Jobs button in the top bar and watch the collection job running. IMPORTANT: Wait until the job has completed and exited the queue before proceeding with the next step. Page 100
101 Close the Job Running window Once the job has completed and the jobs queue is empty, click Close. Page 101

102 Run the Compliance Template Again Now that the collection has completed, you need to run the template again to update the compliance information on it. 1. Click the Run Template button. 2. Click OK and notice the job progress in the new window. Page 102

103 Close the Compliance Running window When the compliance run is complete, click Close to return to the vcenter Configuration Manager interface. Page 103

104 Refresh the Data Grid To see the changes: 1. Right-click in a blank space to produce a menu. 2. Select Refresh data grid view. Page 104

105 Verify non-compliant conditions are now fixed After a few seconds, you will see all the red exclamation marks turn green as all the out of compliance items are fixed by the remote command. Refresh the vcenter Operations Manager Badge From the Compliance slider, expand vcenter Operations Manager Badge Mapping> Mappings. Page 105

106 Run again the Applications Badge Mapping job previously created Update the badge status in vcenter Operations Manager. 1. Select the previously created mapping Rainpole Production Applications Badge Mapping. 2. Click Run. 3. Click OK. NOTE: In a production setting, this is an ideal candidate for a scheduled task. Page 106
107 Close the Mapping Running window After the compliance run is completed, click Close to return to the vcenter Configuration Manager interface. Close the vcenter Configuration Manager Interface by closing the browser window. Page 107

108 Track the Changes in vcenter Operations Manager Switch back to the vcenter Operations Manager web UI. 1. Click the Refresh icon on the top bar. Notice the badge change that reflects the compliance change: Score is now 100 and color is Green, since no conditions failed out of 8 evauated. NOTE: It can take up to two minutes for the change to be displayed. Page 108

109 Bring the Database Server to Full Compliance 1. Click db-w8-01a. 2. Click View details in VCM link. Page 109
110 Log into vcenter Configuration Manager A login window opens for vcenter Configuration Manager. 1. Select OS Admin from the User Role drop-down menu. 2. Verify that no other vcenter Configuration Manager windows are open, and click Login. Page 110

111 Enforce Changes Through vcenter Configuration Manager Now bring items into compliance by leveraging the vcenter Configuration Manager agent installed in the target machine. After logging in, you are automatically in scope with db-w8-01a, 1. Click Enforce button in the top bar to open the Service Desk connection information window. 2. Assign 1000 for RFC and add the description Enforcing Compliance on Rainpole Windows Machines. 3. Click Next. Page 111
112 Select the items to be corrected Select the All items in the current compliance run option and click Next to consider all out-of-compliance items for enforcement. Page 112

113 Confirm the changes made Review the actions that to perform and click Finish to submit the job to the queue. Page 113

114 Approve the Job Through the Service Desk Application The job must now be approved in the Service Desk application. 1. Return to the Service Desk application and click Refresh. 2. Select the 1000 event from the RFC drop-down menu to populate the page with with information from the vcenter Configuration Manager job queue. Verify that the Job Name field contains the script name Enforced Compliance, that the machine involved is db-w8-01a, and that the Run Now check box is selected. 3. Click Approve to submit the job to the running queue. NOTE: if the RFC job does not appear immediately, wait another 30 seconds and click Refresh again. If there are multiple RFC jobs in the queue, select the one with the correct job type and job name. Page 114

115 Watch the Enforce Job Running Now watch the Compliance Enforcing job run. Verify that all of the Enforced Compliance jobs are done before continuing. Page 115
116 Close the Jobs Running window After the jobs are completed, close the window. Page 116
 because the enforcing compliance job also collects")
117 Run the Compliance Template Rerun the compliance template. 1. Click Run Template. 2. Click OK. NOTE: There is no need to collect information again (as with the UNIX machine) because the enforcing compliance job also collects information as it brings items to compliance. Page 117

118 Close the Compliance Running window When the compliance run is complete, click Close to return back to the vcenter Configuration Manager interface. Page 118

119 Refresh the Data Grid View To reflect the changes, 1. Right-click and select Refresh data grid view. Page 119

120 Verify non-compliant conditions are now fixed After a few seconds, all the red exclamation marks turn green as the enforcement fixes all of the out of compliance items. Page 120

121 Refresh the vcenter Operations Manager Badge Expand vcenter Operations Manager Badge Mapping and select Mappings. Page 121

122 Run the Compliance Mapping Job 1. Select the previously created mapping Rainpole Production Applications Badge Mapping. 2. Click Run. 3. Click OK to launch the mapping. Page 122

123 Close the Mapping Running window upon completion When the compliance run is complete, click Close to return to the vcenter Configuration Manager interface. Also Close vcenter Configuration Manger by closing the browser window. Page 123

124 Track Compliance Changes in vcenter Operations Manager Return to the vcenter Operations Manager web interface. 1. Click the Refresh icon on the top bar. Notice the badge change that reflects the compliance change: Score is now 100 and color is Green, since no conditions failed out of 29 evauated. NOTE: It can take up to two minutes for the changes to be displayed. Page 124
. 4. Click the small Compliance badge. 5. Narrow the scope to the last hour by clicking on the Calendar icon. 6. Change from \"Last Hour\" to Last Hour. 7.")
125 View Change Events Inside vcenter Operations Manager You can also track events coming from vcenter Configuration Manager. 1. Click Events. 2. Click the Compliance shadow badge. 3. Click the bullseye icon (to show self events). 4. Click the small Compliance badge. 5. Narrow the scope to the last hour by clicking on the Calendar icon. 6. Change from "Last Hour" to Last Hour. 7. Click the small blue arrow to apply the modifications. Page 125

126 Review the filtered events The events are now shown in the vcenter Operations Manager "Timeline". 1. Hover over one of the blue E events view additional information about the event. 2. For additional details in vcenter Configuration Manager click View in vcm console. Page 126
127 Log in to vcenter Configuration Manager A login window opens for vcenter Configuration Manager. 1. Select OS Admin from the User Role drop-down menu. 2. Verify that no other vcenter Configuration Manager windows are open, and click Login. Page 127

128 View the Change in vcenter Configuration Manager From the Console slider: 1. Expand Change Management> VCM Initiated 2. Select Master Log. 3. Click View Data Grid. Page 128

129 Notice the event(s) logged by vcenter Operations Manager. Details on the type of change are shown. The interface allows you to roll back changes or set reconciliation with change management. Close the vcenter Configuration Manager interface by closing your browser window. Page 129
130 Set Up vsphere Level Compliance for the Virtual Environment vcenter Configuration Manager is tightly integrated with vsphere and supports hardening of the VMware infrastructure, including configuration compliance assessment and automated remediation for VMware ESX, VMware ESXi, vcenter, vcloud Director, and vcloud Networking and Security. vcenter Configuration Manager also addresses configuration management for virtualization constructs such as compliance assessment and patching for virtual machine templates and offline virtual machines. Log In As Virtual Environment Administrator Before logging in, verify that no other vcenter Configuration Manager windows are open. 1. Select the VE Admin role. 2. Click Login. Page 130

131 Run the Compliance Template on the Virtual Environment Now that the production applications are compliant to Rainpole internal regulations, it is time to apply virtualization-specific compliance rules to the virtualization environment for the production applications. 1. Select the Compliance Slider and expand Virtual Environment Compliance> Templates 2. Select Rainpole vsphere 5 Production Compliance Template. 3. Click Run Template. Page 131

132 Select Options for Executing the Template Click OK. Page 132

133 Close the Compliance Running Window The compliance run might take a few minutes. When the compliance run is complete, click Close to return to the vcenter Configuration Manager interface. Page 133

134 Refresh the Data Grid View To reflect the changes: 1. Right-click in a blank space to display a menu. 2. Select Refresh data grid view. Page 134


135 Define the Column Grouping for Better Visibility of the Data Grid To get a better vision of the data grid, drag the Rule Group column and drop it on the Column Grouping top bar. Data Grid Is Now Grouped by Rule Group After dragging the Rule Group column, the data grid is re-organized for better visualization. Review the Compliance Status for Virtual Environment To show the compliance items: 1. Expand the Rainpole Compliance Rules - vsphere ESXi group 2. Expand the Rainpole Compliance Rules - vsphere Guests group. 3. Notice the icons. Icon descriptions: Page 135

136 Green check marks indicate successful compliance rules. Red exclamation marks indicate failed compliance rules that are not enforceable directly by vcenter Configuration Manager. Red exclamation marks with a small yellow sign indicate failed compliance rules that are enforceable directly by vcenter Configuration Manager. Page 136
137 Add Compliance Tracking for the Virtual Environment in vcenter Operations Manager This exercise shows how to create a badge mapping for vcenter Operations Manager to keep track of virtual environment compliance. The exercise is similar to the previous exercise on creating a badge mapping for the production application compliance and adds a layer of compliance that can be tested for both. Page 137

138 Create a Compliance Badge Mapping for the Virtual Environment In the Compliance Slider of the vcenter Configuration Manager: 1. Expand vcenter Operations Manager and select Mappings. 2. Click Add. 3. Enter Rainpole vsphere Virtual Environment Badge Mapping as the mapping name. 4. Select Virtual Object Group Compliance 5. Click Next. Page 138
139 Select the Virtual Objects Group for the vcenter Operations Manager Mapping 1. Select the vcenter Server (VC-L-01A) virtual object for the job 2. Verify your selection. 3. Click Next. NOTE: If the Virtual Objects selection, see "Troubleshooting: When creating a Virtual Environment Compliance Badge Mapping the Virtual Objects Group is Empty" in the Troubleshooting Chapter at the end of this manual. Page 139
140 Select the Compliance Template for the mapping 1. Select the only template available, Rainpole vsphere 5 Production Compliance Template 2. Use the down arrow to move it to the selection box. Verify the selection shows up in the selected items box. 3. Click Next. Page 140


141 Confirm the Compliance Badge Mapping creation The badge mapping is now complete. Click Finish to save and close the window. Run the newly created Compliance Badge Mapping job 1. Select the Rainpole vsphere Virtual Environment Badge Mapping job. 2. Click Run. Page 141

142 Accept the defaults for the Mapping run Click OK. Note: The Mapping task can take a couple of minutes to process all the rules. Please just wait. Page 142
143 Close the Mapping Running windows upon completion When the mapping run is complete, click Close to return to the main screen. Page 143

144 Check the Compliance at both the vsphere-level and OS- Level for Production Applications 1. Return to vcenter Operations Manager, and select app-l-01a from the left bar. 2. Click Planning. 3. Click Views. 4. Click Compliance. This loads the Compliance Breakdown. TIP: Notice that the compliance status has dropped from 100 to 50, and the badge changed from Green to Orange. This is because the production virtual machine is out of compliance at the virtual environment level, even though it is still 100% compliant at the OS level. Page 144

145 Check the Compliance at the vsphere-level for the Virtual Environment 1. Click esx-01a.corp.local to see the new compliance badge displayed for vsphere elements. Tip: Notice the single compliance template inside the Compliance Breakdown view. The Compliance badge reflects only the status of the vsphere environment template. Page 145

146 Remediate Compliance Issues in the Virtual Environment The virtual environment has now been tested for compliance and changes are being tracked in vcenter Operations Manager. In this exercise you will bring the virtual environment into compliance using a provided PowerShell script. Launch the Compliance Fix Script 1. Click Start button in the ControlCenter desktop task bar. 2. Select FIX Virtual Environment Compliance. Page 146

147 Monitor execution of the script Wait for the script to run. When the script run is complete, the window closes automatically. NOTE: The script takes approximately two minutes to complete. Page 147

148 Collect Updated Information from the Virtual Environment Return to vcenter Configuration Manager. 1. Click Collect in the top bar. 2. Click OK. Page 148
149 Select the vcenter Server and option for the Collection 1. Select VC-L-01A. 2. Add it to the Selected box by clicking the > arrow. 3. Click Next. Page 149

150 Select Data Types to Be Collected 1. Expand the Virtualization tree and mark these options for collection: vcenter Guests vcenter Hosts vcenter Network Attributes vcenter Networks vcenter Settings 2. Click Next. Page 150
151 Confirm the Information Collection request Click Finish to start the collection job. Page 151

152 Watch the Collection Job Running 1. Click Jobs in the vcenter Configuration Manager interface to watch the collection process. 2. Set an auto-refresh time or refresh manually. 3. When the status changes to Collector Complete, the job is complete. NOTE: This collection job might a few minutes to complete. Do not continue to the next step until this job is complete. However, you can use this time to explore, if desired. If you went through the troubleshooting process for the empty virtual objects selection, collection should take less than three minutes to complete. Page 152
153 Close the Jobs Running window Once the collection job has completed, close the window. Page 153

154 Run the Compliance Template Again on the Virtual Environment Important: ONLY when the collection is complete, 1. Select Compliance slider and expand Virtual Environment Compliance> Templates. 2. Click Rainpole vsphere 5 Production Compliance Template. Page 154

155 Redirect to the Data Grid View Click View data grid to switch to the grid view. Page 155
156 Run the Compliance Template 1. Click Run Template. 2. Click OK to start the compliance run. Note: The Template Run task can take a few minutes. Just wait until it's finished. Page 156

157 Close the Compliance Running window upon completion When the run is complete, click Close to return to the main screen. Refresh the Data Grid View To reflect the changes: 1. Right-click on a blank space to produce a menu. 2. Select Refresh data grid view. Page 157

158 Examine the Compliance Results After a few seconds, you will see all the red exclamation marks turn green as the script fixes all of the out of compliance items. Page 158

159 Run the Compliance Badge Mapping Again Now run the compliance badge mapping again. 1. From the Compliance slider in vcenter Configuration Manager, expand vcenter Operations Manager Badge Mapping and select Mappings 2. Select the Rainpole vsphere Virtual Environment Badge Mapping job. 3. Click Run. Page 159
160 Accept the Defaults for the Mapping run Click OK to continue the run. Note: the mapping run can take a few minutes. Just wait until it's finished. Page 160

161 Close the Mapping Running window upon completion When the mapping run is complete, click Close to return to the main screen. Page 161
 because the machine is now entirely compliant at both the vsphere level and OS level.")
162 Check the Compliance at both the vsphere-level and OS- Level for Production Applications 1. Return to vcenter Operations Manager and select app-l-01a. 2. Click the Refresh icon. 3. Notice that the compliance status jumped back to 100 (and the badge turned green) because the machine is now entirely compliant at both the vsphere level and OS level. NOTE: It might take up to two minutes to update the display. Page 162

163 Check the Compliance at the vsphere-level for the Virtual Environment 1. Switch to esx-01a.corp.local to see the Compliance Badge display for the vsphere 5 Compliance Template Tip: Notice that it is now 100% compliant here as well. The script fixed the ESXi items that were out of compliance. Page 163

164 Check the Compliance at both the vsphere-level and OS- Level for Production Database 1. Switch to db-w8-01a, the production database server. Tip: The Database Server is now also 100% compliant at both the vsphere and OS level. Track OS-Level and vsphere-level Events and the Compliance Graph 1. Maintaining the focus on db-w8-01a, click Events. 2. This should return you to the settings you had before. If not, click on the Compliance badge. 3. Click the bullseye icon (to show self events). Page 164
 8.")
165 4. Click the small compliance badge. 5. Narrow the scope to the last two hours by clicking on the Calendar icon. 6. Select the current day. 7. Select a two-hour range. (For example: If you are doing this at 4 p.m., select 2 p.m. as the start and 4 p.m. as the end.) 8. Click the small blue arrow to apply the changes. Page 165
. 5. Notice that compliance is back to 100%.")
166 Review the events in the selected time frame 1. The "events timeline" shows the OS-level events (there may be fewer E icons). 2. Notice that compliance at 100%. 3. Notice that vsphere-level compliance was added. 4. Notice the drop in the compliance graph to 50%, and then the changes at the vsphere level occur (done by the Powershell script). 5. Notice that compliance is back to 100%. Note: Close any vcenter Configuration Manager window / tab that is opened at this time. Page 166
167 Module 3 - Set Up Compliance Alerts in vcenter Configuration Manager Page 167
168 Set Up an Alert for Out-of-Compliance Conditions for Production Virtual Machines Out-of-compliance conditions can be monitored through vcenter Configuration Manager. This exercise shows how to create an alert rule that triggers when one of the out-ofcompliance conditions arises and set up an automated response or remediation. Launch vcenter Configuration Manager Verify that no other vcenter Configuration Manager windows are open and click vcenter Configuration Manager. Page 168

169 Log In to vcenter Configuration Manager A login window opens for vcenter Configuration Manager. 1. Select OS Admin from the User Role drop-down menu. 2. Click Login. Page 169

170 Add an Alert to the Rainpole Production Applications Machine Group 1. Click the Administration slider. 2. Expand Alert and select Machine Group Configuration. 3. Expand the All Machines folder and select Rainpole Production Applications. 4. Click Add. Page 170
171 Select an Alert Rule 1. Select the Rainpole Enterprise Applications Compliance Alert rule. 2. Click Next. Page 171
172 Define the Severity 1. Select the Critical severity. 2. Click Next. Page 172

173 Define Automated Responses (Optional) The compliance alert can trigger an automated response. This lab does not use that function, so just click Next. Note: In a production environment, an automated response is an appropriate way to alert the operations or security team of a compliance change in the infrastructure. Page 173

174 Confirm the Alert Addition Request Click on Finish to exit the wizard. Verify That the Alert Has Been Created Verify that the alert rule is listed in the configuration. Page 174
175 Test the Out-of-Compliance Alert on Production Virtual Machines Now that you reached 100% compliance with the previous exercises and have set up a compliance rule alert for the production machine group, you will trigger the alert by creating out-of-compliance conditions. Put the Web Server Out of Compliance Return to the app-l-01a PuTTY session. If you need to open it again, log in with root as the user name and VMware1! as the password. Execute the following command to automatically break compliance inside the virtual machine:./restore-original.sh Page 175
176 Collect Information from the Web Server (app-l-01a) Return to vcenter Configuration Manager while still logged as OS Admin. 1. Click Collect to start the collection process. 2. Click OK. Page 176

177 Select the Web Server (app-l-01a) and Options for the Collection 1. Select app-l-01a. 2. Click the > arrow to move it to the Selected box. 3. Click Select a Collection Filter Set to apply to these machines. 4. Click Next. Page 177

178 Select a Collection Filter 1. Scroll all the way down. 2. Select Rainpole Production Application Collection Filter. 3. Click Next. Page 178
179 Confirm the Collection Click Finish to submit the job. Note: Because this collection does not represent a change in the system, it is not subjected to the approval workflow with the Service Desk application. Page 179

180 Watch the Collection Job Run Click Jobs in the top bar. Important: Wait until the job has completed and exited the queue before proceeding to the next step. When the job is complete, close the Jobs Running window. Page 180
.")
181 See Whether Alerts Have Been Raised 1. Select the Console slider. 2. Expand Alerts and select Active to open the alert panel. 3. Notice the compliance alerts that have been raised (the script modified three conditions). Note: If the alerts are not displayed immediately, click Active to refresh the page. Page 181

182 Examine the Alert Details 1. To examine the alerts details, select the desired alert. 2. Click View Detail. 3. View the details, including the rule that was violated. Close the windows and exit vcenter Configuration Manager. Page 182
183 Roll Back Changes Enforced by vcenter Configuration Manager and Trigger Alerts Important: Close vcenter Configuration Manager. Return to vcenter Operations Manager. Select db-w8-01a, the production database server. Notice that the application is still 100% compliant at both the vsphere and OS levels. Page 183
184 Page 184

185 Find an Event to Roll Back 1. Click Events. The same two-hour span that you specified earlier should still be selected. 2. Hover over the vcenter Configuration Manager change event. 3. Click View in vcm console. Page 185
186 Log In to vcenter Configuration Manager A login window opens for vcenter Configuration Manager. Verify that no other vcenter Configuration Manager windows are open. 1. Select OS Admin from the User Role drop-down menu. 2. Click Login. Page 186
 and a name (Rollback Windows Changes). 4.")
187 Roll Back a vcenter Configuration Manager Change Event 1. Select one or more change events. 2. Click Rollback Changes. 3. Assign an RFC number (2002) and a name (Rollback Windows Changes). 4. Click Next. Page 187

188 Confirm the Rollback Review the rollback action summary and then click OK to submit the job. Page 188
. 3.")
189 Approve the Job in the Service Desk Application Switch to the Service Desk application. 1. Click Refresh until the correct RFC number appears. 2. Verify the information (job description, machines involved). 3. Click Approve to submit the job. Page 189

190 Watch the Rollback Job Run Watch the collection job running by clicking the Jobs button in the top bar. Important: Wait until the job has completed and exited the queue before proceeding with the next step. Upon completion, close the Jobs Running window. Page 190

191 See if Alerts Have Been Raised Because the change rollback job automatically collects information back from the machines, there is no need to collect from db-w8-01a again. Select Console > Alerts> Active. Page 191

192 Refresh the Date Grid View To see the changes: 1. Right-click a blank space to display a menu. 2. Select Refresh data grid view. Page 192

193 Examine the Alert Details 1. After refreshing, one or more alerts should show for db-w8-01a. 2. Select the desired alert and click View Detail to open a new window with all the details, including the rule that was violated. After reviewing the details, close the window and close the current vcenter Configuration Manager session. Page 193
194 Set Up an Alert for Out-of-Compliance Conditions for the Virtual Environment This exercise shows how to raise out-of-compliance alerts at the virtual environment level. Log In As Virtual Environment Administrator Verify that no other vcenter Configuration Manager windows are open. 1. Select VE Admin from the User Role drop-down menu. 2. Click Login. Add an Alert to the Rainpole Production Applications Machine Group 1. Select the Administration slider. 2. Expand Alert and select Virtual Environment Configuration. 3. Expand All Virtual Objects> VC-L-01A> Datacenters> Datacenter Site A. 4. Select VMs. Page 194

195 5. Click Add. Page 195
196 Define the Alert Rule 1. Select the Rainpole vsphere Production Compliance Alert rule. 2. Click Next. Page 196
197 Define the Severity 1. Select the Critical severity. 2. Click Next. Page 197

198 Define Automated Responses (Optional) The compliance alert can trigger an automated response. In this lab you do not use this function, so click Next. Note: In a production environment, an automated response is an appropriate way to alert the operations or security team of a compliance change in the infrastructure. Page 198

199 Confirm the Alert Addition Request Click Finish to exit the wizard. Verify That the Alert Has Been Created Verify that the alert rule is listed in the configuration. Page 199
200 Test the Out-of-Compliance Alert in the Virtual Environment This exercise shows how to trigger an out-of-compliance alert at the virtual environment level by manually undoing some of the changes that the PowerShell script fixed. Page 200

201 Log in to the vsphere Web Client 1. Open a new tab in Internet Explorer and click the vsphere Web Client bookmark in the favorites bar. 2. Select Use Windows session authentication. 3. Click Login. Page 201

202 Navigate to VMs and Templates Click VMs and Templates. Page 202

203 Shut Down the Database Server To trigger an alert, you will cause some advanced options in the database server dbw8-01ato revert. To do this, the server must be shut down. 1. Right-click db-w8-01a. 2. Select Shut Down Guest OS,and click Yes in the confirmation window. Page 203

204 Access the Data Base Server (db-w8-01a) Settings 1. When the shutdown is complete, notice that the green play icon is missing. 2. Right-click db-w8-01a and select Edit Settings. Page 204

205 Select the Advanced VM Options 1. Click VM Options. 2. Expand the Advanced section. 3. Click Edit Configuration. Modify Configuration Parameters At the new panel that opens: 1. Scroll down. 2. Change the following values from true to false: Page 205

206 isolation.tools.autoinstall.disable isolation.tools.diskshrink.disable isolation.tools.diskwiper.disable isolation.tools.vixmessage.disable isolation.monitor.control.disable 3. Verify your changes and click OK. Page 206

207 Finish Editing the Settings Click OK on the Edit Settings panel to apply the modifications. Page 207

208 Start the Database Server Restart the db-w8-01a virtual machine by right-clicking it and selecting Power On. Note: Wait 60 seconds before continuing the exercise. Page 208

209 Collect Updated Information from the Virtual Environment 1. Switch to vcenter Configuration Manager and click Collect in the top bar. 2. Click OK. Page 209
210 Select the vcenter Server Machine (VC-L-01a) 1. Select VC-L-01A. 2. Use the > arrow to move it to the Selected box. 3. Click Next. Page 210
211 Define the Data Types 1. Expand Virtualization and select vcenter Guests as data type to collect. Do not select anything else. 2. Click Next. Page 211
212 Confirm the Collection and Finish Click Finish to complete the collection information and start the collection job. Page 212
213 Run and Monitor the Collection Job Returning to the vcenter Configuration Manager interface: 1. Click Jobs to watch the collection run. 2. Set an auto-refresh time or refresh manually. 3. When the status changes to Collector Complete, the job is complete. Close the Jobs Running window. Page 213

214 See Whether Alerts Have Been Raised 1. Select Console> Alerts. 2. Click Active to open the alert panel and display the five compliance alerts raised for the five advanced parameters that were previously changed. If the data grid is empty, right click and Refresh the data grid view. After reviewing the data, close all the vcenter Configuration Manager sessions. Page 214
215 Module 4 - Patch Operating System and Third-Party Applications with vcenter Configuration Manager Page 215
216 Patch UNIX or Linux Operating System vcenter Configuration Manager can deploy and manage patches for several operating systems and applications. In this exercise you will perform patching on the production Web server SUSE Linux machine and production database Windows machine. You will also perform patching on the Java Runtime Environment using a third-party package. Log In to vcenter Configuration Manager Close any other vcenter Configuration Manager sessions that are open and return to the login window. 1. Select OS Admin from the User Role drop-down menu. 2. Click Login. Assess Patch Status 1. Select the Patching slider. 2. Expand All UNIX/Linux Platforms > Assessment Templates 3. Select SUSE Sudo Security Patch. 4. View the patch information. Page 216


217 5. Click View data grid. Deploy a Patch The SUSE Sudo Security Patch assessment template contains a single SUDO patch. The assessment has already run so you can proceed. 1. Select the Web server machine and notice the Recommended Action (Install Patch). 2. Click Deploy. Page 217
218 Create an RFC for the Service Desk Approval Because the patch deployment modifies the machine, an RFC must be approved. 1. Assign a number (3001) and a name (Deploy SUSE Sudo Patch to Production VMs). 2. Click Next. Page 218
 and the correct bulletin")
219 Select Machine and Bulletin to Deploy 1. Verify that the correct machine (app-l-01a) and the correct bulletin (SUSE-2012:6306) are selected. 2. Click Next. Page 219

220 Review the Required Patches 1. Expand Required Patches to view the patch that will be applied. 2. Click Next. Page 220
221 Confirm the Patch Deployment Order There is only one patch to be applied. Click Next. Page 221

222 Define the Stage and Deployment Scheduling Keep the default selections and click Next. Page 222

223 Define the Reboot Options This patch does not require a reboot. Click Next. Page 223
224 Confirm Patch Deployment Request Review the action summary and click Finish to submit the job. Page 224
. 3. Click Approve.")
225 Approve the Patch Deployment from the Service Desk Return to the Service Desk application. 1. Wait a few seconds and click Refresh. 2. Select the RFC 3001 from the drop down and verify the information (job description, machines involved). 3. Click Approve. Page 225

226 Watch the Path Deployment Job Watch the UNIX patch deployments. 1. In the Patching slider, expand Job Management> UNIX> Job Manager. 2. Click Running. 3. View the list of jobs. Set an auto-refresh time or refresh manually. When the status changes to Collector Complete, the job is complete and will disappear from the queue. Page 226
, which is an indication that patching has completed successfully. 3. To see the details, click View data grid.")
227 Check the Assessment Template Status 1. Return to the SUSE Sudo Security Patch Assessment Template under the Patching slider. It might take a couple of minutes to refresh the data. 2. The report should now show a green bar (as opposed to red as it was before), which is an indication that patching has completed successfully. 3. To see the details, click View data grid. Page 227

228 Verify That the Patch Has Been Applied The data grid should show that the SUSE-2012:6306 patch is correctly installed. Page 228
. 5.")
229 Patch Windows Operating System Assess Patch Status 1. Select the Patching slider. 2. Expand Windows > Assessment Templates. 3. Select the W2K8R2 Security Patches assessment template. 4. Review the Patch Assessment report. (Notice there is an Unknown status for 1 machine). 5. Click View data grid. Page 229

230 Assess Patch Status (cont.) The assessment template contains a bulletin called MS Before deploying the patches you need to assess the status of the machine. 1. Select the db-w8-01a machine. 2. Click Assess to open a status window. 3. After the assessment is complete, click Close. Page 230

231 Refresh the Data Grid View To reflect the changes: 1. Right-click a blank space to display a menu. 2. Select Refreshdata grid view. Page 231
232 Create the Service Desk Patch Job Request Two rows appear, representing the patches that must be deployed for this bulletin. 1. Select both rows. 2. Click Deploy. 3. In the Service Desk window that opens, assign the RFC a number (3002) and a description (Deploy Windows Security Patches). 4. Click Next. Page 232
233 Define the Machines and Patches To Be Deployed Verify that two patches are to be installed, and click Next. Page 233

234 Verify Patches Found in the Collector Expand the Found on Collector section. Verify that both patches are listed under it, and click Next. Page 234
235 Patch Order Confirmation Verify that the two patches are listed and click Next. Page 235

236 Define Advanced Settings for Patch Deployment (Optional) Advanced options are not needed for this patch deployment. Click Next. Page 236

237 Set Patch Staging and Deployment Schedule Verify that Copy patches to target machines during deployment and Run Action now are selected and click Next. Page 237

238 Define Reboot Options Even if these patches require a reboot, do not perform an automatic reboot. Verify that Do not reboot is selected and click Next. Page 238
239 Confirm Patch Deployment Request Review the warning and click Finish. Page 239

240 Review the Patch Job Status: Pending The job is now held for approval. To see the patch job: 1. Under the Patching slider, expand Job Management> Windows> Job Manager. 2. Select Pending Response. 3. Verify that you can see the job (ID 97) with the Pending status. Page 240

241 Approve the Patch Deployment from the Service Desk Return to the Service Desk. 1. Click Refresh until the RFC to approve is shown. 2. Select the corresponding RFC from the drop down menu and verify that the job type and machines involved are correct. 3. Click Approve. Note: The job might not appear with the correct RFC number. It should be the last job in the queue. Page 241
242 Review the Running Patch Jobs 1. After the job is approved, select Job Management> Windows> Job Manager> Running. You might need to refresh the data grid if the job does not show up right away. 2. Confirm that the job is running. Page 242

243 Watch the Jobs Running 1. Click Jobs to watch the Patch Install and Deployment job running. Set an autorefresh time or refresh manually. When the status changes to Collector Complete, the job is completed. 2. The Patching Automated Collection job will now be submitted automatically. The purpose of the second job is to collect changes made by the patch. When the status changes to Collector Complete, the job is complete. Page 243

244 Check the Assessment Template Status 1. Return to the W2K8R2 Security Patches assessment template. 2. Click View data grid. Page 244

245 Run Patch Assessment Again 1. Run the assessment again by clicking Assess. A status window opens. 2. When the assessment is complete, click Close. Page 245

246 Refresh the Data View Grid To reflect the changes: 1. Right-click a blank space to display a menu. 2. Select Refresh data grid view. Review the Patch Status The Suggested Patch column should show the Must Reboot Machine message. This is because a reboot is required for the patch to be applied successfully. Create Another Service Desk Patch Job Request 1. Click Reboot Machines. A Service Desk window opens. 2. Give the RFC a number (3003) and a description (Reboot Windows Production Machines after Patching). Page 246
247 3. Click Next. Page 247

248 Verify the Selected Machine for Reboot Verify that db-w8-01a is selected and click Next. Page 248
249 Select Optional Functions You can enter an optional message to display when rebooting. If you do not enter a message, the standard VCM is rebooting this machine message appears. Click Next. Page 249
250 Set the Job Schedule Select Run Action now and click Next. Page 250

251 Confirm the Patch Action Review the action summary and click Finish to submit the job. Page 251
252 Approve the Job Execution from the Service Desk 1. Return to the Service Desk application and click Refresh until the RFC job appears. 2. Select the corresponding RFC from the drop down menu and verify that the job type and machines involved are correct. 3. Click Approve. Page 252

253 Watch the Status of the Job Click Jobs to watch the reboot job. Set an auto-refresh time or to refresh manually. When the status changes to Collector Complete the job is complete and the entry disappears from the job queue. Close the Jobs Running window when complete. Page 253

254 Collect Updated Information Collect updated information from the machine you just rebooted. 1. Click Collect in the top bar. 2. Click OK. Page 254
255 Verify That the Database Server (db-w8-01a) is Selected Verify that db-w8-01a is selected and click Next. Page 255
256 Select the Data Types to collect 1. Select the Windows group to collect all the Windows data types. 2. Click Next. Page 256
257 Confirm the Collection Request Click Finish to submit the job. Note: This collection does not represent a change in the system and is not subjected to the approval workflow in the Service Desk application. Page 257

258 Watch the Collection Job Run Watch the collection job run by clicking Jobs. Important: Wait until the job is complete and exits the queue before proceeding to the next step. Close the Jobs Running window when the job is done. Page 258

259 Run Patch Assessment (Again) 1. After the collection is done, click Assess to run the assessment again. 2. Click Close when the assessment run is complete. Page 259

260 Refresh the Data View Grid To reflect the changes: 1. Right-click a blank space to display a menu. 2. Select Refresh data grid view. Confirm That Both Patches Have Been Applied The patch status should be green for both of the applied patches. Page 260
. Before deploying the patch, assess the status of the machine.")
261 Patch the Java Runtime Environment on Windows Assess the Patch Status 1. Select the Patching slider. 2. Expand Windows > Assessment Templates. 3. Click Java Update Assessment. 4. Review the current Overall Machine Patch Assessment Status 5. Click View data grid. Assess the Patch Status (cont.). Before deploying the patch, assess the status of the machine. Page 261

262 1. Select the db-w8-01a machine. The assessment template contains a bulletin called JAVA Click Assess. A status / Assessment Results window opens. 3. When the assessment is complete, click Close. Page 262
263 Refresh the Data View Grid To reflect the changes: 1. Right-click on a blank space to produce a menu. 2. Select Refresh data grid view. Page 263
 and a description (Patching Java Runtime on Production VMs). 4. Click Next.")
264 Create the Service Desk Patch Job Request 1. After the assessment has completed, select the db-w8-01a row and review the Suggested Patch column. 2. Click Deploy. A Service Desk window opens. 3. Assign the RFC a number (4001) and a description (Patching Java Runtime on Production VMs). 4. Click Next. Page 264
 and click Next. Page 265")
265 Define the Machine and Patch to be deployed Verify that the correct patch is listed (jre-7u17-windows-x64.exe) and click Next. Page 265

266 Verify Patches found in the Collector Expand the Found on Collector section. Verify that the file is found on the collector and click Next. Page 266
267 Patch Order Confirmation Confirm the patch order and click Next. Page 267
268 Define Advanced Settings for the Patch Deployment (Optional) There is no need for a special switch for this patch. Click Next. Page 268

269 Set Patch Staging and Deployment Schedule Verify that Copy patches to target machines during deployment and Run Action now are selected, and click Next. Page 269

270 Define Reboot Options This patch does not require a reboot. Click Next. Page 270
271 Confirm Patch Deployment Request Review the summary screen and click Finish. Page 271
272 Approve the Patch Deployment from Service Desk Return to the Service Desk. 1. Click Refresh button until the RFC to approve is shown. 2. Select the corresponding RFC from the drop down menu and verify that the job type and machines involved are correct. 3. Click Approve. NOTE: This job might not show with the correct RFC number, but should be the last job in the queue. Page 272
273 Review the Running Patch Jobs 1. After the job has been approved, click the Running section of the Job Manager for Windows to confirm that the job is running correctly. You might need to refresh the data grid if the job does not show up right away. 2. Confirm the job is running. Page 273

274 Watch the job running Watch the patching job run by clicking Jobs in the top bar. IMPORTANT: Wait until the job is completed and exits the queue before proceeding to the next step. Page 274

275 Check the Assessment Template Status 1. Return to the Java Update Assessment template. 2. Click View data grid. Page 275

276 Run Patch Assessment (again) 1. Verify that the machine (db-w8-01a) is selected. 2. Click Assess to run the assessment again. 3. Click Close when the assessment run is complete. Page 276

277 Refresh the Data View Grid To reflect the changes: 1. Right-click on a blank space to produce a menu. 2. Select Refresh data grid view. Review the Patch Status After refreshing, the status should turn green for the applied patch. Page 277

278 Final Check of the Assessment Template Status Click the Java Update Assessment template again and the report shows a 100% green status bar. Page 278
279 Ending Notes Page 279
280 vcloud Suite Control and Compliance End Notes Thank you for completing the vcloud Suite Control and Compliance lab. We hope this lab gave you a better understanding of the following: How you can implement vcloud Networking and Security App to effectively segment your network at the Layer 2 and Layer 3 levels using familiar vsphere constructs (such as virtual machines and port groups). How you can leverage the Data Security component of vcloud Networking and Security App to discover and maintain compliance of the files stored in your virtual machines. How to leverage integration between vcloud Networking and Security and vcenter Configuration Manager to populate vcenter Configuration Manager machine groups using vcloud Networking and Security groups as a starting point. How to check and maintain compliance at the operating system level using vcenter Configuration Manager. How to check and maintain compliance at the virtual environment level using vcenter Configuration Manager. How to track compliance and associated change events using vcenter Operations Manager. How to create alerts for out-of-compliance events in vcenter Configuration Manager. How to manage and deploy operating system and application patches using vcenter Configuration Manager. As noted in the opening lesson, many of these tasks (especially those involving vcenter Configuration Manager) are deliberately not automated in this lab. This is done to show you how the steps are performed and to save lab time. Task that can be automated include: Running compliance templates in vcenter Configuration Manager. Running badge mappings in vcenter Configuration Manager and vcenter Operations Manager. Checking for alerts in vcenter Configuration Manager. Performing machine data collections in vcenter Configuration Manager. Performing patch deployments in vcenter Configuration Manager. Page 280
281 Troubleshooting Page 281
 might stop working and show a non-ending request for authentication when opening the vcenter Configuration Manager Web UI. To fix this problem, reboot vcenter configuration Manager.")
282 Troubleshooting: Cannot Access vcenter Configuration Manager Web UI During very long idle periods, it is possible that the Windows credentials-based login process for vcenter Configuration Manager (based on IIS) might stop working and show a non-ending request for authentication when opening the vcenter Configuration Manager Web UI. To fix this problem, reboot vcenter configuration Manager. Windows ControlCenter Desktop 1. From the ControlCenter desktop, open the Start panel. 2. Click Run. Page 282

283 Perform a Shutdown Execute this command: shutdown /m vcm-w8-01a /r /t 0 This reboots the vcenter Configuration Manager server. The action takes approximately five minutes to complete. After the reboot is complete, log in again by clicking the icon on the desktop. Page 283
284 Troubleshooting: Compliance Report Displays When Setting Up Production Compliance When setting up the compliance template for the Rainpole production application machine group, instead of an empty grid you might be presented with a previously run compliance report. Page 284

285 Compliance Report This Compliance Report shows that neither of the two machines is compliant to the Rainpole Production Applications Compliance Template. 1. Click View Data Grid to examine the data grid. 2. Notice the out-of-compliance items. You can now continue with the exercises. Page 285
286 Troubleshooting: When Creating a Virtual Environment Compliance Badge Mapping the Virtual Objects Group is Empty When setting up a compliance badge mapping for your virtual environment, it might happen that the list for the virtual object selection appears to be empty. Machine Group Compliance Template Mapping If the window appears empty, click Cancel to close it and return to the vcenter Configuration Manager Interface. Page 286

287 Collection Type If this occurs, some data was corrupted in the database and it is necessary to collect the information again. 1. Click Collect. 2. Click OK. Page 287

288 Collect Now Dialog 1. Select VC-L-01A and vsm-l-01a as targets for the collection using the double arrow >>. 2. Click Next. Page 288
289 Collect Now Data Types 1. Click Select All to select all the data types to be collected. 2. Click Next. Page 289
290 Collect Now Dialog Click Finish to submit the job. Page 290

291 Job Running Watch the collection run. This collection job takes approximately 15 minutes to complete. While it is running you can browse around. If you must perform this collection, it will speed up all the other collection tasks that you perform on the virtual environment in the lab exercises. Page 291

292 Troubleshooting: vsphere Web Client Error #1502 Because of the limited amount of memory available in the ControlCenter virtual machine, this error can appear when running tasks on the vsphere Web Client. vsphere Web Client Error To prevent this, close as many windows and programs as you can to free up memory, and click Yes to reload the client and continue the exercise. Page 292
Table of Contents HOL-SDC-1415
 Table of Contents Lab Overview - - IT Outcomes Security Controls Native to Infrastructure. 2 Lab Guidance... 3 Module 1 - Policy-Based Compliance... 5 Introduction... 6 Manage vcenter Server Virtual Machines...
Table of Contents HOL-1701-CHG-5
 Table of Contents Lab Overview: vrealize Operations Application Monitoring: Challenge Lab... 2 Lab Overview... 3 Lab Guidance... 5 Module 1 - Configuring a Custom Application (15 minutes)... 10 Introduction...
Table of Contents HOL-HBD-1301
 Table of Contents Lab Overview... 2 - vcloud Hybrid Service Jump Start for vsphere Admins...3 Module 1 - vcloud Hybrid Service: Architecture and Consumption Principles...5 vcloud Hybrid Service... 6 vcloud
IC L19 - Consolidate Information from across your Infrastructure to create a custom report for PCI DSS Hands-On Lab
 IC L19 - Consolidate Information from across your Infrastructure to create a custom report for PCI DSS Hands-On Lab Description How to implement external data connectors for data relevant to PCI and map
VMware vcenter Configuration Manager Administration Guide vcenter Configuration Manager 5.7
 VMware vcenter Configuration Manager Administration Guide vcenter Configuration Manager 5.7 This document supports the version of each product listed and supports all subsequent versions until the document
VMware AirWatch: Directory and Certificate Authority
 Table of Contents Lab Overview - HOL-1857-06-UEM - VMware AirWatch: Directory and Certificate Authority Integration... 2 Lab Guidance... 3 Module 1 - Advanced AirWatch Configuration, AD Integration/Certificates
IC121-End-to-End Virtual Security Hands-On Lab
 IC121-End-to-End Virtual Security Hands-On Lab Description Many of us fear zero day exploits especially if they could impact our dynamic virtual systems. Learn how you can leverage CCS VSM to quickly lock
Cisco Virtual Application Container Services 2.0 Lab v1
 Cisco Virtual Application Container Services 2.0 Lab v1 Last Updated: 02-SEP-2015 About This Solution Cisco Virtual Application Container Services (VACS) enables simplified deployment of Secure Application
vcenter Operations Manager for Horizon View Administration
 vcenter Operations Manager for Horizon View Administration vcenter Operations Manager for Horizon View 1.5 vcenter Operations Manager for Horizon View 1.5.1 This document supports the version of each product
Cisco ACI vcenter Plugin
 This chapter contains the following sections: About Cisco ACI with VMware vsphere Web Client, page 1 Getting Started with, page 2 Features and Limitations, page 7 GUI, page 12 Performing ACI Object Configurations,
ForeScout Extended Module for IBM BigFix
 Version 1.1 Table of Contents About BigFix Integration... 4 Use Cases... 4 Additional BigFix Documentation... 4 About this Module... 4 About Support for Dual Stack Environments... 5 Concepts, Components,
Table of Contents HOL-SDC-1317
 Table of Contents Lab Overview - Components... 2 Business Critical Applications - About this Lab... 3 Infrastructure Components - VMware vcenter... 5 Infrastructure Components - VMware ESXi hosts... 6
ForeScout Extended Module for VMware AirWatch MDM
 ForeScout Extended Module for VMware AirWatch MDM Version 1.7.2 Table of Contents About the AirWatch MDM Integration... 4 Additional AirWatch Documentation... 4 About this Module... 4 How it Works... 5
vrealize Operations Management Pack for NSX for vsphere 2.0
 vrealize Operations Management Pack for NSX for vsphere 2.0 This document supports the version of each product listed and supports all subsequent versions until the document is replaced by a new edition.
ForeScout Extended Module for MobileIron
 Version 1.8 Table of Contents About MobileIron Integration... 4 Additional MobileIron Documentation... 4 About this Module... 4 How it Works... 5 Continuous Query Refresh... 5 Offsite Device Management...
Trust in the Cloud. Mike Foley RSA Virtualization Evangelist 2009/2010/ VMware Inc. All rights reserved
 Trust in the Cloud Mike Foley RSA Virtualization Evangelist 2009/2010/2011 1 2010 VMware Inc. All rights reserved Agenda How do you solve for Trust = Visibility + Control? What s needed to build a Trusted
VMware vfabric Data Director 2.5 EVALUATION GUIDE
 VMware vfabric Data Director 2.5 EVALUATION GUIDE Introduction... 2 Pre- requisites for completing the basic and advanced scenarios... 3 Basic Scenarios... 4 Install Data Director using Express Install...
vrealize Operations Management Pack for NSX for vsphere 3.5.0
 vrealize Operations Management Pack for NSX for vsphere 3.5.0 This document supports the version of each product listed and supports all subsequent versions until the document is replaced by a new edition.
Installing and Configuring vcloud Connector
 Installing and Configuring vcloud Connector vcloud Connector 2.6.0 This document supports the version of each product listed and supports all subsequent versions until the document is replaced by a new
vrealize Suite Lifecycle Manager 1.0 Installation and Management vrealize Suite 2017
 vrealize Suite Lifecycle Manager 1.0 Installation and Management vrealize Suite 2017 vrealize Suite Lifecycle Manager 1.0 Installation and Management You can find the most up-to-date technical documentation
ForeScout CounterACT. Configuration Guide. Version 1.1
 ForeScout CounterACT Hybrid Cloud Module: VMware NSX Plugin Version 1.1 Table of Contents About VMware NSX Integration... 3 Use Cases... 3 Additional VMware Documentation... 3 About this Plugin... 3 Dependency
Infrastructure Navigator User's Guide
 vcenter Infrastructure Navigator 1.0.0 This document supports the version of each product listed and supports all subsequent versions until the document is replaced by a new edition. To check for more
ForeScout Extended Module for IBM BigFix
 ForeScout Extended Module for IBM BigFix Version 1.0.0 Table of Contents About this Integration... 4 Use Cases... 4 Additional BigFix Documentation... 4 About this Module... 4 Concepts, Components, Considerations...
Data Protection Guide
 SnapCenter Software 4.1 Data Protection Guide For VMs and Datastores using the SnapCenter Plug-in for VMware vsphere September 2018 215-13399_B0 doccomments@netapp.com Table of Contents 3 Contents Deciding
ForeScout Extended Module for MaaS360
 Version 1.8 Table of Contents About MaaS360 Integration... 4 Additional ForeScout MDM Documentation... 4 About this Module... 4 How it Works... 5 Continuous Query Refresh... 5 Offsite Device Management...
Veeam ONE. Version 8.0. User Guide for VMware vsphere Environments
 Veeam ONE Version 8.0 User Guide for VMware vsphere Environments July, 2015 2015 Veeam Software. All rights reserved. All trademarks are the property of their respective owners. No part of this publication
vrealize Operations Manager Customization and Administration Guide vrealize Operations Manager 6.4
 vrealize Operations Manager Customization and Administration Guide vrealize Operations Manager 6.4 vrealize Operations Manager Customization and Administration Guide You can find the most up-to-date technical
Oracle Enterprise Manager 11g Ops Center 2.5 Hands-on Lab
 Oracle Enterprise Manager 11g Ops Center 2.5 Hands-on Lab Introduction to Enterprise Manager 11g Oracle Enterprise Manager 11g is the centerpiece of Oracle's integrated IT management strategy, which rejects
Sophos Enterprise Console Help. Product version: 5.3
 Sophos Enterprise Console Help Product version: 5.3 Document date: September 2015 Contents 1 About Sophos Enterprise Console 5.3...6 2 Guide to the Enterprise Console interface...7 2.1 User interface layout...7
ForeScout Extended Module for Tenable Vulnerability Management
 ForeScout Extended Module for Tenable Vulnerability Management Version 2.7.1 Table of Contents About Tenable Vulnerability Management Module... 4 Compatible Tenable Vulnerability Products... 4 About Support
Installing and Configuring vcloud Connector
 Installing and Configuring vcloud Connector vcloud Connector 2.5.0 This document supports the version of each product listed and supports all subsequent versions until the document is replaced by a new
RSA pro VMware. David Matějů. RSA, The Security Division of EMC
 RSA pro VMware David Matějů RSA, The Security Division of EMC david.mateju@rsa.com How secure are you? Does your IT security address the risks associated with virtualization and private cloud before they
vrealize Operations Management Pack for NSX for Multi-Hypervisor
 vrealize Operations Management Pack for This document supports the version of each product listed and supports all subsequent versions until the document is replaced by a new edition. To check for more
OnCommand Insight 7.2
 OnCommand Insight 7.2 Planning Guide for the Java UI March 2016 215-10395_A0 doccomments@netapp.com Table of Contents 3 Contents OnCommand Insight Plan features... 5 OnCommand Insight product portfolio...
Table of Contents HOL-MBL-1661
 Table of Contents Lab Overview -... 2 Lab Guidance... 3 Module 1 - Just-In-Time Application Deployment (30 minutes)... 4 Module 1 Introduction... 5 Just-In-Time Applications using App Volumes... 6 Module
Using the VMware vcenter Orchestrator Client. vrealize Orchestrator 5.5.1
 Using the VMware vcenter Orchestrator Client vrealize Orchestrator 5.5.1 You can find the most up-to-date technical documentation on the VMware website at: https://docs.vmware.com/ If you have comments
vcenter Operations Management Pack for vcns
 vcenter Operations Management Pack for vcns vcenter Operations Manager 5.7.1 This document supports the version of each product listed and supports all subsequent versions until the document is replaced
vrealize Suite Lifecycle Manager 1.1 Installation, Upgrade, and Management vrealize Suite 2017
 vrealize Suite Lifecycle Manager 1.1 Installation, Upgrade, and Management vrealize Suite 2017 You can find the most up-to-date technical documentation on the VMware website at: https://docs.vmware.com/
vrealize Operations Management Pack for NSX for vsphere 3.0
 vrealize Operations Management Pack for NSX for vsphere 3.0 This document supports the version of each product listed and supports all subsequent versions until the document is replaced by a new edition.
Table of Contents HOL-PRT-1305
 Table of Contents Lab Overview... 2 - Abstract... 3 Overview of Cisco Nexus 1000V series Enhanced-VXLAN... 5 vcloud Director Networking and Cisco Nexus 1000V... 7 Solution Architecture... 9 Verify Cisco
VMware vsphere: What s New Lab Manual ESXi 5.5 and vcenter Server 5.5
 VMware vsphere: What s New Lab Manual ESXi 5.5 and vcenter Server 5.5 VMware Education Services VMware, Inc. www.vmware.com/education VMware vsphere: What s New ESXi 5.5 and vcenter Server 5.5 Part Number
vcenter Operations Management Pack for NSX-vSphere
 vcenter Operations Management Pack for NSX-vSphere vcenter Operations Manager 5.8 This document supports the version of each product listed and supports all subsequent versions until the document is replaced
Table of Contents HOL-1710-SDC-6
 Table of Contents Lab Overview - - What's New: vsphere with Operations Management.. 2 Lab Guidance... 3 Module 1 - What's New in vsphere (90 minutes)... 9 vcenter Server Appliance (VSCA)... 10 vcenter
Using the VMware vrealize Orchestrator Client
 Using the VMware vrealize Orchestrator Client vrealize Orchestrator 7.0 This document supports the version of each product listed and supports all subsequent versions until the document is replaced by
Forescout. eyeextend for IBM BigFix. Configuration Guide. Version 1.2
 Forescout Version 1.2 Contact Information Forescout Technologies, Inc. 190 West Tasman Drive San Jose, CA 95134 USA https://www.forescout.com/support/ Toll-Free (US): 1.866.377.8771 Tel (Intl): 1.408.213.3191
VMware vrealize Operations for Horizon Administration
 VMware vrealize Operations for Horizon Administration vrealize Operations for Horizon 6.4 vrealize Operations Manager 6.4 This document supports the version of each product listed and supports all subsequent
Table of Contents HOL-PRT-1463
 Table of Contents Lab Overview - - vcenter Operations Manager Management Pack for Oracle Enterprise Manager... 2 Lab Guidance... 3 Module 1 - Oracle Enterprise Manager Management Pack Introduction (15
Forescout. Configuration Guide. Version 2.4
 Forescout Version 2.4 Contact Information Forescout Technologies, Inc. 190 West Tasman Drive San Jose, CA 95134 USA https://www.forescout.com/support/ Toll-Free (US): 1.866.377.8771 Tel (Intl): 1.408.213.3191
Centerity Monitor User Guide
 Centerity Monitor 4.10 User Guide July 2018 Page 2 End-User License Agreement (EULA) This guide and the use of Centerity software is subject to Centerity s End-User License Agreement (EULA). A copy of
ForeScout Extended Module for Carbon Black
 ForeScout Extended Module for Carbon Black Version 1.0 Table of Contents About the Carbon Black Integration... 4 Advanced Threat Detection with the IOC Scanner Plugin... 4 Use Cases... 5 Carbon Black Agent
Table of Contents HOL-1757-MBL-6
 Table of Contents Lab Overview - - VMware AirWatch: Technology Partner Integration... 2 Lab Guidance... 3 Module 1 - F5 Integration with AirWatch (30 min)... 8 Getting Started... 9 F5 BigIP Configuration...
Pure Storage FlashArray Management Pack for VMware vrealize Operations Manager User Guide. (Version with Purity 4.9.
 Pure Storage FlashArray Management Pack for VMware vrealize Operations Manager User Guide (Version 1.0.139 with Purity 4.9.x or higher) Sunday, November 27, 2016 16:13 Pure Storage FlashArray Management
VMware vrealize Operations for Horizon Administration
 VMware vrealize Operations for Horizon Administration vrealize Operations for Horizon 6.3 This document supports the version of each product listed and supports all subsequent versions until the document
VMware Infrastructure Planner
 Thanks for participating in a assessment! Table of Contents 1. Release Notes for vsan Assessment v. 2.0.168.0... 2 2. About vsan Assessment... 34 3. Install and configure the virtual appliance... 45 2.1
CounterACT VMware vsphere Plugin
 CounterACT VMware vsphere Plugin Configuration Guide Version 2.0.0 Table of Contents About VMware vsphere Integration... 4 Use Cases... 4 Additional VMware Documentation... 4 About this Plugin... 5 What
Application Discovery Manager User s Guide vcenter Application Discovery Manager 6.2.2
 Application Discovery Manager User s Guide vcenter Application Discovery Manager 6.2.2 This document supports the version of each product listed and supports all subsequent versions until the document
Azure for On-Premises Administrators Practice Exercises
 Azure for On-Premises Administrators Practice Exercises Overview This course includes optional practical exercises where you can try out the techniques demonstrated in the course for yourself. This guide
vshield Administration Guide
 vshield Manager 5.1 vshield App 5.1 vshield Edge 5.1 vshield Endpoint 5.1 This document supports the version of each product listed and supports all subsequent versions until the document is replaced by
Agent and Agent Browser. Updated Friday, January 26, Autotask Corporation
 Agent and Agent Browser Updated Friday, January 26, 2018 2018 Autotask Corporation Table of Contents Table of Contents 2 The AEM Agent and Agent Browser 3 AEM Agent 5 Privacy Mode 9 Agent Browser 11 Agent
VMware vrealize Operations for Horizon Installation
 VMware vrealize Operations for Horizon Installation vrealize Operations for Horizon 6.4 Installation vrealize Operations for Horizon 6.4 This document supports the version of each product listed and supports
ForeScout CounterACT. Plugin. Configuration Guide. Version 2.1
 ForeScout CounterACT Hybrid Cloud Module: VMware vsphere Plugin Version 2.1 Table of Contents About VMware vsphere Integration... 4 Use Cases... 4 Additional VMware Documentation... 4 About this Plugin...
AppDefense Getting Started. VMware AppDefense
 AppDefense Getting Started VMware AppDefense You can find the most up-to-date technical documentation on the VMware website at: https://docs.vmware.com/ If you have comments about this documentation, submit
vrealize Automation Management Pack 2.0 Guide
 vrealize Automation Management Pack 2.0 Guide This document supports the version of each product listed and supports all subsequent versions until the document is replaced by a new edition. To check for
Sophos Mobile as a Service
 startup guide Product Version: 8 Contents About this guide... 1 What are the key steps?... 2 Change your password... 3 Change your login name... 4 Activate Mobile Advanced licenses...5 Check your licenses...6
Data Protection Guide
 SnapCenter Software 4.0 Data Protection Guide For VMs and Datastores using the SnapCenter Plug-in for VMware vsphere March 2018 215-12931_C0 doccomments@netapp.com Table of Contents 3 Contents Deciding
CounterACT VMware vsphere Plugin
 Configuration Guide Version 2.0.1 Table of Contents About VMware vsphere Integration... 4 Use Cases... 4 Additional VMware Documentation... 4 About this Plugin... 5 What to Do... 5 Requirements... 5 CounterACT
Azure 209x Practical Exercises Overview
 Azure 209x Practical Exercises Overview This course includes optional exercises where you can try out the techniques demonstrated in the course for yourself. This guide lists the steps for the individual
Xton Access Manager GETTING STARTED GUIDE
 Xton Access Manager GETTING STARTED GUIDE XTON TECHNOLOGIES, LLC PHILADELPHIA Copyright 2017. Xton Technologies LLC. Contents Introduction... 2 Technical Support... 2 What is Xton Access Manager?... 3
VMware vrealize Operations for Horizon Installation. VMware vrealize Operations for Horizon 6.5
 VMware vrealize Operations for Horizon Installation VMware vrealize Operations for Horizon 6.5 You can find the most up-to-date technical documentation on the VMware website at: https://docs.vmware.com/
the SWIFT Customer Security
 TECH BRIEF Mapping BeyondTrust Solutions to the SWIFT Customer Security Controls Framework Privileged Access Management and Vulnerability Management Table of ContentsTable of Contents... 2 Purpose of This
vrealize Operations Manager User Guide
 vrealize Operations Manager User Guide vrealize Operations Manager 6.5 This document supports the version of each product listed and supports all subsequent versions until the document is replaced by a
Securing Containers Using a PNSC and a Cisco VSG
 Securing Containers Using a PNSC and a Cisco VSG This chapter contains the following sections: About Prime Network Service Controllers, page 1 Integrating a VSG into an Application Container, page 4 About
PAN 802.1x Connector Application Installation Guide
 PAN 802.1x Connector Application Installation Guide Version 1.2 "Copyright CodeCentrix. All rights reserved 2015. Version 1.2 Contact Information CodeCentrix www.codecentrix.co.za/contact Email: info@codecentrix.co.za
Table of Contents. VMware AirWatch: Technology Partner Integration
 Table of Contents Lab Overview - HOL-1857-08-UEM - Workspace ONE UEM - Technology Partner Integration... 2 Lab Guidance... 3 Module 1 - F5 Integration with Workspace ONE UEM (30 min)... 9 Introduction...
Table of Contents HOL CMP
 Table of Contents Lab Overview - - Monitor and Troubleshoot Your Infrastructure and Applications with vrealize Operations and vrealize Log Insight... 2 Lab Guidance... 3 Module 1 - Troubleshoot Infrastructure
Table of Contents HOL-SDC-1412
 Table of Contents Lab Overview... 2 - IT Outcomes Data Center Virtualization and Standardization... 3 Module 1 - Lab Overview (15 Min)... 5 Physical Topology... 6 Application Topology... 8 Access the 3-Tier
VMware Identity Manager Connector Installation and Configuration (Legacy Mode)
") VMware Identity Manager Connector Installation and Configuration (Legacy Mode) VMware Identity Manager This document supports the version of each product listed and supports all subsequent versions until
VMware Identity Manager Connector Installation and Configuration (Legacy Mode) VMware Identity Manager This document supports the version of each product listed and supports all subsequent versions until
vcloud Director Administrator's Guide
 vcloud Director 5.1.1 This document supports the version of each product listed and supports all subsequent versions until the document is replaced by a new edition. To check for more recent editions of
Guide to Deploying VMware Workspace ONE. VMware Identity Manager VMware AirWatch 9.1
 Guide to Deploying VMware Workspace ONE VMware Identity Manager 2.9.1 VMware AirWatch 9.1 Guide to Deploying VMware Workspace ONE You can find the most up-to-date technical documentation on the VMware
VMware vrealize Operations for Horizon Administration. 20 SEP 2018 VMware vrealize Operations for Horizon 6.6
 VMware vrealize Operations for Horizon Administration 20 SEP 2018 VMware vrealize Operations for Horizon 6.6 You can find the most up-to-date technical documentation on the VMware website at: https://docs.vmware.com/
VMware vrealize Operations for Horizon Administration. Modified on 3 JUL 2018 VMware vrealize Operations for Horizon 6.4
 VMware vrealize Operations for Horizon Administration Modified on 3 JUL 2018 VMware vrealize Operations for Horizon 6.4 You can find the most up-to-date technical documentation on the VMware website at:
OnCommand Insight 7.1 Planning Guide
 OnCommand Insight 7.1 Planning Guide NetApp, Inc. 495 East Java Drive Sunnyvale, CA 94089 U.S. Telephone: +1 (408) 822-6000 Fax: +1 (408) 822-4501 Support telephone: +1 (888) 463-8277 Web: www.netapp.com
vrealize Operations Manager User Guide Modified on 17 AUG 2017 vrealize Operations Manager 6.6
 vrealize Operations Manager User Guide Modified on 17 AUG 2017 vrealize Operations Manager 6.6 vrealize Operations Manager User Guide You can find the most up-to-date technical documentation on the VMware
VMware vrealize Operations for Horizon Administration
 VMware vrealize Operations for Horizon Administration vrealize Operations for Horizon 6.2 This document supports the version of each product listed and supports all subsequent versions until the document
Horizon Console Administration. 13 DEC 2018 VMware Horizon 7 7.7
 Horizon Console Administration 13 DEC 2018 VMware Horizon 7 7.7 You can find the most up-to-date technical documentation on the VMware website at: https://docs.vmware.com/ If you have comments about this
VMware Skyline Collector Installation and Configuration Guide. VMware Skyline 1.4
 VMware Skyline Collector Installation and Configuration Guide VMware Skyline 1.4 You can find the most up-to-date technical documentation on the VMware website at: https://docs.vmware.com/ If you have
We start by providing you with an overview of the key feature of the IBM BPM Process Portal.
 Lab 1 Process Portal 1.1 Overview This lab exercise will make you familiar with the key capabilities of the ready-to-use Process Portal included with IBM Business Process Manager (BPM). You will experience
Using ANM With Virtual Data Centers
 APPENDIXB Date: 3/8/10 This appendix describes how to integrate ANM with VMware vcenter Server, which is a third-party product for creating and managing virtual data centers. Using VMware vsphere Client,
Hands-on Lab Session 9909 Introduction to Application Performance Management: Monitoring. Timothy Burris, Cloud Adoption & Technical Enablement
 Hands-on Lab Session 9909 Introduction to Application Performance Management: Monitoring Timothy Burris, Cloud Adoption & Technical Enablement Copyright IBM Corporation 2017 IBM, the IBM logo and ibm.com
vapp Deployment and Configuration Guide
 vapp Deployment and Configuration Guide vcenter Operations Manager 5.8.5 This document supports the version of each product listed and supports all subsequent versions until the document is replaced by
Web Console Setup & User Guide. Version 7.1
 Web Console Setup & User Guide Version 7.1 1 Contents Page Number Chapter 1 - Installation and Access 3 Server Setup Client Setup Windows Client Setup Mac Client Setup Linux Client Setup Interoperation
Contents. Batch & Import Guide. Batch Overview 2. Import 157. Batch and Import: The Big Picture 2 Batch Configuration 11 Batch Entry 131
 Batch & Import Guide Last Updated: 08/10/2016 for ResearchPoint 4.91 Contents Batch Overview 2 Batch and Import: The Big Picture 2 Batch Configuration 11 Batch Entry 131 Import 157 Configure Import File
Sophos Mobile SaaS startup guide. Product version: 7.1
 Sophos Mobile SaaS startup guide Product version: 7.1 Contents 1 About this guide...4 2 What are the key steps?...5 3 Change your password...6 4 Change your login name...7 5 Activate SMC Advanced licenses...8
Copyright 2014, Oracle and/or its affiliates. All rights reserved.
 1 Enterprise Manager 12c Compliance Management Part 1 Overview 2 3 Agenda Compliance Overview Understanding Compliance Results Understanding Compliance Score Calculation Compliance Related Roles and Privileges
Understanding the Relationship with Domain Managers
 4 CHAPTER Understanding the Relationship with Domain Managers Prime Central for HCS reports the events generated by underlying domain managers. Domain managers may also discover topology and relationships
vrealize Operations Manager User Guide
 vrealize Operations Manager User Guide vrealize Operations Manager 6.2 This document supports the version of each product listed and supports all subsequent versions until the document is replaced by a
VMware vrealize Operations for Horizon Installation. VMware vrealize Operations for Horizon 6.3
 VMware vrealize Operations for Horizon Installation VMware vrealize Operations for Horizon 6.3 VMware vrealize Operations for Horizon Installation You can find the most up-to-date technical documentation
vcloud Director Administrator's Guide vcloud Director 8.10
 vcloud Director Administrator's Guide vcloud Director 8.10 You can find the most up-to-date technical documentation on the VMware website at: https://docs.vmware.com/ If you have comments about this documentation,
Log & Event Manager UPGRADE GUIDE. Version Last Updated: Thursday, May 25, 2017
 UPGRADE GUIDE Log & Event Manager Version 6.3.1 Last Updated: Thursday, May 25, 2017 Retrieve the latest version from: https://support.solarwinds.com/success_center/log_event_manager_(lem)/lem_documentation
Infrastructure Navigator User's Guide
 vcenter Infrastructure Navigator 1.1.0 This document supports the version of each product listed and supports all subsequent versions until the document is replaced by a new edition. To check for more