IBM Lotus Sametime Media Manager Cluster Deployment Walk-through Part VI- Bandwidth Manager IBM Corporation
|
|
|
- Felicia Stevenson
- 6 years ago
- Views:
Transcription


1 IBM Lotus Sametime Media Manager Cluster Deployment Walk-through Part VI- Bandwidth Manager
2 Prerequisites for this part of the walk-through We've completed parts I, II, II, IV, and V Lotus Domino 8.5.x is installed and running LDAP is configured on the Domino server Sametime Community Server 8.5.x is installed and running The WebSphere instance for the SSC is located at WebSphere install root /opt/ibm/websphere/appserver Media Manager is installed and running A DB2 server is installed and running with accessible administrator login credentials (to a DB instance)
3 Create the Database for Bandwidth Manager In this step, you create the database for the Bandwidth Manager in preparation for the install of the BWM server cluster
4 From a command terminal on the machine where DB2 is running (stavm204.raleigh.ibm.com), login as the DB administrator (in this case db2inst1) and launch the DB2 Control Center application. Note you might need to grant permission to this user to run GUI programs with xhost +local:db2inst1 run as root if this is not done automatically at OS boot)

5 Click OK on default selection for the view of Advanced


6 Highlight All Databases, click on Selected on the toolbar and then......click on Create Database > Standard.. on the pulldown.
 set the default page size to 8K and then")
7 Choose a name for the BWM database (here we pick BWM_DATA) set the default page size to 8K and then click Next

8 Click Next to accept the defaults for storage path

9 Set Code set to UTF-8, Collating Sequence to UCA400_NO, and click Next

10 Review your settings and click Finish to create the database

11 Click Close after the database is created to remove the message pop-up and then close the DB2 Control Center if you desire
12 Create the WebSphere Profiles for the Bandwidth Manager In this step, you create the WebSphere profiles for the Bandwidth Manager server cluster. These profiles is created in a cell that is separate from the SSC and Media Manager cell. This separation of cells for BWM is a restriction for the release. Since they are separate, we need to create a Deployment Manager environment to host the cluster. We do leverage the existing WebSphere binaries that are already installed for the Media Manager on the target machines. First, we create the Deployment manager cell profile on one machine, and then the Primary node profile on the other.
13 On the machine where the Deployment Manager is to be installed, as root open a command terminal, navigate to the /opt/ibm/webspheremm/appserver/bin/profilemanagement directory, and launch the profile management tool, pmt.sh

14 Click Launch Profile Management Tool
15 Click Create

16 Select Management environment, and click Next

17 Select Deployment manager server type, and click Next

18 Select Advanced profile creation, and click Next

19 Check the box to deploy the admin console, and click Next
, and click Next")
20 Choose a profile name and matching profile directory (BWMDMgrProfile), and click Next

21 Choose a node name and a cell name, and click Next

22 Choose an administrator name and password, and click Next

23 Keep the default certificate selections, and click Next
24 Choose a keystore password, and click Next

25 Confirm and make note of the port assignments, including the administrative console port of 9060, and click Next
26 Click Next

27 Confirm selections and click Create

28 Click Finish

29 Click Installation verification

30 Verify that the verification tool completes successfully
31 On the machine where the Primary node is to be installed, as root open a command terminal, navigate to the /opt/ibm/webspheremm/appserver/bin/profilemanagement directory, and launch the profile management tool, pmt.sh

32 Click Launch Profile Management Tool

33 Click Create

34 Select Application server environment, and click Next

35 Select Advanced profile creation option, and click Next

36 Deselect the option to deploy the administrative console since we will be federating this profile and node into the Deployment manager we previously created. Also deselect the option to deploy the default application. Click Next
, and click Next")
37 Choose a profile name and matching profile directory (BWMAppProfile1), and click Next
 and click")
38 Choose a node name and server name (we number them 1 since they'll be in a cluster) and click Next
39 Choose an administrator name and password, and click Next

40 Keep the default certificate selections, and click Next

41 Choose a keystore password, and click Next
 and click")
42 Confirm and make note of the port assignment for the SOAP connector port (8883) and click Next

43 Click Next

44 Click Next
45 Confirm selections and click Create

46 Click Finish

47 Click Installation verification

48 Verify that the verification tool completes successfully
49 Create the Bandwidth Manager Cluster In this step, you create the cluster in WebSphere for the Bandwidth Manager. First we need to federate the node for the BWM server that we created.

50 In a browser, launch the administrative console for the Deployment manager. Note that this is the console associated with the profile we just created, and is NOT the Sametime System Console. We use the administrative port we noted from the profile creation. We use the login credentials we chose when we created the profile.

51 Before creating the actual cluster, we need to add the BWM server node we just created to the BWM cell. In the administrative console, navigate to System administration > Nodes

52 Click Add Node

53 Select Managed node and then click Next
54 Enter the host stavlab23.rtp.raleigh.ibm.com, the SOAP connector port 8883 we noted earlier for the server, the administrator ID and password, and the Deployment manager ID and password. Click OK
55 After the node is federated, click View the available nodes

56 This node stavlab23bwmnode1 will be the primary node for the cluster

57 Now navigate to Clusters > WebSphere application server clusters
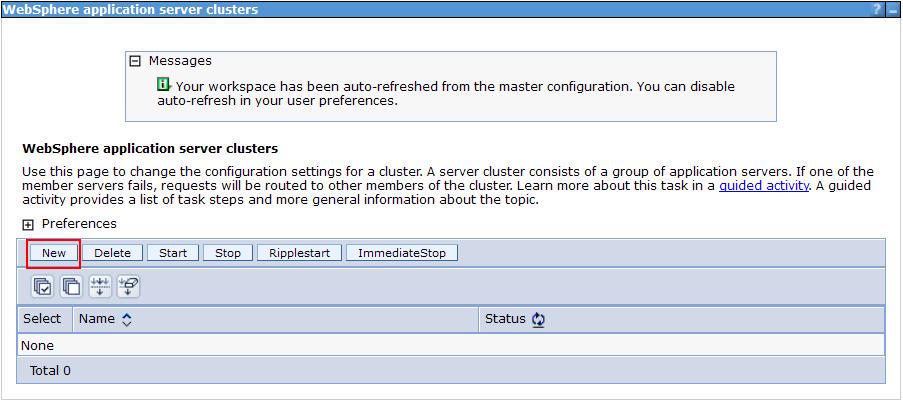
58 Click New

59 Choose a name for the new cluster BWMCluster. Check the box to configure HTTP session memory-to-memory replication. Click Next

60 Select the option to create the first cluster member by converting the existing application server BWMServer1. Click Next

61 Choose a name for the second cluster member (BWMServer2) and select the other machine stavlab24.rtp.raleigh.ibm.com to host it. Click Add Member

62 Click Next

63 Click Finish

64 Click Save
65 Now we need to create the WAS Proxy that sits in front of the new cluster. Navigate to Servers > Server Types > WebSphere proxy servers
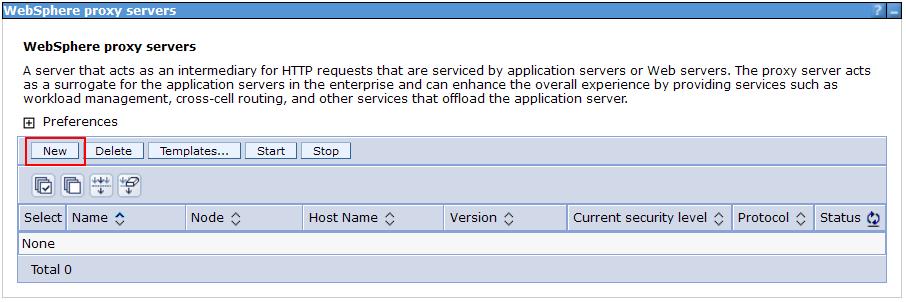
66 Click New

67 Select the node (stavlab23bwmnode1) that will host the proxy, and choose a name for the proxy, BWMProxy. Click Next

68 Select both HTTP and SIP as supported protocols and make sure the Generate unique ports option is checked. Click Next

69 Make sure the template proxy_server_foundation is selected and click Next

70 Click Finish

71 Click Save

72 Click BWMProxy so we can configure the cluster this proxy applies to
73 Expand SIP Proxy Server Settings and then click SIP proxy settings
74 Select the new cluster BWMCluster as the default cluster, and...
75 ...click Apply
76 Click Save
77 Since we have co-located the BWM cluster and proxy with other SIP components (the Media Manager), we need to resolve port conflicts with those components and also adjust the associated virtual host aliases. Navigate to Servers > Server Types > WebSphere proxy servers

78 Click BWMProxy
79 Click Ports

80 Click PROXY_SIPS_ADDRESS to change the port for secure SIP access
81 Change the port value to an unused one (5069) and click Apply
82 Click Save

83 Click PROXY_SIP_ADDRESS to change the port for unsecured SIP access
84 Change the port value to an unused one (5068) and click Apply
85 Click Save

86 Click Save

87 Now navigate to Servers > Server Types > WebSphere application servers

88 Click BWMServer1
89 Click Ports

90 Click SIP_DEFAULTHOST to change the port for unsecured SIP access
91 Change the port value to an unused one (5070) and click Apply

92 Click Save

93 Click SIP_DEFAULTHOST_SECURE to change the port for secured SIP access
94 Change the port value to an unused one (5071) and click Apply
95 Click Save

96 Now we need to adjust the Virtual host alias settings to match the new ports. Navigate to Environment > Virtual hosts
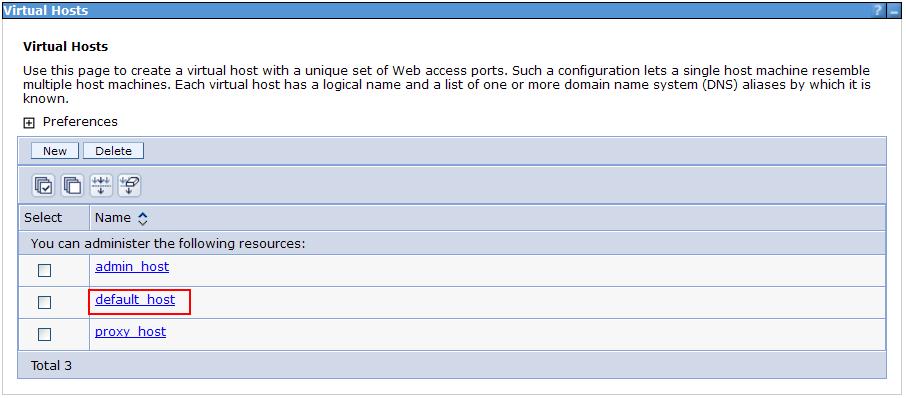
97 Click default_host
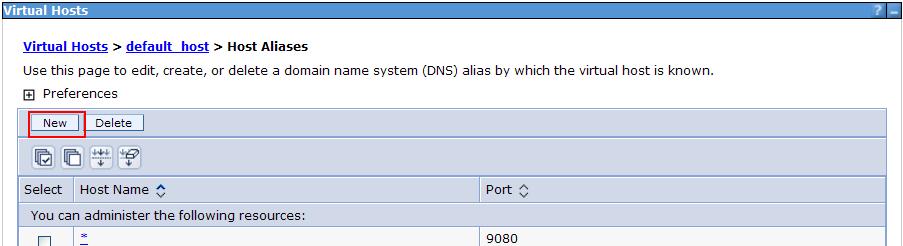
98 Click Host Aliases

99 Click New
100 Add the first of the new ports (5068) and click Apply
101 Click Save
102 Click New
103 Add the next of the new ports (5069) and click Apply
104 Click Save
105 Click New
106 Add the next of the new ports (5070) and click Apply
107 Click Save
108 Click New
109 Add the last of the new ports (5071) and click Apply

110 Click Save

111 To finish these configurations, we need to resynchronize the nodes in the cell for the cluster. Navigate to System administration > Nodes

112 Check the boxes next to the two cluster nodes and click Full Resynchronize
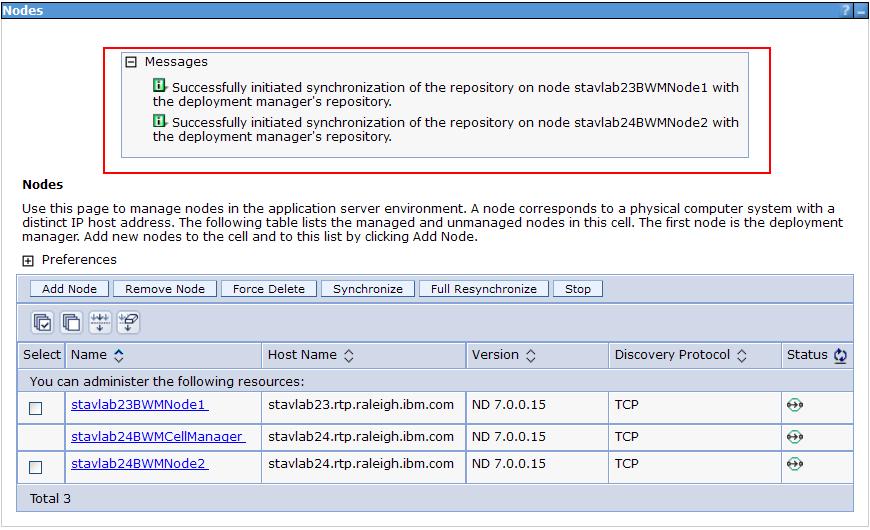
113 Resynchronization is initiated
114 Now we start the cluster. Navigate to Servers > Clusters > WebSphere application server clusters
115 Check the box next to the BWMCluster and then click Start. Click the refresh icon to check to see when the cluster is started.
116 The BWMCluster is started.

117 Finally, we start the proxy for the cluster. Navigate to Servers > Server Types> WebSphere proxy servers

118 Check the box next to the BWMProxy and then click Start.

119 The BWMProxy is started
120 Edit the Bandwidth Manager install property files In this step, you edit the db2.configuration.properties file and the websphere_configuration.properties file to prepare for the installation of Bandwidth Manager. Since an install for a Bandwidth Manager cluster must be performed from the profile where the Deployment manager is installed, we will do this step on the stavlab24.rtp.raleigh.ibm.com machine.

121 On the machine where the Deployment manager is installed, as root open a command terminal and copy the unarchived Bandwidth Manager install image to a temporary directory

122 Navigate to the temporary directory /tmp/bandwidthmanager
123 Edit the db2.connection.properties file and update the connection properties for the DB2 server where we created the BWM_DATA database. Make sure the db2.schema attribute is set to the db2.login value, but in uppercase

124 In the Deployment manager console, navigate to Servers > Server Types > WebSphere application servers

125 Make note of the cell name (stavlab24bwmcell) for the Deployment manager. This value is needed in the subsequent update of the websphere configuration file for the was.cell property
126 In a command terminal, navigate to the following directory: /opt/ibm/webspheremm/appserver/deploytool/itp/plugins and execute the ls command as noted to search for directories starting with com.ibm.datatools.db2_ We make a note of the complete directory name that is found, in this case, com.ibm.datatools.db2_ v _0407. This value is used in the websphere configuration file for the was.db2.driver.path property value

127 Back in the administrative console, navigate to System administration > Deployment manager
128 Click on the Runtime tab, and make note of the node name for the Deployment manager, in this case, stavlab24bwmcellmanager. This value is used in the portlet.node property of the websphere configuration file.

129 Edit the websphere_configuration.properties file, and update the was.cell, was.home, was.hostname, was.userid, was.password, was.db2.driver.path, was.cluster, proxy.host, proxy.port.http, proxy.port.sip, and portlet.node properties based on the information we previously gathered or selected (note that the was.server, was.node. was.profilename, was.hostport, was.sipport, and was.httpport properties are unused for a cluster install). We remember to uncomment all the cluster properties as well
130 Run the Bandwidth Manager install scripts In this step, you invoke an ant task to run the install scripts for Bandwidth Manager
131 On the machine where the Deployment manager is installed (stavlab24.rtp.raleigh.ibm.com), navigate to the temporary directory where the Bandwidth Manager install image is and also where we edited the properties files. Launch the ws_ant.sh script with the -Dinstall.db=true option to populate the database. Note that it does not matter which instance of the ws_ant.sh script is used as long as it is in the WebSphere home path for the Deployment manager of the Bandwidth Manager.

132 The installation takes between 4-10 minutes. Verify that the script ran successfully.

133 To verify that the install worked, navigate to Applications > Application Types > WebSphere enterprise applications.

134 We verify that there are three Bandwidth Manager applications listed (Do not try to start them yet! There are a few more steps before we start the actual cluster with applications)
135 Set up Secure Administrative Access to the Bandwidth Manager console In this step, we configure settings for securely accessing the Bandwidth Manager console
136 In the Administrative console, navigate to Security > Global security
137 Make sure Use Java 2 security to restrict application access is unchecked. Click Apply

138 Click Save

139 Navigate to Environment > Naming > CORBA Naming service groups

140 Click EVERYONE

141 Shift-Click to select all listed Roles. Click Apply
142 Click Save

143 Verify the EVERYONE group has Cos Naming Write, Delete, Create and Read

144 Navigate to Users and Groups > Manage Users

145 Click Create...
146 Choose a User ID (bwm) First/Last name, and a password for the new Administrative user. Click Create

147 Click Close

148 Navigate to Users and Groups > Administrative user roles

149 Click Add...
150 Click Search
151 Select the new user bwm and click the right-arrow to add it to the Mapped to role list
152 Shift-click all Roles in the Role(s) dialog box and select the user bwm. Click OK

153 Click Save
154 We need to restart the Deployment manager. Navigate to System administration > Deployment manager
155 From the Configuration tab, click Stop
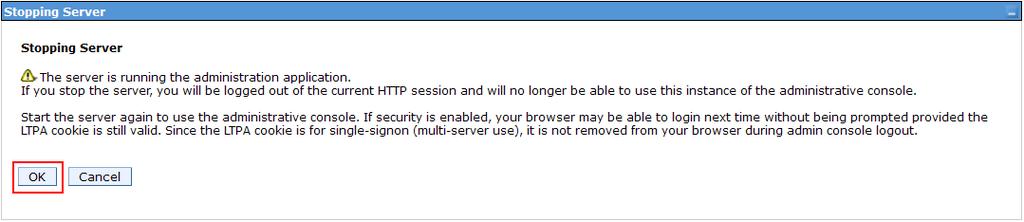
156 Click OK

157 We have stopped the Deployment manager
158 While the Dmgr is stopped, we need to update the LDAP access security setting to enable the Bandwidth Manager to be able to access it. On the machine hosting the Deployment manager, stavlab24.rtp.raleigh.ibm.com, navigate to the WebSphere Identity Manager (WIM) config directory within the Dmgr path and edit the wimconfig.xml

159 Locate the issecurityenabled attribute and change its value to false. Save the file.
160 Navigate to the Dmgr profile bin directory and invoke./startmanager.sh

161 The Deployment manager is started

162 Log back into the Administrative console, but this time, use the new administrative user bwm. Once logged in, resynchronize the cluster nodes as shown earlier (during the cluster creation)
163 We now see a new entry in the left-hand navigation tree. Navigate to Sametime Servers > Bandwidth Manager
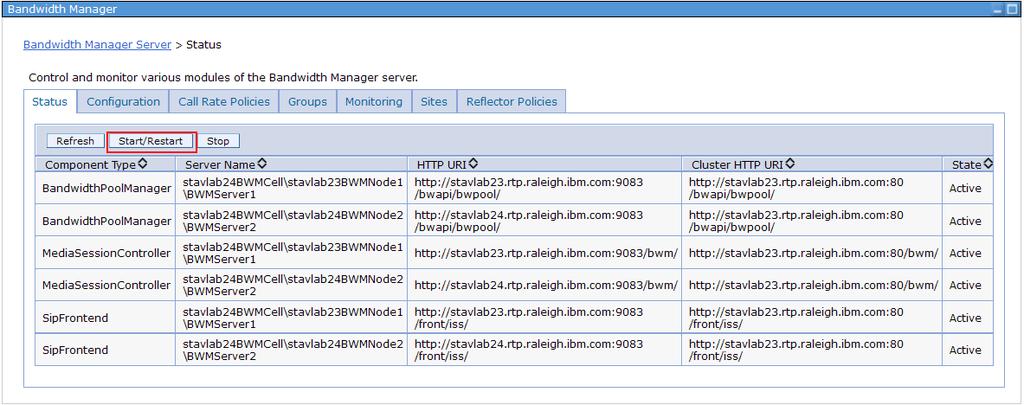
164 We see the Status page for the Bandwidth Manager console
165 Configure LDAP Access for Bandwidth Manager In this step, you configure settings to give Bandwidth Manager access to an LDAP directory of users

166 In the console, navigate to Security > Global security
167 Under Available realm definitions, make sure Federated repositories is selected. Click Set as current, and then Configure...

168 Click Add base entry to Realm...
169 Click Add Repository...
170 Choose a name for the new repository (we pick LDAP), select the Directory type (in our case, Lotus Domino), and enter the host name of the LDAP server, stavm204.raleigh.ibm.com. Enter the bind user ID and password and remove any Login properties present. Click Apply
171 Click Save
172 Enter the base entries for our LDAP server (o=aww) and click Apply
173 Click Save

174 Make sure the primary administrative user name is set to the name used to install Bandwidth Manager and click OK
175 Click Save

176 Return to edit the wimconfig.xml file and add a new config:attributes under the config:attributeconfiguration stanza that maps the uid property in the underlying LDAP directory to the WIM mail attribute. Note that this step might not be needed in all environments if the underyling LDAP server schema already has a mail attribute available in the user object class. As shown before, resynchronize the cluster nodes.

177 Now we need to restart the cluster. Navigate to Servers > Clusters > WebSphere application server clusters

178 Check the box next to BWMCluster and click Stop

179 Click the refresh icon to check for complete stoppage

180 Check the box again and click Start.

181 The cluster is re-started
182 Validate the Bandwidth Manager installation In this step, you validate the installation and post-install configuration of the Bandwidth Manager server
183 In the Administrative console (logged in as bwm), navigate back to Sametime Servers > Bandwidth Manager
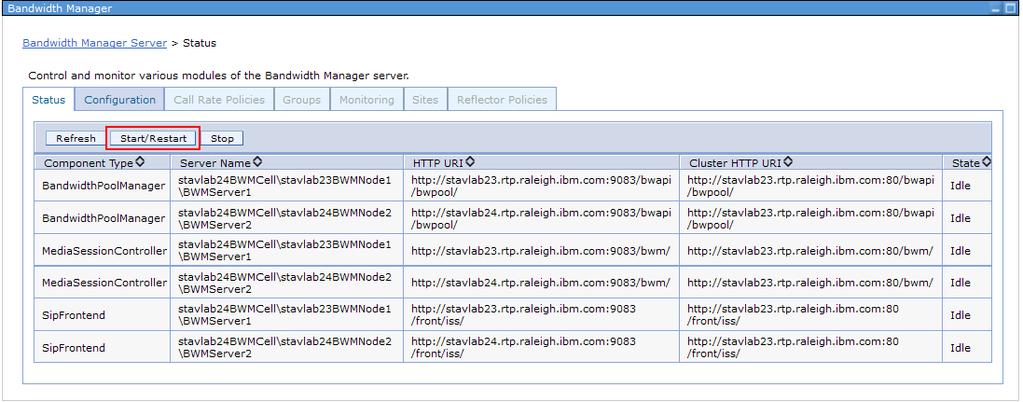
184 Click Start/Restart
185 Click OK on the pop-up
186 The status of the applications turns to Starting. Click the refresh icon after several seconds
187 The status of the applications is now Active. Notice that the portlet tabs are all now activated. Click the Groups tab
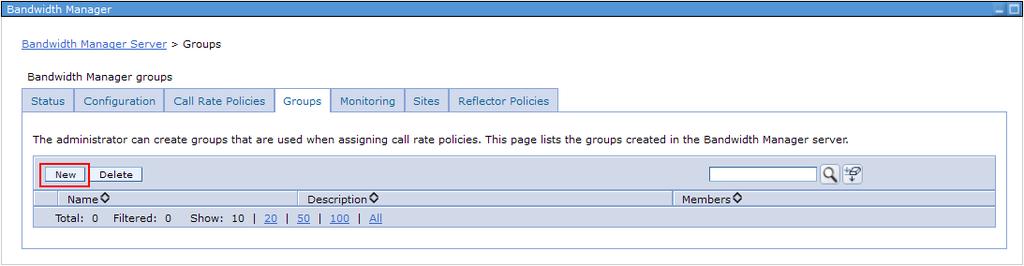
188 Click New
189 Make sure User is selected in the Search by pull-down and enter * in the Search for field. Click Search
190 A list of users is returned in the Search results which verifies we have access to LDAP
191 Hook the Bandwidth Manager into Media Manager In this step, we set up routing from the Bandwidth Manager to the SIP Proxy and vice versa as well as enabling security between the two. First, we configure the Bandwidth Manager to use the SIP Proxy cluster for routing. Second, we set up trust between the two parties. Third, we configure TLS certificates. Finally, we walk through setting up the SIP Proxy routing rules that place the Bandwidth Manager in the path of all SIP dialog requests.
192 In the Administrative console (logged in as bwm), navigate back to Sametime Servers > Bandwidth Manager
193 Click the Configuration tab

194 In the Sip Server URI field, enter the secure SIP URI of the proxy for the SIP Proxy/Registrar, sips:stavlab23.rtp.raleigh.ibm.com:5063;transport=tls. Click Apply, and then click the Status tab
195 Click Start/Restart
196 Click OK

197 Now we set up trust within the SIP Proxy/Registrar to the Bandwidth Manager machine. From the WebSphere console for the SIP Proxy/Registrar, navigate to Servers > Clusters > WebSphere application server clusters
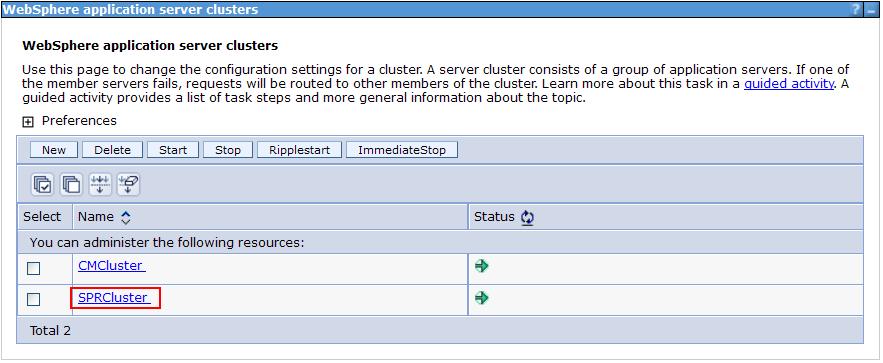
198 Click SPRCluster
199 Expand Cluster members, and then click Details

200 Click STMediaServer (the first cluster member)
201 Expand SIP Container settings, and then click SIP Container
202 Click Custom properties
203 Click com.ibm.ws.sip.security.trusted.iplist
204 Add the host name of the Bandwidth Manager proxy stavlab23.rtp.raleigh.ibm.com (note that this setting is not strictly required since the SIP Proxy and this machine are the same one, but we show this for demonstration purposes since in a more distributed environment, this step is necessary). Click OK

205 Click Save
206 Click Cluster members

207 Click STMediaServerSN (the secondary cluster member)
208 Expand SIP Container settings, and then click SIP Container
209 Click Custom properties

210 Click com.ibm.ws.sip.security.trusted.iplist
211 Add the host name of the Bandwidth Manager proxy stavlab23.rtp.raleigh.ibm.com. Click OK

212 Click Save

213 Now, we set up TLS (SSL) certificates. In the Sametime System Console, navigate to Security > SSL certificate and key management

214 Click Key stores and certificates
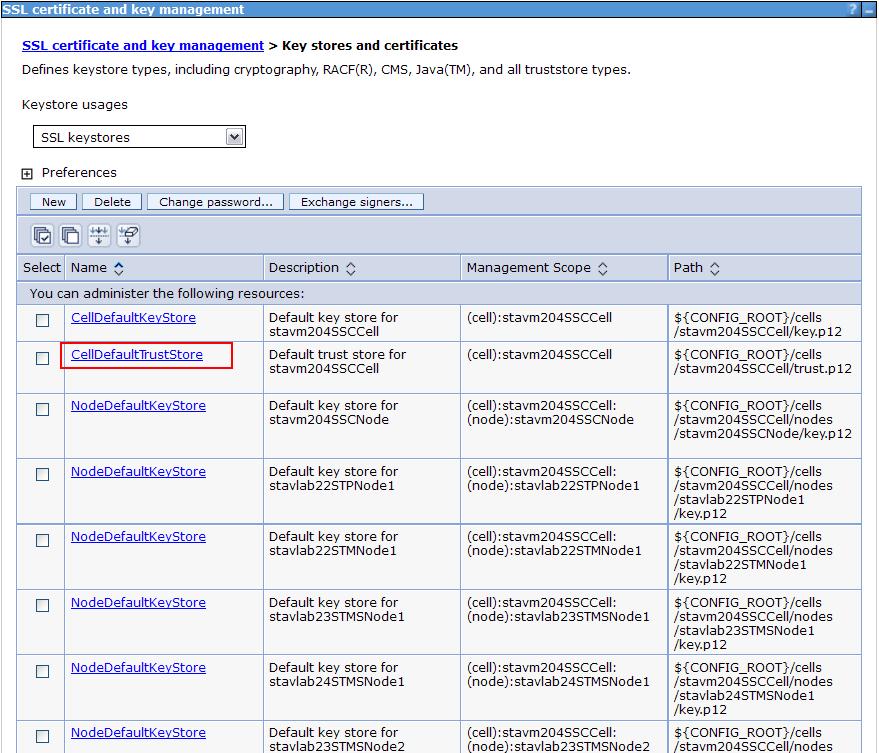
215 Click CellDefaultTrustStore
216 Click Signer certificates

217 Click Retrieve from port
218 Enter the host name of the Bandwidth Manager cluster proxy stavlab23.rtp.raleigh.ibm.com, and the secure SIP port Choose an alias (BWM) and click Retrieve signer information
219 Click OK

220 Click Save

221 Now, log into the Bandwidth Manager console, and navigate to Security > SSL certificate and key management
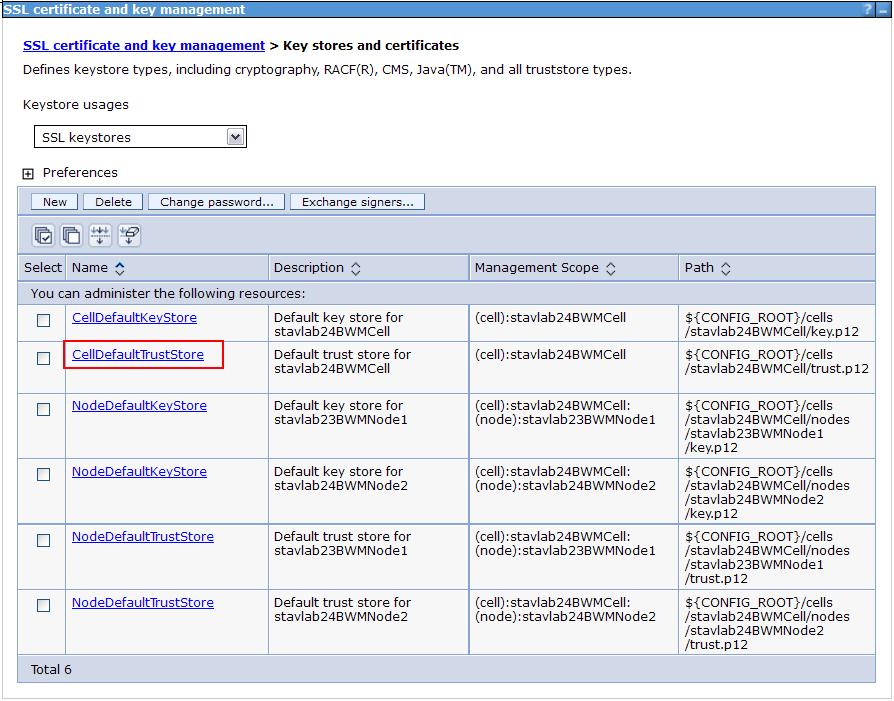
222 Click CellDefaultTrustStore
223 Click Signer certificates

224 Click Retrieve from port
225 Enter the host name of the SIP Proxy/Registrar cluster proxy stavlab23.rtp.raleigh.ibm.com, and the secure SIP port Choose an alias (sip proxy) and click Retrieve signer information
226 Click OK

227 Click Save

228 To finally hook the Bandwidth Manager into the system, we need to configure routing rules in the SIP Proxy. In the Sametime System Console, navigate to Sametime System Console > Sametime Servers > SIP Proxies and Registrars

229 Click SPRCluster
230 Click Proxy Administration
231 Click New to create the first of two rules.
232 Name the first new rule and give it a description. Select Method INVITE and check the box for Contact Header and enter a regular expression that matches the IP address and port of the Conference Manager. Check the box for User defined header and enter Content-Length and 0 as the name and value respectively...
233 ...and for the destination, select SIPS as the scheme, enter the host name of the Bandwidth Manager cluster proxy, and enter the secure port of the proxy. Click OK
234 Click New to create the second rule.
235 Name the second new rule and give it a description. Select Method INVITE and check the box for Contact Header and enter a regular expression that matches the IP address and port of the Conference Manager. Check the box for User defined header and enter Content-type and the regular expression as shown as the name and value respectively...
236 ...and for the destination, select SIPS as the scheme, enter the host name of the Bandwidth Manager cluster proxy, and enter the secure port of the proxy. Click OK
237 Make sure Add public IP to outgoing request is checked. Click OK.

238 Finally, restart the SIP Proxy/Registrar cluster as shown before.
239 Test an end-to-end call In this step, you finally test an Audio/Video call to validate the complete Media Manager and Bandwidth Manager installation

240 Log into the rich client and click Enter Room under the meeting room we used earlier to validate the base Media Manager installation (in Part V of the walk-through).

241 Click the green call icon under Voice and Video and then click Join call with my computer

242 The call is completed

243 In the Bandwidth Manager administrative console, navigate to Sametime Servers > Bandwidth Manager
244 Click the Monitoring tab

245 Note the Internet site now has a call in place and it is reporting 416 Kbps of bandwidth in use. Click Site Calls

246 Click the timestamp associated with the call Start Time
247 Note the call details. Click Ok
Installation and Setup of IBM Sametime From Zero to Hero Part 2 Edge Components
 IBM Collaboration Solutions Installation and Setup of IBM Sametime 8.5.2 From Zero to Hero Part 2 Edge Components Frank Altenburg SME for Sametime IBM Collaboration Solutions mailto:frank.altenburg@de.ibm.com
WebSphere Proxy Server: On Demand Configuration and Cross-Cell Routing
 Chapter 27 WebSphere Proxy Server: On Demand Configuration and Cross-Cell Routing WebSphere Proxy Server is a new type of server supported in WebSphere Application Server Network Deployment (ND) package
Lotusphere IBM Collaboration Solutions Development Lab
 Lotusphere 2012 IBM Collaboration Solutions Development Lab Lab#4 IBM Sametime Unified Telephony Lite telephony integration and integrated telephony presence with PBX 1 Introduction: IBM Sametime Unified
Lotus Connections 2.5 Install
 Copyright IBM Corporation All rights reserved Lotus Connections 2.5 Install Contact you local IBM Representative for more information IBM Corporation Page 1 of 108 The architecture used in this guide is
Policy Manager for IBM WebSphere DataPower 7.2: Configuration Guide
 Policy Manager for IBM WebSphere DataPower 7.2: Configuration Guide Policy Manager for IBM WebSphere DataPower Configuration Guide SOAPMDP_Config_7.2.0 Copyright Copyright 2015 SOA Software, Inc. All rights
APAR PO06620 Installation Instructions
 IBM Corporation APAR PO06620 Installation Instructions IBM Counter Fraud Management 1.5.0.5 IBM Counter Fraud Development 3-31-2017 Table of Contents 1 Fix readme... 1 2 Abstract... 1 3 Contents... 1 4
Deployment Scenario: WebSphere Portal Mashup integration and page builder
 Deployment Scenario: WebSphere Portal 6.1.5 Mashup integration and page builder Deployment Scenario: WebSphere Portal 6.1.5 Mashup integration and page builder...1 Abstract...2 Portal Mashup integration
Lotus Learning Management System R1
 Lotus Learning Management System R1 Version 1.0.4 March 2004 Administrator's Guide G210-1785-00 Contents Chapter 1 Introduction to the Learning Management System and Administration...1 Understanding the
Tips for Using the Integrated Solution Console (ISC) and Sametime System Console (SSC) with IBM Sametime
 and Sametime System Console (SSC) with IBM Sametime") Tips for Using the Integrated Solution Console (ISC) and Sametime System Console (SSC) with IBM Sametime October 28, 2015 Miguel Macias, Sandy Lee, Casey Toole IBM Corporation 2015 1 Agenda Integrated
Tips for Using the Integrated Solution Console (ISC) and Sametime System Console (SSC) with IBM Sametime October 28, 2015 Miguel Macias, Sandy Lee, Casey Toole IBM Corporation 2015 1 Agenda Integrated
Show 201 Installation and Setup of IBM Lotus Sametime From Zero to Hero The Next Generation
 Show 201 Installation and Setup of IBM Lotus Sametime 8.5.1 From Zero to Hero The Next Generation Frank Altenburg SME for Sametime IBM Volker Juergensen Senior IT Specialist IBM 2011 IBM Corporation Agenda
Lotus IBM WebShere Portal 6 Deployment and Administration.
 Lotus 190-825 IBM WebShere Portal 6 Deployment and Administration http://killexams.com/exam-detail/190-825 QUESTION: 131 While managing your Portal environment, you chose to externalize the access control
Installation and Setup of IBM Lotus Sametime From Zero to Hero The Next Generation
 Installation and Setup of IBM Lotus Sametime 8.5.1 From Zero to Hero The Next Generation Frank Altenburg Senior Field Support Engineer frank.altenburg@de.ibm.com Agenda Components of IBM Lotus Sametime
WebSphere Application Server V7: Administration Consoles and Commands
 Chapter 5 of WebSphere Application Server V7 Administration and Configuration Guide, SG24-7615 WebSphere Application Server V7: Administration Consoles and Commands WebSphere application server properties
EVALUATION ONLY. WA2097 WebSphere Application Server 8.5 Administration on Linux. Student Labs. Web Age Solutions Inc.
 WA2097 WebSphere Application Server 8.5 Administration on Linux Student Labs Web Age Solutions Inc. Copyright 2013 Web Age Solutions Inc. 1 Table of Contents Directory Paths Used in Labs...3 Lab Notes...4
Exam Name: IBM Certified System Administrator - WebSphere Application Server Network Deployment V7.0
 Vendor: IBM Exam Code: 000-377 Exam Name: IBM Certified System Administrator - WebSphere Application Server Network Deployment V7.0 Version: Demo QUESTION 1 An administrator would like to use the Centralized
Cisco Jabber Features and Options
 Cisco Jabber 10.6 Features, page 1 Cisco Jabber Features for Windows, Mac, ios and Android, page 3 Cisco Jabber Features for Windows, page 15 Cisco Jabber Features for Mac, page 36 Cisco Jabber for Android
Open Mic Webcast. Jumpstarting Audio- Video Deployments Tony Payne March 9, 2016
 Open Mic Webcast Jumpstarting Audio- Video Deployments Tony Payne March 9, 2016 Agenda The Challenges of Audio and Video Architecture Bill of Materials Component Descriptions Deployment Sample Deployment
IBM Security Access Manager Version 9.0 October Product overview IBM
 IBM Security Access Manager Version 9.0 October 2015 Product overview IBM IBM Security Access Manager Version 9.0 October 2015 Product overview IBM ii IBM Security Access Manager Version 9.0 October 2015:
Configuring an IBM Forms 8.0 Cluster using WebSphere Application Server v
 Configuring an IBM Forms 8.0 Cluster using WebSphere Application Server v8.0.0.4 Preface Authored By: Celine Hall (celine.hall@ca.ibm.com) IBM Forms Level 2 Technical Support IBM Canada Lab Victoria, BC
Plants By WebSphere Ajax Sample Application Installation, Setup and Configuration WebSphere Application Server v8.0
 Plants By WebSphere Ajax Sample Application Installation, Setup and Configuration WebSphere Application Server v8.0 Tibor Beres Software Engineer WebSphere Application Server SIP Testing IBM Software Group,
Ensuring a smooth upgrade to Sametime and IFR 1
 Ensuring a smooth upgrade to Sametime 8.5.2 and 8.5.2 IFR 1 Tony Payne, Sametime L3 February 29,2012 2011 IBM Corporation Agenda Plan Prepare Execute Troubleshoot Validate Known Fixes 2011 IBM Corporation
C examcollection.premium.58q
 C2210-421.examcollection.premium.58q Number: C2210-421 Passing Score: 800 Time Limit: 120 min File Version: 4.0 http://www.gratisexam.com/ C2210-421 IBM WebSphere Portal 8.5 System Administration Core
Security configuration of the mail server IBM
 Security configuration of the mail server IBM ii Security configuration of the mail server Contents Security configuration of the mail server 1 Configuration of the SSL client to trust the SMTP server
WA2031 WebSphere Application Server 8.0 Administration on Windows. Student Labs. Web Age Solutions Inc. Copyright 2012 Web Age Solutions Inc.
 WA2031 WebSphere Application Server 8.0 Administration on Windows Student Labs Web Age Solutions Inc. Copyright 2012 Web Age Solutions Inc. 1 Table of Contents Directory Paths Used in Labs...3 Lab Notes...4
Implementing Single-Sign-On(SSO) for APM UI
 for APM UI") Implementing Single-Sign-On(SSO) for APM UI 1.Introduction...2 2.Overview of SSO with LTPA...3 3.Installing and configuring TDS...5 3.1.Installing TDS 6.3...5 3.2.Changing the administrator password (Optional)...7
Implementing Single-Sign-On(SSO) for APM UI 1.Introduction...2 2.Overview of SSO with LTPA...3 3.Installing and configuring TDS...5 3.1.Installing TDS 6.3...5 3.2.Changing the administrator password (Optional)...7
Introduction... 5 Configuring Single Sign-On... 7 Prerequisites for Configuring Single Sign-On... 7 Installing Oracle HTTP Server...
 Oracle Access Manager Configuration Guide for On-Premises Version 17 October 2017 Contents Introduction... 5 Configuring Single Sign-On... 7 Prerequisites for Configuring Single Sign-On... 7 Installing
IBM InfoSphere Information Server Single Sign-On (SSO) by using SAML 2.0 and Tivoli Federated Identity Manager (TFIM)
 by using SAML 2.0 and Tivoli Federated Identity Manager (TFIM)") IBM InfoSphere Information Server IBM InfoSphere Information Server Single Sign-On (SSO) by using SAML 2.0 and Tivoli Federated Identity Manager (TFIM) Installation and Configuration Guide Copyright International
IBM InfoSphere Information Server IBM InfoSphere Information Server Single Sign-On (SSO) by using SAML 2.0 and Tivoli Federated Identity Manager (TFIM) Installation and Configuration Guide Copyright International
BlackBerry Enterprise Server for Microsoft Office 365. Version: 1.0. Administration Guide
 BlackBerry Enterprise Server for Microsoft Office 365 Version: 1.0 Administration Guide Published: 2013-01-29 SWD-20130131125552322 Contents 1 Related resources... 18 2 About BlackBerry Enterprise Server
Contents Overview... 5 Downloading Primavera Gateway... 5 Primavera Gateway On-Premises Installation Prerequisites... 6
 Gateway Installation and Configuration Guide for On-Premises Version 17 September 2017 Contents Overview... 5 Downloading Primavera Gateway... 5 Primavera Gateway On-Premises Installation Prerequisites...
Enterprise Vault.cloud CloudLink Google Account Synchronization Guide. CloudLink to 4.0.3
 Enterprise Vault.cloud CloudLink Google Account Synchronization Guide CloudLink 4.0.1 to 4.0.3 Enterprise Vault.cloud: CloudLink Google Account Synchronization Guide Last updated: 2018-06-08. Legal Notice
RoomWizard. Instructions for Lotus Domino Synchronization Software Installation
 RoomWizard Instructions for Lotus Domino Synchronization Software Installation RoomWizard TM Instructions for Lotus Domino Synchronization Software Installation Part number 370-0156-05 2017 Steelcase Corporation
User Registry Configuration in WebSphere Application Server(WAS)
") 2012 User Registry Configuration in WebSphere Application Server(WAS) By Geetha Kanra, Sanjay Singh, and Yogendra Srivastava [Abstract: This article provides step by step procedure to configure various
2012 User Registry Configuration in WebSphere Application Server(WAS) By Geetha Kanra, Sanjay Singh, and Yogendra Srivastava [Abstract: This article provides step by step procedure to configure various
Portal Express 6 Overview
 Portal Express 6 Overview WebSphere Portal Express v6.0 1 Main differences between Portal Express and Portal 6.0 Built with the same components as Portal 6.0.0.1 BPC is the only missing piece Supports
Installing and Configuring vcloud Connector
 Installing and Configuring vcloud Connector vcloud Connector 2.6.0 This document supports the version of each product listed and supports all subsequent versions until the document is replaced by a new
This chapter provides information about managing end user directory information.
 End user setup This chapter provides information about managing end user directory information. About end user setup, page 1 End user deletion, page 2 End user settings, page 3 Create Cisco Unity Connection
Getting Started with Cisco WebEx Meeting Applications
 CHAPTER 6 Getting Started with Cisco WebEx Meeting Applications Revised: September, 2010, Contents Modifying Your Provisioned Cisco WebEx Account, page 6-1 Setting Proxy Permissions, page 6-5 Productivity
V7.0. cover. Front cover. IBM Connections 4.5 Deployment Scenarios. Deployment Scenarios ERC 1.0
 V7.0 cover Front cover IBM Connections 4.5 Deployment Scenarios Deployment Scenarios ERC 1.0 Deployment Scenarios Trademarks IBM, the IBM logo, and ibm.com are trademarks or registered trademarks of International
Entrust Connector (econnector) Venafi Trust Protection Platform
 Venafi Trust Protection Platform") Entrust Connector (econnector) For Venafi Trust Protection Platform Installation and Configuration Guide Version 1.0.5 DATE: 17 November 2017 VERSION: 1.0.5 Copyright 2017. All rights reserved Table of
Entrust Connector (econnector) For Venafi Trust Protection Platform Installation and Configuration Guide Version 1.0.5 DATE: 17 November 2017 VERSION: 1.0.5 Copyright 2017. All rights reserved Table of
Cisco TelePresence Management Suite Extension for IBM Lotus Notes
 Cisco TelePresence Management Suite Extension for IBM Lotus Notes Installation and Getting Started Guide D13561.18 June 2011 Software version 11.3.1 Contents Introduction 5 How to use this document 5 Requirements
Table of Contents DevOps Administrators
 DevOps Administrators Table of Contents DevOps Administrators Overview for DevOps Admins Managing Images, Projects, Users Configure a Registry Create Users Assign the Administrator Role Create a Project
IBM Security Access Manager Version December Release information
 IBM Security Access Manager Version 8.0.1 12 December 2014 Release information IBM Security Access Manager Version 8.0.1 12 December 2014 Release information ii IBM Security Access Manager Version 8.0.1
Cisco TelePresence Management Suite Extension for IBM Lotus Notes
 Cisco TelePresence Management Suite Extension for IBM Lotus Notes Installation and Getting Started Guide Software version 11.3.3 D13561.21 Revised October 2014 Contents Introduction 4 How to use this document
Installing ITDS WebAdmin Tool into WebSphere Application Server Network Deployment V7.0
 Installing ITDS WebAdmin Tool into WebSphere Application Server Network Deployment V7.0 This document provides the procedure to install ITDS WebAdmin Tool into a Full WebSphere Application Server Network
VI-CENTER EXTENDED ENTERPRISE EDITION GETTING STARTED GUIDE. Version: 4.5
 VI-CENTER EXTENDED ENTERPRISE EDITION GETTING STARTED GUIDE This manual provides a quick introduction to Virtual Iron software, and explains how to use Virtual Iron VI-Center to configure and manage virtual
Cisco TelePresence Management Suite Extension for IBM Lotus Notes
 Cisco TelePresence Management Suite Extension for IBM Lotus Notes Installation and Getting Started Guide Software version 11.3.2 D13561.19 April 2013 Contents Introduction 4 How to use this document 4
VMware Identity Manager Administration
 VMware Identity Manager Administration VMware Identity Manager 2.4 This document supports the version of each product listed and supports all subsequent versions until the document is replaced by a new
As you learned in Chapter 1, the architectural variations you can construct using
 2 Installation and Configuration Overview As you learned in Chapter 1, the architectural variations you can construct using WebSphere Application Server V6 range from the very simple to the fairly complex.
Lab 3: Linking to OSLC Artifacts
 Objectives After completing this lab, you will be able to: Load Remote Collections of OSLC Requirements Add Traceability from Model Elements to Remote Artifacts (Requirements, Test Cases, Work Items) Overview
Laserfiche Rio 10.3: Deployment Guide. White Paper
 Laserfiche Rio 10.3: Deployment Guide White Paper January 2018 Table of Contents How Laserfiche Licensing Works... 4 Types of Licenses... 4 Named User Licenses... 4 WebLink Public Portal Licenses... 6
Entrust GetAccess 7.0 Technical Integration Brief for IBM WebSphere Portal 5.0
 Entrust GetAccess 7.0 Technical Integration Brief for IBM WebSphere Portal 5.0 November 2004 www.entrust.com 1-888-690-2424 Entrust is a registered trademark of Entrust, Inc. in the United States and certain
Installing and Configuring VMware Identity Manager Connector (Windows) OCT 2018 VMware Identity Manager VMware Identity Manager 3.
 OCT 2018 VMware Identity Manager VMware Identity Manager 3.") Installing and Configuring VMware Identity Manager Connector 2018.8.1.0 (Windows) OCT 2018 VMware Identity Manager VMware Identity Manager 3.3 You can find the most up-to-date technical documentation on
Installing and Configuring VMware Identity Manager Connector 2018.8.1.0 (Windows) OCT 2018 VMware Identity Manager VMware Identity Manager 3.3 You can find the most up-to-date technical documentation on
INTEGRATION NOTE. Installing and Configuring the Cisco Unified MeetingPlace Integration for IBM Lotus Notes. Release 8.6
 INTEGRATION NOTE Installing and Configuring the Cisco Unified MeetingPlace Integration for IBM Lotus Notes Release 8.6 Prerequisites for Installing the Cisco Unified MeetingPlace Integration for IBM Lotus
Cisco TelePresence Conductor
 Cisco TelePresence Conductor Deployment Guide XC1.2 D14827.02 May 2012 Contents Contents Introduction... 4 About the Cisco TelePresence Conductor... 4 Call flow with the Cisco TelePresence Conductor...
IBM LOT-825. IBM WebSphere Portal 6 Deployment and(r) Administration.
 Administration.") IBM LOT-825 IBM WebSphere Portal 6 Deployment and(r) Administration http://killexams.com/exam-detail/lot-825 QUESTION: 97 Your LDAP configuration must support users to login to Portal with their Internet
IBM LOT-825 IBM WebSphere Portal 6 Deployment and(r) Administration http://killexams.com/exam-detail/lot-825 QUESTION: 97 Your LDAP configuration must support users to login to Portal with their Internet
Application User Configuration
 CHAPTER 87 The following topics contain information on managing application user information: Settings, page 87-1 Adding an Administrator User to Cisco Unity or Cisco Unity Connection, page 87-6 Changing
Realms and Identity Policies
 The following topics describe realms and identity policies: Introduction:, page 1 Creating a Realm, page 5 Creating an Identity Policy, page 11 Creating an Identity Rule, page 15 Managing Realms, page
TIM TAM Integration. Planning to install the Tivoli Access Manager Combo Adapter
 TIM TAM Integration For TIM TAM Integration, TAM Combo Adapter is required. The installation and configuration details of TAM Combo Adapter is described below. Planning to install the Tivoli Access Manager
IBM Sametime Web Client & Meeting Server - An Introduction to new features in version 9.0.1
 IBM Sametime Web Client & Meeting Server - An Introduction to new features in version 9.0.1 Open Mic Date: 13-10-2016 IBM Collaboration Solutions Open Mic Team Jayesh Parmar - IBM ICS Support engineer
BlackBerry Enterprise Server for IBM Lotus Domino Version: 5.0. Administration Guide
 BlackBerry Enterprise Server for IBM Lotus Domino Version: 5.0 Administration Guide SWDT487521-636611-0528041049-001 Contents 1 Overview: BlackBerry Enterprise Server... 21 Getting started in your BlackBerry
Privileged Access Agent on a Remote Desktop Services Gateway
 Privileged Access Agent on a Remote Desktop Services Gateway IBM SECURITY PRIVILEGED IDENTITY MANAGER User Experience and Configuration Cookbook Version 1.0 November 2017 Contents 1. Introduction 5 2.
Quick KVM 1.1. User s Guide. ClearCube Technology, Inc.
 Quick KVM 1.1 User s Guide ClearCube Technology, Inc. Copyright 2005, ClearCube Technology, Inc. All rights reserved. Under copyright laws, this publication may not be reproduced or transmitted in any
Quick Start Guide. CollabNet Subversion Connector to HP Quality Center
 Quick Start Guide CollabNet Subversion Connector to HP Quality Center A BOUT THE CONNECTOR About the Connector The CollabNet Subversion Connector to HP Quality Center enables Quality Center users to store
Oracle Fusion Middleware
 Oracle Fusion Middleware Tutorial for Oracle Identity Management 11g Release 1 (11.1.1) E10276-01 May 2009 Oracle Fusion Middleware Tutorial for Oracle Identity Management, 11g Release 1 (11.1.1) E10276-01
software Learning Management System R1
 software Learning Management System R1 Administrator's Guide September 2003 Disclaimer THE INFORMATION CONTAINED IN THIS DOCUMENTATION IS PROVIDED FOR INFORMATIONAL PURPOSES ONLY. WHILE EFFORTS WERE MADE
Chapter 2 WEBLOGIC SERVER DOMAINS. SYS-ED/ Computer Education Techniques, Inc.
 Chapter 2 WEBLOGIC SERVER DOMAINS SYS-ED/ Computer Education Techniques, Inc. Objectives You will learn: Domain - concept and implementation. Content of a domain. Common domain types. Production versus
VMware Identity Manager Connector Installation and Configuration (Legacy Mode)
") VMware Identity Manager Connector Installation and Configuration (Legacy Mode) VMware Identity Manager This document supports the version of each product listed and supports all subsequent versions until
VMware Identity Manager Connector Installation and Configuration (Legacy Mode) VMware Identity Manager This document supports the version of each product listed and supports all subsequent versions until
Lotusphere IBM Collaboration Solutions Development Lab
 Lotusphere 2012 IBM Collaboration Solutions Development Lab Lab #6 Deliver Real-time Collaboration and Social Software by Integrating IBM WebSphere Portal with IBM Connections, IBM Sametime and inotes
Oracle Enterprise Manager. 1 Before You Install. System Monitoring Plug-in for Oracle Unified Directory User's Guide Release 1.0
 Oracle Enterprise Manager System Monitoring Plug-in for Oracle Unified Directory User's Guide Release 1.0 E24476-01 October 2011 The System Monitoring Plug-In for Oracle Unified Directory extends Oracle
Setting Up the Server
 Managing Licenses, page 1 Cross-launch from Prime Collaboration Provisioning, page 5 Integrating Prime Collaboration Servers, page 6 Single Sign-On for Prime Collaboration, page 7 Changing the SSL Port,
Exam Name: Avaya Agile Communication Environment(TM) Implementation Exam
 Implementation Exam") Vendor: Avaya Exam Code: 6007.1 Exam Name: Avaya Agile Communication Environment(TM) Implementation Exam Version: Demo QUESTION 1 A customer plans to deploy an Avaya ACETM Application Integration Engine
Vendor: Avaya Exam Code: 6007.1 Exam Name: Avaya Agile Communication Environment(TM) Implementation Exam Version: Demo QUESTION 1 A customer plans to deploy an Avaya ACETM Application Integration Engine
User guide NotifySCM Installer
 User guide NotifySCM Installer TABLE OF CONTENTS 1 Overview... 3 2 Office 365 Users synchronization... 3 3 Installation... 5 4 Starting the server... 17 2 P a g e 1 OVERVIEW This user guide provides instruction
QS-AVI Address Cleansing as a Web Service for IBM InfoSphere Identity Insight
 QS-AVI Address Cleansing as a Web Service for IBM InfoSphere Identity Insight Author: Bhaveshkumar R Patel (bhavesh.patel@in.ibm.com) Address cleansing sometimes referred to as address hygiene or standardization
Question No: 1 In which file should customization classes be specified in the cust-config section (under mds-config)?
?") Volume: 80 Questions Question No: 1 In which file should customization classes be specified in the cust-config section (under mds-config)? A. web.xml B. weblogic.xml C. adf-config.xml D. adfm.xml Question
Volume: 80 Questions Question No: 1 In which file should customization classes be specified in the cust-config section (under mds-config)? A. web.xml B. weblogic.xml C. adf-config.xml D. adfm.xml Question
LiveNX Upgrade Guide from v5.1.2 to v Windows
 LIVEACTION, INC. LiveNX Upgrade Guide from v5.1.2 to v5.1.3 - Windows UPGRADE LiveAction, Inc. 3500 Copyright WEST BAYSHORE 2016 LiveAction, ROAD Inc. All rights reserved. LiveAction, LiveNX, LiveUX, the
VII. Corente Services SSL Client
 VII. Corente Services SSL Client Corente Release 9.1 Manual 9.1.1 Copyright 2014, Oracle and/or its affiliates. All rights reserved. Table of Contents Preface... 5 I. Introduction... 6 Chapter 1. Requirements...
NotifySCM Workspace Administration Guide
 NotifySCM Workspace Administration Guide TABLE OF CONTENTS 1 Overview... 3 2 Login... 4 2.1 Main View... 5 3 Manage... 6 3.1 PIM... 6 3.2 Document...12 3.3 Server...13 4 Workspace Configuration... 14 4.1
Cisco TelePresence Conductor with Cisco Unified Communications Manager
 Cisco TelePresence Conductor with Cisco Unified Communications Manager Deployment Guide TelePresence Conductor XC4.0 Unified CM 10.5(2) January 2016 Contents Introduction 6 About this document 6 Related
MarkLogic Server. Information Studio Developer s Guide. MarkLogic 8 February, Copyright 2015 MarkLogic Corporation. All rights reserved.
 Information Studio Developer s Guide 1 MarkLogic 8 February, 2015 Last Revised: 8.0-1, February, 2015 Copyright 2015 MarkLogic Corporation. All rights reserved. Table of Contents Table of Contents Information
Installing and Configuring vcloud Connector
 Installing and Configuring vcloud Connector vcloud Connector 2.5.0 This document supports the version of each product listed and supports all subsequent versions until the document is replaced by a new
Configuring Cisco TelePresence Manager
 CHAPTER 3 Revised: February 25, 2009, First Published: November 27, 2006 Contents Introduction, page 3-3 Security Settings, page 3-3 Generating Security Certificate Reports, page 3-4 Viewing Security Certificates,
Table of Contents. Configure and Manage Logging in to the Management Portal Verify and Trust Certificates
 Table of Contents Configure and Manage Logging in to the Management Portal Verify and Trust Certificates Configure System Settings Add Cloud Administrators Add Viewers, Developers, or DevOps Administrators
Extended Search Administration
 IBM Lotus Extended Search Extended Search Administration Version 4 Release 0.1 SC27-1404-02 IBM Lotus Extended Search Extended Search Administration Version 4 Release 0.1 SC27-1404-02 Note! Before using
Architecture & Deployment
 Architecture & Deployment IBM Connections 5.0 Workshop Author: Paul Godby IBM Ecosystem Development Duration: 30 minutes 2014 IBM Corporation Agenda IBM Connections lications Prerequisite Software Deployment
Deployment Guide for Avaya Scopia Add-in for IBM Lotus Notes
 Deployment Guide for Avaya Scopia Add-in for IBM Lotus Notes For Solution 8.3 March 2014 2000-2014 Avaya Inc. All intellectual property rights in this publication are owned by Avaya Inc. and are protected
IBM Exam A Administering IBM Lotus Sametime 8.5 Version: 6.0 [ Total Questions: 130 ]
![IBM Exam A Administering IBM Lotus Sametime 8.5 Version: 6.0 [ Total Questions: 130 ]](/thumbs/91/107367219.jpg "IBM Exam A Administering IBM Lotus Sametime 8.5 Version: 6.0 [ Total Questions: 130 ]") s@lm@n IBM Exam A2040-988 Administering IBM Lotus Sametime 8.5 Version: 6.0 [ Total Questions: 130 ] IBM A2040-988 : Practice Test Question No : 1 - (Topic 0) You are planning to upgrade your Sametime
s@lm@n IBM Exam A2040-988 Administering IBM Lotus Sametime 8.5 Version: 6.0 [ Total Questions: 130 ] IBM A2040-988 : Practice Test Question No : 1 - (Topic 0) You are planning to upgrade your Sametime
software Learning Management System R1
 software Learning Management System R1 Administrator's Guide December 2003 Disclaimer THE INFORMATION CONTAINED IN THIS DOCUMENTATION IS PROVIDED FOR INFORMATIONAL PURPOSES ONLY. WHILE EFFORTS WERE MADE
NBC-IG Installation Guide. Version 7.2
 Installation Guide Version 7.2 2017 Nuance Business Connect 7.2 Installation Guide Document Revision History Revision Date August 8, 2017 Revision List Updated supported SQL Server versions June 14, 2017
Version Installation Guide. 1 Bocada Installation Guide
 Version 19.4 Installation Guide 1 Bocada Installation Guide Copyright 2019 Bocada LLC. All Rights Reserved. Bocada and BackupReport are registered trademarks of Bocada LLC. Vision, Prism, vpconnect, and
IBM Single Sign On for Bluemix Version December Identity Bridge Configuration topics
 IBM Single Sign On for Bluemix Version 2.0 28 December 2014 Identity Bridge Configuration topics IBM Single Sign On for Bluemix Version 2.0 28 December 2014 Identity Bridge Configuration topics ii IBM
Cisco TelePresence Management Suite Extension for Microsoft Exchange
 Cisco TelePresence Management Suite Extension for Microsoft Exchange Administrator Guide Software version 2.2 D14197.06 February 2011 Contents Contents... 2 Introduction... 4 Pre-Installation Information...
Bare SOAP-UI for WS-Security
 Draft Draft Bare SOAP-UI for WS-Security Paul Glezen, IBM Abstract This document is a member of the Bare Series of WAS topics distributed in both stand-alone and in collection form. The latest renderings
Shared Session Management Administration Guide
 Security Access Manager Version 7.0 Shared Session Management Administration Guide SC23-6509-02 Security Access Manager Version 7.0 Shared Session Management Administration Guide SC23-6509-02 Note Before
Realms and Identity Policies
 The following topics describe realms and identity policies: About, page 1 Create a Realm, page 8 Create an Identity Policy, page 14 Create an Identity Rule, page 15 Manage a Realm, page 17 Manage an Identity
Cisco TelePresence Conductor with Cisco Unified Communications Manager
 Cisco TelePresence Conductor with Cisco Unified Communications Manager Deployment Guide XC2.2 Unified CM 8.6.2 and 9.x D14998.09 Revised March 2014 Contents Introduction 4 About this document 4 Further
Does not add an additional server to the configuration. Limits communication failures between the webnetwork Server and Directory Service
 Chapter 21: External Users 398 21.2 OpenDS OpenDS is an open source community project building a free and comprehensive next generation directory service. OpenDS is designed to address large deployments,
Oracle Entitlements Server 11gR2 Integration Guide Published: May 2013
 Oracle Entitlements Server 11gR2 Integration Guide Published: May 2013 Applies To Oracle API Gateway v11.1.2.x Contents Introduction Prerequisites Integration Configuration Steps OES Configuration: Step
Oracle Fusion Middleware
 Oracle Fusion Middleware Quick Installation Guide for Oracle Identity Management 11g Release 1 (11.1.1) E10033-01 May 2009 This guide is designed to help you quickly install the most common Oracle Identity
Cluster Creation on Websphere Application Server 8.5 Oracle FLEXCUBE Universal Banking Release [May] [2017]
![Cluster Creation on Websphere Application Server 8.5 Oracle FLEXCUBE Universal Banking Release [May] [2017]](/thumbs/76/73866185.jpg "Cluster Creation on Websphere Application Server 8.5 Oracle FLEXCUBE Universal Banking Release [May] [2017]") Cluster Creation on Websphere Application Server 8.5 Oracle FLEXCUBE Universal Banking Release 12.4.0.0.0 [May] [2017] Table of Contents 1. PURPOSE... 3 2. INTRODUCTION TO WEBSPHERE... 3 3. PRE-REQUISITES:...
Cluster Creation on Websphere Application Server 8.5 Oracle FLEXCUBE Universal Banking Release 12.4.0.0.0 [May] [2017] Table of Contents 1. PURPOSE... 3 2. INTRODUCTION TO WEBSPHERE... 3 3. PRE-REQUISITES:...
VMware Enterprise Systems Connector Installation and Configuration. JULY 2018 VMware Identity Manager 3.2 VMware Identity Manager VMware AirWatch 9.
 VMware Enterprise Systems Connector Installation and Configuration JULY 2018 VMware Identity Manager 3.2 VMware Identity Manager VMware AirWatch 9.3 You can find the most up-to-date technical documentation
Privileged Identity App Launcher and Session Recording
 Privileged Identity App Launcher and Session Recording 2018 Bomgar Corporation. All rights reserved worldwide. BOMGAR and the BOMGAR logo are trademarks of Bomgar Corporation; other trademarks shown are