ERB Mbps Wireless N Range Extender. User Manual. Version: 1.0
|
|
|
- Katrina McCormick
- 6 years ago
- Views:
Transcription

1 ERB Mbps Wireless N Range Extender User Manual Version: 1.0
2 TABLE OF CONTENTS 1. INTRODUCTION PACKAGE CONTENTS PRODUCT LAYOUT SYSTEM REQUIREMENTS INSTALLATION PC NETWORK ADAPTER SETUP (WINDOWS XP) BRING UP ERB QUICK SETUP RANGE EXTENDER ONE-TOUCH SETUP EXTENDER MANUAL CONFIGURATION ERB9250 PLACEMENT PLACEMENT WALL MOUNTING SMART WIZARD INITIAL SETUP ERB SYSTEM OPERATION MODE STATUS EVENT LOG MONITOR DHCP (CR MODE) SCHEDULE (CR MODE) WIRELESS STATUS BASIC ADVANCED SECURITY WEP ENCRYPTION WPA PRE-SHARED KEY ENCRYPTION FILTER CLIENT LIST WPS AP PROFILE (CB/ CR MODE) NETWORK STATUS LAN FIREWALL (CR MODE) ENABLE DMZ (DEMILITARIZED ZONE) DOS (DENIAL OF SERVICE) MAC FILTER
3 10.5. IP FILTER URL FILTER ADVANCED (CR MODE) NAT PORT MAPPING PORT FORWARDING PORT TRIGGERING ALG UPNP QOS STATIC ROUTING DYNAMIC ROUTING ROUTING TABLE MANAGEMENT ADMIN FIRMWARE CONFIGURE RESET TOOLS TIME SETTING DDNS (CR MODE) DIAGNOSIS LOGOUT...56 APPENDIX A FCC INTERFERENCE STATEMENT...57 APPENDIX B IC INTERFERENCE STATEMENT
4 1. Introduction ERB9250 is a 2.4GHz b/g/n 300Mbps Repeater & Client Bridge (Range Booster / Extender). Range Extender solves the signal attenuation (limited coverage) problem by literally repeating / extending AP radio signal to dead-spots. While repeater clones AP and serves as a subsidiary entity to its clients, client bride offers an extension of wired network to the AP. At 300 Mbps wireless transmission rate, Access Point built into the Router uses advanced MIMO (Multi-Input, Multi-Output) technology to transmit multiple steams of data in a single wireless channel giving you seamless access to multimedia content. Robust RF signal travels farther, eliminates dead spots and extends network range. For data protection and privacy, ERB9250 encodes all wireless transmissions with WEP, WPA, and WPA2 encryption Package Contents Open the package carefully, and make sure that none of the items listed below are missing. Do not discard the packing materials, in case of return; the unit must be shipped back in its original package n SOHO Range Extender 100V~240V Power Adapter 2dBi 2.4GHz SMA Upgradable Antennas x 2 pcs Quick Install Guide CD (User s Manual) 4
5 1.2. Product Layout LED LAN WLAN Power/Status Description 1 ( Link-> blue on, traffic->blink) 1 ( Link-> blue on, traffic->blink) 1 ( On-> red Test/reset default->blink) 5
6 1.3. System Requirements To begin using the ERB9250, make sure you meet the following as minimum requirements: Existing AP / Router PC/Notebook. Operating System Microsoft Windows 98SE/ME/XP/2000/VISTA 1 Free Ethernet port. WiFi card/usb dongle (802.11b/g/n) optional. External xdsl (ADSL) or Cable modem with an Ethernet port (RJ-45). PC with a Web-Browser (Internet Explorer, Safari, Firefox, Opera etc.) Few Ethernet compatible CAT5 cables. 6

![PC Network Adapter setup (Windows XP) Enter [Start Menu] select](/docs-images/74/71222555/images/7-1.jpg "[Control panel] select [Network].")
7 2. Installation Please configure your PC / Notebook Ethernet card IP address before device configuration PC Network Adapter setup (Windows XP) Enter [Start Menu] select [Control panel] select [Network]. Select [Local Area Connection]) icon=>select [properties] 7
![Select [Internet Protocol (TCP/IP)] =>Click](/docs-images/74/71222555/images/8-0.jpg "[Properties]. Select the [General] tab.")
![ERB9250 supports [DHCP] function, please select both](/docs-images/74/71222555/images/8-1.jpg "[Obtain an IP address automatically] and [Obtain DNS")
8 Select [Internet Protocol (TCP/IP)] =>Click [Properties]. Select the [General] tab. ERB9250 supports [DHCP] function, please select both [Obtain an IP address automatically] and [Obtain DNS server address automatically]. 8
9 2.2. Bring up ERB9250 Connect the supplied power-adapter to the power inlet port and connect it to a wall outlet. Then, ERB9250 automatically enters the self-test phase. Once WLAN LED is on and blinking randomly to indicate that it is in normal operation. 9
10 3. Quick Setup Range Extender Prerequisite: Before we start, please make sure the extender is within the coverage of your existing AP. We suggest you place your extender right next to your AP for the initial setup. We can move the extender to further location after configuration is completed. ERB9250 default IP address is , please ensure it is not occupied by any other devices. Power On: Connect the supplied power-adapter to the power inlet port and connect it to a wall outlet. Then, ERB9250 automatically enters the self-test phase. Once WLAN LED is on and blinking randomly to indicate that it is in normal operation One-Touch Setup Extender 1. Make sure your AP/Router WPS function is enabled (some router may require you to press WPS button and hold for a few second to enable WPS). 2. Press the button on ERB9250 once. You will see Orange WLAN LED blinking. 3. Wait for a few seconds. 10

11 4. Once the orange WLAN LED stop blinking and staying on, the setup is then completed. If the LED does not stay on, this means the configuration is not successful. In case you do not have the extender right next to your AP, please move your extender closer and make sure the antennas are properly screwed firmly on the devices. Repeat steps 1~4 again. If the configuration fails again, this probably means your AP does not support one-touch setup function. Please configure your extender manually Manual Configuration 1. It is advised to configure your extender through Ethernet cable. You may need to disconnect other network connections to avoid confusion. 2. Connect your Ethernet port to the extender RJ45/Ethernet port with the cable included in the package. 3. Configure your computer network interface to IP address Open your Web Browser and type in (the device default IP address). 5. Type in admin for both user name and password. 6. Once get accessed, you will see the administration page 7. Click [Basic] under section Wireless. 11
![8. Click on [Site Survey] to search the existing AP. 9.](/docs-images/74/71222555/images/12-0.jpg "Few seconds later, a window will pop up a list of available APs. 10.")
![Select your target AP and click on [Connect]. 11.](/docs-images/74/71222555/images/12-1.jpg "Enter the access key for the target AP and click on [Save]. 12.")

12 8. Click on [Site Survey] to search the existing AP. 9. Few seconds later, a window will pop up a list of available APs. 10. Select your target AP and click on [Connect]. 11. Enter the access key for the target AP and click on [Save]. 12. Pop-up box showing the connection established between AP and the extender. 13. On the extender status page, you should see AP security information being cloned here. 12
13 13
14 4. ERB9250 Placement 4.1. Placement Please note that there may be various interferences and obstacles in the environment that can impact wireless network performance. Most of the wireless driver utility provides signal strength visualization. You can make use of it to measure the signal strength of your AP. You may need to experiment a few times to find out the best location for the range extender. Generally, placing extender at where the AP signal strength greater than 30% considered suitable. You can place ERB9250 on a desk or other flat surface, or you can mount it on a wall. For optimal performance, place your extender within the coverage of your existing AP from which the signal you would like to extend. Like any other wireless device, it must be away from any potential source of interference, such as a metal wall or microwave oven. This location must be close to a power connection. If the antennas are not screwed properly, performance loss can occur Wall Mounting You can mount the device on the wall. There are two mounting points on the bottom of the device. Please find a proper spot where two nails can be applied. The distance 14

15 between the two nails is 89mm. Finally, carefully mount the device onto the wall and make sure the nails are firmly locked on the mount points. Recommended Screw Dimension: 18mm x 5mm 15


16 5. Smart Wizard Please insert the Wizard CD into your CD-ROM driver. If you are using MacOS or other operation system, please browse your CD and click on index.html to start Smart Wizard. 16
17 Click on [Quick Setup] if you would like go for Quick Setup. Click on [Manual Setup] if your AP does not support WPS button or Quick Setup does not work on your AP. Click [User Manual] to view user manual Click on [Adobe Reader] to install PDF reader Please follow the instructions given on the screen to proceed. 17
.")
![Type http://192.168.1.2 in address bar and hit [Enter] button on your keyboard.](/docs-images/74/71222555/images/18-1.jpg "Click <OK> to navigate into ERB9250 configuration home page.")
18 6. Initial Setup ERB9250 ERB9250 uses web-interface for configuration to be accessed through your web browser, such as Internet Explorer or Firefox. 1. OPEN your browser (e.g. Internet Explorer). Type in address bar and hit [Enter] button on your keyboard. Click <OK> to navigate into ERB9250 configuration home page. You will see the home page of ERB9250 as follows. 18
19 19
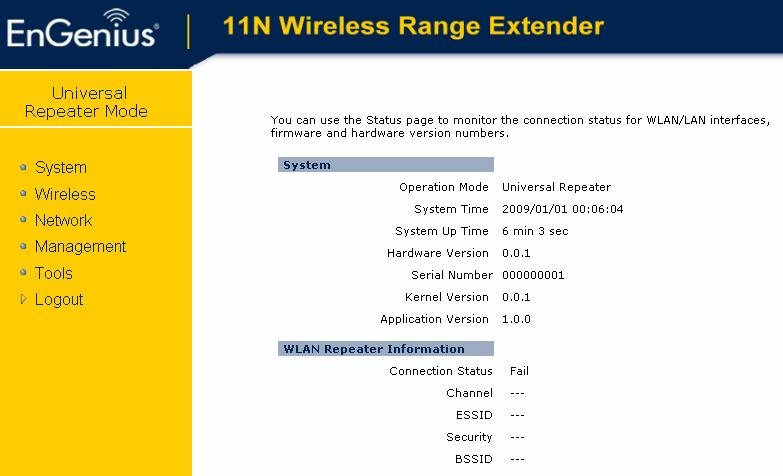
20 7. System 7.1. Operation Mode This page allows you to change device operation mode. ERB9250 supports Universal Repeater (Range Extender) and Client Bridge mode. By default it is configured as an Universal Repeater (also known as Extender). If you are not sure what Client Bridge is, please do not use this mode. Client Bridge is not an AP extender but an Ethernet Wireless Extender. CB serves as a bridge between wired network and wireless network. Once enabled, you can only access the device through Ethernet cable. For Client Bridge mode, you can choose whether to enable router mode. Router mode will enable NAT and DHCP server. Please disable router mode if you are not familiar with these terms Status This page allows you to monitor the current status of your router. 20
21 7.3. Event Log View operation event log. This page shows the current system log of the Broadband router. It displays any event occurred after system start up. At the bottom of the page, the system log can be saved <Save> to a local file for further processing or the system log can be cleared <Clear> or it can be refreshed <Refresh> to get the most updated information. When the system is powered down, the system log will be cleared if not saved to a local file. 21
 View the current LAN clients which are assigned with an IP Address by the DHCPserver.")
22 7.4. Monitor Show histogram for network connection on WAN, LAN & WLAN. Auto refresh keeps information updated frequently DHCP (CR Mode) View the current LAN clients which are assigned with an IP Address by the DHCPserver. This page shows all DHCP clients (LAN PCs) currently connected to your 22

23 network. The table shows the assigned IP address, MAC address and expiration time for each DHCP leased client. Use the <Refresh> button to update the available information. Hit <Refresh> to get the updated table. You can check Enable Static DHCP IP. It is possible to add more static DHCP IPs. They are listed in the table Current Static DHCP Table. IP address can be deleted at will from the table. Click <Apply> button to save the changed configuration Schedule (CR Mode) This page allows users to set up schedule function for Firewall and Power Saving 23


24 Edit schedule options to allow configuration of firewall and power savings services. Fill in the schedule and select type of service. Click <Apply> to keep the settings. 24

25 8. Wireless 8.1. Status 8.2. Basic Radio: You can turn on/off wireless radio. If wireless Radio is off, you cannot associate with AP through wireless. Mode: In this device, we support three operation modes which are AP router and AP route with WDS. If you choose AP Router Mode, you can select AP or WDS function in the drop-down menu. 25
: Either 802.11b or 802.11g wireless devices are in your environment. 2.4 GHz(G): If all your clients are 802.11g, select this one. 2.4 GHz(B+G+N): Either 802.")
26 Band: You can select the wireless standards running on your network environment. 2.4 GHz(B): If all your clients are b, select this one. 2.4 GHz(N): If all your clients are n, select this one. 2.4 GHz(B+G): Either b or g wireless devices are in your environment. 2.4 GHz(G): If all your clients are g, select this one. 2.4 GHz(B+G+N): Either b, g, or n wireless devices are in your environment. Channel: Shows current target AP wireless channel Site Survey: scan for current existing APs To connect to the chosen AP, click on the AP radio button and then click [Connect]. See Chapter 6 or 11.4 for more security detail. 26

27 8.3. Advanced Fragment Threshold: This specifies the maximum size of a packet during the fragmentation of data to be transmitted. If you set this value too low, it will result in bad performance. RTS Threshold: When the packet size is smaller than the RTS threshold, the wireless router will not use the RTS/CTS mechanism to send this packet. Beacon Interval: This is the interval of time that this wireless router broadcasts a beacon. A Beacon is used to synchronize the wireless network. DTIM Period: Enter a value between 1 and 255 for the Delivery Traffic Indication Message (DTIM). A DTIM is a countdown informing clients of the next window for listening to broadcast and multicast messages. Data Rate: The Data Rate is the rate that this access point uses to transmit data packets. The access point will use the highest possible selected transmission rate to transmit the data packets. 27

28 N Data Rate: The Data Rate is the rate that this access point uses to transmit data packets for N compliant wireless nodes. Highest to lowest data rate can be fixed. Channel Bandwidth: This is the range of frequencies that will be used. Preamble Type: The Long Preamble can provide better wireless LAN compatibility while the Short Preamble can provide better wireless LAN performance. CTS Protection: It is recommended to enable the protection mechanism. This mechanism can decrease the rate of data collision between b and g wireless stations. When the protection mode is enabled, the throughput of the AP will be a little lower due to a lot of frame-network that is transmitted. TX Power: This can be set to a bare minimum or maximum power Security This Access Point provides complete wireless LAN security functions, included are WEP, IEEE 802.1x, IEEE 802.1x with WEP, WPA with pre-shared key and WPA with RADIUS. With these security functions, you can prevent your wireless LAN from illegal access. Please make sure your wireless stations use the same security function, and are setup with the same security key. 28

29 ESSID Selection: This broadband router support multiple ESSID, you could select and set up the wanted ESSID. Broadcast ESSID: If you enabled Broadcast ESSID, every wireless station located within the coverage of this AP can discover this AP easily. If you are building a public wireless network, enabling this feature is recommended. Disabling Broadcast ESSID can provide better security. WMM: Wi-Fi MultiMedia if enabled supports QoS for experiencing better audio, video and voice in applications. Encryption: When you choose to disable encryption, it is very insecure to operate ERB WEP Encryption When you select 64-bit or 128-bit WEP key, you have to enter WEP keys to encrypt data. You can generate the key by yourself and enter it. You can enter four WEP keys and select one of them as a default key. Then AP can receive any packet encrypted by one of the four keys. Authentication Type: There are two authentication types: "Open System" and "Shared Key". Both AP and wireless client must be configured with the same authentication type. 29
 or Hexadecimal Digits (in the \"A-F\", \"a-f\" and \"0-9\" range) to be the WEP Key. Default Key: It s the key used to encrypt data.")
30 Key Length: You can select the WEP key length for encryption, 64-bit or 128-bit. The larger the key will be the higher level of security is used, but the throughput will be lower. Key Type: You may select ASCII Characters (alphanumeric format) or Hexadecimal Digits (in the "A-F", "a-f" and "0-9" range) to be the WEP Key. Default Key: It s the key used to encrypt data. Key1 - Key4: The WEP keys are used to encrypt data transmitted in the wireless network. Use the following rules to setup a WEP key on the device. 64-bit WEP: input 10-digits Hex values (in the "A-F", "a-f" and "0-9" range) or 5- digit ASCII character as the encryption keys. 128-bit WEP: input 26-digit Hex values (in the "A-F", "a-f" and "0-9" range) or 13- digit ASCII characters as the encryption keys. Click <Apply> at the bottom of the screen to save the above configurations WPA Pre-Shared Key Encryption Wi-Fi Protected Access (WPA) is an advanced security standard. You can use a pre-shared key to authenticate wireless stations and encrypt data during communication. It uses TKIP or CCMP (AES) to change the encryption key 30

31 frequently. So the encryption key is not easy to be cracked by hackers. This is the best security available Filter This wireless router supports MAC Address Control, which prevents unauthorized clients from accessing your wireless network. Enable wireless access control: Enable the wireless access control function Adding an address into the list Enter the "MAC Address" and "Description" of the wireless station to be added and then click <Add>. The wireless station will now be added into the "MAC Address Filtering Table" below. If you are having any difficulties filling in the fields, just click "Reset" and both "MAC Address" and "Description" fields will be cleared. Remove an address from the list If you want to remove a MAC address from the "MAC Address Filtering Table", select the MAC address that you want to remove in the list and then click "Delete Selected". If you want to remove all the MAC addresses from the list, just click the <Delete All> button. Click <Reset> will clear your current selections. Click <Apply> at the bottom of the screen to save the above configurations. 31

![WPS This interface allows you to activate client WPS and synchronize with other AP. Click [Start to Process] to initiate WPS process.](/docs-images/74/71222555/images/32-1.jpg "It serves the same purpose as the WPS button on the device. 8.8. AP Profile (CB/ CR Mode) This page allows you to edit your AP profiles.")
32 8.6. Client List This page shows all the connected current wireless client users. Click on [Refresh] to get the latest user list and information update WPS This interface allows you to activate client WPS and synchronize with other AP. Click [Start to Process] to initiate WPS process. It serves the same purpose as the WPS button on the device AP Profile (CB/ CR Mode) This page allows you to edit your AP profiles. ERB9250 allows you to keep multiple AP candidates. AP on the top of the list has higher precedence than those on the bottom. 32
![Click [Add] to create new profile. Click [Edit] to create new profile.](/docs-images/74/71222555/images/33-0.jpg "SSID: enter the SSID of the target AP Encryption: select the Encryption method Authentication Type: select authentication type Pre-shared key: enter the key of for security setting.")
33 Click [Add] to create new profile. Click [Edit] to create new profile. SSID: enter the SSID of the target AP Encryption: select the Encryption method Authentication Type: select authentication type Pre-shared key: enter the key of for security setting. Click [Move Up] to move the record up Click [Move Down] to move the record down Click [Delete Selected] to remove the chosen profile Click [Delete All] to remove all profiles. Click [Connect] to activate the chosen AP profile 9. Network 9.1. Status IP address: current IP address of the device IP Subnet Mask: MAC Address: MAC address of the device Ethernet port 33

34 9.2. LAN IP address: It is the router s LAN IP address (the Default Gateway IP address of your LAN clients). It can be changed based on your own choice. IP Subnet Mask: Specify a Subnet Mask for your LAN segment. Default Gateway: please specify gateway IP if any. Leave it blank if you are unsure of this setting d Spanning Tree: This is disabled by default. If 802.1d Spanning Tree function is enabled, this router will use the spanning tree protocol to prevent network loops. 10. Firewall (CR Mode) Enable The Broadband router provides extensive firewall protection by restricting connection parameters, thus limiting the risk of hacker attacks, and defending against a wide array of common Internet attacks. However, for applications that require unrestricted access to the Internet, you can configure a specific client/server as a Demilitarized Zone (DMZ). 34
 properly from behind the NAT firewall, then you can open up the firewall restrictions to unrestricted two-way Internet access by defining a DMZ Host.")
35 10.2. DMZ (Demilitarized Zone) If you have a client PC that cannot run an Internet application (e.g. Games) properly from behind the NAT firewall, then you can open up the firewall restrictions to unrestricted two-way Internet access by defining a DMZ Host. The DMZ function allows you to re-direct all packets going to your WAN port IP address to a particular IP address in your LAN. The difference between the virtual server and the DMZ function is that the virtual server re-directs a particular service/internet application (e.g. FTP, websites) to a particular LAN client/server, whereas DMZ re-directs all packets (regardless of services) from your WAN IP address to a particular server or client. Enable DMZ: Enable/disable DMZ LAN IP Address: Fill-in the IP address of a particular host in your LAN Network or select a PC from the list on the right that will receive all the packets originally from the WAN port/public IP address. Click <Apply> at the bottom of the screen to save the above configurations. 35
36 10.3. DoS (Denial of Service) The Broadband router's firewall can block common hacker attacks, including Denial of Service, Ping of Death, Port Scan and Sync Flood. If Internet attacks occur the router can log the events. Ping of Death: Protections from Ping of Death attack. Discard Ping From WAN: The router s WAN port will not respond to any Ping requests Port Scan: Protects the router from Port Scans. Sync Flood: Protects the router from Sync Flood attack MAC Filter If you want to restrict users from accessing certain Internet applications / services (e.g. Internet websites, , FTP etc.), and then this is the place to set that configuration. MAC Filter allows users to define the traffic type permitted in your LAN. You can control which PC client can have access to these services. 36

37 Enable MAC Filtering: Check to enable or disable MAC Filtering. Deny: If you select Deny then all clients will be allowed to access Internet except the clients in the list below. Allow: If you select Allow then all clients will be denied to access Internet except the PCs in the list below. Add PC MAC Address Fill in LAN MAC Address and <Description> of the PC that is allowed / denied to access the Internet, and then click <Add>. If you find any typo before adding it and want to retype again, just click <Reset> and the fields will be cleared. Remove PC MAC Address If you want to remove some PC from the "MAC Filtering Table", select the PC you want to remove in the table and then click <Delete Selected>. If you want to remove all PCs from the table, just click the <Delete All> button. If you want to clear the selection and re-select again, just click <Reset>. 37

38 Click <Apply> at the bottom of the screen to save the above configurations IP Filter Enable IP Filtering: Check to enable or uncheck to disable IP Filtering. Deny: If you select Deny then all clients will be allowed to access Internet except for the clients in the list below. Allow: If you select Allow then all clients will be denied to access Internet except for the PCs in the list below. Add PC IP Address You can click <Add> PC to add an access control rule for users by an IP address or IP address range. Remove PC IP Address If you want to remove some PC IP from the <IP Filtering Table>, select the PC you want to remove in the table and then click <Delete Selected>. If you want to remove all PCs from the table, just click the <Delete All> button. Click <Apply> at the bottom of the screen to save the above configurations. 38

39 10.6. URL Filter Enable URL Blocking: Enable or disable URL Blocking Add URL Keyword Fill in URL/Keyword and then click <Add>. You can enter the full URL address or the keyword of the web site you want to block. If you happen to make a mistake and want to retype again, just click "Reset" and the field will be cleared. Remove URL Keyword If you want to remove some URL keywords from the "Current URL Blocking Table", select the URL keyword you want to remove in the table and then click <Delete Selected>. If you want remove all URL keywords from the table, click <Delete All> button. If you want to clear the selection and re-select again, just click <Reset>. 39
40 Click <Apply> at the bottom of the screen to save the above configurations 11. Advanced (CR Mode) NAT Network Address Translation (NAT) Network Address Translation (NAT) allows multiple users at your local site to access the Internet through a single Public IP Address or multiple Public IP Addresses. NAT provides Firewall protection from hacker attacks and has the flexibility to allow you to map Private IP Addresses to Public IP Addresses for key services such as Websites and FTP. Select Disable to disable the NAT function Port Mapping Port Mapping allows you to re-direct a particular range of service port numbers (from the Internet / WAN Port) to a particular LAN IP address. It helps you to host servers behind the router NAT firewall. 40
41 Enable Port Mapping: Enable or disable port mapping function. Description: description of this setting. Local IP: This is the local IP of the server behind the NAT firewall. Protocol: This is the protocol type to be forwarded. You can choose to forward TCP or UDP packets only, or select BOTH to forward both TCP and UDP packets. Port Range: The range of ports to be forward to the private IP. Add Port Mapping Fill in the "Local IP", Protocol, Port Range and "Description" of the setting to be added and then click "Add". Then this Port Mapping setting will be added into the "Current Port Mapping Table" below. If you find any typo before adding it and want to retype again, just click <Reset> and the fields will be cleared. Remove Port Mapping If you want to remove a Port Mapping setting from the "Current Port Mapping Table", select the Port Mapping setting that you want to remove in the table and then 41

42 click D<Delete Selected>. If you want to remove all Port Mapping settings from the table, click <Delete All> button. Click <Reset> will clear your current selections. Click <Apply> at the bottom of the screen to save the above configurations Port Forwarding Use the Port Forwarding (Virtual Server) function when you want different servers/clients in your LAN to handle different service/internet application type (e.g. , FTP, Web server etc.) from the Internet. Computers use numbers called port numbers to recognize a particular service/internet application type. The Virtual Server allows you to re-direct a particular service port number (from the Internet/WAN Port) to a particular LAN private IP address (See Glossary for an explanation on Port number). Enable Port Forwarding: Enable or disable Port Forwarding. Description: The description of this setting. Local IP / Local Port: This is the LAN Client/Host IP address and Port number that the Public Port number packet will be sent to. Protocol: Select the port number protocol type (TCP, UDP or both). If you are unsure, then leave it to the default both setting. Public Port enters the service 42
43 (service/internet application) port number from the Internet that will be re-directed to the above Private IP address host in your LAN Network. Public Port: Port number will be changed to Local Port when the packet enters your LAN Network. Add Port Forwarding Fill in the "Description", "Local IP", "Local Port", "Protocol" and Public Port of the setting to be added and then click <Add> button. Then this Virtual Server setting will be added into the "Current Port Forwarding Table" below. If you find any typo before adding it and want to retype again, just click <Reset> and the fields will be cleared. Remove Port Forwarding If you want to remove Port Forwarding settings from the "Current Port Forwarding Table", select the Port Forwarding settings you want to remove in the table and then click "Delete Selected". If you want to remove all Port Forwarding settings from the table, just click the <Delete All> button. Click <Reset> will clear your current selections. Click <Apply> at the bottom of the screen to save the above configurations Port Triggering Some applications require multiple connections, such as Internet games, video Conferencing, Internet telephony and others. In this section you can configure the router to support multiple connections for these types of applications. 43
 port or port range for this type of application (e.g. 2300-2400, 47624) Public Type: Select the Inbound port protocol type: TCP, UDP or BOTH Popular Applications: This section lists the more popular applications that require multiple connections.")
44 Enable Trigger Port: Enable or disable the Port Trigger function. Trigger Port: This is the outgoing (Outbound) range of port numbers for this particular application. Trigger Type: Select whether the outbound port protocol is TCP, UDP or BOTH. Public Port: Enter the In-coming (Inbound) port or port range for this type of application (e.g , 47624) Public Type: Select the Inbound port protocol type: TCP, UDP or BOTH Popular Applications: This section lists the more popular applications that require multiple connections. Select an application from the Popular Applications selection. Once you have selected an application, select a location (1-5) in the Add selection box and then click the <Add> button. This will automatically list the Public Ports required for this popular application in the location (1-5) you specified. Add Port Triggering Fill in the "Trigger Port", "Trigger Type, Public Port, "Public Type", "Public Port" and "Description" of the setting to be added and then Click <Add>. The Port 44

45 Triggering setting will be added into the "Current Trigger-Port Table" below. If you happen to make a mistake, just click <Reset> and the fields will be cleared. Remove Port Triggering If you want to remove Special Application settings from the "Current Trigger-Port Table", select the Port Triggering settings you want to remove in the table and then click <Delete Selected>. If you want remove all Port Triggering settings from the table, just click the <Delete All> button. Click <Reset> will clear your current selections ALG Application Layer Gateway (ALG) You can select applications that need ALG support. The router will let the selected application to correctly pass through the NAT gateway UPnP With UPnP, all PCs in you Intranet will discover this router automatically. So, you don t have to configure your PC and it can easily access the Internet through this router. 45
46 Enable/Disable UPnP: You can enable or Disable the UPnP feature here. After you enable the UPnP feature, all client systems that support UPnP, like Windows XP, can discover this router automatically and access the Internet through this router without having to configure anything. The NAT Traversal function provided by UPnP can let applications that support UPnP connect to the internet without having to configure the virtual server sections QoS QoS can let you classify Internet application traffic by source/destination IP address and port number. You can assign priority for each type of application and reserve bandwidth for it. The packets of applications with higher priority will always go first. Lower priority applications will get bandwidth after higher priority applications get enough bandwidth. This can let you have a better experience in using critical real time services like Internet phone, video conference etc. All the applications not specified by you are classified as rule Others. Priority Queue This can put the packets of specific protocols in High/Low Queue. The packets in High Queue will process first. 46

47 Unlimited Priority Queue: The LAN IP address will not be bounded in the QoS limitation. High/Low Priority Queue: This can put the packets in the protocol and port Bandwidth Allocation: range to High/Low QoS Queue. This can reserve / limit the throughput of specific protocols and port range. You can set the upper bound and Lower bound. 47

48 Type: Specify the direction of packets. Upload, download or both. IP range: Specify the IP address range. You could also fill one IP address Protocol: Specify the packet type. The default ALL will put all packets in the QoS priority Queue. Port range: Specify the Port range. You could also fill one Port. Policy: Specify the policy the QoS, Min option will reserve the selected data rate in QoS queue. Max option will limit the selected data rate in QoS queue. Rate: The data rate of QoS queue. Disabled: This could turn off QoS feature. 48


49 11.8. Static Routing You can set enable Static Routing to let the router forward packets by your routing policy. Destination LAN IP: Specify the destination LAN IP address of static routing rule. Subnet Mask: Specify the Subnet Mask of static routing rule. Default Gateway: Specify the default gateway of static routing rule. Hops: Specify the Max Hops number of static routing rule. Interface: Specify the Interface of static routing rule. 49


50 11.9. Dynamic Routing This page allows you to configure Dynamic Routing Routing Table The page shows the device routing table. 12. Management Admin You can change the password required to log into the broadband router's system web-based management. By default, the password is: admin. Passwords can contain 0 to 12 alphanumeric characters, and are case sensitive. 50
51 Old Password: Fill in the current password to allow changing to a new password. New Password: Enter your new password and type it again in Repeat New Password for verification purposes Idle Timeout: enter Administration Page timeout Firmware This page allows you to upgrade the router s firmware. To upgrade the firmware of your Broadband router, you need to download the firmware file to your local hard disk, and enter that file name and path in the appropriate field on this page. You can also use the Browse button to find the firmware file on your PC. Once you ve selected the new firmware file, click <Apply> at the bottom of the screen to start the upgrade process Configure 51

52 This page allows you to save the current router configurations. When you save the configurations, you also can re-load the saved configurations into the router through the Restore Settings. If extreme problems occur you can use the Restore to Factory Defaults to set all configurations to its original default settings Reset Click on [Apply] to reset to default. 13. Tools Time Setting The Time Zone allows your router to reference or base its time on the settings configured here, which will affect functions such as Log entries and Firewall settings. Time Setup: Synchronize with the NTP server 52

53 Time Zone: Select the time zone of the country you are currently in. The router will set its time based on your selection. NTP Time Server: The router can set up external NTP Time Server. Daylight Savings: The router can also take Daylight Savings into account. If you wish to use this function, you must select the Daylight Savings Time period and check/tick the enable box to enable your daylight saving configuration. Click <Apply> at the bottom of the screen to save the above configurations. Synchronize with PC You could synchronize timer with your Local PC time. 53

54 PC Date and Time: This field would display the PC date and time. Daylight Savings: The router can also take Daylight Savings into account. If you wish to use this function, you must select the Daylight Savings Time period and check/tick the enable box to enable your daylight saving configuration. Click <Apply> at the bottom of the screen to save the above configurations DDNS (CR Mode) DDNS allows you to map the static domain name to a dynamic IP address. You must get an account, password and your static domain name from the DDNS service providers. This router supports DynDNS, TZO and other common DDNS service providers. 54


55 Enable/Disable DDNS: Enable or disable the DDNS function of this router Server Address: Select a DDNS service provider Host Name: Fill in your static domain name that uses DDNS. Username: The account that your DDNS service provider assigned to you. Password: The password you set for the DDNS service account above Click <Apply> at the bottom of the screen to save the above configurations Diagnosis This page allows you to test your network. Type in the address for diagnosis. 55
56 14. Logout Click on [Logout] button to logout. 56
57 Appendix A FCC Interference Statement Federal Communication Commission Interference Statement This equipment has been tested and found to comply with the limits for a Class B digital device, pursuant to Part 15 of the FCC Rules. These limits are designed to provide reasonable protection against harmful interference in a residential installation. This equipment generates, uses and can radiate radio frequency energy and, if not installed and used in accordance with the instructions, may cause harmful interference to radio communications. However, there is no guarantee that interference will not occur in a particular installation. If this equipment does cause harmful interference to radio or television reception, which can be determined by turning the equipment off and on, the user is encouraged to try to correct the interference by one of the following measures: Reorient or relocate the receiving antenna. Increase the separation between the equipment and receiver. Connect the equipment into an outlet on a circuit different from that to which the receiver is connected. Consult the dealer or an experienced radio/tv technician for help. This device complies with Part 15 of the FCC Rules. Operation is subject to the following two conditions: (1) This device may not cause harmful interference, and (2) this device must accept any interference received, including interference that may cause undesired operation. FCC Caution: Any changes or modifications not expressly approved by the party responsible for compliance could void the user's authority to operate this equipment. IMPORTANT NOTE: FCC Radiation Exposure Statement: This equipment complies with FCC radiation exposure limits set forth for an uncontrolled environment. This equipment should be installed and operated with minimum distance 20cm between the radiator & your body. We declare that the product is limited in CH1~CH11 by specified firmware controlled in the USA. This transmitter must not be co-located or operating in conjunction with any other antenna or transmitter. 57
58 Appendix B IC Interference Statement Industry Canada statement: This device complies with RSS-210 of the Industry Canada Rules. Operation is subject to the following two conditions: (1) This device may not cause harmful interference, and (2) this device must accept any interference received, including interference that may cause undesired operation. IMPORTANT NOTE: Radiation Exposure Statement: This equipment complies with IC radiation exposure limits set forth for an uncontrolled environment. This equipment should be installed and operated with minimum distance 20cm between the radiator & your body. This device has been designed to operate with an antenna having a maximum gain of 2 dbi. Antenna having a higher gain is strictly prohibited per regulations of Industry Canada. The required antenna impedance is 50 ohms. 58
Security SSID Selection: Broadcast SSID:
 69 Security SSID Selection: Broadcast SSID: WMM: Encryption: Select the SSID that the security settings will apply to. If Disabled, then the device will not be broadcasting the SSID. Therefore it will
DC-228. ADSL2+ Modem/Router. User Manual. -Annex A- Version: 1.0
 DC-228 ADSL2+ Modem/Router -Annex A- User Manual Version: 1.0 TABLE OF CONTENTS 1 PACKAGE CONTENTS...3 2 PRODUCT LAYOUT...4 3 NETWORK + SYSTEM REQUIREMENTS...6 4 DC-228 PLACEMENT...6 5 SETUP LAN, WAN...7
ESR9850. Wireless N Gigabit Router. (IEEE b/g/n) User Manual
 User Manual") ESR9850 Wireless N Gigabit Router (IEEE 802.11 b/g/n) User Manual Revision History Version Date Notes 1.0 2009/5/22 Initial Table of Content 1. INTRODUCTION... 1 1.1. SUMMARY... 1 1.2. KEY FEATURES...
ESR9850 Wireless N Gigabit Router (IEEE 802.11 b/g/n) User Manual Revision History Version Date Notes 1.0 2009/5/22 Initial Table of Content 1. INTRODUCTION... 1 1.1. SUMMARY... 1 1.2. KEY FEATURES...
WL-615. Wireless Broadband modem/router 54g. User Manual (ADSL2+, B/G) Version: 1.0
 Version: 1.0") WL-615 Wireless Broadband modem/router 54g (ADSL2+, 802.11B/G) User Manual Version: 1.0 TABLE OF CONTENTS...1...1 1KEY FEATURES...4 2PACKAGE CONTENTS...5 3PRODUCT LAYOUT...6 4NETWORK + SYSTEM REQUIREMENTS...8
WL-615 Wireless Broadband modem/router 54g (ADSL2+, 802.11B/G) User Manual Version: 1.0 TABLE OF CONTENTS...1...1 1KEY FEATURES...4 2PACKAGE CONTENTS...5 3PRODUCT LAYOUT...6 4NETWORK + SYSTEM REQUIREMENTS...8
WL-601. Wireless Broadband modem/router. User Manual (ADSL2+, B/G) Version: 2.0
 Version: 2.0") WL-601 Wireless Broadband modem/router (ADSL2+, 802.11B/G) User Manual Version: 2.0 TABLE OF CONTENTS 1 KEY FEATURES...4 2 PACKAGE CONTENTS...5 3 PRODUCT LAYOUT...6 4 NETWORK + SYSTEM REQUIREMENTS...8
WL-601 Wireless Broadband modem/router (ADSL2+, 802.11B/G) User Manual Version: 2.0 TABLE OF CONTENTS 1 KEY FEATURES...4 2 PACKAGE CONTENTS...5 3 PRODUCT LAYOUT...6 4 NETWORK + SYSTEM REQUIREMENTS...8
ESR G Wireless Router Ultra Speed. User Manual. (IEEE b/g)
") ESR6650 3G Wireless Router Ultra Speed (IEEE 802.11 b/g) User Manual TABLE OF CONTENTS 1. INTRODUCTION... 1 1.1. SUMMARY...1 1.2. KEY FEATURES... 2 1.3. PACKAGE CONTENTS... 3 1.4. PRODUCT LAYOUT... 4 2.
ESR6650 3G Wireless Router Ultra Speed (IEEE 802.11 b/g) User Manual TABLE OF CONTENTS 1. INTRODUCTION... 1 1.1. SUMMARY...1 1.2. KEY FEATURES... 2 1.3. PACKAGE CONTENTS... 3 1.4. PRODUCT LAYOUT... 4 2.
HNW300AP 300Mbit Wireless Access Point
 HNW300AP 300Mbit Wireless Access Point USER MANUAL www.hamletcom.com Dear Customer, thanks for choosing an Hamlet product. Please carefully follow the instructions for its use and maintenance and, once
EnGenius EAP N Multi-Function AP/Repeater
 EnGenius EAP9550 11N Multi-Function AP/Repeater Table of Content 1. Introduction...4 1.1. Features and Benefits...4 1.2. Package Contents...5 1.3. System Requirement...5 2. Understanding the Hardware...6
ESR300H / ESR150H V N X-TRA RANGE Wireless Router. [ pg. 1]
![ESR300H / ESR150H V N X-TRA RANGE Wireless Router. [ pg. 1]](/thumbs/76/73811912.jpg "ESR300H / ESR150H V N X-TRA RANGE Wireless Router. [ pg. 1]") ESR300H / ESR150H 11N X-TRA RANGE Wireless Router V1.0 [ pg. 1] Table of Contents 1. Product Overview... 5 1.1. Package Contents... 6 1.2. Product Layout... 6 1.3. Wall Mounting... 8 2. Installation...
ESR300H / ESR150H 11N X-TRA RANGE Wireless Router V1.0 [ pg. 1] Table of Contents 1. Product Overview... 5 1.1. Package Contents... 6 1.2. Product Layout... 6 1.3. Wall Mounting... 8 2. Installation...
Wireless 11n Smart Repeater AP (1T1R)
") (1T1R) 2014 Table of Contents 1. Introduction...3 1.1 Package contents... 3 1.2 Product Features... 3 1.3 Front Panel Description... 4 1.4 Rear Panel Description... 5 2. Installation...6 2.1 Hardware Installation...
(1T1R) 2014 Table of Contents 1. Introduction...3 1.1 Package contents... 3 1.2 Product Features... 3 1.3 Front Panel Description... 4 1.4 Rear Panel Description... 5 2. Installation...6 2.1 Hardware Installation...
MIMO Wireless Broadband Route r User s Manual 1
 MIMO Wireless Broadband Router User s Manual 1 Introduction...4 Features...4 Minimum Requirements...4 Package Content...4 Note...4 Get to know the Broadband Router...5 Back Panel...5 Front Panel...6 Setup
Introduction... 3 Features... 3 Minimum Requirements... 3 Package Content... 3 Note... 3 Get to know the Broadband Router... 4 Back Panel...
 Introduction... 3 Features... 3 Minimum Requirements... 3 Package Content... 3 Note... 3 Get to know the Broadband Router... 4 Back Panel... 4 Front Panel... 5 Setup Diagram... 6 Getting started... 7 Chapter
Broadband Router. User s Manual
 Broadband Router User s Manual 1 Introduction... 4 Features... 4 Minimum Requirements... 4 Package Content... 4 Note... 4 Get to know the Broadband Router... 5 Back Panel... 5 Front Panel... 6 Setup Diagram...7
Wireless Broadband Router
 LW6005A-R2 Wireless Broadband Router Manual 1 Introduction... 4 Features... 4 Minimum Requirements... 4 Package Content... 4 Note... 4 Get to know the Broadband Router... 5 Back Panel... 5 Front Panel...
Introduction... 3 Features... 3 Minimum Requirements... 3 Package Content... 3 Note... 3 Get to know the Broadband Router... 4 Back Panel...
 Introduction... 3 Features... 3 Minimum Requirements... 3 Package Content... 3 Note... 3 Get to know the Broadband Router... 4 Back Panel... 4 Front Panel... 5 Setup Diagram... 6 Getting started... 7 Chapter
WLR User Manual
 WLR-9000 User Manual Table of Contents Introduction... 3 Package Contents... 5 Cautions... 6 Product Layout... 7 Network + System Requirements...10 Setup your Router...11 Setup your Computer...12 Login
802.11a g Dual Band Wireless Access Point. User s Manual
 802.11a+802.11g Dual Band Wireless Access Point User s Manual 0 Chapter 1 Introduction 1.1 Feature Fully interoperable with IEEE 802.11b compliant products. High-Speed data transfer rate up to 11Mbps.
WRT300N-DD User Manual
 WRT300N-DD User Manual Contents Features... 3 Configuring the Router... 3 1 Operation Mode... 8 2 Internet Settings... 8 2.1 WAN... 9 2.2 LAN... 13 2.3 DHCP clients... 15 2.4 Advanced Routing... 15 2.5
AC750 Wireless Dual-Band Router CR2. User Manual
 AC750 Wireless Dual-Band Router CR2 User Manual Version 1.0 4/25/2014 Table of Content Chapter 1 Introduction... 3 1.1 Features... 3 1.2 System Requirement... 3 1.3 Package Contents... 4 Chapter 2 Hardware
Wireless-N Pocket AP/Router ETR9360. Wireless N Pocket AP/Router V1.0
 Wireless-N Pocket AP/Router ETR9360 Wireless N Pocket AP/Router V1.0 1 1. Package Contents...5 2. System Requirements...5 3. Introduction...6 4. Features...7 5. Hardware Overview...8 6. Before you Begin...10
Light Mesh AP. User s Guide. 2009/2/20 v1.0 draft
 Light Mesh AP User s Guide 2009/2/20 v1.0 draft i FCC Certifications This equipment has been tested and found to comply with the limits for a Class B digital device, pursuant to Part 15 of the FCC Rules.
EAP N Multi-Function AP/Repeater
 EAP9550 11N Multi-Function AP/Repeater Table of Content 1. Introduction...3 1.1. Features and Benefits...3 1.2. Package Contents...4 1.3. System Requirement...4 2. Modes...5 2.1. Access Point...5 2.2.
DSL/CABLE ROUTER with PRINT SERVER
 USER S MANUAL DSL/CABLE ROUTER with PRINT SERVER MODEL No:SP888BP http://www.micronet.info 1 Content Table CHAPTER 0:INTRODUCTION... 4 FEATURES... 4 MINIMUM REQUIREMENTS... 4 PACKAGE CONTENT... 4 GET TO
LevelOne FBR-1405TX. User s Manual. 1 PORT BROADBAND ROUTER W/4 LAN Port. Version: 1.0
 LevelOne FBR-1405TX 1 PORT BROADBAND ROUTER W/4 LAN Port User s Manual Version: 1.0 Introduction... 3 Features... 3 Minimum Requirements... 3 Package Content... 3 Get to know the Broadband Router... 4
Introduction... 3 Features... 3 Minimum Requirements... 3 Package Content... 3 Get to know the Broadband Router... 4 Back Panel... 4 Front Panel...
 Introduction... 3 Features... 3 Minimum Requirements... 3 Package Content... 3 Get to know the Broadband Router... 4 Back Panel... 4 Front Panel... 5 Setup Diagram... 6 Getting started... 7 Chapter 1...
RX3041. User's Manual
 RX3041 User's Manual Table of Contents 1 Introduction... 2 1.1 Features and Benefits... 3 1.2 Package Contents... 3 1.3 Finding Your Way Around... 4 1.4 System Requirements... 6 1.5 Installation Instruction...
LevelOne FBR-1405TX. User s Manual. 1-PORT BROADBAND ROUTER W/4 LAN Port
 LevelOne FBR-1405TX 1-PORT BROADBAND ROUTER W/4 LAN Port User s Manual 1 Introduction... 4 Features... 4 Minimum Requirements...4 Package Content... 4 Note...4 Get to know the Broadband Router... 5 Back
Introduction... 3 Features... 3 Minimum Requirements... 3 Package Content... 3 Get to know the Broadband Router... 4 Back Panel... 4 Front Panel...
 Introduction... 3 Features... 3 Minimum Requirements... 3 Package Content... 3 Get to know the Broadband Router... 4 Back Panel... 4 Front Panel... 5 Setup Diagram... 6 Getting started... 7 Chapter 1...
Broadband Router User s Manual. Broadband Router User s Manual
 Broadband Router User s Manual Table of Contents 1 Introduction... 1 1.1 Features... 1 1.2 Package Contents... 2 1.3 LEDs & Connectors of Broadband Router... 2 1.4 System Requirements... 2 1.5 Installation
PRODUCT OVERVIEW... 6 INSTALLATION...
 Table of Content INTRODUCTION... 3 SUMMARY... 3 KEY FEATURES... 3 PACKAGE CONTENTS... 4 SYSTEM REQUIREMENTS... 4 WIRELESS PERFORMANCE CONSIDERATIONS... 5 PRODUCT OVERVIEW... 6 INSTALLATION... 7 PC NETWORK
User Manual Gemtek WiMAX Modem
 User Manual Gemtek WiMAX Modem WIXS-177 CONTENTS Chapter 1 Overview...1-1 1.1. Indoor CPE... 1-1 1.2. Outdoor CPE... 1-2 Chapter 2 WEB-GUI...2-3 2.1. System Configuration Login... 2-3 2.2. System Logout...
Wireless LAN Access Point
 Wireless LAN Access Point IEEE 802.11b/g 54Mbps 501903 User s Manual Table of Contents Chapter 1 Introduction... 1 1.1 Package Contents... 2 1.2 Features... 2 1.3 Specifications... 2 1.4 Physical Description...
LevelOne User Manual WNC-0600USB N_One Wireless USB Adapter
 LevelOne User Manual WNC-0600USB N_One Wireless USB Adapter V2.0.0-0712 i Safety FCC WARNING This equipment has been tested and found to comply with the limits for a Class B digital device, pursuant to
User Manual. OT-1044ns
 User Manual OT-1044ns CONTENTS Chapter 1 Introduction... 3 1.1 Features... 3 1.2 Environments... 3 1.3 System Requirement... 4 Chapter 2 Hardware Installation... 4 2.1 Led indicators... 4 2.2 Back Panel
AIRNET 54Mb b/g High Power USB Adapter. User s Manual
 AIRNET 54Mb 802.11b/g High Power USB Adapter User s Manual FCC Certifications Federal Communication Commission Interference Statement This equipment has been tested and found to comply with the limits
APC-100. IEEE g Wireless USB Adapter. User s Guide v1.0
 APC-100 IEEE 802.11g Wireless USB Adapter User s Guide v1.0 FCC Certifications Federal Communication Commission Interference Statement This equipment has been tested and found to comply with the limits
Introduction. This product complies with the following European Union regulations: This product can be used safely in the countries listed below:
 WLX-2005 Introduction Thank you for purchasing the Sitecom WLX-2005 Wi-Fi Access Point N300. It complies with wireless 802.11b/g/n standards and can create a Wi-Fi network with data transmission rates
WL-5420AP. User s Guide
 WL-5420AP User s Guide Table of contents INTRODUCTION... 1 About the Operation Modes...2 LED Indicators...5 Solid...5 Ports on the Rear Panel...7 GETTING CONNECTED... 8 WPA AP -CONFIGURATION VIA WEB...
AC1200M/MS. User Manual
 AC1200M/MS User Manual Table of Contents User Manual... 1 1 Preface... 1 2 LED Indicators and Connectors... 1 2.1 LED Indicators... 1 2.2 Hardware Installation... 2 3 Voice Prompt (AC1200MS)... 2 4 User
IP806GA/GB Wireless ADSL Router
 IP806GA/GB Wireless ADSL Router 802.11g/802.11b Wireless Access Point ADSL Modem NAT Router 4-Port Switching Hub User's Guide DECLARATION OF CON FORMITY This device complies with Part 15 of the FCC Rules.
802.11b/g Access Point WL-8000AP
 802.11b/g Access Point WL-8000AP User s Guide - FCC Certifications This equipment has been tested and found to comply with the limits for a Class B digital device, pursuant to Part 15 of the FCC Rules.
Wireless LAN Access Point
 Wireless LAN Access Point IEEE 802.11b/g 54Mbps User s Manual Table of Contents Chapter 1 Introduction... 1 1.1 Package Contents... 2 1.2 Features... 2 1.3 Specifications... 2 1.4 Physical Description...
Figure 35: Active Directory Screen 6. Select the Group Policy tab, choose Default Domain Policy then click Edit.
 PC and Server Configuration Figure 35: Active Directory Screen 6. Select the Group Policy tab, choose Default Domain Policy then click Edit. Figure 36: Group Policy Tab 7. Select Computer Configuration
Section 3 - Configuration. Enable Auto Channel Scan:
 Enable Auto Channel Scan: Wireless Channel: The Auto Channel Scan setting can be selected to allow the DGL-4500 to choose the channel with the least amount of interference. Indicates the channel setting
Introduction... 3 Features... 3 Minimum Requirements... 3 Package Content... 3 Get to know the Broadband Router... 4 Back Panel... 4 Front Panel...
 Introduction... 3 Features... 3 Minimum Requirements... 3 Package Content... 3 Get to know the Broadband Router... 4 Back Panel... 4 Front Panel... 5 Setup Diagram... 6 Getting started... 7 Chapter 1...
RANGER SERIES. 150Mbps Wireless Green Broadband Router DG-BR4000NG. 150 Mbps V
 RANGER SERIES 150Mbps Wireless Green Broadband Router DG-BR4000NG N 150 Mbps V1.2 2011-12-15 FCC warning: This equipment has been tested and found to comply with the limits for a class B digital device,
WUG2690 User s Manual
 802.11b+g Wireless LAN USB Adapter WUG2690 User s Manual Federal Communication Commission Interference Statement This equipment has been tested and found to comply with the limits for a Class B digital
High Output Power b/g/n Multi-function Access Point EAP N Multi-Function Access Point V1.0
 1 High Output Power 802.11 b/g/n Multi-function Access Point EAP150 802.11 N Multi-Function Access Point V1.0 1 Table of Contents 1 Introduction... 4 1.1 Features and Benefits... 4 1.2 Package Contents...
IEEE g Wireless PC Card. User s Guide
 IEEE 802.11g Wireless PC Card User s Guide FCC Certifications Federal Communication Commission Interference Statement This equipment has been tested and found to comply with the limits for a Class B digital
XG-520 Wireless b/g Portable Router. User s Manual
 XG-520 Wireless 802.11b/g Portable Router User s Manual FCC Certifications This equipment has been tested and found to comply with the limits for a Class B digital device, pursuant to Part 15 of the FCC
Wireless b/g Portable Router. User s Guide
 Wireless 802.11b/g Portable Router User s Guide FCC Certifications This equipment has been tested and found to comply with the limits for a Class B digital device, pursuant to Part 15 of the FCC Rules.
Outdoor Wireless USB Adapter User Guide
 Outdoor Wireless USB Adapter User Guide FCC STATEMENT This equipment has been tested and found to comply with the limits for a Class B digital device, pursuant to part 15 of the FCC Rules. These limits
High Power Wireless N USB Adapter User s Manual
 High Power Wireless N USB Adapter User s Manual 2 Table of Contents 1. Introduction... 4 1.1 Package Contents... 4 1.2 Features... 4 2. Installation... 5 3. Configuring the Adapter... 11 4. Wireless Utility...
FCC CAUTION SETTING... 9
 1 FCC CAUTION... 3 1 INTRODUCTION... 5 1.1 LED INDICATORS... 6 1.2 PRODUCT APPEARANCE... 7 2 INSTALLATION DIAGRAM... 7 3 SETTING... 9 3.1 USING LAPTOP... 9 3.2 USING IPHONE/IPAD... 13 3.3 USING ANDROID
Wireless-G Router User s Guide
 Wireless-G Router User s Guide 1 Table of Contents Chapter 1: Introduction Installing Your Router System Requirements Installation Instructions Chapter 2: Preparing Your Network Preparing Your Network
Introduction. This product complies with the following European Union regulations: This product can be used safely in the countries listed below:
 WLX-2006 Introduction Thank you for purchasing the Sitecom WLX-2006 Wall Mount Range Extender N300. With this product you can easily double the signal coverage of your Wi-Fi network for better Wi-Fi quality
802.11N Wireless Broadband Router
 802.11N Wireless Broadband Router Pre-N Wireless Access Point Broadband Internet Access WPS 4-Port Switching Hub User's Guide Table of Contents CHAPTER 1 INTRODUCTION... 1 Wireless Router Features... 1
LKR Port Broadband Router. User's Manual. Revision C
 LKR-604 4-Port Broadband Router User's Manual Revision C 1 Contents 1 Introduction... 4 1.1 Features... 4 1.2 Package Contents... 4 1.3 Finding Your Way Around... 5 1.3.1 Front Panel... 5 1.3.2 Rear Panel
Wireless-N PCI Adapter User Manual
 Wireless-N PCI Adapter User Manual V1.0 2010-06-28 FCC Certifications Federal Communication Commission Interference Statement This equipment has been tested and found to comply with the limits for a Class
Federal Communication Commission Interference Statement
 Federal Communication Commission Interference Statement This equipment has been tested and found to comply with the limits for a Class B digital device, pursuant to Part 15 of the FCC Rules. These limits
Wireless LAN Device Series CPE2615. User Manual. v
 Wireless LAN Device Series CPE2615 User Manual v20080312 Preface To use this guide, you should have experience working with the TCP/IP configuration and be familiar with the concepts and terminology of
WL-5450AP & WL-5460AP Wireless Access Point. User s Guide
 WL-5450AP & WL-5460AP Wireless Access Point User s Guide 1 FCC Certifications This equipment has been tested and found to comply with the limits for a Class B digital device, pursuant to Part 15 of the
1. Package contents. 2. Connecting ADSL modem and wireless router
 1. Package contents WL-500W wireless router x 1 Power adapter x 1 Utility CD x 1 RJ45 cable x 1 Quick Start Guide x 1 2. Connecting ADSL modem and wireless router 1) Cable connection Wall power outlet
Multi-Homing Broadband Router. User Manual
 Multi-Homing Broadband Router User Manual 1 Introduction... 4 Features... 4 Minimum Requirements... 4 Package Content... 4 Note... 4 Get to know the Broadband Router... 5 Back Panel... 5 Front Panel...
IP806GA/GB Wireless ADSL Router
 IP806GA/GB Wireless ADSL Router 802.11g/802.11b Wireless Access Point ADSL Modem NAT Router 4-Port Switching Hub User's Guide Table of Contents CHAPTER 1 INTRODUCTION... 1 Wireless ADSL Router Features...
CE APPROVED.4 INTRODUCTION.5 PACKAGE CONTENTS. 6 PRE - INSTALLATION CHECKLIST. 6 SYSTEM REQUIREMENTS. 6 FEATURES AND BENEFITS.11 SETUP WIZARD.
 Web Edition Dec. 2002 Contents CE APPROVED...4 INTRODUCTION...5 PACKAGE CONTENTS... 6 PRE - INSTALLATION CHECKLIST... 6 SYSTEM REQUIREMENTS... 6 FEATURES AND BENEFITS... 7 4 - PORT CABLE/XDSL ROUTER...9
CWA-854HT 54 Mbps Wireless-G High Transmission Access Point User s Guide
 CWA-854HT 54 Mbps Wireless-G High Transmission Access Point User s Guide May 2006 Version 1.00 1 Table of Contents Table of Contents... 2 List of Figures... 4 List of Tables... 6 Chapter 1. Introduction...
Wireless LAN Device Series CPE2615. User Manual. v
 Wireless LAN Device Series CPE2615 User Manual v20081230 Preface To use this guide, you should have experience working with the TCP/IP configuration and be familiar with the concepts and terminology of
ESR350H V N X-TRA RANGE Wireless Gigabit Router. [ pg. 1]
![ESR350H V N X-TRA RANGE Wireless Gigabit Router. [ pg. 1]](/thumbs/75/72143893.jpg "ESR350H V N X-TRA RANGE Wireless Gigabit Router. [ pg. 1]") ESR350H 11N X-TRA RANGE Wireless Gigabit Router V1.0 [ pg. 1] Table of Contents 1. Product Overview... 6 1.1. Package Contents... 7 1.2. Product Layout... 8 1.3. Wall Mounting... 9 2. Installation... 10
ESR350H 11N X-TRA RANGE Wireless Gigabit Router V1.0 [ pg. 1] Table of Contents 1. Product Overview... 6 1.1. Package Contents... 7 1.2. Product Layout... 8 1.3. Wall Mounting... 9 2. Installation... 10
High Power g Wireless USB Adapter USER MANUAL 1.0.0
 High Power 802.11g Wireless USB Adapter USER MANUAL 1.0.0 2009 Table of Contents Chapter I USING THIS DOCUMENT 3 Chapter II INTRODUCTION 3 Chapter III SYSTEM REQUIREMENTS 3 Chapter IV Driver Installation
The VWRT510&WRT500 High Speed Router User s Guide
 The VWRT510&WRT500 High Speed Router User s Guide The page 1 of 53 Table of Contents 1 Preface... 4 2 LED Indicators and Connectors... 5 2.1 LED Indicators... 6 2.2 Hardware Installation... 7 3 Voice Prompt...
Wireless LAN Access Point
 Wireless LAN Access Point IEEE 802.11b 11Mbps User s Manual Table of Contents Chapter 1 Introduction... 1 1.1 Package Contents... 2 1.2 Features... 2 1.3 Specifications... 2 1.4 Physical Description...
802.11b+g Wireless LAN USB Adapter. User Manual
 802.11b+g Wireless LAN USB Adapter User Manual REGULATORY STATEMENTS FCC Certification The United States Federal Communication Commission (FCC) and the Canadian Department of Communications have established
802.11a/b/g Access Point. User s Guide
 802.11a/b/g Access Point User s Guide FCC Certifications This equipment has been tested and found to comply with the limits for a Class B digital device, pursuant to Part 15 of the FCC Rules. These limits
Quick Start Guide. Powerline Wireless Extender GPLWE150 PART NO. Q1337.
 Quick Start Guide Powerline Wireless Extender GPLWE150 PART NO. Q1337 www.iogear.com Package Contents 1 x GPLWE150 Powerline Wireless Extender 1 x Ethernet Cable (5ft) 1 x Quick Start Guide 1 x Warranty
HW550-3G. 3G Mobile Broadband plus 4-Port Wireless-N Router
 HW550-3G 3G Mobile Broadband plus 4-Port Wireless-N Router Table of Contents About the Product...4 Features...5 Requirements...6 Package Content...7 Device Design...8 Getting Started...11 Plan Your Network...12
300Mbps N_Max Wireless Ceiling PoE Access Point
 WAP-6102 300Mbps N_Max Wireless Ceiling PoE Access Point User Manual V1.0 Notice FCC Warning Changes or modifications to this unit not expressly approved by the party responsible for compliance could void
ECB N Long Range Multi-Function Client Bridge / Access Point. 11 N Long Range Multi-Function Client Bridge / Access Point V1.
 1 11N Long Range Multi-Function Client Bridge / Access Point ECB150 11 N Long Range Multi-Function Client Bridge / Access Point V1.0 Table of Contents 1 Introduction... 6 1.1 Features and Benefits...6
b/g/n 1T1R Wireless USB Adapter. User s Manual
 802.11 b/g/n 1T1R Wireless USB Adapter User s Manual Federal Communication Commission Interference Statement This equipment has been tested and found to comply with the limits for a Class B digital device,
300N Draft n Wireless Router Model # AR680W User s Manual
 300N Draft 802.11n Wireless Router Model # AR680W User s Manual Ver. 1A Table of Contents 1. Introduction... 4 1.1 Package Contents... 4 1.2 Features... 4 2. Connecting the Router... 5 3. Verifying Connection
Introduction. This product complies with the following European Union regulations: This product can be used safely in the countries listed below:
 WLX-5100 Introduction Thank you for purchasing the Sitecom WLX-5100 Wi-Fi range extender Dualband AC750. With this product you can easily double the signal coverage of your Wi-Fi network for better Wi-Fi
User s Manual. 11N Wireless LAN Broadband Router. Model No.: SP916GN.
 User s Manual 11N Wireless LAN Broadband Router Model No.: SP916GN http://www.micronet.info Table of Contents Chapter 1 Introduction... 1 1.1 Package Contents... 1 1.2 Key Features... 1 1.3 Safety Information...
R520 Quick Setup Guide
 R520 Quick Setup Guide FCC ID: 2AQ5T-R520 1. Introduction Thanks for purchasing R520 broadband router. This router, equipped with the latest 4G and Wireless-N technology, is a full function network equipment.
IEEE n Wireless PCI Adapter. User s Manual
 IEEE 802.11n Wireless PCI Adapter User s Manual October, 2008 FCC Warning This equipment has been tested and found to comply with the limits for a Class C digital device, pursuant to part 15 of the FCC
Wireless G Broadband Travel user manual Model
 Wireless G Broadband Travel Router user manual Model 523875 INT-523875-UM-0807-03 Thank you for purchasing the INTELLINET NETWORK SOLUTIONS Wireless G Broadband Travel Router, Model 523875. This router
LevelOne WBR User s Manual. 11g Wireless ADSL VPN Router. Ver
 LevelOne WBR-3407 11g Wireless ADSL VPN Router User s Manual Ver 1.00-0510 Table of Contents CHAPTER 1 INTRODUCTION... 1 Wireless ADSL Router Features... 1 Package Contents... 5 Physical Details... 6 CHAPTER
WL5041 Router User Manual
 TECOM WL5041 Router User Manual TECOM CO., LTD. March 2003 2003 by TECOM CO., LTD. All rights reserved. Printed in Taiwan Table of contents Package Contents--------------------------------------- 2 Installing
54M Wireless LAN CardBus Card
 54M Wireless LAN CardBus Card User s Manual Ver.2.0 Federal Communication Commission Interference Statement This equipment has been tested and found to comply with the limits for a Class B digital device,
11g Wireless Broadband Router
 LevelOne WBR-3408 User Manual 11g Wireless Broadband Router (Roteador banda-larga sem fio- Wireless G) Ver. 3.000 Safety FCC WARNING This equipment may generate or use radio frequency energy. Changes or
11N Wireless PCI Adapter User Guide -6-
 -6- Copyright Statement is the registered trademark of Shenzhen Tenda Technology Co., Ltd. All the products and product names mentioned herein are the trademarks or registered trademarks of their respective
Chapter 1 Introduction
 Copyright Statement is the registered trademark of Zonet Technology Inc. All the products and product names mentioned herein are the trademarks or registered trademarks of their respective holders. Copyright
WiFi-Repeater User Manual. Quick Installation Guide(Q.I.G.) REV.1.2
 REV.1.2") WiFi-Repeater User Manual Quick Installation Guide(Q.I.G.) REV.1.2 Introduction: The WiFi Repeater is a combined wired/wireless network connection device designed specifically for small business, office,
WiFi-Repeater User Manual Quick Installation Guide(Q.I.G.) REV.1.2 Introduction: The WiFi Repeater is a combined wired/wireless network connection device designed specifically for small business, office,
WH-9200AP a/b/g Dual Radio Wireless Base Station. User s Manual
 WH-9200AP 802.11a/b/g Dual Radio Wireless Base Station User s Manual Regulatory Information Federal Communication Commission Interference Statement This equipment has been tested and found to comply with
Wireless-N Broadband AP / Router. User s Manual. Version 1.3
 Wireless-N Broadband AP / Router User s Manual Version 1.3 Federal Communication Commission Interference Statement This equipment has been tested and found to comply with the limits for a Class B digital
DWR G Integrated Access Device. User Manual
 DWR-923 4G Integrated Access Device User Manual TABLE OF CONTENTS 1. GETTING TO KNOW THE DWR-923... 2 1.1 Introduction... 2 1.2 Package Contents... 3 1.3 System Requirements... 3 1.4 Hardware Overview
EnGenius. Wireless 11N USB Adapter. User s Manual Version: 1.0
 EnGenius Wireless 11N USB Adapter User s Manual Version: 1.0 Table of Contents 1. INTRODUCTION... 3 1.1. FEATURES & BENEFITS... 4 1.2. USB ADAPTER DESCRIPTION... 4 1.3. SYSTEM REQUIREMENTS... 6 1.4. APPLICATIONS...
WL556E Portable Wireless-N Repeater
 WL556E Portable Wireless-N Repeater Table of Contents About the Device...3 Minimum System Requirements...4 Package Contents...4 Device Overview...5 Front Panel...5 Bottom Panel...6 Configuring the Device...
RT880 Wireless Router&Access Point
 RT880 Wireless Router&Access Point User Manual 1 Table of Contents Chapter 1:Product Overview 1.1 Introduction... 3 1.2 Product Features... 3 1.2.1 Product Layout.. 5 Chapter 2:Quick Setup Guide 2.1 Network
AplombTech Smart Router Manual
 AplombTech Smart Router Manual (Version: 1.0) 1 Version & Purpose Version Manual version V 1.0 Explanation Corresponds to the initial version of device Purpose This manual describes the function features
CHAPTER 7 ADVANCED ADMINISTRATION PC
 ii Table of Contents CHAPTER 1 INTRODUCTION... 1 Broadband ADSL Router Features... 1 Package Contents... 3 Physical Details... 4 CHAPTER 2 INSTALLATION... 6 Requirements... 6 Procedure... 6 CHAPTER 3 SETUP...