Table of Contents 1 Citrix Access Gateway 5 VPX Introduction...1
|
|
|
- Cameron Hensley
- 6 years ago
- Views:
Transcription
1 Table of Contents 1 Citrix Access Gateway 5 VPX Introduction Citrix Access Gateway Access Controller Citrix Access Gateway Advanced 4.x Introduction Prerequisites Installation Additional Installation Options Remove automatic TURing image automatically displaying Prevent browser caching TURing image Prevent the cursor from automatically entering the OTC field Change the TURing button text Verifying the Installation Uninstalling the PINsafe Integration Troubleshooting Known Issues and Limitations Additional Information Citrix Access Gateway Standard 4.x Introduction Prerequisites Baseline Architecture Installation Swivel Configuration Configuring the RADIUS server Setting up PINsafe Dual Channel Transports Citrix Access Gateway Standard Edition Integration Additional Information Citrix Access Gateway Standard 5.x Introduction Prerequisites Baseline Architecture Installation Swivel Configuration Configuring the RADIUS server Setting up PINsafe Dual Channel Transports Citrix Access Gateway Standard Edition Integration CAG RADIUS Properties CAG logon Point Properties Additional Installation Options Verifying the Installation Uninstalling the PINsafe Integration Troubleshooting Known Issues and Limitations Additional Information Citrix Access Gateway Web Interface Proxy Introduction Prerequisites Baseline...34 i
2 Table of Contents 34 Architecture Installation PINsafe and Web Interface Integration Configuration CAG Standard and CAG VPX configuration and installation Citrix Web Interface configuration and installation Additional Installation Options Verifying the Installation Uninstalling the PINsafe Integration Troubleshooting Known Issues and Limitations Additional Information Citrix Products Integration Matrix A guide to PINsafe and Citrix Product Integration Citrix Access Gateway Enterprise Edition Introduction Prerequisites Baseline Architecture Swivel Configuration Configuring the RADIUS server Enabling Session creation with username Setting up Swivel Dual Channel Transports Citrix Access Gateway Enterprise Edition Configuration Citrix Advanced Access Gateway Enterprise Edition RADIUS Configuration Test the RADIUS authentication Additional Configuration Options Login Page Customisation Additional Login Customisation options Challenge and Response Image Request button displayed when needed Testing Uninstall/Removing the integration Troubleshooting Known Issues and Limitations Additional Information Citrix Access Gateway Enterprise Edition Introduction Prerequisites Baseline Architecture Swivel Configuration Configuring the RADIUS server Enabling Session creation with username Citrix Access Gateway Enterprise Edition Configuration Additional Configuration Options Testing Troubleshooting Known Issues and Limitations Additional Information Citrix Access Gateway Enterprise Edition Introduction Prerequisites Baseline Architecture Swivel Configuration Configuring the RADIUS server Enabling Session creation with username Citrix Access Gateway Enterprise Edition Configuration Additional Configuration Options Testing Uninstall/Removing the integration...85 ii
3 Table of Contents 58 Swivel Configuration 58.7 Troubleshooting Known Issues and Limitations Additional Information Citrix Netscaler configuration for Receiver Introduction Prerequisites Netscaler 10.x Configuration for Receiver Citrix Access Standard Edition Gateway RADIUS authentication Citrix Access Advanced Edition Gateway RADIUS authentication Known Issues and Limitations Citrix Netscaler Gateway 10.x Introduction Prerequisites Note on upgrading the Netscaler Baseline Architecture Swivel Configuration Configuring the RADIUS server Enabling Session creation with username Setting up Swivel Dual Channel Transports Citrix Netscaler Gateway Configuration Citrix Advanced Access Gateway Enterprise Edition RADIUS Configuration Citrix Receiver with Netscaler configuration Additional Configuration Options Netscaler RADIUS Monitor and RADIUS Load Balancer Netscaler SSL Bridge Login Page Customisation Upgrading Netscalers with Custom Pages Customisation Overview Additional Login Customisation options Challenge and Response Image Request button displayed when needed Testing Uninstall/Removing the integration Troubleshooting Error Messages Known Issues and Limitations Additional Information Citrix Netscaler Gateway Introduction Prerequisites Note on upgrading the Netscaler Baseline Architecture Swivel Configuration Configuring the RADIUS server Enabling Session creation with username Setting up Swivel Dual Channel Transports Citrix Netscaler Gateway Configuration Citrix NetScaler RADIUS Configuration Citrix Receiver with Netscaler configuration Additional Configuration Options Netscaler RADIUS Monitor and RADIUS Load Balancer Netscaler SSL Bridge Login Page Customisation Additional Login Customisation options iii
4 Table of Contents 86 Additional Configuration Options 86.5 Challenge and Response Image Request button displayed when needed Testing Uninstall/Removing the integration Troubleshooting Error Messages Known Issues and Limitations Additional Information Citrix Netscaler RADIUS Monitor and RADIUS Load Balancer Introduction Prerequisites Baseline Swivel Configuration Netscaler Configuration Create a Swivel Radius Monitor Create Entries for the Swivel RADIUS Servers Create a Swivel Load Balance Service Group Create A Virtual Server Netscaler RADIUS configuration Testing Known Issues Troubleshooting Category:Netscaler Citrix Receiver Introduction Prerequisites iphone / Android Citrix receiver Citrix Netscaler RADIUS authentication for Receiver Citrix Access Standard Edition Gateway RADIUS authentication for Receiver Citrix Access Advanced Edition Gateway RADIUS authentication for receiver Known Issues and Limitations Citrix Web Interface 4 with Presentation Server Introduction Prerequisites Baseline Architecture PINsafe Configuration Citrix Web Interface Configuration Additional Configuration Options Testing Troubleshooting Uninstalling Known Issues and Limitations Additional Information Citrix Web Interface 4.5 Integration Introduction Prerequisites Baseline Architecture PINsafe Configuration Citrix Web Interface Configuration Additional Configuration Options Testing Troubleshooting Uninstalling Known Issues and Limitations Additional Information iv
5 Table of Contents 112 Citrix Web Interface 4.6 Integration Introduction Prerequisites Baseline Architecture PINsafe Configuration Citrix Web Interface Configuration Additional Configuration Options Testing Uninstalling Troubleshooting Known Issues and Limitations Additional Information Citrix Web Interface 5.0 Integration Introduction Prerequisites Baseline Architecture Swivel Configuration Configuring the RADIUS server Enabling Session creation with username Citrix Web Interface Configuration Additional Configuration Options Testing Uninstalling Troubleshooting Known Issues and Limitations Additional Information Citrix Web Interface 5.1 Dual Channel button Citrix Web Interface Dual Chanel Integration Notes Log-in page Customisation Testing Citrix Web Interface 5.1 Integration Introduction Prerequisites Baseline Architecture Swivel Configuration Configuring the RADIUS server Enabling Session creation with username Setting up PINsafe Dual Channel Transports Citrix Web Interface Configuration Copy across the Web Interface Files Edit the Radius_secret.txt Edit the Web.config file Citrix Web Interface RADIUS Configuration Additional Configuration Options Self Reset Testing Uninstalling Troubleshooting Error Messages Known Issues and Limitations Additional Information Citrix Web Interface 5.2 Integration Introduction Prerequisites Baseline Architecture Swivel Configuration Configuring the RADIUS server Enabling Session creation with username Setting up PINsafe Dual Channel Transports v
6 Table of Contents 135 Citrix Web Interface Configuration Copy across the Web Interface Files Edit the Radius_secret.txt Edit the Web.config file Citrix Web Interface RADIUS Configuration Additional Configuration Options Testing Uninstalling Troubleshooting Error Messages Known Issues and Limitations Additional Information Citrix Web Interface 5.3 Integration Introduction Prerequisites Baseline Architecture Swivel Configuration Configuring the RADIUS server Enabling Session creation with username Setting up PINsafe Dual Channel Transports Citrix Web Interface Configuration Copy across the Web Interface Files Edit the Radius_secret.txt Edit the Web.config file Citrix Web Interface RADIUS Configuration Additional Configuration Options Testing Uninstalling Troubleshooting Error Messages Known Issues and Limitations Additional Information Citrix Web Interface 5.4 Integration Introduction Prerequisites Baseline Architecture Swivel Configuration Configuring the RADIUS server Enabling Session creation with username Citrix Web Interface Configuration Edit the radius_secret.txt Edit the web.config file Citrix Web Interface RADIUS Configuration Additional Configuration Options Changing the OTC label Configuring Single Channel: Modifying the Web Interface Files Configuring Single Channel: Edit the Web.config file Challenge and Response Authentication with Count Down Timer Testing Uninstalling Troubleshooting Error Messages vi
7 Table of Contents 166 Known Issues and Limitations Additional Information Citrix Web Interface 5.X additional login page options Citrix Web Interface 5.x additional login page options Removing the Single Channel Button Replacing the Single Channel Button with a Dual Channel Button Single Channel Button with an automated Single Channel Image Turing, Dual channel and Display Index buttons Category:Web Interface Category:XenApp vii
8 1 Citrix Access Gateway 5 VPX 1.1 Introduction Please refer to the documentation located at: Citrix Access Gateway Standard 5.x 1
9 2 Citrix Access Gateway Access Controller 5.0 PINsafe integrates with the Access Controller 5.0 using RADIUS authentication. The following authentication methods are supported: SMS Mobile Phone Client Taskbar utility Please refer to the Citrix Access Controller Administration guide for further information on configuring the Access Controller. The single Channel graphical TURing image cannot currently be embedded into the login page when using the Access Controller 5.0, but we hope to offer this enhancement at a future date. Please contact Swivel Secure to register your interest. 2
10 3 Citrix Access Gateway Advanced 4.x 3
11 4 Introduction This document covers the integration of Citrix Access Gateway Advanced edition 4.x. 4
12 5 Prerequisites PINsafe 3.x The CAG 4.5 integration guide is available here: Citrix Access Gateway Advanced edition 4.5 The CAG integration guide is available here: Citrix Access Gateway Advanced edition Note: For PINsafe Single Channel authentication the PINsafe server IP needs to be reachable by the client (i.e. this means an external IP address or a NAT for the PINsafe server IP). An SSL certificate is usually installed on the PINsafe server to prevent the browser from displaying errors regarding self signed certificates or sites without SSL certification. Swivel Secure can assist with the deployment of the certificate, but this must be purchased and applied for by the end user or their reseller. Additional Integration supplementary documentation is provided below 5

13 6 Installation Ensure on the Logon Point Properties, that under Visibility, the check box is ticked for 'Allow external (gateway appliance) users access to this logon point. If not set, only internal users will have access to this logon point. This option must be set on the default logon point.' 6
14 7 Additional Installation Options 7.1 Remove automatic TURing image automatically displaying To prevent the auto-loading, remove (or comment out) the onblur method on username: // userfield.onblur = ShowTuring; to userfield.onblur = ShowTuring; 7.2 Prevent browser caching TURing image To stop image caching, add a random number to the image request + "&random=" + Math.round(Math.random()* ); Example: //Set the image SRC and make it visible varimg.src = surl + suser + "&random=" + Math.round(Math.random()* ); 7.3 Prevent the cursor from automatically entering the OTC field Remove the following line from Login.ascx //Set focus to the OTC input document.getelementbyid(snameofotctext).focus(); 7.4 Change the TURing button text To change the prompt for Turing, edit the Login.ascx file and look for the line: turingbtn.value = "Turing"; and change it to turingbtn.value = "Refresh Image"; 7.5 Verifying the Installation 7.6 Uninstalling the PINsafe Integration 7.7 Troubleshooting 7.8 Known Issues and Limitations 7.9 Additional Information 7
15 8 Citrix Access Gateway Standard 4.x 8
16 9 Introduction This document covers the integration of Swivel with the Citrix Access Gateway Standard edition. The standard edition allows authentication using SMS, , Mobile Phone applet, PINsafe Taskbar, but does not allow the single channel image to be embedded into the login page. To allow the single channel image to be embedded into the login page, the Advanced Access Controller is required, see Citrix Access Gateway Advanced 4.x 9
17 10 Prerequisites Swivel 3.x Citrix Access Gateway 4.x 10
18 11 Baseline 11
19 12 Architecture Authentications are made against Swivel using RADIUS. 12
20 13 Installation 13
21 14 Swivel Configuration 14.1 Configuring the RADIUS server On the Swivel Administration console configure the RADIUS Server and NAS, see RADIUS Configuration 14.2 Setting up PINsafe Dual Channel Transports See Transport Configuration 14.3 Citrix Access Gateway Standard Edition Integration Follow the Citrix Access Gateway Standard Edition Administration guide to configure RADIUS authentication. 14
22 15 Additional Information For additional features use the Advanced Access Controller. This allows customised login pages and the Single Channel Turing Image authentication, see Citrix Access Gateway Advanced 4.x 15
23 16 Citrix Access Gateway Standard 5.x 16
24 17 Introduction This document covers the integration of Swivel with the Citrix Access Gateway Standard edition. The standard edition allows authentication using SMS, , Mobile Phone applet, Swivel Taskbar, but does not allow the single channel image to be embedded into the login page. To allow the single channel image to be embedded into the login page, the following options are available: Advanced Access Controller is required, see Citrix Access Gateway Advanced 4.x Proxy the login request to a Web Interface login Citrix Access Gateway Web Interface Proxy 17
25 18 Prerequisites Swivel 3.x Citrix Access Gateway 5.x 18
26 19 Baseline PINsafe 3.8 CAG Standard
27 20 Architecture Authentications are made against Swivel using RADIUS. 20
28 21 Installation 21
29 22 Swivel Configuration 22.1 Configuring the RADIUS server On the Swivel Administration console configure the RADIUS Server and NAS, see RADIUS Configuration 22.2 Setting up PINsafe Dual Channel Transports See Transport Configuration 22

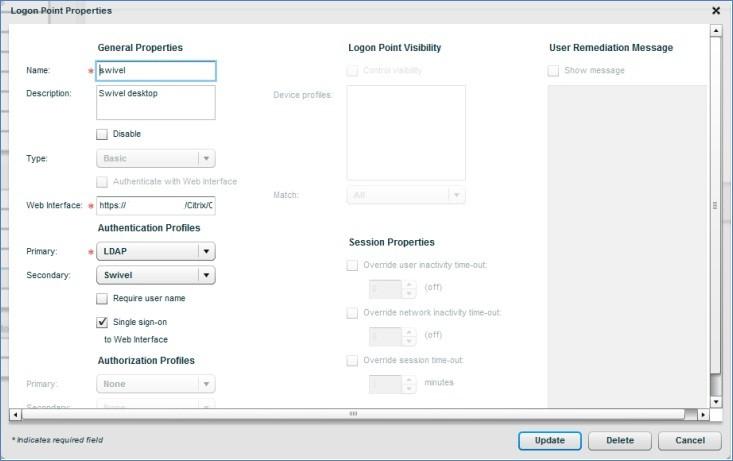
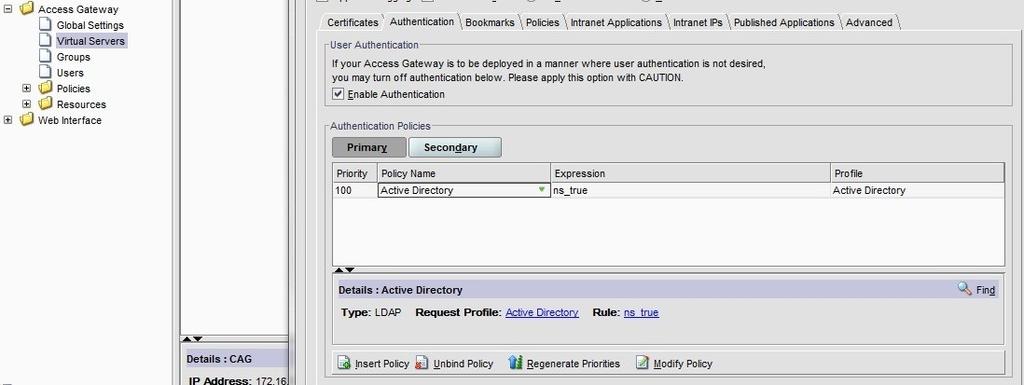
30 23 Citrix Access Gateway Standard Edition Integration Follow the Citrix Access Gateway Standard Edition Administration guide to configure RADIUS authentication CAG RADIUS Properties On the CAG Configuration, configure one or more PINsafe instances as a RADIUS server CAG logon Point Properties Configure Swivel as an authentication server. Swivel would usually be configured as a secondary authentication server with AD as the primary authentication server using RADIUS. In this example Single Sign ON is being used to the Citrix Web Interface, and has been created as a basic logon point. 23
31 24
32 24 Additional Installation Options 25

33 25 Verifying the Installation Browse to the CAG login page and enter username, AD Password and OTC from the SMS or Mobile Phone Client. Check the PINsafe logs to ensure that a RADIUS request has been seen. 26
34 26 Uninstalling the PINsafe Integration 27
35 27 Troubleshooting 28
36 28 Known Issues and Limitations 29
37 29 Additional Information For additional features use the Advanced Access Controller. This allows customised login pages and the Single Channel Turing Image authentication, see Citrix Access Gateway Advanced 4.x 30
38 30 Citrix Access Gateway Web Interface Proxy 31
39 31 Introduction This document is to supplement the Citrix Access Gateway and Citrix Web Interface documentation for the deployment of PINsafe on the Web Interface and using the Secure Ticket Authority to pass authentication from the Citrix Access Gateway to the Citrix Web Interface. 32
40 32 Prerequisites Citrix Access Gateway 5.x Citrix Web Interface 5.x PINsafe 3.x 33
41 33 Baseline Citrix Access Gateway 5.0 Citrix Web Interface 5.4 PINsafe
42 34 Architecture When a user authenticates to the Citrix Access Gateway, the authentication is passed to the Web Interface and the user may use PINsafe authentication. 35
43 35 Installation 35.1 PINsafe and Web Interface Integration Configuration Follow the steps for the appropriate version of PINsafe Web Interface Integration on the PINsafe server see Integrations. Test that this integration is fully working CAG Standard and CAG VPX configuration and installation Configure the Access Gateway with networking information in the required deployment scenario. On the CAG enter under Name Service Providers the IP address and Fully Qualified Hostname of the Web Interface server under the section HOSTS File. Under Deployment Mode set the Access Gateway Mode to Appliance Only. 36


44 Set the Logon Point as home. Configure the Logon Point Properties to authenticate with the Web Interface, using the hostname allows the DMZ IP address range to be hidden. 37
.")
45 Enter the Web Interface server for the Web Address and Application Type should be WEBINTERFACE. Configure the Web Interface as the STA (Secure Ticket Authority). 38


46 35.3 Citrix Web Interface configuration and installation On the Citrix Web Interface edit the Secure Access Settings, Access Methods to be Gateway Direct. 39

47 The (FQDN) Fully Qualified Domain Name needs to be entered for the Gateway Settings 35.4 Additional Installation Options 40
48 36 Verifying the Installation Browse to the login page and authenticate with PINsafe credentials. 41
49 37 Uninstalling the PINsafe Integration 42
50 38 Troubleshooting 43
51 39 Known Issues and Limitations 44
52 40 Additional Information 45
53 41 Citrix Products Integration Matrix 41.1 A guide to PINsafe and Citrix Product Integration Product Integration Product SMS Text Mobile Phone Client Taskbar Utility TURing Image Index number display Token CAG Standard 4 or 5 Yes Yes Yes No No Yes CAG VPX 5 Yes Yes Yes No No Yes CAG VPX 5 with WI authentication Yes Yes Yes Yes Yes Yes Xen App (Web Interface 4/5) Yes Yes Yes Yes Yes Yes CAG Advanced AAC 4.5 Yes Yes Yes Yes Yes Yes CAG Advanced AC Yes Yes Yes No No Yes CAG Enterprise (Netscaler) 8 or 9 or x Yes Yes Yes Yes Yes Yes WI 4.5, 4.6, 5.0, 5.1, 5.2, 5.3, 5.4 Yes Yes Yes Yes Yes Yes Xen App (Web Interface 4/5) Yes Yes Yes Yes Yes Yes PS 4 with WI Yes Yes Yes Yes Yes Yes Citrix Receiver Yes Yes Yes Yes* Yes* Yes CAG = Citrix Access Gateway AAC = Advanced Access Controller (AAC 4.x) PS = Presentation Server WI = Web Interface Index Number Display is the ability to display the index number in the login page Yes* When viewed in browser before receiver starts 46
54 42 Citrix Access Gateway Enterprise Edition 10 47
55 43 Introduction This document shows the steps required to integrate Swivel with the Citrix Access Gateway Enterprise Edition 10.0 (Netscaler VPN). For version 10.1 refer to Citrix Netscaler Gateway 10.x For versions 8.x to 9.1 refer to Citrix Access Gateway Enterprise Edition 8, For other versions of 9.x see Citrix Access Gateway Enterprise Edition 9. It covers the following steps. Configuring Swivel to accept authentication requests from the CAGEE Modifying the CAGEE login pages Configuring the CAGEE to authenticate via PINsafe This gives the basics of the integration, with html and javascript skills the integration can be customised as required. To use the Single Channel Image such as the TURing Image, the Swivel server must be made accessible. The client requests the images from the Swivel server, and is usually configured using Network Address Translation, often with a proxy server. The Swivel appliance is configured with a proxy port to allow an additional layer of protection. 48
56 44 Prerequisites Access Gateway Enterprise Edition firmware version 10.x An administrative logon account for the Access Gateway A Secure Shell (SSH) programme (eg putty) and an SSH-based file transfer application such as WinSCP A Unicode-aware text file editor such as TextPad or WordPad Swivel 3.x Swivel server must be accessible by client when using Single Channel Images, such as the Turing Image, this is usually implemented by a NAT to the Swivel server. Ensure that only the required ports are allowed access. CAGEE pages to modify and/or Swivel files for version
57 45 Baseline Tested with Swivel 3.8, 3.9, Citrix Access Gateway Enterprise Edition Version NS10.0 Build 70.7, and NS10.1 Build
58 46 Architecture The Citrix Advanced Access Gateway Enterprise Edition makes authentication requests against the Swivel server by RADIUS. You can create different logon realms / pages called Virtual Servers, these can have different authentication servers/policies, SSL certificates and resources attached to them. However, the downside is they ALL use the same index.html/login.js/en.xml files, so you cannot have multiple landing pages with/without the Swivel modifications. 51
59 47 Swivel Configuration 47.1 Configuring the RADIUS server On the Swivel Administration console configure the RADIUS Server and NAS, see RADIUS Configuration 47.2 Enabling Session creation with username To allow the TURing image, PINpad and other single channel images, under Server/Single Channel set Allow session request by username to Yes Setting up Swivel Dual Channel Transports See Transport Configuration 52
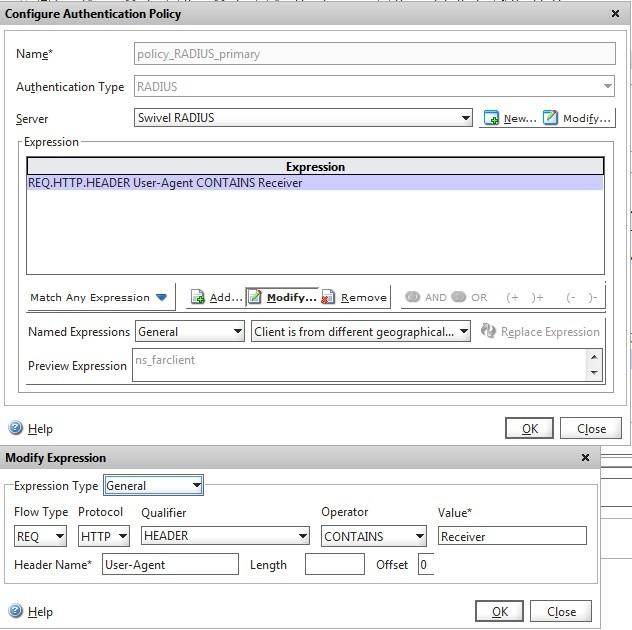
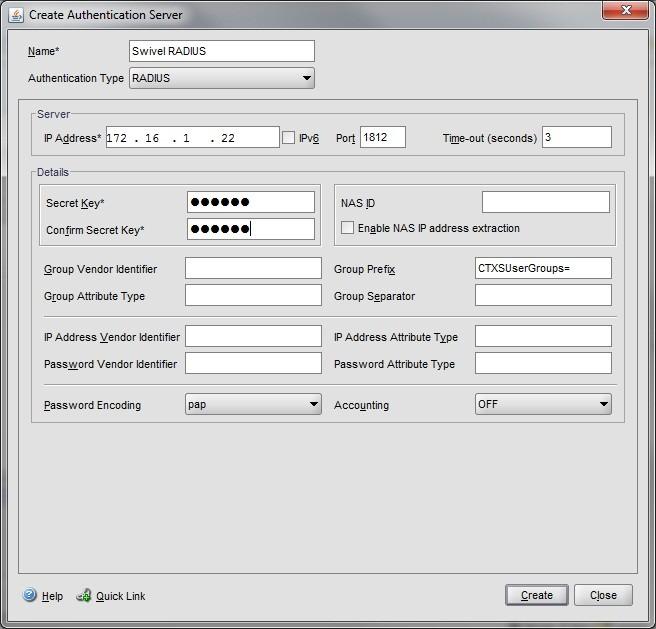
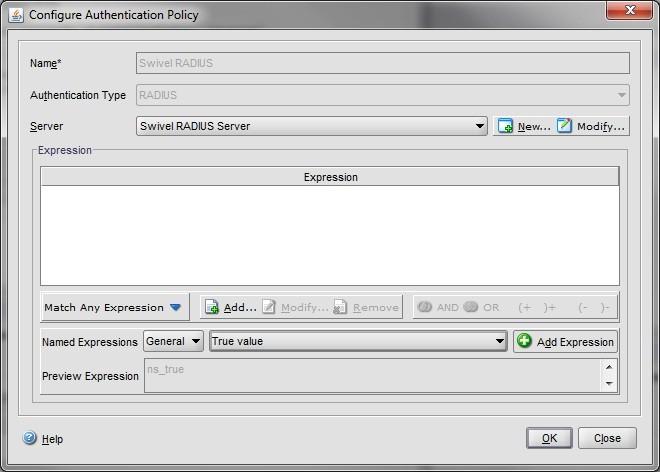
60 48 Citrix Access Gateway Enterprise Edition Configuration The basis of the integration is to create new versions of the login pages. These pages are on the CAGEE and can be accessed via SSH. There are two approaches, firstly to overwrite the relevant files with those provided by Swivel Secure. The other is to actually modify those on the appliance. The latter approach has the advantage the modified pages will always be based on the latest version of the CAGEE files. The main requirement for modifying these pages is to include a TURing image and the button required to request that image. The same approach could also be used to include a button/image for SMS on-demand. If the single Channel TURing image is not to be used, then the login page does not need to be modified, unless other functions are required such as the Get Security String Index. Note: TURing Images, SMS Confirmed image and Get Security String Index Images require the Swivel server to be accessible from the internet, usually with a NAT Citrix Advanced Access Gateway Enterprise Edition RADIUS Configuration The CAGEE needs to be configured to use the Swivel server as a RADIUS authentication server. Where several Swivel appliances are used for resilience, configure the RADIUS request to be made against each of the Swivel servers together with the use of Session Sharing. Note: for appliances, the Swivel VIP should not be used as the RADIUS server IP address, see VIP on PINsafe Appliances Swivel can be configured as the only authentication server or as an additional authentication server, usually this would be together with AD. The required steps are pretty much the same for both scenarios. Under the Netscaler->System->Authentication select the Servers Tab and then click add, enter the following information: Name Swivel RADIUS Authentication type RADIUS Secret Key The secret key configured on the Swivel NAS and also under Confirm Secret Key Group Prefix CTXSUserGroups= Group Separator ; When complete click on Create. If the Authentication option is not available check that the license allows authentication to be configured on the Netscaler licensing page. 53
61 54
62 Under the Netscaler->System->Authentication select the Servers Tab and then click add, enter the following information: Name Swivel RADIUS Policy Authentication Type RADIUS Server Swivel RADIUS Named Expression True Value (Then click Add Expression so ns_true appears under Expression 55
63 56
64 The authentication must be then added such as the Access Gateway/Virtual Servers menu. If just Swivel authentication is required then ensure that only the Swivel policy is active for the Primary. If you require AD and Swivel authentication then you need to make active the Swivel policy as the secondary. Save the settings. 57
65 58
66 48.2 Test the RADIUS authentication At this stage it should be possible to authenticate by SMS, hardware Token, Mobile Phone Client and Taskbar to verify that the RADIUS authentication is working for users. Browse to the SSL VPN login page, and enter Username and if being used, the password. From the Swivel Administration console select User Administration and the required user then View Strings, and select an appropriate authentication string or OTC for the user. At the SSL VPN login enter the required OTC. Check the Swivel logs for a RADIUS success or rejected message. If no RADIUS message is seen, check that the Swivel RADIUS server is started and that the correct ports are being used. 59
67 49 Additional Configuration Options 49.1 Login Page Customisation The login page can be modified to display the TURing image, PINpad or String Index as outlined in the following sections Customisation Overview See under prerequisites for the modified files that need to be uploaded to the Netscaler. Note on editing files: If the files are edited in Winsdows based systems it may be possible that control code ^M are added to the end of the line. These can be viewed and removed by using vi. The below describes how to modify the login page for additional functionality such as the below which require the Swivel server to be accessible by the client, usually through a NAT: TURing Image (Automatic or requested by a button) Display Security String Index Get SMS button Because all files in /netscaler/ns_gui are overwritten upon a restart or power cycle, the script /nsconfig/rc.netscaler copies at boot the required files from /var/mods to /netscaler/ns_gui Login to Netscaler Command Line Use WINscp to use a web file tool or SSH onto the appliance using an admin account. Once onto the box you need to type shell to get access to the command line. >Last login: Wed Sep 10 19:12: Done > shell Last login: Wed Sep 10 21:13: Backup Netscaler files Navigate to the location of the pages to be modified, and make a local backup copy of them. cd /netscaler/ns_gui/vpn cp index.html index.html.bak cd /netscaler/ns_gui/vpn/resources mkdir bak cp *.xml bak Customise the login script Requesting a TURing image These files can be modified before uploading Modify pinsafe.js. The surl setting in pinsafe.js needs to be changed to reflect the Hostname and port number of the relevant Swivel server. For an Appliance this will normally be similar to: surl=" For a software only install see Software Only Installation Customise the login prompt Modify the language resource files in /netscaler/ns_gui/vpn/resources. If you are only using the English language, then edit en.xml and search for <String id="password2"> this should be around line 59. Replace the value for id="password2" with "OTC:". Also, insert a new string for id="password" with a value of "AD Password". You should therefore have 2 lines as follows: <String id="password">ad Password</String> <String id="password2">otc:</string> (Note that Password has no colon at the end, whereas Password2 has a colon) Additional Languages file modifications If you will be using languages other than English, you will also need to edit any other language files you use, replacing the value for Password2 with the appropriate label for OTC (One-time code) and inserting a new string for Password1 with the label for AD (Active Directory) password. 60
68 Edit the file rc.netscaler to copy across any modified language pages, as for English which is included in the script.: cp /var/mods/en.xml.mod /netscaler/ns_gui/vpn/resources/en.xml Upload files to Netscaler Download the files under the prerequisites and copy them to the following locations: index.html to /netscaler/ns_gui/vpn/index.html pinsafe.js to /netscaler/ns_gui/vpn/pinsafe.js rc.netscaler to /nsconfig/rc.netscaler Note that the files in /netscaler/ns_gui/vpn are re-written when the server is rebooted therefore make sure so save these files elsewhere regularly to prevent work in progress being lost during development. How to manage these pages is covered later Copy the modified files from run time to file storage mkdir /var/mods cp /netscaler/ns_gui/vpn/index.html /var/mods/index.html.mod cp /netscaler/ns_gui/vpn/pinsafe.js /var/mods/pinsafe.js.mod cp /netscaler/ns_gui/vpn/resources/en.xml /var/mods/en.xml.mod Also copy across any additional language files modified. Because all files in /netscaler/ns_gui are overwritten upon a restart or power cycle. At boot time the /nsconfig/rc.netscaler script copies /var/mods/ files back to /netscaler/ns_gui Reboot Netscaler to verify files are copied across Reboot the Netscaler to ensure that the files are copied across at boot time Additional Login Customisation options Automated TURing Display With the automated TURing display, when the user leaves the username field, the TURing will be automatically displayed. A login using the TURing image is expected for that user. Edit the index.html file search for onfocus="loginfieldcheck()" Add a new attribute after this, as follows: onblur="showturing()" Example: onfocus="loginfieldcheck()" onblur="showturing()" style="width:100%;" Changing the button labels If you want to want to change the button text such for sending security strings to SMS or on-demand, rather than showing a TURing image, or change the GET Image text you may want to change the label of the button. You can do this as follows: Edit the index.html file and locate the code that renders the button by searching for "btnturing". You will find the following code within the line: id="btnturing" value="get Image" Change the value attribute to an appropriate alternative, such as "Send Message" Requesting the string Index See also Multiple Security Strings How To Guide Modify pinsafe.js. The surl setting in pinsafe.js needs to be changed to reflect the hostname and port number of the relevant Swivel server. For an Appliance this will normally be similar to: surl=" For a software only install see Software Only Installation 61
69 PINpad Netscaler 93 PINpad is a version of the 9.3 customisation modified for Pinpad. Note that in order to use PINpad you will need a Swivel Appliance version or higher. For earlier versions, you can get this from Downloads. PINpad pre-req Requesting an SMS See also Challenge and Response below Modify pinsafe.js. The surl setting in pinsafe.js needs to be changed to reflect the hostname and port number of the relevant Swivel server. For an Appliance this will normally be similar to: surl=" For a software only install see Software Only Installation 49.3 Challenge and Response Citrix Access Gateway Enterprise Edition 9.2 and 10.x support RADIUS Challenge and Response. RADIUS Challenge and Response can be optionally configured to enter a username and Password, which will then ask for a One Time Code. Configure the Swivel server to use Two Stage Authentication and Check Password With Repository, see also Challenge and Response How to Guide Challenge and response is usually configured with Username, and AD password for LDAP authentication, and Swivel configured to use AD password in order to request the SMS message to be sent to the user. It is possible to modify the login page so that the AD password need only be entered once. A modified page can be downloaded from here: CAGEE Two Stage Login page To install the login page use the same procedure as the Single Channel login page Image Request button displayed when needed The following code allows the Single Channel Image request button to be only shown when required. This is useful for refreshing an image or when SMS/Mobile client authentication is used, since when a Single Channel image is generated, either automatically or manually, it then expects a single channel login (within 2 minutes by default). function ns_showpinsafe() { var pspwc = ns_getcookie("pwcount"); if ( pspwc == 2 ) { document.write('<td>'); document.write('<img src="/vpn/images/loginbuttonrolloverglow.gif"/>'); document.write(''); document.write('<input type="button" id="btnturing" value="get Image" '); document.write('onclick="showturing();" class="ctx_caxtonbutton" '); document.write('onmouseover="this.classname='); document.write("'ctx_caxtonbutton_hover';"); document.write('" onmouseout="this.classname='); document.write("'ctx_caxtonbutton';"); document.write('" />'); document.write('</td>'); } } 62
70 50 Testing Browse to the login page and check that a Turing image appears and the One time Code can be entered to login. For SMS or Mobile Phone Apps do not click on the Get Image button, but enter the OTC If the incorrect credentials are used then the login should fail 63
71 Where the TURing image is not used, then the Get Image page modification can be omitted 64
72 51 Uninstall/Removing the integration If the login pages have been modified restore the default login page and remove the added files. Remove Swivel as the authentication server. 65
73 52 Troubleshooting Check the Swivel logs for Turing images and RADIUS requests. Image from PINsafe server absent The CAGEE Netscaler checks each password/otc in turn, so if the AD password is checked first and is incorrect then the secondary authentication will not be tested. Files moved but have a? appended to the end If the script to move the files on login contains the control code ^M at the end of each line (usually introduced by Windows based text editors), then the files may appear with a? at the end of the filename. Use vi to remove the ^M 66
74 53 Known Issues and Limitations The CAGEE caches the javascript so when you make modifications on the CAGEE they are not reflected on the log-in page as rendered. A way round this is to change the name of the.js file and edit the index.html file to use this new.js file. see How To Modify Access Gateway Logon Fields 67
75 54 Additional Information For assistance in the Swivel installation and configuration please firstly contact your reseller and then Swivel Secure support at 68
76 55 Citrix Access Gateway Enterprise Edition Introduction This document shows the steps required to integrate PINsafe with the Citrix Access Gateway Enterprise Edition (Formerly Netscaler VPN) version 8.x to 9.1. Version 9.2 is covered in a separate document see Citrix Access Gateway Enterprise Edition 9. It covers the following steps. Configuring PINsafe to accept authentication requests from the CAGEE Modifying the CAGEE login pages Configuring the CAGEE to authenticate via PINsafe This gives the basics of the integration, with html and javascript skills the integration can be customised as required. To use the Single Channel Image such as the TURing Image, the PINsafe server must be made accessible. The client requests the images from the PINsafe server, and is usually configured using Network Address Translation, often with a proxy server. The PINsafe virtual or hardware appliance is configured with a proxy port to allow an additional layer of protection Prerequisites Access Gateway Enterprise Edition firmware version 8.x to 9.1. An administrative logon account for the Access Gateway A Secure Shell (SSH) programme (eg putty) and an SSH-based file transfer application such as WinSCP A Unicode-aware text file editor such as TextPad or WordPad PINsafe 3.x PINsafe server must be accessible by client when using Single Channel Images, such as the Turing Image, this is usually implemented by a NAT to the PINsafe server. Ensure that only the required ports are allowed access. CAGEE pages to modify and/or PINsafe files File:CAGEE_8_files.zip for versions Baseline PINsafe 3.5 Citrix Access Gateway Enterprise Edition 8.0. Also tested with Architecture The Citrix Advanced Access Gateway Enterprise Edition makes authentication requests against the PINsafe server by RADIUS. You can create different logon realms / pages called Virtual Servers, these can have different authentication servers/policies, SSL certificates and resources attached to them. However, the downside if they ALL use the same index.html/login.js/en.xml files, so you cannot have multiple landing pages with/without the pinsafe modifications. 69
77 56 Swivel Configuration 56.1 Configuring the RADIUS server On the Swivel Administration console configure the RADIUS Server and NAS, see RADIUS Configuration 56.2 Enabling Session creation with username To allow the TURing image, PINpad and other single channel images, under Server/Single Channel set Allow session request by username to Yes Setting up PINsafe Dual Channel Transports See Transport Configuration 56.3 Citrix Access Gateway Enterprise Edition Configuration The basis of the integration is to create new versions of the login pages. These pages are on the CAGEE and can be accessed via SSH. There are two approaches, firstly to overwrite the relevant files with those provided by Swivel Secure. The other is to actually modify those on the virtual or hardware appliance. The latter approach has the advantage the modified pages will always be based on the latest version of the CAGEE files. The main requirement for modifying these pages is to include a TURing image and the button required to request that image. The same approach could also be used to include a button/image for SMS on-demand. Note: TURing Images, SMS Confirmed image and Get Security String Index Images require the PINsafe server to be accessible from the internet, usually with a NAT. See also Multiple Security Strings How To Guide Login Page Customisation SSH onto the virtual or hardware appliance using an admin account. Once onto the box you need to type shell to get access to the command line. >Last login: Wed Sep 10 19:12: Done > shell Last login: Wed Sep 10 21:13: Navigate to the location of the pages to be modified, and make a local backup copy of them >cd /netscaler/ns_gui/vpn >cp index.html index.html.bak >cp login.js login.js.bak Note that the files in /netscaler/ns_gui/vpn are re-written when the server is rebooted therefore make sure so save these files elsewhere reguarlarly to prevent work in progress being lost during development. How to manage these pages is covered later. The index.html file now needs to be edited (or replaced). The tool vi can be used to do this but an application such as WinSCP will make this easier. The required files can be found in the prerequisites. A pinsafe.js file that is a modification of the existing login.js file is required. Make a copy of login.js called pinsafe.js The showturing function shown below needs to be added to this file. Note the surl setting needs to be changed to reflect the IP address and port number of the relevant PINsafe server. There are other changes that can be made, eg changing the prompt to read One-Time code instead of password. For a virtual or hardware appliance this will normally be similar to: surl=" For a software only install see Software Only Installation Because all files in /netscaler/ns_gui are overwritten upon a restart or power cycle, a script must be created that runs at startup to copy the modified files back to this location. The nsafter.sh or rc.netscaler shell scripts can be created or modified to accomplish this. For example via ssh: > shell # mkdir /var/mods # cp /netscaler/ns_gui/vpn/index.html /var/mods/index.html.mod # cp /netscaler/ns_gui/vpn/pinsafe.js /var/mods/pinsafe.js.mod # touch /nsconfig/rc.netscaler # echo cp /var/mods/index.html.mod /netscaler/ns_gui/vpn/index.html >> /nsconfig/rc.netscaler # echo cp /var/mods/pinsafe.js.mod /netscaler/ns_gui/vpn/pinsafe.js >> /nsconfig/rc.netscaler Citrix Advanced Access Gateway Enterprise Edition RADIUS Cofiguration The CAGEE needs to be configured to use the PINsafe server as a RADIUS authentication server. Where a VIP is being used on the PINsafe server then configure the RADIUS request to be made against each of the PINsafe servers together with the use of Session Sharing. PINsafe can be configured as the only authentication server or as an additional authentication server, usually this would be together with AD. The required steps are pretty much the same for both scenarios. Create a new Authentication policy (under the Netscaler->System->Authentication menu). The policy must specify RADIUS and then the PINsafe server must be added as a RADIUS server. 70


78 On the SSL-> Virtual Server menu, the created policy must be activated. If just PINsafe authentication is required then you ensure that only the PINsafe policy is active. If you require AD and PINsafe authentication then you need to make active the PINsafe policy as the secondary. Save the settings. 71
 { var pspwc = ns_getcookie(\"pwcount\"); if ( pspwc == 2 ) { document.write('<td>'); document.write('<img src=\"/vpn/images/loginbuttonrolloverglow.gif\"/>'); document.")
79 56.4 Additional Configuration Options Challenge and Response Citrix Access Gateway Enterprise Edition 9.1 supports RADIUS Challenge and Response Image Request button displayed when needed The following code allows the Single Channel Image request button to be only shown when required. function ns_showpinsafe() { var pspwc = ns_getcookie("pwcount"); if ( pspwc == 2 ) { document.write('<td>'); document.write('<img src="/vpn/images/loginbuttonrolloverglow.gif"/>'); document.write(''); document.write('<input type="button" id="btnturing" value="get Image" '); document.write('onclick="showturing();" class="ctx_caxtonbutton" '); document.write('onmouseover="this.classname='); document.write("'ctx_caxtonbutton_hover';"); document.write('" onmouseout="this.classname='); document.write("'ctx_caxtonbutton';"); document.write('" />'); document.write('</td>'); } } 56.5 Testing Browse to the login page and check that a Turing image appears and the One time Code can be entered to login. 72

80 56.6 Troubleshooting Check the PINsafe logs for Turing images and RADIUS requests. Image from PINsafe server absent 56.7 Known Issues and Limitations The CAGEE caches the javascript so when you make modifications on the CAGEE they are not reflected on the log-in page as rendered. A way round this is to change the name of the.js file and edit the index.html file to use this new.js file. see [1] 56.8 Additional Information For assistance in the PINsafe installation and configuration please firstly contact your reseller and then Swivel Secure support at support@swivelsecure.com 73
81 57 Citrix Access Gateway Enterprise Edition Introduction This document shows the steps required to integrate Swivel with the Citrix Access Gateway Enterprise Edition 9.2 and 9.3 (Formerly Netscaler VPN). for versions 8.x to 9.1 refer to Citrix Access Gateway Enterprise Edition 8. It covers the following steps. Configuring Swivel to accept authentication requests from the CAGEE Modifying the CAGEE login pages Configuring the CAGEE to authenticate via PINsafe This gives the basics of the integration, with html and javascript skills the integration can be customised as required. To use the Single Channel Image such as the TURing Image, the Swivel server must be made accessible. The client requests the images from the Swivel server, and is usually configured using Network Address Translation, often with a proxy server. The Swivel virtual or hardware appliance is configured with a proxy port to allow an additional layer of protection Prerequisites Access Gateway Enterprise Edition firmware version 9.2 or 9.3 An administrative logon account for the Access Gateway A Secure Shell (SSH) programme (eg putty) and an SSH-based file transfer application such as WinSCP A Unicode-aware text file editor such as TextPad or WordPad Swivel3.x Swivel server must be accessible by client when using Single Channel Images, such as the Turing Image, this is usually implemented by a NAT to the Swivel server. Ensure that only the required ports are allowed access. CAGEE pages to modify and/or Swivel files for version 9.2 or version Baseline Swivel 3.5 Citrix Access Gateway Enterprise Edition Version 9.2 and also Swivel 3.8 Citrix Access Gateway Enterprise Edition Version Architecture The Citrix Advanced Access Gateway Enterprise Edition makes authentication requests against the Swivel server by RADIUS. You can create different logon realms / pages called Virtual Servers, these can have different authentication servers/policies, SSL certificates and resources attached to them. However, the downside is they ALL use the same index.html/login.js/en.xml files, so you cannot have multiple landing pages with/without the Swivel modifications. 74
82 58 Swivel Configuration 58.1 Configuring the RADIUS server On the Swivel Administration console configure the RADIUS Server and NAS, see RADIUS Configuration 58.2 Enabling Session creation with username To allow the TURing image, PINpad and other single channel images, under Server/Single Channel set Allow session request by username to Yes Setting up Swivel Dual Channel Transports See Transport Configuration 58.3 Citrix Access Gateway Enterprise Edition Configuration The basis of the integration is to create new versions of the login pages. These pages are on the CAGEE and can be accessed via SSH. There are two approaches, firstly to overwrite the relevant files with those provided by Swivel Secure. The other is to actually modify those on the virtual or hardware appliance. The latter approach has the advantage the modified pages will always be based on the latest version of the CAGEE files. The main requirement for modifying these pages is to include a TURing image and the button required to request that image. The same approach could also be used to include a button/image for SMS on-demand. If the single Channel TURing image is not to be used, then the login page does not need to be modified, unless other functions are required such as the Get Security String Index. Note: TURing Images, SMS Confirmed image and Get Security String Index Images require the Swivel server to be accessible from the internet, usually with a NAT Citrix Advanced Access Gateway Enterprise Edition RADIUS Configuration The CAGEE needs to be configured to use the Swivel server as a RADIUS authentication server. Where a VIP is being used on the Swivel server then configure the RADIUS request to be made against each of the Swivel servers together with the use of Session Sharing. Swivel can be configured as the only authentication server or as an additional authentication server, usually this would be together with AD. The required steps are pretty much the same for both scenarios. Under the Netscaler->System->Authentication select the Servers Tab and then click add, enter the following information: Name Swivel RADIUS Authentication type RADIUS Secret Key The secret key configured on the Swivel NAS and also under Confirm Secret Key Group Prefix CTXSUserGroups= Group Separator ; When complete click on Create. 75
83 76
84 Under the Netscaler->System->Authentication select the Servers Tab and then click add, enter the following information: Name Swivel RADIUS Policy Authentication Type RADIUS Server Swivel RADIUS Named Expression True Value (Then click Add Expression so ns_true appears under Expression 77
85 78
86 The authentication must be then added such as the Access Gateway/Virtual Servers menu. If just Swivel authentication is required then ensure that only the Swivel policy is active for the Primary. If you require AD and Swivel authentication then you need to make active the Swivel policy as the secondary. Save the settings. 79
87 80
88 58.4 Additional Configuration Options Login Page Customisation The below describes how to modify the login page for additional functionality such as the below which require the Swivel server to be accessible by the client, usually through a NAT: TURing Image (Automatic or requested by a button) Display Security String Index Get SMS button Because all files in /netscaler/ns_gui are overwritten upon a restart or power cycle we create a script that copies at boot the required files from /var/mods. See under prerequisites for the modified files that need to be uploaded to the Netscaler. Use WINscp to use a web file tool or SSH onto the virtual or hardware appliance using an admin account. Once onto the box you need to type shell to get access to the command line. >Last login: Wed Sep 10 19:12: Done > shell Last login: Wed Sep 10 21:13: Navigate to the location of the pages to be modified, and make a local backup copy of them >cd /netscaler/ns_gui/vpn >cp index.html index.html.bak >cp login.js login.js.bak In version 9.2 and 10.x, you will also need to modify any resource language files you use. After the above commands, do the following: >cd resources >mkdir bak >cp *.xml bak 81
89 Note that the files in /netscaler/ns_gui/vpn are re-written when the server is rebooted therefore make sure so save these files elsewhere regularly to prevent work in progress being lost during development. How to manage these pages is covered later index.html The index.html file now needs to be edited (or replaced). The tool vi can be used to do this but an application such as WinSCP will make this easier. The required files can be found in the prerequisites. Normally, you can use the index.html file as it is, but there are two possible modifications you may want to consider. Currently, the TURing image is only shown (or security string sent) when you click on the appropriate button. You may prefer that this happens as soon as the username is entered. To do this, you need to add an attribute to the username field, as follows: Firstly, find the field. If you search for "loginfieldcheck", you should locate the following: onfocus="loginfieldcheck()" Add a new attribute after this, as follows: onblur="showturing()" Make sure that you leave a space before and after the new attribute. If you want to want to send security strings to SMS or on-demand, rather than showing a TURing image, you may want to change the label of the button. You can do this as follows: First, locate the code that renders the button by searching for "btnturing". You will find the following code within the line: id="btnturing" value="get Image" Change the value attribute to an appropriate alternative, such as "Send Message" pinsafe.js A pinsafe.js file that is a modification of the existing login.js file is required. Make a copy of login.js called pinsafe.js The surl setting needs to be changed to reflect the IP address and port number of the relevant Swivel server. For a virtual or hardware appliance this will normally be similar to: surl=" For a software only install see Software Only Installation To request a security string on demand, instead of a TURing image, replace SCImage with DCMessage, for example: surl=" Note that using message on demand will display a "CONFIRMED" image instead of a TURing image. If you prefer not to have this visual confirmation, remove the following line which you will find a little lower down: varimg.style.visibility = "visible"; Language resource files Modify the language resource files, which can be found in the resources sub-folder of the vpn folder. If you are only using the English language, then edit en.xml and search for <String id="password2"> Replace the value for id="password2" with "OTC:". Also, insert a new string for id="password1" with a value of "AD Password". You should therefore have 2 lines as follows: <String id="password1">ad Password</String> <String id="password2">otc:</string> (Note that Password1 has no colon at the end, whereas Password2 has a colon). If you will be using languages other than English, you will also need to edit any other language files you use, replacing the value for Password2 with the appropriate label for OTC (One-time code) and inserting a new string for Password1 with the label for AD (Active Directory) password. Because all files in /netscaler/ns_gui are overwritten upon a restart or power cycle, a script must be created that runs at startup to copy the modified files back to this location. The nsafter.sh or rc.netscaler shell scripts can be created or modified to accomplish this. For example via ssh: > shell # mkdir /var/mods # cp /netscaler/ns_gui/vpn/index.html /var/mods/index.html.mod # cp /netscaler/ns_gui/vpn/pinsafe.js /var/mods/pinsafe.js.mod # touch /nsconfig/rc.netscaler # echo cp /var/mods/index.html.mod /netscaler/ns_gui/vpn/index.html >> /nsconfig/rc.netscaler # echo cp /var/mods/pinsafe.js.mod /netscaler/ns_gui/vpn/pinsafe.js >> /nsconfig/rc.netscaler # cp /netscaler/ns_gui/vpn/resources/en.xml /var/mods/en.xml.mod # echo cp /var/mods/en.xml.mod /netscaler/ns_gui/vpn/resources/en.xml >> /nsconfig/rc.netscaler PINpad This is a version of the 9.3 customisation modified for Pinpad. Currently in beta testing. Note that in order to use PINpad you will need a Swivel virtual or hardware Appliance with the latest proxy application installed. You can get this from here. PINpad pre-req 82
90 Challenge and Response Citrix Access Gateway Enterprise Edition 9.2 and 10.x support RADIUS Challenge and Response. Configure the Swivel server to use Two Stage Authentication and Check Password With Repository, see also Challenge and Response How to Guide Challenge and response is usually configured with Username, and AD password for LDAP authentication, and Swivel configured to use AD password in order to request the SMS message to be sent to the user. It is possible to modify the login page so that the AD password need only be entered once. A modified page can be downloaded from here: CAGEE Two Stage Login page To install the login page use the same procedure as the Single Channel login page Image Request button displayed when needed The following code allows the Single Channel Image request button to be only shown when required. This is useful for refreshing an image or when SMS/Mobile client authentication is used, since when a Single Channel image is generated, either automatically or manually, it then expects a single channel login (within 2 minutes by default). function ns_showpinsafe() { var pspwc = ns_getcookie("pwcount"); if ( pspwc == 2 ) { document.write('<td>'); document.write('<img src="/vpn/images/loginbuttonrolloverglow.gif"/>'); document.write(''); document.write('<input type="button" id="btnturing" value="get Image" '); document.write('onclick="showturing();" class="ctx_caxtonbutton" '); document.write('onmouseover="this.classname='); document.write("'ctx_caxtonbutton_hover';"); document.write('" onmouseout="this.classname='); document.write("'ctx_caxtonbutton';"); document.write('" />'); document.write('</td>'); } } 58.5 Testing Browse to the login page and check that a Turing image appears and the One time Code can be entered to login. For SMS or Mobile Phone Apps do not click on the Get Image button, but enter the OTC 83
91 If the incorrect credentials are used then the login should fail Where the TURing image is not used, then the Get Image page modification can be omitted 84
92 58.6 Uninstall/Removing the integration If the login pages have been modified restore the default login page and remove the added files. Remove Swivel as the authentication server Troubleshooting Check the Swivel logs for Turing images and RADIUS requests. Image from PINsafe server absent The CAGEE Netscaler checks each password/otc in turn, so if the AD password is checked first and is incorrect then the secondary authentication will not be tested Known Issues and Limitations The CAGEE caches the javascript so when you make modifications on the CAGEE they are not reflected on the log-in page as rendered. A way round this is to change the name of the.js file and edit the index.html file to use this new.js file. see [1] 58.9 Additional Information For assistance in the Swivel installation and configuration please firstly contact your reseller and then Swivel Secure support at support@swivelsecure.com 85
93 59 Citrix Netscaler configuration for Receiver 86
94 60 Introduction Citrix Receiver is a lightweight software client that allows access to virtual desktops and apps including Windows, Web or SaaS apps on any PC, Mac, netbook, tablet or smartphone. For further information on using Receiver see Citrix Receiver 87
95 61 Prerequisites Citrix receiver Client Swivel Appliance or Server Citrix Netscaler 88

96 62 Netscaler 10.x Configuration for Receiver To allow Primary and Secondary Authentication using Citrix receiver clients the following policies are required. On the Netscaler Access Gateway select Netscaler Gateway then Virtual Servers, click on the required server then Open. Click on the Authentication tab, and create a policy for RADIUS authentication and a Policy for LDAP authentication for the Primary and Secondary authentication. The below assumes that the Primary authentication server is LDAP and the secondary authentication server is RADIUS for methods other than Receiver authentication. 89
97 To create the Policy, click on Insert Policy, then from the drop down Tab below Policy name, click on Insert Policy and enter the following: Name Name of the Policy Authentication Type Usually LDAP and the RADIUS authentication servers Server The authentication server for the above Under Expression click on Add and select the following: Expression Type General Flow Type REQ Protocol HTTP Qualifier Header Operator CONTAINS or NOTCONTAINS 90
98 Value Receiver Header Name Click on OK then create. Double click on the Priority to set the priority to 90 or 100 as appropriate. Create policies for each as below. Receiver settings for Netscaler 10.0 and 10.1 Authentication Server Protocol Priority Value Primary LDAP 90 REQ.HTTP.HEADER User-Agent NOTCONTAINS CitrixReceiver Primary RADIUS 100 REQ.HTTP.HEADER User-Agent CONTAINS CitrixReceiver Standby LDAP 90 REQ.HTTP.HEADER User-Agent CONTAINS CitrixReceiver Standby RADIUS 100 REQ.HTTP.HEADER User-Agent NOTCONTAINS CitrixReceiver Multiple Authentication servers can be created by multiple entries of the same priority, such as AD servers. Receiver settings for Netscaler 10.5 Authentication Server Protocol Priority Value Primary LDAP 90 (REQ.HTTP.HEADER User-Agent NOTCONTAINS CitrixReceiver && REQ.HTTP.HEADER Referer EXISTS) (REQ.HTTP.HEADER User-Agent CONTAINS CitrixReceiver && REQ.HTTP.HEADER User-Agent CONTAINS HTML5) Primary RADIUS 100 REQ.HTTP.HEADER User-Agent CONTAINS CitrixReceiver Standby LDAP 90 REQ.HTTP.HEADER User-Agent CONTAINS CitrixReceiver Standby RADIUS 100 EQ.HTTP.HEADER User-Agent NOTCONTAINS CitrixReceiver (REQ.HTTP.HEADER User-Agent CONTAINS CitrixReceiver && REQ.HTTP.HEADER User-Agent CONTAINS HTML5) 91
99 92
100 63 Citrix Access Standard Edition Gateway RADIUS authentication The following article describes adding RADIUS authentication to the Citrix Access Standard Edition for Citrix Receiver. The RADIUS authentication needs to be set as the primary authentication and AD as the Secondary authentication. 93
101 64 Citrix Access Advanced Edition Gateway RADIUS authentication The following article describes adding RADIUS authentication to the Citrix Access Advanced Edition for Citrix Receiver. 94
102 65 Known Issues and Limitations It has been observed by our customers that the Citrix Receiver only launches successfully on the Android platform when accessing links via the Mozilla Firefox browser (at the time this article was written) 95
103 66 Citrix Netscaler Gateway 10.x 96
104 67 Introduction This document shows the steps required to integrate Swivel with the Citrix Access Gateway Enterprise Edition 10.1 and 10.5 (Netscaler VPN). Swivel can provide Two Factor authentication with SMS, Token, Mobile Phone Client and strong Single Channel Authentication TURing, Pinpad or in the Taskbar using RADIUS. For version 10.0 refer to Citrix Access Gateway Enterprise Edition 10 For versions 8.x to 9.1 refer to Citrix Access Gateway Enterprise Edition 8, For other versions of 9.x see Citrix Access Gateway Enterprise Edition 9. It covers the following steps. Configuring Swivel to accept authentication requests from the CAGEE Modifying the CAGEE login pages Configuring the CAGEE to authenticate via PINsafe To use the Single Channel Image such as the TURing Image, the Swivel server must be made accessible. The client requests the images from the Swivel server, and is usually configured using Network Address Translation, often with a proxy server. The Swivel virtual or hardware appliance is configured with a proxy port to allow an additional layer of protection. The Netscaler can be configured using its load balancing bridging feature to allow a Swivel Severs IP to provide Single Channel images, such as TURing and PINpad. Citrix Netscaler 10.5 has a new HTML GUI interface for management, although the customisation pages using java script remains the same. 97
105 68 Prerequisites Access Gateway Enterprise Edition firmware version 10.1 or higher An administrative logon account for the Access Gateway A Secure Shell (SSH) programme (eg putty) and an SSH-based file transfer application such as WinSCP A Unicode-aware text file editor such as TextPad or WordPad Swivel 3.x Swivel server must be accessible by client when using Single Channel Images, such as the Turing Image, this is usually implemented by a NAT to the Swivel server. Ensure that only the required ports are allowed access. Netscaler pages to modify and/or Swivel files for version 10.x default theme or the Green Bubble 10.x theme The following pages are for 10.5: only the language resources are different from 10.x. Version 10.5 default theme. Green Bubble 10.x theme Note on upgrading the Netscaler When upgrading see the note below if custom pages are used upgrading Netscalers with Custom Pages 98
106 69 Baseline Tested with Swivel Citrix Netscaler Gateway NS10.1 Build Citrix Netscaler Gateway NS
107 70 Architecture The Citrix Advanced Access Gateway Enterprise Edition makes authentication requests against the Swivel server by RADIUS. You can create different logon realms / pages called Virtual Servers, these can have different authentication servers/policies, SSL certificates and resources attached to them. However, the downside is they ALL use the same index.html/login.js/en.xml files, so you cannot have multiple landing pages with/without the Swivel modifications. 100
108 71 Swivel Configuration 71.1 Configuring the RADIUS server On the Swivel Administration console configure the RADIUS Server and NAS, see RADIUS Configuration 71.2 Enabling Session creation with username To allow the TURing image, PINpad and other single channel images, under Server/Single Channel set Allow session request by username to Yes Setting up Swivel Dual Channel Transports See Transport Configuration 101
109 72 Citrix Netscaler Gateway Configuration The Swivel integration uses RADIUS authentication, and where the login page is modified it uses the Netscaler custom web pages which are configured and then copied into an archive file which is deployed at boot time Citrix Advanced Access Gateway Enterprise Edition RADIUS Configuration The CAGEE needs to be configured to use the Swivel server as a RADIUS authentication server. Where several Swivel virtual or hardware appliances are used for resilience, configure the RADIUS request to be made against each of the Swivel servers together with the use of Session Sharing. Note: for virtual or hardware appliances, the Swivel VIP should not be used as the RADIUS server IP address, see VIP on PINsafe Appliances Swivel can be configured as the only authentication server or as an additional authentication server, usually this would be together with AD. The required steps are pretty much the same for both scenarios. Under the Netscaler->System->Authentication select the Servers Tab and then click add, enter the following information: Name Swivel RADIUS Authentication type RADIUS Secret Key The secret key configured on the Swivel NAS and also under Confirm Secret Key Group Prefix CTXSUserGroups= Group Separator ; When complete click on Create. If the Authentication option is not available check that the license allows authentication to be configured on the Netscaler licensing page. 102
110 103

111 Under the Netscaler->System->Authentication select the Servers Tab and then click add, enter the following information: Name Swivel RADIUS Policy Authentication Type RADIUS Server Swivel RADIUS Named Expression True Value (Then click Add Expression so ns_true appears under Expression 104
112 105

113 The authentication must be then added such as the Access Gateway/Virtual Servers menu. If just Swivel authentication is required then ensure that only the Swivel policy is active for the Primary. If you require AD and Swivel authentication then you need to make active the Swivel policy as the secondary. Save the settings. 106
114 107

115 72.2 Citrix Receiver with Netscaler configuration See Citrix Netscaler configuration for Receiver 108
116 73 Additional Configuration Options 73.1 Netscaler RADIUS Monitor and RADIUS Load Balancer See Citrix Netscaler RADIUS Monitor and RADIUS Load Balancer 73.2 Netscaler SSL Bridge The Netscaler allows a SSL Bridge to be created that allows a Network Address Translation to allow access to the Swivel instance to provide single channel images or Mobile App security strings. On the Netscaler Gateway Administration Console Configuration tab select Traffic Management, Load balancing, Virtual Servers, then click on Add, to open a Create Virtual Server (Load Balancing) window. The Netscaler requires an external NAT to the Swivel server, and the Netscaler Network bridge allows this to be done using the Netscaler. The Swivel appliance is usually use to provide the proxy port on 8443 or 443 Name Name of the SSL Bridge Select IP Adress Based Protocol select SSL_Bridge IP address Enter the public IP Address Port Enter the Swivel instance port number, usually 8443 The following should be ticked Directly Accessible', State, AppFlow Logging 109
117 Click Add and enter the required details. Service Name Name of the SSL Bridge Server Swivel server address Protocol select SSL_Bridge from the drop down menu port select the port used to connect to the SSL bridge, usually 443 From the Monitors tab select TCP then Add it to the list of Configured so that it appears on the right hand side with the State box checked., then click on Create. 110

118 73.3 Login Page Customisation This step only needs to be followed if login page customisation is required Upgrading Netscalers with Custom Pages Citrix recommend when upgrading a Netscaler with custom pages, the custom pages should be set back to use default pages, upgrade and then the custom pages reapplied. When upgrading it is recommended to make a backup or snapshot of the existing system. When upgrading a Netscaler 10.1 with custom pages to 10.5, backup the modified pages and scripts, then set the login page back to default. Upgrade, test the Administration console, then upload the modified pages as if carrying out a new Swivel install as given below, then recreate the custom tar file as below as this will then include the updated GUI. 111
119 73.5 Customisation Overview One Touch One touch is a different approach as the user is redirected to a separate page to authenticate and therefore does not actually see the Netscaler login page. Refer to VPN_OneTouch_Integration To customise the page for one touch you need to include the following in the header section of index.html where <swivelappliance> is the hostname of the associated Swivel Appliance //--> //-> Swivel elements function redirect(){ window.location.replace(" + window.location.href ); } var QueryString = function () { // This function is anonymous, is executed immediately and // the return value is assigned to QueryString! var query_string = {}; var query = window.location.search.substring(1); var vars = query.split("&"); for (var i=0;i<vars.length;i++) { var pair = vars[i].split("="); // If first entry with this name if (typeof query_string[pair[0]] === "undefined") { query_string[pair[0]] = pair[1]; // alert(pair[0] + "," + pair[1]); // If second entry with this name } else if (typeof query_string[pair[0]] === "string") { var arr = [ query_string[pair[0]], pair[1] ]; query_string[pair[0]] = arr; //alert(pair[0] + "," + arr); // If third or later entry with this name } else { query_string[pair[0]].push(pair[1]); } } return query_string; } (); $(document).ready(function(){ usernamepassedin = QueryString["username"]; passwordpassedin = QueryString["password"]; if(typeof passwordpassedin == 'undefined') { redirect(); } else { $('[name=passwd]').val(passwordpassedin); $('[name=login]').val(usernamepassedin); //alert("go " + usernamepassedin); document.getelementsbyname("vpnform")[0].submit(); } }); Before the closing </SCRIPT> tag See under prerequisites for the modified files that need to be uploaded to the Netscaler. Note on editing files: If the files are edited in Winsdows based systems it may be possible that control code ^M are added to the end of the line. These can be viewed and removed by using vi. The below describes how to modify the login page for additional functionality such as the below which require the Swivel server to be accessible by the client, usually through a NAT: TURing Image (Automatic or requested by a button) Display Security String Index Get SMS button Because all files in /netscaler/ns_gui are overwritten upon a restart or power cycle, they are incorporated into the archive deployed at boot time Login to Netscaler Command Line Use WINscp to use a web file tool or SSH onto the virtual or hardware appliance using an admin account. Once onto the box you need to type shell to get access to the command line. >Last login: Wed Sep 10 19:12: Done > shell Last login: Wed Sep 10 21:13: Backup Netscaler files Navigate to the location of the pages to be modified, and make a local backup copy of them. cd /netscaler/ns_gui/vpn cp index.html index.html.bak 112
120 Customise the login script The login page can be customised using the standard theme or the Green bubble theme, or possibly another theme. Download the required theme from the pre-requisites above. Note that to use the customised Green Bubble theme, you first have to select the standard Green Bubble theme, then apply the customisation Requesting a TURing image These files can be modified before uploading Modify pinsafe.js. The pinsafeurl variable value in pinsafe.js needs to be changed to reflect the Hostname and port number of the relevant Swivel server. For an virtual or hardware appliance this will normally be similar to: pinsafeurl=" For a software only install see Software Only Installation Customise the login prompt Modify the language resource files in /netscaler/ns_gui/vpn/resources. If you are only using the English language, then edit en.xml and search for <String id="password2"> this should be around line 59. Replace the value for id="password2" with "OTC:". Also, insert a new string for id="password" with a value of "AD Password". You should therefore have 2 lines as follows: <String id="password">ad Password</String> <String id="password2">otc:</string> (Note that Password1 has no colon at the end, whereas Password2 has a colon) Additional Languages file modifications If you will be using languages other than English, you will also need to edit any other language files you use, replacing the value for Password2 with the appropriate label for OTC (One-time code) and inserting a new string for Password1 with the label for AD (Active Directory) password. Edit the file rc.netscaler to copy across any modified language pages, as for English which is included in the script.: cp /var/mods/en.xml.mod /var/netscaler/gui/vpn/resources/en.xml Upload files to Netscaler On the Netscaler ensure that either the default or green bubbles theme is used. On the Netscaler Gateway, select Netscaler Gateway/Global Settings, then click on Change Global Settings, and under the Client Experience tab check the UI Theme. After modifying the pages, this will be set to custom. Download the files under the prerequisites and modify as described above, then copy them to the following locations: index.html to /var/netscaler/gui/vpn/index.html pinsafe.js to /var/netscaler/gui/vpn/pinsafe.js Create the boot archive file mkdir /var/ns_gui_custom cd /netscaler tar -zcvf /var/ns_gui_custom/customtheme.tar.gz ns_gui/* This should create the customtheme.tar.gz file used at boot time, and list all the files used Tell the Netscaler to use the customised login pages /netscaler/ns_gui is a symbolic link that by default points to /var/netscaler/gui, by setting the custom login, this link changes to the custom pages i.e. /var/ns_gui_custom/ns_gui. Therefore it is important that the above boot archive be created before switching to custom. Also note that WinSCP may cache the symbolic link and give the wrong location, so may need to be refreshed in the /netscaler folder. On the Netscaler Gateway, select Netscaler Gateway/Global Settings, then click on Change Global Settings, and under the Client Experience tab change the UI Theme to Custom, then click on OK Note: If the Netscaler pages are changed back from Custom to Default, then the index.html is replaced with the defaault index.html, and if a new custom page is required, then the custom index.html will need to be copied back. 113

121 Reboot Netscaler to verify files are copied across Reboot the Netscaler to ensure that the files are copied across at boot time and that the login page has been modified as required Additional Login Customisation options Automated TURing Display With the automated TURing display, when the user leaves the username field, the TURing will be automatically displayed. A login using the TURing image is expected for that user. Edit the index.html file search for onfocus="loginfieldcheck()" Add a new attribute after this, as follows: onblur="showturing()" Example: onfocus="loginfieldcheck()" onblur="showturing()" style="width:100%;" 114
122 Changing the button labels If you want to want to change the button text such for sending security strings to SMS or on-demand, rather than showing a TURing image, or change the GET Image text you may want to change the label of the button. You can do this as follows: Edit the index.html file and locate the code that renders the button by searching for "btnturing". You will find the following code within the line: id="btnturing" value="get Image" Change the value attribute to an appropriate alternative, such as "Send Message" Requesting the string Index See also Multiple Security Strings How To Guide Modify pinsafe.js. The pinsafeurl setting in pinsafe.js needs to be changed to reflect the hostname and port number of the relevant Swivel server. For a virtual or hardware appliance this will normally be similar to: pinsafeurl=" For a software only install see Software Only Installation PINpad This is a version of the 9.3 customisation modified for Pinpad. Currently in beta testing. Note that in order to use PINpad you will need a Swivel virtual or hardware appliance with the latest proxy application installed. You can get this from here. PINpad pre-req Requesting an SMS See also Challenge and Response below Modify pinsafe.js. The pinsafeurl setting in pinsafe.js needs to be changed to reflect the hostname and port number of the relevant Swivel server. For an virtual or hardware appliance this will normally be similar to: pinsafeurl=" For a software only install see Software Only Installation 73.7 Challenge and Response Citrix Access Gateway Enterprise Edition 9.2 and 10.x support RADIUS Challenge and Response. RADIUS Challenge and Response can be optionally configured to enter a username and Password, which will then ask for a One Time Code. Configure the Swivel server to use Two Stage Authentication and Check Password With Repository, see also Challenge and Response How to Guide Challenge and response is usually configured with Username, and AD password for LDAP authentication, and Swivel configured to use AD password in order to request the SMS message to be sent to the user. It is possible to modify the login page so that the AD password need only be entered once. A modified page can be downloaded from here: CAGEE Two Stage Login page To install the login page use the same procedure as the Single Channel login page. If Single Channel is not being used at all, then a TURing image is not required. Therefore, if you configured a message Resend button (which would replace a Show Image button), then in the pinsafe.js, the parameter: onclick= "showturing();" Must be changed to: onclick= "sendmessage();" Optionally, you can remove the showturing function altogether. Which is in addition to the above step of changing onclick=. Example fucnction code: function showturing() {showimage(pinsafeurl + "SCImage");} 73.8 Image Request button displayed when needed The following code allows the Single Channel Image request button to be only shown when required. This is useful for refreshing an image or when SMS/Mobile client authentication is used, since when a Single Channel image is generated, either automatically or manually, it then expects a single channel login (within 2 minutes by default). function ns_showpinsafe() { var pspwc = ns_getcookie("pwcount"); if ( pspwc == 2 ) { document.write('<td>'); document.write('<img src="/vpn/images/loginbuttonrolloverglow.gif"/>'); 115
123 document.write(''); document.write('<input type="button" id="btnturing" value="get Image" '); document.write('onclick="showturing();" class="ctx_caxtonbutton" '); document.write('onmouseover="this.classname='); document.write("'ctx_caxtonbutton_hover';"); document.write('" onmouseout="this.classname='); document.write("'ctx_caxtonbutton';"); document.write('" />'); document.write('</td>'); } } 116


124 74 Testing Browse to the login page and check that a Turing image appears and the One time Code can be entered to login. For SMS or Mobile Phone Apps do not click on the Get Image button, but enter the OTC If the incorrect credentials are used then the login should fail 117


125 Where the TURing image is not used, then the Get Image page modification can be omitted 118
126 75 Uninstall/Removing the integration If the login pages have been modified restore the default login page and remove the added files. Remove Swivel as the authentication server. 119
127 76 Troubleshooting Check the Swivel logs for Turing images and RADIUS requests. Image from PINsafe server absent The CAGEE Netscaler checks each password/otc in turn, so if the AD password is checked first and is incorrect then the secondary authentication will not be tested Error Messages Files moved but have a? appended to the end If the script to move the files on login contains the control code ^M at the end of each line (usually introduced by Windows based text editors), then the files may appear with a? at the end of the filename. Use vi to remove the ^M Username field length incorrect If the username field is too short it can be increased. Edit the index.html file and locate the below section setting the size="40" <td align="right" style="padding-right:10px;white-space:nowrap;"><span id="user_name" class="ctxmsam_logonfont"></span></td> <td colspan=2 style="padding-right:8px;"><input id="enter user name" class="ctxmsam_contentfont" style="font-size: 8pt" type="text" title="" name="login" size="40" maxlength="127" onfocus="loginfieldcheck()" style="width:100%;" /></td> login command failed over API. Reason: Response not of type text/xml: text:html This error can be seen on the Netscaler Administration console when upgrading with a custom theme. This will preventy login to the Netscaler Administration, although the user login pages should continue to work. To enable login to the Administration console, login to the Netscaler through the command line, backup and then and edit the /nsconfig/ns.config file and set the CUSTOM page to DEFAULT. Look for the line containing -UITHEME CUSTOM and change it to DEFAULT as below: set vpn parameter -locallanaccess ON -defaultauthorizationaction ALLOW -proxy BROWSER -clientcleanupprompt OFF -forcecleanup none -clientopt After making the changes, reboot the system to login. 120
128 77 Known Issues and Limitations The CAGEE caches the javascript so when you make modifications on the CAGEE they are not reflected on the log-in page as rendered. A way round this is to change the name of the.js file and edit the index.html file to use this new.js file. see [1] 121
129 78 Additional Information For assistance in the Swivel installation and configuration please firstly contact your reseller and then Swivel Secure support at 122
130 79 Citrix Netscaler Gateway
131 80 Introduction Netscaler TURing Netscaler PINpad This document shows the steps required to integrate Swivel with the Citrix NetScaler Swivel can provide Two Factor authentication with SMS, Token, and Mobile Phone Client and strong Single Channel Authentication with TURing or Pinpad, or in the Taskbar using RADIUS. It covers the following steps. Configuring Swivel to accept authentication requests from the CAGEE Modifying the CAGEE login pages Configuring the CAGEE to authenticate via PINsafe To use the Single Channel Image such as the TURing Image, the Swivel server must be made accessible. The client requests the images from the Swivel server, and is usually configured using Network Address Translation, often with a proxy server. The Swivel virtual or hardware appliance is configured with a proxy port to allow an additional layer of protection. The Netscaler can be configured using its load balancing bridging feature to allow a Swivel Severs IP to provide Single Channel images, such as TURing and PINpad. 124
132 81 Prerequisites NetScaler version The single channel customisation was created using build 62, and there may be minor cosmetic issues with other versions. An administrative logon account for the Access Gateway A Secure Shell (SSH) programme (eg putty) and an SSH-based file transfer application such as WinSCP A Unicode-aware text file editor such as TextPad or WordPad Swivel 3.x Swivel server must be accessible by client when using Single Channel Images, such as the Turing Image, this is usually implemented by a NAT to the Swivel server. Ensure that only the required ports are allowed access. Netscaler pages to modify and/or Swivel files for version 11.0 default theme. Netscaler pages to modify and/or Swivel files for version 11.0 Green Bubble theme. If you would prefer to deploy ready-made themes, see the following: Default theme TURing image Default theme PINpad Green Bubble theme TURing image Green Bubble theme PINpad See below for details on deploying these themes Note on upgrading the Netscaler When upgrading see the note below if custom pages are used upgrading Netscalers with Custom Pages 125
133 82 Baseline Tested with Swivel Citrix Netscaler Gateway NS11.0 Build
134 83 Architecture The Citrix NetScaler makes authentication requests against the Swivel server by RADIUS. You can create different logon realms / pages called Virtual Servers, these can have different authentication servers/policies, SSL certificates and resources attached to them. However, the downside is they ALL use the same index.html/login.js/en.xml files, so you cannot have multiple landing pages with/without the Swivel modifications. 127
135 84 Swivel Configuration 84.1 Configuring the RADIUS server On the Swivel Administration console configure the RADIUS Server and NAS, see RADIUS Configuration 84.2 Enabling Session creation with username To allow the TURing image, PINpad and other single channel images, under Server/Single Channel set Allow session request by username to Yes Setting up Swivel Dual Channel Transports See Transport Configuration 128
136 85 Citrix Netscaler Gateway Configuration The Swivel integration uses RADIUS authentication, and where the login page is modified it uses the Netscaler custom web pages which are configured and then copied into an archive file which is deployed at boot time Citrix NetScaler RADIUS Configuration The NetScaler needs to be configured to use the Swivel server as a RADIUS authentication server. Where several Swivel virtual or hardware appliances are used for resilience, configure the RADIUS request to be made against each of the Swivel servers together with the use of Session Sharing. Note: for virtual or hardware appliances, the Swivel VIP should NOT be used as the RADIUS server IP address, see VIP on PINsafe Appliances Swivel can be configured as the only authentication server or as an additional authentication server, usually this would be together with AD. The required steps are pretty much the same for both scenarios. Under System->Authentication->RADIUS, select the Servers Tab, click "Add" and enter the following information: Name Swivel RADIUS Server Name The name or IP address of the Swivel server Port 1812 Secret Key The secret key configured on the Swivel NAS and also under Confirm Secret Key Group Prefix CTXSUserGroups= Group Separator ; When complete click on Create. If the Authentication option is not available check that the license allows authentication to be configured on the Netscaler licensing page. 129
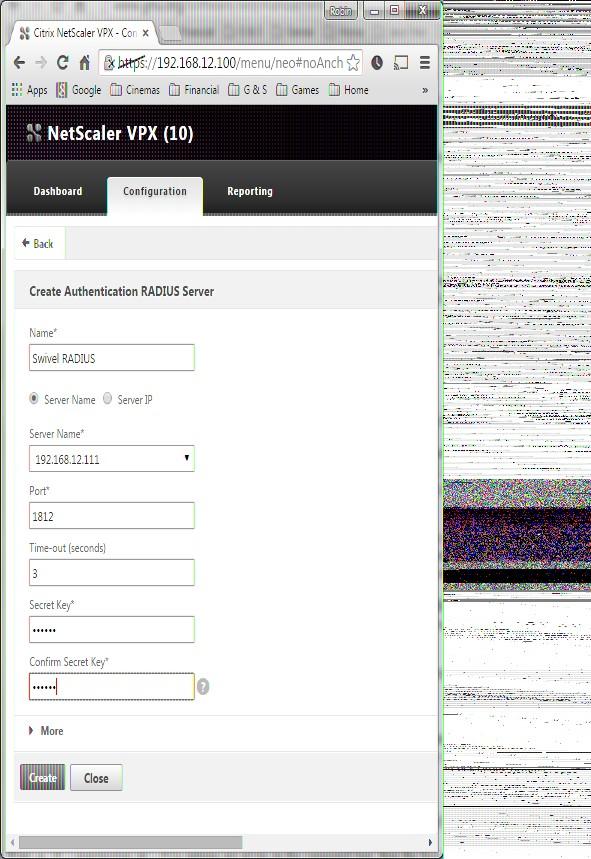
137 130

138 Now select the Policies Tab, click "Add" and enter the following information: Name Swivel RADIUS Policy Server Swivel RADIUS Expression select "ns_true" under Saved Policy Expressions 131

139 The authentication must be then added such as the Access Gateway/Virtual Servers menu. If just Swivel authentication is required then ensure that only the Swivel policy is active for the Primary. If you require AD and Swivel authentication then you need to make active the Swivel policy as the secondary. Save the settings. 132

140 85.2 Citrix Receiver with Netscaler configuration See Citrix Netscaler configuration for Receiver 133
141 86 Additional Configuration Options 86.1 Netscaler RADIUS Monitor and RADIUS Load Balancer See Citrix Netscaler RADIUS Monitor and RADIUS Load Balancer 86.2 Netscaler SSL Bridge The Netscaler allows a SSL Bridge to be created that allows a Network Address Translation to allow access to the Swivel instance to provide single channel images or Mobile App security strings. On the Netscaler Gateway Administration Console Configuration tab select Traffic Management -> Load Balancing -> Virtual Servers, then click on Add, to open a Create Virtual Server (Load Balancing) window. Name Name of the SSL Bridge Protocol select SSL_Bridge Select IP Adress Based IP address Enter the public IP Address Port Enter the internet-facing port number, usually
142 135

143 After creating the virtual server, select it and then Edit 136
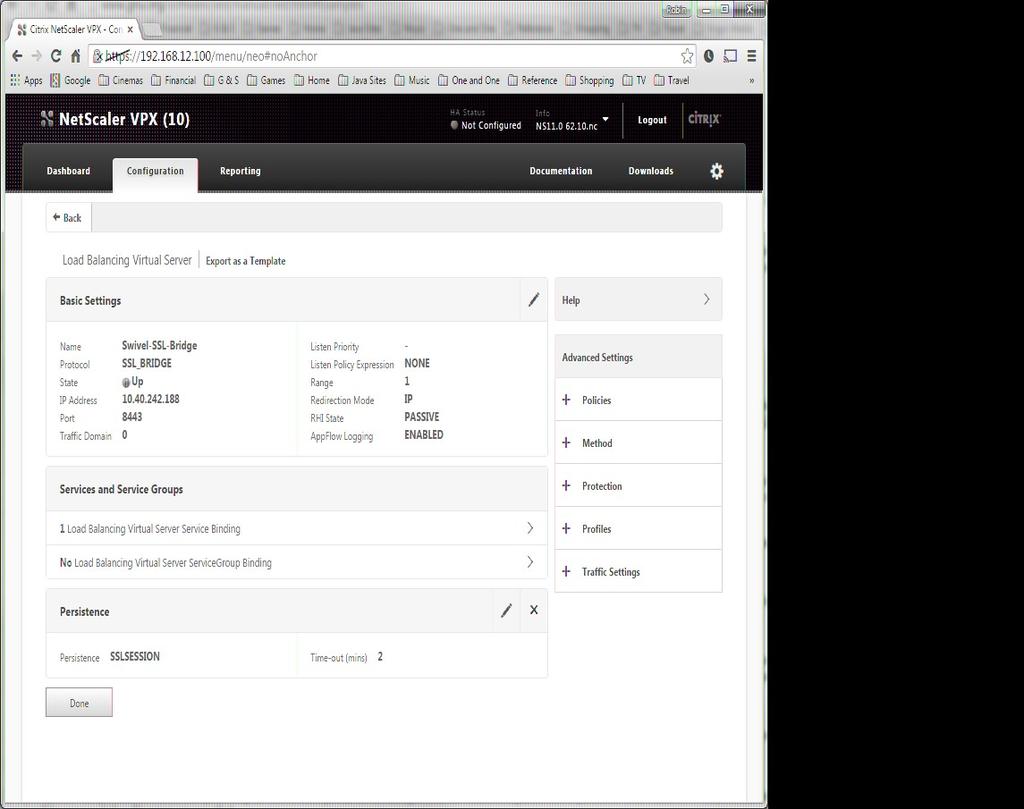
144 137

145 Select "Load Balancing Virtual Server Service Binding" Now click "Add Binding", then under "Select Service", click "+" 138

146 Service Name Name of the SSL Bridge Select "New Server" and enter the IP address of the Swivel server. Protocol select SSL_Bridge from the drop down menu port select the port used to connect to Swivel server, usually 8443 for the proxy application. From the Monitors tab select TCP then Add it to the list of Configured so that it appears on the right hand side with the State box checked., then click on Create. 139
147 86.3 Login Page Customisation This step only needs to be followed if login page customisation is required. Many of the steps described below are derived from the following articles: This article describes creating a custom theme on NetScaler 10.x: This article describes the additional steps required for NetScaler 11: - item #13. Thanks to the originators of these articles Using Existing Customisations If you already have a customisation including Swivel TURing or PINpad, from version 10.x, it may still work with version 11. Results are mixed on this. However, the customisations described on these articles are based on the assumption that you are starting from the default or green bubble theme for version 11. They will not work if you are starting from a 10.x theme. In this case, you should start from one of the built-in themes for version 11 and customise those First Steps Follow these steps whether you plan to use a pre-built theme or to customise your own theme. Citrix recommend when upgrading a Netscaler with custom pages, the custom pages should be set back to use default pages, upgrade and then the custom pages reapplied. When upgrading it is recommended to make a backup or snapshot of the existing system. When upgrading a Netscaler 10.1 or 10.5 with custom pages to 11.0, backup the modified pages and scripts, then set the login page back to default. Upgrade, test the Administration console, then upload the modified pages as if carrying out a new Swivel install as given below, then recreate the custom tar file as below as this will then include the updated GUI. Similarly, we recommend that you select the Default theme initially, before starting the customisation. Ensure that the folder for the custom theme exists: Log on to the NetScaler Gateway command line and enter the following commands: shell mkdir /var/ns_gui_custom You may get the response "File exists". Copy the theme files for either the Default or Green Bubble theme using the following commands: cd /var/netscaler/logon/themes cp -r Default Custom or for the Green Bubble theme cp -r Greenbubble Custom If you are using one of the ready-made themes linked above, skip to the section Deploying a Ready-Made Theme. If you are customising an existing theme, continue to the next section Customising an Existing Theme Preparing the Custom Theme Assuming that you have copied the appropriate theme as described in First Steps, select the Custom theme in order to ensure it is deployed. The files you need to modify will now be in /var/netscaler/logon/themes/custom. Prepare the new custom theme as follows: tar -cvzf /var/ns_gui_custom/customtheme.tar.gz /var/ns_gui_custom/ns_gui/* Now use the NetScaler administration console to select the custom theme: select NetScaler Gateway -> Global Settings, then click on Change Global Settings, select the Client Experience tab, and at the bottom of the tab, switch the UI Theme to Custom Login to Netscaler Command Line Use WINscp to use a web file tool or SSH onto the virtual or hardware appliance using an admin account. Once onto the box you need to type shell to get access to the command line. >Last login: Wed Sep 10 19:12: Done > shell Last login: Wed Sep 10 21:13: Backup Netscaler files Navigate to the location of the pages to be modified, and make a local backup copy of them. cd /var/ns_gui_custom/ns_gui/vpn cp index.html index.html.bak cd js cp gateway_login_form_view.js gateway_login_form_view.js.bak 140
148 Customise the login script See under prerequisites for the modified files that need to be uploaded to the Netscaler. Note on editing files: If the files are edited in Windows-based systems it may be possible that control code ^M are added to the end of the line. These can be viewed and removed by using vi. It is assumed that your custom theme has already been deployed under /var/ns_gui_custom/ns_gui. As noted above, it is also assumed that the theme is based on one of the built-in version 11 themes. If you have a version 10.x customisation that you cannot get to work with version 11, please contact support@swivelsecure.com for further advice. Download the customised files from the pre-requisites above. This contains 5 files, in the appropriate folders: /vpn/index.html - a replacement for the existing file, containing additional lines to insert the swivel files below /vpn/js/gateway_login_form_view.js - a replacement for the existing file, containing a single additional line, which calls a script from swivel.js to insert the customisation. /vpn/js/swivel.js - a new file, containing the JavaScript to insert the customisation /vpn/images/swivel.css - a new file, containing the stylesheet for the Swivel customisation /vpn/images/pinpadblank.png - an optional blank image for the PINpad buttons. Before you copy these files across, you will need to modify the first part of swivel.js as shown here: // Set this to be the correct URL for the required image. var swivelurl = " // Set this to "turing" or "pinpad". Anything else will result in no image. var swivelimagetype = "pinpad"; // Set this to the ID of the password field to populate: "passwd" or "passwd1" var pinpadfield = "passwd1"; swivelurl should contain the public URL for your image. Do not add "SCImage" or "SCPinPad" - this will be done for you. swivelimagetype should be "turing" or "pinpad" as described pinpadfield defines which password field should be filled by the PINpad buttons. If Swivel is the primary authentication, use "passwd", or for secondary authentication use "passwd1" Customise the OTC field and TURing image button text This is an optional step. Modify the language resource files in /netscaler/logon/themes/default/resources. If you are only using the English language, then edit en.xml and search for <Partition id="logon"> Just below this, look for <String id="password2">password 2</String> Replace "Password 2" with "OTC". If you want to change the label on the TURing button, insert a new line just below this: <Property id="new_turing" property="value">new Image</Property> Replace "New Image" with the appropriate text. If you want to change the label on the PINpad refresh button, insert the following line: <Property id="refresh_pinpad" property="value">refresh</property> Replace "Refresh" with the appropriate text Additional Languages file modifications If you will be using languages other than English, you will also need to edit any other language files you use, following the pattern above Upload files to Netscaler Download the files under the prerequisites and modify as described above, then copy them to the appropriate locations under /var/ns_gui_custom/ns_gui Create the boot archive file cd /var/ns_gui_custom tar -zcvf /var/ns_gui_custom/customtheme.tar.gz ns_gui/* This should create the customtheme.tar.gz file used at boot time, and list all the files used Select the custom theme Log on to the NetScaler Administration Console and select the "Custom" theme. Save customisation changes Create Backup and Script to Deploy Files Once you have a working configuration, you should back up the modified files to a suitable location off the NetScaler. It is recommended that the backup directory structure reflects the deployed structure - e.g. put the.js files in a js subdirectory, and the.css file(s) in a images subdirectory. This makes it easier to carry out the next step. As NetScaler often replaces files after a reboot, you also need to take precautions to ensure the custom files are restored after a reboot. To do this, you need to copy the backups you just created into a folder on the NetScaler: the recommended location is to create a folder "custom" under /var/mods. As described above, the directory structure under custom should reflect the directory structure under vpn. 141
149 To restore these files on reboot, you need to edit the file /nsconfig/rc.netscaler. Insert the following line at the beginning of the file: cp -r /var/mods/custom/* /var/netscaler/ns_gui/vpn/* This assumes that your web directory is /var/netscaler/ns_gui - modify accordingly Reboot Netscaler to verify files are copied across Reboot the Netscaler to ensure that the files are copied across at boot time and that the login page has been modified as required. The following section can be skipped if you are customising an existing theme Deploying a Ready-Made Theme These instructions assume you are using one of the pre-built themes listed above. Copy the chosen theme to /var/ns_gui_custom. We recommend WinSCP to copy the files, but any suitable file transfer file will do. Go to /var/netscaler/logon/themes/custom/resources and edit en.xml (again, you can use WinSCP for this): Search for "Password2" If required, change the text for <String id="password2"> to "OTC": <String id="password2">otc</string> Insert a new line below this: <String id="swivelurl"> (Substitute the public URL for your Swivel images (TURing or Pinpad) in the above.) Save the file. If you need to support multiple languages, repeat this process for all supported language files. Log on to the NetScaler Administration Console and select the "Custom" theme. Save customisation changes. If you prefer, as an alternative to inserting the Swivel URL in the resources file(s), you can manually modify swivel.js, as described below. However, if you do this, you will also need to rebuild the custom theme, again as described above Additional Login Customisation options Requesting the String Index See also Multiple Security Strings How To Guide To request the string index, use the "turing" option. Modify swivel.js. Search for the following line: swivelurl += "/SCImage?username="; Replace "SCImage" with "DCIndexImage" Requesting an SMS See also Challenge and Response below To request an SMS on demand, use the "turing" option. Modify swivel.js. Search for the following line: swivelurl += "/SCImage?username="; Replace "SCImage" with "DCMessage" One Touch DISCLAIMER: the following One Touch solution is based on NetScaler 10.5, and has not yet been tested on version 11. One touch is a different approach as the user is redirected to a separate page to authenticate and therefore does not actually see the Netscaler login page. Refer to VPN_OneTouch_Integration To customise the page for one touch you need to include the following in the header section of index.html where <swivelappliance> is the hostname of the associated Swivel Appliance //--> //-> Swivel elements function redirect(){ window.location.replace(" + window.location.href ); } var QueryString = function () { // This function is anonymous, is executed immediately and // the return value is assigned to QueryString! var query_string = {}; var query = window.location.search.substring(1); var vars = query.split("&"); for (var i=0;i<vars.length;i++) { var pair = vars[i].split("="); // If first entry with this name if (typeof query_string[pair[0]] === "undefined") { query_string[pair[0]] = pair[1]; // alert(pair[0] + "," + pair[1]); 142
150 // If second entry with this name } else if (typeof query_string[pair[0]] === "string") { var arr = [ query_string[pair[0]], pair[1] ]; query_string[pair[0]] = arr; //alert(pair[0] + "," + arr); // If third or later entry with this name } else { query_string[pair[0]].push(pair[1]); } } return query_string; } (); $(document).ready(function(){ usernamepassedin = QueryString["username"]; passwordpassedin = QueryString["password"]; if(typeof passwordpassedin == 'undefined') { redirect(); } else { $('[name=passwd]').val(passwordpassedin); $('[name=login]').val(usernamepassedin); //alert("go " + usernamepassedin); document.getelementsbyname("vpnform")[0].submit(); } }); Before the closing </SCRIPT> tag 86.5 Challenge and Response To use two-stage authentication - also known as challenge and response - you will need these custom files. These files are for the Green Bubble theme: for different themes, see the detailed customisation section below. Also note that these files only support TURing in the second stage: for other options, see below. See Challenge and Response How to Guide for details on setting up challenge/response on the Swivel server. In particular, note that the option "Send username with challenge" must be set to "Yes" to use single-channel challenge-response, so if your version of the Swivel software is too old to have that option, you will need to upgrade in order to use challenge-response with TURing Customisation See above for details on where the custom files need to be put. Always take backups of the original files before making any changes. If you are using dual channel, you may not need to make any of these changes: see comments below. You should always download the custom files linked above, even if you are not using the Green Bubble theme with TURing, as you will need the file swivel.js at least. This should be put in the js folder. The other files that need to be changed are index.html, nsshare.js and js/gateway_login_form_view.js. The only change to index.html is to insert a single line: <script type="text/javascript" src="/vpn/js/swivel.js"></script> somewhere in the <head> section. The only change required to gateway_login_form_view.js is as follows: Locate the following line: changepage(); // Prefill names if cert auth Insert before it the following line: customloginpage(form); This calls a function from swivel.js to add the Swivel customisation to the first login page. This hides the Swivel password field, and copies the first password field to it before submitting the page. This assumes that you are using the "Check repository password" option. If you don't want to use that, don't make this change. The second login page is rendered by nsshare.js, so you need to make the following changes to it, only if you want to show TURing in the second page. In the custom files, these are inserted before the DialogInclude function, but they can go anywhere in the file: // Alter this URL as appropriate. var swivelurl = " function showturing(suser) { if (suser!="") { } } // Find the image field. var varimg = document.getelementbyid("imgturing"); // Set the image SRC and make it visible varimg.src = swivelurl + suser + "&random=" + Math.round(Math.random()*100000); varimg.style.display = ""; function showturingimagechallenge() { var challengediv = document.getelementbyid("dialoguestr"); if (challengediv) { var challenge = challengediv.innerhtml; var colonpos = challenge.lastindexof(":"); if (colonpos > 0) { 143
151 var username = challenge.substr(0, colonpos).trim(); challenge = challenge.substr(colonpos+1); challengediv.innerhtml = challenge; showturing(username); } } } Then, in the function DialogueBodyII, look for ln += '<tr><td class="dialoguesubmitcell" style="float:left">'; and insert the following line before it: ln += '<tr><td><img id="imgturing" style="display:none" /></td></tr>'; Then, at the end of DialogueBodyII, insert the following line: showturingimagechallenge(); If you are unclear about any of these changes, they are clearly labelled in the custom files provided Image Request button displayed when needed The following code allows the Single Channel Image request button to be only shown when required. This is useful for refreshing an image or when SMS/Mobile client authentication is used, since when a Single Channel image is generated, either automatically or manually, it then expects a single channel login (within 2 minutes by default). function ns_showpinsafe() { var pspwc = ns_getcookie("pwcount"); if ( pspwc == 2 ) { document.write('<td>'); document.write('<img src="/vpn/images/loginbuttonrolloverglow.gif"/>'); document.write(''); document.write('<input type="button" id="btnturing" value="get Image" '); document.write('onclick="showturing();" class="ctx_caxtonbutton" '); document.write('onmouseover="this.classname='); document.write("'ctx_caxtonbutton_hover';"); document.write('" onmouseout="this.classname='); document.write("'ctx_caxtonbutton';"); document.write('" />'); document.write('</td>'); } } 144

152 87 Testing Browse to the login page and check that a TURing or PINpad image appears and the One time Code can be entered to login. 145
153 88 Uninstall/Removing the integration If the login pages have been modified restore the default login page and remove the added files. Remove Swivel as the authentication server. 146
154 89 Troubleshooting Check the Swivel logs for Turing images and RADIUS requests. Image from PINsafe server absent The CAGEE Netscaler checks each password/otc in turn, so if the AD password is checked first and is incorrect then the secondary authentication will not be tested Error Messages Files moved but have a? appended to the end If the script to move the files on login contains the control code ^M at the end of each line (usually introduced by Windows based text editors), then the files may appear with a? at the end of the filename. Use vi to remove the ^M Username field length incorrect If the username field is too short it can be increased. Edit the index.html file and locate the below section setting the size="40" <td align="right" style="padding-right:10px;white-space:nowrap;"><span id="user_name" class="ctxmsam_logonfont"></span></td> <td colspan=2 style="padding-right:8px;"><input id="enter user name" class="ctxmsam_contentfont" style="font-size: 8pt" type="text" title="" name="login" size="40" maxlength="127" onfocus="loginfieldcheck()" style="width:100%;" /></td> login command failed over API. Reason: Response not of type text/xml: text:html This error can be seen on the Netscaler Administration console when upgrading with a custom theme. This will preventy login to the Netscaler Administration, although the user login pages should continue to work. To enable login to the Administration console, login to the Netscaler through the command line, backup and then and edit the /nsconfig/ns.config file and set the CUSTOM page to DEFAULT. Look for the line containing -UITHEME CUSTOM and change it to DEFAULT as below: set vpn parameter -locallanaccess ON -defaultauthorizationaction ALLOW -proxy BROWSER -clientcleanupprompt OFF -forcecleanup none -clientopt After making the changes, reboot the system to login. 147
155 90 Known Issues and Limitations The CAGEE caches the javascript so when you make modifications on the CAGEE they are not reflected on the log-in page as rendered. A way round this is to change the name of the.js file and edit the index.html file to use this new.js file. see [1] Potential File Locations: /netscaler/ns_gui/vpn /var/ns_gui/vpn /var/ns_gui_custom/vpn /var/netscaler/gui/vpn 148
156 91 Additional Information NOTE: there is an alternative solution to this that uses the NetScaler rewrite feature, and so doesn't require you to make changes to any files. It also has the advantage that it can be applied selectively. Many thanks to Stuart Carroll for finding this approach: For assistance in the Swivel installation and configuration please firstly contact your reseller and then Swivel Secure support at 149
157 92 Citrix Netscaler RADIUS Monitor and RADIUS Load Balancer 150
158 93 Introduction Citrix 10.5 allows the RADIUS to be monitored and load balanced in a number of ways. Earlier versions such as 10.1 also have this capability but have different configuration screens. Where Swivel Single Channel Sessions (TURing, Pinpad), and SMS by On Demand Authentication and Mobile Provision Codes, it is expected that Appliance Synchronisation will also be used. 151
159 94 Prerequisites Swivel HA solution Netscaler 10.x 152
160 95 Baseline Swivel Netscaler
161 96 Swivel Configuration The Swivel servers should be setup as indicated in the integration guide. Configure a RADIUS NAS entry for the Netscaler SNIP interface, see RADIUS Configuration Optionally set Authenticate non-user with just password: to Yes and configure a non Swivel user with a static password, see RADIUS Static Password. 154
162 97 Netscaler Configuration The Netscaler Configuration should be setup and tested to be working before attempting these steps Create a Swivel Radius Monitor On the Netscaler Administration console Configutration Tab select Traffic management/load Balancing/Monitors, then Add Expand the Special Parameters and add Response Codes to 3 for Access Reject and add 2 for Access Accept Set Username to an appropriate test user Set Password to the required value if Authenticate non-user with just password if authenticate non Swivel user is used (or random if not) Set RADIUS Key to the value for the Swivel RADIUS NAS Leave other settings as default Click Create to create the Monitor 155
163 The Monitor should appear in the list. 156
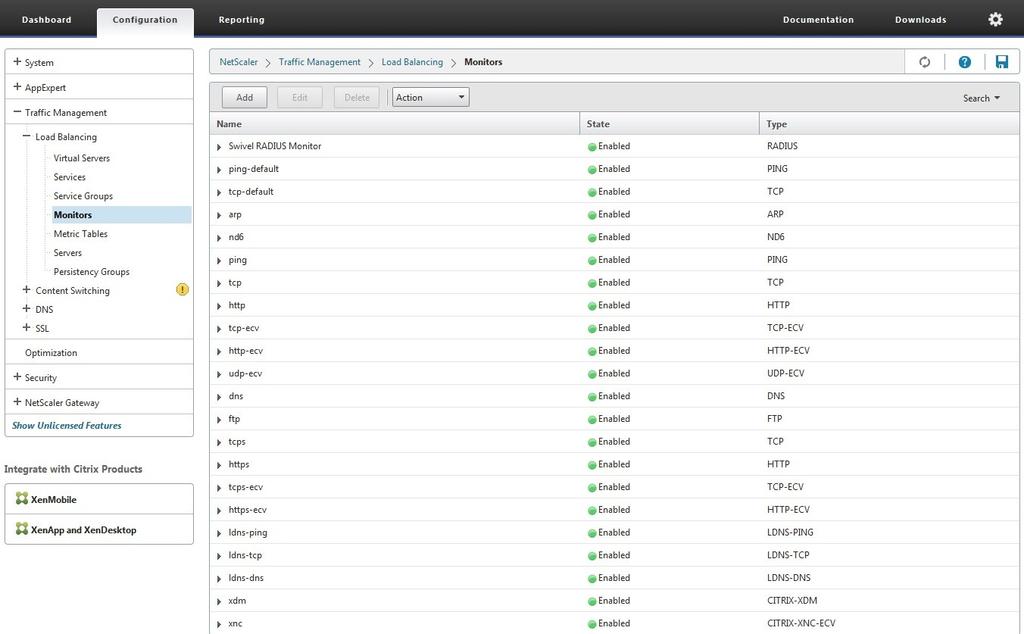
164 157
165 97.2 Create Entries for the Swivel RADIUS Servers On the Netscaler Administration console Configutration Tab select Traffic management/load Balancing/Servers, then Add. Enter the details for each of the Swivel RADIUS servers. If the Swivel servers are already configured, then this step can be skipped over. Enter Server Name' and IP Address/Hostname 158
166 Click Create to create the Server 159
167 97.3 Create a Swivel Load Balance Service Group On the Netscaler Administration console Configutration Tab select Traffic management/load Balancing/Service Group, then Add. Enter the Name, Protocol RADIUS, then click OK, and 160
168 Click below the Service Group members to add members to the group, select the Server Based radio button to add in the Swivel RADIUS servers and enter Port Repeat for each Swivel server to be added. 161

169 Add the Monitor to the Load Balance Server Group From the Right Handside select Monitor so it appears at the bottom then click it again to add the Swivel RADIUS Monitor. 162
170 Click Bind to add it, then Done Create A Virtual Server On the Netscaler Administration console Configutration Tab select Traffic management/load Balancing/Virtual Servers, then Add. Enter a Name for the Virtual Server IP Address, Protocol and Port. Click OK to create the entry Add the Service Group to the Virtual Server After configuring the Virtual Server, the Service section will appear, click on OK to bring up the Service Group on the right hand side. 163
171 Click on the Service Group, it will appear at the bottom allowing it to be seleceted, and then click on Select Service Group Name to choose the required service group created earlier. 164

172 Then click Bind Add the Method to the Virtual Server Select Method and then from the Load Balancing Method drop down select ROUNDROBIN then click on OK. Click Done and the Virtual server should be created. 165

173 97.5 Netscaler RADIUS configuration The Netscaler can now be configured to use the new Virtual Server as its RADIUS servers following the original documentation. 166
174 98 Testing When functioing RADIUS entries will be seen in the Swivel RADIUS logs for each test. Try RADIUS authentications and see which Swivel server that recieves them. Stopping one RADIUS server should indicate on the Virtual Servers that health is degraded, i.e. 50% for two servers. 167
175 99 Known Issues The load balancing can produce a large number of logs. 168
176 100 Troubleshooting 169
177 101 Category:Netscaler 170
178 [[Category:android A] 102 Citrix Receiver 171
179 103 Introduction Citrix Receiver is a lightweight software client that allows access to virtual desktops and apps including Windows, Web or SaaS apps on any PC, Mac, netbook, tablet or smartphone. For configuring Netscaler and Receiver to work with multiple authentication servers see Citrix Netscaler configuration for Receiver 172
180 104 Prerequisites Citrix receiver Client Swivel Appliance or Server Citrix Gateway integrated with Swivel 173
. Click login button. 4.")
181 105 iphone / Android Citrix receiver 1. Open the Safari web browser on the ipad / Mozilla Firefox on Android Please see Known Issues and Limitations 2. Browse to the login page of the Citrix gateway 3. Enter username, password, and Swivel security string (Using TURing or SMS). Click login button. 4. Once the user is logged in go to the Citrix gateway, click on the Citrix application they want to launch (eg, the published desktop) 5. Here?s where things are a little different from a PC. Instead of just launching the Citrix plug-in directly, the user will see the screen shot in the attachment. The user then clicks on the?open in Citrix? button. 6. The Citrix receiver app will launch and allow the user to access the selected Citrix app The latest version of the Citrix Receiver supports?third-party Authentication support? for the ios and Android platform allowing the configuration data to be retrieved from a Citrix gateway URL, so there is no Swivel configuration required on the directly within the Receiver app. 174
182 106 Citrix Netscaler RADIUS authentication for Receiver For configuring Netscaler and Receiver to work with multiple authentication servers see Citrix Netscaler configuration for Receiver 175
183 107 Citrix Access Standard Edition Gateway RADIUS authentication for Receiver The following article describes adding RADIUS authentication to the Citrix Access Standard Edition for Citrix Receiver. The RADIUS authentication needs to be set as the primary authentication and AD as the Secondary authentication
184 108 Citrix Access Advanced Edition Gateway RADIUS authentication for receiver The following article describes adding RADIUS authentication to the Citrix Access Advanced Edition for Citrix Receiver
185 109 Known Issues and Limitations It has been observed by our customers that the Citrix Receiver only launches successfully on the Android platform when accessing links via the Mozilla Firefox browser (at the time this article was written) 178
186 110 Citrix Web Interface 4 with Presentation Server Introduction This document outlines the necessary steps to integrate PINsafe authentication into the Citrix Presentation Server 4 web interface. This also works with Citrix Secure Gateway v3.0. If the Single Channel Image for authentication is to be used a NAT is not required to the PINsafe server as the Image is proxied through the Web Interface server Prerequisites This installation guide assumes that a Presentation Server site has been configured with Explicit authentication enabled. The customised files provided are based on build of the Citrix web interface and have been tested with versions 4.0 and 4.2, for later versions please contact your PINsafe reseller for an update. The following files are required to complete the installation: PINsafeClient.dll? PINsafe authentication client library. login.aspx? Customised login page. pinsafe_image.aspx? Serves single channel images from PINsafe to users. login.js? Customised login page client script. loginbuttons.inc? Customised login form buttons. loginmainform.inc? Customised login form. loginview.cs? Customised login logic constants. login.cs? Customised login logic. web.config.pinsafe? Additional configuration entries for PINsafe integration. The files can be downloaded from here: File:Citrix_PS_4.0_Integration.zip Note: The default Citrix Install path is C:\Inetpub\wwwroot\Citrix\AccessPlatform Baseline PINsafe 3.x Citrix Web Interface build 3.x, 4.0, Architecture The Citrix Web Interface makes authentication requests against the PINsafe server by XML PINsafe Configuration Configuring the PINsafe Agent On the PINsafe server: Select Server then Agents, and create an agent for the Web Interface server, required parameters are: Name: a Descriptive name Hostname/IP: Web Interface server details Shared Secret: To be also used on the Web Interface server Click Apply to save settings Enabling Session creation with username The PINsafe server can be configured so that it returns a Single Channel image by presenting the username via the XML API or the SCImage servlet. On the PINsafe server: Go to the?single Channel? Admin page and set?allow Session creation with Username:? to YES. Click Apply to save settings. To test your configuration you can use the following URL using a valid PINsafe username: Virtual or hardware appliance (use 8080/pinsafe and not the proxy port) Software install 179
187 Citrix Web Interface Configuration Copy across the Web Interface Files On the Citrix Web Interface Server: The following files need to be copied to the listed locations, below the root of the Citrix web interface site. Where an existing file is being replaced and for modified files, ensure you make a backup copy so that the integration can be removed at a later date. PINsafeClient.dll to /bin. login.aspx and pinsafe_image.aspx to /auth. login.js to /auth/clientscripts. loginbuttons.inc and loginmainform.inc to /app_data/auth/include. loginview.cs and login.cs to /app_data/auth/serverscripts. Ensure file permissions are set correctly on the coped files, Authenticated users need read permissions Edit the Web.config file On the Citrix Web Interface Server: Edit the web.config file. Find the the comma separated list of URL's under the <appsettings> key AUTH:UNPROTECTED_PAGES and add Add /auth/pinsafe_image.aspx to the list. The web.config.pinsafe file contains additional keys that need to be copied into the <appsettings> section of the web.config file. Adjust the key values to reflect your PINsafe installation. The default settings are: <add key="pinsafe_ssl" value="false" /> <add key="pinsafe_server" value=" " /> <add key="pinsafe_port" value="8080" /> <add key="pinsafe_context" value="pinsafe" /> <add key="pinsafe_secret" value="" /> If using a PINsafe virtual or hardware appliance, then the following settings may need to be used. <add key="pinsafe_ssl" value="true" /> <add key="pinsafe_server" value=" " /> <add key="pinsafe_port" value="8080" /> <add key="pinsafe_context" value="pinsafe" /> <add key="pinsafe_secret" value="" /> Additional Configuration Options Testing Navigate to the Citrix Web interface login page. The customisation is visible in the addition of a One Time Code field and a Get Code button. Attempting to login with a correct Citrix username and password but no one time code should result in failure. Only when a correct PINsafe one time code is entered in addition to the Citrix credentials should the user be logged in. Citrix Web Interface login with SMS (Do not click on the Turing Button) 180


188 Citrix Web Interface login with Turing Troubleshooting If following the installation steps the Citrix web interface fails to display properly edit web.config and set the customerrors mode to Off. This will enable the display of detailed error messages which may assist in troubleshooting. To verify the Turing image works from the Citrix server, enter the following into a web browser, preferably from the Citrix server, which should display a Turing image if the sever is functioning correctly: 181
189 Try copying across again the install files checking to ensure that they are not read only. Also check the install files have not been overwritten by the Citrix software Uninstalling Copy the backup files made at the start of installation back to their original locations Known Issues and Limitations Self signed certificates are not supported with this version of the integration, either use a valid certificate, or non SSL communications or upgrade the Web Interface version. The integration does not support the use of the virtual or hardware appliance proxy port for Agent-XML authentication, use port 8080 and the context pinsafe Additional Information For assistance in the PINsafe installation and configuration please firstly contact your reseller and then Swivel Secure support at support@swivelsecure.com 182
190 111 Citrix Web Interface 4.5 Integration Introduction This document outlines the necessary steps to integrate PINsafe authentication into the Citrix 4.5 web interface. If the Single Channel Image for authentication is to be used a NAT is not required to the PINsafe server as the Image is proxied through the Web Interface server Prerequisites This installation guide assumes that a Presentation Server site has been configured with Explicit authentication enabled. The customised files provided are based on build of the Citrix web interface, if you have a later version please contact your PINsafe reseller for an update. The following files are required to complete the installation: PINsafeClient.dll? PINsafe authentication client library. login.aspx? Customised login page. pinsafe_image.aspx? Serves single channel images from PINsafe to users. login.js? Customised login page client script. loginbuttons.inc? Customised login form buttons. loginmainform.inc? Customised login form. loginview.aspxf? Customised login logic constants. login.aspxf? Customised login logic. web.config.pinsafe? Additional configuration entries for PINsafe integration. The files can be downloaded from here Note: The default Citrix Install path is C:\Inetpub\wwwroot\Citrix\MetaFrame Baseline PINsafe 3.5 Citrix Web Interface build Architecture The Citrix Web Interface makes authentication requests against the PINsafe server by XML PINsafe Configuration Configuring the PINsafe Agent On the PINsafe server: Select Server then Agents, and create an agent for the Web Interface server, required parameters are: Name: a Descriptive name Hostname/IP: Web Interface server details Shared Secret: To be also used on the Web Interface server Click Apply to save settings Enabling Session creation with username The PINsafe server can be configured so that it returns a Single Channel image by presenting the username via the XML API or the SCIMage servlet. On the PINsafe server: Go to the?single Channel? Admin page and set?allow Session creation with Username:? to YES. Click Apply to save settings. To test your configuration you can use the following URL using a valid PINsafe username: Virtual or hardware appliance (use 8080/pinsafe and not the proxy port) Software install 183
191 111.6 Citrix Web Interface Configuration Copy across the Web Interface Files On the Citrix Web Interface Server: The following files need to be copied to the listed locations, below the root of the Citrix web interface site. Where an existing file is being replaced and for modified files, ensure you make a backup copy so that the integration can be removed at a later date. PINsafeClient.dll to /bin. login.aspx and pinsafe_image.aspx to /auth. login.js to /auth/clientscripts. loginbuttons.inc and loginmainform.inc to /app_data/auth/include. loginview.aspxf and login.aspxf to /app_data/auth/serverscripts. Ensure file permissions are set correctly on the coped files, Authenticated users need read permissions Edit the Web.config file On the Citrix Web Interface Server: Edit the web.config file. Find the the comma separated list of URLs under the <appsettings> key AUTH:UNPROTECTED_PAGES and add Add /auth/pinsafe_image.aspx to the list. The web.config.pinsafe file contains additional keys that need to be copied into the <appsettings> section of the web.config file. Adjust the key values to reflect your PINsafe installation. The default settings are: <add key="pinsafe_ssl" value="false" /> <add key="pinsafe_server" value=" " /> <add key="pinsafe_port" value="8080" /> <add key="pinsafe_context" value="pinsafe" /> <add key="pinsafe_secret" value="" /> If using a PINsafe virtual or hardware appliance, then the following settings may need to be used. <add key="pinsafe_ssl" value="true" /> <add key="pinsafe_server" value=" " /> <add key="pinsafe_port" value="8080" /> <add key="pinsafe_context" value="pinsafe" /> <add key="pinsafe_secret" value="" /> Additional Configuration Options Optional: Using Static Password On the Citrix Web Interface Server: When using a static PINsafe password with the OTC, edit the login.aspxf file as follows: change the following line from if (!pc.login(user, "", otc)) to if (!pc.login(user,password, otc)) 184
192 111.8 Testing Navigate to the Citrix Web interface login page. The customisation is visible in the addition of a One Time Code field and a Get Code button. Attempting to login with a correct Citrix username and password but no one time code should result in failure. Only when a correct PINsafe one time code is entered in addition to the Citrix credentials should the user be logged in. Citrix Web Interface with TURing image (For SMS do not click on Get Code button) Troubleshooting If following the installation steps the Citrix web interface fails to display properly edit web.config and set the customerrors mode to Off. This will enable the display of detailed error messages which may assist in troubleshooting. To verify the Turing image works from the Citrix server, enter the following into a web browser, preferably from the Citrix server, which should display a Turing image if the sever is functioning correctly: Try copying across again the install files checking to ensure that they are not read only. Also check the install files have not been overwritten by the Citrix software Error Messages Server Error in?/citrix/accessplatformswivel? Application Parser Error Message: An error occurred while parsing EntityName. Line 86, position 63. Source Error gives line with <add key=?pinsafe_secret? value=?&&&&&&&? /> Source File: c:\inetpub\wwwroot\citrix\accessplatformswivel\web.config You cannot use some special characters in the secret key file, such as &</nowiki> Uninstalling Copy the backup files made at the start of installation back to their original locations Known Issues and Limitations The integration does not support the use of the virtual or hardware appliance proxy port for Agent-XML authentication, use port 8080 and the context pinsafe. 185
193 Additional Information For assistance in the PINsafe installation and configuration please firstly contact your reseller and then Swivel Secure support at 186
194 112 Citrix Web Interface 4.6 Integration Introduction This document outlines the necessary steps to integrate PINsafe authentication into the Citrix 4.6 web interface. If the Single Channel Image for authentication is to be used a NAT is not required to the PINsafe server as the Image is proxied through the Web Interface server Prerequisites This installation guide assumes that a Presentation Server site has been configured with Explicit authentication enabled. The customised files provided are based on build of the Citrix web interface, if you have a later version please contact your PINsafe reseller for an update. The following files are required to complete the installation: PINsafeClient.dll? PINsafe authentication client library. login.aspx? Customised login page. pinsafe_image.aspx? Serves single channel images from PINsafe to users. login.js? Customised login page client script. loginbuttons.inc? Customised login form buttons. loginmainform.inc? Customised login form. loginview.aspxf? Customised login logic constants. login.aspxf? Customised login logic. web.config.pinsafe? Additional configuration entries for PINsafe integration. The files can be downloaded from here Note: The default Citrix Install path is C:\Inetpub\wwwroot\Citrix\AccessPlatform Baseline PINsafe 3.5 Citrix Web Interface build Architecture The Citrix Web Interface makes authentication requests against the PINsafe server by XML PINsafe Configuration Configuring the PINsafe Agent On the PINsafe server: Select Server then Agents, and create an agent for the Web Interface server, required parameters are: Name: a Descriptive name Hostname/IP: Web Interface server details Shared Secret: To be also used on the Web Interface server Click Apply to save settings Enabling Session creation with username The PINsafe server can be configured so that it returns a Single Channel image by presenting the username via the XML API or the SCImage servlet. On the PINsafe server: Go to the?single Channel? Admin page and set?allow Session creation with Username:? to YES. Click Apply to save settings. To test your configuration you can use the following URL using a valid PINsafe username: Virtual or hardware appliance (use 8080/pinsafe and not the proxy port) Software install 187
195 112.6 Citrix Web Interface Configuration Copy across the Web Interface Files On the Citrix Web Interface Server: The following files need to be copied to the listed locations, below the root of the Citrix web interface site. Where an existing file is being replaced and for modified files, ensure you make a backup copy so that the integration can be removed at a later date. PINsafeClient.dll to /bin. login.aspx and pinsafe_image.aspx to /auth. login.js to /auth/clientscripts. loginbuttons.inc and loginmainform.inc to /app_data/auth/include. loginview.aspxf and login.aspxf to /app_data/auth/serverscripts. Ensure file permissions are set correctly on the coped files, Authenticated users need read permissions Edit the Web.config file On the Citrix Web Interface Server: Edit the web.config file. Find the the comma separated list of URL's under the <appsettings> key AUTH:UNPROTECTED_PAGES and add Add /auth/pinsafe_image.aspx to the list. The web.config.pinsafe file contains additional keys that need to be copied into the <appsettings> section of the web.config file. Adjust the key values to reflect your PINsafe installation. The default settings are: <add key="pinsafe_ssl" value="false" /> <add key="pinsafe_server" value=" " /> <add key="pinsafe_port" value="8080" /> <add key="pinsafe_context" value="pinsafe" /> <add key="pinsafe_secret" value="" /> If using a PINsafe virtual or hardware appliance, then the following settings may need to be used. <add key="pinsafe_ssl" value="true" /> <add key="pinsafe_server" value=" " /> <add key="pinsafe_port" value="8080" /> <add key="pinsafe_context" value="pinsafe" /> <add key="pinsafe_secret" value="" /> Additional Configuration Options Optional: Using Static Password On the Citrix Web Interface Server: When using a static PINsafe password with the OTC, edit the login.aspxf file as follows: change the following line from if (!pc.login(user, "", otc)) to if (!pc.login(user,password, otc)) 188

196 112.8 Testing Navigate to the Citrix Web interface login page. The customisation is visible in the addition of a One Time Code field and a Get Code button. Attempting to login with a correct Citrix username and password but no one time code should result in failure. Only when a correct PINsafe one time code is entered in addition to the Citrix credentials should the user be logged in. Citrix Web Interface with Turing image (For SMS do not click on Get Code button) Uninstalling Copy the backup files made at the start of installation back to their original locations Troubleshooting If following the installation steps the Citrix web interface fails to display properly edit web.config and set the customerrors mode to Off. This will enable the display of detailed error messages which may assist in troubleshooting. To verify the Turing image works from the Citrix server, enter the following into a web browser, preferably from the Citrix server, which should display a Turing image if the sever is functioning correctly: Try copying across again the install files checking to ensure that they are not read only. Also check the install files have not been overwritten by the Citrix software Error Messages Server Error in?/citrix/accessplatformswivel? Application Parser Error Message: An error occurred while parsing EntityName. Line 86, position 63. Source Error gives line with <add key=?pinsafe_secret? value=?&&&&&&&? /> Source File: c:\inetpub\wwwroot\citrix\accessplatformswivel\web.config You cannot use some special characters in the secret key file, such as &</nowiki> Known Issues and Limitations The integration does not support the use of the virtual or hardware appliance proxy port for Agent-XML authentication, use port 8080 and the context pinsafe. 189
197 Additional Information For assistance in the PINsafe installation and configuration please firstly contact your reseller and then Swivel Secure support at 190
198 113 Citrix Web Interface 5.0 Integration Introduction This document outlines the necessary steps to integrate Swivel authentication into the Citrix 5.0 web interface. If the Single Channel Image for authentication is to be used, a NAT is not required to the Swivel server as the Image is proxied through the Web Interface server Prerequisites This installation guide assumes that a Presentation Server site has been configured with Explicit authentication enabled. The customised files provided are based on build of the Citrix web interface, if you have a later version please contact your Swivel reseller for an update. Your Swivel server must be configured for radius authentication and your Citrix Web interface must be using RADIUS for Authentication. The following files are required to complete the installation: PINsafeClient.dll? Swivel authentication client library. include.aspxf? Customised include file. pinsafe_image.aspx? Serves single channel images from Swivel to users. login.js? Customised login page client script. loginstyle.inc? Customised login form style. loginmainform.inc? Customised login form. Constants.java? Customised login logic constants. web.config.pinsafe? Additional configuration entries for Swivel integration. Radius_secret.txt? RADIUS server secret key. The files can be downloaded from here: File:Citrix_WI_5.0_Integration.zip Note: The default Citrix Install path is C:\Inetpub\wwwroot\Citrix\XenApp Baseline Swivel 3.5 Citrix Web Interface build Architecture The Citrix Web Interface makes authentication requests against the Swivel server by RADIUS. 191
199 114 Swivel Configuration Configuring the RADIUS server On the Swivel Administration console configure the RADIUS Server and NAS, see RADIUS Configuration Enabling Session creation with username To allow the TURing image, PINpad and other single channel images, under Server/Single Channel set Allow session request by username to Yes Setting up Swivel Dual Channel Transports See Transport Configuration Citrix Web Interface Configuration Copy accros the Web Interface Files The required files (see prerequisites) need to be copied to the following locations below the root of the Citrix web interface site. Where an existing file is being replaced and for modified files, ensure you make a backup copy so that the integration can be removed at a later date. Move any backup copy files to a separate location. Do NOT rename the file and leave it in place within the same directory. PINsafeClient.dll to /bin. include.aspxf to /app_data/serverscripts pinsafe_image.aspx to /auth. login.js to /auth/clientscripts. loginstyle.inc and loginmainform.inc to /app_data/include. Constants.java to /app_code/pagesjava/com/citrix/wi/pageutils Radius_secret.txt to / Ensure file permissions are set correctly on the coped files, Authenticated users need read permissions Edit the Radius_secret.txt On the Citrix Web Interface server Edit the radius_secret.txt file so that it has the same shared secret as has been entered on the Swivel server Edit the Web.config file On the Citrix Web Interface Server: Edit the web.config file. Find the the comma separated list of URLs under the <appsettings> key AUTH:UNPROTECTED_PAGES and add Add /auth/pinsafe_image.aspx to the list. The web.config.pinsafe file contains additional keys that need to be coied into the <appsettings> section of the web.config file. Adjust the key values to reflect your Swivel installation. The default settings are: <add key="pinsafe_ssl" value="false" /> <add key="pinsafe_server" value=" " /> <add key="pinsafe_port" value="8080" /> <add key="pinsafe_context" value="pinsafe" /> <add key="pinsafe_secret" value="" /> If using a Swivel virtual or hardware appliance, then the following settings may need to be used. <add key="pinsafe_ssl" value="true" /> <add key="pinsafe_server" value=" " /> 192
200 <add key="pinsafe_port" value="8443" /> <add key="pinsafe_context" value="proxy" /> <add key="pinsafe_secret" value="" /> Citrix Web Interface RADIUS Configuration On the Citrix Web Interface server: Launch the Access Management Console on the Web Interface 5.x server and select the appropriate site. Under Common Tasks, select Configure Authentication methods > explicit. Click Properties > Two-factor authentication, the select Radius from the dropdown list Additional Configuration Options see Citrix Web Interface 5.X additional login page options Testing Navigate to the Citrix Web interface login page. The customisation is visible in the addition of a One Time Code field and a Get Code button. Attempting to login with a correct Citrix username and password but no one time code should result in failure. Only when a correct Swivel one time code is entered in addition to the Citrix credentials should the user be logged in Uninstalling Copy the backup files made at the start of installation back to their original locations. On the Citrix Web Interface server: Launch the Access Management Console on the Web Interface 5.x server and select the appropriate site. Under Common Tasks, select Configure Authentication methods > explicit. Click Properties > Two-factor authentication, then select Radius from the dropdown list. Remove the Swivel RADIUS entries. 193
201 114.7 Troubleshooting Check the Swivel logs for any error messages, or absence of session starts and RADIUS requests. If following the installation steps the Citrix web interface fails to display properly edit web.config and set the customerrors mode to Off. This will enable the display of detailed error messages which may assist in troubleshooting. To verify the Turing image works from the Citrix server, enter the following into a web browser, preferably from the Citrix server, which should display a Turing image if the sever is functioning correctly: For a Swivel virtual or hardware appliance: For a software only install see Software Only Installation Try copying across again the install files checking to ensure that they are not read only. Also check the install files have not been overwritten by the Citrix software. If the virtual or hardware appliance is using a self signed certificate it may be necessary turn off https connections between the virtual or hardware appliance and the Citrix server. If a red cross appears, possible causes may be: Self Signed Certificate, either install a valid certificate on the Swivel server or for testing the client can accept the certificate (load Image URL into browser) Swivel server not accessible, check networking and firewalls. Check the Swivel server logs for a session started message. Incorrect Swivel URL, either http, IP/hostname or context (pinsafe or proxy). Right click on the red cross and view the properties Error Messages INFO RADIUS: <0> Access-Request(1) LEN= :4175 PACKET DROPPED - MESSAGE AUTHENTICATOR IS INCORRECT This indicates that the shared secret on the access device and the Swivel NAS setting do not match. INFO RADIUS: <0> Access-Request(1) LEN= :4175 PACKET DROPPED - Duplicate packet from NAS When an authentication fails the RADIUS client may retry sending additional authentication requests. Resolve the initial issue causing the failure Known Issues and Limitations Upgrading the Citrix Web Interface will overwrite the Swivel settings and files so the Swivel integration may need to be applied again Additional Information For assistance in the Swivel installation and configuration please firstly contact your reseller and then Swivel Secure support at support@swivelsecure.com 194
202 115 Citrix Web Interface 5.1 Dual Channel button Citrix Web Interface Dual Chanel Integration Notes This outlines how to replace the Single Channel Image request button with a Dual Channel button. This is a supplement to the Citrix Web Interface 5.1 Integration guide Log-in page Customisation On the Swivel Administration console under Server/Dual Channel, ensure Allow message request by username: is set to Yes. On the Citrix Web Interface Installation create a copy of auth/pinsafe_image.aspx, and call it pinsafe_message.aspx You will also need to ensure that pinsafe_message.aspx is included in the list of unprotected pages. In auth/clientscripts/login.js, make a copy of the function onturingbuttonclick(), calling it onmessagebuttonclick (). Change image.src in this function to point to pinsafe_message.aspx. Edit app_data/include/loginmainform.inc. Locate the text '<div class="otcbuttonpane"'. Copy from here up to the ending </div>, and paste it immediately after this div. Change "href=javascript:onturingbuttonclick" to "href=onmessagebuttonclick". Change the title and id of this div, as well as the id of the enclosed img and span elements. The new div element should be something like this: <div class="otcbuttonpane"><a href="javascript:onmessagebuttonclick()" title="click this button to retrieve a PinSafe message." onmouseover="changeotcbtncolor(true);" onmouseout="changeotcbtncolor(false);" onfocus="changeotcbtncolor(true);" onblur="changeotcbtncolor(false);" tabindex="<%=constants.tab_index_form%>" id="dcmessage" name="dcmessage" ><img id="msgbuttonbg" src="../media/loginbuttonglow.gif" alt="" /><span id="msgbuttonwrapper">get Message</span></a></div> To make sure the new button looks right, you will also need to edit app_data/include/loginstyle.inc. Look for occurrences of #otcbuttonwrapper and add ", #msgbuttonwrapper". Also, for the entry #<%=Constants.ID_OTC_BTN%>, add ", #dcmessage" Testing Test the button from the login page. Check the Swivel logs for the dual channel requests. 195
203 116 Citrix Web Interface 5.1 Integration 196
204 117 Introduction This document outlines the necessary steps to integrate PINsafe authentication into the Citrix 5.1 web interface. If the Single Channel Image for authentication is to be used, a NAT is not required to the PINsafe server as the Image is proxied through the Web Interface server. 197
205 118 Prerequisites This installation guide assumes that a Presentation Server site has been configured with Explicit authentication enabled. The customised files provided are based on build of the Citrix web interface, if you have a later version please contact your PINsafe reseller for an update. Your PINsafe server must be configured for radius authentication and your Citrix Web interface must be using RADIUS for Authentication. The following files are required to complete the installation: PINsafeClient.dll? PINsafe authentication client library. include.aspxf? Customised include file. pinsafe_image.aspx? Serves single channel images from PINsafe to users. login.js? Customised login page client script. loginstyle.inc? Customised login form style. loginmainform.inc? Customised login form. Constants.java? Customised login logic constants. web.config.pinsafe? Additional configuration entries for PINsafe integration. Radius_secret.txt? RADIUS server secret key. The files can be downloaded from here: File:Citrix_WI_5.1_Integration.zip Note: The default Citrix Install path is C:\Inetpub\wwwroot\Citrix\XenApp 198
206 119 Baseline PINsafe 3.5 Citrix Web Interface build
207 120 Architecture The Citrix Web Interface makes authentication requests against the PINsafe server by RADIUS. 200
208 121 Swivel Configuration Configuring the RADIUS server On the Swivel Administration console configure the RADIUS Server and NAS, see RADIUS Configuration Enabling Session creation with username To allow the TURing image, PINpad and other single channel images, under Server/Single Channel set Allow session request by username to Yes Setting up PINsafe Dual Channel Transports See Transport Configuration 201
209 122 Citrix Web Interface Configuration Copy across the Web Interface Files The required files (see prerequisites) need to be copied to the following locations below the root of the Citrix web interface site. Where an existing file is being replaced and for modified files, ensure you make a backup copy so that the integration can be removed at a later date. Move any backup copy files to a separate location. Do NOT rename the file and leave it in place within the same directory. PINsafeClient.dll to /bin. include.aspxf to /app_data/serverscripts pinsafe_image.aspx to /auth. login.js to /auth/clientscripts. loginstyle.inc and loginmainform.inc to /app_data/include. Constants.java to /app_code/pagesjava/com/citrix/wi/pageutils Radius_secret.txt to /Conf Ensure file permissions are set correctly on the coped files, Authenticated users need read permissions Edit the Radius_secret.txt On the Citrix Web Interface server Edit the radius_secret.txt file so that it has the same shared secret as has been entered on the PINsafe server Edit the Web.config file On the Citrix Web Interface Server: Edit the web.config file. Find the the comma separated list of URLs under the <appsettings> key AUTH:UNPROTECTED_PAGES and add Add /auth/pinsafe_image.aspx to the list. The web.config.pinsafe file contains additional keys that need to be coied into the <appsettings> section of the web.config file. Adjust the key values to reflect your PINsafe installation. The default settings are: <add key="pinsafe_ssl" value="false" /> <add key="pinsafe_server" value=" " /> <add key="pinsafe_port" value="8080" /> <add key="pinsafe_context" value="pinsafe" /> <add key="pinsafe_secret" value="" /> <add key="pinsafe_acceptselfsigned" value="false" /> If using a Swivel virtual or hardware appliance, then the following settings may need to be used. <add key="pinsafe_ssl" value="true" /> <add key="pinsafe_server" value=" " /> <add key="pinsafe_port" value="8443" /> <add key="pinsafe_context" value="proxy" /> <add key="pinsafe_secret" value="" /> <add key="pinsafe_acceptselfsigned" value="true" /> Citrix Web Interface RADIUS Configuration On the Citrix Web Interface server: 202
210 Launch the Access Management Console on the Web Interface 5.x server and select the appropriate site. Under Common Tasks, select Configure Authentication methods > explicit. Click Properties > Two-factor authentication, then select Radius from the dropdown list. 203
211 123 Additional Configuration Options see Citrix Xen App 5.x additional login page options Self Reset This outlines how to add the self reset option to the Citrix Web Interface. The Citrix Web Interface 5.1 self reset files can be downloaded here: File:Citrix_WI_5.1_SelfReset.zip Download PINsafeClient.dll and copy to the bin folder overwriting the existing file installed above. Copy reset.aspx and reset.aspx.cs into the auth folder. Add reset.aspx to the list of unprotected pages in web.config. Locate key="auth:unprotected_pages", and at the end of the value field, insert ",./reset.aspx". Insert a link on the Citrix login page to open the reset page. Edit app_data\include\loginmainform.inc, and insert the following line after the login button row, immediately before the </table> tag. <tr><td><a href="./reset.aspx" target="_blank">forgotten my PIN</a></td></tr> 204
212 124 Testing Navigate to the Citrix Web interface login page. The customisation is visible in the addition of a One Time Code field and a Get Code button. Attempting to login with a correct Citrix username and password but no one time code should result in failure. Only when a correct PINsafe one time code is entered in addition to the Citrix credentials should the user be logged in. 205
213 125 Uninstalling Copy the backup files made at the start of installation back to their original locations. On the Citrix Web Interface server: Launch the Access Management Console on the Web Interface 5.x server and select the appropriate site. Under Common Tasks, select Configure Authentication methods > explicit. Click Properties > Two-factor authentication, then select Radius from the dropdown list. Remove the PINsafe RADIUS entries. 206
214 126 Troubleshooting Check the PINsafe logs for any error messages, or absence of session starts and RADIUS requests. If following the installation steps the Citrix web interface fails to display properly edit web.config and set the customerrors mode to Off. This will enable the display of detailed error messages which may assist in troubleshooting. To verify the Turing image works from the Citrix server, enter the following into a web browser, preferably from the Citrix server, which should display a Turing image if the sever is functioning correctly: For a Swivel virtual or hardware appliance: For a software only install see Software Only Installation Try copying across again the install files checking to ensure that they are not read only. Also check the install files have not been overwritten by the Citrix software. If the virtual or hardware appliance is using a self signed certificate it may be necessary turn off https connections between the virtual or hardware appliance and the Citrix server. If a red cross appears, possible causes may be: Self Signed Certificate, either install a valid certificate on the PINsafe server or for testing the client can accept the certificate (load Image URL into browser) PINsafe server not accessible, check networking and firewalls. Check the PINsafe server logs for a session started message. Incorrect PINsafe URL, either http, IP/hostname or context (pinsafe or proxy). Right click on the red cross and view the properties Error Messages INFO RADIUS: <0> Access-Request(1) LEN= :4175 PACKET DROPPED - MESSAGE AUTHENTICATOR IS INCORRECT This indicates that the shared secret on the access device and the PINsafe NAS setting do not match. INFO RADIUS: <0> Access-Request(1) LEN= :4175 PACKET DROPPED - Duplicate packet from NAS When an authentication fails the RADIUS client may retry sending additional authentication requests. Resolve the initial issue causing the failure. 207
215 127 Known Issues and Limitations Upgrading the Citrix Web Interface will overwrite the PINsafe settings and files so the PINsafe integration may need to be applied again. 208
216 128 Additional Information For assistance in the PINsafe installation and configuration please firstly contact your reseller and then Swivel Secure support at 209
217 129 Citrix Web Interface 5.2 Integration 210
218 130 Introduction This document outlines the necessary steps to integrate PINsafe authentication into the Citrix 5.2 web interface. If the Single Channel Image for authentication is to be used, a NAT is not required to the PINsafe server as the Image is proxied through the Web Interface server. 211
219 131 Prerequisites This installation guide assumes that a Presentation Server site has been configured with Explicit authentication enabled. The customised files provided are based on build 5.2 of the Citrix web interface, if you have a later version please contact your PINsafe reseller for an update. Your PINsafe server must be configured for radius authentication and your Citrix Web interface must be using RADIUS for Authentication. The following files are required to complete the installation: include.aspxf? Customised include file. pinsafe_image.aspx? Serves single channel images from PINsafe to users. login.js? Customised login page client script. loginstyle.inc? Customised login form style. loginmainform.inc? Customised login form. Constants.java? Customised login logic constants. web.config.pinsafe? Additional configuration entries for PINsafe integration. Radius_secret.txt? RADIUS server secret key. The files can be downloaded from here: File:Citrix_WI_5.2_Integration.zip Note: The default Citrix Install path is C:\Inetpub\wwwroot\Citrix\XenApp 212
220 132 Baseline PINsafe 3.5 Citrix Web Interface build
221 133 Architecture The Citrix Web Interface makes authentication requests against the PINsafe server by RADIUS. 214
222 134 Swivel Configuration Configuring the RADIUS server On the Swivel Administration console configure the RADIUS Server and NAS, see RADIUS Configuration Enabling Session creation with username To allow the TURing image, PINpad and other single channel images, under Server/Single Channel set Allow session request by username to Yes Setting up PINsafe Dual Channel Transports See Transport Configuration 215
223 135 Citrix Web Interface Configuration Copy across the Web Interface Files The The required files (see prerequisites) need to be copied to the following locations below the root of the Citrix web interface site. Where an existing file is being replaced and for modified files, ensure you make a backup copy so that the integration can be removed at a later date. Move any backup copy files to a separate location. Do NOT rename the file and leave it in place within the same directory. include.aspxf to /app_data/serverscripts pinsafe_image.aspx to /auth. login.js to /auth/clientscripts. loginstyle.inc and loginmainform.inc to /app_data/include. Constants.java to /app_code/pagesjava/com/citrix/wi/pageutils Radius_secret.txt to /Conf Ensure file permissions are set correctly on the coped files, Authenticated users need read permissions Edit the Radius_secret.txt On the Citrix Web Interface server Edit the radius_secret.txt file so that it has the same shared secret as has been entered on the PINsafe server Edit the Web.config file On the Citrix Web Interface Server: Edit the web.config file. Find the the comma separated list of URLs under the <appsettings> key AUTH:UNPROTECTED_PAGES and add Add /auth/pinsafe_image.aspx to the list. The web.config.pinsafe file contains additional keys that need to be copied into the <appsettings> section of the web.config file. Adjust the key values to reflect your PINsafe installation. The default settings are: <add key="pinsafe_ssl" value="false" /> <add key="pinsafe_server" value=" " /> <add key="pinsafe_port" value="8080" /> <add key="pinsafe_context" value="pinsafe" /> <add key="pinsafe_secret" value="" /> <add key="pinsafe_acceptselfsigned" value="false" /> <add key="radius_secret_path" value="/radius_secret.txt" /> <add key="radius_nas_identifier" value="pinsafe" /> If using a PINsafe virtual or hardware appliance, then the following settings may need to be used. <add key="pinsafe_ssl" value="true" /> <add key="pinsafe_server" value=" " /> <add key="pinsafe_port" value="8443" /> <add key="pinsafe_context" value="proxy" /> <add key="pinsafe_secret" value="" /> <add key="pinsafe_acceptselfsigned" value="true" /> <add key="radius_secret_path" value="/radius_secret.txt" /> 216
224 <add key="radius_nas_identifier" value="pinsafe" /> Citrix Web Interface RADIUS Configuration On the Citrix Web Interface server: Launch the Access Management Console on the Web Interface 5.x server and select the appropriate site. Under Common Tasks, select Configure Authentication methods > explicit. Click Properties > Two-factor authentication, then select Radius from the drop down list. Configure the PINsafe server as RADIUS server. If you have more than 1 PINsafe server, you may need to configure all of them in the preferred order. NOTE: you cannot use a virtual IP as the RADIUS address, as this will not work. 217
225 136 Additional Configuration Options see Citrix Xen App 5.x additional login page options 218
226 137 Testing Navigate to the Citrix Web interface login page. The customisation is visible in the addition of a One Time Code field and a Get Code button. Attempting to login with a correct Citrix username and password but no one time code should result in failure. Only when a correct PINsafe one time code is entered in addition to the Citrix credentials should the user be logged in. 219
227 138 Uninstalling Copy the backup files made at the start of installation back to their original locations. On the Citrix Web Interface server: Launch the Access Management Console on the Web Interface 5.x server and select the appropriate site. Under Common Tasks, select Configure Authentication methods > explicit. Click Properties > Two-factor authentication, then select Radius from the drop down list. Remove the PINsafe RADIUS entries. 220
228 139 Troubleshooting Check the PINsafe logs for any error messages, or absence of session starts and RADIUS requests. If following the installation steps the Citrix web interface fails to display properly edit web.config and set the customerrors mode to Off. This will enable the display of detailed error messages which may assist in troubleshooting. To verify the Turing image works from the Citrix server, enter the following into a web browser, preferably from the Citrix server, which should display a Turing image if the sever is functioning correctly: For a Swivel virtual or hardware appliance: For a software only install see Software Only Installation Try copying across again the install files checking to ensure that they are not read only. Also check the install files have not been overwritten by the Citrix software. If the virtual or hardware appliance is using a self signed certificate it may be necessary turn off https connections between the virtual or hardware appliance and the Citrix server. If a red cross appears, possible causes may be: Self Signed Certificate, either install a valid certificate on the PINsafe server or for testing the client can accept the certificate (load Image URL into browser) PINsafe server not accessible, check networking and firewalls. Check the PINsafe server logs for a session started message. Incorrect PINsafe URL, either http, IP/hostname or context (pinsafe or proxy). Right click on the red cross and view the properties Error Messages INFO RADIUS: <0> Access-Request(1) LEN= :4175 PACKET DROPPED - MESSAGE AUTHENTICATOR IS INCORRECT This indicates that the shared secret on the access device and the PINsafe NAS setting do not match. INFO RADIUS: <0> Access-Request(1) LEN= :4175 PACKET DROPPED - Duplicate packet from NAS When an authentication fails the RADIUS client may retry sending additional authentication requests. Resolve the initial issue causing the failure. 221
229 140 Known Issues and Limitations Upgrading the Citrix Web Interface will overwrite the PINsafe settings and files so the PINsafe integration may need to be applied again. 222
230 141 Additional Information For assistance in the PINsafe installation and configuration please firstly contact your reseller and then Swivel Secure support at 223
231 142 Citrix Web Interface 5.3 Integration 224
232 143 Introduction This document outlines the necessary steps to integrate PINsafe authentication into the Citrix 5.3 web interface. If the Single Channel Image for authentication is to be used, a NAT is not required to the PINsafe server as the Image is proxied through the Web Interface server. 225
233 144 Prerequisites This installation guide assumes that a Presentation Server site has been configured with Explicit authentication enabled. The customised files provided are based on build 5.3 of the Citrix web interface, if you have a later version please contact your PINsafe reseller for an update. Your PINsafe server must be configured for radius authentication and your Citrix Web interface must be using RADIUS for Authentication. The following files are required to complete the installation: pinsafe_image.aspx? Serves single channel images from PINsafe to users. login.js? Customised login page client script. loginstyle.inc? Customised login form style. loginmainform.inc? Customised login form. Constants.java? Customised login logic constants. web.config.pinsafe? Additional configuration entries for PINsafe integration. Radius_secret.txt? RADIUS server secret key. The files can be downloaded from here Note: The default Citrix Install path is: C:\Inetpub\wwwroot\Citrix\XenApp PINsafe uses.net so is not dependant on the OS being 32 bit or 64 bit. 226
234 145 Baseline PINsafe 3.5 Citrix Web Interface build
235 146 Architecture The Citrix Web Interface makes authentication requests against the PINsafe server by RADIUS. 228
236 147 Swivel Configuration Configuring the RADIUS server On the Swivel Administration console configure the RADIUS Server and NAS, see RADIUS Configuration Enabling Session creation with username To allow the TURing image, PINpad and other single channel images, under Server/Single Channel set Allow session request by username to Yes Setting up PINsafe Dual Channel Transports See Transport Configuration 229
237 148 Citrix Web Interface Configuration Copy across the Web Interface Files The required files (see prerequisites) need to be copied to the following locations below the root of the Citrix web interface site. Where an existing file is being replaced and for modified files, ensure you make a backup copy so that the integration can be removed at a later date. Move any backup copy files to a separate location. Do NOT rename the file and leave it in place within the same directory. include.aspxf to /app_data/serverscripts pinsafe_image.aspx to /auth. login.js to /auth/clientscripts. loginstyle.inc and loginmainform.inc to /app_data/include. Constants.java to /app_code/pagesjava/com/citrix/wi/pageutils Radius_secret.txt to /Conf Ensure file permissions are set correctly on the coped files, Authenticated users need read permissions Edit the Radius_secret.txt On the Citrix Web Interface server Edit the radius_secret.txt file so that it has the same shared secret as has been entered on the PINsafe server Edit the Web.config file On the Citrix Web Interface Server: Edit the web.config file. Find the the comma separated list of URLs under the <appsettings> key AUTH:UNPROTECTED_PAGES and add Add /auth/pinsafe_image.aspx to the list. The web.config.pinsafe file contains additional keys that need to be copied into the <appsettings> section of the web.config file (not the <switches> section). Adjust the key values to reflect your PINsafe installation. Note: The setting <add key="radius_nas_identifier" value="" /> is present in the file and needs to be set to <add key="radius_nas_identifier" value="pinsafe" /> If using a PINsafe virtual or hardware appliance, then the following settings may need to be used. <add key="radius_secret_path" value="/radius_secret.txt" /> <add key="radius_nas_identifier" value="pinsafe" /> <add key="pinsafe_ssl" value="true" /> <add key="pinsafe_server" value=" " /> <add key="pinsafe_port" value="8443" /> <add key="pinsafe_context" value="proxy" /> <add key="pinsafe_secret" value="" /> <add key="pinsafe_acceptselfsigned" value="true" /> The settings for a software install of PINsafe are: <add key="radius_secret_path" value="/radius_secret.txt" /> <add key="radius_nas_identifier" value="pinsafe" /> <add key="pinsafe_ssl" value="false" /> <add key="pinsafe_server" value=" " /> <add key="pinsafe_port" value="8080" /> <add key="pinsafe_context" value="pinsafe" /> 230
238 <add key="pinsafe_secret" value="" /> <add key="pinsafe_acceptselfsigned" value="false" /> Citrix Web Interface RADIUS Configuration On the Citrix Web Interface server: Launch the Access Management Console on the Web Interface 5.x server and select the appropriate site. Under Common Tasks, select Configure Authentication methods > explicit. Click Properties > Two-factor authentication, then select Radius from the drop down list. Configure the PINSAFE server as RADIUS server. If you have more than one PINsafe server, you may need to configure all of them in the preferred order. NOTE: you cannot use a virtual IP as the RADIUS address, as this will not work. 231
239 149 Additional Configuration Options see Citrix Xen App 5.x additional login page options 232
240 150 Testing Navigate to the Citrix Web interface login page. The customisation is visible in the addition of a One Time Code field and a Get Code button. Attempting to login with a correct Citrix username and password but no one time code should result in failure. Only when a correct PINsafe one time code is entered in addition to the Citrix credentials should the user be logged in. Login using Dual channel authentication Login Using Single Channel Graphical Turing Image 233
241 151 Uninstalling Copy the backup files made at the start of installation back to their original locations. On the Citrix Web Interface server: Launch the Access Management Console on the Web Interface 5.x server and select the appropriate site. Under Common Tasks, select Configure Authentication methods > explicit. Click Properties > Two-factor authentication, then select Radius from the drop down list. Remove the PINsafe RADIUS entries. 234
242 152 Troubleshooting Check the PINsafe logs for any error messages, or absence of session starts and RADIUS requests. If following the installation steps the Citrix web interface fails to display properly edit web.config and set the customerrors mode to Off. This will enable the display of detailed error messages which may assist in troubleshooting. To verify the Turing image works from the Citrix server, enter the following into a web browser, preferably from the Citrix server, which should display a Turing image if the sever is functioning correctly: For a PINsafe virtual or hardware appliance: For a software only install see Software Only Installation Try copying across again the install files checking to ensure that they are not read only. Also check the install files have not been overwritten by the Citrix software. If the virtual or hardware appliance is using a self signed certificate it may be necessary turn off https connections between the virtual or hardware appliance and the Citrix server. If a red cross appears, possible causes may be: Self Signed Certificate, either install a valid certificate on the PINsafe server or for testing the client can accept the certificate (load Image URL into browser) PINsafe server not accessible, check networking and firewalls. Check the PINsafe server logs for a session started message. Incorrect PINsafe URL, either http, IP/hostname or context (pinsafe or proxy). Right click on the red cross and view the properties Error Messages INFO RADIUS: <0> Access-Request(1) LEN= :4175 PACKET DROPPED - MESSAGE AUTHENTICATOR IS INCORRECT This indicates that the shared secret on the access device and the PINsafe NAS setting do not match. INFO RADIUS: <0> Access-Request(1) LEN= :4175 PACKET DROPPED - Duplicate packet from NAS When an authentication fails the RADIUS client may retry sending additional authentication requests. Resolve the initial issue causing the failure. 235
243 153 Known Issues and Limitations Upgrading the Citrix Web Interface will overwrite the PINsafe settings and files so the PINsafe integration may need to be applied again. 236
244 154 Additional Information For assistance in the PINsafe installation and configuration please firstly contact your reseller and then Swivel Secure support at 237
245 155 Citrix Web Interface 5.4 Integration 238
246 156 Introduction This document outlines the necessary steps to integrate PINsafe authentication into the Citrix 5.4 web interface/xen App. If the Single Channel Image for authentication is to be used, a NAT is not required to the PINsafe server as the Image is proxied through the Web Interface server. A statement from Citrix: All 7.x versions of XenApp and XenDesktop now support the use of Web Interface 5.4. Citrix has extended support of Web Interface for XenApp 7.5, XenDesktop 7.5, XenDesktop 7.1 and XenDesktop 7.0 to allow more time for planning and transition to StoreFront. Note, no new features will be added to Web Interface and its end-of-life remains August
247 157 Prerequisites This installation guide assumes that a Presentation Server site has been configured with Explicit authentication enabled. The customised files provided are based on build 5.4 of the Citrix web interface, if you have a later version please contact your PINsafe reseller for an update. Your PINsafe server must be configured for radius authentication and your Citrix Web interface must be using RADIUS for Authentication. The following files are required to complete the installation and need to be edited as required (see below): pinsafe_image.aspx? Serves single channel images from PINsafe to users. login.js.add? Customised login page client script. loginstyle.inc.add? Customised login form style. loginmainform.inc.add? Customised login form. web.config.add? Additional configuration entries for PINsafe integration. Radius_secret.txt? RADIUS server secret key. The files can be downloaded from here. An alternative solution, which includes buttons for TURing image and message request, can be found here. This solution includes two additional files: pinsafe_message.aspx and pinsafe_ping.aspx. Note: The default Citrix Install path is: C:\Inetpub\wwwroot\Citrix\XenApp PINsafe uses.net so is not dependent on the OS being 32 bit or 64 bit. NOTE: you cannot use a virtual IP as the RADIUS address, as this will not work. NOTE: the files with the extension ".add" cannot simply be copied into the appropriate directories. They are text files containing notes as to how you should modify the corresponding files to implement PINsafe customisation. See the notes below for more details. 240
248 158 Baseline PINsafe 3.7 Citrix Web Interface build
249 159 Architecture The Citrix Web Interface makes authentication requests against the PINsafe server by RADIUS. 242
250 160 Swivel Configuration Configuring the RADIUS server On the Swivel Administration console configure the RADIUS Server and NAS, see RADIUS Configuration Enabling Session creation with username To allow the TURing image, PINpad and other single channel images, under Server/Single Channel set Allow session request by username to Yes Setting up PINsafe Dual Channel Transports See Transport Configuration 243
251 161 Citrix Web Interface Configuration Edit the radius_secret.txt On the Citrix Web Interface server Edit the conf/radius_secret.txt file so that it has the same shared secret as has been entered on the PINsafe server. A copy of this file is included in the zip archive Edit the web.config file On the Citrix Web Interface Server: Edit the web.config file. Note: the setting <add key="radius_nas_identifier" value="" /> is present in the file and needs to be changed to <add key="radius_nas_identifier" value="citrix_wi" /> Note: It is recommended that you use the same value as the identifier in the NAS entry in the PINsafe admin console. If the Web Interface server has multiple network interfaces, the value of RADIUS_NAS_IP_ADDRESS may need to be set to the IP address used by the NAS. This is the IP address of the Web Interface server, NOT the PINsafe server. Make sure that the following entry is included, if it is not there already: <add key="radius_secret_path" value="/radius_secret.txt" /> To allow access to the TURing image from the login page, locate the following line: <add key="auth:unprotected_pages"... The value attribute on this entry is a list of URLs that can be accessed without authentication. Add the following to the end of this list (before the closing quote):,/auth/pinsafe_image.aspx If you are using the alternative integration, you will need to include the other files:,/auth/pinsafe_image.aspx,/auth/pinsafe_message.aspx,/auth/pinsafe_ping.aspx Citrix Web Interface RADIUS Configuration On the Citrix Web Interface server: Launch the Access Management Console on the Web Interface 5.x server and select the appropriate site. Under Common Tasks, select Configure Authentication methods > explicit. Click Properties > Two-factor authentication, then select Radius from the drop down list. 244

252 Configure the PINSAFE server as RADIUS server. If you have more than one PINsafe server, you may need to configure all of them in the preferred order. NOTE: you cannot use a virtual IP as the RADIUS address, as this will not work. 245
253 162 Additional Configuration Options The above modifications will allow authentication to the Web Interface using some of the PINsafe authentication mechanisms such as SMS, mobile Phone applet, and Taskbar. Additional configuration options including the single channel TURing image are listed below. see also Citrix Web Interface 5.X additional login page options Changing the OTC label To change the label for the PINsafe one-time code field from the default of?passcode:?, locate the file C:\Program Files\Citrix\Web Interface\5.4.0\Languages\accessplatform_strings.properties. (If the language is not English, locate the appropriate file for the appropriate language, if it exists). Edit this file, and locate the line containing?passcode=passcode:?. Replace the second word PASSCODE with OTC, or an appropriate text Configuring Single Channel: Modifying the Web Interface Files The required files (see prerequisites) are of two types: those NOT ending in ".add" need to be copied to the following locations below the root of the Citrix web interface site. Those ending in ".add" contain instructions describing how to modify the corresponding file without the ".add" extension. Where an existing file is being replaced or modified, ensure you make a backup copy so that the integration can be removed at a later date. Move any backup copy files to a separate location. Do NOT rename the file and leave it in place within the same directory. The below files contained within the zip file should extract to the relevant locations. The majority of the files included in the integration are modifications to existing files. This are stored with the same name as the file they are intended to modify, but with the additional extension of.add. Each file contains instructions as to how the original files should be added. More details are given below: 1. Copy pinsafe_image.aspx to /auth. This is a new file, not a modification to an existing one. 2. Edit login.js in /auth/clientscripts. Insert the contents of login.js.add at the start of this file, below the header, as indicated in the file itself. 3. Edit loginmainform.inc in /app_data/include. Insert the contents of loginmainform.inc.add as indicated in this file: locate a particular section of the file and insert a line. 4. Edit loginstyle.inc in /app_data/include. Insert the contents of loginstyle.inc.add at the bottom of this file, before the footer text, as indicated in the file. 5. Ensure file permissions are set correctly on the copied files, Authenticated users need read permissions Configuring Single Channel: Edit the Web.config file On the Citrix Web Interface Server: Edit the web.config file. The web.config.add file contains additional keys that need to be copied into the <appsettings> section of the web.config file (not the <switches> section). Adjust the key values to reflect your PINsafe installation. Find the the comma separated list of URLs under the <appsettings> key AUTH:UNPROTECTED_PAGES and add Add /auth/pinsafe_image.aspx to the list. If using a Swivel virtual or hardware appliance, then the following settings may need to be used. <add key="pinsafe_ssl" value="true" /> <add key="pinsafe_server" value=" " /> <add key="pinsafe_port" value="8443" /> <add key="pinsafe_context" value="proxy" /> <add key="pinsafe_secret" value="" /> <add key="pinsafe_acceptselfsigned" value="true" /> The settings for a software install of PINsafe are: <add key="pinsafe_ssl" value="false" /> <add key="pinsafe_server" value=" " /> <add key="pinsafe_port" value="8080" /> <add key="pinsafe_context" value="pinsafe" /> <add key="pinsafe_secret" value="" /> 246
254 <add key="pinsafe_acceptselfsigned" value="false" /> Challenge and Response Authentication with Count Down Timer Citrix Web Interface can be configured to use Challenge and Response whereby a user enters a username and password, and if that is correct the user is sent an SMS message and will be prompted to enter an OTC. By default the OTC sent is valid for two minutes only, so a count down timer is provided to show how long the user has left. For information on configuring the PINsafe RADIUS Challenge and response see Challenge and Response How to Guide. The required files can be downloaded here: Challenge and Response with count down files Extract the files ensuring their correct locations challenge.inc is copied to app_data/include challenge.js to auth/clientscripts 247


255 163 Testing Navigate to the Citrix Web interface login page. The customisation is visible in the addition of a One Time Code field and a Get Code button. Attempting to login with a correct Citrix username and password but no one time code should result in failure. Only when a correct PINsafe one time code is entered in addition to the Citrix credentials should the user be logged in. Login using Dual channel authentication Login Using Single Channel Graphical Turing Image 248
256 164 Uninstalling Copy the backup files made at the start of installation back to their original locations. On the Citrix Web Interface server: Launch the Access Management Console on the Web Interface 5.x server and select the appropriate site. Under Common Tasks, select Configure Authentication methods > explicit. Click Properties > Two-factor authentication, then select Radius from the drop down list. Remove the PINsafe RADIUS entries. 249
257 165 Troubleshooting Check the PINsafe logs for any error messages, or absence of session starts and RADIUS requests. If following the installation steps the Citrix web interface fails to display properly edit web.config and set the customerrors mode to Off. This will enable the display of detailed error messages which may assist in troubleshooting. To verify the Turing image works from the Citrix server, enter the following into a web browser, preferably from the Citrix server, which should display a Turing image if the sever is functioning correctly: For a Swivel virtual or hardware appliance: For a software only install see Software Only Installation Try copying across again the install files checking to ensure that they are not read only. Also check the install files have not been overwritten by the Citrix software. If the virtual or hardware appliance is using a self signed certificate, you need to add the following entry to web.config: <add key="pinsafe_acceptselfsigned" value="true" /> If a red cross appears, possible causes may be: Self Signed Certificate, either install a valid certificate on the PINsafe server or for testing the client can accept the certificate (load Image URL into browser) PINsafe server not accessible, check networking and firewalls. Check the PINsafe server logs for a session started message. Incorrect PINsafe URL, either http, IP/hostname or context (pinsafe or proxy). Right click on the red cross and view the properties Error Messages INFO RADIUS: <0> Access-Request(1) LEN= :4175 PACKET DROPPED - MESSAGE AUTHENTICATOR IS INCORRECT This indicates that the shared secret on the access device and the PINsafe NAS setting do not match. INFO RADIUS: <0> Access-Request(1) LEN= :4175 PACKET DROPPED - Duplicate packet from NAS When an authentication fails the RADIUS client may retry sending additional authentication requests. Resolve the initial issue causing the failure. 250
258 166 Known Issues and Limitations Upgrading the Citrix Web Interface will overwrite the PINsafe settings and files so the PINsafe integration may need to be applied again. If you need to use userprincipalname to authenticate to Swivel, you may find that the domain name is removed before sending the username to Swivel. To avoid this, make the following changes: Locate and edit the file app_code\pagesjava\com\citrix\wi\pageutils\twofactorauth.java Find the following method: public static String getusername(upncredentials token, boolean fullyqualified) { if (fullyqualified) { return token.getshortdomain() + "\\" + token.getshortusername(); } else { return token.getshortusername(); } } Replace it with the following: public static String getusername(upncredentials token, boolean fullyqualified) { return token.getuseridentity(); } 251
259 167 Additional Information For assistance in the PINsafe installation and configuration please firstly contact your reseller and then Swivel Secure support at 252
260 168 Citrix Web Interface 5.X additional login page options Citrix Web Interface 5.x additional login page options This outlines how to further customise the Citrix login page. This is a supplement to the Citrix Web Interface 5.x Integration guides Removing the Single Channel Button To remove the refresh image, delete the following text: "<a class='leftdoor' href='javascript:onturingbuttonclick();'>" + "Refresh Image" + "</a> Replacing the Single Channel Button with a Dual Channel Button Replacing TURing image with a Dual Channel (SMS) request Edit the file pinsafe_image.aspx find the following line: url.appendformat("{0}:{1}/{2}/scimage?username={3}", server, port, context, Request.QueryString["username"]); Replace with: url.appendformat("{0}:{1}/{2}/dcimage?username={3}", server, port, context, Request.QueryString["username"]); Compatibility This has been tested on Citrix Web Interface Dual Channel Button modification On the Swivel Administration console under Server/Dual Channel, ensure Allow message request by username: is set to Yes. On the Citrix Web Interface Installation create a copy of auth/pinsafe_image.aspx, and call it pinsafe_message.aspx You will also need to ensure that pinsafe_message.aspx is included in the list of unprotected pages. In auth/clientscripts/login.js, make a copy of the function onturingbuttonclick(), calling it onmessagebuttonclick (). Change image.src in this function to point to pinsafe_message.aspx. Edit app_data/include/loginmainform.inc. Locate the text '<div class="otcbuttonpane"'. Copy from here up to the ending </div>, and paste it immediately after this div. Change "href=javascript:onturingbuttonclick" to "href=onmessagebuttonclick". Change the title and id of this div, as well as the id of the enclosed img and span elements. The new div element should be something like this: <div class="otcbuttonpane"><a href="javascript:onmessagebuttonclick()" title="click this button to retrieve a PinSafe message." onmouseover="changeotcbtncolor(true);" onmouseout="changeotcbtncolor(false);" onfocus="changeotcbtncolor(true);" onblur="changeotcbtncolor(false);" tabindex="<%=constants.tab_index_form%>" id="dcmessage" name="dcmessage" ><img id="msgbuttonbg" src="../media/loginbuttonglow.gif" alt="" /><span id="msgbuttonwrapper">get Message</span></a></div> To make sure the new button looks right, you will also need to edit app_data/include/loginstyle.inc. Look for occurrences of #otcbuttonwrapper and add ", #msgbuttonwrapper". Also, for the entry #<%=Constants.ID_OTC_BTN%>, add ", #dcmessage". To change the Refresh Image button modify the file under auth\clientscripts\login.js.add and search for the line Refresh Image and change to the required text, such as Request Code or Request SMS. "<span class='rightdoor'>refresh Image</span>" +" Dual Channel Testing Test the button from the login page. Check the Swivel logs for the dual channel requests Single Channel Button with an automated Single Channel Image The Citrix Web Interface 5.x integration has a button to generate the Single Channel Image. This can be modified to automatically show the Turing image without the need for pressing the button when the user enters into the required field. 253
261 Compatibility This has been tested on Citrix Web Interface 5.1 using the Single Channel Turing Image Single Channel Button to automated Single Channel Image modification Edit the loginmainform.inc file on the Citrix server. Locate the username field - look for the following: <input type='text' name='<%=constants.id_user%>'... insert the following line after that one: onblur='onturingbuttonclick()' This causes the turing image JavaScript function to be called when the user leaves the username field Automated Single Channel Image Testing Test the image from the login page. Check the Swivel logs for the single channel image requests Turing, Dual channel and Display Index buttons The Citrix Web Interface 5.x integration has a button to generate the Single Channel Image. This can be modified to add additional buttons of Show Turing Image, Send Dual Channel Security String and Display Index number. See also Multiple Security Strings How To Guide Compatibility This has been tested on Citrix Web Interface Required Files The following files are required and should be used for installation: [1] Installation Instructions Follow the installation instructions for the relevant Citrix version Testing Verify that three buttons are displayed and that they show the expected results when selected. The following screen shots show the different buttons in use 254

262 Single Channel TURing Image request Multiple Security String Message index number telling user which security string to use for authentication 255

263 Securiy String On Demand Confirmation message of sending the user a Security String 256
Citrix Access Gateway Enterprise Edition 10
 Citrix Access Gateway Enterprise Edition 10 Contents 1 Introduction 2 Prerequisites 3 Baseline 4 Architecture 5 Swivel Configuration 5.1 Configuring the RADIUS server 5.2 Enabling Session creation with
Citrix Netscaler Gateway 11
 Citrix Netscaler Gateway 11 Contents 1 Introduction 2 Prerequisites 2.1 Note on upgrading the Netscaler 3 Baseline 4 Architecture 5 Swivel Configuration 5.1 Configuring the RADIUS server 5.2 Enabling Session
Joomla 1.6 Integration
 Joomla 1.6 Integration Contents 1 Introduction 2 Prerequisites 3 Baseline 4 Architecture 5 Swivel Configuration 5.1 Configuring the RADIUS server 5.2 Enabling Session creation with username 5.3 Setting
Barracuda SSL VPN Integration
 Barracuda SSL VPN Integration Contents 1 Introduction 2 Prerequisites 3 Baseline 4 Architecture 5 Swivel Configuration 5.1 Configuring the RADIUS server 5.2 Enabling Session creation with username 6 Barracuda
Juniper SA 8.x Integration
 Juniper SA 8.x Integration Contents 1 Overview 2 Prerequisites 3 File Downloads 4 Baseline 5 Architecture 6 Installation 6.1 Swivel Configuration 6.1.1 Configuring the RADIUS server 6.1.2 Enabling Session
Aventail Integration
 Aventail Integration SonicWall Aventail clientless SSL VPN Gateway Integration Guide Contents 1 Introduction 2 Prerequisites 3 Baseline 4 Architecture 5 Swivel Configuration 5.1 Configuring the RADIUS
Stonesoft Integration
 Stonesoft Integration Contents 1 Introduction 2 Prerequisites 3 Baseline 4 Architecture 5 Swivel Configuration 5.1 Configuring the RADIUS server 5.2 Setting up the RADIUS NAS 5.3 Enabling Session creation
Checkpoint SecureClient Integration
 Checkpoint SecureClient Integration Version 1.1 March 2010, Updated March 2014 Checkpoint SecureClient Integration Guide Contents 1 Introduction 1.1 Prerequisites 1.2 Baseline 1.3 Architecture 2 Swivel
Table of Contents 1 Cisco AnyConnect...1
 Table of Contents 1 Cisco AnyConnect...1 2 Introduction...2 3 Cisco AnyConnect Integration...3 4 Cisco AnyConnect Client Integration...4 4.1 Configure the Cisco ASA...4 4.2 Install the Cisco AnyConnect
HOB Remote Desktop VPN
 HOB Remote Desktop VPN Contents 1 Introduction 2 Prerequisites 3 Baseline 4 Architecture 5 Swivel Configuration 5.1 Configuring the RADIUS server 5.2 Enabling Session creation with username 5.3 Setting
Microsoft OWA 2007 IIS Integration
 Microsoft OWA 2007 IIS Integration Contents 1 Introduction 2 Prerequisites 3 Baseline 4 Architecture 5 Installation 5.1 Software Installation 5.2 Configuration of the IIS Filter 5.2.1 Swivel Settings 5.2.2
Microsoft OWA 2013 IIS Integration
 Microsoft OWA 2013 IIS Integration Contents 1 Introduction 2 Compatibility 3 Prerequisites 4 File Downloads 5 Architecture 6 Installation 6.1 Software Installation 6.2 Configuration of the IIS Filter 6.2.1
Microsoft ISA 2006 Integration. Microsoft Internet Security and Acceleration Server (ISA) Integration Notes Introduction
 Integration Notes Introduction") Microsoft ISA 2006 Integration Contents 1 Microsoft Internet Security and Acceleration Server (ISA) Integration Notes 2 Introduction 3 Prerequisites 3.1 ISA 2006 Filter 3.2 TMG Filter 4 Baseline 5 Architecture
Microsoft ISA 2006 Integration Contents 1 Microsoft Internet Security and Acceleration Server (ISA) Integration Notes 2 Introduction 3 Prerequisites 3.1 ISA 2006 Filter 3.2 TMG Filter 4 Baseline 5 Architecture
VMware View (Horizon)
") VMware View (Horizon) Contents 1 Introduction 2 Credits 3 Prerequisites 4 Baseline 5 Architecture 6 Swivel Configuration 6.1 Configuring the RADIUS server 6.2 Setting up the RADIUS NAS 6.3 Enabling Session
VMware View (Horizon) Contents 1 Introduction 2 Credits 3 Prerequisites 4 Baseline 5 Architecture 6 Swivel Configuration 6.1 Configuring the RADIUS server 6.2 Setting up the RADIUS NAS 6.3 Enabling Session
Microsoft UAG Integration
 Microsoft UAG Integration Contents 1 Introduction 2 Prerequisites 3 Baseline 4 Architecture 5 Installation 5.1 Configure The Swivel Server 5.1.1 Configure a RADIUS NAS entry 5.1.2 Configure Single Channel
Microsoft OWA 2010 IIS Integration
 Microsoft OWA 2010 IIS Integration Contents 1 Introduction 2 Compatibility 3 Prerequisites 3.1 Additional Prerequisites for Version 2.9 4 File Downloads 4.1 OWA Filter Change History 5 Architecture 6 Installation
<Partner Name> <Partner Product> RSA SECURID ACCESS Implementation Guide. Citrix NetScaler Gateway 12.0
 RSA SECURID ACCESS Implementation Guide Citrix 12.0 Peter Waranowski, RSA Partner Engineering Last Modified: February 20 th, 2018 Table of Contents Table of Contents...
JUNIPER INTEGRATION HOW TO USE PINSAFE TO AUTHENTICATE A JUNIPER SSL VPN SWIVEL SECURE VICTORIA AVENUE HARROGATE HG1 1EL
 JUNIPER INTEGRATION HOW TO USE PINSAFE TO AUTHENTICATE A JUNIPER SSL VPN SWIVEL SECURE VICTORIA AVENUE HARROGATE HG1 1EL JUNIPER INTEGRATION NOTE CONTENTS CONTENTS...2 History...2 Issue...2 Details...2
Microsoft Windows GINA login
 Microsoft Windows GINA login Contents 1 Introduction 2 Prerequisites 3 Baseline 4 Architecture 5 Swivel Configuration 5.1 Configure a Swivel Agent 5.2 Create a Third Party Authentication 6 Terminal Services
Android. Configuring Mobile Client user access on the Swivel virtual or hardware appliance
 Android Contents 1 The Swivel Android Client Overview 2 Prerequisites 3 Swivel Configuration 3.1 Configuring Mobile Client user access on the Swivel virtual or hardware appliance 3.2 Configuring the Swivel
Oracle WebLogic. Overview. Prerequisites. Baseline. Architecture. Installation. Contents
 Oracle WebLogic Contents 1 Overview 2 Prerequisites 3 Baseline 4 Architecture 5 Installation 5.1 Swivel Integration Configuration 5.1.1 Configuring Swivel for Agent XML Authentication 5.1.2 Configuring
2 Oracle WebLogic Overview Prerequisites Baseline Architecture...6
 Table of Contents 1 Oracle Access Manager Integration...1 1.1 Overview...1 1.2 Prerequisites...1 1.3 Deployment...1 1.4 Integration...1 1.5 Authentication Process...1 2 Oracle WebLogic...2 3 Overview...3
JUNIPER INTEGRATION HOW TO USE PINSAFE TO AUTHENTICATE A JUNIPER SSL VPN SWIVEL SECURE VICTORIA AVENUE HARROGATE HG1 1EL
 JUNIPER INTEGRATION HOW TO USE PINSAFE TO AUTHENTICATE A JUNIPER SSL VPN SWIVEL SECURE VICTORIA AVENUE HARROGATE HG1 1EL JUNIPER INTEGRATION NOTE CONTENTS CONTENTS...2 INTRODUCTION...3 PREQUISITES...3
F5 APM Integration. This article describes how to integrate the F5 Big-IP Access Policy Manager with Swivel. The article covers two aspects:
 F5 APM Integration Contents 1 F5 Big-IP Access Policy Manager (APM) Integration Notes 2 RADIUS Integration 2.1 Test the RADIUS authentication 3 Logon page Customisation 3.1 Removing the Automatic TURing
Challenge and Response How to Guide
 Challenge and Response How to Guide Contents 1 Challenge and Response Authentication 2 Introduction 3 Prerequisites 4 Architecture 5 Installation 5.1 Challenge and Response Swivel 3.10 onwards 5.2 Challenge
DIGIPASS Authentication to Citrix XenDesktop with endpoint protection
 DIGIPASS Authentication to Citrix XenDesktop with endpoint protection SmartAccess Configuration with Digipass INTEGRATION GUIDE Disclaimer Disclaimer of Warranties and Limitation of Liabilities All information
Taskbar for Windows. Contents. Overview. Prerequisites. Versions. PositiveID Support. Installer
 Taskbar for Windows Contents 1 Overview 1.1 Versions 1.2 PositiveID Support 1.3 Installer 2 Prerequisites 3 Architecture 4 Swivel Server Configuration 4.1 Enabling Session creation with username 5 Taskbar
Integration Guide. SafeNet Authentication Manager. Using RADIUS Protocol for Citrix NetScaler 10.5
 SafeNet Authentication Manager Integration Guide Technical Manual Template Release 1.0, PN: 000-000000-000, Rev. A, March 2013, Copyright 2013 SafeNet, Inc. All rights reserved. 1 Document Information
Google Apps Integration
 Google Apps Integration Contents 1 Using Swivel for Google Apps Authentication 2 Prerequisites 3 Google SSO 4 Swivel and Google Apps 5 User Experience 6 Install the Swivel Google software 7 Create private
Vendor: Citrix. Exam Code: 1Y Exam Name: Implementing Citrix NetScaler 10 for App and Desktop Solutions. Version: Demo
 Vendor: Citrix Exam Code: 1Y0-250 Exam Name: Implementing Citrix NetScaler 10 for App and Desktop Solutions Version: Demo QUESTION NO: 1 Citrix 1Y0-250 Exam A company uses various pre-approved user devices
Ericom PowerTerm WebConnect
 Ericom PowerTerm WebConnect Contents 1 Introduction 2 Prerequisites 3 Baseline 4 Architecture 5 Installation 5.1 Swivel Integration Configuration 5.1.1 Configuring the RADIUS server 5.1.2 Setting up the
Microsoft IIS version 6 Integration
 Microsoft IIS version 6 Integration Contents 1 Overview 2 Prerequisites 3 PINsafe Configuration 4 Configuring the IIS Server 4.1 Install the PINsafeIISFilter.exe 4.2 Configure the ISAPI filter 4.3 Create
Citrix Netscaler RADIUS Monitor and RADIUS Load Balancer
 Citrix Netscaler RADIUS Monitor and RADIUS Load Balancer Contents 1 Introduction 2 Prerequisites 3 Baseline 4 Swivel Configuration 5 Netscaler Configuration 5.1 Create a Swivel Radius Monitor 5.2 Create
Integrating Swivel Secure s Pinsafe into Fortinet SSL VPN login
 Integrating Swivel Secure s Pinsafe into Fortinet SSL VPN login Overview PinSafe from Swive Secure is an enhance authentication system that utilizes both single and dual factor authentication. The essence
Receiver for BlackBerry 2.2
 Receiver for BlackBerry 2.2 2015-04-19 05:21:53 UTC 2015 Citrix Systems, Inc. All rights reserved. Terms of Use Trademarks Privacy Statement Contents Receiver for BlackBerry 2.2... 3 About This Release...
Installing and Configuring VMware Identity Manager Connector (Windows) OCT 2018 VMware Identity Manager VMware Identity Manager 3.
 OCT 2018 VMware Identity Manager VMware Identity Manager 3.") Installing and Configuring VMware Identity Manager Connector 2018.8.1.0 (Windows) OCT 2018 VMware Identity Manager VMware Identity Manager 3.3 You can find the most up-to-date technical documentation on
Installing and Configuring VMware Identity Manager Connector 2018.8.1.0 (Windows) OCT 2018 VMware Identity Manager VMware Identity Manager 3.3 You can find the most up-to-date technical documentation on
Microsoft Intelligent Application Gateway Installation Notes Table of Contents Introduction Prerequisites
 Microsoft Intelligent Application Gateway Installation Notes Created May 2007 Table of Contents Microsoft Intelligent Application Gateway Installation Notes... 1 Introduction... 1 Prerequisites... 1 Edit
Deliver and manage customer VIP POCs. The lab will be directed and provide you with step-by-step walkthroughs of key features.
 SR L15 Hands-On Lab Description Protecting Corporate Networks with Symantec Validation and ID Protection At the end of this lab, you should be able to Technically present and answer questions from your
Two factor authentication for Citrix NetScaler
 Two factor authentication for Citrix NetScaler logintc.com/docs/connectors/citrix-netscaler.html The LoginTC RADIUS Connector is a complete two-factor authentication virtual machine packaged to run within
VI. Corente Services Client
 VI. Corente Services Client Corente Release 9.1 Manual 9.1.1 Copyright 2014, Oracle and/or its affiliates. All rights reserved. Table of Contents Preface... 5 I. Introduction... 6 II. Corente Client Configuration...
Citrix Exam 1Y0-253 Implementing Citrix NetScaler 10.5 for App and Desktop Solutions Version: 6.0 [ Total Questions: 186 ]
![Citrix Exam 1Y0-253 Implementing Citrix NetScaler 10.5 for App and Desktop Solutions Version: 6.0 [ Total Questions: 186 ]](/thumbs/89/98642625.jpg "Citrix Exam 1Y0-253 Implementing Citrix NetScaler 10.5 for App and Desktop Solutions Version: 6.0 [ Total Questions: 186 ]") s@lm@n Citrix Exam 1Y0-253 Implementing Citrix NetScaler 10.5 for App and Desktop Solutions Version: 6.0 [ Total Questions: 186 ] Question No : 1 Scenario: An administrator needs to deliver production
s@lm@n Citrix Exam 1Y0-253 Implementing Citrix NetScaler 10.5 for App and Desktop Solutions Version: 6.0 [ Total Questions: 186 ] Question No : 1 Scenario: An administrator needs to deliver production
XenMobile 10 Cluster installation. Here is the task that would be completed in order to implement a XenMobile 10 Cluster.
 XenMobile 10 Cluster installation Here is the task that would be completed in order to implement a XenMobile 10 Cluster. For this example, running on my lab, I am using XenServer 6.5 SP1 as hypervisor
Pulse Secure Policy Secure
 Policy Secure RSA SecurID Ready Implementation Guide Last Modified: November 19, 2014 Partner Information Product Information Partner Name Pulse Secure Web Site http://www.pulsesecure.net/ Product Name
Azure MFA Integration with NetScaler
 Azure MFA Integration with NetScaler This guide focuses on describing the configuration required for integrating Azure MFA (Multi-Factor Authentication) with NetScaler. Citrix.com 1 NetScaler is a world-class
SafeNet Authentication Service
 SafeNet Authentication Service Integration Guide Using RADIUS Protocol for Citrix NetScaler 10.1 Access Gateway and Unified StoreFront 2.5 All information herein is either public information or is the
Configuring the SMA 500v Virtual Appliance
 Using the SMA 500v Virtual Appliance Configuring the SMA 500v Virtual Appliance Registering Your Appliance Using the 30-day Trial Version Upgrading Your Appliance Configuring the SMA 500v Virtual Appliance
Barracuda Networks SSL VPN
 RSA SecurID Ready Implementation Guide Partner Information Last Modified: October 24, 2013 Product Information Partner Name Barracuda Networks Web Site https://www.barracuda.com/ Product Name Barracuda
Table of Contents 1 AQL SMS Gateway How to Guide...1
 Table of Contents 1 AQL SMS Gateway How to Guide...1 2 AQL...2 3 Overview...3 4 Trial Account with 50 free SMS messages...4 5 Prerequisites...5 6 Configuring the AQL transport...6 6.1 Configuring one or
VMware Identity Manager Connector Installation and Configuration (Legacy Mode)
") VMware Identity Manager Connector Installation and Configuration (Legacy Mode) VMware Identity Manager This document supports the version of each product listed and supports all subsequent versions until
VMware Identity Manager Connector Installation and Configuration (Legacy Mode) VMware Identity Manager This document supports the version of each product listed and supports all subsequent versions until
Symantec VIP. Integration Guide for Citrix NetScaler
 Symantec VIP Integration Guide for Citrix NetScaler Legal Notice Copyright 2017 Symantec Corporation. All rights reserved. Symantec, the Symantec Logo, and the Checkmark Logo are trademarks or registered
Technical Bulletin, November 2014
 Technical Bulletin, November 2014 Introduction This release bulletin relates to Version 3.10.3 of the Swivel Authentication Platform. Feature Overview Core Enhancements Version 3.10.3... 3 Send Dual Channel
Migrating vrealize Automation 6.2 to 7.1
 Migrating vrealize Automation 6.2 to 7.1 vrealize Automation 7.1 This document supports the version of each product listed and supports all subsequent versions until the document is replaced by a new edition.
Citrix Access Gateway Vpx Installation Guide Vmware
 Citrix Access Gateway Vpx Installation Guide Vmware NetScaler Virtual Appliance Setup for the VMware ESX Platform...12. NetScaler products that include NetScaler, NetScaler virtual appliance, Access Gateway
Installing and Configuring vcloud Connector
 Installing and Configuring vcloud Connector vcloud Connector 2.6.0 This document supports the version of each product listed and supports all subsequent versions until the document is replaced by a new
NetScaler Gateway 10.5
 NetScaler Gateway 10.5 Jun 26, 2014 About This Release Key Features What's New Known Issues Compatibility with Citrix Products System Requirements NetScaler Gateway Plug-in System Requirements Endpoint
SuperLumin Nemesis. Getting Started Guide. February 2011
 SuperLumin Nemesis Getting Started Guide February 2011 SuperLumin Nemesis Legal Notices Information contained in this document is believed to be accurate and reliable. However, SuperLumin assumes no responsibility
Citrix Netscaler configuration for Receiver
 Citrix Netscaler configuration for Receiver Contents 1 Introduction 2 Prerequisites 3 Netscaler 10.x Configuration for Receiver 4 Citrix Access Standard Edition Gateway RADIUS authentication 5 Citrix Access
NetScaler Radius Authentication. Integration Guide
 NetScaler Radius Authentication Integration Guide Copyright 2018 Crossmatch. All rights reserved. Specifications are subject to change without prior otice. The Crossmatch logo and Crossmatch are trademarks
Citrix Access Gateway Implementation Guide
 Citrix Access Gateway Implementation Guide Copyright Copyright 2006, CRYPTOCard Corp. All Rights Reserved. No part of this publication may be reproduced, transmitted, transcribed, stored in a retrieval
<Partner Name> <Partner Product> RSA SECURID ACCESS Implementation Guide. Pulse Connect Secure 8.x
 RSA SECURID ACCESS Implementation Guide Pulse Connect Secure 8.x Daniel R. Pintal, RSA Partner Engineering Last Modified: January 24 th, 2018 Solution Summary The Pulse
Amigopod Release Notes. Updating to Amigopod Document Overview. Overview of the Update Process. Verify the System s Memory Limit
 Amigopod 3.5.4 Release Notes This document contains release information for version 3.5.4 of the Aruba Amigopod visitor management appliance. Document Overview This document is organized into the following
Cisco TelePresence VCS Cluster Creation and Maintenance
 Cisco TelePresence VCS Cluster Creation and Maintenance Deployment Guide Cisco VCS X8.5 Cisco TMS 13.2 or later December 2014 Contents Introduction 4 Prerequisites 5 Upgrading an X7.1 or later cluster
Configuring Cisco TelePresence Manager
 CHAPTER 3 Revised: November 27, 2006, First Published: November 27, 2006 Contents Introduction, page 3-1 System Configuration Tasks, page 3-2 Security Settings, page 3-3 Database, page 3-4 Room Phone UI,
App Orchestration 2.6
 Configuring NetScaler 10.5 Load Balancing with StoreFront 3.0 and NetScaler Gateway for Last Updated: June 04, 2015 Contents Introduction... 3 Configure the NetScaler load balancer certificates... 3 To
Migrating from Citrix XenApp (IMA / FMA) to Parallels Remote Application Server
 to Parallels Remote Application Server") Parallels Remote Application Server Migrating from Citrix XenApp (IMA / FMA) to Parallels Remote Application Server Contents 1. Introduction a. Why Should You Migrate from Citrix to Parallels RAS b. Overview
Parallels Remote Application Server Migrating from Citrix XenApp (IMA / FMA) to Parallels Remote Application Server Contents 1. Introduction a. Why Should You Migrate from Citrix to Parallels RAS b. Overview
PAN 802.1x Connector Application Installation Guide
 PAN 802.1x Connector Application Installation Guide Version 1.2 "Copyright CodeCentrix. All rights reserved 2015. Version 1.2 Contact Information CodeCentrix www.codecentrix.co.za/contact Email: info@codecentrix.co.za
Sentry SSO with Netscaler
 Sentry SSO with Netscaler Contents 1 Introduction 2 Overview 3 Configure Netscaler Login 4 Configuring Netscaler 5 Configuring Sentry Login 6 Configuring Sentry RADIUS 7 SSO 8 Authentication with AD/LDAP
Exam : JN Title : Juniper Networks Certified Internet Assoc(JNCIA-SSL) Exam. Version : Demo
 Exam. Version : Demo") Exam : JN0-561 Title : Juniper Networks Certified Internet Assoc(JNCIA-SSL) Exam Version : Demo 1. Which model does not support clustering? A. SA700 B. SA2000 C. SA4000 D. SA6000 Answer: A 2. What is a
Exam : JN0-561 Title : Juniper Networks Certified Internet Assoc(JNCIA-SSL) Exam Version : Demo 1. Which model does not support clustering? A. SA700 B. SA2000 C. SA4000 D. SA6000 Answer: A 2. What is a
Access Gateway 9.3, Enterprise Edition
 Access Gateway 9.3, Enterprise Edition 2015-05-03 05:23:10 UTC 2015 Citrix Systems, Inc. All rights reserved. Terms of Use Trademarks Privacy Statement Contents Access Gateway 9.3, Enterprise Edition...
IPMI Configuration Guide
 IPMI Configuration Guide 1. Introduction of IPMI Server Manager... 2 2. IPMI Server Manager GUI Overview... 3 1 1. Introduction of IPMI Server Manager IPMI Server Manager allows remote access of computers
Cisco Expressway Cluster Creation and Maintenance
 Cisco Expressway Cluster Creation and Maintenance Deployment Guide Cisco Expressway X8.6 July 2015 Contents Introduction 4 Prerequisites 5 Upgrading an X8.n cluster to X8.6 6 Prerequisites 6 Upgrade Expressway
HOB HOB RD VPN. RSA SecurID Ready Implementation Guide. Partner Information. Product Information Partner Name. Last Modified: March 3, 2014 HOB
 RSA SecurID Ready Implementation Guide Last Modified: March 3, 2014 Partner Information Product Information Partner Name HOB Web Site www.hobsoft.com Product Name Version & Platform 2.1 Product Description
AppController :28:18 UTC Citrix Systems, Inc. All rights reserved. Terms of Use Trademarks Privacy Statement
 AppController 1.0 2013-05-26 04:28:18 UTC 2013 Citrix Systems, Inc. All rights reserved. Terms of Use Trademarks Privacy Statement Contents AppController 1.0... 9 About This Release... 11 Introduction...
Table of Contents 1 V3 & V4 Appliance Quick Start V4 Appliance Reference...3
 Table of Contents 1 V & V4 Appliance Quick Start...1 1.1 Quick Start...1 1.2 Accessing Appliance Menus...1 1. Updating Appliance...1 1.4 Webmin...1 1.5 Setting Hostname IP Address...2 1.6 Starting and
IBM Single Sign On for Bluemix Version December Identity Bridge Configuration topics
 IBM Single Sign On for Bluemix Version 2.0 28 December 2014 Identity Bridge Configuration topics IBM Single Sign On for Bluemix Version 2.0 28 December 2014 Identity Bridge Configuration topics ii IBM
PrepAwayExam. High-efficient Exam Materials are the best high pass-rate Exam Dumps
 PrepAwayExam http://www.prepawayexam.com/ High-efficient Exam Materials are the best high pass-rate Exam Dumps Exam : 1Y0-250 Title : Implementing Citrix NetScaler 10 for App and Desktop Solutions Vendor
Authlogics Forefront TMG and UAG Agent Integration Guide
 Authlogics Forefront TMG and UAG Agent Integration Guide With PINgrid, PINphrase & PINpass Technology Product Version: 3.0.6230.0 Publication date: January 2017 Authlogics, 12 th Floor, Ocean House, The
Implementation Guide for protecting Juniper SSL VPN with BlackShield ID
 Implementation Guide for protecting Juniper SSL VPN with BlackShield ID Copyright Copyright 2011, CRYPTOCard All Rights Reserved. No part of this publication may be reproduced, transmitted, transcribed,
ISA 2006 and OWA 2003 Implementation Guide
 ISA 2006 and OWA 2003 Implementation Guide Copyright Copyright 2006, CRYPTOCard Corp. All Rights Reserved. No part of this publication may be reproduced, transmitted, transcribed, stored in a retrieval
Vendor: Citrix. Exam Code: 1Y Exam Name: Designing, Deploying and Managing Citrix XenMobile Solutions. Version: Demo
 Vendor: Citrix Exam Code: 1Y0-370 Exam Name: Designing, Deploying and Managing Citrix XenMobile Solutions Version: Demo QUESTION NO: 1 Which connection type is used when WorxWeb for ios is configured to
<Partner Name> <Partner Product> RSA SECURID ACCESS. VMware Horizon View 7.2 Clients. Standard Agent Client Implementation Guide
 RSA SECURID ACCESS Standard Agent Client Implementation Guide VMware Horizon View 7.2 Clients Daniel R. Pintal, RSA Partner Engineering Last Modified: September 14, 2017
Configuring Confluence
 Configuring Confluence Configuring Confluence for SSO enables administrators to manage their users using NetScaler. Users can securely log on to Confluence using their enterprise credentials. To configure
XenMobile 8.5 Migration Whitepaper
 Mobile Platforms Group XenMobile 8.5 Migration Whitepaper This document outlines the supported migration path from CloudGateway 2.6 components to XenMobile (Project Ares) components. In addition, the document
IVE Quick Startup Guide - OS 4.0
 IVE Quick Startup Guide - OS 4.0 Initial Setup Once you receive the IVE device, unpack the IVE and connect it to a PC or Laptop using the console (null modem) cable provided with the IVE. You have to connect
HySecure Quick Start Guide. HySecure 5.0
 HySecure Quick Start Guide HySecure 5.0 Last Updated: 25 May 2017 2012-2017 Propalms Technologies Private Limited. All rights reserved. The information contained in this document represents the current
goremote.carolinas.org
 Detailed instructions for goremote.carolinas.org Section 1. Registering your account in the goremote portal To setup your access to goremote.carolinas.org, please follow these steps: Open a browser window
Upgrade Guide for Cisco Digital Media System Release 5.0
 Upgrade Guide for Cisco Digital Media System Release 5.0 Revised: December 12, 2008, This guide provides information about and instructions for upgrading your Cisco DMS appliances and Cisco Digital Media
Upgrading the Server Software
 APPENDIXB This appendix describes how to upgrade or reinstall the Cisco PAM server software, desktop client software, and Gateway module firmware. Contents Upgrade Notes for Release 1.5.0, page B-2 Obtaining
Vendor: Citrix. Exam Code: 1Y Exam Name: Implementing Citrix NetScaler 10.5 for App and Desktop Solutions. Version: Demo
 Vendor: Citrix Exam Code: 1Y0-253 Exam Name: Implementing Citrix NetScaler 10.5 for App and Desktop Solutions Version: Demo QUESTION 1 A Citrix Administrator needs to configure a single virtual server
KACE Systems Deployment Appliance 5.0. Administrator Guide
 KACE Systems Deployment Appliance 5.0 Administrator Guide Table of Contents About the KACE Systems Deployment Appliance...10 Getting started... 11 Tasks for getting started using the KACE SDA... 11 About
Deploying Citrix Access Gateway VPX with Web Interface 5.4
 Deploying Citrix Access Gateway VPX with Web Interface 5.4 Ben Piper President Ben Piper Consulting, LLC Copyright 2012 Ben Piper. All rights reserved. Page 1 Introduction Deploying Citrix Access Gateway
Migrating vrealize Automation 6.2 to 7.2
 Migrating vrealize Automation 6.2 to 7.2 vrealize Automation 7.2 This document supports the version of each product listed and supports all subsequent versions until the document is replaced by a new edition.
Upgrade, Backup, Restore, and Reset Guide for Access Gateway Enterprise Edition
 Citrix Systems, Inc. Upgrade, Backup, Restore, and Reset Guide for Access Gateway Enterprise Edition Author: Scott L. Lindars Department: Worldwide Technical Readiness Issue Date: June 2007 Circulation:
Persistent Data Transfer Procedure
 This chapter describes exporting and importing Cisco Secure ACS, Release 5.5 or 5.6 data into Cisco ISE, Release 1.4 system using the migration tool. Exporting Data from Cisco Secure ACS, page 1 Analyzing
Upgrade Instructions. NetBrain Integrated Edition 7.1. Two-Server Deployment
 NetBrain Integrated Edition 7.1 Upgrade Instructions Two-Server Deployment Version 7.1a Last Updated 2018-09-04 Copyright 2004-2018 NetBrain Technologies, Inc. All rights reserved. Contents 1. Upgrading
AppController :21:56 UTC Citrix Systems, Inc. All rights reserved. Terms of Use Trademarks Privacy Statement
 AppController 2.6 2014-03-18 13:21:56 UTC 2014 Citrix Systems, Inc. All rights reserved. Terms of Use Trademarks Privacy Statement Contents AppController 2.6... 6 About This Release... 8 Getting Started...
Vendor: Citrix. Exam Code: 1Y Exam Name: Managing Citrix XenDesktop 7 Solutions Exam. Version: Demo
 Vendor: Citrix Exam Code: 1Y0-200 Exam Name: Managing Citrix XenDesktop 7 Solutions Exam Version: Demo Question Set 1 QUESTION 1 Scenario: A Citrix Administrator installs XenServer. The administrator provisions
External Authentication with Ultra Protect v7.2 SSL VPN Authenticating Users Using SecurAccess Server by SecurEnvoy
 External Authentication with Ultra Protect v7.2 SSL VPN Authenticating Users Using SecurAccess Server by SecurEnvoy Contact information SecurEnvoy www.securenvoy.com 0845 2600010 1210 Parkview Arlington
TechTalk: Implementing Citrix Receiver from Windows to iphone. Stacy Scott Architect, Worldwide Technical Readiness
 TechTalk: Implementing Citrix Receiver from Windows to iphone Stacy Scott Architect, Worldwide Technical Readiness Citrix Receiver Citrix Receiver Overview Citrix Receiver for iphone Citrix Receiver for
Performing Maintenance Operations
 This chapter describes how to back up and restore Cisco Mobility Services Engine (MSE) data and how to update the MSE software. It also describes other maintenance operations. Guidelines and Limitations,