Abstract. Avaya Solution & Interoperability Test Lab
|
|
|
- Roberta Daniels
- 5 years ago
- Views:
Transcription

1 Avaya Solution & Interoperability Test Lab Application Notes for Dialogic IMG 1010 Media Gateway with Avaya Communication Server 1000E 7.5 and Avaya Meeting Exchange Enterprise Edition 6.2 using SIP Trunking - Issue 1.0 Abstract These Application Notes present a sample configuration for connectivity between Avaya Communications Server 1000E (CS1000E) using E1/PSTN to connect to the Dialogic IMG 1010 Media Gateway. The Dialogic IMG 1010 Media Gateway provides E1 to SIP and SIP to E1 protocol translation to interoperate with Avaya Aura Meeting Exchange Enterprise Edition 6.2 via SIP Trunking. Testing was conducted via the Internal Interoperability Program at the Avaya Solution and Interoperability Test Lab. 1 of 85
2 Table of Contents 1. Introduction Interoperability Testing Test Description and Coverage Test Results and Observations G729 Codec Issue UBlast (Blast Dial) - Manual & Auto Bridge Talk Reports Network Outage / Recovery Line Transfer / Conference Transfer Reference Configuration Equipment and Software Validated Configuration Tools Configure Avaya Communication Server Login to Unified Communication Management GUI Verify Equipped Feature Packages Administer E1 Card Administer D-Channel Administer Routes and Trunks Administer Route List Block Administer Distant Steering Code Enable the E1 Card Enable D-channel Automatic Establishment Backing up the changes to CS1000E Configure Dialogic IMG 1010 Media Gateway Connecting with Client View Dialogic IMG Configuration Name Profiles Create SIP Profile Create DS1 Profile IP Bearer Profiles New IP Codec in Bearer Profile Logical IMG Physical IMG Network Interfaces Network Interface VoIP Module Network Interface CPU - Signaling Facilities for DS1 and VoIP of 85
3 DS1 Facilities VoIP Facilities IMG Signaling (ISDN, SS7, SIP, H.323) SIP Signaling ISDN Signaling ISDN D Channel External Network Elements External Gateways External Gateway Routing Configurations Channel groups Channel Group (ISDN) Assign ISDN D Channel to Channel Group (ISDN) Assign ISDN B-Channels to the ISDN Group Channel Group (SIP) Channel Group with SIP Gateway Routing Route Entry Configure Avaya Meeting Exchange Enterprise Application Configure System Manager for Meeting Exchange Configure SIP Listener Configure Dial Out Configure DNIS Mappings Creating a Sign In User for Bridge Talk Bridge Talk Configuration Create a SCAN Conference Verification Steps Verify Call Flows Verification Avaya Communication Server 1000E Troubleshooting Call tracing Verify Dialogic IMG Verify ISDN Trunk Status Verify ISDN D-Channel Status SIP trunk Status Call Tracing in IMG Conclusion Additional References Appendix A Meeting Exchange Configuration via SSH of 85
4 1. Introduction There are installation instances of Avaya Communication Server 1000E which are not SIP or IP capable, or where the software release may not have been SIP interoperability tested, but the customer wishes to deploy Avaya Meeting Exchange Enterprise Edition. In this case an effective solution is to front end the Avaya Communication Server 1000E with an E1-PSTN to SIP gateway, which then signals via SIP trunks to Avaya Aura Session Manager R6.2, which in turn has a SIP trunk to Avaya Meeting Exchange Enterprise Edition. In these Application Notes, the E1/PSTN to SIP Gateway is represented by the Dialogic IMG Interoperability Testing The solution in this document uses the following configuration: Avaya Communication Server 1000E (CS1K) is configured with an E1/PSTN link to Dialogic IMG 1010 Media Gateway (IMG 1010). In turn, the Dialogic IMG 1010 Media Gateway is configured with SIP trunk to Avaya Meeting Exchange Enterprise Edition R6.2. The incoming call from the Avaya Communication Server 1000E is presented as E1 to the Dialogic IMG 1010 Media Gateway. The E1 signal is converted to SIP by the IMG 1010 and signaled to the Avaya Meeting Exchange Enterprise Edition R6.2 using TCP, with DTMF being transmitted within the RTP stream using RFC2833 compliant messages. The Avaya Meeting Exchange Enterprise Edition R 6.2 release can now be managed via the Avaya Aura System Manager as a Managed Element. The initial configuration of Meeting Exchange as a Managed Element is not covered in detail in this document. For more details, see Section 10 Reference [6]. Note: A third party PBX was connected to the solution to represent an external PSTN caller dialing to the Meeting Exchange conference service via Avaya Communication Server 1000E. The configuration of the E1 trunk between Avaya Communication Server and the third party PBX is not covered in this document. 4 of 85
5 2.1. Test Description and Coverage Testing focused on the following: SCAN/FLEX/DIRECT Conference connectivity / two way audio Use of CODECS G711MU /A and G729 DTMF In-Band / Out of Band Blast Dial - a predefined list of attendees that can rung by use of a feature code by the moderator Moderator Features / Conferee features Moderator initiated Out Dial Conference Recording / Playback Operator Audio Path Operator activities i.e. Help / Blast Dial / Conference Room transfers 2.2. Test Results and Observations Testing was generally successful; however at the time of testing, the release of software for Meeting Exchange was a pre GA (General Availability) release. As such, some problems were experienced during testing which have been reported. The following issues were discovered during the testing phase: G729 Codec Issue Under tests codecs G711MU and G711A functioned correctly. However when the codec was defined as G729 only, the call initially failed. On observation, the SIP Invite to MX contained G729 in the SDP. The MX responded with SIP 488 Not Acceptable here and traces from MX indicated No matching media found. On further investigation, it was discovered that insufficient capacity had been made available to the system under test which was configured with 8000 revenue ports. Alteration of the processtable.cfg was needed to increase the softms (soft media server) processes from default 8 softms processes to a required 12 softms processes. Under recommendation from the support team, this was increased to 12 by configuring the processtable.cfg file manually, incrementing the ipckeynumber and ProcessArgs value by one each time. The screen shot on the next page shows the four additional media Server entries to the processtable.cfg file within Meeting Exchange to increase the number of ports from 8 to 12 to accommodate the use of the G729 codec. 5 of 85
6 config]# cat processtable.cfg # processes file, enumerates the number of processes in the network. # will have the name of the process Key ID and the IP address proccessname ipckeynumber autostart ProcessExe ipaddress route ProcessArgs initipcb noexecute bridget noexecute dspevents/msdispatcher,netevents/sipagent commsprocess /usr/dcb/bin/servercomms sipagent /usr/dcb/bin/sipagent dspevents/msdispatcher,appevents/bridget700 msdispatcher /usr/dcb/bin/msdispatcher netevents/sipagent,appevents/bridget700,dspevents/mediaserver mediaserver /usr/dcb/bin/softms appevents/msdispatcher,netevents/msdispatcher 1 mediaserver /usr/dcb/bin/softms appevents/msdispatcher,netevents/msdispatcher 2 mediaserver /usr/dcb/bin/softms appevents/msdispatcher,netevents/msdispatcher 3 mediaserver /usr/dcb/bin/softms appevents/msdispatcher,netevents/msdispatcher 4 mediaserver /usr/dcb/bin/softms appevents/msdispatcher,netevents/msdispatcher 5 mediaserver /usr/dcb/bin/softms appevents/msdispatcher,netevents/msdispatcher 6 mediaserver /usr/dcb/bin/softms appevents/msdispatcher,netevents/msdispatcher 7 mediaserver /usr/dcb/bin/softms appevents/msdispatcher,netevents/msdispatcher 8 mediaserver /usr/dcb/bin/softms appevents/msdispatcher,netevents/msdispatcher 9 mediaserver /usr/dcb/bin/softms appevents/msdispatcher,netevents/msdispatcher 10 mediaserver /usr/dcb/bin/softms appevents/msdispatcher,netevents/msdispatcher 11 mediaserver /usr/dcb/bin/softms appevents/msdispatcher,netevents/msdispatcher 12 notifyservice noexecute :10235 snmpagent noexecute logserver /usr/dcb/bin/logserver none /usr/ipcb/config/logserverconfig.xml #mxmonitor noexecute <aps1-ip> appevents/msdispatcher,netevents/msdispatcher aps1 #mxmonitor noexecute <aps2-ip> appevents/msdispatcher,netevents/msdispatcher aps2 #mxmonitor noexecute <aps3-ip> appevents/msdispatcher,netevents/msdispatcher aps3 #mxmonitor /usr/dcb/bin/mxmonitor <stdby-ip> appevents/msdispatcher,netevents/msdispatcher standby UBlast (Blast Dial) - Manual & Auto On attempting to test ublast (Blast Dial-Automatic and manual), the feature was found not be working. On further investigation, it was recommended that when entering the participants into a blast dial list, the Name field should not be populated with an extension number. Instead use Alpha characters Bridge Talk Reports Bridge Talk is the software management tool used for creating conferences. On using the Bridge Talk tool Reports to view the conference details for the long period, it was not possible to open the reports for the previous day. A message would be received that the pages were blank, else 6 of 85
7 the Bridge Talk would crash completely. Only reports for today would load to the report viewer. The Meeting Exchange was checked and confirmed that the files used for reporting (*.COD and *.CODR) do exist and have a reasonable size. This issue was resolved by applying patch mx-bridge-patch Network Outage / Recovery When the NIC was pulled the endpoints were disconnected. On reapplying the NIC to bring MX on line, there was no attempt to reconnect the callers. Observations in Bridge Talk showed a conference with 5 users, however these were not diallable from an Operator in Bridge Talk. However a moderator or conferee could recall into the Conference and be joined to the original conference. The phantom endpoints in the conference had to be disconnected via Bridge Talk before the conference room was cleared completely. The Avaya SIP and H.323 endpoints were rejoined to the conference Line Transfer / Conference Transfer It is possible via Bridge Talk to move participants by selecting their line number and performing a transfer to a different conference room. It is also possible to move the participants in one conference room to another. However, this is intermittently not working. On the occasion the transfer does not complete, a message is displayed in Bridge Talk Problems with the statustcp socket you are not receiving messages. Your display may not be accurate. However the Operator can perform a transfer from one conference room to another of a participant. This issue was resolved by applying patch mx-bridge-patch of 85
8 3. Reference Configuration The configuration in Figure 1 was used to compliance test Avaya Communication Server 1000E (CS1000E) interoperability with Avaya Meeting Exchange Enterprise Edition via E1/PSTN and SIP trunks using Dialogic IMG 1010 Media Gateway. An E1 trunk is used to connect Avaya Communication Server 1000E to the Dialogic IMG 1010 Media Gateway,which in turn is also configured with a SIP trunk to Avaya Meeting Exchange Enterprise Edition. The gateway s role is to translate E1 messages to SIP and vice versa. Avaya Communication Server 1000E supports an Avaya 1140 IP Phone (Unistim), Avaya 1220 IP Phone (Unistim), and an Avaya M3904 Digital Phone. The Avaya Aura environment also consisted of System Manager which was used for management programming of the Avaya Meeting Exchange Enterprise Edition. An additional third-party PBX was connected to the CS1000E with an E1 trunk to simulate an external caller. The configuration of this is outside the scope of this document. Avaya Meeting Exchange Enterprise Edition has been installed and configured on Avaya S8800 Media Server. Figure 1 Network configuration of Avaya Communication Server 1000E, Dialogic IMG 1010 Media Gateway, with Avaya Meeting Exchange enterprise Edition R6.2 8 of 85
9 4. Equipment and Software Validated The following equipment and software were used for the sample configuration provided: Equipment Avaya S8800 Media Server Software Avaya Aura Meeting Exchange Enterprise Edition R 6.2 Version mx-bridge-patch mx-bridge-patch mx-bridge-patch Avaya Bridge Talk Version Avaya S8800 Media Server Avaya Aura System Manager R6.2 Release: smgr (Service Pack 3) Build VSP: smgr Avaya Communication Manager 1000E Avaya Handset 1140E (IP) Phone Avaya Handset 1220 (IP) Phone Avaya Handset M3904 (Digital) Dialogic Release 7.5 Q Version 4121 UniStim 0625C8A UniStim 062AC8A Digital Endpoint Dialogic Gate Control Element Management System (GCEMS) Server IMG 1010 Media Gateway RedHat Enterprise Linux Server Release 5.1 (Tikanga) Dialogic ClientView Version Software Version of 85
10 4.1. Configuration Tools Avaya Communication Server 1000E (CS1K) was configured via UCM Element Manager which can be accessed via Avaya Aura System Manager if using Single Sign On. Alternatively, the Element Manager GUI can be accessed directly via the ELAN IP Address. Additional configuration was carried out using PuTTY to access the relevant Overlays via the CLI console screen. Dialogic IMG 1010 Media Gateway was configured via IMG Client View software. This was accessed by using VNC Viewer to connect to the GCEMS server and running the IMG Client software installed on the Linux server. For later versions, a Windows based IMG ClientView software package is available. Avaya Meeting Exchange was configured via Avaya Aura System Manager. Configuration of Meeting Exchange is also possible via a PuTTY session. Avaya Bridge Talk was used to configure the conference settings for SCAN, FLEX and DIRECT. This document has assumed the following: All relevant IP equipment has been installed and licensed and introduced to the IP LAN Endpoints on CS1000E have been configured and are capable of dialing one another. Users have a basic familiarity with PuTTY and the web GUI interfaces for both Avaya Communication Server 1000E (CS1000E), Avaya Aura System Manager and Avaya Aura Meeting Exchange. 10 of 85

11 5. Configure Avaya Communication Server This section focuses on configuring the E1 trunks on Avaya Communication Server 1000E to connect with Dialogic IMG 1010 Media Gateway. The NTBK50AAE5 E1 2Mbps ISDN trunk card is installed in slot 3 of the Avaya MG1000 Media gateway. These Application Notes assume that the telephones are installed and configured and the ISDN PRI is not being configured for the first time, so error detection thresholds and clock synchronization control are assumed to be in place. If not, refer to the ISDN Primary Rate Interface Document in Section 10 Reference [4] for detailed descriptions. Furthermore these Applications Notes used the Coordinated Dial Plan (CDP) feature to route calls from the Avaya Communication Server 1000E over the E1 to Dialogic IMG 1010 Media Gateway. The CDP feature is assumed to be already enabled on Avaya Communication Server 1000E, and therefore will not be described in detail. The procedures below describe the details of configuring Avaya Communication Server 1000E: Log in to the Unified Communications Management GUI Launch Element Manager Verify Equipped Feature Packages Administer E1 card Administer D-Channel Administer Routes and Trunks Administer Route List Block Administer Distant Steering Code Enable E1 card Enable D-channel automatic establishment Login to Unified Communication Management GUI. In these application notes, access was made via Avaya Aura System Manager using Single Sign On. Open an instance of a web browser and connect to the web GUI for Avaya Aura System Manager and login in with appropriate credentials. 11 of 85


12 Once connected to System Manager, select UCM Services from the System Manager Home screen in the Services section. Once the Elements screen has opened, select the Element Manager system to be opened. 12 of 85

13 If prompted to, accept the web security certificate. A successful connection will show the System Overview Screen. Menu choices on the left are expandable where indicated with a + symbol. Once selected, the details will be displayed on the right hand side Verify Equipped Feature Packages To verify the features available within CS1000E which are necessary for this configuration select Tools Logs and Reports Equipped Feature Packages. Using the column labeled Package Number on the right, scroll down and ensure the following packages are equipped. 19 Digit Display (DDSP) 59 Coordinated Dialing Plan (CDP) 95 Calling Party Name Display (CPND) 145 Integrated Services Digital Network (ISDN) 146 Primary Rate Access (CO) (PRA) Mb/s Primary Rate Interface (PRI2) 184 Overlap Signaling (M1 to M1 and M1 to 1TR6 CO) (OVLP) 202 International Primary Rate Access (CO) (IPRA) 263 QSIG Interface (QSIG) 305 QSIG Generic Functional Protocol (QSIGGF) 316 QSIG Supplementary Service (QSIG-SS) 13 of 85


14 5.3. Administer E1 Card Select System Core Equipment Loops. To add a new Loop, click on the drop down arrow, select 2.0 Mb/s Primary Rate Interface and click on the Add button. In the new screen that opens enter the following: PRI Loop Number Enter the loop number i.e. 043 to represent where the Media Gateway Card will be inserted in the relevant Shelf and Slot. Alternatively enter a number between Media Gateway Card Enter the Shelf-Cabinet-Slot where the NTBK50AAE5 E1 2Mbps ISDN trunk card has been inserted into the Avaya MG1000 Media Gateway. In this example the trunk card has been inserted in slot 3. Click Save to save the changes. 14 of 85


15 At this stage, the screen may look similar to the one below, however the status of the loop may show as disabled. At this stage, the status of disabled is normal as further configuration is required before the trunk card can be enabled for service Administer D-Channel The next step is to administer a D-Channel. Navigate to Routes and Trunks D-Channels. From the drop down for Choose a D-Channel Number selecting an appropriate number from the list and set type to DCH. In the example below, the D-Channel number chosen matches the loop number created in Step 5.3 for programming purposes. Click on the Add button to begin the creation of the D-Channel. 15 of 85
16 The D-Channel 43 Property screen is displayed. Enter the following values for the specified fields and leave other fields at default. D channel Card Type Set to MSDL Media Gateway Card Set to Port Number Set to 1 Designator Set to a desired name for the D-Channel User Set to Primary Rate Interface Interface Type for D-Channel Set to Euro ISDN Interface (EURO) Country Set to ETS 300=102 basic protocol (ETSI) D channel PRI loop Set to 43 Scroll down the screen and expand Basic Options (BSCOPT) Configuring D-channel Basic Options Configure the following settings: PINX customer number Set to 0 Output request Buffers Set to 128 D-channel transmission rate Set to 64kb/s clear (64KC) Channel Negotiation option Set to No Alternative acceptable, exclusive(1) Then click on Edit button to configure Remote Capabilities 16 of 85
17 Configure Remote Capabilities: Scroll down the screen and check the following capabilities: Connected line identification presentation (COLP) Diversion info. Sent, rerouting requests processed (DV3I) Message waiting indication using integer values (QMWI) Once these fields have been checked, click on Return Remote Capabilities button. Please note: screen show has been condensed. Once the changes have been made, scroll down the screen and select Submit button. 17 of 85


18 The D-channel should then be displayed Administer Routes and Trunks The next step is to create a route and trunks to route calls to Dialogic IMG 1010 Media Gateway. From the menu on the left select Routes and Trunks Routes and Trunks. Next to the applicable Customer click on the Add Route button. The Customer 0, New Route Property Configuration screen is displayed. Enter the following values and leave the remaining fields at default. 18 of 85
19 Route Number (ROUT) Set to 43 Designator field for Trunk (DES) Set to a descriptive name Trunk Type (TKTP) Set to TIE Incoming & Outgoing Trunk (ICOG) Set to IAO Access Code for trunk route (ACOD) Set to 143 Digital Trunk Route (DTRK) Enable Digital Trunk Type (DGTP) Set to PRI2 Integrated services digital network option (ISDN) Enable Mode of operation (MODE) Set to ISDN/PRA route, DTRK must be Yes (PRA) Interface type for Route (IFC) Set to EuroISDN Interface (EURO) Private Network Identifier (PNI) Set to Call Type for outgoing direct dialed TIE route (CTYP) Set to Coordinated Dial Plan (CDP) Calling Number Dial Plan (CNDP) Set to Unknown (UKWN) 19 of 85
20 Once complete, scroll down the screen and expand the section General Options General Options Configure the following options: Data Selection (DSEL) Set to VOD Trunk Access Restriction Group (TARG) Set to 01 Search Method for Outgoing trunk member (SRCH) Set to LIN Once these fields have been configured, scroll down and select the Submit button to commit the changes. 20 of 85

21 Once the changes have been committed, the next step is to add Trunks to the route. To Add trunks, click on the Add Trunks button beside the Route. Trunks may be added one at a time or in multiples. In the following example, 30 trunks will added to the route through a single screen configuration. In the Basic configuration area for trunk configuration, enter the following: Multiple trunk input number Set the number of trunks to be created i.e. 30 Auto Increment member number Ensure this field is ticked Trunk data block Set to TIE trunk data block (TIE) Terminal Number Set to Designator field for Trunk Member Number Trunk Group Restriction Access Set to 1 Click Save to save the changes and to create the trunks. Enter a descriptive name Enter the first member number. i.e. 1 (This will increment on each subsequent trunk) 21 of 85

22 Once the trunks have been created they can be displayed against the Route by expanding the Route details 22 of 85

23 5.6. Administer Route List Block The next two stages involve setting up a Route List Block and a Distant Steering Code to route the digit patterns dialed by the Avaya CS1000E endpoints to reach the Avaya Meeting Exchange. The first step is to create a Route List Block. From the menu on the left select Dialing and Numbering Plans Electronic Switched Network. From the screen on the right hand side, select Route List Block (RLB). In the Route List Blocks window enter the Route List Index to be created and click the Add button. 23 of 85
24 In the configuration screen fill in the following fields: (screen shots broken up for clarity) In Basic Options section: Ensure the field Route List Index is set to 43. Leave all other fields at default. In Options section: Click on the drop down beside Route Number and select the appropriate Route Number. Leave all other fields at default. Scroll down the screen and select Submit (not shown). Once submitted the Route List Blocks screen should look similar to the next screen shot when the Route List Block Index has been expanded. 24 of 85
 when a specific digit pattern is dialed. Return to the Electronic Switched Network (ESN) screen and select Distant Steering Code.")
25 5.7. Administer Distant Steering Code The Distant Steering Code will indicate which Route List to use (and therefore which trunks/routes to use) when a specific digit pattern is dialed. Return to the Electronic Switched Network (ESN) screen and select Distant Steering Code. 25 of 85
26 To add a new Distant Steering Code change the drop down to Add and enter the first few digits of the pattern to be dialed. Click on the Add button. In the example below the digit pattern to dial the Meeting Exchange conference number is 23XXX. (All conference access numbers start 23). In the configuration screen that appears set the following fields: Flexible Length number of digits Set to 5 i.e. the number of digits in the conference access number. Route List to be accessed for trunk Steering Code Set to Enable the E1 Card Even though the E1 card can be enabled via the web based interface Element manager, the D- channel cannot come into service unless the E1 card is enabled via the command line interface. Access the Avaya Communication Server 1000E command line interface via SSH using a tool such as PuTTY. 26 of 85
27 The Avaya Communication Server 1000E command line interface is a character based serial interface to the operating system and overlay programs on each system component. The program issues a prompt for input and the system administrator enter the appropriate response via the keyboard, followed by the return key. The output from the Avaya Communication Server 1000E command line interface has been trimmed down in the subsequent sections in order to focus on key settings for the configuration. Values in bold represent values entered by the system administrator. Command OVL111 IDLE 0 >LOGI USERID? admin PASS?XXXXXX Comment Issue the login command Enter a valid User ID Enter a valid user password TTY #04 LOGGED IN ADMIN 18:26 3/10/2012 OVL000 >LD 96.enl MSDL FDL Use load 96 to enable the E1 card Enable the E1 card with the physical slot number of the card and the option FDL to force parametric downloads. Please note the dot before enl Enable D-channel Automatic Establishment Use the command line interface to enable automatic establishment for the administered D- channel. Command >LD 96.enl auto 43 Comment Use load 96 to enable automatic establishment for the D-channel. In this case D-channel 43 is being enabled. Please wait a few minutes to ensure the channels have come up Backing up the changes to CS1000E Changes may be backed up to the CS1000E either via Element Manager or via the CLI console screen. For Element Manager initiated backup navigate in Element Manager to Tools Backup and Restore Call Server. Click on Backup. For backup via the CLI console enter LD 46 and type EDD and press return. Both methods take a few minutes. 27 of 85

28 6. Configure Dialogic IMG 1010 Media Gateway The following sections describe the configuration steps required to implement E1 and SIP trunks and inter routing on the Dialogic IMG 1010 Media Gateway to Meeting Exchange using the IMG Client View software. These settings relate to this sample configuration and are by no means exhaustive. Certain areas are not shown or may be condensed for brevity. It is assumed that basic hardware and software installation has been described as per Section 10 References [8-10], so that the GCEMS Server and IMG 1010 have been configured with suitable IP addresses and the Client View software opens successfully when executed. This section will focus on the following areas: Profiles for IP Bearer (for SIP) and DS1 (for PSTN) Logical IMG and Physical IMG Configure Network Interfaces for VoIP(Data) and CPU(Signaling) Configure Facilities (i.e. trunks for E1 and SIP) Configure Signaling for E1 and SIP, including D Channels for ISDN Configure External Network Elements and Gateways Routing Configuration Configure Channel Groups for ISDN and SIP Configure Routing Tables and Route Entry 6.1. Connecting with Client View Client View is the proprietary software installed on the GCEMS server used to manage the Dialogic IMG 1010 Media Gateway. A suitable login and username as well as the IP address of the GCEMS server are required to make a successful connection to begin managing the IMG On initial connection the Event View window may automatically appear. This can be closed by selecting File>Exit or by minimizing. 28 of 85


29 Once the Event View has been cleared / minimized the main window to manage the IMG 1010 is displayed. The Configuration Tree on the left contains all of the items that can be configured. Right click an item to access additional configuration items. Create an entry on the Configuration Tree opens the corresponding screen in the Configuration Pane. The Configuration Pane, on the top right of the screen shows the properties of the selected object. This pane is used to view and edit the configuration. The column titled As-Configured, shows the current configuration as defined by the parameters in the Property column. Enter or edit the values in the User Specified column. Adding a new entry may sometimes be more than a single step. Within Client View it may be necessary to create the containing object first then commit it, prior to adding a subsidiary item to that particular folder. For example, to add a new SIP SGP Profile to the Profiles section, the Profile Section must exist first. 29 of 85


30 6.2. Dialogic IMG Configuration Name On first time connection to the Dialogic, a default configuration file is created. To save the configuration file with a new name, select the Filename property in the configuration pane and enter a new name in the User-Specified column. To commit the name change select the Configured Item from the Configuration Tree, right click and select Commit. 30 of 85
. 6.3.1.")

31 6.3. Profiles Configure a Profile object by selecting Configuration Avaya_Interop Dialogic IMG EMS. Right click on Dialogic IMG EMS and select Profile. To save the changes, right click Profiles and select Commit (not shown) Create SIP Profile Configure the SIP Profile by right clicking Profiles and select New SIP SGP. Set the following parameters, leaving remaining parameters at default values. Name Set as required else leave at Default Codec Priority Select Local SIP Privacy Select Off To save the changes right click on SIP:default ID:0 and select Commit (not shown). 31 of 85
.")
32 Create DS1 Profile Configure the E1 Physical Span by right clicking Profiles and select New E1 Profile. Set the following parameters to correspond accordingly with the connection to the CS1000E, leaving the remaining parameters at default. One profile may be used for many DS1 spans if required). Name Set as required Coding Method Select HDB3 Enable CRC4 Select False Enable FEBE Select False Signaling Method Select Clear Channel, used for ISDN-PRI & SS7 spans Layer 1 Management Select E1 Layer 1 Mgmt Transmit All Zeros Select False To save the changes right click on E1 Prof:DefaultE1 and select Commit (not shown). 32 of 85
 Digit Relay Select DTMF Packetized Digit Relay Packet Type Select 101 To save")
33 IP Bearer Profiles Configure an IP Bearer Profile by right clicking Profiles and select New IP Bearer Profile. Select the following parameters, leaving the remaining parameters at default. IP Bearer Profile Name Set as required Silence Suppression Select Disable Echo Cancellation Select Enabled (NLP Enabled) Digit Relay Select DTMF Packetized Digit Relay Packet Type Select 101 To save the changes right click on Bearer:Default IP Profile ID-1 and select Commit not shown). 33 of 85

34 New IP Codec in Bearer Profile Assign one or more codecs to the IP bearer by selecting Configuration Avaya_Interop Dialogic IMG EMS Profiles Bearer:Default IP Profile ID:1. Right click the IP Bearer Profile in the Configuration tree and select New Supported Vocoders. Select the following Parameters, leaving the meaning parameters at default values. Payload Type Select G711 alaw To save the changes, right click Priofile:1 Entry:0 and select Commit (not shown). The screenshot shot shows the new vocoder created underneath the Bearer. 34 of 85

35 6.4. Logical IMG Create a Logical IMG by selecting Configuration Avaya_Interop Dialogic IMG EMS. Right click on Dialogic IMG EMS in the configuration tree and select New Logical IMG. Select the following parameters, leaving the remaining parameters at their default values. Name Set a descriptive name To save the changes, right click Logical IMG IMG Group 1 and select Commit (not shown). 35 of 85

36 Physical IMG Create a Physical IMG underneath the Logical IMG. This will assign an IP address to the IMG 1010 for connectivity purposes and relates to physical interface CTRL 0 on the rear of the unit. To create the Physical IMG select Configuration Avaya_Interop Dialogic IMG EMS Logical IMG IMG Group 1. Right click and select New Physical IMG. Select the following parameters, leaving the remaining parameters at default values. IMG Name Set a descriptive name IP Address (nn.nn.nn.nn) 0d: (IP address assigned to CTRL 0) IMG Type Select 1010 Trunk Type Select E1 To save the changes, right click IMG Name: Avaya Interop-ID:0 and select Commit (not shown). 36 of 85
.")
37 6.5. Network Interfaces Create an object for Network Interfaces by selecting Configuration Avaya_Interop Dialogic IMG EMS Logical IMG IMG Group 1 IMG Name AvayaInterop-ID:0. Right click and select New Network Interfaces. This will create a folder called IP Network. To save the changes right click on IP Network and select Commit (not shown). 37 of 85

38 Network Interface VoIP Module Create a Network Interface corresponding to the VoIP Module 0:Port 0 by selecting Configuration Avaya_Interop Dialogic IMG EMS Logical IMG IMG Group 1 IMG Name AvayaInterop-ID:0 IP Network. Right click on IP Network and select New IP Address. Select the following parameters, leaving the remaining parameters at default values. Physical Interface Select VoIP Module 0 Logical Interface Select Data Address Type IP Address Subnet Default Gateway Select IP V4 0d: (IP address assigned to physical interface DATA 0) To save the changes, right click VoIP Module 0 Data and select Commit (not shown). 38 of 85

39 Network Interface CPU - Signaling The network interface corresponding to the CPU is an optional IP address that can later be used for SIP Signaling, H.323 Signaling, DNS, Radius and to interface with other external network elements. Create a Network Interface corresponding to the CPU by selecting Configuration Avaya_Interop Dialogic IMG EMS Logical IMG IMG Group 1 IMG Name AvayaInterop-ID:0 IP Network. Right click on IP Network and select New IP Address. Select the following parameters, leaving the remaining parameters at default values. Physical Interface Select CPU Logical Interface Select Signaling Address Type IP Address Subnet Default Gateway Select IP V4 0d: (IP address assigned to physical interface SIG 0) 39 of 85
.")
40 6.6. Facilities for DS1 and VoIP Create an object for a Facility by selecting Configuration Avaya_Interop Dialogic IMG EMS Logical IMG IMG Group 1 IMG Name AvayaInterop-ID:0. Right click on IMG Name AvayaInterop-ID:0 and select New Facility. To save the changes right click Facility and select Commit (not shown). 40 of 85

41 DS1 Facilities Configure a TDM DS1 E1 by selecting Configuration Avaya_Interop Dialogic IMG EMS Logical IMG IMG Group 1 IMG Name AvayaInterop-ID:0 Facility. Right click on Facility and select New TDM Spans. In the configuration pane on the right select Bearer or Signaling spans. Underneath select the profile for the span as created in Section TDM spans will be brought into service and if the network is also in service, then the span status will show in service. If the network is not in service, the span status will show receiving remote alarm. To save the changes, right click on the Bearer or Signaling Span object and select Commit (not shown). 41 of 85

42 VoIP Facilities Configure VoIP Facilities by selecting Configuration Avaya_Interop Dialogic IMG EMS Logical IMG IMG Group 1 IMG Name AvayaInterop-ID:0 Facility. Right click on Facility and select New Bearer IP. In the configuration pane on the right select the following parameters, leaving the others at default values. Module ID Will usually default to 0 if it is the first one Network Interface Will default to VoIP Module 0 in relation to the Module ID Network IP Address 0d: (populated from the configuration provided for the VoIP module in Section 6.5.1) To save the changes, right click VoIP Resource 0 and select Commit. 42 of 85
 Create an object for Signaling by selecting Configuration Avaya_Interop Dialogic IMG EMS Logical IMG IMG Group 1 IMG Name AvayaInterop-ID:0.")
43 6.7. IMG Signaling (ISDN, SS7, SIP, H.323) Create an object for Signaling by selecting Configuration Avaya_Interop Dialogic IMG EMS Logical IMG IMG Group 1 IMG Name AvayaInterop-ID:0. Right click on IMG Name AvayaInterop-ID:0 and select New Signaling. To save the changes, right click on Signaling and select Commit (not shown). 43 of 85

44 SIP Signaling Configure SIP Signaling by selecting Configuration Avaya_Interop Dialogic IMG EMS Logical IMG IMG Group 1 IMG Name AvayaInterop-ID:0 Signaling. Right click on Signaling and select New SIP. Administer the settings in the configuration pane that enable SIP connectivity between the IMG and other SIP User Agents. Set the following parameters, leaving the remaining fields at default values. SIP signaling IP Address 0d: (from Section 6.5.2) Local SIP Port Select 5060 Default transport Type Select TCP Remote IMG s SIP Profile Select SIP: default ID:0 (from Section 6.3.1) Network IP Address 0d: (populated from the configuration provided for the VoIP module in Section 6.5.1) To save the changes right click SIP Signaling and select Commit (not shown). 44 of 85

45 ISDN Signaling Create an object for ISDN by selecting Configuration Avaya_Interop Dialogic IMG EMS Logical IMG IMG Group 1 IMG Name AvayaInterop-ID:0 Signaling. Right click on Signaling and select New ISDN. Right click on this folder and select Commit (not shown). 45 of 85

46 ISDN D Channel Configure an ISDN D-Channel by selecting Configuration Avaya_Interop Dialogic IMG EMS Logical IMG IMG Group 1 IMG Name AvayaInterop-ID:0 Signaling ISDN D Channels. Right click on ISDN D Channels and select New ISDN D Channels. Select the following parameters, leaving the remaining parameters at default values. Primary Interface - Offset Select Bearer - ID:0 Primary Channel Select 16 Base Variant Select Euro-ISDN Network Side To save the changes right click IMG:0 Bearer - ID:0-Chan:16 and select Commit (not shown). 46 of 85


47 6.8. External Network Elements Create an object for External Network Elements by selecting Configuration Avaya_Interop Dialogic IMG EMS. Right click on Dialogic IMG EMS and select New External Network Elements. To save the changes, right click on External Network Elements and select Commit (not shown) External Gateways Create an object for external Gateways by selecting Configuration Avaya_Interop Dialogic IMG EMS External Network Elements. Right click on External Network Elements and select New External Gateways. To save the changes right click on External Gateways and select Commit (not shown). 47 of 85

48 External Gateway Configure an External Gateway, to represent Meeting Exchange, by selecting Configuration Avaya_Interop Dialogic IMG EMS External Network Elements External Gateways. Right click and select New External Gateway. Select the following parameters leaving the remaining parameters at default values. Name A descriptive name i.e. Meeting Exchange Gateway Signaling Protocol Select SIP Gateway IP Address 0d: (Meeting Exchange IP Address Gateway Mask 00: Gateway Transport Type Select TCP Gateway Remote Port Select 5060 SIP Profile Select SIP:default-ID:0 To save the changes right click on the newly created external gateway and select Commit (not shown). 48 of 85
49 6.9. Routing Configurations Create an object for Routing Configuration by selecting Configuration Avaya_Interop Dialogic IMG EMS Right click on Dialogic IMG EMS and select New Routing Configuration. To save the changes right click on Routing Configuration and select Commit (not shown) Channel groups Create an object for Channel Groups by selecting Configuration Avaya_Interop Dialogic IMG EMS Routing Configuration. Right click on Routing Configuration and select New Channel Groups. To save the changes right click on Channel Groups and select Commit (not shown). 49 of 85
50 Channel Group (ISDN) Configure an ISDN Channel Group by selecting Configuration Avaya_Interop Dialogic IMG EMS Routing Configuration Channel Groups. Right click on Channel Groups and select New Channel Groups. Select the following parameters, leaving the remaining parameters at their default values. Name Signaling Type Route Table A descriptive name i.e. CS1K Select ISDN Select RT_CS1KtoMX ID:7 (to be configured in Section 6.9.2) To save the changes right click on the newly created Channel Group and select Commit (not shown). Note: The administration for the Route Table and Translation Table fields are displayed in this screen, although the tables have not yet been created. When providing the IMG with an initial configuration, create a Channel Group first, then create a Route Table and optional Translation Table, then edit the Channel Group to include these tables. This note applies to all channel groups. 50 of 85
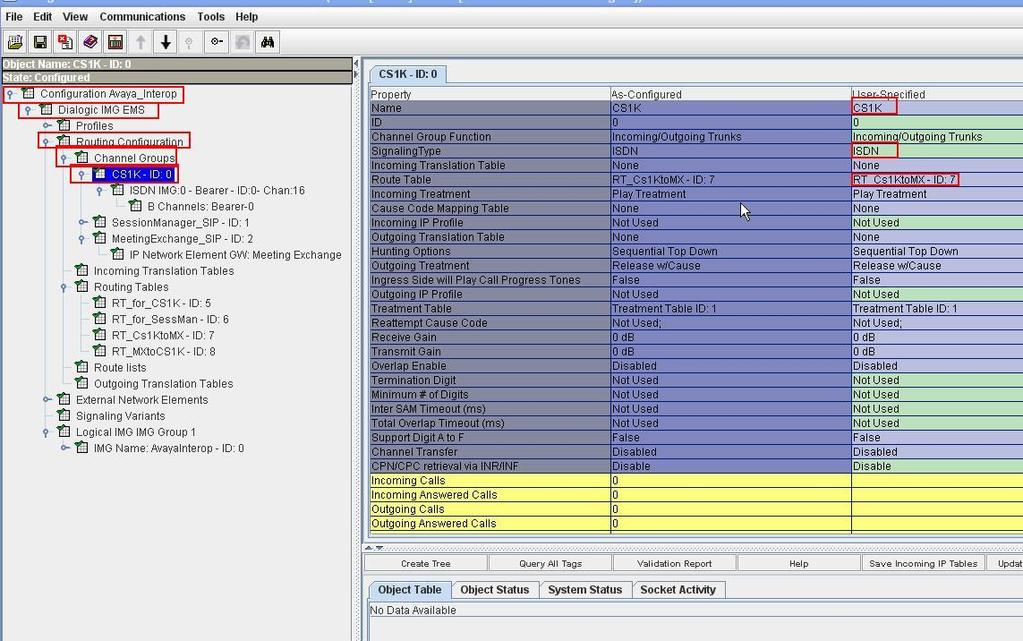
51 51 of 85
 Assign a D-Channel configured under the Physical IMG to Channel Group (ISDN) by selecting Configuration Avaya_Interop Dialogic IMG EMS Routing")
52 Assign ISDN D Channel to Channel Group (ISDN) Assign a D-Channel configured under the Physical IMG to Channel Group (ISDN) by selecting Configuration Avaya_Interop Dialogic IMG EMS Routing Configuration Channel Groups CS1K-ID:0. Right click on CS1K-ID:0 and select New ISDN Group. Select the following parameters, leaving the remaining parameters at default values. ISDN D Channel Select IMG:0 Bearer ID:0-Chan :16 52 of 85

53 Assign ISDN B-Channels to the ISDN Group Assign B-Channels to the ISDN Channel Group corresponding to PSTN provider by selecting Configuration Avaya_Interop Dialogic IMG EMS Routing Configuration Channel Groups CS1K-ID:0 ISDN IMG:0-Bearer-ID:0-Chan:16. Right click and select New ISDN Circuits. Select the following parameter, leaving the remaining parameters at default values. IMG Interface Select Bearer To save the changes, right click on B Channels: Bearer:0 and select Commit (not shown). 53 of 85

54 Channel Group (SIP) Configure a Channel Group corresponding to each External Gateway by selecting Configuration Avaya_Interop Dialogic IMG EMS Routing Configuration Channel Groups. Right click Channel Groups and select New Channel Group. Select the following parameters, leaving the remaining parameters at their default values. Name A descriptive name i.e. MeetingExchange_SIP Signaling Type Select SIP Route Table Select RT_MXtoCS1K ID:8 (to be configured in Section 6.9.2) To save the changes right click on the newly created Channel Group and select Commit (not shown). 54 of 85

55 Channel Group with SIP Gateway Assign a SIP Gateway to the Channel Group corresponding with each external Gateway by selecting Configuration Avaya_Interop Dialogic IMG EMS Routing Configuration Channel Groups MeetingExchange_SIP-ID:2. Right Click and select New IP Network Element. Select the following parameter. IP Network Element Select GW:Meeting Exchange To save the changes right click on the newly created IP Network Element GW: Meeting Exchange and select Commit (not shown). 55 of 85
. 6.9.2.")
56 Routing Create an object for Routing Tables by selecting Configuration Avaya_Interop Dialogic IMG EMS Routing Configuration. Right click Routing Configuration and select New Service Routing Tables. To save the changes right click on the newly created Routing Tables and select Commit (not shown) Route Entry Add two route entries to the Routing Table to route all calls from the inbound channel group on the IMG to the outbound channel group by selecting Configuration Avaya_Interop Dialogic IMG EMS Routing Configuration Routing Tables. Right click the Routing Tables and select Add Route Entry. Select the following parameters, leaving the reaming parameters at their default values. Name A descriptive name i.e. RT_CS1KtoMX ID Select an available ID i.e. 7 To save the changes, right click RT_CS1KtoMX ID:7 and select Commit. 56 of 85

57 Create a second Route Entry using the same method, with the following settings. Name A descriptive name i.e. RT_MXtoCS1K ID Select an available ID i.e. 8 To save the changes, right click RT_MXtoCS1K ID:8 and select Commit. Once the two Route Entrys have been created they must be further modified. Select the entry RT_CS1KtoMX ID:7 from the Configuration Tree on the left. Right click and select Add Entry. In the pop up window, select the following parameters, leaving the remaining fields at default values. Route Criteria Type In Channel Group Route Action Type Outgoing Channel Group Click OK to save the changes Select Channel Group Select CS1K-ID:0 Select Channel Group Select MeetingExchange _SIP-ID:2 To configure the second route table RT_MXtoCS1K ID:8, use the same method and select the following parameters. Route Criteria Type In Channel Group Route Action Type Outgoing Channel Group Click OK to save the changes Select Channel Group Select MeetingExchange _SIP-ID:2 Select Channel Group Select CS1K-ID:0 The screen shot on the next page shows the main IMG configuration screen in the background with the pop up window for configuring the above settings for entry RT_MXtoCS1K ID:8 only. 57 of 85

58 58 of 85
59 7. Configure Avaya Meeting Exchange Enterprise Application This section describes the steps for configuring Avaya Meeting Exchange using Avaya Aura System Manager. It will also briefly cover configuration of conferences via Bridge Talk software. With the introduction of Meeting Exchange Enterprise Edition R6.2 the configuration tools have moved to System Manager Web interface, rather than the PuTTY / SSH session previously used. This document will focus on the web interface configuration method. The following steps describe the administrative process for configuring Avaya Meeting Exchange Enterprise Edition: Configure System Manager for Meeting Exchange Configure SIP Listener Configure Dialout Configure DNS Mappings Configure Incoming SIP URI Conversion Rules Restart the conference bridge Note: Appendix A will contain screen shots of the configuration data via SSH session from steps 7.2 to 7.5 for reference purposes only Configure System Manager for Meeting Exchange In order to manage Meeting Exchange via System Manager, it must first be added to the System Manager Inventory. Log in to System Manager with a suitable username and password using address of System Manager> 59 of 85


60 On the home screen from the Elements section select Inventory. From the list on the left hand side, select Manage Elements. Once the list has appeared on the right hand side, select New. 60 of 85

61 In the New Elements window, select Meeting Exchange and Conferencing 6.0 from the drop down list. On next screen in the General Settings fill out the following: Name Set to a suitable descriptive Name Type Should already be set as Meeting Exchange and Conferencing 6.0 Node Enter the IP Address of the Meeting Exchange Server Click Commit or Done when finished. 61 of 85


62 To ensure the Meeting Exchange has been added to the System Manager configuration system, return to the Home screen and from the Elements section click on Meeting Exchange. From the menu on the left select Audio Conferencing Bridge Features. Review the data on the right hand side. It should display the named Meeting Exchange server and indicate its IP address and status as Online. If this step is successful, proceed to the next step, else recheck the settings. 62 of 85

63 7.2. Configure SIP Listener The SIP signaling messages in the sample configuration are transmitted between the Avaya Meeting Exchange and the SIP interface of the Dialogic IMG 1010 over a TCP channel. Configure the following settings to enable SIP Connectivity on the Meeting Exchange server. In System Manager navigate to Meeting Exchange Media Configuration. Select the Meeting Exchange to be configured (tick the box) and then click on the Configure button. The next stage is to set the SIP Listener and Response contact to recognize the IP address of the Meeting Exchange and set the transport protocol (TCP) and port number to be used. Expand the section labeled SIP and configure the following: SIP Listener URI Set to sip:6000@ :5060;transport=tcp Response Contact Set to sip:6000@ :5060;transport=tcp Click Save. The extension 6000 is the default extension number the Meeting Exchange is installed with. This can be changed to a more suitable number if desired. 63 of 85
. In the Call Routing section on the right hand side click the Edit button beside Telnum to Uri.")
64 7.3. Configure Dial Out The Meeting Exchange must be configured to be able to route outbound calls to Dialogic IMG Navigate to Meeting Exchange Audio Conferencing Call Routing. Select the relevant Meeting Exchange and select Configure (not shown). In the Call Routing section on the right hand side click the Edit button beside Telnum to Uri. Once the screen has opened, click on the New button. (not shown). In the Telnum to URI configuration window, enter the following: Telnum Set to * (wildcard) URI Set to sip:$0@ :5060;transport=tcp (IP address of Dialogic IMG 1010). $0 will capture all the digits input by a user for outbound routing. For full details, please refer to Section 10, References [5] and [6]. Click Save. 64 of 85


65 Ensure that this new mapping is first on the list use the Move Up/Move Down buttons to change the order. Click Done. (See screen shot on next page). After clicking Done, the screen returns to the main Call Routing screen. It is necessary to click Save on that screen to complete the process and then Apply Changes. From time to time certain configuration changes will need to be applied to the Meeting Exchange. A screen similar to the one below may appear after a final save is performed. To apply these changes to Meeting Exchange, click on the Apply Changes button. In some instances a restart of Meeting Exchange services may be required and this will be carried out as part of the Applied change. 65 of 85
66 7.4. Configure DNIS Mappings The DNIS is the number that conference users dial to access a conference. To create and map a DNIS to a conference type, navigate to Meeting Exchange Audio Conferencing Call Routing. Select the relevant Meeting Exchange and select Configure (not shown). In the Call Routing section on the right hand side click the Edit button beside Call Branding. Click on the Add button and in the Call Branding Add Entry screen set the following: DDI Set to telephone number to be assigned for SCAN conferences i.e Name Set a descriptive name for the conference Organization Name Enter a suitable name Ownership Leave set to System Message Number Set to 247 to prompt users to enter a Pin number Message Set Number Leave set at 1 On Entry Set to Scan Call Flow On Failure Set to Direct to Enter queue Conference Room Start Set to 0 Conference Room End Set to 0 Click Save. 66 of 85
67 The settings for a FLEX queue are similar: 67 of 85

68 The settings for a DIRECT conference are also very similar. Once all the conference types have been added to the Call Branding screen, click on Done to begin applying the changes Creating a Sign In User for Bridge Talk To create an account that is allowed to login to Bridge Talk to configure conferences navigate to Meeting Exchange Audio Conferencing Bridge Features. Select the relevant Meeting Exchange and click Configure. Expand the Sign In Users section and Click on the edit button beside Sign In Users. 68 of 85

69 Click on New to create a new Sign In User. Fill out the following fields: Role Set as required Name Set as required Phone Number Set as required Password /Confirm Password Set as required Click Save and Done as required back through the screens. You will be prompted to Apply Changes. 69 of 85


70 7.6. Bridge Talk Configuration Bridge Talk is a separate piece of software installed on a client PC that allows a user to create and manage conferences. Once the software is installed on a suitable PC, double click the icon to open the software. Once the software is open, the user will be prompted for a username and password and the IP address of the Meeting Exchange server. Use the Sign In user created in the previous step Create a SCAN Conference To create a SCAN conference where users will be prompted to enter a suitable PIN number, in the menu bar click on View Conference Scheduler. In the Conference Scheduler window that opens, click on File Schedule Conference. A blank conference screen will be displayed. Configure the following fields as a minimum to achieve basic conference functionality: 70 of 85

71 Status Set to enabled Mode Set to unattended Conference Type Set to daily Name Enter a descriptive name Telephone Enter the SCAN conference DNIS number Start Date Enter a suitable start date End Date Enter a suitable end date or leave blank Conferee Code Enter a PIN number to be used by conferees Moderator Code Enter a PIN number to be used by the conference Moderator Conference Name Enter a descriptive name Auto Blast [OPTIONAL] A Blast Dial List will need to be created Dial List Create a Blast Dial list of conferees to be dialed Start Time Set the start time for the conference to start from End Time Set the start time for the conference to end by Maximum Lines Enter the maximum number of lines to be made available to the conference. Click Save to save the conference details. 71 of 85
 they will be placed in the conference room.")
72 When users dial the relevant access code, i.e , they will be prompted to enter a PIN number. Once they have entered the relevant pin (Conferee or Moderator) they will be placed in the conference room. 72 of 85
73 8. Verification Steps 8.1. Verify Call Flows The call flow pattern for calls coming to the Meeting Exchange from the Avaya Aura Communication Server (CS1000E) will move through the following steps: W - Indicates potential WireShark tracing points. 1. Call from IP phone on the Avaya Communication Server (CS1000E) dials to reach Meeting Exchange. The endpoint can be monitored via a WireShark trace or via trace tools available in the CS1000E. The CS1000E looks up the number in Distant Steering Codes and directs the call to the Route that indicates an E1 link to the Dialogic IMG Dialogic IMG 1010converts the E1 traffic to a SIP request after looking at its own Routing Table and determines the call should be routed to the Avaya Meeting Exchange. The traffic in and out of Dialogic IMG 1010 can be monitored via WireShark, as well as the built in Call Tracing Log. 3. Meeting Exchange receives the SIP INVITE and compares to the Call Branding table to determine if the number is recognized. If the dialed number is recognized, it will respond with a request for the caller to enter a PIN number. If not recognized, the caller will be placed into the Enter queue and will hear music. Some limited tracing is available directly on Meeting Exchange. 73 of 85
. Underneath select the MSDL to be checked then click on Submit.")
74 8.2. Verification Avaya Communication Server 1000E Select System Maintenance Change to Select by Functionality. From the list offered select MSDL Diagnostics. Once the diagnostic screen has opened, select Get Status of MSDL Device (STAT). Underneath select the MSDL to be checked then click on Submit. The status of the MSDL will appear in the window below. 74 of 85
75 Troubleshooting Call tracing Call tracing on the Avaya Communication Server (CS1000E) can be carried via the CLI. To trace the activity of an endpoint, enter the following: Command >LD 80.entc <TN> hhmm.gotr.stpt Comment Use load 80 for tracing. enter i.e..entc The TN is the TN number of the endpoint and 0010 will run the trace for 10 minutes. GOTR will start the trace. The trace will stop after 10 minutes else type STPT to stop the trace manually. To monitor the activity on the E1 Link to Dialogic IMG 1010, messaging must be enabled on the relevant D-Channel and then output can be display to the monitor screen. Command >LD 96.enl msgi X (where X is the D-Channel).enl msgo X (where X is the D-Channel).enl mon tty.dis mon tty Comment Use load 96 for tracing on the D-Channels Enable Incoming messages on DCH X Enable Outgoing messages on DCH X To display the traffic on the screen of the PuTTY session To stop the display of traffic on the PuTTY screen 75 of 85

76 8.3. Verify Dialogic IMG Verify ISDN Trunk Status To check the ISDN trunk statuses go to Configuration Avaya_Interop Dialogic IMG EMS Routing Configuration Channel Groups ISDN IMG:0 Bearer-ID:0-Chn:16 B Channels:Bearer:0. Click on the tab Object Table in the Information Pane. This will show the trunks and their current status. 76 of 85


77 Verify ISDN D-Channel Status To check the ISDN D Channel status go to Configuration Avaya_Interop Dialogic IMG EMS Logical IMG IMG 1 IMG Name:AvayaInterop-ID:0 Signaling ISDN D- Channels IMG:0 Bearer-ID:0-Chn:16 Check the field Primary D-Channel Status SIP trunk Status To check the ISDN trunk statuses go to Configuration Avaya_Interop Dialogic IMG EMS Logical IMG IMG 1 IMG Name:AvayaInterop-ID:0 Facility VoIP Resource 0. Click on the tab Object Table in the Information Pane. This will show the trunks and their current status. 77 of 85

78 8.5. Call Tracing in IMG A call tracing tool is available within the IMG, however it must be configured first. In the Configuration Tree select Configuration Avaya_Interop Dialogic IMG EMS Logical IMG IMG 1 IMG Name:AvayaInterop-ID:0. Right click and select New Call Tracing. In the field Call Tracing Period (minutes) set the number of minutes the trace will run for when enabled. Right click and Commit the changes to create the Call Tracing object. To run a trace at any time, right click on the Call Tracing Enable object. From the menu select Start/Reset Call tracing. This will begin the race and save the log to Call Tracing Directory location on the GCEMS Server. To stop the trace prior to the defined tracing period, right click and select Stop Call Tracing. To update the status of tracing in the configuration Pane, right click and select Update Status. 78 of 85


79 In the example, the trace files are stored in the GCEMS Server at /opt/dialogic/common/calltracing. The GCEMS server can be accessed via VNU Viewer or alternatively the location of the trace files may be changed to an alternative location. The opened trace file will show the call coming in from the CS1K, being converted to a SIP Invite and then being sent out. 79 of 85

80 9. Conclusion As illustrated in this Application Notes Dialogic IMG 1010 can interoperate with Avaya Meeting Exchange Enterprise Edition using SIP trunks with CS1000E R 7.5 interconnecting with Dialogic IMG 1010 via E1 trunk. 80 of 85
81 10. Additional References Product documentation for Avaya products may be found at Avaya Communication Server 1000E (CS1K) [1] Element Manager System Reference - Administration Avaya Communication Server 1000E 7.5 NN , Standard August 2012 [2] Software Input Output Reference Administration Avaya Communication Server 1000E 7.5 NN , November 2010 [3] Software Input Output Reference Maintenance Avaya Communication Server 1000E 7.5 NN , November 2010 [4] ISDN Primary Rate Interface Features Fundamentals Books 1 to3 Avaya Communication Server 1000E 7.5 NN , November 2010 Avaya Meeting Exchange Enterprise Edition. Please note As the software tested was pre GA, there are no current manuals available for the product. Additionally, the product may now be managed via Avaya Aura System Manager in a similar manner to Avaya Aura Conferencing. The manuals listed below may be useful in the configuration of Meeting Exchange: [5] Deploying Avaya Aura Conferencing Release 7.0 Issue 4 October 2012 see Chapter 12 - Configuring the application server network elements on System Manager - Steps 1-6 to add Meeting Exchange to System Manager Inventory. [6] Administering Meeting Exchange Servers Release Issue 1 [7] Avaya Bridge Talk v integrated Help. Dialogic IMG 1010 Media Gateway [8] IMG 1010 Quick Start Guide January 2012 Doc ID [9] IMG 1010 Upgrade System Software May 2011 [10] IMG 1010 Integrated Media Gateway Web Help Release SP12 (24 Aug 2012) 81 of 85

82 Appendix A Meeting Exchange Configuration via SSH Login to Meeting Exchange via SSH. Change over to sroot with the appropriate password Configure SIP Listener At the prompt using vi edit the sytem.cfg which can be found at /usr/ipcb/config/system.cfg Fields marked in BOLD relate to the settings made via the web GUI. Some screens are foreshortened for brevity [sroot@mx62 craft]# vi /usr/ipcb/config/system.cfg # ip address of the server IPAddress= # request we will be listening to MyListener=sip:6000@ :5060;transport=tcp # if this setting is populated will Overwrite the contact field in responses respcontact=<sip:6000@ :5060;transport=tcp> MaxChannelCount= of 85
83 Configure telnumtouri craft]# vi /usr/ipcb/config/telnumtouri.tab # telnum to uri conversion table # # This file is for dialing out from the Bridge to an external party. The # digits that are dialed are converted into the Request URI in the SIP INVITE. # For example, if the digits dialed were and one of the patterns was # "93????" a match would take place. If the conversion for that match was # $1 then the Request URI for the SIP INVITE would be sip:936543@ # # THE COMMENT COLUMN OR ANY OF THE COLUMNS SHOULD HAVE NO SPACES TelnumPattern TelnumConversion comment * sip:$0@ :5060;transport=tcp RouteToIMG_1010 * $1 default Configure DNIS Mappings Use the command CBUTIL ADD to add conference DNIS to Meeting Exchange. [craft@mx62 ~]$ cbutil list cbutil Copyright 2004 Avaya, Inc. All rights reserved. DNIS Grp Msg PS CP Function On Failure Line Name Company Name Room Start Room End Conference Code N SCAN ENTER SCAN Conference Avaya N FLEX ENTER FLEX Conference Avaya N DIRECT DEFAULT DIRECT Conference Avaya N DIRECT DEFAULT DIRECT-Moderator Avaya 0 0????? Y SCAN DEFAULT 0 0 To restart the Conference Server at the prompt enter bridge restart. Sign In Users Sign In Users can be created via the dcbmaint / dcbadmin menus. From the prompt type dcbmaint and press return. Select Administrator Menu Sign-In Management. Select the appropriate menu item for the user type to be created. 83 of 85

84 84 of 85
Abstract. Avaya Solution & Interoperability Test Lab
 Avaya Solution & Interoperability Test Lab Configuring SIP trunks between Avaya Aura Session Manager Release 6.2, Avaya Meeting Exchange Enterprise Edition Release 6.2 and Cisco Unified Communications
Abstract. Testing was conducted via the Internal Interoperability Program at the Avaya Solution and Interoperability Test Lab.
 Avaya Solution & Interoperability Test Lab Configuring SIP Connectivity between the Avaya Meeting Exchange Enterprise S6200 Conferencing Server R5.2 and Cisco Unified Communications Manager R7.0 Issue
Abstract. Avaya Solution & Interoperability Test Lab
 Avaya Solution & Interoperability Test Lab Configuring SIP Trunks in Avaya Aura Session Manager R6.1, Avaya Communication Server 1000E R7.5, and Avaya Aura Conferencing Standard Edition R6.0 to support
Abstract. Testing was conducted via the Internal Interoperability Program at the Avaya Solution and Interoperability Test Lab.
 Avaya Solution & Interoperability Test Lab Configuring SIP Connectivity between the Avaya Meeting Exchange S6200 Conferencing Server R5.2 and Cisco Unified Communications Manager R6. 1 Issue 1.0 Abstract
Abstract. Testing was conducted in the Avaya Solution and Interoperability Test Lab, utilizing a test account on Gamma Telecom s production service.
 Avaya Solution & Interoperability Test Lab Application Notes for Configuring SIP Trunk Connectivity between Avaya Meeting Exchange Enterprise Edition 5.2, Avaya Aura Session Border Controller 6.0 and the
Application Notes for Movitas Hosted Solution over SIP Trunk between Movitas MvPBX System and Avaya Communication Server 1000 Release 7.5 Issue 1.
 Avaya Solution and Interoperability Test Lab Application Notes for Movitas Hosted Solution over SIP Trunk between Movitas MvPBX System and Avaya Communication Server 1000 Release 7.5 Issue 1.0 Abstract
Abstract. Avaya Solution & Interoperability Test Lab
 Avaya Solution & Interoperability Test Lab Application Notes for Configuring OpenText RightFax with Avaya Communication Server 1000 and Avaya Aura Session Manager via SIP Trunk Interface - Issue 1.0 Abstract
Abstract. Testing was conducted at the Avaya Solution and Interoperability Test Lab.
 Avaya Solution & Interoperability Test Lab Application Notes for Configuring SIP Trunks between Avaya Aura TM Conferencing Standard Edition 6.0 and Cisco Unified Communications Manager 8.0 Issue 1.0 Abstract
Abstract. Avaya Solution & Interoperability Test Lab
 Avaya Solution & Interoperability Test Lab Application Notes for Configuring the Esna Office-LinX Version 8.2 with Avaya Communication Server 1000E Release 7.5 and Avaya Aura Session Manager Release 6.1
Avaya PBX SIP TRUNKING Setup & User Guide
 Avaya PBX SIP TRUNKING Setup & User Guide Nextiva.com (800) 285-7995 2 P a g e Contents Description... 3 Avaya IP PBX Configuration... 3 Licensing and Physical Hardware... 4 System Tab Configuration...
Configuring SIP Connectivity between the Avaya Meeting Exchange S6200 Conferencing Server and Cisco Unified CallManager - Issue 1.
 Avaya Solution & Interoperability Test Lab Configuring SIP Connectivity between the Avaya Meeting Exchange S6200 Conferencing Server and Cisco Unified CallManager - Issue 1.0 Abstract These Application
Abstract. Avaya Solution & Interoperability Test Lab
 Avaya Solution & Interoperability Test Lab Application Notes for Uecomm/Optus Evolve SIP Trunking Service with Avaya IP Office 9.1.6 and Avaya Session Border Controller for Enterprise 7.0 - Issue 1.0 Abstract
Abstract. Avaya Solution & Interoperability Test Lab
 Avaya Solution & Interoperability Test Lab Application Notes for Configuring Rauland-Borg Responder 5 to Interoperate with Avaya Communication Server 1000 and Avaya Aura Session Manager Issue 1.0 Abstract
Application Notes for IPC Unigy with Avaya Communication Server using QSIG Trunks Issue 1.0
 Avaya Solution & Interoperability Test Lab Application Notes for IPC Unigy with Avaya Communication Server 1000 7.5 using QSIG Trunks Issue 1.0 Abstract These Application Notes describe the configuration
Abstract. Avaya Solution & Interoperability Test Lab
 Avaya Solution & Interoperability Test Lab Application Notes for Configuring Rauland-Borg Responder 5 to Interoperate with Avaya Communication Server 1000 R7.6 and Avaya Aura Session Manager R6.3 Issue
Application Notes for IPC Unigy with Avaya Communication Server using QSIG Trunks Issue 1.0
 Avaya Solution & Interoperability Test Lab Application Notes for IPC Unigy with Avaya Communication Server 1000 7.5 using QSIG Trunks Issue 1.0 Abstract These Application Notes describe the configuration
Configuring Alcatel OmniPCX Enterprise with Avaya Aura Conferencing Standard Edition 6.0 Issue 1.0
 Avaya Solution & Interoperability Test Lab Configuring Alcatel OmniPCX Enterprise with Avaya Aura Conferencing Standard Edition 6.0 Issue 1.0 Abstract These Application Notes present a sample configuration
Abstract. Avaya Solution Interoperability Test Lab
 Avaya Solution Interoperability Test Lab Configuring Secure SIP Connectivity using Transport Layer Security (TLS) between Avaya Aura Session Manager R6.1 and Avaya Communication Server 1000E R7.5 with
Avaya Solution & Interoperability Test Lab
 Avaya Solution & Interoperability Test Lab Application Notes for Enghouse Interactive Attendant Console 6.0 to interoperate with Avaya Communication Server1000E R7.6 and Avaya Aura Session Manager R6.3
Abstract. Avaya Solution & Interoperability Test Lab
 Avaya Solution & Interoperability Test Lab Application Notes for Configuring OpenText RightFax with Avaya Communication Server 1000 and Avaya Aura Session Manager via SIP Trunk Interface - Issue 1.0 Abstract
Abstract. Testing was conducted via the Internal Interoperability Program at the Avaya Solution and Interoperability Test Lab.
 Avaya Solution & Interoperability Test Lab Configuring the Avaya G860 Media Gateway to provide Connectivity between the Public Switched Telephone Network (PSTN) and the Avaya Meeting Exchange Enterprise
Abstract. Avaya Solution & Interoperability Test Lab
 Avaya Solution & Interoperability Test Lab Application Notes for Configuring Trio Enterprise R3.1 with Avaya Communication Server 1000E R7.5 over SIP Trunk using a Network Routing Service Issue 1.0 Abstract
Application Notes for Noble Systems with Avaya Aura TM SIP Enablement Services and Avaya Aura TM Communication Manager Issue 1.1
 Avaya Solution & Interoperability Test Lab Application Notes for Noble Systems with Avaya Aura TM SIP Enablement Services and Avaya Aura TM Communication Manager Issue 1.1 Abstract These Application Notes
Application Notes for Configuring Sonexis ConferenceManager with Avaya IP Office using a SIP trunk Issue 1.0
 Avaya Solution & Interoperability Test Lab Application Notes for Configuring Sonexis ConferenceManager with Avaya IP Office using a SIP trunk Issue 1.0 Abstract These Application Notes describe the procedure
Abstract. Avaya Solution & Interoperability Test Lab
 Avaya Solution & Interoperability Test Lab Application Notes for Avaya Communication Server 1000E Release 7.5, Avaya Aura Session Manager 6.1, and Avaya Aura Session Border Controller 6.0 with Verizon
Abstract. Avaya Solution & Interoperability Test Lab
 Avaya Solution & Interoperability Test Lab Application Notes for Configuring Esna Officelinx Version 10.6 with Avaya Communication Server 1000 Release 7.6 and Avaya Aura Session Manager Release 7.1.1 -
Abstract. Avaya Solution & Interoperability Test Lab
 Avaya Solution & Interoperability Test Lab Application Notes for Avaya Communication Server 1000E Release 7.5, Avaya Aura Session Manager 6.1, and Avaya Aura Session Border Controller 6.0 with Verizon
DMP 128 Plus C V DMP 128 Plus C V AT. Avaya IP Office Configuration Guide REVISION: 1.2 DATE: JANUARY 9 TH 2018
 DMP 128 Plus C V DMP 128 Plus C V AT Avaya IP Office Configuration Guide REVISION: 1.2 DATE: JANUARY 9 TH 2018 Revision Log Date Version Notes August 6 th 2017 1.0 First Release: Applies to Firmware 1.01.0004.002
Application Notes for Configuring Cablevision Optimum Voice SIP Trunking with Avaya IP Office - Issue 1.1
 Avaya Solution & Interoperability Test Lab Application Notes for Configuring Cablevision Optimum Voice SIP Trunking with Avaya IP Office - Issue 1.1 Abstract These Application Notes describe the procedures
Abstract. Avaya Solution & Interoperability Test Lab
 Avaya Solution & Interoperability Test Lab Application Notes for Bell Canada SIP Trunking Service with Avaya Communication Server 1000 Release 7.5, Avaya Aura Session Manager Release 6.1 and Acme Packet
Application Notes for OneAccess-Telstra Business SIP with Avaya IP Office Release 11 SIP Trunking - Issue 1.0
 Avaya Solution & Interoperability Test Lab Application Notes for OneAccess-Telstra Business SIP with Avaya IP Office Release 11 SIP Trunking - Issue 1.0 Abstract These Application Notes illustrate a sample
Abstract. Avaya Solution & Interoperability Test Lab
 Avaya Solution & Interoperability Test Lab Application Notes for configuring Aculab s ApplianX IP Gateway to interoperate with Avaya Aura Communication Manager R6.3 and Avaya Aura Session Manager R6.3
Application Notes for Multi-Tech FaxFinder IP with Avaya IP Office Issue 1.0
 Avaya Solution & Interoperability Test Lab Application Notes for Multi-Tech FaxFinder IP with Avaya IP Office Issue 1.0 Abstract These Application Notes describe the configuration steps required for Multi-Tech
Application Notes for TelStrat Engage Record Version 3.3 with Avaya Business Communication Manger Release 6.0 VoIP Recording Issue 1.
 Avaya Solution & Interoperability Test Lab Application Notes for TelStrat Engage Record Version 3.3 with Avaya Business Communication Manger Release 6.0 VoIP Recording Issue 1.0 Abstract These Application
Application Notes for MultiTech FaxFinder IP with Avaya IP Office Issue 1.0
 Avaya Solution & Interoperability Test Lab Application Notes for MultiTech FaxFinder IP with Avaya IP Office Issue 1.0 Abstract These Application Notes describe the configuration steps required to integrate
Abstract. Avaya Solution & Interoperability Test Lab
 Avaya Solution & Interoperability Test Lab Application Notes for Configuring Avaya Communication Server 1000E R7.5 and Avaya Aura Session Manager R6.2 to interoperate with Presence Technology OpenGate
DMP 128 Plus C V DMP 128 Plus C V AT. Avaya Aura Configuration Guide REVISION: 1.1 DATE: SEPTEMBER 1 ST 2017
 DMP 128 Plus C V DMP 128 Plus C V AT Avaya Aura Configuration Guide REVISION: 1.1 DATE: SEPTEMBER 1 ST 2017 Revision Log Date Version Notes August 6 th 2017 1.0 First Release. Applies to Firmware 1.01.0004.002
Application Notes for Configuring the Esna Office-LinX version 8.1 with Avaya Communication Server 1000 Release Issue 1.0
 Avaya Solution & Interoperability Test Lab Application Notes for Configuring the Esna Office-LinX version 8.1 with Avaya Communication Server 1000 Release 7.5 - Issue 1.0 Abstract These Application Notes
Application Notes for configuring IPC Unigy with Avaya Communication Server and Avaya Aura Session Manager 6.1 using SIP Trunks Issue 1.
 Avaya Solution & Interoperability Test Lab Application Notes for configuring IPC Unigy with Avaya Communication Server 1000 7.5 and Avaya Aura Session Manager 6.1 using SIP Trunks Issue 1.0 Abstract These
Application Notes for Configuring Windstream SIP Trunking with Avaya IP Office - Issue 1.0
 Avaya Solution & Interoperability Test Lab Application Notes for Configuring Windstream SIP Trunking with Avaya IP Office - Issue 1.0 Abstract These Application Notes describe the procedures for configuring
Application Notes for Configuring CenturyLink SIP Trunking with Avaya IP Office Issue 1.0
 Avaya Solution & Interoperability Test Lab Application Notes for Configuring CenturyLink SIP Trunking with Avaya IP Office 6.1 - Issue 1.0 Abstract These Application Notes describe the procedures for configuring
DMP 128 Plus C V DMP 128 Plus C V AT. Avaya Aura Configuration Guide REVISION: DATE: MARCH 7 TH 2018
 DMP 128 Plus C V DMP 128 Plus C V AT Avaya Aura Configuration Guide REVISION: 1.2.1 DATE: MARCH 7 TH 2018 Revision Log Date Version Notes August 6 th 2017 1.0 First Release. Applies to Firmware 1.01.0004.002
Application Notes for Phonect SIP Trunk Service and Avaya IP Office 7.0 Issue 1.0
 Avaya Solution & Interoperability Test Lab Application Notes for Phonect SIP Trunk Service and Avaya IP Office 7.0 Issue 1.0 Abstract These Application Notes describe the procedures for configuring Session
Application Notes for Configuring EarthLink SIP Trunk Service with Avaya IP Office using UDP/RTP - Issue 1.0
 Avaya Solution & Interoperability Test Lab Application Notes for Configuring EarthLink SIP Trunk Service with Avaya IP Office using UDP/RTP - Issue 1.0 Abstract These Application Notes describe the procedures
Application Notes for Configuring Computer Instruments e-ivr, as a SIP endpoint, with Avaya IP Office 500 V2 Issue 1.0
 Avaya Solution & Interoperability Test Lab Application Notes for Configuring Computer Instruments e-ivr, as a SIP endpoint, with Avaya IP Office 500 V2 Issue 1.0 Abstract These Application Notes describe
Application Notes for Configuring Tidal Communications tnet Business VoIP with Avaya IP Office using SIP Registration - Issue 1.0
 Avaya Solution & Interoperability Test Lab Application Notes for Configuring Tidal Communications tnet Business VoIP with Avaya IP Office using SIP Registration - Issue 1.0 Abstract These Application Notes
Application Notes for Configuring the Esna Officelinx version with Avaya Communication Server 1000 Release 7.65 SP8 - Issue 1.
 Avaya Solution & Interoperability Test Lab Application Notes for Configuring the Esna Officelinx version 10.6.1724 with Avaya Communication Server 1000 Release 7.65 SP8 - Issue 1.1 Abstract These Application
Application Notes for Configuring SIP Trunking between CenturyLink SIP Trunk (Legacy Qwest) Service and Avaya IP Office R8.0 (16) Issue 1.
 Service and Avaya IP Office R8.0 (16) Issue 1.") Avaya Solution & Interoperability Test Lab Application Notes for Configuring SIP Trunking between CenturyLink SIP Trunk (Legacy Qwest) Service and Avaya IP Office R8.0 (16) Issue 1.0 Abstract These Application
Avaya Solution & Interoperability Test Lab Application Notes for Configuring SIP Trunking between CenturyLink SIP Trunk (Legacy Qwest) Service and Avaya IP Office R8.0 (16) Issue 1.0 Abstract These Application
Application Notes for Avaya B179 SIP Conference Phone with Avaya Communication Server 1000 Release 7.5 Issue 1.0
 Avaya Solution & Interoperability Test Lab Application Notes for Avaya B179 SIP Conference Phone with Avaya Communication Server 1000 Release 7.5 Issue 1.0 Abstract These Application Notes describe a solution
Application Notes for IPC System Interconnect Alliance with Avaya Communication Server using QSIG Trunks Issue 1.0
 Avaya Solution & Interoperability Test Lab Application Notes for IPC System Interconnect Alliance with Avaya Communication Server 1000 7.5 using QSIG Trunks Issue 1.0 Abstract These Application Notes describe
Application Notes for Biscom FAXCOM Server with Avaya IP Office Server Edition R10 Issue 1.0
 Avaya Solution & Interoperability Test Lab Application Notes for Biscom FAXCOM Server with Avaya IP Office Server Edition R10 Issue 1.0 Abstract These Application Notes describe the configuration steps
Application Notes for Configuring the ADTRAN NetVanta UC Server with Avaya IP Office 6.1 Issue 1.0
 Avaya Solution & Interoperability Test Lab Application Notes for Configuring the ADTRAN NetVanta UC Server with Avaya IP Office 6.1 Issue 1.0 Abstract These Application Notes describe the procedure for
Abstract. MC; Reviewed: SPOC 03/25/2014. Solution & Interoperability Test Lab Application Notes 2014 Avaya Inc. All Rights Reserved.
 Avaya Solution & Interoperability Test Lab Application Notes for Configuring 2N StarGate 1.17 with Avaya Aura Communication Manager 6.3 Using a SIP Trunk - Issue 1.0 Abstract These Application Notes describe
Abstract. Avaya Solution & Interoperability Test Lab
 Avaya Solution & Interoperability Test Lab Application Notes for Configuring Dialogic ControlSwitch System with Avaya Aura Session Manager R6.3, Avaya Aura Experience Portal 7.0 and Avaya Proactive Outreach
Abstract. Avaya Solution & Interoperability Test Lab
 Avaya Solution & Interoperability Test Lab Application Notes for Configuring Escene Communication Technology ES620, ES410, ES320 and ES210 Enterprise IP Phones with Avaya Aura Session Manager 6.1 and Avaya
Application Notes for Configuring Nuance Speech Attendant with Avaya Aura Session Manager R6.3 and Avaya Communication Server 1000 R7.6 Issue 1.
 Avaya Solution & Interoperability Test Lab Application Notes for Configuring Nuance Speech Attendant with Avaya Aura Session Manager R6.3 and Avaya Communication Server 1000 R7.6 Issue 1.0 Abstract These
Application Notes for Avaya IP Office Release 8.0 with AT&T Business in a Box (BIB) over IP Flexible Reach Service Issue 1.0
 over IP Flexible Reach Service Issue 1.0") Avaya Solution & Interoperability Test Lab Application Notes for Avaya IP Office Release 8.0 with AT&T Business in a Box (BIB) over IP Flexible Reach Service Issue 1.0 Abstract These Application Notes
Avaya Solution & Interoperability Test Lab Application Notes for Avaya IP Office Release 8.0 with AT&T Business in a Box (BIB) over IP Flexible Reach Service Issue 1.0 Abstract These Application Notes
Application Notes for Configuring Fonolo In-Call Rescue with Avaya IP Office Server Edition using SIP Trunks Issue 1.0
 Avaya Solution & Interoperability Test Lab Application Notes for Configuring Fonolo In-Call Rescue with Avaya IP Office Server Edition using SIP Trunks Issue 1.0 Abstract These Application Notes describe
Abstract. Avaya Solution & Interoperability Test Lab
 Avaya Solution & Interoperability Test Lab Application Notes for Configuring SIP Trunking between the PAETEC Broadsoft based SIP Trunking Solution and an Avaya IP Office Telephony Solution Issue 1.0 Abstract
Abstract. Avaya Solution & Interoperability Test Lab
 Avaya Solution & Interoperability Test Lab Application Notes for Avaya Aura Communication Manager 5.2.1, Avaya Aura Session Manager 6.1 and Avaya Aura Session Border Controller 6.0.3 with AT&T IP Toll
Application Notes for Configuring Technicolor TB30 SIP Phones to interoperate with Avaya IP Office - Issue 1.0
 Avaya Solution & Interoperability Test Lab Application Notes for Configuring Technicolor TB30 SIP Phones to interoperate with Avaya IP Office - Issue 1.0 Abstract These Application Notes describe the configuration
Application Notes for Revolabs FLX UC 1000 with Avaya Aura Communication Manager and Avaya Aura Session Manager Issue 1.0
 Avaya Solution & Interoperability Test Lab Application Notes for Revolabs FLX UC 1000 with Avaya Aura Communication Manager and Avaya Aura Session Manager Issue 1.0 Abstract These Application Notes describe
Application Notes for Configuring SIP Trunking between McLeodUSA SIP Trunking Solution and an Avaya IP Office Telephony Solution Issue 1.
 Avaya Solution & Interoperability Test Lab Application Notes for Configuring SIP Trunking between McLeodUSA SIP Trunking Solution and an Avaya IP Office Telephony Solution Issue 1.1 Abstract These Application
Abstract. These Application Notes describe the configuration steps required for Avaya Aura Communication Manager 6.3 with 2N StarGate using DSS1.
 Avaya Solution & Interoperability Test Lab Application Notes for Configuring 2N StarGate 1.17 with Avaya Aura Communication Manager 6.3 Using DSS1- Issue 1.0 Abstract These Application Notes describe the
Abstract. Avaya Solution & Interoperability Test Lab
 Avaya Solution & Interoperability Test Lab Application Notes for Configuring Trio Enterprise R3.2 with Avaya Communication Server 1000E R7.5 and Avaya Aura Session Manager R6.1 using a SIP connection Issue
Abstract. Avaya Solution & Interoperability Test Lab
 Avaya Solution & Interoperability Test Lab Application Notes for Configuring Avaya IP Office Release 9.0 with Avaya Session Border Controller for Enterprise Release 6.2 to support BT Ireland SIP Trunk
Application Notes for Configuring SIP Trunking Using Verizon Business IP Contact Center VoIP Inbound and Avaya IP Office Release 8.1 Issue 1.
 Avaya Solution & Interoperability Test Lab Application Notes for Configuring SIP Trunking Using Verizon Business IP Contact Center VoIP Inbound and Avaya IP Office Release 8.1 Issue 1.0 Abstract These
Abstract. Avaya Solution & Interoperability Test Lab
 Avaya Solution & Interoperability Test Lab Application Notes for SIP Trunking Using Verizon Business IP Trunk SIP Trunk Service and Avaya IP Office Release 6.1, Using REFER and DNS SRV Issue 1.0 Abstract
Application Notes for Presence OpenGate with Avaya IP Office 9.0 Issue 1.0
 Avaya Solution & Interoperability Test Lab Application Notes for Presence OpenGate with Avaya IP Office 9.0 Issue 1.0 Abstract These Application Notes describe the configuration steps required for Presence
Application Notes for Extron DMP 128 Plus C V with Avaya Aura Communication Manager and Avaya Aura Session Manager - Issue 1.0
 Avaya Solution & Interoperability Test Lab Application Notes for Extron DMP 128 Plus C V with Avaya Aura Communication Manager and Avaya Aura Session Manager - Issue 1.0 Abstract These Application Notes
Application Notes for Exceptional Innovation Life point InTouch with Avaya Aura Communication Manager Using Avaya Aura Session Manager Issue 1.
 Avaya Solution & Interoperability Test Lab Application Notes for Exceptional Innovation Life point InTouch 3.1.1 with Avaya Aura Communication Manager Using Avaya Aura Session Manager Issue 1.0 Abstract
Application Notes for Intego Systems ProNet.net Nurse Call System with Avaya Communication Manager using Avaya SIP Enablement Services Issue 1.
 Avaya Solution & Interoperability Test Lab Application Notes for Intego Systems ProNet.net Nurse Call System with Avaya Communication Manager using Avaya SIP Enablement Services Issue 1.0 Abstract These
Application Notes for the Aculab GroomerII with Avaya SIP Enablement Services 3.1 and Avaya Communication Manager Issue 1.
 Avaya Solution & Interoperability Test Lab Application Notes for the Aculab GroomerII 10.1.2 with Avaya SIP Enablement Services 3.1 and Avaya Communication Manager 3.1.2 - Issue 1.0 Abstract These Application
Application Notes for Nuance Speech Attendant with Avaya Aura Session Manager and Avaya Aura Communication Manager Issue 1.0
 Avaya Solution & Interoperability Test Lab Application Notes for Nuance Speech Attendant with Avaya Aura Session Manager and Avaya Aura Communication Manager Issue 1.0 Abstract These Application Notes
AT&T VOIP Nortel BCM50 Release 3.0 SIP Configuration Guide For Use with AT&T IP Flexible Reach Service. Issue /26/2007
 AT&T VOIP Nortel BCM50 Release 3.0 SIP Configuration Guide For Use with AT&T IP Flexible Reach Service Issue 0.7 12/26/2007 Issue 0.7 Page 1 of 37 TABLE OF CONTENTS 1 Introduction... 4 1.1 Pre-IP PBX Configuration
MCS SIP Integration with Avaya Communication Manager
 Page: 1 of 11 Overview This document outlines the configuration steps to integrate the Mutare Communication Server (MCS) using SIP with the Avaya Aura Communication Manager. Document 145-MCS Specifications,
Abstract. Avaya Solution & Interoperability Test Lab
 Avaya Solution & Interoperability Test Lab Application Notes for Avaya Communication Server 1000E Release 7.5, Avaya Aura Session Manager 6.1, and Avaya Aura Session Border Controller 6.0.2 with AT&T IP
Application Notes for Exceptional Innovation Life point InTouch with Avaya Aura Communication Manager Using Avaya Aura Session Manager Issue 1.
 Avaya Solution & Interoperability Test Lab Application Notes for Exceptional Innovation Life point InTouch with Avaya Aura Communication Manager Using Avaya Aura Session Manager Issue 1.0 Abstract These
Application Notes for Metropolis ProfitWatch Call Accounting System with Avaya Aura Communication Manager Issue 1.0
 Avaya Solution & Interoperability Test Lab Application Notes for Metropolis ProfitWatch Call Accounting System with Avaya Aura Communication Manager Issue 1.0 Abstract These Application Notes describe
Application Notes for IPC Alliance 16 with Avaya Modular Messaging 5.2 via Avaya Aura Session Manager 6.3 using SIP Trunks Issue 1.
 Avaya Solution & Interoperability Test Lab Application Notes for IPC Alliance 16 with Avaya Modular Messaging 5.2 via Avaya Aura Session Manager 6.3 using SIP Trunks Issue 1.0 Abstract These Application
Abstract. Avaya Solution & Interoperability Test Lab
 Avaya Solution & Interoperability Test Lab Application Notes for Syntec CardEasy CPE with Avaya Aura Session Border Controller for Enterprise and Avaya Aura Communication Manager using a SIP trunk - Issue
Abstract. Avaya Solution & Interoperability Test Lab
 Avaya Solution & Interoperability Test Lab Application Notes for Configuring Dialogic Brooktrout SR140 Fax Software with Avaya IP Office 11 via a SIP Trunk Interface using Transport Layer Security (TLS)
Application Notes for the LifeSize Phone with Avaya Communication Manager and Avaya SIP Enablement Services Issue 1.0
 Avaya Solution & Interoperability Test Lab Application Notes for the LifeSize Phone with Avaya Communication Manager and Avaya SIP Enablement Services Issue 1.0 Abstract These Application Notes describe
MITEL SIP CoE Technical. Configuration Note. Configure Mitel MiVoice Office 6.1 SP1 PR2 for use with IntelePeer SIP Trunking. SIP CoE XXX
 MITEL SIP CoE Technical Configuration Note Configure Mitel MiVoice Office 6.1 SP1 PR2 for use with IntelePeer SIP Trunking SIP CoE 12-4940-00XXX NOTICE The information contained in this document is believed
Application Notes for Empix evolve v3.1 Skypetophone with Avaya IP Office 7.0 Issue 1.0
 Avaya Solution & Interoperability Test Lab Application Notes for Empix evolve v3.1 Skypetophone with Avaya IP Office 7.0 Issue 1.0 Abstract These Application Notes describe the compliance testing configuration
Application Notes for Configuring Rauland-Borg Responder 5 to Interoperate with Avaya IP Office Issue 1.0
 Avaya Solution & Interoperability Test Lab Application Notes for Configuring Rauland-Borg Responder 5 to Interoperate with Avaya IP Office Issue 1.0 Abstract These Application Notes describe a compliance-tested
Application Notes for Magnetic North Optimise VoIP Call Recorder with Avaya Communication Manager and Avaya Application Enablement Services Issue 1.
 Avaya Solution & Interoperability Test Lab Application Notes for Magnetic North Optimise VoIP Call Recorder with Avaya Communication Manager and Avaya Application Enablement Services Issue 1.0 Abstract
Application Notes for Polycom SpectraLink 8450 SIP Telephone version with Avaya Communication Server 1000 Release 7.5 Issue 1.
 Avaya Solution & Interoperability Test Lab Application Notes for Polycom SpectraLink 8450 SIP Telephone version 4.0.0.0282 with Avaya Communication Server 1000 Release 7.5 Issue 1.1 Abstract These Application
Abstract. _ 1 of 22 2N_VB_SM63_SIP. MC; Reviewed: SPOC 03/25/2014
 Avaya Solution & Interoperability Test Lab Application Notes for Configuring 2N VoiceBlue Next 1.17 with Avaya Aura Communication Manager 6.3 Using a SIP Trunk - Issue 1.0 Abstract These Application Notes
Application Notes for Avaya B179 SIP Conference Phone with Avaya Communication Server 1000 Release 6.0 Issue 1.0
 Avaya Solution & Interoperability Test Lab Application Notes for Avaya B179 SIP Conference Phone with Avaya Communication Server 1000 Release 6.0 Issue 1.0 Abstract These Application Notes describe a solution
Application Notes for Komutel CCS with Avaya IP Office - Issue 1.1
 Avaya Solution & Interoperability Test Lab Application Notes for Komutel CCS with Avaya IP Office - Issue 1.1 Abstract These Application Notes describe the steps required to integrate Komutel CCS (Call
Abstract. Avaya Solution & Interoperability Test Lab
 Avaya Solution & Interoperability Test Lab Application Notes for Configuring Avaya IP Office Release 9.0 with Avaya Session Border Controller for Enterprise Release 6.2 to support Belgacom SIP Trunk Service
Application Notes for Configuring SIP Trunking between TelePacific SmartVoice SIP Connect and an Avaya IP Office Telephony Solution 1.
 Avaya Solution & Interoperability Test Lab Application Notes for Configuring SIP Trunking between TelePacific SmartVoice SIP Connect and an Avaya IP Office Telephony Solution 1.0 Abstract These Application
Application Notes for Valcom One-Way IP Speakers with Avaya Aura Communication Manager and Avaya Aura Session Manager Issue 1.0
 Avaya Solution & Interoperability Test Lab Application Notes for Valcom One-Way IP Speakers with Avaya Aura Communication Manager and Avaya Aura Session Manager Issue 1.0 Abstract These Application Notes
Abstract. Avaya Solution & Interoperability Test Lab
 Avaya Solution & Interoperability Test Lab Application Notes for Syntec CardEasy CPE with Avaya Session Border Controller for Enterprise, Avaya Aura Communication Manager and Avaya Aura Application Enablement
Business Communication Manager Release 5.0 Configuration Guide for Skype for SIP R1.3. Issue 1.0
 Avaya BCM Solutions Test Lab Business Communication Manager Release 5.0 Configuration Guide for Skype for SIP R1.3 Issue 1.0 Abstract This document provides guidelines for configuring a SIP Trunk between
Application Notes for Configuring Dialogic Brooktrout SR140 Fax Software with Avaya IP Office via SIP Trunk Interface - Issue 1.0
 Avaya Solution & Interoperability Test Lab Application Notes for Configuring Dialogic Brooktrout SR140 Fax Software with Avaya IP Office via SIP Trunk Interface - Issue 1.0 Abstract These Application Notes
Application Notes for Integrated Research PROGNOSIS IP Telephony Manager with Avaya Communication Manager - Issue 1.0
 Avaya Solution & Interoperability Test Lab Application Notes for Integrated Research PROGNOSIS IP Telephony Manager with Avaya Communication Manager - Issue 1.0 Abstract These Application Notes describe
Application Notes for Packet One SIP Trunk System Version 3.1 Interoperability with Avaya Software Communication System Release Issue 1.
 Avaya Solution & Interoperability Test Lab Application Notes for Packet One SIP Trunk System Version 3.1 Interoperability with Avaya Software Communication System Release 4.0 - Issue 1.0 Abstract These
Avaya Solution & Interoperability Test Lab
 Avaya Solution & Interoperability Test Lab Application Notes for Enghouse Interactive Attendant Console 6.0 to interoperate with Avaya Aura Communication Manager R6.3 and Avaya Aura Session Manager R6.3