This Best Practice Guide contains:
|
|
|
- Madlyn Harrington
- 5 years ago
- Views:
Transcription
1
2 About This Guide Deep Security provides a single platform for server security to protect physical, virtual, and cloud servers as well as hypervisors and virtual desktops. Tightly integrated modules easily expand to offer in-depth defenses, including anti-malware, web reputation, intrusion prevention, firewall, integrity monitoring, and log inspection. It is available in agentless and agent-based options that can all be managed through a single console across physical, virtual, and cloud server deployments. This guide is intended to help users get the best productivity out of the product. It contains a collection of best practices that are based on knowledge gathered from previous enterprise deployments, lab validations, and lessons learned in the field. Examples and considerations in this document serve only as a guide and not a representation of strict design requirements. These guidelines do not apply in every environment but can help guide you through configuring Deep Security for optimum performance. Trend Micro Incorporated reserves the right to change this document and products without notice. Before installing and using the software, please review the Readme file and the latest version of the applicable user documentation. 2
3 This Best Practice Guide contains: Deployment considerations and recommendations. Guidance in sizing server and storage resources for Deep Security implementation. Upgrade guidelines and scenarios. Recommended configuration to maximize system performance and reduce administrative overhead. Best practice tips for VDI, private and public cloud environments. 3
4 Acknowledgments This guide was made by the following individuals who volunteered their time and expertise to this project: Marlon Beriña, Aldrin Ceriola, Saif Chaudhry, Jennifer Chua, Jason Dablow, Erwin Dusojan, Mohamed Inshaff, Jill Maceda, Marion Mora, Winfred Lin, Robert See, Hugo Strydom, Reuel Morales, Raphael Bottino, Tomokuni Naoki, Iwata Toshiyuki, Ebenizer Padu, Igor Valoto, Simon Zhang, Martin Tarala, Andy Dai, Chen Lin, Davy Ariokta Trinugraha,Kyle Klassen and Fernando Cardoso. We would also like to thank the following people for their significant support and contribution during development and review: Shiela Aballa, Rodel Villarez, Ziv Huang, Marty Tsai, Cellina Lin, Chris Lai, Paul Liang, Zion Li Document version: 1.2 Release date: May 2,
5 Table of Contents 1 Environment Operating Systems and Database System VMware vsphere and NSX Compatibility with Deep Security VMware Tools and NSX Endpoint Drivers (for Agentless Anti-Malware) Environmental Recommendations for TMCM Integration Sizing Considerations Installation and Deployment Deep Security Components Deep Security Manager Deep Security Agent/Relay Deep Security Virtual Appliance (DSVA) Database VMware Components Deployment Scenario Samples Testing Deep Security Upgrade and Migration Deep Security Manager Upgrade Recommendations: Upgrade vcns to NSX: Configuration UI Configurations Dashboard Alerts Policies Smart Folders Module Configurations Anti-Malware Web Reputation Firewall Intrusion Prevention Integrity Monitoring Log Inspection Application Control Connected Threat Defense (CTD) Administration and System Settings
6 5.3.1 Recommendation Scan System Settings Performance Tuning and Optimization Deep Security Manager Configure Deep Security Manager's Maximum Memory Usage Configure Multiple Managers Performance Profiles Database Exclude Database files from Anti-Malware scans Auto-growth and Database Maintenance Database Indexing Deep Security Relay Deep Security Relay Location Relay Groups NSX NSX Firewall NSX Security Policy Disaster and Recovery High Availability Removing a virtual machine from Deep Security protection in a disaster Recovering a physical machine (with Deep Security Agent) in a Disaster Recovering an inaccessible Deep Security Virtual Appliance Isolating a Deep Security Issue Other Deployment Scenarios Multi-Tenant Environment Environments using Teamed NICs Air-Gapped Environments Solaris Zones Microsoft Cluster Servers Microsoft Hyper-V Virtualized Environments (VDI) Private, Public & Hybrid Cloud Environments SAP IBM Rational ClearCase Docker support Automation Activation from Gold Image
7 8.13 Oracle RAC cluster SAML
8 1 Environment Deep Security 11.0 consists of several components working together to provide protection. The information provided in this section will help you determine the compatibility and recommended software for: a) Operating Systems b) Database Systems c) VMware vsphere and NSX Compatibility d) VMware Tools and NSX Guest Introspection Driver 1.1 Operating Systems and Database System Refer to the Installation Guide. 1.2 VMware vsphere and NSX Compatibility with Deep Security VMware and Deep Security compatibility charts often change, especially as new versions of vsphere are being released. To get the latest compatibility chart, refer to the compatibility matrix article. 1.3 VMware Tools and NSX Endpoint Drivers (for Agentless Anti -Malware) The agentless anti-malware operations provided by Deep Security requires the NSX File Introspection Driver to be installed on the virtual machines in order to be protected. VMware includes the VMware NSX File Introspection Driver in VMware Tools 9.x, but the installation program does not install it on guest VMs by default. To install it on a guest VM, review the installation options in the table below: Available VMware Tools Installation Options Installation Option vshield Endpoint Action Typical Complete Custom NSX File Introspection Driver does NOT install NSX File Introspection Driver Endpoint installs You must explicitly install NSX File Introspection Driver DO NOT select this option Select if you want all features Expand VMware Device Drivers > VMCI Driver. Select NSX File Introspection Driver and choose This feature will be installed on local drive. Table 1: VMware Tools Installation Options 8
9 NOTE The NSX Driver bundled with VMware Tools is now called Guest Introspection upon upgrading vsphere to version 5.5 Update 2. However, Guest Introspection service is used for NSX 6.1 or higher. If you are using NSX 6.0 and below, the name of this service is VMware Endpoint. 1.4 Environmental Recommendations for TMCM Integration We recommend using Trend Micro Control Manager 6.0 Service Pack 3 with Patch 2 (or higher) to implement the Connected Threat Defense strategy in defense against emerging threats and targeted attacks. 9
10 2 Sizing Considerations Sizing recommendations depend on the type of environment and various other factors such as network, hardware, software and applications. See Started/sizing.html for the latest sizing guidelines for Deep Security Manager, its database, Deep Security Agent, and Deep Security Virtual Appliance. 10

11 3 Installation and Deployment Deep Security is composed of several components that need to communicate with each other. If you re deploying in a highly segmented network environment, knowledge about the various ports it uses will be useful for preventing unintended functionality disruptions. Make sure that all required ports are open and not reserved for other purposes. Refer to the article below for a list of ports required in Deep Security: Communication ports used by Deep Security ( 3.1 Deep Security Components Figure 1: Deep Security Manager Deep Security Manager A. Deployment Considerations 1. Use the fully qualified domain name (FQDN). Define Deep Security Manager to use its FQDN, which is resolvable by all other components. If this was not defined correctly during the installation, it can be modified under Deep Security Manager > Administration > System Information. The manager address or name specified in the Network Map with Activity Graph screen will be used by the other components to contact Deep Security Manager. 2. Deploy at least one, secondary Deep Security Manager node. This is recommended to be deployed for redundancy. See Configure Multi-Node Managers. NOTE Multi-node deployment is not meant to address geographic dispersion. Therefore, Deep Security Manager nodes and database must be in the same network segment (i.e. NO DSM1/DB in London with DSM2 in Paris connected via WAN). 3. Deep Security Manager virtual machine settings recommendations are as follows: Use vmxnet3 as vnic driver. Use Paravirtual SCSI as vdisk controller. Thick Eager Zero Disk is preferred. 11
12 4. TLS1.2 is enforced in DSM 10.1 or higher. However, it is possible that some customers cannot implement such enforcement. In that case, use the following workaround: Modify the Deep Security Manager configuration.properties file to add a protocols=tlsv1,tlsv1.1,tlsv1.2 line as required to re-enable the older protocols. B. Other Recommended Settings 1. By default, the installer is configured to use 1 GB of memory. If the installer fails and you receive a java.lang.outofmemoryerror error during installation, you might need to configure the installer to use less memory. To configure the amount of RAM available to the installer: a. Go to the directory where the installer is located. b. Create a new text file called "Manager-Windows-11.0.xxxx.x64.vmoptions" or "Manager-Linux xxxx.x64.vmoptions", depending on your installation platform (where "xxxx" is the build number of the installer). c. Edit the file by adding the line: "-Xmx800m". In this example, 800 MB of memory will be made available to the installer. d. Save the file and launch the installer. 2. Deep Security Manager can specify a hostname and a port that replace the default settings to put a load balancer in front of a: Manager user interface port (4119) Manager heartbeat port (4120) Relay port (4122) To configure the load balancers, go to Deep Security Manager > Administration > System Settings > Advanced > Load Balancers. This setup is recommended for multi-tenant (service provider) environments, especially in the cloud. A load balancer allows the following: Tunneling for ports 4119, 4120, and 4122 traffic over 443 (three load balancers with three addresses). Ability to add and remove Deep Security Manager nodes on demand, without generating update traffic going to each Deep Security Agent and Deep Security Virtual Appliance in the environment. Load balancers can be configured to use different ports for different traffic. If the load balancer supports port re-direction, it can be used to expose all the required protocols over port 443 (using three load balancers). 12


13 Figure 2: Load Balancer Support In all cases, the load balancer should be configured as http or https load balancer without SSL Terminating. This ensures a given communication exchange will happen directly between the Deep Security Agent, Deep Security Virtual Appliance and Deep Security Manager from start to finish. The next connection can balance to a different node. On environments with a fixed number of Deep Security Manager nodes, there is no need to use a load balancer in front of Deep Security Manager. NOTE For high availability and scalability, the Deep Security Manager provides the URL address of all nodes to all agents and virtual appliances. The agents and virtual appliances use the list to randomly select a manager node and continue to try the rest of the list until a node can be reached. If it cannot reach any nodes, it will wait until the next heartbeat and try again. Figure 3: Deep Security Agent or Relay Deep Security Agent/Relay A. Deployment Considerations 1. Each computer should be able to resolve the fully qualified domain name of the Deep Security Manager for a successful deployment. 13
14 2. The clock on a Deep Security Agent (DSA) or Deep Security Relay (DSR) machine must be synchronized with Deep Security Manager within 24 hours. It is recommended to sync the time with NTP server. 3. If the client machine where Deep Security Agent or Deep Security Relay will be installed has a previous OfficeScan client, the drivers (tmactmon, tmevtmgr, and tmcomm) must be fully uninstalled prior to installation. After uninstallation finishes, rebooting OfficeScan is required. Deep Security Agent and OfficeScan client use the same name for drivers, however, Deep Security Agent cannot use OfficeScan client's drivers and OfficeScan cannot use Deep Security Agent s. 4. In Deep Security Manager 10.3 or later, the Enable Relay button has been removed. Instead, go to Relay Management. NOTE Disabling the relay feature on a Windows 10 agent can sometimes take more than ten minutes to complete. The new Relay Management page does not allow users to add or modify relay group descriptions. 5. There is a combined mode feature in Deep Security 11.0 that allows the Deep Security Virtual Appliance and Deep Security Agent to work together in providing security. In combined mode, the features are distributed so that some protection is supplied by Deep Security Agent and other protection is given by Deep Security Virtual Appliance. There is no concept of redundancy or standby, so if either of these agents fail, then the corresponding protection or feature is lost. In the Settings menu at policy level or computer level, you can select which component will provide protection when both the Deep Security Agent and the Deep Security Virtual Appliance are present as shown below: Figure 4: Combined Mode If you do not use NSX Advanced or Enterprise version and the consolidation ratio of an ESXi host is high (for instance, one ESXi host contains 100 VMs), then choose anti-malware and integrity monitoring to be provided by Deep Security Virtual Appliance and the rest will be provided by Deep Security Agent to benefit the performance. NOTE With agentless protection, anti-malware will not support the advanced features such as behavior monitoring and endpoint correlation. 6. Check the fully qualified domain name (FQDN) of the machine before and after the Deep Security Agent installation. A brief network interruption occurs during the agent installation process. Sometimes, it can 14
15 affect Dynamic Host Configuration Protocol (DHCP) auto-registration. It is recommended to verify the computer s FQDN (ping -a <ip or server name>) before and after the installation. Should an issue with auto-registration arise, use ipconfig /registerdns or reboot the computer. 7. Deep Security Agent installation will disable iptables (Linux) or Windows Firewall (Windows) by default to avoid conflicts. In situations where the Deep Security Agent firewall feature is NOT used, refer to the steps below to prevent the installer from disabling iptables or from making any changes to the native Windows Firewall. a. For Windows, refer to the following article to modify the Deep Security Agent MSI package and prevent it from changing the Windows Firewall: Windows Firewall settings changed after installing Deep Security Agent (DSA) b. For Linux, create or touch an empty file with the following path: /etc/use_dsa_with_iptables If the file is present, then the Deep Security Agent scripts will not disable iptables. # touch /etc/use_dsa_with_iptables # service iptables restart # service ip6tables restart 8. Install multiple dedicated Deep Security Relays to achieve redundancy and optimize the bandwidth usage. At least one Deep Security Relay is required for a Deep Security environment, but a minimum of two is recommended. It is also recommended to deploy dedicated servers for Deep Security Relay. 9. Deep Security Relay s communication direction must be set to bidirectional otherwise the rule update might fail to apply. 10. Anti-malware functionality might have some problems if a 10.0 Deep Security Manager activates a 10.3 Deep Security Agent. We recommend using Deep Security Manager 11.0 to manage Deep Security Agent 9.6, 10.0, and When you install Deep Security Agent, only send the installer (msi, rpm) file to the destination machine. The plug-ins can be deployed to Deep Security Agent based on policy. 15


16 12. Trend Micro recommends using a distributed switch for deploying NSX. However, if you wish to use local storage, follow the steps below: 1. In each ESXi of the cluster, configure the Agent VM Settings to use local datastore and standard port group. 2. In the service deployment wizard, select Specified on-host for both datastore and network. 16

17 B. Agent Deployment Scripts Deep Security Manager's deployment script generator can be used to generate scripts that run on computers where the agent will be installed. The script can be modified to optionally perform subsequent tasks like activation and policy assignment. Figure 5: Deployment Script Consider using deployment scripts in these scenarios: Other Notes: Environments where there is a need to deploy and activate multiple agents. Automate the activation process and deployment of policies. Activate and deploy to clients in environments where the server cannot communicate or discover clients directly, but clients can reach the server without problem. In Amazon Elastic Compute Cloud (Amazon EC2) and Azure environments, it can be bundled with an endpoint and used while instances are being auto-scaled. 1. Deployment scripts only support basic function and cannot fulfill all needs for all environments. Adjust the scripts to fit your specific needs. Some environments might experience a delay in starting the ds_agent service. If the dsa_control activation signal is sent before the ds_agent service is started, this might prevent the activation from working successfully. Extend the sleep time in the scripts to prevent this. For example, in Amazon Web Services (AWS) testing, concurrent launching of 100 instances had better results when the sleep time was set to more than 60 seconds. This depends highly on AWS system loading, disk I/O, CPU loading, network bandwidth, and database configuration. 17

18 2. In Amazon Web Services (AWS EC2) environments, the new instances must be able to access the URLs specified in the generated deployment script. This means that Deep Security Manager must be either internet facing, connected to AWS via VPN/Direct Link, or deployed on Amazon Web Services as well. 3. The base tenant MUST import the agent packages before using deployment scripts (for both single and multitenant deployments). 4. The agent-initiated activation feature must be configured correctly in Deep Security Manager for scripts to do activation tasks. The agent-initiated activation option must be enabled on the Administration > System Settings > Agents tab. 5. By default, port 4118 is not open on the security group (firewall) of AWS. To activate from the Deep Security Manager console, the Deep Security Agent must be able to communicate on port 4118 of AWS. To allow 4118 on the security group of AWS: a. Open the AWS web console. b. Go to Network and Security. c. Select Security Group. d. Under TCP Port (Service), check if port 4118 is listed. If not, select Create a rule to add it. You can telnet to the machine to verify communication on port To automatically protect a new instance of AWS, please refer to the following article: Deploying Deep Security agents using the Amazon Web Services (AWS) management console ( Figure 6: Deep Security Virtual Appliance 18

19 3.1.3 Deep Security Virtual Appliance (DSVA) A. Deployment Considerations 1. It s required to download the Deep Security Virtual Appliance installer package into Deep Security Manager prior to the deployment of Deep Security Virtual Appliance and addition of the vcenter server to Deep Security Manager. Deep Security 11 ships a new appliance package with a new RHEL7 OS. This appliance needs more resources than the old appliance. There is an issue when a virtual machine (VM) is protected agentlessly by a Deep Security Virtual Appliance and the VM is moved (using vmotion) from ESX A to ESX B, where both ESX A and ESX B have an appliance installed. In that scenario, the source appliance stores some temporary data to a relay and the target appliance downloads the package from the relay. However, if the relay is disabled, deleted, or deactivated, the target appliance is not able to download the package and it could fail to restore some data (such as the integrity-monitoring baseline) on the target appliance. 2. Ensure that the Deep Security Virtual Appliance can resolve the FQDN of the Deep Security Manager and that the ESX server is able to connect to the Deep Security Manager FQDN at port There will be issues in installing the driver and deploying Deep Security Virtual Appliance if ESX cannot. Ensure that the Deep Security Manager and vshield Manager FQDN can be resolved by Deep Security Virtual Appliance. Do not update the VMware Tools within Deep Security Virtual Appliance. Deep Security Virtual Appliance uses the device drivers that come with the version of tools it was built with. When a tool upgrade is implemented, Deep Security Virtual Appliance DSVA may not start. 3. Change Deep Security Virtual Appliance s default password after installation by pressing <F2>and selecting the option Configure Password on the console. The default password for the deployed Deep Security Virtual Appliance image is dsva. 4. Confirm that NSX Manager has the correct vcenter and Lookup Service settings. In the NSX Manager console, go to Manager > NSX Management Service. Figure 7: vcenter Server on NSX Manager 19
20 5. When creating VMs to be protected by Deep Security Virtual Appliance, note the following considerations: VMware Tools or later with the Guest Introspection Driver should be installed. Virtual Disks Supported: LSI Logic parallel, LSI SAS, or VMware paravirtual SCSI driver (Buslogic is unsupported). B. Other Recommendations In agentless anti-malware environments, file scanning takes place on the Deep Security Virtual Appliance because there is no agent on the endpoint. Deep Security Virtual Appliance uses the conventional scanning method (recommended) that does not use Smart Protection Server. The web reputation feature is used by the Deep Security Virtual Appliance. When someone tries to access a URL on the VM, the rating of that URL is checked by the Deep Security Virtual Appliance first to ensure the URL is not malicious. To check the rating of the URL, Deep Security Virtual Appliance sends that query to the Smart Protection Server. Smart Protection Network is globally available online courtesy of Trend Micro. By default, Deep Security Virtual Appliance will use it. Please refer to this article ( to reference the complete list of URLs that Deep Security needs to access. Confirm that the URLs are allowed on your company firewall/proxy. To avoid internet traffic going to the global servers, install a local standalone Smart Protection Server 3.1 or higher Database A. Deployment Considerations 1. The Deep Security Manager must be co-located on the same network as its database, with the connection speed of 1 GB LAN or higher. Connections over WAN are discouraged. Deep Security Manager relies on the database to function. Any increase in latency can have a serious negative impact on Deep Security Manager s performance and availability. 2. Dedicate a database server to a separate machine. 3. Database VM setting recommendations: Use vmxnet3 as vnic driver Use Paravirtual SCSI as vdisk controller Use Thick Eager Zero Disk 4. Microsoft SQL Enterprise or Oracle Enterprise are recommended. Microsoft SQL Server Express is supported only in very limited deployments with Deep Security 10.0 Update 2 or later (for details, see Microsoft SQL Server Express considerations). Microsoft SQL Enterprise Server Create the Deep Security Manager database in SQL prior to installation. 20
21 Ensure that the remote TCP connection is enabled in your database server ( The database account that will be used should have db_owner rights for the Deep Security Manager database. The dbcreator server role is required if multi-tenancy is used. Set the database with simple recovery model ( Oracle Database Server Ensure that the Oracle Listener service is started and accepts remote TCP connections on your database server. Create the * dsm database user. Any other user name can be used. Grant the CONNECT, RESOURCEroles and the UNLIMITED TABLESPACEsystem privilege to the user dsm. Assign the CREATE SEQUENCE, CREATE TABLE and CREATE TRIGGERsystem privileges to the user dsm. If you plan to use multi-tenancy, grant the CREATEUSER, DROP USER, ALTER USER, GRANT ANY PRIVILEGEand GRANT ANY ROLE system privileges to the user dsm. 5. Connecting to the database through TCP/IP channel is recommended. In situations where the use of named pipes is required to connect to the SQL Server, a properly authenticated Microsoft Windows communication channel must be available between Deep Security Manager's host and the SQL Server host. This might already exist if: The SQL Server is on the same machine as Deep Security Manager. Both servers are members of the same domain. A trust relationship exists between the two servers. If no such communication channel is available, Deep Security Manager will fail to communicate with the SQL Server over named pipes. 6. Make sure the correct connection settings are used during installation. When the Deep Security Manager installer prompts you for the database connection details, enter the database hostname under Hostname and the pre-created database for Deep Security under Database Name. 21

22 Figure 8: Connecting to SQL instance The installation supports both SQL and Windows Authentication. If you re using Windows Authentication, click Advanced to display additional options. The screenshot above is an example of connecting to a named SQL instance using Windows Authentication. 7. For Oracle, avoid using special characters for the database user. Although Oracle allows special characters when configuring the database user object, Deep Security does not support special characters for the database user. 8. For Microsoft SQL Server, keep the database name short, particularly if multi-tenancy is planned for the environment. A short name for the main database will make it easier to read the database names of your tenants. For example, if the main database is "MAINDB", the first tenant's database name will be "MAINDB_1", the second tenant's database name will be "MAINDB_2", and so on. 9. For security, your account and password for the database might have an expiration. In this case, you can follow the article below to change the account and password for the database in Deep Security Manager: Changing the Deep Security Manager (DSM) database credentials and port ( 10. To avoid deadlocks, Deep Security sets READ_COMMITTED_SNAPSHOT to On when installing with Microsoft SQL server. If an installation or an upgrade is performed, Is Read Committed Snapshot On True will flag in your database. 22

23 3.2 VMware Components Figure 9: VMware Components A. Deployment Considerations 1. Ensure the latest security patches are applied to vcenter, ESXi, and NSX Manager. For version compatibility details, refer to: Deep Security and VMware compatibility matrix 2. Ensure all VMware components are tied to an NTP server. It s recommended to use the same NTP server for the entire environment, and that they re all synchronized. 3. To deploy NSX, the OVA package can be downloaded from VMware s website: It s suggested to use NSX 6.3.x or higher for Deep Security If you re using NSX free license, there is no need for Host Preparation before deploying Deep Security Virtual Appliance. 4. Login credentials with access to vcenter and NSX Manager are required when connecting the components to Deep Security. Always remember to update the connection details in Deep Security each time the password for these accounts change to avoid synchronization issues. 5. This can be done via DSM > Computers > right-click on vcenter > Properties. For more details on the permissions, refer to this article: Permissions required for Deep Security Virtual Appliance (DSVA) deployment and operations ( NOTE If vcenter is installed on Windows, Update Manager must be enabled. 23

24 6. Deploying the Guest Introspection driver on VMs For VDI environments, enable the driver in the gold image. For mass deployments refer to VMware document: CD6ED7DD-E2E2-48BC-A6B0-E0BB81E05FA3.html Verify on random VMs to ensure these drivers are running command in command prompt: 7. Multiple vcenters sc query vsepflt sc query vmci Deep Security supports multiple vcenter servers. Virtual Machine UUIDs must be unique across all vcenter instances. For example, adding a VM to the inventory on multiple vcenter servers can result in duplicate UUID issues. If you re using Linked Mode, each linked vcenter server must be added individually to Deep Security Manager. 8. Keep Deep Security Manager and Deep Security Manager in the same ESXi Host using VM/Host Rules at Cluster Settings Figure 10: Keep Virtual Machines Together 24

25 3.3 Deployment Scenario Samples A. Standard Small Scale Deployment Figure 11: Standard Small Scale Deployment For small standard deployment, only a single Deep Security Manager infrastructure is required. For best performance, it s recommended that: The database is installed on a separate machine. Both Deep Security Manager and the database are located in the same datacenter. There are one to two Deep Security Relays for updates. A 10-minute heartbeat is used for all systems. Refer to the heartbeat section for additional details on heartbeats. 25


26 B. Medium Scale Deployment with VPN users Figure 12: Remote systems connect to VPN regularly Figure 13: Medium Scale Deployment For medium scale deployment, the best practice is to have: Two Deep Security Manager nodes for redundancy. Deep Security Manager and broadband both located in the datacenter. Bi-directional communication. Two relays for updates. 10-minute heartbeat for servers. 26
27 60-minute heartbeat for desktops and internal laptops. 10-minute heartbeat for remote laptops (may vary; heartbeat frequency needs to be less than the average VPN session frequency). Refer to the heartbeat section for additional details on heartbeat and communication methods. 3.4 Testing Deep Security Validate and test Deep Security features and functionality after deployment. Refer to the following link for guidelines on testing each module of Deep Security. The link also provides the procedure for testing the integration with VMware, Active Directory, and SIEM tools, along with failover/high availability tests and scenarios: Testing the Deep Security modules ( 27
28 4 Upgrade and Migration 4.1 Deep Security Manager Upgrade Recommendations: 1. Before upgrading the Deep Security Manager, create a full backup of the Deep Security Manager database. In the rare event that there s difficulty in upgrading, this will allow you to roll back by installing the previous manager (with a temp database) and re-pointing it at the restored database (in dsm.properties). 2. Perform the upgrade on non-peak or low-peak hours. 3. For multi-node Deep Security Manager, upgrades must be done on all Deep Security Manager nodes. For example, you must upgrade Deep Security Manager node 1, then node 2, and then node 3. All nodes must run on the same version prior to upgrade. 4. If a previous version of Deep Security Manager is installed on your system, choose between "Upgrade the existing installation" and "Overwrite the existing installation": a. Upgrading the installation will upgrade the Deep Security Manager to the latest version but will not overwrite your policies, such as intrusion prevention rules, firewall rules and application types, or change any of the security settings being applied to the computers in your network. b. Overwriting the existing installation erases all the data associated with the previous installation and then installs the latest parameters for filters, rules, policies and others. 5. In a Multi-Tenant environment: a. When the installer runs and detects an existing installation, it offers an upgrade option. If upgrade is selected, the installer notifies other nodes to shut down and then begins the process of upgrading. b. The primary tenant is upgraded first, followed by the tenants in parallel (five at a time). Once the installer finishes, the same installer package would be executed on the rest of the Deep Security Manager nodes. 6. For environments with large databases, schema modification during an upgrade can take a significant amount of time (8 or more hours), so plan accordingly. 4.2 Upgrade vcns to NSX: Procedures are available at: %20vCNS%20Migration.pptx?dl=0 28
29 5 Configuration Deep Security is a modular solution that can be adapted to different environments, so there is no right or wrong way to configure the product. Below are some common settings, exclusions, and other helpful configurations which appear in most Deep Security deployments. Double-check with your company s policies before adapting these recommendations. 5.1 UI Configurations Dashboard We recommend that at least the following widgets are included and placed on the area best seen on the dashboard page: a. Alert Status Keeps you informed of any critical items that might need immediate attention such as security updates and protection on computers going offline. b. Computer Status Gives you a good overview of agents status. c. My Account Status Shows information about the user currently logged in. d. Security Update Status Shows information about out-of-date vs. up-to-date agents. Create multiple dashboards and group them by usage (that is General, Anti-Malware, Updates and others) for easier management of large scale environments. Administrators can easily switch between them from the tabbed view. Each dashboard has a different time and computer filter, allowing multiple views into the system Alerts By default, most alerts are enabled. In large environments, it can be beneficial to remove some alerts so only the ones that require action are triggered. Alerts should be configured to give the most relevant information, so the proper action(s) can be taken. From the alerts page, users can select Configure Alerts to enable or disable alerts Policies Policies replicate security settings to servers and desktops that share similar security requirements. We recommend that machines with similar settings, software installed, application, or function be grouped strategically when assigning policies. Note that the default policies built in Deep Security are meant to be examples and should not be used without prior configuration. A. Policies vs. Computer Level Rule and Configuration Assignment The best practice is to assign most rules through Policies for ease of management. The advantages of using Policies are as follows: The user can change or test the policy settings before assigning it to the machines. 29
30 It allows a quick removal of rules and configuration by simply taking out a machine from the policy or assigning it an entirely new one. It duplicates the policy and uses it as a baseline setting for future policies to be created. When to use Computer Level rule assignment: Leveraging automatic assignment There are many varying computers (that is, each machine uses different applications, different OS updates, and so on, so they are virtually impossible to group) NOTE When using a combination of policy and computer level assignments, keep in mind that when you un-assign a policy from a computer, rules might still apply. This occurs if the rules were assigned independent of the policy. B. Policy Groupings Below are some recommended machine groupings to effectively take advantage of policies: By Operating System (for example, Windows 2008 Servers, Windows XP Machines, and Linux) By Server Function (for example, Mail Servers, Web Servers, User Laptops, and Point of Sale Systems) By Application installed/version (for example, OfficeScan Servers, Oracle 10 Database Servers, MS SQL 2005 Servers) Properly grouping the machines is essential to effectively managing recommendation scans. When a recommendation scan is performed on an individual member of a policy, the recommendations for that particular agent (Deep Security Agent) will be seen on the policy as well. Accepting or applying the recommendations at the policy level will apply the rules to all members of the policy. The advantage of this method is the ease of maintenance. However, the disadvantage is that unnecessary rules might be assigned to certain members. For this reason, it s recommended to group the machines accordingly, if users don't want to see the vulnerability being triggered for machines that should not be affected. NOTE Deep Security 10 supports multiple levels of policy inheritance. A newly-created policy can be configured to inherit all or some of its settings from a parent policy. It lets you create a tree structure of security policies. For example, you can create a parent policy called "Windows Server" and two child policies, "Windows Server 2008" and "Windows Server 2003", inherited from their parent policy. Each child policy can have child policies of their own for different editions of Windows Server. 30

31 Sample Policy grouping with policy inheritance: Figure 14: Policy inheritance C. Policy Names As a best practice, use a naming convention for policies to more easily manage multiple policies in an environment. Figure 15: Sample of Naming Convention Smart Folders When using the Smart Folder function, be sure to identify Computer Name and Display Name correctly. 5.2 Module Configurations Anti-Malware A. Configuration Go to Policies > Common Objects > Other > Malware Scan Configuration > Scan Settings. 31
32 Recommended Real-Time Scan Configuration General Recommendation Files to Scan Directories to Scan All Files All directories Actions Active Action Custom Actions: For Virus For Trojans For Packer For Spyware For Other Threats Possible Malware upon Detection Disabled Enabled Clean Delete Quarantine Quarantine Quarantine ActiveAction Options Enable Spyware / Grayware Scan Scan Compressed Files Maximum size of individual extracted files Enabled Enabled Customized Size Maximum Levels 2 Maximum number of files to extract 10 Scan Embedded Microsoft Office Objects Scan for Exploit Code in Microsoft Office Objects Enabled Enabled OLE Layers to Scan 3 Enable IntelliTrap* Enable Network Directory Scan Scan Files When Alert when Disabled Enabled** Read/Write Enabled Table 2: Real-Time Scan Configuration * IntelliTrap helps block real-time compressed executable files and pairs them with other malware characteristics. Since IntelliTrap identifies such files as security risks and might incorrectly block safe files, you can disable IntelliTrap if users regularly exchange real-time compressed executable files. IntelliTrap only works in Real-Time mode. **Network scanning should be disabled to maintain maximum performance during Real-Time Scan. 32
33 However, these network resources must be protected by a local AV scanner. Leave enabled if there is no other file scanner for these network shares. Recommended Scheduled Scan Configuration General Files to Scan Directories to Scan Recommendation All Files All directories Actions Active Action Custom Actions: For Virus For Trojans For Packer For Spyware For Cookie For Other Threats Possible Malware Upon Detection Disabled Enabled Clean Delete Quarantine Quarantine Delete Quarantine Quarantine Options Enable Spyware / Grayware Scan Scan Compressed Files Maximum size of individual extracted files Enabled Enabled Customized Size Maximum Levels 3 Maximum number of files to extract 10 Scan Embedded Microsoft Office Objects Scan for Exploit Code in Microsoft Office Objects Enabled Enabled OLE Layers to Scan 3 CPU Usage Alert when Medium Enabled Table 3: Scheduled Scan Configuration 33
34 Recommended Manual Scan Configuration General Files to Scan Directories to Scan Recommendation All Files All directories Actions Active Action Custom Actions: For Virus For Trojans For Packer For Spyware For Cookie For Other Threats Possible Malware Upon Detection Disabled Enabled Clean Delete Quarantine Quarantine Delete Quarantine Quarantine Options Enable Spyware / Grayware Scan Scan Compressed Files Maximum size of individual extracted files Enabled Enabled Customized Size Maximum Levels 2 Maximum number of files to extract 10 Scan Embedded Microsoft Office Objects Scan for Exploit Code in Microsoft Office Objects Enabled Enabled OLE Layers to Scan 3 CPU Usage Alert when High Enabled Table 4: Manual Scan Configuration 34
35 When deciding which actions to take when malware is detected, note that there is a corresponding secondary action that will be triggered if the initial action fails to execute. Primary Action (configured on the console) Quarantine Clean Delete Deny Secondary Action (hardcoded) Pass Quarantine Clean Quarantine B. Scan Schedule Setting In addition to scan configurations, you can also set up a Real-Time Scan schedule. This can be useful if there is a specific timeframe in which you would like to turn off real-time scanning to improve performance. Sample Scenario: File Server is scheduled to have a backup of all files every day at 2:00am - 4:00am. This server will most likely have high activity during this time, and whitelisting the 2:00am -4:00am timeslot from Real-Time Scan activity would significantly help improve performance for both the backup task and server resource. NOTE Perform a full manual scan on a server before running the actual backup task. We recommend that weekly scheduled scans are performed on all protected machines. C. Multi-Threaded Processing Real-Time Scan uses multi-threaded scans by default. However, for on-demand and scheduled scans, this option needs to be configured, depending on the environment. Go to Policy/Computer > Anti-Malware > Advanced > Resource Allocation for Malware Scans. Figure 16: Resource Allocation for Malware Scans Enable the option for physical machines using the physical Deep Security Agent to improve the performance. Note that restarting the machine is required for any change to take effect. 35
. D. Quick Scan vs.")
36 These are the scenarios where this setting should NOT be enabled: Agentless environments. If multi-threading is not an option, since the machine resource is limited (common for CPU-bound tasks). When a resource should be held by a single operator only at a time (common for IO-bound tasks). D. Quick Scan vs. Full Scan The Quick Scan feature improves the agent-based (Windows only) scanning time. It enables scanning for only critical files that are most likely to be infected. This allows more frequent quick scans to be scheduled with lower impact, and allows full scans to be performed on a less frequent basis (such as weekly). Full Scan: Runs a full system scan on all processes and files. Uses the configuration set under manual scan (scans the files based on directories, extensions, files configured to be included in the scan). Runs at scheduled times by creating a scheduled task or manual scan (on-demand). Runs on all platforms supporting anti-malware. Takes longer to complete. Quick Scan: Provides a fast, high-level scan of critical system areas for currently active threats. Looks for currently active malware, but will not perform deep file scans to look for dormant or stored infected files. Is significantly faster than a Full Scan on larger drives. Is only available for Windows Agent-based systems. Has no configurable settings and will not use any scan configuration (will not check settings like Directories to Scan or Files to Scan). Is only available on-demand. Quick Scans cannot be scheduled as part of a task. Figure 17: Quick Scan for Malware 36
37 E. Scan Cache This feature is used by the Deep Security Virtual Appliance to maximize the efficiency of malware and integrity monitoring scans of virtual machines by enabling a re-duplication of scanning in malware and integrity monitoring scans. This increases the performance on scan times for subsequent scans of similar VMs (like virtual desktop infrastructure (VDI) linked clones). Scan Cache: Works best when VMs are linked clones (VDI is a prime case). Prevents scanning identical files twice. Is stored in the Deep Security Virtual Appliance memory. Information is not transferred when a VM is vmotioned to another host to avoid conflicts with the target cache. The target Deep Security Virtual Appliance s cache would apply to the newly migrated VM. To modify the scan cache configurations: a. On the Deep Security Manager console, go to Administration > System Settings > Advanced. b. Click Scan Cache Configurations > View Scan Cache Configurations. c. Configure the following settings: Anti-Malware Real-Time Scan Cache : 15 Minutes Anti-Malware On-Demand Scan Cache: 1 Day Integrity Monitoring Scan Cache: 1 Day Remember when changing the cache values: Shorter expiry period on cache means it s refreshed more frequently. Consider setting it to a lower value to increase security. Create dedicated Scan Cache policies for VMs that you want to separate and have their own Scan Cache. This is appropriate for different departments sharing the same infrastructure. If you have a large number of VMs per host (VDI environment), monitor the disk I/O and CPU usage during scanning. If the scanning time is too long, consider increasing the size of the cache or adjusting the scan cache settings to achieve the required performance. If cache size needs to be increased, you can adjust Deep Security Virtual Appliance system s memory accordingly. When to use the Update Sequence Number (USN) Setting: With this setting enabled, Deep Security can check the USN value of a file. During real-time scans, it will read partial content of files to determine if the files are identical. More information can be found here: -us/library/aa363798%28v=vs.85%29.aspx 37


38 This setting reduces the performance and usually needs a higher cache setting. Only use this setting if stronger security is required. Specific Scan Cache Settings for VMs and Policies can be changed under: Policy > Anti-Malware > Advanced > VM Scan Cache Policy > Integrity Monitoring > Advanced > VM Scan Cache F. Scan Exclusions The Directory Lists, File Extension Lists, and File Lists can be set in the Common Objects section of Policies tab. Figure 18: Directory, File Extension, and File Lists These lists are then referenced on the Exclusions tab in the Malware Scan Configurations. Figure 19: Exclusions tab of Malware Scan Configuration Use this list as a starting point and refine it based on your environment and paths. 38
39 General Exclusions and Excluding Windows Update or Automatic Update Files Files: pagefile.sys NTUser.pol registry.pol ${Windir}\Software Distribution\Datastore\DataStore.edb ${Windir}\Software Distribution\Datastore\Logs\Edb*.log ${Windir}\Software Distribution\Datastore\Logs\Res1.log ${Windir}\Software Distribution\Datastore\Logs\Res2.log ${Windir}\Software Distribution\Datastore\Logs\Edb.chk ${Windir}\Software Distribution\Datastore\Logs\tmp.edb ${Windir}\Software Distribution\Datastore\Logs\hiberfil.sys ${Windir}\Software Distribution\Datastore\Logs\pagefile.sys ${Windir}\Software Distribution\Datastore\Logs\Edbres00001.jrs ${Windir}\Software Distribution\Datastore\Logs\Edbres00002.jrs ${Windir}\Security\*.edb ${Windir}\Security\*.sdb ${Windir}\Security\*.log ${Windir}\Security\*.chk Directories: ${allusersprofile}\ ${Windir}\system32\GroupPolicy\ ${Windir}\Cluster\ Extension Exclusions: *.pst 39
40 Microsoft Windows Server Domain Controllers Files: TEMP.edb EDB.chk Directories: ${Windir}\SYSVOL\ ${Windir}\NTDS\ ${Windir}\ntfrs\ ${Windir}\system32\dhcp\ ${Windir}\system32\dns\ Microsoft SQL Server Large databases should not be scanned because it might hinder performance. Since Microsoft SQL Server databases are dynamic, exclude the directory and backup folders from the scan list. If it s necessary to scan database files, a scheduled task can be created to scan them during off-peak hours. Directories: ${ProgramFiles}\Microsoft SQL Server\MSSQL\Data\ ${Windir}\WINNT\Cluster\ Q:\ # if using SQL Clustering # if using SQL Clustering File Servers Access to files over shared drives can degrade performance. To scan some file types, only a fraction of content is required. Other file types require a full scan or even a decompression. Trend Micro recommends that file servers are excluded from scanning and perform scanning on the local file server itself. With exclusions in place, there is no need to scan the file as it is accessed, which increases performance. It is also recommended to use agent protection for file servers for better performance. 40

41 NOTE If there are any custom applications not mentioned here, please contact the software vendor to get their recommended scan exclusions. You can also refer to the Recommended scan exclusion list for Trend Micro Endpoint products. G. Quarantine Settings: With agentless anti-malware feature, quarantined files are stored in the Deep Security Virtual Appliance, so enough free space must be available on a Deep Security Virtual appliance disk. The default quarantined file settings are the recommended settings. To access the settings, go to Deep Security Manager > Policy > Anti-malware > Advanced Figure 20: Advanced Anti-Malware Settings 41 Maximum disk space used to store quarantined files: This represents the maximum space that the Deep Security Manager sets aside for Deep Security Virtual Appliance. Files from all protected virtual machines (VMs) must share this space. Maximum file size to scan: This is the largest file that can be quarantined. Quarantined files will be automatically deleted from a Deep Security Virtual Appliance under the following circumstances: If a VM undergoes vmotion, quarantined files associated with that VM will be deleted from the Deep Security Virtual Appliance. If a VM is deactivated from the Deep Security Manager, quarantined files associated with that VM will be deleted from the Deep Security Virtual Appliance. If a Deep Security Virtual Appliance is deactivated from the Deep Security Manager, all the quarantined files stored on that Deep Security Virtual Appliance will be deleted. If a Deep Security Virtual Appliance is deleted from the vcenter, all the quarantined files stored on that Deep Security Virtual Appliance will also be deleted. H. Maximum performance configuration for anti-malware: To maximize the performance of the anti-malware feature, the following actions are recommended:
42 1. Enable the scan cache and change the cache time based on your real situation. 2. Use Scan files during Read for file scanning. 3. Add UNC path in the exclusion list. At the same time, check that the real-time scan is enabled so that all VMs are being protected. 4. Set up the proper exclusion list to exclude the folder, file, or extensions. 5. Set the scan limitation to prevent scanning a file larger than the specified size. Read vs Write: Read: The system scans the virus when reading any files. This means you might download a test virus to your disk and until someone wants to run it, the system can catch the test virus when any file events are reading. Write: Write is important, but it affects the performance. Some FTP clients and browsers download a file by splitting the body to several pieces. For example: Download a 100 MB file. The browser can download 1 MB each time (write 1 MB and close the file, write another 1 MB and close the file and so on until the entire file has been downloaded). This means the file has to be scanned 100 times. The worst case scenario is if the malware hides itself in the last bytes. If we do not scan on write and the file is malware, it could be safe because it has been put on the disk without execution. We can scan it when it starts to be launched (read) and prevent its execution if a malware is found. Write might detect malware in time, but it greatly affects the performance. I. Use Security Enhancement Feature: Server Platform Server platforms use Default Real-Time Scan Configuration which turns security enhancement off by default. If you would like to enable security enhancement on the server platform, here are some suggestions: 1. Test on your staging environment first, before applying to your production environment. 2. You could add your critical applications to Behavior Monitoring Protection Exceptions. This can avoid FP and impact your business. On the other hand, you will lose protection if your critical applications have been compromised. NOTE: If you have added your critical applications to Exclusions > Process Image File List before, you don t have to add it to Behavior Monitoring Protection Exceptions. AM won t monitor any activities your application has if you ve added it to Process Image File List exclusion. 3. Once any FP occurs, disable Security Enhancement first, including behavior monitoring, endpoint correlation and process memory scan in real-time AM configuration. Availability 42
43 Security Enhancement protection relies on Trend Micro backend services. If you lose network connection of these backend services, Security Enhancement might not be able to protect you from advanced threats, such as ransomware attacks. Confirm that Trend Micro backend services are reachable from your environment and the proxy configuration is correct. Security Enhancement relies on monitoring system activities, including file events generated by any process. Security Enhancement detects malicious behavior by tracing these system events. If you change the setting of AM config Inclusions > Scan Settings > Directories to scan from All directories to a specific Directory List, then only file events coming from this Directory List will be monitored. Monitoring capability outside the Directory List will be lost, and so detection capability and protection will be lost as well. For example, if you configure Directory List to C:\MyFolder, a ransomware that has encrypted your files located outside C:\MyFolder won t be detected. Air-Gapped Environments As described above, Security Enhancement protection relies on Trend Micro backend services. If you deploy Deep Security 11.0 in an air-gapped environment, we suggest turning Security Enhancement off, no matter the platform. Turning off Security Enhancement in the air-gapped environment might prevent AM emit network traffic from attempting to reach our backend services. It also improves performance. FA mitigation If your legitimate program is detected as a malicious program by Security Enhancement, add it to Behavior Monitoring Protection Exceptions. If that doesn t work, try disabling Endpoint Correlation, because this feature does not support exclusion. Unless you disable Endpoint Correlation, you won t be able to add your program to any exclusion list, including Behavior Monitoring Protection Exceptions. Clean malicious program manually Behavior monitoring, including ransomware protection, cannot quarantine malicious programs. It can only terminate that malicious process, without changing its program files. If a malicious program installs a run key or adds itself to the system schedule task, then it might be launched again after the system reboots or the task scheduled. Behavior monitoring will continue to terminate it periodically. Once the system admin confirms the program is malicious, they must delete that malicious program manually to avoid further damage Web Reputation The default security level Medium is suitable for most users. However, if you want further security, you can adjust it to the High level. Web Reputation queries will go to the Smart Protection Server (if enabled) or to our cloud WRS servers. It s recommended to set up a local Smart Protection Server in house to limit the amount of required internet queries, which can lead to performance degradation. If you are using products from Websense, be aware that there are potential incompatibilities between Deep Security Web Reputation and Websense s URL filtration. We recommend disabling the Web Reputation if the protected computer is behind a Websense edge appliance. If you have specific web pages to allow or block, configure them in the Exceptions tab. By default, Web Reputation is enabled to port 80 and If you have an HTTP proxy server using other ports, configure it in the Advanced tab. 43
44 1. Create a new Port List from Shared > Port Lists including you proxy port (e.g. 3128). 2. Choose the created Port List at Web Reputation > Advanced > Ports. Other setting recommendations: The Block pages that have not been tested by Trend Micro option should be unchecked. Otherwise, it could cause false positives. Include internal company URLs in the Allowed list under Exceptions. Wildcards are supported. Ensure that your company s firewall/proxy allows traffic going to when using the global Smart Protection Server Firewall Firewall configuration and administration must be performed carefully. There are no single set of rules that can fit all environments. This guide aims to give users best practice tips and recommendations that can be used as references and guidelines when building your own rules. A. Inline vs. Tap Mode 44 Use Inline Mode (Deep Security Manager > Policies > Settings > Network Engine > Network Engine Mode). When operating Inline, the live packet stream passes through the network engine. Stateful tables are maintained, firewall rules are applied, and traffic normalization is carried out. As a result, Intrusion Prevention rules can be applied to payload content. Use Inline Mode with rules set to Detect, when there is a need to test the configuration and rules before deploying them into the production environment. This way, the real world process of analyzing the traffic takes place without having to perform any action, such as blocking or denying of packets. Running Deep Security in Tap Mode is NOT recommended. It is not the best practice to perform tests or evaluate Deep Security. Traffic patterns in this mode do not represent how the network will behave should the administrator decide to switch to Inline Mode. In Deep Security Manager 10.2 or later, a new drop-down menu in the Deep Security Manage is available for configuring failure response. Make sure the appropriate option(s) has been switched to (fail open). Using ratt tool, run the "ratt -s var" command as follows. The output will show current configuration as below. # ratt -s var CHECK_FO_SYSTEM_FAILURE ( checkfailopensystemfailure ) = 2 CHECK_FO_SANITY_FAILURE ( checkfailopensanityfailure ) = 2 B. Firewall Rule Actions Know the difference between the firewall rule actions before creating your rules. Each rule can take one of the following actions: Deny Explicitly blocks traffic that matches the rule. Force Allow If a packet matches a Force Allow rule, it is passed but still filtered by Intrusion Prevention. No events are logged. This action type must be used for UDP and ICMP traffic.
45 Bypass Allows traffic to bypass both Firewall and Intrusion Prevention analysis. It should be created in pairs (for both incoming and outgoing traffic). Use this setting for media-intensive protocols only. Log only If a packet matches a Log Only rule, it is passed and an event is logged. No other action will be taken. Allow If a packet matches an Allow rule, it is passed and any other traffic not covered by a rule will be implicitly denied. Use this with caution. C. Restrictive vs. Permissive Firewall Typically, firewall policies are based on one of two design strategies. Either they permit any service unless it is expressly denied, or they deny all services unless expressly allowed. Decide what type of firewall you would like to implement to reduce administrative overhead in terms of creating and maintaining the rules. Permissive Mode (Reactive) Permits all traffic by default and only blocks traffic it believes to be malicious based on signatures or other information. Easy to implement, however, it provides minimal security and requires complex rules. Rarely used, except in cases where you are not using the firewall but want to leverage it to block a port. Deny rules are used to explicitly block traffic. Restrictive Mode (Proactive) The recommended best practice from a security perspective. Stops all traffic by default, and only allows traffic explicitly permitted. If the primary goal of your planned firewall is to block unauthorized access, the emphasis needs to be on restricting, rather than enabling, connectivity. Easier to maintain and more secured. Allow rules are used only to permit certain traffic across the firewall and deny everything else. NOTE Allow rules explicitly allow traffic that matches it to pass. In addition, it implicitly denies everything else that is not defined. Be careful when creating allow rules without defining the related rules correctly. Doing so can cause it to block all traffic apart from what the Allow rule is created for. D. Stateful Inspection 45 Stateful configurations should be used when the firewall is ON. The Stateful filtering engine inspects and validates each packet on an individual basis, which involves analyzing the packet within the context of traffic history, correctness of the packet s header values, and protocol state transitions. This enables protection against attacks such as denial of service, provided that a default configuration with Stateful TCP/ICMP/UDP is enabled and only solicited replies are allowed. If the UDP Stateful option is enabled, Force Allow must be used when running UDP servers (like DHCP). If there is no DNS or WINS server configured for the Deep Security Agents, a Force Allow, Incoming UDP Ports 137 rule might be required for NetBIOS.
46 Stateful logging should be disabled unless required for ICMP/UDP protocols. E. Interface Isolation Interface Isolation allows you to force a computer to use only one interface at a time. This prevents attackers from bridging across two interfaces. It is commonly used to protect users with wireless laptops. Configure this via Policy > Firewall > Interface Isolation. Enter string patterns that will match the names of the interfaces on a computer in order of priority. Limit the number of active interfaces to one at any given time. It is not recommended to enable this at the global level. Enable it through the policy instead. NOTE Interface patterns accept wildcards such as asterisk (*) as well as regex expressions. F. Other Recommendations Bypass Rules Bypass rules operate like force allow but skips the rest of the packet processing pipeline, so intrusion prevention is also skipped. Use this action for traffic that you prefer to allow across both the firewall and intrusion prevention. We recommend creating a pair of rules for each type of traffic. For example, create a rule bypassing the incoming traffic (request), and another to bypass outbound traffic (response). Rule Priority Rule priority determines the order in which filters are applied so high priority rules get applied before low priority rules. When actions share the same priority, the order of precedence for rules are Bypass, Force Allow, and then Deny. However, a deny action with a higher priority will take precedence over a bypass action with a lower priority. Note that Allow rules can only have a priority of 0. Keep this in mind when using Allow rules to implicitly deny traffic (any traffic not matching the Allow rules are denied). This means when a Deny rule is added on the list, it will take precedence over all the existing Allow rules in place. Use Force Allow for traffic that should always be allowed (such as ARP). To simplify the administration of firewall rules, consider reserving certain priority levels to specific actions. For example, apply a default Priority 3 to rules that use bypass, Priority 2 for Force Allow rules and Priority 1 for deny rules. This reduces the potential for rule conflicts. ARP Traffic Always allow ARP. If a computer relies on dynamic ARP, include an appropriate rule to allow ARP. ARP forms the basis of the TCP/IP stack. ARP facilities provide translation from IP addresses to Ethernet addresses, which are essential for sending packets to other systems on the local LAN segment. Without this conversion, there can be no other form of peer-to-peer IP communication. Deep Security Manager should not instruct a Deep Security Agent to drop ARP packets, unless it s actually desired (configuration uses static ARP tables). To ensure this, follow these guidelines: 46
47 - Enable the Trend Micro-provided ARP force allow rule. - Do not prevent broadcast ARP packets. Out Of Allowed Policy Out of Allowed Policy (Open Port) events can help quickly identify misconfigurations in rules. Generating these events for TCP, UDP, and ICMP advanced settings can assist with building and adjusting your policy. To configure this, go to Policy > Firewall > Advanced > Generate Firewall Events for packets that are Out of Allowed Policy. Use Port, IP, and MAC lists These lists are objects that can be reused by multiple rules. Using these lists in the configuration of multiple firewall rules facilitates configuration changes since only a single common list must be updated. Modifications done on any of the lists are picked up by all the rules where they are used or assigned. Number of rules Avoid assigning more than 300 rules, because doing so can affect system performance. Document all firewall rule changes Use the Description field of the firewall rule to note why, when, and for what purpose the rule was created for. Note when and why rules are created and deleted for easier maintenance. Advanced Network Engine settings To configure this, got to Policies > Policy > Settings > Network Engine > Advanced Network Engine Settings. Established Timeout: This parameter defines the maximum time an idle connection can be kept. Certain applications can require an active connection for longer, so increase the value when you have such applications and there are Out of Connection events. Cold Start Timeout: Specify the amount of time to allow non-syn packets that could belong to a connection that was established before the stateful mechanism was started. Increasing this value can avoid an Out of Connection event after restarting Deep Security Agent or deploying a new profile. Maximum TCP Connections and Maximum UDP Connections: Maximum simultaneous TCP/UDP Connections are allowed. Consider heap memory size before adjusting these parameters. Enable Debug Mode: In debug mode, the Deep Security Agent and Deep Security Virtual Appliance captures a certain number of packets (specified by the setting below: Number of Packets to retain in Debug Mode ). When a rule is triggered and debug mode is on, Deep Security Agent and Deep Security Virtual Appliance will keep a 47
48 record of the last number of packets that passed before the rule was triggered. It will return those packets to the Deep Security Manager as Debug Events. Number of Packets to retain in Debug Mode: Specify the number of packets to retain and log when the Debug Mode is on. Log All Packet Data: Record the packet data for events that are unassociated with specific firewall or intrusion prevention rules. These are the log packet data for events such as Dropped Retransmit or Invalid ACK. Minimum Fragment Size: If legitimate traffic is blocked and there are First Fragment Too Small firewall events, change its value to 0 to disable the checking. Minimum Fragment Offset: If legitimate traffic is blocked and there are Fragment Offset Too Small firewall events, change its value to 0 to disable the checking. For more tips and information about the Deep Security Firewall, you can refer to the following link: Understanding the features of Deep Security firewall ( Intrusion Prevention A. Modifying Rules 48 Intrusion Prevention (formerly called Deep Packet Inspection) rules should never be modified at the global level (Deep Security Manager > Policies > Common Objects > Rules > Intrusion Prevention Rules) because there is no way to restore them. Configuration should be done by overriding the Policy or Computer. This way, the default master copy of the rules is kept on a global level and can be used as a reference, should there be a need to revert back changes. Incorrect rules can cause downtime. You can create a rule based on the signature only. For those advanced rules (Start/End/Patterns or XML format), please contact Trend Micro Technical Support to obtain a qualified rule. B. Using Detect Only or Prevent Mode If a specific rule is causing false positives, place that rule in Detect Only Mode or un-assign it. Any rule requiring configuration should be assigned Detect Only Mode until the rule can be configured for that computer. For new deployments, we recommend setting rules to Inline Detect Mode for easier identification of false positives. Once the tests and additional configurations have been made, switch a rule to Prevent Mode to start blocking the packets that match the rule.
49 C. HTTP Protocol Decoding The HTTP Protocol Decoding filter is the most important filter in the Web Server Common Application Type. This filter is responsible for decoding the HTTP traffic before the other rules inspect it. In addition, this filter allows control over various components of the decoding process. This rule is required should you choose to use any of the Web Application Common or Web Server Common filters that requires it. The Deep Security Manager automatically assigns this rule when it s required by other rules. Because each web application is different, the policy that uses this filter should run in detect-only mode for a period of time, before switching to Prevent Mode to determine if any configuration changes are required. Changes are often required to the list of illegal characters. Refer to the following KB articles for more details on this rule and how to tune it: HTTP protocol decoding in Deep Security ( Modifying the list of URI characters that Deep Security Agent considers illegal ( Troubleshooting the Illegal Character in URI error in Deep Security ( D. Cross-Site Scripting and Generic SQL Injection Rules Two of the most common application-layer attacks are SQL injection and cross-site scripting (XSS). SQL injection rules and cross-site scripting intercept the majority of attacks by default. Adjust the drop score for specific resources if they are causing false positives. Both rules are smart filters that require custom configuration for web servers. If you that have output from Web Application Vulnerability Scanners, leverage that information when applying protection. For example, if the user name field on login.asp page is vulnerable to SQL Injection, ensure that the SQL Injection rule is configured to monitor that parameter with a low threshold to drop on. More details can be found here: Understanding the Generic SQL Injection Prevention rule ( E. Filtering SSL Data Streams Deep Security Manager supports intrusion prevention analysis of SSL traffic and is able to filter SSL encrypted data streams. Filtering SSL traffic is only supported by the Deep Security Agent, not the Deep Security Virtual Appliance. The Deep Security Agent does not filter SSL connections that use compression. This can be assigned and configured on individual computers. Open the Details window of the computer you wish to configure, and go to Intrusion Prevention > Advanced > SSL Configurations > View SSL Configurations. NOTE This feature might cause a performance impact. It is not recommended for servers with high numbers of connections per second. 49
50 If this feature is activated, it s recommended to disable the inspection of HTTP responses to avoid performance degradation. As all web attacks that we protect against are included in the HTTP request and not the HTTP response, disabling inspection on responses will improve performance. To configure this: a. Go to the computer or policy > Intrusion Prevention. b. Select a rule with Web Server Common app type, right-click Application Type > Properties. c. Go to Configuration tab and uncheck Inherited. d. Uncheck Monitor responses from Web Server. e. Update the changes to the computer/policy. F. Other Recommendations Set the rules to only log dropped packets to save disk space. If rules are manually assigned, do not assign more than 300 rules as it affects system performance. Use Recommendation Scan to apply the necessary rules for the best protection and performance. Only select the Always Include Packet Data option (Rule Properties > General > Events) if you re interested in examining the source of attacks. Otherwise, leaving the packet data logging on will create much larger log sizes. Application types under intrusion prevention rules should be checked prior to use. For example, Trend Micro OfficeScan and Trend Micro OfficeScan NT Listener application types are inspecting incoming ports 8080, 4343, 26964, 24880, and by default. OfficeScan ports can be changed, especially the random 5-digit client port. These rules should be reconfigured to match your OfficeScan settings before assigning them. One port cannot be assigned to more than eight application types; otherwise the rules will not work on that port. G. Interface Tagging By default, firewall and intrusion prevention rules are assigned to all interfaces on the computer. You can use Interface Types to assign firewall or intrusion prevention rules to a specific interface on a machine that has multiple interfaces (for example, if there are some specific rules you would like to apply to only the wireless network interface). To configure, go to Policy > Interface Types > Network Interface Specificity. Think about the difference in protection for different interfaces when creating policies. Consider populating the Interface Type based on the different networks available to all potential Deep Security Agent protected machines. H. Ransomeware Detection Refer to this article, which includes recommendations on rolling out the rule Ransomware Detection and Prevention in Deep Security : 50
51 I. TippingPoint Network Security Many customers are benefiting from both TippingPoint network security and Deep Security host security. Intrusion prevention (IPS) rules now show the TippingPoint ID of the equivalent TippingPoint rule Integrity Monitoring Monitoring the operating system, application files and directories is an excellent way to maintain the integrity of the data on your server. Unexpected changes to these files can be a good indicator that something suspicious has occurred and should be investigated. Rules created for Integrity Monitoring should be as specific as possible to improve performance and avoid conflicts or false positives. Do not try to create a rule that monitors the entire hard drive. A. Using Integrity Monitoring to protect against malware Integrity Monitoring can monitor files and registries. Malware typically infects a system by modifying certain registry keys and various system files. The default Deep Security rules allow you to monitor the integrity of a machine by observing what is most commonly changed by malware in an infected system. Here are a few sample rules that are applicable for all types of situations in Windows platform: Rule Microsoft Windows Hosts file modified Rule Microsoft Windows All Users Startup programs modified Rule Microsoft Windows System DLL or EXE file modified Unless new software or a security patch is installed, there is no reason why any of these files should be modified. If such an event is raised, the administrator can check what is happening on the machine to determine whether or not it s compromised. It s also possible to create custom rules to monitor specific threats. If a user knows the behavior of a particular virus they are trying to contain in an environment, they can create a special monitoring rule that checks for certain registry keys or files created by the virus. This can determine if the spread of the virus is being contained. Note that Integrity Monitoring detects changes made to the system, but cannot prevent or undo these changes. B. Baselines Baselines are automatically created when integrity monitoring rules are assigned to a computer. Retrieving baselines is necessary to recognize any abnormal behavior that might occur. Trend Micro recommends enabling Scan Computers for Integrity Check for computers. C. Rules from a Recommendation Scan Recommended integrity monitoring rules typically result in too many monitored entities and attributes. Decide what is critical and what should be monitored, then create custom rules or tune out of the box rules. Pay attention to the rules that monitor frequently changed properties, like process IDs or open ports, as they can be very active and might require some adjusting. 51
52 D. Trusted-Source-Based Event Tagging When the Integrity Monitoring feature is used, depending on the rules and settings, it might be difficult to search and determine which events are good and informational, and which events need further investigation. The Deep Security auto-tagging feature helps to group and label multiple events to suppress security events for legitimate changes. To configure this feature, go to Deep Security Manager > Events and Reports > Integrity Monitoring Events > Auto-Tagging > Trusted Source. Deep Security allows administrators to automatically tag authorized changes by using internal reference servers, Certified Safe Software Service that Trend Micro hosts in the cloud, or by comparing it with other computers in a group. Certified Safe Software Service is a cloud-based database of signatures that Trend Micro has certified as known-good files. More information on how to enable Trusted-Source-Based Event Tagging can be found in the Online Help and Administrator s Guide of Deep Security. Selecting the Trusted Source: Local Trusted Computer Use this when implementing a Golden Host model, where applications and files installed on the Golden Host are used as a basis for comparison. This model is most useful when: There are in-house applications installed on the local trusted computer. Software, service packs or patches are installed on the local trusted computer and can be used as a reference for other computers. The local trusted computer is malware-free and secure. The local trusted computer contains Integrity Monitoring rules that are similar to the computer that will use it as reference. Best Practices: The security events from the trusted computers must be collected before the security events from other computers. You can use scheduled task to automatically scan trusted computers. Create two scheduled integrity monitoring scans. The first scan only checks the trusted computers while the second scan checks the others. To only trust events that have been generated as part of a maintenance window, leverage the Pause Collection functionality available in the Auto-Tag Rule properties. This functionality disables automatic additions of new information to the Known Good Store based on changes on the trusted source, when the collection has been paused. When paused, the events from the associated computers related to previously trusted events will continue to be tagged. However, new information will not be added to the Known Good Store until collection is resumed. 52
53 Certified Safe Software Service Use this when there are no local reference servers and users are free to install and upgrade software by themselves or at any given time. In this scenario, files are compared against Trend Micro s database of known-good files. Best Practices: Ensure the Deep Security Manager has connection to the internet to query this cloud-based service. Certified Safe Software Service only supports SHA-1. If this service will be used, the Policy > Integrity Monitoring > Advanced tab > Content Hash Algorithms should be set to SHA-1. Among the three trusted-source-based event tagging mechanisms, Certified Safe Software Service is the safest and most secure because there is no need to maintain a reference server. Trend Micro is responsible for ensuring that the cloud service only contains known-good files. Certified Safe Software Service should have top priority over other auto-tag rules. Trusted Common Baseline Use this when a group of computers can use each other as reference. The baselines of the computers in this group will be added to the common baseline. The computers in this group should be secure and free of malware, as changes in one computer will automatically be added to the baseline. When a similar event occurs on another computer in the group, the event will automatically be tagged. Best Practices: The trusted common baseline auto-tagging rule should be in place before any integrity monitoring rules are applied to the computers in the common baseline group. Group the computers sharing the same operating system and function (for example, Microsoft SQL servers running on Windows 2008 R2). Setup and maintenance of trusted common baseline is easier compared to local trusted computer, but the level of protection is lower because all computers in the group are considered trusted. Trusted common baseline should be set to the lowest priority. E. Real-Time File Integrity Monitoring In Deep Security 11.0, the updated file monitoring engine is shared with application control and allows real time detection of file changes for both Linux and Windows. Previously, Linux integrity scans were scheduled only. This enhancement improves Deep Security's ability to meet compliance requirements. Beginning in Deep Security 11.0, integrity monitoring supports real-time monitoring of file changes for both Linux and Windows. NOTE The Deep Security Agent for both 64-bit Windows and 64-bit Linux now depends on the application control plugin to trigger the real-time file system events that are sent to the integrity monitoring plugin. 53
54 32-bit Windows platforms will run in legacy mode and will not provide the user and process information for real-time change events. As in previous releases, real-time integrity monitoring is not available on 32-bit Linux platforms. Only real-time file events include information about the user/process that made the change. As in previous releases, other type of integrity monitoring events such as change to services or running process will not include this information. F. Change details In Deep Security 11.0, the updated file monitoring engine will capture "who" made changes to a monitored file. This attribute is critically important for users to investigate and respond appropriately to change events and can help meet compliance requirements. G. Disk Spaces on local agent for integrity function The size of the SQLite database varies depending on the number of events that occur on the host. If free disk space drops below 5 MB, Integrity Monitoring will be suspended. The dsp.imthread thread will vacuum the database when the following conditions are satisfied: There is no ongoing Integrity Monitoring scanning. The size of unused page in the database is more than 4 MB Log Inspection Events from the Windows event log and other application specific logs are a great source of information for the status of your server and applications. Log Inspection is an automated solution to inspect these log files for suspicious events and alerts, and is a valuable feature to include for your defense in depth strategy. This feature is especially useful for creating easier access to important events in monitored log files, without manually tracing through it. Log Inspection rules must be properly configured. Most recommended rules work well, but Windows Event rules should be adjusted to gather security events relevant to your requirements. Events for this feature can overwhelm the Deep Security Manager database if too many log entries are triggered and stored. Severity Clipping Send Deep Security Agent and Deep Security Virtual Appliance events to syslog when they equal or exceed the following severity level: This should typically be changed when a syslog server is used. This setting determines which event triggered by those rules is sent to the syslog server (if syslog is enabled). Store events at the Deep Security Agent and Deep Security Virtual Appliance for later retrieval by Deep Security Manager when they equal or exceed the following severity level: This setting determines which log inspection events are kept in the database and displayed on the log inspection events screen. Custom rules can be made to monitor logs that are not in the included set of rules. 54
55 5.2.7 Application Control Application Control is a new feature that was added in Deep Security In Deep Security 11, it supports these platforms: Windows Linux 2008 R R CentOS 6 (64 bit) CentOS 7 (64 bit) RedHat 6 (64 bit) RedHat 7 (64 bit) Debian 8 (64 bit) Cloud Linux 7 (64 bit) SUSE 12 (64 bits) Oracle Linux 7 (64 bit) Ubuntu 16 (64 bit) AWS Linux (64 bit) When Application Control is enabled for blocking executables, the following extensions will be blocked specifically:.class.jar.war.ear.php.py.pyc.pyo.pyz If your environment has an extension mentioned above but is considered a safe file, add it to the whitelist in software inventory. In Deep Security 11.0, Application Control has been enhanced with a new Block by Hash feature that allows administrators to submit known bad hash values to Deep Security for Application Control blacklist enforcement. The control will now recognize a new Global rule set that includes a list of hash values to be blocked. This rule set takes precedence over any other rules from existing shared or local rule sets, and will be enforced by every Deep Security Agent enabled with Application Control. This feature provides a simply way for users to block unwanted or bad software from running at a global system-wide level. The design allows the workflow to be fully automated; with APIs for creating the Global rule set, adding and deleting hash values. Application Control creates a software change event log whenever new executable files are detected on protected systems. Sometimes these changes are generated as part of the normal operation of trusted 55
56 software. For example, when Windows self-initiates a component update, thousands of new executable files may be installed. Application control will now auto-authorize many of these file changes when created by well-known Windows processes and no longer create corresponding change log events. By removing the noise associated with expected software changes, users will have clearer visibility into changes that may require their attention. Before you deploy this feature in customer environment, make sure you already checked the support matrix of application control vs features here. NOTE When using Application Control, if you create a golden image, update it with required patches, create a shared ruleset, and then apply that shared ruleset to other computers. When you install those same patches on the other computer, they will be allowed to execute because they are in the shared ruleset. However, the patch updates will appear on the Software Changes page. To avoid this, Application Control must be set to Maintenance Mode when applying patches Connected Threat Defense (CTD) Trend Micro developed a concept called Connected Threat Defense (CTD). Deep Security, which has an improved participation at CTD since version 10.0, is now able to push suspicious files to the Deep Discovery Analyzer sandbox. Once intel is gathered for a file detected as risky, a suspicious object will be generated around it, which will then be pushed to the Control Manager (TMCM). Afterwards, TMCM will push the most up-to-date list of suspicious objects to the Deep Security Manager. All the agents configured to receive the Suspicious Objects List from the Deep Security Manager will receive the information and be able to stop the threat, even before running it. Figure 21: Connected Threat Defense Process 56


57 Best Practices: Ensure you have a working Deep Discovery Analyzer in your environment. Please check the Deep Discovery Analyzer Admin Guide for more information. Go to Administration > System Settings > Connected Threat Defense and make sure Enable submission of suspicious files to Deep Discovery Analyzer is selected. Figure 22: Enable submission of suspicious files to DDAN Ensure that Automatic file submission is also selected, because it assures that all suspicious files will be submitted to the Analyzer every 15 minutes. Figure 23: Automatic file submission 57


58 Go to Administration > System Settings > Connected Threat Defense and make sure Compare objects against Suspicious Object List is selected. Note that the suspicious object list update and/or deployment can be performed by manually updating the suspicious file list in Deep Security Manager. Go to Administration > Updates > Security and use the controls in the Suspicious Object List Updates column to get the latest list and send it to your protected computers. You can also create a scheduled task that regularly checks for an updated list. 58
59 In Malware Scan Configuration > General > Document Exploit, ensure Scan documents for exploits is checked and the option Scan for exploits against known critical vulnerabilities and aggressive detection of unknown suspicious exploits is selected. Figure 24: Scan documents for exploits NOTE If there is a need to change the Remediation Actions to Use Custom Actions, ensure that Aggressive Detection Rule is configured to Pass, as it guarantees a file that triggers this rule will be submitted for analysis. Check the Control Manager guide for more information on how to configure the desired behavior expected from Deep Security Agents whenever it finds a suspicious object. 5.3 Administration and System Settings Recommendation Scan The recommendation engine is a framework that exists within Deep Security Manager, which allows the system to suggest and automatically assign security configurations. The goal is to make the configuration of computers easier and only assign security that is required to protect that computer. Recommendation scans affect the performance impact of Deep Security Manager, so schedule these when no other tasks are running. A. Run recommendation scans weekly Recommendation scans can impact Deep Security Manager s performance, so avoid scanning with high frequency. Systems that don t change often (servers) can be scanned less frequently. Systems that lack control over when changes occur (workstations) should be scanned more frequently. Ongoing scans for recommendations are not advised, this setting should be set to no. (Policy/Computer > Settings > Scanning > Recommendations > Perform ongoing scans for recommendations) If ongoing scans are set to automatically start, administrators have no control over when it will occur. The best practice is to create a new scheduled task with type Scan Computers for Recommendations to take place once a week instead. B. Run scans after a major change (application of a patch, installation of new application, etc.) Scans should be performed after major changes to the computer to determine if any additional protection is required. 59
60 C. Run scans after applying a new Deep Security Update. This allows you to use the recently released rules, and get the latest updates assigned or unassigned. D. Assign recommended rules to the policy, not to the computer. As a best practice, recommended rules should be assigned to the policy and not directly to computers. Recommended rules can only be applied automatically to the machine where the recommendation scan was ran. Refer to the Policy section for additional details. E. Run the scan on computers with similar functions. In environments with similar computers, scans can be performed on a subset of computers to gather baseline recommendations for them all. F. Automatic Assignment of Intrusion Prevention Recommendations This option is disabled by default (Policy/Computer > Intrusion Prevention > General > Recommendations ). It s not recommended to enable this option on the computer level. An exception to this would be when the machine is on its own and cannot be associated with other machines in a group. When this is enabled, intrusion prevention rules will automatically be enabled on the machine when the rule is found to be applicable, or a matching application is found on the machine related to the rule. See Policy vs Computer Level for more details. Disabling this setting gives administrators better control on assigning and un-assigning recommended rules System Settings A. Communication Direction This option can be set at the policy or computer level. The default Bidirectional method is recommended and used in most production deployments. Manager-Initiated should typically only be used for machines in the DMZ that cannot reach the Deep Security Manager in the datacenter. Agent-Initiated method is recommended for environments where the agent is behind a firewall, such as mobile workstations. A disadvantage of the Agent-Initiated method is that policies cannot be updated on demand. The system must wait for the next heartbeat before the policy change can be deployed. To configure this setting, go to Policy/Computer > Settings > Computer > Communication Direction. B. Heartbeat Settings This can be configured at the policy or computer level. Look for it in Policy/Computer > Settings > Computer > Heartbeat. Heartbeat Interval Servers 10 Minutes Desktops 60 Minutes 60
61 The most important factor in choosing the interval setting is the acceptable amount of time between when an event triggers, and when the events are delivered to the Deep Security Manager. Choosing a high frequency can have a negative impact on the Deep Security Manager s performance. Why do servers require a lower heartbeat (more frequent interval)? They are typically more critical assets, and administrators might want to be notified of relevant events more frequently. If protection is in place when roaming, why would administrators want a laptop to connect to Deep Security Manager while off network? To have the ability to update the policy on the laptop when roaming. Also, events are stored in the Deep Security Manager with the event timestamp, not the timestamp when they were delivered to Deep Security Manager. Historical events can often be overlooked for devices that haven t performed a heartbeat in the last 24 hours. Number of heartbeats that can be missed before an alert is raised By default, the value is 2. If a heartbeat is missed after two attempts, the agent will be tagged as offline. We recommend increasing this value in most environments, so agents that are actually online won t be tagged as frequently. In addition, if a heartbeat fails, events are stored locally to Deep Security Agents or Deep Security Virtual Appliances until the connection is restored. If SIEM or Syslog servers are used to store events, heartbeat setting are less of a concern. Agents send events to Syslog in real-time, without batching and waiting for the next heartbeat. C. Agent-Initiated Activations This option is most common for environments with large distributed installations, where it s more desirable for the activation to be initiated by the agent, rather than the Deep Security Manager. Very useful when a large number of computers are added to a Deep Security installation and script can be used to automate the activation process. See Deployment Scripts. For Agent-Initiated Activation to succeed, the Allow Agent -Initiated Activation option must be enabled on the Administration > System Settings > Agents tab. Used when the server cannot communicate or discover clients directly, but clients can reach server without a problem. Deep Security Agents can initiate the activation process using a locally-run command-line tool. To activate, use Run as administrator to open cmd.exe, and run the command: dsa_control /a dsm://dsmhost:4120/ During the activation, the agent can determine the assigned policy and apply it. Additionally, agents can request scans or updates after they have been activated. This can be used to tightly integrate scans to other changes, such as patch management. Refer to the product Online Help or Administrator s Guide for additional details. 61
62 Allow reactivation of cloned VMs. This is used in environments with VM clones (for instance, cloning new VM/instance from preactivated VM, templates, or AWS images. It can also be used to switch an orphan managed VM/instance back to the vcenter or cloud managed VM/instance). If enabled, Deep Security Manager recognizes the VM as a clone and reactivates it as a new computer. Below are some notes to consider: VM/Instance must be managed under Cloud Account/vCenter. VM/Instance must have unique system IDs (BIOS UUID, MAC addresses, hostname, IP). Ensure the network communication in the environment has no communication issues. This helps prevent the host from going offline or getting a mismatch. Cloned VM Original VM must remain activated Clone activation will not migrate any policies or settings from the original VM. Allow reactivation of Unknown VMs This allows previously activated VMs, which have been removed from their cloud environment and deleted from Deep Security Manager, to be reactivated if they are added back to the inventory of VMs. This is useful if the server deleted the agent by accident or if the server deactivated the agent, but the agent did not receive the deactivation request. Below are some notes to consider: VM MUST have a valid server certificate but no activation record on current Deep Security Manager server(s). Unknown activation will not migrate any policies or settings from the original VM. D. Send Policy Changes Immediately By default, this setting is turned on. If there are changes made to any setting within the Deep Security environment, all affected computers are immediately updated. Change the setting by going to Policy/Computer > Settings > Computer > Automatically send policy changes to computers. It s recommended that this option is disabled. Instead, use a scheduled task to update and send policy changes to agents manually. Manual or scheduled updates give the administrator more control to follow the existing change control process. Scheduled tasks can be set to update machines during maintenance windows, off hours or other times with low traffic. To monitor when machines were last updated, administrators can use the Last Successful Update information on the Computers tab of Deep Security Manager. 62
63 E. Agent Self-Protection By default, if anti-malware functionality is installed, Deep Security Agent can protect its services, installation directories and status from any modification, including shutdown from the self-protection setting. If this setting is turned on, enable and set a password for the local override setting by going to Policy/Computer > Settings > Agent Self Protection. F. Scheduled Tasks Tasks can be configured to automate certain common tasks by a schedule. Below is a list of recommended tasks to establish: Download Security Updates (Frequency: Once Daily) Scan Computers for Malware (Frequency: Once Weekly, or in accordance to company policy) Scan Computers for Recommendations (Frequency: Once Weekly) Send Policy (Frequency: Once Weekly, and run as needed) When scheduling recommendation scans, the best practice is to set the task by group (per policy, or for a group of computers, no more than 1,000 machines per group) and spread it to different days (database server scans are scheduled every Monday, mail server scans are scheduled every Tuesday, and so on). Recommendation scans can be CPU-intensive on the Deep Security Manager, so setting different schedules per group will help avoid performance issues. Schedule the recommendation scans more frequently for systems that change often. G. Log Retention The best practice is to run the data pruning feature built into Deep Security Manager. If there is a compliance requirement to keep log sets for a longer period of time, the recommendation is to use third-party SIEM products to store the data. Configure this under Administration > System Settings > Storage. Event retention is relevant to maintain a reasonably sized database. Default retention time settings are as follow: Seven days for security events (AM, FW, IPS, IM, LI) Never for system or agent events (as these can be useful for audit history purposes) 13 weeks for counters (used for reporting and very small in comparison to the security event logs) H. Using Tags for Events Tagging events allows administrators to manually tag events with pre-defined or custom labels. This makes log monitoring and review more efficient. To configure tags and auto-tag rules, go to Policies > Common Objects > Other >Tags. See also Trusted-Source-Based Event Tagging. 63
64 I. Active Directory Synchronization for Users and Computers Deep Security supports the discovery of computers using Active Directory and importing users for user management. Non-SSL based LDAP is not supported to synchronize user account information because it is considered sensitive and should not be sent unencrypted. Domain controllers need to support LDAPs (port 636) for directory synchronization to work. Refer to the following links for more details on enabling LDAPs: However, discovery and synchronization of computers with active directory can be done using standard LDAP (port 389) as the information retrieved is not sensitive (user credential information is not pulled down). 64

65 6 Performance Tuning and Optimization Figure 25: Performance Tuning for DSM 6.1 Deep Security Manager Configure Deep Security Manager's Maximum Memory Usage The Deep Security Manager default setting for maximum memory usage is 4 GB. Refer to the Sizing Considerations section to determine the recommended size allocated for the Deep Security Manager. To configure the amount of memory available to the Deep Security Manager: For Windows: 1. Go to the Deep Security Manager directory, which is the same directory as Deep Security Manager.exe (e.g. C:\Program Files\Trend Micro\Deep Security Manager). 2. Create a new file called Deep Security Manager.vmoptions. 3. Edit the file by adding the line: -Xmx8g (in this example, 8g will make 8 GB of memory available to the Deep Security Manager). 4. Save the file and restart Deep Security Manager. For Linux: 1. Go to the Deep Security Manager directory (/opt/dsm). 2. Create a new file called dsm_s.vmoptions. 3. Edit the file by adding the line: -Xmx8g (in this example, 8g will make 8 GB of memory available to the Deep Security Manager). 4. Save the file and restart Deep Security Manager. You can verify the new setting by going to System > System Information and in the System Details area, expand Manager Node > Memory. The Maximum Memory value should now indicate the new configuration setting. 65
66 When you consider adding CPU/Memory to Deep Security Manager, also consider adding a new Deep Security Manager node. Two Deep Security Manager nodes with 4CPU/8G memory has better performance than one Manager node with 8CPU/16GB memory, in most cases. See Configure Multi-Node Managers Configure Multiple Managers Run and install multiple managers operating in parallel using a single database. Running multiple nodes provides increased reliability, high availability, virtually unlimited scalability, and better performance. Each node is capable of all tasks, and users can log in to any node to carry out their tasks. The failure of a node will not impact tasks or lose data. You can add (or reduce) other manager nodes anytime, with no downtime. Figure 26: Configuring Manager Node Each node must run the same version of the Deep Security Manager software. If you upgrade one of the manager-nodes to a newer version, other nodes will shut down automatically until they are upgraded to the same version. To add a new manager node: 1. Prepare new hardware and operating system. 2. Run the Deep Security Manager installer on that hardware. 3. Choose the same database for Deep Security Manager as the existing manager 4. Choose Add a new Manager node. 66
.")
67 Figure 27: Add a new Manager node Two manager nodes are recommended. Three or more manager nodes can cause a database I/O bottleneck and result in decreased performance. Instead of adding more than two manager nodes, increase the system RAM, JVM allocation, and CPU to achieve scalability (see Sizing Considerations for guidelines). If, after following the sizing guidelines, you feel the manager nodes are insufficient to implementation, please contact support for guidance. In a multi-node manager environment, all agents and virtual appliances have the addresses of all manager nodes. The agents and virtual appliances use the list of addresses to randomly select a node to contact. They continue to try the rest of the list until no nodes can be reached (or are all busy). If you use multi-node manager with a load balancer environment, configure the load balancer setting through Administration > System Settings > Advanced > Load Balancers. See Load Balancer Support Performance Profiles Performance profiles determine the number of concurrent operations that can take place for specific types of functionality. This includes the amount of Deep Security Agent of Deep Security Virtual Appliance-initiated connections that the manager will accept, and settings to avoid scan storms in virtualized environments. This setting allows you to adjust the limits for a given Deep Security Manager and set the load you want. It allows users to control scans done in an environment so they can run unlimited scans, or choose to limit them to prevent performance issues. You can change the performance profile through Deep Security Manager > Administration > System Information. Click the desired Manager on the map and change the performance profile. 67
68 Refer to the tables below for a general idea on what each type of profile can handle: A. Aggressive Profile By default, new installations use the aggressive performance profile, which is optimized for a dedicated Deep Security Manager. This means the computer hosting the Deep Security Manager does not perform any other task (such as database server or web server). Operation 2-core system 4-core system 8-core system Activations Updates Recommendation Scans Check Status Agent/Appliance-Initiated Heartbeats Simultaneous Endpoint Disk & Network Jobs Simultaneous Endpoint Disk & Network Jobs per ESX 20 Active 30 Active 50 Active 40 Queued 40 Queued 40 Queued Table 5: Aggressive Profile Use this profile on the following scenarios: Virtualized Environments (Agentless deployment with Deep Security Virtual Appliance and VMware) Hyper-V, Citrix, or other hypervisors where Physical Agents are used to provide protection The default profile limits concurrent scans to three per ESX host and 50 globally for physical machines or VMs on other virtualization platforms, to prevent scan storms. Concurrent limit includes anti-malware scans, recommendation scans, integrity scans, baseline rebuild, and updates. 68
69 Sample Scenario: Figure 28: Aggressive Profile Sample When a scan is triggered for all 250 machines, Deep Security will process the request as follows, instead of running the scan for all 250 machines at the same time: Scan the first three VMs protected by Deep Security Agent. The remaining 47 VMs will be placed in the queue. They will be seen in the console as Scan Pending. As soon as one scan job finishes, the next scan in the queue will start. Scan the first 50 physical machines protected by Deep Security Agent. The remaining 50 machines will be placed in the queue. As soon as one scan job finishes, the next scan in the queue will start. Scan one VM protected by Deep Security Virtual Appliance. The remaining 99 VMs will be placed in the queue. They will be seen in the console as Scan Pending and will be processed as soon as the one agentless VM finishes its scan. Maximum concurrent scans for Deep Security Virtual Appliance are set to 1 by default. However, this can be changed under the Deep Security Virtual Appliance properties. Go to Settings > Scanning > Virtual Appliance > Max Concurrent Scans. Figure 29: Max Concurrent Scans This setting determines the number of scans that the virtual appliance will perform at the same time. The recommended maximum number is 5. If you increase the number beyond 10, scan performance might begin to degrade. Scan requests are queued by Deep Security Virtual Appliance and carried out in the order in which they arrive. 69
70 B. Standard Profile Similar overall settings with aggressive profile, but set to a lower limit. Operation 2-core system 4-core system 8-core system Activations Updates Recommendation Scans Check Status Agent/Appliance-Initiated Heartbeats Simultaneous Endpoint Disk & Network Jobs Simultaneous Endpoint Disk & Network Jobs per ESX 20 Active 30 Active 50 Active 40 Queued 40 Queued 40 Queued Table 6: Standard Profile Use this profile on the following scenario: Only when the Deep Security Manager is installed on a system with other resource-intensive software and resources are limited. C. Unlimited Agent Disk & Network Usage This setting is identical to Aggressive but has no limit on endpoint disk and network usage operations. Operation 2-core system 4-core system 8-core system Activations Updates Recommendation Scans Check Status Agent/Appliance-Initiated Heartbeats Simultaneous Endpoint Disk & Network Jobs Simultaneous Endpoint Disk & Network Jobs per ESX 20 Active 30 Active 50 Active 40 Queued 40 Queued 40 Queued Unlimited Unlimited Unlimited Unlimited Unlimited Unlimited Table 7: Unlimited Agent Disk & Network Usage 70

71 Use this profile on the following scenario: Fully Physical Environments Using this profile will concurrently run as many scans as possible and will assume there is no shared disk. 1. *Limited Disk and Network Usage - This profile exists only on older versions of Deep Security. If you upgraded your Deep Security environment, you might see this as an additional profile. 2. Custom Performance Profile If further tuning of the default profiles is desired, please contact Trend Micro Technical Support for assistance. Some of the symptoms that help determine if a custom performance profile is needed are: Frequent agent heartbeat rejections Recommendation scans that take too long to complete Anti-malware scans that take too long to complete Figure 30: Performance Tuning of Database 6.2 Database Exclude Database files from Anti-Malware scans To optimize and establish a stable database performance, database related files (dsm.mdf and dsm.ldf) should be excluded from any type of anti-malware scanning Auto-growth and Database Maintenance For Microsoft SQL Servers, create less auto-growth events in the future by adjusting the default auto-growth settings to a higher value. NOTE Each time an auto-growth event is performed, SQL Server delays database processing. This means that processing against that database will be delayed until the auto-growth event is completed. This could result in slower response time for other SQL commands that are being processed against the database that is growing. 71
72 Monitor and perform database maintenance jobs to make sure things are working normally and to prevent creating a large, fragmented database, which could lead to performance issues Database Indexing It s recommended to periodically rebuild the index of the database to improve performance. Indexes are specialized data structures that operate on tables (and sometimes views) in the database engine, used to aid in the searching for and sorting of data. Indexes are vital for the database engine to return results quickly. As data is modified in the underlying tables that the indexes operate on, the indexes become fragmented. As the indexes become more and more fragmented, query times get longer. To fix this situation, either reorganize or rebuild the index in Microsoft SQL or Oracle. Below are some useful links with additional information on how to do this: Rebuilding SQL Server Indexes Index Rebuilding Techniques Deep Security Relay Deep Security Relay Location At least one Deep Security Relay is required in every Deep Security environment. You can deploy Deep Security Relay in the same node as Deep Security Manager when you place the Deep Security Agent package in the same folder as Deep Security Manger installer. It s recommended to set up additional relays for redundancy. You can enable the relay feature on Deep Security Agent at any time, but once it s enabled the relay cannot be disabled. If you want to disable the relay feature, you must re-install Deep Security Agent Relay Groups Each relay belongs to a relay group. Deep Security Agents and Deep Security Appliances are assigned to relay groups, not individual relays. By default, Deep Security Manager has only the Default Relay Group, and all relays belong to this group. You can create multiple relay groups that can be arranged in a hierarchy, so a single top level group gets its updates from the Trend Micro Update Server and then passes them down through a hierarchy of sub-groups. To add a new relay group, go to Administration > Updates > Relay Groups. 72

73 Figure 31: Relay Groups 6.4 NSX NSX Firewall The NSX firewall rules can be created to filter out unwanted traffic before they are redirected to Deep Security Virtual Appliance for firewall and IPS inspection. The Deep Security Virtual Appliance provides the firewalling capability in a different layer within NSX infrastructure, based on the following general design considerations: VMWare NSX Distributed Firewall (DFW) is meant to enforce firewall directly at VM vnic layer, which is used to filter east-west traffic flow in SDDC environment. In most cases, VMWare NSX Edge Firewall is responsible for handling north-south traffic, which is moving through the data center. Deep Security is deployed on a cluster level in NSX as a service, and Deep Security Virtual Appliance is deployed on per ESXi host level. Deep Security Virtual Appliance firewall and IPS engine network traffic filtering are defined in NSX Security Policy Network Introspection Services layer, which is filtered after NSX firewall rule layer. Default Deep Security policy contains firewall and IPS rules set, which are mostly based on application and server OS type. Deep Security Event-Based Task (EBT) is recommended for auto policy assignment and managing the VM s activation status. Deep Security EBT is inserted to NSX Security Policy as a service profile for NSX to redirect the Network Introspection Service. Proper NSX Security Policy and NSX Security Group design are critical for Deep Security policy so that VM receives consistent security configurations NSX Security Policy In general, VMWare recommends various object grouping models to create NSX Security Policy: Network Based Policies: This is the traditional approach of grouping based on L2 or L3 elements. Grouping can be based on MAC addresses, IP addresses or a combination of both. This is not a recommended approach in dynamic environments, such as Cloud automated deployments, where VMs and application topologies are changed rapidly. 73

74 Infrastructure Based Policies: The grouping is based on SDDC infrastructure like vcenter clusters, logical switches, and distributed port groups. VMWare recommends NOT to take this approach if your environment does not have a physical or logical boundary. Application Based Polices: In this approach, grouping is based on the application type. VMWare recommends using infrastructure based policies or application based policies when deploying NSX. Therefore, it s recommended to proactively correlate Deep Security policy management with NSX security group and policy design. The NSX Security Groups can be defined with multiple inclusion and exclusions as shown in the diagram below: Figure 32: NSX Security Groups In NSX, it s possible to assign VMs to multiple security groups. However, from a Deep Security policy assignment perspective, it s important that individual VMs should only be assigned to one NSX security group. Otherwise, it can cause multiple Deep Security policies to be assigned to the VM. If NSX Security Group Change EBT is leveraged to manage the Deep Security security policy assignment, it is recommended to create the task with the following configurations in individual scenarios: 74 Use full NSX security group matching, if possible. To reduce the management efforts, use java regex matching pattern only if necessary. Only activate the unprotected VMs with Appliance protection Available = TRUE and Appliance Protection Activated = False. Deactivate VMs when the VMs leave the NSX security group. Create EBT for individual NSX security groups and assign the Deep Security security accordingly. When multiple vcenters are imported to Deep Security Manager, specify the vcenter in EBT matching condition to allow EBT to only work in expected vcenter. To achieve better performance, define different security policies for different groups of computers, which have different Deep Security functionalities enabled. For example, define a security policy for computers which only have AM enabled. In this policy, do not specify any Network Introspection Services. For the computers using Deep Security firewall, add one service in Network Introspection Services to redirect all traffic to Deep Security Virtual Appliance. If only IPS is used, consider only redirecting the ports which need Deep Security Virtual Appliance to be checked when adding Network Introspection Services. For example, if it s a web server, only rules for the port 80 is assigned. Then, only redirect port 80 traffic in the NSX security policy, so that the other traffic can reach VM directly.
75 NOTE There are some compatibility issues between Deep Security and NSX (or higher). Click here for more information. Deep Security 11.0 do not support NSX 6.2.x. 75

76 7 Disaster and Recovery Deep Security uses a database for all of its configurations and settings. It is highly recommended to have a proper disaster recovery plan in place. This provides the best chance of successfully recovering a production environment in the quickest amount of time, in case there is a disaster situation. Figure 33: Backup, Recover, and Restore It s important that a regular backup of the Deep Security database is scheduled, especially when applying a patch or an upgrade to the software. For Microsoft SQL Server database, Deep Security Manager can initiate a backup schedule task to do the database backup. It s also recommended to use Microsoft SQL Server Management Studio to back up and restore the database. For detailed procedure, please refer: The Deep Security Manager cannot initiate a backup of an Oracle database. To back up and restore your Oracle database, please consult Oracle support or refer to the Oracle article below to do the task using the Oracle Recovery Manager Tool: Do not store you backups in the same physical location as the database files. If your physical drive goes bad, you should be able to use the other drive or a remote location that stored the backups to perform a restoration. Only restore the database from the same version number as the Deep Security Manager. 7.1 High Availability Database clustering is supported in both Oracle and Microsoft SQL environments, and is recommended for disaster recovery situations. Oracle Data Guard and Microsoft SQL database mirroring both have no side effects in regular Deep Security functionality and can be safely used. To recover from a disaster, make sure the database is fully mirrored or restored and available in the environment. Have a cold standby Deep Security Manager ready, point it at the mirrored or restored database, and start the service. 76
77 7.2 Removing a virtual machine from Deep Security protection in a disaster If only a selected number of machines need to be isolated and removed: 1. Deactivate the affected virtual machines. a. Go to Deep Security Manager > Computers. b. Right-click the machine and select Actions. c. Click Deactivate. 2. If there is no immediate access to the Deep Security Manager console, use one of the following: If there is another ESXi host that does not have Deep Security protection, vmotion the VM to this host. If all ESXi hosts are protected, login to the local Deep Security Virtual Appliance VM and reset the appliance. Note that doing this will unprotect all VMs protected by that Deep Security Virtual Appliance. If several VMs have the issue and need to be isolated and removed: 1. Deactivate the affected virtual machines. 2. Deactivate Deep Security Virtual Appliance. a. Go to Deep Security Manager > Computers. b. Right-click the Deep Security Virtual Appliance and select Actions. c. Click Deactivate. 3. If necessary, unprepare the ESXi host and uninstall the vshield Endpoint. To unprepare and remove the Deep Security Driver: a. Go to Deep Security Manager > Computers. b. Right-click the ESXi Host and select Restore ESX To remove the vshield Driver: a. Login to the vshield Manager console. b. Change the view to Host & Clusters. c. Expand datacenters and select the datacenter where the affected ESXi host resides. d. Click the affected ESXi and go to the Summary tab. e. Under the vshield Endpoint service, click Uninstall. 77
78 When removing the filter driver, the ESXi host will be placed in maintenance mode and will be required to reboot. NOTE In an agentless environment, firewall and Stateful checks are done in the filter driver residing on the ESX host itself. As such, in a disaster scenario, shutting down the Deep Security Virtual Appliance will only impair or shut down anti-malware, integrity monitoring, and recommendation xcan functionalities. If the issue relates to a firewall rule blocking traffic on virtual machines, put the ESXi host in maintenance mode and unprepare it. 7.3 Recovering a physical machine (with D eep Security Agent) in a Disaster Sometimes, assigning an incorrect policy or rule can completely isolate a machine from the network. To remove a faulty rule or policy, do one of the following: 1. If rules have been applied to the policy only, remove the faulty rule from the policy and trigger a Send Policy to the affected machines. a. Go to Policy and double-click the affected policy. b. Click Firewall/IP > Assign/Unassign the rule and press Save. c. On the affected machines, right-click Send Policy. 2. If rules have been applied directly on the machines, open the details for each affected machine and remove the faulty rule. a. Go to the affected machine and double-click for details. b. Select Firewall/IP > Assign/Unassign the rule and press Save. c. Go to Overview > Actions > Send Policy or right-click on the affected machine under Computers > Actions > Send Policy. 3. If you do not know which rule is at fault, remove the entire policy from the machine. a. Right-click the affected machine, then go to Actions > Assign Policy > None b. Right-click the affected machine, then go to Actions > Send Policy 4. If the rule involved is a firewall or intrusion prevention rule, you can also consider turning the firewall and intrusion prevention state to Off. You can do this locally on the affected machine or on the Policy under the General tab. 5. If Deep Security Manager cannot communicate with the agents, log on locally to the machine and trigger an agent reset to completely clear all configurations on the agent and deactivate it. On the command prompt of the local agent, run: dsa_control /r 78
79 The Reset action does the following: Cleans up all Deep Security Agent configuration settings and Deep Security Agent memory Removes relation between Deep Security Agent and Deep Security Manager Removes corresponding entries from the database Refer to Agent Self Protection for more details. 6. Reactivate using a new policy without the recent change. 7.4 Recovering an inaccessible Deep Security Virtual Appliance Take the following steps to recover an inaccessible Deep Security Virtual Appliance: 1. Reboot the Deep Security Virtual Appliance. 2. If a reboot does not fix it, shut down the existing Deep Security Virtual Appliance. 3. Login to Deep Security Manager and attempt to deactivate the inactive Deep Security Virtual Appliance and wait until you get the error Deactivation Failed (Computers > Deep Security Virtual Appliance > Right Click > Actions > Deactivate). 4. Clear warnings and errors for that Deep Security Virtual Appliance (Computers > right-click the Deep Security Virtual Appliance > Actions > Clear Warnings and Errors). 5. Deploy a new Deep Security Virtual Appliance from Deep Security Manager (Computers > right-click the ESX Host > Actions > Deploy Appliance). 6. Activate the new Deep Security Virtual Appliance (Computers > right-click the Deep Security Virtual Appliance > Actions > Activate). 7. Reactivate all the VMs to the new Deep Security Virtual Appliance. Note that when you replace a faulty Deep Security Virtual Appliance, all logs, settings, and quarantined files from the original Deep Security Virtual Appliance will be lost. 7.5 Isolating a Deep Security Issue 1. It s recommended to first isolate the module causing the issue, as opposed to deactivating or uninstalling the agent. Check the related event logs for information and clues regarding the issue. If no related logs are observed and multiple features are used, turn off the suspected module one by one to find the culprit. For example, if the issue involves HTTP blocked traffic, first turn off WRS and then the firewall. 79
80 2. For issues involving WRS: If traffic to a certain site is blocked, consider adding it to the Allowed URLs by going to the Policy/Computer > Web Reputation > Exceptions tab. Enter the URL in the allow list, save, and send the policy. If adding the site to the allow list does not help, turn off the web reputation (Policy/Computer > Web Reputation > General > Web Reputation State). If WRS is turned off and the issue still persists, check other enabled features. 3. For issues involving the firewall: Note if a new rule or a modification on a rule has taken place. Un-assign the suspected rule and verify if the issue persists. If you are not sure which rule is causing the issue, consider removing the policy assigned to the affected machine. Verify if the issue still persists. If no recent change has occurred but traffic is blocked, turn the firewall off. To do this, go to Policy/Computer > Firewall > General > Firewall State. If the firewall is disabled and the issue persists, verify that Firewall Stateful Configurations are also set to None (Policy/Computer > Firewall > General > Firewall Stateful Configurations ). If both settings are turned off and the issue persists, switch the Network Engine to Tap mode. Go to Policy/Computer > Settings > Network Engine > Network Driver Mode. Should the issue still persist, check the other features that are enabled. 4. For issues involving intrusion prevention: Note if a new rule update has been applied or a modification on a rule has taken place. Un-assign the suspected rule or roll back the security update. Verify if the issue persists. If you are not aware which rule is causing the issue, consider removing the policy assigned to the affected machine. Verify if issue still persists. If no recent change or update has been applied but traffic is blocked, switch the behavior from Prevent to Detect or turn off the intrusion prevention. Both settings can be found under Policy/Computer > Intrusion Prevention > General > Intrusion Prevention State/Behavior. If intrusion prevention is turned off and the issue still persists, switch the Network Engine to Tap mode. Go to Policy/Computer > Settings > Network Engine > Network Driver Mode. If the issue still persists, check the other features that are enabled. 5. For issues involving anti-malware: Performance Related: If there are performance or access issues when the AM module is turned on, consider adding the directory or file being scanned to the exclusion list first. To do so, go to the Scan Configuration used by 80
81 the Computer/Policy (Policy/Computer > Anti-Malware > General> Select Scan type > Configuration > Edit > Exclusions). Verify if the issue still persists. If adding the file or directory to the exclusion does not work, remove the policy assigned to the affected machine. If the issue persists, turn off anti-malware protection. Go to Policy/Computer > Anti-Malware > General > Anti-Malware State. If the issue continues, de-activate the agent. Should the issue still persist, check the other features that are enabled. Detection Issues: If the issue involves undetected malware, verify the anti-malware state and make sure there are no errors. Check for failed events under Policy/Computer > Anti -Malware > Events. Consult the following articles for Anti-Malware state verification: Verifying a successful Deep Security Virtual Appliance (DSVA) installation ( Anti-Malware Driver Offline status appears when logging on to the Deep Security Manager (DSM) console ( Verify Smart Protection settings and ensure there are no connection failures (Policy/Computer > Anti -Malware > Smart Protection ). Should the issue persist, contact Trend Micro Technical Support. 6. For issues involving integrity monitoring: Note if a new rule update has been applied or a modification on a rule has taken place. Note the additional modifications made and review the configuration changes. You can also un-assign the suspected rule or roll back the security update. Verify if the issue persists. If no recent change or update has been applied but alerts continue to be generated, turn off the integrity monitoring by going to Policy/Computer > Integrity Monitoring > General > Integrity Monitoring State. Should the issue still persist, check the other features that are enabled. 7. For issues involving log inspection: Note if a new rule update has been applied or a modification on a rule has taken place. Note the additional modifications made and review the configuration changes. You can also un-assign the suspected rule or roll back the security update. Verify if the issue persists. If no recent change or update has been applied but alerts continue to get generated, turn off the log inspection by going to Policy/Computer > Log Inspection > General > Log Inspection State. Should the issue still persist, check the other features that are enabled. 81
82 8 Other Deployment Scenarios 8.1 Multi -Tenant Environment Multi-Tenancy allows you to create independent environments of Deep Security with the same manager and database infrastructure. It can be used by service providers or enterprises that require strong isolation between departments or lines of business. Multi-Tenant vs Single Tenant Deployment Single Tenant Multi-Tenant Managed Computers 100,000 1,000,000 or more Deep Security Nodes Databases ,000 Database Servers 1 (with or without replication) Table 8: Multi-Tenant vs. Single Tenant Deployment Beginning in Deep Security 10.2, multi-tenancy is supported when using a PostgreSQL database, with each tenant on a separate database. Recommendations: 1. Reconnaissance IP List In a multi-tenant environment, the tenants might have to manually add the Deep Security Manager IP address in the Ignore Reconnaissance IP list found in Policies > Common Objects > Lists > IP Lists. This is to avoid getting the warning message "Reconnaissance Detected: Network or Port Scan. 2. Multi-Database Servers Multi-tenancy relies on using multiple databases in the case of Microsoft SQL or multiple users in the case of Oracle. To scale further, Deep Security Manager can be connected to multiple database servers and automatically distribute the new tenants across the available set of database servers. To configure additional databases to use, go to: Administration > System Settings > Database Servers 3. Use the chargeback feature to monitor tenant usage Monitoring can help determine the percentage usage of Deep Security Manager by hours of protection. Deep Security Manager records data about tenant usage. This information is displayed in the Tenant Protection Activity widget on the Dashboard, the tenant Properties window's Statistics tab, and the Chargeback report. 82
83 This information can be customized to determine what attributes are included in the record. It also provides the ability to monitor the usage of the overall system and look for indicators of abnormal activity. For instance, if a single tenant experiences a spike in Security Event Activity, it might be under attack. 4. Tenant pending deletion state Tenants can be deleted, however the process is not immediate. This guarantees that all the tenant-related jobs are finished before the records are deleted. The longest job runs every week, so the tenant will be in the pending deletion state for approximately seven days before the database is removed. 5. Multi-tenant options under System Settings Allow Tenants to use the relays in the "Default Relay Group" (for unassigned Relays): This gives the tenants automatic access to relays setup in the primary tenant and saves the tenants from setting up dedicated relays for security updates. Allow Tenants to use the "Backup" Scheduled Task: This determines if the Backup Scheduled Task should be available to tenants. In most cases, backups should be managed by the database administrator and this option should remain checked. Allow Tenants to use the "Run Script" Scheduled Task: Scripts present a potentially dangerous level of access to the system. However, the risk can be mitigated as scripts must be installed on the Deep Security Manager using file-system access. 8.2 Environments using Teamed NICs Windows NIC teaming software creates a new virtual master interface, which adopts the MAC address of the first subordinate interface. By default, the Windows Agent will bind to all virtual and physical interfaces during installation. As a result, in a teamed NIC environment, the agent will bind with the physical interfaces as well as the virtual interface created by the teaming software. The agent cannot function properly with multiple interfaces that have the same MAC address. 1. To function properly in a teamed-nic environment, the agent must be bound only to the virtual interface created by the teaming software. For more information, refer to the following KB: Deep Security Agent and Vulnerability Protection Agent are unable to attach to Intel Teamed NIC Virtual Adapter ( 2. Using the agent in a teamed-nics environment on Windows 2003 requires SP 2 or later, or the installation of the following patch: 3. The Deep Security Agent's network driver is bound to the network interfaces for only the installation or upgrade period. After installation, it is impossible for the bindings to be automatically adjusted when you add or remove network interfaces to or from a teamed-nic. Doing so can lead to network connectivity problems, or to the system not being properly protected. After adding or removing a network interface in a teamed environment where the agent's network driver is installed, verify that the driver is only bound to the virtual interface and not bound to any physical adapters. 83
84 4. On Solaris systems with multiple interfaces on the same subnet, the operating system may route packets through any of the interfaces. Because of this, any Firewall Stateful Configuration options or intrusion prevention rules should be applied to all interfaces equally. 5. Deep Security 10.1 and higher prevent a Windows network interruption during Deep Security Agent install or upgrade, which means the TCP connection will be maintained when installing, uninstalling, or upgrading the tbimdsa.sys windows driver. NOTE With Windows XP and Windows 2003, there is still a one-time network disconnection because the OS is using an NDIS 5 framework. 8.3 Air-Gapped Environments At least one Deep Security Relay is required in every Deep Security environment. The relay must be able to download updates from the Trend Micro Update Server so the rest of the relays, agents and appliances connect to that Relay for update distribution. If your environment requires that the Deep Security Relay is not allowed to connect to a relay or update server through the internet, then an alternative method is available to import a package of updates to a relay for distribution to other Deep Security Software Components. The following resources provide details on generating an update bundle: Manually updating the Deep Security Relay Agent (DSR) ( To avoid confusion when working in an air-gapped scenario, it s recommended to disable the following options under System Settings > Updates: Allow Agents/Appliances to update from this source if Deep Security Relays are not available. Agents can update components automatically when not in contact with Deep Security Manager. 8.4 Solaris Zones Keep in mind that Solaris Zones allows multiple instances of Solaris to run in one shared kernel. The Deep Security Agent for Solaris is only supported to run with the Global/Root Zone. Refer to the article below for more details: Installing the Deep Security Agent (DSA) on Solaris in the global zone ( 8.5 Microsoft Cluster Servers Cluster servers involve two separate installations of the underlying operating system with shared resources (databases, disks, IP addresses) that get swapped back and forth when the cluster performs a failover. 84
85 Deep Security can be configured to protect one node in the cluster or both. In this environment, consider the following: That you are installing Deep Security Agent to a local disk, and not a shared disk. If the cluster software uses a network heartbeat with a dedicated network interface card, no rules should be assigned to this interface. You can also create bypass rules so the heartbeats aren't inspected. Currently, we have encountered some issues when activating and deactivating Microsoft cluster or SQL cluster in the ESXi 5.5 machines. The VMware ESXi 5.1 does not have this issue. To avoid the issue, please install Deep Security Agent as a workaround. Installing or uninstalling Deep Security Agent might cause temporary disconnection of the cluster due to binding or unbinding the drivers. Choose a suitable time for this to happen. 8.6 Microsoft Hyper -V When deploying Deep Security on a Microsoft Hyper-V environment, the Deep Security Agent should be installed within each guest operating system in each virtual machine (VM). This provides the maximum amount of context and security for each guest. Recommendation scans can be used to determine the applicable set of intrusion prevention, integrity monitoring and log inspection rules required per guest. Anti-malware, web reputation, and firewall policies can also be individually configured per guest using the Deep Security Agent deployment. If you wish to protect the Parent Partition (also known as the Management Operating System), additional steps are required so that the network traffic is not inspected twice. It s recommended to choose one of the following options: Do not use intrusion prevention in the parent partition. Use intrusion prevention in the parent partition, but use the firewall policy assigned to the agent in the parent partition to bypass incoming and outgoing traffic for the IPs of the VMs being hosted. This can be done with two bypass rules - one for incoming and another for outgoing - that operate on the destination IP range of guests for incoming traffic, and the source IP range of guests for outgoing traffic. Bypass skips the intrusion prevention rule processing, preventing a duplicate inspection of the traffic in both the parent partition and guest virtual machine. It is also recommended to use bypass rules, like the second option above, if there is a firewall policy on the parent partition. 85
, and preparing the Golden Master")
86 8.7 Virtualized Environments (VDI) VMware Horizon View Figure 34: VMware vsphere Install the VMware vshield Endpoint in-guest driver with the Golden Image When using either the traditional installation method or Microsoft Deployment Toolkit (MDT), and preparing the Golden Master Image(s), install the necessary VMware vshield Endpoint in-guest driver which is a part of the VMware Tools. 2. Persistent and Non-Persistent VMs Both persistent and non-persistent view desktops need antivirus protection. Agentless protection is recommended for both scenarios. Install VMware tools in the virtual machine before it is converted into a parent virtual machine for linked clones. If agent-based protection is required, install an un-activated Deep Security Agent on the VM before it becomes the parent virtual machine. 3. Deep Security Notifier Notifier file ds_notifier.vif should not be added into exclusion due to infrastructure changes. VMware VMCI is no longer used for the Trend Micro Notifier. If the notifier is not working, make sure the C:\ProgramData\ds_notifier.vif was not added into the exclusion list. 4. Automating Virtual Machine Activations Deep Security Virtual Appliance can instantiate and activate virtual agents for virtual machines as they are created and assigned a specific policy automatically. Event-based tasks should be created so it can trigger Instant Protection functionality when VMs are added to a virtual environment protected by Deep Security Virtual Appliance. To configure event-based tasks, go to Administration > Event -Based Tasks. Event-based tasks can use conditions to trigger the action. The conditions use standard regex expressions. To know more about regex usage and to test the expressions configured, you can refer to these sites: (Regex reference) (Regex expression tester) 86
87 5. Note the number of protected VMs 87 Deep Security Manager must control the maximum number of protected VMs running on each protected ESXi host. Improper sizing can degrade the Deep Security Virtual Appliance performance. Please refer to the Sizing Considerations section in this document. For additional best practice details on running anti-malware protection for VMware View, you can refer to this document: 6. Activating Virtual Machine using Event -Based Task Trend Micro recommends setting a delay time for Event-Based task for a successful activation execution. Please refer to KB link: Activating virtual machine (VM) using Event-Based Task fails in Deep Security ( 7. Golden image When using golden image in a VDI environment, you must select the correct OS type to avoid Deep Security Manager reporting an incapable anti-malware. Citrix XenDeskop 1. Install a deactivated Deep Security Agent on a Master image. Deep Security Virtual Appliance (Agentless) does not work with a pure Citrix environment (VMs running on Citrix XenServer). For these environments, the physical agent-based solution is recommended. Install the agents in the master image (deactivated) and then perform agent-based activation in the provisioning process. Use an Event-Based Task to assign the correct policy based on the attributes available (such as Computer Name). Activating an agent using the Deep Security Manager console has its limits. These limits are sometimes due to network topology or firewall constraints that could prevent manager-initiated activation jobs. In some environments (non-persistent), using different scripting techniques (like ScriptLogic, PowerShell or Batch script) are the most common ways to automatically activate and configure Deep Security Agent. Alternatively, you can achieve the same result when Deep Security Agent is installed into a Master image and the streaming (PVS) Citrix VDI desktops are running on top of VMware vsphere Environment. If a computer with the same name already exists: Re-activate the existing computer Reactivate cloned agents Reactivate unknown agents With this setting, the previously activated Deep Security Agent in master image is reactivated the first time that it contacts the Deep Security Manager from the streaming VM on which it was launched. This all occurs in the context of the first heartbeat. It does not require a second heartbeat to complete. Remember, this functionality works in both agent initiated communication mode, and bi-directional
88 communication mode. The Deep Security Manager does not need to establish a connection to the agent for this function to work (as long as the agent is able to connect to the Deep Security Manager). If your network only allows one-way communication (such as Agent-to-Manager) it s recommended that you change the Direction of Deep Security Manager to Agent/Appliance communication to Agent/Appliance Initiated. Conflict Resolution with Personal vdisk (Persistent) For Deep Security Agent to work properly with Citrix Personal vdisk (PvD) in XenDesktop, you must add a folder and file rules in the master image to always overwrite PVD content and allow the agent to generate ds_agent.config file. The folder rule forces the files in the master image C:\programdata\Trend Micro\Deep Security Agent\dsa_core directory to always overwrite PVD content. While this rule works, it will not allow the agent operation to generate ds_agent.config file. Without this file, the agent service will not be able to start properly, so the agent automatic reactivation will fail. Therefore, a file rule must be created as well to allow the ds_agent.config file to be created. The file rule will be combined with the folder rules during PVD update. files_rules.txt addition [Rule-Begin] Type=File-Catalog-Construction Action=Catalog-Location-Guest-Modifiable name="%allusersprofile%\trend Micro\Deep Security Agent\dsa_core\ds_agent.config" name="%programfiles%\trend Micro\Deep Security Agent\AgentData\dsa_core\ds_agent.config" [Rule-End] custom_folders_rules.txt addition [Rule-Begin] Type=Conflict-Resolution Action=Rebuild-Dst name="%allusersprofile%\trend Micro\**\*" name="%programfiles%\trend Micro\**\*" [Rule-End] 88
89 NOTE Deep Security Virtual Appliance (Agentless) can be used to provide protection for the pooled Citrix VDI desktops if they are running on top of VMware vsphere. VMware tools would also need to be installed within the master image to include the necessary vshield Endpoint driver to use appliance-based protection. 2. Deep Security Agent and the Citrix target device driver On Citrix PVS 6.0 Environment, if you are installing (In-Guest) Deep Security Agent, the Citrix Target device driver might not be able to connect successfully to the provisioning server due to a possible conflict. If you are installing Deep Security Agent on a Windows operating system that is connected to a PVS server using disk provisioning, the temporary workaround is to change the tbimdsa driver loading order during system startup from PNP_TDI to NDIS. To do so, manually change the loading order of tbimdsa driver used by Deep Security Agent. a. Go to HKEY_LOCAL_MACHINE\SYSTEM\CurrentControlSet\Services\tbimdsa b. Add or modify String Group value to NDIS c. Add or modify DWORD Start value to 0 By changing the Group from PNP_TDI to NDIS and Start value from 3 to 0, it allows tbimdsa driver to load after Citrix driver has loaded. d. Reboot the machine. The PVS Target Device will be able to connect to the vdisk upon boot-up. Refer to this article: Citrix Target Device driver cannot connect to the provisioning server when in-guest Deep Security Agent (DSA) is installed on Citrix PVS 6.0 environment ( for more details. Citrix XenApp 1. Citrix XenApp s API Hooks Citrix s API hooks can prevent the Deep Security Agent service from starting. To resolve this, the ds_agent.exe must be added into XenApps exclusion list. Refer to this link: 2. Anti-Malware Exclusion for Citrix Trend Micro recommends that Citrix files are excluded from scanning by Deep Security. For a more comprehensive list of recommended scan exclusion, refer to the following KB link: Citrix-recommended exclusions on Deep Security ( 89
90 8.8 Private, Public & Hybrid Cloud Environments Amazon Web Services (AWS) Deep Security Manager can now be connected to Amazon Web Services to provide instance discovery and collect additional information about these instances. This can be used to automate security (for example, assigning a policy based on an Amazon Security Group). Assign a dedicated account for Deep Security so that you will be able to refine the rights and permissions or revoke the account at any time. It s recommended that you give Deep Security an Access and Secret key with only read-only permissions. Deep Security 11.0 adds support for Amazon RDS PostgreSQL in Multi-AZ deployments. For customers who use AWS Marketplace or implement software installations to AWS, use of RDS PostgreSQL will be a common deployment configuration. Amazon RDS provides high availability and failover support for database instances using Multi-AZ deployments. For more information, please check here. NOTE If you activate a Deep Security Agent (for Windows) on an AWS WorkSpace and apply a policy that uses the default firewall rules, the workspace will become "unhealthy". You must alter the policy to allow access to the ports required by WorkSpaces. vcloud Environment Deep Security Manager can now connect to the vcloud director to discover the machines that need to be protected. If this is used with a public cloud, it can help with agent management. If vcloud is used within a private or community cloud where Deep Security Manager is deployed, the vcloud support can work together with the vcenter integration to provide agentless protection to vcloud. The vcloud director (vcd) workloads are presented in Deep Security in the following hierarchy: 1. vcloud Director Instance 2. Virtual Datacenter 3. vapp 4. Virtual Machine (being the endpoint that can be protected) This allows the administrator to select virtual machines from certain vdc/vapp s to be protected. 1. Multiple vcd instances can be presented, but make sure the following rules are applied: All vcenters that vcd used for resources are already configured in the administrative side of the portal. Present vcd instances at vcd System object. This will allow all workloads to be discovered in vcd. 2. The following vcloud Director settings must be configured correctly: vcd public URL vcd public REST API base URL (System > Administration > Public Addresses) 90
91 3. The vcloud organization accounts that will be used by Deep Security Manager to access vcloud must have the Administrator View" right. This can be verified by checking the user s role properties in vcloud, then by going to the Rights for this Role > All Rights > General folder. Figure 35: Rights for this Role 4. Consider the following settings when adding the vcloud Director Instance: The name should be descriptive. Enter the address of the vcloud Director instance as follows: vcloud.mycompany.com There is no need to add http or https in the From field of the address. There is no need to add the organization name at the end of the URL. 5. When importing the vcloud resources into Deep Security Manager, the user name must include "@orgname". For example, if the vcloud account's user name is kevin and the vcloud Organization you've given the account access to is CloudOrgOne, then the Deep Security user must enter kevin@cloudorgone as their user name. 6. When adding more than one vcloud Director instance, ensure that the corresponding Provider Virtual Datacenter resources have been added to Deep Security Manager. This includes: All vcenter instances used for Provider Virtual Datacenters All vshield Manager instances used for Provider Virtual Datacenters 7. Public Catalog VMs must have the vshield driver installed as part of the template configuration before adding the vapp/vm to the catalog. 8. Configure the vcenter Database to Assign Unique UUIDs to New Virtual Machines: &sliceid=2&doctypeid=dt_kb_1_1&dialogid= &stateid= Other Useful References: Changing the UUID of vcenter Servers in Deep Security ( 91

92 VMware SRM (Site Recovery Management) Environment In the VMware SRM (Site Recovery Management) environment, both multi-node Deep Security Manager and separate Deep Security Manager are supported to provide protections: Scenario 1: Multi-node Deep Security Manager in Protected site-a and Recovery Site-B. Scenario 2: Separate Deep Security Manager in Protected site-a and Recovery Site-B. Scenario 1 and 2, agentless (Deep Security Virtual Appliance) both work after a failover to the recovered site and after returning back to the protected site. The agent-based (Deep Security Agent), can ONLY be managed by one site. Although the VMs cannot be managed after failover to recovery site, the Deep Security Agent service and function can still work. Once returned to the protected site, the VMs can be managed and should work normally. By design, when the VMs are set up in VMware Site Recovery Protection Groups, the Recovery site s VMs icon will be changed. Refer to the screenshot below: Figure 36: VMware Site Recovery Protection Groups 92
 to activate or re-activate the VMs when they failover to Recovery Site. 8.")
93 Figure 37: Changed icons of Protection Groups On the Deep Security Manager, both the Protected site s VMs and the Recovery site s VMs are displayed before the recovery. Therefore, you cannot use the Event-Based Tasks (Computer-Created) to activate or re-activate the VMs when they failover to Recovery Site. 8.9 SAP If you install the Deep Security Agent prior to SAP server with Virus Scan Adapter, disable the real-time scan of Deep Security Agent before the SAP installation to avoid race condition. Create a new security profile for SAP server only. Do not use the existing policy plus the SAP function. When SAP module is on, the AM module should be on agent in combined mode. Exclude the SAP folders from AM scanning and IM baseline ( /usr/sap on Linux systems) IBM Rational ClearCase If the Deep Security on a Linux has IBM Rational ClearCase installed, it can result in server freeze. Please refer to the IBM s recommendation for running the AV on the server: Docker support Supported Docker Platform Deep Security 11.0 supports Docker environment on only the Linux platform, not Windows. Deep Security Agent should be installed into Docker host. Installing Deep Security Agent to Docker container is not supported. 93
94 The Docker host OS must be one supported by Deep Security Agent 11.0: Red Hat Enterprise Linux/CentOS SUSE Linux Enterprise Server Amazon Linux Ubuntu Debian Docker optimized host OS, such as those below, are NOT supported: Atomic Host Snappy Ubuntu Core Photon OS However, Docker container can be based on any distributions, such as Alpine Linux, Busybox, and others Container Protection Deep Security Agent 11.0 provides intrusion prevention, web reputation, and real-time anti-malware features to Docker containers by installing Deep Security Agent to Docker host. A. Intrusion Prevention Create /etc/use_dsa_with_iptables as below before installing Deep Security Agent to your Docker so Deep Security Agent does not remove iptables configuration, which is required for Docker networking. # touch /etc/use_dsa_with_iptables Note that assigned IPS rules take effect to ALL Docker containers on the same host because Deep Security Agent is working at the host level. Because iptables is enabled, you should also allow communication ports required for Deep Security Agent in iptables rule, such as 4118/tcp. Please refer to the following solution for required ports. Communication ports used by Deep Security ( B. Recommendation Scan Recommendation scan does not completely work for applications in Docker containers. You should manually choose which IPS rules to assign. Some IPS rules might be recommended even if the application is not vulnerable because Deep Security Agent can only find running processes in containers but not detect the application version. C. Inter-Container Traffic Deep Security s network security features (firewall, intrusion prevention, web reputation) does NOT affect inter-container traffic on a host in either classic link model (by --link option) or networking model. 94


95 D. Host Port and Container Port Because Deep Security Agent works at host, container service port and host service port should be the same so IPS rules can inspect traffic as expected. For example, if you run web server on container port 80/tcp, you should bind it to host port 80/TCP. Otherwise, you should modify port configuration at all application types to add host service port. Some container orchestration platforms, such as Amazon ECS or Kubernetes, can use dynamic host port by its configuration. You should configure to use static host port same as container service port Host Protection Deep Security Agent 11.0 provides all security features to Docker host. A. Firewall You do not need to enable Deep Security Firewall feature in general, because Docker container only exposes ports which are explicitly configured. If you must use it, there are several points and limitations as shown below. If you use firewall on Docker host, you should allow BOTH incoming and outgoing traffic for incoming connection to Docker container application. For example, if you are running web server in a Docker container on port 80/TCP, you must allow incoming traffic to Docker host on port 80/TCP AND outgoing traffic to Docker container on port 80/TCP. Figure 38: Firewall on Docker Host You might also need to allow some ports at host to be used by Docker and related orchestration framework. Below are some examples. a. Docker Remote API port 2375/TCP (HTTP) or 2376/TCP (HTTPS), Docker registry 5000/TCP b. Amazon ECS Agent 443/TCP, 51678/TCP, 51679/TCP c. Kubernetes apiserver 8080/tcp(HTTP) or 6443/tcp(HTTPS), etcd 2379/tcp, kubelet 10250/tcp and 10255/tcp
96 d. Docker swarm mode 2377/tcp, 7946/tcp+udp and 4789/tcp+udp You cannot use random (dynamic) host port mapping with Deep Security Firewall because rule cannot be adapted to dynamic ports Deployment Scripts Amazon ECS (EC2 Container Service) When deploying Deep Security Agent to Amazon ECS cluster instance, you can modify Deployment Script to be put into instance user-data as below. #!/usr/bin/env bash echo ECS_CLUSTER=ClusterName >> /etc/ecs/ecs.config touch /etc/use_dsa_with_iptables curl -o /tmp/agent.rpm -s rpm -ihv /tmp/agent.rpm (snip) Other reminders: You can put your ClusterName for the instance to join to ECS cluster. Create /etc/use_dsa_with_iptables not to disable iptables. Use curl instead of wget because wget is not installed by default in Amazon ECS-optimized AMI Automation Activation from Gold Image This section explains steps about how to automate Deep Security protection using vsphere 6 + vcns with Combined Protection or Agent only. 1. Enable Agent-Activation on Deep Security Console. 96 Figure 39: Enable Agent-Activation


97 2. Create an Event Based Task to activate in which security profile you would like to configure the VDI or VM: Figure 40: Agent-Initiated Activation Figure 41: Assign to Computer Group Figure 42: Computer Name 97
. 3. Install the Deep Security Agent to the Gold Image, do not activate on the Deep Security Manager. Only install the agent. 4.")
98 Figure 43: Describe the new task On Event Based Task, you can define which Security Profile that VM will need to receive, based on (vcenter Name, Folder Name from vcenter, ESXI host, Platform Last IP Usage and other configuration). 3. Install the Deep Security Agent to the Gold Image, do not activate on the Deep Security Manager. Only install the agent. 4. Create a batch file to the Gold image, like the sample scripts to insert on VDI or VM: (all scripts are in.bat format) Script to use on GOLD Image with IMG as a hostname: SET var=%computername% SET var=%var:~0,3% IF "%var%"=="img" ( exit ) ELSE ( cd "C:\Program Files\Trend Micro\Deep Security Agent\" dsa_control.cmd -a dsm://(ip or Hostname DSM):4120/ ) Script to a Normal VM if you wish to activate the VM automatically: cd "C:\Program Files\Trend Micro\Deep Security Agent\" dsa_control.cmd -a dsm:// (IP or Hostname DSM):4120/ Creating a Windows Task Scheduler event to execute the BAT file every time a VDI or VM is created and when you execute a recompose on VMware Horizon: 98


99 This procedure must be done on Gold Image: 99
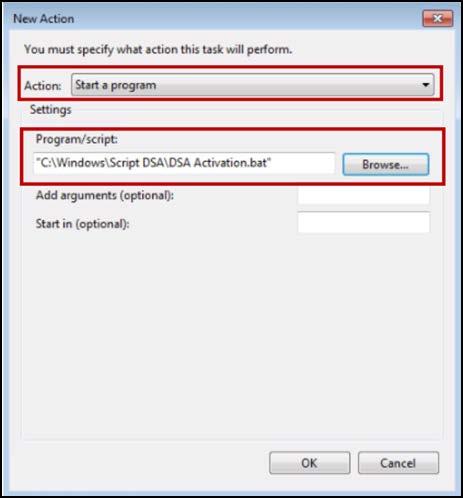
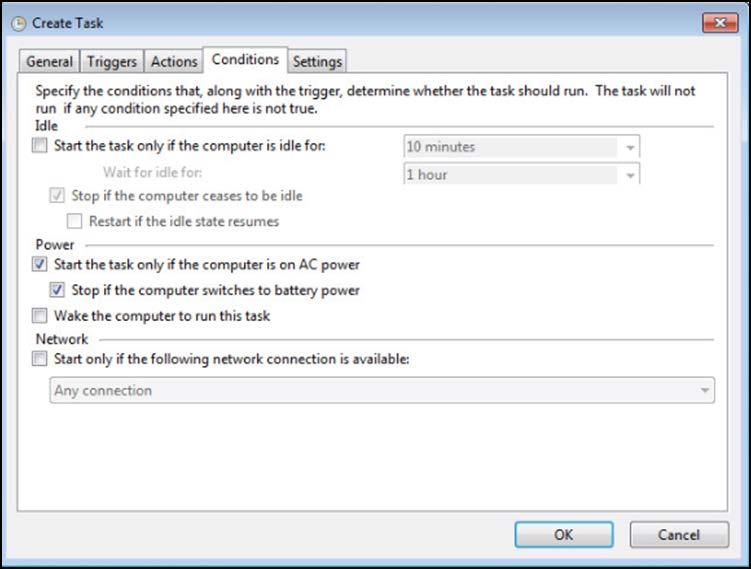
100 100

101 To test the new settings, create a new VM based on the new Gold image, using the new configuration Oracle RAC cluster Some clustering applications, such as the Oracle RAC database, are highly sensitive to the packet latency impact of the Deep Security firewall and intrusion prevention features, leading to cluster node evictions and data replication performance issues. To help avoid these issues, we suggest that you bypass the dedicated NIC that is used for cluster traffic only (but never bypass a NIC with production traffic). For more information, see SAML When configuring SAML, keep in mind the following items: 1. You are using the Deep Security Manager URL (Not Deep Security as a Service URL) in ADFS (or others). 2. The Deep Security Manager server's time has been synced with NTP servers. 3. During Active Directory mapping, make sure you have the correct name convention. The default mapping for Deep Security is to map TMDS-xxxx groups in Active Directory and ADFS-xxxx in Deep Security Manager. 4. There is a maximum of 10 roles allowed when configuring SAML. 101
 About this guide Deep Security provides a single platform for server security to protect physical, virtual, and cloud servers as well as hypervisors and virtual desktops. Tightly integrated modules easily
This Best Practice Guide contains:
 About this guide Deep Security provides a single platform for server security to protect physical, virtual, and cloud servers as well as hypervisors and virtual desktops. Tightly integrated modules easily
Document Format Size. Readme (Deep Security Manager) txt 25 KB. Readme (Deep Security Virtual Appliance) txt 20 KB
 txt 25 KB. Readme (Deep Security Virtual Appliance) txt 20 KB") About this guide Deep Security provides a single platform for server security to protect physical, virtual, and cloud servers as well as hypervisors and virtual desktops. Tightly integrated modules easily
About this guide Deep Security provides a single platform for server security to protect physical, virtual, and cloud servers as well as hypervisors and virtual desktops. Tightly integrated modules easily
 Trend Micro Incorporated reserves the right to make changes to this document and to the products described herein without notice. Before installing and using the software, please review the readme files,
 Trend Micro Incorporated reserves the right to make changes to this document and to the products described herein without notice. Before installing and using the software, please review the readme files,
 Trend Micro Incorporated reserves the right to make changes to this document and to the products described herein without notice. Before installing and using the software, please review the readme files,
 Trend Micro Incorporated reserves the right to make changes to this document and to the products described herein without notice. Before installing and using the software, please review the readme files,
 Trend Micro Incorporated reserves the right to make changes to this document and to the products described herein without notice. Before installing and using the software, please review the readme files,
 Trend Micro Incorporated reserves the right to make changes to this document and to the products described herein without notice. Before installing and using the software, please review the readme files,
Sophos for Virtual Environments. startup guide -- Sophos Central edition
 Sophos for Virtual Environments startup guide -- Sophos Central edition Contents About this guide... 1 About Sophos for Virtual Environments...2 Key steps in installation... 5 Check the system requirements...
Sophos Anti-Virus for VMware vshield: On-Premise Edition startup guide. Product version: 2.1
 Sophos Anti-Virus for VMware vshield: On-Premise Edition startup guide Product version: 2.1 Document date: August 2016 Contents 1 About this guide...4 2 About Sophos Anti-Virus...5 3 Key steps in installation...7
MOVE AntiVirus page-level reference
 McAfee MOVE AntiVirus 4.7.0 Interface Reference Guide (McAfee epolicy Orchestrator) MOVE AntiVirus page-level reference General page (Configuration tab) Allows you to configure your McAfee epo details,
WHITE PAPER: BEST PRACTICES. Sizing and Scalability Recommendations for Symantec Endpoint Protection. Symantec Enterprise Security Solutions Group
 WHITE PAPER: BEST PRACTICES Sizing and Scalability Recommendations for Symantec Rev 2.2 Symantec Enterprise Security Solutions Group White Paper: Symantec Best Practices Contents Introduction... 4 The
Securing the Modern Data Center with Trend Micro Deep Security
 Advania Fall Conference Securing the Modern Data Center with Trend Micro Deep Security Okan Kalak, Senior Sales Engineer okan@trendmicro.no Infrastructure change Containers 1011 0100 0010 Serverless Public
Installing and Configuring vcenter Support Assistant
 Installing and Configuring vcenter Support Assistant vcenter Support Assistant 6.0 This document supports the version of each product listed and supports all subsequent versions until the document is replaced
McAfee MOVE AntiVirus Installation Guide. (McAfee epolicy Orchestrator)
") McAfee MOVE AntiVirus 4.7.0 Installation Guide (McAfee epolicy Orchestrator) COPYRIGHT Copyright 2018 McAfee, LLC TRADEMARK ATTRIBUTIONS McAfee and the McAfee logo, McAfee Active Protection, epolicy Orchestrator,
McAfee MOVE AntiVirus 4.7.0 Installation Guide (McAfee epolicy Orchestrator) COPYRIGHT Copyright 2018 McAfee, LLC TRADEMARK ATTRIBUTIONS McAfee and the McAfee logo, McAfee Active Protection, epolicy Orchestrator,
VMware vfabric Data Director Installation Guide
 VMware vfabric Data Director Installation Guide vfabric Data Director 1.0.1 This document supports the version of each product listed and supports all subsequent versions until the document is replaced
Sophos for Virtual Environments Startup guide -- Enterprise Console edition. Product version: 1.1
 Sophos for Virtual Environments Startup guide -- Enterprise Console edition Product version: 1.1 Contents 1 About this guide...4 2 About Sophos for Virtual Environments...5 3 Key steps in installation...8
VMware vrealize Operations for Horizon Installation
 VMware vrealize Operations for Horizon Installation vrealize Operations for Horizon 6.4 Installation vrealize Operations for Horizon 6.4 This document supports the version of each product listed and supports
vcenter Server Installation and Setup Update 1 Modified on 30 OCT 2018 VMware vsphere 6.7 vcenter Server 6.7
 vcenter Server Installation and Setup Update 1 Modified on 30 OCT 2018 VMware vsphere 6.7 vcenter Server 6.7 You can find the most up-to-date technical documentation on the VMware website at: https://docs.vmware.com/
VMware vrealize Operations for Horizon Installation. VMware vrealize Operations for Horizon 6.5
 VMware vrealize Operations for Horizon Installation VMware vrealize Operations for Horizon 6.5 You can find the most up-to-date technical documentation on the VMware website at: https://docs.vmware.com/
vcenter Server Installation and Setup Modified on 11 MAY 2018 VMware vsphere 6.7 vcenter Server 6.7
 vcenter Server Installation and Setup Modified on 11 MAY 2018 VMware vsphere 6.7 vcenter Server 6.7 You can find the most up-to-date technical documentation on the VMware website at: https://docs.vmware.com/
Virtualization with VMware ESX and VirtualCenter SMB to Enterprise
 Virtualization with VMware ESX and VirtualCenter SMB to Enterprise This class is an intense, five-day introduction to virtualization using VMware s immensely popular Virtual Infrastructure suite including
vsphere Replication for Disaster Recovery to Cloud vsphere Replication 8.1
 vsphere Replication for Disaster Recovery to Cloud vsphere Replication 8.1 You can find the most up-to-date technical documentation on the VMware website at: https://docs.vmware.com/ If you have comments
VMware vsphere Data Protection Evaluation Guide REVISED APRIL 2015
 VMware vsphere Data Protection REVISED APRIL 2015 Table of Contents Introduction.... 3 Features and Benefits of vsphere Data Protection... 3 Requirements.... 4 Evaluation Workflow... 5 Overview.... 5 Evaluation
Getting Started with VMware View View 3.1
 Technical Note Getting Started with VMware View View 3.1 This guide provides an overview of how to install View Manager components and provision virtual desktops. Additional View Manager documentation
Installing and Configuring vcloud Connector
 Installing and Configuring vcloud Connector vcloud Connector 2.6.0 This document supports the version of each product listed and supports all subsequent versions until the document is replaced by a new
vsphere Replication for Disaster Recovery to Cloud
 vsphere Replication for Disaster Recovery to Cloud vsphere Replication 6.0 This document supports the version of each product listed and supports all subsequent versions until the document is replaced
Getting Started with ESXi Embedded
 ESXi 4.0 Embedded vcenter Server 4.0 This document supports the version of each product listed and supports all subsequent versions until the document is replaced by a new edition. To check for more recent
Sophos for Virtual Environments. startup guide -- Enterprise Console edition
 Sophos for Virtual Environments startup guide -- Enterprise Console edition Contents About this guide... 1 About Sophos for Virtual Environments...2 Key steps in installation... 5 Check the system requirements...
VMware vrealize Operations for Horizon Installation. VMware vrealize Operations for Horizon 6.3
 VMware vrealize Operations for Horizon Installation VMware vrealize Operations for Horizon 6.3 VMware vrealize Operations for Horizon Installation You can find the most up-to-date technical documentation
VMware vsphere Replication Installation and Configuration. vsphere Replication 6.5
 VMware vsphere Replication Installation and Configuration vsphere Replication 6.5 You can find the most up-to-date technical documentation on the VMware website at: https://docs.vmware.com/ If you have
vshield Administration Guide
 vshield Manager 5.1 vshield App 5.1 vshield Edge 5.1 vshield Endpoint 5.1 This document supports the version of each product listed and supports all subsequent versions until the document is replaced by
vsphere Replication for Disaster Recovery to Cloud vsphere Replication 6.5
 vsphere Replication for Disaster Recovery to Cloud vsphere Replication 6.5 You can find the most up-to-date technical documentation on the VMware website at: https://docs.vmware.com/ If you have comments
Virtualization with VMware ESX and VirtualCenter SMB to Enterprise
 Virtualization with VMware ESX and VirtualCenter SMB to Enterprise This class is an intense, four-day introduction to virtualization using VMware s immensely popular Virtual Infrastructure suite including
VMware vsphere Replication Administration. vsphere Replication 8.1
 VMware vsphere Replication Administration vsphere Replication 8.1 You can find the most up-to-date technical documentation on the VMware website at: https://docs.vmware.com/ If you have comments about
VMware vfabric Data Director Installation Guide
 VMware vfabric Data Director Installation Guide vfabric Data Director 2.5 This document supports the version of each product listed and supports all subsequent versions until the document is replaced by
Trend Micro. Apex One as a Service / Apex One. Best Practice Guide for Malware Protection. 1 Best Practice Guide Apex One as a Service / Apex Central
 Trend Micro Apex One as a Service / Apex One Best Practice Guide for Malware Protection 1 Best Practice Guide Apex One as a Service / Apex Central Information in this document is subject to change without
Administering vrealize Log Insight. April 12, 2018 vrealize Log Insight 4.6
 Administering vrealize Log Insight April 12, 2018 4.6 You can find the most up-to-date technical documentation on the VMware website at: https://docs.vmware.com/ If you have comments about this documentation,
VMware vsphere with ESX 4 and vcenter
 VMware vsphere with ESX 4 and vcenter This class is a 5-day intense introduction to virtualization using VMware s immensely popular vsphere suite including VMware ESX 4 and vcenter. Assuming no prior virtualization
Using VMware vsphere With Your System
 Using VMware vsphere, page 1 Configuring the ESXi Host to Use an NTP Server, page 2 Creating a Backup by using VMware vcenter, page 2 Taking a Snapshot by using VMware vcenter, page 3 Attaching an Existing
Administering vrealize Log Insight. 05-SEP-2017 vrealize Log Insight 4.3
 Administering vrealize Log Insight 05-SEP-2017 4.3 You can find the most up-to-date technical documentation on the VMware website at: https://docs.vmware.com/ If you have comments about this documentation,
Administering vrealize Log Insight. 12-OCT-2017 vrealize Log Insight 4.5
 Administering vrealize Log Insight 12-OCT-2017 4.5 You can find the most up-to-date technical documentation on the VMware website at: https://docs.vmware.com/ If you have comments about this documentation,
Using VMware vsphere with Your System
 Using VMware vsphere, on page 1 Configuring the ESXi Host to Use an NTP Server, on page 2 Creating a Backup by Using VMware vcenter, on page 2 Taking a Snapshot by using VMware vcenter, on page 3 Removing
Data Protection Guide
 SnapCenter Software 4.0 Data Protection Guide For VMs and Datastores using the SnapCenter Plug-in for VMware vsphere March 2018 215-12931_C0 doccomments@netapp.com Table of Contents 3 Contents Deciding
McAfee Network Security Platform 8.3
 8.3.7.44-8.3.7.14 Manager-Virtual IPS Release Notes McAfee Network Security Platform 8.3 Revision A Contents About this release New features Enhancements Resolved issues Installation instructions Known
VMware Identity Manager Connector Installation and Configuration (Legacy Mode)
") VMware Identity Manager Connector Installation and Configuration (Legacy Mode) VMware Identity Manager This document supports the version of each product listed and supports all subsequent versions until
VMware Identity Manager Connector Installation and Configuration (Legacy Mode) VMware Identity Manager This document supports the version of each product listed and supports all subsequent versions until
McAfee Network Security Platform 8.3
 8.3.7.28-8.3.3.9 Manager-Mxx30-series Release Notes McAfee Network Security Platform 8.3 Revision C Contents About this release New features Enhancements Resolved issues Installation instructions Known
Dell EMC Ready Architectures for VDI
 Dell EMC Ready Architectures for VDI Designs for VMware Horizon 7 on Dell EMC XC Family September 2018 H17387 Deployment Guide Abstract This deployment guide provides instructions for deploying VMware
vsphere Update Manager Installation and Administration Guide 17 APR 2018 VMware vsphere 6.7 vsphere Update Manager 6.7
 vsphere Update Manager Installation and Administration Guide 17 APR 2018 VMware vsphere 6.7 vsphere Update Manager 6.7 You can find the most up-to-date technical documentation on the VMware website at:
Sophos Virtual Appliance. setup guide
 Sophos Virtual Email Appliance setup guide Contents Installing a virtual appliance...1 Prerequisites...3 Enabling Port Access...4 Downloading Virtual Appliance Files... 7 Determining Disk Space and Memory
VMware Skyline Collector Installation and Configuration Guide. VMware Skyline 1.4
 VMware Skyline Collector Installation and Configuration Guide VMware Skyline 1.4 You can find the most up-to-date technical documentation on the VMware website at: https://docs.vmware.com/ If you have
Acronis Backup & Recovery 11.5
 Acronis Backup & Recovery 11.5 Installation Guide Applies to the following editions: Update 2 Advanced Server Server for Windows Virtual Edition Server for Linux Advanced Server SBS Edition Workstation
WatchGuard XTMv Setup Guide Fireware XTM v11.8
 WatchGuard XTMv Setup Guide Fireware XTM v11.8 All XTMv Editions Copyright and Patent Information Copyright 1998 2013 WatchGuard Technologies, Inc. All rights reserved. WatchGuard, the WatchGuard logo,
Privileged Remote Access Virtual Appliance Setup
 Privileged Remote Access Virtual Appliance Setup 2003-2018 BeyondTrust, Inc. All Rights Reserved. BEYONDTRUST, its logo, and JUMP are trademarks of BeyondTrust, Inc. Other trademarks are the property of
VMware Skyline Collector Installation and Configuration Guide. VMware Skyline Collector 2.0
 VMware Skyline Collector Installation and Configuration Guide VMware Skyline Collector 2.0 You can find the most up-to-date technical documentation on the VMware website at: https://docs.vmware.com/ If
vshield Quick Start Guide
 vshield Manager 4.1.0 Update 1 vshield Zones 4.1.0 Update 1 vshield Edge 1.0.0 Update 1 vshield App 1.0.0 Update 1 vshield Endpoint 1.0.0 Update 1 This document supports the version of each product listed
VMware Mirage Getting Started Guide
 Mirage 5.8 This document supports the version of each product listed and supports all subsequent versions until the document is replaced by a new edition. To check for more recent editions of this document,
ForeScout Extended Module for Symantec Endpoint Protection
 ForeScout Extended Module for Symantec Endpoint Protection Version 1.0.0 Table of Contents About the Symantec Endpoint Protection Integration... 4 Use Cases... 4 Additional Symantec Endpoint Protection
VMware vsphere Replication Administration. vsphere Replication 6.0
 VMware vsphere Replication Administration vsphere Replication 6.0 You can find the most up-to-date technical documentation on the VMware website at: https://docs.vmware.com/ If you have comments about
System Requirements. Hardware and Virtual Appliance Requirements
 This chapter provides a link to the Cisco Secure Network Server Data Sheet and lists the virtual appliance requirements. Hardware and Virtual Appliance Requirements, page 1 Virtual Machine Appliance Size
SRA Virtual Appliance Getting Started Guide
 SRA Virtual Appliance Getting Started Guide 1 Notes, Cautions, and Warnings NOTE: A NOTE indicates important information that helps you make better use of your system. CAUTION: A CAUTION indicates potential
VMware vsphere Replication Administration. vsphere Replication 6.5
 VMware vsphere Replication Administration vsphere Replication 6.5 You can find the most up-to-date technical documentation on the VMware website at: https://docs.vmware.com/ If you have comments about
WatchGuard XTMv Setup Guide
 WatchGuard XTMv Setup Guide All XTMv Editions Copyright and Patent Information Copyright 1998 2011 WatchGuard Technologies, Inc. All rights reserved. WatchGuard, the WatchGuard logo, LiveSecurity, and
SaaSaMe Transport Workload Snapshot Export for. Alibaba Cloud
 SaaSaMe Transport Workload Snapshot Export for Alibaba Cloud Contents About This Document... 3 Revision History... 3 Workload Snapshot Export for Alibaba Cloud... 4 Workload Snapshot Export Feature...
Installing and Configuring vcenter Multi-Hypervisor Manager
 Installing and Configuring vcenter Multi-Hypervisor Manager vcenter Server 5.1 vcenter Multi-Hypervisor Manager 1.1.2 This document supports the version of each product listed and supports all subsequent
McAfee Endpoint Security for Servers Product Guide. (McAfee epolicy Orchestrator)
") McAfee Endpoint Security for Servers 5.1.0 Product Guide (McAfee epolicy Orchestrator) COPYRIGHT Copyright 2018 McAfee, LLC TRADEMARK ATTRIBUTIONS McAfee and the McAfee logo, McAfee Active Protection,
McAfee Endpoint Security for Servers 5.1.0 Product Guide (McAfee epolicy Orchestrator) COPYRIGHT Copyright 2018 McAfee, LLC TRADEMARK ATTRIBUTIONS McAfee and the McAfee logo, McAfee Active Protection,
THREAT PROTECTION FOR VIRTUAL SYSTEMS #ILTACON #ILTA156
 THREAT PROTECTION FOR VIRTUAL SYSTEMS #ILTACON #ILTA156 JIM P. NIXON Application Support Manager Seyfarth Shaw LLP jnixon@seyfarth.com IN THE PAST, TRADITIONAL SOLUTIONS DIDN T THINK ABOUT VIRTUAL WORKLOADS
Securing the Data Center against
 Securing the Data Center against vulnerabilities & Data Protection Agenda Virtual Virtualization Technology How Virtualization affects the Datacenter Security Keys to a Secure Virtualized Deployment and
McAfee Network Security Platform 9.2
 McAfee Network Security Platform 9.2 (9.2.7.22-9.2.7.20 Manager-Virtual IPS Release Notes) Contents About this release New features Enhancements Resolved issues Installation instructions Known issues Product
TECHNICAL WHITE PAPER - FEBRUARY VMware Site Recovery for VMware Cloud on AWS Evaluation Guide TECHNICAL WHITE PAPER
 TECHNICAL WHITE PAPER - FEBRUARY 2019 VMware Site Recovery for VMware Cloud on AWS Evaluation Guide TECHNICAL WHITE PAPER Table of Contents Introduction 4 Pre-requisites 4 Site Recovery Manager Server...
What Is New in VMware vcenter Server 4 W H I T E P A P E R
 What Is New in VMware vcenter Server 4 W H I T E P A P E R Table of Contents What Is New in VMware vcenter Server 4....................................... 3 Centralized Control and Visibility...............................................
VMware vsphere Administration Training. Course Content
 VMware vsphere Administration Training Course Content Course Duration : 20 Days Class Duration : 3 hours per day (Including LAB Practical) Fast Track Course Duration : 10 Days Class Duration : 8 hours
Dell EMC vsan Ready Nodes for VDI
 Dell EMC vsan Ready Nodes for VDI Integration of VMware Horizon on Dell EMC vsan Ready Nodes April 2018 H17030.1 Deployment Guide Abstract This deployment guide provides instructions for deploying VMware
SnapCenter Software 4.0 Installation and Setup Guide
 SnapCenter Software 4.0 Installation and Setup Guide March 2018 215-12926_C0 doccomments@netapp.com Table of Contents 3 Contents Deciding whether to read the SnapCenter Installation and Setup Guide...
vsphere Replication for Disaster Recovery to Cloud
 vsphere Replication for Disaster Recovery to Cloud vsphere Replication 5.6 This document supports the version of each product listed and supports all subsequent versions until the document is replaced
CounterACT VMware vsphere Plugin
 Configuration Guide Version 2.0.1 Table of Contents About VMware vsphere Integration... 4 Use Cases... 4 Additional VMware Documentation... 4 About this Plugin... 5 What to Do... 5 Requirements... 5 CounterACT
Migration. 22 AUG 2017 VMware Validated Design 4.1 VMware Validated Design for Software-Defined Data Center 4.1
 22 AUG 2017 VMware Validated Design 4.1 VMware Validated Design for Software-Defined Data Center 4.1 You can find the most up-to-date technical documentation on the VMware Web site at: https://docs.vmware.com/
SnapCenter Software 4.0 Concepts Guide
 SnapCenter Software 4.0 Concepts Guide May 2018 215-12925_D0 doccomments@netapp.com Table of Contents 3 Contents Deciding whether to use the Concepts Guide... 7 SnapCenter overview... 8 SnapCenter architecture...
PassTest. Bessere Qualität, bessere Dienstleistungen!
 PassTest Bessere Qualität, bessere Dienstleistungen! Q&A Exam : VCP-510 Title : VMware Certified Professional on VSphere 5 Version : Demo 1 / 7 1.Which VMware solution uses the security of a vsphere implementation
Quick Start Guide TABLE OF CONTENTS COMMCELL ARCHITECTURE OVERVIEW COMMCELL SOFTWARE DEPLOYMENT INSTALL THE COMMSERVE SOFTWARE
 Page 1 of 35 Quick Start Guide TABLE OF CONTENTS This Quick Start Guide is designed to help you install and use a CommCell configuration to which you can later add other components. COMMCELL ARCHITECTURE
vsphere Security Modified on 21 JUN 2018 VMware vsphere 6.7 VMware ESXi 6.7 vcenter Server 6.7
 Modified on 21 JUN 2018 VMware vsphere 6.7 VMware ESXi 6.7 vcenter Server 6.7 You can find the most up-to-date technical documentation on the VMware website at: https://docs.vmware.com/ If you have comments
Forescout. Configuration Guide. Version 2.4
 Forescout Version 2.4 Contact Information Forescout Technologies, Inc. 190 West Tasman Drive San Jose, CA 95134 USA https://www.forescout.com/support/ Toll-Free (US): 1.866.377.8771 Tel (Intl): 1.408.213.3191
Tips and Tricks on Building Agentless Antivirus Scanners for Virtual Desktops
 July 2013 Tips and Tricks on Building Agentless Antivirus Scanners for Virtual Desktops Yury Magalif, MASE, VCP Principal Architect Cloud Computing Agenda I. Design Decisions Current AV or Agentless II.
vrealize Suite Lifecycle Manager 1.0 Installation and Management vrealize Suite 2017
 vrealize Suite Lifecycle Manager 1.0 Installation and Management vrealize Suite 2017 vrealize Suite Lifecycle Manager 1.0 Installation and Management You can find the most up-to-date technical documentation
Security Gateway Virtual Edition
 Security Gateway Virtual Edition R75.20 Administration Guide 4 March 2012 Classification: [Restricted] 2012 Check Point Software Technologies Ltd. All rights reserved. This product and related documentation
vsphere Security Update 2 Modified on 22 JUN 2018 VMware vsphere 6.5 VMware ESXi 6.5 vcenter Server 6.5
 Update 2 Modified on 22 JUN 2018 VMware vsphere 6.5 VMware ESXi 6.5 vcenter Server 6.5 You can find the most up-to-date technical documentation on the VMware website at: https://docs.vmware.com/ If you
Administering vrealize Log Insight. September 20, 2018 vrealize Log Insight 4.7
 Administering vrealize Log Insight September 20, 2018 4.7 You can find the most up-to-date technical documentation on the VMware website at: https://docs.vmware.com/ If you have comments about this documentation,
Step by Step ASR, Azure Site Recovery
 Prepared by: Mohammad Asmayal Jawad linkedin.com/in/asmayal/ August 14, 2017 V1.0 Table of Contents WORK LOADS PROTECTED... 1 DEPLOYMENT STEPS... 1 PREREQUISITES...2 LIMITATIONS... 3 SET UP AZURE... 4
Using VMware vsphere Replication. vsphere Replication 6.5
 Using VMware vsphere Replication 6.5 You can find the most up-to-date technical documentation on the VMware website at: https://docs.vmware.com/ If you have comments about this documentation, submit your
McAfee Endpoint Security for Servers Product Guide
 McAfee Endpoint Security for Servers 5.2.0 Product Guide COPYRIGHT Copyright 2018 McAfee, LLC TRADEMARK ATTRIBUTIONS McAfee and the McAfee logo, McAfee Active Protection, epolicy Orchestrator, McAfee epo,
McAfee Network Security Platform 9.1
 9.1.7.49-9.1.3.6 Manager-M-series, Mxx30-series, XC Cluster Release Notes McAfee Network Security Platform 9.1 Revision C Contents About the release New features Enhancements Resolved issues Installation
VMware Mirage Getting Started Guide
 Mirage 5.0 This document supports the version of each product listed and supports all subsequent versions until the document is replaced by a new edition. To check for more recent editions of this document,
CounterACT VMware vsphere Plugin
 CounterACT VMware vsphere Plugin Configuration Guide Version 2.0.0 Table of Contents About VMware vsphere Integration... 4 Use Cases... 4 Additional VMware Documentation... 4 About this Plugin... 5 What
21CTL Disaster Recovery, Workload Mobility and Infrastructure as a Service Proposal. By Adeyemi Ademola E. Cloud Engineer
 21CTL Disaster Recovery, Workload Mobility and Infrastructure as a Service Proposal By Adeyemi Ademola E. Cloud Engineer 1 Contents Introduction... 5 1.2 Document Purpose and Scope...5 Service Definition...
Install ISE on a VMware Virtual Machine
 Supported VMware Versions, page 1 Support for VMware vmotion, page 1 Support for Open Virtualization Format, page 2 Virtual Machine Requirements, page 3 Virtual Machine Resource and Performance Checks,
Data Protection Guide
 SnapCenter Software 4.1 Data Protection Guide For VMs and Datastores using the SnapCenter Plug-in for VMware vsphere September 2018 215-13399_B0 doccomments@netapp.com Table of Contents 3 Contents Deciding
Trend Micro deep security 9.6
 datasheet Trend Micro deep security 9.6 Comprehensive security platform for physical, virtual, and cloud servers Virtualization has already transformed the data center and now, organizations are moving
vrealize Operations Management Pack for NSX for vsphere 3.0
 vrealize Operations Management Pack for NSX for vsphere 3.0 This document supports the version of each product listed and supports all subsequent versions until the document is replaced by a new edition.
vsphere Security Update 1 Modified 03 NOV 2017 VMware vsphere 6.5 VMware ESXi 6.5 vcenter Server 6.5
 Update 1 Modified 03 NOV 2017 VMware vsphere 6.5 VMware ESXi 6.5 vcenter Server 6.5 You can find the most up-to-date technical documentation on the VMware website at: https://docs.vmware.com/ If you have