SI-18 Series. User Manual November V2
|
|
|
- Wilfred Snow
- 5 years ago
- Views:
Transcription

1 SI-18 Series User Manual November V2
2 Copyright 2011 All Rights Reserved. No part of this manual, including the products and software described in it, may be reproduced, transmitted, transcribed, stored in a retrieval system, or translated into any language in any form or by any means, except documentation kept by the purchaser for backup purposes, without the express written permission of the owner. Products and corporate names mentioned in this manual may or may not be registered trademarks or copyrights of their respective companies, and are used for identification purposes only. All trademarks are the property of their respective owners. Every effort has been made to ensure that the contents of this manual are correct and up to date. However, the manufacturer makes no guarantee regarding the accuracy of its contents, and reserves the right to make changes without prior notice. 2
3 Table of Contents Safety Information... 5 Acknowledgments... 6 Accessories... 8 Components... 9 I/O View... 9 Specification Mounting SI-18 to the Wall Wall mounting requirements Selecting the location Exploded view of the SI-18 assembly Parts description Installation Installing WLAN antenna (Optional) Installing the memory Setting Jumper Pin Definition BIOS Setup BIOS Introduction BIOS Setup Main BIOS Setup Advanced Settings Chipset Settings Boot Settings Security Settings Save & Exit Settings Driver Installation AMD A55E Chipset Family Graphic Driver Installation
4 Realtek High Definition Audio Driver Installation Realtek LAN Controller Drivers Installation Appendix
5 Safety Information Your SI-18 is designed and tested to meet the latest standards of safety for information technology equipment. However, to ensure your safety, it is important that you read the following safety instructions. Setting up your system Read and follow all instructions in the documentation before you operate your system. Do not use this product near water. Set up the system on a stable surface. Do not secure the system on any unstable plane. Do not place this product on an unstable cart, stand, or table. The product may fall, causing serious damage to the product. Slots and openings on the chassis are for ventilation. Do not block or cover these openings. Make sure you leave plenty of space around the system for ventilation. Never insert objects of any kind into the ventilation openings. This system should be operated from the type of power indicated on the marking label. If you are not sure of the type of power available, consult your dealer or local power company. Use this product in environments with ambient temperatures between 0 C and 45 C. If you use an extension cord, make sure that the total ampere rating of the devices plugged into the extension cord does not exceed its ampere rating. DO NOT LEAVE THIS EQUIPMENT IN AN ENVIRONMENT WHERE THESTORAGE TEMPERATURE MAY GO BELOW -20 C (-4 F) OR ABOVE 80 C (176 F). THIS COULD DAMAGE THE EQUIPMENT. THE EQUIPMENT SHOULD BE IN A CONTROLLED ENVIRONMENT. Care during use Do not walk on the power cord or allow anything to rest on it. Do not spill water or any other liquids on your system. When the system is turned off, a small amount of electrical current still flows. Always unplug all power, and network cables from the power outlets before cleaning the system. If you encounter the following technical problems with the product, unplug the power cord and contact a qualified service technician or your retailer. The power cord or plug is damaged. 5
6 Liquid has been spilled into the system. The system does not function properly even if you follow the operating instructions. The system was dropped or the cabinet is damaged. CAUTION: Danger of explosion if battery is incorrectly replaced. Replace only with the same or equivalent type recommended by the manufacturer. Dispose of used batteries according to the manufacturer s instructions. The warranty does not apply to the products that have been disassembled by users 6
7 Acknowledgments AMI is a registered trademark of AMI Software International, Inc. AMD and ATI are registered trademarks of AMD Corporation. Microsoft Windows is a registered trademark of Microsoft Corporation. FINTEK is a registered trademark of FINTEK Electronics Corporation. REALTEK is a registered trademark of REALTEK Electronics Corporation. All other product names or trademarks are properties of their respective owners. 7
8 Accessories a. Power Cord x 1 b. Driver CD x 1 c. Power Brick x 1 8
 port supports a high quality VGA-compatible device such as a monitor or projector to allow viewing on a larger external display.")
9 Component s I/O View Refer to the diagram below to identify the components on this side of the system. DVI The Digital Visual Interface (DVI) port supports a high quality VGA-compatible device such as a monitor or projector to allow viewing on a larger external display. LAN The eight-pin RJ-45 LAN port supports a standard Ethernet cable for connection to a local network. COM Communication or serial port is compatible with RS-232 interface without RI (ring indicator) signal. USB The USB (Universal Serial Bus) port is compatible with USB devices such as keyboards, mouse devices, cameras, and hard disk drives. USB allows many devices to run simultaneously on a single computer, with some peripheral acting as additional plug-in sites or hubs. AUDIO The stereo audio jack (3.5mm) is used to connect the system s audio out signal to amplified speakers or headphones. DC-IN The supplied power adapter converts AC power to DC power for use with this jack. Power supplied through this jack supplies power to the system. T o prevent damage to the system, always use the supplied power adapter. 9
10 Specification System Mainboard EB-900 Construction SGCC 1.0t Chassis Color Black / White Storage GB SATA HDD x 1 Mounting Wall mount Dimensions 125.5(W) x 36(H) x 125.5(D)mm (4.94 x 1.41 x 4.94 ) Power Supply 60W DC adapter Operating Temperature 0 C ~ 45 C (32 F ~ 113 F) Storage Temperature -20 C ~ 80 C Relative Humidity C (non-condensing) Vibration HDD: 0.25 Grms/5~500Hz random operation Shock HDD: 15 Grms peak acceleration (11 msec duration) RoHS Available This specification is subject to change without prior notice. 10
11 Mounting SI-18 to the Wall You can install SI-18 on plastic (LCD monitor), wood, drywall surface over studs, or a solid concrete or metal plane directly. Ensure the installer uses at least four M3 length 6mm screws to secure the system on wall. Six M3 length 6mm screws are recommended to secure the system on wall. Fasteners are not included with the unit, and must be supplied by the installer. The types of fasteners required are dependent on the type of wall construction. Choose fasteners that are rated either Medium Duty or Heavy Duty. To assure proper fastener selection and installation, follow the fastener manufacturer s recommendations. Wall mounting requirements Note: Before mounting the system on wall, ensure that you are following all applicable building and electric codes. When mounting, ensure that you have enough room for power and signal cable routing. And have good ventilation for power adapter. The method of mounting must be able to support weight of the SI-18 plus the suspend weight of all the cables to be attached to the system. Use the following methods for mounting your system: 11
12 Mounting to hollow walls Method 1: Wood surface A minimum wood thickness 38mm (1.5in.) by 25.4 cm (10in.) of high, construction grade wood is recommended. Note: This method provides the most reliable attachment of the unit with little risk that the unit will come loose or require ongoing maintenance. Method 2: Drywall walls - Drywall over wood studs is acceptable. Mounting to a solid concrete or brick wall - Mounts on a flat smooth surface. Selecting the location Plan the mounting location thoroughly. Locations such as walkway areas, hallways, and crowded areas are not recommended. Mount the unit to a flat, sturdy, structurally sound column or wall surface. The best mounting surface is a standard countertop, cabinet, table, or other structure that is minimally the width and length of the unit. This recommendation reduces the risk that someone may accidentally walk into and damage the device. Local laws governing the safety of individuals might require this type of consideration. 12
13 Exploded view of the SI-18 assembly Parts description Part NO. Description Part NO. Description 1 HDD 2 HDD bracket 3 EB900 4 FAN Set 5 FAN bracket 6 Heatsink 7 FAN Dock 8 Bottom Chassis / Mounting 9 Chassis Body I/O 10 Chassis Body 11 Top cover 13
14 Installation Installing WLAN antenna (Optional) SI-18 reserved one SMA connector hole for WLAN (wireless LAN) antenna connection on I/O side. It means you can only use one antenna solution WLAN card. For n solution, you can only have up to 150Mbit/s performance. You can have WLAN feature by purchase WLAN set from your sales representative. And follow below procedure to install the WLAN feature by yourself. Before you start to install WLAN antenna and card please: - Complete remove DC power source from SI Please ensure you have good ESD protection environment and if possible please wear ESD protection equipment and have well grounding connection. 1. Upside-down SI-18 and let bottom side face to you. 2. Remove all M3 screw of bottom chassis (12 pieces) with properly screw driver from point A. A A A A 3. Rotating SI-18 to let bottom side face to your body. 4. Using screw driver to pinch out the knock-out metal-plate of SMA antenna hole from point B. To avoid the metal fall in system, please pinch out the metal-cover with same direction as the figure below. 14

15 B 5. Hold WLAN antenna SMA head carefully and through the hole on I/O wall. Beware the direction of SMA head with the hole, there only has one direction can pass through the antenna hole. And there has one washer shall be put on head before through into the hole, point C. C 6. Fit on antenna washer then hex nut on SMA connector and use hex socket driver or plier to tie the nut to ensure the SMA connector secure on I/O wall. 15
16 7. Install your WLAN card on mini-pcie connector and use the screw provided by WLAN card to secure WLAN card in position on point D. D D 8. Wiring the IPX connector on WLAN card and manage your internal antenna 16
17 cable routing. 9. Screw bottom chassis back to system with 8 screws where disassembled by procedure 2 in above. 17
18 Installing the memory The motherboard supports two DDR3 memory socket for a maximum total memory of 4GB in DDR3 memory type. Installing and Removing Memory Module (CN1) To install the DDR3 modules, locate the memory slot on the board and perform the following steps: 1. Hold the DDR3 module so that the key of the DDR3 module align with those on the memory slot. 2. Gently push the DDR3 module in SOCKET position until the clips of the slot close to hold the DDR3 module in place when the DDR3 module touches the bottom of the slot. 3. To remove the DDR3 module, press the clips with both hands. 18
19 Setting Jumper Jumpers are used on the motherboard to select various settings and features according to your needs and applications. Contact your supplier if you have doubts about the best configuration for your needs. The following lists the connectors and their respective functions. Jumper Locations JP1: Clear CMOS Setting JP1 Setting Normal Clear CMOS 19

20 JP2: LCD Panel Power Selection JP2 LCD Panel Power 3.3V 5V JP6: COM1 RS232 +5V/+12V Power Setting JP6 Setting Function Pin 1-2 Short/Closed Pin 3-4 Short/Closed Pin 5-6 Short/Closed +12V Normal +5V Pin Definition 20
21 BIOS Setup This chapter describes the different settings available in the AMI BIOS that comes with the board. BIOS Introduction The BIOS (Basic Input/Output System) installed in your computer system s ROM supports Intel processors. The BIOS provides critical low-level support for a standard device such as disk drives, serial ports and parallel ports. It also password protection as well as special support for detailed fine-tuning of the chipset controlling the entire system. BIOS Setup The BIOS provides a Setup utility program for specifying the system configurations and settings. The BIOS ROM of the system stores the Setup utility. When you turn on the computer, the BIOS are immediately activated. Pressing the <Del> key immediately allows you to enter the Setup utility. If you are a little bit late pressing the <Del> key, POST (Power On Self-Test) will continue with its test routines, thus preventing you from invoking the Setup. If you still wish to enter Setup, restart the system by pressing the Reset button or simultaneously pressing the <Ctrl>, <Alt> and <Delete> keys. You can also restart by turning the system Off and back On again. The following message will appear on the screen: Press <DEL> to Enter Setup In general, you press the arrow keys to highlight items, <Enter> to select, the <PgUp> and <PgDn> keys to change entries, <F1> for help and <Esc> to quit. When you enter the Setup utility, the Main Menu screen will appear on the screen. The Main Menu allows you to select from various setup functions and exit choices. 21
22 Main BIOS Setup This setup allows you to record some basic hardware configurations in your computer system and set the system clock. Note: If the system cannot boot after making and saving system changes with Setup, the AMI BIOS supports an override to the CMOS settings that resets your system to its default. Warning: It is strongly recommended that you avoid making any changes to the chipset defaults. These defaults have been carefully chosen by both AMI and your system manufacturer to provide the absolute maximum performance and reliability. Changing the defaults could cause the system to become unstable and crash in some cases. System Language Choose the system default language. System Date Set the Date. Use Tab to switch between Data elements. 22
23 System Time Set the Time. Use Tab to switch between Time elements. 23
24 Advanced Settings This section allows you to configure and improve your system and allows you to set up some system features according to your preference. Launch PXE OpROM Enable or Disable Boot Option for Legacy Network Devices. Launch Storage OpROM Enable or Disable Boot Option for Legacy Mass Storage Devices with Option ROM. 24
25 PCI Subsystem Settings This section allows you to configure the PCI, PCI-X and PCI Express settings. PCIE Configuration The fields under PCIE Configuration features settings for Primary Dual Slot Config, GPP Slots Power Limit, GFX ports, GPPs and NB-SB port features. Internal Graphics Mode The settings for IB828 are Disabled and UMA; while the IB828 has additional settings of Sideport and UMA+sideport. Init Display First The default setting is IGX. NB Power Management The default setting is Auto. 25
26 Memory Hole At 15M-16M In order to improve performance, certain space in memory can be reserved for ISA cards. This memory must be mapped into the memory space below 16 MB. The choices are Enabled and Disabled. System BIOS Cacheable The setting of Enabled allows caching of the system BIOS ROM at F000h-FFFFFh, resulting in better system performance. However, if any program writes to this memory area, a system error may result. PCI ROM Priority In case of multiple Option ROMs (Legacy and EFI Compatible), specifies what PCI Option ROM to launch. PCI Latency Timer Value to be programmed into PCI Latency Timer Register. VGA Palette Snoop Enables or Disables VGA Palette Registers Snooping. PERR# Generation Enables or Disables PCI Device to Generate PERR#. SERR# Generation Enables or Disables PCI Device to Generate SERR#. Relaxed Ordering Enables or Disables PCI Express Device Relaxed Ordering. Extended Tag If ENABLED allows Device to use 8-bit Tag field as a requester. No Snoop Enables or Disables PCI Express Device No Snoop option. Maximum Payload Set Maximum Payload of PCI Express Device or allow System BIOS to select the value. 26
27 Maximum Read Request Launches (Enabled/Disabled) the boot option for legacy network devices. PCI Express Link Settings Set Maximum Read Request Size of PCI Express Device or allow System BIOS to select the value. ASPM Support Set the ASPM Level: Force L0 Force all links to L0 State AUTO BIOS auto configure DISABLE Disables ASPM Extended Synch If ENABLED allows generation of Extended Synchronization patterns. ACPI Settings This section configures the system ACPI parameters. Enabled ACPI Auto Configuration Enables or Disables BIOS ACPI Auto Configuration. Enable Hibernation Enables or Disables System ability to Hibernate (OS/S4 Sleep State). This option may be not effective with some OS. ACPI Sleep State Select the highest ACPI sleep state the system will enter, when the SUSPEND button is pressed. 27
28 Lock legacy Resources Enabled or Disabled Lock of Legacy Resources S3 Video Repost Enabled or Disabled S3 Video Repost. 28
29 CPU Configuration This section shows the CPU configuration parameters. Limit CPUID Maximum Disabled for Windows XP. PSS Support Enabled /disabled the generation of ACPI_PPC, and _PCT objects. PSTATE Adjustment Provide to adjust startup P-state level. PPC adjustment Provide to adjust_ppc object. NX Mode Enabled/disabled NO-execute page protection Function. SVM Mode Enabled/disabled CPU Virtualization. 29
30 C6 Mode Enabled/disabled C6. Node 0 Information View Memory Information related to Node 0. 30
31 Auto Power On Schedule This section setups the power on time for the system. Schedule Slot 1 Setup the hou/minute for sytem power on. Schedule Slot 2 Setup the hou/minute for sytem power on.. IDE Configuration This section shows the IDE devices configuration. Serial-ATA Controller Enable / Disable Serial ATA Controller. 31
32 USB Configuration Legacy USB Support Enables Legacy USB support. AUTO option disables legacy support if no USB devices are connected. DISABLE option will keep USB devices available only for EFI applications. EHCI Hand-off Enabled/Disabled. This is a workaround for Oses without EHCI hand-off support. The EHCI ownership change should be claimed by EHCI driver. USB transfer time-out The time-out value for Control, Bulk, and Interrupt transfers. Device reset time-out USB mass storage device Start Unit command time-out. Device power-up delay Maximum time the device will take before it properly reports itself to the Host Controller. Auto users default value: for a Root port it is 100ms, for a Hub port the delay is taken from Hub descriptor. 32
33 Super IO Configuration Serial Port 0/1 Configuration Set Parameters of Serial Port 0/1 (COMA/COMB) Power Failure The options: Keep last state, By pass mode, Always on, and Always off. H/W Monitor Temperatures/Voltages The values are read-only values as monitored by the system and show the PC health status. 33
34 CPU Shutdown Temperature Aside from the Disabled options, this field allows the setting of shutdown temperature from 70C to 95C. 34
35 Chipset Settings This section allows you to configure and improve your system and allows you to set up some system features according to your preference. North Bridge This item shows the North Bridge Parameters. North Bridge LVDS Config Select This item shows the Specify INT15 options for LVDS South Bridge This item shows the South Bridge Parameters. 35
36 North Bridge This section allows you to configure the North Bridge Chipset. IOMMU Mode IOMMU is supported on LINUX based systems to convert 32bit I/O to 64bit MMIO. Memory Clock This option allows user to select different memory clock. 36
37 GFX Configuration PSPP Policy PCIe speed power policy. Memory Configuration Integrated Graphics Enable Integrate Graphics controller. Node 0 Information View memory information related to Node 0. 37
38 North Bridge LVDS Config Select South Bridge This section allows you to configure the South Bridge Chipset. 38
39 SB SATA Configuration OnChip SATA Type Native IDE / n RAID / n AHCI / n AHCI / n Legacy IDE / n IDE->AHCI / n HyperFlash 39
40 SB USB Configuration SB GPP Port Configuration 40
41 SB HD Azalia Configuration Boot Settings This section allows you to configure the boot settings according to your preference. Setup Prompt Timeout Number of seconds to wait for setup activation key (0xFFFF) means indefinite waiting. Bootup NumLock State Select the keyboard NumLock state. 41

42 Quiet Boot Enables/Disables Quiet Boot option. GateA20 Active UPON REQUEST GA20 can be disabled using BIOS services. ALWAYS do not allow disabling GA20; this option is useful when any RT code is executed above 1MB. Option ROM Messages Set display mode for Option ROM. Options are Force BIOS and Keep Current. Interrupt 19 Canture Enable: Allows Option ROMs to trap Int 19. UEFI Option Priorities Enables/Disables UEFI boot from disks. Security Settings Administrator Password Set Setup Administrator Password. User Password Set User Password. 42
43 Save & Exit Settings Save Changes and Exit Exit system setup after saving the changes. Disacard Changes and Exit Exit system setup without saving any changes. Save Changes and Reset Reset the system after saving the changes. Discard Changes and Reset Reset system setup without saving any changes. Save Changes Save Changes done so far to any of the setup options. Discard Changes Discard Changes done so far to any of the setup options. 43
44 Restore Defaults Restore/Load Defaults values for all the setup options. Save as User Defaults Save the changes done so far as User Defaults. Restore User Defaults Restore the User Defaults to all the setup options. Boot Override Pressing ENTER causes the system to enter the OS. Launch EFI Shell from filesystem device Attempts to launch EFI Shell application (Shellx64.efi) from one of the available filesystem devices. 44
45 Driver Installation This section describes the installation procedures for software and drivers. The software and drivers are included with the motherboard. If you find the items missing, please contact the vendor where you made the purchase. 45

46 AMD A55E Chipset Family Graphic Driver Installation Follow the steps below to install the AMD A55E chipset family graphics drivers. 1. Insert the CD that comes with the system. Click AMD, then AMD A55E Chipset Drivers, and then AMD A55E Series Graphics Drivers. 46

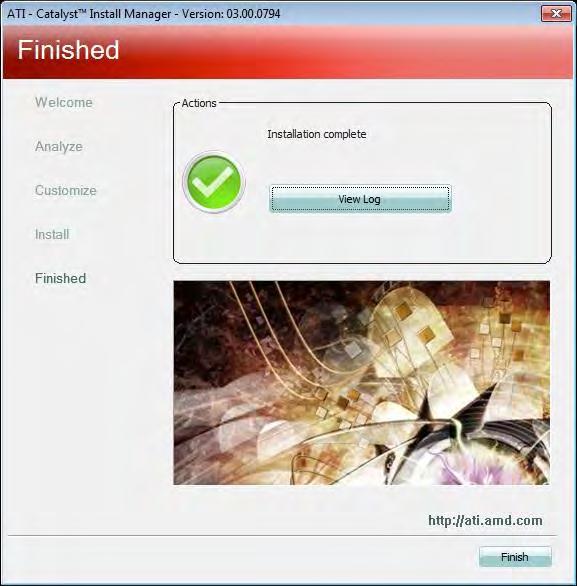
47 2. When the welcome screen to the ATI Catalyst Install Manager appears, click Next. Now, click Install to allow the installation of the software components. 47

48 3. Select Express and click Next to proceed with the installation. On the following screen, click Finish to complete the installation process. 48
49 49
50 Realtek High Definition Audio Driver Installation Follow the steps below to install the Realtek HD audio drivers. 1. Insert the CD that comes with the system. Click AMD and click Realtek High Definition Audio Driver. 50


51 2. When the welcome screen to the Audio Driver Setup appears, click Next to start the software installation. Once the InstallShield Wizard is complete, click Finish to restart the computer. 51
52 Realtek LAN Controller Drivers Installation Follow the steps below to install the Realtek LAN drivers. 1. Insert the CD that comes with the system. Click Intel, then LAN Card, and then Realtek Lan Controller Drivers.. 2. Click Realtek RTL8111E LAN Drivers. 52


53 3. When the Welcome screen of the InstallShield Wizard appears, click Next to continue. 4. When the InstallShieldWizard has finished installing the Realtek LAN drivers, click Finish. 53
54 Appendix ~This page is intentionally left blank~ 54
SI-18 Series. User Manual
 SI-18 Series User Manual Revision Release Date V0.1 2011/11/15 V0.2 2014/09/23 Copyright 2011 IBASE Technology INC. All Rights Reserved. No part of this manual, including the products and software described
AMI200 Series User Manual
 AMI200 Series User Manual 2012 August V4.0 Copyright 2010 IBASE Technology INC. All Rights Reserved. No part of this manual, including the products and software described in it, may be reproduced, transmitted,
iops-18 User Manual 2013 Oct V1 IBASE Technology Inc.
 www.ibase.com.tw iops-18 User Manual 2013 Oct V1 IBASE Technology Inc. iops-18 User Manual 1 Copyright 2013 IBASE Technology Inc. All Rights Reserved. No part of this manual, including the products and
SI-22 Series. User Manual V1.1
 SI-22 Series User Manual V1.1 Tel. (514) 832-0808 Fax. (514) 832-0128 Toll Free: 1 (866) 590-4288 Email: info@ibt.ca Web: www.ibt.ca Copyright 2013 All Rights Reserved. No part of this manual, including
AMS Series. Fanless System
 AMS100-807 Series Fanless System User s Manual Version 1.0 Table of Contents Chapter 1 Specifications... 3 Chapter 2 AMS100-807 Series Features... 4 Chapter 3 System Dimensions... 5 Chapter 4 Opening the
ZOTAC ZBOX User s Manual
 ZOTAC ZBOX User s Manual No part of this manual, including the products and software described in it, may be reproduced, transmitted, transcribed, stored in a retrieval system, or translated into any language
SI-32-N Series User Manual
 SI-32-N Series User Manual ii Revision Release Date V0.1 2014/09/01 iii IBASE Technology Inc. Copyright 2013 IBASE Technology Inc. All Rights Reserved. No part of this manual, including the products and
ZOTAC ZBOX User s Manual
 ZOTAC ZBOX User s Manual No part of this manual, including the products and software described in it, may be reproduced, transmitted, transcribed, stored in a retrieval system, or translated into any language
ZOTAC ZBOX. User s Manual
 User s Manual ZOTAC ZBOX No part of this manual, including the products and software described in it, may be reproduced, transmitted, transcribed, stored in a retrieval system, or translated into any language
291-MB333-04P7F EN1070K
 291-MB333-04P7F EN1070K User s Manual ZOTAC ZBOX No part of this manual, including the products and software described in it, may be reproduced, transmitted, transcribed, stored in a retrieval system,
ZOTAC ZBOX. User s Manual
 User s Manual ZOTAC ZBOX No part of this manual, including the products and software described in it, may be reproduced, transmitted, transcribed, stored in a retrieval system, or translated into any language
ZOTAC ZBOX User s Manual
 User s Manual No part of this manual, including the products and software described in it, may be reproduced, transmitted, transcribed, stored in a retrieval system, or translated into any language in
SI-28 Series User Manual
 SI-28 Series User Manual 2011 November V1 Copyright 2011 IBASE Technology INC. All Rights Reserved. No part of this manual, including the products and software described in it, may be reproduced, transmitted,
Manual AMS ibase
 Manual AMS100-807 ibase Our company network supports you worldwide with offices in Germany, Austria, Switzerland, Great Britain and the USA. For more information please contact: FORTEC Elektronik AG Hauptniederlassung
QK5P1000-Manual_Cover-135x135mm_PrintReady.eps 1 2/7/ :52:09 AM CMY 291-MB384-01S4F
 QK5P1000-Manual_Cover-135x135mm_PrintReady.eps 1 2/7/2018 11:52:09 AM C M Y CM MY CY CMY K 291-MB384-01S4F User s Manual No part of this manual, including the products and software described in it, may
ZOTAC ZBOX nano. User s Manual
 User s Manual ZOTAC ZBOX nano No part of this manual, including the products and software described in it, may be reproduced, transmitted, transcribed, stored in a retrieval system, or translated into
ZOTAC VR GO 2.0. User s Manual
 User s Manual No part of this manual, including the products and software described in it, may be reproduced, transmitted, transcribed, stored in a retrieval system, or translated into any language in
ZOTAC ZBOX. User s Manual
 User s Manual No part of this manual, including the products and software described in it, may be reproduced, transmitted, transcribed, stored in a retrieval system, or translated into any language in
ZOTAC ZBOX User s Manual
 ZOTAC ZBOX User s Manual No part of this manual, including the products and software described in it, may be reproduced, transmitted, transcribed, stored in a retrieval system, or translated into any language
ZOTAC ZBOX User s Manual
 ZOTAC ZBOX User s Manual No part of this manual, including the products and software described in it, may be reproduced, transmitted, transcribed, stored in a retrieval system, or translated into any language
ZOTAC VR GO. User s Manual
 User s Manual ZOTAC VR GO No part of this manual, including the products and software described in it, may be reproduced, transmitted, transcribed, stored in a retrieval system, or translated into any
BYARM-181-PC. User Manual
 www.ibase.com.tw BYARM-8-PC User Manual IBASE Technology Inc. BYARM-8-PC User Manual 2 Revision Release Date V0. 205/02/03 Copyright 203 IBASE Technology Inc. All Rights Reserved. 2 BYARM-8-PC User Manual
ZOTAC ZBOX. User s Manual
 User s Manual ZOTAC ZBOX No part of this manual, including the products and software described in it, may be reproduced, transmitted, transcribed, stored in a retrieval system, or translated into any language
EVO-TP Hardware System
 User Manual Revision v1.3 February 2010 EVO-TP Hardware System Copyright 2009 February All Rights Reserved Manual Version 1.1 Part Number: The information contained in this document is subject to change
ZOTAC ZBOX User s Manual
 User s Manual No part of this manual, including the products and software described in it, may be reproduced, transmitted, transcribed, stored in a retrieval system, or translated into any language in
ZOTAC ZBOX nano. User s Manual
 User s Manual ZOTAC ZBOX nano No part of this manual, including the products and software described in it, may be reproduced, transmitted, transcribed, stored in a retrieval system, or translated into
Handbuch. DAVIDE Mini PC GRAFENTHAL
 Handbuch GRAFENTHAL DAVIDE Mini PC GRAFENTHAL GmbH von-monschaw-straße 3 47574 Goch info@grafenthal.de www.grafenthal.de Copyright 2017 GRAFENTHAL GmbH, Alle Rechte vorbehalten. GRAFENTHAL ist eine eingetragene
ZOTAC ZBOX nano. User s Manual
 User s Manual ZOTAC ZBOX nano No part of this manual, including the products and software described in it, may be reproduced, transmitted, transcribed, stored in a retrieval system, or translated into
ZOTAC ZBOX nano User s Manual
 ZOTAC ZBOX nano User s Manual No part of this manual, including the products and software described in it, may be reproduced, transmitted, transcribed, stored in a retrieval system, or translated into
TA990FXE UEFI BIOS Manual
 UEFI BIOS Setup... 1 1 Main Menu... 3 2 Advanced Menu... 4 3 Chipset Menu... 15 4 Boot Menu... 21 5 Security Menu... 23 6 O.N.E Menu... 24 7 Exit Menu... 33 i UEFI BIOS Setup Introduction The purpose of
Waterproof Industrial Touch Panel PC PLXX-IPCR USER MANUAL
 Waterproof Industrial Touch Panel PC PLXX-IPCR USER MANUAL CONTENTS Package Contents 02 Safety Instructions 03 FCC & CE Statement 04 Introduction 05 Features 06 Motherboard Specification 07 System Specification
SI-12 Series. User Manual
 www.ibase.com.tw SI-12 Series User Manual IBASE Technology Inc. 2 Revision Release Date V0.1 2014/06/20 V0.2 2014/09/23 Copyright 2013 IBASE Technology Inc. All Rights Reserved. 2 1 Copyright 2013 IBASE
BIOS User Guide RACING P1A
 BIOS User Guide RACING P1A BIOS Update... 2 UEFI BIOS Setup... 6 1. Main Menu... 7 2. Advanced Menu... 8 3. Chipset Menu...14 4. Security Menu...20 5. Boot Menu...23 6. Exit Menu...25 BIOS Update The BIOS
291-MB309-02N6F. PI331 pico
 291-MB309-02N6F PI331 pico ZOTAC ZBOX pico User s Manual No part of this manual, including the products and software described in it, may be reproduced, transmitted, transcribed, stored in a retrieval
ZOTAC ZBOX User s Manual
 ZOTAC ZBOX User s Manual No part of this manual, including the products and software described in it, may be reproduced, transmitted, transcribed, stored in a retrieval system, or translated into any language
ZOTAC ZBOX User s Manual
 ZOTAC ZBOX User s Manual No part of this manual, including the products and software described in it, may be reproduced, transmitted, transcribed, stored in a retrieval system, or translated into any language
UEFI BIOS Setup Main Menu Advanced Menu Chipset Menu Boot Menu Security Menu Performance Menu...
 UEFI BIOS Setup... 1 1 Main Menu... 3 2 Advanced Menu... 4 3 Chipset Menu... 16 4 Boot Menu... 20 5 Security Menu... 24 6 Performance Menu... 26 7 Exit Menu... 31 i UEFI BIOS Setup Introduction The purpose
ZOTAC ZBOX nano User s Manual
 ZOTAC ZBOX nano User s Manual No part of this manual, including the products and software described in it, may be reproduced, transmitted, transcribed, stored in a retrieval system, or translated into
Waterproof Industrial Touch Panel PC. WP-GN Series User Manual
 Waterproof Industrial Touch Panel PC WP-GN Series User Manual Content Package Contents.%%%%%%%%%%%%%%%%%%%%%%%%%%...%%%%%%%. 02 Safety Instructions %%%%%%%%%%%%%%%%%%%%%%%%%%%%%..%%%%%. 03 FCC & CE Statement
ZP-PI335GK-BT User s Manual
 291-MB387-02ZTF ZP-PI335GK-BT User s Manual No part of this manual, including the products and software described in it, may be reproduced, transmitted, transcribed, stored in a retrieval system, or translated
SI-38 Series. User Manual
 SI-38 Series User Manual Revision Release Date V0.1 2012/07/30 V0.2 2014/09/23 Copyright 2012 IBASE Technology INC. All Rights Reserved. No part of this manual, including the products and software described
291-MB309-03M8F. PI330 pico
 291-MB309-03M8F PI330 pico ZOTAC ZBOX pico User s Manual No part of this manual, including the products and software described in it, may be reproduced, transmitted, transcribed, stored in a retrieval
ZOTAC ZBOX nano User s Manual
 ZOTAC ZBOX nano User s Manual No part of this manual, including the products and software described in it, may be reproduced, transmitted, transcribed, stored in a retrieval system, or translated into
ZOTAC ZBOX User s Manual
 ZOTAC ZBOX User s Manual No part of this manual, including the products and software described in it, may be reproduced, transmitted, transcribed, stored in a retrieval system, or translated into any language
SI-58 Series User Manual
 SI-58 Series User Manual 2012 Jun V1 Copyright 2012 IBASE Technology INC. All Rights Reserved. No part of this manual, including the products and software described in it, may be reproduced, transmitted,
ZOTAC ZBOX. User s Manual
 User s Manual ZOTAC ZBOX No part of this manual, including the products and software described in it, may be reproduced, transmitted, transcribed, stored in a retrieval system, or translated into any language
Note: The configurations and factory defaults described here are for VL-EPIC-25 BIOS version 1.02.
 EPIC-25 BIOS Setup - Part 1 This article and VT1704 - EPIC-25 BIOS Setup - Part 2 provide reference information and tips for setting BIOS Setup parameters on the VL-EPIC-25 (Iguana). Start BIOS Setup by
ZOTAC ZBOX nano User s Manual
 ZOTAC ZBOX nano User s Manual No part of this manual, including the products and software described in it, may be reproduced, transmitted, transcribed, stored in a retrieval system, or translated into
ZOTAC ZBOX pico. User s Manual
 291-MB307-04Q3F ZOTAC ZBOX pico User s Manual No part of this manual, including the products and software described in it, may be reproduced, transmitted, transcribed, stored in a retrieval system, or
NanoPC User s Manual
 NanoPC User s Manual Trademark: All trademarks are the property of their respective owners. Version: Symbol description: CAUTION User s Manual V1.0 for NanoPC. Note: Refers to important information that
EVO-TM2A EVO-TM2B Touch Screen Monitor
 User Manual Revision v1.3 Dec. 2010 EVO-TM2A EVO-TM2B Touch Screen Monitor Copyright 2010 August All Rights Reserved Manual Version 1.3 Part Number: The information contained in this document is subject
Thank you for selecting UTC RETAIL s innovative Model 1170 Point of Sale solution!
 1170 POS SYSTEM 1170 USER GUIDE Thank you for selecting UTC RETAIL s innovative Model 1170 Point of Sale solution! This guide is designed to acquaint you with the features and functionality of the 1170
VT Falcon (VL-EPU-2610) BIOS Setup
 BIOS Setup") VT-1710 - Falcon (VL-EPU-2610) BIOS Setup This article provides reference information and tips for setting BIOS Setup parameters on the VL-EPU-2610 (Falcon). Start BIOS Setup by pressing Delete or F2 after
VT-1710 - Falcon (VL-EPU-2610) BIOS Setup This article provides reference information and tips for setting BIOS Setup parameters on the VL-EPU-2610 (Falcon). Start BIOS Setup by pressing Delete or F2 after
BIOS User Guide B350ET2
 BIOS User Guide B350ET2 BIOS Update... 2 UEFI BIOS Setup... 6 1. Main Menu... 7 2. Advanced Menu... 8 3. Chipset Menu...22 4. Boot Menu...26 5. Security Menu...28 6. O.N.E Menu...30 7. Exit Menu...34 BIOS
Version 1.0 Revision Date: August.16, Embedded System User s Manual ROC114A. Rock Box, Fanless Embedded System User s Manual.
 Version 1.0 Revision Date: August.16, 2012 Embedded System User s Manual ROC114A Rock Box, Fanless Embedded System User s Manual Safety information Electrical safety To prevent electrical shock hazard,
User s Manual. Sapphire Pure White Fusion E350. AMD E350 Series Mainboard
 User s Manual Sapphire Pure White Fusion E350 AMD E350 Series Mainboard TRADEMARK All products and company names are trademarks or registered trademarks of their respective holders. These specifications
ZOTAC ZBOX Giga User s Manual
 ZOTAC ZBOX Giga User s Manual No part of this manual, including the products and software described in it, may be reproduced, transmitted, transcribed, stored in a retrieval system, or translated into
ZOTAC ZBOX nano User s Manual
 ZOTAC ZBOX nano User s Manual No part of this manual, including the products and software described in it, may be reproduced, transmitted, transcribed, stored in a retrieval system, or translated into
USER MANUAL. VERSION V1.0 March Saturn Plus
 USER MANUAL VERSION V1.0 March 2011 Saturn Plus Copyright 2011 March All Rights Reserved Manual Version 1.0 Part Number: 3LMKKPC70210 ii The information contained in this document is subject to change
NUC BOX 3000/3050/3150. User Manual
 NUC BOX 3000/3050/3150 User Manual Version 1.0 Published September 2015 Important Safety Instructions Pay close attention to the following safety instructions before performing any of the operation. Basic
ZOTAC ZBOX Giga User s Manual
 ZOTAC ZBOX Giga User s Manual No part of this manual, including the products and software described in it, may be reproduced, transmitted, transcribed, stored in a retrieval system, or translated into
Thank you for selecting UTC RETAIL s innovative Model 1170 Point of Sale solution!
 1170 POS SYSTEM 1170 INSTALLATION GUIDE Thank you for selecting UTC RETAIL s innovative Model 1170 Point of Sale solution! This Installation Guide will help you efficiently install the 1170 POS. The document
Colorful Technology Website:
 Colorful Technology Website: http://www.colorful.cn Thanks for purchasing our based on Intel B250 Chipset motherboard. The motherboard C.B250A-BTC PLUS V20 based on Intel B250 Express Chipset, support
NETBOX User s Manual
 NETBOX User s Manual Trademark: All trademarks are the property of their respective owners. Version: User s Manual V1.0 for NETBOX. P/N: 3A2231600-000-G Symbol description: CAUTION! Caution : refers to
NVR-CV. Network Video Recorder Hot-Swappable Tray for 3.5 HDD x 4 or 2.5 HDD x 4 Gigabit Ethernet x 2 COM x 2, USB2.0 x 6. VGA x 1, DVI-D x 1
 Netw ork Video Recorder N V R - CV Network Video Recorder Hot-Swappable Tray for 3.5 HDD x 4 or 2.5 HDD x 4 Gigabit Ethernet x 2 COM x 2, USB2.0 x 6 VGA x 1, DVI-D x 1 Manual 1st Ed. Oct. 2013 Copyright
ZOTAC ZBOX Blu-ray User s Manual
 ZOTAC ZBOX Blu-ray User s Manual No part of this manual, including the products and software described in it, may be reproduced, transmitted, transcribed, stored in a retrieval system, or translated into
UEFI BIOS Setup Main Menu Advanced Menu Chipset Menu Security Menu Boot Menu Performance Menu...
 UEFI BIOS Setup... 1 1 Main Menu... 3 2 Advanced Menu... 4 3 Chipset Menu... 15 4 Security Menu... 18 5 Boot Menu... 21 6 Performance Menu... 22 7 Exit Menu... 24 i UEFI BIOS Setup Introduction The purpose
TPOWER X79 UEFI BIOS Manual
 UEFI BIOS Setup... 1 1 Main Menu... 3 2 Advanced Menu... 4 3 Chipset Menu... 17 4 Boot Menu... 22 5 Security Menu... 24 6 O.N.E Menu... 25 7 Exit Menu... 31 i UEFI BIOS Setup Introduction The purpose of
XPC BIOS User Guide. For the : DS47
 XPC BIOS User Guide For the : DS47 Shuttle XPC Installation Guide 2013 by Shuttle Inc. All Rights Reserved. Copyright No part of this publication may be reproduced, transcribed, stored in a retrieval system,
TEOS Hardware System TEOS 8416 / TEOS 1016/ TEOS1216
 TEOS Hardware System TEOS 8416 / TEOS 1016/ TEOS1216 Revision v1.1 November 2011 Copyright 2009~2011 All Rights Reserved Manual Version 1.1 The information contained in this document is subject to change
MIL-STD Rugged Computer User's Manual. Version 1.0 Revision Date: July. 05, 2017 THOR200. MIL-STD Rugged Computer
 THOR200 MIL-STD Rugged Computer Safety information Electrical safety To prevent electrical shock hazard, disconnect the power cable from the electrical outlet before relocating the system. When adding
CMI212 System Family
 CMI212 System Family Mini-ITX Standard Systems User s Manual Version 1.0 (May 2017) Copyright 2017 IBASE Technology, Inc. All rights reserved. No part of this publication may be reproduced, copied, stored
ZOTAC ZBOX User s Manual
 ZOTAC ZBOX User s Manual No part of this manual, including the products and software described in it, may be reproduced, transmitted, transcribed, stored in a retrieval system, or translated into any language
TZ68A+ UEFI BIOS Manual
 UEFI BIOS Setup... 1 1 Main Menu... 3 2 Advanced Menu... 4 3 PCIPnP Menu... 18 4 Boot Menu... 22 5 Chipset Menu... 25 6 O.N.E Menu... 26 7 Exit Menu... 32 i UEFI BIOS Setup Introduction The purpose of
POS500/505 with B75 M/B Installation Guide Point-of-Sale Hardware System
 POS500/505 with B75 M/B Installation Guide Point-of-Sale Hardware System 48200280 July 2003 V1.0 1. Accessory External Floppy Cable External IDE Cable Power Cord Y Cable(Keyboard & Mouse) Serial Cable
USER MANUAL VERSION V1.0 AUG MiniPOS Hardware System
 USER MANUAL VERSION V1.0 AUG 2010 MiniPOS Hardware System Copyright 2010 August All Rights Reserved Manual Version 1.0 Part Number: 3LMPPA530110 The information contained in this document is subject to
GOT3126T-832. All-in-One 12.1 SVGA TFT Fanless Compact-Size PANEL PC. User s Manual
 GOT3126T-832 All-in-One 12.1 SVGA TFT Fanless Compact-Size PANEL PC User s Manual Disclaimers This manual has been carefully checked and believed to contain accurate information. Axiomtek Co., Ltd. assumes
PTBG965EFN LF. User Manual. English PTBG965EFN LF. Mainboard Manual
 Mainboard Manual 1 Copyright Copyright 2006 FIC (First International Computer) Incorporated All rights reserved. Disclaimer: FIC Inc. shall not be liable for technical or editorial errors or omissions
24.0 Wide Format Panel Mount PC. Models VTPC240P3 / VTPC240PS3
 Solutions for Demanding Applications VARTECH S Y S T E M S I N C. 24.0 Wide Format Panel Mount PC Models VTPC240P3 / VTPC240PS3 User s Guide Read these instructions completely before attempting to operate
User Manual Version V1.1 March Elios Point-of-Sale Hardware System
 User Manual Version V1.1 March 2010 Elios Point-of-Sale Hardware System Copyright 2009~2010 All Rights Reserved Manual Version 1.1 The information contained in this document is subject to change without
LV-681. Mini-ITX motherboard. User s Manual. Edition: /04/09. LV-681 User s Manual 1
 LV-681 Mini-ITX motherboard User s Manual Edition: 1.00 2007/04/09 LV-681 User s Manual 1 Copyright The trademarks mentioned in the manual are legally registered to their respective companies. Disclaimer
Chapter 4 Using BIOS 1
 Chapter 1 Using BIOS 4 4.1 About the Setup Utility The computer uses the latest American Megatrends Inc. BIOS with support for Windows Plug and Play. The CMOS chip on the motherboard contains the ROM setup
MITAC Desktop Board PD10TI Product Guide
 MITAC Desktop Board PD10TI Product Guide Desktop Board Features This chapter briefly describes the main features of MITAC Desktop Board PD10TI. Table 1 summarizes the features of the Desktop Board. TABLE
Rugged Panel PC AcuPanel 12 User Manual Revision 2.0
 ACURA EMBEDDED SYSTEMS INC. Rugged Panel PC AcuPanel 12 User Manual Revision 2.0 Contents Chapter 1: AcuPanel 12 Overview Specifications... 2 Knowing AcuPanel 12... 4 Rear Top... 4 Rear Bottom... 5 Rear
MITAC Desktop Board PD12TI Product Guide
 MITAC Desktop Board PD12TI Product Guide Desktop Board Features This chapter briefly describes the main features of MITAC Desktop Board PD12TI. Table 1 summarizes the features of the Desktop Board. Table
Network Application Platform. User s Manual
 525 Network Application Platform User s Manual Rev:1.0 Date:2012.03 CONTENTS CHAPTER 1 PACKAGE CONTENTS... 3 CHAPTER 2 INTRODUCTION... 4 CHAPTER 3 LAYOUT... 5 CHAPTER 4 REAR PANEL SKETCH MAP... 5 CHAPTER
Keyboard PC User Manual
 Keyboard PC User Manual Version 1.0 Jun. 2010 1 DMP Electronics Inc. Copyright The information in this manual is subject to change without notice for continuous improvement in the product. All rights are
WinMate Communication INC. Digital Signage Pluggable Module User s Manual. OAMO OPS Module
 OAMO OPS Module The digital signage display pluggable standard (DPS) which enables a standard and easier integration of a digital signage computing system or a pluggable module into the display panel.
CMI211 System Family
 CMI211 System Family Mini-ITX Standard Systems User s Manual Version 1.0 (Apr. 2017) Copyright 2017 IBASE Technology, Inc. All rights reserved. No part of this publication may be reproduced, copied, stored
Version 1.0 Revision Date: July. 26, Embedded System User s Manual ROC316A. Rock Box, Fanless Embedded System User s Manual.
 Version 1.0 Revision Date: July. 26, 2012 Embedded System User s Manual ROC316A Rock Box, Fanless Embedded System User s Manual Safety information Electrical safety To prevent electrical shock hazard,
Keep the work area free of clutter and clean. Food and drinks are not allowed in the work area.
 29 Chapter 3 Computer Assembly Introduction This chapter addresses the process of the computer assembly process. The ability to successfully assemble a computer is a milestone for the PC Ttechnician. It
1.1.Packing Contents 1*Colorful C.B250A-BTC V20 motherboard 2*SATA cables 1*Driver/Utility CD 1*User's Guide 1*I/O shield 1.2.MOTHERBOARD SPEC CPU
 Colorful Technology Website: http://www.colorful.cn Thanks for purchasing our based on Intel B250 Chipset motherboard. The motherboard C.B250A-BTC V20 based on Intel B250 Express Chipset, support Intel
PowerBrick-CV User s Manual Edition 2.0
 The Power Brick-CV Users Manual PowerBrick-CV User s Manual Edition 2.0 Small footprint rugged Pentium-M With Digital Video Recorder The Power Brick-CV Users Manual Preface Copyright The material in this
4170 POS System Installation Guide
 4170 POS System 4170 Installation Guide Thank you for selecting UTC RETAIL s innovative Model 4170 Point of Sale solution! This Installation Guide will help you efficiently install the 4170 POS. The document
Rugged Panel PC AcuPanel 17 User Manual Revision 1.5
 ACURA EMBEDDED SYSTEMS INC. Rugged Panel PC AcuPanel 17 User Manual Revision 1.5 Contents Chapter 1: AcuPanel 17 Overview Specifications... 2 Knowing AcuPanel 17... 4 Rear Top... 4 Rear Bottom... 5 Rear
POS 46X Series. Manual
 POS 46X Series Manual Point-of-Sale Hardware System P/N: 48201120 June 2005 V1.0 Copyright 2005 06 All Rights Reserved Manual Version 1.0 The information contained in this document is subject to change
Chapter 3: Computer Assembly
 Chapter 3: Computer Assembly IT Essentials v6.0 ITE v6.0 1 Chapter 3 - Sections & Objectives 3.1 Assemble the Computer Build a Computer. 3.2 Boot the Computer Explain how to verify BIOS and UEFI settings.
Computer Setup (F10) Utility Guide HP Business Desktops dx5150 model
 Utility Guide HP Business Desktops dx5150 model") Guide HP Business Desktops dx5150 model Document Part Number: 374172-001 December 2004 This guide provides instructions on how to use Computer Setup. This tool is used to reconfigure and modify computer
Guide HP Business Desktops dx5150 model Document Part Number: 374172-001 December 2004 This guide provides instructions on how to use Computer Setup. This tool is used to reconfigure and modify computer