Veriton M678G/S678G. Product End-of-Life Disassembly Guide
|
|
|
- Kory Foster
- 6 years ago
- Views:
Transcription
1 Veriton M678G/S678G Product End-of-Life Disassembly Guide
2 Machine Disassembly and Replacement To disassemble the computer, you need the following tools: Wrist grounding strap and conductive mat for preventing electrostatic discharge. Wire cutter. Phillips screwdriver (may require different size). NOTE: The screws for the different components vary in size. During the disassembly process, group the screws with the corresponding components to avoid mismatches when putting back the components. 1
3 General Information Before You Begin Before proceeding with the disassembly procedure, make sure that you do the following: 1. Turn off the power to the system and all peripherals. 2. Unplug the AC adapter and all power and signal cables from the system. 2
4 Disassembly Procedure This section tells you how to disassemble the system when you need to perform system service. CAUTION: Before you proceed, make sure you have turned off the system and all peripherals connected to it. 3


5 Remove side cover 1. Put the desktop on the worktable lightly. 2. Release left side cover with 2 screws then remove left side cover. Screw location Push the side cover lightly Screw location Remove CPU fan pipe 1. Release the CPU fan pipe. 4


6 Remove Cards 1. Release the tooless slot cover. 2. Remove VGA, TV, Modem Card. The following list references the approximate location of the components. (optional by SKU) Modem card TV card VGA card Notice: I. Remove card, don t touch any electric parts on PCB. VGA card TV card Modem card slot cover 5


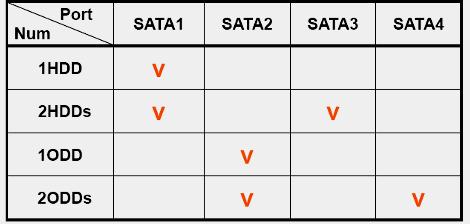
7 Remove HDD Data Cables 1. Remove master HDD data cable from M/B SATA1/SATA3. 2. Remove slave ODD data cable from M/B SATA2. SATA4 SATA3 SATA2 SATA1 Remove slave HDD cable Remove master HDD cable 6


8 Remove ODD DATA cable 1. Remove master ODD data/power cable from master ODD. Remove master ODD Power Cable Remove master ODD Data Cable Remove HDD power cable 1. Remove master HDD data cable from master HDD. 2. Remove slave HDD data cable from slave HDD. Remove slave HDD Remove master HDD 7

9 Remove Cables 1. Remove front panel light cable from PANEL1"slot of M/B. 2. Remove USB1 cable from M/B"F_ USB3. 3. Remove USB2 cable from M/B F_ USB4. 4. Remove card reader cable from M/B"USB2. 5. Remove audio cable from the AUDIO"port on M/B. Notice: I. Recovery switch cable is next to FDD port, and the black cable face to the top of chassis. II. Intrusion switches cable face to front bezel of chassis. Remove HDD 1. Remove master HDD from the first HDD location. 2. Remove slave HDD from the second HDD location. (optional by SKU) 8


10 Slave HDD Master HDD Remove card reader 1. Remove card reader from chassis. 9


11 Remove FDD Cable 1. Remove FDD digital cable just as pictures (optional by SKU). 2. Plug 4 pins power cord from FDD slot. Remove from FDD Remove from M/B FDD1 slot 3. Remove front bezel light cable from PATA power cable. Remove Front bezel light cable 10


12 Remove ODD 1. Push the lock handle release ODD. 2. Remove master ODD from the location. 3. Remove slave ODD from the location. (optional by SKU) Master ODD location Slave ODD location 11


13 Remove Cables 1. Remove M/B power cable from M/B ATX1. 2. Remove 12 V power cable from M/B JPW1. 3. Remove System Fan cable from M/B SYS-F2. MB power cable 12

.")
14 Remove System FAN 1. Release four screws according to the following picture. 2. Remove Sys FAN (optional by SKU). Release four screws The direction of System FAN 13


15 Remove mother board and RTC battery 1. Release 8 pcs screws form the corresponding hole. 2. Release screws according to the following picture in turn. 3. Remove the M/B from chassis and remove the RTC battery form M/B. 14

. 3.")

16 16move CPU cooler 1. Remove cooler power cable from M/B CPU-F2. 2. Release screw 1 first, then fixes screw 2, screw 3 & screw 4 (as pictures below). 3. Remove cooler from the retention module. Remove memory 1. Remove the first memory from DIMM. 2. Remove the second memory from DIMM2. (optional by SKU) 15


17 Remove CPU 1. Remove CPU according following the pictures. Lock the Handle 1. Remove I/O shielding. Remove I/O shielding 16
TravelMate 6493 Series Disassembly Instruction
 TravelMate 6493 Series Disassembly Instruction please refer to http://csd.acer.com.tw PRINTED IN TAIWAN Chapter 3 Machine Disassembly and Replacement This chapter contains step-by-step procedures on how
Computer Assembly (Installing Mother Board & CPU)
") Computer Assembly (Installing Mother Board & CPU) IT@SCHOOL HARDWARE TEAM Biju Thiruvananthapuram Sree Kumar Kottarakkara Shamsudeen Attingal Pradeep Mattara Wandoor Pre-Installation Precaution Mother
Computer Assembly (Installing Mother Board & CPU) IT@SCHOOL HARDWARE TEAM Biju Thiruvananthapuram Sree Kumar Kottarakkara Shamsudeen Attingal Pradeep Mattara Wandoor Pre-Installation Precaution Mother
Table of Contents - 1. Predator PO3-600 User s Guide
 Table of Contents - 1 Predator PO3-600 User s Guide 2 - Upgrading your Computer 2018. All Rights Reserved. Desktop Computer Covers: Tower models This revision: April 2018 V1.00 Important This manual contains
(Hardware and case keys are provided inside the chassis storage compartment.)
") 1. Motherboard installation...1 2. Install 3½ and 5¼ drives...3 3. Install PCI components...4 4. Fan installation and setup...5 5. Temperature probe setup...6 6. Connect case leads to motherboard...7 7.
1. Motherboard installation...1 2. Install 3½ and 5¼ drives...3 3. Install PCI components...4 4. Fan installation and setup...5 5. Temperature probe setup...6 6. Connect case leads to motherboard...7 7.
Intel NUC Kit NUC6CAYS User Guide
 Intel NUC Kit NUC6CAYS User Guide Regulatory Model NUC6CAY 1 Before You Begin CAUTIONS The steps in this guide assume you re familiar with computer terminology and with the safety practices and regulatory
After completing this chapter, you will meet these objectives:
 3.0 Introduction Assembling computers is a large part of a technician's job. As a technician, you will need to work in a logical, methodical manner when working with computer components. As with any learned
CONTENTS. 1. Motherboard installation Install 5¼ and 3½ drives Install PCI components Case fan setup...5
 USER S MANUAL CONTENTS 1. Motherboard installation...1 2. Install 5¼ and 3½ drives...3 3. Install PCI components...4 4. Case fan setup...5 5. Connect case leads to motherboard...6 6. Identify the power
ALIENWARE AURORA SERVICE MANUAL 01/
 ALIENWARE AURORA SERVICE MANUAL 01/ 01 Notes, Cautions, and Warnings NOTE: A NOTE indicates important information that helps you make better use of your computer. CAUTION: A CAUTION indicates either potential
Intel NUC Kit NUC7i7BNH Intel NUC Kit NUC7i5BNH Intel NUC Kit NUC7i3BNH
 Intel NUC Kit NUC7i7BNH Intel NUC Kit NUC7i5BNH Intel NUC Kit NUC7i3BNH User Guide 1 Before You Begin CAUTIONS The procedures in this user guide assume familiarity with the general terminology associated
Cube YY-0420/0430 Technical Instruction
 Cube YY-0420/0430 Technical Instruction Contact Information YEONG YANG Technology Co., Ltd. Address 12F, 778-1, Chung Cheng Road, Chung-Ho City, Taipei, Taiwan, R.O.C. Telephone +886-2-3234-0020 Fax +886-2-3234-0014
Serial ATA Hot Swap Drive Cage Upgrade Kit for: Intel Server Chassis SC5200 Intel Server Chassis SC5250-E
 Serial ATA Hot Swap Drive Cage Upgrade Kit for: Intel Server Chassis SC5200 Intel Server Chassis SC5250-E A Guide for Technically Qualified Assemblers of Intel Identified Subassemblies/Products Order Number:
User Guide for NUC7CJYSAL. Intel NUC 7 Essential, a Mini PC with Windows 10 NUC7CJYSAL. User Guide
 Intel NUC 7 Essential, a Mini PC with Windows 10 NUC7CJYSAL User Guide 1 Before You Begin CAUTIONS The steps in this guide assume you re familiar with computer terminology and with the safety practices
Intel NUC Kit NUC6CAYS User Guide
 Intel NUC Kit NUC6CAYS User Guide Regulatory Model NUC6CAY 1 Before You Begin CAUTIONS The procedures in this user guide assume familiarity with the general terminology associated with personal computers
Intel NUC Kit NUC7i3BNHX1 with Intel Optane Memory. Intel NUC Kit NUC7i5BNHX1 with Intel Optane Memory
 Intel NUC Kit NUC7i3BNHX1 with Intel Optane Memory Intel NUC Kit NUC7i5BNHX1 with Intel Optane Memory Intel NUC Kit NUC7i7BNHX1 with Intel Optane Memory User Guide 1 Before You Begin CAUTIONS The procedures
Intel NUC Kit NUC7i7BNH, NUC7i5BNH & NUC7i3BNH User Guide. Intel NUC Kit NUC7i7BNH Intel NUC Kit NUC7i5BNH Intel NUC Kit NUC7i3BNH User Guide
 Intel NUC Kit NUC7i7BNH Intel NUC Kit NUC7i5BNH Intel NUC Kit NUC7i3BNH User Guide 1 Before You Begin CAUTIONS The procedures in this user guide assume familiarity with the general terminology associated
Product End-of-Life Disassembly Instructions Product Category: Personal Computers
 Product End-of-Life Disassembly Instructions Product Category: Personal Computers Marketing Name / Model [List multiple models if applicable.] HP ProDesk 600 G3 Small Form Factor Business PC Purpose: The
Intel NUC 7 Home, a Mini PC with Windows 10 NUC7i3BNHXF. Intel NUC 7 Home, a Mini PC with Windows 10 NUC7i5BNHXF
 Intel NUC 7 Home, a Mini PC with Windows 10 NUC7i3BNHXF Intel NUC 7 Home, a Mini PC with Windows 10 NUC7i5BNHXF Intel NUC 7 Enthusiast, a Mini PC with Windows 10 NUC7i7BNHXG User Guide 1 Before You Begin
Intel NUC7 Home, a Mini PC with Windows 10 NUC7i3BNHXF. Intel NUC7 Home, a Mini PC with Windows 10 NUC7i5BNHXF
 Intel NUC7 Home, a Mini PC with Windows 10 NUC7i3BNHXF Intel NUC7 Home, a Mini PC with Windows 10 NUC7i5BNHXF Intel NUC7 Enthusiast, a Mini PC with Windows 10 NUC7i7BNHXG User Guide 1 Before You Begin
Computer Assembly Step by Step DRAFT
 9781587132636_ch03.qxp 8/20/10 1:37 PM Page 79 CHAPTER 3 Computer Assembly Step by Step Objectives Upon completion of this chapter, you should be able to answer the following questions: How do I open the
To connect the AC adapter:
 Replacing the AC Adapter Replacing the AC Adapter 3 Plug the power cord into a wall outlet. The power indicator turns on. To connect the AC adapter: Connect the power cord to the AC adapter. Power indicator
H4 Series Hardware Replacement Guide
 Machine type: 10059/7723 10060/7724 10068/7752 10080/3099/1194 10091/2558/1196 H4 Series Hardware Replacement Guide Version 3.0 2011.08 31500379 Hardware Replacement Guide Copyright Lenovo 2011. All rights
WEASEL N/B MAINTENANCE
 2. System Assembly & Disassembly 2.1 System View 2.1.1 Front View ❶ Microphone Connector ❷ Audio Input Connector ❸ Audio Output Connector ❹ Top Cover Latch ❹ ❶ ❸ ❷ 2.1.2 Left-Side View ❶ VGA Port ❷ S-Video
Installing the Cisco ADE 2130 and 2140 Series Appliance Hardware Options
 CHAPTER 4 Installing the Cisco ADE 2130 and 2140 Series Appliance Hardware Options This chapter provides instructions for installing, replacing, and removing various hardware options in your Cisco ADE
EVGA assumes you have purchased all necessary parts needed to allow for proper system functionality.
 Before You Begin Parts NOT in the Kit This kit contains all the hardware necessary to install and connect your new EVGA e-7050/610i GPU motherboard with integrated GeForce graphics processing. However,
User Guide. Intel NUC 7 Home, a Mini PC with Windows 10 NUC7i5BNKP. Intel NUC 7 Enthusiast, a Mini PC with Windows 10 NUC7i7BNKQ
 Intel NUC 7 Home, a Mini PC with Windows 10 NUC7i5BNKP Intel NUC 7 Enthusiast, a Mini PC with Windows 10 NUC7i7BNKQ User Guide 1 Before You Begin CAUTION The steps in this guide assume you re familiar
Lab 1 CST8214 Ian! D. Allen Winter 2008
 CST 8214 Lab #1 Name: Date: Lab Section: Lab partner s name: Lab PC Number: Lab instructor signature (when complete): Objectives: To identify the different hardware components that make up a computer system
User Guide for NUC7i3DNHNC. Intel NUC7 Business, a Mini PC with Windows 10 NUC7i3DNHNC. User Guide
 Intel NUC7 Business, a Mini PC with Windows 10 NUC7i3DNHNC User Guide 1 Before You Begin CAUTIONS The steps in this guide assume you re familiar with computer terminology and with the safety practices
Replacing the Gateway 200ARC Keyboard
 Replacing the Gateway 200ARC Keyboard Replacing the Gateway 200ARC Keyboard This package includes a replacement keyboard for your Gateway 200ARC notebook and these printed instructions. Tools you need
Product End-of-Life Disassembly Instructions
 Product End-of-Life Disassembly Instructions Product Category: Personal Computers Marketing Name / Model [List multiple models if applicable.] HP ProDesk 498 G1 Microtower Business PC Purpose: The document
FIELD REPLACEABLE UNIT DOCUMENTATION
 Satellite TM 1700 Series GENERAL INFORMATION Tools Required for Proper Disassembly and Reassembly: 1. Phillips Screwdriver (Size 1) 2. Flat head screwdriver (5mm) 3. Hex driver (5mm) 4. Case Separator
Ollee Ultra Mini PC, a Mini PC with 32GB emmc and Windows 10 Pro MAPMG. Ollee Ultra Mini PC, a Mini PC with 120GB SSD and Windows 10 Pro MAPMG1
 Ollee Ultra Mini PC, a Mini PC with 32GB emmc and Windows 10 Pro MAPMG Ollee Ultra Mini PC, a Mini PC with 120GB SSD and Windows 10 Pro MAPMG1 User Guide Before You Begin CAUTIONS The procedures in this
User Guide. Intel NUC 8 Business, a Mini PC with Windows 10 NUC8i7HNKQC. Intel NUC 8 Enthusiast, a Mini PC with Windows 10 NUC8i7HVKVA
 Intel NUC 8 Business, a Mini PC with Windows 10 NUC8i7HNKQC Intel NUC 8 Enthusiast, a Mini PC with Windows 10 NUC8i7HVKVA User Guide 1 Before You Begin CAUTIONS The procedures in this user guide assume
Chapter 3: Computer Assembly
 Chapter 3: Computer Assembly IT Essentials v6.0 ITE v6.0 1 Chapter 3 - Sections & Objectives 3.1 Assemble the Computer Build a Computer. 3.2 Boot the Computer Explain how to verify BIOS and UEFI settings.
User Guide. Intel NUC7 Home, a Mini PC with Windows 10 NUC7i5BNKP. Intel NUC7 Enthusiast, a Mini PC with Windows 10 NUC7i7BNKQ
 Intel NUC7 Home, a Mini PC with Windows 10 NUC7i5BNKP Intel NUC7 Enthusiast, a Mini PC with Windows 10 NUC7i7BNKQ User Guide 1 Before You Begin CAUTION The procedures in this guide assume familiarity with
Aspire M5700 Service Guide
 Aspire M5700 Service Guide Service guide files and updates are available on the AIPG/CSD web; for more information please refer to http://csd.acer.com.tw PRINTED IN TAIWAN Revision History Please refer
Upgrade & Replacement
 Chapter 4 Upgrade & Replacement Follow the individual procedures in this chapter to perform the notebook s upgrade and replacement of various major components. A sus A7V Series Notebook is an all-in-one
Gateway Profile 4 service guide
 Gateway Profile 4 service guide Customizing Troubleshooting Contents Replacing Components in Your Gateway Profile 4.................. 1 About this guide.....................................................
Product End-of-Life Disassembly Instructions Product Category: Personal Computers
 Product End-of-Life Disassembly Instructions Product Category: Personal Computers Marketing Name / Model [List multiple models if applicable.] HP ProDesk 480 G1 MT Business PC Name / Model #2 Name / Model
CONTENTS. 1. Motherboard installation Install 3½ and 5¼ drives Install PCI components Connect case leads to motherboard...
 CONTENTS 1. Motherboard installation... 1 2. Install 3½ and 5¼ drives... 3 3. Install PCI components... 4 4. Connect case leads to motherboard... 5 5. Case fan setup... 5 6. Optional device installation...
RIOTORO CR1080. Installation Guide
 RIOTORO CR1080 Installation Guide Welcome to RIOTORO Thank you for purchasing the RIOTORO CR1080 Computer Case The CR1080 chassis squeezes raw computing power into in a cool, quiet and elegant PC that
Intel NUC Kit DN2820FYKH User Guide. Intel NUC Kit DN2820FYKH User Guide
 Intel NUC Kit DN2820FYKH User Guide 1 Before You Begin CAUTIONS The procedures in this user guide assume familiarity with the general terminology associated with personal computers and with the safety
HP ProLiant DL165 G7 Server
 HP ProLiant DL165 G7 Server Installation Instructions Part Number 601464-003 Identifying server components Front panel components Figure 1 Front Panel Components / 4 3.5 LFF HDD Item Description 1 Thumbscrews
User Guide. Intel NUC 8 Enthusiast, a Mini PC with Windows 10 NUC8i7BEKQA. Intel NUC 8 Home, a Mini PC with Windows 10 NUC8i5BEKPA
 Intel NUC 8 Enthusiast, a Mini PC with Windows 10 NUC8i7BEKQA Intel NUC 8 Home, a Mini PC with Windows 10 NUC8i5BEKPA User Guide 1 Before You Begin CAUTIONS The steps in this guide assume you re familiar
Intel NUC Kit D54250WYKH & D34010WYKH User Guide. Intel NUC Kit D54250WYKH Intel NUC Kit D34010WYKH User Guide
 Intel NUC Kit D54250WYKH Intel NUC Kit D34010WYKH User Guide 1 Before You Begin CAUTIONS The procedures in this user guide assume familiarity with the general terminology associated with personal computers
Disassembly Procedure
 Chapter 2 Disassembly Procedure Please follow the information provided in this section to perform the complete disassembly procedure of the notebook. Be sure to use proper tools described before. SUS A7T
Installing and Upgrading Memory and Virtual Private Network Modules
 APPENDIX C Installing and Upgrading Memory and Virtual Private Network Modules This chapter tells how to install or upgrade memory and how to install a Virtual Private Network (VPN) module in your Cisco
Installing a New Solo 1150 Hard Drive
 Installing a New Solo 1150 Hard Drive This package includes a new hard drive kit for your Solo 1150 notebook computer and these printed instructions. Tools you need You will need a small Phillips screwdriver
Intel NUC Kit NUC5i3MYHE & NUC5i5MYHE User Guide. Intel NUC Kit NUC5i3MYHE Intel NUC Kit NUC5i5MYHE User Guide
 Intel NUC Kit NUC5i3MYHE Intel NUC Kit NUC5i5MYHE User Guide 1 Before You Begin CAUTIONS The procedures in this user guide assume familiarity with the general terminology associated with personal computers
User Guide for NUC8i5BEK, NUC8i3BEK. Intel NUC Kit NUC8i5BEK Intel NUC Kit NUC8i3BEK. User Guide
 Intel NUC Kit NUC8i5BEK Intel NUC Kit NUC8i3BEK User Guide 1 Before You Begin CAUTIONS The steps in this guide assume you re familiar with computer terminology and with the safety practices and regulatory
User Guide for NUC7CJYSAL. Intel NUC 7 Essential, a Mini PC with Windows 10 NUC7CJYSAL. User Guide
 Intel NUC 7 Essential, a Mini PC with Windows 10 NUC7CJYSAL User Guide 1 Before You Begin CAUTIONS The procedures in this guide assume familiarity with the general terminology associated with personal
Dell Precision 3430 Small Form Factor
 Dell Precision 3430 Small Form Factor Service Manual Regulatory Model: D11S Regulatory Type: D11S004 Notes, cautions, and warnings NOTE: A NOTE indicates important information that helps you make better
Intel NUC Kit NUC8i7HNK & NUC8i7HVK User Guide. Intel NUC Kit NUC8i7HNK Intel NUC Kit NUC8i7HVK User Guide
 Intel NUC Kit NUC8i7HNK Intel NUC Kit NUC8i7HVK User Guide 1 Before You Begin CAUTIONS The procedures in this user guide assume familiarity with the general terminology associated with personal computers
Oracle <Insert Picture Here>
 Slide 1 Oracle Slide 2 WZT-6509 version B Sun Fire Nehalem and Westmere Rack-Mount Server Installation and Replacement Welcome to the installation and replacement
Dell OptiPlex 5060 Tower
 Dell OptiPlex 5060 Tower Service Manual Regulatory Model: D18M Regulatory Type: D18M005 Notes, cautions, and warnings NOTE: A NOTE indicates important information that helps you make better use of your
Dell Precision 3430 Small Form Factor
 Dell Precision 3430 Small Form Factor USB Type-C card Installation Guide Regulatory Model: D11S Regulatory Type: D11S004 Notes, cautions, and warnings NOTE: A NOTE indicates important information that
LC18. Specification: Product Overview. Touch Screen
 LC18 Product Overview LC18 Specification: Material: Aluminum front panel, 1.5mm aluminum body Color: Black & Silver Motherboard: ATX, Micro ATX Drive Bay: External - 5.25" x 2 External - 3.5" x 1 Internal
Upgrading and Servicing Guide
 Upgrading and Servicing Guide The information in this document is subject to change without notice. Hewlett-Packard Company makes no warranty of any kind with regard to this material, including, but not
Replacing the Gateway M275 Keyboard
 Replacing the Gateway M275 Keyboard This package includes a replacement keyboard for your Gateway M275 notebook and these printed instructions. Tools you need You need a small Phillips screwdriver and
Intel NUC Kit NUC8i7HNK & NUC8i7HVK User Guide. Intel NUC Kit NUC8i7HNK Intel NUC Kit NUC8i7HVK. User Guide
 Intel NUC Kit NUC8i7HNK Intel NUC Kit NUC8i7HVK User Guide 1 Before You Begin CAUTIONS The procedures in this user guide assume familiarity with the general terminology associated with personal computers
Installation & Replacement
 Installation & Replacement Follow the individual procedures to perform the notebook s installation and replacement of various major components. Z30N Series Notebook balances novelty and mobility in an
Upgrading and Servicing Guide
 Upgrading and Servicing Guide The only warranties for Hewlett-Packard products and services are set forth in the express statements accompanying such products and services. Nothing herein should be construed
An ISO 9001 Company. BOP 1KW-MG FIRMWARE RETROFIT KIT
 INSTRUCTION MANUAL 1. DESCRIPTION KEPCO An ISO 9001 Company. BOP 1KW-MG FIRMWARE RETROFIT KIT BOP 1KW-MG RETROFIT KIT 219-0597 Kepco KIT 219-0597 contains the PROMs used to upgrade the firmware for BOP
Alienware Area-51 R5 Service Manual
 Alienware Area-51 R5 Service Manual Computer Model: Alienware Area-51 R5 Regulatory Model: D03X Regulatory Type: D03X002 Notes, cautions, and warnings NOTE: A NOTE indicates important information that
SySTIUM TECHNOLOGIES. Assembly Guide. Model 133i
 Assembly Guide Model 133i Radio Frequency Interference Notice (USA) This equipment has been tested and found to comply with the limits for a Class B digital device, pursuant to Part 15 of the FCC Rules,
Replacing Preamplifier Circuit Boards
 Instruction Guide Replacing Preamplifier Circuit Boards Before you begin This instruction sheet applies to the Plexon PBX-series preamplifiers. Use these instructions to expand, replace, or upgrade the
Product End-of-Life Disassembly Instructions Product Category: Personal Computers
 Product End-of-Life Disassembly Instructions Product Category: Personal Computers Marketing Name / Model [List multiple models if applicable.] HP ProDesk 400 G3 MT Business PC Name / Model #2 Name / Model
How To Install: C4000 EMV Upgrade Kit
 How To Install: C4000 EMV Upgrade Kit IMPORTANT: Before proceeding with installation please verify you have the current card reader bezel in the kit. Correct bezel will have a small eject pin hole below
Dell OptiPlex All-in-One. Stand Installation Guide
 Dell OptiPlex All-in-One Stand Installation Guide Notes, cautions, and warnings NOTE: A NOTE indicates important information that helps you make better use of your product. CAUTION: A CAUTION indicates
FIELD REPLACEABLE UNIT DOCUMENTATION. Portege R100 GENERAL INFORMATION. Tools Required for Proper Disassembly and Reassembly:
 Portege TM GENERAL INFORMATION Tools Required for Proper Disassembly and Reassembly: 1. Phillips Screwdriver (Size 0) 2. Flat head Screwdriver 3. Case Separator 4. ESD Wrist Strap 5. ESD mat 6. Tweezers
HP ProLiant MicroServer
 HP ProLiant MicroServer Installation Sheet Part Number 615715-004 Panel door components Item Component 1 16 screws for HDD installation 2 4 screws for ODD installation 3 Screw driver Rear panel components
Installation & Replacement
 Installation & Replacement Follow the individual procedures to perform the notebook s installation and replacement of various major components. Z31N Series Notebook balances novelty and mobility in an
Z-MACHINE GT900. English. English version
 English English version www.zalman.co.kr www.zalmanusa.com Table of Contents 1. Safety Notices 3 2. Components 4 3. Specifications 6 4. Front Panel Buttons and I/O Ports 7 5. Installation Guide8 2 (1)
ww.battery-adapter.com
 Removing and replacing an FRU Lenovo G470/G475/G570/G575 This section presents exploded figures with the instructions to indicate how to remove and replace the FRU. Make sure to observe the following general
apple Service Source Xserve RAID 17 March Apple Computer, Inc. All rights reserved.
 apple Service Source Xserve RAID 17 March 2003 2003 Apple Computer, Inc. All rights reserved. apple Service Source Basics Xserve RAID 2003 Apple Computer, Inc. All rights reserved. Overview Xserve RAID
Product End-of-Life Disassembly Instructions
 Product End-of-Life Disassembly Instructions Product Category: Personal Computers Marketing Name / Model [List multiple models if applicable.] HP Engage Flex Pro Purpose: The document is intended for use
CMB-679. Mini Barebone system Intel High Performance Platform Installation Guide Edition /10/22
 CMB-679 Mini Barebone system Intel High Performance Platform Installation Guide Edition 1.2 2013/10/22 Document Content: Packing List Product Specification Hardware Installation Packing List: CMB-679 Chassis
Replacing the Gateway M405 Keyboard
 Replacing the Gateway M405 Keyboard This package includes a replacement keyboard for your Gateway M405 notebook and these printed instructions. Tools you need You need a small Phillips and a small flat-blade
Installation & Replacement
 Installation & Replacement Follow the individual procedures to perform the notebook s installation and replacement of various major components. Z70N Series Notebook is a fusion of flexibility, style and
Replacing the Gateway M305 Optical Drive
 Replacing the Gateway M305 Optical Drive This package includes an optical drive, such as a CD or DVD drive, for your Gateway M305 notebook and these printed instructions. Installing a replacement drive
IntelliVue MP20/30. Hardware Upgrade Installation Guide. IntelliVue Patient Monitor MP20/30. Patient Monitoring M B *M B*
 IntelliVue MP20/30 Hardware Upgrade Installation Guide IntelliVue Patient Monitor MP20/30 Patient Monitoring M8001-9302B *M8001-9302B* Part Number M8001-9302B 4512 610 06841 Printed in Germany 01/05 1
7403-K131/132/133/K138. Memory Modules. Kit Instructions. Issue C
 7403-K131/132/133/K138 Memory Modules Kit Instructions Issue C Revision Record Issue Date Remarks A Nov 2008 First issue B Mar 2011 Added 7409, 7600, and 7610 support C Mar 2013 Added K138 (4 GB) 1 Introduction
Precision Tower Service Manual. Regulatory Model: D24M Regulatory Type: D24M003
 Precision Tower 3630 Service Manual Regulatory Model: D24M Regulatory Type: D24M003 Notes, cautions, and warnings NOTE: A NOTE indicates important information that helps you make better use of your product.
Fujitsu T902 Teardown
 Fujitsu T902 Teardown Disassembling the Fujitsu T902 to motherboard extraction. Written By: Maxxender ifixit CC BY-NC-SA www.ifixit.com Page 1 of 14 TOOLS: Phillips #1 Screwdriver (1) Spudger (1) Anti-Static
Keep the work area free of clutter and clean. Food and drinks are not allowed in the work area.
 29 Chapter 3 Computer Assembly Introduction This chapter addresses the process of the computer assembly process. The ability to successfully assemble a computer is a milestone for the PC Ttechnician. It
VI31 MAINBOARD MANUAL. Date : 1, 2002 PCB : 2.2 (for HP)
") VI31 MAINBOARD MANUAL Date : 1, 2002 PCB : 2.2 (for HP) Table of Contents Table of Contents Chapter 1 Overview The VI31 Mainboard... 1-2 Main Features... 1-3 Chapter 2 Installation Procedures Quick Reference
VI31 MAINBOARD MANUAL Date : 1, 2002 PCB : 2.2 (for HP) Table of Contents Table of Contents Chapter 1 Overview The VI31 Mainboard... 1-2 Main Features... 1-3 Chapter 2 Installation Procedures Quick Reference
Quick Reference This guide is written for technically qualified personnel with experience installing and configuring desktop boards.
 Intel Desktop Boards D850EMD2 and D850EMV2 Quick Reference This guide is written for technically qualified personnel with experience installing and configuring desktop boards. Before You Begin Warning
V5420 Host Card Upgrade Kit for R3082D Quick Start Guide
 Quick Start Guide Upgrade kit contents The table below shows the contents of the V5420 Host Card Upgrade Kit (components are not shown to scale). Part Function Pieces V5420 Host Card 1 Host card bracket
Sabio Digital SD-KN1 Notebook Assembly Guide
 Sabio Digital SD-KN1 Notebook Assembly Guide Rev. 1.4 Sabio Digital KN1 Assembly Guide 1 of 11 www.sabioproducts.com Table of Contents Section 1.0 - Overview... 3 Section 2.0 - Before You Begin... 3 Section
apple Service Source imac (USB 2.0) Updated 11 September Apple Computer, Inc. All rights reserved.
 Updated 11 September Apple Computer, Inc. All rights reserved.") apple Service Source imac (USB 2.0) Updated 11 September 2003 2003 Apple Computer, Inc. All rights reserved. imac (USB 2.0) - 1 apple Service Source Basics imac (USB 2.0) 2003 Apple Computer, Inc. All
apple Service Source imac (USB 2.0) Updated 11 September 2003 2003 Apple Computer, Inc. All rights reserved. imac (USB 2.0) - 1 apple Service Source Basics imac (USB 2.0) 2003 Apple Computer, Inc. All
ASUS A2000 Series Notebook consists of various modules. This chapter
 Chapter 2 Disassembly Procedure Please follow the information provided in this section to perform the complete disassembly procedure of the notebook. Be sure to use proper tools described before. ASUS
Memory (RAM) Replacement Instructions. apple PowerBook (FireWire) Tools Required. Electrostatic Discharge (ESD)
 Replacement Instructions. apple PowerBook (FireWire) Tools Required. Electrostatic Discharge (ESD)") apple PowerBook (FireWire) Memory (RAM) Replacement Instructions Be sure to follow these instructions carefully. Failure to follow these instructions could result in damage to your equipment and may void
apple PowerBook (FireWire) Memory (RAM) Replacement Instructions Be sure to follow these instructions carefully. Failure to follow these instructions could result in damage to your equipment and may void
Dell Precision 7920 Tower
 Dell Precision 7920 Tower Owner's Manual Regulatory Model: D04X Regulatory Type: D04X001 Notes, cautions, and warnings NOTE: A NOTE indicates important information that helps you make better use of your
Inspiron 22. Service Manual Series. Regulatory Model: W17B Regulatory Type: W17B001
 Inspiron 22 3000 Series Service Manual Regulatory Model: W17B Regulatory Type: W17B001 Notes, cautions, and warnings NOTE: A NOTE indicates important information that helps you make better use of your
2. Why is it important to remove loose jewelry before working inside a computer case?
 Chapter 2 Solutions Reviewing the Basics 1. When taking a computer apart, why is it important to not stack boards on top of each other? Answer: You could accidentally dislodge a chip. 2. Why is it important
apple Service Source Xserve RAID Xserve RAID and Xserve RAID (SFP) Updated: 25 May Apple Computer, Inc. All rights reserved.
 Updated: 25 May Apple Computer, Inc. All rights reserved.") apple Service Source Xserve RAID Xserve RAID and Xserve RAID (SFP) Updated: 25 May 2004 2003 Apple Computer, Inc. All rights reserved. apple Service Source Basics Xserve RAID 2003 Apple Computer, Inc.
apple Service Source Xserve RAID Xserve RAID and Xserve RAID (SFP) Updated: 25 May 2004 2003 Apple Computer, Inc. All rights reserved. apple Service Source Basics Xserve RAID 2003 Apple Computer, Inc.
HOME THEATER PC CHASSIS
 HOME THEATER PC CHASSIS Model: HTPC 280 BAV4 & SAV4 Color: Black & Silver Quick Installation Guide (U.S. & Canada Only) Version 1.0 DISCLAIMER No warranty or representation, either expressed or implied,
Latitude Owner's Manual. Regulatory Model: P72G Regulatory Type: P72G003
 Latitude 5495 Owner's Manual Regulatory Model: P72G Regulatory Type: P72G003 Notes, cautions, and warnings NOTE: A NOTE indicates important information that helps you make better use of your product. CAUTION:
Product End-of-Life Disassembly Instructions Product Category: Personal Computers
 Product End-of-Life Disassembly Instructions Product Category: Personal Computers Marketing Name / Model [List multiple models if applicable.] OMEN X by HP Desktop PC 900 Purpose: The document is intended
FIELD REPLACEABLE UNIT DOCUMENTATION. Satellite TM. A20 Series GENERAL INFORMATION. Tools Required for Proper Disassembly and Reassembly:
 GENERAL INFORMATION Tools Required for Proper Disassembly and Reassembly: 1. Phillips Screwdriver (Size 0&1) 2. 4mm Flat head Screwdriver 3. Case Separator 4. ESD Wrist Strap 5. ESD mats 6. Tweezers Before
Dell Inspiron N5110 Service Manual
 Dell Inspiron N5110 Service Manual Regulatory model: P17F Regulatory type: P17F001 Notes, Cautions, and Warnings NOTE: A NOTE indicates important information that helps you make better use of your computer.