Neousys Technology Inc. Nuvo-5000 Series
|
|
|
- Barry Stevens
- 6 years ago
- Views:
Transcription
1 Neousys Technology Inc. Nuvo-5000 Series Intel 6 th -Gen Core i7/i5/i3 Fanless Controller Nuvo-5002E, Nuvo-5006E Nuvo-5002P, Nuvo-5006P Nuvo-5002LP, Nuvo-5006LP Nuvo-5006E-PoE, Nuvo-5006P-PoE, Nuvo-5006LP-PoE Nuvo-5026E, Nuvo-5026E-PoE User s Manual Rev. A2-1 -
2 Revision History Date Change List Version May Initial release A1 Feb Added Nuvo-5026E/ Nuvo-5026E-PoE A2-2 -
3 Declaimer Declaration of Conformity FCC CE Copyright and Trademarks Chapter 1 Introduction Overview Product Specification Specification of Nuvo-5002E/P and Nuvo-5006E/P Specification of Nuvo-5002LP and Nuvo-5006LP Specification of Nuvo-5006E-PoE/5006P-PoE/5006LP-PoE Specification of Nuvo-5026E/ Nuvo-5026E-PoE List of Supported CPU Chapter 2 Getting to Know your Nuvo Unpacking your Nuvo-5000 Controller Front Panel I/O Functions Power Button Reset Button LED Indicators Gigabit Ethernet Port Remote On/Off Control and Status LED Output USB 3.0 Connectors DVI/HDMI Connectors VGA Connector DisplayPort Back Panel I/O Functions Pin Terminal Block for DC and IGN Input COM Ports (COM1 / COM2 / COM3) USB2.0 Connectors Speaker-out and Mic-in Audio Jacks MezIO TM I/O Connector SIM Socket Internal I/O Functions DDR4 SODIMM Sockets msata / mini-pcie #1 Dual-Mode Socket Mini-PCIe #2 Socket Internal SATA Port # Internal SATA Port # Internal USB Port
4 2.5 MezIO TM Interface Pin Definition of MezIO TM Interface MezIO TM Module for Nuvo-5000 Series Expansion Cassette Cassette of Nuvo-5006E/5002E Cassette of Nuvo-5006P/5002P Cassette of Nuvo-5026E/ Nuvo-5026E-PoE Neousys Cassette Module Fan in Cassette Enclosure Mechanical Dimension Top View of Nuvo-5000E/5000P Series Front View of Nuvo-5000E/5000P Series Side View of Nuvo-5000E/5000P Series Bottom View of Nuvo-5000E/5000P Series Top View of Nuvo-5000LP Series Front View of Nuvo-5000LP Series Side View of Nuvo-5000LP Series Bottom View of Nuvo-5000LP Series Top View of Nuvo-5026E/ Nuvo-5026E-PoE Front View of Nuvo-5026E/ Nuvo-5026E-PoE Rear View of Nuvo-5026E/ Nuvo-5026E-PoE Side View of Nuvo-5026E/ Nuvo-5026E-PoE Bottom View of Nuvo-5026E/ Nuvo-5026E-PoE Chapter 3 Getting Start Disassemble your Nuvo-5000 Controller Disassemble Nuvo-5000E/P Series Disassemble Nuvo-5000LP Series Install and Replace LGA1151 CPU Identify PCBA Revision Install a CPU on Nuvo-5000 Rev. A Replace the CPU on Nuvo-5000 Rev. A Install a CPU on Nuvo-5000 Rev. A Replace the CPU on Nuvo-5000 Rev. A Install DDR4 SODIMM Module Install DDR4 SODIMM Module for Nuvo-5000E/P Series Install DDR4 SODIMM Module for Nuvo-5000LP Series Install 2.5 SATA HDD/SSD Install 2.5 SATA HDD/SSD to HDD Bracket Install 2.5 SATA HDD/SSD to HDD Tray (Nuvo-5000LP Only) Install Mini-PCIe Module
5 3.6 Install MezIO TM Module Install Add-on Card in Cassette Mount your System Mount your System on the Wall Mount your System on the DIN-rail Connect DC Power to your System Power on your Nuvo-5000 Controller Power on Using the Power Button Power on Using an External Non-latched Switch Power on Nuvo-5000 Using Wake-on-LAN Function Chapter 4 BIOS and Driver BIOS Settings COM Port Configuration SATA Port Configuration Hot Plug for SATA Port # Enable TPM Feature Configure CPU SKU Power Wake-on-LAN Option Power On after Power Failure Option Configure Legacy/UEFI Boot Type Position New Boot Device Watchdog Timer for Booting Select a Boot Device Configure AMT Configure RAID Volume Operating System Support Driver Installation Install All Drivers Using One-Click Driver Installation Install Drivers Manually Install Driver for WDT and Per-port PoE On/Off Control Appendix A Install Windows 7 on Nuvo A.1 Before We Start A.2 Create USB Flash Drive Installer Step-by-Step Step 1 - Create.ISO file from Windows 7 DVD Step 2 - Create USB flash drive installer from.iso Step 3 - Create working folder on your local drive Step 4 - Execute batch file to patch.wim files Step 5 - Install Windows 7 using USB flash drive installer Appendix B Using Watchdog Timer Install WDT_DIO Library
6 WDT Function Reference Appendix C Using Per-Port PoE On/Off Control Per-Port PoE On/Off Control Function Reference
7 Declaimer This manual is intended to be used as a practical and informative guide only and is subject to change without prior notice. It does not represent commitment from Neousys Technology Inc. Neousys shall not be liable for direct, indirect, special, incidental, or consequential damages arising out of the use of the product or documentation, nor for any infringements upon the rights of third parties, which may result from such use. Declaration of Conformity FCC This equipment has been tested and found to comply with the limits for a Class A digital device, pursuant to part 15 of the FCC Rules. These limits are designed to provide reasonable protection against harmful interference when the equipment is operated in a commercial environment. This equipment generates, uses, and can radiate radio frequency energy and, if not installed and used in accordance with the instruction manual, may cause harmful interference to radio communications. Operation of this equipment in a residential area is likely to cause harmful interference in which case the user will be required to correct the interference at his own expense. CE The product(s) described in this manual complies with all applicable European Union (CE) directives if it has a CE marking. For computer systems to remain CE compliant, only CE-compliant parts may be used. Maintaining CE compliance also requires proper cable and cabling techniques. Copyright and Trademarks This document contains proprietary information protected by copyright. All rights are reserved. No part of this document may be reproduced by any mechanical, electronic, or other means in any form without prior written permission of the manufacturer. Company/product names mentioned herein are used for identification purposes only and are trademarks and/or registered trademarks of their respective companies


8 Chapter 1 Introduction 1.1 Overview Integrating cutting-edge technologies, Neousys creates the next-generation fanless controller, Nuvo-5000 series, with ruggedness, performance and versatility. It supports socket-type, 6th-Gen Core processors for flexible CPU selection from Pentium to Core i7 according to performance consideration, and remains -25 C to 70 C true wide-temperature operating. It provides plenty of embedded I/O functions for general applications, including Gigabit Ethernet, USB3/USB2, COM and VGA/DVI/DP triple display outputs. If they are not enough, Neousys patented Cassette offers an easy way for I/O expansion by installing an off-the-shelf PCIe/PCI card. Nuvo-5000 series further incorporates Neousys MezIO TM, an interface electronically and mechanically fitted for embedded system, to presents a cost-effective and reliable way for I/O enhancement. By installing optional MezIO TM module, Nuvo-5000 can deliver more application-oriented functions for diversified vertical markets. Latest Intel CPU, Cassette and MezIO TM creates a powerful controller with numerous I/O configuration. Nuvo-5000 is the one platform for all applications! Nuvo-5000E/P Series Nuvo-5000LP Series * R.O.C. Patent No. M
9 1.2 Product Specification Specification of Nuvo-5002E/P and Nuvo-5006E/P System Core Supports the following CPU - Intel Core i (8M Cache,3.4/4.0 GHz, 65W TDP)* - Intel Core i (6M Cache, 3.2/3.6 GHz, 65W TDP)* - Intel Core i (3M Cache, 3.7 GHz, 51W TDP)* - Intel Pentium G4400 (3M Cache, 3.3 GHz, 54W TDP)* Processor - Intel Celeron G3900 (2M Cache, 2.8 GHz, 51TDP)* - Intel Core i7-6700te (8M Cache, 2.4/3.4 GHz, 35W TDP) - Intel Core i5-6500te (6M Cache, 2.3/3.3 GHz, 35W TDP) - Intel Core i3-6100te (4M Cache, 2.7 GHz, 35W TDP) - Intel Pentium G4400TE (3M Cache, 2.4 GHz, 35W TDP) - Intel Celeron G3900TE (2M Cache, 2.3 GHz, 35W TDP) Chipset Intel Q170 Platform Controller Hub Graphics Integrated Intel HD Graphics 530/510 Memory Up to 32 GB DDR SDRAM by two SODIMM sockets AMT Supports AMT 11.0 TPM Supports TPM 2.0 I/O Interface 2x Gigabit Ethernet ports by Intel I219-LM and I210-IT (Nuvo-5002E/P) Ethernet 6x Gigabit Ethernet ports by Intel I219-LM and 5x I210-IT (Nuvo-5006E/P) 1x stacked VGA + DVI-D connector Video Port 2x DisplayPort connectors, supporting 4K2K resolution 4x USB 3.0 ports via native XHCI controller USB 4x USB 2.0 ports 2x software-programmable RS-232/422/485 ports (COM1 & COM3) Serial Port 1x RS-232 port (COM2) Audio 1x Mic-in and 1x Speaker-out Storage Interface SATA HDD 2x Gen3, 6 Gb/s SATA ports for 2.5 HDD/SSD installation, supporting RAID 0/1 msata 1x full-size msata port (mux with mini-pcie) Expansion Bus 1x PCI slot in Cassette (Nuvo-5002P/5006P) PCI/PCI Express 1x PCIe x16 Gen3, 8-lanes signals in Cassette (Nuvo-5002E/5006E) - 9 -
10 Mini PCI-E Expandable I/O 1x internal mini PCI Express socket with panel-accessible SIM socket 1x internal mini PCI Express socket with internal SIM socket (mux with msata) 1x MezIO TM expansion port for Neousys MezIO TM modules Power Supply & Ignition Control DC Input Remote Ctrl. & LED Output Max. Power Consumption 1x 3-pin pluggable terminal block for 8~35V DC input 1x 10-pin (2x5) wafer connector for remote on/off control and status LED output With Core i7-6700te: 49.2W With Core i5-6500te: 47.8W With Core i3-6100te: 39.4W Mechanical Dimension Weight Mounting 240 mm (W) x 225 mm (D) x 90 mm (H) 4.4 kg Wall-mounting (Standard) or DIN-Rail mounting (optional) Environmental with i7-6700te, i5-6500te, i3-6100te, Pentium G4400TE (35W TDP) -25 C ~ 70 C *** Operating Temperature Storage Temperature Humidity Vibration Shock EMC with i7-6700, i5-6500, i (65W/51W TDP) -25 C ~ 70 C **/*** (configured as 35W CPU mode) -25 C ~ 50 C **/*** (configured as 65W/51W CPU mode) -40 C ~85 C 10%~90%, non-condensing Operating, 5 Grms, Hz, 3 Axes (w/ SSD, according to IEC ) Operating, 50 Grms, Half-sine 11 ms Duration (w/ SSD, according to IEC ) CE/FCC Class A, according to EN & EN EN 50155:2007 * Maximal power consumption is measured with 100% CPU and 3D loading applied using Passmark BurnInTest v8.0. No Ethernet connection and external PoE devices are connected. or detail testing criteria, please contact Neousys Technology. ** For i running at 65W mode, the high operating temperature shall be limited to 50 C and thermal throttling may occur when sustained full-loading applied. Users can configure CPU power in BIOS to obtain higher operating temperature. *** For sub-zero operating temperature, a wide temperature HDD drive or Solid State Disk (SSD) is required
11 1.2.2 Specification of Nuvo-5002LP and Nuvo-5006LP System Core Supports the following CPU - Intel Core i (8M Cache,3.4/4.0 GHz, 65W TDP)* - Intel Core i (6M Cache, 3.2/3.6 GHz, 65W TDP)* - Intel Core i (3M Cache, 3.7 GHz, 51W TDP)* - Intel Pentium G4400 (3M Cache, 3.3 GHz, 54W TDP)* Processor - Intel Celeron G3900 (2M Cache, 2.8 GHz, 51TDP)* - Intel Core i7-6700te (8M Cache, 2.4/3.4 GHz, 35W TDP) - Intel Core i5-6500te (6M Cache, 2.3/3.3 GHz, 35W TDP) - Intel Core i3-6100te (4M Cache, 2.7 GHz, 35W TDP) - Intel Pentium G4400TE (3M Cache, 2.4 GHz, 35W TDP) - Intel Celeron G3900TE (2M Cache, 2.3 GHz, 35W TDP) Chipset Intel Q170 Platform Controller Hub Graphics Integrated Intel HD Graphics 530/510 Memory Up to 32 GB DDR SDRAM by two SODIMM sockets AMT Supports AMT 11.0 TPM Supports TPM 2.0 I/O Interface 2x Gigabit Ethernet ports by Intel I219-LM and I210-IT (Nuvo-5002LP) Ethernet 6x Gigabit Ethernet ports by Intel I219-LM and 5x I210-IT (Nuvo-5006LP) 1x stacked VGA + DVI-D connector Video Port 2x DisplayPort connectors, supporting 4K2K resolution 4x USB 3.0 ports via native XHCI controller USB 4x USB 2.0 ports 2x software-programmable RS-232/422/485 port (COM1 & COM3) Serial Port 1x RS-232 port (COM2) Audio 1x Mic-in and 1x Speaker-out Storage Interface SATA HDD 2x Gen3, 6 Gb/s SATA ports for 2.5 HDD/SSD installation, supporting RAID 0/1 msata 1x full-size msata port (mux with mini-pcie) Expansion Bus 1x internal mini PCI Express socket with panel-accessible SIM socket Mini PCI-E 1x internal mini PCI Express socket with internal SIM socket (mux with msata) Expandable I/O 1x MezIO TM expansion port for Neousys MezIO TM modules Power Supply & Ignition Control DC Input 1x 3-pin pluggable terminal block for 8~35V DC input
12 Remote Ctrl. & LED Output Max. Power Consumption 1x 10-pin (2x5) wafer connector for remote on/off control and status LED output With Core i7-6700te: 49.2W With Core i5-6500te: 47.8W With Core i3-6100te: 39.4W Mechanical Dimension Weight Mounting 240 mm (W) x 225 mm (D) x 77 mm (H) 3.1 kg Wall-mounting (Standard) or DIN-Rail mounting (optional) Environmental with i7-6700te, i5-6500te, i3-6100te, Pentium G4400TE (35W TDP) -25 C ~ 70 C *** Operating Temperature Storage Temperature Humidity Vibration Shock EMC with i7-6700, i5-6500, i (65W/51W TDP) -25 C ~ 70 C **/*** (configured as 35W CPU mode) -25 C ~ 50 C **/*** (configured as 65W/54W/51W CPU mode) -40 C ~85 C 10%~90%, non-condensing Operating, 5 Grms, Hz, 3 Axes (w/ SSD, according to IEC ) Operating, 50 Grms, Half-sine 11 ms Duration (w/ SSD, according to IEC ) CE/FCC Class A, according to EN & EN EN 50155:2007 * Maximal power consumption is measured with 100% CPU and 3D loading applied using Passmark BurnInTest v8.0. No Ethernet connection and external PoE devices are connected. or detail testing criteria, please contact Neousys Technology. ** For i running at 65W mode, the high operating temperature shall be limited to 50 C and thermal throttling may occur when sustained full-loading applied. Users can configure CPU power in BIOS to obtain higher operating temperature. *** For sub-zero operating temperature, a wide temperature HDD drive or Solid State Disk (SSD) is required
13 1.2.3 Specification of Nuvo-5006E-PoE/5006P-PoE/5006LP-PoE System Core Support the following CPU - Intel Core i (8M Cache,3.4/4.0 GHz, 65W TDP)* - Intel Core i (6M Cache, 3.2/3.6 GHz, 65W TDP)* - Intel Core i (3M Cache, 3.7 GHz, 51W TDP)* - Intel Pentium G4400 (3M Cache, 3.3 GHz, 54W TDP)* Processor - Intel Celeron G3900 (2M Cache, 2.8 GHz, 51TDP)* - Intel Core i7-6700te (8M Cache, 2.4/3.4 GHz, 35W TDP) - Intel Core i5-6500te (6M Cache, 2.3/3.3 GHz, 35W TDP) - Intel Core i3-6100te (4M Cache, 2.7 GHz, 35W TDP) - Intel Pentium G4400TE (3M Cache, 2.4 GHz, 35W TDP) - Intel Celeron G3900TE (2M Cache, 2.3 GHz, 35W TDP) Chipset Intel Q170 Platform Controller Hub Graphics Integrated Intel HD Graphics 530/510 Memory Up to 32 GB DDR SDRAM by two SODIMM sockets AMT Supports AMT 11.0 TPM Supports TPM 2.0 I/O Interface Ethernet 6x Gigabit Ethernet ports by Intel I219-LM and 5x I210-IT IEEE 802.3at PoE+ PSE for Port 3~6, up to 25.5 W each port, PoE+ 80 W total power budget 1x stacked VGA + DVI-D connector Video Port 2x DisplayPort connectors, supporting 4K2K resolution 4x USB 3.0 ports via native XHCI controller USB 4x USB 2.0 ports 2x software-programmable RS-232/422/485 port (COM1 & COM3) Serial Port 1x RS-232 port (COM2) Audio 1x Mic-in and 1x Speaker-out Storage Interface SATA HDD 2x Gen3, 6 Gb/s SATA ports for 2.5 HDD/SSD installation, supporting RAID 0/1 msata 1x full-size msata port (mux with mini-pcie) Expansion Bus 1x PCI slot in Cassette (Nuvo-5006P-PoE) PCI/PCI Express 1x PCIe x16 Gen3, 8-lanes PCIE signals in Cassette (Nuvo-5006E-PoE) 1x internal mini PCI Express socket with panel-accessible SIM socket Mini PCI-E 1x internal mini PCI Express socket with internal SIM socket (mux with msata)
14 Expandable I/O 1x MezIO TM expansion port for Neousys MezIO TM modules Power Supply & Ignition Control DC Input Remote Ctrl. & LED Output Max. Power Consumption 1x 3-pin pluggable terminal block for 8~35V DC input 1x 10-pin (2x5) wafer connector for remote on/off control and status LED output With Core i7-6700te: 49.2W With Core i5-6500te: 47.8W With Core i3-6100te: 39.4W Mechanical Dimension Weight Mounting 240 mm (W) x 225 mm (D) x 90 mm (H) (Nuvo-5006E-PoE / Nuvo-5006P-PoE) 240 mm (W) x 225 mm (D) x 77 mm (H) (Nuvo-5006LP-PoE) 4.4 kg (Nuvo-5006E-PoE / Nuvo-5006P-PoE) 3.1kg (Nuvo-5006LP-PoE) Wall-mounting (Standard) or DIN-Rail mounting (optional) Environmental with i7-6700te, i5-6500te, i3-6100te, Pentium G4400TE (35W TDP) -25 C ~ 70 C *** Operating Temperature Storage Temperature Humidity Vibration Shock EMC with i7-6700, i5-6500, i (65W/51W TDP) -25 C ~ 70 C **/*** (configured as 35W CPU mode) -25 C ~ 50 C **/*** (configured as 65W/54W/51W CPU mode) -40 C ~85 C 10%~90%, non-condensing Operating, 5 Grms, Hz, 3 Axes (w/ SSD, according to IEC ) Operating, 50 Grms, Half-sine 11 ms Duration (w/ SSD, according to IEC ) CE/FCC Class A, according to EN & EN EN 50155:2007 * Maximal power consumption is measured with 100% CPU and 3D loading applied using Passmark BurnInTest v8.0. No Ethernet connection and external PoE devices are connected. or detail testing criteria, please contact Neousys Technology. ** For i running at 65W mode, the high operating temperature shall be limited to 50 C and thermal throttling may occur when sustained full-loading applied. Users can configure CPU power in BIOS to obtain higher operating temperature. *** For sub-zero operating temperature, a wide temperature HDD drive or Solid State Disk (SSD) is required
15 1.2.4 Specification of Nuvo-5026E/ Nuvo-5026E-PoE System Core Intel Core i (8M Cache,3.4/ 4.0 GHz, 65W TDP)* Intel Core i (6M Cache, 3.2/ 3.6 GHz, 65W TDP)* Intel Core i (3M Cache, 3.7 GHz, 51W TDP)* Intel Pentium G4400 (3M Cache, 3.3 GHz, 54W TDP)* Processor Intel Celeron G3900 (2M Cache, 2.8 GHz, 51W TDP)* Intel Core i7-6700te (8M Cache, 2.4/ 3.4 GHz, 35W TDP) Intel Core i5-6500te (6M Cache, 2.3/ 3.3 GHz, 35W TDP) Intel Core i3-6100te (4M Cache, 2.7 GHz, 35W TDP) Intel Pentium G4400TE (3M Cache, 2.4 GHz, 35W TDP) Chipset Graphics Memory Intel Celeron G3900TE (2M Cache, 2.3 GHz, 35W TDP) Intel Q170 platform controller hub Integrated Intel HD graphics 530 or 510 (CPU dependent) Up to 32 GB DDR SDRAM by two SODIMM sockets AMT Supports AMT 11.0 TPM Supports TPM 2.0 I/O Interface Ethernet PoE+ 6x Gigabit Ethernet ports by Intel I219 and 5x I210 Optional IEEE 802.3at PoE+ PSE for GbE Ports 3 ~ 6, 80 W total power budget USB Video Port 4x USB3.0 ports via native xhci controller 4x USB2.0 ports 1x stacked VGA + DVI-D connector 2x DisplayPort connectors, supporting 4K2K resolution 2x software-programmable RS-232/ 422/ 485 port (COM1 & COM3) Serial Port 1x RS-232 port (COM2) Audio 1x Mic-in and 1x speaker-out Storage Interface SATA HDD 2x internal SATA port for 2.5 HDD/ SSD installation, supporting RAID 0/ 1 msata Expansion Bus PCI/PCI Express Mini PCI-E Expandable I/O Power Supply 1x full-size msata port (mux with mini-pcie) 2x PCIe x8 Gen3, 4-lanes PCIe signals in expansion Cassette 1x internal mini PCI Express socket with front-accessible SIM socket 1x internal mini PCI Express socket with internal SIM socket (mux with msata) 1x MezIO expansion port for Neousys MezIO modules
16 DC Input Remote Ctrl. & Status Output Mechanical Dimension Weight Mounting Environmental Operating Temperature Storage Temperature Humidity Vibration 1x 3-pin pluggable terminal block for 8~35V DC input 1x 10-pin (2x5) wafer connector for remote on/ off control and status LED output 240 mm (W) x 225 mm (D) x 111 mm (H) 3.7 kg (incl. CPU, memory and HDD) Wall-mount by mounting bracket (standard) or DIN-Rail mounting (optional) with i7-6700te, i5-6500te, i3-6100te, Pentium G4400TE (35W TDP) -25 C ~ 75 C ** with i7-6700, i5-6500, i (65W/51W TDP) -25 C ~ 70 C */ ** (configured as 35W CPU mode) -25 C ~ 50 C */ ** (configured as 65W/ 51W CPU mode) -40 C ~ 85 C 10%~90%, non-condensing Operating, 5 Grms, Hz, 3 Axes (w/ SSD, according to IEC ) Shock Operating, 50 Grms, Half-sine 11 ms Duration (w/ SSD, according to IEC ) EMC CE/ FCC Class A, according to EN55022, EN55024 & EN55032 * For i running at 65W mode, the highest operating temperature shall be limited to 50 C and thermal throttling may occur when sustained full-loading applied. Users can configure CPU power in BIOS to obtain higher operating temperature. ** For sub-zero operating temperature, a wide temperature HDD drive or Solid State Disk (SSD) is required
17 1.3 List of Supported CPU Nuvo-5000 series supports Intel 6 rd -Gen Core TM i7/i5/i3, Pentium and Celeron processor via the LGA1151 CPU socket. You can choose the following processors according to your consideration of cost and performance. Intel Core i7-6700te Processor (8M Cache, up to 3.40 GHz, 35W TDP)* Intel Core i7-6700t Processor (8M Cache, up to 3.60 GHz, 35W TDP) Intel Core i Processor (8M Cache, up to 4.00 GHz, 65W TDP)* Intel Core i5-6402p Processor (6M Cache, up to 3.40 GHz, 65W TDP) Intel Core i5-6500te Processor (6M Cache, up to 3.30 GHz, 35W TDP)* Intel Core i Processor (6M Cache, up to 3.90 GHz, 65W TDP) Intel Core i5-6600t Processor (6M Cache, up to 3.50 GHz, 35W TDP) Intel Core i Processor (6M Cache, up to 3.60 GHz, 65W TDP)* Intel Core i5-6500t Processor (6M Cache, up to 3.10 GHz, 35W TDP) Intel Core i5-6400t Processor (6M Cache, up to 2.80 GHz, 35W TDP) Intel Core i Processor (6M Cache, up to 3.30 GHz, 65W TDP) Intel Core i3-6098p Processor (3M Cache, 3.60 GHz, 54W TDP) Intel Core i3-6100te Processor (4M Cache, 2.70 GHz, 35W TDP)* Intel Core i Processor (4M Cache, 3.80 GHz, 51W TDP) Intel Core i3-6300t Processor (4M Cache, 3.30 GHz, 35W TDP) Intel Core i Processor (4M Cache, 3.90 GHz, 51W TDP) Intel Core i Processor (3M Cache, 3.70 GHz, 51W TDP)* Intel Core i3-6100t Processor (3M Cache, 3.20 GHz, 35W TDP) Intel Pentium Processor G4400TE (3M Cache, 2.40 GHz, 35W TDP)* Intel Pentium Processor G4400T (3M Cache, 2.90 GHz, 35W TDP) Intel Pentium Processor G4400 (3M Cache, 3.30 GHz, 54W TDP)* Intel Pentium Processor G4500 (3M Cache, 3.50 GHz, 51W TDP) Intel Pentium Processor G4500T (3M Cache, 3.00 GHz, 35W TDP) Intel Pentium Processor G4520 (3M Cache, 3.60 GHz, 51W TDP) Intel Celeron Processor G3900TE (2M Cache, 2.30 GHz, 35W TDP)* Intel Celeron Processor G3920 (2M Cache, 2.90 GHz, 51W TDP) Intel Celeron Processor G3900 (2M Cache, 2.80 GHz, 51W TDP)* The processors with * are listed in Intel Embedded Roadmap and with a 7-year life cycle support (2015~2021)
18 Chapter 2 Getting to Know your Nuvo Unpacking your Nuvo-5000 Controller When you receive the package of Nuvo-5000 series, please check immediately if the package contains all the items listed in the following table. If any item is missing or damaged, please contact your local dealer or Neousys Technology Inc. for further assistance. For Nuvo-5002E/P, 5006E/P, 5006E-PoE and 5006P-PoE Item Description Qty 1 Nuvo-5002E/P, 5006E/P and 5006E/P-PoE fanless controller 1 (According to the configuration you order, CPU/DDR4/HDD may be included. Please verify these items if necessary.) 2 Accessory box, which contains Neousys Drivers & Utilities DVD Wall-mounting bracket Foot pad 3-pin pluggable terminal block HDD thermal pad for 2.5 HDD/SSD (if HDD is not installed) Screw pack For Nuvo-5002LP, 5006LP and 5006LP-PoE Item Description Qty 1 Nuvo-5002LP, 5006LP and 5006LP-PoE fanless controller 1 (According to the configuration you order, CPU/DDR4/HDD may be included. Please verify these items if necessary.) 2 Accessory box, which contains Neousys Drivers & Utilities DVD Wall-mounting bracket Foot pad 3-pin pluggable terminal block Key for hot-swappable HDD tray HDD thermal pad for 2.5 HDD/SSD (if HDD is not installed) Screw pack
19 For Nuvo-5026E Item Description Qty 1 2 Nuvo-5026E (If you ordered CPU/ RAM/ HDD, please verify these items) Accessory box, which contains CPU bracket Neousys drivers & utilities DVD Wall-mounting bracket Foot pad 3-pin power terminal block HDD thermal pad for 2.5 HDD/SSD (if HDD is not installed) Screw pack Fan (40X40X10 mm) Rubber spacer
20 2.2 Front Panel I/O Functions On Nuvo-5000 series, plenty of I/O functions are provided on front panel and back panel so you can easily access them. All models of Nuvo-5000 series share the same I/O allocation and the only difference is the number of Ethernet port. We use Nuvo-5006 as an example for illustrating I/O functions. Most common computer I/O functions are placed on the front panel. In this section, we ll illustrate each I/O function on the front panel. NOTE For demonstration purposes, Nuvo-5000 series will be used in most illustrations Power Button The power button is a tact switch for ATX mode on/off operation. To turn on the Nuvo-5000 controller, press the power button and the PWR LED is lighted up. To turn off the Nuvo-5000 controller, you can either issue a shutdown command in OS, or just simply press the power button. In case of system halts, you can press and hold the power button for 5 seconds to compulsorily shut down the system. Please note that a 5 seconds interval is kept by the system between two on/off operations (i.e. once turning off the system, you shall wait for 5 seconds to initiate another power-on operation)
21 2.2.2 Reset Button The reset button is used to manually reset the system in case of any abnormal condition. To avoid unexpected operation, the reset button is hidden behind the front panel. You need to use a pin-like object to push the reset button LED Indicators There are four LED indicators on the front panel: PWR, HDD, WDT, and IGN. The descriptions of these three LED are listed in the following table. Indicator Color Description PWR Green Power indicator, lighted-up when system is on. HDD Red Hard drive indicator, flashing when SATA hard drive is active. WDT Yellow Watchdog timer indicator, flashing when watchdog timer is started. IGN Orange If ignition option (MezIO-V20) is applied, this LED is used to indicate ignition signal status

22 2.2.4 Gigabit Ethernet Port Nuvo-5000 series offers 6 GbE ports (Nuvo-5006E/5006P/5006LP) or 2 GbE ports (Nuvo-5002E/5002P/5002LP). The GbE port marked in blue is designed with Intel I219-LM and ports marked in red are implemented with Intel I210-IT Gigabit Ethernet controllers. Each port has one dedicated GbE controller and one dedicated PCI Express link to present maximal network performance. When plugging in the Ethernet cable, you can tell the Ethernet status and speed from the LED indicators on the RJ45 connector as following: Active/Link LED LED Color Status Description Off Ethernet port is disconnected Yellow On Ethernet port is connected and no data transmission Flashing Ethernet port is connected and data is transmitting/receiving Speed LED LED Color Status Description Off 10 Mbps Green or Green 100 Mbps Orange Orange 1000 Mbps The port implemented using Intel I219-LM supports Wake-on-LAN function. It is also capable of operating with Intel AMT (Active Management Technology) to support advanced features such as remote SOL desktop and remote on/off control. Please refer to section 4.2 for detail. To utilize the GbE port in Windows, you need to install corresponding driver for Intel I210-IT/I219-LM GbE controller. Please refer to section 4.5 for information of driver installation
23 2.2.5 Remote On/Off Control and Status LED Output For an application which places Nuvo-5000 controller inside a cabinet, it s useful to control the on/off of the system via an external switch, as well as check how the system s running via some external LED indicators. Nuvo-5000 series provides a 2x5, 2.0mm pitch wafer connector on the front panel for this purpose. Pin# Definition Description 1 Ctrl+ [Input] Remote on/off control, connecting to an external 2 Ctrl- switch to turn on/off the system (polarity is negligible). 3 Power+ [Output] System power indicator, on if system is turned 4 Power- on, off if system is turned off. 5 HDD+ [Output] Hard drive indicator, flashing when SATA hard 6 HDD- drive is active. 7 Standby Power+ [Output] Standby power indicator, lighting up when DC 8 Standby Power- power is applied and system is in S5 (standby) mode. 9 WDT+ [Output] Watchdog timer indicator, flashing when 10 WDT- watchdog timer is started. Note Please make sure the polarity is correct when you connect the external LED indicator to the Status LED Output
24 Pin#3 to pin#10 are used to output the system status including power, HDD, and watchdog timer status. Pin#1 and pin#2 are used to turn on or turn off the system remotely by connecting an external switch. Users should connect a non-latched switch to Ctrl+/Ctrl- as it acts exactly the same as the power button on the front panel. For detail information of using remote on/off control function, please refer to section The status LED output has a built-in series-resistor and provides 3.3V, 10mA current, which means you can use these pins to directly drive an external LED indicator USB 3.0 Connectors Nuvo-5000 series offers four USB 3.0 (SuperSpeed USB) ports on its front panel. They are implemented by native xhci (extensible Host Controller Interface) controller in Q170 chipset and are compatible with USB 3.0, USB 2.0, USB 1.1 and USB 1.0 devices. Legacy USB support is also provided so you can use USB keyboard/mouse in DOS environment. Due to the nature that XHCI driver is not included natively in Windows 7, you may encounter the issue of USB keyboard/mouse not working when installing Windows 7. Neousys offers a Windows-based batch file and step-by-step guide to help you. Please refer to Appendix A for information of installing Windows 7 on Nuvo-5000 series

25 2.2.7 DVI/HDMI Connectors Nuvo-5000 series has multiple display outputs on its front panel for connecting different displays according to your system configuration. DVI/HDMI transmits graphics data in digital format and therefore can deliver better image quality at high resolution. The DVI/HDMI connector on the front panel can either output DVI signals or HDMI signal depending on the display device connected. It supports up to 1920 x 1200 resolution. You can use a DVI to HDMI cable to connect a HDMI display device. Nuvo-5000 series supports tipple independent display outputs with any combination of VGA, DVI/HDMI and DisplayPort. To support multiple display outputs and achieve best DVI/HDMI output resolution in Windows, you need to install corresponding graphics driver. Please refer to section 4.5 for information of driver installation
26 2.2.8 VGA Connector Nuvo-5000 series has multiple display outputs on its front panel for connecting different displays according to your system configuration. VGA connector is the most popular way for connecting a display. The VGA output on Nuvo-5000 series supports up to 1920 x 1200 resolution. By BIOS default and hardware implementation, the VGA output is always enabled in any case. Nuvo-5000 series supports tipple independent display outputs with any combination of VGA, DVI/HDMI and DisplayPort. To support multiple display outputs and achieve best DVI/HDMI output resolution in Windows, you need to install corresponding graphics driver. Please refer to section 4.5 for information of driver installation. Note Please make sure your VGA cable includes SDA and SCL (DDC clock and data) signals for correct communication with monitor to get resolution/timing information. A cable without SDA/SCL can cause blank screen on your VGA monitor due to incorrect resolution/timing output
 connectors are available for high-resolution graphics outputs.")

27 2.2.9 DisplayPort Nuvo-5000 series has multiple display outputs on its front panel for connecting different displays according to your system configuration. Two DisplayPort (DP) connectors are available for high-resolution graphics outputs. They can deliver 4096 x 2304 resolution when single DP port is used or 2880 x 1800 resolution when both DP ports are simultaneously used. DisplayPort on Nuvo-5000 series are designed to support passive DP adapter/cable. You can simply use a DP-to-HDMI cable or DP-to-DVI cable connect different display devices. Nuvo-5000 series supports tipple independent display outputs with any combination of VGA, DVI/HDMI and DisplayPort. To support multiple display outputs and achieve best DVI/HDMI output resolution in Windows, you need to install corresponding graphics driver. Please refer to section 4.5 for information of driver installation
28 2.3 Back Panel I/O Functions To fit general application requirements, Nuvo-5000 series offers more I/O functions on its back panel. In this section, we ll illustrate each I/O function on the back panel. NOTE For demonstration purposes, Nuvo-5000 series will be used in most illustrations Pin Terminal Block for DC and IGN Input Nuvo-5000 series allows a wide range of DC power input from 8 to 35V via a 3-pin pluggable terminal block, which is fit for field usage where DC power is usually provided. And the screw clamping connection of the terminal block gives a very reliable way of wiring DC power. For detail information of supplying DC power via pluggable terminal block, please refer to section 3.9. In addition to DC power input, this terminal block can also accept ignition signal input (IGN) when MezIO-V20 ignition control module is installed for in-vehicle applications. Caution 1. Please make sure the voltage of DC power is correct before you connect it to Nuvo-5000 controller. Supplying a voltage over 35V will damage the system
29 2.3.2 COM Ports (COM1 / COM2 / COM3) Nuvo-5000 series provides three COM ports for communicating with external devices. COM1, COM2 and COM3 are located on the back panel via 9-pin D-Sub male connectors. hey are implemented using industrial-grade ITE8786 Super IO chip (-40 to 85 C) and provide up to bps baud rate. COM1 and COM3 are software-configurable RS-232/422/485 ports and COM2 is a standard 9-wire RS-232 port. The operation mode, slew rate and termination of COM1 and COM3 can be set in BIOS setup utility (refer to section for detail). The following table describes the pin definition of COM ports. COM1 / COM3 COM2 Pin# RS-232 Mode RS-422 Mode RS-485 Mode (Two-wire 485) RS-232 Mode 1 DCD DCD 2 RX 422 TXD+ 485 TXD+/RXD+ RX 3 TX 422 RXD+ TX 4 DTR 422 RXD- DTR 5 GND GND GND GND 6 DSR DSR 7 RTS RTS 8 CTS 422 TXD- 485 TXD-/RXD- CTS 9 RI RI
30 2.3.3 USB2.0 Connectors In addition to USB 3.0, Nuvo-5000 Series provides four USB 2.0 ports on the back panel. They are implemented by native xhci (extensible Host Controller Interface) controller in Q170 chipset and are compatible with USB 2.0, USB 1.1 and USB 1.0 devices. Legacy USB support is also provided so you can use USB keyboard/mouse in DOS environment. Due to the nature that XHCI driver is not natively included in Windows 7, you may encounter the issue of USB keyboard/mouse not working when installing Windows 7. Neousys offers a Windows-based batch file and step-by-step guide to help you. Please refer to Appendix A for information of installing Windows 7 on Nuvo-5000 series Speaker-out and Mic-in Audio Jacks Nuvo-5000 series provides audio function using Intel High Definition Audio in Q170 chipset and Realtek ALC262 codec. There are two audio jacks on the back panel. The left one is used for microphone input, and the right one is used for speaker output. To utilize the audio function in Windows, you need to install corresponding drivers for both Intel Q170 chipset and Realtek ALC262 codec. Please refer to section 4.5 for information of driver installation

31 2.3.5 MezIO TM I/O Connector Nuvo-5000 series is designed to incorporate Neousys MezIO TM interface. You can install a MezIO TM module to expand application-oriented I/O function. To support MezIO TM I/O connectivity, Nuvo-5000 series reserves the cutting hole for a SCSI-II 68-pin connector on its back panel. Please refer to section 2.5 for information of MezIO TM interface and section 3.6 for installing a MezIO TM module SIM Socket Nuvo-5000 series provides a panel-accessible SIM socket is on the back panel. Combining with a 3G/4G module installed on internal mini-pcie port, you can have Internet access via telecom operator s network. The SIM socket is a push-push type. You can insert and push a SIM card to the end to install it, and push the installed SIM card again to eject it. Please note that SIM card must be inserted upside down. You can refer to section 3.5 for information of installing a 3G/4G module and SIM card

32 2.4 Internal I/O Functions In addition to I/O connectors on the front/back panel, Nuvo-5000 series provides other features via its on-board connectors, such as SATA ports, mini-pcie sockets, internal USB ports and MezIO TM interface. In this section, we ll illustrate these internal I/O functions. NOTE For demonstration purposes, Nuvo-5000 series will be used in most illustrations DDR4 SODIMM Sockets Nuvo-5000 series provides two 260-pin, SODIMM sockets for installing DDR4 memory modules. It supports maximal 32GB capacity by installing two 16GB DDR MHz SODIMM modules. For information of installing DDR4 memory modules, please refer to section 3.3 for details
33 2.4.2 msata / mini-pcie #1 Dual-Mode Socket Nuvo-5000 series provides two mini-pcie sockets compliant with mini-pcie specification rev The first socket supports mini-pcie and msata dual mode operation. You can install either a msata SSD or mini-pcie module into this socket. The system automatically detects and configures it to run PCIe or SATA signals according to installed module. This mini-pcie socket is designed with SIM card support. With a SIM card installed, it s capable to connect your system to Internet in wide territory through telecom 3G/4G network. For WIFI/3G/4G communication, Nuvo-5000 series provides multiple SMA antenna apertures on the front and back panel for multi-antenna configuration
34 The following table describes the pin definition of msata/mini-pcie #1 dual-mode socket. Pin # Signal (mpcie) Signal (msata) Pin # Signal (mpcie) Signal (msata) 1 WAKE# Vaux +3.3Vaux 3 COEX1-4 GND GND 5 COEX V +1.5V 7 CLKREQ# - 8 UIM_PWR - 9 GND GND 10 UIM_DATA - 11 REFCLK UIM_CLK - 13 REFCLK UIM_RESET - 15 GND GND 16 UIM_VPP - Mechanical Key 17 Reserved* (UIM_C8) - 18 GND GND 19 Reserved* (UIM_C4) - 20 W_DISABLE# - 21 GND GND 22 PERST# - 23 PERn0 SATA_Rxp Vaux +3.3Vaux 25 PERp0 SATA_Rxn 26 GND GND 27 GND GND V +1.5V 29 GND GND 30 SMB_CLK SMB_CLK 31 PETn0 SATA_Txn 32 SMB_DATA SMB_DATA 33 PETp0 SATA_Txp 34 GND GND 35 GND GND 36 USB_D GND GND 38 USB_D Vaux +3.3Vaux 40 GND GND Vaux +3.3Vaux 42 LED_WWAN# - 43 GND - 44 LED_WLAN# - 45 Reserved - 46 LED_WPAN# - 47 Reserved V +1.5V 49 Reserved - 50 GND GND 51 Reserved Vaux +3.3Vaux Note Some off-the-shelf mini-pcie 4G modules are not compliant to standard mini-pcie interface. They use 1.8V I/O signals instead of standard 3.3V I/O, and may have signal conflict on certain pins. Please make sure your 4G module has the correct pin definition or consult Neousys for the compatibility. Installing an incompatible 4G module may damage the system or the module itself may be damaged
35 2.4.3 Mini-PCIe #2 Socket Nuvo-5000 series provides two mini-pcie sockets compliant with mini-pcie specification rev The second mini-pcie socket works with the panel-accessible SIM slot. There are plenty of off-the-shelf mini-pcie modules with versatile capabilities. By installing a mini-pcie module, your system can have expanded features such as WIFI, GPS, CAN bus, analog frame grabber and etc. You can also install a 3G/4G module and SIM card to access Internet in wide territory through telecom 3G/4G network. For WIFI/3G/4G communication, Nuvo-5000 provides multiple SMA antenna apertures on the front and back panel for multi-antenna configuration
36 The following table describes the pin definition of mini-pcie #2 socket. Pin # Signal Pin # Signal 1 WAKE# Vaux 3 COEX1 4 GND 5 COEX V 7 CLKREQ# 8 UIM_PWR 9 GND 10 UIM_DATA 11 REFCLK- 12 UIM_CLK 13 REFCLK+ 14 UIM_RESET 15 GND 16 UIM_VPP Mechanical Key 17 Reserved* (UIM_C8) 18 GND 19 Reserved* (UIM_C4) 20 W_DISABLE# 21 GND 22 PERST# 23 PERn Vaux 25 PERp0 26 GND 27 GND V 29 GND 30 SMB_CLK 31 PETn0 32 SMB_DATA 33 PETp0 34 GND 35 GND 36 USB_D- 37 GND 38 USB_D Vaux 40 GND Vaux 42 LED_WWAN# 43 GND 44 LED_WLAN# 45 Reserved 46 LED_WPAN# 47 Reserved V 49 Reserved 50 GND 51 Reserved Vaux Note Some off-the-shelf mini-pcie 4G modules are not compliant to standard mini-pcie interface. They use 1.8V I/O signals instead of standard 3.3V I/O, and may have signal conflict on certain pins. Please make sure your 4G module has the correct pin definition or consult Neousys for the compatibility. Installing an incompatible 4G module may damage the system or the module itself may be damaged
37 2.4.4 Internal SATA Port #1 Nuvo-5000 series provides two SATA ports which support Gen3, 6 Gb/s SATA signals. Each SATA port is composed of a 7-pin SATA connector and a 4-pin power connector. In Nuvo-5002E/P and 5006E/P, SATA port #1 is used in conjunction with the HDD bracket to accommodate the first 2.5 HDD/SSD. A dedicated cable is shipped with the system to provide standard 22-pin SATA connector. In Nuvo-5002LP and 5006LP, SATA port #1 is connected to the front-accessible, hot-plug HDD tray so you can easily install and remove a 2.5 HDD/SSD. For information of installing a HDD/SSD to SATA port #1, please refer to section 3.4 for detail
38 2.4.5 Internal SATA Port #2 Nuvo-5000 series provides two SATA ports which support Gen3, 6 Gb/s SATA signals. Each SATA port is composed of a 7-pin SATA connector and a 4-pin power connector. For all models of Nuvo-5000 series, SATA port #2 is used in conjunction with the HDD bracket to accommodate the second 2.5 HDD/SSD. A dedicated cable is shipped with the system to provide standard 22-pin SATA connector. For information of installing a HDD/SSD to SATA port #2, please refer to section 3.4 for detail
39 2.4.6 Internal USB Port Nuvo-5000 series provides one additional USB port internally on the PCBA. It supports standard USB 2.0 signals. You can utilize this USB port to connect a USB protection dongle inside the chassis of Nuvo-5000 controller


40 2.5 MezIO TM Interface MezIO TM is an innovative interface designed for integrating application-oriented I/O functions into an embedded system. It offers computer signals, power rails and control signals via a high-speed connector. MezIO TM is also mechanically reliable benefited from its 3-point mounted mezzanine structure. A MezIO TM module can leverage these signals to implement comprehensive I/O functions. Nuvo-5000 series incorporates MezIO TM interface and universal mechanical design to accommodate Neousys standard MezIO TM modules. For customers who want to develop their own MezIO TM module, Neousys provides MezIO TM design documents on a NDA basis. Please contact Neousys for further information Pin Definition of MezIO TM Interface MezIO TM interface leverages FCI BERGSTAK board-to-board connector to provide interconnectivity of high-speed signals. The receptacle part on the PCBA is FCI LF while the plug part on the MezIO TM module is FCI LF. Please refer to the following table for signal definition of its 60-pos connector
41 Function Pin Pin Function Signal Signal Description # # Description Reserved Reserved 1 2 PCIE_TXP_0 PCIe data pair Reserved Reserved 3 4 PCIE_TXN_0 PCIe data pair Reserved Reserved 5 6 GND Ground Reserved Reserved 7 8 PCIE_RXP_0 PCIe data pair System S4 signal SLP_S4# 9 10 PCIE_RXN_0 PCIe data pair Ground GND CLK100_P_0 PCIe clock pair Reserved Reserved CLK100_N_0 PCIe clock pair Ground GND GND Ground Reserved UID_LED PCIE_TXP_1 PCIe data pair Platform reset signal PLT_RST# PCIE_TXN_1 PCIe data pair USB data pair USBP5_N PCIE_RXP_1 PCIe data pair USB data pair USBP5_P PCIE_RXN_1 PCIe data pair Ground GND GND Ground SMB bus SMB_DATA CLK100_P_1 PCIe clock pair SMB bus SMB_CLK CLK100_N_1 PCIe clock pair PCIe data pair PCIE_TXP_ GND Ground PCIe data pair PCIE_TXN_ PCIE_TXP_2 PCIe data pair Ground GND PCIE_TXN_2 PCIe data pair PCIe data pair PCIE_RXP_ GND Ground PCIe data pair PCIE_RXN_ PCIE_RXP_2 PCIe data pair Power button signal PWRBTN# PCIE_RXN_2 PCIe data pair Reserved Reserved RXD4 SIO COM4 PCH GPIO GPIO_RISER TXD4 SIO COM4 PCH GPIO GPIO_RISER RXD5 SIO COM5 PCH GPIO GPIO_RISER TXD5 SIO COM5 Ground GND GND Ground 3.3V power P3V P1V8 1.8V power 3.3V power P3V GND Ground 5V power P5V P12V 12V power 5V power P5V P12V 12V power
42 2.5.2 MezIO TM Module for Nuvo-5000 Series Neousys offers standard MezIO TM modules to expand I/O functions for Nuvo-5000 series. Currently you can have more RS-232/422/485 ports, isolated digital I/O or ignition power control by installing the following module into your Nuvo-5000 controller. Neousys will continuously develop MezIO TM modules with versatile features for Nuvo-5000 series and other embedded products. Model Description Product Photo MezIO-C port RS-232/422/485 and 4-port RS-232 MezIO TM module MezIO-C port RS-232/422/485 and 4-port RS-422/485 MezIO TM module MezIO-D CH isolated DI and 8-CH isolated DO MezIO TM module
43 MezIO-D CH isolated DI and 16-CH isolated DO MezIO TM module MezIO-V20 16-mode ignition power control MezIO TM module (Nuvo-5000LP only)


 can create adequate air flow and maintain stable thermal")
44 2.6 Expansion Cassette Neousys patented expansion Cassette (R.O.C. Patent No. M456527) is an innovation design for fanless controller. By providing a separated compartment to accommodate add-on card, it s more effective to manage the thermal conditions of both the system and the add-on card. The modular concept brought by Cassette also reduces the complexity of installing and replacing an add-on card in the fanless controller. Nuvo-5006E/5002E contains a Cassette with PCI Express slot, Nuvo-5006P/5002P contains a Cassette with PCI slot and Nuvo-5026E contains a Cassette that has dual x8 PCI Express slots, each with x4 PCI Express signal. If users want to use an add-on card with higher power consumption, the fan (optional for Nuvo-5000 series, standard accessory for Nuvo-5026E) can create adequate air flow and maintain stable thermal condition for Cassette. Nuvo-50002E/P and Nuvo-5006E/P Nuvo-5026E Note 1. Due to the fanless feature, the total power consumption of installed PCI and PCIe cards should be confined to 16W to limit the heat generated by add-on cards and maintain the system stability. For applications need add-on cards which consume more than 16W, the fan option is suggested to maintain a reasonable temperature inside the chassis. Please refer to section The operating temperature of the whole system when cards installed is affected by the power consumption and operating temperature of add-on cards. Please consult your add-on card supplier or Neousys Technology for further information
 for a PCI Express add-on card with high power consumption.")
45 2.6.1 Cassette of Nuvo-5006E/5002E The expansion Cassette of Nuvo-5006E/5002E contains a backplane with a x16 PCI Express connector. It runs 8-lanes, Gen3 PCIe signals to provide a maximal 16 GB/s bandwidth. Nuvo-5006E/5002E supports 5A@12V rated current (60 watts) for a PCI Express add-on card with high power consumption. You can also get the 12VDC from the on-board power connectors if necessary. # Connector Function Description 1 x16 PCI Express x16 PCI Express connector that runs 8-lane, Gen3 signals. Compatible with x16, x8, x4 and x1 PCI Express add-on card. 3-pin, 2.54mm pitch power connector for supplying 12VDC to the optional fan. 2 12VDC Fan Power Pin Description 1 N/A 2 12V (2A rated Current) 3 GND 3 SATA Signal Standard 7-pin SATA connector 4-pin, 2.0mm pitch wafer connector for supplying 5/12VDC 4 5/12VDC Power Pin Description 12V 1 (2A rated Current) 2 GND 3 GND 5V 4 (2A rated Current)
46 2.6.2 Cassette of Nuvo-5006P/5002P The expansion Cassette of Nuvo-5006P/5002P contains a backplane with a 32-bit/33MHz PCI connector. Nuvo-5006P/5002P supports 5A@12V rated current (60 watts). You can get the 12VDC from the on-board power connectors if necessary. # Connector Function Description 1 33MHz/32-bit PCI 33MHz/32-bit PCI bus via PLX8112 PCIe-to-PCI bridge 2 3-pin, 2.54mm pitch power connector for supplying 12VDC to the optional fan. 12VDC Fan Power Pin Description 1 N/A 2 12V (2A rated Current) 3 GND 3 SATA Signal Standard 7-pin SATA connector 4 4-pin, 2.0mm pitch wafer connector for supplying 5/12VDC 5/12VDC Power Pin Description 12V 1 (2A rated Current) 2 GND 3 GND 5V 4 (2A rated Current)
.")
 3 GND 10-pin, 2.")
47 2.6.3 Cassette of Nuvo-5026E/ Nuvo-5026E-PoE The expansion Cassette of Nuvo-5026E series contains a backplane with two x8 PCI Express slot connectors with x4 PCI Express signal. It supports 7.5A@12V rated current for two PCIe slots. (60 watts Max. power consumption for PCIe slot when paired with a 65W CPU or 90 watts Max. power consumption when paired with a 35W CPU). # Connector Function Description 1 x8 PCI Express Dual x8 PCI Express connector that each runs 4-lane, Gen3 signals. Compatible with x4 and x1 PCI Express add-on card. 3-pin, 2.54mm pitch power connector for supplying 12VDC to the fan. 2 12VDC Fan Power Pin Description 1 N/A 12V 2 (2A rated Current) 3 GND 10-pin, 2.0mm pitch wafer connector for Industrial-grade Intelligent Ultracapacitor-based power backup module (PB2500J) /12VDC Power Pin Description Pin Description 1 PWRBTNJ_SLOT 2 SLP_S4_S5_n_SLOT 3 BAT_MONITOR1 4 SLP_S3_n_SLOT GND 10 GND

48 2.6.3 Neousys Cassette Module Neousys offers several read-to-use Cassette modules with pre-installed functional card and cautiously-designed thermal solution. You can simply install a Cassette module to Nuvo-5000 series to obtain additional function without concerning any thermal issue. Model Description Product Photo CSM-R800 Cassette module with 4-drives hardware RAID 0/1/10, accommodating four 2.5 SATA HDD/SSD CSM-PoE354 Cassette module with PCIe-PoE354at and pre-installed passive heat-spreader CSM-USB380 Cassette module with PCIe-USB380 and pre-installed passive heat-spreader CSM-NV750 Cassette module with nvidia GTX-750 graphics card, pre-installed heat-spreader and fan


 as a general solution for")


49 2.6.4 Fan in Cassette Enclosure When an add-on card with high power consumption (e.g. PCIe graphics card) installed in Cassette, you need to consider the thermal dissipation. Neousys offers a fan (optional accessory for Nuvo-5000 series, standard for Nuvo-5026E series) as a general solution for versatile add-on cards, to create active air flow and maintain proper temperature inside Cassette. If conduction-cooling scheme is needed, a customized a heat-spreader shall be made accordingly to contact components on add-on card and the surface of Cassette. Nuvo-5000 series Cassette fan (optional) Nuvo-5026E series Cassette fan
50 2.7 Mechanical Dimension Top View of Nuvo-5000E/5000P Series

51 2.7.2 Front View of Nuvo-5000E/5000P Series Side View of Nuvo-5000E/5000P Series

52 2.7.4 Bottom View of Nuvo-5000E/5000P Series


53 2.7.5 Top View of Nuvo-5000LP Series Front View of Nuvo-5000LP Series


54 2.7.7 Side View of Nuvo-5000LP Series Bottom View of Nuvo-5000LP Series
55 2.7.9 Top View of Nuvo-5026E/ Nuvo-5026E-PoE
56 Front View of Nuvo-5026E/ Nuvo-5026E-PoE Rear View of Nuvo-5026E/ Nuvo-5026E-PoE
57 Side View of Nuvo-5026E/ Nuvo-5026E-PoE Bottom View of Nuvo-5026E/ Nuvo-5026E-PoE
58 Chapter 3 Getting Start In this chapter, we ll illustrate how to disassemble your Nuvo-5000 controller and install all necessary components such as CPU, memory and hard drive. Please follow the correct procedures to prevent any damage on your Nuvo-5000 controller. NOTE For demonstration purposes, Nuvo-5000 series will be used in most illustrations. 3.1 Disassemble your Nuvo-5000 Controller In prior to install components such as CPU, memory and HDD to Nuvo-5000 series, you need to disassemble Nuvo-5000 controller and expose the PCBA. Please cautiously follow the procedures described here to prevent any damage on your Nuvo-5000 controller Disassemble Nuvo-5000E/P Series 1. Put the Nuvo-5000E/P controller upside down on a flat surface. 2. Unscrew four M3 flat-head screws and detach Cassette by pulling it up


59 3. Unscrew seven hex bolts on the front panel and another seven hex bolts on the back panel. And remove both front panel and back panel. (another 7 hex bolts on the opposite side) 4. Remove the bottom cover of Nuvo-5000E/P controller. You can see the PCBA exposed


60 3.1.2 Disassemble Nuvo-5000LP Series 1. Put the Nuvo-5000LP controller upside down on a flat surface. 2. Unscrew six hex bolts on the front panel and another six hex bolts on the back panel. And remove both front panel and back panel. (another 6 hex bolts on the opposite side) 3. Remove the bottom cover of Nuvo-5000LP controller and the SATA cable attached to the hot-swappable HDD tray. You can see the PCBA exposed

61 3.2 Install and Replace LGA1151 CPU Nuvo-5000 series supports 6 th -Gen, LGA1151 socket-type CPU. You can select the CPU according to your consideration of performance, cost and ambient condition. This section describes how to install or replace the CPU on your Nuvo-5000 controller. Caution Please carefully handle the exposed LGA socket on PCBA. The contacts of LGA1151 socket without protective cover are extremely easy to be damaged by foreign objects. You shall always put the protective cover back to the LGA socket when CPU is absent Identify PCBA Revision On Nuvo-5000 series, we use a retaining bracket to hold CPU firmly to the LGA1151 socket. We have different bracket design on PCBA revision A1 and revision A2. Before you go further with installing or replacing CPU, please check the PCBA revision first and follow the corresponding procedures for CPU installation/replacement. Rev. A1 Rev. A2 For Nuvo-5000 series Rev. A1, please refer to section and for instructions of installing/replacing CPU. For Nuvo-5000 series Rev. A2, please refer to section and for instructions of installing/replacing CPU
. 2. Place the PCBA on a flat surface. Remove the plastic protective cover from the LGA1151 socket.")
62 3.2.2 Install a CPU on Nuvo-5000 Rev. A1 For a Nuvo-5000 Rev. A1 barebone (without CPU installed), please follow steps described below to install a CPU on it. 1. Remove the PCBA from the heat-sink by loosing four M3 P-head screws(red circles). 2. Place the PCBA on a flat surface. Remove the plastic protective cover from the LGA1151 socket. Caution When the protective cover is removed and LGA1151 socket is exposed, please carefully handle the PCBA to avoid any damage on LGA socket

63 3. Make sure that you line up the two guiding notches on the LGA1151 socket with the notches along the edges of the CPU. Place the CPU into the socket and by holding it firmly by the sides and lowering it into the socket. 4. Get the CPU retaining bracket from the accessory box. Place it on the top of CPU and secure it to the PCBA using two M3 P-head screws

64 5. Remove all protective films of thermal pads of the heat-sink. 6. Put the PCBA back to heat-sink. Make sure all the screw holes on PCBA are aligned with mounting posts of the heat-sink. 7. Get five M3 spring screws from the accessory box. Fix them according to the order
 to fix the")
65 indicated on the photo (red circles). And tighten four M3 P-head screws (yellow circles) to fix the PCBA to the heat-sink

 and four M3 P-head screws (yellow circles). 2.")
66 3.2.3 Replace the CPU on Nuvo-5000 Rev. A1 For a Nuvo-5000 Rev. A1 with CPU installed, please follow steps described below to replace the CPU on it. Caution Please make sure the PCBA/heat-sink assembly is cooled down to room temperature before you proceed with the replacement/installation procedures. Replacing the CPU at high temperature may damage the system. 1. Remove the PCBA from the heat-sink by loosing five M3 spring screws (red circles) and four M3 P-head screws (yellow circles). 2. Hold the heat-sink firmly and gently push the PCBA forward and backward till you feel the CPU is detached from the thermal pad on the heat-sink


67 3. Gently lift the PCBA. Once you feel significant adhesion between PCBA and heat-sink, DO NOT apply more force for lifting it. In this case, please repeat step 2 to separate the PCBA from the heat-sink. 4. Place the PCBA on a flat surface. The CPU is held by a bracket on the PCBA. Unscrew two M3 P-head screws to remove the CPU retaining bracket. And carefully pick up the CPU. Caution When the original CPU is removed and LGA1151 socket is exposed, please carefully handle the PCBA to avoid any damage on LGA socket
68 5. Check the condition of thermal pads on the heat-sink, especially the thermal pad for CPU. If it s broken, please replace it with a new one. 6. Follow steps described in step 3 to step 7 in section to install a new CPU to your Nuvo-5000 controller
. 2. Place the PCBA on a flat surface. Remove the plastic protective cover from the LGA1151 socket.")
69 3.2.4 Install a CPU on Nuvo-5000 Rev. A2 For a Nuvo-5000 Rev. A2 barebone (without CPU installed), please follow steps described below to install a CPU on it. 1. Remove the PCBA from the heat-sink by loosing four M3 P-head (red circles). 2. Place the PCBA on a flat surface. Remove the plastic protective cover from the LGA1151 socket. Caution When the protective cover is removed and LGA1151 socket is exposed, please carefully handle the PCBA to avoid any damage on LGA socket


70 3. Make sure that you line up the two guiding notches on the LGA1151 socket with the notches along the edges of the CPU. Place the CPU into the socket and by holding it firmly by the sides and lowering it into the socket. 4. Get the CPU retaining bracket from the accessory box and place it on the top of CPU. On Nuvo-5000 Rev. A2, the CPU retaining bracket must be screwed from the opposite side. Please hold the CPU and bracket firmly while turning the PCBA upside down, and secure the CPU retaining bracket with two M3 P-head screws

71 5. Remove all protective films of thermal pads of the heat-sink. 6. Put the PCBA back to heat-sink. Make sure all the screw holes on PCBA are aligned with mounting posts of the heat-sink
.")
72 7. Get five M3 spring screws from the accessory box. Fix them according to the order indicated on the photo (red circles). And tighten four M3 P-head screws (yellow circles) to fix the PCBA to the heat-sink

 and six M3 P-head (yellow circles). 2.")
73 3.2.5 Replace the CPU on Nuvo-5000 Rev. A1 For a Nuvo-5000 Rev. A2 with CPU installed, please follow steps described below to replace the CPU on it. Caution Please make sure the PCBA/heat-sink assembly is cooled down to room temperature before you proceed with the installation/replacement procedures. Replacing the CPU at high temperature may damage the system. 1. Remove the PCBA from the heat-sink by loosing five M3 spring screws (red circles) and six M3 P-head (yellow circles). 2. Gently lift the PCBA from the heat-sink. The CPU and CPU retaining bracket shall stay with the heat-sink


74 Caution When the PCBA is detached and LGA1151 socket is exposed, please carefully handle the PCBA to avoid any damage on LGA socket. 3. Insert a slotted screwdriver into the gap between the CPU retaining bracket and the heat-sink, and lever the CPU and bracket. Please DO NOT apply force to the CPU otherwise the CPU can be damaged. 4. Check the condition of thermal pads on the heat-sink, especially the thermal pad for CPU. If it s broken, please replace it with a new one. 5. Follow steps described in step 3 to step 7 in section to install a new CPU to your Nuvo-5000 controller
75 3.3 Install DDR4 SODIMM Module Nuvo-5000 series provides two 260-pin, SODIMM sockets for installing DDR4 memory modules. It supports maximal 32GB capacity by installing two 16 GB DDR SODIMM modules. You can install/replace DDR4 SODIMM modules by following the steps described in this section. NOTE For demonstration purposes, Nuvo-5000 series will be used in most illustrations Install DDR4 SODIMM Module for Nuvo-5000E/P Series 1. Follow the steps described in section to disassemble the Nuvo-5000E/P chassis. You can see the DDR4 SODIMM sockets on the PCBA exposed. 2. Tile the SODIMM module and insert it to the SODIMM socket. As it s firmly contacted with socket connectors, press it down until the clamps of the socket snap into the latching position of SODIMM module. 3. Repeat step 2 if you want to install the second DDR4 SODIMM module

76 3.3.2 Install DDR4 SODIMM Module for Nuvo-5000LP Series 1. Follow the steps described in section to disassemble the Nuvo-5000LP chassis. You can see the DDR4 SODIMM sockets on the PCBA exposed. 2. Tile the SODIMM module and insert it to the SODIMM socket. As it s firmly contacted with socket connectors, press it down until the clamps of the socket snap into the latching position of SODIMM module. 3. Repeat step 2 if you want to install the second DDR4 SODIMM module


 (Nuvo-5000LP) 2.")
77 3.4 Install 2.5 SATA HDD/SSD Nuvo-5000 series has two SATA ports for connecting SATA HDD or SSD drives. On Nuvo-5000E/P series, SATA ports are used in conjunction with the HDD bracket on the trapdoor to accommodate two 2.5 HDD/SSD. On Nuvo-5000LP series, the first SATA port is connected to the panel-accessible, hot-swappable HDD tray and the second port is used in conjunction with the HDD bracket on the trapdoor. Please follow instructions described in this section to install SATA HDD/SSD to your Nuvo-5000 controller. NOTE For demonstration purposes, Nuvo-5000 series will be used in most illustrations Install 2.5 SATA HDD/SSD to HDD Bracket 1. Put the Nuvo-5000E/P or Nuvo-5000LP controller upside down on a flat surface. You can see the trapdoor exposed. Use a Philips screwdriver to loosen three M3 flat-head screws and remove the trapdoor from the bottom cover. (Nuvo-5000E/P) (Nuvo-5000LP) 2. Get the HDD thermal pad from the accessory box. Remove protective films on both sides and place the thermal pad on the center of HDD bracket. (HDD bracket of Nuvo-5000E/P) (HDD bracket of Nuvo-5000LP)


 (HDD bracket of")

 (Nuvo-5000LP) 5.")
78 3. Place the HDD/SSD into the bracket and gently push it down to make it contact with the thermal pad. Use a Philips screwdriver to fix it with M3 flat-head screws from the accessory box. Please note that the HDD must be placed in the right direction as below. (HDD bracket of Nuvo-5000E/P) (HDD bracket of Nuvo-5000LP) 4. Pull out the SATA cable inside the chassis and connect it to HDD/SSD. (Nuvo-5000E/P) (Nuvo-5000LP) 5. Place the HDD/bracket assembly back to the bottom cover. And fix it with three M3 flat-head screws. (Nuvo-5000E/P) (Nuvo-5000LP)


79 3.4.1 Install 2.5 SATA HDD/SSD to HDD Tray (Nuvo-5000LP Only) 1. Find the door of hot-swappable HDD tray on the front panel of Nuvo-5000LP controller. 2. Pull the handle of the tray door to open the hot-swappable HDD tray. 3. Insert the 2.5 HDD/SSD into the hot-swappable HDD tray. Please note the HDD must be placed in the right direction when you install it. 4. Push the handle back to the HDD tray along with the 2.5 HDD till it snaps into the latching position. 5. If necessary, get the key from the accessory box to lock the door of HDD tray and secure the HDD/SSD


80 3.5 Install Mini-PCIe Module Nuvo-5000 series provides two full-size mini-pcie sockets with SIM card support. You can install off-the-shelf mini-pcie modules to expand functions for Nuvo-5000 controller. In this section, we demonstrate how to install a mini-pcie 3G module and its antenna to the Nuvo-5000 controller. NOTE For demonstration purposes, Nuvo-5000 series will be used in most illustrations. 1. Follow the steps described in section 3.1 to disassemble the Nuvo-5000 controller. You can see mini-pcie sockets on the PCBA exposed. 2. Tilt the mini-pcie 3G module and insert it into the mini-pcie #2 socket (marked as red). And fix the module with one M2.5 P-head screw


81 3. Attach the IPEX-to-SMA cable to the 3G module. 4. Fix the SMA connector of the IPEX-to-SMA cable to one of the four antenna apertures on either front panel of back panel. 5. Recover the front panel, back panel and the bottom cover and attach a 3G antenna to the SMA connector. The mini-pcie #2 socket shall be used in conjunction with the panel-accessible SIM socket on the back panel. Insert the SIM card upside down to the SIM socket to support 3G communication for your Nuvo-5000 controller

82 3.6 Install MezIO TM Module Nuvo-5000 series is designed with Neousys MezIO TM interface. You can install a MezIO TM module to expand application-oriented I/O function. In this section, we demonstrate the procedure of installing Neousys MezIO-C180 to add eight additional COM ports to your Nuvo-5000 controller. NOTE For demonstration purposes, Nuvo-5000 series will be used in most illustrations. 1. Follow the steps described in section 3.1 to disassemble the Nuvo-5000 controller. You can see MezIO TM interface connector on the PCBA. 2. Align the board-to-board connector on the MezIO-C180 module to to connector on the PCBA. Gently push it down and make sure the connector is firmly contacted. Fix the MezIO TM module with three M3 P-head screws

83 3. Remove the pre-cutting plate of MezIO TM I/O aperture on the back panel to expose the SCSI-II 68-pin connector of the MezIO-C180 module

84 3.7 Install Add-on Card in Cassette The expansion Cassette is used to accommodate a PCI Express or PCI add-on card. To install an add-on card into Cassette, please refer to the instructions described in this section. 1. Remove Cassette from the system by loosening four M4 screws. Nuvo-5000E/P systems Nuvo-5026E series Gently wiggle and detach the Cassette enclosure from the main system enclosure

85 2. For Nuvo-5026E series, unscrew three screws shown below to remove the Cassette cover. 3. Pull the cover of Cassette toward arrow pointing direction to open it. And then remove the blank faceplate installed in Cassette by loosening a M3 screw
86 4. Install a PCI/PCIe add-on card into the PCI/PCIe connector. Note that the tail of faceplate of the add-on card must be inserted into the mortise. Tighten the add-on card using a M3 screw. 5. Recover Cassette and assemble it to system enclosure. Fix the Cassette with four M4 screws


87 3.8 Mount your System Nuvo-5000 series/ Nuvo-5026E series provide versatile ways of mounting. You can use wall-mounting brackets shipped with the system to mount it on the wall. Neousys also offers optional DIN rail mounting kit to mount it on a DIN rail. To mount your system controller, please refer to the instructions listed below Mount your System on the Wall The system is shipped with two wall-mounting brackets as the standard mounting option. Please follow steps below to mount your system on a flat surface. 1. Get two wall-mounting brackets and four M4 screws from the accessory box. Fix the mounting brackets to system using M4 screws. Nuvo-5000 series Nuvo-5026E/ Nuvo-5026E-PoE


88 2. Place the system on a flat surface and fix it with screws. You can also take advantage of the keyhole-shaped holes of mounting brackets to suspend the system on the Wall. Nuvo-5000 series Nuvo-5026E series 3. For best efficiency of heat dissipation, please mount your system in a right direction


89 3.8.2 Mount your System on the DIN-rail Neousys also provides the option of the DIN-rail mounting kit. The kit includes a bracket and a DIN-rail mounting clip. You should fix the clip to the bracket using four M4 flat-head screws first, and then fix the bracket assembly to the system with another four M4 screws. This option can be useful if you want to deploy it inside an equipment cabinet where DIN rail is available. Nuvo-5000 series Nuvo-5026E series

90 3.9 Connect DC Power to your System Nuvo-5000 series uses a 3-pin pluggable terminal block to accept 8~35V DC power input. It provides the reliable way for directly wiring the DC power. The pluggable terminal block is also used to accept ignition signal if MezIO-V20 ignition control module is installed. To connect DC power via the 3-pin pluggable terminal block, please follow the steps described below. 1. Make sure the external DC power supply is power off or disconnected before wiring. 2. Get the 3-pin pluggable terminal block from the accessory box. The terminal block fits the wires with a gauge of 12~24 AWG. 3. Carefully identify the positive and negative contacts of your DC power supply and pluggable terminal block. The polarities between DC power supply and terminal block must be positive (+) to positive (+) and ground (GND) to ground (GND). 4. Insert the wires to correct contacts of pluggable terminal block and tighten clamping screws using a Philips screwdriver. 5. Firmly plug the terminal block into a receptacle on the rear panel, and tighten the captive screws using a Slotted screwdriver. Caution 1. Nuvo-5000 series accepts 8~35 VDC when using terminal block for DC input. Please make sure the voltage and polarity of DC power is correct before you connect it to Nuvo-5000 controller. Supplying a voltage over 35V or incorrect polarity will damage the system
91 3.10 Power on your Nuvo-5000 Controller For better flexibility of operation, Nuvo-5000 series provides three alternatives to power on your Nuvo-5000 controller. You can turn on your Nuvo-5000 controller by pressing the power button, using an external non-latched switch, or by sending a special LAN packet. In this section, we illustrate these ways to power on your Nuvo-5000 controller Power on Using the Power Button This is the simplest way to turn on your Nuvo-5000 controller. The power button on the front panel is a non-latched switch and behaves the ATX-mode on/off control. As DC power is connected, push the power button will turn on the system as well as the PWR LED indicator. Push the button when system is on will turn off the system. If your operating system supports ATX power mode (i.e. Microsoft Windows or Linux), push the power button causes a pre-defined system behavior, such as shutdown or hibernation
 for connecting a non-latched switch and behaves ATX-mode power on/off control.")
92 Power on Using an External Non-latched Switch For an application which places Nuvo-5000 controller inside a cabinet, it s useful to control the on/off of the system using an external switch. Nuvo-5000 series provides a 2x5, 2.0mm pitch wafer connector (for detail, please refer to section 2.2.5) for connecting a non-latched switch and behaves ATX-mode power on/off control. The external non-latched switch acts exactly the same as the power button on the front panel. To power on Nuvo-5000 controller using an external non-latched switch (ATX-mode), please follow the steps described below. 1. Prepare a non-latched switch with a 2x5, 2.0mm pitch wafer terminal. Note that the switch must be connected to pin#1 and pin#2 (polarity is negligible). 2. Connect the wafer terminal to the wafer connector on the front panel of the Nuvo-5000 controller. 3. Push the non-latched switch will turn on the system (the PWR LED indicator on the front panel is on at the same time). Push the non-latched switch when system is on will turn off the system. If your operating system supports ATX power mode (i.e. Microsoft Windows or Linux), push the power button causes a pre-defined system behavior, such as shutdown or hibernation

93 Power on Nuvo-5000 Using Wake-on-LAN Function Wake-on-LAN (WOL) is a mechanism to wake up a computer system from a S5 (system off with standby power) state via issuing a magic packet. Nuvo-5000 series implements the Wake-on-LAN function for the GbE port marked below. To enable WOL function and power on you Nuvo-5000 controller, please follow the steps described below. 1. When Nuvo-5000 controller boots up, press F2 to enter BIOS setup utility. 2. Enter the [Power] menu. And configure the [Wake On LAN] option as [Enabled]. This setting enables the Wake-on-LAN function for Nuvo-5000 series. Please refer to section for the instruction of configuring this BIOS option. 3. In Windows 7 system, identify the Local Area Connection of corresponding Intel I219 Gigabit Controller and click the Configure button
, followed by sixteen repetitions of the target computer's 48-bit MAC")
94 4. Click the Power Management tag, and check the following two options accordingly Wake on Magic Packet Nuvo-5000 series can wake from S5 state when receiving a magic packet. The magic packet is a broadcast frame containing anywhere within its payload 6 bytes of all 255 (FF FF FF FF FF FF in hexadecimal), followed by sixteen repetitions of the target computer's 48-bit MAC address. For example, NIC s 48-bit MAC Address is 78h D0h 04h 0Ah 0Bh 0Ch DESTINATION SOURCE MISC FF FF FF FF FF FF 78 D0 04 0A 0B 0C 78 D0 04 0A 0B 0C 78 D0 04 0A 0B 0C 78 D0 04 0A 0B 0C 78 D0 04 0A 0B 0C 78 D0 04 0A 0B 0C 78 D0 04 0A 0B 0C 78 D0 04 0A 0B 0C 78 D0 04 0A 0B 0C 78 D0 04 0A 0B 0C 78 D0 04 0A 0B 0C 78 D0 04 0A 0B 0C 78 D0 04 0A 0B 0C 78 D0 04 0A 0B 0C 78 D0 04 0A 0B 0C 78 D0 04 0A 0B 0C MISC CRC There are some free tools available on Internet that can be used to send a magic packet. Please refer to the following link to understand more about Magic Packet

95 Chapter 4 BIOS and Driver 4.1 BIOS Settings Nuvo-5000 series is shipped with factory-default BIOS settings cautiously programmed for best performance and compatibility. In this section, we ll illustrate some of BIOS settings you may need to modify. Please always make sure you understand the effect of change before you proceed with any modification
96 4.1.1 COM Port Configuration There are totally five COM ports implemented on Nuvo-5000 series. COM1, COM2 and COM3 are located on the back panel. COM4 and COM5 are internally used for MezIO TM interface. COM1 and COM3 of Nuvo-5000 series support RS-232 (full-duplex), RS-422 (full-duplex) and RS-485 (half-duplex) mode, while COM2 supports RS-232 mode only. You can set the operating mode of COM1/COM3 via BIOS settings. Another option in BIOS, Slew Rate, defines how sharp the rising/falling edge is for the output signal of COM1/COM3. For long-distance RS-422/485 transmission, you may set the Slew Rate option as High to improve signal integrity. For RS-422/485 communication, the RS-422/485 Termination option determines whether to enable/disable internal termination of RS-422/485 transceiver according to your wiring configuration (e.g. with or without external termination). To configure COM1/COM3 operating mode: 1. When Nuvo-5000 controller boots up, press F2 to enter BIOS setup utility. 2. Go to [Advanced] [Peripheral Configuration]. 3. Set the [Set COM1 as] to a proper mode for COM1 of your Nuvo-5000 controller. 4. Set the [Set COM3 as] to a proper mode for COM3 of your Nuvo-5000 controller

97 4.1.2 SATA Port Configuration The SATA controller of Nuvo-5000 series supports two operating modes: AHCI and RAID mode. AHCI mode, which exposes SATA's advanced capabilities such as hot swapping and native command queuing, is supported in most of modern operating systems. RAID mode provides a more reliable data storage (RAID 1/5/10) or a higher disk access throughput (RAID 0/5/10). The RAID feature is built in Intel Q170 chipset with BIOS support. No additional H/W or driver is needed to use RAID function. You can configure the RAID volume during BIOS POST. Please refer to section 4.3 for detail. To configure SATA controller operating mode: 1. When Nuvo-5000 controller boots up, press F2 to enter BIOS setup utility. 2. Go to [Advanced] [SATA Configuration]. 3. Set the [SATA Mode Selection] to a proper mode for your Nuvo-5000 controller
98 4.1.3 Hot Plug for SATA Port #1 On Nuvo-5006LP and Nuvo-5002LP, SATA port #1 is connected to a panel-accessible HDD tray which supports hot-swap feature. You can simply eject the HDD and replace it with another one without turning off the system. By default, hot plug for SATA port # 1 is disabled in BIOS, you need to enable it in prior to support the hot-swap feature. To enable hot plug for SATA port #1: 1. When Nuvo-5000 controller boots up, press F2 to enter BIOS setup utility. 2. Go to [Advanced] [SATA Configuration]. 3. Enable the [Hot Plug] option for SATA port #1 to support hot-swap feature
99 4.1.4 Enable TPM Feature TPM, or Trusted Platform Module, is a hardware-based cryptoprocessor to secure hardware by integrating cryptographic keys into devices. Nuvo-5000 series is designed with on-board TPM 2.0 module. As TPM 2.0 requires 64-bit Windows 7/8/10 with UEFI boot mode, it is disable in BIOS by default. For customers who want to utilize TPM feature, you shall enable TPM in BIOS as well as install Windows with UEFI mode. To enable TPM 2.0 feature: 1. When Nuvo-5000 controller boots up, press F2 to enter BIOS setup utility. 2. Go to [Security]. 3. Enable TPM by selecting Available for [TPM Availability] option. 4. You will also need to select UEFI boot mode for installing Windows. Please refer to section for detail

100 4.1.5 Configure CPU SKU Power Nuvo-5000 series supports a long list of 6 th -gen Skylake LGA1151 CPU with up to 65W TDP. A unique feature, SKU Power Config is implemented in BIOS to allow users to specify user-defined SKU power limit for installed CPU according to deployment environment and power budget. For example, if a Nuvo-5000 controller with 65W i CPU installed is deployed in the environment of 60 C ambient temperature, you can limit the CPU to run with up to 45W TDP. This feature gives you the flexibility of CPU selection and great balance between computing power and operating temperature range. Here is our suggestion regarding specifying SKU power for system with 65W/54W/51W CPU. - For system running at up to 70 C ambient, specify SKU power to 35 W. - For system running at up to 60 C ambient, specify SKU power to 45 W.. - For system running at up to 50 C ambient, specify SKU power to Max. TDP. To configure the CPU SKU power limit: 1. When Nuvo-5000 controller boots up, press F2 to enter BIOS setup utility. 2. Go to [Power] [Power & Performance]. 3. Select a proper value of SKU power limit for [SKU Power Config] option
101 4.1.6 Wake-on-LAN Option Wake-on-LAN (WOL) is a mechanism which allows you to turn on your Nuvo-5000 controller via Ethernet connection. To utilize Wake-on-LAN function, you need to enable this option first in BIOS settings. Please refer to section for instructions of using WOL function. To enable/disable Wake on LAN option: 1. When Nuvo-5000 controller boots up, press F2 to enter BIOS setup utility. 2. Go to [Power]. 3. Enable/disable the [Wake on LAN] option according to your application
102 4.1.7 Power On after Power Failure Option The Power On after Power Failure option defines the behavior of Nuvo-5000 controller when DC power is supplied. Value S0 Power On S5 Power Off Description System is powered on when DC power is supplied. System is kept in off state when DC power is supplied. To set Power On after Power Failure option: 1. When Nuvo-5000 controller boots up, press F2 to enter BIOS setup utility. 2. Go to [Power]. 3. Set the [Power On after Power Failure] option to a proper value for your Nuvo-5000 controller
103 4.1.8 Configure Legacy/UEFI Boot Type Nuvo-5000 series supports both legacy and UEFI boot mode. UEFI, or Unified Extensible Firmware Interface, is a specification proposed by Intel to define a software interface between operating system and platform firmware. Most modern operating systems, such as Windows 7/8/10 and Linux, support both legacy and UEFI boot mode. Compared to that legacy boot uses MBR partition for disk and VBIOS for video initialization, UEFI boot uses GPT partition which supports > 2TB partition size and GOP driver for faster video initialization. Here is our suggestion of choosing legacy boot or UEFI boot for your system. - If you need > 2TB disk partition or want to use TPM 2.0 function, you shall choose UEFI boot mode and install operating system accordingly. - Otherwise you can choose legacy boot mode for most cases. To configure legacy or UEFI boot type: 1. When Nuvo-5000 controller boots up, press F2 to enter BIOS setup utility. 2. Go to [Boot]. 3. Set the [Boot Type] option to a proper value for your Nuvo-5000 controller
104 4.1.9 Position New Boot Device When you plug a newly-installed boot device (e.g. USB flash disk), this option allow you determine whether to place the new boot device in the first place or the last place in the boot sequence. 1. When Nuvo-5000 controller boots up, press F2 to enter BIOS setup utility. 2. Go to [Boot] menu. 3. The [Add New Boot Device] option decides whether to place the newly-installed boot device to the First place or the Last place in the boot sequence

105 Watchdog Timer for Booting The BIOS of Nuvo-5000 series has a useful feature which allows users to use the watchdog timer to secure the booting process. You can specify the timeout value for watchdog timer. Once the watchdog timer expires, the BIOS issues a reset command to initiate another booting process. You can also set the behavior of how to stop the watchdog timer. There are two options in BIOS menu, Automatically after POST and Manually after Entering OS. When Automatically after POST is selected, the BIOS automatically stop the watchdog timer after POST (Power-On Self Test) OK. When Manually after Entering OS is selected, it s user s liability to stop the watchdog timer when entering OS. This guarantees the system can always boot to OS, otherwise another booting process will be initiated. For information about programming watchdog timer, please refer to Appendix B Using Watchdog Timer. To set the watchdog timer for boot in BIOS: 1. When Nuvo-5000 controller boots up, press F2 to enter BIOS setup utility. 2. Go to [Boot] menu. 3. Disable or select timeout value for [WDT for Booting] option. 4. Once you give a timeout value, the [WDT Stop Option] option appears. You can select Automatically after POST or Manually after Entering OS
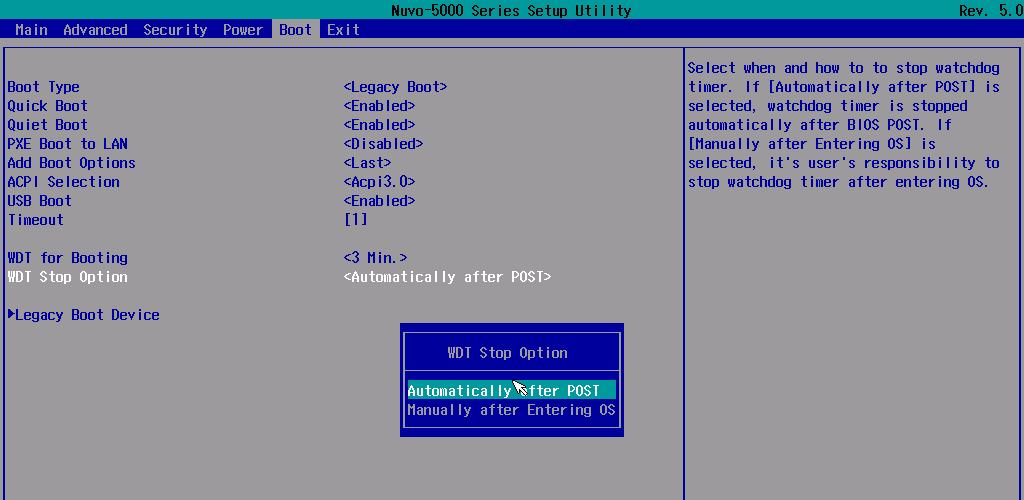
106
, you may need to select one of them as the boot device. There are two ways to select the device.")
107 Select a Boot Device When you have multiple bootable devices connected to your Nuvo-5000 controller (e.g. HDD, msata, USB flash disk, USB DVD-drive), you may need to select one of them as the boot device. There are two ways to select the device. You can either, press F12 when system boots up to go to Boot Manager and then select one of the devices, or select the boot device in BIOS settings. To select a boot device in UEFI boot mode: 1. When Nuvo-5000 controller boots up, press F2 to enter BIOS setup utility. 2. Go to [Boot] [UEFI Boot Device]. 3. Use F5/F6 or +/- to change the order of UEFI boot devices. To select a boot device in legacy boot mode: 1. When Nuvo-5000 controller boots up, press F2 to enter BIOS setup utility. 2. Go to [Boot] [Legacy Boot Device]. 3. The [Boot Menu] option decides whether to list all bootable devices connected to your Nuvo-5000 controller according to [By Device] or [By Device Type]. You can use F5/F6 or +/- to change the boot order of devices or device categories


108 4.2 Configure AMT Intel AMT (Active Management Technology) is a hardware-based technology for remotely managing target PCs via Ethernet connection. Nuvo-5000 series supports AMT function via its Ethernet port implemented with Intel I219-LM. In prior to use AMT to remotely control Nuvo-5000 series, you need to configure AMT password and network settings. 1. Make sure you have Ethernet connection on the Ethernet port implemented via I219-LM of Nuvo-5000 series. 2. Press F10 when Nuvo-5000 controller boots up. A MEBx configuration page appears. 3. Select MEBx Login and you re asked for password. The default password is admin. For further MEBx configuration, please refer to Intel MEBX User Guide. You can find related information at
, RAID 1 (data mirroring), RAID 5 (data stripping + parity) and RAID 10 (data stripping + mirroring).")
. 2.")
109 4.3 Configure RAID Volume Nuvo-5000 series supports hardware RAID function for more reliable and efficient disk access. The built-in RAID supports RAID 0 (data stripping), RAID 1 (data mirroring), RAID 5 (data stripping + parity) and RAID 10 (data stripping + mirroring). You can configure RAID mode according to your application by following steps listed below. 1. Make sure you ve configured SATA controller to RAID mode (refer to section for further information). 2. Reboot Nuvo-5000 controller, you will see a UI banner for RAID configuration. 3. Press <CTRL-I> to enter RAID configuration page. You can create, delete or configure your RAID volume here
110 4.4 Operating System Support Nuvo-5000 series supports most modern operating systems developed for Intel x86 architecture. The following list contains the operating systems which have been tested with Nuvo-5000 series in Neousys Technology Inc. Microsoft Window 7 32-bit* Microsoft Window 7 64-bit* Microsoft Window bit Microsoft Windows bit OpenSUSE 42.1** Fedora 23** Ubuntu LTS and LTS** Debian 8.3** * Due to the nature that XHCI driver is not included natively in Windows 7, you may encounter the issue of USB keyboard/mouse not working when installing Windows 7. Neousys offers a Windows-based batch file and step-by-step guide to help you. Please refer to Appendix A for information of installing Windows 7 on Nuvo ** For some Linux distributions, graphics driver and RAID function may not be completely implemented in its kernel. You may encounter restrictions when using these features, such as triple independent display and RAID. It should be user s liability to manually upgrade related drivers if necessary. Neousys will keep this list updated as we continuously test other operating systems with Nuvo-5000 series. Please contact us for the latest OS support list

111 4.5 Driver Installation Neousys provides a very convenient utility in Drivers & Utilities DVD to allow the One-Click driver installation. This utility automatically detects your Windows operating system and installs all necessary drivers to your Nuvo-5000 controller with just one mouse click Install All Drivers Using One-Click Driver Installation 1. Insert the Drivers & Utilities DVD into a USB DVD-drive attached to your Nuvo-5000 series. A setup utility launches and the following dialog appears. 2. Click on the Automatic Driver Installation. The setup utility will automatically detect your Windows operating system and install all necessary drivers. According to different versions of Windows, the installation process takes about 6~8 minutes. Once driver installation is done, the setup utility reboots your Windows and your system works normally afterward
112 4.5.2 Install Drivers Manually You can also manually install each driver for Nuvo-5000 series. Please refer to the following information about installing drivers for different operating system. Windows 7 32-bit The recommended driver installation sequence is 1. Chipset driver (x:\driver_pool\chipset_10_series\win_all\setupchipset.exe) 2. Graphics driver (x:\driver_pool\graphics_6th_i7\win_7_32\setup.exe) 3. Audio driver (x:\driver_pool\audio_alc262\win_all_32\setup.exe) 4. LAN driver (x:\driver_pool\gbe_i210_i350\win_all_32\apps\prosetdx\win32\dxsetup.exe) 5. ME driver (x:\driver_pool\me_10_series\win_all_amt\setupme.exe) Windows 7 64-bit The recommended driver installation sequence is 1. Chipset driver (x:\driver_pool\chipset_10_series\win_all\setupchipset.exe) 2. Graphics driver (x:\driver_pool\graphics_6th_i7\win_7_8_10_64\setup.exe) 3. Audio driver (x:\driver_pool\audio_alc262\win_all_64\setup.exe) 4. LAN driver (x:\driver_pool\gbe_i210_i350\win_all_64\apps\prosetdx\winx64\dxsetup.exe) 5. TPM 2.0 driver (x:\driver_pool\tpm2\win7_64\windows6.1-kb v7-x64.msu) 6. ME driver (x:\driver_pool\me_10_series\win_all_amt\setupme.exe) Windows 8/ bit The recommended driver installation sequence is 1. Chipset driver (x:\driver_pool\chipset_10_series\win_all\setupchipset.exe) 2. Graphics driver (x:\driver_pool\graphics_6th_i7\win_7_8_10_64\setup.exe) 3. Audio driver (x:\driver_pool\audio_alc262\win_all_64\setup.exe) 4. LAN driver (x:\driver_pool\gbe_i210_i350\win_all_64\apps\prosetdx\winx64\dxsetup.exe) 5. ME driver (x:\driver_pool\me_10_series\win_all_amt\setupme.exe) Windows bit The recommended driver installation sequence is 1. Chipset driver (x:\driver_pool\chipset_10_series\win_all\setupchipset.exe) 2. Graphics driver (x:\driver_pool\graphics_6th_i7\win_7_8_10_64\setup.exe) 3. Audio driver (x:\driver_pool\audio_alc262\win_all_64\setup.exe)
113 4. LAN driver (x:\driver_pool\gbe_i210_i350\win_all_64\apps\prosetdx\winx64\dxsetup.exe) 5. ME driver (x:\driver_pool\me_10_series\win_all_amt\setupme.exe)
114 4.5.3 Install Driver for WDT and Per-port PoE On/Off Control Neousys provides a driver package which contain function APIs for WDT and per-port PoE power on/off control function. You should install the driver package (WDT_DIO_Setup.exe) in prior to use these functions. Please note that you must install WDT_DIO_Setup_v2.2.2 or later revision for Nuvo-5000 series. Windows 7 32-bit Please execute the driver setup program in the following directory. x:\driver_pool\wdt_dio\xp_win7_8_32\wdt_dio_setup_v2.2.2.exe Windows 7/8/10 64-bit (x64) Please execute the driver setup program in the following directory. x:\driver_pool\wdt_dio\win7_8_64\wdt_dio_setup_v2.2.2(x64).exe Windows 7/8/10 64-bit (WOW64) Please execute the driver setup program in the following directory. x:\driver_pool\wdt_dio\win7_8_wow64\wdt_dio_setup_v2.2.2(wow64).exe
115 Appendix A Install Windows 7 on Nuvo-5000 Intel Skylake platform removes EHCI controller and supports USB 2.0 and USB 3.0 connectivity only through its xhci controller. For Windows 8/8.1 and Windows10, no issue is anticipated due to native xhci support in the OS. However, Windows 7 does not natively support xhci thus manual installation of Intel s xhci driver is required to support both USB storage device and USB keyboard/mouse during the OS installation process. To install Windows 7 on Nuvo-5000, the simplest way is to create a USB thumb drive with Windows 7 installation files and Intel xhci driver included. Neousys provides a Windows-based batch file and step-by-step guide to help you. Please follow instructions in this section to install Windows 7 on your Nuvo A.1 Before We Start... Before we proceed with the creation of USB flash drive installer, please make sure you have the following items. 1. Windows 7 original installation DVD 2. USB thumb drive with at least 4 GB capacity 3. Software utility to create ISO image from DVD, e.g. ImgBurn ( Nero ( 4. Software utility to create bootable USB drive from ISO file, e.g. Microsoft Windows USB/DVD Download Tool ( ISO to USB ( 5. You should have at least 10 GB disk space on your local drive. A.2 Create USB Flash Drive Installer Step-by-Step Step 1 - Create.ISO file from Windows 7 DVD The first step is to create a.iso file from the Windows 7 DVD. Here we use ImgBurn ( to create the.iso file and save it to local drive


116 Step 2 - Create USB flash drive installer from.iso The next step is to create a bootable USB flash drive using the.iso file created in step 1. Here we use Microsoft Windows USB/DVD Download Tool to create the USB flash drive ( Please note that the content of USB flash drive will be destroyed. 1. Right-click on the Windows 7 USB DVD Download Tool and select Run as administrator. 2. Follow the instructions below to create the USB flash drive installer
117 Step 3 - Create working folder on your local drive In this step, we need to create a working folder on your local drive and copy necessary files to it. Please following the steps below. 1. Create a temporary working folder on your local drive. Here we use D:\WIM as an example. 2. Create another folder under D:\WIM for Intel xhci driver files. Here we use \x86 for Win7 32-bit and \x64 for Win7 64-bit. 3. Copy xhci driver files to the corresponding folder. You can find the driver files from Neousys Driver DVD. For Win7 32-bit, copy all files from x:\driver_pool\usb3_10_series\win7_all\x86 to D:\WIM\x86 For Win7 64-bit, copy all files from x:\driver_pool\usb3_10_series\win7_all\x64 to D:\WIM\x64 (where x: denotes the drive of your DVD drive) 4. Copy install.wim and boot.wim from \sources folder of your USB flash drive to D:\WIM. 5. Copy the batch file (Win7_USB3_Patch_x86.bat or Win7_USB3_Patch_x64.bat) to D:\WIM. You can find the batch file in x:\driver_pool\usb3_10_series\win7_all
 to simplify this process. 1.")

118 Step 4 - Execute batch file to patch.wim files To support xhci for Windows 7 installation, both install.wim and boot.wim need to be patched to include xhci driver files. Neousys offers Windows-based batch files (Win7_USB3_Patch_x86.bat for Windows 7 32-bit and Win7_USB3_Patch_x64.bat for Windows 7 64-bit) to simplify this process. 1. Before executing the batch file, please make sure folders specified in the batch file are identical to your working folders. 2. Execute the batch file with administrator privilege. It appears an interactive menu for choosing Windows 7 edition. Please input the corresponding index number for your Windows 7 edition and press Enter

119 3. The batch file will automatically patch both install.wim and boot.wim. It takes few minutes to finish the patch process. 4. Once patch finished, please overwrite the \sources\install.wim and \sources\boot.wim in USB flash drive installer with the patched ones. Step 5 - Install Windows 7 using USB flash drive installer Now you can use the USB flash drive to install Windows 7 on your Nuvo Plug the USB flash drive to USB port of Nuvo Power on the system and press F12 to select USB flash drive as boot device. 3. Follow regular installation process to install Windows 7 on your Nuvo The xhci driver is included in the newly-installed system. Note: If it appears a warning message of Setup was unable to create a new system partition or locate an existing system partition, please to unplug and re-plug the USB flash drive, click Refresh and try again
120 Appendix B Using Watchdog Timer Nuvo-5000 series provides watchdog timer (WDT) function to ensure reliable system operation. The WDT is a hardware mechanism to reset the system if the watchdog timer is expired. Users can start the WDT and keeping resetting the timer to make sure the system or program is running. Otherwise, the system shall be reset. In this section, we ll illustrate how to use the function library provided by Neousys to program the WDT functions. Currently, WDT driver library supports Windows 7/8.1/10 32-bit and 64-bit versions. For other OS support, please contact Neousys Technology for further information. Install WDT_DIO Library The WDT_DIO function library is delivered in the form of a setup package named WDT_DIO_Setup.exe. In prior to program WDT, you should execute the setup program and install the WDT library. Please use the following WDT_DIO_Setup packages according to your operating systems and applications on Nuvo-5000 series. - For Windows 7/8.1/10 32-bit OS, please install WDT_DIO_Setup_v2.2.2.exe or later version. - For Windows 7/8.1/10 64-bit OS with 64-bit application (x64 mode), please install WDT_DIO_Setup_v2.2.2(x64).exe or later version. - For Windows 7/8.1/10 64-bit OS with 32-bit application (WOW64 mode), please install WDT_DIO_Setup_v2.2.2(wow64).exe or later version


121 To install WDT_DIO_Setup package, please follow steps described below. 1. Execute WDT_DIO_Setup exe. The following dialog appears. 2. Click Next > and specify the directory of installing related files. The default directory is C:\Neousys\WDT_DIO
Neousys Technology Inc. Nuvo-3000 Series. User s Manual. Rev. A1.1
 Neousys Technology Inc. Nuvo-3000 Series Intel 3 rd -Gen Core i7/i5/i3 Fanless Controller Nuvo-3005E/3005P Nuvo-3003E/3003P Nuvo-3005TB/3003TB User s Manual Rev. A1.1 Published September 4 th, 2013 Page
Neousys Technology Inc.
 Neousys Technology Inc. Nuvo-5100VTC Series User Manual Rev. 1.0 Table of Contents Table of Contents Table of Contents... 2 Legal Information... 5 Contact Information... 6 Declaration of Conformity...
Wide-Temperature Fanless Embedded System
 Wide- Fanless Embedded System We Create Featured Products Neousys Technology, Inc. 15F., No.868-3, Zhongzheng Rd., Zhonghe Dist., New Taipei City, 23586, Taiwan Tel: +886-2-22236182 Fax: +886-2-22236183
Neousys Technology Inc. Nuvo-3100 Series. User s Manual. Rev. A1.3
 Neousys Technology Inc. Nuvo-3100 Series Intel 3rd-Gen Core i7/i5 Fanless in-vehicle Controller Nuvo-3100VTC Nuvo-3120 User s Manual Rev. A1.3 Published Jan 27 th, 2015 Copyright 2014 Neousys Technology
RCO-3000 Advanced Fanless System with 5 th Gen Intel Broadwell Core i5/i3 or Celeron Processor, 2x LAN
 RCO-3000 Advanced Fanless System with 5 th Gen Intel Broadwell Core i5/i3 or Celeron Processor, 2x LAN FEATURES Intel Core Processor i5-5350u, up to 2.9GHz / i3-5010u, 2.1GHz or Celeron 3765U, 1.9GHz 1x
USER Manual SPC-3000/3500
 SPC-3000/3500 USER Manual Intel Core i7/i5/i3 SoC (Skylake-U) Ultra-Compact Fanless Embedded System, 4 GigE LAN, 4 USB 3.0, 9 COM, SUMIT, -40 C to 85 C 1.0.0 Edition 20161021 Record of Revision Version
EPC-APL. Quick Reference Guide. Intel Pentium /Celeron Processor Fanless Tiny System. Copyright Notice. 1 st Ed 12 September 2017
 Intel Pentium /Celeron Processor Fanless Tiny System Quick Reference Guide 1 st Ed 12 September 2017 Copyright Notice Copyright 2017 ALL RIGHTS RESERVED. Part No. E2017CAI0A0R FCC Statement THIS DEVICE
About Neousys. Rugged / Embedded. In-Vehicle Computing. Machine Vision. GPU Computing. Surveillance / Video Analytics
 Rugged / Embedded About Neousys Established in 2010, Neousys Technology designs and manufactures rugged embedded modules and systems with core expertise ranging from embedded computing to data acquisition
Neousys Technology Inc. Nuvo-3100 Series. User s Manual. Rev. A1.4
 Neousys Technology Inc. Nuvo-3100 Series Intel 3rd-Gen Core i7/i5 Fanless in-vehicle Controller Nuvo-3100VTC Nuvo-3120 User s Manual Rev. A1.4 Published Mar 19 th, 2015 Page 1 of Date Change List Version
USER Manual RCS-9000F GTX1080
 RCS-9000F GTX1080 USER Manual Intel Xeon /Core i7 GPU Computing System with NVIDIA GeForce GTX1080 Workstation-grade Performance, Expandable, Independent Graphics 1.0.0 Edition 20180402 Record of Revision
RCO-6000 Rugged Fanless Embedded System with LGA 1151 socket for Intel 6th Gen. (Skylake) Desktop Processor
 Desktop Processor") RCO-6000 Rugged Fanless Embedded System with LGA 1151 socket for Intel 6th Gen. (Skylake) Desktop Processor FEATURES LGA 1151 socket for 6th Gen. Intel Core i7/i5/i3, Pentium, or Celeron Desktop Processor
RCO-6000 Rugged Fanless Embedded System with LGA 1151 socket for Intel 6th Gen. (Skylake) Desktop Processor FEATURES LGA 1151 socket for 6th Gen. Intel Core i7/i5/i3, Pentium, or Celeron Desktop Processor
 Industrial and Embedded Computers. Software, Peripherals, and Services. 866-412-6278 www.coastipc.com Industrial and Embedded Computers. Software, Peripherals, and Services. 866-412-6278 www.coastipc.com
Neousys Technology Inc. Nuvo-2500 Series. User s Manual Rev. A1.0
 Neousys Technology Inc. Nuvo-2500 Series Compact Intel Bay Trail Fanless Computer User s Manual Rev. A1.0 Published Jul. 20th, 2015 Copyright 2015 Neousys Technology Inc. All Right Reserved. Page 1 of
Neousys Technology Inc. Nuvo-1000 Series. User s Manual. Rev. A1
 Neousys Technology Inc. Nuvo-1000 Series Intel Core i7/i5 Fanless Embedded Controller User s Manual Rev. A1 Published March 25, 2010 Copyright 2011 Neousys Technology Inc. All Right Reserved. Page 1 of
RCO Rugged Fanless System w/ Intel Broadwell-U Core i5/i3 or Celeron Processor
 RCO-3000 Rugged Fanless w/ Intel Broadwell-U Core i5/i3 or Celeron Processor FEATURES Intel Core i5-5350u, i3-5010u, or Celeron 3765U 1x 204-pin DDR3L SO-DIMM, up to 8GB 1x DVI-I and 1x DisplayPort 2x
Features. With SSD: 3 5 ~ 500 Hz, random, 1 hr/axis With 2.5" HDD: 1 5 ~ 500 Hz, random, 1 hr/axis
 MIC-7500 Compact Fanless System with 6 th Gen Intel Core i Processor Features Intel 6 th Gen Core i7/i5/i3/celeron (BGA-type) processor with Intel QM170 chipset Wide operating temperature (-20 ~ 60 C)
USER Manual RCS Xeon /Core i7/i5/i3 Fanless Robust Computing System High Performance, Flexible, Expandable, Extended Temperature.
 RCS-9000 USER Manual Intel Xeon /Core i7/i5/i3 Fanless Robust Computing System High Performance, Flexible, Expandable, Extended Temperature 1.4.0 Edition 20171103 Record of Revision Version Date Page Description
ACO In-Vehicle Fanless System w/ Intel Broadwell-U Core i5/i3 or Celeron Processor
 ACO-3000 In-Vehicle Fanless w/ Intel Broadwell-U Core i5/i3 or Celeron Processor FEATURES Intel Core i5-5350u, i3-5010u, or Celeron 3765U 1x 204-pin DDR3L SO-DIMM, up to 8GB 1x DVI-I and 1x DisplayPort
Features. Q170: 3 x independent displays (third display output via optional cable) H110: 2 x independent displays Controller
 H110: 2 x independent displays Controller") MIC-7700 NEW Compact Fanless System with 6 th /7 th Gen Intel Core i CPU Socket (LGA 1151) Features Intel 6 th /7 th Gen Core i CPU socket-type (LGA1151) with Intel Q170/ H110 chipset Wide operating temperature
MIC-7700 NEW Compact Fanless System with 6 th /7 th Gen Intel Core i CPU Socket (LGA 1151) Features Intel 6 th /7 th Gen Core i CPU socket-type (LGA1151) with Intel Q170/ H110 chipset Wide operating temperature
Features. MIC-7700Q: 3 x independent displays (third display output via optional cable) MIC-7700H: 2 x independent displays Controller
 MIC-7700H: 2 x independent displays Controller") MIC-7700 NEW Compact Fanless System with 6 th /7 th Gen Intel Core i CPU Socket (LGA 1151) Features Intel 6 th /7 th Gen Core i CPU socket-type (LGA1151) with Intel Q170/ H110 chipset Wide operating temperature
MIC-7700 NEW Compact Fanless System with 6 th /7 th Gen Intel Core i CPU Socket (LGA 1151) Features Intel 6 th /7 th Gen Core i CPU socket-type (LGA1151) with Intel Q170/ H110 chipset Wide operating temperature
Neousys Technology Inc.
 CoastIPC.com 866-412-6278 Neousys Technology Inc. User Manual Revision 1.0 Table of Contents Table of Contents Table of Contents... 2 Legal Information... 4 Contact Information... 5 Declaration of Conformity...
USER Manual ECX th Gen Intel Xeon /Core i7/i5/i3 Fanless Embedded System Workstation-grade, 10GigE LAN, Extended Temperature
 ECX-1000 USER Manual 8th Gen Intel Xeon /Core i7/i5/i3 Fanless Embedded System Workstation-grade, 10GigE LAN, Extended Temperature 1.0.0 Edition 20181008 Record of Revision Version Date Page Description
Neousys Technology Inc. Nuvo-1300af Series. User s Manual. Rev. A1
 Neousys Technology Inc. Nuvo-1300af Series Intel Core i7/i5 Fanless Embedded Controller with 4x integrated Gigabit PoE ports User s Manual Rev. A1 Published Feb 6 th, 2012 Copyright 2012 Neousys Technology
7/6th Generation Intel Xeon and Core Processors, Extreme Performance, Compact and Modular Rugged Workstation
 Rugged Embedded Computer DX-1000 7/6th Generation Intel Xeon and Core Processors, Extreme Performance, Compact and Modular Supports 7/6th Generation Intel Xeon / Core LGA1151 Socket Type Processors with
Features. -40 ~ 60 95% humidity (non-condensing) 40 C (non-condensing) Vibration
 40 C (non-condensing) Vibration") MIC-7300 NEW Compact Fanless System with Intel Celeron N3350/Atom x7-e3950 Processor Features Intel Celeron N3350/Atom x7-e3950 processor 2 x RS-232/422/485 and 4 x RS232 serial ports (with expansion cable)
MIC-7300 NEW Compact Fanless System with Intel Celeron N3350/Atom x7-e3950 Processor Features Intel Celeron N3350/Atom x7-e3950 processor 2 x RS-232/422/485 and 4 x RS232 serial ports (with expansion cable)
IVH-9000 Series. 4K Isolated DIO
 IVH-9000 Series Quad Core 6th Gen Intel Xeon / Core i7/ i5/ i3 (Skylake-H) In-Vehicle Fanless Embedded with Intel CM236, 18 GigE LAN with 16 PoE +, 4 Front-access SSD Tray,, High Performance, Rugged, Extended
Features. -40 ~ 60 95% humidity (non-condensing) 40 C (non-condensing) Vibration
 40 C (non-condensing) Vibration") MIC-7300 NEW Compact Fanless System with Intel Celeron N3350/Atom x7-e3950 Processor Features Intel Celeron N3350/Atom x7-e3950 processor 2 x RS-232/422/485 and 4 x RS232 serial ports (with expansion cable)
MIC-7300 NEW Compact Fanless System with Intel Celeron N3350/Atom x7-e3950 Processor Features Intel Celeron N3350/Atom x7-e3950 processor 2 x RS-232/422/485 and 4 x RS232 serial ports (with expansion cable)
Neousys Technology Inc. POC-120 Series. User s Manual. Rev. A1
 Neousys Technology Inc. POC-120 Series Ultra-compact Atom Bay Trail-I Fanless General-Purpose Embedded Controller User s Manual Rev. A1 Published May 29 th, 2015 Copyright 2015 Neousys Technology Inc.
RCO Compact Rugged Fanless System with Intel Atom E3827/E3845 or Celeron J1900
 RCO-1000 Compact Rugged Fanless System with Intel Atom E3827/E3845 or Celeron J1900 FEATURES Intel Atom Processor E3827, E3845, or Celeron J1900 1x 204-pin DDR3L SO-DIMM, up to 8GB Dual independent display
USER Manual ECS Quad Core Intel Core i7/i5/i3 w/c236 Fanless Embedded System High Performance, Rugged, -40 C to 75 C Extended Temp.
 ECS-9000 USER Manual Quad Core Intel Core i7/i5/i3 w/c236 Fanless Embedded System High Performance, Rugged, -40 C to 75 C Extended Temp. 1.3.0 Edition 20180202 Record of Revision Version Date Page Description
Rugged Fanless Computer. The Cincoze Diamond Line is a rugged, reliable and comprehensive solution for critical industrial environments.
 Rugged Fanless Computer The Cincoze Diamond Line is a rugged, reliable and comprehensive solution for critical industrial environments. DA Series. Efficient & Palm Size Rugged Fanless Computer Onboard
RIGID BCDM01S-RGD. Data Sheet. Extreme Temperature Environmentally Hardened Video Servers. Environmentally Hardened Video Server KEY FEATURES
 RIGID BCDM01S-RGD Extreme Temperature Environmentally Hardened Video Servers The Rigid Server Series places durability at the forefront. Mobile, invehicle, and remote environments can create extreme temperatures
JNAF791 Series ATX. ATX Embedded Motherboard, 8th Generation Intel Xeon E, Core i7/ i5 /i3, Pentium Celeron LGA1151 Socket Processor, Max.
 ATX JNAF791 Series ATX Embedded Motherboard, 8th Generation Intel Xeon E, Core i7/ i5 /i3, Pentium Celeron LGA1151 Socket Processor, Max. 95W TDP The JETWAY JNAF791 Series are ATX form factor board adopts
ACO-6000 Series Surveillance Applied Fanless System
 ACO-6000 Series Surveillance Applied Fanless System Table of Contents Prefaces.. 04 Revision....... 04 Disclaimer...... 04 Copyright Notice.... 04 Trademarks Acknowledgment...... 04 Environmental Protection
EVS Series. Intel Xeon /Core i7/i5/i3 Fanless GPU Computing System with Intel C236 & NVIDIA GeForce GT K Isolated DIO.
 EVS-1000 Series Xeon /Core i7/i5/i3 Fanless GPU Computing System with C236 & NVIDIA GeForce GT 1030 Fanless, -25 C to 60 C Operating Temperature LGA 1151 Socket supports workstation-grade 7th generation
fit-pc Intense 2 Overview
 specifications Specifications: Overview is the second generation of the acclaimed miniature fanless PC, and further improves the best-in-class features of its predecessor with 4 th and 5 th generations
MPC-FR Series Fanless Ruggedized Marine Computer
 N W MARINE PC E S MPC-FR Series Fanless Ruggedized Marine Computer User Manual www.marinepc.com MPC-FR Series FCC Statement THIS DEVICE COMPLIES WITH PART 15 FCC RULES. OPERATION IS SUBJECT TO THE FOLLOWING
Neousys Technology Inc. PCIe-PoE2+/PCIe-PoE4+ User s Manual. Rev. A1
 Neousys Technology Inc. PCIe-PoE2+/PCIe-PoE4+ 2-Port/4-Port x4 PCI-E Gigabit Power over Ethernet Frame Grabber Card User s Manual Rev. A1 Published Apr 10 th, 2012 Page 1 of Contents Declaimer...3 Declaration
Neousys Technology Inc.
 Neousys Technology Inc. Nuvo-6108GC Series User Manual Revision 1.0 Table of Contents Table of Contents Table of Contents... 2 Legal Information... 4 Contact Information... 5 Declaration of Conformity...
MB-i87Q0. CPU Intel 4 th Gen. Core Processors in LGA1150. LAN Intel PCIe i217lm GbE PHY (iamt supported) Intel PCIe i210at GbE controller
 Intel PCIe i210at GbE controller") MB-i87Q0 Micro-ATX Industrial Motherboard Quick Installation Guide Version. Form Factor Micro-ATX Industrial Motherboard CPU Intel th Gen. Core Processors in LGA50 Chipset Intel Q87 PCH I/O PCIe/ PCI/
MB-i87Q0 Micro-ATX Industrial Motherboard Quick Installation Guide Version. Form Factor Micro-ATX Industrial Motherboard CPU Intel th Gen. Core Processors in LGA50 Chipset Intel Q87 PCH I/O PCIe/ PCI/
ITX-i77M0. 3 rd Generation Intel Core i7/i5/i3 Processors in rpga988 (Socket G2)
") ITX-i77M0 Mini-ITX Industrial Motherboard Quick Installation Guide Version. Form Factor Mini-ITX CPU 3 rd Generation Intel Core i7/i5/i3 Processors in rpga988 (Socket G) Chipset Intel QM77 Video Dual Channel
ITX-i77M0 Mini-ITX Industrial Motherboard Quick Installation Guide Version. Form Factor Mini-ITX CPU 3 rd Generation Intel Core i7/i5/i3 Processors in rpga988 (Socket G) Chipset Intel QM77 Video Dual Channel
MB-i67Q0. CPU Intel LGA1155 Socket Processors. LAN Intel 82579LM PCIe 10/100/1000 Base-T Ethernet, Intel 82583V PCIe 10/100/1000 Base-T Ethernet
 MB-i67Q0 Micro-ATX Industrial Motherboard Quick Installation Guide Version.2 Form Factor Micro-ATX Industrial Motherboard CPU Intel LGA55 Socket Processors Chipset Intel PCH Q67 I/O PCIe/ PCI/ SATA/ USB/
DA PoE. Key Features. Highlights. Intel Pentium N4200 / Celeron N3350 Processor Affordable Fanless Embedded Computer. Rugged Embedded Computer
 DA-1100 Intel Pentium N4200 / Celeron N3350 Processor Affordable Fanless Embedded Computer Key Features Onboard Intel Pentium N4200 / Celeron N3350 Processor Supports Triple Independent Display Supports
KEEX-7100 Series Single Board Computer in 3.5" ECX Form Factor with Intel Ivy Bridge Processors
 Single Board Computer in 3.5" ECX Form Factor with Intel Ivy Bridge Processors Intel Intel Ivy Bridge UE Processor Intel QM77/ HM76 Express Chipset 1x DDR3 SO-DIMM 2x SATA, 1x msata for Storage 2x LVDS,
Overview. Icon Descriptions. Acknowledgement. Intel, Pentium and Celeron are registered trademarks of Intel Corp.
 Model: AOPS-7080 Overview Icon Descriptions The icons are used in the manual to serve as an indication of interest topics or important messages. Below is a description of these icons: Copyright and Trademarks
Thank you for selecting UTC RETAIL s innovative Model 1170 Point of Sale solution!
 1170 POS SYSTEM 1170 USER GUIDE Thank you for selecting UTC RETAIL s innovative Model 1170 Point of Sale solution! This guide is designed to acquaint you with the features and functionality of the 1170
Neousys Technology Inc. PCIe-PoE354at/PCIe-PoE352at. User s Manual. Rev. A1
 Neousys Technology Inc. PCIe-PoE354at/PCIe-PoE352at 4-Port / 2-Port Server-grade Gigabit 802.3at PoE+ Frame Grabber Card User s Manual Rev. A1 Published Jun 18th, 2015 Copyright 2015 Neousys Technology
MIL-STD Rugged Computer User's Manual. Version 1.0 Revision Date: July. 05, 2017 THOR200. MIL-STD Rugged Computer
 THOR200 MIL-STD Rugged Computer Safety information Electrical safety To prevent electrical shock hazard, disconnect the power cable from the electrical outlet before relocating the system. When adding
RCO-3200 Series Advanced Fanless Embedded System
 RCO-3200 Series Advanced Fanless Embedded System Table of Contents Prefaces.. 04 Revision..... 04 Disclaimer....... 04 Copyright Notice.. 04 Trademarks Acknowledgment.....04 Environmental Protection Announcement....
OMNI Expandable HMI Panel Computer with Intel Celeron J1900/ N2807 Processor
 17 OMNI-2155 15.6 Expandable HMI Panel Computer with Intel Celeron J1900/ N2807 Processor Expandable HMI Panel PC Solution OMNI Slot 9-30 V Power Connector RS-232/422/485 VGA Remote Power Connector USB
Compact, fanless, vibration-proof computers for rolling stock applications. Features and Benefits. Certifications
 V2416A Series Compact, fanless, vibration-proof computers for rolling stock applications Features and Benefits Intel Celeron/Core i7 processor Two hot-swappable 2.5-inch HDD or SSD storage expansion trays
PCIE-Q670-R20 Quick Installation Guide Version 2.01
 Full-size PICMG 1.3 CPU Card supports LGA1155 Intel, Intel Core i7/i5/i3/pentium and Celeron processor CPU per Intel Q67, DDR3, VGA /DVI-D, Dual Intel PCIe GbE, SATA 6Gb/s, mini PCIe, HD Audio and RoHS
ITX-i67M0. Soldered onboard Intel Core i7/i5/i3,celeron in rpga988 (Socket G2)
") ITX-i6M0 Mini-ITX Industrial Motherboard Quick Installation Guide Version. Form Factor Mini-ITX CPU Soldered onboard Intel Core i/i5/i,celeron in rpga88 (Socket G) Chipset Intel QM6 Video Dual Channel
ITX-i6M0 Mini-ITX Industrial Motherboard Quick Installation Guide Version. Form Factor Mini-ITX CPU Soldered onboard Intel Core i/i5/i,celeron in rpga88 (Socket G) Chipset Intel QM6 Video Dual Channel
Key Features. Instant Reboot The CV-100/P2000 Series supports 0.2 second instant reboot for critical factory application.
 CV-115/P2000 15" 6th Gen. Intel Core Processor U Series Fanless Touch Panel PC with CFM & CDS Technology Key Features 15" XGA TFT-LCD with Resistive 5-wire / Projected CapacitiveTouch Onboard Intel 6th
SPECTRA-POWERBOX 3000A-SERIES
 FEATURES Support from Intel Dual Core & Quad SuperCap integrated for CMOS Core Desktop 6th Generation processors battery maintain-free Robust Mini-PC in attractiv industrial design Power ignition input,
Rugged Panel PC AcuPanel 17 User Manual Revision 1.5
 ACURA EMBEDDED SYSTEMS INC. Rugged Panel PC AcuPanel 17 User Manual Revision 1.5 Contents Chapter 1: AcuPanel 17 Overview Specifications... 2 Knowing AcuPanel 17... 4 Rear Top... 4 Rear Bottom... 5 Rear
Key Features. Instant Reboot The CV-100/P2000 Series supports 0.2 second instant reboot for critical factory application.
 CV-117/P2000 17" 6th Gen. Intel Core Processor U Series Fanless Touch Panel PC with CFM & CDS Technology Key Features 17" SXGA TFT-LCD with Resistive 5-wire / Projected CapacitiveTouch Onboard Intel 6th
USER Manual ECS-9200/9100
 ECS-9200/9100 USER Manual Quad Core Intel Xeon / Core i7/ i5/ i3 Fanless Embedded System High Performance, Rugged, Expandable, -40 C to 75 C Extended Temp 1.2.0 Edition 20170919 Record of Revision Version
Key Features. Instant Reboot The CV-100/P2000 Series supports 0.2 second instant reboot for critical factory application.
 CV-119/P2000 19" 6th Gen. Intel Core Processor U Series Fanless Touch Panel PC with CFM & CDS Technology Key Features 19" SXGA TFT-LCD with Resistive 5-wire / Projected CapacitiveTouch Onboard Intel 6th
fitlet-rm specifications
 fitlet-rm specifications fitlet-rm Rugged and Robust fitlet-rm is a ruggedized miniature fanless PC housed in an all-metal housing. It provides excellent durability at extreme temperatures and under conditions
Rugged Panel PC AcuPanel 12 User Manual Revision 2.0
 ACURA EMBEDDED SYSTEMS INC. Rugged Panel PC AcuPanel 12 User Manual Revision 2.0 Contents Chapter 1: AcuPanel 12 Overview Specifications... 2 Knowing AcuPanel 12... 4 Rear Top... 4 Rear Bottom... 5 Rear
VL BPC 100. Valueline configurable box PC. Data sheet 3063_en_E. 1 Description. 2 Features
 Valueline configurable box PC Data sheet 0_en_E Description PHOENIX CONTACT 0-07- Features The VL BPC 000 is a configurable box PC that can be mounted either directly on a wall or on a DIN rail. The VL
USER Manual PE PCI Express x4, 2-channel/ 4-channel Gigabit LAN, IEEE 802.3at Compliant PoE + Expansion Card. 1.1.
 PE-1000 USER Manual PCI Express x4, 2-channel/ 4-channel Gigabit LAN, IEEE 802.3at Compliant PoE + Expansion Card 1.1.0 Edition 20150713 Record of Revision Version Date Page Description Remark 0.9 01/20/2015
ARC Quick Reference Guide. 12.1" Intel Atom SoC Processor E3845 Fanless Rugged Touch Panel PC with IET Expansion.
 12.1" Intel Atom SoC Processor E3845 Fanless Rugged Touch Panel PC with IET Expansion Quick Reference Guide 1 st Ed 07 January 2015 Copyright Notice Copyright 2015 Avalue Technology Inc., ALL RIGHTS RESERVED.
iops-18 User Manual 2013 Oct V1 IBASE Technology Inc.
 www.ibase.com.tw iops-18 User Manual 2013 Oct V1 IBASE Technology Inc. iops-18 User Manual 1 Copyright 2013 IBASE Technology Inc. All Rights Reserved. No part of this manual, including the products and
CS-112/P nits. Key Features. Overview. Highlights -20 C ~ 70 C. Industrial Panel PC
 CS-112/P2000 12.1" TFT-LCD Sunlight Readable Touch Panel PC with 6th Gen. Intel Core Processor Sunlight Readable Key Features 12.1 TFT-LCD with Ultra High Brightness up to 1,500 nits and 1024 x 768 (XGA)
DATENBLATT. BP-ECS7000-Serie. HABEN SIE FRAGEN ODER WÜNSCHEN SIE EIN INDIVIDUELLES ANGEBOT? Unser Team berät Sie gerne persönlich.
 DATENBLATT BP-ECS7000-Serie HABEN SIE FRAGEN ODER WÜNSCHEN SIE EIN INDIVIDUELLES ANGEBOT? Unser Team berät Sie gerne persönlich. TELEFON + 49 (0) 81 41/36 97-0 TELEFAX + 49 (0) 81 41/36 97-30 E-MAIL info@plug-in.de
KEEX-5100 Series Standard / Extended Temperature Single Board Computer in 3.5" ECX Form Factor with Intel Haswell / Broadwell ULT Processors
 Standard / Extended Temperature Single Board Computer in 3.5" ECX Form Factor with Intel Haswell / Broadwell ULT Processors 4th /5th Gen. Intel Haswell / Broadwell ULT Processor 1x DDR3L SO-DIMM Socket
Key Features. Instant Reboot The CV-100/P2000 Series supports 0.2 second instant reboot for critical factory application.
 CV-W115/P2000 15.6" 6th Gen. Intel Core Processor U Series Fanless Touch Panel PC with CFM & CDS Technology Key Features 15.6" WXGA TFT-LCD with Resistive 5-wire / Projected CapacitiveTouch Onboard Intel
EmCORE-i65M3. Intel Celeron TM 827E Processor. 2 x Intel 82583V PCIe Gigabit Ethernet
 Form Factor 3.5" Compact Board EmCORE-i65M3 CPU Intel Celeron TM E Processor 3.5" Compact Board Quick Installation Guide Version. Chipset Intel PCH HM65 Video Dual Channels 4-bit LVDS/ DVI-I LAN x Intel
3U 19-inch IEC native PRP/HSR computers with Intel Celeron, Core i3 or i7 CPU. Features and Benefits. Certifications
 DA-820 Series 3U 19-inch IEC 61850 native PRP/HSR computers with Intel Celeron, Core i3 or i7 CPU Features and Benefits IEC 61850-3, IEEE 1613, and IEC 60255 compliant for power substation automation systems
Features and Benefits. Certifications
 V2403 Series Fanless, rugged, ready-to-go x86 Industrial IoT embedded computers Features and Benefits Intel Core-i Series processor with three performance options -40 to 70 C (system and LTE) operating
HMIBMUSI29D2801 Modular Box PC HMIBM Universal SSD DC Windows 10 2 slots
 Characteristics Modular Box PC HMIBM Universal SSD DC Windows 10 2 slots Main Range of product Product or component type Device short name Processor name Chipset type Free slots Video controller type Operating
1151 CPU, DP/ VGA, 5 COM, 6 USB,
 PPC-MB-8260AE Mini-ITX Motherboard with Intel Core i7/i5/i3/pentium /Celeron LGA 1151 CPU, DP/ VGA, 5 COM, 6 USB, Dual LAN, PCIe x4, and Mini PCIe Startup Manual Packing List Specifications Before card
ECX-SLU0 / KLU0 Series
 Standard / Extended Temperature Single Board Computer in 3.5" ECX Form Factor with Intel Skylake / Kaby Lake U-Series Processors Intel Skylake / Kaby Lake U-Series Processors 2x DDR4 SO-DIMM 1x LVDS, 1x
MARINE PC MPC-SPC12 & -17
 N W MARINE PC E S MPC-SPC12 & -17 12.1 & 17 LED/LCD Touch Screen Panel PC Fanless Intel CoreTM E3845 QuadCore CPU Rugged Embedded Computer for All-Weather Conditions Quick Reference Guide 1 ST Ed 4 December
TANK- 800-D H61. Embedded System. Features. Versatile Expansion Interface. Rich I/O Function
 TANK- 800-D525 820-H61 Intel D525 3-Slot Fanless Embedded System Intel Sandy Bridge 3-Slot Embedded System Features Intel Atom D525 1.8GHz dual-core processor for TANK-800 2nd Generation Intel Core low
JNU691 Series. Intel Apollo Lake Processor Motherboard support 3 Independent Display outputs (2 * HDMI Ports and 1 * VGA Port)
") NUC SBC JNU691 Series Intel Apollo Lake Processor Motherboard support 3 Independent Display outputs (2 * HDMI Ports and 1 * VGA Port) Product Introduction The JETWAY JNU691 Series adopts the Intel Apollo
NUC SBC JNU691 Series Intel Apollo Lake Processor Motherboard support 3 Independent Display outputs (2 * HDMI Ports and 1 * VGA Port) Product Introduction The JETWAY JNU691 Series adopts the Intel Apollo
WAFER-ULT-i1 WAFER-ULT2-i1. Quick Installation Guide Version 1.1
 3.5" SBC supports Intel 22nm 4 th / 14nm 5 th Generation Mobile Core i7/i5/i3 and Celeron on-board Processor (ULT), VGA, LVDS, idp, Dual GbE, PCIe Mini, USB 3.0, SATA 6Gb/s, Audio, iris-1010 and RoHS WAFER-ULT-i1
PPC-MB-8260AE (Intel Core i7/i5/i3/pentium/ Celeron LGA 1151 Mini-ITX with DP/VGA, 5 COM, 6 USB, Dual LAN, PCIe x4, Mini PCIe, DDR4) Startup Manual
 Startup Manual") PPC-MB-8260AE (Intel i7/i5/i3/pentium/ Celeron LGA 1151 Mini-ITX with DP/VGA, 5 COM, 6 USB, Dual LAN, PCIe x4, Mini PCIe, DDR4) Startup Manual Packing List Specifications Before card installation, ensure
PPC-MB-8260AE (Intel i7/i5/i3/pentium/ Celeron LGA 1151 Mini-ITX with DP/VGA, 5 COM, 6 USB, Dual LAN, PCIe x4, Mini PCIe, DDR4) Startup Manual Packing List Specifications Before card installation, ensure
Features and Benefits. Certifications
 V2616A Series High-performance network video recorder computers Features and Benefits Compliant with EN 50121-4 Complies with all EN 50155 mandatory test items 1 IEC 61373 certified for shock and vibration
Compact Size Embedded System
 Compact Size Embedded Model Name uibx-0-bw uibx-0-bt uibx-0-cv-n600 Black Silver Silver Dimensions (WxDxH) (mm) 6.6 x 0. x 7 x 0.8 x 7 6.6 x x. Fan Construction Extruded aluminum alloy Extruded aluminum
42"Chassis Touch Screen Monitor
 42"Chassis Touch Screen Monitor Model : TSPC 4201 PCT Features Fully Flat Projective Capacitive Touch Technology 10 Point muti touch,40 Point multi touch available Integrated removable PC module,external
VL BPC MINI. A configurable industrial computer platform. Data sheet 2930_en_F. 1 Description. 2 Features
 A configurable industrial computer platform Data sheet 90_en_F Description PHOENIX CONTACT 0-08- Features The VL BPC MINI is an embedded box PC and is part of the Valueline family of industrial computers.
1.0.4 Edition 10/03/2014 All information is subject to change without notice.
 1.0.4 Edition 10/03/2014 All information is subject to change without notice. Worldwide Technical Support and Product Information www.vecow.com Vecow Corporate Headquarters 12F No 111 Zhongcheng Rd Tucheng
NVR-CV. Network Video Recorder Hot-Swappable Tray for 3.5 HDD x 4 or 2.5 HDD x 4 Gigabit Ethernet x 2 COM x 2, USB2.0 x 6. VGA x 1, DVI-D x 1
 Netw ork Video Recorder N V R - CV Network Video Recorder Hot-Swappable Tray for 3.5 HDD x 4 or 2.5 HDD x 4 Gigabit Ethernet x 2 COM x 2, USB2.0 x 6 VGA x 1, DVI-D x 1 Manual 1st Ed. Oct. 2013 Copyright
DE2700 (QuickSilver) Introduction
 Introduction") DE2700 (QuickSilver) Introduction AOpen B2B Product Management Division April 2009 v.1.0 Contents 1. Target market and product segment 2. Product features 3. Lifecycle information 4. Product spec information
DE2700 (QuickSilver) Introduction AOpen B2B Product Management Division April 2009 v.1.0 Contents 1. Target market and product segment 2. Product features 3. Lifecycle information 4. Product spec information
ACO-3000 Series Vehicle Applied Fanless System
 ACO-3000 Series Vehicle Applied Fanless System Table of Contents Prefaces.. 04 Revision..... 04 Disclaimer....... 04 Copyright Notice.. 04 Trademarks Acknowledgment.....04 Environmental Protection Announcement....
General. Display. Ethernet Interface. MIO-5271 Startup Manual 1
 MIO-5271 3.5 MI/O-Compact SBC, Intel Core U-series (i5/celeron ), DDR3L, VGA, HDMI/DP, 48-bit LVDS, 2 x GbE, 2 x Mini PCIe, msata, Fanless, imanager, MIOe Startup Manual Packing List Before you begin installing
Heavy Duty Fanless Touch Panel PC GOT3217W-881-PCT.
 Heavy Duty Fanless Touch Panel PC GOT3217W-881-PCT Model GOT3000 Product Line GOT3217W 881 PCT GOT3846T GOT3106T GOT3126T GOT3156T GOT3177T GOT3157W GOT3187W GOT3217W Aspect Ratio 4:3 Rectangle 16:9 Wide
BoxPC G-Series. Arista 3rd Generation Fanless Industrial Computers. Intel AMT. Rapid Storage Technology
 BoxPC G-Series Arista 3rd Generation Fanless Industrial Computers Rapid Storage Technology Intel AMT R i7 Powerhouse BoxPC-138-G00 and BoxPC-238-G00 are powered by Intel 3rd generation i7 mobile processor
Expandable Embedded Computer. MXC-2000 Series Intel Atom Fanless Expandable Embedded Computer with PCI/PCIe Slots
 Expandable Embedded Computer MXC-2000 Series Intel Atom Fanless Expandable Embedded Computer with PCI/PCIe Slots Intel Atom N270 1.6 GHz processor + 945GSE chipset Configurable, providing both PCI and
0B specifications 1B
 0B 1Bspecifications fit-pc 4 fit-pc4 Specifications2 Overview Using AMD's latest G-Series 'Jaguar' Quad Core System-on-Chip (SoC), Fit PC4 is the next generation to be introduced within the already popular
17 Modular HMI Panel PC with Intel Celeron J1900/ N2807 Processor. Features. System. Processor. System Memory. Mechanical. SMA Antenna Hole x 1
 Industrial Modular Touch Panel Solutions OMNI-3175-BT 17 Modular HMI Panel PC with Intel Celeron J1900/ N2807 Processor 9-30 V Power Connector LAN x 2 USB 2.0 x 3 USB 3.0 x 1 HDMI Power Button RS-232/422/485
Feature and Benefits. Certifications
 UC-2100 Series Arm-based palm-sized industrial computing platform for IIoT applications Feature and Benefits Armv7 Cortex-A8 1000 MHz processor 1 or 2 auto-sensing 10/100 Mbps Ethernet ports Gigabit Ethernet
ITX-i87H0. Intel 4th Generation Core TM Family processors. RTL8111G Gigabit Ethernet controller
 ITX-i87H0 Form Factor Mini-ITX Mini-ITX Industrial Motherboard CPU Intel 4th Generation Core TM Family processors Quick Installation Guide Version.0 Video HDMI/LVDS/DisplayPort I/O SATA/ USB.0/ USB3.0/
PPC-F-Q370 SERIES. OpenVINO. AI Ready Panel PC Based on Intel OpenVINO toolkit AR 501 CAR 500 CAR 406 CAR 407 CAR 408 CAR 409 CAR 404 CAR 405 CAR 402
 PPC-F-Q370 SERIES AI Ready Panel PC Based on Intel OpenVINO toolkit Motorcycle 48 CAR 305 CAR 304 People 32 CAR 308 CAR 401 CAR 306 CAR 307 CAR 309 CAR 308 CAR 400 CAR 402 CAR 403 Motorcycle 48 Motorcycle
Intel QM87 MIL-STD Fanless Rugged Vibration Proof Computer
 Intel QM87 MIL-STD Fanless Rugged Vibration Proof Computer Intel Core i7 Haswell Processor, Fanless Rugged Vibration Proof System, mpcie expansion 9V to 36V DC-in, Wide Temp. -40 ~ 70 C MIL-STD 810G Vibration:10
1.0.2 Edition 11/10/2012 All information is subject to change without notice.
 1.0.2 Edition 11/10/2012 All information is subject to change without notice. Worldwide Technical Support and Product Information www.vecow.com Vecow Corporate Headquarters 7F No 105 Zhongcheng Rd Tucheng
PPC-F-Q370 SERIES AI Ready Panel PC Based on Intel OpenVINO toolkit
 PPC-F-Q370 SERIES AI Ready Panel PC Based on Intel OpenVINO toolkit 15 Motorcycle 48 CAR 305 CAR 304 People 32 CAR 308 CAR 401 17 15.6 18.5 21.5 23.8 CAR 306 CAR 307 CAR 309 CAR 308 CAR 400 CAR 402 CAR