Equipment (Tools) Needed
|
|
|
- Melvyn Bailey
- 5 years ago
- Views:
Transcription

 Replacing the elastomers with new Gray elastomeric connectors from DRK.")
1 Display Repair Kit This kit is compatible with all Fluke 80 Series (83, 85, 86, 87, & 88), Matco MD- 88 Fluke 88, and Fluke Kent-Moore J39200 Multimeters. Older Fluke 80 Series Multimeters have Pink Elastomers that loose their bounce over time. This will cause missing, faded, or fading LCD segments on the display. This is known as ghosting within the testing community. These instructions offer two solutions: 1) Temporary Fix that involves cleaning the original pink elastomers. 2) Replacing the elastomers with new Gray elastomeric connectors from DRK. Equipment (Tools) Needed What you will need: (2) Elastomeric Connectors (Elastomers) Phillips Screwdriver Flat head Screwdriver Small Flat head Screwdriver, or equivalent Alcohol Pad Latex Gloves (Surgical Gloves), or similar (Optional ESD Precaution) Pencil Eraser (Optional. Recommended only for severe dirt and grime removal) *Caution*

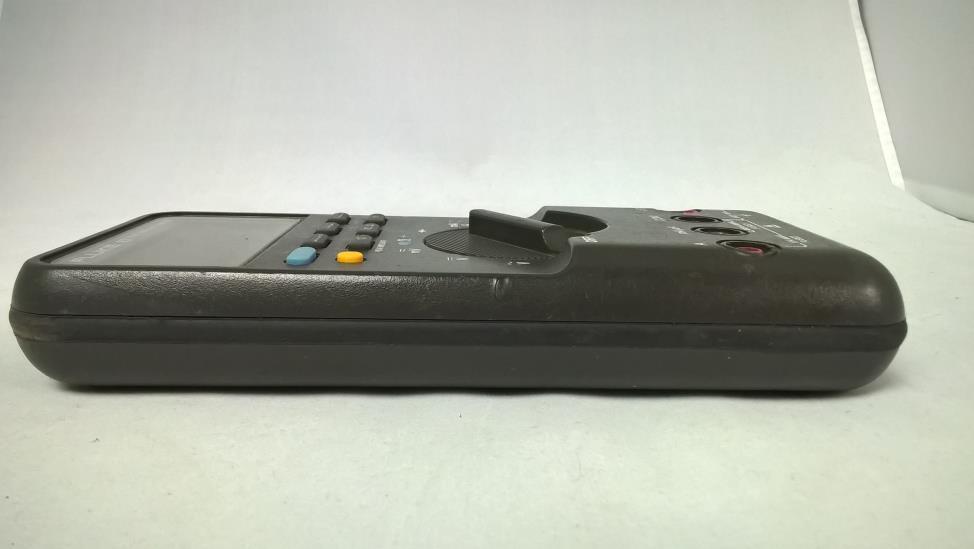
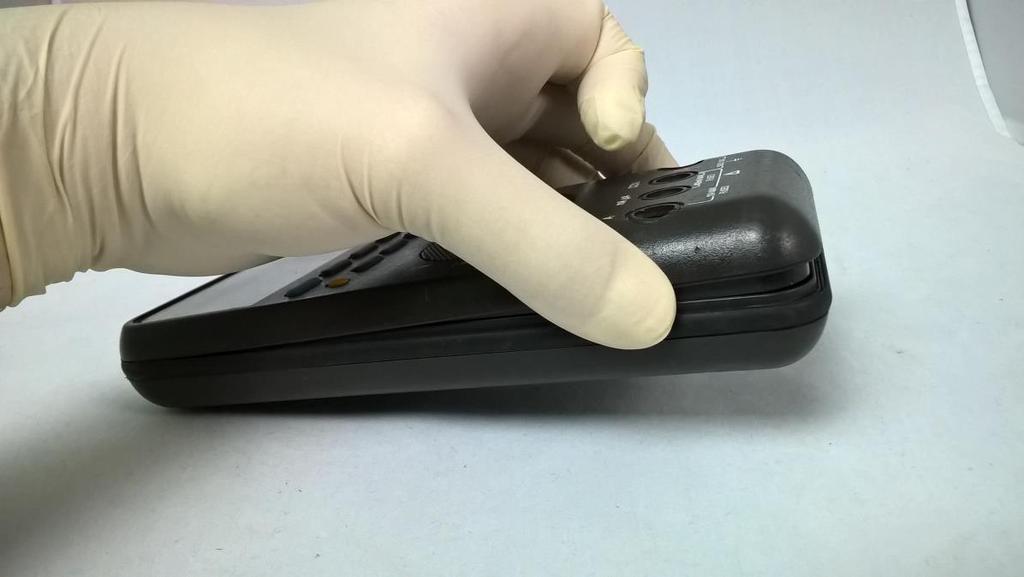
2 ESD (Electrostatic Discharge) awareness and practices should be followed to minimize potential damage. Discharge personal static prior to handling Avoid plastic, vinyl, and Styrofoam in work area Perform replacement at a static free work station **Warning** Remove All Input Signals and Test Leads Before Proceeding 1. Case Disassembly Disconnect all test leads from any live source Turn Fluke to Off position Remove Test Leads Using Phillips head screwdriver, remove the screws from the bottom (lower) case ***NOTE*** The gasket between the case is sealed to the bottom casing. The Top (Upper) Case lifts from the Bottom (Lower) case easily. Do Not attempt to remove, or separate the gasket from the lower casing. Lift up by the Top (Upper) Case, from the input terminal side, to separate it from the Bottom (Lower) Case. (See Pics) Lift up until Top (Upper) Case unsnaps from the Bottom (Lower) Case on the display side. 2
3 3

4 ***Be careful not to remove, or adjust the dust jacket seal that is connected to the bottom half of the case. Make sure to lift from the top case only where the input connectors are*** Lift up from the input side GENTLY until the top case unsnaps from the display side. 4


5 *** Latex Gloves may be used as an ESD Precaution*** Remove the Rubber Button Pad and set aside, or keep with the Top Case 5


6 2. Steps for Cleaning, or Replacing Elastomeric Connectors: 1. Remove the Fluke Meter Main PCB board from the casing. a. Remove the 9V Battery. b. The PCB board should be loose and come right out by lifting up by the input receptacle. 6


7 2. Use the small Flathead Screwdriver to remove the LCD Faceplate LCD Faceplate 7


8 3. Remove the LCD from PCB Board. a. LCD may seem to stick a little. It s normal. Carefully lift by the edges until LCD Comes out. b. Elastomers may, or may not, come out along with the LCD. Again, this is normal. 8


9 c. Remove the elastomers if they are still attached and Set LCD Display aside. LCD FRONT SIDE (Grayish, or Digit Side) LCD BACK SIDE (White Side) 9
10 d. It may, or may not be necessary to remove the BACK LIGHT. It fits loosely and is connected by two pins. e. NOTE: If The Back Light is removed, be sure to put back in place BEFORE the LCD. f. FOR TEMPORARY FIX only if new Elastomers ARE NOT available. Use Alcohol Pad, or Cotton Swab and cleaning alcohol, to wipe the LCD edges clean 10

11 For temporary fix, clean along the edges of the LCD for best results. 4. Remove the Old Pink Elastomeric Connectors from the Main PCB, if you have not already done so. *FOR CLEANING ONLY, PLEASE CONTINUE. **FOR REPLACING OLD PINK ELASTOMERS WITH NEW GRAY ONES, PLEASE SKIP TO STEP 6*** 11


12 5. FOR TEMPORARY FIX CLEANING ONLY: Clean the Old Elastomers with an alcohol pad, or cotton swab with cleaning alcohol. Simply wipe along the top and bottom edges of the Elastomers. RE-INSERT elastomers and skip to STEP 7. 12
 TWO Original Pink Elastomers into the slots.")
13 6. REPLACING OLD PINK ELASTOMERS WITH NEW GRAY ELASTOMERS: Insert the (2) TWO New Gray Elastomeric Connectors into the slots where the old pink ones were removed from. 7. Re-insert the (2) TWO Original Pink Elastomers into the slots. 13
14 8. Insert the Back Light. 14
 is on top as in picture. Also, verify that the LCD is right side up and NOT upside down. 15")
15 Be sure that Back Light pins are inserted properly as shown in this picture above. 9. Place the LCD over the Elastomeric Connectors. Make sure LCD Digit Side (grayish side) is on top as in picture. Also, verify that the LCD is right side up and NOT upside down. 15


16 10. Re-Insert 9V Battery 16

17 11. Use Finger, or Flat Head Screw Driver to turn meter switch on. Turn to VDC marked or, the second position V 17


18 12. GENTLY press down on the LCD and verify that the LCD is on correctly, and that the digits appear normal. 18
19 13. Turn the meter to OFF position 19

20 14. Place the LCD Cover over the LCD and gently press down and carefully snap into place. a. New Gray elastomeric connectors may be slightly taller than the original pink elastomeric connectors. This is Normal. Apply enough pressure to snap the LCD Cover into place. 20


21 15. Use Finger or Flat Head Screw Driver to turn meter on one last time before completing re-assembly. Verify that the display is clear and that all LCD segments are showing. ***SEE IMPORTANT NOTE AT THE END IF LCD DISPLAY IS STILL FADED, OR MISSING SEGMENTS*** 16. Turn Meter Off 17. Place main PCB back into the bottom case 21


22 18. Place the Button Pad into place on the Main PCB a. It may still be on the front casing 22
 Case over the Bottom (Lower)")
23 19. Verify that the 9V Battery is connected. 20. Seat the Top (Upper) Case over the Bottom (Lower) Case. 23
 Casing Enjoy your nice digital display.")
24 21. Press the Top and Bottom Casings together Firmly and evenly to ensure a nice snug enclosure 22. Insert screws to the Bottom (Lower) Casing Enjoy your nice digital display. 24

25 ***IMPORTANT*** If your display is physically damaged, or cracked, or if the LCD Cover is broken or cracked, then this procedure will not work. The LCD cover, or LCD would have to be replaced separately to fix the display. IMPORTANT: If display is still faded, or missing segments: i. Carefully inspect the Display area along the sides and underneath the Main PCB. Verify that there are no loose, or broken parts that are causing a loose connection between the LCD and the PCB. ii. Inspect for broken tabs on the Top Shield. Broken tabs on the Top Shield will usually cause a loose connection. iii. Replacement Parts may be needed to correct this problem. iv. If there are no loose connections and the LCD is still missing segments, then the LCD Display is bad. There are no known replacements available for these older Fluke 80 Series Meters. Our Best recommendation is to find a reasonable priced unit online with a good display, and switching out. This Picture (above) is an example of a bad, or broken LCD Display. Notice that the LCD Segments are completely missing. This usually occurs when there is a crack, or chip on the glass section of the LCD that connects to the elastomers. 25
26 All Kits Come with 60 day money back Warranty, or item exchange. Buyer pays return shipping For more information on Fluke Series LCD Repair Kits, Services, and Input Connectors, please us at We are now offering Calibration Services on All Test Equipment. All Calibrations are NIST Traceable and come with calibration sticker and certificate. Contact us for more information. This Procedure has been produced by and may not be copied, or redistributed without expressed written consent. Copyright 2014, all rights reserved. 26
HP Pavilion dv7-6c90us Cooling fan Replacement
 HP Pavilion dv7-6c90us Cooling fan Replacement This guide will walk you through the process of replacing the cooling fan in an HP Pavilion dv7 laptop. Written By: Angelina Clayton ifixit CC BY-NC-SA www.ifixit.com
PC9/P9 CPU Card Replacement
 Introduction These instructions explain how to replace the CPU card in the PC9 Industrial PC or the P9 PowerStation. They include steps for disassembling the unit, removing the old CPU card, installing
Gateway Profile 4 service guide
 Gateway Profile 4 service guide Customizing Troubleshooting Contents Replacing Components in Your Gateway Profile 4.................. 1 About this guide.....................................................
Instructions for SVC-KIT-0020
 Kaleidescape, Inc. July 22, 2010 Instructions for SVC-KIT-0020 Title Time to complete 1U Server Power Supply Replacement 1 hour Procedure to complete Locate Parts and Tools Service Kit Parts Power supply
Audi Climate Control LCD Rebuild Kit
 Audi Climate Control LCD Rebuild Kit Restores cracked, leaking or missing segment LCD s for the following vehicles: 1997-98 Audi A4 with electronic climate control center 1995-97 Audi A6 with electronic
Replacing Preamplifier Circuit Boards
 Instruction Guide Replacing Preamplifier Circuit Boards Before you begin This instruction sheet applies to the Plexon PBX-series preamplifiers. Use these instructions to expand, replace, or upgrade the
TD-700 FLUOROMETER SERVICE MANUAL
 TD-700 FLUOROMETER SERVICE MANUAL July 1996 CONTENTS Page Section 1 INTRODUCTION 2 Section 2 PRELIMINARY CHECKS 3 Section 3 TROUBLESHOOTING GUIDE 5 A. Lamp (Fluorescent) 5 B. Lamp Heater 7 C. Fan 8 D.
Written By: Walter Galan
 Replace a cracked screen on your iphone 4S. Written By: Walter Galan ifixit CC BY-NC-SA www.ifixit.com Page 1 of 32 INTRODUCTION Use this guide to replace the screen on your iphone 4S. After successfully
Huawei P9 Display Assembly with Frame Replacement
 Huawei P9 Display Assembly with Frame Replacement Replace the display assembly including the frame in your Huawei P9 smartphone. Written By: Dominik Schnabelrauch ifixit CC BY-NC-SA www.ifixit.com Page
FIELD REPLACEABLE UNIT DOCUMENTATION. Portege R100 GENERAL INFORMATION. Tools Required for Proper Disassembly and Reassembly:
 Portege TM GENERAL INFORMATION Tools Required for Proper Disassembly and Reassembly: 1. Phillips Screwdriver (Size 0) 2. Flat head Screwdriver 3. Case Separator 4. ESD Wrist Strap 5. ESD mat 6. Tweezers
Written By: Andrea Giannone
 How to Fix iphone 4S Wi-Fi Grayed Out Use this guide to permanently fix an "unclickable" grayed out Wi-Fi button in the iphone 4s. Written By: Andrea Giannone ifixit CC BY-NC-SA www.ifixit.com Page 1 of
JDM Installation Guide
 JDM Installation Guide Part 1: how to install the JetDrive SSD Upgrade Kit into your Mac - OS X 10.10 or earlier - OS X 10.11 (El Capitan) - OS X 10.13 (High Sierra) Part 2: how to install the JetDrive
iphone 4 Headphone Jack & Volume Control Cable Replacement
 iphone 4 Headphone Jack & Volume Control Cable Replacement Replace a broken headphone jack on your iphone 4. A new headphone jack will also give you new electronic portions of the silent switch and volume
Replacing/Upgrading Mac Pro Processors (Early 2008)
") Replacing/Upgrading Mac Pro Processors (Early 2008) The steps in this procedure illustrate how to remove the lower processor (CPU B). The instructions are the same for removing the upper processor (CPU
Replacing/Upgrading Mac Pro Processors (Early 2008) The steps in this procedure illustrate how to remove the lower processor (CPU B). The instructions are the same for removing the upper processor (CPU
Presario 1200 Series Models: XL101-XL113, XL115, XL118-XL127. This section explains the removal and replacement procedures for the 1200XL unit.
 Removal Sequence Presario 1200 Series This section explains the removal and replacement procedures for the 1200XL unit. Serial Number Location Report the unit s serial number 1 to Compaq when requesting
PlayStation 3 Teardown PS3. Written By: Mint137. ifixit CC BY-NC-SA Page 1 of 22
 PlayStation 3 Teardown PS3 Written By: Mint137 ifixit CC BY-NC-SA www.ifixit.com Page 1 of 22 INTRODUCTION This is a teardown of an original launch 60GB PlayStation 3 system. One of the best units out
Memory (RAM) Replacement Instructions. apple PowerBook (FireWire) Tools Required. Electrostatic Discharge (ESD)
 Replacement Instructions. apple PowerBook (FireWire) Tools Required. Electrostatic Discharge (ESD)") apple PowerBook (FireWire) Memory (RAM) Replacement Instructions Be sure to follow these instructions carefully. Failure to follow these instructions could result in damage to your equipment and may void
apple PowerBook (FireWire) Memory (RAM) Replacement Instructions Be sure to follow these instructions carefully. Failure to follow these instructions could result in damage to your equipment and may void
itech Training Courses iphone 5S LCD Assembly Replacement Guide
 itech Training Courses iphone 5S LCD Assembly Replacement Guide 2014 icracked, Inc. All rights reserved. ios, all Apple product names, and Apple logos are trademark property of Apple, Inc. The content
Written By: Walter Galan
 iphone 6 Plus Front Panel Replacement Replace the Front Panel in your iphone 6 Plus. Written By: Walter Galan ifixit CC BY-NC-SA www.ifixit.com Page 1 of 27 INTRODUCTION Use this guide to strip and replace
iphone 4 Verizon Headphone Jack Cable Replacement
 iphone 4 Verizon Headphone Jack Cable Replacement Replace a broken headphone jack cable that contains the upper microphone as well as the electronic portions of the volume buttons and silent switch on
Note: Clean Work area of all or any debris after Repair.
 Scope: Details: Required Tools For Reference when repairing the: Display / Assembly Replacement ESD Strap (From Kit): Phillips #00 Screwdriver Tweezers Plastic Spudger Plastic Opening Pick Personal Protective
Written By: Andrew Bookholt
 Replace a dead logic board in your iphone 4 Verizon. Written By: Andrew Bookholt ifixit CC BY-NC-SA www.ifixit.com Page 1 of 17 INTRODUCTION Use this guide to replace your iphone's logic board. TOOLS:
Motion LE1700 Tablet PC Hard Disk Drive Upgrade Procedure
 Motion LE1700 Tablet PC Hard Disk Drive Upgrade Procedure 2008 Motion Computing, Inc. All rights reserved. This document contains information protected by copyright. No part of this document may be reproduced
P1P Touchscreen Installation Guide
 Occasionally you will need to replace the P1 Pentium PowerStation s touchscreen, depending on the environment where you are operating the unit. Before you begin, read the section on Electrostatic Discharge
iphone 5s Bluetooth and Wi-Fi Antenna Replacement
 iphone 5s Bluetooth and Wi-Fi Antenna Replacement How to replace the bluetooth and wi-fi antenna in an iphone 5s. Written By: Sam Lionheart ifixit CC BY-NC-SA www.ifixit.com Page 1 of 38 INTRODUCTION Weak
Written By: Walter Galan
 iphone 4 Front Facing Camera Replacement Front-facing camera replacement. Written By: Walter Galan ifixit CC BY-NC-SA www.ifixit.com Page 1 of 17 INTRODUCTION Use this guide to replace the small VGA front
PC9/P9 Floppy Drive Replacement
 Introduction These instructions explain how to replace the floppy disk drive in the PC9 Industrial PC or the P9 PowerStation. They include steps for disassembling the unit, removing the previously installed
Chapter 4 Replacement Procedures
 Chapter 4 Replacement Procedures 4 4-ii Satellite P30 Series Maintenance Manual Chapter 4 Contents 4.1 General... 4-1 4.2 Battery... 4-7 4.3 PC Card... 4-8 4.4 HDD... 4-10 4.5 Optical Drive Module... 4-12
Installing System Board Options
 CHAPTER 8 Installing System Board Options This section describes how to install the following options: Expansion cards Memory modules Microprocessor This section also includes instructions for replacing
256 Kbytes (1771-DRS) 1 Mbyte (1771-DRS1) 4 Mbytes (1771-DRS4) Installation Data
 1 Mbyte (1771-DRS1) 4 Mbytes (1771-DRS4) Installation Data") Installation Data You can add static RAM memory to your control coprocessor main module to expand user memory. The RAM single inline memory module (SIMM) is available in the following sizes: 256 Kbytes
Installation Data You can add static RAM memory to your control coprocessor main module to expand user memory. The RAM single inline memory module (SIMM) is available in the following sizes: 256 Kbytes
DX7 Special Edition ROM Install Guide
 DX7 Special Edition ROM Install Guide Table of Contents Required Tools/ Getting Started... p. 2 Installation... p.3-7 Opening the DX7... p. 3 Locating the Original ROM... p. 4 Removing the Original ROM...
Removing and Replacing Parts
 Removing and Replacing Parts Preparing to Work Inside the Computer Recommended Tools Screw Identification System Components Hard Drive Fixed Optical Drive Media Bay Devices Memory Modules Mini PCI Card
iphone 4 Verizon Earpiece Speaker Replacement
 iphone 4 Verizon Earpiece Speaker Replacement Replace a blown-out earpiece speaker in your iphone 4 Verizon. Written By: Andrew Bookholt ifixit CC BY-NC-SA www.ifixit.com Page 1 of 18 INTRODUCTION Use
Installing MacBook Pro 15" Unibody Mid 2009 Dual Hard Drive
 Installing MacBook Pro 15" Unibody Mid 2009 Dual Hard Drive Use this guide to install a second hard drive in place of the optical drive. Written By: Brittany McCrigler ifixit CC BY-NC-SA www.ifixit.com
Nintendo 3DS XL 2015 Upper Screen
 Nintendo 3DS XL 2015 Upper Screen Replacement Showing how to replace the Upper Screen of the Nintendo 3DS XL. Written By: Ryan Butler ifixit CC BY-NC-SA www.ifixit.com Page 1 of 13 INTRODUCTION This guide
Plasma Panel Replacement Guide DU-42PX12X
 Plasma Panel Replacement Guide DU-42PX12X Panel Replacement: At this point, the panel has been determined to be defective and replacement is necessary. Upon receiving the replacement panel, it must be
PiJuice Quick Start Guide and FAQ. Getting started. Kit contents
 PiJuice Quick Start Guide and FAQ Getting started As one of the smallest systems around there are so many amazing things you could do with the Raspberry Pi if it was self-powered and portable. Introducing
Samsung Galaxy S4 Display Assembly Replacement
 Samsung Galaxy S4 Display Assembly Replacement INTRODUCTION Use this guide along with the Werx Repair Mat to replace the cracked or broken screen on your Samsung Galaxy S4. Use this guide to replace the
Apple ipod 3 rd Generation Take Apart Repair Manual
 Apple ipod 3 rd Generation Take Apart Repair Manual Any portion of this manual may not be copied, reproduced, or distributed without the express written consent of Powerbookmedic.com. Violators will be
Apple 3.5 Drive External Floppy Drive
 Apple 3.5 Drive External Floppy Drive Teardown This guide will show the disassembly down to the bare internal drive and other components of the Apple 3.5 Drive. Written By: rockinkat ifixit CC BY-NC-SA
Toshiba Satellite A215 S4697 Screen
 Toshiba Satellite A215 S4697 Screen Replacement When your computer screen is cracked or does not work anymore, it may need a new screen. Written By: Carlos ifixit CC BY-NC-SA www.ifixit.com Page 1 of 15
OnePlus 5 Screen and Digitizer Assembly Replacement
 OnePlus 5 Screen and Digitizer Assembly Replacement Follow this guide to replace the screen and digitizer for the OnePlus 5. This replaces the screen as well as the frame it is attached to. Written By:
HP ENVY Rove 20-k014us Ram Replacement
 Guide to replace or upgrade the RAM for an HP Envy ROVE. Written By: Berit Bingham ifixit CC BY-NC-SA www.ifixit.com Page 1 of 9 INTRODUCTION The RAM is very accessible on this device so removing the back
Bluetooth Shielding Instructions
 Mac mini 2012 Bluetooth Shielding Instructions 1 INTRODUCTION 1.1 STATIC PRECAUTIONS 1.2 TOOLS REQUIRED 2 DISASSEMBLY 3 SHIELDING 4 FAQ 4.1 FAQ 5 CUSTOMER SERVICE 5.1 Before Contacting Customer Service
4.1 General. 4 Replacement Procedures
 4.1 General This chapter explains how to disassemble the computer and replace Field Replaceable Units (FRUs). It may not be necessary to remove all the FRUs in order to replace one. The chart below is
Dell Inspiron N5110 Service Manual
 Dell Inspiron N5110 Service Manual Regulatory model: P17F Regulatory type: P17F001 Notes, Cautions, and Warnings NOTE: A NOTE indicates important information that helps you make better use of your computer.
Samsung Galaxy Tab Speaker
 Samsung Galaxy Tab 2 10.1 Speaker Replacement This guide will show you how to replace a broken speaker in your tablet. Written By: Matthew Weeman ifixit CC BY-NC-SA www.ifixit.com Page 1 of 11 INTRODUCTION
Dell Latitude E6500 Teardown
 Dell Latitude E6500 Teardown Disassembling the Dell Latitude E6500. Step by Step. I disassemble it down to the base assembly. Written By: Luis Gomez ifixit CC BY-NC-SA www.ifixit.com Page 1 of 16 INTRODUCTION
Written By: Ben Eisenman
 iphone 3GS Rear Panel Replacement Replace a broken rear case on your iphone 3GS. Written By: Ben Eisenman ifixit CC BY-NC-SA www.ifixit.com Page 1 of 22 INTRODUCTION The plastic rear half of the iphone.
Written By: Brendan Kelly
 Game Boy Micro LCD Screen Replacement Written By: Brendan Kelly ifixit CC BY-NC-SA www.ifixit.com Page 1 of 13 INTRODUCTION In this guide, we'll show you how to change the LCD Screen. TOOLS: Phillips #00
W Warning To avoid electrical shock, remove test leads and any input signals from the Model 707 Loop Calibrator before opening the case.
 Model 707 Loop Calibrator W Warning To avoid electrical shock, remove test leads and any input signals from the Model 707 Loop Calibrator before opening the case. WCaution The Model 707 Loop Calibrator
Game Boy Micro Motherboard Replacement
 Game Boy Micro Motherboard Replacement Written By: Brendan Kelly ifixit CC BY-NC-SA www.ifixit.com Page 1 of 12 INTRODUCTION In this guide, we will show you how to remove and replace the motherboard and
Service Manual - Memory Upgrade
 Inspiron 14 3000 Series Service Manual - Memory Upgrade Regulatory Model: P53G Regulatory Type: P53G002 Contents Before working inside your computer...3 Before you begin... 3 Safety instructions... 3 Recommended
Written By: Sam Lionheart
 iphone 5s Lightning Connector Replacement Remove the Lightning connector/headphone jack assembly from your iphone 5s. Written By: Sam Lionheart ifixit CC BY-NC-SA www.ifixit.com Page 1 of 26 INTRODUCTION
Retina MacBook 2016 Display Assembly
 Retina MacBook 2016 Display Assembly Replacement Replace the display assembly on the Retina MacBook 2016. Written By: Adam O'Camb ifixit CC BY-NC-SA www.ifixit.com Page 1 of 20 INTRODUCTION Use this guide
To connect the AC adapter:
 Replacing the AC Adapter Replacing the AC Adapter 3 Plug the power cord into a wall outlet. The power indicator turns on. To connect the AC adapter: Connect the power cord to the AC adapter. Power indicator
Dell XPS L702X Service Manual
 Dell XPS L702X Service Manual Regulatory model: P09E series Regulatory type: P09E002 Notes, Cautions, and Warnings NOTE: A NOTE indicates important information that helps you make better use of your computer.
Dell Inspiron XPS and Inspiron 9100 Service Manual
 Dell Inspiron XPS and Inspiron 9100 Service Manual Dell Inspiron XPS and Inspiron 9100 Service Manual Before You Begin Memory Module, Mini PCI Card, and Devices System Components Subwoofer Bluetooth Card
Written By: Sam Lionheart
 iphone SE Logic Board Replacement Use this guide to replace a faulty logic board in your iphone SE. Written By: Sam Lionheart ifixit CC BY-NC-SA www.ifixit.com Page 1 of 27 INTRODUCTION Use this guide
HP Pavilion 15 P Series Hard Drive Replacement
 HP Pavilion 15 P Series Hard Drive Replacement This guide will show you how to to replace the hard drive in your HP Pavilion P Series laptop. Written By: Nick ifixit CC BY-NC-SA www.ifixit.com Page 1 of
Manual 04 - Logic Board
 Manual 04 - Logic Board Written By: Josh Patterson 2017 guides.cellphonesandbox.com Page 1 of 16 TOOLS: Technician Starter Package (1) 2017 guides.cellphonesandbox.com Page 2 of 16 Step 1 Removal 1 - Battery
imac Intel 21.5" EMC 2389 SSD Dual Drive
 imac Intel 21.5" EMC 2389 SSD Dual Drive Installation Use this guide to install a second SSD in place of the optical drive. Written By: Dozuki System 2017 guides.crucial.com Page 1 of 17 INTRODUCTION There
SSD Dual Drive Installation
 SSD Dual Drive Installation Replace the optical drive in your imac Intel 21.5". Written By: Dozuki System 2017 guides.crucial.com Page 1 of 18 INTRODUCTION imac won't read disks? Use this guide to replace
Installing imac Intel 27" EMC 2390 Dual HDD or
 Installing imac Intel 27" EMC 2390 Dual HDD or SSD Drive Installing a secondary HDD or SSD in the mid 2010 27" imac EMC 2390. Written By: Brett Hartt ifixit CC BY-NC-SA www.ifixit.com Page 1 of 23 INTRODUCTION
How to add a Second Drive to a Mac mini (2012) using the OWC Data Doubler SSD/2.5 Installation Kit
 using the OWC Data Doubler SSD/2.5 Installation Kit") Instructional Video Series How to add a Second Drive to a Mac mini (2012) using the OWC Data Doubler SSD/2.5 Installation Kit Skill Level: Challenging Time to Complete: Approximately 45 Minutes Required
Instructional Video Series How to add a Second Drive to a Mac mini (2012) using the OWC Data Doubler SSD/2.5 Installation Kit Skill Level: Challenging Time to Complete: Approximately 45 Minutes Required
How to Upgrade the Hard Drive in a 24 imac (2007-Early 2009)
") Instructional Video Series How to Upgrade the Hard Drive in a 24 imac (2007-Early 2009) Skill Level: Involved Time to Complete: Approximately 45 Minutes Required Tools: Small Phillips Screwdriver Torx
Instructional Video Series How to Upgrade the Hard Drive in a 24 imac (2007-Early 2009) Skill Level: Involved Time to Complete: Approximately 45 Minutes Required Tools: Small Phillips Screwdriver Torx
Written By: Anthony Valdez
 ASUS Eee PC 1018P Fan Replacement This guide will show how to remove the fan, in order to replace it. Written By: Anthony Valdez ifixit CC BY-NC-SA www.ifixit.com Page 1 of 12 INTRODUCTION The CPU Fan
apple Service Source Apple Cinema Display 22" LCD (ADC) 11 April Apple Computer, Inc. All rights reserved.
 11 April Apple Computer, Inc. All rights reserved.") apple Service Source Apple Cinema Display 22" LCD (ADC) 11 April 2003 2003 Apple Computer, Inc. All rights reserved. apple Service Source Take Apart Apple Cinema Display 22" LCD (ADC) 2003 Apple Computer,
apple Service Source Apple Cinema Display 22" LCD (ADC) 11 April 2003 2003 Apple Computer, Inc. All rights reserved. apple Service Source Take Apart Apple Cinema Display 22" LCD (ADC) 2003 Apple Computer,
PowerBook G4 Aluminum 12" GHz Modem Replacement
 PowerBook G4 Aluminum 12" 1-1.5 GHz Modem Replacement Written By: irobot ifixit CC BY-NC-SA www.ifixit.com Page 1 of 15 INTRODUCTION 56k internal modem, standard on all models. TOOLS: Coin (1) Phillips
Canon Powershot SD550 Zoom Lens Assembly Replacement
 Canon Powershot SD550 Zoom Lens Assembly Replacement This repair guide will show you how to take apart the PowerShot SD550 and replace the zoom lens. Written By: Matthew Theiss ifixit CC BY-NC-SA www.ifixit.com
Nintendo 3DS XL Upper LCD Display
 Nintendo 3DS XL Upper LCD Display Replacement This guide is going to help you take apart the Upper LCD screen so you will be able to once again play your favorite games on your Nintendo 3DS XL! Written
PowerBook G4 Aluminum 12" GHz Left Clutch Hinge Replacement
 PowerBook G4 Aluminum 12" 1-1.5 GHz Left Clutch Hinge Replacement Written By: Matthew Newsom ifixit CC BY-NC-SA www.ifixit.com Page 1 of 50 INTRODUCTION Replace a broken clutch hinge to make your display
Thank you for purchasing this Factory Service Manual CD/DVD from servicemanuals4u.com.
 Thank you for purchasing this Factory Service Manual CD/DVD from servicemanuals4u.com. Please check out our ebay auctions for more great deals on Factory Service Manuals: servicemanuals4u Dell Latitude
Written By: Andrew Optimus Goldberg
 iphone 5 Rear-Facing Camera Replacement Remove the rear-facing 8 MP isight camera from your iphone 5 Written By: Andrew Optimus Goldberg ifixit CC BY-NC-SA www.ifixit.com Page 1 of 26 INTRODUCTION Use
Written By: Brittany K
 Nintendo DS Lite Motherboard Replacement Written By: Brittany K ifixit CC BY-NC-SA www.ifixit.com Page 1 of 11 INTRODUCTION This guide has been updated by ifixit staff! Read the new, official guide here.
Dell Latitude C800 Service Manual
 Dell Latitude C800 Service Manual Dell Latitude C800 Service Manual Before You Begin Preparing to Work Inside the Computer Recommended Tools Screw Identification Removing and Replacing Parts System Components
iphone 3G Headphone Jack Replacement Replace a broken audio port in an iphone 3G. Written By: irobot ifixit CC BY-NC-SA
 iphone 3G Headphone Jack Replacement Replace a broken audio port in an iphone 3G. Written By: irobot ifixit CC BY-NC-SA www.ifixit.com Page 1 of 18 INTRODUCTION No audio? Replace the headphone jack! TOOLS:
Packard Bell Vibe 300 Disassembly Manual
 Packard Bell Vibe 300 Disassembly Manual 1 Table of Contents Overview 2 Technician Notes 2 Disassembly Instructions 2 Reassembly Instructions 2 Required Tools 2 Removing the Bottom Cover 3 Removing the
5x86 Third Serial Port Installation
 Introduction This document explains how to add a third serial port to P3, P4, P5, or P7 PowerStations that have a 5x86 CPU card. It includes instructions for opening the PowerStation, reconfiguring the
Nintendo DSi Touch Screen / Bottom LCD Replacement
 Nintendo DSi Touch Screen / Bottom LCD Replacement Disassembly and replacement of the lower LCD / touch screen Written By: bushing ifixit CC BY-NC-SA www.ifixit.com Page 1 of 15 INTRODUCTION This guide
Escrito por: Andrew Bookholt
 Replace the exterior metal silent switch on your Verizon iphone 4. Escrito por: Andrew Bookholt ifixit CC BY-NC-SA es.ifixit.com Página 1 de 23 INTRODUCCIÓN Use this guide to replace the external metal
Written By: Evan Noronha
 Replace just the front panel not including the home button assembly, front-facing camera and sensor assembly, or earpiece speaker in an iphone 6s Plus. Written By: Evan Noronha ifixit CC BY-NC-SA www.ifixit.com
Retina MacBook 2017 Upper Case Assembly
 Retina MacBook 2017 Upper Case Assembly Replacement Replace the upper case assembly (including the integrated keyboard) on the Retina MacBook 2017. Written By: Tobias Isakeit ifixit CC BY-NC-SA www.ifixit.com
Canon Powershot A720 IS Motherboard Replacement
 Canon Powershot A720 IS Motherboard Replacement This guide will show how to replace the motherboard. Written By: Jamie ifixit CC BY-NC-SA www.ifixit.com Page 1 of 16 INTRODUCTION This guide will allow
ASUS D550MA-DS01 Motherboard
 ASUS D550MA-DS01 Motherboard Replacement This guide will show you how to remove the motherboard from the laptop. Steps included in this process are removing the screws, disconnecting cables, and removing
Sabio Digital SD-KN1 Notebook Assembly Guide
 Sabio Digital SD-KN1 Notebook Assembly Guide Rev. 1.4 Sabio Digital KN1 Assembly Guide 1 of 11 www.sabioproducts.com Table of Contents Section 1.0 - Overview... 3 Section 2.0 - Before You Begin... 3 Section
CARTRIDGE REMANUFACTURING INSTRUCTIONS XEROX PHASER 6180 TONER CARTRIDGE
 XEROX PHASER 6180 CARTRIDGE REMANUFACTURING INSTRUCTIONS XEROX PHASER 6180 TONER CARTRIDGE REMANUFACTURING THE XEROX PHASER 6180 TONER CARTRIDGES By Mike Josiah and the Technical Staff at UniNet First
Written By: Sam Lionheart
 iphone 6 Front Panel Replacement Replace the bare front panel of an iphone 6. Written By: Sam Lionheart ifixit CC BY-NC-SA www.ifixit.com Page 1 of 27 INTRODUCTION For an easier repair, use our fix kit
imac Intel 21.5" EMC 2389 Stand Replacement
 imac Intel 21.5" EMC 2389 Stand Replacement Replace a broken or cosmetically unappealing stand on the imac 2389 21.5 Written By: Aaron Cooke ifixit CC BY-NC-SA www.ifixit.com Page 1 of 30 INTRODUCTION
Written By: Colin Glaves
 Written By: Colin Glaves ifixit CC BY-NC-SA www.ifixit.com Page 1 of 9 INTRODUCTION Please try our Troubleshooting Guide prior to replacing your Display Assembly. This guide covers the detachment and assembly
Samsung Galaxy Tab G SIM Card Reader
 Samsung Galaxy Tab 10.1 4G SIM Card Reader Replacement If you're having issues with your SIM card reader, this guide will help you replace the faulty reader with a new one. Written By: Ashley Stark ifixit
Reflowing Xbox 360 Motherboard
 Reflowing Xbox 360 Motherboard Reflow the solder on your Xbox 360's motherboard. Written By: Andrew Bookholt ifixit CC BY-NC-SA www.ifixit.com Page 1 of 31 INTRODUCTION Use this guide to reflow the solder
EPROM Replacement Instructions for Sprint ; Controller Assembly. and Replacement Instructions for Sprint Controller Assembly
 Sprint EPROM and Controller Replacement Instructions Page 1 EPROM Replacement Instructions for Sprint ; Controller Assembly Service Kit P/N 157 151 and Replacement Instructions for Sprint Controller Assembly
Vintage Korg CX-3 Board Repair Service Kit
 Vintage Korg CX-3 Board Repair Service Kit Disassembly and Shipping Instructions Figure 1. The Korg CX-3 Organ 98-13000610 Page 1 Revised June, 2011 Table of Contents Table of Contents... 2 Contents of
ipod Classic Click Wheel Replacement Written By: irobot ifixit CC BY-NC-SA Page 1 of 25
 ipod Classic Click Wheel Replacement Written By: irobot ifixit CC BY-NC-SA www.ifixit.com Page 1 of 25 INTRODUCTION The click wheel receives the feedback of your fingers and transmits it to the logic board.
iphone 6S Full Display Assembly Replacement
 iphone 6S Full Display Assembly Replacement INTRODUCTION Use this guide along with the Werx Repair Mat to replace the cracked or broken screen on your iphone 6S. Follow Werx Repair Mat Steps 1,2,5 to disassemble.
2015 SIMMCONN LABS, LLC. All rights reserved. NewScope-T1 Operation Manual
 2015 SIMMCONN LABS, LLC. All rights reserved NewScope-T1 Operation Manual April 12, 2017 NewScope-T1 Operation Manual 1 Introduction... 3 2 Installation... 4 2.1 Initial Inspection... 4 2.2 Installation
imac Intel 27" EMC 2309 and 2374 Hard Drive
 imac Intel 27" EMC 2309 and 2374 Hard Drive Replacement imac Intel 27" EMC 2309 and 2374 Hard Drive replacement. Escrito por: Andrew Bookholt ifixit CC BY-NC-SA es.ifixit.com Página 1 de 17 INTRODUCCIÓN
V5420 Host Card Upgrade Kit for R3082D Quick Start Guide
 Quick Start Guide Upgrade kit contents The table below shows the contents of the V5420 Host Card Upgrade Kit (components are not shown to scale). Part Function Pieces V5420 Host Card 1 Host card bracket
PowerBook G4 Aluminum 12" GHz Display Data Cable Replacement
 PowerBook G4 Aluminum 12" 1-1.5 GHz Display Data Cable Replacement Written By: Matthew Newsom ifixit CC BY-NC-SA www.ifixit.com Page 1 of 47 INTRODUCTION Replace a damaged display data cable to restore