Notebook PC E-Manual
|
|
|
- Rafe Greene
- 6 years ago
- Views:
Transcription
1 Notebook PC E-Manual
2 E7814 October 2012 COPYRIGHT INFORMATION No part of this manual, including the products and software described in it, may be reproduced, transmitted, transcribed, stored in a retrieval system, or translated into any language in any form or by any means, except documentation kept by the purchaser for backup purposes, without the express written permission of ASUSTeK COMPUTER INC. ( ASUS ). ASUS PROVIDES THIS MANUAL AS IS WITHOUT WARRANTY OF ANY KIND, EITHER EXPRESS OR IMPLIED, INCLUDING BUT NOT LIMITED TO THE IMPLIED WARRANTIES OR CONDITIONS OF MERCHANTABILITY OR FITNESS FOR A PARTICULAR PURPOSE. IN NO EVENT SHALL ASUS, ITS DIRECTORS, OFFICERS, EMPLOYEES OR AGENTS BE LIABLE FOR ANY INDIRECT, SPECIAL, INCIDENTAL, OR CONSEQUENTIAL DAMAGES (INCLUDING DAMAGES FOR LOSS OF PROFITS, LOSS OF BUSINESS, LOSS OF USE OR DATA, INTERRUPTION OF BUSINESS AND THE LIKE), EVEN IF ASUS HAS BEEN ADVISED OF THE POSSIBILITY OF SUCH DAMAGES ARISING FROM ANY DEFECT OR ERROR IN THIS MANUAL OR PRODUCT. Products and corporate names appearing in this manual may or may not be registered trademarks or copyrights of their respective companies, and are used only for identiication or explanation and to the owners beneit, without intent to infringe. SPECIFICATIONS AND INFORMATION CONTAINED IN THIS MANUAL ARE FURNISHED FOR INFORMATIONAL USE ONLY, AND ARE SUBJECT TO CHANGE AT ANY TIME WITHOUT NOTICE, AND SHOULD NOT BE CONSTRUED AS A COMMITMENT BY ASUS. ASUS ASSUMES NO RESPONSIBILITY OR LIABILITY FOR ANY ERRORS OR INACCURACIES THAT MAY APPEAR IN THIS MANUAL, INCLUDING THE PRODUCTS AND SOFTWARE DESCRIBED IN IT. Copyright 2012 ASUSTeK COMPUTER INC. All Rights Reserved. LIMITATION OF LIABILITY Circumstances may arise where because of a default on ASUS part or other liability, you are entitled to recover damages from ASUS. In each such instance, regardless of the basis on which you are entitled to claim damages from ASUS, ASUS is liable for no more than damages for bodily injury (including death) and damage to real property and tangible personal property; or any other actual and direct damages resulted from omission or failure of performing legal duties under this Warranty Statement, up to the listed contract price of each product. ASUS will only be responsible for or indemnify you for loss, damages or claims based in contract, tort or infringement under this Warranty Statement. This limit also applies to ASUS suppliers and its reseller. It is the maximum for which ASUS, its suppliers, and your reseller are collectively responsible. UNDER NO CIRCUMSTANCES IS ASUS LIABLE FOR ANY OF THE FOLLOWING: (1) THIRD- PARTY CLAIMS AGAINST YOU FOR DAMAGES; (2) LOSS OF, OR DAMAGE TO, YOUR RECORDS OR DATA; OR (3) SPECIAL, INCIDENTAL, OR INDIRECT DAMAGES OR FOR ANY ECONOMIC CONSEQUENTIAL DAMAGES (INCLUDING LOST PROFITS OR SAVINGS), EVEN IF ASUS, ITS SUPPLIERS OR YOUR RESELLER IS INFORMED OF THEIR POSSIBILITY. SERVICE AND SUPPORT Visit our multi-language web site at 2 Notebook PC E-Manual
3 Table of Contents About this manual... 6 Conventions used in this manual... 7 Icons... 7 Typography... 7 Safety precautions... 8 Using your Notebook PC... 8 Caring for your Notebook PC... 9 Proper disposal...10 Chapter 1: Hardware Setup Getting to know your Notebook PC...12 Top View...12 Bottom...17 Right Side...19 Left Side...20 Chapter 2: Using your Notebook PC Getting started...24 Install the battery pack Charge your Notebook PC Lift to open the display panel Press the power button Gestures for the touch screen and touchpad...27 Using the touch screen...27 Using the touchpad...29 Using the keyboard...34 Function keys...34 Function keys for ASUS Apps...35 Windows 8 keys...35 Multimedia control keys...36 Numeric keypad (on selected models)...36 Chapter 3: Working with Windows 8 Starting for the first time...38 Windows 8 lock screen...38 Windows UI...39 Notebook PC E-Manual 3
4 Start screen...39 Windows Apps...39 Hotspots...40 Working with Windows apps...42 Launching apps...42 Customizing apps...42 Closing apps...44 Accessing the Apps screen...45 Charms bar...47 Snap feature...49 Other keyboard shortcuts...51 Connecting to wireless networks...53 Wi-Fi...53 Bluetooth...55 Airplane mode...57 Connecting to wired networks...58 Coniguring a dynamic IP/PPPoE network connection...58 Coniguring a static IP network connection...62 Turning your Notebook PC off...63 Putting your Notebook PC to sleep...63 Chapter 4: ASUS apps Featured ASUS Apps...66 LifeFrame...66 Power4Gear Hybrid...68 Instant On...69 ASUS VivoBook Instant Functions...70 Chapter 5: Power-on Self Test (POST) The Power-on Self Test (POST)...78 Using POST to access BIOS and Troubleshoot...78 BIOS...78 Accessing BIOS...78 BIOS Settings...79 Troubleshoot...86 Refresh your PC...86 Reset your PC...87 Advanced options Notebook PC E-Manual
5 Chapter 6: Upgrading your Notebook PC Installing a Random Access Memory (RAM) module...92 Replacing the Hard Disk Drive (HDD)...95 Installing a new battery pack...99 Appendices DVD-ROM Drive Information (on selected models) Blu-ray ROM Drive Information (on selected models) Internal Modem Compliancy Overview Network Compatibility Declaration Network Compatibility Declaration Non-Voice Equipment Federal Communications Commission Statement FCC Radio Frequency (RF) Exposure Caution Statement Declaration of Conformity (R&TTE directive 1999/5/EC) CE Marking IC Radiation Exposure Statement for Canada Wireless Operation Channel for Diferent Domains France Restricted Wireless Frequency Bands UL Safety Notices Power Safety Requirement TV Tuner Notices REACH Nordic Lithium Cautions (for lithium-ion batteries) Optical Drive Safety Information Macrovision Corporation Product Notice CTR 21 Approval (for Notebook PC with built-in Modem) ENERGY STAR complied product European Union Eco-label Prevention of Hearing Loss Coating Notice Global Environmental Regulation Compliance and Declaration 121 ASUS Recycling/Takeback Services Regional notice for Singapore Regional notice for United States of America Notebook PC E-Manual 5
6 About this manual This manual provides information about the hardware and software features of your Notebook PC, organized through the following chapters: Chapter 1: Hardware Setup This chapter details the hardware components of your Notebook PC. Chapter 2: Using your Notebook PC This chapter shows you how to use the diferent parts of your Notebook PC. Chapter 3: Working with Windows 8 This chapter provides an overview of using Windows 8 in your Notebook PC. Chapter 4: ASUS Apps This chapter features the ASUS apps included with your Notebook PC s Windows 8 operating system. Chapter 5: Power-on Self-test (POST) This chapter shows you how to use POST to change the settings of your Notebook PC. Chapter 6: Upgrading your Notebook PC This chapter guides you through the process of replacing and upgrading parts of your Notebook PC. Appendices This section includes notices and safety statements for your Notebook PC. 6 Notebook PC E-Manual
7 Conventions used in this manual To highlight key information in this manual, some text are presented as follows: IMPORTANT! This message contains vital information that must be followed to complete a task. NOTE: This message contains additional information and tips that can help complete tasks. Icons WARNING! This message contains important information that must be followed to keep you safe while performing tasks and prevent damage to your Notebook PC's data and components. The icons below indicate the devices you can use for completing a series of tasks or procedures on your Notebook PC. = Use the touch screen. = Use the touchpad. = Use the keyboard. Typography Bold Italic = This indicates a menu or an item that must be selected. = This indicates sections that you can refer to in this manual. Notebook PC E-Manual 7
8
9
10 Proper disposal Do not throw your Notebook PC in municipal waste. This product has been designed to enable proper reuse of parts and recycling. The symbol of the crossed out wheeled bin indicates that the product (electrical, electronic equipment and mercury-containing button cell battery) should not be placed in municipal waste. Check local regulations for disposal of electronic products. Do not throw the battery in municipal waste. The symbol of the crossed out wheeled bin indicates that the battery should not be placed in municipal waste. 10 Notebook PC E-Manual
11 Chapter 1: Hardware Setup Notebook PC E-Manual 11
12 Getting to know your Notebook PC Top View NOTE: The keyboard's layout may vary per region or country. The top view may also vary in appearance depending on the Notebook PC model. 12 Notebook PC E-Manual
13 Microphone The built-in microphone can be used for video conferencing, voice narrations, or simple audio recording. Camera indicator The camera indicator lights up when the built-in camera is in use. Camera The built-in camera allows you to take pictures or record videos using your Notebook PC. Display panel This high-deinition display panel provides excellent viewing features for photos, videos, and other multimedia iles on your Notebook PC. NOTE: This Notebook PC is equipped with a touch-enabled panel, allowing you to operate your Notebook PC using touch gestures. For more details, refer to the Gestures for the touch screen and touchpad section in this manual. Power button Press the power button to turn your Notebook PC on or of. You can also use the power button to put your Notebook PC to sleep or hibernate mode and wake it up from sleep or hibernate mode. In the event that your Notebook PC becomes unresponsive, press and hold the power button for about four (4) seconds until your Notebook PC shuts down. ASUS Vivo key Press this key to launch the ASUS VivoBook app. NOTE: For more information, refer to the ASUS VivoBook section in this manual. Notebook PC E-Manual 13
14 Numeric keypad (on selected models) The numeric keypad toggles between these two functions: for numeric input and as pointer direction keys. NOTE: For more details, refer to the Numeric keypad section in this manual. Keyboard The keyboard provides full-sized QWERTY keys with a comfortable travel depth for typing. It also enables you to use the function keys, allows quick access to Windows, and controls other multimedia functions. NOTE: The keyboard layout difers by model or territory. Touchpad The touchpad allows the use of multi-gestures to navigate onscreen, providing an intuitive user experience. It also simulates the functions of a regular mouse. NOTE: For more details, refer to the Gestures for the touchpad section in this manual. Status indicators The status indicators help identify the current hardware status of your Notebook PC. Power indicator The power indicator lights up when the Notebook PC is turned on and blinks slowly when the Notebook PC is in sleep mode. 14 Notebook PC E-Manual
15 Two-color battery charge indicator The two-color LED provides a visual indication of the battery s charge status. Refer to the following table for details. Color Solid Green Solid Orange Blinking Orange Lights of Status The Notebook PC is plugged to a power source, charging its battery, and the battery power is between 95% and 100%. The Notebook PC is plugged to a power source, charging its battery, and the battery power is less than 95%. The Notebook PC is running on battery mode and the battery power is less than 10%. The Notebook PC is running on battery mode and the battery power is between 10% to 100%. Notebook PC E-Manual 15
16 Drive activity indicator This indicator lights up when your Notebook PC is accessing the internal storage drives. Bluetooth / Wireless indicator This indicator lights up when your Notebook PC s wireless function (Bluetooth or Wi-Fi) is enabled. Number lock indicator This indicator lights up when the number lock function is activated. This allows you to use some of the keys on your keyboard for numeric input. Capital lock indicator This indicator lights up when the capital lock function is activated. Using capital lock allows you to type capitalized letters (such as A, B, C) using your Notebook PC s keyboard. 16 Notebook PC E-Manual
17 Bottom NOTE: The bottom side may vary in appearance depending on model. WARNING! The bottom of the Notebook PC can get warm to hot while in use or while charging the battery pack. When working on your Notebook PC, do not place it on surfaces that can block the vents. IMPORTANT! Battery time varies by usage and by the speciications for this Notebook PC. The battery pack cannot be disassembled. Notebook PC E-Manual 17
18 Spring battery lock The spring battery lock automatically locks the battery pack in place once it is inserted into the battery slot. IMPORTANT! This lock should be held in an unlocked position when removing the battery pack. Battery pack The battery pack is automatically charged when your Notebook PC is connected to a power source. When charged, the battery pack supplies power to your Notebook PC. Manual battery lock The manual battery lock is used to keep the battery pack secured. This lock should be manually moved to a locked or unlocked position to insert or remove the battery pack. Air vents The air vents allow cool air to enter and warm air to exit the Notebook PC. WARNING! Ensure that paper, books, clothing, cables, or other objects do not block any of the air vents or else overheating may occur. Hard disk drive compartment This compartment is a reserved space for the hard disk drive of your Notebook PC. Random-access memory module (RAM) compartment The RAM compartment allows you to add RAM memory modules to increase the memory capacity of your Notebook PC. 18 Notebook PC E-Manual
19 Right Side Headphone output/microphone input combo jack port This port allows you to connect your Notebook PC to ampliied speakers or headphones. You can also use this port to connect your Notebook PC to an external microphone. USB 2.0 port The USB (Universal Serial Bus) port is compatible with USB 2.0 or USB 1.1 devices such as keyboards, pointing devices, lash disk drives, external HDDs, speakers, cameras and printers. Optical drive electronic eject button Press this button to eject the optical drive tray. Manual eject hole The manual eject hole is used to eject the drive tray in case the electronic eject button does not work. WARNING! Use the manual eject hole only when the electronic eject button does not work. Kensington lock port The Kensington lock port allows you to secure your Notebook PC using Kensington compatible Notebook PC security products. Notebook PC E-Manual 19
20 Left Side Power (DC) input port Insert the bundled power adapter into this port to charge the battery pack and supply power to your Notebook PC. WARNING! The adapter may become warm to hot while in use. Ensure not to cover the adapter and keep it away from your body while it is connected to a power source. IMPORTANT! Use only the bundled power adapter to charge the battery pack and supply power to your Notebook PC. Air vents The air vents allow cool air to enter and warm air to exit the Notebook PC. WARNING! Ensure that paper, books, clothing, cables, or other objects do not block any of the air vents or else overheating may occur. VGA port This port allows you to connect your Notebook PC to an external display. 20 Notebook PC E-Manual
21 HDMI port This port is for a High-Deinition Multimedia Interface (HDMI) connector and is HDCP compliant for HD DVD, Blu-ray, and other protected content playback. LAN port Insert the network cable into this port to connect to a local area network (LAN). USB 3.0 port This Universal Serial Bus 3.0 (USB 3.0) port provides a transfer rate of up to 5 Gbit/s and is backward compatible to USB 2.0. Notebook PC E-Manual 21
22 22 Notebook PC E-Manual
23 Chapter 2: Using your Notebook PC Notebook PC E-Manual 23
24 Getting started NOTE: If your Notebook PC does not have its battery pack installed, use the following procedures for installation. Install the battery pack. A. Move the manual battery lock to the unlocked position. B. Align and insert the battery pack into the Notebook PC s battery slot. C. Move the manual battery lock back to the locked position after inserting the battery pack. 24 Notebook PC E-Manual
25 Charge your Notebook PC. A. Connect the AC power cord to the AC/DC adapter. B. Plug the AC power adapter into a 100V~240V power source. C. Connect the DC power connector into your Notebook PC s power (DC) input. Charge the Notebook PC for 3 hours before using it in battery mode for the irst time. IMPORTANT! Ensure that your Notebook PC is connected to the power adapter before turning it on for the irst time. Locate the input/output rating label on your Notebook PC and ensure that it matches the input/output rating information on your power adapter. Some Notebook PC models may have multiple rating output currents based on the available SKU. When using your Notebook PC on power adapter mode, the socket outlet must be near to the unit and easily accessible. Power adapter information: - Input voltage: Vac - Input frequency: 50-60Hz - Rating output current: 3.42A (65W) - Rating output voltage: 19V Notebook PC E-Manual 25
26 Lift to open the display panel. Press the power button. 26 Notebook PC E-Manual


27 Gestures for the touch screen and touchpad Gestures allow you to launch programs and access the settings of your Notebook PC. Refer to the following illustrations when using hand gestures on your touch screen and touchpad. Using the touch screen Left edge swipe Right edge swipe Swipe from the left edge of the screen to shule your running apps. Zoom out Swipe from the right edge of the screen to launch the Charms bar. Zoom in Bring together your two ingers on the touch panel. Spread apart your two ingers on the touch panel. Notebook PC E-Manual 27
28
29 Using the touchpad Moving the pointer You can tap or click anywhere on the touchpad to activate its pointer, then slide your inger on the touchpad to move the pointer onscreen. Slide horizontally Slide vertically Slide diagonally Notebook PC E-Manual 29
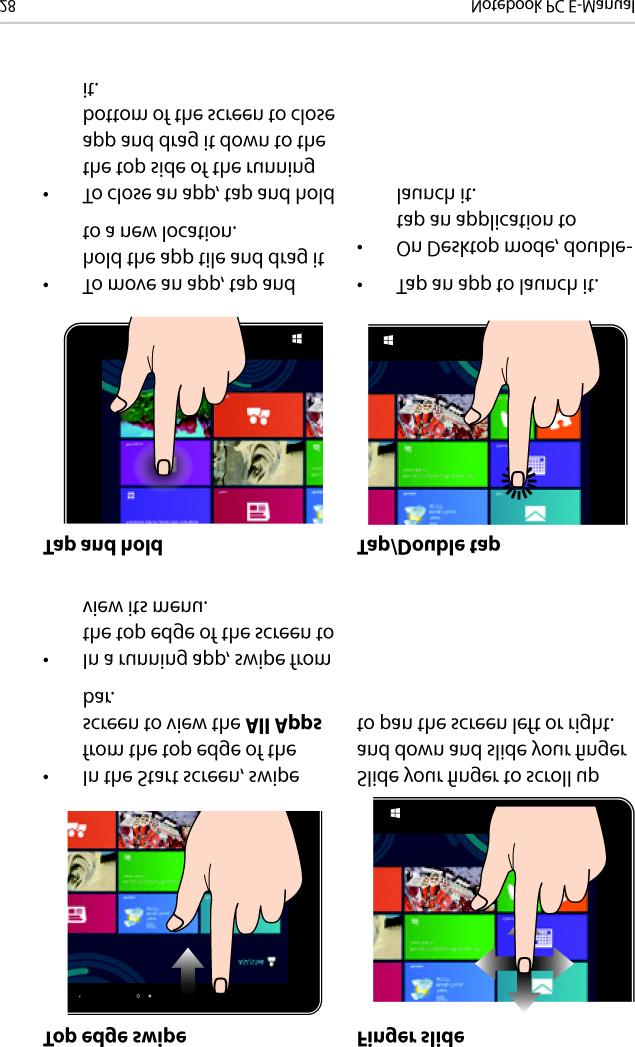
30 One-inger gestures Tap/Double tap In the Start screen, tap an app to launch it. In Desktop mode, double-tap an application to launch it. Left-click Right-click In the Start screen, click an app to launch it. In Desktop mode, doubleclick an application to launch it. In the Start screen, click an app to select it and launch the settings bar. You can also press this button to launch the All Apps bar. In Desktop mode, use this button to open the rightclick menu. NOTE: The areas inside the dotted line represent the locations of the left mouse button and the right mouse button on the touchpad. 30 Notebook PC E-Manual
31 Drag and drop Double-tap an item, then slide the same inger without lifting it of the touchpad. To drop the item to its new location, lift your inger from the touchpad. Top edge swipe In the Start screen, swipe from the top edge to launch the All Apps bar. In a running app, swipe from the top edge to view its menu. Left edge swipe Right edge swipe Swipe from the left edge to shule your running apps. Swipe the right edge to launch the Charms bar. Notebook PC E-Manual 31
32 Two-inger gestures Tap Rotate Tap two ingers on the touchpad to simulate the right-click function. Two-inger scroll (up/down) To rotate an image, place two ingers on the touchpad then turn one inger clockwise or counterclockwise while the other stays still. Two-inger scroll (left/right) Slide two ingers to scroll up or down. Zoom out Slide two ingers to scroll left or right. Zoom in Bring together your two ingers on the touchpad. Spread apart your two ingers on the touchpad. 32 Notebook PC E-Manual
33 Drag and drop Select an item then press and hold the left button. Using your other inger, slide down the touchpad to drag and drop the item to a new location. Three-inger gestures Swipe up Swipe down Swipe three ingers upward to show all running applications. Swipe three ingers downward to show the Desktop mode. Notebook PC E-Manual 33
34 Using the keyboard Function keys The function keys on your Notebook PC s keyboard can trigger the following commands: Puts the Notebook PC into Sleep mode Turns Airplane mode on or of NOTE: When enabled, the Airplane mode disables all wireless connectivity. Decreases display brightness Increases display brightness Turns the display panel of Activates the second screen NOTE: Ensure that the second display is connected to your Notebook PC. Enables or disables the touchpad Turns the speaker on or of Turns the speaker volume down Turns the speaker volume up 34 Notebook PC E-Manual
35 Function keys for ASUS Apps Your Notebook PC also comes with a special set of function keys that can be used to launch ASUS apps. Toggles the ASUS Splendid Video Enhancement Technology app to switch between these display color enhancement modes: Gamma Correction, Vivid Mode, Theater Mode, Soft Mode, My Proile, and Normal. Launches the ASUS LifeFrame app Launches the ASUS Power4Gear Hybrid app Windows 8 keys There are two special Windows keys on your Notebook PC s keyboard used as below: Press this key to go back to the Start screen. If you are already in the Start screen, press this key to go back to the last app you opened. Press this key to simulate the right-click functions. Notebook PC E-Manual 35
36 Multimedia control keys The multimedia control keys allow you to control multimedia iles, such as audios and videos, when played in your Notebook PC. Press PC, illustrated as below. in combination with the arrow keys on your Notebook Stop Skip to previous track or rewind Play or pause Skip to next track or fast forward Numeric keypad (on selected models) A numeric keypad is available on selected Notebook PC models. You can use this keypad for numeric input or as pointer direction keys. To use the numeric keypad as pointer direction keys, press To use the numeric keypad for numeric input only, press.. 36 Notebook PC E-Manual
37 Chapter 3: Working with Windows 8 Notebook PC E-Manual 37
38 Starting for the irst time When you start your computer for the irst time, a series of screens appear to guide you in conifguring the basic settings of your Windows 8 operating system. To start your Notebook PC for the irst time: 1. Press the power button on your Notebook PC. Wait for a few minutes until the setup screen appears. 2. From the setup screen, pick a language to use on your Notebook PC. 3. Carefully read the License Terms. Tick I accept the terms for using Windows then click Accept. 4. Follow the onscreen instructions to conigure the following basic items: Keep your PC secure Personalize Wireless Settings Sign in to your PC 5. After coniguring the basic items, the Windows 8 tutorial appears. Watch this to learn more about Windows 8 functionalities. Windows 8 lock screen The Windows 8 lock screen may appear when your Notebook PC enters the Windows 8 operating system. To proceed, tap on the lock screen or press any key on your Notebook PC's keyboard. 38 Notebook PC E-Manual


39 Windows UI Windows 8 comes with a tile-based user interface (UI) which allows you to organize and easily access Windows apps from the Start screen. It also includes the following features that you can use while working on your Notebook PC. Start screen The Start screen appears after successfully signing in to your user account. It helps organize all the applications you need in just one place. User account Zoom in/out button Windows Apps These are apps pinned on the Start screen and displayed on tiledformat for easy access. NOTE: Some apps require signing in to your Microsoft account before they are fully launched. Notebook PC E-Manual 39
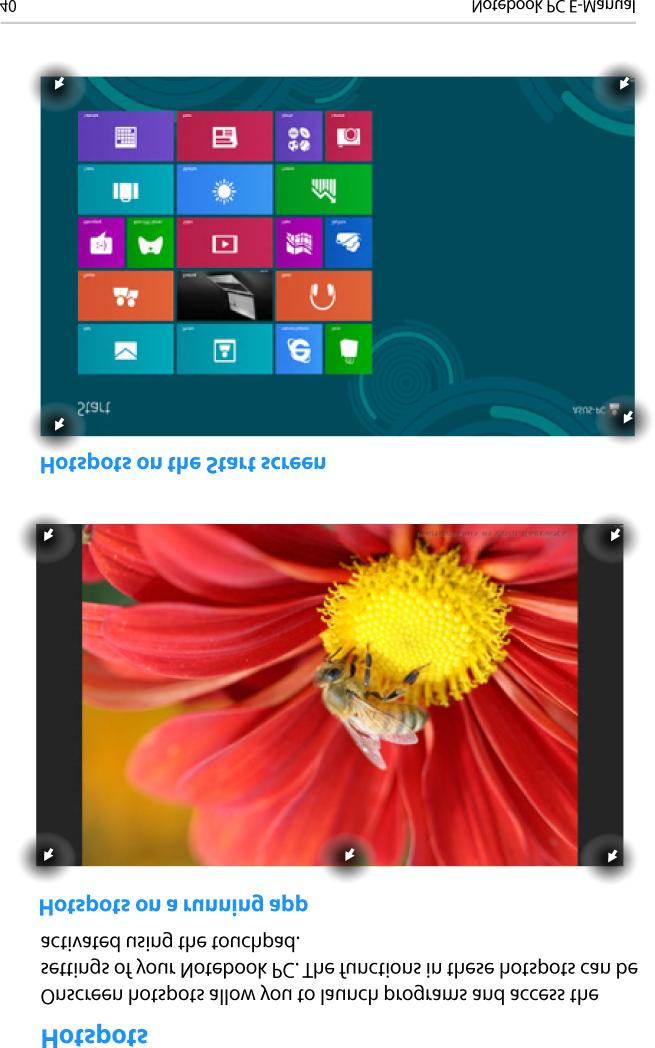
40
41 Hotspot upper left corner Action Hover your mouse pointer on the upper left corner then tap on the recent app s thumbnail to revert back to that running app. If you launched more than one app, slide down to show all running apps. lower left corner From a running app screen: Hover your mouse pointer on the lower left corner then tap on the Start screen s thumbnail to go back to the Start screen. NOTE: You can also press the Windows key Start screen. From the Start screen: on your keyboard to go back to the Hover your mouse pointer on the lower left corner then tap on the running app s thumbnail to go back to that app. top side Hover your mouse pointer on the top side until it changes to a hand icon. Drag then drop the app to a new location. NOTE: This hotspot function only works on a running app or when you want to use the Snap feature. For more details, refer to the Snap feature under Working with Windows apps. upper or lower right corner Hover your mouse pointer on the upper or lower right corner to launch the Charms bar. Notebook PC E-Manual 41
42 Working with Windows apps Use your Notebook PC s touch screen, touchpad, or keyboard to launch, customize, and close apps. Launching apps Tap an app to launch it. Position your mouse pointer over the app then left-click or tap once to launch it. Press twice then use the arrow keys to browse through the apps. Press to launch an app. Customizing apps You can move, resize, or unpin apps from the Start screen using the following steps: Moving apps Tap and hold the app tile then drag it to a new location. Double-tap on the app then drag and drop the app to a new location. 42 Notebook PC E-Manual
43 Resizing apps 1. Swipe down the app tile to select and launch the settings bar. 2. Tap to reduce or to enlarge the app tile. Right-click on the app to activate its settings bar then tap or. Unpinning apps 1. Swipe down the app tile to select and launch the settings bar. 2. Tap to unpin an app. Right-click on the app to activate the settings bar then tap. Notebook PC E-Manual 43
44 Closing apps Tap and hold the top side of the running app then drag it down to the bottom of the screen to close it. 1. Move your mouse pointer on the top side of the launched app then wait for the pointer to change to a hand icon. 2. Drag then drop the app to the bottom of the screen to close it. From the running app s screen, press. 44 Notebook PC E-Manual

45 Accessing the Apps screen Aside from the apps already pinned on your Start screen, you can also open other applications through the Apps screen. Launching the Apps screen Horizontal scroll bar Launch the Apps screen using your Notebook PC's touch screen, touchpad, or keyboard. 1. Swipe from the top or bottom edge of the screen to launch the All Apps bar. 2. Tap to show all installed apps in your Notebook PC. Swipe from the top edge to launch the All Apps bar. From the Start screen, press to select the All Apps icon then press. Notebook PC E-Manual 45
46 Pinning more apps on the Start screen You can pin more apps on the Start screen using your touch screen or touchpad. 1. In the Apps screen, swipe down the app to select and launch the settings bar. 2. Tap to pin the selected app on the Start screen. 1. Position the mouse pointer over the app you want to pin on the Start screen. 2. Right-click on the app to activate its settings. 3. Tap on the icon. 46 Notebook PC E-Manual

47 Charms bar The Charms bar is a toolbar that can be triggered on the right side of your screen. It consists of several tools that allow you to share applications and provide quick access for customizing the settings of your Notebook PC. Launching the Charms bar Charms bar NOTE: When called out, the Charms bar initially appears as a set of white icons. The image above shows how the Charms bar looks like once activated. Use your Notebook PC s touch screen, touchpad, or keyboard to launch the Charms bar. Swipe from the right edge of the screen to launch the Charms bar. Move your mouse pointer on the upper or lower right corner of the screen. Press Notebook PC E-Manual 47
48 Inside the Charms bar Search This tool allows you to look for iles, applications, or programs in your Notebook PC. Share This tool allows you to share applications via social networking sites or . Start This tool reverts the display back to the Start screen. From the Start screen, you can also use this to revert back to a recently opened app. Devices This tool allows you to access and share iles with the devices attached to your Notebook PC such as an external display or printer. Settings This tool allows you to access the PC settings of your Notebook PC. 48 Notebook PC E-Manual

49 Snap feature The Snap feature displays two apps side-by-side, allowing you to work or switch between apps. IMPORTANT! Ensure that your Notebook PC s screen resolution is set to 1366 x 768 pixels or higher before using the Snap feature. Snap bar Using Snap Use your Notebook PC s touch screen, touchpad, or keyboard to activate and use Snap. 1. Launch the app you wish to snap. 2. Tap and hold the app s topmost part then drag it to the left or right side of the screen until the snap bar appears. 3. Launch another app. Notebook PC E-Manual 49
50 1. Launch the app you wish to snap. 2. Hover the mouse point on the top side of your screen. 3. Once the pointer changes to a hand icon, drag then drop the app to the left or right side of the display panel. 4. Launch another app. 1. Launch the app you wish to snap. 2. Press. 3. Launch another app. 4. To switch between apps, press. 50 Notebook PC E-Manual
51 Other keyboard shortcuts Using the keyboard, you can also use the following shortcuts to help you launch applications and navigate Windows 8. \ Switches between the Start screen and the last running app Launches the desktop Launches the Computer window on Desktop mode Opens the File search pane Opens the Share pane Opens the Settings pane Opens the Devices pane Activates the Lock screen Minimizes the Internet Explorer window Notebook PC E-Manual 51
52 Opens the Second screen pane Opens the Apps search pane Opens the Run window Opens Ease of Access Center Opens the Settings search pane Opens a menu box of Windows tools Launches the magniier icon and zooms in your screen Zooms out your screen Opens the Narrator Settings Enables the print screen function 52 Notebook PC E-Manual

53
54 4. Tap Connect to start the network connection. NOTE: You may be prompted to enter a security key to activate the Wi-Fi connection. 5. If you want to enable sharing between your Notebook PC and other wireless-enabled systems, tap Yes, turn on sharing and connect to devices. Tap No, don't turn on sharing or connect to devices if you do not want to enable the sharing function. 54 Notebook PC E-Manual
55 Bluetooth Use Bluetooth to facilitate wireless data transfers with other Bluetooth-enabled devices. IMPORTANT! Ensure the Airplane mode is turned of to enable the Bluetooth function of your Notebook PC. For more details, refer to the Airplane mode section in this manual. Pairing with other Bluetooth-enabled devices You need to pair your Notebook PC with other Bluetooth-enabled devices to enable data transfers. To do this, use your or touch screen or touchpad as follows: 1. Launch the Charms bar. 2. Tap then tap Change PC Settings. 3. Under PC Settings, select Devices then tap Add a Device to search for Bluetooth-enabled devices. Notebook PC E-Manual 55

56 4. Select a device from the list. Compare the passcode on your Notebook PC with the passcode sent to your chosen device. If they are the same, tap Yes to successfully pair your Notebook PC with the device. NOTE: For some bluetooth-enabled devices, you may be prompted to key in the passcode of your Notebook PC. 56 Notebook PC E-Manual
57 Airplane mode The Airplane mode disables wireless communication, allowing you to use your Notebook PC safely while in-light. Turning Airplane mode on 1. Launch the Charms bar. or 2. Tap and tap. 3. Move the slider to the right to turn the Airplane mode on. Press. Turning Airplane mode of 1. Launch the Charms bar. or 2. Tap and tap. 3. Move the slider to the left to turn the Airplane mode of. Press. NOTE: Contact your airline provider to learn about related inlight services that can be used and restrictions that must be followed when using your Notebook PC in-light. Notebook PC E-Manual 57
58 Connecting to wired networks You can also connect to wired networks, such as local area networks and broadband Internet connection, using your Notebook PC s LAN port. NOTE: Contact your Internet Service Provider (ISP) for details or your network administrator for assistance in setting up your Internet connection. To conigure your settings, refer to the following procedures. IMPORTANT! Ensure that a network cable is connected between your Notebook PC s LAN port and a local area network before performing the following actions. Coniguring a dynamic IP/PPPoE network connection 1. Launch Desktop. or 2. From the Windows taskbar, right-click the network icon Center. then tap Open Network and Sharing 3. In the Network and Sharing Center window, tap Change adapter settings. 4. Right-click on your LAN then select Properties. 58 Notebook PC E-Manual


59 5. Tap Internet Protocol Version 4(TCP/IPv4) then tap Properties. 6. Tap Obtain an IP address automatically then tap OK. NOTE: Proceed to the next steps if you are using PPPoE connection. Notebook PC E-Manual 59

60 7. Return to the Network and Sharing Center window then tap Set up a new connection or network. 8. Select Connect to the Internet then tap Next. 60 Notebook PC E-Manual


61 9. Tap Broadband (PPPoE). 10. Type your User name, Password, and Connection name then tap Connect. 11. Tap Close to inish the coniguration. 12. Tap on the taskbar then tap the connection you just created. 13. Type your user name and password then tap Connect to start connecting to the Internet. Notebook PC E-Manual 61

62 Coniguring a static IP network connection or 1. Repeat steps 1 to 5 under Coniguring a dynamic IP/PPPoE network connection. 2 Tap Use the following IP address. 3. Type the IP address, Subnet mask and Default gateway from your service provider. 4. If needed, you can also type the preferred DNS server address and alternate DNS server address then tap OK. 62 Notebook PC E-Manual
63 Turning your Notebook PC off You can turn of your Notebook PC by doing either of the following procedures: Tap from the Charms bar then tap > or Shut down to do a normal shutdown. From the log-in screen, tap > Shut down. You can also shut down your Notebook PC using Desktop mode. To do this, launch the desktop then press alt + f4 to launch the Shut Down window. Select Shut Down from the drop-down list then select OK. If your Notebook PC is unresponsive, press and hold the power button for at least four (4) seconds until your Notebook PC turns of. Putting your Notebook PC to sleep To put your Notebook PC on Sleep mode, press the power button once. You can also put your Notebook PC to sleep mode using Desktop mode. To do this, launch the desktop then press alt + f4 to launch the Shut Down window. Select Sleep from the drop-down list then select OK. Notebook PC E-Manual 63
64 64 Notebook PC E-Manual
65 Chapter 4: ASUS apps Notebook PC E-Manual 65
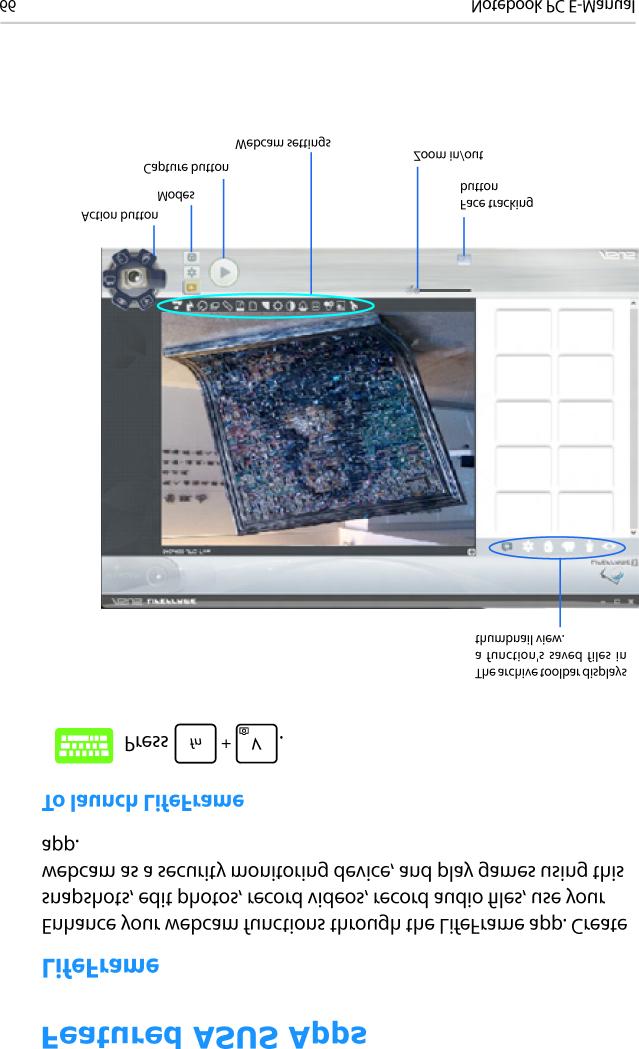
66
67

68 Power4Gear Hybrid Optimize the performance of your Notebook PC using the power saving modes in Power4Gear. NOTE: Unplugging the Notebook PC from its power adapter automatically switches Power4Gear Hybrid to Battery Saving mode. To launch Power4Gear Hybrid Press. Select from these power saving modes. Use these options to customize your power saving mode. Allows you to hide the desktop icons onscreen and turns the presentation mode on or of. Performance mode Use this mode when doing high-performance activities like playing games or conducting business presentations using your Notebook PC. Battery Saving mode This mode extends your Notebook PC s battery life while plugged in to the power adapter or while running on battery power only. 68 Notebook PC E-Manual
69

70 ASUS VivoBook Instant Functions This Notebook PC comes with ASUS VivoBook Instant Functions that provide a one-tap access to various Windows 8 settings and ASUS apps included with your Notebook PC. To access ASUS VivoBook Instant Functions: Tap on the Start screen. or Press. ASUS Vivobook home page close button Instant Functions Tap these buttons to scroll left or right. Tap this to launch Desktop mode. Tap this to launch the power options. 70 Notebook PC E-Manual

71 Instant Functions System Settings This allows you to quickly access the Personal, Hardware, Network, and System settings of your Notebook PC. To access these settings: 1. Launch the ASUS VivoBook home page. 2. Tap System Settings on your ASUS VivoBook home page. Notebook PC E-Manual 71


72 3. Tap the icon you wish to access under any of these menus: Personal, Hardware, Network, System. These settings allow you to customize the user account and Windows 8 Desktop mode of your Notebook PC. These settings you allow you to customize some of the hardware included with your Notebook PC. This allows you to quickly launch the Network and Sharing Center of Windows 8. These settings allow you to do backup recovery, uninstall programs, and change the system time and date of your Notebook PC. My Computer This app launches the Computer system folder which shows you an overview of the available storage systems in your Notebook PC. Launch My Computer by tapping on the app, as shown below, on the ASUS VivoBook home page. 72 Notebook PC E-Manual


73 Audio Wizard AudioWizard allows you to customize the sound modes of your Notebook PC for a clearer audio output that its actual usage scenarios. To use AudioWizard: 1. Tap AudioWizard on the ASUS VivoBook home page. 2. In the AudioWizard window, tap the sound mode you want to activate. NOTE: Tap OFF if you want to deactivate any of the sound modes you previously saved. 3. Tap done to save the selected sound mode and exit the AudioWizard window. Notebook PC E-Manual 73

74 Power4Gear The Power4Gear app inside the ASUS VivoBook home page allows you to quickly switch between these two power saving options: Performance and Battery Saving. NOTE: For more details on Power4Gear, refer to the Power4Gear Hybrid section in this manual. Move this switch to the left or right to turn the Battery Saving mode of or on. battery charge status Tutorial Launch the ASUS Tutorial and ASUS Smart Gesture videos by tapping on the icons inside the Tutorial app. 74 Notebook PC E-Manual


75 System Information This app shows an overview of your Notebook PC s system information in terms of storage and memory space. You can also tap this app to instantly access the Windows 8 System settings of your Notebook PC from the ASUS VivoBook home page. Splendid Tap this app to launch the ASUS Splendid Video Enhancement Technology window and switch between these display color enhancement modes: Gamma Correction, Vivid Mode, Theater Mode, Soft Mode, My Proile, and Normal. Notebook PC E-Manual 75

76 Quick Toggle Quick Toggle allows you to activate or deactivate the wireless and touchpad functions of your Notebook PC. It also allows you to change the contrast and volume settings of your Notebook PC by moving the slide bar to the left or right. Tap this to deactivate or activate the wireless functions of your Notebook PC. Tap this to toggle between locking and unlocking your Notebook PC s touchpad. Slide to the left or right to adjust your Notebook PC s volume level. Slide to the left or right to adjust your Notebook PC s display brightness. 76 Notebook PC E-Manual
77 Chapter 5: Power-on Self Test (POST) Notebook PC E-Manual 77
78 The Power-on Self Test (POST) The Power-on Self Test (POST) is a series of software-controlled diagnostic tests that run when you turn on or restart your Notebook PC. The software that controls the POST is installed as a permanent part of the Notebook PC s architecture. Using POST to access BIOS and Troubleshoot During POST, you can access the BIOS settings or run troubleshooting options using the function keys of your Notebook PC. You may refer to the following information for more details. BIOS The Basic Input and Output System (BIOS) stores system hardware settings that are needed for system startup in the Notebook PC. The default BIOS settings apply to most conditions of your Notebook PC. Do not change the default BIOS settings except in the following circumstances: An error message appears onscreen during system bootup and requests you to run the BIOS Setup. You have installed a new system component that requires further BIOS settings or updates. WARNING: Using inappropriate BIOS settings may result to system instability or boot failure. We strongly recommend that you change the BIOS settings only with the help of a trained service personnel. Accessing BIOS Restart your Notebook PC then press during POST. 78 Notebook PC E-Manual
79 BIOS Settings Boot NOTE: The BIOS screens in this section are for reference only. The actual screens may difer by model and territory. This menu allows you to set your boot option priorities. You may refer to the following procedures when setting your boot priority. 1. On the Boot screen, select Boot Option #1. Aptio Setup Utility - Copyright (C) 2012 American Megatrends, Inc. Main Advance Boot Security Save & Exit Boot Coniguration UEFI Boot Launch CSM [Enabled] [Disabled] Sets the system boot order Boot Option Priorities Boot Option #1 Add New Boot Option Delete Boot Option [Windows Boot Manager] : Select Screen : Select Item Enter: Select +/ : Change Opt. F1 : General Help F9 : Optimized Defaults F10 : Save & Exit ESC : Exit Version Copyright (C) American Megatrends, Inc. 2. Press and select a device as the Boot Option #1. Aptio Setup Utility - Copyright (C) 2012 American Megatrends, Inc. Main Advance Boot Security Save & Exit Boot Coniguration Fast Boot Launch CSM [Disabled] [Disabled] Sets the system boot order Driver Option Priorities Boot Option Priorities Boot Option #1 Add New Boot Option Delete Boot Option Boot Option #1 [Windows Boot Manager] Windows Boot Manager Disabled : Select Screen : Select Item Enter: Select +/ : Change Opt. F1 : General Help F9 : Optimized Defaults F10 : Save & Exit ESC : Exit Version Copyright (C) American Megatrends, Inc. Notebook PC E-Manual 79
80 Security This menu allows you to set up the administrator and user password of your Notebook PC. It also allows you to control the access to your Notebook PC s hard disk drive, input/output (I/O) interface, and USB interface. NOTE: If you install a User Password, you will be prompted to input this before entering your Notebook PC's operating system. If you install an Administrator Password, you will be prompted to input this before entering BIOS. Aptio Setup Utility - Copyright (C) 2012 American Megatrends, Inc. Main Advance Boot Security Save & Exit Password Description If ONLY the Administrator s password is set,then this only limits access to Setup and is only asked for when entering Setup. If ONLY the user s password is set, then this is a power on password and must be entered to boot or enter Setup. In Setup, the User will have Administrator rights. Administrator Password Status User Password Status Administrator Password User Password HDD Password Status : Set Master Password Set User Password I/O Interface Security System Mode state Secure Boot state Secure Boot Control NOT INSTALLED NOT INSTALLED NOT INSTALLED User Disabled [Disabled] Set Administrator Password. The password length must be in the following range: Minimum length 3 Maximum length 20 : Select Screen : Select Item Enter: Select +/ : Change Opt. F1 : General Help F9 : Optimized Defaults F10 : Save & Exit ESC : Exit Version Copyright (C) 2012 American Megatrends, Inc. To set the password: 1. On the Security screen, select Administrator Password or User Password. 2. Type in a password then press. 3. Re-type to conirm the password then press. 80 Notebook PC E-Manual
81 To clear the password: 1. On the Security screen, select Administrator Password or User Password. 2. Type in the current password then press. 3. Leave the Create New Password ield blank then press. 4. Select Yes in the conirmation box then press. I/O Interface Security In the Security menu, you can access I/O Interface Security to lock or unlock some interface functions of your Notebook PC. Aptio Setup Utility - Copyright (C) 2012 American Megatrends, Inc. Security I/O Interface Security LAN Network Interface [UnLock] Wireless Network Interface [UnLock] HD AUDIO Interface [UnLock] SATA 2nd HDD Interface [UnLock] USB Interface Security LAN Network Interface Lock UnLock If Locked, LAN controller will be disabled. : Select Screen : Select Item Enter: Select +/ : Change Opt. F1 : General Help F9 : Optimized Defaults F10 : Save & Exit ESC : Exit Version Copyright (C) 2012 American Megatrends, Inc. To lock an interface: 1. On the Security screen, select I/O Interface Security. 2. Select an interface you would like to lock then press. 3. Select Lock. Notebook PC E-Manual 81
82 USB Interface Security Through the I/O Interface Security menu, you can also access USB Interface Security to lock or unlock ports and devices. USB Interface Security USB Interface Aptio Setup Utility - Copyright (C) 2012 American Megatrends, Inc. Security [UnLock] If LOCKED, all USB devices will be disabled External Ports CMOS Camera Card Reader Lock UnLock [UnLock] [UnLock] [UnLock] USB Interface : Select Screen : Select Item Enter: Select +/ : Change Opt. F1 : General Help F9 : Optimized Defaults F10 : Save & Exit ESC : Exit Version Copyright (C) 2012 American Megatrends, Inc. To lock the USB interface: 1. On the Security screen, select I/O Interface Security > USB Interface Security. 2. Select an interface that you would like to lock then select Lock. NOTE: Setting the USB Interface to Lock also locks and hides the External Ports and other devices included under USB Interface Security. 82 Notebook PC E-Manual
83 Set Master Password In the Security menu, you can use Set Master Password to set up a password-enabled access to your hard disk drive. Aptio Setup Utility - Copyright (C) 2012 American Megatrends, Inc. Aptio Setup Utility Copyright (C) 2011 American Megatrends, Inc. Main Advance Boot Security Save & Exit Password Description If ONLY the Administrator s password is set,then this only limits access to Setup and is only asked for when entering Setup. If ONLY the user s password is set, then this is a power on password and must be entered to boot or enter Setup. In Setup, the User will have Administrator rights. Administrator Password Status User Password Status Administrator Password User Password HDD Password Status : Set Master Password Set User Password I/O Interface Security System Mode state Secure Boot state Secure Boot Control To set the HDD password: NOT INSTALLED NOT INSTALLED NOT INSTALLED User Disabled [Disabled] 1. On the Security screen, select Set Master Password. 2. Type in a password then press. Set HDD Master Password. ***Advisable to Power Cycle System after Setting Hard Disk Passwords*** : Select Screen : Select Item Enter: Select +/ : Change Opt. F1 : General Help F9 : Optimized Defaults F10 : Save & Exit ESC : Exit Version Copyright (C) 2012 American Megatrends, Inc. 3. Re-type to conirm the password then press. 4. Select Set User Password then repeat the previous steps to set up the user password. Notebook PC E-Manual 83
84 Save & Exit To keep your coniguration settings, select Save Changes and Exit before exiting the BIOS. Aptio Setup Utility - Copyright (C) 2012 American Megatrends, Inc. Main Advance Boot Security Save & Exit Save Changes and Exit Discard Changes and Exit Exit system setup after saving the changes. Save Options Save Changes Discard Changes Restore Defaults Boot Override Windows Boot Manager Launch EFI Shell from ilesystem device : Select Screen : Select Item Enter: Select +/ : Change Opt. F1 : General Help F9 : Optimized Defaults F10 : Save & Exit ESC : Exit Version Copyright (C) 2012 American Megatrends, Inc. To update the BIOS: 1. Verify the Notebook PC s exact model then download the latest BIOS ile for your model from the ASUS website. 2. Save a copy of the downloaded BIOS ile to a lash disk drive. 3. Connect your lash disk drive to your Notebook PC. 4. Restart your Notebook PC then press during POST. 5. From the BIOS menu, Select Advanced > Start Easy Flash, then press. 84 Notebook PC E-Manual
85 Aptio Setup Utility - Copyright (C) 2012 American Megatrends, Inc. Aptio Setup Utility Copyright (C) 2011 American Megatrends, Inc. Main Advance Boot Security Save & Exit Start Easy Flash Internal Pointing Device Wake on Lid Open Power Off Energy Saving Intel Virtualization Technology Intel AES-NI VT-d [Enabled] [Enabled] [Enabled] [Enabled] [Enabled] [Enabled] Press Enter to run the utility to select and update BIOS. SATA Coniguration Graphics Coniguration DPTF Coniguration Intel (R) Anti-Theft Technology Corporation USB Coniguration Network Stack : Select Screen : Select Item Enter: Select +/ : Change Opt. F1 : General Help F9 : Optimized Defaults F10 : Save & Exit ESC : Exit Version Copyright (C) 2012 American Megatrends, Inc. 6. Locate your downloaded BIOS ile in the lash disk drive then press. ASUSTek Easy Flash Utility FLASH TYPE: Winbond 25X/Q Series Current BIOS Platform: S550 Version: 102 Build Date: Aug Build Time: 20:36:16 New BIOS Platform: Unknown Version: Unknown Build Date: Unknown Build Time: Unknown FSO FS1 FS2 FS3 FS4 0 EFI <DIR> [ ]: Switch [ ]: Choose [q]: Exit [Enter]: Enter/Execute 7. After the BIOS update process, select Exit > Restore Defaults to restore the system to its default settings. Notebook PC E-Manual 85
86 Troubleshoot By pressing during POST, you can access Windows 8 troubleshoot options which includes the following: Refresh your PC Reset your PC Advanced options Refresh your PC Use Refresh your PC if you want to refresh your system without losing your current iles and applications. To access this during POST: 1. Restart your Notebook PC then press during POST. 2. Wait for Windows to load the Choose an option screen then tap Troubleshoot. or 3. Tap Refresh your PC. 4. In the Refresh your PC screen, read the bullet points to learn more about using this option then tap Next. 5. Tap the account you would like to refresh. 6. Type your account password then tap Continue. 7. Tap Refresh. IMPORTANT! Ensure that your Notebook PC is plugged in to a power source before refreshing your system. 86 Notebook PC E-Manual
Notebook PC. E-Manual
 Notebook PC E-Manual E7814 November 2012 COPYRIGHT INFORMATION No part of this manual, including the products and software described in it, may be reproduced, transmitted, transcribed, stored in a retrieval
Notebook PC. E-Manual
 Notebook PC E-Manual E7620 August 2012 COPYRIGHT INFORMATION No part of this manual, including the products and software described in it, may be reproduced, transmitted, transcribed, stored in a retrieval
E10211 First Edition April 2015 Notebook PC
 E10211 First Edition April 2015 Notebook PC E-Manual COPYRIGHT INFORMATION No part of this manual, including the products and software described in it, may be reproduced, transmitted, transcribed, stored
E9042 First Edition March 2014 Notebook PC
 E9042 First Edition March 2014 Notebook PC E-Manual COPYRIGHT INFORMATION No part of this manual, including the products and software described in it, may be reproduced, transmitted, transcribed, stored
E10454 Revised Edition V3 May 2015 Notebook PC
 E10454 Revised Edition V3 May 2015 Notebook PC E-Manual COPYRIGHT INFORMATION No part of this manual, including the products and software described in it, may be reproduced, transmitted, transcribed, stored
E10465 First Edition July 2015 Notebook PC
 E10465 First Edition July 2015 Notebook PC E-Manual COPYRIGHT INFORMATION No part of this manual, including the products and software described in it, may be reproduced, transmitted, transcribed, stored
Notebook PC. E-Manual
 Notebook PC E-Manual E8233 First Edition May 2013 COPYRIGHT INFORMATION No part of this manual, including the products and software described in it, may be reproduced, transmitted, transcribed, stored
Notebook PC. E-Manual
 Notebook PC E-Manual E7483 August 2012 COPYRIGHT INFORMATION No part of this manual, including the products and software described in it, may be reproduced, transmitted, transcribed, stored in a retrieval
E10823 First Edition September ASUS Notebook PC. E-manual
 E10823 First Edition September 2015 ASUS Notebook PC E-manual COPYRIGHT INFORMATION No part of this manual, including the products and software described in it, may be reproduced, transmitted, transcribed,
E10784 First Edition September E-Manual
 E10784 First Edition September 2015 E-Manual COPYRIGHT INFORMATION No part of this manual, including the products and software described in it, may be reproduced, transmitted, transcribed, stored in a
Notebook PC. E-Manual
 Notebook PC E-Manual E9036 First Edition February 2014 COPYRIGHT INFORMATION No part of this manual, including the products and software described in it, may be reproduced, transmitted, transcribed, stored
E11526 Revised Edition V2 April E-Manual
 E11526 Revised Edition V2 April 2016 E-Manual COPYRIGHT INFORMATION No part of this manual, including the products and software described in it, may be reproduced, transmitted, transcribed, stored in a
E9655 First Edition August 2014 Notebook PC
 E9655 First Edition August 2014 Notebook PC E-Manual COPYRIGHT INFORMATION No part of this manual, including the products and software described in it, may be reproduced, transmitted, transcribed, stored
E12001 First Edition October E-Manual
 E12001 First Edition October 2016 E-Manual COPYRIGHT INFORMATION No part of this manual, including the products and software described in it, may be reproduced, transmitted, transcribed, stored in a retrieval
Notebook PC. E-Manual
 Notebook PC E-Manual E8279 First Edition June 2013 COPYRIGHT INFORMATION No part of this manual, including the products and software described in it, may be reproduced, transmitted, transcribed, stored
E11921 First Edition September E-Manual
 E11921 First Edition September 2016 E-Manual COPYRIGHT INFORMATION No part of this manual, including the products and software described in it, may be reproduced, transmitted, transcribed, stored in a
E10114 First Edition April 2015 Notebook PC
 E10114 First Edition April 2015 Notebook PC E-Manual COPYRIGHT INFORMATION No part of this manual, including the products and software described in it, may be reproduced, transmitted, transcribed, stored
E13137 First Edition / August E-Manual
 E13137 First Edition / August 2017 E-Manual COPYRIGHT INFORMATION No part of this manual, including the products and software described in it, may be reproduced, transmitted, transcribed, stored in a retrieval
E11814 First Edition October E-Manual
 E11814 First Edition October 2016 E-Manual COPYRIGHT INFORMATION No part of this manual, including the products and software described in it, may be reproduced, transmitted, transcribed, stored in a retrieval
ASUS Tablet ASUS Mobile Dock
 E10029 First Edition December 2014 ASUS Tablet ASUS Mobile Dock E-Manual T100 Series COPYRIGHT INFORMATION No part of this manual, including the products and software described in it, may be reproduced,
E12080 First Edition October E-Manual
 E12080 First Edition October 2016 E-Manual COPYRIGHT INFORMATION No part of this manual, including the products and software described in it, may be reproduced, transmitted, transcribed, stored in a retrieval
E11240 First Edition March E-Manual
 E11240 First Edition March 2016 E-Manual COPYRIGHT INFORMATION No part of this manual, including the products and software described in it, may be reproduced, transmitted, transcribed, stored in a retrieval
 About this manual Safety precautions Getting to know your ASUS Transformer Book Trio Tablet PC station Transforming your devices into an ASUS Transformer Book Trio Undocking the tablet
E10406 First Edition July 2015 Notebook PC
 E10406 First Edition July 2015 Notebook PC E-Manual COPYRIGHT INFORMATION No part of this manual, including the products and software described in it, may be reproduced, transmitted, transcribed, stored
G Series GAMING NOTEBOOK PC. E12664 First Edition / July 2017
 G Series GAMING NOTEBOOK PC E12664 First Edition / July 2017 COPYRIGHT INFORMATION No part of this manual, including the products and software described in it, may be reproduced, transmitted, transcribed,
Lenovo Miix User Guide. Read the safety notices and important tips in the included manuals before using your computer.
 Lenovo Miix 2 11 User Guide Read the safety notices and important tips in the included manuals before using your computer. Notes Before using the product, be sure to read Lenovo Safety and General Information
E10406 First Edition July 2015 Notebook PC
 E10406 First Edition July 2015 Notebook PC E-Manual COPYRIGHT INFORMATION No part of this manual, including the products and software described in it, may be reproduced, transmitted, transcribed, stored
Lenovo IdeaPad Flex 10
 Lenovo IdeaPad Flex 10 User Guide Read the safety notices and important tips in the included manuals before using your computer. Notes Before using the product, be sure to read Lenovo Safety and General
E11633 First Edition July E-Manual
 E11633 First Edition July 2016 E-Manual COPYRIGHT INFORMATION No part of this manual, including the products and software described in it, may be reproduced, transmitted, transcribed, stored in a retrieval
Windows XP Installation Guide
 E3484 Windows XP Installation Guide November 2007 15G06Q009000 Copyright Information No part of this manual, including the products and software described in it, may be reproduced, transmitted, transcribed,
ASUS Tablet ASUS Mobile Dock
 E10231 First Edition July 2015 ASUS Tablet ASUS Mobile Dock E-Manual T100 Series COPYRIGHT INFORMATION No part of this manual, including the products and software described in it, may be reproduced, transmitted,
E11011 First Edition December E-Manual
 E11011 First Edition December 2015 E-Manual COPYRIGHT INFORMATION No part of this manual, including the products and software described in it, may be reproduced, transmitted, transcribed, stored in a retrieval
E10533 First Edition September ASUS Notebook PC. E-manual
 E10533 First Edition September 2015 ASUS Notebook PC E-manual COPYRIGHT INFORMATION No part of this manual, including the products and software described in it, may be reproduced, transmitted, transcribed,
E11329 First Edition May E-Manual
 E11329 First Edition May 2016 E-Manual COPYRIGHT INFORMATION No part of this manual, including the products and software described in it, may be reproduced, transmitted, transcribed, stored in a retrieval
E12532 First Edition / August E-Manual
 E12532 First Edition / August 2017 E-Manual COPYRIGHT INFORMATION No part of this manual, including the products and software described in it, may be reproduced, transmitted, transcribed, stored in a retrieval
E12434 First Edition / February E-Manual
 E12434 First Edition / February 2017 E-Manual COPYRIGHT INFORMATION No part of this manual, including the products and software described in it, may be reproduced, transmitted, transcribed, stored in a
E11960 First Edition November E-Manual
 E11960 First Edition November 2016 E-Manual COPYRIGHT INFORMATION No part of this manual, including the products and software described in it, may be reproduced, transmitted, transcribed, stored in a retrieval
Lenovo IdeaPad Yoga 13
 Lenovo IdeaPad Yoga 13 User Guide V2.0 Read the safety notices and important tips in the included manuals before using your computer. Note Before using the product, be sure to read Lenovo Safety and General
ideapad 100S-14IBR User Guide
 ideapad 100S-14IBR User Guide Read the safety notices and important tips in the included manuals before using your computer. Notes Before using the product, be sure to read Lenovo Safety and General Information
E12938 First Edition / July E-Manual
 E12938 First Edition / July 2017 E-Manual COPYRIGHT INFORMATION No part of this manual, including the products and software described in it, may be reproduced, transmitted, transcribed, stored in a retrieval
Lenovo S21e. User Guide. S21e-20. lmn Read the safety notices and important tips in the included manuals before using your computer.
 Lenovo S21e S21e-20 User Guide lmn Read the safety notices and important tips in the included manuals before using your computer. Notes Before using the product, be sure to read Lenovo Safety and General
Lenovo N22. User Guide. included manuals before using your computer. included manuals before using your computer.
 Lenovo N22 User Guide Read Read the the safety safety notices notices and and important important tips tips in in the the included manuals before using your computer. included manuals before using your
E13439 Revised Edition V2 / August E-Manual
 E13439 Revised Edition V2 / August 2017 E-Manual COPYRIGHT INFORMATION No part of this manual, including the products and software described in it, may be reproduced, transmitted, transcribed, stored in
Lenovo ideapad 110S. User Guide. ideapad 110S-11IBR. Read the safety notices and important tips in the included manuals before using your computer.
 Lenovo ideapad 110S ideapad 110S-11IBR User Guide Read the safety notices and important tips in the included manuals before using your computer. Notes Before using the product, be sure to read Lenovo Safety
Lenovo Yoga User Guide. Read the safety notices and important tips in the included manuals before using your computer.
 Lenovo Yoga 2 13 User Guide Read the safety notices and important tips in the included manuals before using your computer. Notes Before using the product, be sure to read Lenovo Safety and General Information
Lenovo YOGA 310. User Guide YOGA IAP. Read the safety notices and important tips in the included manuals before using your computer.
 Lenovo YOGA 310 YOGA 310-11IAP User Guide Read the safety notices and important tips in the included manuals before using your computer. Notes Before using the product, be sure to read Lenovo Safety and
E14249 First Edition / August 2018
 E14249 First Edition / August 2018 COPYRIGHT INFORMATION No part of this manual, including the products and software described in it, may be reproduced, transmitted, transcribed, stored in a retrieval
Lenovo ideapad 710S Plus User Guide
 Lenovo ideapad 710S Plus User Guide Read the safety notices and important tips in the included manuals before using your computer. Notes Before using the product, be sure to read Lenovo Safety and General
Using memory cards (not supplied)
") Chapter 1. Getting to know your computer Using memory cards (not supplied) Your computer supports the following types of memory cards: Secure Digital (SD) card Secure Digital High Capacity (SDHC) card
Chapter 1. Getting to know your computer Using memory cards (not supplied) Your computer supports the following types of memory cards: Secure Digital (SD) card Secure Digital High Capacity (SDHC) card
Lenovo Legion Y530. User Guide. Legion Y530-15ICH. Read the safety notices and important tips in the included manuals before using your computer.
 Lenovo Legion Y530 Legion Y530-15ICH User Guide Read the safety notices and important tips in the included manuals before using your computer. Notes Before using the product, be sure to read Lenovo Safety
Lenovo ideapad 720S-13IKB ideapad 720S Touch-13IKB ideapad 720S-13ARR
 Lenovo ideapad 720S-13IKB ideapad 720S Touch-13IKB ideapad 720S-13ARR User Guide Read Read the the safety safety notices notices and and important important tips tips in in the the included manuals before
ZOTAC ZBOX User s Manual
 ZOTAC ZBOX User s Manual No part of this manual, including the products and software described in it, may be reproduced, transmitted, transcribed, stored in a retrieval system, or translated into any language
Tablet PC. User Manual TF600TG
 Tablet PC User Manual TF600TG ASUS is devoted to creating environment-friendly products and packaging to safeguard consumers health while minimizing the impact on the environment. The reduction of the
Lenovo YOGA 500. User Guide. Read the safety notices and important tips in the included manuals before using your computer.
 Lenovo YOGA 500 YOGA 500-14ISK User Guide YOGA 500-15ISK Read the safety notices and important tips in the included manuals before using your computer. Notes Before using the product, be sure to read Lenovo
Lenovo V310. User Guide. Read the safety notices and important tips in the included manuals before using your computer.
 Lenovo V310 V310-14ISK V310-15ISK User Guide Read the safety notices and important tips in the included manuals before using your computer. Notes Before using the product, be sure to read Lenovo Safety
Lenovo Flex User Guide. Read the safety notices and important tips in the included manuals before using your computer.
 Lenovo Flex 3-1130 User Guide Read the safety notices and important tips in the included manuals before using your computer. Notes Before using the product, be sure to read Lenovo Safety and General Information
Lenovo YOGA 920. User Guide. Read the safety notices and important tips in the included manuals before using your computer.
 Lenovo YOGA 920 YOGA 920-13IKB YOGA 920-13IKB Glass User Guide Read the safety notices and important tips in the included manuals before using your computer. Notes Before using the product, be sure to
Lenovo ideapad FLEX 5
 Lenovo ideapad FLEX 5 ideapad FLEX 5-1470 ideapad FLEX 5-1570 User Guide Read the safety notices and important tips in the included manuals before using your computer. Notes Before using the product, be
Lenovo ideapad 310S User Guide
 Lenovo ideapad 310S ideapad 310S-15ISK ideapad 310S-15IKB User Guide Read the safety notices and important tips in the included manuals before using your computer. Notes Before using the product, be sure
Lenovo ideapad 710S-13ISK
 Lenovo ideapad 710S-13ISK User Guide Read Read the the safety safety notices notices and and important important tips tips in in the the included manuals before using your computer. included manuals before
Lenovo YOGA 530. User Guide YOGA IKB YOGA ARR
 Lenovo YOGA 530 YOGA 530-14IKB YOGA 530-14ARR User Guide Read the safety notices and important tips in the included manuals before using your computer. Notes Before using the product, be sure to read Lenovo
Using GIGABYTE Notebook for the First Time
 Congratulations on your purchase of the GIGABYTE Notebook P7! This Manual will help you to get started with setting up your notebook. For more detailed information, please visit our website at http://www.gigabyte.com.
Lenovo Y520. User Guide Y520-15IKBN. Read the safety notices and important tips in the included manuals before using your computer.
 Lenovo Y520 Y520-15IKBN User Guide Read the safety notices and important tips in the included manuals before using your computer. Notes Before using the product, be sure to read Lenovo Safety and General
Lenovo ideapad 330S ideapad 330S-14AST ideapad 330S-14AST U ideapad 330S-14AST D ideapad 330S-15AST ideapad 330S-15AST U ideapad 330S-15AST D
 Lenovo ideapad 330S ideapad 330S-14AST ideapad 330S-14AST U ideapad 330S-14AST D ideapad 330S-15AST ideapad 330S-15AST U ideapad 330S-15AST D User Guide Read the safety notices and important tips in the
Lenovo. Read the safety notices and important tips in the included manuals before using your computer.
 Lenovo User Guide Read the safety notices and important tips in the included manuals before using your computer. Notes Before using the product, be sure to read Lenovo Safety and General Information Guide
Lenovo ideapad 110. User Guide. Read the safety notices and important tips in the included manuals before using your computer.
 Lenovo ideapad 110 ideapad 110-14AST ideapad 110-15AST User Guide Read the safety notices and important tips in the included manuals before using your computer. Notes Before using the product, be sure
Lenovo ideapad Y700. User Guide. Read the safety notices and important tips in the included manuals before using your computer.
 Lenovo ideapad Y700 User Guide Read the safety notices and important tips in the included manuals before using your computer. Notes Before using the product, be sure to read Lenovo Safety and General Information
Lenovo V110. User Guide. Read the safety notices and important tips in the included manuals before using your computer.
 Lenovo V110 V110-17IKB V110-17ISK User Guide Read the safety notices and important tips in the included manuals before using your computer. Notes Before using the product, be sure to read Lenovo Safety
Lenovo YOGA 730 User Guide
 Lenovo YOGA 730 User Guide Read the safety notices and important tips in the included manuals before using your computer. Notes Before using the product, be sure to read Lenovo Safety and General Information
Lenovo ideapad 110. User Guide. ideapad IKB. Read the safety notices and important tips in the included manuals before using your computer.
 Lenovo ideapad 110 ideapad 110-17IKB User Guide Read the safety notices and important tips in the included manuals before using your computer. Notes Before using the product, be sure to read Lenovo Safety
Lenovo ideapad 520 User Guide
 Lenovo ideapad 520 User Guide Read the safety notices and important tips in the included manuals before using your computer. Notes Before using the product, be sure to read Lenovo Safety and General Information
ideapad 510S-13ISK 510S-13IKB
 ideapad 510S-13ISK 510S-13IKB User Guide Read the safety notices and important tips in the included manuals before using your computer. Notes Before using the product, be sure to read Lenovo Safety and
Using GIGABYTE Notebook for the First Time
 Congratulations on your purchase of the GIGABYTE Notebook. This manual will help you to get started with setting up your notebook. The final product configuration depends on the model at the point of your
Lenovo ideapad D330-10IGM
 Lenovo ideapad D330-10IGM User Guide Read the safety notices and important tips in the included manuals before using your computer. Notes Before using the product, be sure to read Lenovo Safety and General
Handbuch. DAVIDE Mini PC GRAFENTHAL
 Handbuch GRAFENTHAL DAVIDE Mini PC GRAFENTHAL GmbH von-monschaw-straße 3 47574 Goch info@grafenthal.de www.grafenthal.de Copyright 2017 GRAFENTHAL GmbH, Alle Rechte vorbehalten. GRAFENTHAL ist eine eingetragene
Lenovo YOGA 720. User Guide. Read the safety notices and important tips in the included manuals before using your computer.
 Lenovo YOGA 720 YOGA 720-13IKB YOGA 720-15IKB User Guide Read the safety notices and important tips in the included manuals before using your computer. Notes Before using the product, be sure to read Lenovo
Lenovo ideapad 330S. User Guide. ideapad 330S-15IKB U. ideapad 330S-15IKB D
 Lenovo ideapad 330S ideapad 330S-14IKB ideapad 330S-14IKB U ideapad 330S-14IKB D ideapad 330S-15IKB ideapad 330S-15IKB U ideapad 330S-15IKB D User Guide Read the safety notices and important tips in the
Using GIGABYTE Notebook for the First Time
 Congratulations on your purchase of the GIGABYTE Notebook P2742! This Manual will help you to get started with setting up your notebook. For more detailed information, please visit our website at http://www.gigabyte.com.
Lenovo Z41-70 Lenovo Z51-70 Lenovo ideapad 500 User Guide
 Lenovo Z41-70 Lenovo Z51-70 Lenovo ideapad 500 User Guide Read the safety notices and important tips in the included manuals before using your computer. Notes Before using the product, be sure to read
Lenovo ideapad 500. User Guide. ideapad ISK/ideapad ISK
 Lenovo ideapad 500 ideapad 500-14ISK/ideapad 500-15ISK User Guide Read the safety notices and important tips in the included manuals before using your computer. Notes Before using the product, be sure
E14407 Revised Edition V2 / May E-Manual
 E14407 Revised Edition V2 / May 2018 E-Manual COPYRIGHT INFORMATION No part of this manual, including the products and software described in it, may be reproduced, transmitted, transcribed, stored in a
Contents. Introduction. Getting Started. Navigating your Device. Customizing the Panels. Pure Android Audio. E-Books. Browsing the Internet
 Contents Introduction Getting Started Your Device at a Glance Charging Assembling the Power Adapter Turning On/Off, Unlocking Setting to Sleep and Waking Up Connecting to a Computer Navigating your Device
English. User Manual. ET22 Series
 User Manual ET22 Series E8140 February 2013 COPYRIGHT INFORMATION No part of this manual, including the products and software described in it, may be reproduced, transmitted, transcribed, stored in a retrieval
E14245 First Edition / August E-Manual
 E14245 First Edition / August 2018 E-Manual COPYRIGHT INFORMATION No part of this manual, including the products and software described in it, may be reproduced, transmitted, transcribed, stored in a retrieval
Lenovo ideapad 320. User Guide
 Lenovo ideapad 320 ideapad 320-15ISK/ideapad 320H-15ISK/ ideapad 320L-15ISK/ideapad 320R-15ISK/ ideapad 320E-15ISK/ideapad 320-15IKB/ ideapad 320H-15IKB/ideapad 320L-15IKB/ ideapad 320R-15IKB/ideapad 320E-15IKB/
Lenovo Yoga S730-13IWL
 Lenovo Yoga S730-13IWL User Guide Read the safety notices and important tips in the included manuals before using your computer. Notes Before using the product, be sure to read Lenovo Safety and General
ZOTAC ZBOX nano. User s Manual
 User s Manual ZOTAC ZBOX nano No part of this manual, including the products and software described in it, may be reproduced, transmitted, transcribed, stored in a retrieval system, or translated into
Quick Start Guide Notion Ink Design Labs Pvt. Ltd. 1
 Quick Start Guide 2014 Notion Ink Design Labs Pvt. Ltd. 1 2014 Notion Ink Design Labs Pvt. Ltd. 2 Contents 1. Caring for your device 2. Travelling with your device 3. Device layout 4. Keyboard case layout
Contents. Introduction. Getting Started. Navigating your Device. Customizing the Panels. Pure Android Audio. E-Books
 Contents Introduction Getting Started Your Device at a Glance Charging Assembling the Power Adapter Turning On/Off, Unlocking Setting to Sleep and Waking Up Inserting and Removing a microsd Card Connecting
Lenovo ideapad 110. User Guide. ideapad ISK ideapad ISK
 Lenovo ideapad 110 ideapad 110-14ISK ideapad 110-15ISK User Guide Read the safety notices and important tips in the Read the safety notices and important tips in the included manuals before using your
E14580 First Edition / August E-Manual
 E14580 First Edition / August 2018 E-Manual COPYRIGHT INFORMATION No part of this manual, including the products and software described in it, may be reproduced, transmitted, transcribed, stored in a retrieval
Contents. Introduction
 Page 1 of 15 Contents Introduction Getting Started Your Device at a Glance Charging Assembling the Power Adapter Turning On/Off, Unlocking Setting to Sleep and Waking Up Inserting and Removing a microsd
Using GIGABYTE Notebook for the First Time
 P57 V.0 Congratulations on your purchase of the GIGABYTE Notebook. This manual will help you to get started with setting up your notebook. The final product configuration depends on the model at the point
E13784 Revised Edition V2 / December E-Manual
 E13784 Revised Edition V2 / December 2017 E-Manual COPYRIGHT INFORMATION No part of this manual, including the products and software described in it, may be reproduced, transmitted, transcribed, stored
Using GIGABYTE Notebook for the First Time
 P5 V4.0 Congratulations on your purchase of the GIGABYTE Notebook. This manual will help you to get started with setting up your notebook. The final product configuration depends on the model at the point
Lenovo ideapad 520S/320S User Guide
 Lenovo ideapad 520S/320S User Guide Read the safety notices and important tips in the included manuals before using your computer. Notes Before using the product, be sure to read Lenovo Safety and General
ZOTAC ZBOX User s Manual
 User s Manual No part of this manual, including the products and software described in it, may be reproduced, transmitted, transcribed, stored in a retrieval system, or translated into any language in
User Guide. Read the safety notices and important tips in the included manuals before using your computer.
 User Guide Read the safety notices and important tips in the included manuals before using your computer. Notes Before using the product, be sure to read Lenovo Safety and General Information Guide first.
ZOTAC ZBOX nano User s Manual
 ZOTAC ZBOX nano User s Manual No part of this manual, including the products and software described in it, may be reproduced, transmitted, transcribed, stored in a retrieval system, or translated into
ZOTAC VR GO. User s Manual
 User s Manual ZOTAC VR GO No part of this manual, including the products and software described in it, may be reproduced, transmitted, transcribed, stored in a retrieval system, or translated into any