Powerbook G4 Titanium 400/500 Repair Guide
|
|
|
- Randolf Stanley
- 6 years ago
- Views:
Transcription

1 Powerbook G4 Titanium 400/500 Repair Guide Copyright 2003 Powerbookmedic.com. All rights reserved. Any portion of this manual may not be copied, reproduced, or distributed without the express written consent of Powerbookmedic.com. Violators will be prosecuted. This manual is presented as a guide in order to help you repair problems on your powerbook. Working on a powerbook can be dangerous if not done properly. We at Powerbookmedic.com take no responsibility for any damage or harm done to yourself or your powerbook as a result of reading this guide. Suggestions for making this manual better? sales@powerbookmedic.com Tools Needed for Take Apart: Torx T8 Screwdriver Available from our online store Torx T6 Screwdriver Available from our online sore Philips head screwdriver (small and medium size screwdrivers) Pliers Always remove the battery and power supply from the computer before beginning any take apart or repair! Page 1 of 44
2 Table of Contents Identifying the 400/500 Powerbook G4...pg. 3 Identification of Parts...pg. 4 Battery Removal... pg.5 Keyboard Removal....pg. 6 Ram Removal......pg 7 Modem Removal. pg. 8 Bottom Case Removal.pg. 9 Airport Card Removal.....pg. 11 Hard Drive Removal.....pg. 13 DVD / Optical Drive Removal pg. 15 PMU Board Removal.pg. 17 PRAM Battery Removal pg. 19 Logic Board Removal.... pg. 20 Display Removal pg. 24 Display Take Apart / Hinge Replacement......pg. 27 PCMCIA Card Cage Removal pg. 40 Rib Frame / Heat Exchange Removal. pg. 41 Inverter Board.pg. 43 Page 2 of 44
3 Identifying the Powerbook G4 400/500 The powerbook G4 Titanium is easily identified by its titanium frame and sleek appearance. Even though all of the models look nearly identical, each of them is different in a unique way, and the parts are NOT interchangeable between models. The easiest way to identify which model you have and need parts for is by processor speed. The pairs listed below are compatible only with each other. For example, the 400mhz can use 500mhz parts, but cannot use the parts from a 550mhz. 400mhz & 500mhz 550mhz & 667mhz (non-dvi) 667mhz & 867mhz DVI To determine if your machine is a DVI model, then you will need to look at the rear ports on your unit. Look at the pictures below. The first picture is a NON-DVI model. (Notice the VGA port next to the fan slots. The picture below is from a DVI model. Notice the rectangular DVI port. Page 3 of 44


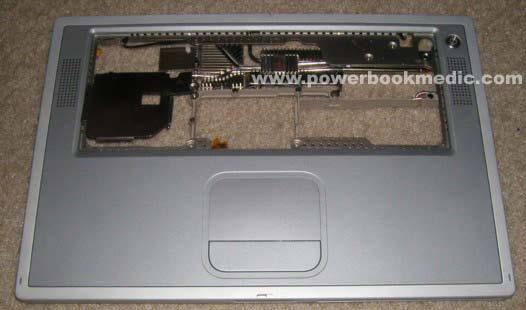
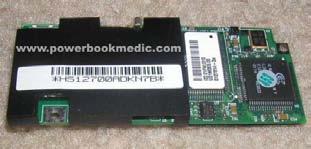
4 Identification of Parts Display Bottom Pan Casing Optical Drive Inverter Board Clutch Covers Logic Board Trackpad / Heat Exchange /Rib Frame Modem Page 4 of 44


5 Before proceeding with any repair, make sure your powerbook is shut down and unplugged. It is a good idea to let your powerbook sit unplugged for at least 15 minutes before proceeding with any repair. It is strongly recommended that you remove the battery before proceeding with any repairs. Battery Removal Turn the computer over with the bottom up as shown. Push the battery latch to the right as shown. The battery will then pop up and you will be able to remove it from the laptop as shown in the second picture. Page 5 of 44

 To remove the keyboard connector, grasp the cable as shown and gently pull up.")
6 Keyboard Removal Before proceeding, you must first remove: Battery After you have removed the battery, turn the computer over and open up the display. Then, depress the two keyboard tabs as shown in the picture. Holding the tabs in, flip the keyboard up and towards you. (If the keyboard does not easily come out, check to make sure you have not locked the keyboard.) To remove the keyboard connector, grasp the cable as shown and gently pull up. You can gently wiggle the cable from side to side if it doesn t come off easily. Do not use much force. It should come off relatively easily. Page 6 of 44


7 Memory (Ram) Removal Before proceeding, you must first remove: Battery Keyboard To remove currently installed ram, pry back the metal or plastic fasteners holding in the ram as shown. Do this on each side. It s easier if you do them at the same time. The ram chip will pop up. Just slide out to remove it. To install a new chip, just align the new chip in the grooves, press in, and then press down until the fasteners clip on both sides. Page 7 of 44

8 Modem Removal Before proceeding, you must first remove: Battery Keyboard To remove the modem you will need either a pair of pliers or a 5mm hex nut screwdriver or wrench. Undo the hex nut as shown. Then pull the modem up to disconnect it from the motherboard. Lastly remove the cable connected to the modem. Page 8 of 44

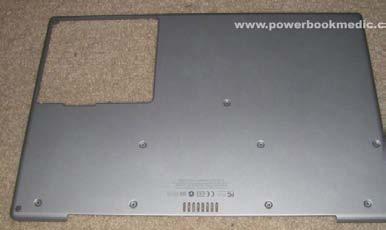
9 Bottom Case Removal Before proceeding, you must first remove: Battery Remove the 8 Philips Head screws from the bottom case with a Philips Head screwdriver. Be careful not to strip the screws. (Apply just enough downward force to break the initial torque.) Page 9 of 44


10 Gently lift up on the case as shown. Do not use much force at all or you will break the trackpad casing. Gently work your way around the casing. Take special care near the DVD drive area. This area is very delicate, and you especially risk breaking the trackpad at this point. When the casing is loose, lift up and place it on a clean surface. Page 10 of 44


11 Airport Card Removal / Installation Before proceeding, you must first remove: Battery Bottom Case To remove the airport card locate the metal clip that holds the cable connector in place. Gently pry this back with your finger and pull up on the cable to release it from the connector. Lift up on the card as shown. Then pull the card out of its connector. (You may gently rock the card side to side to ease it out of the connector.) Page 11 of 44

12 Using your fingers, pull the cable connector from the card. (If it is hard to pull the connector out, you can use a pair of needle nose pliers to gently pull the connector out while holding the card. If you do this, don t use much force at all or you risk breaking the card and connector.) Page 12 of 44


13 Hard Drive Removal Before proceeding, you must first remove: Battery Bottom Case Disconnect the orange hard drive cable from the motherboard as shown. Remove the two Torx T8 screws shown in red. These are located in the battery bay. Note There are two rubber washers, if they fall out remember to put them back in when installing a new drive. Lift the drive up and out. Page 13 of 44

14 Remove the orange cable from the hard drive by pulling the cable straight up as shown. Do not use excessive force or you will bend the connector pins. Replacement note If it is difficult to put the hard drive back in, you can remove the torx screw from the rib frame and move that portion of the rib frame slightly to allow for more wiggle room. Page 14 of 44

 Turn the computer over and locate the DVD drive and two orange cables connected to the motherboard. You must first remove the orange strip of tape covering the cables.")
15 CD / DVD Drive Removal Before proceeding, you must first remove: Battery Keyboard Bottom Case Remove the black dust cover as shown by gently prying up one corner and pulling up lightly. Work your way around the dust cover until it is free. (Do not pull too hard or you will tear part of the plastic on the DVD drive. It is recommended that you replace the dust cover when reinstalling a new drive.) Turn the computer over and locate the DVD drive and two orange cables connected to the motherboard. You must first remove the orange strip of tape covering the cables. Then, undo the orange cable on the left from the motherboard as shown. Your fingernail or a flat head screwdriver will work. Page 15 of 44

16 Grabbing the drive from the sides only, lift the drive up and out. Note Grasp the drive by the sides only or you run the risk of damaging your drive. Page 16 of 44

17 PMU Board Removal Before proceeding, you must first remove: Battery Keyboard Bottom Case CD/DVD Drive First, Remove all of the orange tape surrounding the PMU board. Then undo the two cables as shown. Your fingernail or a flathead screwdriver will work. Undo the red white and black cable as shown. Page 17 of 44


18 Locate the metal hinge as shown and pull it in the direction of the Pram battery to lift it up and away from the PMU card. Lift the PMU card up and out to remove. Pull in the direction of the PRAM battery. Page 18 of 44

19 Pram Battery Removal Before proceeding, you must first remove: Battery Keyboard Bottom Case CD/DVD Drive Remove the orange tape covering the PRAM battery cable. Then, undo the white black and red cable from the PMU board as shown The PRAM battery is held on by an adhesive tape. It is easiest to stick a flathead screwdriver under the battery and work your way around the battery gently pulling up to loosen the adhesive tape. The battery will then pull up and out. Page 19 of 44


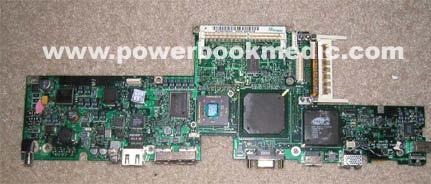
20 Logic Board Removal Before proceeding, you must first remove: Battery Keyboard Bottom Case Airport Card (If installed) Undo to cable connector shown in red. Go to the next picture and remove the torx T8 screw near the PCMCIA card cage shown in red. Undo the orange PCMCIA connector from the motherboard by gently prying it up. Remove the battery connector cable from the motherboard by gently prying it up. This connector can be hard to remove sometimes. Use a flathead screwdriver while pulling up to make the job a little easier. Page 20 of 44


21 Locate the EMI clip as shown. Using a flathead screwdriver pry up the EMI clip. It will be behind the DVD drive. Turn the laptop over. Undo the three cables on the left hand side of the logic board. These cables are very delicate, so use extreme caution Page 21 of 44


22 If you have not already done so, disconnect the hard drive cable from the motherboard. The airport connector, which is also shown in red, does not need to be removed. Remove the two Torx T8 screws as shown in red. Locate the DVD drive and two orange cables connected to the motherboard. You must first remove the orange strip of tape covering the cables. Then, undo the two orange cables from the motherboard. (In the picture the DVD drive has been previously removed) Page 22 of 44


23 Remove the orange piece of tape covering the black and grey cable on the right hand side of the logic board. Carefully undo the cable. Grasp the logic board as shown and gently pull up. Then gently pull the board out and place it on an antistatic surface. Page 23 of 44
 Logic Board Remove the 4 Torx T8 screws on the clutch covers as shown. Page 24 of 44")
24 Display Removal Before proceeding, you must first remove: Battery Keyboard Bottom Case Airport Card (If installed) Logic Board Remove the 4 Torx T8 screws on the clutch covers as shown. Page 24 of 44


25 Gently pry the clutch covers off of the frame. If you use a flathead screwdriver, be sure not to chip your paint. They should come off easily. Now, remove the 4 Philips head screws at the locations shown. Do not remove the black screws on the black hinge. Be very careful around the cables. On the right hand side, gently remove the pink and black cable from the inverter board as shown. Page 25 of 44

26 On both sides of the casing is the piece shown in red. This piece pivots up and folds over. On the side with the display cable and white and blue wire, lift this piece up, and then, carefully guide the display cable and blue and white cable through the hole. You will have to turn the display data cable to get it properly go through the hole. Be very careful with the cables! Page 26 of 44

27 Display Take Apart / Hinge Replacement READ BEFORE PROCEEDING Working on the display of the G4 Titanium is a very risky procedure. If you are not careful, there is a high risk of damaging your display. Also, the casing will not look 100% cosmetically perfect many times after performing this repair if you have never done this type of work before. Physical Harm The casing of the Display is extremely sharp, and you risk cutting yourself on the casing if you are not careful. We strongly recommend using protective gloves when performing this procedure. By performing any work on your Powerbook and by continuing with this repair, you agree that Powerbookmedic.com is in no way shape or form responsible for any damage done to your laptop or for physical injury done to yourself. Before proceeding, you must first remove: Battery Keyboard Bottom Case Airport Card (If installed) Logic Board Display Hinge Mount Removal Hold your display as shown, and locate the 2 hinge mounts shown in red in the picture. They will be held on by two black Philips head screws Page 27 of 44


28 Remove the two Philips head screws on each hinge mount as shown. Make sure to apply enough downward pressure so as not to strip the screws. Guide the hinge mount out and towards you as shown. Page 28 of 44
 or get to the display cable, you ll need to remove all 4.")
 If your hinges are broken, the next step will be much easier.")
29 Opening the Display On both sides of the display you will notice 2 Torx T6 Screws as shown in red. If you want to remove the entire back panel (not recommended) or get to the display cable, you ll need to remove all 4. If you are performing just a hinge replacement, you only need to remove one from each side. (The ones on the bottom of the display where the hinges are located) If your hinges are broken, the next step will be much easier. If your hinges aren t broken, then there is a high likelihood of breaking them when you try to open the display unless you take extra care. Grab the display as shown, and pull with a fair amount of force up. You are needing to break the epoxy bond holding the display together. Try to only grasp the display as close to the edge as possible. You do not want to put pressure anywhere near the actual LCD or you may break it. Page 29 of 44


30 After the initial bond is broken, you need to work your way around the display to break the bond. Do this slowly. If you try to do too much at one time you ll dent your display casing. Again, only grasp from the sides. If you are performing the hinge repair only break the bond up to about 3-4 along the side you want to break the bond as little as possible as it will be a cleaner repair when you are done. Display Cable Replacement If you are replacing the hinges, skip these next steps for the display cable removal. Break the bond all the way around three edges of the display. Do not break the bond on the top of the display (side with screen latch mechanism) unless absolutely necessary. It is very difficult to put the casing back together if you break the top bond. Page 30 of 44


31 After you work your way around, it should look something like the picture. From the base of the display, open the display as shown. You ll notice there is an orange piece of tape holding the display cable to the display connector. You will need to remove this piece of tape as well as the piece holding the cable on closer to the bottom of the display. You will then be able to remove the cable from its connector. Page 31 of 44
 The frieze is held on by a light epoxy, so you just have")
32 Note: this picture is turned around from the picture above. The display cable is most easily replaced by replacing the enter cable and frieze (the white cylindrical plastic piece that is about 7 long) The frieze is held on by a light epoxy, so you just have to pull it towards you and off as shown. The cable will then be free. You can then replace the cable. You will need to epoxy the case (and frieze back together) Use a small amount of epoxy all the way along the casing edge, and then clamp and let sit. See instructions below for more information on epoxy. Page 32 of 44


33 Hinge Replacement Note: Some of these pictures are taken with the display still attached. It is possible to do the repair without removing the display module, but in so doing you risk more damage to your unit. We strongly recommend against this! There are two main ways your hinges can break. We will cover the repair of both types of breaks below. Break Type # 1 The picture to the left shows the first type of possible hinge break. If you re lucky, this is what you ve got. The hinge is broken off only at the base. This makes extraction of the bad hinge much easier. Follow the instructions above to break the bond on about 3-4 of the casing on the side of the casing of the hinge you need to replace. Use a flat tool to nudge the bad hinge up. Do not use a lot of force or you will dent your casing. Page 33 of 44


34 Follow the hinge along, and continue gently nudging the hinge up until you believe it is sufficiently loose to be extracted. Again, do not use much force. Use a pair of need nose pliers to pull the hinge towards you and out. Note: Do not use much force. You want the hinge to come out easily. If you use too much force the hinge will break and extraction will be much more difficult. If you have extracted your hinge at this point, skip the next step on the second type of break. Page 34 of 44


35 Break Type # 2 With the second type of break, there is a stronger likelihood that the repair will leave your casing slightly damaged. In this type of break, the hinge breaks higher up into your casing. This makes extraction of the bad hinge much more difficult. If you haven t done so already, follow the instructions above to break the bond on about 3-4 of the casing on the side of the casing of the hinge you need to replace. Then, extract the first part of the broken hinge. Page 35 of 44


36 If the rest of the hinge does not come out easily, you will need to use a flat head tool to follow the piece of the hinge and break the bond with the hinge and the casing. The less force you use, the easier it will be to close your casing. A lot of times, you will damage the thin piece of metal that connects the top casing to the bottom casing. When you close your display back, it will normally go back into position, but you may have to prod it in certain places with a flat head screwdriver to allow the casing to close correctly. Page 36 of 44


37 Use a pair of needle nose pliers to extract the hinge when it is loose enough to be pulled out. Putting it Back Together To put the display back together, you have to bond it with epoxy or contact cement. We use Loctite Quick Set Epoxy. It is very strong, and does the job well. The downside is that if you make a mistake in the repair, getting back in may be more difficult. Contact cement has a more glue consistency, and while it won t look as pretty or be as strong, it will be easier to undo if you make a mistake. If you use the epoxy, premix the two components. (You can use broken hinges to mix.) Page 37 of 44


38 Apply the epoxy to the hinge. Apply enough to thoroughly coat the hinge, but not enough so that it drops off the hinge or that there are big gobs. If you use too much you could damage the display. Also, BE CAREFUL with the epoxy. Do not get the epoxy on your display or you will damage it. Make sure you only get it on the hinge and the area it needs to go in. Line the epoxied hinge up with the hinge hole. NOTE: If you are repairing the hinge around the inverter wire, be extremely careful that you guide the wire into the frieze before putting the hinge in. You want the inverter cable to come out of the frieze and no other place or you will have a whole other set of problems on your hand. Page 38 of 44
 to clamp the display shut. Only clamp the edge of the display!")

39 Guide the hinge into place. Make sure the hinge goes all the way back and then fits snugly into its corner. Wipe off any excess epoxy! Use a strong spring clamp (available at Wal-mart) to clamp the display shut. Only clamp the edge of the display! Do not put the clamp on the actual LCD or you will break it. Let the epoxy sit for 24 hours or as the instructions say. 24 hours is a good time to let the epoxy sit however. After it is dry, use a cleaner like GOO BE GONE on the case if you accidentally got some epoxy on it. Reassemble your laptop. Page 39 of 44
 Logic Board Remove the two torx T8 screws as shown. Then just lift the card cage out of the trackpad.")
40 PCMCIA Card Cage Replacement Before proceeding, you must first remove: Battery Keyboard Bottom Case Airport Card (If installed) Logic Board Remove the two torx T8 screws as shown. Then just lift the card cage out of the trackpad. Page 40 of 44
 Logic")

41 Rib Frame / Heat Exchange Removal Before proceeding, you must first remove: Battery Keyboard Bottom Case Airport Card (If installed) Logic Board PCMCIA Card Cage Remove the 4 Torx T6 Screws near the ports as shown. Remove the 4 Torx T8 screws from the location shown. Page 41 of 44


42 Along the rib frame there are 4 small torx T8 screws as shown. Remove all 4 screws. Gently lift the rib frame and heat sync up and out. Page 42 of 44

43 Inverter Board Removal Before proceeding, you must first remove: Battery Keyboard Bottom Case Airport Card (If installed) Logic Board PCMCIA Card Cage Rib Frame / Heat Exchanger Fold the inverter board over and undo the orange connector as shown. The board will now be free to be removed. Page 43 of 44

44 At Powerbookmedic.com, we strive to make our manuals as accurate as possible. If you would like to see something in this manual or would like to see something improved in this manual, please us at: For all of your powerbook & ibook parts and repair needs, visit us at: Copyright 2003 Powerbookmedic.com. All rights reserved. Page 44 of 44
Powerbook G4 Titanium 550/667 Repair Guide
 Powerbook G4 Titanium 550/667 Repair Guide Copyright 2003 Powerbookmedic.com. All rights reserved. Any portion of this manual may not be copied, reproduced, or distributed without the express written consent
Powerbook G4 Titanium DVI 667/800/867/1GHZ Repair Guide
 Powerbook G4 Titanium DVI 667/800/867/1GHZ Repair Guide Copyright 2003 Powerbookmedic.com. All rights reserved. Any portion of this manual may not be copied, reproduced, or distributed without the express
Apple Clamshell ibook Repair Manual
 Apple Clamshell ibook Repair Manual Copyright 2003 Powerbookmedic.com. All rights reserved. Any portion of this manual may not be copied, reproduced, or distributed without the express written consent
Apple ipod 3 rd Generation Take Apart Repair Manual
 Apple ipod 3 rd Generation Take Apart Repair Manual Any portion of this manual may not be copied, reproduced, or distributed without the express written consent of Powerbookmedic.com. Violators will be
Apple ipod Mini Take Apart Repair Manual
 Apple ipod Mini Take Apart Repair Manual Copyright 2006 Powerbookmedic.com. All rights reserved. Any portion of this manual may not be copied, reproduced, or distributed without the express written consent
PowerBook G4 Titanium DVI Display Replacement
 PowerBook G4 Titanium DVI Display Replacement Written By: irobot ifixit CC BY-NC-SA www.ifixit.com Page 1 of 26 INTRODUCTION Change out the entire display assembly, including the hinges and casing. This
PowerBook G4 Aluminum 12" GHz Left Clutch Hinge Replacement
 PowerBook G4 Aluminum 12" 1-1.5 GHz Left Clutch Hinge Replacement Written By: Matthew Newsom ifixit CC BY-NC-SA www.ifixit.com Page 1 of 50 INTRODUCTION Replace a broken clutch hinge to make your display
PowerBook G4 Aluminum 12" GHz Display Data Cable Replacement
 PowerBook G4 Aluminum 12" 1-1.5 GHz Display Data Cable Replacement Written By: Matthew Newsom ifixit CC BY-NC-SA www.ifixit.com Page 1 of 47 INTRODUCTION Replace a damaged display data cable to restore
PowerBook G3 Pismo I/O EMI Shield Replacement
 PowerBook G3 Pismo I/O EMI Shield Replacement Written By: irobot ifixit CC BY-NC-SA www.ifixit.com Page 1 of 23 INTRODUCTION A thin metal shield resides above the ports that protects from electromagnetic
ibook G3 Clamshell Hard Drive Replacement
 ibook G3 Clamshell Hard Drive Replacement Written By: irobot ifixit CC BY-NC-SA www.ifixit.com Page 1 of 22 INTRODUCTION You can install hard drives up to 9mm thick. TOOLS: 5mm Nut Driver (1) Coin (1)
PowerBook G4 Aluminum 17" GHz Heat Sink & Fan Assembly Replacement
 PowerBook G4 Aluminum 17" 1-1.67 GHz Heat Sink & Fan Assembly Replacement Written By: irobot ifixit CC BY-NC-SA www.ifixit.com Page 1 of 26 INTRODUCTION The heat sink and fan together help to keep the
apple Service Source PowerBook G4 Updated 8 July Apple Computer, Inc. All rights reserved.
 apple Service Source PowerBook G4 Updated 8 July 2003 2003 Apple Computer, Inc. All rights reserved. apple Service Source Take Apart PowerBook G4 2003 Apple Computer, Inc. All rights reserved. apple PowerBook
PowerBook G4 Aluminum 12" 867 MHz Subwoofer Replacement
 PowerBook G4 Aluminum 12" 867 MHz Subwoofer Replacement Written By: irobot ifixit CC BY-NC-SA www.ifixit.com Page 1 of 32 INTRODUCTION Replacing the subwoofer isn't easy, but it can be done. TOOLS: 4mm
ibook G3 14" Hard Drive Replacement
 Written By: irobot ifixit CC BY-NC-SA www.ifixit.com Page 1 of 20 INTRODUCTION How to remove the hard drive and its bracket from your computer. TOOLS: Coin (1) Paper Clip (1) Phillips #00 Screwdriver (1)
Reflowing Xbox 360 Motherboard
 Reflowing Xbox 360 Motherboard Reflow the solder on your Xbox 360's motherboard. Written By: Andrew Bookholt ifixit CC BY-NC-SA www.ifixit.com Page 1 of 31 INTRODUCTION Use this guide to reflow the solder
PowerBook G4 Aluminum 12" 867 MHz Heat Sink & Fan Replacement
 PowerBook G4 Aluminum 12" 867 MHz Heat Sink & Fan Replacement Written By: irobot ifixit CC BY-NC-SA www.ifixit.com Page 1 of 17 INTRODUCTION The heat sink and fan together help to keep the processor cool
PowerBook G4 Aluminum 15" GHz Modem Replacement
 PowerBook G4 Aluminum 15" 1-1.5 GHz Modem Replacement Written By: irobot ifixit CC BY-NC-SA www.ifixit.com Page 1 of 15 INTRODUCTION 56k internal modem, standard on all models. TOOLS: Coin (1) Phillips
PowerBook G4 Aluminum 12" 867 MHz Display Replacement
 PowerBook G4 Aluminum 12" 867 MHz Display Replacement Escrito por: irobot ifixit CC BY-NC-SA es.ifixit.com Página 1 de 36 INTRODUCCIÓN Change out the entire display assembly, including the inverter, Airport
ibook G4 14" 933 MHz-1.33 GHz Hard Drive
 ibook G4 14" 933 MHz-1.33 GHz Hard Drive Replacement Written By: irobot ifixit CC BY-NC-SA www.ifixit.com Page 1 of 25 INTRODUCTION You can install hard drives up to 9.5mm thick. TOOLS: Coin (1) Phillips
PowerBook G4 Aluminum 12" GHz Logic Board Replacement
 PowerBook G4 Aluminum 12" 1-1.5 GHz Logic Board Replacement Written By: irobot ifixit CC BY-NC-SA www.ifixit.com Page 1 of 32 INTRODUCTION This motherboard includes all ports except the DC-In board. TOOLS:
MacBook Core 2 Duo Clutch Cover
 MacBook Core 2 Duo Clutch Cover Replacement Replace the clutch cover on your MacBook Core 2 Duo. Written By: Ben Eisenman ifixit CC BY-NC-SA www.ifixit.com Page 1 of 29 INTRODUCTION Replace the curved
PowerBook G4 Aluminum 15" GHz Heat Sink Replacement
 PowerBook G4 Aluminum 15" 1-1.5 GHz Heat Sink Replacement Written By: irobot ifixit CC BY-NC-SA www.ifixit.com Page 1 of 23 INTRODUCTION The heat sink helps keep the processor cool and happy. TOOLS: Anti-Static
PowerBook G4 Aluminum 17" 1.67 GHz (High- Res) PC Card Cage Replacement
 PC Card Cage Replacement") PowerBook G4 Aluminum 17" 1.67 GHz (High- Res) PC Card Cage Replacement Written By: Walter Galan ifixit CC BY-NC-SA www.ifixit.com Page 1 of 14 INTRODUCTION Replace a faulty PC card cage to regain functionality
PowerBook G4 Aluminum 17" 1.67 GHz (High- Res) PC Card Cage Replacement Written By: Walter Galan ifixit CC BY-NC-SA www.ifixit.com Page 1 of 14 INTRODUCTION Replace a faulty PC card cage to regain functionality
Written By: John Sutton
 Replacing the fan on your HP g7-2275 dx. Written By: John Sutton ifixit CC BY-NC-SA www.ifixit.com Page 1 of 20 INTRODUCTION Laptop cooking your lap? This guide will walk you through replacing your fan.
PowerBook G4 Aluminum 12" GHz Heat Sink Replacement
 PowerBook G4 Aluminum 12" 1-1.5 GHz Heat Sink Replacement Written By: irobot ifixit CC BY-NC-SA www.ifixit.com Page 1 of 16 INTRODUCTION The heat sink helps keep the processor cool and happy. TOOLS: Arctic
ibook G3 14" Top Shield Replacement
 Written By: irobot ifixit CC BY-NC-SA www.ifixit.com Page 1 of 18 INTRODUCTION The metallic top shield protects the logic board from electromagnetic interference. TOOLS: Coin (1) Paper Clip (1) Phillips
PowerBook G4 Aluminum 17" GHz PRAM Battery & USB Board Replacement
 PowerBook G4 Aluminum 17" 1-1.67 GHz PRAM Battery & USB Board Replacement Written By: irobot ifixit CC BY-NC-SA www.ifixit.com Page 1 of 12 INTRODUCTION Is your clock resetting itself or USB on the right
ipod Classic Headphone Jack & Hold Switch Replacement
 ipod Classic Headphone Jack & Hold Switch Replacement Replace Headphone Jack & Hold Switch to fix no audio and/or no unlock Written By: irobot ifixit CC BY-NC-SA www.ifixit.com Page 1 of 22 INTRODUCTION
MacBook Pro 17" Models A1151 A1212 A1229 and A1261 LCD Replacement
 MacBook Pro 17" Models A1151 A1212 A1229 and A1261 LCD Replacement Escrito por: Andrew Bookholt ifixit CC BY-NC-SA es.ifixit.com Página 1 de 21 INTRODUCCIÓN Use this guide to replace just the LCD rather
ASUS D550MA-DS01 Motherboard
 ASUS D550MA-DS01 Motherboard Replacement This guide will show you how to remove the motherboard from the laptop. Steps included in this process are removing the screws, disconnecting cables, and removing
HP Pavilion dv7-6c90us Cooling fan Replacement
 HP Pavilion dv7-6c90us Cooling fan Replacement This guide will walk you through the process of replacing the cooling fan in an HP Pavilion dv7 laptop. Written By: Angelina Clayton ifixit CC BY-NC-SA www.ifixit.com
ibook G4 12" 800 MHz-1.2 GHz RJ-11 Board
 ibook G4 12" 800 MHz-1.2 GHz RJ-11 Board Replacement Written By: irobot ifixit CC BY-NC-SA www.ifixit.com Page 1 of 24 INTRODUCTION The standard telephone jack port for connecting to the 56k internal modem.
PowerBook G4 Aluminum 12" GHz Modem Replacement
 PowerBook G4 Aluminum 12" 1-1.5 GHz Modem Replacement Written By: irobot ifixit CC BY-NC-SA www.ifixit.com Page 1 of 15 INTRODUCTION 56k internal modem, standard on all models. TOOLS: Coin (1) Phillips
Macintosh PowerBook 165c Motherboard Replacement
 Macintosh PowerBook 165c Motherboard Replacement This guide will demonstrate how to replace the Macintosh PowerBook 165c Motherboard. Written By: John ifixit CC BY-NC-SA www.ifixit.com Page 1 of 15 INTRODUCTION
Moto G4 LCD Screen and Digitizer Assembly Replacement
 Moto G4 LCD Screen and Digitizer Assembly Replacement Replace a cracked or faulty display as a complete assembly, including the surrounding frame/chassis. Written By: Richard Gonzalez ifixit CC BY-NC-SA
PowerBook G4 Aluminum 15" GHz PC Card Cage Replacement
 PowerBook G4 Aluminum 15" 1-1.5 GHz PC Card Cage Replacement Written By: irobot ifixit CC BY-NC-SA www.ifixit.com Page 1 of 19 INTRODUCTION You can again use PC card accessories by replacing a faulty PC
MacBook Pro 17" Models A1151 A1212 A1229 and A1261 Display Inverter Replacement
 MacBook Pro 17" Models A1151 A1212 A1229 and A1261 Display Inverter Replacement Written By: Andrew Bookholt ifixit CC BY-NC-SA www.ifixit.com Page 1 of 17 INTRODUCTION Backlight not working? Use this guide
MacBook Pro 15" Core Duo Model A1150 LCD Panel High Definition (1920x1200) Replacement
 Replacement") MacBook Pro 15" Core Duo Model A1150 LCD Panel High Definition (1920x1200) Replacement Written By: Ben Eisenman ifixit CC BY-NC-SA www.ifixit.com Page 1 of 25 INTRODUCTION By following this guide, you
MacBook Pro 15" Core Duo Model A1150 LCD Panel High Definition (1920x1200) Replacement Written By: Ben Eisenman ifixit CC BY-NC-SA www.ifixit.com Page 1 of 25 INTRODUCTION By following this guide, you
Toshiba Satellite L305-S5946 Power Jack Replacement
 Toshiba Satellite L305-S5946 Power Jack Replacement Replace the power jack in your Toshiba Satellite L305-S5946. Written By: Michael Erberich ifixit CC BY-NC-SA www.ifixit.com Page 1 of 16 INTRODUCTION
apple Service Source ibook G4 (14.1 LCD) October 22, Apple Computer, Inc. All rights reserved.
 October 22, Apple Computer, Inc. All rights reserved.") apple Service Source ibook G4 (14.1 LCD) October 22, 2003 2003 Apple Computer, Inc. All rights reserved. apple Service Source Take Apart ibook G4 (14.1 LCD) 2003 Apple Computer, Inc. All rights reserved.
apple Service Source ibook G4 (14.1 LCD) October 22, 2003 2003 Apple Computer, Inc. All rights reserved. apple Service Source Take Apart ibook G4 (14.1 LCD) 2003 Apple Computer, Inc. All rights reserved.
MacBook Pro 15" Core 2 Duo Models A1226 and A1260 SSD Installation
 MacBook Pro 15" Core 2 Duo Models A1226 and A1260 SSD Installation Written By: Dozuki System 2017 guides.crucial.com Page 1 of 10 INTRODUCTION You can install hard drives up to 9.5mm thick. Some drive
MacBook Core 2 Duo Display Replacement
 MacBook Core 2 Duo Display Replacement Written By: irobot ifixit CC BY-NC-SA www.ifixit.com Page 1 of 23 INTRODUCTION Change out the entire display assembly, including the inverter, Airport antennas, hinges
MacBook Pro 15" Core 2 Duo Models A1226 and A1260 SSD Dual Drive Installation
 MacBook Pro 15" Core 2 Duo Models A1226 and A1260 SSD Dual Drive Installation Use this guide to install a second hard drive in place of the optical drive. Written By: Dozuki System 2017 guides.crucial.com
Written By: Walter Galan
 Replace a cracked screen on your iphone 4S. Written By: Walter Galan ifixit CC BY-NC-SA www.ifixit.com Page 1 of 32 INTRODUCTION Use this guide to replace the screen on your iphone 4S. After successfully
apple Service Source ibook ibook (Opaque 16 VRAM), ibook (32 VRAM) November 6, Apple Computer, Inc. All rights reserved.
, ibook (32 VRAM) November 6, Apple Computer, Inc. All rights reserved.") apple Service Source ibook ibook (Opaque 16 VRAM), ibook (32 VRAM) November 6, 2002 2002 Apple Computer, Inc. All rights reserved. apple Service Source Take Apart ibook (Opaque 16 VRAM), ibook (32 VRAM)
apple Service Source ibook ibook (Opaque 16 VRAM), ibook (32 VRAM) November 6, 2002 2002 Apple Computer, Inc. All rights reserved. apple Service Source Take Apart ibook (Opaque 16 VRAM), ibook (32 VRAM)
OnePlus 5 Screen and Digitizer Assembly Replacement
 OnePlus 5 Screen and Digitizer Assembly Replacement Follow this guide to replace the screen and digitizer for the OnePlus 5. This replaces the screen as well as the frame it is attached to. Written By:
Manual 04 - Logic Board
 Manual 04 - Logic Board Written By: Josh Patterson 2017 guides.cellphonesandbox.com Page 1 of 16 TOOLS: Technician Starter Package (1) 2017 guides.cellphonesandbox.com Page 2 of 16 Step 1 Removal 1 - Battery
Dell Inspiron Teardown
 Dell Inspiron 15-7559 Teardown This guide will demonstrate how to take apart the Dell Inspiron 15-7559. Written By: Trenton Greevebiester ifixit CC BY-NC-SA www.ifixit.com Page 1 of 18 INTRODUCTION This
Xbox 360 Motherboard Replacement
 Xbox 360 Motherboard Replacement Motherboard replacement. Redigido por: Walter Galan ifixit CC BY-NC-SA pt.ifixit.com Página 1 de 29 INTRODUÇÃO Use this guide to completely strip down your motherboard.
MacBook Pro 15" Core Duo Model A1150 Keyboard Replacement
 MacBook Pro 15" Core Duo Model A1150 Keyboard Replacement Written By: irobot ifixit CC BY-NC-SA www.ifixit.com Page 1 of 16 INTRODUCTION This guide shows the hidden screws you must remove when replacing
MacBook Pro 15" Core 2 Duo Model A1211 Speakers Replacement
 MacBook Pro 15" Core 2 Duo Model A1211 Speakers Replacement Written By: irobot ifixit CC BY-NC-SA www.ifixit.com Page 1 of 21 INTRODUCTION Restore sound to your laptop by replacing the speakers. TOOLS:
Toshiba Satellite A210 Motherboard
 Toshiba Satellite A210 Motherboard Replacement In this guide you will learn how to properly remove the Motherboard. Written By: Devin ifixit CC BY-NC-SA www.ifixit.com Page 1 of 12 INTRODUCTION Before
Removing and Replacing Parts
 Removing and Replacing Parts Preparing to Work Inside the Computer Recommended Tools Screw Identification System Components Hard Drive Fixed Optical Drive Media Bay Devices Memory Modules Mini PCI Card
Toshiba Satellite A215 S4697 Screen
 Toshiba Satellite A215 S4697 Screen Replacement When your computer screen is cracked or does not work anymore, it may need a new screen. Written By: Carlos ifixit CC BY-NC-SA www.ifixit.com Page 1 of 15
Chapter 4 Replacement Procedures
 Chapter 4 Replacement Procedures 4 4-ii Satellite P30 Series Maintenance Manual Chapter 4 Contents 4.1 General... 4-1 4.2 Battery... 4-7 4.3 PC Card... 4-8 4.4 HDD... 4-10 4.5 Optical Drive Module... 4-12
MacBook Pro 15" Core 2 Duo Models A1226 and A1260 ExpressCard Cage Replacement
 MacBook Pro 15" Core 2 Duo Models A1226 and A1260 ExpressCard Cage Replacement Written By: Walter Galan ifixit CC BY-NC-SA www.ifixit.com Page 1 of 15 INTRODUCTION You can again use ExpressCard accessories
imac Intel 27" EMC 2639 Hard Drive
 imac Intel 27" EMC 2639 Hard Drive Replacement Replace the Hard Drive in your imac Intel 27" EMC 2639. Written By: Walter Galan ifixit CC BY-NC-SA www.ifixit.com Page 1 of 26 INTRODUCTION Replacing the
MacBook Pro 15" Retina Display Mid 2012 Speakers Replacement
 MacBook Pro 15" Retina Display Mid 2012 Speakers Replacement Replace the Speakers in your MacBook Pro 15" Retina Display Mid 2012. Written By: Brett Hartt ifixit CC BY-NC-SA www.ifixit.com Page 1 of 23
ASUS D550MA-DS01 Screen Replacement
 ASUS D550MA-DS01 Screen Replacement This guide will show you how to replace your laptop screen. Written By: Calvin Wieczorek ifixit CC BY-NC-SA www.ifixit.com Page 1 of 12 INTRODUCTION Many people will
MacBook Pro 15" Core Duo Model A1150 ExpressCard Cage Replacement
 MacBook Pro 15" Core Duo Model A1150 ExpressCard Cage Replacement Written By: irobot ifixit CC BY-NC-SA www.ifixit.com Page 1 of 17 INTRODUCTION You can again use ExpressCard accessories by replacing a
imac Intel 21.5" Retina 4K Display (2017) RAM
 RAM") imac Intel 21.5" Retina 4K Display (2017) RAM Replacement Learn how to replace or upgrade the RAM in your 2017 Retina 4K imac. Written By: Evan Noronha ifixit CC BY-NC-SA www.ifixit.com Page 1 of 38 INTRODUCTION
imac Intel 21.5" Retina 4K Display (2017) RAM Replacement Learn how to replace or upgrade the RAM in your 2017 Retina 4K imac. Written By: Evan Noronha ifixit CC BY-NC-SA www.ifixit.com Page 1 of 38 INTRODUCTION
ipod Classic Click Wheel Replacement Written By: irobot ifixit CC BY-NC-SA Page 1 of 25
 ipod Classic Click Wheel Replacement Written By: irobot ifixit CC BY-NC-SA www.ifixit.com Page 1 of 25 INTRODUCTION The click wheel receives the feedback of your fingers and transmits it to the logic board.
When you are ready to build your computer you will have the following materials to work with.
 Copyright 2009 BOSMA Enterprises Chapter 3 Putting the Computer Together When you are ready to build your computer you will have the following materials to work with. 1. One motherboard. 2. One ribbon
MacBook Pro 15" Core 2 Duo Models A1226 and A1260 Optical Drive Replacement
 MacBook Pro 15" Core 2 Duo Models A1226 and A1260 Optical Drive Replacement Upgrade or replace the SuperDrive (requires a slim drive) in your MacBook Pro 15" Core 2 Duo Models A1226 and A1260. Written
MacBook Core Duo Optical Drive Replacement
 MacBook Core Duo Optical Drive Replacement MacBook Core Duo optical drive replacement. Written By: irobot ifixit CC BY-NC-SA www.ifixit.com Page 1 of 18 INTRODUCTION [video: http://www.youtube.com/watch?v=8l151w_giry]
HP Envy TouchSmart m7 k010dx Screen
 HP Envy TouchSmart m7 k010dx Screen Replacement Use this guide to replace the screen in your HP Envy TouchSmart m7 k010dx. Written By: Owen Ou ifixit CC BY-NC-SA www.ifixit.com Page 1 of 12 INTRODUCTION
imac Intel 21.5" EMC 2389 Stand Replacement
 imac Intel 21.5" EMC 2389 Stand Replacement Replace a broken or cosmetically unappealing stand on the imac 2389 21.5 Written By: Aaron Cooke ifixit CC BY-NC-SA www.ifixit.com Page 1 of 30 INTRODUCTION
imac Intel 20" EMC 2105 and 2118 SSD
 imac Intel 20" EMC 2105 and 2118 SSD Installation Replace the hard drive in your imac Intel 20" EMC 2105 and 2118. Written By: Dozuki System 2017 guides.crucial.com Page 1 of 15 INTRODUCTION Upgrade your
ipod Classic Battery Replacement Replace the battery on your ipod classic. Written By: irobot ifixit CC BY-NC-SA
 ipod Classic Battery Replacement Replace the battery on your ipod classic. Written By: irobot ifixit CC BY-NC-SA www.ifixit.com Page 1 of 18 INTRODUCTION Battery not lasting long? Swap it out. TOOLS: 1.5"
Gateway Profile 4 service guide
 Gateway Profile 4 service guide Customizing Troubleshooting Contents Replacing Components in Your Gateway Profile 4.................. 1 About this guide.....................................................
imac Intel 20" EMC 2105 and 2118 Hard Drive
 imac Intel 20" EMC 2105 and 2118 Hard Drive Replacement Replace the hard drive in your imac Intel 20" EMC 2105 and 2118. Written By: Walter Galan ifixit CC BY-NC-SA www.ifixit.com Page 1 of 16 INTRODUCTION
Scritto Da: Ben Hirsch
 HP Pavilion dv6000 Motherboard Replacement Replace the motherboard in your HP Pavilion dv6000. Scritto Da: Ben Hirsch ifixit CC BY-NC-SA it.ifixit.com Pagina 1 di 13 INTRODUZIONE How to replace/install
Apple PowerBook G4 17
 Apple PowerBook G4 17 PRAM Battery Installation Manual Your computer is a static-sensitive device. It is susceptible to invisible damage if not protected during installation. We recommend proper grounding
Figure 4-29 Removing the CPU compartment cover
 4 Replacement Procedures 4.9 CPU 4 4.9 CPU Removing the CPU To remove the CPU, follow the steps below. 1. Turn the computer upside down and remove two M2.5 4 security screws securing the CPU compartment
Chapter 2: Disassembly
 P370EM / P370EM3 Chapter 2: Overview This chapter provides step-by-step instructions for disassembling the P370EM / P370EM3 series notebook s parts and subsystems. When it comes to reassembly, reverse
iphone 3G Headphone Jack Replacement Replace a broken audio port in an iphone 3G. Written By: irobot ifixit CC BY-NC-SA
 iphone 3G Headphone Jack Replacement Replace a broken audio port in an iphone 3G. Written By: irobot ifixit CC BY-NC-SA www.ifixit.com Page 1 of 18 INTRODUCTION No audio? Replace the headphone jack! TOOLS:
Nintendo 3DS XL Upper LCD Display
 Nintendo 3DS XL Upper LCD Display Replacement This guide is going to help you take apart the Upper LCD screen so you will be able to once again play your favorite games on your Nintendo 3DS XL! Written
Written By: Evan Noronha
 iphone 6s Power Button Cover Replacement Replace a faulty power button cover in an iphone 6s. Written By: Evan Noronha ifixit CC BY-NC-SA www.ifixit.com Page 1 of 36 INTRODUCTION Use this guide to remove
MacBook Core Duo Right Hinge Mount
 MacBook Core Duo Right Hinge Mount Replacement MacBook Core Duo right hinge mount replacement. Written By: irobot ifixit CC BY-NC-SA www.ifixit.com Page 1 of 10 INTRODUCTION The right hinge mount connects
Mac Mini Mid 2010 SSD Installation
 Mac Mini Mid 2010 SSD Installation Replace your Mac Mini Mid 2010's hard drive for more storage space and an increase in speed. Written By: Dozuki System 2017 guides.crucial.com Page 1 of 15 INTRODUCTION
apple Service Source imac (USB 2.0) Updated 11 September Apple Computer, Inc. All rights reserved.
 Updated 11 September Apple Computer, Inc. All rights reserved.") apple Service Source imac (USB 2.0) Updated 11 September 2003 2003 Apple Computer, Inc. All rights reserved. imac (USB 2.0) - 1 apple Service Source Basics imac (USB 2.0) 2003 Apple Computer, Inc. All
apple Service Source imac (USB 2.0) Updated 11 September 2003 2003 Apple Computer, Inc. All rights reserved. imac (USB 2.0) - 1 apple Service Source Basics imac (USB 2.0) 2003 Apple Computer, Inc. All
Written By: Ben Eisenman
 iphone 3GS Rear Panel Replacement Replace a broken rear case on your iphone 3GS. Written By: Ben Eisenman ifixit CC BY-NC-SA www.ifixit.com Page 1 of 22 INTRODUCTION The plastic rear half of the iphone.
Written By: Walter Galan
 PlayStation 3 Motherboard Replacement Replace your PS3's motherboard. Written By: Walter Galan ifixit CC BY-NC-SA www.ifixit.com Page 1 of 24 INTRODUCTION Use this guide to replace a blown motherboard.
Bluetooth Shielding Instructions
 Mac mini 2012 Bluetooth Shielding Instructions 1 INTRODUCTION 1.1 STATIC PRECAUTIONS 1.2 TOOLS REQUIRED 2 DISASSEMBLY 3 SHIELDING 4 FAQ 4.1 FAQ 5 CUSTOMER SERVICE 5.1 Before Contacting Customer Service
Written By: Walter Galan
 imac Intel 21.5" EMC 2428 CPU Replacement Replace the CPU in your imac Intel 21.5" EMC 2428. Written By: Walter Galan ifixit CC BY-NC-SA www.ifixit.com Page 1 of 33 INTRODUCTION Use this guide to upgrade
Dell Latitude E6500 Teardown
 Dell Latitude E6500 Teardown Disassembling the Dell Latitude E6500. Step by Step. I disassemble it down to the base assembly. Written By: Luis Gomez ifixit CC BY-NC-SA www.ifixit.com Page 1 of 16 INTRODUCTION
MacBook Pro 17" Unibody AirPort Board Replacement
 MacBook Pro 17" Unibody AirPort Board Replacement Replace the AirPort Board in your MacBook Pro 17" Unibody. Written By: Brett Hartt ifixit CC BY-NC-SA www.ifixit.com Page 1 of 15 INTRODUCTION Having issues
imac Intel 21.5" EMC 2389 SSD Dual Drive
 imac Intel 21.5" EMC 2389 SSD Dual Drive Installation Use this guide to install a second SSD in place of the optical drive. Written By: Dozuki System 2017 guides.crucial.com Page 1 of 17 INTRODUCTION There
iphone 6s Front Panel Replacement
 iphone 6s Front Panel Replacement Note: DIY at your own risk. New beginner must be careful, screens got problems mostly due to wrong installation process. INTRODUCTION Use this guide to replace a cracked
Nook Tablet Display Replacement
 Nook Tablet Display Replacement Written By: Michael Mooney ifixit CC BY-NC-SA www.ifixit.com Page 1 of 12 INTRODUCTION This guide will show easy ways to access the nook tablet visual display, replace the
The Fone Works. Written By: The Foneworks. This a teardown guide of the PlayStation 3. PlayStation 3 Motherboard Teardown
 The Fone Works PlayStation 3 Motherboard Teardown This a teardown guide of the PlayStation 3. Written By: The Foneworks 2017 thefoneworks.dozuki.com Page 1 of 23 INTRODUCTION This is a teardown guide based
4.1 General. 4 Replacement Procedures
 4.1 General This chapter explains how to disassemble the computer and replace Field Replaceable Units (FRUs). It may not be necessary to remove all the FRUs in order to replace one. The chart below is
Motorola Atrix 4G Bottom Speaker
 Motorola Atrix 4G Bottom Speaker Replacement This guide will show you how to access the Motorola Atrix 4Gs bottom speaker for repair or replacement. Written By: Jake ifixit CC BY-NC-SA www.ifixit.com Page
Installing imac Intel 27" EMC 2390 Dual HDD or
 Installing imac Intel 27" EMC 2390 Dual HDD or SSD Drive Installing a secondary HDD or SSD in the mid 2010 27" imac EMC 2390. Written By: Brett Hartt ifixit CC BY-NC-SA www.ifixit.com Page 1 of 23 INTRODUCTION
imac Intel 27" Retina 5K Display CPU Replacement
 imac Intel 27" Retina 5K Display CPU Replacement Replace or upgrade the CPU in your imac Intel 27" Retina 5K Display. Written By: Sam Lionheart ifixit CC BY-NC-SA www.ifixit.com Page 1 of 36 INTRODUCTION
imac Intel 27" EMC 2546 SSD Replacement
 imac Intel 27" EMC 2546 SSD Replacement Remove your imac's SSD, or the SSD portion of your imac's Fusion Drive. Written By: Dozuki System 2017 guides.crucial.com Page 1 of 33 INTRODUCTION If your imac
HP Flyer Red Hard Disc Drive Replacement
 HP Flyer Red Hard Disc Drive Replacement This guide will show you how to remove your hard drive. Written By: Anthony Ciotti ifixit CC BY-NC-SA www.ifixit.com Page 1 of 12 INTRODUCTION This guide is helpful
ipod Touch 5th Generation Power Button Replacement
 ipod Touch 5th Generation Power Button Replacement Remove the power/sleep button from your ipod Touch 5th Generation. Written By: Andrew Optimus Goldberg ifixit CC BY-NC-SA www.ifixit.com Page 1 of 29
A how-to guide for replacing the DJI Phantom 4 body shell. *Replacing the body shell could also be used as a tear-down guide. Written By: GotMac
 A how-to guide for replacing the DJI Phantom 4 body shell. *Replacing the body shell could also be used as a tear-down guide. Written By: GotMac ifixit CC BY-NC-SA www.ifixit.com Page 1 of 15 INTRODUCTION
Written By: senordingdong
 Installation of the UniMac V4 adapter into the Apple imac Intel 17". This enables the usage of non OEM LCD panels, and offers an otherwise unavailable Full HD upgrade. This used for repair of the common