Operation Manual for Independence 3.0
|
|
|
- Georgina Knight
- 5 years ago
- Views:
Transcription
1
2

3 Operation Manual for Independence 3.0
4 Copyright This documentation is protected by copyright law. All rights, especially rights concerning duplication, distribution, and translation, are reserved. No part of this publication may be reproduced in the form of copies, microfilm, or other processes, or transmitted into a language used for machines, especially data processing machines, without the express written consent of the publisher. MAGIX and Samplitude are registered trademarks of MAGIX AG. ASIO & VST are registered trademarks of Steinberg Media Technologies GmbH. All other mentioned product names are trademarks of their respective owners EUCONTM is a trademark of Avid Technology. Other mentioned product names may be registered trademarks of the respective manufacturer Errors and changes to the contents as well as program modifications reserved. This product uses MAGIX patented technology (USP ) and MAGIX patent pending technology. Copyright MAGIX AG, All rights reserved.
5 Table Of Content Welcome Basics & User Interface First start of Independence Using Independence as plug-in Using Independence in standalone mode Audio Preferences...23 MIDI Preferences...24 Projects, Layer Sets, Layers, Alternates, Sections & Zones Zone...25 Section...25 Alternate...25 Layer...25 Layer Set...25 Project...25 General Operation Input Fields...26 Pull-Down Menus...26 Buttons...26 Drag n Drop Support...27 VST Effects & VST Instruments Import Installation of VST Plug-Ins...33 Loading VST Instruments into Independence...34 Loading VST Effects into Independence...36 User Interface Layer Set Area Layer Area MIDI Programs...50 Pre-cache...51 Keep Settings & Show Custom Edit...52 Auto-Mapping-Import...52 X-Y-Z Mapping...53 Multi Key Mapping...54 Chromatic Mapping...54 One Key Mapping...55 Quick Mapping...55 Basic Settings...55 RAM Cleaner...56 Read Model...57 Tune Model...58 Format pull-down...60 MIDI Settings...61
6 Miscellaneous...62 Instrument Icons...63 Elastique: real-time time-stretching & pitch-shifting Introduction Approach for the use of audio loops Approach for dynamic use Quick Edit Custom Remote Control section Filter section Effect section Modules Module Editor Output Settings...74 Key Switch...75 Keyboard Options...77 Filters...79 Skip...80 Volume AHDSR...80 Flexible Modifiers External Sources...89 Fix Value...89 Velocity...89 Release Velocity...90 Random...90 Pitchbend...90 Modwheel...90 Mono Aftertouch (channel pressure)...90 Poly Aftertouch (key pressure)...90 MIDI Automation...90 Host Automation...90 Custom Control...90 Key Position (keyboard tracking)...90 Key Distance...91 Key Up...91 Key Down...91 Internal Sources...91 LFO (Low Frequency Oscillator)...92 AHDSR Envelope...94 Free Envelope Unipolar / Bipolar...94 Step Modulator Unipolar / Bipolar...96 Glide (Portamento)...98
7 Step Sequencer...99 Arpeggiator Arranger Time Modulator Insert FX Mapping Working with Zones Select and move one or multiple Zones Copy one or multiple Zones Resize a Zone Invisible features Mapping parameters Creating Sections in the Mapping Editor Edit Preferences Menu Special Menu Audio Files Browser Audio Editor Audio Editor Parameters Working with Slices MIDI File Editor Loading MIDI files MIDI Editor parameters Performance Overview Operation (simple example) Alternate Mode parameters Advanced Legato Mode parameters Legato Playing Techniques Legato Start Legato Option Legato Target Browser Overview Operation Searching for files File display Information batch MIDI files Audio files...171
8 Mixer Content Editor Group Editor Show/Hide Editor MIDI input pull-down menu Channel Display Layer Channel Insert Button Group Name BUS sends Audio Out selection pull-down menu Solo and Mute button Level indicator Volume fader and graphic level meter Volume chart Panorama chart Channel types Automation Setup of an automation Additional automation features Visual presentation of automated parameters Insert Filters and Effects Load, save & remove insert filters and effects Equalizers band parametric EQ band parametric EQ Vintage 3 band EQ Filters D Filter X-Filter Filter Follower Low Cut Filter High Cut Filter Multi Mode Filter LFE Filter Satellites HP Filter Dynamics Compressor Limiter Gater Modulation Chorus...197
9 Flanger Phaser Ring Modulator Rotary Vinylizer Distortion Time clipper Bit reduction Dual band distortion Tube distortion Delay Sample delay Delay Filter Delay Doubler Echo Helper Volume Panorama XY panorama Phase invert Level meter Level meter Pro Calibration Metronome Reference Tone Channel Manager Surround Panner Reverb Reverb Reverb TWO Special Origami & Origami LE Origami Positioner Preamp Modeler Cabinet Modeler Mic Modeler Pro Surround Environment Channel Manager Calibration LFE Filter Surround Panner Insert Filter & Effects...229
10 Preferences & Help Page Engine settings RAM Settings and Overview Multi Core Support RF-HDD (Read From Hard Disk Drive) Preload time Unload time Block size Use original BIT rate / Pre-convert to 32 BIT Output and Surround settings Default Layer Format Surround Misc. settings Default Root Key Default Author Information Debug Log Help Page Credits License Agreements License Agreement Software License Agreement Sound Library Index
11
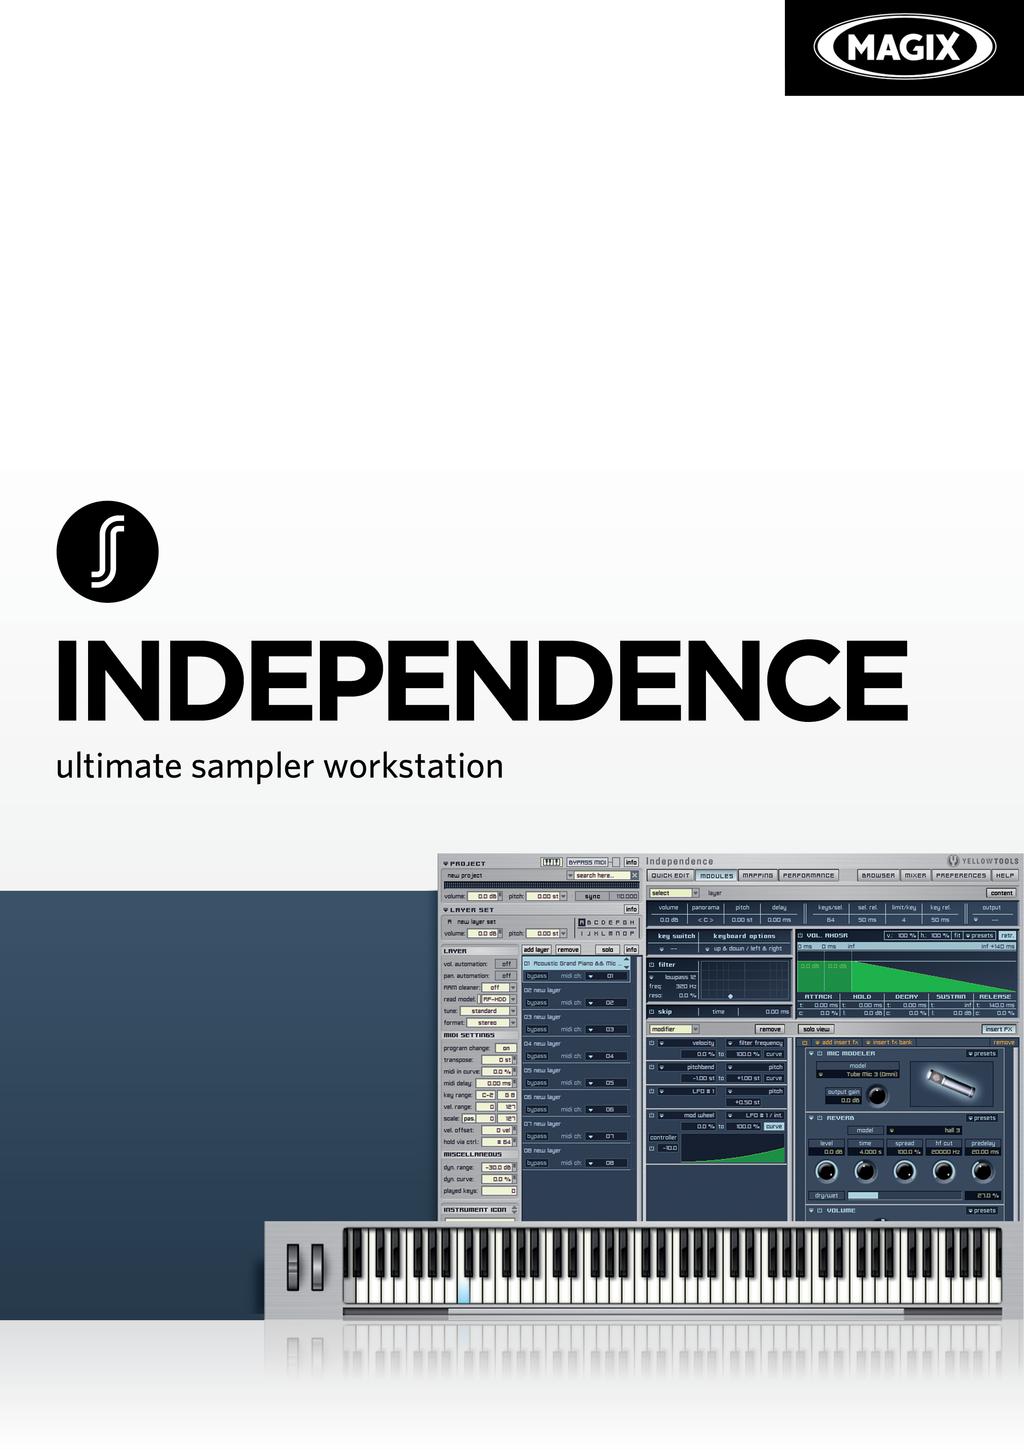
12 12 CHAPTER 1 Welcome Welcome Thank you very much for purchasing INDEPENDENCE - the ultimate sampler-workstation. With the introduction of Independence, MAGIX once again sets new standards for sample based instruments and offers by far the fastest, most powerful and easiest way of performing, customizing, and creating authentic instruments on your computer. Enhanced by a clear user interface, the flexibility of a full-modular structure, stunning effects and filters and many unique features Independence is still easy to use and offers immediate access to a fantastic and intuitive handling. Independence is the result of the unresting further development of yellow tools samplerworkstation technology and comes with a totally redesigned and innovative audio engine. To give you utmost control and flexibilty for your music production, Independence is the first software sampler that allows you to load 3rd party VST effect plug-ins AND VST instrument plug-ins! The intuitive user interface, the unique file management, an ultra fast streaming integration, multi core processor support and the Auto-RAM-Cleaner allow you to load and use an unlimited number of instruments in seconds. The completely new Browser page in Independence 2 lets you search and import audio and MIDI files as easy as possible. Beside audio and MIDI files you can also search for any other Independence files such like Projects, Layer Sets, Layer Sets and Sections - with any kind of attributes! To make your file management as easy as possible, the Independence browser contains a sophisticated attributes batch utility that lets you edit and add attributes for your selected files in one simple step. With the custom remote control unit of Independence you can easily assign your favourite parameters to one of the 32 flexible knobs and buttons, so you can even customize the user interface to your needs. Wether you want to work in mono, stereo or surround environments up to 8.1, Independence is prepared for everything and offers creative, flexible and immediate solutions for any demands of music producers, film-composers, sound designers, songwriters and remixers. So you can care about the really important things - making music! Independence comes with a multipage user interface that contains any controls and parameters you need for authentic instrument performances, available in clearly designed categories for an intuitive and user-friendly workflow.
13 MAGIX INDEPENDENCE 3.0 Manual 13 For immediate access to the most important parameters and settings of Independence, the default start page of Independence is the QUICK EDIT page. We also call it composer s page since it includes the most common used feautures for immediate access and customization of your instruments. To edit the parameters on this page you can enter the values by double-clicking the parameter value display or also use the sliders. The sophisticated Custom Remote Control area of the Quick Edit page lets you assign any Independence parameter directly to one of the 8 freely assignable custom remote knobs or buttons. You can edit the volume, panorama and pitch parameters of the currently selected Layer and additionally set the general EQ color. To add some filter or effect settings you can select one of the already prepared presets or also create your custom settings and save them as new preset. The effects are based on a real-time Impulse Response Processor. You can always select the presets in the pulldown menus or with a click on the forward/backward arrows. The EQ, Filter and Effect parameters have an additional bypass button.

14 14 CHAPTER 1 Welcome One of the most powerful features of Independence is the Modules Editor, in particular the Flexible Modifiers. They let you customize your sounds and instruments at will as you can connect any source with any destination. Tempo-synchronized LFOs, the use of any external MIDI controller, randomizers and flexible free envelopes - Independence offers anything you need to modify your music. The ingenious structure of the modifiers and the perfect integration into the user interface enable a quick, easy and unmatched workflow. On this page you can also add Insert Filter and Effects to your instruments. With a click on the Insert FX button the right part of the Modifier sections switches into the Insert FX section and you can add unlimited number of inserts. The inserts support drag n drop workflow so you can change their order afterwards at will. Click the Insert FX button again to switch back to the Modifier section. The Insert FX button becomes orange if you added any inserts to your instruments, so you can always see if there are any Inserts active for your currently selected Layer.

15 MAGIX INDEPENDENCE 3.0 Manual 15 With Independence s clearly arranged MAPPING EDITOR it has never been so easy to create your custom mappings in just a few seconds. The sophisticated editing options and the amazing graphical representation enable you to edit multi-velocity instruments with any kind of x-fades, fade-ins, fade-outs and individual curves for each fade. To facilitate the process of creating mappings for your sounds, Independence includes an unique Auto-Import feature: Independence recognizes the name-structure of multiple samples that belong together and offers corresponding import options for the files. The visual display of the audio files contains next to the waveform and the file name also all information on sample rate, bit rate, file type, length, number of frames and file size. One of the most innovative features of the Mapping Editor is the unique Auto Groove Recognition. In the Audio Editor you can switch to the Slice mode at any time. Using the sensitivity settings you can adjust the automatic groove recognition for the selected loop. Furthermore the Slice Editor allows many more flexible and intuitive editing options: Zoom, fixing and moving slice markers, manual deletion and adding of slice markers and finally the frame accurate movement and adjustment of all slice markers... as usual for Independence all this is possible in real-time!!! For the first time it is now possible to slow down your audio loop in its original tune up to 60% without loss of quality!
 any static sounding performance is a thing of the past. The playback of the alternate steps can be at random or also assigned individually.")
16 16 CHAPTER 1 Welcome The Performance mode of Independence is the humanizer for your sampled instruments. With up to 32 different variations per sample (Section) any static sounding performance is a thing of the past. The playback of the alternate steps can be at random or also assigned individually. It is the unique sample and file management architecture of Independence that allows such realistic performances that are far away from previous sample based instruments. Thus the typical machine gun effect definitely is a thing of the past. To make these instruments sound even more authentically, Independence also offers two different advanced Legato Modes. The legato parameters can be assigned to each Section individually to achieve an unmatched simulation of the realistic behavior of an instrument played with legato. Separate start, option and target values enable you to perfect your legato sequence on the keyboard up and down. To achieve even more spectacular results you can combine the Advanced Legato Mode with Independence s Tune Model. More than 50 different presets of arabic, turkish, indian, historic and many more tunes for your instruments. Furthermore you can also create your own tunes and add them to your preset list.

17 MAGIX INDEPENDENCE 3.0 Manual 17 The sophisticated file BROWSER of Independence gives you immediate, fast and easy access to any files you can use in Independence. You get an overview of your Independence Projects, Layer Sets, Layers and Sections and also all available MIDI and audio files inside your Independence User Folder folder - so you have six browsers in one. Beside the clear overview you can also search for any of your files in a way you have never experienced before in a software sampler: If you want to search for Independence Projects, Layer Sets or Layers you can not only search for the file names but also for categories, dates, authors, etc. Searching for MIDI files can be done with the attributes bars, bpm, meter, etc. and the audio file search even accepts the attributes channels, beats, sample rate, size, etc. For MIDI and audio files the browser contains an automatic pre-listen function. If not deactivated, the playback of a file gets started as soon as you click on it. Additionally you can edit the pre-listen playback volume for audio files and you can select if MIDI files get played with their original tempo or your current Independence tempo. With the information batch option you can easily add or replace the information for Projects, Layer Sets and Layers.
.")
18 18 CHAPTER 1 Welcome The professional built-in MIXER of Independence allows you to edit, mix and finish your instrument projects completely independent from your host. You can assign UNLIMITED BUS channels to your project. For your individual settings each Layer channel contains 5 BUS sends (selectable as pre and post). Furthermore you can add an unlimited number of Custom channels (internal virtual channels) which let you customize the Sections of each Layer. Thus you can create additional virtual channels for an easier and more comfortable editing of your Layer. Especially for the mixer it is very important to have fast access to your tracks, pure control and a best possible overview of your channels. All these features, the individual assignment of your channels in groups and the quick show/hide overview turn this Independence feature by far into the most professional and most powerful plug-in mixer.
19 MAGIX INDEPENDENCE 3.0 Manual 19 The PREFERENCES page contains any parameters to adjust Independence to your needs and the power of your computer. Many of the parameters are standardized which you may already know. The Preferences page affects the complete plug-in, so it is very important to edit the available parameters in this area very carefully! Making changes may cause incompatibility with other Projects or the required settings may not get adjusted correctly which in turn may cause the locking of multiple parameters or even loss of performance. The Preferences page is divided into 5 areas: Beside the basic output and MIDI settings you can also create your surround setup - and save it into presets. Additionally you can add Libraries, change your user folder and also change your RAM, Multi Code and hard disk settings. Please keep in mind that you always have to save the preferences after any changes you made! Your changes will take effect after the restart of Independence.

20 20 CHAPTER 1 Welcome On the Independence HELP Page you have several links to PDF documents (manuals, shortcut overview, tips & tricks) and to some online links for the newest updates, tutorials and much more. The online links require an internet connection and to read the PDF documents on your computer you need the free Adobe Acrobat Reader or any other application that can open PDF documents.

21 MAGIX INDEPENDENCE 3.0 Manual 21 Basics & User Interface First start of Independence If you start Independence for the first time, the E-License Manager will open and you can activate Independence. Without activation - you can skip this process with a click on the Exit button - you can fully use Independence with just a few limitations: The import of audio files is limited to 25 files, the import of 3rd party VST instrument plugins is deactivated and both the Mapping and Performance pages are not available - in short: without activation you can use Independence as a powerful sample player. You can unlock this free player version at any time with purchasing an Independence Pro serial number - you do not have to install any new software but only finish the activation process.

22 22 CHAPTER 2 Basics & User Interface To activate Independence Pro at a later date, simply switch to the Mapping or Performance page and click the Activate Independence Pro button. The E-License Manager will open and you can start with the activation. IMPORTANT: For the installation and activation of your product there are separate manuals available. Please read these documents carefully. If there are sound library for Independence already available, you can immediately load these instruments. Otherwise switch to the Preferences page and click on the Library tab: With the button add library you can now add instruments. Please choose your product folder that contains the Layers, Image Files, Presets and further files. Independence will add the library accordingly with all content and settings automatically and after saving the preferences you can load and play the instruments.

23 MAGIX INDEPENDENCE 3.0 Manual 23 Using Independence as plug-in Because of all the different sequencers please refer to the manual of your host application for the process of loading instrument plug-ins. There are no special requirements for using Independence as a plug-in. Using Independence in standalone mode The Independence standalone versions for Mac (PowerPC and IntelMacs) and Windows XP are extemely stable and powerful and allow you to create your custom independence setup for your DAW. If you start the Independence standalone version for the first time, the following two setup windows will appear: Audio Preferences Independence recognizes all available audio interfaces, their I/O buffer sizes and sample rates: After the selection of your preferred audio interface we recommend you to set the I/O buffer size to a minimum of 512 frames. Maybe some more details about this parameter: The I/O buffer size is the buffer of your audio interface. This buffer allows you a smooth and uninterrupted performance. On the other hand you have to keep in mind, that the higher you will set this value, the more latency will be the result. This means that you have to find the best balance between required performance and acceptable latency. The sample rate offers the resultion that are supported by your audio interface. When finished, click on the OK button to proceed. You can also change your audio setup at any time afterwards. IMPORTANT: Independence standalone support up to 64 mono and 64 stereo outputs simultaneously. To get this maximum of output channels you ll need multiple audio interfaces. To create a setup for the use of more than one audio interface at the same time please switch to the Audio/MIDI configuration (Mac OS X) or to the settings of your ASIO Multimedia Driver (Windows XP/Vista).

24 24 CHAPTER 2 Basics & User Interface MIDI Preferences Independence can manage up to 32 MIDI ports (up to 512 MIDI channels simultaneously!). Independence recognizes all available physical and virtual MIDI ports automatically. Simply click on the pull-down menus to select the MIDI ports you want to use with Independence. Use the check boxes beside the ports to activate or deactivate the corresponding MIDI ports. Please keep in mind that you have to assign one MIDI-in port at minimum - otherwise Independence will not get any MIDI input. You can also change your MIDI preferences at any time afterwards.
25 MAGIX INDEPENDENCE 3.0 Manual 25 Projects, Layer Sets, Layers, Alternates, Sections & Zones To give you any option for a personal customization of your instruments Independence is based on an very sophisticated architecture and file management - but still very easy and intuitively to use. Zone The smallest but of course most basic element is the Zone. One Zone can be a sample of a multi-sampled instrument a MIDI file or an audio loop. Zones are shown in the Mapping Editor as single quads which you can move and edit at will. If you use Independence s slicer in the Audio Editor you can additionally divide a Zone into several Parts (most commonly used with the auto-groove-recognition feature for loops). Parts of a Zone are marked yellow in the waveform display. If you have a multi-sampled instrument which contains several articulations for the same note you can combine several Zones that belong together into Sections. Section Sections are a group of Zones and thus very useful elements to edit multiple Zones simultaneously. The Independence core library uses Sections mainly to combine the different articulations, dynamics or playing styles of an instrument into groups for easier editing. Sections get created in the Mapping Editor of Independence. Simply select one or multiple Zones you want to combine to one Section and enter a new name for this Section. Alternate If each note of an instrument was recorded in multiple articulations you will have one Section for each articulation. For an easier and much faster editing, you can now group all these Sections to one Alternate. So an Alternate enables you to edit the parameters of an entire group of Sections simultaneously with simply one mouse click. Alternates are also the basic elements for Independence s Performance Mode. Layer Layer is the most important item of Independence and the basic element that contains ALL settings of an instrument, including all Module, Mapping and Performance settings. Layer Set Each Independence Layer Set can contain an unlimited number of Layers. Use the Layer Sets for an easier management and customization of groups of instruments that have some basic settings in common. Project Projects contain ALL settings of the integrated Layer Sets, Layers, Alternates, Sections and Zones.
26 26 CHAPTER 2 Basics & User Interface General Operation The operation of Independence is extremely intuitively and user-friendly. There are some basic control that we will explain in the following overview: Input Fields These are the most common operating controls of Independence. There are several ways to use the input fields: 1.) With the keyboard: Double-click on an input field, enter a new value and press the return key to activate the new value. 2.) With the mouse: Click and hold the mouse button on an input field. Keep the mouse button pressed and move upwards to increase the value or move downwards to decrease the value. Release the mouse button when you reached the desired value. The faster you move the mouse the faster the parameter value of the input field will change. If you use the mouse for adjusting your values, you can additionally use the following keyboard short cuts: For a better finetuning, press and hold the shift key before you move up or down. To reset the input field to its default value, press and hold the command key (Mac OS X) or the ctrl key (Windows XP) and click on the respective input field. As soon as you start editing the value of an input field (whether with the keyboard or with the mouse), the area of this input field and the value itself get displayed inversely: Pull-Down Menus Independence s pull-down menus are labeled with a little triangle icon in front of the parameter name. You can click anywhere on the name or the triangle to open the pulldown menu. Buttons Most of the buttons of Independence are self-explanatory. Nevertheless there are some special buttons we want to mention separately: content button: bypass buttons: The different Working Areas of Independence contain a content button in the upper right corner. Use this button to switch the left Layer parameter area into the Content Browser display for the selected Layer and gives you an immediate overview and choice of all available Sections and Alternates. Many of Indepencence s features and parameters have additional bypass buttons which enable you to deactivate your changes and settings. For Layers, Sections, Alternates and Legatos there are add buttons but you can also just double-click with your mouse to add new item. All scrollbars in Independence support the mouse wheel, so you can easily scroll any contents with your mouse or the scrollbars.

 you want to import into the Layer display and release your")
 to an empty part of the display, a new Layer gets created")
27 MAGIX INDEPENDENCE 3.0 Manual 27 Drag n Drop Support You can import MIDI files directly from your desktop or any other folder. Drag the MIDI file(s) you want to import into the Layer display and release your mouse button. If you drag the file(s) to an empty part of the display, a new Layer gets created automatically. When you release the mouse button the MIDI import dialog comes up: Here you can assign the key for the MIDI file(s). With a click on the import button, the MIDI file(s) get imported accordingly:
.")
28 28 CHAPTER 2 Basics & User Interface If you drag the file(s) onto an existing Layer, the MIDI file(s) get imported into this Layer. When you release the mouse button the MIDI import dialog comes up: Here you can assign the key for the MIDI file(s). With a click on the import button, the MIDI file(s) get imported into the Layer accordingly:
 directly into the Mapping Matrix to start the import process: You can also drag n drop audio files")
29 MAGIX INDEPENDENCE 3.0 Manual 29 If there is a Layer already available and selected, you can also drag the MIDI file(s) directly into the Mapping Matrix to start the import process: You can also drag n drop audio files from any location on your computer into Independence. Drag the audio file(s) you want to import into the Layer display and release your mouse button. If you drag the file(s) to an empty part of the display, a new Layer gets created automatically.
30 30 CHAPTER 2 Basics & User Interface When you release the mouse button the audio import dialog comes up: With a click on the import button, the audio file(s) get imported accordingly: If you drag the file(s) onto an existing Layer, the audio file(s) get imported into this Layer.

31 MAGIX INDEPENDENCE 3.0 Manual 31 When you release the mouse button the audio import dialog comes up: Here you can select the mapping type and other import options. With a click on the import button, the audio file(s) get imported accordingly:
32 32 CHAPTER 2 Basics & User Interface If there is a Layer already available and selected, you can also drag the audio file(s) directly into the Mapping Matrix to start the import process:

33 MAGIX INDEPENDENCE 3.0 Manual 33 VST Effects & VST Instruments Import Independence is the first software sampler that can load 3rd party VST Effect and VST Instrument plug-ins! In Independence Free you can ONLY load VST Effect Plug-ins. Installation of VST Plug-Ins To use your VST Effect & VST Instrument plug-ins inside Independence and Independence Live you first have to copy your VST plug-ins into the folder VST Plug-Ins inside your Independence Application Folder: During the first start after this process Independence starts the validation of the new VST Effects & Instruments. All VST plug-ins that pass this validation will then be available. Independence automatically recognizes which plug-ins are effects and which are instruments. Thus you do not have to take care about all the different plug-ins. In the Layer pull-down menu only the VST Instruments are available - and the Layer & mixer FX menu will only show VST Effects. IMPORTANT: Independence only accepts VST Effect and VST Instrument plug-ins! Any other plug-in types get ignored automatically.

34 34 CHAPTER 2 Basics & User Interface HINT : The VST Plug-Ins folder inside the Independence Application Folder supports sub-folders. If you have many VST plug-ins you want to use inside Independence you can create your own sub-folders for a better overview and copy your plug-ins into these folders. IMPORTANT: Independence will scan the VST Plug-Ins folder of the Independence Application Folder with every start. Any new plug-ins that pass the validation will be available immediately. If you have a lot of VST plug-ins you want to use in Independence, the validation process may need some time. Loading VST Instruments into Independence VST Instruments can get loaded exactly the same way you load any other instruments into Independence. Click on the name of the Layer you want to use for the VST instrument to open the Layer pull-down menu and select VST Instruments. All available VST Instruments inside your VST Plug-Ins folder of the Independence Application Folder are displayed accordingly:
 icon below the name.")
35 MAGIX INDEPENDENCE 3.0 Manual 35 Now you can select the VST Instrument you want to load into Independence. After the loading finished successfully the name of the Layer switches to the name of the VST Instrument. Layers that contain a VST Instrument display an additional E (Edit) icon below the name. Click on the E button to open the user interface of the loaded VST Instrument. You can now load presets and use the VST instruments in Independence without any restrictions. IMPORTANT: Never remove VST plug-ins you saved with a Project, Layer or Insert FX. Otherwise the Projects can not get loaded correctly anymore. NOTE : If you want to move Independence Projects between Mac OS X and Windows XP/Vista that include 3rd party VST plug-ins you have to make sure that these plug-ins are available on both platforms! Most developers of VST plug-ins support both the Mac and the Windows platform.

36 36 CHAPTER 2 Basics & User Interface Loading VST Effects into Independence As already mentioned the VST Effect plug-ins are available in the Layer Insert FX area and in the Independence mixer environment. Open the add insert fx pull-down menu and select the VST Effect plug-in you want to load: The plug-in gets loaded into the VST plug-in window. Click on the edit button to open the user interface of the loaded VST Effect. You can now load your presets of the VST effect and use both the Independence insert filter & effects and your other VST Effects inside Independence.

37 MAGIX INDEPENDENCE 3.0 Manual 37 User Interface The user interface of Independence is divided into the basic part on the left and the different working areas on the right. The multipage structure allows you to switch between the multiple working areas immediately. For an even better overview some working areas allow an additional Content view which enlarges the working area to the entire width of Independence and hides the Layer details on the left as long as activated : Project Area with global volume settings, pitch settings in semitones or Hertz, sync selection and content search option. 2: Layer Set Area with custom volume settings, pitch settings in semitones or Hertz and selection between 16 Layer Sets (from A to P) 3: Layer Area with individual settings for each Layer. The position of the Layers can get changed by drag n drop. Priority option for immediate solo playback of one Layer. 4: Working Area Selection for immediate switching between the main working areas Modules, Mapping, Performance, Mixer, Preferences and Key Status. 5: Working Area that always shows the settings of the selected Layer patch. 6: You can show/hide the keyboard with a click on the keyboard button in the upper left corner. The color assignment of the keys is as follows: Keyswitches (yellow), MIDI files (green), C1 (blue), Dynamic Split (purple) used keys (white), unused keys (grey), repetition key (red).

38 38 CHAPTER 2 Basics & User Interface Project Area An Independence Project contains ALL settings of the integrated Layer Sets, Layers, Alternates, Sections and Parts. So any changes of the available parameters in this area will finally affect all instruments you loaded. We decided to use the word Projects instead of session or song to avoid any confusion with the naming of your sequencer software. Project pull-down MIDI panic/bypass MIDI-IN icon Project Notepad (Infofile) Project name Content searcher Project volume Project levelmeter Project pitch Keyboard on/off Project sync With the drop-down menu you can load or save your Independence Projects. You can also save a Project as autoload file! Independence will then always start with the entire content and settings of your Project automatically. Simply save (replace) your Project as the file Autoload.ytip in the basics folder of your Independence User Folder. In the project preferences you have the following three basic options you can activate/deactivate. MIDI thru: Activate this option to enable Independence to route incoming MIDI signals from Independence to any other connected hardware or software that can communicate with Independence via MIDI. This can be an external mixer console (like a Yamaha 02R96 hardware) or a software (like Cubase or other host applications). This way you can even use Independence mixer or insert parameters to control the sliders and faders of an external hardware mixer. Remember Layer editing page: If activated each Layer you select will automatically switch to its lastly used editing page of Independence. If you do not activate this option you will always stay at the currently selected editing page. Program Change: Use this option to generally activate or deactivate the program change feature for Independence. This way you do not have to deactivate program change for each Layer separately if you maybe do not want to use this feature temporarily. You could also call it program change bypass feature.
39 MAGIX INDEPENDENCE 3.0 Manual 39 The MIDI-IN icon shows incoming MIDI signals and thus the existing MIDI connection of Independence. If Independence should not work correctly during your work, you can use the MIDI panic/bypass button to mute and reset all note-on MIDI signals immediately. IMPORTANT: ALL Project parameters affect the entire Independence instance! The volume value assign the general volume for the entire Project. The pitch parameter is available in semitones and Hertz and assigns the basic tone pitch. This is very useful as you can switch to a 443 or 448 Hertz tune immediately, for example. The value range for semitones is set to +/- 60 and the value range for Hertz between 380 and 500. You can switch between the two options with a click on the drop-down. If you only want to change the tone pitch of single Layers and not the entire Project please read the chapters Layer Set Area or Layer Area on the following pages. If you use Independence as plug-in in your sequencer software an automatic synchronization connection gets established to guarantee the unobstructed synchronization with your host. You will notice that always you change the tempo of your sequencer software also the tempo in Independence will change to the same value accordingly. IMPORTANT: If you use Independence in the standalone mode and you want to use multiple Modules or Insert Effects and Filters which need a tempo specification you have to enter this value into the Project tempo display! Since the size of your custom Projects, Layer Sets and Layers archive will grow continuously, the internal Content Searcher of Independence will always help you to find exactly the Instruments you are looking for - immediately and user-friendly. Click on the Content Searcher display to place your cursor...

40 40 CHAPTER 2 Basics & User Interface... and enter the key word (drums, for example). Press the return key on your keyboard to start the search function. Now only the Projects, Layer Sets and Layers get listed in the appropriate pull-down menus which exactly match to your search key. To disable the Content Searcher please click on the X icon on the right side of the input field and the Project, Layer Set and Layer pull-down menus will show their original structure again. With a click on the small arrow of the Content Searcher you ll get the list of the last 20 keywords you used for your search. You can use this pull-down menu to search again for Layers without having to enter the keywords again: The Project Notepad (infofile) is a small but nice feature. To save some custom details of your Project (like creation date, modification date, in which session you use the project, etc.) click on the i icon and the notepad (infofile) will show up in the working area. Now enter your custom information and click the i icon again to close the notepad (infofile) and revert to your prior screen. IMPORTANT: If you do not use Independence as plug-in but in the standalone mode you always have to save your Project before you close Independence. Otherwise all your unsaved changes of the Layers get lost. Of course we included a warning dialog to avoid accidental quitting. In plug-in mode all your changes and settings get also saved in your session/song of your sequencer software.

41 MAGIX INDEPENDENCE 3.0 Manual 41 Layer Set Area Each Independence Layer Set can contain an unlimited number of Layers. Use the Layer Sets for an easier management and customization of groups of instruments that have some basic settings in common (e.g. A-Drums, B-Percussion, C-Basses, D-Guitars,...), since all settings in this area will affect all Layers that are part of this Layer Set. At the moment Independence can manage up to 16 different Layer Sets - from A to P. Layer Set pull-down Layer Set name Layer Set volume Layer Set Notepad (Infofile) Layer Set Selection Layer Set pitch With the drop-down menu you can load, save, delete, etc. your Independence Layer Sets. When loading a Layer Set, the message Locating Audio/Image files. Please be patient shows up in the working area of Independence. After the loading process is finished the working area contains the Modules page and the name of your Layer Set gets displayed below the pull-down menu. Depending on the Layer Set you ve loaded the Layer section now contains multiple Layer patches which you can play immediately with your keyboard or other MIDI controller. You can switch between the Layer patches with the mouse or also with the key switch feature. IMPORTANT: The Layer Set parameters apply to ALL Layers that are part of the selected Layer Set! The Layer Set pull-down menu contains the different load and save options for your Layer sets. Use the append option to add all Layers of a specific Layer Set to your currently selected Layer Set.
42 42 CHAPTER 2 Basics & User Interface The volume value assign the general volume for the entire Layer Set. The pitch parameter is available in semitones and Hertz and assigns the tone pitch for the selected Layer Set. Like in the Project Area this is very useful as you can now assign different tone pitches to your Layer Sets immediately, but it will only affect the Layers that are part of this Layer Set and not all Layers of the entire Project. The value range for semitones is also set to +/- 60 and the value range for Hertz between 380 and 500. The Layer Set Selection contains 16 letters - from A to P. Each Layer Set can contain an unlimited number of Layers. You can switch between the Layer Sets with a click on the wanted letter. The currently selected Layer Set is displayed with the inverse letter and also shows this letter before the name of the Layer Set. As soon as a Layer Set contains one or multiple Layers, a black border gets added to the respective Layer Set. Thus you will always have the overview used of Layer Sets. Like the Project Area also the Layer Set area contains the useful notepad (infofile) editor. Use this feature to take some notes for your Layer Sets.

43 MAGIX INDEPENDENCE 3.0 Manual 43 Layer Area Layer is the most important item of Independence and the basic element that contains ALL settings of an instrument inclusive any Module, Mapping and Performance settings!!! As the Layers contain the sounds and instruments of Independence, this area finally offers the most detailed setting options. All settings on the left side of the Layer list always affect the selected Layer (marked in blue). If you switch between the loaded Layers also the setting values will switch accordingly. Add Layer Layer Settings Remove Layer Solo (Layer Priority) Layer Notepad (Infofile) MIDI Settings Layer list Miscellaneous Instrument Icon To load an instrument, click on the add layer button or double-click in the Layer display to add a new empty Layer. Then click on the Layer name to open the Layer drop-down menu in witch you can select the instrument. Beside the list of all available Independence Layers and the standard parameters like load, save, delete, etc., this pull-down menu also contains further options for your Layer, like the pre-cache feature and the import options for audio and MIDI files.

44 44 CHAPTER 2 Basics & User Interface The keep settings option at the bottom of the Layer pull-down menu is a very helpful funtion to assign ALL current settings of the Layer settings, MIDI settings, the Miscellaneous area as well as all parameters of the Modules page of the selected Layer to a new instrument. If you want to assign your settings of these areas to a new instrument, please click on keep settings first and load a new instrument into the same Layer afterwards - now you replace the content of the Layer with a new instrument, but you keep the settings of the prior one. With the option keep custom control settings you can also assign your current automation setup of the Quick Edit Page parameters to a new Layer the same way. The Layer you select in this menu gets loaded into the Layer for which you opened the pull-down menu. When loading a Layer, the message Locating Audio/Image files. Please be patient shows up in the working area of Independence. After the loading process is finished the working area contains the Quick Edit page and the name of your Layer switches from New Layer into the name of the Layer you ve loaded. Depending on the Layer you ve loaded you can start playing the Layer with your keyboard or other MIDI controller immediately. Some Layers maybe include already prepared controller features like key switch or other controller commands.
45 MAGIX INDEPENDENCE 3.0 Manual 45 Next to the Layer name there are two small arrows that allow fast switching between the available Layers: The direction corresponds to the structure of your Layer patches in the Layer pull-down menu, so if you click the arrow that points upstairs, the current Layer gets replaced with the next Layer ABOVE the currently loaded Layer in the Layer pull-down menu. The arrow that points downstairs works the other way around: the current Layer gets replaced with the next Layer BELOW the currently loaded Layer in the Layer pull-down menu. As soon as you change any of the editing parameters of the Layer and then click an arrow to switch to the next Layer, a warning message will show up to avoid the accidental loss of your unsaved changes. IMPORTANT: When you switch between Layers with the arrows, your MIDI input channels get retained to enable continuous playing. Next to the switch arrows there is a little but very useful level meter that shows the current volume of the Layer, so you do not always have to switch to the Mixer page. To delete one or multiple Layers simultaneously press and hold the shift key, click on the Layers you want to delete and click the remove button afterwards. A warning message will show up to avoid the accidental deletion of your Layers.


46 46 CHAPTER 2 Basics & User Interface Like the Project Area and the Layer Set area also each Layer contains the useful notepad (infofile) editor. Use this feature to take some notes for your Layers or visit the author website. Here you can also enter and edit the keywords, categories and attributes of the currently selected Layer for the search on the Independence Browser page. There you can also use the Information Batch option to add or replace information for multiple Layers simultaneously. On the Independence Preferences page you can enter a Default Author Name and Default Author Weblink. These information will then automatically get added to every new Layer. To mute a Layer you can press the bypass button of the Layer or also use the following shortcut: Press and hold the alt key and click on the desired Layer you want to mute. The color of the Layer name switches from light blue to dark blue and thus the mute status also gets displayed graphically.


47 MAGIX INDEPENDENCE 3.0 Manual 47 For immediate access to your MIDI channel settings, each Layer contains its own MIDI channel pull-down menu. If you use Independence as a standalone version, you will additionally get the MIDI port pull-down menu with up to 32 virtual and/or physical ports.

48 48 CHAPTER 2 Basics & User Interface The Layer Solo button of Independence activates an enhanced Solo functionality. This feature will help you to avoid the permanent selection and deselection of different Layers in order to achieve different solo settings. Select one Layer (or press and hold the shift key to select multiple Layers) and click the solo button. The background color of the selected Layer(s) switches from light blue to orange and thus the solo status also gets displayed graphically. Now just the orange colored Layers are audible. As long as the solo option is activated you can add and remove Layers with the held shift key and your mouse or also select a new Layer. To disable the solo function please click on the solo button again and all Layers get restored to their standard color and basic status. Independence generally shows the status of a Layer in different colors. active Layer: light blue Layer name selected Layer: light blue background solo Layer: orange background muted Layer: dark blue Layer name keys witch Layer: orange Layer name Here are some examples how the Layers can look like: - active Layer - active and selected Layer - active Layer - muted Layer - active Layer with key switch

 - muted Layer - active Layer (but muted) You can easily change the order of the")
49 MAGIX INDEPENDENCE 3.0 Manual 49 - active Layer - active Layer - active and selected Layer - muted and selected Layer - active and selected Layer with key switch - active Layer (but muted) - active priority Layer - active Layer (but muted) - muted Layer - active Layer (but muted) You can easily change the order of the Layers per drag n drop. Click on the Layer number and drag it to the desired position.


50 50 CHAPTER 2 Basics & User Interface MIDI Programs The MIDI programs feature can be used as powerful remote control for Independence and all included Layers. If you are used to work with multiple computers you can install Independence on a separate computer without connected monitor, for example, and control it with your host application on another computer. To switch between different Layers you do not even have to touch Independence on the second computer: you can easily and comfortable switch simply with the program change option of your host application. Another advantage of this feature is the compatibility to MIDI files (format 1): As soon as you load a MIDI file that includes a program change number into your hardware or software sequencer, Independence will load the corresponding Layer patch automatically! Finally MIDI Programs turns Independence into a powerful workstation for live performances: You can switch between the currently loaded Layer patches directly with your MIDI keyboard without any additional loading time (precaching activated!). To save a Layer patch as a MIDI program you first have to load the desired Layer patch into Independence. After the Layer was loaded please open the Layer internal pull-down menu (click on the Layer name) and select the option save layer as midi program : Now a new window comes up where you can enter the following information: Layer Name: Bank Number: Enter a name for the MIDI program patch. Enter the number of the MIDI bank in witch you want to save the Layer. If the bank number you enter does not exist yet, Independence will create a new bank accordingly. Program Number: This is finally the remote ID of the Layer. As soon as your MIDI keyboard or hardware/software host sends this number to Independence, the Layer gets loaded and activated.


51 MAGIX INDEPENDENCE 3.0 Manual 51 Of course you can also load the Layers with the midi programs option in the Layer pull-down menu. Use this menu also for an overview of all your existing banks and MIDI programs. Independence can manage up to 16,383 different banks. Each bank can contain up to 128 different MIDI programs, from 0 to so a maximum of more than 2,000,000 assignable MIDI programs! Pre-cache Independence is a sample-based workstation. So you have to keep in mind that Independence has to manage several gigs of audio files simultaneously. This causes continous loading and unloading processes - which finally take time... To accelerate this process and thus your work, we integrated a powerful pre-cache option. All Layers that are part of the pre-cache option you select, get pre-loaded into Independence and are available immediately when you activate them - without any additional loading time. Pre-cache is extremely usable for any kind of live perfomance with Independence: Simply select your pre-cache option and you can witch between several gigabyte large instruments immediately! IMPORTANT: The usability of the Pre-cache feature does not depend on the power of your computer. It does NOT use additonal RAM like streaming or other resources of your computer when activated!
.")
52 52 CHAPTER 2 Basics & User Interface Keep Settings & Show Custom Edit At the bottom of the Layer pulldown menu you can activate the following three options: keep layer settings: If activated all your current Layer settings will be transferred to any new Layer you load (Modifiers, Modules, Insert FXs and all basic Layer settings). This way you can make your custom settings - with modifiers and effects, for example, and then keep these settings for the next Layer you load. keep custom control settings: The same as mentioned above - but here you keep your current settings of the custom control area. show custom edit: Here you can decide if you want to use the Independence User Interface for your Layer or - if available - a custom Layer User Interface - of Engine powered products, for example. Auto-Mapping-Import Besidey the massive Independence libraries and the compatibility to all Independence Instruments and upcoming premium sound libraries, Independence also offers a unique Auto-Mapping-Import option for AIFF and WAV files, so you also can use your own samples and sampling libraries in Independence. Without activation of Independence Pro the import is limited to 25 audio files. The Audio File Browser (refer to chapter Mapping ) allows the import of audio files directly from the Independence user interface. Additionally you can also use the import audio files option from the Layer pull-down menu. You can import single or multiple samples and map them automatically to your keyboard in 2 simple steps: First select the audio files you want to import and then choose the mapping structure. The condition precedent to the Auto-Mapping-Import is a uniform naming structure of the audio files you want to import and map. These structure depends on the mapping type and is explained on the following pages. To start the Auto-Mapping-Import, click on a Layer to open the pull-down menu and select import audio files. Now select one or multiple audio files you want to import and click on the open button to continue.


53 MAGIX INDEPENDENCE 3.0 Manual 53 After the selection of the audio files the following window shows up: The Auto-Mapping-Import offers the following five different mapping structures: X-Y-Z Mapping This mapping option will import and map entire instruments including multiple velocities per note and recognizes any available Sections/Alternates. All information regarding the mapping are included in the filename. A valid name could be: Concert Guitar XC2 Y04 Z02. The X assigns the key on your keyboard or other MIDI controller, the Y assigns the velocity zoning and the Z assigns the Section/Alternate for the audio file.
 is the loudest audio file.")

54 54 CHAPTER 2 Basics & User Interface The information included in the audio file of our example: XC2 = the audio file gets mapped on C2 Y04 = the audio file gets mapped as fourth velocity split on C2 Z02 = the audio file is part of the second Section/Alternate Normally the last velocity (e.g. Y12) is the loudest audio file. Nevertheless you can click the checkbox first velocity is the loudest in case this should apply to your import. If you also want to create one Section/Alternate even for each individual velocity, simply click the appropriate checkbox. Multi Key Mapping This mapping option is the most typical for the import of other sampling libraries. In most cases the file names of sampling libraries already contain the key/note. Thus this mapping option looks at a note assignment at the end of the filename, like C2, D#4, etc. The Multi Key Mapping can import multiple audio files of the same note (e.g. long notes and slides of each note) and will always assign the full dynamic range (velocity 0 to 127) to each of them. Thus they get mapped on the same key and overlap. In this case you can select create Sections automatically. After the import you can finetune the mapping by editing the individual Sections - assign different velocity ranges for each section, for example. Chromatic Mapping This mapping option is recommended for the import of audio loops or FX samples. All selected audio files get mapped successively, starting at the assigned key note. The velocity range for each audio file is always 0 to 127. If you additionally want to create one Section for each key, simply click the appropriate checkbox.


55 MAGIX INDEPENDENCE 3.0 Manual 55 One Key Mapping This mapping option is recommended for the import of sounds key by key and enables you to import multiple audio files that are separated by their velocity splits per note - mostly drums or percussive instruments. Thus this mapping option looks at a velocity assignment at the end of the filename, like 02, 15, etc. As already mentioned, normally the last velocity (e.g. 12) is the loudest audio file. Nevertheless you can click the checkbox first velocity is the loudest in case this should apply to your import. If you additionally want to create one Section for each key, simply click the appropriate checkbox. TIP : Beside the Auto-Mapping-Importer there is also the Independence Edition of the sampler disc and file format converter Translator. With this software from Chicken Systems you can convert other hardware and software sampler formats to the Independence format. Quick Mapping Using this optio you can import ONE audio file that gets mapped onto the full key range automatically (from C-2 to G8). The Root Key is on C3. For immediate access and best possible overview, the most important Layer editing parameters are available on the left side of the Layer list. These parameters are classified into five main categories. These are: Basic Settings Here you can switch the default automation for volume (CC#7) and panorama (CC#10) on or off. Both parameters refer to the Volume and Panorama values of the Quick Edit page.

56 56 CHAPTER 2 Basics & User Interface RAM Cleaner This feature allows a very special optimization of the performance of your computer resources. In practice it often happens that many Zones of a loaded instrument remain unused and thus only require unnecessarily RAM. At this point Independence s Auto-Ram- Cleaner becomes active: When you finished the editing of a Layer, simply click on the Ram Cleaner pull-down menu and select one of the following options: A: If you activate the Auto-Ram-Cleaner, Independence automatically unloads all unused sound samples of the Layer, so only the sounds you used remain in the memory. To activate the Auto-Ram-Cleaner simply click this option again. B: To give you still the flexibility of any subsequent editing you can reset the Auto-Ram- Cleaner at any time and all sound samples of the Layer get reloaded. If the Auto-Ram-Cleaner is active, the number of the respective Layer gets shaded. TIP 1: If you only want to add a few additional Zones, deactivate the Auto-Ram-Cleaner shortly and play back your song again in your sequencer software or play with your MIDI keyboard only the additional Zones. Afterwards activate the Auto-Ram- Cleaner again. TIP 2: If you switch to the Mapping page afterwards you will notice that only the used Zones are visible and all unused Zones got unloaded. If you still want to make the unloaded Zones visible please click on the select pull-down menu of the Mapping Editor, click on edit preferences and select show unloaded audio files. Now also the unloaded Zones are visible, but marked in red.

57 MAGIX INDEPENDENCE 3.0 Manual 57 Read Model The Read Model is a very important feature and allows you to switch between RAM (RF- RAM) and hard disk (RF-HDD) as memory for all loaded sound samples. The MAGIX RF-HDD technology enables you to load and play instruments completely independent from their physical size - even if this size is bigger than your available RAM. Only a small part of the beginning of each required audio file gets loaded into RAM and the rest remains on the hard disk. The entire audio file only gets reloaded if required. This is a very complex technology which allows an enormous performance and a so far unreached loading rate. You can adjust the parameters of the Read Model in Independence s preferences (-> see Preferences chapter). To switch between the two read models please click on the pulldown menu and select your preferred model. Beside the options read from HDD and read from RAM you can also activate the Elastique Time-Stretch & Pitch-Shfting option in this menu. All further details get explained in the chapter Elastique.

58 58 CHAPTER 2 Basics & User Interface Tune Model The Tune Model pull-down menu is a very unique feature of Independence. Different culture very often have different tunes for their instruments. To give you the flexibility to adjust any instrument to any tune model Independence already offers more than 50 different models for Arabic, Historic, Indian, Chinese and Turkish tunes. Of course you can also create your own, custom tune models. If you select edit from the drop-down menu the left working area of Independence switches to the Tune Model page. Now the Tune Model Editor will show up in the working area and contains the basic tune models on the left and the alternative tune models (muted by default) on the right side. You can select the root key for the tune model in the appropriate pull-down menu in the upper left corner. The order of your keys will change accordingly. Use the active keys input field to adjust the range of your tune model. All keys beyond this range still get displayed but muted (displayed in darker blue). If you want to assign different tunes that depend on the playing direction, simply deactivate the bypass button for the alternative tune model and select the preferred playing direction for the alternative tune model in the upper pull-down menu. Use the reset button in the upper right corner to reset the tune model to its default values.


59 MAGIX INDEPENDENCE 3.0 Manual 59 If you want to save your custom tune model, click on the select pull-down and select save as. To exit the Tune Model Editor, click on the exit option in the pull-down menu.
 Layer.")
60 60 CHAPTER 2 Basics & User Interface Format pull-down This menu lets you assign if the selected instrument gets processed as MONO, STEREO or SURROUND (incl. all surround formats) Layer. For more details about the Surround Environment of Independence please refer to the chapter Pro Surround Environment.

61 MAGIX INDEPENDENCE 3.0 Manual 61 MIDI Settings With the Program Change button you can switch the program change feature on or off. The transpose parameter accepts values from -60 semitones to +60 semitones to adjust the Layer position to your keyboard. Some keyboards or other MIDI controllers can only send very low or very high velocities if you press them very gently or very hard. Midi in curve allows you to compensate your MIDI controllers behavior and adjust it so it fits the instrument. If you want to give your performance more human touch you can add a MIDI delay in milliseconds to your instruments. This is very useful if you have several percussion Layers, for example, and you do not want to play them all on the spot - what is completely impossible for live performances. Use key range to adjust the range of incoming notes that the selected Layer is allowed to receive. This way you can adjust the playable area of the Layer on the keyboard since all notes outside this range get ignored. Vel range (velocity range) allows you to limit the playability of the sound via the velocity of the notes. The sample will only get played if the velocity of the Note-On MIDI message is in the range that was defined in the vel range section. Thus you can limit the Layer patch vertically. This feature is very useful when combining and playing multiple Layers. EXAMPLE: If you want to combine two or more instruments - piano and strings, for example - you can use the velocity range to switch or blend between the instruments depending on the velocity you play on your keyboard. In the first Layer you load the piano and limit the Vel Range from In the second Layer you load the strings and enter the Vel Range Now you can play the piano in the range and above the velocity 121 you play the strings. If you set the vel range for the piano from 0-127, you will play both instruments simultaneously in the range 121 to 127. With scale you can adjust how the dynamic range of the falls in Layer 2 scales inside its newly defined velocity range. In the example mentioned before, the falls will only be played with velocities 121 to 127. Scale allows you to play the falls with its full dynamic range from
62 62 CHAPTER 2 Basics & User Interface 0 to 127. Scaling the vertical range this way is very useful when the new range is very small, but you still need a great dynamic range in it. Additionally you can choose between an active (act.) or a passive (pas.) status for the scale you assigned. The active status for the second Layer means, that although you assigned the range from 121 to 127 velocities, the Layer gets played with a volume level that corresponds to its full volume range as if it was mapped from So you will also get the volume level of 121 to 127 for this range. So the two different Layers get an optimum fade for their points of contact. The passive status will play back the sounds of the second Layer in its full volume range, from 0 to and thus fade in. Vel. offset (velocity offset) allows you to change all incoming MIDI note-on information simultaneously. If you use the value -12 vel, for example, any incoming MIDI information gets reduced for 12 velocities. Hold via controller assigns on which controller number your keyboard should react to the pressed sustain pedal. You can manage up to 127 different and freely assignable MIDI controllers for each Layer and also deactivate this feature. The default value is set to #64. Miscellaneous All Notes are mapped to a volume level that is derived from their velocities. This sets the basic volume of a tone. The dynamic range parameter enables you to adjust the dynamic range of the instrument in db. Additionally you can adjust the dynamic curve of the range limits that you want to use in a session. The played keys display always shows the overview about your currently played keys on your keyboard or the incoming MIDI notes from your sequencer software. Some more details about the key polyphony: Independent from how you maybe want to adjust your polyphony settings to save CPU power, for example, you never have to worry about if your Layers are mono, stereo or surround - or even which surround format, but you just have to enter a value to assign the maximum allowed number of simultaneously played keys. Possible Confusion: If you load a stereo Layer patch and press and hold 5 keys simultaneously afterwards, the played keys display will show only the value 5 - your currently played keys. In fact at this moment ten voices get played internally (five times two channels!). If we talk about a 5.1 surround Layer patch this internal number of played voices even triples! This way it may happen that your computer gets enormously stressed by a big session, although just 200 incoming notes from your host get displayed, for example. In fact this means 1,200 channels if this is an internal surround 5.1 format. If there are furthermore some Zones in the Mapping Editor which overlap - with an x-fade between two Zones, for example - the effective number of internal played channels increases to 2,400!!!


63 MAGIX INDEPENDENCE 3.0 Manual 63 Instrument Icons Independence comes with more than 250 instrument icons. These icons always show a picture of the currently loaded instrument. You can also assign the available icons to your own instrument Layers. Click on the icon display to open the icon pull-down menu, select the instrument icon you want to assign to the currently selected Layer and release the mouse button.


64 64 CHAPTER 3 Elastique Time-Stretch & Pitch-Shifting Elastique: real-time time-stretching & pitch-shifting Introduction Sound libraries and virtual instruments can get separated into two general categories: multi-sampled instruments and loops. One disadvantage of audio loops can be their fixed tempo which may not always fit to the tempo of your arrangement. For this reason Independence offers Elastique (by zplane.development) that you can use for changes of the tempo and pitch of audio loops with very high quality. Furthermore you can also use Elastique for pitch and tempo changes of multi-sampled instruments, too. This option is very useful for manipulation, effects and experimental sound design. Approach for the use of audio loops Load a Layer that contains audio loops or import audio loops into an empty Layer. Afterwards please select the option Elastique in the read model pull-down menu. Now switch to the Mapping page and select one or multiple audio loops. The mapping parameters now contain one additional feature: o. bpm button: Here you can enter the original BPM value of the audio loop into the right parameter value field - or you click on o. bpm and thus scan the selected file(s) and detect the BPM values automatically (if multiple files are selected, all files get scanned separately). Depending on the number of beats maybe a manual adjustment of the MBP value is required.
: TIP: Normally audio loops always contain loop start and loop")
65 MAGIX INDEPENDENCE 3.0 Manual 65 After the scan process is finished the BPM value is displayed accordingly (of course you can also enter the value manually): TIP: Normally audio loops always contain loop start and loop end markers. Independence recognizes these markers during the import automatically and the playback mode gets set to loop. If you import/load audio loops that do not contain loop markers, you have to select all files after the import and then select the option loop in the Playback Mode pull-down menu manually. With immediate effect the audio loops get adjusted to Independence tempo or the tempo of your sequencer software. You can also load multiple audio loops with different tempo settings into the same Layer. Any differences get automatically adjusted, too, so all audio loops get played with the same tempo - independent from their original BPM value.

66 66 CHAPTER 3 Elastique Time-Stretch & Pitch-Shifting Approach for dynamic use Generally any pitch parameters of samplers create pitch-shifting by the speed-up or slowing-down of the playback tempo of an audio file - so to speak only the playback tempo is changed and the pitch retains. Elastique however changes the original pitch of an audio file in real-time and retains the playback tempo. So as soon as Elastique is activated, the pitch parameter in Independence automatically switches accordingly - both on the Mapping page and the Modules page. The Mapping page pitch parameter is qualified for static changes of the pitch, whereas the pitch parameter on the Modules page is qualified for dynamic pitch changes. You can create changes of the pitch (destination pitch ) and of the tempo (destination tempo ) with the use of the internal sources, like LFO, Step Modulator, Free Envelope, etc., for example. Switch to the Modules page after the selection of Elastique in the read model pulldown menu. Two new buttons auto tempo and formants are now available: auto tempo : If activated, the current BPM settings for all audio files of the Mapping page get used - if BPM values are available. In this case any further editing of the parameters tempo and pitch on the Modules page will be based on these existing BPM values. If auto tempo is not activated, all files get processed without the consideration of their BPM values. formants : (Formanten beibehalten) If activated the formants of the audio file get preserved during the processing. This option improves the time-stretch quality.

67 MAGIX INDEPENDENCE 3.0 Manual 67 The relevant destinations for Elastique are pitch and tempo : Pitch: Tempo: Changes the pitch of an audio file without changing the original tempo. Very useful for manipulation and effects. Changes the length of an audio file. Thus the playback speed can be faster or slower. 100% correspond to the original tempo. Higher values cause a speed-up - lower values a slowing-down.

68 68 CHAPTER 4 Quick Edit Quick Edit For immediate access to the most important parameters and settings of Independence, the default start page of Independence is the Quick Edit page. - we also call it composer page. This page covers the most common features you may want to use to assign your preferred taste to your instruments. Beside the basic parameters volume, panorama and pitch you can also adjust the EQ color for the currently selected Layer. The sophisticated Custom Remote Control area of the Quick Edit page lets you assign any Independenceparameter directly to one of the 64 freely assignable custom remote knobs or buttons. The Custom Control area contains 4 pages, each with 8 knobs and 8 buttons. The pages get selected with the pull-down menu. Additionally you can add some custom filter and/or effect settings with a few simple clicks - even just browsing through all the included presets will definitely inspire you and gives you the possibility to easily customize your instruments the way you want.


69 MAGIX INDEPENDENCE 3.0 Manual 69 Custom Remote Control section There is a custom learn option for any Independence parameter, so you just have to select this option for the parameter you want to assign to one of the custom control knobs or buttons (in the example we chose the resonance parameter of the insert Multimode Filter on the Modules page): To finish the assignment you only have to click on the knob or button you want to use for the manipulation of the selected parameter. Of course you can also assign any connections manually. Beside that general assignment of parameters to the remote control knobs and buttons you can additionally set a minimum and maximum automation value for each parameter you assigned to a knob. This means that you can use the full range (0% to 100%) of the remote control knob only for a specified value range of the assigned parameter. This gets explained more detailed in the chapter Automation.

70 70 CHAPTER 4 Quick Edit You can even use the remote control buttons to create a start note that triggers one of the MIDI modules of Independence, like Arranger, Step Sequencer, Arpeggiator, etc. - so you can simply start and stop these modules the easiest way possible. You can use your sustain pedal, for example, to start or stop the playback of a Step Sequencer! Additionally - to keep the overview - you can select up to 8 different colors for the knobs and buttons. This way you can create groups of parameters that belong together which is very useful especially during live performances! Activating the powerful host and MIDI automation options for the custom remote control, you can finally use any external hardware controller with Independence. Filter section The Filter section contains a preset pull-down menu with additional arrows to step through the available presets, a Slope pull-down menu and the parameters frequency and resonance. If you click on the preset pull-down menu you can select the preset you want to assign to the currently selected Layer. Beside the already included presets you can also save your custom settings as a new preset. To assign the current filter settings to another Layer, simply click on copy, select the other Layer in the Layer display, open the Filter preset pull-down menu and select paste. In the Slope pull-down menu you can select the filter type you want to use. Effect section In the Effect Section (based on a real-time Impulse Response Processor) you have immediate access to many inspiring rooms, halls and other presets you maybe want to add to your instruments. With the amount parameter you can edit the intensity of the selected effect. Like in the Filter section you can also save any of your custom settings as new preset.

71 MAGIX INDEPENDENCE 3.0 Manual 71 Modules Next to the standard parameters you will notice at first sight, Independence s Modules page contains many worldwide unique and sophisticated features! This page is subdivided into two main parts that allow a fast and intuitive workflow: The Module Editor in the upper part and the Flexible Modifier Editor in the lower part. Depending on the Layer patch you load maybe not all parameters/input fields will be visible from the beginning and it is also possible that your content browser will show more or less Sections or Alternates. For a better understanding of the following explanations please load the Layer Acoustic Guitar Chords from the Independence Core Library. IMPORTANT: ALL parameters of this page beside Polyphony Range and Outputs get fully automated with internal modifiers, internal modules, any kind of external MIDI controllers, or directly with your sequencer software. All details about automation are explained in this chapter and in the chapter Automation.


72 72 CHAPTER 5 Modules The upper select pull-down menu allows you an immediate switch between your available Sections/Alternates of the Layer and your entire Layer. So you easily can edit settings that only affect parts of your Layer or also edit the settings for the complete Layer. The select pull-down menu is designed very clearly and also enables you to select/ deselect the available Sections or Alternates in groups. To select a group, click on the pulldown menu, choose the desired selection and release the mouse button afterwards. IMPORTANT: After you have selected one or multiple Layers, Sections or Alternates, ALL available editing parameters on the Module page will exclusively affect this selection! This kind of subdivision of the editing parameters allows the most accurate and most detailed possibilities for manipulation and editing. For a better overview of the available Sections and Alternates you can open the userfriendly Content Browser in addition. Click on the content button in the upper right corner of the Modules page and the Content Browser will open on the left side and overlap the Layer list and the Layer parameters. Beside the selection of one or multiple Sections/Alternates (press and hold the shift key for multiple selection) for faster editing, this browser also shows additional and important information of each available Section and Alternate, like used key switches with (C#0), used insert effect with i, used modifiers with m, etc.
73 MAGIX INDEPENDENCE 3.0 Manual 73 Module Editor Beside the standard and self-explanatory editing parameters like volume, panorama, pitch and delay you additionally have the possibility to assign a very custom polyphony limitation that will only affect your selected Layer, Sections or Alternates. EXAMPLE: To achieve the so-called hihat effect with a self created drum kit, select your hihat Section in the select pull-down menu or the Content Browser. Enter the value 1 into the input filed key/sel. (keys per selection). Now play the hihat Zones on your keyboard (or another MIDI controller) and you will notice that always when you play a new note the prior one gets interrupted. In addition you can assign the fade-out time for the prior note with the sel. rel. (selection release) parameter. The performance of your instruments can be optimized by setting the maximum allowed voices here. There is always an internal limit - due to the power of your computer - that you can never cross. Nevertheless Independence has NO internal limitation (no limit) of played keys per Layer or played keys in general, but each value underneath this physical limit can be specified as a new limit for the Layers or the key. Should you ever cross this soft limit when playing the instrument, then Independence will terminate the oldest note with the specified release time. You ll be able to hear more notes than you specified in the limit, but only until the old note finishes its release and is switched off. To adjust Independence best possible to the power of your computer you can here set the maximum number of keys per Layer, Section or Alternate (depending on what you selected) incl. the release time that is used to fade out old notes that are switched off by the keys per layer limit. Independence does not only offer a horizontal limit, but also a vertical polyphony limit per key, meaning that you can save even more CPU power. This feature also helps you emulate the behavior of a live played instrument since it removes notes that would sum up in an unrealistic manner. As an example, when playing a Sourdo you won t be able to hear the first beat anymore after playing the fourth one. Independence enables you to adjust exactly this behavior via the limit per key feature - also including the adjustment of the key release time. Independence has NO internal limitation of played keys per Layer or played keys in general.
. Independence can manage an unlimited number of Custom Channels.")
74 74 CHAPTER 5 Modules Output Settings The Output Settings are located on the right side of the first parameter bar. Here you can immediately route your existing selections to so-called Custom Channels (internal virtual channels). Independence can manage an unlimited number of Custom Channels. These channels enables you to subdivide a Layer into multiple internal add-on channels which you then can edit individually with additional modifiers or insert filter and effects. IMPORTANT: You can not only route one or multiple Sections and Alternates of a Layer to a Custom Channel but also the complete Layer! Now select one or multiple Sections or Alternates in the select pull-down menu or the Content Browser and click on the output pull-down menu: This pull-down menu contains a list where you can select the desired Custom Channel for your selection. As soon as you add a new Custom Channel, the Independence Mixer automatically creates the corresponding channel. TIP: You can route your Layer, Sections or Alternates to a certain new or already existing Custom Channel, or even each Layer/Section/Alternate to a separate Custom Channel to execute any further editing much clearer.


75 MAGIX INDEPENDENCE 3.0 Manual 75 The left part below the basic parameters of the Module Editor contains the Key Switch feature, the playing direction feature, the filter section and the skip feature. Key Switch Independence offers key switches to switch between Layers or even only between your Sections and Alternates of a Layer - without affecting the main key switch of the Layer! This way you can switch between multiple e-bass Layers with the Layer key switch, for example, and simultaneously switch inside the Layer between the different playing techniques, like long notes, vibrato notes, tappings, 8th notes, slides, etc. - provided that these playing techniques exist as individual Sections/Alternates. To create a key switch select one Layer or one or multiple Sections or Alternates in the select pull-down menu or the Content Browser. Assign the desired key switch note to your selection afterwards. Next to the standard selection of a note that assigns a key switch we also included a learn function that helps for an easier assignment of the key switch note. Click on the key switch pull-down menu and the following list shows up: Select the learn option and press the desired note on your keyboard (or other MIDI controller) afterwards. Now this note is your key switch note for the selected Layer and it is also shown in the key switch display accordingly.
76 76 CHAPTER 5 Modules Use the bypass button to deactivate the key switch function temporarily. There are three additional Key Switch modes available: default mode: this is the regular Key Switch Mode you already know next note mode: if you press a note of this Key Switch Mode, ONLY ONE note (the next one) will be played with the new Key Switch and after this note the Key Switch you used before gets activated again. hold mode: in this mode you have to press and hold the Key Switch key as long as you want to play the samples of this Key Switch. As soon as you release the key on your keyboard the Key Switch you used before gets activated again. IMPORTANT: The two modes next note and hold can ONLY get used with Sections or Alternates!
 Playing Direction: The playing direction feature lets you assign the playback of a Layer, Section or Alternate depending on the playing direction on your keyboard: Upwards & Downwards: The selected")
77 MAGIX INDEPENDENCE 3.0 Manual 77 Keyboard Options With the Keyboard Options feature you can assign three basic settings for the keyboard behavior. 1.) Playing Direction: The playing direction feature lets you assign the playback of a Layer, Section or Alternate depending on the playing direction on your keyboard: Upwards & Downwards: The selected Section/Alternate always gets played. Upwards: The selected Section/Alternate only gets played, if the next coming note is above the prior one. Downwards: The selected Section/Alternate only gets played, if the next coming note is below the prior one. This feature combined with the Tune Model lets you individually assign which note should create an additional tune and when the note should do it. Additionally you can use playing direction to assign a duplication of notes to your keyboard. 2.) Dynamic Split: This feature was specially developed for live performances with Independence: Layers, Sections and Alternates can get assigned to a specific playing hand (left hand, right hand, left & right hand). Left & right hand means that an instrument is playable normally on the entire keyboard range. This option is the default status for instruments. If you want to play multiple instruments live and simultaneously - but you only have one
.")
78 78 CHAPTER 5 Modules keyboard available - you can assign Layers/Sections/Alternates specifically to one hand and thus split the keyboard virtually - in this case the note C3 is the so-called split key by default (of course you can also change this split key). Dynamic Split now enables you to play the instruments even beyond this split key - if your perfomance may exceed the split key: The split key moves dynamically and automatically adapted to your live performance. EXAMPLE: You assign the option left hand to an electric bass instrument and the option right hand to an acoustic guitar. Split Key is set to C3. With a standard keyboard split now all bass notes beyond C3 and all guitar notes below C3 would change to the other instrument automatically. With Dynamic Split you can now even play the guitar below C3, for example, since the keyboards moves virtually downwards with your performance. 3.) Repetition Note: in this mode the last played note gets repeated automatically. This is very useful for basses, for example, because the performance of 16th notes then is a lot easier.

79 MAGIX INDEPENDENCE 3.0 Manual 79 Filters Meanwhile filters is a very common item and their function needn t get explained more detailed. Nevertheless the Independence filters has been extended by some additional features. To activate the filters please click on the bypass button to the left of the filter headline and click on the pull-down menu to select a filter with its properties: Among the pristine sound you can use the spot inside the 2D panel to edit both parameters, frequency cutoff and resonance, simultaneously. This is very useful in practice but of course you can also edit both parameters individually in their input fields. The special feature of this filter section is the absolute function. Here an example what it does: If you activate filters for an entire Layer patch, the settings will always affect all included Sections and Alternates. Additionally to these general settings you can select one or multiple Sections or Alternates and assign custom frequency cutoff and resonance values exclusively to this selection. Independence will then add these individual values to the general values of the entire Layer and recalculate new values internally (relative). If you, on the other hand, want to separate your current selection from the general Layer filter settings and assign individual filter types and settings to your selected Sections or Alternates, click the abs. button. Now the general Layer filter setting get ignored for your entire selection. EXAMPLE: A Layer patch with 2 Sections is selected and the filter section is activated. The current resonance value is 40%. You now select the first Section and set the resonance value for this Section to 75%. As the abs. button is not active, the general Layer filter settings get included and the 40% now get calculated as a 100% range. Thus the recalculated resonance value for the first Section will be 70% and for the rest of the Layer the value will be 40%. When you activate the abs. button for the first Section, the general Layer filter settings get ignored and the resonance value for the first Section now will be 75%, for the rest of the Layer it will be 40%. To deactivate the filter section please use the bypass button to the left of the filter headline. If you want to assign a dynamic filter performance to your selection, whether by external
80 80 CHAPTER 5 Modules controllers like velocity, modwheel, MIDI/host automation, etc., or by internal modules like Free Envelope, Step Modulator, AHDSR Curve, etc., please refer to Flexible Modifiers. Skip Skip is a very simple but also a very useful feature. The general play back start position for each sample always gets assigned in the Audio Editor. Additionally you can use skip to move the start position of one or multiple Sections or Alternates (and all included Zones) with the editing of only one parameter. We extended this parameter with two decimal places for the first 100 milliseconds which allows you to edit the start position frame precisely even for a sample rate of 96 khz. Use the skip feature to give your performances a more natural feel. A group of live musicians will rarely hit a note exactly at the same time, for example. Skip lets you adjust this delay between the instrument and allows you to simulate slight imperfections of live performances. To deactivate the skip feature please use the bypass button to the left of the skip headline. IMPORTANT: Like the filter section also the skip parameters can be used with absolute or relative settings. Please refer to the explanations in the f ilter section. Volume AHDSR The right part below the basic parameters of the Module Editor contains the Volume AHDSR feature (Volume Attack, Hold, Decay, Sustain, Release Curve). When a mechanical musical instrument produces sound, the relative volume of the sound produced changes over time. The way that this varies is different from instrument to instrument. For instance, a pipe organ, when a key is pressed, plays a note at constant volume, the sound ending virtually as soon as the key is released. The sound of a guitar, by contrast, is loudest immediately after it is played, and fades with time. Other instruments have their own characteristic volume patterns. The AHDSR envelope is a way to specify the appropriate behavior for a voice created by the synthesizer. Although usually applied to volume, it is also common to control other sound elements such as filter frequencies or oscillator pitches via AHDSR envelope.

81 MAGIX INDEPENDENCE 3.0 Manual 81 The AHDSR envelope is specified using four parameters: Attack: How quickly the sound reaches full volume after the sound is activated (the key is pressed). For most mechanical instruments, this period is virtually instantaneous. Hold: How long the envelope stays at full volume before entering the decay phase. Decay: How quickly the sound reduces in volume after the initial peak and hold time. Sustain: The constant volume that the sound takes after decay until the note is released. Note that this parameter specifies a volume level rather than a time period. Release: How quickly the sound fades after the end of the note (the key is released). Often, this time is very short. An example where the release is longer might be a percussion instrument like a glockenspiel, or a piano with the sustain pedal pressed. With the VOL. AHDSR curve you can adjust the time flow and simultaneously the volume flow of your Layer, Section or Alternate. Generally the AHDSR curve is used in retrigger mode. This means that for each newlyplayed Zone the curve always starts from the beginning again. You can switch off this mode at any time with a click on the retr. button in the upper right corner. Any time related parameters also contain additional curve (in %) or volume settings (in db) to enable an even finer adjustment. Use the v. (vertical) and h. (horizontal) zoom options to customize the view of the curve. Beside these input fields you can also frame the part of the curve you want to zoom in with your mouse. To move an already horizontally zoomed-in view, press and hold the shift key, click with the mouse on the curve and drag it to the left or to the right. Click the fit button to return to the general view.


82 82 CHAPTER 5 Modules IMPORTANT: Independence s Volume AHDSR allows even positive volume values amounting to additional 12dB for the Hold Level and Sustain Level parameters. Please use these settings very carefully since this can possibly cause unwanted overmodulation of your Layers, Sections or Alternates! Positive volume values get displayed in red immediately. IMPORTANT: Switched off, the retrigger function always only affects audio files,that are not part of any Section or Alternate but only of a Layer. If you want to use this feature for Sections or Alternates, you have to use the AHDSR envelope of the Internal Modifiers. You can save all your parameter settings as individual preset or also assign them by copy & paste to other Layers, Sections or Alternates. To save your settings click on the presets pull-down menu and the select the save as option. A dialog will show up where you can enter your desired name for your preset. If you click on the presets pull-down menu next time, your preset will show up in the list.
83 MAGIX INDEPENDENCE 3.0 Manual 83 Beside the save as option you can also assign your current VOL. AHDSR settings to other Layers, Sections or Alternates without having to save your changes before. To copy your current settings click on the presets pull-down menu and select the copy option. Now select your Layer, Section or Alternate you want to transfer these settings, click on the presets pull-down menu again and select the paste option afterwards. You will notice that ALL parameter settings of the current VOL. AHDSR have changed to the values of your prior curve. To deactivate the VOL. AHDSR please use the bypass button in the upper right corner. IMPORTANT: Like the filter section also the VOL. AHDSR curve can be used with absolute or relative settings. Please refer to the explanations in the filter section. TIP: You can also use Independence s Flexible Modifiers to assign full-dynamic modification to your Filter, Volume AHDSR and Skip settings.

84 84 CHAPTER 5 Modules Flexible Modifiers With Independence s Flexible Modifiers and their modules you can assign additional and specific modifications to your Layers, Sections and Alternates during your playing. These modifications can get generated well directed or also at random. The Flexible Modifier Editor is a really powerful and creative part of Independence! EXAMPLE: By means of a LFO (internal modulator) as source and pitch as destination you can create a vibrato. Simultaneously you can assign the intensity of the modification, with the modwheel controller as source and the LFO intensity as destination, for example. With this combination you will create a typical synth vibrato. If you, however, select volume instead of pitch as destination for the first modifier, you will create a typical tremolo. Independence offers an unlimited number of possible combinations of all types and in any order. The concurrent access to the same parameter guarantees the total flexibility in all respects. Independence s Modifiers are subdivided into two groups: External Sources: Incoming MIDI commands like velocity, pitchbend, modwheel or any other MIDI CC command from your keyboard or from your sequencer application via MIDI and host automation. Internal Sources: These are the Independence internal modules like LFO, Glide, Step Modulator, AHDSR Curve, Free Envelope, Step Sequencer, Arranger, Arpeggiator and Time Modulator.


85 MAGIX INDEPENDENCE 3.0 Manual 85 Let s take a closer look at all internal and external Modifiers: Click on the modifier pull-down menu. All these sources are available all along for onetime or multiple use. As soon as you select one of the Modifiers - mod wheel (ctrl. #1), for example - a small box gets added the Modifier window below the pull-down menu. With this first step you ve selected your source. To assign the destination please click on the appropriate pull-down menu and select volume, for example.
86 86 CHAPTER 5 Modules If you now play the instrument and simultaneously move the mod wheel of your keyboard up or down you will accordingly change the volume of the instrument in real-time. Use the two parameters below the source and destination pull-down menus to assign the range for the modulation. Additionally you can even adjust the character of the curve for this modulation and thus the progression of the fading between the minimum and maximum values of the defined range. To open and edit the curve settings of the modifier, click the curve button and adjust the parameters accordingly. Beside the general curve character you can additonally also draw your custom controller curve for external modifiers. This enables you to create custom and fexible switching/ blending between instruments using external controllers. For easier drawing you can also assign the number of steps (controler values) and even copy, paste or save your settings as presets. Click the controller button to switch to the controller matrix. Use the x-blend parameter for very custom curve characters. Here are some examples how the controller can be used. SHORTCUT: Press and hold the ctrl key to draw your steps with a red artificial line. TIP: You can use any external MIDI controller (breath controller, mod wheel, etc.) with the controller feature to switch/blend between multiple Layers, Section and Alternates. So you can blend between two or more different playing techniques like long notes, vibrato, tremolo, etc simply with your MIDI controller.

87 MAGIX INDEPENDENCE 3.0 Manual 87 IMPORTANT: Some Flexible Modifiers contain additional internal modules, like LFO, Free Envelope, Step Modulator, etc. These modules get displayed in the right part of the Flexible Modifier Editor: Primarily you will get a list of all basic destinations for your Flexible Modifiers. As soon as you add a Flexible Modifier that contains an additional internal module, the list of available destinations automatically gets extended by this module. Beside the internal and external sources you can also select many parameters of insert filters and effects as destinations - available options are shown in the menu automatically. Using this options you can change the frequency parameter value (destination) of a 6 band equalizer with the modwheel (source), for example. Also possible is the assignment of changes of the dry/wet values of an Origami Impulse Response Processor (destination) to the run of a Step Modulator (source). In this case the dry/wet values will change according to the created Stepmodulator run. TIP: If you use internal sources (LFO, Stepmodulator, Free Envelope, etc.) with this function, you have to pay attention to activate or deactivate the retrigger parameter of the internal sources. This parameter will define if the run of the sequence will start from the beginning always you press a new key (retrigger on ) or if the run of the sequence continues (retrigger off ).

88 88 CHAPTER 5 Modules

89 MAGIX INDEPENDENCE 3.0 Manual 89 Beside the available Modifiers, the modifier pull-down menu also contains a preset menu. Presets will always replace all currently loaded modifiers! Use append if you want to add presets. Use copy/paste and the save options to create your custom presets. TIP: If you regularly use an external MIDI controller with the Flexible Modifiers, you can save all your settings as Modifier presets. Thus you do not have to create your basic setup again and again anew. External Sources Independence contains the following External Sources: Fix Value The only entirely static Modifier of Independence that routes the incoming MIDI note-on commands from your controller to the selected destination. Velocity The value of the selected Flexible Modifier destination is depending on the velocity value of the incoming MIDI command.
90 90 CHAPTER 5 Modules Release Velocity Only supported by a few MIDI controllers, mostly keyboards. The value of the selected Flexible Modifier destination is depending on how fast you released the key of your keyboard. Random Any incoming note-on MIDI command generates a random value within the assigned Flexible Modifier destination range. Pitchbend The value of the selected Flexible Modifier destination is depending on the position of the pitchbend controller of your keyboard (mostly a wheel or a joystick). Modwheel The value of the selected Flexible Modifier destination is depending on the position of the modwheel controller of your keyboard (mostly a wheel or a joystick). Mono Aftertouch (channel pressure) The value of the selected Flexible Modifier destination is generated by pressing a key that has already been pressed. Poly Aftertouch (key pressure) It works just like Mono Aftertouch, however, for each key separately. MIDI Automation Here can freely select from 128 MIDI CCs (Continuous Controllers) and assign them to a Flexible Modifier destination. The L button activates the MIDI learn function. If you click on this button and then move an arbitrary controller, Independence will take the CC number and the current position of the value automatically. Host Automation Enables the direct automation of Flexible Modifier destinations by your sequencer software. IMPORTANT: The MIDI and host automation in this area only affects Independence s Flexible Modifiers. Please read the chapter Automation for the powerful mixer and insert filter and effect automation features of Independence. Custom Control Enables the direct assignment of any parameter of the Flexible Modifiers to the knobs and buttons of the Custom Remote Control area on the Quick Edit page. Key Position (keyboard tracking) The value of the selected Flexible Modifier destination is depending on the position of the key within the entire range of your keyboard (or other MIDI controller).
.")
91 MAGIX INDEPENDENCE 3.0 Manual 91 Key Distance The value of the selected Flexible Modifier destination is depending on the distance between the prior and upcoming key of your keyboard (or other MIDI controller). Key Up It works just like Key Distance, however, only for keys within the playing direction upwards. Key Down It works just like Key Distance, however, only for keys within the playing direction downwards. Internal Sources Basically each internal Flexible Modifier of Independence contains its own preset pulldown menu, so beside the overall presets for your Flexible Modifiers you can additionally manage the presets for each single Internal Modifier individually. Also these preset pulldown menus contain the copy/paste option for the immediate transfer of your settings to other internal Flexible Modifiers without having to save them before. Additionally you can minimize the display of each internal Modifier simply with a click on the open/close triangle in the upper left corner of each Modifier. Even in closed mode you still have full control over the basic parameters of the internal Modifiers. Depending on your setup maybe the list of used Internal Sources becomes quite long (example A). For a better workflow - especially if you work with a large number of Internal Sources - you can use the solo view button. If activated only the currently selected Internal Source will be opened and all others get minimzed automatically (example B). Example A: solo view button not active.
 In addition to the main oscillator(s) of a synthesizer, which is responsible for the creation of the audio signal itself, an LFO is an additional oscillator that")
92 92 CHAPTER 5 Modules Example B: solo view button active. LFO (Low Frequency Oscillator) In addition to the main oscillator(s) of a synthesizer, which is responsible for the creation of the audio signal itself, an LFO is an additional oscillator that operates at a comparatively lower frequency (hence its name), that modulates the audio signal, thus causing a difference to be heard in the signal without the actual introduction of another sound source. Low Frequency Oscillation as a concept was first introduced in the modular synths of the 1960s and 70s often its effect was accidental ; such were the extensive capabilities of a modular synth operator to patch the instrument to create a vast array of different configurations. They have since appeared in some form on almost every synthesizer, and more recently other electronic instruments such as samplers have included them, to augment their capacity for sound alteration. The principle behind low frequency oscillation as a means of modulating a signal, as opposed to adding to it, is that its frequency is lower than the audible frequency of the human ear (20Hz 20kHz) i.e., the frequency is low enough so that it isn t heard as a tone. A low frequency oscillator can be routed to control a variety of different parameters, for example the frequency of the audio oscillator, the phase, panning, filter frequency, or the velocity of the synthesizer s output. For instance, when routed to pitch, an LFO serves to simulate vibrato, and when an LFO modulates amplitude (volume), it creates tremolo.
93 MAGIX INDEPENDENCE 3.0 Manual 93 On most synthesizers and sound modules, there are several different ways in which the user can alter the effect produced by the LFO. These may include a variety of different waveforms, a rate control, routing options (as described above), a tempo sync feature, and an option to control the amount by which the LFO will modulate the audio signal. Electronic musicians use LFO for a variety of applications, ranging from adding simple vibrato or tremolo to a melody, to more complex applications such as triggering gate envelopes. Differences between LFO rates also account for a number of commonly heard effects in modern music - for instance, a very low rate can be used to modulate filter frequency, thereby providing the characteristic gradual sensation of the sound becoming clearer or closer to the listener. Alternatively, a high rate can be used for bizarre rippling sound effects (indeed, another important use of LFO would be for various sound effects used in films). However, these effects are difficult to describe, instead they are more understandable simply when heard. You can choose between the following waveforms: sine, triangle, square, saw and random. The retr. (retrigger) button lets you select if you want to start the LFO progression always from the beginning for each newly played note. The LFO parameters in detail: Frequency: Here you can assign the number of waveform repetitions per second and thus the tempo of the LFO in hertz Hz = one complete waveform repetition per second. Sync: Use this option to synchronize the tempo of your LFO to your host application or to Independence internally. If activated, the frequency input field will change into a pull-down menu where you can specifically select the kind of synchronization. Delay: Here you can assign a delay to your LFO. Combine this option with an additional AHDSR curve to create a fade-in of your LFO.


94 94 CHAPTER 5 Modules AHDSR Envelope This internal Flexible Modifier lets you adjust a specific modulation envelope for the selected destination. All parameters and options are the same as for the basic AHDSR envelope in the Module Editor. Free Envelope Unipolar / Bipolar Free Envelope enables you to create the entire progression of an upcoming modulation in advance. In contrast to the AHDSR envelope, that is editable with a maximum of 10 parameters, Free Envelope allows an unlimited number of freely assignable markers. IMPORTANT: A Free Envelope marker also always contains a level and a position value. Additionally you can use the curve parameter to adjust the character how the marker should be reached. Add markers: To add a marker to your Free Envelope, simply click on the position in the editing display where you want to add the marker.
95 MAGIX INDEPENDENCE 3.0 Manual 95 Delete markers: To delete an existing marker, click on the marker shortly! (Otherwise you will select the marker). Edit/Move markers: Basically you can edit the level and curve parameters by entering values into the input fields or using your mouse (click and hold the value and drag up or down) as usual. In addition you can edit and move the markers with simply with your mouse. Therefore click and hold the marker you want to edit and drag it to a new position. The level and position parameters will change accordingly. If you want to move multiple markers simultaneously, press and hold the alt key before you select a marker. Now also all markers to the right of the selected marker get selected (red color) and you can move them to the new position. To keep the assigned distance between two markers you want to move, simply click and hold the green connecting line between the 2 markers (the color changes into red). If you then drag the two selected markers to a new position you will notice, that their (time) distance will not change. TIP: For the fine-tuning of markers you can also press and hold the shift key before you select a marker. If you now move the marker any changes will be made decimal places accurately. You can generally assign if the Free Envelope gets display unipolar or bipolar. The only difference is, that in bipolar mode also negative values of markers get displayed, what makes you work much easier if the assigned range for your Flexible Modifier destination contains negative and positive values. EXAMPLE: Your Flexible Modifier destination is pitch and the assigned range is from 0 to +10 semitones. Thus the unipolar Free Envelope is quite enough, since the level value 0% corresponds to 0 semitones and the value 100% corresponds to +10 semitones. If you now assign the pitch range from -10 to +10 and still work in the unipolar mode, you have to keep in mind that now the level value 0% means -10 semitones, the level value 50% means 0 semitones and the level value 100% means +10 semitones. This makes it quite difficult since you always have to think about the value range. If you switch to the bipolar mode, the Free Envelope display will also include negative values. In our example now the level value 0% means 0 semitones, -100% means -10 semitones and 100% means +10 semitones.

96 96 CHAPTER 5 Modules Use the sync button to synchronize the Free Envelope to your host application or to Independence internally. If activated, the upper timeline of the editing display and the position value will change accordingly. The minimal valid value for the sync option is 1/128. The retr. (retrigger) button lets you select if you want to start the Free Envelope progression always from the beginning for each newly played note. The loop button activates the permanent loop within the two fixed loop markers, visible by the two horizontal dashed lines. To zoom in/out the current view of your Free Envelope, simply enter the wanted zoom factor in the input field or change the value with your mouse. Use the scroll bar to scroll to the wanted position. To return to the basic view of your entire Free Envelope, click the fit button. TIP: Beside the scroll bar you can also use the blue timeline to scroll pixel accurately to the wanted position of your Free Envelope. Simply click and hold any position in the timeline with your mouse and drag to the left or right. Step Modulator Unipolar / Bipolar The Step Modulator enables you to create a so-called stepped modulation. In practice this internal Flexible Modifiers is commonly used with pitch or cutoff filter as destination, in order to achieve typically hashed progressions. Independence s Step Modulator is extended to 128 steps to enable an even more accurate setup. Additionally you can also switch between the unipolar and bipolar view of your settings (see chapter Free Envelope ). To draw or edit the progression, simply click (and hold) on the respective bar in the Step Modulator editing display. Now can adjust the level of the bar by dragging it up or down. To edit multiple bars simultaneously, keep the mouse button pressed and move your mouse to the left or right. SHORTCUT: Press and hold the ctrl key to draw your steps with a red artificial line.
97 MAGIX INDEPENDENCE 3.0 Manual 97 IMPORTANT: For an easier adjustment of your progression you can edit the parameter settings of the Step Modulator even during the play-back of the sequence in real-time. Let s take a closer look to the parameters of the Step Modulator: loop pull-down menu: Here you can select between three different loop modes: loop: continual repeat of your sequence; always from the beginning. loop FB (loop forward/backward): continual repeat of your sequence; however, in each case from the beginning to the end and then reverse. no loop: one-time play-back of your sequence to the end. Use the sync button to synchronize the Step Modulator to your host application or to Independence internally. If activated, the frequency input field will change into a pull-down menu where you can select the different sync options. Additionally the input quant. button for the MIDI input quantization will appear bottom left in the Step Modulator window. Use the retr. button, the presets pull-down menu and the bipolar button as already explained in this chapter. Steps: Use the steps input field to adjust the number of used steps. The maximum number of available steps is 128. Frequency: Here you can assign the tempo in hertz Hz = one complete Step Modulator sequence per second. X-fade: Here you can assign a smooth transition for two successive steps. TIP: If you enter quite large values for the x-fade parameter you will get an extreme smoothness between the steps in order to achieve very nice and interesting sequence. Delay: Here you can assign a delay to your Step Modulator. Combine this option with an additional AHDSR curve to create a fade-in of your Step Modulator. Shuffle: Self-explanatory ;-)
98 98 CHAPTER 5 Modules Glide (Portamento) In current usage, portamento is making a continuous slide up or down in frequency from a previous note, rather than a discrete change from one note to the next. This is most commonly encountered on string instruments, such as the guitar or violin, which can produce a continuous range of frequencies rather than being limited to the chromatic or diatonic scale, and impossible on a fixed-pitch instrument like the piano. Portamento can often be generated automatically on synthesizers, where a parameter setting can be used to control the speed at which an oscillator moves to a new pitch. Often this parameter is called glide. Alternatively, portamento effects can be produced manually by a skilled player by the use of the pitch wheel at the side of most synthesizer keyboards. Synth lines with lots of portamento defined West Coast G funk of the mid 1990s, and continue to be a distinctive part of electronic music today. In MIDI sequencing, portamento can be generated by using a channel message that creates a sliding effect by smoothly changing pitch from the last note played to the pitch of the currently playing note. Additionally Independence allows to use also other destinations beside pitch what can be very useful and also sounds quite interesting. The available glide parameters of Independence are: Legato button: If activated, the glide function is only used if two or more played notes overlap each other. Time: Assigns the time for the change from one note to the next. Chromatic button: If you activate this button, the distance between the played note to the next gets calculated and the time of your glide gets extended accordingly. EXAMPLE: Your current time for the glide is set to 100ms. If you now activate the chromatic button and first play C3 and afterwards D#3, the new calculated time for the glide will be 300ms. Key Limit: Here you can limit the chromatic parameter and assign the maximum considered distance range for two successively played notes. If you set this value to 5 semitones, for example, the recalculated time for the glide will never be larger than these 5 semitones, even if the effective distance between the two played notes may be larger than 5 semitones. Curve: Self-explanatory ;-)
, the Step Sequencer only uses the destination note on to achieve typically hashed progressions.")
99 MAGIX INDEPENDENCE 3.0 Manual 99 Step Sequencer Like the Step Modulator also the Step Sequencer enables you to create a so-called stepped sequences of your instruments. Unlike the Step Modulator (which is commonly used with pitch or cutoff filter as destination), the Step Sequencer only uses the destination note on to achieve typically hashed progressions. Independence s Step Sequencer is extended to 64 steps to enable an even more accurate setup. To draw or edit the progression, simply click (and hold) on the respective bar in the Step Sequencer editing display. Now can adjust the level of the bar by dragging it up or down. To edit multiple bars simultaneously, keep the mouse button pressed and move your mouse to the left or right. SHORTCUTS: Press and hold the shift key (Mac and Windows XP) to edit the bars in smaller, finer steps. TIP: The Step Sequencer uses the entire range of your keyboard. This enables you to create very nice sequences also for strings, for example. As Independence allows an unlimited number of Step Sequencers per Layer you can also use the Step Sequencer to create very custom drum sequences! You can add one Step Sequencer for each single key of your keyboard (one key per drum instrument) and thus create a typical drum machine. Let s take a closer look to the parameters of the Step Sequencer: sustain button: If activated, the steps get played back until the next step is reached. midi thru button: Use this button to route the MIDI notes generated by the Step Sequencer to the MIDI output or to your sequencer software. You can use this feature to record the MIDI notes in your sequencer software or to trigger the notes to another hardware or software instrument.
100 100 CHAPTER 5 Modules loop pull-down menu: Here you can select between two different loop modes: loop: continual repeat of your sequence; always from the beginning. no loop: one-time play-back of your sequence to the end. hold button: Normally a MIDI file gets played back as long as you press and hold the assigned key of your keyboard. If you activate the hold button you only have to press the key once to start the playback. If you press the key again the playback will stop. Grid: The background matrix to adjust the view of the Step Sequencer. time pull-down menu: Here you can select the playback speed of your sequence: 1/2 x speed: playback in half speed of the original sequence (host tempo or Independence internal tempo). 1 x speed: playback in original sequence tempo (host tempo or Independence internal tempo). 2 x speed: playback in double speed of the original sequence tempo (host tempo or Independence internal tempo). Steps: Use the steps input field to adjust the number of used steps. The maximum number of available steps is 64. rate pull-down menu: Here you can select the length of your sequence in quarter steps. If you select 1, for example, the length of your sequence is one quarter. input quant. button: Automatic adjustment of the start of your sequence to the tempo of your host application. delay pull-down menu: Here you can add a delay to the start point of the sequence playback. Shuffle: Self-explanatory ;-)

101 MAGIX INDEPENDENCE 3.0 Manual 101 Arpeggiator The Arpeggiator allows you to play alternating notes or chords automatically based on input, most often from a MIDI controller. This creates an electronically created arpeggio. Arpeggiators range from simple patterns to complex and user controllable patterns. These patterns are particularly popular in dance music such as techno, but actually date back to the earliest of analog synthesizers of the 70 s and 80 s. The Independence Arpeggiator is a lot of fun to play with and can inspire some truly original ideas, not to mention the ability to enable musicians of all skill levels to play some complex patterns that may even be impossible to accomplish without the aid of arpeggiation. The Independence Arpeggiator also allows you to import your own MIDI files using the midi file pull-down menu. The default root key of imported MIDI files is C3. You can also drag MIDI files directly from your desktop or other folders into the Arpeggiator display. Let s take a closer look to the parameters of the Arpeggiator: midi thru button: Use this button to route the MIDI notes generated by the Arpeggiator to the MIDI output or to your sequencer software. You can use this feature to record the MIDI notes in your sequencer software or to trigger the notes to another hardware or software instrument. loop pull-down menu: Here you can select between two different loop modes: loop: continual repeat of your sequence; always from the beginning. no loop: one-time play-back of your sequence to the end.
102 102 CHAPTER 5 Modules dynamic : If deactivated, the playback velocity of the Arpeggiator will always be the maximum of 127. If you want to use other static velocity values just edit the vel. offset parameter accordingly. Activate the dynamic button and the Arpeggiator playback will depend on the velocity of your keyboard. vel. offset : Use this parameter for custom velocity values. Works in the velocity range from -127 to octave : Here you can enter the number of octaves for your Arpeggiator sequence. mode pull-down menu: Here you can select between 15 different playback directions of your Arpeggiator, like up, down, up & down, etc. input quant. button: Automatic adjustment of the start of your Arpeggiator sequence to the tempo of your host application. time pull-down menu: Here you can select the playback speed of your Arpeggiator sequence: 1/4 x speed: playback in one-quarter speed of the original Arpeggiator sequence (host tempo or Independence internal tempo). 1/2 x speed: playback in half speed of the original Arpeggiator sequence (host tempo or Independence internal tempo). 1 x speed: playback in original Arpeggiator sequence tempo (host tempo or Independence internal tempo). 2 x speed: playback in double speed of the original Arpeggiator sequence tempo (host tempo or Independence internal tempo). 4 x speed: playback in quadruplicate speed of the original Arpeggiator sequence tempo (host tempo or Independence internal tempo). delay pull-down menu: Here you can add a delay to the start point of the Arpeggiator sequence playback. Shuffle: Self-explanatory ;-) IMPORTANT: Maybe you will need a gate parameter for your Arpeggiator. As the Independence AHDSR envelope offers much more options than a simple gate parameter we recommend you to use this feature for more individual settings.
 into the Arranger and assign these MIDI files to chords.")
103 MAGIX INDEPENDENCE 3.0 Manual 103 Arranger The Arranger is a unique and inspiring MIDI file player with automatic chord recognition. This means that you can import one or multiple MIDI files (let s say a little strings arrangement) into the Arranger and assign these MIDI files to chords. If you now play the chords on your keyboard the MIDI files get started and the Arranger will transpose the MIDI files automatically to the correct position - depending on the position of the chord and the octave. Check out the available Arranger Layers in the folder Inspiring Instruments/Arranger and you will see how this MIDI player can be used. Beside the basic window the Arranger has an additional editor window that can be opened with the edit button: You will only need the editor if you create your own arrangements or if you want to edit parameters of already existing presets. The Arranger can work in four different modes. Let s get started with an easy example: In easy mode you only need two MIDI files for your arrangement - one for the major chords and one for the minor chords. Please select easy in the mode pull-down menu...


104 104 CHAPTER 5 Modules now select the chord... and finally import your MIDI file (in our example the MIDI file for the minor chords).
 option to import multiple MIDI files simultaneously.")
105 MAGIX INDEPENDENCE 3.0 Manual 105 You can also import MIDI files via drag n drop directly from your desktop or any other folder. Please repeat this process and assign another MIDI file for the major chord. You can use the auto import MIDI file(s) option to import multiple MIDI files simultaneously. Important for this process is the naming structure of the MIDI files that you want to import. Independence looks for an X and a Chord after your name, so compatible MIDI files can looke like this: myfile X C maj.mid or myfile X D# min.mid. If you now play chords on your keyboard you will notice that different MIDI files get played for minor chords than for major chords. Additionally all major and minor chords you will play automatically get transposed correctly, so you only have to arrange two MIDI chords for your entire performance! You now may think that major and minor is not enough - of course there are a lot more chords you can play... For this reason there are three other modes available, so you can create more custom arrangements: Beside MIDI files for major and minor chords, the medium mode lets you assign MIDI files also for all other chords:

106 106 CHAPTER 5 Modules IMPORTANT: The auto chord harmonizer is a very sophisticated algorithm that allows you even in the easy and medium mode the usage of the key pulldown menu! Even if you only have very few MIDI files for your chords, you can activate the auto chord harmonizer which will automatically create and adjust all other chords and scales in real-time - corresponding to the selected key. If even this assignment is not enough for you, you can select the complex mode and assign MIDI files to each single note individually:


107 MAGIX INDEPENDENCE 3.0 Manual 107 Depending on your arrangement you maybe have a lot of MIDI files to assign. Use the key pull-down menu to change the root key of all MIDI files in one step. Use the Arranger in single mode if you only want to assign MIDI files to each note separately. In this mode the automatic chord regognition is deactivated, so the Arranger works like a simple MIDI file player for grooves or lines.


108 108 CHAPTER 5 Modules The Arranger contains a separate Key Switch option that allows you to use multiple Arranger banks: Please choose the option create new bank and then assign the Key Switch note you want to use. This way each Key Switch note can contain different MIDI files - like 20 Arrangers in one.

109 MAGIX INDEPENDENCE 3.0 Manual 109 The Arranger parameters in detail: follow button: If you play a chord, the corresponding MIDI file always gets started from the beginning. If you want to start the MIDI file from the position of the previously played chord, simply activate this feature. dynamic button: All MIDI files normally get played with their original velocity settings. Use this button if you want to play the MIDI files depending on the velocity you play with your keyboard. midi thru button: Activate this button if you want to route your MIDI arrangement to another generator (sampler or synthesizer) or to record the arrangement in your host application. presets pull-down menu: Here you can load and save your Arranger presets. input quant. (Input Quantization) pull-down menu: off: MIDI file playback starts immediately. live mode 1: MIDI file playback starts immediately but note-off signals get ignored. This mode is recommended for strings or pad arrangements. live mode 2: MIDI file playback starts immediately but note-off signals have a slight delay. This mode is recommended for arrangements with fast switches between different chords. next beat: MIDI file playback gets synchronized with your host tempo (using Independence as plug-in) or the Independence internal tempo (in standalone mode). This means that the MIDI file playback always starts accurately to the next beat. next count: MIDI file playback gets synchronized with your host tempo or the Independence internal tempo. This means that the MIDI file playback always starts accurately to the next count. next bar: MIDI file playback gets synchronized with your host tempo or the Independence internal tempo. This means that the MIDI file playback always starts accurately to the next bar.
110 110 CHAPTER 5 Modules previous bar: MIDI file playback gets synchronized with your host tempo or the Independence internal tempo. This means that the MIDI file playback always starts immediately. The start position depends on the current playback position of the previous bar. edit button: Opens the Arranger editor window. hold button: Normally a MIDI file gets played back as long as you press and hold the assigned chord on your keyboard. If you activate the hold button you only have to play the chord once to start the playback. If you play new chords, hold is still active, so you do not have to hold the chord. Only if you play the same chord two times successively the playback will stop. vel. offset (velocity offset): Use this parameter to change the velocity of the entire MIDI file - and thus the dynamic. If the settings of your MIDI file do not fit the dynamic you need, simply increase/decrease the velocity value. If you enter the value -20 vel, for example, the entire dynamic of the MIDI file and the related samples gets affected and played back in reduced velocity (original values minus 20). scale vel. (scale velocity): This option lets you scale the entire dynamic range of the MIDI file (velocity 0-127) into a lower range proportionally. You can also use inverted values for scale velocity to create very nice effect.

111 MAGIX INDEPENDENCE 3.0 Manual 111 note filter pull-down menu: This option lets you filter unwanted notes of the MIDI file and so change the complexity. The value you select in the pull-down menu is the upper limit. All notes below this value get filtered. shuffle : Self-explanatory ;-) duration : This parameter affects the duration of the notes inside the MIDI files (NOT the MIDI file duration!). Values below 100% will shorten the notes. randomizers time, velocity, note : Independence comes with three powerful humanize options to give your MIDI files an incredibly realistic human touch.
.")
112 112 CHAPTER 5 Modules note offset : Use this parameter to transpose the entire MIDI file in semitones. play range : Only velocities inside this range get played. speed pull-down menu: Here you can select the playback speed of your MIDI file: 1/4 x speed: playback in 1/4 speed of the original MIDI file tempo (host tempo or Independence internal tempo). 1/2 x speed: playback in 1/2 speed of the original MIDI file tempo (host tempo or Independence internal tempo). 1 x speed: playback in original MIDI file tempo (host tempo or Independence internal tempo). 2 x speed: playback in double speed of the original MIDI file tempo (host tempo or Independence internal tempo). 4 x speed: playback in quadruple speed of the original MIDI file tempo (host tempo or Independence internal tempo). transpose button: Here you can activate the automatic transposition of the MIDI files - only available in expert mode. auto select button: If you activate this feature, any chord you play on your keyboard will automatically get selected in the select chord pull-down menu. This is very useful for creating your custom arrangements. IMPORTANT: If you assign MIDI files for the inversions of chords, please keep in mind that you have to use MIDI files for the inversions that are 1 octave below the original chord.
113 MAGIX INDEPENDENCE 3.0 Manual 113 Time Modulator The Time Modulator is a very useful modifier for the time-related customization of the noteon and note-off behaviour of your instruments. Here an example for a better understanding: If you perform a conga set with the keyboard you will recognize that there are also hand noises FX beside the instrument samples. If you press a key an your keyboard a note-on signal gets send and the instrument sound gets played. As soon as you release the key, a note-off signal gets send and the hand noise FX sound gets played. In practice the permanent repeat of this effect can sometimes be unwanted - if you press and hold a key for a long time, for example. In this case there is a natural release of the sound sample and the note-off hand noise FX will not sound like the behaviour of a real, live played instrument. The Independence Time Modulator is the solution for this problem: You can specify a time range - depending on your instrument - in which note-off signals get played. Any note-off signal outside this range will not be played. In detail: Note-off signals that are sent before the entered minimum value get played normally. Note off signals that are sent between the entered minimum and maximum value get played depending on the modifier you assigned to the Time Modulator - from 100% to 0%. Note-off signals that are sent above the entered maximum value do not get played. For the conga example the Time Modulator setup could look like this: Select the Time Modulator and assign the destination note-off. For very shortly played notes we always want to get the hand noise FX when the key is released, so we set the minimum time to 300 milliseconds. This means that if you release the key during 300 milliseconds, the hand noise FX sounds get played. A naturally sounding maximum value for the congas is 2 seconds. This means that if you release a key between 300 milliseconds and 2 seconds, the hand noise FX sounds get played with an decreasing velocity - from 100% to 0% of the velocity you played on the keyboard. This simulates a naturally sounding hand noise effect depending on the tempo of your perfomance. Any note-off signals above 2 seconds do not get played. TIP: To get even more authenticity and an incredibly real live feeling for your conga performance, you can add the modifier random and select volume as destination.
114 114 CHAPTER 5 Modules The Time Modulator offers a lot more possibilities that just the management of your noteoff behaviour. Using the available modes of the Time Modulator and assigning different destinations you can create very custom and experimental sounding effects. Just check out one of the following setups: Time Modulator mode poly note-on to note on with pitch destination. Time Modulator mode poly note-off to note on with volume destination. Time Modulator mode mono note-off to note on with filter frequency destination. The different modes of the Time Modulator are: poly note-on to note off : Time Modulator starts with the note-off signal. poly note-on to note on : Time Modulator starts with the second note-on signal that is not interrupted by a note-off signal. poly note-off to note on : Time Modulator starts with the first note-on signal after a noteoff signal. The mono modes work the same way like the poly modes but are specially designed for legato perfomances.

115 MAGIX INDEPENDENCE 3.0 Manual 115 Insert FX In the right upper corner of the Flexible Modifier Editor there is an additional insert FX button. When activated the internal Flexible Modifier window will change to the insert effects page. Here you can assign all available insert filters and effects of Independence also to any Layer, Section or Alternate - completely independent from the insert FX settings in your Mixer page. The font color of the insert FX button will change into orange as soon as you ve added insert effects or filters to your Layer. This way you will always know which Layer contains insert effects even if this part of Independence is currently not visible. In contrast to the Mixer (these insert FX settings only get saved in Projects) all the insert FX settings of the Modules page automatically get saved in you Layer patch and thus are available immediately after reloading the Layer at a later date. The functionality and operation of this insert FX section corresponds to the operation in the Mixer page. Since Independence contains very extensive insert filters and effects please refer to chapter Insert Filters and Effects for all further details.

116 116 CHAPTER 6 Mapping Mapping Welcome to the core of Independence! This page of Independence contains the basic structure and settings that allow all succeeding editing in the first place. The principle is very simple and explained in a few basic steps. Before we take a closer look to this page, a few words about MIDI and Mapping at first: A MIDI controller (e.g. keyboard) sends any information with a so-called MIDI protocol which is based on a vertical and horizontal matrix, each with 127 partitions (= velocities) - from 0 to 127. The horizontal partitions are the keys from your keyboard and thus each note can also get defined as number (e.g. C3 = MIDI note 63). The vertical partitions contain different additional information for each key, like multiple samples with different dynamics of the note. Thus each information sent from the keyboard is always linked to exactly one Zone in your Mapping matrix. Basically a Zone is the simply displayed position of an audio file and a Zone can always only manage one audio file. Please load a Layer from the Independence Core Library as explained in the chapter Basics & User Interface and switch to the Mapping page. The Audio Editor (the upper window) will be empty at this moment - we will explain this part of the Mapping page later. The window below is the Mapping Editor and contains the mapping matrix of the instrument you loaded. Each Zone is shown as a small blue box. The more Zones are displayed in this window the more different dynamic steps or articulations are available for the instrument.

117 MAGIX INDEPENDENCE 3.0 Manual 117 Now play a few notes with your keyboard (or any other MIDI controller). If not disabled in the select pull-down menu you will recognize that the incoming MIDI signal gets displayed as a small light blue line in the Mapping Editior. As soon as you play a key in a velocity which is connected to a Zone, an audio file gets played back. That s it. This structure of the Mapping Editor decides if and how an audio file gets played back. Also considered will be all the different parameter settings like volume, panorama, root key, etc. This layout is essential and also very important. Independence s Mapping Editor enables you to create your custom mappings intuitively, ultra-fast and in a clearly arranged environment! If you open the Content Browser the left side of Independence will switch and you will get a detailed list of all currently available Sections and Alternates of your selected Layer. You can now select the Section or Alternate you want to edit either in the content browser or with the select pull-down menu of Mapping Editor. On the left side you can easily mute Sections. Simply press and hold the Alt key and click on the Section you want to mute. If there are Sections and/or Alternates that include an internal Key Switch, the assigned key gets displayed right beside the name of the Section/Alternate. The color of the currently activated Key Switch gets displayed in orange. For an even better overview, all currently available key switch notes are also displayed in the Mapping Editor - as grey Zones from 0 to 127. If there are multiple key switches on the same note the color gets brighter the more key switches are on the same note. To offer easiest and fastest access to all your 3rd party libraries, your own instruments, audio files and loops we integrated the sophisticated Audio Files Browser.

118 118 CHAPTER 6 Mapping This feature does not only work as a simple browser but also includes powerful options to create the mapping of your files already while you import them automatically. Now click and hold any Zone of the currently loaded Layer Patch. The selected Zone becomes orange and in the upper window an audio waveform shows up immediately. The waveform is the graphical visualization of the audio file that is included in the Zone. Now drag the Zone with your mouse to a position of your choice, e.g. C6, and release. Always you play C6 now on your keyboard (or any other MIDI controller) the Zone you ve just moved will play back. With this Mapping Editor and all the available parameters you can always decide about position, layout, possible overlaps, tone pitch (root key), volume, panorama, etc. of all your Zones. For a better fine tuning of your Zones you can zoom in the Mapping Editor matrix totally free in the vertical and horizontal axis. Therefore use the + and - icons down right of the Mapping Editor window. To switch back to the original view just click on the spot in the corner. For immediate access to the sounds Independence s Mapping Editor also contains an enhanced keyboard at the bottom which is very useful for quick checks of any changes you made on this page. You can click on the keys of the virtual keyboard to play back the Zone. This keyboard also recognizes different velocities. The more at the top you click on the key the higher velocity gets played back. The same the other way round: The lower you click the key the lower velocity gets played back.

119 MAGIX INDEPENDENCE 3.0 Manual 119 To accelerate the editing and adjustment processes in the Mapping Editor there are many versatile features available. If you click on the select pull-down menu of the Mapping Editor the following menu will appear and will always show the executable functions only.

120 120 CHAPTER 6 Mapping This vast number of intuitively usable editing options accelerates your custom editing of the mapping matrix enormously and also allows maximum flexibility during your work. Nevertheless you still have the required user-friendly overview about everything important. Beside this main select pull-down menu you can also use a hided additional pull-down menu inside the Mapping window. This menu only contains the most important commands you will need permanently. To open this menu hold the CTRL key (Mac OS X and Windows XP) and click somewhere in the Mapping window. The following menu will show up: Apart from a few new commands both pull-down menus are in principle self-explanatorily. The few exceptions that are maybe not understandable at first sight get explained on the following pages in this chapter. Because nearly everything in the Mapping Editor affects one or multiple Zones we first want to take a closer look to all the basic operations regarding size and position of Zones and explain the further parameters afterwards. There are multiple ways to adjust the size and position of one or multiple Zones. Please load one Layer patch from the Independence Core Library and switch to the Mapping page again.

121 MAGIX INDEPENDENCE 3.0 Manual 121 Working with Zones Select and move one or multiple Zones To select multiple Zones, hold and press the shift key and either create a border around the desired Zones using your mouse (click, hold and release when finished) or click all the Zones you want to select separately one after the other. To move the selected Zones click and hold the selection and drag it to the new position. If you drag the selection horizontally out of the visible area, the Mapping Editor display scrolls automatically. When selecting Zones you will see an additional Info Border around your selection. This border always displays the current position, the key range and the velocity: If your mapping contains multiple Zones that overlap, the intensity of the color of selected and unselected Zones display the area where they overlap.
.")
122 122 CHAPTER 6 Mapping As you can see, the intensity of the color of the Zones always also displays the areas where Zones overlap. Additionally you can see, that the parameter display of the Mapping Editor always depends on your current selection. If no Zone is selected, the parameter display is empty (see prior page). If one Zone is selected, all parameters get displayed and if multiple Zones are selected, only the Zone independent parameters get displayed.
, hold the ALT Key (Mac OS X and Windows XP) and drag the selection to the new position.")
123 MAGIX INDEPENDENCE 3.0 Manual 123 Copy one or multiple Zones To copy one or multiple Zones just select your desired Zone(s), hold the ALT Key (Mac OS X and Windows XP) and drag the selection to the new position. You will see that not the selection gets moved but a copy - your selection still remains at the original position. Beside the ALT Key you can also use the Copy and Paste commands from the select pull-down menu. Resize a Zone To resize a Zone Independence offers multiple options. First click on the Zone you want to resize. Now move your mouse pointer to one of the 4 corners or one of the four borders. As soon as you move over one of the corners/borders, the mouse pointer will switch to its editing status and also change its look. On the corners of the Zone the mouse pointer will look like this: Now you can click and hold with the mouse on this corner and drag/stretch the Zone to the desired size. Using the corners of a Zone you can scale the Zone in the x- and y-axis simultaneously.

124 124 CHAPTER 6 Mapping On the borders of the Zone the mouse pointer looks like this (upper border, for example): You can now resize the Zone in the direction of the arrow. Using the borders of a Zone you can scale the Zone either in the x-axis OR the y-axis. HINT: If you select one or multiple Zones, then click on the left or right border of the selection and then press and hold the SHIFT Key (Mac OS X and Windows XP) before you resize your selection horizontally, any overlap of Zones is blocked. The mouse pointer will change its color from blue into white during this process. Invisible features Zone Positioner : If you select one or multiple Zones and drag them to a position that abuts horizontally or vertically to a border of the Mapping window, the selected Zones do not overlap immediately but snap in first. Only with a stronger movement of the mouse the Zones begin to overlap. The same applies to the horizontal movement of one or multiple zone. To avoid incessant changes of the vertical position during a horizontal movement or copy of multiple Zones you have to move your mouse pointer with a larger vertical distance from the original position to move the Zones also vertically. Of course this works the same way for the stability of vertical movements of Zones. The drag n drop functionality and the keyboard shortcuts enable you to create, edit and customize the mapping of your instruments in just a few seconds. Just try all the different features we explained so far: copy and paste Zones, move them, resize them and let them overlap and you will recognize how easy-to-use, intuitively and user friendly the work with Independence s Mapping Editor is! Mapping parameters Root Key: Sets the basic tune of one or multiple Zones. If you load a tonal instrument (guitar, for example) all Zones must have the same Root Key so the instrument is playable in its original tune. Of course you can also assign different Root Keys to different Zones.
: Instruments are sampled in different dynamic steps.")
125 MAGIX INDEPENDENCE 3.0 Manual 125 Key Range: Sets the range of one or multiple Zones and thus the start and end position. Vel Range (Velocity Range): Instruments are sampled in different dynamic steps. In order to arrange these steps you can use this parameter to assign the upper and lower limit for one or multiple Zones. Volume: Assigns the volume for one or multiple Zones. Panorama: Assigns the parameter settings for one or multiple Zones. Pitch: Assigns the pitch for one or multiple Zones. Top Fade: If you do not want that one or multiple Zones end abruptly you can use this feature as a kind of smooth release of the Zone(s). Thus Top Fade assigns the upper fade-out limit. Top Curve: Assigns the curve character of Top Fade. Bottom Fade: The opposite of Top Fade and thus the fade-in limit. Bottom Curve: Assigns the curve character of Bottom Fade. Here you can see how fades get displayed in Independence:
 before you edit your selection")
126 126 CHAPTER 6 Mapping HINT: If you combine Top Fade and Bottom Fade you can create a so-called X-Fade which allows the smooth fading between one or multiple Zones. HINT 2: If you select one or multiple Zones, then click on the upper or lower border of the selection and then press and hold the SHIFT Key (Mac OS X and Windows XP) before you edit your selection vertically, you can create a X-Fade between the selected Zones automatically. The mouse pointer will change its color from blue into white during this process. Solo: If you want to hear only one or a few Zones during your work, just make your selection and switch to the solo mode. Now you will only hear the selected Zones, all others are muted. Mute: Works like solo - just the other way round: All selected Zones get muted. Reverse: If activated, the selected Zone(s) get played back reversed. Playback Mode: Independence offers 5 different playback mode: - sample: In this mode the sample gets played back only as long as you push and hold the key of your keyboard. When you release the key the playback will stop. Loop markers get ignored. - loop forward: Here loop markers are considered and the sample gets played back and looped as long as you push and hold the key. When you release the key the playback will stop. - loop forward/backward: An extended loop mode which causes an continuous switch between the forward and backward play back direction of the selected Zone, referring to the loop start and end markers. - one shot: In this mode the sample always gets played back to the end - independent from the moment you release the key. - note off: This playback mode only plays the sounds when the key of your keyboard gets released.
127 MAGIX INDEPENDENCE 3.0 Manual fg mode: The Flexible Groove mode (fg mode) is a very unique feature and gets explained together with the Slice Mode in the Audio Editor. Additionally to the Loop mode you can assign the behavior of the loop in Independence s Audio Editor. More details about this feature will follow later in this chapter. Tracking button: This button lets you select if the tune of the sample(s) gets changed or not when you move one or multiple Zones in the Mapping Editor. TIP 1: If you do not want to change the basic tune of instruments you move, just switch the Tracking button off. TIP 2: If you do not want to change the tune when you move one or multiple Zones which already have an own (and correct) basic tune, just switch on the Auto Move Root Key option in the Mapping Editor preferences ( select -> edit preferences ). TIP 3: If you select multiple Zones with different parameter settings ONLY the parameters get displayed which are identical for all selected Zones. All other parameters are displayed with -- in the input field. If you now edit one of the visible parameters it will affect ALL selected Zones, of course. If you edit one of the invisible parameters you have two options: 1.) If you edit the value with your MOUSE POINTER, the new value gets ADDED to the respective values. 2.) If you enter the new value with your KEYBOARD, all different values of the Zones get OVERWRITTEN and the value you entered gets assigned to all Zones.
128 128 CHAPTER 6 Mapping Creating Sections in the Mapping Editor As we already explained in the chapter Architecture & Operation a Section consists of ONE or Multiple Zones. In short: A Section is a logical group of Zones that allows to edit their respective parameters altogether. EXAMPLE: If you select all Zones of a snare drum which is part of a drum kit Layer Patch and create one new Section of all these Zones, you can switch to the Module Page and assign one new Custom Channel to this Section. Now you are able to edit the snare drum Section individually with any additional insert effects and filters, without affecting the entire drum kit Layer patch that contains the snare drum. NOTE: If your editing mainly affects an entire Layer patch you do not need to create individual Sections from Zones of this Layer. Sections are essential if you want to edit basic, logic groups of Zones of a Layer patch separately from other Zones. To create a new Section please select one or multiple Zones with the pressed shift key and your mouse. When finished click the select pull-down menu and select create new section. Now enter an arbitrary name for your new Section and press the return key. TIP : Always use well-defined names for your Sections! This makes the management of your Sections much easier. If you select multiple Zones and you want to create a separate Section for each selected Zone, you can use the option Create Section for each selected Zone in the select pulldown menu. This will create a new Zone for each of the selected Zones an name them automatically. All other pull-down menu parameters which affect Zones or Sections - like Delete, Move to Section, etc - are self-explanatory.

129 MAGIX INDEPENDENCE 3.0 Manual 129 Edit Preferences Menu show audio file name : Shows next to the Section name also the name of the audio file above the Mapping Editor. auto move root key : Enables to move one or multiple Zones without Root Key so the basic tune will not get changed. For immediate access to this function there also an auto move r.k. button above the mapping display. show root key of selected zone : Shows the root key of the currently selected Zone as a dark orange key on the virtual keyboard below the mapping matrix. show playing audio file : Shows the entire Zone of the audio file that gets played. show note on velocity : Shows ALL played notes incl. their velocity in the Mapping Editor with a thin blue line. show unloaded audio files : Shows all Zones which are currently not loaded into the RAM if the Auto-Ram-Cleaner option is activated. This feature will show all these Zones in red color. show MIDI files : Shows all available MIDI files in the mapping matrix. IMPORTANT: For the best overview of all your Sections always use the Content browser of the Mapping Editor. This browser gets displayed on the left side and enables next to the overview also the direct selection of one or multiple Sections and additional information about possibly activated Key Switches, playing directions, Modifiers and Insert Effects. A Section which already includes an Insert Effect, for example, gets marked with an (i), activated modifiers with a (m) on the right side of the Content Browser.
 velocity option to invert the velocity of all selected samples automatically.")
130 130 CHAPTER 6 Mapping Special Menu If you import your own libraries and samples, for example, and you finally recognize that the samples (Zones) are not mapped correctly, you can use the invert selected zone(s) velocity option to invert the velocity of all selected samples automatically. The option update selected file(s) information is very useful to undo your changes and reset the original values of one or multiple audio files to their default values - loop markers, file length, etc, for example. Independence reads audio loop marker (loop start and loop end) according to the industry standard. If you load/import audio loops that contain loop markers with different standards, sometimes clicking noises during the playback can occur - caused by the shifting of one frame at the loop end. In this case you can activate the option increment loop end position of selected zone(s) and Independence will switch the playback behavior accordingly, so all loops get played correctly. Select all affected Layers, Sections, Alternates or Tones (samples) and activate this option afterwards. To give your instruments a human touch without creating custom Alternates in the Performance area of Independence, simply activate classic alternate mode. If you play the same Zone (sample) twice successively, Independence automatically creates a variation of the first Zone below the played velocity. Maybe you already know about this feature from the Modular Virtual Instruments. This feature is not recommended if you use Zones that include fades or x-fades. Select audio file via MIDI input is a helpful feature for the audio editor of the Mapping page. If activated, the audio editor display will always show the audio file waveform of the currently played zone. For immediate access to this function there also an select via midi button above the mapping display.

131 MAGIX INDEPENDENCE 3.0 Manual 131 Audio Files Browser Independence includes an intelligent audio files browser to offer immediate access to all your 3rd party libraries, your own instruments, audio files and loops. Furthermore you can use the pre-listen function to listen to your audio files before you import them. The Audio Files Browser shows the content of the audio files folder from your currently selected Independence User Folder, including number of channels, sample-rate and bit-rate of each audio file - if activated in the browser pull-down menu. The audio files browser is very useful if you work with audio files and want to see the mapping matrix at the same time. Independence also offers a separate browser page that contains much more features and also works for other file formats. To open a folder simply click the small arrow. If you double-click a folder you will switch into this directory. To switch back to the upper level use the back button. With a click on the home button you will switch to the first level of the audio files folder and automatically

 Select your preferred auto-mapping style Select your root key After")
132 132 CHAPTER 6 Mapping refresh the entire folder structure.to start the pre-listen playback of a file hold the CTRL key (Mac and Windows) or activate the auto button and click on the file. To stop the playback simply click again. The refresh button re-scans your audio files folder, so you do not have to restart Independence even if you added new audio files. You can select one or several files with your mouse using the shift key (Mac and Windows) and the Command key (Mac) or the Strg key (Windows). The import works in three simple steps: Select the audio files (single files, groups of files, complete folders and directories) Select your preferred auto-mapping style Select your root key After the selection of the audio files you want to import you can use the options pull-down menu at the bottom of the browser to choose between several options for the automapping (the available options are explained in Basics & User Interface ): Depending on the mapping selection you can now select the root key for your mapping: Independence recognizes all audio files that belong together and maps them automatically with the options you ve selected. Of course you can rerun this import process as many times as you want - even within the same Layer patch - and thus create your custom mappings quite simply, fast and flexibly.

133 MAGIX INDEPENDENCE 3.0 Manual 133 Audio Editor Independence s built-in Audio Editor is a very versatile tool with a huge collection of totally new features and functions. IMPORTANT: In the Audio Editor you can only edit the currently selected Zone! Editing of multiple selected Zones is not possible because the Audio Editor affects always only one audio sample. Select one Zone with your mouse in the Mapping Editor. Now the Audio Editor displays the selected Zone in the upper part of the Mapping page. This graphical display is called Audio Waveform and corresponds exactly to the real audio course of your selected Zone. Independence s Audio Editor contains two different types of markers: Start/End markers (yellow) and Loop markers (green). In the general mode each Zone always contains one yellow Start marker and one yellow End marker. If there is any loop option selected, two green loop markers get added to the Zone (start & end). In the Slice Edit mode multiple additional Start markers get added, depending on your settings. By the means of the Audio Editor you get detailed insights into your Zone and thus into your audio file.

134 134 CHAPTER 6 Mapping Please click the select pull-down menu of the Audio Editor. Beside the many important show options about the details of the selected Zone - like name, sample rate, bit rate, audio format, length, number of frames and filesize - you can also select your preferred display type for the selected Zone. This way you can always decide if the Zone gets displayed with all its channels or only with the channels you selected. This feature is extremely helpful if you work with surround files which contain multiple channels. With update audio file information you can reset any prior changes of the selected audio file to its original settings (loop marker and start/end marker). The slice edit option is a very powerful and extensive feature and gets explained at the end of this chapter. Beside the graphical waveform display, Independence s Audio Editor also shows the different marker positions (Start/End and Loop Start/End) of the selected Zone and enables you to edit all these markers on the spot. Click and hold the yellow triangle of a marker with your mouse, e.g. Sample Start Marker. Now drag the marker to a new position and you will see how the s. start value will change accordingly. This is very user-friendly and easy customization of your markers and works the same way for all marker types of Independence.

135 MAGIX INDEPENDENCE 3.0 Manual 135 Audio Editor Parameters s. start (sample start): Assigns the play back start position of your selected Zone in frames. s. end (sample end): Assigns the play back end position of your selected Zone in frames. volume : Assigns the volume of your selected Zone. panorama : Assigns the panorama ratio of your selected Zone. pitch : Assigns the pitch of your selected Zone. h. zoom : Horizontal zoom of your selected Zone. v. zoom : Vertical zoom of your selected Zone. fit envelope : Immediate view of the entire waveform of the selected Zone. show pull-down menu: This pull-down menu enables the frame precise zooming in to the following positions: Start Marker, End Marker, Start Loop Marker (if available) and End Loop Marker (if available) play : Plays back the selected Zone including all parameters.
136 136 CHAPTER 6 Mapping stop : Stops the play back of the selected Zone. TIP 1: To zoom-in or out simultaneously during the horizontal movement of a marker press and hold the shift key while moving the marker. To stop the zoom operation but still move the marker just release the shift key and proceed the movement of the marker. TIP 2: To zoom-in just a specific selection of the Zone just create a border (press and hold the mouse button) around the part of the waveform you want to zoom-in. After you release the mouse button, the framed part gets shown in the full size of the waveform display. TIP 3: There are two different ways to scroll the waveform display: With the scrollbars or with the mouse, when you press and hold the mouse button in the blue time bar, to scroll pixel accurately.
137 MAGIX INDEPENDENCE 3.0 Manual 137 Working with Slices Slice Edit is an additional feature of Independence s Audio Editor which allows you to separate the selected Zone into multiple single Parts, also known as Automatic Groove Recognition. Maybe you have already made some experiences with this kind of functionality but you can sure that Independence contains some additional surprises. In general the edit slice mode is used to separate an audio loop. Combined with the simultaneous export of MIDI files this allows to change the tempo of the loop without changing its tone pitch. For a better understanding please load any audio file (a drum loop, for example) with the Import Audio File option of the Layer pull-down menu. For the automatic import please choose Chromatic and afterwards C1 as start note. Switch to the Audio Editor again. Now select the Zone on C1 you ve just loaded. The audio waveform of this Zone gets displayed in the Audio Editor immediately. Now your screen will look like this:


138 138 CHAPTER 6 Mapping Now open the select pull-down menu and select the slice edit option. A new parameter on the upper right side of the Audio Editor will show up: sensitivity! This parameter defines how sensitive the Independence internal search function responds to dynamic changes of the audio file. Scroll or enter a new value for sensitivity and the number of markers will change accordingly. Of course you can edit this separation which is based on the automatic dynamic recognition also afterwards at any time Just edit the sensitivity parameter until you are content with the result. If you can not get an ideal separation of your file you can of course readjust the markers, add new markers or delete unwanted markers at will.

139 MAGIX INDEPENDENCE 3.0 Manual 139 To enhance this fine tuning and overview we ve integrated a multiplicity of additional useful features. In the Slice Editor mode the Audio Editor is separated into two horizontal, equal parts: Upper part: The upper part includes the marker editing functions. As soon as you work in the Slice Mode, one red colored Start Marker and one red colored End Marker get displayed. These two markers contain the area for the subsequent export. The Start Markers of the Slices get displayed in yellow color. To add start markers just click into the upper part of the audio waveform - a new yellow marker gets added. To delete a start marker please press and hold and the alt key and click on the marker you want to delete. To move a start marker just click and hold the yellow triangle of the marker and move it to the left or to the right. If you want to lock a start marker press and hold the shift key and click on the wanted marker. Lower part: The lower part includes the zoom and play back functions. Click and hold the mouse button in the lower part of the audio waveform and drag a border (orange colored) around the part you want to zoom in. After you release the mouse button, the selected part of the Zone gets shown in maximum display size. To play back a part between two markers, click on the audio waveform in the lower part of the Audio Editor display. TIP: To move and zoom-in a marker at the same time: Click and hold the mouse button on the wanted marker and move it to the left or right. To zoom-in simultaneously now press and hold the shift key additionally and move your mouse up or down. This way you will zoom-in and out respectively. If you reached your wanted view only release the shift key and you still can edit the position of your marker. You can proceed this function multiple times successively and when you release the mouse button, the display will zoom-in or out back to its original view.
140 140 CHAPTER 6 Mapping When you are comfortable with the marker positions, open the select pull-down menu and select the slice and MIDI file export option. The following dialog window comes up: Here you can choose the start note for the future mapping (all further parts get mapped chromatically upwards from this note) and select if new Sections for each Zone get created. The tempo gets calculated automatically by entering the number of bars. To finish, click the Export button and save your MIDI files on your hard disk. Simultaneously with the export of your MIDI files the playback mode switches into fg mode (Flexible Groove mode) automatically. Using this mode it is possible to slow down your audio loop in its original tune up to 60% without loss of quality!

141 MAGIX INDEPENDENCE 3.0 Manual 141 Of course you can also change and adjust the tune of your loop anytime at will. Now you can load/import all these MIDI files into your sequencer software and thereupon the Mapping Editor will look like this: If you now click on the new Zones in the Mapping Editor you will recognize that instead of the entire file only one Part is displayed with start and end markers. Each further Zone belongs to one further Part.
142 142 CHAPTER 6 Mapping Now you can play back the imported MIDI file in your sequencer software and change the tempo if required. The loop gets adjusted to the new tempo automatically. Of course you can change the playback sequence of the Parts in your host application or in the Independence Mapping Editor at any time! IMPORTANT: The Sensitivity algorithm that is integrated into Independence is optimized to any audio file format.

143 MAGIX INDEPENDENCE 3.0 Manual 143 You can also slice your audio loop and import the MIDI file in one step directly in Independence. Simply select the appropriate option in the select pull-down menu: The following dialog windows come up: First you can choose the start note for the future mapping (all further parts get mapped chromatically upwards from this note) and select if new Sections for each Zone get created. The tempo gets calculated automatically by entering the number of bars. Click the Export button to assign the Key Note for the MIDI file in the next dialog window and finish the process with the Import button.

144 144 CHAPTER 6 Mapping Now Independence automatically slices the audio loop and creates the corresponding MIDI file. The Mapping window contains both the MIDI file and the audio file with slices. The imported MIDI file automatically gets selected and the Audio Editor switches to the MIDI Editor display. The MIDI Editor functions and features get explained on the following pages.
 in Mapping Editor.")
145 MAGIX INDEPENDENCE 3.0 Manual 145 MIDI File Editor Independence s MIDI file Editor is one of the most powerful MIDI integrations you will find in software samplers. You can import an unlimited number of MIDI files and edit them like Zones (audio files) in Mapping Editor. Independence allows to play multiple MIDI files simultaneously - even depending on the velocity you play on your keyboard. Additionally you can overlap MIDI files and thus start the playback of multiple files with only one key - even if the MIDI files are located in different Layers. Each MIDI file has its separate settings and parameters that allow you the most comfortable way to customize your setup. MIDI files in the Mapping Editor are colored green by default or yellow if selected. Like the Zones in Independence you can also edit, move, scale, copy/paste, drag n drop the MIDI files at will. Imported MIDI files always get save with the Layer patch so you can be sure that nothing gets lost and all MIDI files will be available when you load the Layer the next time. IMPORTANT: MIDI CCs of a MIDI file also get imported. Nevertheless you first have to activate the CCs in Independence. An example: A MIDI file contains a cutoff filter on the MIDI controller #26. After the import of the MIDI file switch to the Modules page and add the Modifier MIDI Automation. Set the controller value to 26 and assign cutoff to the destination.

146 146 CHAPTER 6 Mapping Loading MIDI files To load a MIDI file for a Layer please click on the Layer name to open the Layer internal pull-down menu and click import midi files. Your system browser will come up and you can select one or multiple MIDI files from any location. Afterwards enter your desired key note and click the import button. You can also import MIDI files via drag n drop from your desktop or any other folder. Drag the MIDI file onto the Layer in which you want to import the file.

147 MAGIX INDEPENDENCE 3.0 Manual 147 Independence will automatically switch to the Mapping area and select the loaded MIDI file. The Audio Editor display will also switch to the MIDI Editor and you can now customize and edit your MIDI files. Independence reads any available information of the MIDI file and will show them in the parameter display. MIDI Editor parameters meter : The meter display contains the number of bars and beats of the selected MIDI file. Of course you can edit these parameters afterwards and assign custom bar and beat values. n. offset (note offset): Use this parameter to transpose the entire MIDI file in semitones. v. offset (velocity offset): Use this parameter to change the velocity of the entire MIDI file - and thus the dynamic. If the settings of your MIDI file do not fit the dynamic you need, simply increase/decrease the velocity value. If you enter the value -30 vel, for example, the entire dynamic of the MIDI file and the related samples gets affected and played back in reduced velocity (original values minus 30).


148 148 CHAPTER 6 Mapping delay pull-down menu: Here you can add a delay to the start point of the MIDI file playback. The value you will select in this pull-down applies to your meter settings. Example: If your meter settings are 4 / 4 and you select the delay value 4, the playback of the MIDI file gets delayed for 1 bar after you ve started the playback. Speed pull-down menu: Here you can select the playback speed of your MIDI file: 1/2 x speed: playback in half speed of the original MIDI file tempo (host tempo or Independence internal tempo). 1 x speed: playback in original MIDI file tempo (host tempo or Independence internal tempo). 2 x speed: playback in double speed of the original MIDI file tempo (host tempo or Independence internal tempo).
149 MAGIX INDEPENDENCE 3.0 Manual 149 Note Filter pull-down menu: This options lets you filter unwanted notes of the MIDI file and so change the complexity. The value you select in the pull-down menu is the upper limit. All notes below this value get filtered. Play Range : Only velocities inside this range get played. Scale Velocity : This options lets you scale the entire dynamic range of the MIDI file (velocity 0-127) into a lower range proportionally. TIP: The inversion of the values (127-0) creates very nice effects for your grooves. playback mode pull-down menu: The default playback mode of a loaded MIDI file is loop. If you want to playback your MIDI file as a sequence (only one time) you can switch to the sequence mode. For both modes you can edit the start and end value of your MIDI file. The lower menu bar contains the following MIDI file settings that affect the entire Layer: dyn. (dynamic) button: Generally a MIDI file always contains fix velocity settings - independent from the velocity you may play on your keyboard. If you want to playback your MIDI file depending on the velocity you play your keyboard simply switch this option on. hold button: Normally a MIDI file gets played back as long as you press and hold the assigned key of your keyboard. If you activate the hold button you only have to press the key once to start the playback. If you press the key again the playback will stop. midi thru button: Use this button to route the MIDI notes to the MIDI output or to your sequencer software. You can use this feature to record the MIDI notes in your sequencer software or to trigger the notes to another hardware or software instrument.

150 150 CHAPTER 6 Mapping 1 midi only button: Use the 1 midi only button if you have multiple MIDI files available in your Layer but you only want to play them separately and not simultaneously. If you press a new key on your keyboard the currently playing MIDI file gets stopped and the new one gets started. midi priority button: If audio file and MIDI file zones overlap, you can use this button to make sure that the noteon signal of a key on your keyboard will only affect the MIDI file (start or stop) and not also the audio file. shuffle : Self-explanatory ;-) randomizers time, velocity, note : Independence comes with three powerful humanize options to give your MIDI grooves an incredibly realistic human touch. input quant. (Input Quantization) pull-down menu: Here you can select if the playback of the MIDI file will start immediately - status: off - or if it gets synchronized to your host tempo (using Independence as plug-in) or the Independence internal tempo (in standalone mode): next beat: The MIDI file playback always starts accurately to the next beat. next count: The MIDI file playback always starts accurately to the next count. next bar: The MIDI file playback always starts accurately to the next bar. previous bar: The MIDI file playback always starts immediately. The start position depends on the current playback position of the previous bar. IMPORTANT: If you use the Independence virtual keyboard to start the playback of a MIDI file you can additionally press and hold the ctrl. key before you click on the keyboard. Then you will start ALL currently loaded MIDI files which are mapped to this key of ALL currently loaded Layers. This way you can use Independence also as a GM (general MIDI) player! IMPORTANT: The start and end values are connected to your meter settings. If you change the meter settings afterwards also the start and end values get re-calculated automatically to fit your new meter settings.

151 MAGIX INDEPENDENCE 3.0 Manual 151 Performance Overview With our sound design and sample library experiences of many years we came to the point where we recognized the need to break new ground with the development of our new technology. No sooner said than done and so we present a worldwide unique and sophisticated Performance Mode with forward-looking features. As already explained in the chapter Mapping & Audio Editor, Independence s instruments are based on a very detailed classification, arrangement and operation of the containing audio files. This highperformance structure allows the amazingly real playability of the instruments on your keyboard. Although the instruments of the Core Library and also the additional instruments specially developed for Independence are already exceptionally playable on the spot, this Performance Mode enables you to customize your instruments at will and give them a remarkable human touch. What is it that make sample based instruments sound even more authentically? It is the availability of multiple alternatives of the same sound. Playing an instrument live you will never hear exactly the same sound twice, even if the musician plays the same note multiple times. Simulating this live feeling is the major task of the Perfomance mode: Managing and combining up to 32 alternatives of the same sample automatically for the most authentic perfomances ever!

 - a Conga, for example. Both Zones do not contain different velocity samples but alternative hits of the same velocity. So BOTH Zones get layered on the same key (e.g. C#3) AND the same velocity (e.")
152 152 CHAPTER 7 Performance The Performance Page is divided into two parts. The Alternate Mode in the upper part and the Advanced Legato Mode in the lower part. After reading this chapter you will understand why both features are located on this page. Operation (simple example) Before we however begin to explain all available parameters on this page with all details, let s start with an example: Let s assume you loaded a new Layer which contains two different Zones (Samples) - a Conga, for example. Both Zones do not contain different velocity samples but alternative hits of the same velocity. So BOTH Zones get layered on the same key (e.g. C#3) AND the same velocity (e.g. 0 to 127), in short: one upon the other! These Zones are named Conga1 and Conga2, for example. As already explained in the chapter Mapping and Audio Editor all Independence internal editors only communicate with Sections, so you now have to switch to the Mapping page and create a new Section for each Zone respectively. After this is done return to the Performance page, click on the select pull-down menu and select the New Alternate option: Now enter a name for the Alternate right beside the select pull-down (e.g. Conga Alternate) and confirm with the Return key to instance the new Alternate. As this Alternate is still empty you now have to select the Sections you want to use for this Alternate. Therefore click on the Basic Step pull-down 1. All available Sections get displayed - in this case the Sections Conga1 and Conga2. Select the Section Conga1...

153 MAGIX INDEPENDENCE 3.0 Manual and afterwards click on the Basic Steps pull-down 2 and select the Section Conga2. If you now play C#3 on your keyboard/midi controller multiple times successively you will see and hear that each time you play C#3, the Sections get played back alternatively. That s it - you now have the basic knowledge about the functionality of Alternates. NOTE: This is a very simple example for the Alternate Mode that explains just the basics for a better understanding of the following details. If you perform instruments of the Independence Core Library you will see that this feature is used very often and also very extensively. If you load the Layer patch Alto Sax Jazz Vibrato mf from the Independence Core Library, switch to the Performance Page and play the saxophone on your keyboard, you will see that the numbers of the Basic Steps are changing their color and position permanently and at random. This shows that an Alternate is currently in use.

154 154 CHAPTER 7 Performance We made the experience that in practice (from musical aspect) more than 16 Basic Steps are not needed and would also cause a worse overview. For this reason we set the maximum number of steps for Independence to 16 Basic Steps and 16 Alternative Steps. For a better overview of your Alternates, Independence contains an additional Content Browser on the Performance Page. To open this browser just click the Content button top right. The Content Browser is very useful for an intuitive and quick selection of all available Alternates, so the fast Independence workflow is always guaranteed. Additionally the Content Browser also shows the currently activated modules of the available Alternates. If there is a Key Switch on C#1 or another module from the Modules Page currently activated for an Alternate, for example, the indicators (KS C#1) and (m) get added right beside the Alternate name. The currently played Alternate is labelled with an asterisk on the right side of the Alternate name. Alternate Mode parameters The variety of the available parameters on the Performance Page lets you imagine the limitless possibilities to create, edit and customize any desired operations to realize all your combinations of Alternates, Repetitions, Steps and Articulations. All parameters on this page lets you control the chronology and sequence of the Alternates. The left part contains the Basic Steps parameters, the right part the Alternative Steps parameters. Select pull-down menu The select pull-down menu contains the functions to create a new Alternate, to rename the current Alternate and finally to delete the current Alternate. Additionally you have a main bypass function. A click on bypass all will bypass all Alternates that are part of the selected Layer patch. To undo the bypass all command just click it again. Right beside the pull-down menu the name of the currently selected Alternate gets displayed.
155 MAGIX INDEPENDENCE 3.0 Manual 155 Bypass button Only affects the selected Alternate. Reset button Resets the Start Step of the selected Alternate to its default value. SHORTCUTS: To reset the Start Step of ALL Alternates in ALL currently loaded Layers to their default values simultaneously, press the Mac Key (MAC OS X) or the Strg Key (Windows XP) and click the reset button. Content button Opens and closes the Content Browser. Polyphony input field This feature enables you to save a step if not just a single note but a chord gets played, for example. Only if the time lag between two played notes is larger than the entered value, a new Section of the Alternate gets played. In our experience the default value of 30 milliseconds is quite enough in most cases. Naturally you can always adjust this value to your own needs. Valid range of values: milliseconds. Key Range input field Defines the range for the selected Alternate. Start input field Defines the default Section of the Basic Steps which gets played if you start a session Valid range of values: 1. to 16. step. Random input field This is the step random generator of Independence. If activated, Independence sets the sequence of the available Sections at random automatically. Random is extremely useful for live performances. Valid range of values: 0% - 100%. Step Limit input field If the Alternates of a Layer do not get played back for a longer time - e.g. a guitar Layer is not played during a saxophone solo - it is not required to use the next Basic Step if the Layer is played again. Thus Step Limit contains the time value since when the switch to a new Basic Step is not required. Hold button If activated, the alternate mode will stop and always play the currently selected step. Reset Key pull-down menu Select a key on your keyboard that will reset the alternate mode to the start step.
156 156 CHAPTER 7 Performance Now let s take a look to the right part of the parameters. Here you can edit the settings for the Alternative Steps. Why Alternative Steps? We will explain this feature with the following example: Imagine you had a live bass player in front of you. Tell him to play a simple but dynamic and very fast bass line, but only with ONE finger... Impossible! As soon as the bass line is too fast for a one finger performance, the bass player has to play with a permanent switch between two fingers. As soon as he plays like this, also the sound of the bass will slightly change. Exactly this slight change of the character of the sound (caused by the switch between two fingers) is simulated in Independence by Alternative Steps. String performances, for example, work the same way. With Alternative Steps you can easily simulate when to play the instrument with down-bow or up-bow. One of the strengths of Independence is that you only have to make your setup once. The Alternate Mode automatically takes control on the process of your Alternative Steps, so you can focus on your music! With the following parameters you can set up why, when and how an Alternative Step gets played back. A.S. Start (Alternative Step Start) Defines the minimum period that has to elapse between two samples until Alternative Steps are used. Valid range of values: milliseconds. A.S. End (Alternative Step End) This is the upper time limit that defines the maximum period that is allowed to elapse between two samples to use Alternative Steps. This value has always to be higher than the A.S. Start value. Together with the A.S. End parameter these values set up the range in which Alternative Steps are used. Valid range of values: milliseconds. All further parameters are identical to the Basic Steps parameters. Please refer to the explanations on the left page. IMPORTANT: Of course you can use the same Section in the same Alternate multiple times. If you want to use the same Section also in different Alternates, you first have to switch to the Mapping Page and duplicate the desired Section. You can then use this copy for any other Alternate. SHORTCUTS: You can also bypass single Steps. Therefore press the ALT Key (MAC OS X & Windows XP) and click on the Step you want to bypass. Now the color of the Step changes and shows its bypass status this way. All other Steps still get played, only the bypassed Step gets skipped. To undo the bypass activation just repeat the action.

157 MAGIX INDEPENDENCE 3.0 Manual 157 Advanced Legato Mode parameters Be sure you have never seen any Legato feature like this before! Independence s innovative multi-dynamic Advanced Legato Mode admits a perfect and worldwide unique simulation of an instrument played with Legato. ANY imaginable combination a live musician entails is reproducible and adjustable identically without any restrictions. Before we get started with all details about this amazing feature, first a note to calm you down, it also works simply! Here the quick start guide: - click on the select pull-down menu and select new legato. - then click the first of the five unused pull-down menus top right and select layer That s it! You now can play your Layer with the standard Legato Mode.
158 158 CHAPTER 7 Performance If you want to simulate the Legato playing technique even more precisely and specifically you really need something much more powerful, right? Welcome to Independence s Advanced Legato Mode! NOTE: Next to the Alternates the Content Browser of the Performance Page also shows the Legato Content down left. You can always use this browser for quick switching between the different available Legato modes. To bypass the currently selected Legato (whether you select it in the pull-down menu or in the Content Browser) use the bypass button top right. Independence comes with two different legato modes. In standard mode not only the following but also the prior played note will be used for legato (like a synthesizer). If you activate the next key only button, only the following played note will be used for the legato. Legato Playing Techniques Depending on the composition, of course, a live musician (e.g. guitar player) always uses the Legato playing technique. This is plainest hearable in slow compositions, like ballads. A guitar player only plays legato with his left hand. If he plays two or more legato notes successively you can hear that as these notes do not have the normal attack but are a bit smoother at the beginning. This playing technique is very important and also very complex and requires much more samples than a simple synth-legato. If you have the possibility to listen to a live legato played instrument you will recognize very clearly that there is a little break with a specific noise before each new note. The reason is that the musician needs time to move his hand to the wanted finger position. To simulate and reproduce all this in a sampling library is the demand of Independence s Advanced Legato Mode! For a better understanding of the structure and how to setup the Legato Mode here an example: Please load the Layer patch Nylon Acoustic Guitar Legato from the Independence Core Library and switch to the Performance Page. You will see that this Layer contains 1 Alternate with 4 different Basic Steps and two different Legato. In this Layer patch each playing style has its own Legato: Legato F (Legato forte) and Legato MF (Legato mezzoforte). Now select Legato F (from the select pull-down menu or the Content Browser) and play the instrument a little stronger on your keyboard... of course with a few legato notes. You will realize that as soon as you play notes with legato the basic sound of the guitar alters a little. This is the unique simulation of a real legato! The Advanced Legato Mode contains three main components: - Legato Start (can be a Layer, Alternate or Section) - Legato Option - Legato Target
159 MAGIX INDEPENDENCE 3.0 Manual 159 Legato Start The Layer, Alternate or Section you select as Start contains the basic sounds of your instrument. Independence recognizes immediately if you play notes with legato and manages all additional parameters automatically. Legato Option Here you can make the settings for optional Legato Layers. These can contain finger noises, for example. Additionally you can select different sounds for playing on your keyboard upwards or downwards. This option is very useful because the hand noises of a guitar player, for example, sound totally different depending on the playing direction. If available, these Layers help to simulate a real legato played instrument. Legato Target This is the actual target Alternate or Section that can contain a collection of originally legato played notes like tappings, hammer-ons, etc. BUT: All this details just explain the basic structure and use of the Advanced Legato Mode. This unique feature with its multifunctional and user friendly parameters gives you utmost control over an entire Legato solution and fulfills all your desires! To create your custom, even more extensive legato instruments, please proceed as follows: Click the select pull-down menu to create a new legato. Enter your desired name for this legato afterwards and confirm the name with the Return key. Of course you can always use the select pull-down menu also to rename or delete the currently selected legato or to bypass all available legatos.
160 160 CHAPTER 7 Performance Legato Start Now you can select your Legato Start Layer, Alternate or Section in the intended pull-down menu. The available parameters of the Legato Start option are: Key Range: Here you can assign the range for the legato simulation. Skip: You can only use this parameter if no Legato Option or Legato Target exist. The value sets the skip time of the next played note of the same Layer. Random: This parameter allows a more realistic, humanly sounding fine tuning of the Skip parameter. Because not always the same Skip value gets used, Random works as dynamic variance from the set Skip value and thus for a bit more liveliness of the Skip parameter. Treshold: This is the slide in time of the upcoming legato note. T-Curve (Treshold Curve): As the name implies... :-) In the pull-down menu of Legato Start you can select the Layer, Alternate or Section you want to use for the new Legato. You selection in this pull-down is by far the most important parameter! You can create many different legato modes, and this is even necessarily, because in practice a mezzo-forte played legato note requires totally different settings than a forte played legato note!

161 MAGIX INDEPENDENCE 3.0 Manual 161 Legato Option If desired you can now make your settings for the Legato Option - if and when optional hand noises get played: Delay: Use Delay to assign the delay of the upcoming Target note! This feature gives the hand noises the time that is required for the full sound of the sample. An additional result is a smooth overlap with the Legato Targets - and a constant and complete overlap with the Legato Targets is definitely undesired. Random: Provides the Human Touch! With its sophisticated functionality this parameter creates permanent dynamic alternations during this process, so the overlap of Legato Option and Legato Target is not proceeded all along but only sometimes. Selection Rel (Selection Release): Here you can assign the maximum duration for the Legato Option. As already noticed the Legato Option contains two pull-down menus. So you can select the Section or Alternate for the Legato Option that get used if you play on the keyboard upwards and one if you play downwards. This gives you an incredibly real playability of the instrument as its sounds different if the guitar player moves his hand on the strings upwards or downwards to play the next note. You can select different Sections or Alternates in both pull-down menus or also the same.

162 162 CHAPTER 7 Performance Legato Target The last option to customize your Advanced Legato mode is the Legato Target: Release: Sets the maximum time for the sound of the first played note. Rel. Curve (Release Curve): Sets the sound phase of the first played note. Ghost Note: Here you can select a note that mutes the played sequence at the end. This simulates a perfect ending of a legato played phrase. Also for the Legato Target you can select the same or different Alternates or Sections in the pull-down menus which gives you utmost flexibility for the organization of your custom Legato Mode. IMPORTANT: As already mentioned: Both parts of the Performance Page - the Alternate Mode and the Advanced Legato Mode - are completely linked among each other and communicate accordingly. BUT you have to keep in mind that also other modules like Tune Model and Playing Direction are included in these processes and can influence your settings on this page accordingly. After this short introduction you will definitely realize that the Independence Performance editor allows most detailed adjustments and by far the most professional manipulation and control of any kind of alternations, repetitions, steps, articulations and legato modes - immediately and extremely user friendly! As already explained in the Mapping Editor you can also use the Content Browser of the Performance Mode to mute your Alternates and see the current Key Switch status of your available Alternates.

163 MAGIX INDEPENDENCE 3.0 Manual 163 Browser Overview The sophisticated file browser of Independence gives you immediate, fast and easy access to any files you can use in Independence. You get an overview of your Independence Projects, Layer Sets, Layers and Sections and also all available MIDI and audio files inside your Independence folder - so you have six browsers in one. Beside the clear overview you can also search for any of your files in a way you have never experienced before in a software sampler: If you want to search for Independence Projects, Layer Sets or Layers you can not only search for the file names but also for categories, dates, authors, etc. Searching for MIDI files can be done with the attributes bars, bpm, meter, etc. and the audio file search even accepts the attributes channels, beats, sample rate, size, etc. For MIDI and audio files the browser contains an automatic pre-listen function. If not deactivated, the playback of a file gets started as soon as you click on it. Additionally you can edit the pre-listen playback volume for audio files and you can select if MIDI files get played with their original tempo or your current Independence tempo.

164 164 CHAPTER 8 Browser Operation At the top of the Browser page you have the six main buttons for the supported file types. Below these main buttons there are two navigation arrows to step through your folders, a refresh button for your Independence User Folder folder and a home button to switch back to the top level of the selected file type. On the upper right side of the browser there is the search option. We will explain this one later. To browse through your files there are two options: You can click on the triangle icons on the left of each folder to expand its content - in our example the folder Electric & Acoustic Pianos...

165 MAGIX INDEPENDENCE 3.0 Manual or you can open a folder with a double-click on its name: To load Projects, Layer Sets, Layers and Sections you can use the buttons at the bottom or just double-click the file you want to load. Layer Sets and Layers can also get added to your current Layers. In this case the Layers do not get loaded into the currently selected Layer/Layer Set (and thus do not replace the content of the Layer) but added as one or more new Layers. If there is no Layer existing and you import Layers, Sections, MIDI or audio files, a new Layer gets created automatically.

166 166 CHAPTER 8 Browser Searching for files One of the most sophisticated features of the Independence Browser is the search function. You can not only enter keywords for your search but you can also specify where Independence should search for your keywords. Please click on the search pull-down menu to open the additional parameters. Now you can customize your search with the activation/deactivation of the available search options. To search for a file simply enter one or more keywords into the search here... text field. Already with the first character you enter Independence starts immediately with the search process. The last 20 keywords you entered get saved in the recent searches tab.

167 MAGIX INDEPENDENCE 3.0 Manual 167 File display The Independence Browser can also show you many attributes of your files. This way you can customize the file display at will to get always the file details you need. Press and hold the ctrl. key or use the right mouse button and click on the headline of the browser display. The attributes menu will open and you can now select which file attributes get displayed. Additionally you can also scale the width of your columns. Click on the hyphen of a column you want to scale up or down and drag it to the desired size. Use your mousewheel or the scroll bars to scroll the content of the display accordingly.

168 168 CHAPTER 8 Browser Information batch For Projects, Layer Sets and Layers there is an information batch option at the bottom of the browser page. In the pull-down menu you can select which kind of information you want to add or replace. Afterwards enter the information in the textfield right beside the pull-down menu and press the batch button to start the process for your selected Projects, Layer Sets or Layers.

169 MAGIX INDEPENDENCE 3.0 Manual 169 MIDI files As already mentioned before there are some special options for the search and display of MIDI files. You can use the play and stop buttons at the bottom of the browser to start or stop the playback of a MIDI file - so you can listen to it before you may load the file. The playback of the MIDI file will always the instrument(s) of the currently selected Layer. You can also activate the autoplay button - then the MIDI file playback starts automatically when you click on a MIDI file. On default the playback tempo of MIDI files is their original tempo. Click the original tempo button if you want to playback MIDI files in your current Independence tempo. To import a MIDI file in the currently selected Layer you can doubleclick on the file name or press the execute button. The MIDI file always gets imported to the key you select in the pull-down menu left beside the execute button.


170 170 CHAPTER 8 Browser The search parameters for MIDI files are different from the Projects, Layer Sets, Layers and Sections parameters. Click on the search pull-down menu to select the parameters you want to use for your search. Also for the MIDI file search the last 20 keywords you entered get saved in the recent searches tab. Also the file display offers different columns if you are in the MIDI section. Press and hold the ctrl. key or use the right mouse button and click on the display headline to select the file details you want to get displayed. In the pull-down menu beside the original tempo button you can additionally edit the playback speed in the steps 1/2 x speed, 1 x speed and 2 x speed.

171 MAGIX INDEPENDENCE 3.0 Manual 171 Audio files The audio files section of the browser works nearly the same way as the MIDI file section. Instead of the tempo option you can adjust the pre-listen volume for the audio files playback. Also the import parameters are slightly different and correspond to the audio import options that are explained in the chapter Auto-Mapping-Import. To import one or more audio files into the currently selected Layer you can double click the selected files or use the execute button.

172 172 CHAPTER 8 Browser The search parameters for audio files are also different from the other file types. Simply click on the search pull-down menu and customize your search the way you want. Also for the audio file search the last 20 keywords you entered get saved in the recent searches tab. Press and hold the ctrl. key or use the right mouse button and click on the display headline to select the file details you want to get displayed for audio files.

173 MAGIX INDEPENDENCE 3.0 Manual 173 Mixer The mixer of Independence is by far unique and the most sophisticated plug-in mixer worldwide! The Independence mixer enables an extremely fast workflow and contains everything you need to finalize and perfect what you have done so far. It is not necessary to leave Independence to add additional insert filters and effects and edit them as requested. Next to many standard Inserts, Independence also comes with many specially optimized filters and effects. More precisely Independence contains a battery (built-in Inserts) of more than 30 integrated filters and effects and is of course expandable with many professional present and upcoming Filter And Effect Extensions. The Independence mixer is divided into 4 areas: Content Editor, Group Editor, Show/Hide Editor and the Channel Display.
, BUS Channels and Output Channels. You can easily select one or more channels (of any kind).")
174 174 CHAPTER 9 Mixer Content Editor Below the edit content pull-down menu you have your Edit Selection window that contains the overview of all used and existing Layer Channels, Custom Channels (virtual internal channels), BUS Channels and Output Channels. You can easily select one or more channels (of any kind). Click on the channels to show the channels directly and connect them with additional functions afterwards - e.g. using the show/hide pull-down menu to remove the selected channels, to show the selected channels or use the Group Editor to combine the selected channels to a new group. Back to the edit content menu which we want to explain with the following example: Problem and solution: During your work with extensive Projects it will happen commonly that a few of the Custom and BUS Channels you ve created are not in use anymore and finally dispensable. For example you may have checked out multiple effects for different Layers or Groups and at the end there are still some Channels in your Project that are not in use anymore. Exactly this typical way of working is the reason for this great feature - be sure you ll love! Activating this feature is quite simple: - click on the edit content pull-down menu. - select one of the three options, remove all unused bus & custom channels, for example - release the mouse button and Independence will check all BUS and Custom Channels if they are used and finally all unused channels get removed. SHORTCUTS: To select and edit multiple channels simultaneously hold the Mac Key (Mac OS X) or the Strg Key (Windows XP/Vista) and click on the channels you want to select.

175 MAGIX INDEPENDENCE 3.0 Manual 175 Group Editor Maybe you ve wondered why we used the name Section for a multi selection of multiple Zones and not the common name Group in the prior Mapping Editor chapter... Well, here is the reason: Group is a reserved index for our built-in mixer, which stands for a multi selection of different channels which is a much more common naming in the music than a multi selection of Zones. The Group Editor contains a select group pull-down menu and an Edit Selection window. Just select one or more Channels (of any kind), then click on the select group pull-down and choose between the following options: Click on new group to create a group of all Channels you selected. You can assign a name to your new group afterwards. TIP: For a better overview we recommend you to use always very clear names for your GROUPS ( Drum Kit Room 2 Complete, for example). If you do not enter a name for your GROUP Independence uses an automatic naming with variables like group 1, group 2, etc. IMPORTANT: Working with the Group Editor is very easy and thus much more intuitive, easier and much faster. If you combine multiple channels to a group, you can edit the SOLO buttons or the VOLUME for all Channels of this group with one mouse click simultaneously, for example. Further options of the Group Editor are very similar and nearly self-explanatory, like rename group : Select the Group you want to rename from the rename group pull-down menu and enter the new name in the text window afterwards. Press the Return key and the new name gets accepted. SHORTCUTS: To select/edit multiple channels simultaneously hold the Mac Key (Mac) or the Strg Key (Windows) and click on the channels you want to select.


176 176 CHAPTER 9 Mixer Show/Hide Editor Definitely the most commonly used editing function of the mixer! The show/hide editor contains the appropriate pull-down menu and the Edit Selection Window. Clicking the pull-down menu the following dialog will show up: Click the desired editing option, like hide selected in the screenshot above, and you will recognize that all channels you ve selected in the Edit Selection Window before now gets deselected and also the Channel Display at the bottom of this page show less Channels. IMPORTANT: The show/hide editor hides the channels only visually to enable a better and faster overview while you are working. Nothing gets deleted or removed from your Project and you can undo any action at any time. MIDI input pull-down menu If there is any MIDI automation activated the Independence mixer generally accepts the input from all MIDI channels (1 to 16). Use this pull-down menu if you want the mixer only to accept MIDI input from one specific MIDI channel. This is very useful if you work with multiple automated mixer parameters or insert FX parameters.
177 MAGIX INDEPENDENCE 3.0 Manual 177 Channel Display At the bottom of the mixer page all existing channels (of any kind) are shown horizontally one after another. Independence s mixer contains 5 kinds of channels: - Layer Channels (name color: blue) - Custom Channels (name color: green) - BUS Channels (name color: orange) - Output Channels (name color: yellow) - Surround Channels (name color: yellow) These are shown in this order automatically. BUT: It is possible at any time to define your custom order of the channels. Just select one or more channels and move them with drag n drop to the left or to the right. You will see that now the channels are shown in a different - your - order. Of course the different channels distinguish significantly by their inner life and functionality: Layer Channel 1 2 The Layer Channel is a graphic chart of a loaded Layer Patch. As soon as you load a new Layer Patch into Independence, a new channel gets added to the mixer automatically. A Layer Channel contains the following parameters: 1. Insert Button 3 2. Group Name 3. Five successively ordered BUS sends including volume 4. Audio Out selection pull-down menu Solo and Mute button 6. Level indicator - maximum reached level index 7. Volume fader and graphic level meter 8. Volume chart 9. Panorama chart 10. Kind and number of Layer
178 178 CHAPTER 9 Mixer Insert Button The Insert button has three different states: A B A - Layer Channel contains NO Insert Filters and Effects B - Layer Channel contains Insert Filters and Effects and/or the Insert window is open The standard status of this button is A. If you click the button the Insert window opens to the right side and the status switches to C. In the opened Insert window you can instance and edit the powerful built-in Insert Filters and Effects that come with Independence. You can add unlimited Inserts for to each Layer and additionally change the order of the inserts dynamically per drag n drop. If you click the Insert button again after you ve added Inserts the Insert window will close and the status of the button switches to B. All further information about the Independence Filters and Effects are explained very detailed in chapter Insert Filters and Effects. IMPORTANT: As soon as you instance additional Insert Filters and Effects for a Layer, a little Insert label gets added to the channel name in the Edit Content and Show/Hide windows. This is very helpful in practice as it supports an optimum overview. Group Name This chart shows the name of the Group - if existing.

179 MAGIX INDEPENDENCE 3.0 Manual 179 BUS sends Independence allows the use of unlimited BUS Channels - and especially with the option to add as much additional Custom Channels as wanted you will be able to create your custom environment. For each Layer Channel you use 5 additional BUS sends, each with the following parameters: Pre or post selection, bypass, BUS send volume adjustment and the option to route to a new or already existing BUS channel. IMPORTANT: Pre or post assigns if the incoming signal gets routed with its original volume settings (pre) or including the value of the volume parameter (post) and thus with edited volume settings. With the first assignment always post is selected automatically. You can change this selection at any time using the pull-down menu. SHORTCUTS: To bypass the BUS Channel you can also press the ALT key (Mac OS X and Windows XP/Vista) and click the channel you want to bypass.
180 180 CHAPTER 9 Mixer Audio Out selection pull-down menu Clicking on the Audio Out pull-down menu you will get a menu with all available outputs. Just select the output channel you want and your channel gets routed accordingly. The Audio Our pull-down menu always contains all currently available output channels, so you can select any Mono, Stereo or Surround channels at will. Solo and Mute button Solo and Mute are standard parameters of a channel to play or mute only the selected channel. Level indicator A very useful display! It always shows the maximum reached volume of your session. If you want or need a new calculation of this value you can reset the level indicator with a click on the display. Thus the prior value gets deleted and the current value gets calculated. SHORTCUTS: If you hold the Mac Key (MAC OS X) or the Strg Key (Windows XP/Vista) and then click the display, all level indicators of all channels of your session/project gets reset. Volume fader and graphic level meter Just a short comment to these self-explanatory parameters: Depending on the type of the channel (Mono, Stereo, Surround 5.0, 5.1, etc.) the dynamic level meter switches automatically to the correct display form. So the level meter of a Mono channel (of any kind) is displayed with only one bar, for example, or a Surround 5.0 channel with 5 smaller bars. Volume chart Next to the volume fader of the volume fader and graphic level meter area you can also use this parameter to change the volume. The volume display additionally shows the precise position in db. TIP: To get an even finer adjustment of the volume you can also enter the desired value directly or push and hold the SHIFT Key (Mac OS X and Windows XP/Vista), click on the value and drag or and down.
. You can rename the channels with a double-click.")
181 MAGIX INDEPENDENCE 3.0 Manual 181 Panorama chart This parameter is only available for Mono and Stereo channels and changes the panorama of the complete channel. Channel types A B C D E To keep track of your mixer environment each channel contains its name/type and number at the bottom (e.g. Bus Stereo 2). You can rename the channels with a double-click. Additionally the different channel types are displayed in different colors. The names of Output Channels are displayed yellow, for example. This area is also useful to move your channel to another position (drag n drop) or to select one or more channels to add/ combine them to a Group. The Independence mixer contains the following five types of Channels: A - Layer Channel B - Custom Channel C - BUS Channel D - Output Channel E - Surround Output Channel Output Channels are sort of the physical forwarding to your sequencer software or directly to your sound card. The maximum number of Output Channels depends on your sequencer software or your DA converter and is additionally limited to 64 Mono and 64 Stereo channels per instance. To adjust this number accordingly please read the chapter Preferences.

182 182 CHAPTER 10 Automation Automation Independence offers MIDI automation with 128 MIDI CCs (Continuous Controller) per MIDI channel and host automation with 128 host channels per entity. You can use MIDI and host automation for the channel parameters volume, panorama, solo, mute and BUS volume of the Independence mixer AND for the insert filters and effects in the mixer area and the modules area. On the following pages we will explain the MIDI and host automation assignment of parameters in Independence. Please read the user manual of your host application about the required settings and assignments for automation in your sequencer software. IMPORTANT: Because of the flexibility and the nearly limitless possiblities of Independence no parameter names get used for the automation but only numbers. This enables you to use the same insert filter or effect multiple times in Independence with different automations assigned to the same parameter. Setup of an automation To automate a parameter please click the held ctrl key on the desired parameter to open the automation pull-down menu (example MIDI automation of the Multi Mode Filter parameter Frequency ):

183 MAGIX INDEPENDENCE 3.0 Manual 183 Select the MIDI controller number 26 and move your controller 26 of your MIDI keyboard (or any other MIDI controller) afterwards. You will recognize that the Frequency value will change accordingly. To make the assignment of MIDI controllers even easier we integrated next to the manual assignment also a midi learn function. Just click on this option in the pull-down menu and move any controller of your MIDI keyboard you want to use for Frequency afterwards. Independence recognizes the CC number and its position automatically and assigns this number to Frequency accordingly. The custom learn option is only available for Layer inserts - not in the mixer. Use this option to assign the selected parameter to one of the custom remote knobs or buttons on the Quick Edit page - or select the custom ctrl # menu for manual assignment. You can always view the currently selected controler number of a parameter in the midi ctrl #, host ctrl # or custom ctrl # menus at any time and of course also change it manually. The host automation works exactly the same way - you can assign host controller channels both manually and with host learn (example: BUS volume parameter of a Layer channel in the mixer): Numbers marked with a * show an already assigned/used controller number for a MIDI or host automation.

184 184 CHAPTER 10 Automation Additional automation features The automation pull-down menu contains beside the learn and manual assignment of automation controllers also additional and very useful parameters: off : With this option you can delete the automation of the assigned parameter. bypass : With this option you will not delete the automation but only mute it temporarily. The assigned controller number maintains. invert : If you activate this option, Independence will process the incoming messages from your controller inverted. set automation minimum value & set automation maximum value : Beside the general automation of parameters you can additionally set a minimum and maximum automation value for each parameter. This means that you can use the full range (0% to 100%) of the selected controler only for a specified value range of the assigned (automated) parameter. Set the parameter to your desired minimum/maximum value and select the minimum/maximum option in the pull-down menu afterwards. recall automation minimum value & recall automation maximum value : Select this option and the parameter value will switch to the currently assigned minimum/maximum value immediately. reset automation range : Select this option to reset both the current minimum and the current maximum values for the automated parameter.
.")
185 MAGIX INDEPENDENCE 3.0 Manual 185 no automation range scaling : Select this option to automate a parameter only within the assigned range. Below or above this range there will no more changes of the parameter (the last valid value of the range will be used above/below the maximum/minimum). This option is very useful if you assigned several parameters to the same Custom Knob. An example: The following parameters get assigned to the same Custom Knob: Volume from 0% to 100% - Panorama from 30% to 80% - Reverb WET from 50% to 100%. Depending on your automation you will get great sounding fades between different parameter value changes on one Custom Knob. curve : You can also adjust the settings of the curve behavior from the minimum to the maximum value. These values can get select between 2, 3 and 4 times faster/slower as the original curve. This is very useful if you want to x-fade between 2 parameters - between the parameters dry and wet of an Origami Impulse Response Processor, for example
: 1.) Standard view: Parameter without automation (color yellow ). 2.")
186 186 CHAPTER 10 Automation Visual presentation of automated parameters As soon as a parameter of Independence is automated, the color of the parameter value will change. In Independence parameters can be indicated in four different ways (example: Frequency ): 1.) Standard view: Parameter without automation (color yellow ). 2.) midi learn / host learn view: A learn option for the parameter Frequency was activated (color orange ). 3.) Automated view: The parameter Frequency is automated (color green ). 4.) bypass view: he parameter Frequency is automated but currently muted (color grey ).

187 MAGIX INDEPENDENCE 3.0 Manual 187 Insert Filters and Effects Manipulation is a very popular instrument to edit and customize your sounds. For this purpose Independence offers over 40 stunning filters and effects in ultimate perfection. Since you can add the available insert filters and effects to both your channels in the builtin Mixer and to the Flexible Modifier Editor per Layer, Section or Alternate, all details and explanations in this chapter apply to the Inserts in general, independent from where you may use them. Regarding the Inserts there are some general but important statements: You can add unlimited! Insert filters and effects. You can change the order of the Inserts simply per drag n drop. Any Insert that contains a sync button is fully synchronizable to your sequencer software (host) or to the Independence internal tempo and you can also choose the mode of synchronization. Beside the main insert fx bank pull-down menu, that enables you to load, save and copy/paste already prepared presets of multiple inserts, also each individual insert filter or effect contains its own preset pull-down menu that includes all these options. You can minimize the editing display of each insert with a click on the open/close triangle in the upper left corner. Wherever you may save a preset of your custom insert settings, it will always be available in the preset pull-down menus of both areas, the Mixer and the Flexible Modifiers. IMPORTANT: The processing of the activated insert filters and effects will always be calculated in the order top down. Load, save & remove insert filters and effects As soon as you work with Independence s insert filters and effect, the upper insert menu bar comes up. There are two ways to load or save an insert filter or effect. You can use the insert fx bank pull-down menu to load or save a group of inserts at the same time.

188 188 CHAPTER 11 Insert Filter and Effects Use the copy/paste options to transfer the current settings to another Layer, Section or Alternate without having to save them before. Use the rebuild menu option to refresh the presets pull-down menu if you have copied presets into your Independence User Folder during your work. IMPORTANT: If you load an insert fx bank ALL your currently loaded insert filters and effects get replaced automatically! The other way is to load or save individual insert filters and effect. Click with your mouse on the add insert fx pull-down menu. Select the insert you want to add to your channel, Layer, Section or Alternate and release the mouse button. The selected insert gets added to the insert display below the pull-down menu. You can add as many inserts as you want and thus create your custom virtual insert filter and effect rack. To remove a currently loaded insert simply select the insert you want to remove and click the remove button in the upper right corner of the insert display. To remove multiple inserts at the same time, press and hold the shift key and click on all inserts you want to remove. There is a main bypass button in the upper left corner of the insert display. If activated ALL currently loaded insert filters and effects get muted. Of course also each individual insert contains a separate bypass button. IMPORTANT: If you save the settings of any insert as autoload.ytp file in the respective folder, the currently adjusted parameter values get loaded as default when ever you add the insert again!
 or cut (negative db values).")
 the adjusted frequency is boosted (positive db values) or cut (negative db values).")
189 MAGIX INDEPENDENCE 3.0 Manual 189 Equalizers Equalizer provide controls to boost or cut specified frequencies of the audio signal. 4 band parametric EQ Lowshelf: Below the adjusted frequency the audio signal is boosted (positive db values) or cut (negative db values). Band 1: Depending on the selected slope of the curve (value 3) the adjusted frequency is boosted (positive db values) or cut (negative db values). Band 2: Depending on the selected slope of the curve (value 3) the adjusted frequency is boosted (positive db values) or cut (negative db values). Highshelf: Above the adjusted frequency the audio signal is boosted (positive db values) or cut (negative db values). Output Gain: The output volume of the audio signal. 6 band parametric EQ Same as 4 Band parametric EQ but with four identical filters.
 or cut (negative db values). Frequency: Specifies the frequency, above/below which the audio signal gets boosted/ cut.")
190 190 CHAPTER 11 Insert Filter and Effects Vintage 3 band EQ As the name implies: A precise reproduction of a Vintage EQ. The slope of the curve is already determined for each filter. Band 1: The adjusted frequency can get boosted (positive db values) or cut (negative db values). Frequency: Specifies the frequency, above/below which the audio signal gets boosted/ cut. Output Gain: The output volume of the audio signal.


191 MAGIX INDEPENDENCE 3.0 Manual 191 Filters 2D Filter With the 2D Filter you can boost or cut the range of frequencies - depending on the selection of your filter type and slope. Use the spot in the 2D matrix to edit both parameters Frequency and Resonance simultaneously. Slope: Pull-down menu to select the filter type and slope. Frequency: Specifies the frequency, above/below which the audio signal gets boosted/ cut. Resonance: Emphasis of the selected frequency from 0% (no emphasis) to 100% (maximum emphasis). X-Filter With X-Filter you can assign an infinitely variable fade between the three filter types Low Pass, Band Pass and High Pass. Frequency: Specifies the frequency, above/below which the audio signal gets boosted/ cut. Resonance: Emphasis of the selected frequency from 0% (no emphasis) to 100% (maximum emphasis). Slope: Pull-down menu to select the slope. Filter Mode: Fade between Low Pass, Band Pass and High Pass from 0% to 100%.

192 192 CHAPTER 11 Insert Filter and Effects Filter Follower Same as X-Filter. Additionally the Filter Follower changes the settings for Frequency and Resonance of the selected Slope and Filter Mode in a dynamic ratio to the volume of the audio signal. Frequency: Specifies the frequency, above/below which the audio signal gets boosted/ cut. Resonance: Emphasis of the selected frequency from 0% (no emphasis) to 100% (maximum emphasis). Slope: Pull-down menu to select the slope. Filter Mode: Fade between Low Pass, Band Pass and High Pass from 0% to 100%. Intensity: Intensity of the filter. Attack: Release: The moment the filter will apply after the audio signal started. The moment as of the filter will not apply any longer after the audio signal softens. Output Gain: The output volume of the audio signal. Low Cut Filter With the Low Cut Filter you can cut low frequencies depending on the selected slope. Slope: Frequency: Pull-down menu to select the filter type and slope. Specifies the frequency, below which the audio signal gets cut.

193 MAGIX INDEPENDENCE 3.0 Manual 193 High Cut Filter With the High Cut Filter you can cut high frequencies depending on the selected slope. Slope: Pull-down menu to select the filter type and slope. Frequency: Specifies the frequency, above which the audio signal gets cut. Multi Mode Filter The Multimode Filter allows the usage of the three filter types Low Pass, Band Pass and High Pass simultaneously. Slope: Pull-down menu to select the slope. Frequency: Specifies the frequency, above/below which the audio signal gets boosted/cut. Resonance: Emphasis of the selected frequency from 0% (no emphasis) to 100% (maximum emphasis). Low Pass: Volume of the Low Pass part. Band Pass: Volume of the Band Pass part. High Pass: Volume of the High Pass part.
194 194 CHAPTER 11 Insert Filter and Effects LFE Filter If you are working in a surround format that contains a LFE, you can use this filter to cut high frequencies depending on the selected slope. LFE creator: Creates a new additional LFE channel out of all available channels. Slope: Pull-down menu to select the filter slope. Frequency: Specifies the frequency, above which the LFE signal gets cut. Output Gain: The output volume of the audio signal. IMPORTANT: To use the LFE creator option you have to select a surround format that allows an LFE channel (5.1, for example) in the input and output pull-down menus. Satellites HP Filter If you are working in a surround format you can use this filter to cut low frequencies depending on the selected slope. Slope: Pull-down menu to select the filter slope. Frequency: Specifies the frequency, below which the audio signal gets cut. Output Gain: The output volume of the audio signal.

195 MAGIX INDEPENDENCE 3.0 Manual 195 Dynamics Compressor With the Compressor you can reduce the dynamic of your audio signal and thus the differences between soft and loud signals. Thereby you can turn up the overall signal higher without exceeding the available headroom and causing unwanted distortions. The result is more presence and punch of your audio signal. Input Gain: Treshold: Ratio: Attack: Release: Knee: Here you can turn up or down the volume of your input signal before the compression applies. Sets the level above which the compressor starts reducing peaks. Determines the amount of compression. Sets how long it takes for compression to kick in after the input signal exceeds the treshold level. Determines how long it takes for the compression action to stop after the input signal falls below the treshold level. The curve character of the starting compression after exceeding the treshold level. 0% is a hard start of the compression, 100% an extremely soft start. Lookahead: This value balances small fluctuations of the audio signal within the entered time in milliseconds. Output Gain: The output volume of the audio signal.


196 196 CHAPTER 11 Insert Filter and Effects Limiter A Limiter regulates the output level of the audio signal gently down, before an overregulation can take place. Finally the Limiter is also like an extreme type of the compressor, since it works according to the same principle as the compressor, however the level of the compression is substantially higher. Treshold: Determines the value in db about how much you want to raise the volume of your audio signal. Release: Determines how long it takes for the limiter action to stop after the input signal falls below the treshold level. Output Gain: The output volume of the audio signal. Gater A Gater only lets an audio signal pass through if a determined volume level of the audio signal is exceeded. With the Gater you can avoid noises of the audio signal and also control its dynamic. Treshold: Sets the volume level above which the gater lets the audio signal pass through. Attack: The rise time of the audio signal after it exceeds the treshold level. Hold: This value balances small fluctuations of the audio signal within the entered time in milliseconds. Release: Determines how long it takes for the gater action to stop after the input signal falls below the treshold level.

197 MAGIX INDEPENDENCE 3.0 Manual 197 Modulation Chorus Chorus doubles the audio signal and detunes the copy compared to the original signal. Thereby the audio signal sounds softer and is more present. Depth: Determines the level of the modulation in %. Speed: Determines the speed of the modulation in hertz. HF Damp: All frequencies of the audio file above the set value get cut. Spread: Limitation of the panorama ratio from both sides simultaneously. 100% corresponds to the full stereo panorama, 0% corresponds to mono. Dry/Wet: Volume relation between the unprocessed (dry) and the processed (wet) audio signal. Sync: Enables the synchronization of the Speed parameter (changes into a select pull-down menu) to the tempo of your sequencer software (host). Flanger Flanger doubles the audio signal and delays the copy compared to the original signal. Depth: Determines the level of the modulation in %. Speed: Determines the speed of the modulation in hertz. HF Damp: All frequencies of the audio file above the set value get cut. Feedback: Routes the delayed signal back to the module s input. Higher values create a more intense effect. Spread: Limitation of the panorama ratio from both sides simultaneously. 100% corresponds to the full stereo panorama, 0% corresponds to mono. Dry/Wet: Volume relation between the unprocessed (dry) and the processed (wet) audio signal. Sync: Enables the synchronization of the Speed parameter (changes into a select pull-down menu) to the tempo of your sequencer software (host).

198 198 CHAPTER 11 Insert Filter and Effects Phaser Like Flanger also the Phaser effect splits the input signal, manipulates the frequencies of one split and then sums the two splits back together. The result sounds similar to a flanger, but softer and subtler. Speed: Determines the speed of the modulation in hertz. Start Freq: Sets the start frequency of the Phaser effect. Range: Determines the range around the start frequency in which the phaser modulation takes place. 0% corresponds to no modulation, 100% corresponds to maximum modulation. Feedback: Routes the delayed signal back to the module s input. Higher values create a more intense effect.. Spread: Limitation of the panorama ratio from both sides simultaneously. 100% corresponds to the full stereo panorama, 0% corresponds to mono. Dry/Wet: Sync: Volume relation between the unprocessed (dry) and the processed (wet) audio signal. Enables the synchronization of the Speed parameter (changes into a select pull-down menu) to the tempo of your sequencer software (host).

199 MAGIX INDEPENDENCE 3.0 Manual 199 Ring Modulator The Ring Modulator modulates specified adjusted frequency ranges. Shape: Here you can assign the type of the modulation progress (sinus, square, saw). Frequency: Here you can adjust the frequency range from 10Hz to 20kHz. Rotary This effect is the simulation of a Rotary Speaker. Crossover: Here you can separate the frequency range of the signal processing - in above and below the entered value. Depth: The time-based length of the rotary processing. Dry/Wet: Here you can adjust the ratio of the non-processed (dry) and processed (wet) signal. Output Gain: The output volume of the audio signal. Low Rate: The frequency of the lower oscillator Low Trem.: The intensity of the lower oscillator High Rate: The frequency of the upper oscillator High Trem.: The intensity of the upper oscillator Sync: Enables the synchronization of the low rate and high rate parameters to the tempo of your sequencer software (host).

200 200 CHAPTER 11 Insert Filter and Effects Vinylizer Independence s Vinylizer includes three different vinyl types (33, 45, 78 tempo) to simulate the sound of old recordings. Beside the different tempos you can additionally choose between three categories: 1 = new recording 2 = old recording 3 = very old recording Model: Selection of the vinyl type. Model Vol: Volume of the selected vinyl type. Clicks: Simulation of the Crackle noises of old recordings. 0% corresponds to no noises, 100% corresponds to many noises. An authentic value is between 3% and 7%. Clicks Vol: Volume of the Crackle noises in db. Noise: Simulation of noise of old recordings db. Lowpass: All frequencies above the set value get cut. Highpass: All frequencies below the set value get cut. Output Gain: The output volume of the audio signal.
201 MAGIX INDEPENDENCE 3.0 Manual 201 Distortion Time clipper Time Clipper hacks the audio signal and produces an analog rhythmic distortion. This distortion is however not static, but dynamic - in dependence to the Depth and Speed parameters. Treshold: Sets the value for Time Clipper to start after the input signal exceeds the treshold level. Gain: Determines the level of the modulation in db. Depth: Determines the level of the modulation in %. Speed: Determines the speed of the modulation in hertz. Volume: The output volume of the audio signal. Sync: Enables the synchronization of the Speed parameter (changes into a select pull-down menu) to the tempo of your sequencer software (host). Bit reduction Bit reduction reduces the resolution of the audio signal. Thus you can reduce the sound quality and you can simulate the sounds of older equipment. Bit Reduct: Here you can assign the new resolution to your audio signal. 24 bit correspond to the current standard of recording studios, 16 bit to an audio-cd, 8 bit to older samplers and drum machines, 4 bit to very cheap sound generators (toys, for example). Sample Red.: Reduces the number of frames and thus creates interesting effects. Aliased: If sample reduction is used, you can activate this option to avoid unwanted clicks. Drive: Creates a digital distortion.
202 202 CHAPTER 11 Insert Filter and Effects Dual band distortion Dual Band Distortion splits the audio signal and produces an analog distortion. Each split gets modulated separately. Frequency: Sets the frequency value where the audio signal gets split. Drive A: This is the range below the set frequency. The set db value determines the volume of the modulation. Drive B: This is the range above the set frequency. The set db value determines the volume of the modulation. Color: With color you can make the modulated audio signal brighter or closer. Negative values produce a closer sound, positive values produce a brighter sound. Volume: The output volume of the audio signal. Tube distortion Tube Distortion produces an analog symmetric or asymmetric distortion of the audio signal. Drive: The assigned db value determines the volume level of the modulation. Low Cut: Specifies the frequency, below which the audio signal gets cut. HF Damp: All frequencies of the audio file above the set value get cut. Shape: Here you can choose between symmetric and asymmetric processing. Volume: The output volume of the audio signal.
203 MAGIX INDEPENDENCE 3.0 Manual 203 Delay Sample delay With Sample Delay you can assign a time related movement of the audio signal. Time L: The delay of the left channel in milliseconds. Time R: The delay of the right channel in milliseconds. Link Button: If activated, the entered value gets also assigned to the other channel automatically. If you edit the value of one channel with your mouse, the value of the other channel gets scaled accordingly. Sync Button: Enables the synchronization of the delay to the tempo of your sequencer software (host). Delay Delay can produce one or more delayed copies of the input signal and thus creates an echo-like sound. Delay L: The interval for the left channel between hearing the straight signal and the first delay of the delayed signal. Feedback L: Sends a portion of the output of the left channels back into the input of the delay line, which create repeating echoes. 0% corresponds to no delay, 100% corresponds to many delays. Pan L: Panorama settings of the delay of the left channel from 100L (left) to 100R (right). Dry/Wet L: Volume relation between the unprocessed (dry) and the processed (wet) left Delay R: channel of the audio signal. The interval for the right channel between hearing the straight signal and the first delay of the delayed signal. Feedback R: Sends a portion of the output of the right channels back into the input of the delay line, which create repeating echoes. 0% corresponds to no delay, 100% corresponds to many delays.
 and the processed (wet) right channel of the audio signal.")
204 204 CHAPTER 11 Insert Filter and Effects Pan R: Dry/Wet R: Sync: Panorama settings of the delay of the right channel from 100L (left) to 100R (right). Volume relation between the unprocessed (dry) and the processed (wet) right channel of the audio signal. Enables the synchronization of the Delay L and Delay R parameters (they change into a select pull-down menu) to the tempo of your sequencer software (host). Filter Delay Same as Delay. Additionally you have two more parameters: Low Cut: High Cut: Specifies the frequency, below which the audio signal gets cut. Specifies the frequency, above which the audio signal gets cut. IMPORTANT: The parameters Low Cut and High Cut only correspond to the processed (wet) signal. Doubler Doubler produces a simple duplication of the audio signal. Time: Here you can assign the time distance between the original audio signal and the duplicated signal.
 to the tempo of your sequencer software (host).")
205 MAGIX INDEPENDENCE 3.0 Manual 205 Panorama: Panorama settings of the duplicated audio signal from 100L (left) to 100R (right). Sync: Enables the synchronization of the Time parameter (changes into a select pull-down menu) to the tempo of your sequencer software (host). Phase Invert: If activated, the phase of the newly generated signal gets inverted. Dry/Wet: Volume relation between the unprocessed (dry) and the processed (wet) audio signal. Echo With Echo you can simulate the typical echo effects of Vintage machines. Variation: Delay: Echoes: De-Pan: HF Damp: Dry/Wet: Sync: Here you can select the volume progression of the echo effect: Ramp Down starts the first echo with its original volume level and the following echoes get turned down. Ramp Up starts quiet and becomes louder. With Constant all echoes have the original volume level of the audio signal. The interval between hearing the straight signal and the first echo of the delayed signal. Number of echoes. Automatic movement of the echoes between the left and right channel. 100% corresponds to a movement between the full stereo panorama, 0% corresponds to no movement. All frequencies of the audio file above the set value get cut. Volume relation between the unprocessed (dry) and the processed (wet) audio signal. Enables the synchronization of the Delay parameter (changes into a select pull-down menu) to the tempo of your sequencer software (host).
206 206 CHAPTER 11 Insert Filter and Effects Helper Volume Here you can assign volume changes to the entire audio signal. Panorama Here you can assign the panorama relation of your entire audio signal. Panorama: Panorama settings from 100L (left) to 100R (right). Spread: Limitation of the panorama ratio from both sides simultaneously. 100% corresponds to the full stereo panorama, 0% corresponds to mono. Auto Pan: Automatic movement of the echoes between the left and right channel. 100% corresponds to a movement between the full stereo panorama, 0% corresponds to no movement. A.P. Speed: The speed of the Auto Pan movement in hertz. One complete movement in one second corresponds to 1.00 hertz. Sync Button: Enables the synchronization of the Speed parameter (changes into a select pull-down menu) to the tempo of your sequencer software (host). XY panorama Here you can limit the panorama relation of the audio signal. You can assign different values to each channel.

207 MAGIX INDEPENDENCE 3.0 Manual 207 Phase invert Here you can invert the phase of the left and/or right channel. Level meter The Level Meter displays the current output volume level of the audio signal. Level meter Pro The Levelmeter Pro shows RMS and peak values simultaneously: Calibration To calibrate the speakers for a surround environment you can use this helper.
208 208 CHAPTER 11 Insert Filter and Effects Metronome You can use Independence s Metronome with custom tempo, synced to the tempo of Independence or synced to the tempo of your host. Reference Tone Use this helper to tune your Independence instruments or even your guitars, basses etc. Channel Manager A very powerful surround helper that also works in stereo format. Additionally you can route any channel of your surround format to L (left) and R (right) and thus create a mix down of your surround format to stereo. Please refer to the chapter Pro Surround Environment for more details.
 or mono (M) or surround (S) icons new volume settings get calculated for all existing channels of your currently selected surround format.")
209 MAGIX INDEPENDENCE 3.0 Manual 209 Surround Panner The surround panner enables you to use instruments that contain stereo, mono and surround audio files in any Independence surround environment. Corresponding to the position of the stereo (L & R) or mono (M) or surround (S) icons new volume settings get calculated for all existing channels of your currently selected surround format. Radius: Mode: Here you can assign the radius of the surround panner. The inner orange circle displays the center db value and the outer red circle displays the rear minimum db value of the newly created audio signal. Here you can select the mono (for mono audio files), stereo (for stereo audio files) or surround (for surround files) surround panner.

210 210 CHAPTER 11 Insert Filter and Effects Center: Volume level of the center channel. LFE: Volume level of the LFE channel. Output gain: Output volume of all audio channels. Angle: Determines the angle of the left audio signal from 0 to 360. Distance: Determines the distance of the left audio signal to the center position of the surround format. Type: In this pull-down menu you can select how to move the audio signal(s). free: each audio signal gets moved individually x mirror: The audio signals gets mirrored against the x-axis. y mirror: The audio signals gets mirrored against the y-axis. xy mirror: The audio signals gets mirrored against the x-axis and the y-axis. sync: Parallel movement of the audio signals to the x-axis and the y-axis. Angle: The angle of the right audio signal from 0 to 360. Distance: The distance of the right audio signal to the center position of the surround format. Front max.: The maximum volume level for the front position of the audio signal. Front min.: The minimum volume level for the front position of the audio signal. Center: The volume level for the center position of the audio signal. Rear max.: The maximum volume level for the rear position of the audio signal. Rear min.: The minimum volume level for the rear position of the audio signal. TIP 1: The distance parameter also allows negative values up to -100%. This way you can move the audio signal(s) from the front left position to the rear right position with a single move, for example. TIP 2: Use the surround panner in surround mode to balance your surround audio files. Keep in mind that any changes of the positions of a surround audio file may cause phases. Use the Channel Manager Helper insert to avoid this problem.

211 MAGIX INDEPENDENCE 3.0 Manual 211 Reverb Reverb Reverb produces - unlike echo - continuous sonic reflections of the audio signal. Thus allows an extremely real simulation of reverbs of different rooms Model: Select between already prepared reverb simulations. Level: Here you can raise or lower the volume of the signal even before the modulation begins. Time: Determines how long the reverberation lasts in milliseconds. Lower values equate to smaller rooms, higher values equate to larger rooms. Spread: Limitation of the panorama ratio from both sides simultaneously. 100% corresponds to the full stereo panorama, 0% corresponds to mono. HF Cut: All frequencies above the assigned value get cut. Predelay: Introduces a short pre-delay before the reverb takes effect. Dry/Wet: Volume relation between the unprocessed (dry) and the processed (wet) audio signal.

212 212 CHAPTER 11 Insert Filter and Effects Reverb TWO Same as Reverb. Additionally you have some further parameter for an even more realistic reverb simulation. A real reverb always consists of three parts: The original audio signal, the first early reflection, and finally the ambience produced by the impulse. Early Refl.: Selection of the room for the first early reflection. Level: Volume of the first reflection. Spread: Limitation of the panorama ratio from both sides simultaneously. 100% corresponds to the full stereo panorama, 0% corresponds to mono. Predelay: Introduces a short pre-delay before the reverb takes effect. Frequency: Determines the tempo of the modulation of the processed signal in hertz. Depth: Determines the level of the modulation of the processed signal in %. Dry/Wet: Volume relation between the unprocessed (dry) and the processed (wet) audio signal.

213 MAGIX INDEPENDENCE 3.0 Manual 213 Special Origami & Origami LE Origami is a high-end real-time engine to use and edit Impulse Response files, developed by MAGIX software developers and audio engineers. In Independence Origami and Origami LE are already integrated. Featured with IR files of the fantastic INSP:IR Impulse Library from Inspired Acoustics, Origami gives you an amazing listening experience - as if you would be in the room yourself! To enable you to move your instruments inside the loaded room individually we expanded Origami by the Positioner feature. After the Positioner is activated you can move your audio source - and thus your instrument - completely free within the loaded room... as usual for Independence in real-time, of course!!! ORIGAMI additionally contains the Èlastique SOLOIST Time-Stretch algorithm developed by zplane.development. With this feature you can edit and customize the playback time and tune of your audio and impulse response files. The result is a high-quality manipulation which is specially designed for creating amazing effects.

214 214 CHAPTER 11 Insert Filter and Effects IR format: Multi-channel audio files (interleaved) have to get specified before you can use them in Origami. An IR file with 5 channels can be 5.0 DD, DTS or Music, for example. In this pull-down menu you can select the format for the processing of your Impulse Response files - independent from your selected input/output format! This way you can use a 5.0 IR file, for example, also in an 5.1 or any other format up to without any prior conversion of the file!

215 MAGIX INDEPENDENCE 3.0 Manual 215 Presets: Use this pull-down menu to load the Impulse Response files that are included in Independence or to load your own presets. Origami comes with a huge number of premium impulse response files, that you can use immediately in your productions. These presets are located in the IA Production Responses tab. You can also load the sources of all included impulse response files to customize them at will.

216 216 CHAPTER 11 Insert Filter and Effects Since Origami also supports surround impulse response files, there is a separate tab for the already included surround presets. These presets give you immediate access to premium surround impulses for your music production. IMPORTANT: The processing Impulse Response files takes a lot more CPU power than any other Independence insert filter or effect.

217 MAGIX INDEPENDENCE 3.0 Manual 217 IR file info: The IR file info button in the upper left corner of Origami lets you switch to the info page of the currently loaded Impulse Response file. Here you can enter your own notes and you will see - if available - the location details and additional author details. After the first click the IR file info button will switch to the status back. To return to the main page just click the button again.

218 218 CHAPTER 11 Insert Filter and Effects Import: Use this pull-down menu to import your own impulse response files. You can also drag n drop audio files from your desktop/hard disks directly into the wave form display. Positioner: Click this button to open the Positioner feature. The Positioner gets explained on the next page. Pre-delay: The moment the IR processor will start after the incoming audio signal. You can assign positive and negative values. Positive values create a delayed start, with negative values the beginning of the IR file gets skipped. Time: Here you can assign if the IR file gets used completely or only by percentage of the entire length. Tail: Here you can assign the decay time of the IR file - depending on the time value. 100% correspond to the entire length of the IR file less the time portion. Tail Curve: The curve characteristic of the decay phase (Tail). High Cut: All frequencies of the IR file above the adjusted value get cut. True button: The sophisticated Impulse Response Processor Origami even manages true stereo (one multi channel audio file with 4 separate channels) and true surround processing up to 8.1 (one interleaved audio file with up to 81 separate channels). Even in true stereo and true surround mode you can still use the positioner feature and the new Channel Manager insert allows you any custom channel routing to fit your needs.
219 MAGIX INDEPENDENCE 3.0 Manual 219 The following processing is supported: mono to: stereo to: surround to: mono, stereo, surround mono, stereo, true stereo, surround, true surround mono, stereo, true stereo, surround, true surround EQ: Dry: Wet: Pitch: Formants Button: Tempo: Sync Button: See chapter Equalizer. Volume of the unprocessed audio signal. Volume of the processed audio signal. Here you can change the pitch of your impulse response file. This option is very useful for manipulation and effects. (preserve formants) If activated the formants of the audio file will be preserved during the processing. This imporoves the time-stretch quality. Changes the length of your impulse response file to play it faster or slower. 100% is the original tempo. Higher values cause an acceleration, lower values cause a slowdown. If activated the impulse response file gets synchronized with the tempo of your host application. This is very useful if you use loops as impulse response file. O. Tempo Button: Here you can enter the original tempo of the impulse response file into the parameter value field. This is specially designed for the use of audio loops. With a click on the button the loaded file gets scanned and the tempo will be recognized automatically. Depending on the number of bars you maybe have to enter a revised value manually. Output Gain: The output volume of the audio signal.

220 220 CHAPTER 11 Insert Filter and Effects Origami Positioner When you click on the positioner button in the upper right corner, the display will switch to the positioner screen and the button changes into back. If the Positioner is not yet activated, simply click on the orange button inside the 3D panel to activate Origami s positioner and to move your instruments inside the virtual room As soon as activated, a speaker icon comes up in the middle of the 3D matrix and the status of the button switches into active.

221 MAGIX INDEPENDENCE 3.0 Manual 221 Now you can change the position of the audio signal in your virtual room. To return to the original position of the audio signal in the center, please press and hold the Alt key and click on the icon. Now the room position will be reset to its default values. If you are pleased with your audio signal s position, you can click the back button in the upper right corner to return to your basic screen. Whenever the positioner is activated and you return to your basic screen or Origami s IR file info, the positioner button gets bordered lightly to show its activated status.


222 222 CHAPTER 11 Insert Filter and Effects Preamp Modeler Independence comes with a selection of 12 premium preamps, specially designed for the Independence Core Library and the Independence Instruments. Model: Presence: Use this pull-down menu to select your preamp model. This DSP parameter increases the higher middle frequencies of the audio signal. This way the sound becomes more presence. Output Gain: The output volume of the audio signal..


223 MAGIX INDEPENDENCE 3.0 Manual 223 Cabinet Modeler The Cabinet Modeler offers the simulation of the typical cabinet sound for any of your instruments - but was specially designed for electric guitars and electric basses. You can choose between 6 legendary cabinet models of different size and with different microphone position. Model: Use this pull-down menu to select your cabinet model. Color: This parameter allows you to edit the EQ color of the audio signal. Output Gain: The output volume of the audio signal.

224 224 CHAPTER 11 Insert Filter and Effects Mic Modeler The Mic Modeler allows you the immediate assignment of different microphone characters to your instruments. Available are 14 different legendary microphone models of the categories condenser, dynamic and tube. Depending on the microphone model you can even select between the different positions and characters omni directional, directional close, directional far and directional farer. Model: Use this pull-down menu to select your mic model. Output Gain: The output volume of the audio signal.

225 MAGIX INDEPENDENCE 3.0 Manual 225 Pro Surround Environment Independence comes with the most sophisticated Surround Environment you will ever find in any software sampler and supports all professional surround formats, like Pro Logic, Dolby Surround, Dolby Digital, DTS, ITU, SDDS and many more up to 8.1. Please keep in mind that also have to assign the corresponding surround format to the output channel in the mixer. Of course all insert filter and effects of Independence are now fully surround compatible.

226 226 CHAPTER 12 Pro Surround Environment Worldwide unique in Indepedence is the total flexibility of all the formats: You can immediately switch between all the available surround formats and Independence will automatically route the channels to the assignment of the new format. Additonally you can assign the surround formats for each Layer individually, so Independence can manage different surround formats at the same time. Beside the surround format selection in the Layer area, you also have some further surround settings on the Preferences page of Independence. There you can assign the preferences for the import settings of your surround files and you have the option to set the general channel assignment for all multi channel files for three different formats: Channel Manager This helper automatically shows all available channels of the currently selected output format, so if you switch from stereo to 5.1 DTS the Channel Manager display will switch accordingly: Additionally you can route any channel of your surround format to L (left) and R (right) and thus create a mix down of your surround format to stereo. You can also use the Channel Manager to finetune the volume, delay and output channels of your output format.
227 MAGIX INDEPENDENCE 3.0 Manual 227 Calibration Depending on your speaker position and your room size you can use this helper insert to calibrate your speakers: LFE Filter If you are working in a surround format that contains a LFE, you can use this filter to cut high frequencies depending on the selected slope. The LFE creator button creates a new additional LFE channel out of all available channels. Satellites HP Filter If you are working in a surround format you can use this filter to cut low frequencies depending on the selected slope.

228 228 CHAPTER 12 Pro Surround Environment Surround Panner The surround panner enables you to use instruments that contain stereo, mono or surround audio files in any Independence surround environment. Corresponding to the position of the stereo (L & R), mono (M) or surround (S) icons new volume settings get calculated for all existing channels of your currently selected surround format.


229 MAGIX INDEPENDENCE 3.0 Manual 229 Insert Filter & Effects As already mentioned before all Independence Filters and Effects are fully surround compatible. You can switch between the available formats at any time and all inserts will immediately switch to the new format automatically. The example below shows the insert Filter Delay : format: Stereo format: 5.0 SMPTE / ITU / Music format: 7.1 SDDS Film

230 230 CHAPTER 13 Preferences & Help Page Preferences & Help Page The Preferences page contains many standardized parameters which you may already know. Even though you will be able to make your personal setup immediately some more details about the available options maybe helpful for you. Depending on the Independence version you use some of the parameters will not be adjustable or visible on your preferences page. All parameters that are available for your version are of course freely editable. The Preferences page affects the complete plug-in, so it is very important to edit the available parameters in this area very carefully! Making changes may cause incompatibility with other Projects or the required settings may not get adjusted correctly which in turn may cause the locking of multiple parameters or even loss of performance. IMPORTANT: Changes of the Preferences parameters affect the basic ROUTING SETUP of Independence. To accept your changes a restart of Independence is required. Only after this your settings get accepted. Therefore click on SAVE PREFERENCES after you finished your setup, close Independence and select it again from the plug-in list of your sequencer software.

231 MAGIX INDEPENDENCE 3.0 Manual 231 Engine settings RAM Settings and Overview Although computers become better and faster all the time, RAM is still a very valuable part. These parameters give you a permanent summary of the current RAM usage of your Independence. Minimum RAM lets you assign the amount of RAM that is always reserved for Independence. Allocated RAM shows the maximum RAM usage of Independence during the complete session. Used RAM is a permanent changing value that shows the exact amount of RAM Independence currently uses. There are multiple ways to optimize RAM usage of your computer. Therefore please read the details about the RF-HDD (Read From Hard Disk Drive) feature and the Auto-RAM- Cleaner. Multi Core Support Independence supports the reservation and assignment of multi core usage (up to eight cores). Thus Independence has priority access to the number of cores you assign as soon as additional CPU ressources are needed. Depending on your computer you can use this feature to boost your performance with a single instance of Independence. The pull-down menu will always contain the number of cores of you computer. If you have a dual core computer, for example, you only get 2 cores listed. The support of multi cores and finally the possibility to assign a specific number of cores for Independence is a powerful and unique feature for software sampler - because you can now assign not only processors but even the cores. If you have an eight core computer, for example, you can now assign 6 cores to Independence and take the other 2 cores

232 232 CHAPTER 13 Preferences & Help Page remain free - let s say for your host application. This way there will be never any process of Independence and your host application that will take the same core at the same time - and exactly this result gives you an unmatched performance! RF-HDD (Read From Hard Disk Drive) Our current and also upcoming Virtual Instruments and Sample Libraries are designed for most professional and most realistic performances. This demand implicates very high memory requirements. The solution: RF-HDD, an innovative and entirely new streaming technology, exclusively developed by MAGIX software engineers. Preload time When loading a Layer only the defined time of each audio file gets pre-loaded into the RAM of your computer. The rest of each audio file remains on the hard disk and only gets loaded in case it gets used/played. PRELOAD TIME allows you to adjust this value and actually accepts values between 200 milliseconds and 3 seconds per audio file. You can also use the pull-down menu on the right to use the presets. Unload time This parameter unloads unused audio files after the defined time. Every played audio file gets its own start time. After the expiration of the entered unload time the sample gets unloaded immediately. This process discharges the RAM of your computer and so lets you adjust Independence to the performance of your system. Currently you can enter values between 0 milliseconds and 20 seconds. You can also use the pull-down menu on the right to use the presets. Block size As Independence is design for extremely fast performances and simultaneously has to manage an enormous amount of audio files we had to add this third parameter. While
233 MAGIX INDEPENDENCE 3.0 Manual 233 loading, block size allows larger loading steps and so reduces the continuous and timeconsuming movements of the read head of the hard disk drive. Depending on the basic speed of your hard disk you can enter custom values or use the presets in the pull-down menu on the right. In practice even slow hard disks become an increased performance in speed and stability. Even the RF-HDD feature is part of all versions of Independence it may happen that the three parameters are not visible in the Preferences. In this case please download and install the newest version from pro.magix.com. TIP: Depending on your computer, OS and your system configuration we recommend you to try multiple combinations with different values of the three parameters. This way you will find the best results to optimize your system. Use original BIT rate / Pre-convert to 32 BIT Independence comes with an automatic recognition and immediate internal adjustment of the settings of your sequencer application. Actually the compatibility up to 32 Bit/192 khz is guaranteed. Thereby an entire compatibility to any sequencer and used hardware gets fully supported. Apart from this you can decide to convert the Audio Files already during the loading to the appropriate bit rate or to convert them from the RAM only until they get used. Library Settings In this area you can add sound libraries for Independence - completely independent from where these libraries are located on your computer. The location gets saved after your selection and if you should change this location afterwards, the affected libraries get labelled with missing).
.")
234 234 CHAPTER 13 Preferences & Help Page User Folder Settings Here you can change the location of your User Folder. This folder contains all user related files (Layers, Presets, Audio Files, Projects, etc.). The Independence application files are not contained in this folder, so the basic functionality of Independence will not be affected by any changes of this folder. Beside the user folder you have three different quick links you can choose. You can use the quick links only with audio files in Independence!

235 MAGIX INDEPENDENCE 3.0 Manual 235 Output and Surround settings As Independence already supports many different interfaces and because of all the different sequencer applications actually available sometimes it can be required or helpful to increase or reduce the number of available outputs. IMPORTANT: Thereby you can also save or require performance of your computer. At the moment the maximum amount of available outputs is set to 64 MONO and 64 STEREO outputs per instance. Unfortunately many sequencer applications have different ways to manage additional output channels of plug-ins. Please read the manual of your sequencer application how to do it. Default Layer Format If you add a new Layer to your project, also a new output channel gets added to the mixer page accordingly. The output format of this channel in the mixer will be the default format you select in this pull-down menu.

236 236 CHAPTER 13 Preferences & Help Page Surround Any surround preference settings get always saved with your Independence Project. If you import multi channel audio files into Independence, you can save your default channel assignment using the appropriate pull-down menus. Additonally you can also save the default settings for three different surround output formats and also create your own presets. IMPORTANT: After your routing setup you can choose/switch between all available surround formats in the Audio Out pull-down menu for each Layer individually and at any time.

237 MAGIX INDEPENDENCE 3.0 Manual 237 Misc. settings Default Root Key If you import audio files that do not contain a root key information, the selected key of this pull-down menu gets used as default root key. Default Author Information The Default Author Name and Default Author Weblink information automatically get added to every new Project, Layer Set and Layer you will create. You can also edit these information at any time afterwards in the corresponding info pages. Debug Log Using this option activates/deactivates the creation of a log file. Log files may help us searching for any errors if the application may not run error-free.

238 238 CHAPTER 13 Preferences & Help Page Help Page On the Independence Help Page you have several links to PDF documents (manuals, shortcut overview, tips & tricks) and to some online links for the newest updates, tutorials and much more. The online links require an internet connection and to read the PDF documents on your computer you need the free Adobe Acrobat Reader or any other application that can open PDF documents.

239 MAIGX INDEPENDENCE 3.0 Manual 239 Credits Idea and conception: Drazen Vlahovic Productdesign and projectmanagement: Christian Hellinger Senior software developer: Roman Glomb Recording & sound design: Drazen Vlahovic Assistance to Drazen Vlahovic: Artur Kujawa, Patrick Damiani, Zoran Buden Recorded at: yt studios Karlsruhe, tidalwave Studios Karlsruhe, Custom Recordings Karlsruhe Èlastique SOLOIST by zplane.development. Symphony Orchestra Samples: Symphony Orchestra, Kirk Hunter Studios, USA Pipe Organ Samples: NDB Pipe Organ; Shirokuma Ltd., Hungary Impulse Response Files: Inspired Acoustics INSP:IR impulse library ; Entel Ltd., Hungary User interface: Mauve Design, yt art division Graphic design, art direction, packaging designs: Hedgehog advertising agency, Germany Packaging and production: Optime Service GmbH, Germany Special Thanks To: Slavica, Enna and Adrian Vlahovic for their limitless patience, Gabriele & Amelie Hellinger just for everything, Roman Glomb for his 36 hours days, Rita Schaupp, Rolf and Ariane Hellinger, Adelheid Nehring von Oettingen for their support, Michael Lips from Gravis Shop Karlsruhe, Rudi Metzler and RockShop Karlsruhe for the support, Manfred Graf, Reinhold Rausch, KUK GmbH, WIBU Systems AG, Wolfgang Völker, Patrick Kirst, Zlatko Dozic, Torsten Wieseler, Marcel Millot, Umbo, Martin Straka, Matthias & Markus Loris, Frank Lemmert, Christian Auer, Casi, Pedro Weis, the companies Apple, Emagic, Digidesign, Entel, Shirokuma and Chicken Systems, all Independence beta-testers and all our worldwide resellers and distribution partners.
Independence Pro. Independence 2 Independence LIVE Independence FX. Product Details
 Independence Pro Independence 2 Independence LIVE Independence FX INDEPENDENCE PRO is the ultimate package for music creation in your studio and for live perfomances. and contains three powerful products:
Groove Agent 4. Version history Known issues & solutions. Januar 2015 Steinberg Media Technologies GmbH
 Groove Agent 4 Version history Known issues & solutions Januar 2015 Steinberg Media Technologies GmbH Table of contents Table of contents... 2 About... 3 Groove Agent 4.2.0... 4 New features... 4 Last
MOX6/MOX8 Editor VST Owner s Manual
 MOX6/MOX8 Editor VST Owner s Manual Contents What is the MOX6/MOX8 Editor VST?...2 Data Structure of the MOX6/MOX8 Editor VST...3 Starting the MOX6/MOX8 Editor VST...4 An Example of MOX6/MOX8 Editor VST
HALion 5. Version history Known issues & solutions. February 2015 Steinberg Media Technologies GmbH
 HALion 5 Version history Known issues & solutions February 2015 Steinberg Media Technologies GmbH Table of contents Table of contents... 2 About... 3 HALion 5.1.10... 4 Improvements & issues resolved...
MOTIF XS Editor VST Owner s Manual
 MOTIF XS Editor VST Owner s Manual Contents What is the MOTIF XS Editor VST?...2 Data Structure of the MOTIF XS Editor VST...3 Starting the MOTIF XS Editor VST...4 An Example of MOTIF XS Editor VST in
Groove Agent 4. Version history Known issues & solutions. April 2016 Steinberg Media Technologies GmbH
 Groove Agent 4 Version history Known issues & solutions April 2016 Steinberg Media Technologies GmbH Table of contents About... 3 Groove Agent 4.2.30... 4 Improvements & issues resolved... 4 Groove Agent
MOTIF XF Editor Owner s Manual
 MOTIF XF Editor Owner s Manual Contents What is the MOTIF XF Editor?...2 Studio Manager...2 Studio Connections...2 About Open Plug-in Technology...3 Data Structure of the MOTIF XF Editor...4 Starting the
and close the various Traktor Panels. Setup: click on the setup icon to open the setup dialog. Close: clicking this icon will close TRAKTOR DJ Studio.
 Welcome... TRAKTOR DJ Studio 2 Quick Reference...to TRAKTOR DJ Studio 2, the latest and most advanced version of the software that changed the way DJs think about computers. We ve introduced a number of
HALion 5. Version history Known issues & solutions. July 2017 Steinberg Media Technologies GmbH
 HALion 5 Version history Known issues & solutions July 2017 Steinberg Media Technologies GmbH HALion 5.1.20 Improvements & issues resolved The following list details resolved issues and improvements in
New Features in Nuendo 4.2
 New Features in Nuendo 4.2 Cristina Bachmann, Heiko Bischoff, Marion Bröer, Sabine Pfeifer The information in this document is subject to change without notice and does not represent a commitment on the
Editor/Plug-In Editor Manual
 Editor/Plug-In Editor Manual E Table of Contents Introduction... 1 Main features...1 Please note before use...1 M50 Editor and M50 Plug-In Editor operating requirements...1 Installation... Installation
User Guide. Manual Version 1.0
 User Guide Manual Version 1.0 Table of Contents Introduction... 3 System Requirements and Product Support... 3 Installation... 3 Windows... 3 Mac OS X... 3 Quick Start... 4 Operation... 5 Global Controls...
HALion 4. Version history Known issues & solutions. Januar 2013 Steinberg Media Technologies GmbH
 HALion 4 Version history Known issues & solutions Januar 2013 Steinberg Media Technologies GmbH Table of contents About... 3 HALion 4.5.4... 4 Issues resolved... 4 HALion 4.5.3... 5 Improvements... 5 Issues
Accusonus Inc. Lexington, Massachusetts USA
 The information in this document is subject to change without notice and does not represent a commitment on the part of Accusonus Inc. The software described by this document is subject to a License Agreement
Kameleono. User Guide Ver 2.1
 Kameleono Ver 2.1 Table of Contents Overview...4 MIDI Processing Chart...5 Kameleono Inputs...5 Kameleono Core...5 Kameleono Output...5 Getting Started...6 Installing...6 Manual installation on Windows...6
LiveProfessor 2. User Manual. Rev audiostrom.com
 LiveProfessor 2 User Manual Rev 1.0 - audiostrom.com Contents Introduction 4 System Requirements 4 License files 4 First Run 5 Installing Plugins Plugin Manager Audio Settings MIDI Inputs 7 Replacing A
Cristina Bachmann, Heiko Bischoff, Marion Bröer, Sabine Pfeifer, Heike Schilling The information in this document is subject to change without notice
 Operation Manual Cristina Bachmann, Heiko Bischoff, Marion Bröer, Sabine Pfeifer, Heike Schilling The information in this document is subject to change without notice and does not represent a commitment
Installing energyxt2.5. Mac. Double-click energyxt2.5 disk image file. Drag the energyxt2.5 folder to your "Applica- tions" folder / your desktop.
 ENGLISH 2 Getting started Windows Installing energyxt2.5 Mac Linux Double-click the setup file and follow the on- screen instructions. i. i. Double-click energyxt2.5 disk image file. Drag the energyxt2.5
USO RESTRITO. Operation Manual
 Operation Manual Cristina Bachmann, Heiko Bischoff, Marion Bröer, Sabine Pfeifer, Heike Schilling The information in this document is subject to change without notice and does not represent a commitment
JX-3P. PLUG-OUT Software Synthesizer Owner s Manual Roland Corporation 01
 JX-3P PLUG-OUT Software Synthesizer Owner s Manual 2018 Roland Corporation 01 Introduction When using the JX-3P for the first time, you must specify the MIDI Input/Output setting in the Setting window
Axiom DirectLink for Reason and Record User Guide
 User Guide Legal Notices This guide is copyrighted 2010 by Avid Technology, Inc., with all rights reserved. Under copyright laws, this guide may not be duplicated in whole or in part without the written
BeatMaker 3 User Manual. Revision:
 BeatMaker 3 User Manual Revision: 3.0.10 What s new in version 3.0.10 of this manual - Updated section Quick Start Guide: 1.3 Transport toolbar - Added section Performance View: 2.7 Select mode - Updated
User Guide. English. Manual Version 1.0
 User Guide English Manual Version 1.0 Table of Contents (Click a chapter/section to skip to it.) Introduction... 5 Box Contents... 5 Support... 5 About This User Guide... 5 Initial Setup... 6 1. Software/Driver
Prophet '08 PlugSE Editor
 Prophet '08 PlugSE Editor SoundTower PlugSE for Prophet 08 Synthesizer VST (PC/Mac) AudioUnits (Mac) SoundEditor, PlugSE, and ipad Products Reach Inside... SoundTower Inc. 2012 www.soundtower.com Special
User Guide English. Manual Version 1.8
 User Guide English Manual Version 1.8 Table of Contents Welcome to the MPC... 12 System Requirements and Product Support... 12 About This User Guide... 13 Important Notes... 14 Installation... 14 Windows...
User Manual V
 By User Manual V1.0 http://polyversemusic.com/support support@polyversemusic.com Gatekeeper User Manual Table of Contents Getting Started 4 Installation 4 Presets 5 With or Without MIDI? 5 Ableton Live
Workshop. Automation ÂØÒňΠMV-8000
 ÂØÒňΠMV-8000 Workshop Automation 2006 Roland Corporation U.S. All rights reserved. No part of this publication may be reproduced in any form without the written permission of Roland Corporation U.S.
Maize Sampler 2 Documentation
 Maize Sampler 2 Documentation Copyright (C) 1995-2014 Maizesoft 1 Introduction Have you ever dreamed publishing your samples as a VST and Audio Unit virtual instrument? With Maize Sampler 2, this is easy
MainStage 2. Exploring MainStage
 MainStage 2 Exploring MainStage KKApple Inc. Copyright 2011 Apple Inc. All rights reserved. Your rights to the software are governed by the accompanying software license agreement. The owner or authorized
Using the 01X with Cubase SX 3. To all 01X users thank you for your continued use of the Yamaha 01X Digital Mixing Studio!
 Supplementary Manual Using the 01X with Cubase SX 3 To all 01X users thank you for your continued use of the Yamaha 01X Digital Mixing Studio! Since the 01X was first released, software programs that can
Eastern Percussion Module
 Eastern Percussion Module VERSION 1.0 USER MANUAL 1. INTRODUCTION Thank you for purchasing the Zero-G Eastern Percussion Module. This fantastic library was created to help musicians and composers to achieve
Welcome Installation Authorization The T-Pain Engine: Quick Start Interface Sound Check... 10
 CONTENTS Welcome... 5 Installation... 5 Authorization... 6 The T-Pain Engine: Quick Start... 8 Interface... 8 Sound Check... 10 The T-Pain Engine: First Steps... 11 Beat... 11 Vocals... 14 FX... 15 Mixdown...
TRAKTOR DJ Studio 2 Quick Reference. Welcome... The TRAKTOR Panels
 Welcome... TRAKTOR DJ Studio 2 Quick Reference...to TRAKTOR DJ Studio 2, the latest and most advanced version of the software that changed the way DJs think about computers. We ve introduced a number of
Introduction. SYNFERNO is a powerful instrument and cinematic sound module for the NATIVE INSTRUMENTS KONTAKT 5 sampler.
 Table of contents Introduction...3 Sytem Requirements...4 Installation.....5 Launching SYNFERNO...6 Playing Loops...8 GUI Overview...10 The EDIT Page...12 The FX Page...14 The SEQ Page...17 MIDI Mapping
Sounds of the Delta Kontakt instrument.
 Sounds of the Delta Kontakt instrument. INDEX 1...How to Install/Load presets. 2...Overview of instrument. 3...Sequencer 4...Effects section and controls. 5...Credits. Thank you for buying our latest Kontakt
SampleCell Editor Addendum
 SampleCell Editor Addendum Version 3.1 for Macintosh Digidesign 2001 Junipero Serra Boulevard Daly City, CA 94014-3886 USA tel: 650 731 6300 fax: 650 731 6399 Technical Support (USA) tel: 650 731 6100
Inear Display AMALGAME
 Inear Display AMALGAME User Guide Version 1.1 Table Of Contents Introduction 3 Overview 4 Installation and First Launch 5 Interface Overview 6 Loading and Saving Presets 7 Effects 8 XY Pad 9 Sequences
HALion 6 HALion Sonic (SE) 3
 3") HALion 6 HALion Sonic (SE) 3 Version history June 2017 Steinberg Media Technologies GmbH HALion 6.0.10 / HALion Sonic (SE) 3.0.10 Improvements & issues resolved The following lists all resolved issues
HALion 6 HALion Sonic (SE) 3 Version history June 2017 Steinberg Media Technologies GmbH HALion 6.0.10 / HALion Sonic (SE) 3.0.10 Improvements & issues resolved The following lists all resolved issues
change to a better tool
 creative tools change to a better tool www.pinnaclesys.com 31000919 burn listen restore MUSIC organize compose You want to create, restore and play music and then burn it all onto CD? Make the most out
Studio Manager. for. Owner s Manual
 Studio Manager for Owner s Manual E i Important Information Exclusion of Certain Liability Trademarks Copyright Manufacturer, importer, or dealer shall not be liable for any incidental damages including
Important Information
 STUDIO MANAGER for Owner s Manual Keep This Manual For Future Reference. E i Important Information Important Information Studio Manager Exclusion of Certain Liability Trademarks Copyright Manufacturer,
Cubase 9.5. Version History. October 2018 Steinberg Media Technologies GmbH
 Cubase 9.5 Version History October 2018 Steinberg Media Technologies GmbH Cubase 9.5.40 Issues & improvements The following list details resolved issues and improvements in this version. Additional improvements
MV-8000 Production Studio. When asked So what s up with the new MV-8000? Here are the opening points to hit The MV-8000 has:
 The Main Points When asked So what s up with the new MV-8000? Here are the opening points to hit The MV-8000 has: Integrated Sampling, MIDI Sequencing, and Audio Recording 2 Samplers In One High Quality
SH-2. PLUG-OUT Software Synthesizer Owner s Manual
 SH-2 PLUG-OUT Software Synthesizer Owner s Manual Copyright 2014 ROLAND CORPORATION All rights reserved. No part of this publication may be reproduced in any form without the written permission of ROLAND
SAINT LOUIS DREAMA Page 2 of 12
 Page 2 of 12 END USER LICENCE AGREEMENT (EULA) Do not use or install the product, software and sound ware and all contents, If you do not agree with these following conditions. By installing or using this
AUDIO VIDEO MEDIA CONTROLLERS. EuCon Application Setup Guide. Document Revision: K
 EuCon Application Setup Guide Document Revision: K MC Control, MC Mix, MC Transport, Studio Monitor Express, Studio Monitor Pro, EuControl, EuCon and EuCon Powered are trademarks of Euphonix Inc. All other
USO RESTRITO. Getting Started
 Getting Started Original Manual: Synkron Revision and Quality Control: C. Bachmann, H. Bischoff, S. Pfeifer, C. Schomburg The information in this document is subject to change without notice and does not
WAVES CLA BASS USER GUIDE
 WAVES CLA BASS USER GUIDE Table of Contents Chapter 1 Introduction...3 1.1 Welcome...3 1.2 Product Overview...3 1.3 Concepts and Terminology...4 1.4 A Few Words from Chris...4 1.5 Components...5 Chapter
QUICKSTART GUIDE ENGLISH ( 3 12 ) INICIO RÁPIDO ESPAÑOL ( ) UTILISATION SIMPLIFIÉ FRANÇAIS ( ) KURZANLEITUNG DEUTSCH ( )
 INICIO RÁPIDO ESPAÑOL ( ) UTILISATION SIMPLIFIÉ FRANÇAIS ( ) KURZANLEITUNG DEUTSCH ( )") QUICKSTART GUIDE ENGLISH ( 3 12 ) INICIO RÁPIDO ESPAÑOL ( 13 22 ) UTILISATION SIMPLIFIÉ FRANÇAIS ( 23 22 ) KURZANLEITUNG DEUTSCH ( 33 42 ) GUIDA RAPIDA ITALIANO ( 43 52 ) BOX CONTENTS Please make sure
QUICKSTART GUIDE ENGLISH ( 3 12 ) INICIO RÁPIDO ESPAÑOL ( 13 22 ) UTILISATION SIMPLIFIÉ FRANÇAIS ( 23 22 ) KURZANLEITUNG DEUTSCH ( 33 42 ) GUIDA RAPIDA ITALIANO ( 43 52 ) BOX CONTENTS Please make sure
Manual by Ludvig Carlson, Anders Nordmark, Roger Wiklander Quality Control: C. Bachmann, H. Bischoff, S. Pfeifer, C. Schomburg
 Getting Started Manual by Ludvig Carlson, Anders Nordmark, Roger Wiklander Quality Control: C. Bachmann, H. Bischoff, S. Pfeifer, C. Schomburg The information in this document is subject to change without
OpenForms360 Validation User Guide Notable Solutions Inc.
 OpenForms360 Validation User Guide 2011 Notable Solutions Inc. 1 T A B L E O F C O N T EN T S Introduction...5 What is OpenForms360 Validation?... 5 Using OpenForms360 Validation... 5 Features at a glance...
GarageBand 3 Getting Started Includes a complete tour of the GarageBand window, plus step-by-step lessons on working with GarageBand
 GarageBand 3 Getting Started Includes a complete tour of the GarageBand window, plus step-by-step lessons on working with GarageBand 1 Contents Chapter 1 7 Welcome to GarageBand 8 What s New in GarageBand
Eventide Inc. One Alsan Way Little Ferry, NJ
 Copyright 2017, Eventide Inc. P/N: 141254, Rev 4 Eventide is a registered trademark of Eventide Inc. AAX and Pro Tools are trademarks of Avid Technology. Names and logos are used with permission. Audio
MDW Hi-Res Parametric EQ Plug-In Guide
 MDW Hi-Res Parametric EQ Plug-In Guide Version 1.0 for Macintosh Digidesign 2001 Junipero Serra Boulevard Daly City, CA 94014-3886 USA tel: 650 731 6300 fax: 650 731 6399 Technical Support (USA) tel: 650
GVI Release Notes Version 3.54 January 12, 2007 Please check for the latest updates.
 GVI Release Notes Version 3.54 January 12, 2007 Please check http://www.tascam.com for the latest updates. Manual Addendum... 1 Using GVI and the VSL Performance Tool... 1 New Feature in 3.54... 1 GSI
The MPC Renaissance & MPC Studio Bible - Demo Tutorial (For MPC Software 2.x)
") The MPC Renaissance & MPC Studio Bible - Demo Tutorial (For MPC Software 2.x) This free tutorial is taken from MPC-Tutor s tutorial book The MPC Renaissance & MPC Studio Bible (MPC Software 2.1 Edition).
The MPC Renaissance & MPC Studio Bible - Demo Tutorial (For MPC Software 2.x) This free tutorial is taken from MPC-Tutor s tutorial book The MPC Renaissance & MPC Studio Bible (MPC Software 2.1 Edition).
StepPolyArp Unit. Step Polyphonic Arpeggiator / Sequencer App & Audio Unit MIDI effect for ios
 StepPolyArp Unit Step Polyphonic Arpeggiator / Sequencer App & Audio Unit MIDI effect for ios Presentation... 1 Application setup... 2 MIDI connections between ios applications... 2 MIDI over WiFi on macos...
ACID PRO 4.0. An overview of new features By Gary Rebholz and Michael Bryant
 ACID PRO 4.0 By Gary Rebholz and Michael Bryant This document explores the new features in ACID PRO 4.0 in great detail. The best way to use this document is to download the trial version of ACID PRO 4.0
CL series Live Recording with Nuendo Live. Using Steinberg Nuendo Live
 CL series Live Recording with Nuendo Live Using Steinberg Nuendo Live 2nd Edition: April 2013 Summary: This guide will show how quick and easy it is to achieve a high quality, live multi-track recording
MPC The MPC2500 comes with 16MB of onboard memory which can be expanded up to 128 MB of RAM via the optional EXM128 memory card.
 MPC 2500 Product Description The Akai Professional MPC2500 Music Production Center combines a 64-Track MIDI Sequencer with a 32-voice 16bit Stereo Digital Sampler. The MPC is a rock solid sequencing and
Structure Professional Sampler Workstation
 Structure Professional Sampler Workstation Version 1.0 Copyright 2007 Digidesign, a division of Avid Technology, Inc. All rights reserved. This guide may not be duplicated in whole or in part without the
Please note that the following issues have been fixed in the 7.1 update.
 7.1, Elements 7.1, LE 7.1 fixed issues Please note that the following issues have been fixed in the 7.1 update. Time Ruler Style If "transparency" is activated for the time ruler in the Edit window, for
WAVES CLA UNPLUGGED USER GUIDE
 WAVES CLA UNPLUGGED USER GUIDE Table of Contents Chapter 1 Introduction...3 1.1 Welcome...3 1.2 Product Overview...3 1.3 Concepts and Terminology...4 1.4 A Few Words from CLA...4 1.5 Components...5 Chapter
bx_digital V2 mono manual
 Index 1. What is bx_digital V2 mono? 3 3.12. Seings (A/B/C/D) 8 3.13. Manual & Help 8 2. Features of the bx_digital V2 mono: 3 3. Overview and Details 3 3.1. EQ-Section 4 3.2. Input Gain and Output Gain
Sales Manual Part II
 Sales Manual Part II In this sales manual, you ll be able to show how to make a song and create a WAV file of the song. Table of Contents Page 1. Main Features of the Sequencer 2 2. How to Demo the Sequencer
echo collective ORION - user guide
 echo collective ORION - user guide ORION system requirements ORION is a fully featured drum set and step sequencer built on and for Kontakt by Native Instruments. In addition to the sequencer, ORION contains
01V96 Editor. Owner s Manual. Special Notices. Contents. Yamaha Pro Audio Global Site
 01V96 Editor Owner s Manual Special Notices The software and this owner s manual are the exclusive copyrights of Yamaha Corporation. Copying of the software or reproduction of this manual in whole or in
FL STUDIO 12. Dark green Mixer Pink Window. Light green Piano roll Purple Pattern. Yellow Playlist Dark blue Playback
 FL STUDIO 12 Categories Dark green Mixer Pink Window Light green Piano roll Purple Pattern Yellow Playlist Dark blue Playback Orange Both Playlist & Piano roll Light blue Navigation Red Help No color Mixed
, What's new in Reason 2.0?
 , English Version 2.0, What's new in Reason 2.0? igital Sampler, 14 Channel Expandable Mixer, Master Song Sequencer, Multiple Effects Processors Analog Polysynth, Shelving and Parametric EQs REX-loop Player
MPC Essentials Release Notes
 MPC Essentials Release Notes About Akai Professional is continually updating and enhancing MPC Essentials. This document lists the new features, fixes and improvements made to your MPC Essentials software.
INSTALLATION. UNDERSCORE is a sample library for Native Instruments Kontakt 5.3 and later. It will NOT work with the free Kontakt Player.
 INSTALLATION UNDERSCORE is a sample library for Native Instruments Kontakt 5.3 and later. It will NOT work with the free Kontakt Player. Before loading any of the instruments in the Instruments folder,
For professional and aspiring DJs.
 For professional and aspiring DJs. MAGIX Digital DJ turns your Mac or PC into a high-end DJ system! Whether you're a DJ novice or a pro, this professional DJ software includes everything a DJ needs: virtual
The Environment. Overview
 Logic-ch6_b.qxd 9/23/02 11:35 AM Page 172 6 The Environment Figure 6.1 Environment objects Overview The Environment is the heart of Logic Audio, and it can seem as complicated as a coronary operation if
Chaos Culture. Multiclip Editor / Multiclip Note preview 1.5. Edited by Jason Cowling
 Chaos Culture Introduction... 2 Important stuff... 2 Setup... 3 Editing clips... 4 Using the editor... 5 Settings... 9 Workflow settings... 10 Performance... 13 Future updates... 13 Editor 1.6.61 / Note
A project is the basic file type in Cubase, in the same way that a document is the basic file type in Microsoft Word.
 CUBASE Menu > Cubase SL help The Cubase.net website: http://www.cubase.net/phpbb2/ A project is the basic file type in Cubase, in the same way that a document is the basic file type in Microsoft Word.
Check the contents of the package
 Read this first! UA-4FX Owner s Manual Copyright 2005 ROLAND CORPORATION All rights reserved. No part of this publication may be reproduced in any form without the written permission of ROLAND CORPORATION.
Cristina Bachmann, Heiko Bischoff, Lillie Harris, Christina Kaboth, Insa Mingers, Matthias Obrecht, Sabine Pfeifer, Benjamin Schütte, Marita Sladek
 Operation Manual Cristina Bachmann, Heiko Bischoff, Lillie Harris, Christina Kaboth, Insa Mingers, Matthias Obrecht, Sabine Pfeifer, Benjamin Schütte, Marita Sladek This PDF provides improved access for
Cubase SX3 / DM2000 V2 Setup and Operation
 Cubase SX3 / DM2000 V2 Setup and Operation Page 1 Cubase SX3 / DM2000 V2 Setup and Operation This document describes setup and operation for remote control of Cubase SX from the DM2000 digital mixing console.
PS04 Pattern Editor. Last Update: Feb,
 PS04 Pattern Editor www.soundside.de Last Update: Feb,12 2004 Index 1. Introduction. 2. Overview of the Pattern Editor. 3. Setting up the Pattern Editor. 4. Loading and playing a Rhythm Pattern in the
manual mix. create. repair.
 mix. create. repair. contents welcome to proximity:eq + 3 install 4 authorization 5 updates 6 stay up to date user interface 7 an overview user interface 8 menu bar user interface 9 parameter section user
Accusonus Inc. Lexington, Massachusetts USA
 The information in this document is subject to change without notice and does not represent a commitment on the part of Accusonus Inc. The software described by this document is subject to a License Agreement
QUICK-START GUIDE ROLAND DJ-808
 QUICK-START GUIDE ROLAND DJ-808 Installation and Setup The Roland DJ-808 requires drivers for both Windows and MacOS operating systems. IMPORTANT NOTE: Please ensure you have the latest available drivers
Waves GTR3 ToolRack Manual
 Waves GTR3 ToolRack Manual Waves GTR ToolRack Manual 1 TABLE OF CONTENTS CHAPTER 1 INTRODUCTION...3 1.1 WELCOME...3 1.2 PRODUCT OVERVIEW...3 1.3 COMPONENTS...4 1.4 AUTOMATION...4 MIDI Automation...4 CHAPTER
SD9 Update Voice Improved the synchronization of the Live Audio Drums when using the HARMONY or DOUBLE features with the lead voice.
 SD9 Update 1.1.2 Half Bar This function has been modified as such: if pressed during the first half of the measure, the 1/2 bar fill is heard during the current measure. However if pressed during the 2
Manual addendum written by Nadine Raihani, Cornelius Lejeune Manual version: 1.3 (09/2008) Software version: 2.0.4
 Software version: 2.0.4") MANUAL ADDENDUM The information in this document is subject to change without notice and does not represent a commitment on the part of NATIVE INSTRUMENTS GmbH. The software described by this document
MANUAL ADDENDUM The information in this document is subject to change without notice and does not represent a commitment on the part of NATIVE INSTRUMENTS GmbH. The software described by this document
New Features in Digital Performer 5.13
 New Features in Digital Performer 5.13 OVERVIEW This document provides late-breaking information about new features in Digital Performer 5.13 not covered in the DP5 manuals. Current system requirements.....................................
Cubase SX / 02R96 Setup and Operation V2
 Page 1 Cubase SX / 02R96 Setup and Operation This document describes setup and operation for remote control of Cubase SX from the 02R96 digital mixing console. These instructions apply to 02R96 V2.0 or
Digital Audio. Amplitude Analogue signal
 Digital Audio The sounds that we hear are air molecules vibrating in a wave pattern. These sound waves are measured by our ear drums and processed in our brain. As computers are digital machines, sound
THE PLAY 5 SYSTEM RELEASE NOTES & INSTALLATION GUIDE
 THE PLAY 5 SYSTEM RELEASE NOTES & INSTALLATION GUIDE EASTWEST SOUNDS Welcome to the PLAY 5 System! Whether this is your first experience with the PLAY System, or you re upgrading from a previous version,
TB-303. Software Bass Line Owner s Manual Roland Corporation 01
 TB-303 Software Bass Line Owner s Manual 2019 Roland Corporation 01 Introduction For details on the settings for the DAW software that you re using, refer to the DAW s help or manuals. About Trademarks
Eventide Inc. One Alsan Way Little Ferry, NJ
 Copyright 2015, Eventide Inc. P/N: 141259, Rev 2 Eventide is a registered trademark of Eventide Inc. AAX and Pro Tools are trademarks of Avid Technology. Names and logos are used with permission. Audio
USER GUIDE. Version Copyright Loopmasters. All rights reserved.
 1 USER GUIDE Version 1.4.1 Copyright 2008-2017 Loopmasters. All rights reserved. 2 CONTENTS Introduction...3 Requirements... 4 Installation...5 Loopcloud Overview... 6 Loopcloud Browser...7 Finding Sounds...
MCompressor. Presets button. Left arrow button. Right arrow button. Randomize button. Save button. Panic button. Settings button
 MCompressor Presets button Presets button shows a window with all available presets. A preset can be loaded from the preset window by double-clicking on it, using the arrow buttons or by using a combination
Really Easy Recording & Editing
 ASME 2011 Really Easy Recording & Editing Katie Wardrobe Midnight Music The Audacity screen... 4 Import audio (a song or SFX)... 4 Before we start...4 Import song into Audacity...4 Adjusting the view...
STEVEN SLATE DRUMS 5 User Manual
 STEVEN SLATE DRUMS 5 User Manual CONTENTS Introduction Sampler Operation Settings Construct Kit Edit Instrument Articulations Dynamics Microphone Section ADSR Mixer Mixer Routing Mapping Grooves 2 4 5
GANG STOMPS. user manual
 GANG STOMPS user manual loops de la Crème - Feb 2017 1 Thank you for purchasing GANG STOMPS! This Kontakt library lets you easily play and control a group of 24 musicians stomping together in a room with
FL STUDIO 20. Dark green Mixer Pink Window. Light green Piano roll Purple Pattern. Yellow Playlist Dark blue Playback
 FL STUDIO 20 Categories Dark green Mixer Pink Window Light green Piano roll Purple Pattern Yellow Playlist Dark blue Playback Orange Both Playlist & Piano roll Light blue Navigation Red Help No color Mixed
AUDIOMODERN SYNC 3 BASIC MANUAL
 BASIC MANUAL THANK YOU FOR BUYING SYNC 3. Please feel free to contact us at audiomodern@mail.com HOW TO INSTALL To install, unzip and drag the instrument-folder to any hard drive. Launch Kontakt and load
Version User s Guide
 EN Sample Manager for MZ-X500/X300 Version 1.1.0 User s Guide Use this manual in combination with the User s Guide that comes with the Instrument. SAMPLEMANAMZX-110-E1A Contents Introduction... 3 What
Supplementary Manual
 MUSIC SYNTHESIZER Supplementary Manual Contents New Functions in MONTAGE Version 1.60... 2 Additional New Effect Types... 3 Additional New Performances... 4 Motion Control... 5 Common/Audio Edit (Common/Audio)...