Raspberry Pi Basic Setup
|
|
|
- Nathaniel Stevenson
- 6 years ago
- Views:
Transcription

1 Raspberry Pi Basic Setup Memory card preparation: Before loading the operating system on the memory card, the card should be formatted with SD Formatter, a program specifically designed for secure digital memory cards. The formatting function available in the Windows operating system should not be used to format these types of cards. Download the program from {SDForm} and install it. After installation, mark the shortcut (or the program itself) to Run as Administrator. Now, connect a card reader/writer suitable for a micro-sd memory card to the PC. Insert the SD or micro- SD memory card into the card reader/writer. Some micro-sd cards and older card reader/writers are incompatible, so it may be necessary to install the micro-sd card in a full-size SD card carrier or adapter and insert the carrier into the reader. When using SD Formatter, generally select the Full (Erase) or (Full Overwrite) Format Type and set the Format Size Adjustment to ON. The time to format is related to the size of the memory card and may require several minutes. The Volume Label is optional and, if used, should reflect the name of the system used with the card (for example, Callisto-Pi) the text is limited to 11 characters. Raspbian image installation: Many systems use the Raspbian distribution, which is a version of Linux. It is necessary to download and install the distribution image on the memory card in a format that is compatible with the RPi. It is not possible to simply copy and paste (or drag-and-drop) the distribution image from a Windows PC to a memory card; instead, a special image writer program is needed. Suitable programs are Win32 Disk Imager {WDImg}, HDD Raw Copy Utility {HDDRaw} and Etcher {Etcher}. The instructions that follow are based on Win32 Disk Imager. Download and install the program and place a shortcut to it on the Desktop. Mark the shortcut (or the program itself) to Run as Administrator. Now, download the Raspbian distribution from {Raspbian} and extract it to the Desktop. Write this image to a 4 GB or larger micro-sd memory card as follows: Determine card s drive letter from My Computer or Explorer and then open Win32 Disk Imager. A drive letter is shown in the Device field in upper-right of Win32 Disk Imager. If you have more than one device plugged into the PC, select the letter corresponding to your memory card (drive letter E: in example above). See last page for copyright and document info, File: Reeve_RPi_BasicSetup.doc, Page 1


 access using a terminal emulator, but later versions do not.")
2 Click the folder icon to right of the Image File input field. Windows Explorer will open (below). Navigate to the location where the Raspbian image is located and select the file. Click Open. In the example below, the image file is located on the Desktop but it has not yet been selected in the File name field. At this time you will be returned to the Win32 Disk Imager user interface. Click the Write button. After a moment the Progress bar will show the Write operation, which requires several minutes. A Class 4 memory card will require more time than a Class 10 card. Be patient. When the Write process finishes, a Success window will pop up. By default, Raspbian distributions prior to Jessie allowed Secure Shell (SSH) access using a terminal emulator, but later versions do not. SSH is required in all setups described in this document. Therefore, for Jessie and later distributions, it is necessary to place an empty text file on the memory card that will enable SSH. This file is not required for Raspbian distributions prior to Jessie. See last page for copyright and document info, File: Reeve_RPi_BasicSetup.doc, Page 2
. Save the file without any extension (ssh not ssh.txt).")
3 Proceed as follows: After writing the Raspbian Jessie (or later) image to the memory card and before removing it from the Windows PC, prepare an empty text file named ssh with a text editor such as NotePad or NotePad++ (it does not matter what is in the file; it can be empty). Save the file without any extension (ssh not ssh.txt). Copy this file to the memory card using normal Windows file explorer copy/paste or drag/drop procedures. Eject the memory card by right-clicking the drive letter in My Computer or Explorer and selecting Eject. Remove the memory card from the reader/writer. Memory card installation: Insert the micro-sd memory card into the slot connector on the bottom of the RPi board. The contacts side of the memory card (see right) should face the board. For some RPi versions, the memory card connector slot is push-to-insert/push-to-release and is self-latching. The card cannot be inserted the wrong way. Gently push the card all the way in and release finger pressure; the card should remain in the holder and not spring out. To release, push again and the card will spring out. Other RPi versions use friction to hold the card; for these simply push the card into the slot until it stops. Simply pull the card to remove it. Network: Connect a high-quality Cat5 network cable between the RPi Ethernet connector and a LAN switch or router. The wired connection is used for provisioning. A WLAN connection can be installed later. Power Supply: Before connecting a 5 Vdc power supply, read this first: DO NOT attempt to power the RPi using a USB port on a desktop or laptop PC or handheld device. Power measurements of the RPi model B+ showed < 1.5 W average dc load. However, when the RPi is booting and depending on connected peripherals, the measured load current can be > 670 ma (3.4 W), too high for a PC USB port. The system should be powered by a well-regulated, low ripple, electrically quiet power source rated 1.0 A at 5.0 Vdc ( 5 W). Using a poor quality power supply will lead to unreliable operation so be sure it meets these requirements. One of the most common problems users have with the RPi is inadequate power supply current. To minimize electrical noise, it is recommended that ferrite beads be installed on the power cable (image below). AC wall power adapter rated 12 W at 5 Vdc with North American ac input plug. One or more clamshell ferrite beads on the dc power lead may help reduce radio frequency interference from the switch-mode power supply. This image shows one bead on the right with three windings of the power lead. The Raspberry Pi uses a micro-usb connector for power. (Image 2014 W. Reeve) See last page for copyright and document info, File: Reeve_RPi_BasicSetup.doc, Page 3
4 Power connection: Connect the 5 V power supply to the micro-usb connector on the RPi. Refer to the table below and watch the LEDs on the RPi board. If the red LED does not illuminate, there is a problem with the power supply. If the green Activity LED turns on and stays on, the memory card may be corrupted. Condition RPi LED Indicators Power off Power LED, Red: OFF Activity LED, Green: OFF Power on, Boot Power LED, Red: ON Activity LED, Green: Flashes during boot Power on, Ready Power LED, Red: ON Activity LED, Green: Occasional flash Ethernet connector Left LED, Yellow: ON 100 Mb/s, OFF 10 Mb/s Right LED, Green: ON link established, Flashes activity OFF if no link Note: Later, when it becomes necessary to remove power from the RPi, the RPi must be properly shutdown (just like a Windows PC). Never remove power without first shutting down the RPi. To shutdown, log into RPi as described in the next section using the SSH terminal. At the prompt enter: sudo halt or sudo shutdown h now All LED indicators on the RPi board except the red power LED will extinguish when the shutdown is complete, requiring only a moment. The LEDs on the GPS receiver boards will not change. Power may then be removed from the RPi board. Secure Shell installation: This guide is based on PuTTY {PuTTY}, which should be downloaded and installed now. Open PuTTY and enter the RPi IP address into the Host Name or IP address field. Do not change the port (22) or Connection type (SSH). You can determine the RPi s IP address from your router LAN status screen or by using a program like Netscan {Netscan} or Advanced IP Scanner {AdvancedIP}. Enter a name for the session (example, GpsNtp-Pi) in the Saved Sessions field. You also can customize the user interface by clicking on the various entries in the Category window but you can do this later. Click the Save button to save the session settings. See last page for copyright and document info, File: Reeve_RPi_BasicSetup.doc, Page 4


5 Upper-left: Screenshot of PuTTY configuration window with the IP address for a test setup. Your installation will have use a different address. Upper-right: Upon first connection, PuTTY asks for authentication; click Yes. Lower-left: When PuTTY is connected, the window changes to a simple command line interface. After login, you can make changes to the RPi as described in this guide. Click Open. After authentication you will see the RPi login prompt in the command line interface. Enter the username and then the password. You will not see characters on the console as you enter the password. Default username: pi Default password: raspberry After logging into RPi, you will see the prompt pi@raspberry - $ At any time you can right-click the bar at the top of the PuTTY window to see the PuTTY menu. Click Change Settings... if you would like to revise the user interface and session settings. See last page for copyright and document info, File: Reeve_RPi_BasicSetup.doc, Page 5

6 This operating system and software are modified and provisioned as described in the following sections. Text in Blue is typed at the RPi prompt Text in Red indicates editing inside a configuration file Initial setup: Several initial setup steps use the built-in nano editor. See the last section for a very brief review of nano commands. Log into the RPi using PuTTY. First, set the default keyboard layout using the nano editor. Replace the xkbmodel= pc105 with xkbmodel= pc104 and xkblayout= gb with xkblayout= us : sudo nano /etc/default/keyboard # KEYBOARD CONFIGURATION FILE # Consult the keyboard(5) manual page. XKBMODEL="pc104" XKBLAYOUT="us" XKBVARIANT="" XKBOPTIONS="lv3:ralt_switch,terminate:ctrl_alt_bksp" BACKSPACE="guess" Type CTRL-X (Exit), Y (yes), Enter to save and close the editor. Change host name: To change the host name (example, My-Pi), edit the /etc/hosts file: sudo nano /etc/hosts Change the name associated with address (do not change ), as in: My-Pi (this is an example, use the desired name for your application) Similarly, replace the name in the /etc/hostname file: sudo nano /etc/hostname See last page for copyright and document info, File: Reeve_RPi_BasicSetup.doc, Page 6
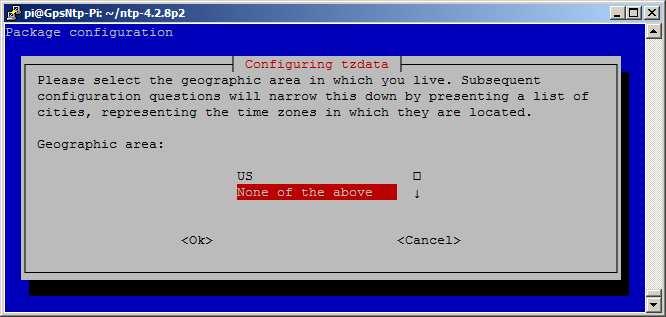
7 Change the name from raspberry, as in My-Pi (this is an example, use the desired hostname for your application) Type CTRL-X (Exit), Y (yes), Enter to save and close the editor. After changes have been made to both the hosts and hostname files, commit the changes to the kernel by entering sudo /etc/init.d/hostname.sh sudo reboot Change password: Log into the RPi using the defaults: User: pi Password: raspberry At the prompt enter the following command: passwd Note: Only change the password for user: pi as instructed above DO NOT entersudo passwd RPi responds with: Changing password for pi (current) UNIX password: Enter the current (default) password. No characters will be displayed. Enter the new password and confirm it when RPi responds with: Enter new UNIX password: Retype new UNIX password: Enter the new password. After RPi accepts the new password you will see the following. The new password will take effect immediately: passwd: password updated successfully Enter the following command at the prompt. After a moment a window will appear with a list of settings. Use the arrow keys to select the desired option, press Tab to Select and then Enter: sudo raspi-config Select Option 9. Advanced Options A0 Update. This option updates to the latest Raspi-Config tool. Select Option 1. Expand filesystem Select Option 5. Internationalization Options Option I1. Change Locale en_us.utf-8 UTF-8. Use the spacebar to deselect en_gb.utf-8 UTF-8. Scroll down to en_us.utf-8 UTF-8 and select it with the spacebar. Scroll through the entire list to make sure only one Locale is selected Select Option 5. Internationalization Options Option I2. Change Timezone. On Configuring tzdata window, select None of the Above and then UTC. The UTC timezone is required for the NTP server application Select Option 5. Internationalization Options Option I3. Change Keyboard Layout See last page for copyright and document info, File: Reeve_RPi_BasicSetup.doc, Page 7


8 Select Option 9. Advanced Options A8 Enable or Disable Serial Shell Accessible No. This option is required to disable system messages from appearing on the internal serial port (TxD and RxD). Finish & Reboot Example screenshots are shown below. See last page for copyright and document info, File: Reeve_RPi_BasicSetup.doc, Page 8


9 See last page for copyright and document info, File: Reeve_RPi_BasicSetup.doc, Page 9

10 When initial setup is complete: sudo reboot Now it is necessary to update the software and operating system. These steps may require several minutes and the screen may appear to freeze at times but be patient: sudo apt-get update sudo apt-get dist-upgrade sudo rpi-update sudo reboot See last page for copyright and document info, File: Reeve_RPi_BasicSetup.doc, Page 10
11 Timekeeping The RPi does not have a hardware real-time clock and uses a software clock instead. By default the Raspbian operating system uses the Network Time Protocol for timekeeping. The NTP always uses Coordinated Universal Time (UTC) but the RPi clock itself may be set to any time zone by runningraspi-config as described above. However, it is recommended that UTC be used for all technical RPi projects. The Raspbian Stretch version (available September 2017) apparently does not include NTP; therefore, install it uing sudo apt-get update && sudo apt-get -y install ntp The default NTP configuration uses a pool of NTP servers as shown immediately below. # pool.ntp.org maps to about 1000 low-stratum NTP servers. Your server will # pick a different set every time it starts up. Please consider joining the # pool: < server 0.debian.pool.ntp.org iburst server 1.debian.pool.ntp.org iburst server 2.debian.pool.ntp.org iburst server 3.debian.pool.ntp.org iburst For many projects there is no reason to change the server list but for projects that rely on the RPi clock for data time-stamping, the default pool should be refined to use time servers based in the country or region where the RPi is to be located. A list of server pools may be found at {NTPPool}. To edit the NTP configuration file: sudo nano /etc/ntp.conf For the United States, replace the four servers listed above with server 0.us.pool.ntp.org iburst server 1.us.pool.ntp.org iburst server 2.us.pool.ntp.org iburst server 3.us.pool.ntp.org iburst Type CTRL-X (Exit), Y (yes), Enter to save and close the editor. Now, restart the NTP service: sudo service ntp restart To query NTP ntpq crv -p Backup and Restore Backup your RPi software images after provisioning. See {BkRsRPi} for procedures. Software Manuals See last page for copyright and document info, File: Reeve_RPi_BasicSetup.doc, Page 11
12 Each software function in the RPi software has a manual, which can be accessed by typing at the promptman followed by the function name. For example, to read the manual for the NTP daemon, typeman ntpd and for the GPS daemon, typeman gpsd. Some Useful Software Tools To monitor CPU and memory load, use the top command or install a similar tool called htop. To use top, enter top To install htop, enter sudo apt-get install htop and to use it, enter htop Exit both top and htop with CTRL-C. To determine the CPU temperature enter vcgencmd measure_temp or /opt/vc/vcgencmd measure_temp To determine the usage on the micro-sd or SD memory card, use the disk filesystem command df h To reduce space used by archived logs, use WinSCP to check following directory for archived log files (*.gz) /var/log/ If archived files exist and you do not want them, go to a PuTTY (or console) command prompt and enter cd /var/log/ ls sudo rm *.gz The above commands change the directory, list the files and then remove (delete) all files with the.gz extension. See last page for copyright and document info, File: Reeve_RPi_BasicSetup.doc, Page 12

13 Nano Editor Use arrow keys to move the cursor. Move cursor to beginning of text to be copied or cut. To select text, ALT-a and then use arrow keys To copy selected text, ALT-^ To cut selected text, CTRL-k To paste selected text, CTRL-u WinSCP WinSCP is a very useful program (SCP is Secure Copy Protocol) when operating and setting up the RPi from a Windows PC. It is similar to Windows file explorer and can be downloaded from With WinSCP, the RPi files can be dragged/dropped to and from a Windows environment, something not easily done with the RPi console. After download, install WinSCP in the normal way; choose Typical Installation (default) and then when the Initial User Settings window appears, select the Explorer User interface style (not the default), see below. If you already have PuTTY installed on the PC, WinSCP will ask if the sites in PuTTy should be imported; select Yes to simplify later use. The next window displayed during installation will list the sites and some can be unselected if desired. When the installation finishes, the last window allows WinSCP to be launched, or it can be launched the normal way from Windows. When WinSCP is first launched, a Login window will open that allows a new or existing site to be selected, see example below that shows the New Site selected and an existing site imported from PuTTY in the left pane. See last page for copyright and document info, File: Reeve_RPi_BasicSetup.doc, Page 13


14 For a new site, enter the hostname or IP address in the Host name field in the right frame. Below that enter the associated User name and Password and click the Login button. A Warning window will popup. Click Yes. See last page for copyright and document info, File: Reeve_RPi_BasicSetup.doc, Page 14
")
15 Next, the main WinSCP window will open (see below). The left pane will show the entire RPi directory structure (it may be necessary to double-click /<root> a couple times). Any directory can be opened in the right pane by double-clicking the directory, and files can be dragged and dropped from a Windows folder on the PC (such as My Computer or any File Explorer window) to the selected location on the RPi. To edit a file in WinSCP, rightclick it and select Edit from the list, or simply double-click the file. Web Links and References {AdvancedIP} {BkRsRPi} {Etcher} {HDDRaw} {Netscan} {NTPPool} {PuTTY} {Raspbian} {SDForm} {WDImg} See last page for copyright and document info, File: Reeve_RPi_BasicSetup.doc, Page 15
16 Document information Author: Whitham D. Reeve Copyright: 2015 ~ 2017 W. Reeve Revision: 0.0 (Original taken from GpsNtp-Pi Setup Guide, 13 Feb 2015) 0.1 (Updates and added nano editor, 01 Mar 2015) 0.2 (Added IP scanner, 26 Apr 2015) 1.0 (Initial distribution, 29 Apr2015) 1.1 (Minor edits, 21 Jun 2015) 1.2 (Added timekeeping section, 20 Dec 2015) 1.3 (New Raspi-Config, 03 Jan 2016) 1.4 (Added WinSCP, 04 Aug 2016) 1.5 (Added requirement for ssh file, 18 Feb 2017) 1.6 (Clarified hosts and hostname, 03 Mar 2017) 1.7 (Added SD Formatter, 14 Mar 2017) 1.8 (Memory card slot types, 02 Apr 2017) 1.9 (Updated hosts/hostname instructions, 02 Jul 2017) 2.0 (Added top, htop and measure temp, 22 Jul 2017) 2.1 (Added note about password and added NTP for Raspbian Stretch, 12 Sep 2017) 2.2 (Added file management, 19 Nov 2017) See last page for copyright and document info, File: Reeve_RPi_BasicSetup.doc, Page 16
GpsNtp-Pi Network Time Server ~ Supplement
 GpsNtp-Pi Network Time Server ~ Supplement Whitham D. Reeve 1. Introduction This document applies to manufactured GpsNtp-Pi units and is meant to supplements the general description and installation guide
Setup Wireless LAN (WLAN) on the Raspberry Pi
 on the Raspberry Pi") Setup Wireless LAN (WLAN) on the Raspberry Pi 1. Introduction Adding a wireless LAN connection to the Raspberry Pi (RPi) requires only a USB wireless access device (also called WLAN dongle and Wi-Fi dongle)
Setup Wireless LAN (WLAN) on the Raspberry Pi 1. Introduction Adding a wireless LAN connection to the Raspberry Pi (RPi) requires only a USB wireless access device (also called WLAN dongle and Wi-Fi dongle)
Network Time Protocol and Meinberg NTP Time Server Monitor ~ Installation Guide. 1. Introduction. 2. NTP Installation
 Network Time Protocol and Meinberg NTP Time Server Monitor ~ Installation Guide Whitham D. Reeve 1. Introduction This installation guide provides step-by-step instructions for installing the Network Time
Raspberry Pi NTP Clock Setup Guide
 Raspberry Pi NTP Clock Setup Guide Several steps are involved in getting your Raspberry Pi to operate as a NTP Clock. To begin with, you must obtain a LCD Plate (www.adafruit.com) and build it. You must
Install the Minicom Terminal Emulator for Use with Callisto-Lx
 Install the Minicom Terminal Emulator for Use with Callisto-Lx Whitham D. Reeve 1. Introduction Minicom is an ASCII text-based, menu-driven serial communication program for Linux that is used to allow
Installation and Operation Guide See last page for copyright and document information
 GpsNtp- ~ Installation and Operation Guide See last page for copyright and document information GpsNtp-Pi ~ Installation and Operation Guide Table of Contents 1. Introduction... 1 2. Hardware Assembly...
XLink Kai Raspberry Pi Beginners Tutorial
 XLink-Kai-Raspberry-Pi-Beginners-Tutorial.md XLink Kai Raspberry Pi Beginners Tutorial Hi! This tutorial will guide you through setting up XLink Kai on a Raspberry Pi to play multiplayer system link Xbox
Adafruit's Raspberry Pi Lesson 6. Using SSH
 Adafruit's Raspberry Pi Lesson 6. Using SSH Created by Simon Monk Last updated on 2017-08-16 01:12:07 AM UTC Guide Contents Guide Contents Overview Enabling SSH Using a blank boot file Using Raspi-Config
RETROPIE INSTALLATION GUIDE
 RETROPIE INSTALLATION GUIDE CONTENTS THE FOLLOWING GUIDE WILL COVER THE INSTALLATION, SETUP AND CONFIGURATION OF THE RASPBERRY PI, RASPBIAN OS AND RETROPIE Author: http://rpiarcadebuild.wordpress.com/
Raspberry Pi Setup Tutorial
 Raspberry Pi Setup Tutorial The Raspberry Pi is basically a miniature linux- based computer. It has an ARM processor on it, specifically the ARM1176JZF- S 700 MHz processor. This is the main reason why
Raspberry Pi 3 Model B+ and JMRI with WiFi Access Point for Pi- SPROG One and Pi-SPROG Nano raspian-stretch build
 Raspberry Pi 3 Model B+ and JMRI with WiFi Access Point for Pi- SPROG One and Pi-SPROG Nano 2018-03-13-raspian-stretch build May 2018 SPROG DCC These instructions describe the process of setting up a Raspberry
Callisto-Pi: Callisto Spectrograms from Raspberry Pi
 Callisto-Pi: Callisto Spectrograms from Raspberry Pi Whitham D. Reeve 1. Introduction This paper describes how to use the inexpensive Raspberry Pi computer to automatically produce spectrogram images in
Manual of ET-LCD SW HAT
 ET- LCD SW HAT ET-LCD SW HAT is Board I/O that is specifically designed for connection with Board Raspberry Pi through Connector 40-PIN; this board includes LCD 16x2, SW, Buzzer, RTC DS3231 with Connector
Lab 0: Intro to running Jupyter Notebook on a Raspberry Pi
 Lab 0: Intro to running Jupyter Notebook on a Raspberry Pi Nick Antipa, Li-Hao Yeh, based on labs by Jon Tamir and Frank Ong January 24, 2018 This lab will walk you through setting up your Raspberry Pi
Experiments 1 How to set up Raspberry Pi B+ The little computer you can cook into DIY tech projects
 Experiments 1 How to set up Raspberry Pi B+ The little computer you can cook into DIY tech projects The Raspberry Pi is a computer about the size of a credit card. The darling of the do-it-yourself electronics
Digital Free Library. Created by Kirby Griese. Last updated on :35:15 PM UTC
 Digital Free Library Created by Kirby Griese Last updated on 2018-01-04 04:35:15 PM UTC Guide Contents Guide Contents Overview Parts Needed Preparation Prepare Micro SD Card Install Apache Configure Access
NANO-SPOT Personal Digital Hotspot
 NANO-SPOT Personal Digital Hotspot User's Manual REVISION 1.01 Micro-Node International, Inc. - Henderson, Nevada Table of Contents 1.0 NANO-SPOT DESCRIPTION... 3 2.0 INCLUDED ACCESSORIES... 3 3.0 GETTING
RaspiDigiHamClock. Raspberry Pi Amateur Radio Digital Clock. v WA4EFH R.Grokett
 RaspiDigiHamClock Raspberry Pi Amateur Radio Digital Clock v2018-07-08 WA4EFH R.Grokett Overview Amateur Radio Operators (aka HAM Radio) use 24 hour UTC (Universal Coordinated Time) for much of their operation.
How Do I Recover infiniti Remotes and Line Cards?
 How Do I Recover infiniti Remotes and Line Cards? Date: June 26, 2008 Overview This FAQ contains the following information and procedures pertaining to ids Release 6.0.1 and later: Before Attempting to
Davide Cavaliere 18 th February 2017
 Davide Cavaliere www.monocilindro.com dadez87@gmail.com 18 th February 2017 This guide explains how to set in read mode your Raspberry Pi 3, running the latest Raspbian Jessie (January 2017). This feature
Adafruit's Raspberry Pi Lesson 1. Preparing an SD Card for your Raspberry Pi
 Adafruit's Raspberry Pi Lesson 1. Preparing an SD Card for your Raspberry Pi Created by Simon Monk Last updated on 2016-12-03 03:20:15 AM UTC Guide Contents Guide Contents Overview You Will Need Downloading
Appliance Guide. Version 1.0
 Appliance Guide Version 1.0 Contents Contents 1 Revision history 2 Getting Started 3 Getting to Know the R7-3000/5000/5000x 5 Getting to Know the R7-1000 6 Setting Up the Appliance 7 Logging in to the
System Manager Unit (SMU) Hardware Reference
 Hardware Reference") System Manager Unit (SMU) Hardware Reference MK-92HNAS065-02 Notices and Disclaimer Copyright 2015 Hitachi Data Systems Corporation. All rights reserved. The performance data contained herein was obtained
System Manager Unit (SMU) Hardware Reference MK-92HNAS065-02 Notices and Disclaimer Copyright 2015 Hitachi Data Systems Corporation. All rights reserved. The performance data contained herein was obtained
ToF T1 User Guide. a module solution provider. Date: 2017/02/13. Hardware Test Supervisor. Software Test Engineer. Center Supervisor Rex
 a module solution provider ToF T1 User Guide Date: 2017/02/13 Software Test Engineer Hardware Test Supervisor Test Supervisor Center Supervisor Rex Copyright JORJIN TECHNOLOGIES INC. LIMITED 2014 Version
Raspberry Pi 3 Model B and JMRI with WiFi Access Point for Pi-SPROG One and Pi-SPROG Nano raspian-jessie build
 Raspberry Pi 3 Model B and JMRI with WiFi Access Point for Pi-SPROG One and Pi-SPROG Nano 2017-04-10-raspian-jessie build June 2017 SPROG DCC These instructions describe the process of setting up a Raspberry
Lab #5 Guide: Installing Ubuntu as a Virtual Machine
 Lab #5 Guide: Installing Ubuntu as a Virtual Machine CTEC1863/2018F Operating Systems Mike Boldin Tools, Materials and Equipment Oracle VirtualBox software official site: https://www.virtualbox.org/wiki/downloads
Helsinki 19 Jan Practical course in genome bioinformatics DAY 0
 Helsinki 19 Jan 2017 529028 Practical course in genome bioinformatics DAY 0 This document can be downloaded at: http://ekhidna.biocenter.helsinki.fi/downloads/teaching/spring2017/exercises_day0.pdf The
Adafruit PiUART - USB Console and Power Add-on for Raspberry Pi
 Adafruit PiUART - USB Console and Power Add-on for Raspberry Pi Created by lady ada Last updated on 2017-08-29 10:20:23 PM UTC Guide Contents Guide Contents Overview Pinouts Enabling Serial Console Option
All rights reserved by Waveshare Electronics Co., Ltd. Not allow to modify, distribute, or copy without permission.
 DVK512 User Manual Copyright All rights reserved by Electronics Co., Ltd. Not allow to modify, distribute, or copy without permission. Revision History Revision Date Description V1.0 Aug. 18, 2014 Initial
Experimental Procedure. Frequently Asked Questions (FAQ) Kit General Questions. Setting Up and Using Your Raspberry Pi Projects Kit
 Kit General Questions. Setting Up and Using Your Raspberry Pi Projects Kit") 1 of 11 9/13/2018, 2:31 PM https://www.sciencebuddies.org/science-fair-projects/project-ideas/compsci_p059/computer-science/design-your-own-video-game (http://www.sciencebuddies.org/science-fairprojects/project-ideas/compsci_p059/computer-science/design-your-own-video-game)
1 of 11 9/13/2018, 2:31 PM https://www.sciencebuddies.org/science-fair-projects/project-ideas/compsci_p059/computer-science/design-your-own-video-game (http://www.sciencebuddies.org/science-fairprojects/project-ideas/compsci_p059/computer-science/design-your-own-video-game)
USER MANUAL: 4G. The PiIoT is a WAN communications board which provides a 2G / 3G / 4G
 USER MANUAL: 4G The PiIoT is a WAN communications board which provides a 2G / 3G / 4G wireless interface for the Raspberry Pi 2 and 3. Conforming to the HAT specification, the PiIoT also provides location
Author A.Kishore/Sachin WinSCP
 WinSCP WinSCP is a freeware windows client for the SCP (secure copy protocol), a way to transfer files across the network using the ssh (secure shell) encrypted protocol. It replaces other FTP programs
Sun VirtualBox Installation Tutorial
 Sun VirtualBox Installation Tutorial Installing Linux Mint 5 LTS Guest OS By Dennis Berry Welcome to the world of virtualization and Linux. This tutorial is intended to help users who are new to the world
Preparing SD card for Pi
 Preparing SD card for Pi Sarwan Singh Assistant Director(S) NIELIT Chandigarh Education is the kindling of a flame, not the filling of a vessel. - Socrates 1 sarwan@nielit Using NOOBS- New Out Of Box Software
VI-CENTER EXTENDED ENTERPRISE EDITION GETTING STARTED GUIDE. Version: 4.5
 VI-CENTER EXTENDED ENTERPRISE EDITION GETTING STARTED GUIDE This manual provides a quick introduction to Virtual Iron software, and explains how to use Virtual Iron VI-Center to configure and manage virtual
High Voltage Module Raspberry Pi Documentation Page 1
 Raspberry Pi Setup High Voltage Documentation Instrumentation Development Lab Department of Physics and Astronomy University of Hawaii at Manoa AUTHOR: Cameron Asaoka DATE: 7/6/2017 High Voltage Module
Guide to your Plug Computer
 This document lives here: http://inst.eecs.berkeley.edu/~ee122/fa11/project3/guide-to-plug.pdf Guide to your Plug Computer UC Berkeley, EE 122, Fall 2011 Version 1 This document is a step-by-step guide
idirect Technical Note 1. INTRODUCTION 2. DIFFERENCES BETWEEN INFINITI AND NETMODEM II+ SERIES
 idirect Technical Note Subject: Recovering infiniti Remotes Date: March 10, 2006 Applies To: Version 6.0.1 and Later 1. INTRODUCTION This technical note contains information and procedures pertaining to:
iridium Server for Raspberry Pi
 Эта страница является переводом страницы Rpi. Перевод выполнен на 100%. Другие языки: English русский iridium Server for Raspberry Pi Installing and setting up a server in a project i3 lite iridium Sever
DX System Operating Guide
 DX System Operating Guide Supported by: Technology Corporation Rackit Technology Corporation 274 Madison Avenue, New York, NY 10016 Tel: (212) 679-0050 Fax: (212) 679-0040 1. 8 0 0. 6 3 6. 3 4 3 4 w International
You can use the WinSCP program to load or copy (FTP) files from your computer onto the Codd server.
 files from your computer onto the Codd server.") CODD SERVER ACCESS INSTRUCTIONS OVERVIEW Codd (codd.franklin.edu) is a server that is used for many Computer Science (COMP) courses. To access the Franklin University Linux Server called Codd, an SSH connection
CODD SERVER ACCESS INSTRUCTIONS OVERVIEW Codd (codd.franklin.edu) is a server that is used for many Computer Science (COMP) courses. To access the Franklin University Linux Server called Codd, an SSH connection
Raspberry Pi 2b PART 1. Table of Contents. Step by step guide. 1. Hardware (0:05) RS Online (ex-tax prices)... 3 MSY ebay...
 RS Online (ex-tax prices)... 3 MSY ebay...") Step by step guide PART 1 Table of Contents 1. Hardware (0:05)... 3 RS Online (ex-tax prices)... 3 MSY... 4 ebay... 4 Centercom Computers... 4 2. Installing the operating system (0:21)... 5 Preparing the
Step by step guide PART 1 Table of Contents 1. Hardware (0:05)... 3 RS Online (ex-tax prices)... 3 MSY... 4 ebay... 4 Centercom Computers... 4 2. Installing the operating system (0:21)... 5 Preparing the
IT 341 Introduction to System Administration Project I Installing Ubuntu Server on a Virtual Machine
 IT 341 Introduction to System Administration Project I Installing Ubuntu Server on a Virtual Machine Here we create a new virtual machine and install Ubuntu 16.04 LTS Server on it. In this instance, we
Zenoss Resource Manager Upgrade Guide
 Zenoss Resource Manager Upgrade Guide Release 6.2.0 Zenoss, Inc. www.zenoss.com Zenoss Resource Manager Upgrade Guide Copyright 2018 Zenoss, Inc. All rights reserved. Zenoss, Own IT, and the Zenoss logo
Installing the Operating System or Hypervisor
 If you purchased E-Series Server or NCE Option 1 (E-Series Server or NCE without a preinstalled operating system or hypervisor), you must install an operating system or hypervisor. This chapter includes
DXi6900-S Software Installation and Upgrade Guide
 DXi6900-S Software Installation and Upgrade Guide This document contains the following topics: Introduction 2 Checking for Software Upgrades 2 Contacting Quantum 3 Performing a Fresh Software Installation
Upgrading to the Raspberry Pi 3B or Pi 3B+ 1
 Upgrading to the Raspberry Pi 3B or Pi 3B+ 1 By Sandy McCauley April 30, 2018 Part 1: Before you commit to doing this NOTE: This is NOT a KNK USA-published procedure. Any questions should be directed to
Lab: Setting up PL-App with a Raspberry Pi
 Lab Topology Objectives Set up a Raspberry Pi board as a PL-App device Use PL-App Launcher to provision and discover PL-App devices Background Cisco Prototyping Lab is a set of hardware and software components
Wallet Installation Guide for Staking on Raspberry PI
 Wallet Installation Guide for Staking on Raspberry PI V2.1 November 2018 CONTENTS 01. Version History... 13 02. Introduction... 3 03. Prerequisites... 13 04. Installation Steps... 6 05. Add an address
Web Console Setup & User Guide. Version 7.1
 Web Console Setup & User Guide Version 7.1 1 Contents Page Number Chapter 1 - Installation and Access 3 Server Setup Client Setup Windows Client Setup Mac Client Setup Linux Client Setup Interoperation
IoTivity Development on ARTIK 530s
 Getting Started Guide Sungdong Kim SAMSUNG IoTivity Development on ARTIK 530s G E T T I N G S T A R T E D G U I D E Version 1.0, October 24, 2018 Table of Contents Summary... 3 OCF and IoTivity... 3 The
Lab - Install Windows 7 or Vista
 Introduction In this lab, you will install the Windows 7 or Vista operating system. Recommended Equipment A computer with a blank hard disk drive Windows 7 or Vista installation DVD or USB flash drive
Step-by-step guide for the libradtran virtual machine. A) Installation
 Installation") Step-by-step guide for the libradtran virtual machine July 2014 A) Installation You need approximately 7GB of free disk space on your computer to install the virtual machine. Step 1) Extract the archive
Step-by-step guide for the libradtran virtual machine July 2014 A) Installation You need approximately 7GB of free disk space on your computer to install the virtual machine. Step 1) Extract the archive
Spreedbox Getting Started Guide
 Spreedbox Getting Started Guide Last Updated: September 2017 CONTENTS 1. Introduction... 3 2. Prerequisites... 4 3. Opening the box... 5 4. USB Manual, Quick Start Guide & MAC Sticker... 6 5. International
O ptima S aver P i. User Guide. January 2017 Version 1.0
 O ptima S aver P i User Guide January 2017 Version 1.0 T able O f C ontents Page 1. What is OptimaSaverPi -------------------------- 2 2. Why OptimaSaverPi -------------------------- 2 3. Requirement --------------------------
Applied ICT Skills MS Windows
 Applied ICT Skills MS Windows Lesson 1 - How to install an operating system into computer? Windows 7 is perhaps the best Microsoft operating system and is very easy to install compared to other windows.
Deploy the ExtraHop Discover Appliance 1100
 Deploy the ExtraHop Discover Appliance 1100 Published: 2018-07-17 The following procedures explain how to deploy an ExtraHop Discover appliance 1100. System requirements Your environment must meet the
Contents. Crave Masternode Setup Guides. Single / Multiple Local Masternode(s) Single Masternode using a VPS. Multiple Masternodes using a VPS
 Single Masternode using a VPS. Multiple Masternodes using a VPS") Contents Crave Masternode Setup Guides Single / Multiple Local Masternode(s) 1 Requirements...1 2 Preparing Masternodes...1 3 Preparing Controller Wallet...2 4 Masternode Configuration...3 5 Starting Masternodes...3
Contents Crave Masternode Setup Guides Single / Multiple Local Masternode(s) 1 Requirements...1 2 Preparing Masternodes...1 3 Preparing Controller Wallet...2 4 Masternode Configuration...3 5 Starting Masternodes...3
Topics. What is a RaspberryPi? Why should I want one? What is Raspbian? What is SSH? What is FTP? What is LAMP? Making a LAMP Stack!
 Topics What is a RaspberryPi? Why should I want one? What is Raspbian? What is SSH? What is FTP? What is LAMP? Making a LAMP Stack! What is a Raspberry Pi? The Raspberry Pi is a Credit Card sized computer.
IT Essentials v6.0 Windows 10 Software Labs
 IT Essentials v6.0 Windows 10 Software Labs 5.2.1.7 Install Windows 10... 1 5.2.1.10 Check for Updates in Windows 10... 10 5.2.4.7 Create a Partition in Windows 10... 16 6.1.1.5 Task Manager in Windows
CCNA 1 Chapter 2 v5.0 Exam Answers 2013
 CCNA 1 Chapter 2 v5.0 Exam Answers 2013 1. Refer to the exhibit. A switch was configured as shown. A ping to the default gateway was issued, but the ping was not successful. Other switches in the same
RAK831 Pilot Gateway User Manual V1.0
 RAK831 Pilot Gateway User Manual V1.0 Shenzhen Rakwireless Technology Co., Ltd www.rakwireless.com info@rakwireless.com 2018 Rakwireless all rights reserved. in this document, the actual company and product
WLM1200-RMTS User s Guide
 WLM1200-RMTS User s Guide Copyright 2011, Juniper Networks, Inc. 1 WLM1200-RMTS User Guide Contents WLM1200-RMTS Publication Suite........................................ 2 WLM1200-RMTS Hardware Description....................................
Silex SD-320AN-03 Serial Server
 GE Healthcare Silex SD-320AN-03 Serial Server Firmware Upgrade Instructions 2106794-001 Revision B Silex SD-320AN-03 Serial Server English 2018 General Electric Company. All Rights Reserved. Publication
Sysinstall main menu. Move the cursor down by using the DOWN-ARROW and select Standard.
 Initial Boot from Install Disc 1 Turn on the power for your machine. Sysinstall main menu Immediately place the first CD-ROM of the FreeBSD 5.3 install set in your machine's CD-ROM drive. You'll see an
Spring 2017 Gabriel Kuri
 Lab 2 ECE 431L Spring 2017 Gabriel Kuri This lab is made up of two parts. Part 1 will consist of familiarizing yourself with the Raspberry Pi (RPi). It includes running Unix/Linux commands to become somewhat
WinSCP. Author A.Kishore/Sachin
 WinSCP WinSCP is a freeware windows client for the SCP (secure copy protocol), a way to transfer files across the network using the ssh (secure shell) encrypted protocol. It replaces other FTP programs
Gooligum Electronics 2015
 The Wombat Prototyping Board for Raspberry Pi Operation and Software Guide This prototyping board is intended to make it easy to experiment and try out ideas for building electronic devices that connect
Upgrading the Fiery CS IC-310 to system software version 2.0
 Upgrading the Fiery CS IC-310 to system software version 2.0 Overview This document describes how to upgrade the Fiery CS IC-310 to system software, version 2.0. Notify the site administrator that some
Sedao Ltd SAM-MZ. Multi Zone Digital Signage Player User manual revised August 2012
 Sedao Ltd SAM-MZ Multi Zone Digital Signage Player User manual revised August 2012 Contents Introduction... 2 Unpacking your SAM-MZ... 2 Step 1) Installing your SAM-MZ... 3 What s on screen?... 4 Turning
CIS 231 Windows 7 Install Lab #2
 CIS 231 Windows 7 Install Lab #2 1) To avoid certain problems later in the lab, use Chrome as your browser: open this url: https://vweb.bristolcc.edu 2) Here again, to avoid certain problems later in the
MAGNUM-SDVN Security Administration Manual
 MAGNUM-SDVN Security Administration Manual Revision 19: November 21, 2017 Contents Overview... 3 Administrative Access... 4 Logging Into Terminal Locally... 4 Logging Out Of Local Terminal... 4 Logging
Windows XP. A Quick Tour of Windows XP Features
 Windows XP A Quick Tour of Windows XP Features Windows XP Windows XP is an operating system, which comes in several versions: Home, Media, Professional. The Windows XP computer uses a graphics-based operating
Configure router. 26. Start AirPort Utility (located in the Utilities folder). The AirPort Utility window show a component diagram:
. The AirPort Utility window show a component diagram:") Configure router The Raspberry Pi 3 (RPi) should be assigned a fixed IP address in the router. After installing osmc for the first time, you should configure the router. 26. Start AirPort Utility (located
Configure router The Raspberry Pi 3 (RPi) should be assigned a fixed IP address in the router. After installing osmc for the first time, you should configure the router. 26. Start AirPort Utility (located
Xtra-PC User Guide. Published: April 2017 Edition: 2 Xtra-PC 4.0. Copyright Xtra-PC. All Rights Reserved.
 Xtra-PC User Guide Published: April 2017 Edition: 2 Xtra-PC 4.0 Copyright 2014-2017 Xtra-PC. All Rights Reserved. Table of Contents Overview of Xtra-PC... 4 Hardware Requirements... 4 Initial Setup...
1. USB to Serial cable driver installation instructions 2. Instructions for use with Raspberry Pi 3. Instructions for use with WRT54g and similar
 TechnoFix This document contains three sections: 1. USB to Serial cable driver installation instructions 2. Instructions for use with Raspberry Pi 3. Instructions for use with WRT54g and similar Please
WSDA User Guide
 User Guide Version 8500-0029 rev. 006 WSDA -1000 User Guide www.microstrain.com Little Sensors, Big Ideas. 2012 by 459 Hurricane Lane, Suite 102 Williston, VT 05495 Phone 802-862-6629 Fax 802-863-4093
System Management Unit (SMU)
") System Management Unit (SMU) Hardware Reference Guide The SMU400 is a 1U rack mounted device, used to manage the servers and clusters of the Hitachi NAS Platform, Hitachi HUS File Module, and Hitachi Virtual
System Management Unit (SMU) Hardware Reference Guide The SMU400 is a 1U rack mounted device, used to manage the servers and clusters of the Hitachi NAS Platform, Hitachi HUS File Module, and Hitachi Virtual
CHAPTER 2 ACTIVITY
 CHAPTER 2 ACTIVITY 2.1.1.1 1. CLI stands for 2. GUI stands for 3. Write the step you used to go to CLI interface on Windows 4. The OS, normally loads from a disk drive, into RAM. 5. The portion of the
CIS 231 Windows 10 Install Lab # 3
 CIS 231 Windows 10 Install Lab # 3 1) To avoid certain problems later in the lab, use Chrome as your browser: open this url: https://vweb.bristolcc.edu 2) Here again, to avoid certain problems later in
Network Configuration Example
 Network Configuration Example Adding a New Routing Device to Your Network Modified: 2017-01-17 Juniper Networks, Inc. 1133 Innovation Way Sunnyvale, California 94089 USA 408-745-2000 www.juniper.net All
BeagleBone Black: Installing Operating Systems
 BeagleBone Black: Installing Operating Systems Created by Justin Cooper Last updated on 2017-12-05 07:31:58 PM UTC Guide Contents Guide Contents Overview Choosing an Operating System Angstrom Download
The Broadband Ham Net community has had a need for a stand alone time server for their meshes. This document will attempt to fill in this need.
 Introduction: The Broadband Ham Net community has had a need for a stand alone time server for their meshes. This document will attempt to fill in this need. Some caveats to consider before embark on a
Reset the Admin Password with the ExtraHop Rescue CD
 Reset the Admin Password with the ExtraHop Rescue CD Published: 2018-01-19 This guide explains how to reset the administration password on physical and virtual ExtraHop appliances with the ExtraHop Rescue
Setup Instructions for Upgrading the Windows XP Panasonic CF-19 Toughbook to Windows 7
 Setup Instructions for Upgrading the Windows XP Panasonic CF-19 Toughbook to Windows 7 Installation Setup Please ensure that the Windows XP CF-19 Toughbook to be upgraded is plugged in but powered OFF
Flex Focus 1202 Software Installation Procedure
 Flex Focus 1202 Software 4.6.6 Installation Procedure IMPORTANT: The installation procedure must be carried out only by B-K service personnel or their authorised representatives, who are aware of the hazards
TSM800 / TSM1330 Update Instructions
 TSM800 / TSM1330 Update Instructions Contents Contents... 1 Automatic Updates... 1 Manual Update to the Latest Version of N2KView... 2 Manual Update of the Complete Operating System... 3 Automatic Updates
Getting Started with ESX Server 3i Installable Update 2 and later for ESX Server 3i version 3.5 Installable and VirtualCenter 2.5
 Getting Started with ESX Server 3i Installable Update 2 and later for ESX Server 3i version 3.5 Installable and VirtualCenter 2.5 Getting Started with ESX Server 3i Installable Revision: 20090313 Item:
Zenoss Resource Manager Upgrade Guide
 Zenoss Resource Manager Upgrade Guide Release 6.2.1 Zenoss, Inc. www.zenoss.com Zenoss Resource Manager Upgrade Guide Copyright 2018 Zenoss, Inc. All rights reserved. Zenoss, Own IT, and the Zenoss logo
Creating a Windows Server 2012 R2 virtual instance Maher Saad, Chestnut Residence, University of Toronto
 Creating a Windows Server 2012 R2 virtual instance Maher Saad, Chestnut Residence, University of Toronto Disclaimer The author of this document shall not carry responsibility for any damage to the network,
202 Lab Introduction Connecting to the Lab Environment
 202 Lab Introduction Connecting to the Lab Environment Objectives During this v7.1 Deployment lab, each student (from the Blue group or Green group) must verify access (and permissions) to their assigned
Getting started with Raspberry Pi (and WebIoPi framework)
") Getting started with Raspberry Pi (and WebIoPi framework) 1. Installing the OS on the Raspberry Pi Download the image file from the Raspberry Pi website. It ll be a zip file as shown below: Unzip the file
Getting started with Raspberry Pi (and WebIoPi framework) 1. Installing the OS on the Raspberry Pi Download the image file from the Raspberry Pi website. It ll be a zip file as shown below: Unzip the file
User Manual. DVK512 Expansion Board For Raspberry Pi
 DVK512 Expansion Board For Raspberry Pi User Manual DVK512 is an expansion board designed for Raspberry Pi Model B+, integrates various components and interfaces for connecting external accessory boards.
How to Use This Lab Manual
 3 Contents How to Use This Lab Manual........................................ 5 Lab 1: Setting Up the Student System.................................. 7 Lab 2: Installing Fedora............................................
Intel Entry Storage System SS4000-E
 Intel Entry Storage System SS4000-E Software Release Notes January 2007 Storage Systems Technical Marketing Engineering Document Revision History Intel Entry Storage System SS4000-E Document Revision History
Installation of Cisco Business Edition 6000H/M
 Installation Overview, page 1 Installation Task Flow of Cisco Business Edition 6000H/M, page 2 Installation Overview This chapter describes the tasks that you must perform to install software on your Business
CCNA 1 Chapter 2 v5.0 Exam Answers %
 CCNA 1 Chapter 2 v5.0 Exam Answers 2015 100% 1. Which two features are characteristics of flash memory? (Choose two.) Flash provides nonvolatile storage. Flash receives a copy of the IOS from RAM when
Cisco ISE Command-Line Interface
 This chapter provides information on the Cisco Identity Services Engine (Cisco ISE) command-line interface (CLI) that you can use to configure and maintain Cisco ISE. Cisco ISE Administration and Configuration
Point of View SmartTV-500 Center - Android 4.2. General notices for use...2 Disclaimer...2 Box Contents...2
 Point of View SmartTV-500 Center - Android 4.2 English Table of Contents General notices for use...2 Disclaimer...2 Box Contents...2 1.0 Product basics...3 1.1 Buttons and connections... 3 1.2 Connecting
LevelOne FNS bay/1usb Soho NAS. User s Manual
 LevelOne FNS-1000 1- bay/1usb Soho NAS User s Manual Table of Contents Introduction... 2 The FNS-1000 NAS Server... 2 FNS-1000 Features... 2 Package Contents... 2 System Requirements... 2 Disclaimer...