Website Reference Guide
|
|
|
- Bertram Ramsey
- 5 years ago
- Views:
Transcription
1 Website Reference Guide MU LTIMEDIA
2 B
3 Contents Login 04 Dashboard 05 Toolbar 08 Posts and Pages 09 Adding Content 12 Visual Editor 14 Adding images and other media 18 Adding HTML links 26 Saving and Publishing 30 Media Library 31 Setting/Support 38 C
4 Login Before you can make any changes to your site, you will need to log in. The login for your site is typically found at the following URL - Obviously, replace yourwordpress-site.com with your actual domain name. There are exceptions to this of course. For instance, your WordPress setup maybe installed in a subdirectory. For most standard setups though, you ll find the above URL should work. 4
 you will see the name of your site in the header area.")
5 Dashboard Once you ve logged in, the WordPress Dashboard appears. This is your main administration homepage. At the very top of your Dashboard (and across every page) you will see the name of your site in the header area. In the example screenshot above and throughout this documentation) the site name is Your WordPress Site. This is also hyperlinked to your site s homepage. You will also see the name of the person who is currently logged in (e.g. Joe Blogg). Move your cursor over your name to reveal the Log Out link as well as a link to edit your Profile. When new or updated features are introduced into WordPress, you ll be shown a New Feature Pointer. This is simply to bring to your attention some feature within the Dashboard that s been added or updated. In the above Dashboard image, the New Feature Pointer is highlighting the updated Toolbar. Click Dismiss to hide the pointer. On most pages, just below your Username there are a couple of small inverted tabs. One called Screen Options and another called Help. Clicking either of these links will cause a panel to slide down from the top of the page. The Help link, not surprisingly, displays some help information. The Screen Options link will display various options that allow you to configure what is displayed on the current page. The details in this panel change depending on what page you re currently viewing. As an example, on your main Dashboard page the Screen Options allow you to set which panels you d like displayed on the page. 5

6 Dashboard Menu Options Down the left-hand side of the Dashboard and on every page you will see your main navigation menu. This is where you ll find all the options to update and configure your site. Hovering your cursor over each of the main menu options will display a fly-out menu with the various choices for that particular menu option. Once you click each of the main menu options, that particular menu will expand to show all the available options within that section (if there are any). 6
7 The main menu options and their usage are: Dashboard This will display your main Dashboard homepage. In the top left of your Dashboard you ll see some brief stats on the number of Posts, Pages and Comments. If you have the Akismet anti-spam plugin activated, you ll also see the number of Spam Comments or comments awaiting moderation. Posts This is where you can create a new Blog Post. You can also update your Categories and Post Tags. Media This is where all your uploaded images, documents or files are stored. You can browse through your Media library, as well as edit and update the files. Pages This is where you create and maintain all your Pages. Users This screen lists all the existing users for your site. Depending on your Role, you can also add new users as well as manage their Roles. Tools This section gives you access to various convenient tools. You can also import data to your WordPress site or export all your WordPress data to a file. 7

8 Toolbar The WordPress Toolbar is a way of easily accessing some of the most common WordPress features. When you are logged into your WordPress dashboard and you visit your website, you will see the Toolbar running across the top of your site. This bar only appears if you are currently logged into your WordPress site, which means that it won t be visible to your everyday site visitors. If you are not logged in, the Toolbar won t be displayed. The Toolbar allows you to quickly access the following commonly used features. Visit the WordPress.org website, Codex or Support forums Display your site Dashboard and other commonly used menu options that allow you to update your site Themes, Widgets, Menus and depending on your theme, Background and Header View or Edit your blog comments Add a new Post, Media, Page or User Edit the current Page or Post Perform a site Search View or Edit your Profile and logout from the WordPress Dashboard Hiding the Toolbar You can stop the Toolbar from displaying by modifying the preferences associated with your Profile. Simply click on the Users link in the left-hand navigation to display the list of Users. From this list of Users, click your user name or click on the Edit link that appears beneath the user name when hovering your cursor over each row. Alternatively, click on the Your Profile link underneath the Users menu option in the left-hand navigation or within the fly-out menu. 8
. An About us page is an example of a Page on a typical website.")
9 Posts and Pages WordPress is built around two basic concepts. Posts and Pages. Posts are typically blog entries. A series of articles, listed (usually) reverse-chronologically. Pages are used for more static content (i.e. content that doesn t change or changes infrequently). An About us page is an example of a Page on a typical website. In most cases you ll find that the content in the About us page doesn t change all that frequently. Now, you might be thinking, but I don t need a blog. This might be true, but you can also use the blog concept if you have a site where you need to display your latest news or even just company updates. Basically, any information that gets updated on a semi-regular basis can benefit from the blog functionality. Whether that s a traditional blog, your company s latest news or even just your own personal updates. Posts After clicking on the Posts menu option you ll be shown a list of Posts that your site contains. Among the information displayed is the Post title, the Author, Categories, Tags, No. of Comments and either the Date Published, Date Scheduled or the Date the Post was Last Modified. The Posts screen will look similar to the screen below. 9
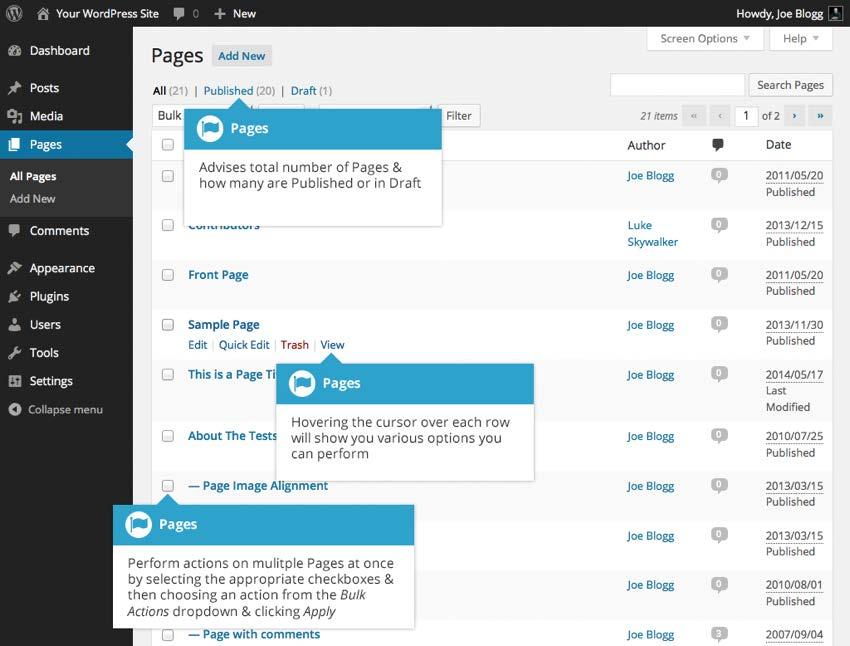
10 Posts At the top of the page you can view how many Posts in total you have in your site, how many are Published, Scheduled, Sticky, Pending, in Draft or in the Trash. When hovering your cursor over each row, a few links will appear beneath the Post title. Edit Will allow you to edit your Post. This is the same as clicking on the Post title Quick Edit Allows you to edit basic Post information such as Title, Slug, Date plus a few other options Trash Will send the Post to the Trash. Once the Trash is emptied, the page is deleted View Displays the Post. If the Post hasn t been published yet, this will say Preview Next to each Post title is a checkbox. This allows you to perform an action on multiple items at once. You simply check the Posts that you would like to affect and then from the Bulk Actions dropdown select either the Edit option or the Move to Trash option and then click the Apply button. The Edit option will allow you to edit the Categories, Tags, Author, whether to allow Comments and Pings or not, the Status and whether or not the Posts are Sticky. The Move to Trash option will move the selected items to the Trash. You can also filter the pages that are displayed using the dropdown lists and the Filter button. At the top of the list of Posts there are also two icons that change how the list is displayed. Click the List View icon ( ) to display the posts in the traditional List View or click the Excerpt View icon ( ) to display a short excerpt from the Post underneath the Post title. Pages After clicking on the Pages menu option you ll be shown a list of Pages that your site contains. Among the information displayed is the Page title, the Author, No. of Comments and either the Date Published or the Date the Page was Last Modified. The Pages screen will look similar to screen below. On the opposite page you can view how many Pages in total you have in your site and how many are Published or in Draft. When hovering your cursor over each row, a few links will appear beneath the Page title. Edit Will allow you to edit your Page. This is the same as clicking on the Page title Quick Edit Allows you to edit basic Page information such as Title, Slug, Date plus a few other options Trash Will send the Page to the Trash. Once the Trash is emptied, the page is deleted View Displays the Page. If the Page hasn t been published yet, this will say Preview Next to each Page title is a checkbox. This allows you to perform an action on multiple items at once. You simply check the Pages that you would like to affect and then from the Bulk Actions dropdown select either the Edit option or the Move to Trash option and then click the Apply button. The Edit option will allow you to edit the Author, Parent, Template, whether to allow Comments or not and the Status of each of the checked items. The Move to Trash option will move the selected items to the Trash. You can also filter the pages that are displayed using the dropdown list and the Filter button. 10
11 11

12 Adding your Site Content Adding content to your site is an easy process no matter whether you re creating a Post or a Page. The procedure for both is almost identical. Apart from how they display on your site, which was described earlier, the other main difference is that Posts allow you to associate Categories and Tags whereas Pages don t. What s the difference between categories and tags? Normally, Tags are ad-hoc keywords that identify important information in your Post (names, subjects, etc) that may or may not recur in other Posts, while Categories are pre-determined sections. If you think of your site like a book, the Categories are like the Table of Contents and the Tags are like the terms in the index. Adding a New Page To add a new Page, hover your cursor over the Pages menu option in the left-hand navigation menu and in the fly-out menu, click the Add New link. Alternatively, click the Pages menu option and then click the Add New link underneath, or the Add New button at the top of the page. You will be presented with a page similar to the image below. 12

13 Adding a New Post To add a new Post, hover over the Posts menu option in the left-hand navigation menu and in the fly-out menu, click the Add New link. Alternatively, click the Posts menu option and then click the Add New link underneath, or the Add New button at the top of the page. You will be presented with a page similar to the image below. 13
14 Adding Content with the Visual Editor The editor used to enter content into your Page or Post is very easy to use. It s much like using a regular word processor, with toolbar buttons that allow you to Bold ( ) or Italicize ( ) text or enter in Headings ( ) or bullet points ( ). You can even use most of the basic keyboard shortcuts used in other text editors. For example: Shift+Enter inserts a line break, Ctrl+C/Cmd+C = copy, Ctrl+X/Cmd+X = cut, Ctrl+Z/Cmd+Z = undo, Ctrl+Y/Cmd+Y = redo, Ctrl+A/Cmd+A = select all, etc. (use the Ctrl key on a PC or the Command key on a Mac). With WordPress 4.0 and above, the Visual Editor now expands to fit your content, rather than simply scrolling. On top of that, no matter how tall the Visual Editor becomes, the toolbar buttons will be available at all times by sticking to the top of the page. At the top of the editor there are two tabs, Visual and Text ( ). These switch the editor view between the Visual Editor and the Text editor. The Text view will enable you to view the HTML code that makes up your content. For the more experienced users this can be helpful at times but for those not familiar with HTML tags, it s not recommended. When creating a new Page or Post, the first thing to do is enter in your title in the top entry field where it says Enter title here. After moving the cursor down to the editor a new Permalink is created for your page. Permalinks are the permanent URL s to your individual Posts, Pages, Categories etc.. Though not usually necessary, you can manually edit your permalink by clicking on the actual permalink (the part after the domain name with the yellow background) or by clicking the Edit button next to it. Once you ve modified it, click Ok to save or Cancel to cancel your changes. At the top of the editor where your content is written, there are numerous formatting buttons. Clicking the Toolbar Toggle button ( ) will show or hide a second line of formatting buttons which gives you extra functionality. The editor buttons perform the following functions: Add Media Used to upload and insert media such as images, audio, video or documents Bold Bold text Italic Italicise text Strikethrough Add a strikethrough to your text Bulleted List Create an unordered (bullet point) list Numbered List Create an Ordered (numbered) list Blockquote Used as a way of showing a quote. How this looks will be entirely dependent on the Theme that your site is currently using Horizontal Line Inserts a horizontal line into your page Align Left Align text to the left 14
15 Align Center Align text in the center of the page Align Right Align text to the right Insert/edit link Used to create an html link to another page or website. The text or image that you want to link needs to be selected first before the button will become active Remove link Remove the html link from the selected link. Your cursor must be sitting on an active link for the button to be active Insert Read More tag Inserts the More tag into your Page. Most blogs only display a small excerpt of a Post and you re required to click the Post title or a Read more... link to continue reading the rest of the article. When you insert a More tag into your Post, everything prior to the tag is considered as this excerpt. Most times you d only use this button when you re creating a blog Post, rather than a Page Toolbar Toggle Used to show or hide the second row of formatting buttons on the editor toolbar Distraction Free Writing Clicking this button will enlarge the editor so that it fills the browser window. Clicking the Exit fullscreen link at the top of the screen will reduce it back to its original size Style Used to format the Page text based on the styles used by the current Theme Underline Underline your text Justify Align text on both the left and right (i.e. justify) Text color Use to change the color of text Paste as text Copying and pasting text from other sites or word processors sometimes leaves the text formatted differently to what you were expecting. The reason for this is that quite often the html tags or codes that formatted the original text are pasted along with the text itself. To avoid this, Paste as Text will strip all these formatting and html tags. The Paste as Text option acts like a toggle, staying on until you turn it off by clicking the button again or until you save your page content Clear formatting Use this to remove all the formatting (e.g. Bold, Underline, text color etc..) from the highlighted text Special character Used to insert special characters not easily accessible via the keyboard (e.g. ¼, ½, ¾,,, ö etc..) Decrease indent Removes one level of indenting Increase indent Indents text by one level Undo Undo your last action Redo Redo your last action Keyboard shortcuts Displays information about the WordPress Visual Editor along with keyboard shortcuts Visual/Text Switches the editor view between the Visual Editor and the Text editor. The Text view will enable you to view the HTML code that makes up your content. For the more experienced users this can be helpful at times but for those not familiar with HTML tags, it s not recommended 15

16 Switching to the Text Editor At the top of the editor there are two tabs, Visual and Text ( ). These switch the editor view between the Visual Editor and the Text editor. The Text view will enable you to view the HTML code that makes up your content. For the more experienced users this can be helpful at times but for those not familiar with HTML tags, it s not recommended. The Text editor is much like the Visual Editor, only not as intuitive. The numerous formatting buttons provide you with basic HTML formatting capabilities when editing your Page or Post content. The buttons work in two ways. Clicking a button without highlighting any text first, will simply insert the opening HTML tag relevant for that button. As an example, clicking the Bold button will insert the <strong> HTML tag into your text. Clicking the Bold button again will close the tag by inserting the closing </strong> tag. If you highlight some text prior to clicking a button, both the opening and closing tags will be inserted around that highlighted text. For example, highlighting the text, bold text, prior to clicking the Bold button will insert <strong>bold text</strong>. The following editor buttons are available whilst in the Text editor: Bold Bold text Italic Italicise text Link Used to insert a website link. When the button is clicked a pop-up window will appear where you type in the URL that you would like to link to Blockquote Used as a way of showing a quote. How this looks will be entirely dependent on the Theme that your site is currently using Delete Used as a way of showing deleted text. How this looks will be dependent on the Theme but is usually done by showing the text with a strikethrough Insert Used as a way of showing inserted text. How this looks will be dependent on the Theme but is usually done by showing the text with an underline 16
17 Image Used to insert an image into the text. When the button is clicked a pop-up window will appear where you type in the URL of the image that you would like inserted Unordered List Used to insert an unordered (bullet point) list Ordered List Used to insert an ordered (numbered) list List Item Used to insert a list item into your ordered or un-ordered list Code Used for indicating a piece of code More Inserts the More tag into your Page. Most blogs only display a small excerpt of a Post and you re required to click the Post title or a Read more... link to continue reading the rest of the article. When you insert a More tag into your Post, everything prior to the tag is considered as this excerpt. Most times you d only use this button when you re creating a blog Post, rather than a Page Distraction Free Writing Clicking this button will enlarge the editor so that it fills the browser window. Clicking the Exit fullscreen link at the top of the screen will reduce it back to its original size Close Tags Used to close open tags. If for example, you clicked both the Bold and Italic buttons to insert their opening tags, clicking the Close tags button will insert both of the matching closing tags, in the correct order 17
18 Adding Images and Other Media Adding images and other media files such as videos, documents or PDFs is extremely easy within WordPress. All your images and files are stored in the Media Library. Once they re uploaded into the Media Library, it s a very simple matter to insert them into your Page or Post content. In the case of files such as Word Documents or PDFs, if necessary, it s a simple process to create links to those files so that people can then download them. Inserting an Image Using the WordPress media manager, it s extremely simple to insert, align and link your individual images and image galleries. To insert an image into your Page/Post, click the Add Media button ( ) and then simply drag your image(s) from wherever they are on your computer, into the browser window. Your file(s) will be automatically uploaded. Alternatively, click the Select Files button and then select the file(s) that you d like to upload, using the dialog window that is displayed. It s also possible to simply drag your image straight into the Visual Editor, rather than clicking the Add Media button. 18
19 No matter whether you ve clicked the Add Media button or simply dragged and dropped your image into the Visual Editor, once your image is uploaded, your Media Library is displayed, which contains all your previously uploaded images. The image(s) that you ve just uploaded will be automatically selected for easy insertion into your Page or Post. Selected images are shown with a tick icon in the top right corner of the image. After uploading your image(s), you can then select other previously uploaded images by holding down the Ctrl key (Cmd key on Macs) and simply clicking on them. To deselect an image, click the tick in the top right corner of the image. At the bottom of the window you will see a count of the number of images currently selected. There are several options within this Insert Media window to help make it easier to add images into your Page or Post. By default, all previously uploaded images are shown, starting with the most recent uploads. If you d like to narrow this list down, at the top of the window is a dropdown list that allows you to filter your displayed images by All media items, items Uploaded to this post/page, or just Images, Audio files or Video files. You can also filter your media files by selecting a date, or alternatively, there is also a Search field that allows you to search for specific images. 19

20 The properties of the currently highlighted image (i.e. The image with the blue border) in the screen below will be shown on the right-hand side of the Insert Media window. These properties include the filename, the date the file was uploaded and the image size. It s at this point you can also change the image Title, Caption, Alt Text and Description for each image, as well as the Alignment, Link and the Size at which the image is inserted. Title is displayed as a tooltip when the mouse cursor hovers over the image in the browser Caption is displayed underneath the image as a short description. How this displays will be dependent on the WordPress theme in use at the time. You can also include basic HTML in your captions Alt Text is displayed when the browser can t render the image. It s also used by screen readers for visually impaired users so it s important to fill out this field with a description of the image. To a small degree, it also plays a part in your website Search Engine Optimisation (SEO). Since search engines can t read images they rely on the Alt Text Description is usually displayed on the attachment page for the media, however this is entirely up to the theme that is currently in use For each image, you can select how you would like the image aligned, either Left, Center or Right aligned, using the Alignment dropdown list. You can also select None for no alignment which will mean the image will display using the default alignment setting for your Theme. 20
21 You can also change what your inserted image(s) will link to using the Link To dropdown list. You have the choice of linking to the image s attachment page by selecting Attachment Page, or you can link to the full size image by selecting Media File. You can also link to any URL by selecting Custom URL. When you do this, a new field will appear that allows you to enter in the custom URL. You can also choose not to link to anything by selecting None. When your image(s) are uploaded, WordPress will also create several copies of your file at various sizes. You can choose which one you d like to insert into your Page or Post using the Size dropdown list. To insert the image at the exact size you uploaded, simply select Full Size. Next to each size listed in this dropdown will be the actual dimensions of the image, in pixels (e.g. 300 x 225). Once you ve selected all your images, click the Insert into post button to insert the selected image(s) into your Post at the current cursor position (when editing a Page, this button will say Insert into page). If you d like to change the order of your images, click the Edit Selection link at the bottom of the Insert Media window. The window will change so that only the selected images are shown. Alternatively, clicking the Clear link will deselect all images. After clicking the Edit Selection link at the bottom of the Insert Media window, all the currently selected images are shown. You can change the order in which the images will appear in your Page or Post by clicking and dragging each image to reorder them. You can also update the image Title, Caption, Alt Text and Description for each image. To remove one of your selected images, click the small x that appears in the top right corner of the image when you hover your cursor over the tick. 21
, click the Add Media button again ( ).")
22 Clicking the Return to library button will take you back to the previous screen that allows you to select or deselect your images. When you re editing your Post/Page, if you wish to insert an image that you uploaded earlier (as opposed to uploading a new image), click the Add Media button again ( ). Once the pop-up window displays, click the Media Library tab at the top of the pop-up window rather than dragging a new file into the upload window. All your previously uploaded images will be displayed, with the most recent ones shown first. Select the image(s) that you d like to insert into your Page or Post and then simply click the Insert into post button (or if you re editing a Page, this button will say Insert into page). As mentioned earlier, you can also click the Edit Selection link at the bottom of the window if you d like to change the order the i mages are inserted. 22

23 Edit or Delete an Image There are various options available for adjusting the layout of inserted images. After clicking on an image that has already been inserted into your Page or Post, a small toolbar will appear over the image. By selecting one of the alignment buttons ( ) you can change the alignment of the inserted image. Clicking the edit icon ( ) allows you to edit the image properties. Clicking the delete icon ( ) will delete the image from your content. It will only remove the image from your Page or Post, it will not delete the image from your Media Library. When you click on an image in your Page or Post, as well as the alignment, edit and delete icons mentioned above, the image also displays resizing handles. These are the small squares you see around the edge of the image. To resize your image, simply click and drag one of the corner resize handles. As with any image editing software though, if you try to enlarge a small image, it will tend to get quite pixelated. It s always best to insert a large image and then resize down. After clicking the Edit Image icon ( ) the following pop-up window will appear. 23
24 24
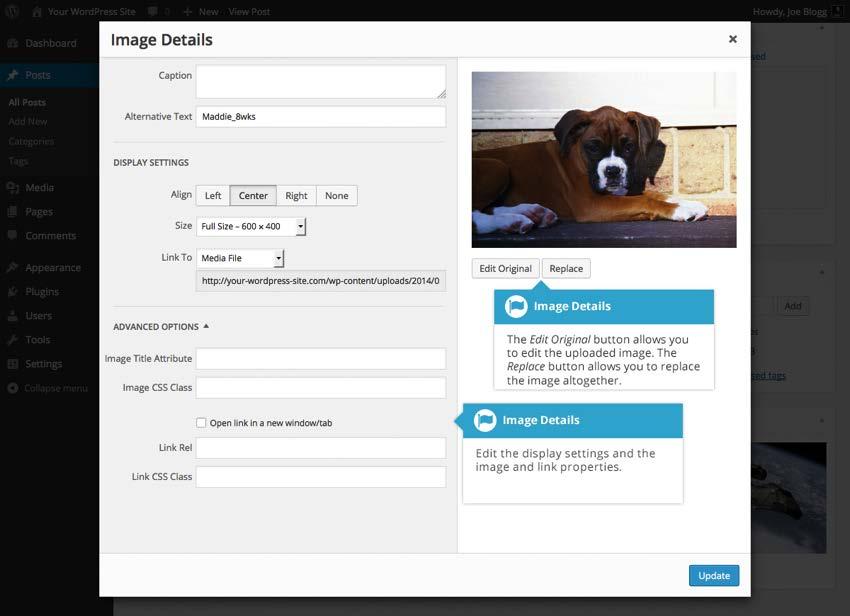
25 The Image Details pop-up window allows you to edit the various image and link properties: Caption Displayed underneath the image as a short description. How this displays will be dependent on the WordPress theme in use at the time. You can also include basic HTML in your captions Alternative Text Displayed when the browser can t render the image. It s also used by screen readers for visually impaired users so it s important to fill out this field with a description of the image. To a small degree, it also plays a part in your website Search Engine Optimisation (SEO). Since search engines can t read images they rely on the Alt Text Align Allows you to select how you would like the image aligned. They can be either Left, Centered or Right aligned. Setting alignment to None will remove the other alignment settings. How this affects your image within your content will depend on the current theme in use Size Select a specific size from the dropdown list or select Custom Size and then enter the Width and Height (in pixels) in the input fields that appear Link To Select where you would like to link your image to from the dropdown list. You have the choice of linking to the image attachment page by selecting Attachment Page, or you can link to the full size image by selecting Media File. You can also link to any URL by selecting Custom URL. When you do this, a new field will appear that allows you to enter in the custom URL. You can also choose not to link to anything by selecting None Image Title Attribute Displayed as a tooltip when the mouse cursor hovers over the image in the browser Image CSS Class By default, WordPress will assign several CSS Classes to your image. If, for some reason, there s other CSS Classes that you d like to assign to your image then you can add them into this input field Link Rel Describes the relationship from the current document to the specified link. More information on the rel HTML attribute can be found on Wikipedia Link CSS Class If there is a specific CSS Class that needs to be set on the HTML link then you can add it into this input field Clicking the Edit Original button allows you to perform some simple manipulation with your uploaded image. You re able to rotate and flip your image as well as scale and crop it to different sizes. If you d like to replace the image entirely, click the Replace button and you ll be shown your Media Library where you can select a new image. Once you have updated the image properties, click the Update button to save your changes. Alternatively, 25

26 Adding HTML Links HTML links allow your site visitors to easily navigate around your site. They re also used when you want to allow people to download files from your site, such as PDFs or other documents, for viewing images or even just linking to other websites. HTML links will frequently be shown with an underline to differentiate it from other text, but this may vary depending on the theme you re currently using. Inserting an HTML Link Inserting an html link in your Page/Post to one of your own pages or another site is extremely easy. Simply click and drag the cursor and highlight the text that you want turned into a link and then click the Insert/edit link button ( ). As well as being able to insert a link to another site, you can also easily insert a link to one of your existing Posts or Pages by simply selecting it from a list. In the pop-up window that is displayed, simply fill in URL and the Title and then click the Add Link button. URL URL of the page or website that you would like to create a link to Link Text The text that you highlighted prior to clicking the Insert/edit link button will be automatically displayed Open link in a new window/tab When someone clicks the link you can have it open in the same window (default setting) or have it open in a new browser window/tab 26 Alternatively, if you d like to add a link to one of your existing Posts or Pages, simply click the Or link to existing content link to display a list of your existing content then select the relevant page from the supplied list. If you have a large number of pages within your site, you can type the Page or Post name in the Search field to make it easier to find. As you type, the list will re-populate based on matching results. After selecting one of your existing pages, the relevant details will be updated in the URL and Title fields. Click the Add Link button to add your link.
 and then simply drag your file from wherever it is on your computer, into the browser window. Your file will be automatically uploaded.")
27 Inserting Links to Media Files Adding a link to media files such as documents or PDF s is just as easy as adding a standard html link. There are a couple of ways you can go about it. Click the Add Media button ( ) and then simply drag your file from wherever it is on your computer, into the browser window. Your file will be automatically uploaded. Alternatively, click the Select Files button and then select the file that you d like to upload, using the dialog window that is displayed. Once your file is uploaded, your Media Library, which contains all your previously uploaded files, is displayed. The file that you ve just uploaded will be automatically selected for easy insertion into your Page or Post. Update the Title for your file. The Title will be used for the text link when it s inserted into your content. From the Link To dropdown list, select Media File. The field just below this will be automatically populated with the URL for the file. Click the Insert into post button to insert a link to the selected file in your Post at the current cursor position (when editing a Page, this button will say Insert into page). If you happen to know the URL for the media file that you d like to link to or if you d like to create a link on some existing text, simply click and drag the cursor and highlight the text that you want turned into a link and then click the Insert/edit link button ( ). Just like previously, when adding a simple HTML link, enter the URL to your media file and then click the Add Link button. A standard html link will be created that links to the media file that you specified. 27

28 Editing an HTML Link Simply click the link within your Page/Post that you d like to edit, to position the cursor somewhere within it and then click the Insert/edit link button ( ). A pop-up window will appear, just like when the link was originally inserted. Update the required details and click the Update button. Removing an HTML Link To remove an html link, click the link within your post that you d like to remove, to position the cursor somewhere within it and then click the Unlink button ( ). If you want to remove a link from an image, simply click the image once to select it and then click the Unlink button. If the html link is linking to an uploaded file or image, clicking the Unlink button won t remove or delete that file, it will simply remove the hyperlink. Editing Existing Content To edit an existing page, simply click on the relevant Page/Post title, when viewing your list of Pages or Posts. Alternatively, click on the Edit link that appears beneath the title when hovering your cursor over each row. The screen that appears will be exactly the same as the Add New Page/Add New Post screen, only with the existing content displayed. When you ve finished editing your Page/Post, click the Update button. 28


29 Deleting Content If you wish to delete one of your Pages or Posts, click on the Trash link that appears beneath the title when hovering your cursor over each row. This will move the Page/Post to the Trash. To delete the Page/Post permanently or to restore the Page/Post, click the Trash link at the top of the screen. When the cursor is hovering over each item in the Trash, the Restore and Delete Permanently links appear. Click Delete Permanently to permanently remove a single Page or Post. Clicking Restore will restore the Page or Post. If you would like to permanently delete or restore numerous items at once, click the checkboxes next to the items you would like to delete or restore and then choose either Restore or Delete Permanently from the Bulk Actions dropdown list at the top of the page. After selecting the appropriate action click the Apply button to make your change. Alternatively, click the Empty Trash button to delete all the items in the Trash. 29

30 Saving and Publishing Once you ve added all your content to your Page or Post you have the option of Saving the Page as a Draft or Publishing the page. Clicking the Save Draft button will simply save your Page/Post. This is handy if you would like to come back at a later date to add more content or if you re simply not ready to publish yet. Clicking the Publish button will save your Page/Post and publish it on your website. Clicking the Preview button will show you a preview of the current Page/Post. There are also several options available when saving. By default the Status is set to Draft but this can be changed by clicking the Edit link just to the right of Status: within the Publish panel. Pending Review means the draft is waiting for review by an editor prior to publication. Draft means the post has not been published and remains a draft for you. You can also change the visibility of the Page by clicking the Edit link just to the right of Visibility: within the Publish panel. Public is the default and means the page is viewable to all. There is also an option to make the Post sticky. Sticky posts are placed at the top of all blog posts and stay there even after new posts are published. Password Protected allows you to assign a password to your page. Only people who have the password will be able to access the page. Private hides the content from the public completely. Normal users and visitors will not be aware of private content. You will only see the private content when you are logged into your WordPress blog. By default, when you click the Publish button your Page/Post is published immediately. To change this, click the Edit link just to the right of Publish immediately within the Publish panel. You can then select the date and time that you d like to schedule your Page/Post to be published. You must also click the Publish button when you have updated the date and time fields to publish at the desired date and time. 30

31 Media Library The Media Library is where you can find all the files that you ve uploaded. In WordPress 4.0 and above there are two different types of views you can select from when viewing your media library. You can click the List View icon ( ) to display your images in a list, similar to how they ve been displayed in previous versions of WordPress, or you can click the Grid View icon ( ) to view your images in the new Grid layout. The Grid View will display a grid of thumbnail images for each of your media files. The Grid View employs infinite scrolling, rather than displaying your images over multiple pages. To view more images, simply scroll to the bottom of the page and more thumbnails are automatically loaded. The List View will display your images similar to how they ve been displayed in previous versions of WordPress, in a list over multiple pages. 31

32 Both views show the most recently uploaded files first. There are also dropdown lists that allow you to filter the list of files that are currently being displayed, along with a search field to help search for files. Within the List View, the list of files contains a small thumbnail version of the image or file, the file name and the type of file (JPG, MP3, etc.), the name of the Author who uploaded the file, the Page or Post which the image was uploaded to, the number of comments and the date the file was uploaded. When hovering your cursor over each row in the List View, a few links will appear beneath the file name. Edit Allows you to edit the file properties such as Title, Alt Text, Caption and Description. You can also perform some basic image manipulation Delete Permanently Deletes the file permanently from the Media Library View Will take you to the display page for that file 32

33 Viewing a File in the Media Library The Grid View will display a grid of thumbnail images for each of your media files. Depending on the file type, you ll either see a thumbnail image for that particular file or an icon representation. After clicking on a thumbnail within the Grid View, a pop-up window will display the properties for that particular file. If the file is an image, you ll also see a larger version of that image. For supported audio and video files (M4a, MP4, OGG, WebM, FLV, WMV, MP3, WAV and WMA) you ll see the appropriate media player. For other file types such as PDF s or Word Documents, there is a link to view the attachment page which has a link to the actual file. Within the List View, hover the cursor over one of the rows and click the View link. If the file is an image, you ll see a larger version of that image. For supported audio and video files (M4a, MP4, OGG, WebM, FLV, WMV, MP3, WAV and WMA) you ll see the appropriate media player. For other file types such as PDF s or Word Documents, you ll see the attachment page which has a link to the actual file. 33


34 Adding a File to the Media Library To add a new file to the Media Library, click on the Add New link in the left-hand navigation menu or the Add New button at the top of the page. If you click the Add New button when you re viewing the Media Library in the List View, or click the Add New link in the menu, simply drag your images from wherever they are on your computer, into the area marked Drop files here. Your file(s) will be automatically uploaded. Once your images or files are uploaded, they re listed below the file uploader. If you d like to edit the file properties, click the Edit link next to the file. If you click the Add New button when you re viewing the Media Library in the Grid View, you can drag your images from wherever they are on your computer, to anywhere on the screen. Your file(s) will be automatically uploaded. Once your images or files are uploaded, they re displayed below the file uploader, with the rest of your media. When uploading files, you can also click the Select Files button and then select the files that you d like to upload, using the dialog window that is displayed. 34

35 Editing the File Properties If you re viewing your files using the Grid View, simply click on one of your media files and you ll be presented with a pop-up window that displays the relevant properties for that particular file. After updating each field your changes will be automatically saved. You can use the arrow buttons at the top of the pop-up window to navigate to the previous or next image. Click the x in the top-right of the pop-up window to return to the media Grid View. To edit the properties of an existing file when using the List View within the Media Library, hover the cursor over the particular row that contains the file you wish to edit and click the Edit link. Alternatively, you can also click the file title or the thumbnail image. Clicking the Edit link next to the file after it s just been uploaded, will also allow you to edit its properties. After clicking Edit, the relevant properties for that particular media file are displayed, including the title, URL, filename, file type and in the case of an image, the file dimensions. When editing the file properties, the Alternative Text field will only be displayed for images. 35

36 Editing an Image No matter what view you re using, just above the image you ll find the following image editing buttons: Crop Click on the image and drag the selection box to the size that you d like the image cropped. Click the Crop button to crop the image to the new size Rotate counter-clockwise Rotate the image 90 counter-clockwise Rotate clockwise Rotate the image 90 clockwise Flip vertically Flip the image vertically Flip horizontally Flip the image horizontally Undo Undo the last change Redo Redo the last change 36

37 To scale your image to a new size, simply enter the width or height dimensions in the appropriate field and click the Scale button. For best results, scaling should be done before performing any other operations like cropping, flipping or rotating the image. It s important to note that images can only be scaled down, not up. After entering one scale value, the other value will change automatically so as to keep the image in proportion. The original image dimensions are displayed just above the input fields, for your reference. There are several ways to crop your image. The easiest is to simply click on the image and drag the selection box to the appropriate size. If you d like your image cropped to a specific ratio, enter the values in the Aspect Ratio input fields (e.g. 1:1 (square), 4:3, 16:9 etc.). You can then hold down the shift key and drag one of the edges of your selection to enlarge or reduce the size, while keeping this aspect ratio locked. If there is already a selection made, specifying the aspect ratio will automatically change the selection to match it. Whenever the selection box is adjusted, the dimensions are displayed in the Selection input fields. You can also manually enter the dimensions of the selection box (in pixels) by entering values into these two fields. Once your selection box is adjusted, simply click the Crop button just above the image to crop the image to this new size. By selecting one of the options in the Thumbnail Settings panel, you have the option to apply your changes to All image sizes, just the Thumbnail image or All sizes except Thumbnail. Click the Save button to save your changes. Click the Update button to return to the main Media Library page. If you d like to revert back to your original image, click the Edit Image button again to return to the image editor. A new Restore Original Image link is displayed just below the Scale Image link. Click the Restore Original Image link and then click the Restore image button to discard your changes and restore your original image. 37
38 Settings The various Settings screens are used to configure your WordPress site. Normally, once your WordPress site is set up there s no reason to change any of these settings. These Settings options will only be touched upon very briefly. You can find out lots more information in regards to configuring your site within the WordPress Codex. Support For further support feel free to visit 38
39 39
40 Produced By Fraynework Multimedia
The Gardens Trust WordPress Manual. thegardenstrust.org. Page: 1
 The Gardens Trust WordPress Manual thegardenstrust.org Page: 1 Login Before you can make any changes to the site, you will need to log in. The login of the site is found at the following URL - http://thegardenstrust.org/wp-admin.
Introduction... 5 Login... 6 Dashboard Dashboard Menu Options Toolbar Hiding the Toolbar Posts versus Pages...
 Contents Introduction... 5 Login... 6 Dashboard... 7 Dashboard Menu Options... 8 Toolbar... 10 Hiding the Toolbar... 11 Posts versus Pages... 12 Posts... 12 Pages... 14 Adding your Site Content... 16 Adding
Wordpress Blog Manual. DMM Designs
 Wordpress Blog Manual DMM Designs Contents Introduction... 6 Login... 7 Dashboard... 8 Dashboard Menu Options... 9 Toolbar... 10 Hiding the Toolbar... 11 Posts... 13 Pages... 15 Adding your Site Content...
ADRION PROJECT WEBSITES USER S MANUAL
 ADRION PROJECT WEBSITES USER S MANUAL September 2018 Summary 1. The ADRION Project Website... 3 2. Content instructions... 3 3. Contacts for technical assistance... 3 4. Login... 3 5. Editable contents...
WordPress User Guide Version February 2012
 WordPress User Guide Version 3.3.1 February 2012 Contents 1. Overview...3 1.1 Logging in to your site...3 1.2 Quick start - adding an item that has a read more button...3 Login...5 Dashboard...5 Hiding
Copyright 2012 Anthony Hortin
 Copyright 2012 Anthony Hortin Page:1 Contents Welcome & Introduction... 4 Login... 5 Dashboard... 6 Dashboard Menu Options... 6 Toolbar... 7 Posts... 8 Pages... 2 Adding your Site Content... 10 Adding
ONEFUSION INSTRUCTION MANUAL HELPING YOU MANAGE YOUR OWN SITE
 11/6/2013 ONEFUSION INSTRUCTION MANUAL HELPING YOU MANAGE YOUR OWN SITE Wordpress 2013 One Fusion Table of Contents Welcome and Login... 1 Dashboard... 2 Dashboard Menu... 4 Toolbar... 6 Pages... 7 Add
Easy WP Guide WordPress Manual
 All rights reserved Easy WP Guide WordPress Manual by xtrememnc.com Copyright 2013 Published December 2013 Version: 2.6 for WordPress 3.8 xtrememnc.com Page:2 Contents Welcome... 7 Introduction... 8 Login...
WordPress Manual. by Anthony Hortin Maddison Designs maddisondesigns.com. Copyright 2016 Anthony Hortin All rights reserved. Published December 2016
 by Anthony Hortin Maddison Designs maddisondesigns.com Copyright 2016 Anthony Hortin All rights reserved Published December 2016 Page: 1 Contents Welcome... 6 Introduction...7 Login... 9 Dashboard...10
Website Training Guide for Staff
 Website Training Guide for Staff Welcome to the General Website Training Guide. This tutorial will cover a brief introduction to the Research Website for St. Michael s Hospital, the Wordpress backend,
HOW TO UPDATE YOUR NEW WEBSITE IN WORDPRESS
 HOW TO UPDATE YOUR NEW WEBSITE IN WORDPRESS MARCH 16, 2013 PREPARED BY: KEVIN HISKO, PHILTER COMMUNICATIONS - @KEVINHISKO TABLE OF CONTENTS The Basics How to Login Your Dashboard Dashboard Menu Options
Who should use this manual. Signing into WordPress
 WordPress Manual Table of Contents Who should use this manual... 3 Signing into WordPress... 3 The WordPress Dashboard and Left-Hand Navigation Menu... 4 Pages vs. Posts... 5 Adding & Editing Your Web
Wordpress Training Manual
 The Dashboard... 2 If this is your first time logging in:... 2 How do I change my password or email address?... 3 Search Engine Optimization (SEO)... 4 SEO for Pages... 4 SEO for Images... 5 Managing Pages...
Updating The Rural Stories Matter Website
 Updating The Rural Stories Matter Website Logging In Go to your login URL. The following dialog box will appear: Type in the username and password as follows: Username: xxxxxxxx Password: xxxxxxxxxxxxxxxx
WordPress A Reference Guide for TU Students Version:
 WordPress A Reference Guide for TU Students Version: 2017.11.17 Adapted from OTS Training s Reference Guide for Faculty/Staff by OTS Student Computing Services scs@towson.edu 410-704-5151 www.towson.edu/scs
Lectures 6: Manage WebSite/ CATEGORIES and POSTS
 Yarmouk University Transferring E-Business Fundamentals to Syrian Refugees (TEFSR) Lectures 6: Manage WebSite/ CATEGORIES and POSTS Dr. Anas AlSobeh anas.alsobeh@yu.edu.jo ADD CATEGORY Category is used
page 1 OU Campus User Guide
 page 1 OU Campus User Guide Logging Into OU Campus page page 2 1. Navigate to a page on your site that you wish to edit. 2. Scroll down to the footer and click the symbol. 3. Enter your OU Campus username
WordPress Editors Guide. A complete guide to Editors functions in WordPress
 WordPress Editors Guide A complete guide to Editors functions in WordPress Table of Contents Quick Start... 5 Login... 5 Profile... 7 Edit/Add New Pages... 8 Edit/Add New Posts... 9 Editors Guide... 10
WPI Project Center WordPress Manual For Editors
 WPI Project Center WordPress Manual For Editors April 17, 2015 Table of Contents Who should use this manual... 3 Signing into WordPress... 3 The WordPress Dashboard and Left-Hand Navigation Menu... 4 Adding
Do It Yourself Website Editing Training Guide
 Do It Yourself Website Editing Training Guide Version 3.0 Copyright 2000-2011 Sesame Communications. All Rights Reserved. Table of Contents DIY Overview 3 What pages are editable using the DIY Editing
*monthly; log in to your wordpress dashboard and update plugins which are showing prompts to do so.
 *monthly; log in to your wordpress dashboard and update plugins which are showing prompts to do so. TRNA WORDPRESS LOGIN AND EDITING INSTRUCTIONS; 10/17/18 (see end of this document for web developer-level
Lava New Media s CMS. Documentation Page 1
 Lava New Media s CMS Documentation 5.12.2010 Page 1 Table of Contents Logging On to the Content Management System 3 Introduction to the CMS 3 What is the page tree? 4 Editing Web Pages 5 How to use the
WordPress Manual For Massachusetts Academy of Math and Science
 WordPress Manual For Massachusetts Academy of Math and Science September 19, 2017 Table of Contents Who should use this manual... 4 Signing into WordPress... 4 The WordPress Dashboard and Left-Hand Navigation
Joomla! 2.5.x Training Manual
 Joomla! 2.5.x Training Manual 1 Joomla is an online content management system that keeps track of all content on your website including text, images, links, and documents. This manual includes several
Wordpress Editor Guide. How to Log in to Wordpress. Depending on the location of the page you want to edit, go to either:
 Wordpress Editor Guide How to Log in to Wordpress Depending on the location of the page you want to edit, go to either: http://www.necc.mass.edu/wp- admin (for the main website) Or http://facstaff.necc.mass.edu/wp-
How to Edit Your Website
 How to Edit Your Website A guide to using your Content Management System Overview 2 Accessing the CMS 2 Choosing Your Language 2 Resetting Your Password 3 Sites 4 Favorites 4 Pages 5 Creating Pages 5 Managing
WordPress 2.7 Basic User Documentation
 WordPress 2.7 Basic User Documentation Author: Jess Planck http://funroe.net Last Updated: 01/17/2009 08:22:00 This document is licensed under the Attribution-ShareAlike 3.0 Unported license, available
How to Edit Your Website
 How to Edit Your Website A guide to using your Content Management System Overview 2 Accessing the CMS 2 Choosing Your Language 2 Resetting Your Password 3 Sites 4 Favorites 4 Pages 5 Creating Pages 5 Managing
CUPA-HR Chapters: WordPress Reference Guide
 CUPA-HR Chapters: WordPress Reference Guide Table of Contents How to Log In to WordPress... 1 How to Create a Page in WordPress... 2 Editing a Page in WordPress... 5 Adding Links in WordPress... 6 Adding
1.0 Overview For content management, Joomla divides into some basic components: the Article
 Joomla! 3.4.x Training Manual Joomla is an online content management system that keeps track of all content on your website including text, images, links, and documents. This manual includes several tutorials
WYSIWYG Editor: Users Manual
 WYSIWYG Editor: Users Manual Table of Contents WYSIWYG Editor Overview.... 3 Adding Text... 4 Inserting an Image.... 7 Inserting a File.... 15 Embedding Media.... 21 Inserting an Email Link.... 25 Captiva
WORDPRESS USER GUIDE HWDSB Websites
 WORDPRESS USER GUIDE HWDSB Websites Table of Contents Forward - About Wordpress... 3 1. Getting Started... 5 1.1) Log into your account... 5 1.2) About the Dashboard... 6 1.3) Internal vs. External Views...
WORDPRESS TRAINING MANUAL LAST UPDATED ON FEBRUARY 26TH, 2016
 WORDPRESS TRAINING MANUAL LAST UPDATED ON FEBRUARY 26TH, 2016 LOG INTO WORDPRESS Visit the Login page http://intermountaineyecare.net/wp-admin/ Enter your Username and Password NOTE: Additional usernames
ADMIN MANUAL OF Wordpress
 ADMIN MANUAL OF Wordpress By: - Pratap Singh 8800 93 45 56 Logging In to WordPress WordPress login screen Enter your username and password. If you have forgotten this information, use the Lost Your Password?
BHM Website Teacher User Guide
 BHM Website Teacher User Guide How to Login 1. Go to HUhttp://bhmschools.org/userUH 2. Enter your username and password and click Log in How to Change Your Password 1. Go to My Account in your Nav bar
Creating and updating content on your WordPress content management system (CMS)
") Creating and updating content on your WordPress content management system (CMS) Posts vs pages WordPress comes with two content types: Posts and pages. Posts are content entries listed in reverse chronological
Creating and updating content on your WordPress content management system (CMS) Posts vs pages WordPress comes with two content types: Posts and pages. Posts are content entries listed in reverse chronological
Logging Into Your Site
 This training document is meant as a step-by-step guide to creating and delivering a UW-Madison site in the current UW-Madison theme. In this training class, you will learn how to log in to access your
Starting Your SD41 Wordpress Blog blogs.sd41.bc.ca
 Starting Your SD41 Wordpress Blog blogs.sd41.bc.ca The web address to your blog starts with blogs.sd41.bc.ca/lastnamefirstinitial (eg. John Smith s blog is blogs.sd41.bc.ca/smithj) All work is done in
Links Menu (Blogroll) Contents: Links Widget
 Contents: Links Widget") 45 Links Menu (Blogroll) Contents: Links Widget As bloggers we link to our friends, interesting stories, and popular web sites. Links make the Internet what it is. Without them it would be very hard to
45 Links Menu (Blogroll) Contents: Links Widget As bloggers we link to our friends, interesting stories, and popular web sites. Links make the Internet what it is. Without them it would be very hard to
PRESENCE. RadEditor Guide. SchoolMessenger 100 Enterprise Way, Suite A-300 Scotts Valley, CA
 PRESENCE RadEditor Guide SchoolMessenger 100 Enterprise Way, Suite A-300 Scotts Valley, CA 95066 800-920-3897 www.schoolmessenger.com Contents Contents... 2 Introduction... 3 What is RadEditor?... 3 RadEditor
Managing Content in WordPress
 The Beginners Guide to WordPress Posts, Pages & Images WordPress is one of the most popular content management systems and blogging platforms in the world. It is free, open source software that allows
EPiServer Content Editor s Guide
 EPiServer Content Editor s Guide Contents Getting Started with EPiServer... 19 Logging In... 19 Navigating from the Global Menu... 19 Generic Functions, Toolbar and Panes... 20 Generic Functions... 20
CROMWELLSTUDIOS. Content Management System Instruction Manual V1. Content Management System. V1
 Content Management System Instruction Manual V1 www.cromwellstudios.co.uk Cromwell Studios Web Services Content Management System Manual Part 1 Content Management is the system by which you can change
What is OU Campus? Log into OU Campus
 OU Campus v10 Content Providers User Guide This document is designed to provide (level 5) Content Providers with basic information needed to do most tasks. Those needing additional information are encouraged
UIS Office of Web Services Documentation. WordPress User Guide. WordPress User Guide 8/31/17 Page 1 of 13
 UIS Office of Web Services WordPress User Guide WordPress User Guide 8/31/17 Page 1 of 13 UIS Office of Web Services WordPress User Guide Prepared by Ralph Shank Table of Contents About WordPress 3 Getting
UIS Office of Web Services Documentation. WordPress User Guide. WordPress User Guide 4/17/18 Page 1 of 12
 WordPress User Guide WordPress User Guide WordPress User Guide 4/17/18 Page 1 of 12 Prepared by Ralph Shank Table of Contents About WordPress... 3 Getting Connected to Your Website... 3 Editing and Publishing
WordPress Reference Guide for Faculty/Staff
 WordPress Reference Guide for Faculty/Staff WordPress: Reference Guide for Faculty Table of Contents INTRODUCTION... 3 LOGIN... 3 DASHBOARD... 5 DASHBOARD MENU OPTIONS... 5 ADMIN TOOLBAR... 6 POSTS VERSUS
Creating a Website with Wordpress
 Creating a Website with Wordpress Wordpress Fundamentals Version 1.6 Fayette County Public Schools June 28, 2013 Sow-Foong Hedman Technology Web Team Contents What is Wordpress?... 4 Overview... 4 Key
Web Authoring Guide. Last updated 22 February Contents
 Web Authoring Guide Last updated 22 February 2016 Contents Log in................................ 2 Write a new post...3 Edit text...4 Publish a post...5 Create a link...6 Prepare photographs...7 Insert
Imagery International website manual
 Imagery International website manual Prepared for: Imagery International Prepared by: Jenn de la Fuente Rosebud Designs http://www.jrosebud.com/designs designs@jrosebud.com 916.538.2133 A brief introduction
WordPress Reference Guide for Organizations
 WordPress Reference Guide for Organizations Table of Contents INTRODUCTION... 3 LOGIN... 3 DASHBOARD... 4 DASHBOARD MENU OPTIONS... 4 ADMIN TOOLBAR... 5 POSTS VERSUS PAGES... 5 VISITING YOUR SITE... 6
ALES Wordpress Editor documentation ALES Research websites
 ALES Wordpress Editor documentation ALES Research websites Contents Login... 2 Website Dashboard... 3 Editing menu order or structure... 4 Add a new page... 6 Move a page... 6 Select a page to edit...
Logging in to the management system.
 Welcome to your new site! The Wordpress publishing platform is a robust tool that helps you publish your content to the web without getting too involved with the code. This guide is designed to help you
Website Management and Editing
 Website Management and Editing In fall 2015, UNC Finance and Administration began the large-scale project of migrating all websites within the Division to the UNC-supported WordPress content management
Creating Teacher Webpages on the New APS WordPress Site
 Creating Teacher Webpages on the New APS WordPress Site TABLE OF CONTENTS INTRODUCTION 3 THE EDITING DASHBOARD 4 CREATING A NEW PAGE 5 EDITING YOUR PAGE 6 1. Page Title 7 2. Toolbar/ toolbar icons 7 3.
The left menu is very flexible, allowing you to get to administrations screens with fewer clicks and faster load times.
 12 Menu, Modules and Setting of Wordpress.com Collapse, Hide, Icons, Menu, Menus The left menu is very flexible, allowing you to get to administrations screens with fewer clicks and faster load times.
Beginners Guide to Snippet Master PRO
 Beginners Guide to Snippet Master PRO This document assumes that Snippet Master has been installed on your site. If not please contact the Bakas IT web team at webreg@bakasit.com.au. Initial Login Screen...
PBwiki Basics Website:
 Website: http://etc.usf.edu/te/ A wiki is a website that allows visitors to edit or add their own content to the pages on the site. The word wiki is Hawaiian for fast and this refers to how easy it is
A QUICK GUIDE TO USING WORDPRESS
 A QUICK GUIDE TO USING WORDPRESS 1. WRITE A POST You can write a post from the front page of your blog in two ways. First, click on the Blog name button in your task bar at the top of the page: This reveals
Training Manual and Help File
 Training Manual and Help File 30.06.2011 Update Manage Grow Welcome to your new Juniper Website Management System with CMS Introduction The Juniper Website Management System with CMS (Website Content Management
SIGBI-Hosted Websites Club Administrator s User Guide - updated January 2017
 www.sigbi.org SIGBI-Hosted Websites Club Administrator s User Guide - updated January 2017 This document is bookmarked for ease of reference. To view the bookmarks, right-click anywhere on the page to
Introduction to Basic Website Maintenance. Fox River Water Reclamation District
 Introduction to using WordPress CMS instructions prepared for Fox River Water Reclamation District Prepared by John Staples, Visionary Webworks / eparkdistrict.com Revised 05/02/16 www.visionarywebworks.com
Newcastle University Personal Web Publishing
 Newcastle University Personal Web Publishing User Guide (v1.1) Support: it.servicedesk@ncl.ac.uk Feedback: wordpress-feedback@ncl.ac.uk May 2014 Research and Collaborative Services, ISS Contents Section
Getting Started. So the first thing to do is: Log In
 Getting Started So the first thing to do is: Log In You can either use the Staff Login link on the websites footer, or simply add /wp-admin to the root address and you ll arrive at the login page as above
Dreamweaver MX Overview. Maintaining a Web Site
 Dreamweaver MX Overview Maintaining a Web Site... 1 The Process... 1 Filenames... 1 Starting Dreamweaver... 2 Uploading and Downloading Files... 6 Check In and Check Out Files... 6 Editing Pages in Dreamweaver...
OU EDUCATE TRAINING MANUAL
 OU EDUCATE TRAINING MANUAL OmniUpdate Web Content Management System El Camino College Staff Development 310-660-3868 Course Topics: Section 1: OU Educate Overview and Login Section 2: The OmniUpdate Interface
How To Add/Modify Your Website Content
 How To Add/Modify Your Website Content Table of Contents Log In to your Website & Admin Area... 1 WordPress Dashboard... 2 WordPress Posts & Pages... 3 Add a Post or Page... 4 Edit a Post or Page... 5
How to set up a local root folder and site structure
 Activity 2.1 guide How to set up a local root folder and site structure The first thing to do when creating a new website with Adobe Dreamweaver CS3 is to define a site and identify a root folder where
Rich Text Editor Quick Reference
 Rich Text Editor Quick Reference Introduction Using the rich text editor is similar to using a word processing application such as Microsoft Word. After data is typed into the editing area it can be formatted
2016 TRTA Content Managers Resource Guide How to update and edit your local unit website. Roy Varney, TRTA Multimedia Specialist
 2016 TRTA Content Managers Resource Guide How to update and edit your local unit website. Roy Varney, TRTA Multimedia Specialist Table of Contents Introduction... 1 Basic information... 1 - How to log
Creating and Managing Your Personal Mines Website on WordPress
 Creating and Managing Your Personal Mines Website on WordPress Table of Contents Creating your site... 2 Managing your site... 2 About WordPress... 2 Logging in... 2 Pages... 2 Editing an Existing Page...
Blogs.mcgill.ca guide
 Blogs.mcgill.ca guide A step-by-step document to blogging at McGill McGill University Table of Contents BLOGGING AT MCGILL...3 BLOGGING IN TEACHING AND LEARNING...3 LOGGING IN TO BLOGS.MCGILL.CA...4 USING
TinyMCE Users Guide. This user manual will show you all the basics of the TinyMCE editor.
 Introduction TinyMCE is a platform independent web based Javascript HTML WYSIWYG editor. What this means is that it will let you create html content on your web site. TinyMCE supports a lot of Operation
Portwalk Place WORDPRESS MANUAL O ROURKE HOSPITALITY MARKETING OROURKEHOSPITALITY.COM
 Portwalk Place WORDPRESS MANUAL TABLE OF CONTENTS Login... 3 Editing Existing Pages... 4 Adding New Pages... 7 Editing/Adding Text... 9 Creating a Link... 10 Linking to a PDF... 11 Making a Link a Button...
NETZONE CMS User Guide Copyright Tomahawk
 NETZONE CMS User Guide Copyright 2015. Tomahawk 1 Phone: + 64 9 522 2333 Email: getintouch@tomahawk.co.nz Tomahawk 2015 www.tomahawk.co.nz 2 NETZONE CMS USER GUIDE WHAT YOU LL FIND INSIDE LOGGING IN 4
SCHULICH MEDICINE & DENTISTRY Website Updates August 30, Administrative Web Editor Guide v6
 SCHULICH MEDICINE & DENTISTRY Website Updates August 30, 2012 Administrative Web Editor Guide v6 Table of Contents Chapter 1 Web Anatomy... 1 1.1 What You Need To Know First... 1 1.2 Anatomy of a Home
Administrative Training Mura CMS Version 5.6
 Administrative Training Mura CMS Version 5.6 Published: March 9, 2012 Table of Contents Mura CMS Overview! 6 Dashboard!... 6 Site Manager!... 6 Drafts!... 6 Components!... 6 Categories!... 6 Content Collections:
WordPress CMS How To Guide
 TABLE OF CONTENTS CREATE AN EVENT POST... 1 THE FEATURED AREA Change the Order of the Featured Events... 3 Switch to a Full- Width Slider... 3 STATIC CONTENT Edit a Page... 3 Edit the Footer... 3 WordPress
CAT ALUMNI MEMBER USER GUIDE
 THE BASICS CAT ALUMNI MEMBER USER GUIDE Logging in Click on CAT Login at the top of homepage or go to http://racstl.com/artcommunity/community-arts-training-institute/cat-institute-alumni-login/. Use the
FCKEditor v1.0 Basic Formatting Create Links Insert Tables
 FCKEditor v1.0 This document goes over the functionality and features of FCKEditor. This editor allows you to easily create XHTML compliant code for your web pages in Site Builder Toolkit v2.3 and higher.
Beginner Workshop Activity Guide 2012 User Conference
 Beginner Workshop Activity Guide 2012 User Conference TUESDAY, MARCH 6 2:00PM 5:00 PM Beginner Training Workshop Attendees will learn the end user functions of OU Campus TM. They will learn how to log
UW Oshkosh WordPress Training Manual. June 2015 Integrated Marketing Communications *Updated January 2016
 UW Oshkosh WordPress Training Manual June 2015 Integrated Marketing Communications *Updated January 2016 Table of Contents What is WordPress...3 WordPress Resources...3 Website Best Practices...4 How to
Site Owners: Cascade Basics. May 2017
 Site Owners: Cascade Basics May 2017 Page 2 Logging In & Your Site Logging In Open a browser and enter the following URL (or click this link): http://mordac.itcs.northwestern.edu/ OR http://www.northwestern.edu/cms/
Creating an with Constant Contact. A step-by-step guide
 Creating an Email with Constant Contact A step-by-step guide About this Manual Once your Constant Contact account is established, use this manual as a guide to help you create your email campaign Here
User s guide to using the ForeTees TinyMCE online editor. Getting started with TinyMCE and basic things you need to know!
 User s guide to using the ForeTees TinyMCE online editor TinyMCE is a WYSIWYG (what you see is what you get) editor that allows users a familiar word-processing interface to use when editing the announcement
Center for Academic Excellence engaging faculty inspiring learning. WordPress Quick-Reference Manual
 Center for Academic Excellence engaging faculty inspiring learning WordPress Quick-Reference Manual Contents Signing up for a WordPress account... 2 Adding a new blog... 2 Changing the theme of your blog...
Dreamweaver Basics Outline
 Dreamweaver Basics Outline The Interface Toolbar Status Bar Property Inspector Insert Toolbar Right Palette Modify Page Properties File Structure Define Site Building Our Webpage Working with Tables Working
WordPress Maintenance For Beginners
 WordPress Maintenance For Beginners Content Pages, posts, users, links, widgets, menus, comments, products, etc. Media Images, documents, videos, music, etc. Plugins Function, features, and facilities.
The Veranda House WORDPRESS MANUAL O ROURKE HOSPITALITY MARKETING OROURKEHOSPITALITY.COM
 The Veranda House WORDPRESS MANUAL TABLE OF CONTENTS Login... 3 Editing Existing Pages... 4 Adding New Pages... 6 Editing a Room Post... 7 Editing a Packages Post... 9 Editing/Adding Text... 11 Creating
A Guide to Using WordPress + RAVEN5. v 1.4 Updated May 25, 2018
 + v 1.4 Updated May 25, 2018 Table of Contents 1. Introduction...................................................................................3 2. Logging In.....................................................................................4
User Guide. Chapter 6. Teacher Pages
 User Guide Chapter 6 s Table of Contents Introduction... 5 Tips for s... 6 Pitfalls... 7 Key Information... 8 I. How to add a... 8 II. How to Edit... 10 SharpSchool s WYSIWYG Editor... 11 Publish a...
The Telerik Rad Editor might not be available if you are using a browser other than Internet Explorer or Firefox.
 TELERIK RAD EDITOR The Telerik Rad Editor is another project that DNN makes use of for creating formatted content. The editor includes a toolbar with buttons similar to those you'd find in a word processor
School Website WordPress User Guide
 School Website WordPress User Guide version 3.3 Olathe Public Schools USD # 233 2012 Table of Contents Introduction 0 Log into WordPress... 1 Dashboard View... 1 Dashboard Menu Bar.. 2 Pages. 4 New Page
Learn more about Pages, Keynote & Numbers
 Learn more about Pages, Keynote & Numbers HCPS Instructional Technology May 2012 Adapted from Apple Help Guides CHAPTER ONE: PAGES Part 1: Get to Know Pages Opening and Creating Documents Opening a Pages
The Etomite Manual for website editors.
 The Etomite Manual for website editors. (Version: 1.1) Etomite is a web tool that allows your website to be user-editable. This means that you can add, edit, and delete pages and whole website sections
In the fourth unit you will learn how to upload and add images and PDF files.
 Introduction Here at SUNY New Paltz, we use the Terminal Four (T4) web content management system (CMS). This puts the power of editing content on our college s webpage in the hands of our authorized users.
New Website User Manual
 New Website User Manual General Notes 3 How To Login To Your Website And Access Admin Dashboard 4 Adding / Editing Sliders 5 Home Slider 5 School Slider (Same steps for ALL school pages) - Add a Slide
A Guide to Blogging on Wordpress
 A Guide to Blogging on Wordpress Below is a written guide with pictures for using the WordPress blogging platform. If you re more of a visual person, there are videos here: http://wordpress.tv/category/howto/
How to use WordPress to create a website STEP-BY-STEP INSTRUCTIONS
 How to use WordPress to create a website STEP-BY-STEP INSTRUCTIONS STEP 1:Preparing your WordPress site Go to the Dashboard for your new site Select Appearance > Themes. Make sure you have Activated the
NYLearns Curriculum Administration:
 NYLearns Curriculum Administration: Creating a Curriculum Map May 2014 2 This page left intentionally blank 3 Contents Signing in to NYLearns... 4 Curriculum Mapping... 6 Creating Curriculum Maps... 7