Instructions NPA project mini websites
|
|
|
- Bennett Horn
- 6 years ago
- Views:
Transcription
1 Instructions NPA project mini websites Version 1.0 This document provides guidance for using the project mini websites on the NPA programme website. The Content Management System (CMS) for the mini website is based on the open-source software TYPO3. Table of Contents 1. Mini Website Purpose Page structure Access to CMS Access Backend Getting started in TYPO Main functions Editing pages Visibility of pages Editing page content: content elements Homepage View: (pre)viewing pages List: Creating and editing News and Events File list: Uploading documents and images Screenshots... 16
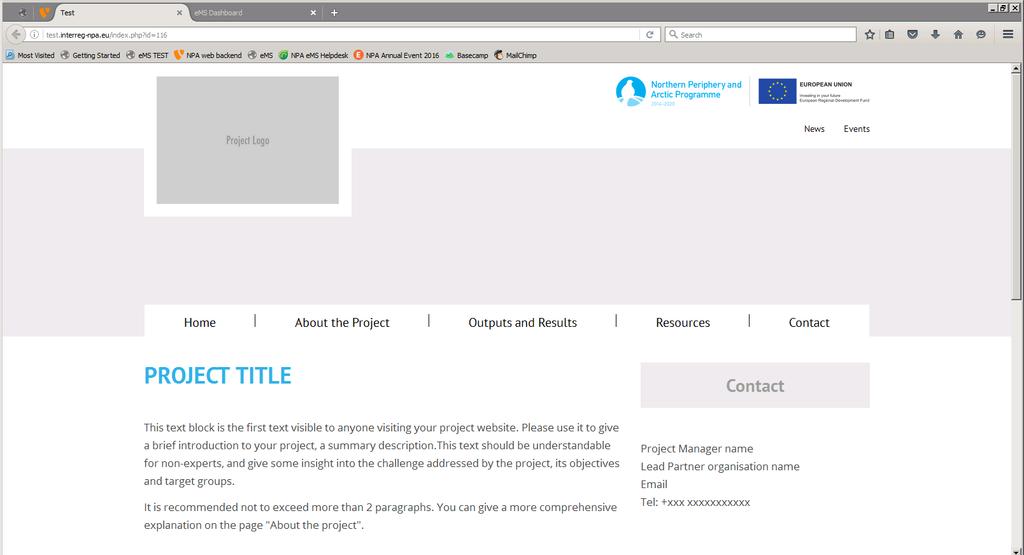
2 1. Mini Website 1.1 Purpose The NPA programme provides projects with their own mini website as part of the programme website. This saves effort on the project s side to make their own website as part of the mandatory publicity measures. In addition, it ensures that the project website complies with publicity requirements and the availability of information after project closure. Thirdly, it gives the programme access to similar information on all its projects, which is easy to share with third parties. Some projects choose to develop their own websites. The NPA programme expects such websites to mainly focus on the viable project outputs, or even to serve as the delivery platform for those outputs. On the other hand, the programme expects projects to use the mini websites for information about the project cooperation, still highlighting the outputs under development. Note: By publishing information and audiovisual materials on the project mini websites, you give the NPA the right to use the materials and duplicate them in different publications, websites, etc. 1.2 Page structure All project mini websites follow a similar page structure, see below. On the templated pages, you can find guidance for filling the mini website with content, together with some placeholders for pictures and files. Page Purpose Instructions Home Entry page of the mini website Short introduction to the project and main contact details The short introduction is the first text visible to anyone visiting your project website. Please use it to give a brief introduction to your project, a summary description. This text should be understandable for non-experts, and give some insight into the challenge addressed by the project, its objectives and target groups. It is recommended not to exceed more than 2 paragraphs. You can give a more comprehensive explanation on the page "About the project". About the Project Rationale of the project Please remember to add contact details in the right-hand column, and in the page footer. Use this section to describe the motivation behind the project; the problem it solves or the opportunity it tries to take advantage of. Include such topics as: How did the project come about? Does the project build on previous cooperation projects? What change does the project intend to make? What NPA specific challenge or opportunity does it address? How will the project achieve the intended result? Please refer to the benefits of transnational cooperation. What is unique/innovative about the project? 2
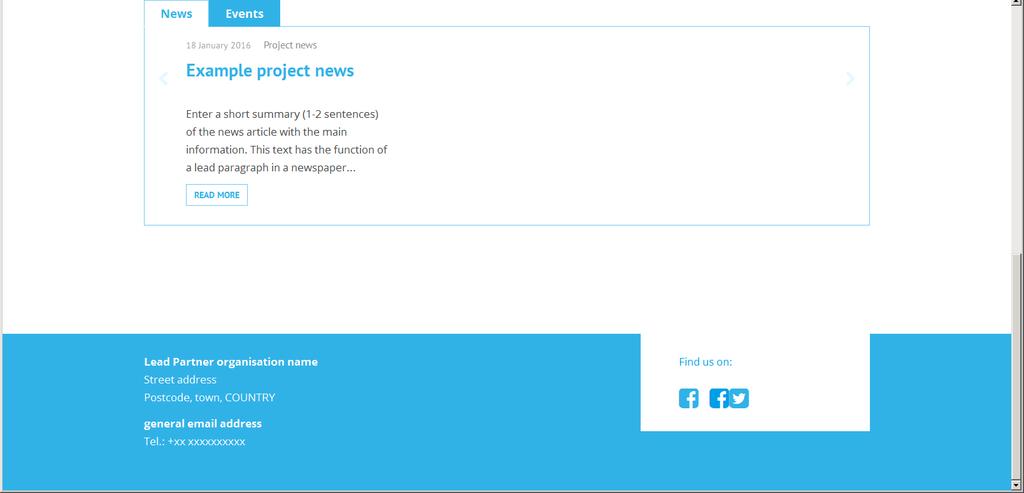
3 Who are the intended end users of the project outputs? If desired, you can make sub pages in the section About the Project. Outputs and Results Project specific this page is hidden by default Resources An overview of project outputs, including their intended impact and target groups Optional A collection of project deliverables, and promotional materials Please write the text in a style that non-experts can understand. It is a good idea to make this text timeless, so it does not need to be updated frequently. Provide a brief introduction to your project outputs (products and service) and their intended result. For each project output include such topics as: The purpose of the product/service: what change will it bring? The attributes of the product/service The target group for the product/service The status of the product/service development Indicate how the product/service will be provided If possible, add a link to further information or a dedicated output website. You can use this page for other project information, if desired. On this page, you can add your project resources, such as studies and toolkits. This is also the location for your promotional materials such as newsletters, brochures, presentations, pictures, and videos. Please provide a short introduction to this section. Contact Contact details for the partnership Describe how to get in touch with the project. For example, do you have a specific person handling press? Provide contact details for each partner. News Project news Provide a teaser: Enter a short summary (1-2 sentences) of the news article/event with the main information. In the main text, it is recommended to make sub headings for readerfriendliness. Events Project events Attach images, files and links where appropriate. 3

4 2. Access to CMS 2.1 Access The Content Management System for creating and managing contents on the NPA website is accessible on the following link: You will have received a username and password from the Joint Secretariat. Figure 1 - Login page NPA website CMS 2.2 Backend After logging in, you will enter the website backend, the behind-the-scenes area of the website. On the other hand, the frontend of the website is the public website that visitors can see on projectname.interregnpa.eu. In the backend, you can see a menu with the main functions on the left-hand side: Page, View, List and Filelist. Next to the menu, you will find the page tree, displaying the main and sub pages of the website. On the right, you can find the main editing window, which will display the page setup, depending on which main function you choose. 4

5 Figure 2 - Backend NPA website 2.3 Getting started in TYPO3 It is highly recommended to watch 4-minute video below (Ctrl + click) introducing the main functions. In addition, we recommend that you familiarise the NPA Styleguide for the website. After logging in, please choose the function in the left hand menu based on the type of action you wish to undertake. Function Purpose Page Editing existing pages View Viewing pages in the frontend layout Previewing unpublished pages in the frontend layout List Creating news and event items Editing existing news and event items File list Uploading files for linking/attaching documents to pages, news and events Uploading media files such as pictures and videos, for use on pages, news and events Each function is described in more detail in the chapter 4. 5

6 3. Main functions 3.1 Editing pages The purpose of the Page function is to create and edit the contents of the standard pages on the website. Note: Changing the page tree by adding or removing a page has major impacts on the look and functionality of your project mini website Visibility of pages It is possible to make pages visible or invisible on the front-end of the website. Making a page invisible can be useful in case you plan to make more extensive changes to a page. You can make it visible again after you are done. You can recognise an invisible page by the disabled icon. In order to make the page visible, right-click on the page name, and select Enable. Once enabled, the disabled icon will disappear, and the lightbulb icon in the right-click menu will be on. You can preview invisible pages in the View function, or by clicking on the eye icon Editing page content: content elements The layout for standard pages is a main section in the centre, and a narrow column on the right. Some pages have a different layout due to their function, for example the homepage, the news and events overviews. In the CMS, text, images and other page content are organised in content elements. In order to add or edit page content, you need to add or edit such content elements. In the backend, the content elements look like a white box, with a grey menu bar at the top. 3 Homepage with content elements There are a number of different actions you can take with content elements. 6

7 Table 1 - Content element actions Actions Instructions Create element To create a new content element, click on the plus icon in the page area of choice, and select the type of content element you want to add, normally Text & Images. Visibility of You can make a content element visible or invisible on the public website by clicking element on the enable symbol. A lightbulb that is switched on means that the element is visible, one that is off means that the element is invisible on the public website. Move element To move an element, simply drag and drop it to the page area of your choice. Copy element To copy an element, right-click on the content element icon and select Copy. Then click on the Paste icon in the page area of choice. Copying an element can be useful in case you wish to create many similar items Edit element To edit an existing content element, click on the edit icon.this will open a multi tab page to manage the contents and the settings of the element. Delete element If you have no future use for an element, you can delete it by clicking on the trash can icon. Combining elements It is also possible to combine different content elements in a specific format, such as multiple tabs (for example, the news/events on the homepage) or an accordion (for example, the contact details). In order to do so, you have to first create a content element that is a container for the other elements. Create a new element, go to tab grid elements, select the container of your choice and save. Then create the other content elements inside the container. 4 Menu for adding a new content element 7
8 In order to edit the contents and look of the content element, click on the edit icon. A new page will open with different tabs. Below, the settings for the standard Text & Images element are explained tab by tab. Remember to save your work before moving to another tab! Table 2 Content element settings Functions Tab General Type Header Type Rich Text Editor Explanation Here you can change the content element type. Note: the available settings will change depending on the type. Title of the element. Note: the title will appear as a header text. To avoid a header text, leave this box empty. Choose Überschrift 1 for page titles, choose Überschrift 2 for section headers. This is the text box where you can add/edit the page text. If your text is divided into sub headings, it is recommended to create a new text box for each sub section, each with their own heading. This makes it easier to update/move/hide a specific part of the page. Sub sections are also more user-friendly for web visitors. When copying text from other sources, it is recommended to use the paste as plain text function, to avoid a mishmash of formats. By clicking on the paste icon, you can toggle between normal paste and paste as plain text. Alternatively, it is possible to remove formatting with the broom icon. Please use the Save & Preview function to check what your text looks like on the frontend. Tab Images Add image In order to add an in-text hyperlink, select the words, and click on the hyperlink icon. Then select the type of hyperlink you wish to create: Page, File, Folder, External URL or . For files and external URLs, please always choose the target new window from the drop-down box. Note: to avoid too many in-text hyperlinks, please remember that it is also possible to add a file list in the right-hand column (see chapter 3.4). Use this option to select a new image file. Click to open a popup window that allows you to browse through images in the document library of the website. In case your image is not there, scroll down to the area below the document library to upload a new file. Select & Upload Files Click on the +sign after the file name in order to add it to the content element. Then click Save in the top menu. Once you have added an image file, tick the box Enlarge to click to allow users to see a bigger version of the image. Use this option to upload and insert a new image file. If you anticipate that the image will be reused, please upload it first to the relevant folder by scrolling down to the upload area below the document library. Tab Appearance (please only use the image alignment function on this page) Image Alignment Use the drop-down box Position and Alignment to change how images are aligned in relation to the page text. Tab Access (please only use the Publish dates function) Publish Date If you wish to schedule publishing a content element in the future, you can enter a publish date here. The element will automatically become visible on the scheduled date and time. 8
 belongs.")
9 Expiration Date Tab Categories Categories If you wish to automatically unpublish a content element in the future, you can enter an expiration date here. The element will automatically become invisible on the scheduled date and time. Tick the category to which the content element (or page on which it is placed) belongs. This facilitates the search function. 5 - Document library popup window 9
10 3.1.3 Homepage The homepage has a different setup from other pages on the website. To edit the homepage, click on the globe icon next to the name of your project, ensuring that you are in the Page function. You can then edit the different text elements in the body and footer of the page. Note: do not delete any content elements, in particular the news and event feed. In order to update the project logo and header image on the home page, right-click on the globe icon next to the name of your project, and select edit. A new page will open with different tabs. On the tab General, under Files, you have the option to add a logo and header image. A popup window will open that allows you to browse through images in the document library of the website. In case your image is not there, scroll down to the area below the document library to upload a new file. Click on the +sign after the file name in order to add it to the page. Then click Save in the top menu. In order to update the Facebook and Twitter links in the page footer, edit the content element in the footer called Social Media Links. 3.2 View: (pre)viewing pages In order to view what a page looks like on the frontend, you can use the View function. Simply select the page in the page tree and make sure that the View function is selected in the left-hand menu. The View function can also be used to preview unpublished web pages. This can be helpful when making major updates to a page, or creating a new page. 10

11 3.3 List: Creating and editing News and Events The List function is used for creating page content of a different type than standard pages. Examples are news articles and events. In order to add a news article or event, make sure the List function is active and choose News or Events from the page tree, under the folder Meta. Note: make sure you access the news/events list under the main NPA website, and not under one of the project sub sites (they also have news/events). 6 - Accessing News in the List function In order to create a news article or event, click on the new record icon under News (next to the word Header). A new page will open with several tabs, where you can add content and manage the settings for your news article or event. Below follows a description of the most important fields. Remember to save your work before moving to another tab! Table 3 - News/events settings Functions Tab General Header Top news Type Hide Teaser Explanation This is the title of your news article or event. Please keep it short and unambiguous. Tick this box if you want this story to stay on the top of the news list, even if newer articles are added. Normally, this setting is used for the launch of a call, or for holiday schedules. Please only use the type News Tick this box, to make sure that your draft news article/event stays invisible until you are satisfied to publish it. Enter a short summary (1-2 sentences) of the news article with the main information. This text has the function of a lead paragraph in a newspaper article. It will be visible in the list of news articles, and in the news notification. 11
12 Author name Author Date & time Is Event Event end (events only) Full day(events only) Organiser (events only) Location (events only) Text This field is normally left empty This field is normally left empty This is the date of the news article or the event start date (and time) Tick this box if you wish to switch from news article to event. Note: this will affect the available fields. Enter the end date (and time) for the event Tick if the event is a full day event (this also counts for an event running over multiple days) Enter the organiser name, usually Joint Secretariat As a minimum, enter the town and country of the event. In addition, you can add the venue name. Note: it is best to mention address details in the agenda or on the registration page. This is the main text of your news article or event. Note: this text follows below the teaser on the page of the article or event; there is no need to repeat the teaser text. For reader-friendliness, it is recommended to make sub headings in a longer text. When copying text from other sources, it is recommended to use the paste as plain text function, to avoid a mishmash of formats. By clicking on the paste icon, you can toggle between normal paste and paste as plain text. Alternatively, it is possible to remove formatting with the broom icon. Note: It is not possible to preview unpublished news articles/events. In order to check what they look like, you need to publish them. Disable In order to add an in-text hyperlink, select the words, and click on the hyperlink icon. Then select the type of hyperlink you wish to create; Page, File, Folder, External URL or . For files and external URLs, please always choose the target new window from the drop-down box. Note: to avoid too many in-text hyperlinks, please remember that it is also possible to add hyperlinks and files to the article/event on the tab Relations. Tick this box to disable the news article/event. This has the same effect as ticking Hide. Tab Access Publish Date Expiration Date Tab Options Categories Tab Relations Media file If you wish to schedule publishing a news article/event in the future, you can enter a publish date here. The news article/event will automatically become visible on the scheduled date and time. This can be useful for publishing calls. If you wish to automatically unpublish a news article/event in the future, you can enter an expiration date here. The news article/event will automatically become invisible on the scheduled date and time. This can be useful for unpublishing the holiday schedule. Tick the category to which the news article or event belongs. This allows visitors to filter the news article or event. If you wish to add a picture or video to the news story or event, either select it from the document library Add media file, or upload a new picture Select & Upload files. In the popup window, click on the +sign after the file name to add it. Then click Save in the top menu. You can then choose whether the picture should be shown in the preview, the list of news 12
13 Related files articles. It is also possible to add a hyperlink to the picture, which opens when clicking on the picture. Please remember to always choose the target new window. Alternatively type the following behind the URL address: _blank If you wish to add files to the news story or event, select it from the document library Add media file. This function can be useful if your news article is referring to a report or publication. In case of events, this is the location where you can upload the agenda, and PowerPoint presentations after the event. Note: Please browse through the library before deciding to add a new file, to avoid duplication in the document library. In case your file is not there, scroll down to the area below the document library to upload a new file to the relevant folder. Related links In the popup window, click on the +sign after the file name to add it. Then click Save in the top menu. If you wish to link to an internal or external web page, you can add a hyperlink here. A nameless hyperlink is created, which you need to edit. Please give the link an easy to understand title, such as Fifth Call page or Registration Link. Click Save in the top menu. Please remember to always choose the target new window, in case of an external URL. Alternatively type the following behind the URL address: _blank Related news This function can be useful for call announcements, where it is good practice to add a link to the call page (internal link). For events, add the registration link here. If you wish to make visitors aware of other news articles or events related to the topic, click on the folder item to select related articles. Note: In the popup window, you may need to navigate to the news/events folder using the following path: Sites/Northern Periphery and Arctic Programme /Meta/News or Events Click on the +sign before a news article to add it. Then click Save in the top menu. Tab Metadata is normally not used Publishing You can publish your news article or event by unticking the Hide box. Alternatively, in the list of news or event items, you can activate the lightbulb. 13

14 3.4 File list: Uploading documents and images Files and images can be managed in the website s document library under the function File list. Note: Please browse through the library before deciding to add a new file, to avoid duplication in the document library. 7 - Access Document Library under File list There are different file actions, described below. Actions Instructions Create folder If you wish to add a new file, select the relevant folder for your file. If there is no relevant folder, consider if a new folder is necessary. You can add a new folder by clicking on the new record icon. Please give the folder a short and unambiguous name. Add file Once inside the folder, you can add a new file by clicking on the upload icon, or by dragging and dropping a file from your Windows explorer to the area at the top of the file list. Edit file Overwrite existing file You will be asked if you wish to overwrite any files with the same name. Click Yes. Once you have added a new file, you need to refresh the list by clicking on the refresh icon or Ctrl + F5. Note: the tick box Extended View needs to be ticked in order to see the edit options. Once you have added a new file, you need to edit the file title. Click on the pencil icon, which will open a new page. Here you can edit the title of the file as it is displayed on the frontend. It is recommended to give your file a short, unambiguous title without the file extension, e.g. Programme Manual v5. In the Description, you can for example add more details about the purpose of the file. If you wish to replace an existing file on the website without breaking any links to that file, for example the Programme Manual, make sure the file name of the updated file 14
15 Move file Delete file Adding file list is exactly the same as the name of the file in the Document Library. If needed, first rename the filename in the Document Library. After you have overwritten the file, please check that the file title and description are still valid, or need to the updated as well. You can move a file to another folder by copying and pasting it, by right-clicking on the file icon. Any links to the file will be automatically updated. If you have no future use for a file, you can delete it by clicking on the trash can icon. File lists are a way of displaying a group of files, usually in the right-hand column of a page, for example the application pack. There are two ways of adding a file list to a web page. In both cases, you need to create a content element, in the Page function. You can find the content element of the type File Links on the Special elements tab. Then enter the edit mode for your newly created file list content element. Option 1: single files On the tab General, under Files, select the single files by clicking on Add file. Then Save. If needed, upload the relevant files through the upload section of the document library popup window. Option 2: file collection On the tab General, under Files, go to select file collections. Click on Create new, and select the options of your choice. You can choose between a static selection of files, a folder from storage that is automatically updated when a new file is added to that folder, or a category of files. Then select the relevant folder from the document library, and Save. If needed, upload the relevant files through the upload section of the document library popup window. 15

16 4. Screenshots 8 - Homepage project mini website 16

17 9 - Standard page with accordion element 10 - List of news items 17


18 11 - List of events 12 Individual event with picture, related news and link 18
SCHULICH MEDICINE & DENTISTRY Website Updates August 30, Administrative Web Editor Guide v6
 SCHULICH MEDICINE & DENTISTRY Website Updates August 30, 2012 Administrative Web Editor Guide v6 Table of Contents Chapter 1 Web Anatomy... 1 1.1 What You Need To Know First... 1 1.2 Anatomy of a Home
DTP Project webpages User Manual
 DTP Project webpages User Manual A stream of cooperation Version April 2018 New Developments explained in red Version May 2018 - New Developments explained in orange Version August 2018 New Developments
Using Microsoft Word. Paragraph Formatting. Displaying Hidden Characters
 Using Microsoft Word Paragraph Formatting Every time you press the full-stop key in a document, you are telling Word that you are finishing one sentence and starting a new one. Similarly, if you press
CreateASite Beginner s Guide
 Contents Getting Started... 3 Access the CreateASite Control Panel... 3 Select a Category/Subcategory... 4 Select a Template... 6 Change the Site Template... 10 Change Colours... 12 Change Fonts... 13
DTP Project webpages User Manual
 DTP Project webpages User Manual A stream of cooperation Version December 2016 Programme co-funded by European Union funds (ERDF, IPA, ENI) Table of content Introduction... 4 Recommendations... 5 Requirements
CUSTOMER PORTAL Splash Pages
 CUSTOMER PORTAL Splash Pages SPLASHPAGES In the splash page area, you can either create a custom splash page or use our editing tool and create a custom splash page using your own code. These splash pages
Managing Your Website with Convert Community. My MU Health and My MU Health Nursing
 Managing Your Website with Convert Community My MU Health and My MU Health Nursing Managing Your Website with Convert Community LOGGING IN... 4 LOG IN TO CONVERT COMMUNITY... 4 LOG OFF CORRECTLY... 4 GETTING
Creating Pages with the CivicPlus System
 Creating Pages with the CivicPlus System Getting Started...2 Logging into the Administration Side...2 Icon Glossary...3 Mouse Over Menus...4 Description of Menu Options...4 Creating a Page...5 Menu Item
Web Site Documentation Eugene School District 4J
 Eugene School District 4J Using this Documentation Revision 1.3 1. Instruction step-by-step. The left column contains the simple how-to steps. Over here on the right is the color commentary offered to
Somerville College WordPress user manual. 7th October 2015
 Somerville College WordPress user manual 7th October 05 0 INDEX YOUR SITE IMAGES FORMS THE MENU 4 4 5 0 YOUR SITE The Content Management System The Somerville website has been built using the WordPress
Confluence User Training Guide
 Confluence User Training Guide Below is a short overview of wikis and Confluence and a basic user training guide for completing common tasks in Confluence. This document outlines the basic features that
Swiiit User Guide 09/11/2016
 Swiiit User Guide 09/11/2016 Contents Getting Started... 4 Overview of Main Tools... 5 Webpages... 6 Main pages (Sections)... 6 Rearrange Sections... 6 Subpages... 7 Change the Title of a Webpage... 8
Web Manager. Training Manual
 Web Manager Training Manual 1 Intentionally Blank 2 Contents Document History... 4 Introduction... 5 Login... 5 Control Panel... 5 Settings... 5 Settings... 6 Siteadmin Password... 6 Website Keywords...
DTP Project webpages User Manual
 DTP Project webpages User Manual A stream of cooperation Version December 2017 Programme co-funded by European Union funds (ERDF, IPA, ENI) Table of content Introduction... 4 Recommendations... 5 Requirements
Beginner Workshop Activity Guide 2012 User Conference
 Beginner Workshop Activity Guide 2012 User Conference TUESDAY, MARCH 6 2:00PM 5:00 PM Beginner Training Workshop Attendees will learn the end user functions of OU Campus TM. They will learn how to log
Working with the website editor...5. Editing page properties Creating a new page Adding and editing content records...
 About this guide...3 About the structure of web pages in typo3...4 The outer template...4 The page record...4 Page content records...4 Access to editing and publishing records...4 Working with the website
New Website User Manual
 New Website User Manual General Notes 3 How To Login To Your Website And Access Admin Dashboard 4 Adding / Editing Sliders 5 Home Slider 5 School Slider (Same steps for ALL school pages) - Add a Slide
EDQM Extranet. User Guide
 EDQM Extranet User Guide 1 Contents Get technical support... 3 By e-mail... 3 By telephone... 3 Access... 3 URL... 3 Login... 3 Logout... 3 Password reminder... 3 Language... 3 Adjust interface for working
Introduction to Adobe CQ5
 UNDP Country Office User Guide Part I Introduction to Adobe CQ5 How to use Adobe CQ5 to build websites UNDP OC Web Team v1.1 1. How to log in to CQ5 1 Contents 1. How to log in to CQ5... 2 2. CMS terminology...
Cascade V8.4 Website Content Management for the Site Manager UMSL
 Cascade V8.4 Website Content Management for the Site Manager UMSL Contents Purpose & How to Use This Guide... 5 Getting Started and Logging In... 5 Login... 5 Dashboard... 5 Notifications... 5 Setting
Managing your content with the Adobe Experience Manager Template Editor. Gabriel Walt Product Manager twitter.com/gabrielwalt
 Managing your content with the Adobe Experience Manager Template Editor Gabriel Walt Product Manager twitter.com/gabrielwalt Table of Contents 1. Introduction 3 1.1 Overview 3 1.2 Prerequisites 3 2. Getting
Administrative Training Mura CMS Version 5.6
 Administrative Training Mura CMS Version 5.6 Published: March 9, 2012 Table of Contents Mura CMS Overview! 6 Dashboard!... 6 Site Manager!... 6 Drafts!... 6 Components!... 6 Categories!... 6 Content Collections:
BCI.com Sitecore Publishing Guide. November 2017
 BCI.com Sitecore Publishing Guide November 2017 Table of contents 3 Introduction 63 Search 4 Sitecore terms 66 Change your personal settings 5 Publishing basics 5 Log in to Sitecore Editing 69 BCI.com
TEACHER PAGES USER MANUAL CHAPTER 6 SHARPSCHOOL. For more information, please visit: Chapter 6 Teacher Pages
 SHARPSCHOOL USER MANUAL CHAPTER 6 TEACHER PAGES For more information, please visit: www.customernet.sharpschool.com 0 TABLE OF CONTENTS 1. 2. 3. 4. 5. 6. 7. 8. 9. 10. 11. INTRODUCTION... 1 I. TEACHER PAGE
Private Sales & Flash Sales v4.x Configuration for Magento 2
 Private Sales & Flash Sales v4.x Configuration for Magento 2 From Plumrocket Documentation Contents 1. Configuring Private Sales and Flash Sales Extension 1.1. Configuring Private Sales Homepage 1.2. Configuring
Introduction to Moodle
 Introduction to Moodle Preparing for a Moodle Staff Development Session... 2 Logging in to Moodle... 2 Adding an image to your profile... 4 Navigate to and within a course... 6 Content of the basic template
Grande Prairie, Alberta. LibraryAware Manual. Samantha Mercer, Digital Learning & Outreach Librarian
 Grande Prairie, Alberta www.peacelibrarysystem.ab.ca LibraryAware Manual Samantha Mercer, Digital Learning & Outreach Librarian November 2017 Table of Contents Login Access 1 How to Login... 4 2 Forgot
NYU A&S AEM Implementation. Exercise Sheets
 NYU A&S AEM Implementation Exercise Sheets Table of Contents Table of Contents... 2 Exercise 1: Blank Page with Title... 1 A. Create page using template Blank Page with Title... 1 B. Author component Generic
UW Oshkosh WordPress Training Manual. June 2015 Integrated Marketing Communications *Updated January 2016
 UW Oshkosh WordPress Training Manual June 2015 Integrated Marketing Communications *Updated January 2016 Table of Contents What is WordPress...3 WordPress Resources...3 Website Best Practices...4 How to
Starting Your SD41 Wordpress Blog blogs.sd41.bc.ca
 Starting Your SD41 Wordpress Blog blogs.sd41.bc.ca The web address to your blog starts with blogs.sd41.bc.ca/lastnamefirstinitial (eg. John Smith s blog is blogs.sd41.bc.ca/smithj) All work is done in
Websites. Version 1.7
 Websites Version 1.7 Last edited 15 Contents MyNetball Information...3 Websites...4 Web packages...4 Setting up the layout...5 Uploading files and images...6 Using Dropbox to Increase your Website Data...7
CCM Website toolkit. Version 1.2 working draft Author Bobby Kimutai. Change revisions. Video links updated
 CCM Website toolkit Version 1.2 working draft Author Bobby Kimutai Change revisions Video links updated Contents Definition of terms and abbreviations... 2 Abbreviations... 2 Requesting for the CCM website...
NETZONE CMS User Guide Copyright Tomahawk
 NETZONE CMS User Guide Copyright 2015. Tomahawk 1 Phone: + 64 9 522 2333 Email: getintouch@tomahawk.co.nz Tomahawk 2015 www.tomahawk.co.nz 2 NETZONE CMS USER GUIDE WHAT YOU LL FIND INSIDE LOGGING IN 4
Swiiit User Guide 03/09/2015
 Swiiit User Guide 03/09/2015 Contents Getting Started... 4 Overview of Main Tools... 5 Webpages... 6 Main pages (Sections)... 6 Rearrange Sections... 6 Subpages... 7 Change the Title of a Webpage... 8
Web Pro Manager: General User Guide
 Web Pro Manager: General User Guide Version 1.14 (7/2013) Web Pro Manager is an open-source website management platform that is easy to use, intuitive, and highly customizable. Web Pro Manager can be used
INTRODUCTION TO BLACKBOARD
 INTRODUCTION TO BLACKBOARD Working URL - https://www.d11.org Layout of the site MY START BAR CHANNEL BAR HEADER GLOBAL ICONS Logging In Use your email as your username and your network password. SITE MANAGER
template Digital Communications
 Digital Communications How to create an events page using the TMP-3-1-Event-Details template If your department/division hosts events (separate from the public lecture programme), you can use a TMP-3-1-Event-Details
Contents. Announcer Pro Version 4.6 Page 2 of 35 Version V4.6
 User Guide Contents 1. Introduction... 3 1.1. Getting Started... 3 1.2. Navigation... 4 2. Create a Newsletter... 6 2.1. Confirm Company Details... 6 2.2. Choose Template... 8 2.3. Edit Newsletter... 8
Electronic Committees (ecommittees) Frequently Asked Questions v1.0
 Frequently Asked Questions v1.0") 3 Electronic Committees (ecommittees) Frequently Asked Questions v1.0 SABS 2012-12-06 Table of Contents 1 Contents 1 Login and access... 3 1.1 How to access the ecommittee workspace... 3 1.1.1 Via the
3 Electronic Committees (ecommittees) Frequently Asked Questions v1.0 SABS 2012-12-06 Table of Contents 1 Contents 1 Login and access... 3 1.1 How to access the ecommittee workspace... 3 1.1.1 Via the
2013, Active Commerce 1
 2013, Active Commerce 1 2013, Active Commerce 2 Active Commerce User Guide Terminology / Interface Login Adding Media to the Media Library Uploading an Item to the Media Library Editing the Media Meta
The Distributor s Content Management Guide for subzero-wolf.com
 The Distributor s Content Management Guide for subzero-wolf.com Dear Distributor Partner Portal users, Please use this guide help you find your way around and assist you in editing Showroom detail page
General Training Curriculum
 General Training Curriculum Table of Contents 1.0 Getting Started 1.1 What is MODX? 1.2 Browser Support 1.3 How Do I Log In? 2.0 MODX Dashboard 2.1 What is a Dashboard? 2.2 Global Top Menu Bar 2.2.0 MODX
Wordpress Training Manual
 The Dashboard... 2 If this is your first time logging in:... 2 How do I change my password or email address?... 3 Search Engine Optimization (SEO)... 4 SEO for Pages... 4 SEO for Images... 5 Managing Pages...
CMS (Content Managed System) Training Manual
 Training Manual") CMS (Content Managed System) Training Manual 1 Contents Document History... 3 Introduction... 4 Login... 4 Control panel... 4 User manager... 5 Global Configuration... 7 Site Settings... 8 Metadata Settings...
CMS (Content Managed System) Training Manual 1 Contents Document History... 3 Introduction... 4 Login... 4 Control panel... 4 User manager... 5 Global Configuration... 7 Site Settings... 8 Metadata Settings...
Creating an with Constant Contact. A step-by-step guide
 Creating an Email with Constant Contact A step-by-step guide About this Manual Once your Constant Contact account is established, use this manual as a guide to help you create your email campaign Here
Website Training Part 2. Administration of the Website
 Rotary Websites: Websites Club, Website Training Part 2 Administration of the Website Club Admin To login first click here Enter your username and password and then click Log In If you have forgotten your
Getting Started (New Accounts)
") Getting Started (New Accounts) 1. On any page with the menu, go to the faculty section and choose Faculty Website Access. 2. On the login page, make sure you are on Windows Login. Login with the username
Getting Started (New Accounts) 1. On any page with the menu, go to the faculty section and choose Faculty Website Access. 2. On the login page, make sure you are on Windows Login. Login with the username
Creating a Website with Wordpress
 Creating a Website with Wordpress Wordpress Fundamentals Version 1.6 Fayette County Public Schools June 28, 2013 Sow-Foong Hedman Technology Web Team Contents What is Wordpress?... 4 Overview... 4 Key
2016 TRTA Content Managers Resource Guide How to update and edit your local unit website. Roy Varney, TRTA Multimedia Specialist
 2016 TRTA Content Managers Resource Guide How to update and edit your local unit website. Roy Varney, TRTA Multimedia Specialist Table of Contents Introduction... 1 Basic information... 1 - How to log
C1 CMS User Guide Orckestra, Europe Nygårdsvej 16 DK-2100 Copenhagen Phone
 2017-02-13 Orckestra, Europe Nygårdsvej 16 DK-2100 Copenhagen Phone +45 3915 7600 www.orckestra.com Content 1 INTRODUCTION... 4 1.1 Page-based systems versus item-based systems 4 1.2 Browser support 5
Basic Content Management Introduction
 Basic Content Management Introduction Logging into the editing process To begin editing your website you use your username and password to access your website's backend. The backend of your website can
MOODLE MANUAL TABLE OF CONTENTS
 1 MOODLE MANUAL TABLE OF CONTENTS Introduction to Moodle...1 Logging In... 2 Moodle Icons...6 Course Layout and Blocks...8 Changing Your Profile...10 Create new Course...12 Editing Your Course...15 Adding
page 1 OU Campus User Guide
 page 1 OU Campus User Guide Logging Into OU Campus page page 2 1. Navigate to a page on your site that you wish to edit. 2. Scroll down to the footer and click the symbol. 3. Enter your OU Campus username
EPiServer Content Editor s Guide
 EPiServer Content Editor s Guide Contents Getting Started with EPiServer... 19 Logging In... 19 Navigating from the Global Menu... 19 Generic Functions, Toolbar and Panes... 20 Generic Functions... 20
Creating an eflash Message
 Creating an eflash Message eflash emails are easy to create and send, yet incredibly responsive to read of any device which makes them great for parent notifications. Send an eflash for those messages
4.1 Creating content elements
 4.1 Creating content elements The content of a page is created by using content elements. You can build the page by using a variation of elements in combination with each other. Select a page in the page
Logging Into Your Site
 This training document is meant as a step-by-step guide to creating and delivering a UW-Madison site in the current UW-Madison theme. In this training class, you will learn how to log in to access your
Microsoft Windows SharePoint Services
 Microsoft Windows SharePoint Services SITE ADMIN USER TRAINING 1 Introduction What is Microsoft Windows SharePoint Services? Windows SharePoint Services (referred to generically as SharePoint) is a tool
Joomla! 2.5.x Training Manual
 Joomla! 2.5.x Training Manual 1 Joomla is an online content management system that keeps track of all content on your website including text, images, links, and documents. This manual includes several
UTAS CMS. Easy Edit Suite Workshop V3 UNIVERSITY OF TASMANIA. Web Services Service Delivery & Support
 Web Services Service Delivery & Support UNIVERSITY OF TASMANIA UTAS CMS Easy Edit Suite Workshop V3 Web Service, Service Delivery & Support UWCMS Easy Edit Suite Workshop: v3 Contents What is Easy Edit
ProMenPol Database Description
 Project No.: 44406 Project Acronym: ProMenPol Project Title: Promoting and Protecting Mental Health Supporting Policy through Integration of Research, Current Approaches and Practices Instrument: Co-ordination
Managing your Website s Content in WordPress
 Managing your Website s Content in WordPress Prepared for Westmont Aged Care Services Ltd 1 December 2016 For further support please contact: Annie O Shea M: 0412 169 664 E: annie@webstrategies.net.au
ROLLA PUBLIC SCHOOLS WEB EDITING REFRESHER
 ROLLA PUBLIC SCHOOLS WEB EDITING REFRESHER Logging in 1. In the address line of Internet Explorer, enter the following URL: www.rolla.k12.mo.us/typo3 Or From the RPS Home page, select Staff Inside RPS
About the Tutorial. Audience. Prerequisites. Copyright & Disclaimer. Joomla
 About the Tutorial Joomla is an open source Content Management System (CMS), which is used to build websites and online applications. It is free and extendable which is separated into frontend templates
Course Exercises for the Content Management System. Grazyna Whalley, Laurence Cornford June 2014 AP-CMS2.0. University of Sheffield
 Course Exercises for the Content Management System. Grazyna Whalley, Laurence Cornford June 2014 AP-CMS2.0 University of Sheffield PART 1 1.1 Getting Started 1. Log on to the computer with your usual username
Web Page Basics. FRSD Elementary Technology Workshop. February Presented by Lisa Stewart, Tammy Gianvito, and Diane Kaufmann
 Web Page Basics FRSD Elementary Technology Workshop February 2014 Presented by Lisa Stewart, Tammy Gianvito, and Diane Kaufmann Please save this booklet for future reference. 2 P a g e Notes and Questions
*monthly; log in to your wordpress dashboard and update plugins which are showing prompts to do so.
 *monthly; log in to your wordpress dashboard and update plugins which are showing prompts to do so. TRNA WORDPRESS LOGIN AND EDITING INSTRUCTIONS; 10/17/18 (see end of this document for web developer-level
MANAGE YOUR CONSTRUCTION21 COMMUNITY
 MANAGE YOUR CONSTRUCTION21 COMMUNITY Online communities are spaces dedicated to exchanges, news watch and sharing of documents. By creating your community on a specific topic, you stand out as a national
Using this tutorial, you will create a Web page for a fictional foundation. The tutorial is divided into the following parts:
 Extend Tutorial Copyright Copyright 2005 ACS Technologies Group, Inc. All rights reserved. Reproduction of any part of this publication by mechanical or electronic means, including facsimile transmission
Creating an with Constant Contact. A step-by-step guide
 Creating an Email with Constant Contact A step-by-step guide About this Manual Once your Constant Contact account is established, use this manual as a guide to help you create your email campaign Here
magento_1:blog_pro
 magento_1:blog_pro https://amasty.com/docs/doku.php?id=magento_1:blog_pro For more details see the Blog Pro extension page. Blog Pro Create responsive blog posts with a handy WYSIWYG editor, easily customize
e-portfolios Benefits of an e-portfolio Showcase your best works Progress assessment Job search; present to employers Share with family and friends
 1 e-portfolios Digication training objective The objective is to learn the tools and features of Digication and gain the essential skills to use Digication to develop an electronic portfolio. What you
Blog Pro for Magento 2
 magento_2:blog_pro https://amasty.com/docs/doku.php?id=magento_2:blog_pro For more details see the extension page. Make blogging an effective part of your marketing strategy with. Take advantage of the
In the fourth unit you will learn how to upload and add images and PDF files.
 Introduction Here at SUNY New Paltz, we use the Terminal Four (T4) web content management system (CMS). This puts the power of editing content on our college s webpage in the hands of our authorized users.
N200 Visit User Guide Release 3.28
 N200 Visit User Guide Release 3.28 2017 N200, a GES Global Company 1 Contents Introduction 7 1. Overview 8 1.1 Goal 8 1.2 Hierarchy 8 1.3 Visitors and Partners 8 1.4 Modules 9 1.5 User Types 9 1.6 Navigation
ECDL Module 6 REFERENCE MANUAL
 ECDL Module 6 REFERENCE MANUAL Presentation Microsoft PowerPoint XP Edition for ECDL Syllabus Four PAGE 2 - ECDL MODULE 6 (USING POWERPOINT XP) - MANUAL 6.1 GETTING STARTED... 4 6.1.1 FIRST STEPS WITH
Autodesk Global Event Platform
 Autodesk Global Event Platform User Manual Updated: January 8 th 2013 Created by: Onemedia Contents Accessing the tool... 3 Accessing the tool Autodesk Partners... 3 Accessing the tool Autodesk Logging
London MLE Fronter Waltham Forest Fronter User Level 3 (Version 2.0 Nov 2011)
") Once you have completed Fronter User Level 3 you will know: How to create a new room -1 How to add members to a room -2 How to creating resources Page -3 How to create resources - Embedding a video onto
Once you have completed Fronter User Level 3 you will know: How to create a new room -1 How to add members to a room -2 How to creating resources Page -3 How to create resources - Embedding a video onto
Lava New Media s CMS. Documentation Page 1
 Lava New Media s CMS Documentation 5.12.2010 Page 1 Table of Contents Logging On to the Content Management System 3 Introduction to the CMS 3 What is the page tree? 4 Editing Web Pages 5 How to use the
Table of Contents. Adding Files Select File...20 Metadata...20 A to Z...21
 ptools Manual Table of Contents Welcome to ptools... 1 To login:...1 Adding in Active X... 2 To Install XStandard:...2 Locations... 2 New Categories or Locations...2 A to Z...5 Primary Document...5 Documents...
TYPO3 Editing Guide Contents
 TYPO3 Editing Guide Contents Introduction... 2 Logging in... 2 Selecting your Workspace for editing... 2 Working with Content Elements... 3 Working in the Editing Window... 4 Pasting content from MS Word
CM Mega Menu Documentation
 CM Mega Menu Documentation Release 1.0.0 CMExtension May 26, 2016 Contents 1 Overview 3 1.1 Technical Requirements......................................... 3 2 Installation 5 2.1 Upgrading................................................
User Guide. Chapter 6. Teacher Pages
 User Guide Chapter 6 s Table of Contents Introduction... 5 Tips for s... 6 Pitfalls... 7 Key Information... 8 I. How to add a... 8 II. How to Edit... 10 SharpSchool s WYSIWYG Editor... 11 Publish a...
REACH SCREEN SYSTEMS. System Support Manual. User manual for operating the REACH Announcement Tool, Scheduling Tool, and Touch Screen Systems.
 REACH SCREEN SYSTEMS System Support Manual User manual for operating the REACH Announcement Tool, Scheduling Tool, and Touch Screen Systems. Table of Contents REACH Announcement Tool... 4 Overview... 4
Welcome to you user manual for your website
 Welcome to you user manual for your website Your website is unique to you. We build our websites on the Wordpress platform. and each of our websites are designed to be different. To achieve this we use
FileNET Guide for AHC PageMasters
 PageMasters have the permissions necessary to perform the following tasks with Site Tools: ACADEMIC HEALTH CENTER 2 Application Requirements...3 Access FileNET...3 Log in to FileNET...3 Navigate the Site...3
FAI Website: User Manual.
 FAI Website: User Manual www.fai.org Version 3 07.02.2012 Page 1 Table of content Introduction... 3 Login... 4 User menu... 4 Article categories... 5 Articles... 7 How to edit an existing article... 8
1.0 Overview For content management, Joomla divides into some basic components: the Article
 Joomla! 3.4.x Training Manual Joomla is an online content management system that keeps track of all content on your website including text, images, links, and documents. This manual includes several tutorials
How to create level 1 and level 2 landing pages
 Digital Communications How to create level 1 and level 2 landing pages Introduction The new LSE landing page templates have been designed to showcase top-level information about a service or division.
Website Training Manual
 Website Training Manual Version 1.0 9/11/13 Section 1: Manage Users... 3 Adding Users... 3 Managing Users... 3 Section 2: Manage Content... 4 Section 3: Create Content... 5 Featured Slider... 5 Governance...
Drupal 7 Template. Page 1 of 27. Site Title. Navigation Tabs. Homepage Slide. Social Media. News article. Events. Links. Contact Information
 Site Title Navigation Tabs Homepage Slide News article Social Media Events Contact Information Links Page 1 of 27 Table of Contents USER ACCOUNT... 3 Edit Profile... 3 CONTENT... 5 ADD CONTENT... 5 BASIC
Center for Academic Excellence engaging faculty inspiring learning. WordPress Quick-Reference Manual
 Center for Academic Excellence engaging faculty inspiring learning WordPress Quick-Reference Manual Contents Signing up for a WordPress account... 2 Adding a new blog... 2 Changing the theme of your blog...
Episerver CMS. Editor User Guide
 Episerver CMS Editor User Guide Episerver CMS Editor User Guide 18-3 Table of Contents 3 Table of contents Introduction 15 Features, licenses and releases 16 Copyright notice 16 About Episerver 17 The
WEB EDITING REFRESHER
 WEB EDITING REFRESHER ROLLA PUBLIC SCHOOLS January 2010 Logging in 1. In the address line of Internet Explorer, enter the following URL: www.rolla.k12.mo.us/typo3 Or From the RPS Home page, select Staff
How to Use Serif WebPlus 10
 How to Use Serif WebPlus 10 Getting started 1. Open Serif WebPlus and select Start New Site from the Startup Screen 2. WebPlus will start a blank website for you. Take a few moments to familiarise yourself
Episerver CMS. Editor User Guide
 Episerver CMS Editor User Guide Episerver CMS Editor User Guide 17-2 Release date 2017-03-13 Table of Contents 3 Table of contents Table of contents 3 Introduction 11 Features, licenses and releases 11
Joomla! Frontend Editing
 Joomla! Frontend Editing Instructor for this Workshop Web Development School of Arts and Sciences TABLE OF CONTENTS Welcome... 3 What is Joomla?... 3 Joomla Overview Login... 4 How is Joomla! Organized?...
JITs Portal. User Manual
 JITs Portal User Manual November 2017 JITs Portal 1 Table of Contents Chapter 1 Introduction... 2 1.1 What is the JITs Portal?...3 1.2 User Guide structure...4 Chapter 2 Working with the JITs Portal...
User Guide. Web Intelligence Rich Client. Business Objects 4.1
 User Guide Web Intelligence Rich Client Business Objects 4.1 2 P a g e Web Intelligence 4.1 User Guide Web Intelligence 4.1 User Guide Contents Getting Started in Web Intelligence 4.1... 5 Log into EDDIE...
1.0 New visitisleofman.com Page Logging in and out of your account Page Help Tutorial Videos Page Updating Information Page 6
 1.0 New visitisleofman.com Page 2 2.0 Logging in and out of your account Page 3 3.0 Help Tutorial Videos Page 5 4.0 Updating Information Page 6 4.1 Product Details Page 7 4.2 Description Page 9 4.3 Media