ArtOfTest Inc. Automation Design Canvas 2.0 Beta Quick-Start Guide
|
|
|
- Gladys Mathews
- 6 years ago
- Views:
Transcription
1 Automation Design Canvas 2.0 Beta Quick-Start Guide
2 Contents Creating and Running Your First Test... 3 Adding Quick Verification Steps Creating Advanced Test Verifications Creating a Data Driven Test How to resolve test step failures Changing how an Element is found Using the 3D Viewer Performing Common Automation Tasks Automation Design Canvas Recommend Tool Window Layout WebAii Test Run Configuration Recording Surface Tool Window Overview Element Explorer Tool Window Overview Test Explorer Tool Window Overview DOM Explorer Tool Window Overview WebAii Test Tab Overview Customizing Your Test Using C# or VB.NET Code Creating a Test With a Code Behind File Creating a Test With Custom Code Steps How to Reference Elements from the Element Explorer in Code Behind Files
 Open Visual Studio and create a new test project. 3")
3 Creating and Running Your First Test Let s jump right in and show you how easy it is to record and run your tests. 1) Open Visual Studio and create a new test project. 3
 Click on the WebAii Test type and select OK.")
4 2) Right click on the project node in the solution explorer and select Add -> New Test. 3) Click on the WebAii Test type and select OK. 4) Your new empty test should open automatically. 4

5 5) If this is your first time creating a WebAii Test please see the section Recommended Tool Window Layout. 6) To begin recording the steps of your test, click on the Record button (circled in red above). 5
 In the Test Url box, enter www.google.com. 6")
6 7) The Recorder tab will automatically activate. 8) In the Test Url box, enter 6
7 9) Click the Navigate to URL button. 10) You will notice a recording step has been added to the Test Explorer tool window. 11) Type in WebAii in the Google search box and click the search button. 12) You will notice that two more steps have been added to Test Explorer. That s how easy it is to create your first test! Save and build your project. To execute your test you have 2 options: a. You can click the Quick Execute button (circled in red above). b. To execute your test using Visual Studios testing framework i. open the Test View tool window. This can be found by clicking on Test on the top menu then -> Windows -> Test View. 7
 An Internet Explorer window will open and the steps")

8 ii. Right click on your test and click Run Selection. 13) An Internet Explorer window will open and the steps of your test will automatically execute in that browser window. When the test completes the browser window will close. 8

9 14) After the test runs, double click on results summary in the Test Results tool window to view the execution log. 9

10 Adding Quick Verification Steps Adding verification steps is quick and simple using the Quick Tasks menu. 1. In the Recorder window hover the mouse cursor over an element you would like to add a verification on. 2. Wait 1 second for the little blue round nub to appear. 3. Click on the nub. This will open the Element Toolbox. 4. Click on the Quick Tasks button (circled in red above). This will open a list of available quick tasks. What is listed depends on what type of element you have selected. Here s an example with a select drop down selected: 10


11 Notice that is has Verify selection is items. 5. Here s an example with a Table element selected: Notice that it has Verify table has items. 6. Double clicking one of these items will add that Verify/Wait For as a step to your test list this: 11
12 12
 To craft a verification step, enable the Automation Overlay Surface by clicking on the Enable overlay")
13 Creating Advanced Test Verifications 1) Test Verifications are added to a test as an ordered step. 2) To craft a verification step, enable the Automation Overlay Surface by clicking on the Enable overlay button. 13
14 3) You will know if the Automation Overlay Surface is on by hovering over the web page and seeing each element being highlighted. 14
 From the Element Toolbox, click the Build Verification button to open the Sentence Verification Builder.")
15 4) Select an Element that you want to craft a verification for, wait 1 second for the little blue nub to appear, and then click on the nub. This will open the Element Toolbox. 5) From the Element Toolbox, click the Build Verification button to open the Sentence Verification Builder. 15
 During verification crafting, the content is dynamically built against the currently selected element.")
16 6) The verification builder offers sentence based verifications of elements. 7) Start by selecting a rule category from the drop down box. 8) During verification crafting, the content is dynamically built against the currently selected element. As you make choices, default values will be populated according to the values the element contains. 9) For example, if you choose Content as your verification rule then you will see three menu options. Click on the down arrow next to each option to see a list of possible values. 16
 To delete or start over, click the Delete icon. 13) Verifications can be crafted to verify many different values, styles or attributes of an element.")
17 10) You can validate that your verification is valid by clicking on the Verification icon. 11) You can also locate the current element in the DOM tree by clicking the Locate in DOM icon. 12) To delete or start over, click the Delete icon. 13) Verifications can be crafted to verify many different values, styles or attributes of an element. You can craft multiple sentences by selecting a rule and filling in the verification criteria. NOTE: Each sentence will add a separate verification step to Test Explorer. 14) When you finish building your verification, select OK to add it as a step to your current test. 17
 There are two tabs at the top of this tab, one labeled Steps and the other labeled Data 5) Click on the Data tab. 6) At the top of this tab are 3 buttons.")
18 Creating a Data Driven Test 1) Create a new test as outlined above. 2) Record the Google search steps as outlined above. 3) Click on the test tab. 4) There are two tabs at the top of this tab, one labeled Steps and the other labeled Data 5) Click on the Data tab. 6) At the top of this tab are 3 buttons. Only the Create a new data table will be enabled. Click this button to add a new grid for your data. 7) The default grid will have 5 columns. For this data test we are going to go through five iterations of the test with different search text each iteration. 18
 Continue entering text for 4 more grid cells. New rows will automatically be added as you type. 12) Save your test.")
19 8) Change the columns text box to 1 and click Update. 9) You now have a grid of just one column. 10) Enter any text into the first grid cell and hit enter or tab. The input will move to the second grid cell. 11) Continue entering text for 4 more grid cells. New rows will automatically be added as you type. 12) Save your test. 13) You can use data from a data array in both recorded steps and code behind methods. To use reference data from the data array in a code behind method continue with the following steps. To bind data from a data array to a recorded step, jump to step ) Convert the step to code that sets the value of the Google search text box from the Test Explorer. 15) To reference the data from your grid use the Data property followed by the index of the column. For example: [CodedStep(@"Set 'QText' text to 'WebAii'")] public void WebAiiTest1_CodedStep() { // You can reference the column by index Pages.Google.QText.Text = (string)data[0]; // Or by name Pages.Google.QText.Text = (string)data["animals"]; } 16) Save and build your project. 17) Execute your test. Note that the test will execute for each row in the data array. 18) To bind data to a recorded step, follow these steps. 19) Open the properties window by pressing the F4 key. 20) Click on the recorded step that sets the value of the Google search text box from the Test Explorer. 19
 Enter the name of the column you want to draw data from into the text box. In our example we want the first column so we ll enter $(Animals).")
20 21) The properties for this step will appear in the properties window. 22) Click on the drop down arrow for (Bindings). 23) Click on the Text node in the displayed tree. 24) Enter the name of the column you want to draw data from into the text box. In our example we want the first column so we ll enter $(Animals). 25) Click the Set button 26) The data for the column named Animals from the data array is now bound to the Text property for that step. Instead of entering the text WebAii into the search box, the data stored in the data array will be entered instead. 27) Save and build your project. 28) Execute your test. Note that the test will execute for each row in the data array. 20
 Clicking the Red X icon will launch the failure debug UI.")
21 How to resolve test step failures 1) After running quick execution for a test, any failed steps will appear in error: 2) Clicking the Red X icon will launch the failure debug UI. 21
 The failure debug UI shows you the details about the failure and offers you the chance to update the verification if that is what is needed.")
22 3) The failure debug UI will give a description of the failure as well as details about the failed step. 4) The failure debug UI shows you the details about the failure and offers you the chance to update the verification if that is what is needed. 5) At this point the tester needs to decide if the test needs updating or the page under test has a defect. If the test needs updating, then you can simply modify the verification properties and click OK to update the test. Otherwise the test has detected a product defect and a bug should be logged in your bug tracking system. 22
 In order to change how an element is found, right click on the element in the Element Explorer tool window and select Edit Element.")
23 Changing how an Element is found 1) Whenever a web page element has an action recorded against it, or you explicitly add an element to Elements Explorer, a Find Expression is generated that tells the framework how to find that specific element on the web page. 2) In order to change how an element is found, right click on the element in the Element Explorer tool window and select Edit Element. 3) The Find Expression Builder will launch and display how the element is currently being found. 4) The Find Expression Builder consists of the following components: a. Element Property/Attribute The first textbox specifies what property or attribute of the element to examine. Some of the things you can enter for HTML elements include: TextContent, NodeIndexPath, TagName, TagIndex, XPath or any HTML attribute (e.g. name, id, visibility, etc.). Some of the things you can enter For XAML elements include: TextContent, XamlTag, Name, TagIndex or any XAML attribute (e.g. Foreground, Content, etc.) b. Compare type The compare type drop down controls what sort of comparison will be performed (e.g. Exact, Contains, StartsWith, etc.). 23
24 c. Value to look for The next textbox holds the value that will be used in that expression. It can be either a value to look for (such as a string, or a number) or an index path (tag index or XAML index), or a RegEx expression. d. And/Then Find Expression Builder supports the ability to use multiple criteria for locating the correct element. When this drop down is sent to AND it means the current line and the next line must both equate to true. When sent to THEN it means you are creating a chained find expression. In a chained find expression you are specifying how to find element A and then underneath element A find element B. This is very useful for pages in which multiple custom complex controls have been added in different panels. You can use a chained find expression to locate the correct panel and then find the correct element (such as a button) within that panel. 5) After specifying the method and criteria to use for the element find, you can click on the Validate icon inside the Actions group box to validate that the current find expression finds the element within the current DOM. NOTE: For more information and a detailed discussion on crafting and using find expressions, please visit our website. 24

25 Using the 3D Viewer The 3D viewer shows a hierarchical view starting at a selected element traversing up the DOM tree all the way up to the DOM root. It can be used to identify/lock on elements and quickly build verifications. This is what it looks like: There are two methods of opening the 3D viewer. 7. In the Recorder window hover the mouse cursor over an element you would like to examine in the 3D viewer. 8. Wait 1 second for the little blue round nub to appear. 9. Start dragging this nub. The nub will change into an image of the highlighted element and a pop out panel will appear on the left side of the screen with three buttons in it. Drop the image of 25

26 the element you are dragging onto the middle button (the 3D viewer button) 10. The 3D viewer will open and the element you were dragging will be selected in the viewer. 11. If you drag the element onto the top button it adds that element to the Elements Explorer tool window. 12. If you drag the element onto the bottom button it locates that element in the DOM tree and highlights it in the DOM Explorer tool window. Once the 3D viewer is open you can: 1. Traverse the DOM layers by: a. Clicking on an element in the element list. b. Dragging the blue nub left/right (shown below). c. Clicking on the left/right arrows (shown above). 2. Increase/decrease magnification of the screenshot by clicking the + or symbol (shown above). 3. Clicking on the Lock on Surface button will: 26

27 a. Close the 3D viewer returning you to the Recorder window. b. Highlight that element in the Recorder. c. Open the Element Toolbox. 4. When you click on the Available Verifications tab a list of prebuilt verifications is displayed. 5. The controls in the View group box control which of the available verifications will be displayed. You can change the category being displayed using the Categories drop down. You can limit the view to only the verifications you have selected by checking the Selected Only checkbox. 6. You can quickly add verifications by checking the checkbox (or checkboxes) for the verification(s) that you want and then clicking Add to Project. 7. There are two buttons on each verification in the list. The first button (the one on the left) will test whether or not the verification passes or fails against the currently loaded web page. The other button will locate the selected element in the DOM tree and highlight it in the Dom Explorer tool window. 8. You also have the option of modifying the verification before you add it to the project. Use the drop downs and the edit boxes to modify the verification before clicking Add to Project. 27

28 Performing Common Automation Tasks This picture shows an exploded view of the Element Toolbox with all of the different tasks you can accomplish with it: 28
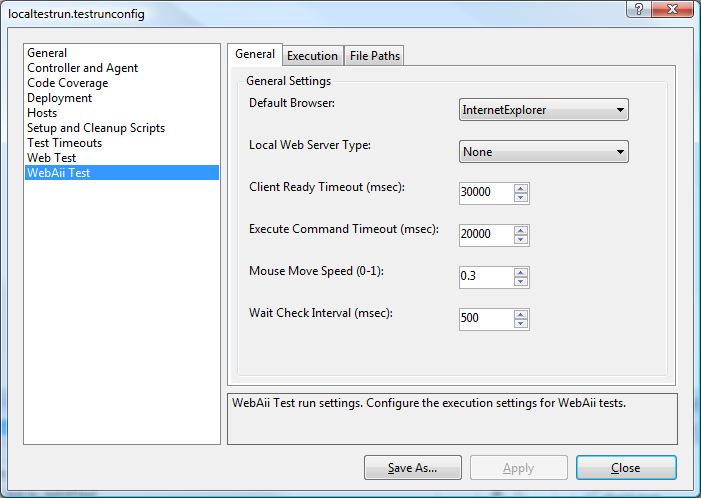
29 Automation Design Canvas Recommend Tool Window Layout The first time you load Automation Design Canvas, all tool windows except for the recording surface might be floating. Below is a recommended layout. The layout above is the recommended tool window layout to optimize space and recording efficiency. The Automation Design Canvas Tool Windows are: a. Recording Surface (Document window docked) b. Elements Explorer (Dockable tool window docked) c. Test Explorer (Dockable tool window docked) d. DOM Explorer (Dockable tool window docked) Note: This is only a recommended layout; you should customize your layout to your liking. WebAii Test Run Configuration To configure WebAii Framework settings for execution: 1) Double click on localtestrun.testrunconfig under Solution Items in the Solution Explorer. 2) On the left side of the Test Run Config dialog click on the item labeled WebAiii Test. 3) This will give you a page with three tabs to configure all the run time configuration settings for all test executions within this project. 29
30 30
31 Recording Surface Tool Window Overview The Recording Surface tool window contains a web browser and the Automation Overlay Surface. Most actions performed against a webpage can be recorded by just performing the action directly. The menu bar for the Recording Surface contains (from left to right) a. Enable / Disable the Automation Overlay Surface b. Launch external IE recording window c. Navigate Back d. Navigate Forward e. Test Url f. Navigate To g. Refresh page h. Stop navigation i. Pause recording j. Start recording (Enable the capturing of actions on page) k. User Settings (configure settings for Automation Design Canvas) l. Add dialogs drop down The Automation Overlay Surface (when enabled) provides the user with a visual effect indicating the element you are hovering over. 31
32 In order to perform more specific actions or to craft verifications against an Element, hover over an element for one second and a little blue circle will appear that is called the nub. Clicking on the nub will open the Element Toolbox The Element Toolbox has these buttons: a. Add to project elements Adds the highlighted element to the Elements Explorer tool window. b. Locate In DOM Explorer Highlights the current element in the DOM Explorer tool window. c. View 3D Opens a special hierarchical 3D view showing the path from the highlighted element all the way up to the DOM root. d. Build Verification Opens the verification builder UI. e. Quick Tasks Quickly record verification or wait for a specific property on the element. 32
33 f. Drag & Drop Enables you to record a drag & drop step. g. JavaScript Events Invoke a specific JavaScript event against the highlighted element. h. Mouse Actions has options to record specific desktop actions against the highlighted element. i. Scroll Element Adds a scroll element to the top or bottom of the page step. Note: The Overlay Automation Surface allows users to record steps that they may not be able to record by simply interacting with the page e.g. mouse hover over. 33

34 Element Explorer Tool Window Overview The Elements Explorer tool window maintains a list of all Elements within the current project. It provides a one stop shop to help maintain elements and the way they are found during execution. The Elements Explorer menu bar has these buttons: a. A green icon at the far left that controls highlighting of elements on the recording surface as they are selected in the tree view. Clicking on the button turns on element highlighting. Clicking on the button again turns off element highlighting. b. Refresh Clicking on this icon refreshes the display of the elements in Elements Explorer. You seldom should have to do this because Design Canvas normally automatically refreshes the window properly. c. View All or View Current Page only. The tree view is organized by Page -> Frame -> Test Regions -> Elements. The hierarchy is maintained according to where the element was located on the page. For example, if there are no frames or regions then elements for that particular page will be listed under the Page node. Each Page Node has a context menu with two choices: a. Load Page loads the page in the recording surface. b. Validate All Elements validates that all elements can be located on the current page using the current FindParam settings. Each Element node has a context menu with three active choices (when the page is loaded in the recording surface): a. Edit allows you to change the Find Expression of the Element (the way the element is found). b. Locate In DOM Explorer highlights the element node in the DOM Explorer tool window. c. Load Page loads the URL the element belongs to into the recording surface window. 34
35 Clicking each element will display the properties for that element in the Properties tool window. 35

36 Test Explorer Tool Window Overview The Test Explorer tool window provides the list of steps contained within the currently selected test. Each step has: a. Type Icon represents the type of step: Action, Verification, Coded. b. Order of the Step. c. Enabled checkbox whether the step will run during execution. d. Step description. e. Continue on failure indicator controls whether or not the test will stop if that verification step detects a failure. f. Delete Button deletes the step from the test. The menu bar for the Test Explorer contains (from left to right): a. Clear all test steps deletes all steps from test. b. Move Step Down moves selected step down one in the sequence. c. Move Step Up moves selected step up one in the sequence. d. Undo Restores a step you just deleted or changed to its previous state & location. e. Redo Re-applies the edit that was undone with the Undo button. f. Browser Drop Down selects which browser to use for quick execution. g. Enable Test Annotation enables test annotation during Quick Execution. If you want to change the execution across all your tests then you need to change the setting in the test configuration as previously explained. h. Execution Delay sets (in milliseconds) the time to delay between each step execution. i. Quick Execute immediately executes the current test in the selected browser. j. Clear execution results clears the previous execution results of the last Quick Execute run. k. Add - This dropdown allows you to add special steps that can t be recorded. These steps include: a. Capture Desktop Captures a screenshot of the desktop and stores it in a file. b. Capture Browser Captures a screenshot of the browser window and stores it in a file. c. Custom Annotation Allows you to add your own annotations to the test. 36
37 d. Test as Step With this option you can include another test as a test step in this test. Design Canvas will run the other test when it comes to this step and, when complete, resume running the rest of the steps of this test. e. Wait x msecs Causes the test to pause for number of milliseconds you specify. f. Clear Cookies Will clear all of the browsers cookies. g. Wait for Url Waits for a specific URL to appear in the navigation bar of the browser. This is very useful for page redirection or form posting where there can be delay in processing by the web server. h. Inspection Point Pauses the test and opens a DOM window with the current DOM. You can then study the DOM tree. The test will automatically resume when you close this DOM window. Clicking a step will display the properties for that step in the Properties tool window. You can edit the properties of that step (e.g. the URL to navigate to, the text to enter into a text box, check or uncheck a checkbox, etc.). 37

38 DOM Explorer Tool Window Overview The DOM Explorer tool window displays the Document Object Model for the currently loaded page in the Recorder document window. The nodes are a hierarchical representation of all the HTML/XAML elements that make up the page. Each node in the tree is listed by: <[Tag Name] [attributes]> Clicking on a node in the DOM Explorer will highlight that element (if visible) in the Recorder document window. Right clicking a node will bring up a context menu containing two options: a) Goto provides a shortcut for moving to a significant layer of the DOM tree (Page root element, embedded frames, Silverlight applications). b) Add to Project Elements will add the currently selected element to the Elements Explorer tool window and craft a default FindParam for that element. 38 The menu bar for the DOM Explorer contains (from left to right)
39 a) View (two options) a. Hierarchal View Displays the DOM in the order of the page. b. TagName Displays the DOM ordered by tag names. b) Refresh DOM will rebuild the tree from the current page. c) Move to main element drop down Lists the root element, any frames and any Silverlight applications found on the current page. Selecting one of these from the drop down highlights that element in the DOM Explorer tool window. d) Search will enable another menu below to search through the DOM tree. e) Find expression text box enter a valid Find Expression ( f) Evaluate Expression The Go button g) Move to Previous Result h) Move to Next Result 39
 Add a code behind file Adds a new.cs or.vb code behind file which is then logically attached to the test in Solution Explorer.")
40 WebAii Test Tab Overview Each WebAii test loaded in Visual Studio will have its own document tab allowing for step visualization and test data manipulation. The test tab has a menu bar with four icons: a) Add a code behind file Adds a new.cs or.vb code behind file which is then logically attached to the test in Solution Explorer. b) Convert test to VS WebTest Generates a Visual Studio WebTest from the test and adds it to the project. c) Generate Unit Test from WebAii Test Generates a Visual Studio Unit Test from the test. d) Record Opens the Recorder window and directly enables recording for this test) Note: Some recorded steps will not have an image associated with them because of the nature of the action. For example, a Navigate To action does not have an image Clicking on any of the step images in the Storyboard will bring that image forward and move to that step in Test Explorer. Each recorded image will have the element that it was recorded against highlighted within the image. The test tab also contains a Data tab. The Data tab allows for the creation of a simple Excel like data array to be used by the steps of the test. See Creating a Data Driven Test section in the Design Canvas User s Guide for more details. 40
41 Customizing Your Test Using C# or VB.NET Code Now that you have the core of your test put together, you may run into a scenario that requires a test step that is more complex than can be put together using the Verification Builder or the actions provides by the Element Toolbox. Automation Design Canvas supports using a code behind file. Using a code behind file you can actually write any code you need and have that code executed as a test step. The following sections describe how to do that. Creating a Test With a Code Behind File 1) Create a test as outlined above. 2) Record a few steps as outlined above. 3) There are two ways of creating a code behind file for your test. a. On the test tab, click the Add code behind button. 41
 Method A will create a blank code behind file while method B will create a code behind file with the selected step converted into a method matching the selected step name.")

42 - Or - b. Right click on any step in the Test Explorer and select Convert To Code. 4) Method A will create a blank code behind file while method B will create a code behind file with the selected step converted into a method matching the selected step name. 5) Note that a step with generated code will be read only in the Test Explorer tool window. The description can only be changed in the CodedStep method attribute that appears in the code behind file. A coded step will be indicated with a code icon and will have a white background in the Test Explorer tool window. 6) Once a step has been converted to code, you cannot convert it back to a regular step. 7) Save and build the project. 8) Execute the test. 42
 Just like a step that has been converted to code; a method in the code behind file is represented as a step in the Test Explorer tool window.")
43 Creating a Test With Custom Code Steps 1) Create a test and add a code behind file using method A as outlined above. 2) Just like a step that has been converted to code; a method in the code behind file is represented as a step in the Test Explorer tool window. 3) In order to write custom steps in code, you must add a method in the code behind file that takes no parameters and has a void return type. 4) The method must be decorated with the CodedStep attribute as shown below: [CodedStep("MyCustom Step Description")] public void MyCustomStep() { // Custom code goes here ActiveBrowser.NavigateTo(" } 5) Add the above method or one similar to your liking to your code behind and click save. 6) Notice that the coded step is added to the Test Explorer with the coded icon immediately upon saving. NOTE: Newly coded steps are always added to the end of the steps in the Test Explorer tool window. You can use the move up/down buttons on the Test Explorer tool window to change its order of execution or drag and drop the step to the desired position. 43
44 7) The name of the method becomes the step name and the description from the Coded Step attribute is listed as the description in the Test Explorer tool window. 8) Save and build the project. 9) Execute the test. 10) The code behind file has access to all the WebAii runtime objects like ActiveBrowser etc. If you are familiar with the WebAii runtime automation framework, this will be an identical coding experience. 44
 For example: If the image above was your current Elements Explorer window, you could reference the BtnGSubmit element like this: a. Pages.Google.")
45 How to Reference Elements from the Element Explorer in Code Behind Files 1) Pages can be referenced in the code behind file in the same way they are found hierarchically in Elements Explorer. 2) For example: If the image above was your current Elements Explorer window, you could reference the BtnGSubmit element like this: a. Pages.Google.BtnGSubmit 3) In this example it will return the strongly typed WebAii framework HtmlInputSubmit type. 45
Telerik Corp. Test Studio Standalone & Visual Studio Plug-In Quick-Start Guide
 Test Studio Standalone & Visual Studio Plug-In Quick-Start Guide Contents Create your First Test... 3 Standalone Web Test... 3 Standalone WPF Test... 6 Standalone Silverlight Test... 8 Visual Studio Plug-In
VERSION JANUARY 19, 2015 TEST STUDIO QUICK-START GUIDE STANDALONE & VISUAL STUDIO PLUG-IN TELERIK A PROGRESS COMPANY
 VERSION 2015.1 JANUARY 19, 2015 TEST STUDIO QUICK-START GUIDE STANDALONE & VISUAL STUDIO PLUG-IN TELERIK A PROGRESS COMPANY TEST STUDIO QUICK-START GUIDE CONTENTS Create your First Test.2 Standalone Web
Telerik Test Studio. Web/Desktop Testing. Software Quality Assurance Telerik Software Academy
 Telerik Test Studio Web/Desktop Testing Software Quality Assurance Telerik Software Academy http://academy.telerik.com The Lectors Iliyan Panchev Senior QA Engineer@ DevCloud Testing & Test Studio Quality
A Guide to Quark Author Web Edition 2015
 A Guide to Quark Author Web Edition 2015 CONTENTS Contents Getting Started...4 About Quark Author - Web Edition...4 Smart documents...4 Introduction to the Quark Author - Web Edition User Guide...4 Quark
AUTOMATION DESIGN CANVAS 1.1 USER GUIDE
 ArtOfTest, Inc. ArtOfTest, Inc. AUTOMATION DESIGN CANVAS 1.1 USER GUIDE CONTENT 1 INTRODUCING AUTOMATION DESIGN CANVAS... 1 1.1 ABOUT THIS DOCUMENT... 1 1.2 WHY USE AUTOMATION DESIGN CANVAS... 1 1.3 AUTOMATION
Excel Tables & PivotTables
 Excel Tables & PivotTables A PivotTable is a tool that is used to summarize and reorganize data from an Excel spreadsheet. PivotTables are very useful where there is a lot of data that to analyze. PivotTables
SPARK. User Manual Ver ITLAQ Technologies
 SPARK Forms Builder for Office 365 User Manual Ver. 3.5.50.102 0 ITLAQ Technologies www.itlaq.com Table of Contents 1 The Form Designer Workspace... 3 1.1 Form Toolbox... 3 1.1.1 Hiding/ Unhiding/ Minimizing
Data Grid Utilities - Searching Data Grids
 Data Grid Utilities - Searching Data Grids Step 1 : To search any column on selected data grids begin by right mouse-clicking the column header for the column you want to search. This feature works on
ALES Wordpress Editor documentation ALES Research websites
 ALES Wordpress Editor documentation ALES Research websites Contents Login... 2 Website Dashboard... 3 Editing menu order or structure... 4 Add a new page... 6 Move a page... 6 Select a page to edit...
Concordance Basics. Part I
 Concordance Basics Part I 1 Getting Started 1 Familiarity with the Concordance environment is the first step in learning the multi-faceted features of this powerful program. This chapter focuses on learning
Frequency tables Create a new Frequency Table
 Frequency tables Create a new Frequency Table Contents FREQUENCY TABLES CREATE A NEW FREQUENCY TABLE... 1 Results Table... 2 Calculate Descriptive Statistics for Frequency Tables... 6 Transfer Results
HOW TO BUILD YOUR FIRST ROBOT
 Kofax Kapow TM HOW TO BUILD YOUR FIRST ROBOT INSTRUCTION GUIDE Table of Contents How to Make the Most of This Tutorial Series... 1 Part 1: Installing and Licensing Kofax Kapow... 2 Install the Software...
SCRIPT REFERENCE. UBot Studio Version 4. The UI Commands
 SCRIPT REFERENCE UBot Studio Version 4 The UI Commands UI Text Box This command creates a field in the UI area at the top of the browser. Drag the command from the toolbox into the scripting area. In the
HOW TO USE THE CONTENT MANAGEMENT SYSTEM (CMS) TABLE OF CONTENTS
 TABLE OF CONTENTS") HOW TO USE THE CONTENT MANAGEMENT SYSTEM (CMS) TABLE OF CONTENTS GETTING STARTED (LOGIN) 2 SITE MAP (ORGANIZE WEBPAGES) 2 CREATE NEW PAGE 3 REMOVE PAGE 6 SORT PAGES IN CHANNEL 7 MOVE PAGE 8 PAGE PROPERTIES
HOW TO USE THE CONTENT MANAGEMENT SYSTEM (CMS) TABLE OF CONTENTS GETTING STARTED (LOGIN) 2 SITE MAP (ORGANIZE WEBPAGES) 2 CREATE NEW PAGE 3 REMOVE PAGE 6 SORT PAGES IN CHANNEL 7 MOVE PAGE 8 PAGE PROPERTIES
The Preparing for Success Online Mapping Tool
 The Preparing for Success Online Mapping Tool Baker Polito Administration The Executive Office of Housing and Economic Development and MassGIS Questions & Comments? Please contact MassWorks@state.ma.us
Using Sitecore 5.3.1
 Using Sitecore 5.3.1 An End-User s Guide to Using and Administrating Sitecore Author: Sitecore Corporation Date: December 12, 2007 Release: Rev. 1.0 Language: English Sitecore is a registered trademark.
Secure Guard Central Management System
 Speco Technologies, Inc. Secure Guard Central Management System Usage Information Contents 1 Overview... 7 2 Installation... 7 2.1 System Requirements... 7 2.2 System Installation... 7 2.3 Command Line
Getting Started Guide
 UX-App Getting Started Guide Contents Keyboard Shortcuts... 2 Basic Shortcuts... 2 Component Manipulation... 2 Working with groups... 3 Grid Control... 3 Context Menu... 4 User Interface... 5 Managing
edev Technologies integreat4tfs 2015 Update 2 Release Notes
 edev Technologies integreat4tfs 2015 Update 2 Release Notes edev Technologies 11/18/2015 Table of Contents 1. INTRODUCTION... 2 2. SYSTEM REQUIREMENTS... 3 3. APPLICATION SETUP... 3 DASHBOARD... 4 1. FEATURES...
Dive Into Visual C# 2008 Express
 1 2 2 Dive Into Visual C# 2008 Express OBJECTIVES In this chapter you will learn: The basics of the Visual Studio Integrated Development Environment (IDE) that assists you in writing, running and debugging
BASIC MICROSOFT POWERPOINT
 BASIC MICROSOFT POWERPOINT PART ONE PHONE: 504-838-1144 IT Training Team Jefferson Parish Library EMAIL: jpltrain@jplibrary.net In this class you will learn to: Launch, close, and interact with Microsoft
Photoshop Fundamentals
 Lesson 3 Photoshop Fundamentals Photoshop Fundamentals How to Navigate your Document Zooming in and out To zoom in and out on your Photoshop document, hold down the Command key (Ctrl on Win) and press
Secure MaxMarkup
 Secure MaxMarkup 4.0 MaxMarkup contains many enhancements over the MaxTakeoff and Secure MaxReader levels of MaxView, such as enhanced document viewing, enhanced markup and annotation tools, layers and
GraphWorX64 Productivity Tips
 Description: Overview of the most important productivity tools in GraphWorX64 General Requirement: Basic knowledge of GraphWorX64. Introduction GraphWorX64 has a very powerful development environment in
Reporting Center. Primary (Stand-Alone) Interface
 Interface") Reporting Center The Reporting Center is where you will go to run or create reports on projects. It can be accessed in any of the follow ways, each with a slightly different user interface and functionality.
Reporting Center The Reporting Center is where you will go to run or create reports on projects. It can be accessed in any of the follow ways, each with a slightly different user interface and functionality.
Excel Level 1
 Excel 2016 - Level 1 Tell Me Assistant The Tell Me Assistant, which is new to all Office 2016 applications, allows users to search words, or phrases, about what they want to do in Excel. The Tell Me Assistant
Requirements Document
 GROUP 9 Requirements Document Create-A-Page Matthew Currier, John Campbell, and Dan Martin 5/1/2009 This document is an outline of what was originally desired in the application in the Project Abstract,
Part I. Integrated Development Environment. Chapter 2: The Solution Explorer, Toolbox, and Properties. Chapter 3: Options and Customizations
 Part I Integrated Development Environment Chapter 1: A Quick Tour Chapter 2: The Solution Explorer, Toolbox, and Properties Chapter 3: Options and Customizations Chapter 4: Workspace Control Chapter 5:
Guide to WB Annotations
 Guide to WB Annotations 04 May 2016 Annotations are a powerful new feature added to Workbench v1.2.0 (Released May 2016) for placing text and symbols within wb_view tabs and windows. They enable generation
6.3. Applying Designs CHAPTER
 CHAPTER Now we ll look at the overall appearance of the slides. The slides could do with brightening up a bit to increase the impact of the presentation. We ll also insert some pictures to add interest.
In the first class, you'll learn how to create a simple single-view app, following a 3-step process:
 Class 1 In the first class, you'll learn how to create a simple single-view app, following a 3-step process: 1. Design the app's user interface (UI) in Xcode's storyboard. 2. Open the assistant editor,
OnCOR Silverlight Viewer Guide
 Getting Around There are many ways to move around the map! The simplest option is to use your mouse in the map area. If you hold the left button down, then click and drag, you can pan the map to a new
Administrative Training Mura CMS Version 5.6
 Administrative Training Mura CMS Version 5.6 Published: March 9, 2012 Table of Contents Mura CMS Overview! 6 Dashboard!... 6 Site Manager!... 6 Drafts!... 6 Components!... 6 Categories!... 6 Content Collections:
Quick Guide for Photoshop CC Basics April 2016 Training:
 Photoshop CC Basics Creating a New File 1. Click File > New 2. Keep Default Photoshop Size selected in the Preset drop-down list. 3. Click OK. Showing Rulers 1. On the Menu bar, click View. 2. Click Rulers.
A Guided Tour of Doc-To-Help
 A Guided Tour of Doc-To-Help ii Table of Contents Table of Contents...ii A Guided Tour of Doc-To-Help... 1 Converting Projects to Doc-To-Help 2005... 1 Using Microsoft Word... 10 Using HTML Source Documents...
Scorebook Navigator. Stage 1 Independent Review User Manual Version
 Scorebook Navigator Stage 1 Independent Review User Manual Version 11.2013 TABLE OF CONTENTS Getting Started... 1 Browser Requirements... 1 Scorebook Navigator Browser Compatability... 1 Logging in...
The following instructions cover how to edit an existing report in IBM Cognos Analytics.
 IBM Cognos Analytics Edit a Report The following instructions cover how to edit an existing report in IBM Cognos Analytics. Navigate to Cognos Cognos Analytics supports all browsers with the exception
1.1: Introduction to Fusion 360
 .: Introduction to Fusion 360 Fusion 360 is a cloud- based CAD/CAM tool for collaborative product development. The tools in Fusion enable exploration and iteration on product ideas and collaboration within
SCRIPT REFERENCE. UBot Studio Version 4. The Selectors
 SCRIPT REFERENCE UBot Studio Version 4 The Selectors UBot Studio version 4 does not utilize any choose commands to select attributes or elements on a web page. Instead we have implemented an advanced system
Introduction to Word 2010
 Introduction to Word 2010 Screen Elements 4 1 2 3 5 10 6 7 8 9 1. File Tab: The File tab will bring you into the Backstage View. The Backstage View is where you manage your files and the data about them
The CAP Panel Builder technology is designed to construct and manage configurations of stack panel products.
 About The CAP technology is designed to construct and manage configurations of stack panel products. Use the intuitive to assemble the components and control properties of stackable panels such as top
Multiple Sequence Alignment
 Introduction to Bioinformatics online course: IBT Multiple Sequence Alignment Lec3: Navigation in Cursor mode By Ahmed Mansour Alzohairy Professor (Full) at Department of Genetics, Zagazig University,
Create a Seating Chart Layout in PowerTeacher
 Nova Scotia Public Education System Create a Seating Chart Layout in PowerTeacher Revision Date: 1 Seating Chart Overview...3 2 How to Create a Seating Chart Layout...4 3 How to Create Additional Layouts
Specification Manager
 Enterprise Architect User Guide Series Specification Manager Author: Sparx Systems Date: 30/06/2017 Version: 1.0 CREATED WITH Table of Contents The Specification Manager 3 Specification Manager - Overview
Programming with ADO.NET
 Programming with ADO.NET The Data Cycle The overall task of working with data in an application can be broken down into several top-level processes. For example, before you display data to a user on a
SlickEdit Gadgets. SlickEdit Gadgets
 SlickEdit Gadgets As a programmer, one of the best feelings in the world is writing something that makes you want to call your programming buddies over and say, This is cool! Check this out. Sometimes
Overview of Adobe Fireworks
 Adobe Fireworks Overview of Adobe Fireworks In this guide, you ll learn how to do the following: Work with the Adobe Fireworks workspace: tools, Document windows, menus, and panels. Customize the workspace.
Joomla! 2.5.x Training Manual
 Joomla! 2.5.x Training Manual 1 Joomla is an online content management system that keeps track of all content on your website including text, images, links, and documents. This manual includes several
My Awesome Presentation Exercise
 My Awesome Presentation Exercise Part One: Creating a Photo Album 1. Click on the Insert tab. In the Images group click on the Photo Album command. 2. In the Photo Album window that pops up, look in the
Useful Google Apps for Teaching and Learning
 Useful Google Apps for Teaching and Learning Centre for Development of Teaching and Learning (CDTL) National University of Singapore email: edtech@groups.nus.edu.sg Table of Contents About the Workshop...
Technical Issues: Please Contact (Teresa Saljanin)
") Objectives: Wire Frame Tasks What is a Page Builder? How to add a New Page. Creating Menus. Creating content. Linking Content to a page. Adding Image to Wire Frame Adding Flex Menu Adding to blue area.
Objectives: Wire Frame Tasks What is a Page Builder? How to add a New Page. Creating Menus. Creating content. Linking Content to a page. Adding Image to Wire Frame Adding Flex Menu Adding to blue area.
Contents. Xweb User Manual
 USER MANUAL Contents 1. Website/Pages/Sections/Items/Elements...2 2. Click & Edit, Mix & Match (Drag & Drop)...3 3. Adding a Section...4 4. Managing Sections...5 5. Adding a Page...8 6. Managing Pages
Pelnor Help Add-in.
 Pelnor Help Add-in http://www.pelnor.com/ Pelnor Software Index HelpAddIn 1 Pelnor Help Add-in UserControl... 1 Node Editor...7 URL Link Dialog...10 Inner Document Link Selection Dialog... 11 Help Document
Getting Started With the Cisco PAM Desktop Software
 CHAPTER 3 Getting Started With the Cisco PAM Desktop Software This chapter describes how to install the Cisco PAM desktop client software, log on to Cisco PAM, and begin configuring access control features
PowerScheduler Course Tally Worksheet instructions.
 PowerScheduler Course Tally Worksheet instructions. This document will describe the process of copying course request information from PowerSchool into an Excel Course Tally Worksheet. Once the information
Creating custom reports is for advanced users only. It is the sole responsibility of the user to debug any custom reports.
 SI5 User and Administration Guide 527 Report Designer Pro users have the ability to create custom reports using the Report Designer. To open the report designer interface, go to Tools > Report Designer
TABLE OF CONTENTS TABLE OF CONTENTS... 1 INTRODUCTION... 2 USING WORD S MENUS... 3 USING WORD S TOOLBARS... 5 TASK PANE... 9
 TABLE OF CONTENTS TABLE OF CONTENTS... 1 INTRODUCTION... 2 USING WORD S MENUS... 3 DEFINITIONS... 3 WHY WOULD YOU USE THIS?... 3 STEP BY STEP... 3 USING WORD S TOOLBARS... 5 DEFINITIONS... 5 WHY WOULD
The walkthrough is available at /
 The walkthrough is available at https://downloads.openmicroscopy.org/presentations/2018/gbi-sydney / Description We will demonstrate a number of features of the OMERO platform using an OMERO server based
Mihaylo College Website Content Editing Guide
 Mihaylo College Website Content Editing Guide The following guide will take you through the steps necessary to update website content for https://business.fullerton.edu through the OmniUpdate (OUCampus)
ArcGIS. ArcGIS Desktop. Tips and Shortcuts
 ArcGIS ArcGIS Desktop Tips and Shortcuts Map Navigation Function Shortcut Availability Refresh and redraw the display. F5 9.1, Suspend the map s drawing. F9 9.1, Zoom in and out. Center map. Roll the mouse
CROMWELLSTUDIOS. Content Management System Instruction Manual V1. Content Management System. V1
 Content Management System Instruction Manual V1 www.cromwellstudios.co.uk Cromwell Studios Web Services Content Management System Manual Part 1 Content Management is the system by which you can change
1 User Guide. 1 Main screen
 1 User Guide 1 Main screen The opening screen appears in figure 1. Please wait until the loading bar (as shown in the bottom left) has filled up and the text changed from loading to completed. From the
Managing Content with AutoCAD DesignCenter
 Managing Content with AutoCAD DesignCenter In This Chapter 14 This chapter introduces AutoCAD DesignCenter. You can now locate and organize drawing data and insert blocks, layers, external references,
SILVACO. An Intuitive Front-End to Effective and Efficient Schematic Capture Design INSIDE. Introduction. Concepts of Scholar Schematic Capture
 TCAD Driven CAD A Journal for CAD/CAE Engineers Introduction In our previous publication ("Scholar: An Enhanced Multi-Platform Schematic Capture", Simulation Standard, Vol.10, Number 9, September 1999)
A Quick Tour GETTING STARTED WHAT S IN THIS CHAPTER?
 1 A Quick Tour WHAT S IN THIS CHAPTER? Installing and getting started with Visual Studio 2012 Creating and running your fi rst application Debugging and deploying an application Ever since software has
Working with PDF s. To open a recent file on the Start screen, double click on the file name.
 Working with PDF s Acrobat DC Start Screen (Home Tab) When Acrobat opens, the Acrobat Start screen (Home Tab) populates displaying a list of recently opened files. The search feature on the top of the
Dreamweaver Basics Outline
 Dreamweaver Basics Outline The Interface Toolbar Status Bar Property Inspector Insert Toolbar Right Palette Modify Page Properties File Structure Define Site Building Our Webpage Working with Tables Working
AutoCAD 2009 User InterfaceChapter1:
 AutoCAD 2009 User InterfaceChapter1: Chapter 1 The AutoCAD 2009 interface has been enhanced to make AutoCAD even easier to use, while making as much screen space available as possible. In this chapter,
OU EDUCATE TRAINING MANUAL
 OU EDUCATE TRAINING MANUAL OmniUpdate Web Content Management System El Camino College Staff Development 310-660-3868 Course Topics: Section 1: OU Educate Overview and Login Section 2: The OmniUpdate Interface
4 Timesaving Tips for Word 2010
 Teaching and Learning Center Table of Contents Page 1.0 Overview... 3 1.1 Before you begin... 3 2.0 Quick Styles... 4 2.1 Adding Heading 1 and Heading 2 Quick Styles... 5 3.0 Navigation Pane... 7 3.1 Using
Microsoft. An Introduction
 Microsoft Amarillo College Revision Date: February 7, 2011 Table of Contents SLIDE MASTER... 2 ACCESSING THE SLIDE MASTER... 2 BACKGROUNDS... 2 FONT COLOR OF SLIDE TITLES... 3 FONT COLOR OF BULLET LEVELS...
How do I make a basic composite or contact sheet?
 How do I make a basic composite or contact sheet? FotoFusion enables you to make a grid-style layout and use text tags to create labels under image frames. This is useful for making simple composites and
Excel 2003 Tutorial II
 This tutorial was adapted from a tutorial by see its complete version at http://www.fgcu.edu/support/office2000/excel/index.html Excel 2003 Tutorial II Charts Chart Wizard Chart toolbar Resizing a chart
Session 7 MS Word. Graphics. Inserting Clipart, and Graphics Modify graphics Position graphics
 Session 7 MS Word Graphics Inserting Clipart, and Graphics Modify graphics Position graphics Table of Contents Session 7 Working with Graphics... 1 The Toolbar... 1 Drawing Toolbar... 1 Picture Toolbar...
with TestComplete 12 Desktop, Web, and Mobile Testing Tutorials
 with TestComplete 12 Desktop, Web, and Mobile Testing Tutorials 2 About the Tutorial With TestComplete, you can test applications of three major types: desktop, web and mobile: Desktop applications - these
DataPro Quick Start Guide
 DataPro Quick Start Guide Introduction The DataPro application provides the user with the ability to download and analyze data acquired using the ULTRA-LITE PRO range of Auto Meter products. Please see
Chapter 10 Linking Calc Data
 Calc Guide Chapter 10 Linking Calc Data Sharing data in and out of Calc This PDF is designed to be read onscreen, two pages at a time. If you want to print a copy, your PDF viewer should have an option
How to make a power point presentation. Dr. Mohamed F. Foda
 How to make a power point presentation Dr. Mohamed F. Foda Step 1: Launch the PowerPoint Program When you launch the PowerPoint program, you may be prompted to pick what kind of document you want to create.
ekaizen Lessons Table of Contents 1. ebook Basics 1 2. Create a new ebook Make Changes to the ebook Populate the ebook 41
 Table of Contents 1. ebook Basics 1 2. Create a new ebook 20 3. Make Changes to the ebook 31 4. Populate the ebook 41 5. Share the ebook 63 ekaizen 1 2 1 1 3 4 2 2 5 The ebook is a tabbed electronic book
DbSchema Forms and Reports Tutorial
 DbSchema Forms and Reports Tutorial Introduction One of the DbSchema modules is the Forms and Reports designer. The designer allows building of master-details reports as well as small applications for
User Guide. v7.5. September 4, For the most recent version of this document, visit kcura's Documentation Site.
 User Guide v7.5 September 4, 2013 For the most recent version of this document, visit kcura's Documentation Site. Table of Contents 1 User guide overview 4 2 Relativity objects 4 3 Workspace 6 3.1 Workspaces
Custom Reference Data Tables
 Overview, page 1 Concepts for, page 2 Steps and Procedures, page 2 Policy Builder: Constructing, page 3 Control Center: Populating a Custom Reference Data Table, page 7 Typical Tasks for Everyday, page
Working with Workbooks
 Working with Workbooks In Datameer, you can create a workbook to get to new insights with your data. Inside the workbook, you can add additional data sources, change the column and sheet names, collapse
RESEARCH DATABASE. When you come to the Marine Mammal Research Database, you will see a window like the one below.
 RESEARCH DATABASE When you come to the Marine Mammal Research Database, you will see a window like the one below. Use bottom scroll bar to see more columns of information. An alternative to using the bottom
Livelink Training Manual
 Livelink Training Manual Table of Contents 1.0 ACCESS LIVELINK... 4 2.0 NAVIGATING THROUGH LIVELINK... 4 2.1 Themes... 4 2.2 High level Livelink Structure... 5 2.3 Toggling between Quicklinks and Tree
Full Stack Web Developer
 Full Stack Web Developer Course Contents: Introduction to Web Development HTML5 and CSS3 Introduction to HTML5 Why HTML5 Benefits Of HTML5 over HTML HTML 5 for Making Dynamic Page HTML5 for making Graphics
Studio2012.aspx
 1 2 3 http://www.hanselman.com/blog/tinyhappyfeatures1t4templatedebugginginvisual Studio2012.aspx 4 5 Image source: http://www.itworld.com/software/177989/7-days-using-onlykeyboard-shortcuts-no-mouse-no-trackpad-no-problem
No Programming Required Create web apps rapidly with Web AppBuilder for ArcGIS
 No Programming Required Create web apps rapidly with Web AppBuilder for ArcGIS By Derek Law, Esri Product Manager, ArcGIS for Server Do you want to build web mapping applications you can run on desktop,
SQL Server. Management Studio. Chapter 3. In This Chapter. Management Studio. c Introduction to SQL Server
 Chapter 3 SQL Server Management Studio In This Chapter c Introduction to SQL Server Management Studio c Using SQL Server Management Studio with the Database Engine c Authoring Activities Using SQL Server
Dreamweaver MX The Basics
 Chapter 1 Dreamweaver MX 2004 - The Basics COPYRIGHTED MATERIAL Welcome to Dreamweaver MX 2004! Dreamweaver is a powerful Web page creation program created by Macromedia. It s included in the Macromedia
Introduction. Inserting and Modifying Tables. Word 2010 Working with Tables. To Insert a Blank Table: Page 1
 Word 2010 Working with Tables Introduction Page 1 A table is a grid of cells arranged in rows and columns. Tables can be customized and are useful for various tasks such as presenting text information
Map Viewer User Guide. January 2018
 January 2018 Revision History Map Viewer 3.0.1 Revision Date Author / Reviewer Description of Changes 1 April 6, 2017 RWE Addition of Known Issues, format changes. 2 April 11, 2017 RWE Revision for PROD
Tutorial 3 - Welcome Application
 1 Tutorial 3 - Welcome Application Introduction to Visual Programming Outline 3.1 Test-Driving the Welcome Application 3.2 Constructing the Welcome Application 3.3 Objects used in the Welcome Application
Excel 2013 Intermediate
 Excel 2013 Intermediate Quick Access Toolbar... 1 Customizing Excel... 2 Keyboard Shortcuts... 2 Navigating the Spreadsheet... 2 Status Bar... 3 Worksheets... 3 Group Column/Row Adjusments... 4 Hiding
1.0 Overview For content management, Joomla divides into some basic components: the Article
 Joomla! 3.4.x Training Manual Joomla is an online content management system that keeps track of all content on your website including text, images, links, and documents. This manual includes several tutorials
Full Stack Web Developer
 Full Stack Web Developer S.NO Technologies 1 HTML5 &CSS3 2 JavaScript, Object Oriented JavaScript& jquery 3 PHP&MYSQL Objective: Understand the importance of the web as a medium of communication. Understand
AGENT123. Full Q&A and Tutorials Table of Contents. Website IDX Agent Gallery Step-by-Step Tutorials
 AGENT123 Full Q&A and Tutorials Table of Contents Website IDX Agent Gallery Step-by-Step Tutorials WEBSITE General 1. How do I log into my website? 2. How do I change the Meta Tags on my website? 3. How
Module 3: Working with C/C++
 Module 3: Working with C/C++ Objective Learn basic Eclipse concepts: Perspectives, Views, Learn how to use Eclipse to manage a remote project Learn how to use Eclipse to develop C programs Learn how to
Management Reports Centre. User Guide. Emmanuel Amekuedi
 Management Reports Centre User Guide Emmanuel Amekuedi Table of Contents Introduction... 3 Overview... 3 Key features... 4 Authentication methods... 4 System requirements... 5 Deployment options... 5 Getting
FSA Algebra 1 EOC Practice Test Guide
 FSA Algebra 1 EOC Practice Test Guide This guide serves as a walkthrough of the Florida Standards Assessments (FSA) Algebra 1 End-of- Course (EOC) practice test. By reviewing the steps listed below, you