Login: Quick Guide for dotcms & Accessibility April 2016 Training:
|
|
|
- Nelson Palmer
- 6 years ago
- Views:
Transcription
1
2
3

 It will be automatically filled in after selecting the field. c. Show on Menu Keep it unchecked. 4. Click Save. 5. To publish, right-click the folder name and select Publish. 1.")
. certain file types (e.g., *.jpg, *.docx, 2. Click New > Folder. 4.")
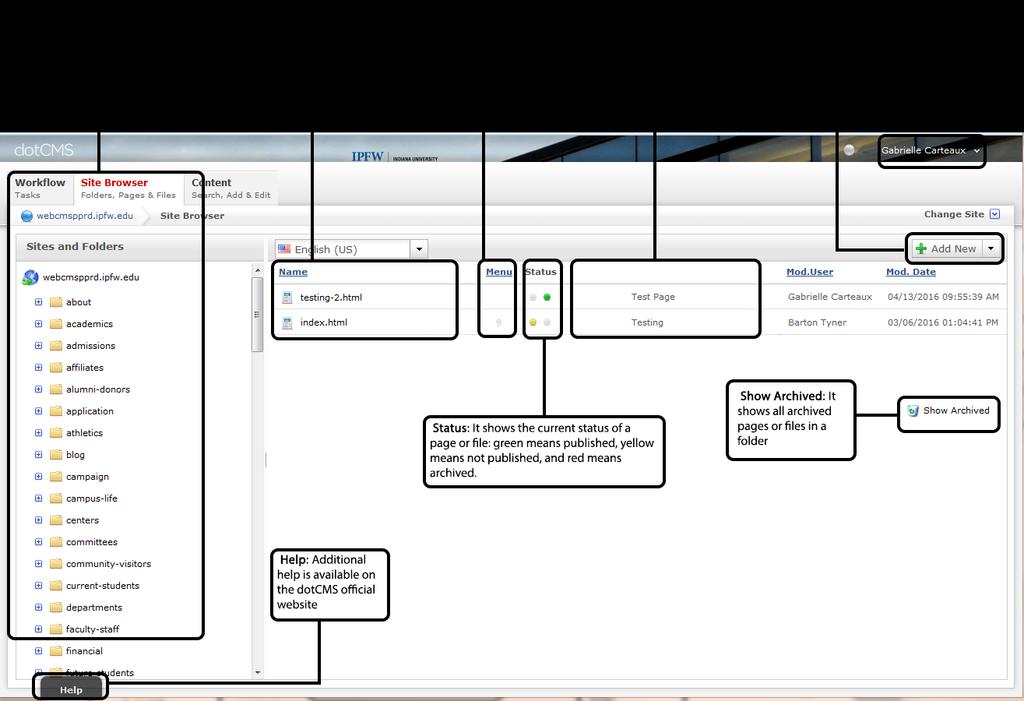
4 dotcms & Accessibility Note: The recommended browser for dotcms is Mozilla Firefox. at 0). d. Show on Menu Check the box if the folder should be shown on the menu. Logging In 1. Open Mozilla Firefox and navigate to 2. Log in with your IPFW credentials. Folders Creating a New Folder Note: All folders showing on menu must have an index page. 3. In the Properties window, fill in the following fields: a. Title Enter images for an image folder or documents for a documents folder. b. Name (URL) It will be automatically filled in after selecting the field. c. Show on Menu Keep it unchecked. 4. Click Save. 5. To publish, right-click the folder name and select Publish. 1. Right-click the parent folder in which the e. Allowed File Extensions Leave blank new folder will reside. to allow any type of files to be uploaded Note: You may also double-click to the folder. on the parent folder and choose i. Or enter *.extension to allow only Add New > Folder from the dropdown on the top right. *.xlsx). certain file types (e.g., *.jpg, *.docx, 2. Click New > Folder. 4. Click Save. 3. In the Properties window, fill in 5. To publish, right-click the folder name and Menu Links the following: select Publish. Creating a Menu Link a. Title Enter the desired name for the Note: These steps create a link to an internal Creating a Sub-folder for Images or folder (use full names instead of Documents page, external page, or document. The link will acronyms or abbreviations). Note: Image or document folders do not need show on the navigation menu. i. Note: This text will show on the an index page. navigation menu if Show on Menu is 1. Navigate to the desired folder. checked. 1. Navigate to the desired folder. 2. In the upper right corner, click the Add New b. Name (URL) It will be automatically drop-down menu and select Menu Link. 2. In the upper right corner, click the Add New filled in after selecting the field. 3. In the Properties window, fill in the drop-down menu and select Folder. i. To change the URL: keep it short, following fields: only use lower case, use a hyphen to a. Title Enter the desired name for the separate words, and DO NOT use link. Use full names instead of acronyms spaces between words. or abbreviation. c. Sort Order Enter a numeric value to organize the order of folders showing on the menu (Note: The first item starts Help Desk: helpdesk@ipfw.edu Page 1

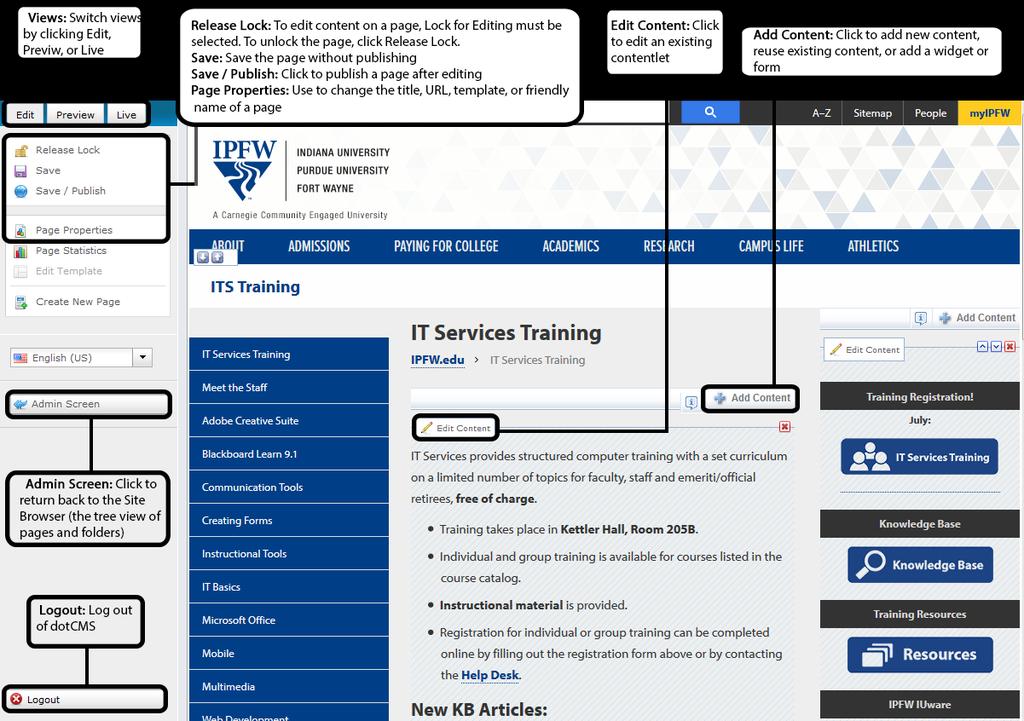
5 i. Note: Text will show on menu. b. Type Choose the desired option, e.g., External Link for links referring to a different website. i. If Internal Link is selected, click Browse to locate and select the desired page/document. ii. If External Link is selected, click the first drop-down menu and select the desired option. Then, enter the URL in the field next to the drop-down menu. c. Target Choose the desired option in which the linked page should open. i. Note: New Window is recommended for external links. d. Sort Order Enter a number to sort the position of the link on the menu. e. Show on Menu Check to show the link on the menu. 4. Click Save. 5. To publish, right-click the menu link name and select Publish. Editing a Menu Link 1. Right-click the menu link name and select Edit. 2. Edit the desired field(s). 3. Click Save or Save and Publish. HTML Pages Note: Some options may change when right clicking on pages that have been edited. 2. In the upper right hand corner, click the Add New drop-down menu and select Page. 3. A window will pop up. Leave it as Page Asset and click Select. 4. On the Basic Properties tab: a. Page/Menu Title Enter the desired title. DO NOT use acronyms. i. Note: Text will be displayed as the page s title. b. Host or Folder Make sure this has the folder the new page will be in. c. Page URL It will be automatically filled in after selected the field. i. If change is needed, use lowercase, keep it short, and unique to each page in a folder. ii. Note: Change it to index.html to make the page into an index page. d. Template Click to choose the desired template. 5. Click the Advanced Properties tab. a. Show on Menu Check if desired. i. It will show the page s title on the navigation menu. showing on the menu. c. Friendly Name Enter the official full department name and the title/description of the page. i. Separate information using spacehyphen-space (e.g., Department of Biology About Us). d. SEO Description Enter a brief description of the page. i. Note: Use full sentences. e. SEO Keywords Enter keywords, separated by commas, which would be used to search for the page. f. Page Metadata Leave it blank. 6. Click Save. Editing Page Properties 1. Locate the desired page. 2. Right-click the page name and select Page Properties. 3. Click Lock for Editing. 4. Edit the desired field(s), e.g., Template, Friendly Name. 5. Click Save or Save and Publish. Publishing a Page 1. Locate the desired HTML page. 2. Right-click the page and select Publish. a. Note: All related assets needs to be published before publishing the page. b. Menu Sort Order If Show on Creating a New HTML Page 1. Navigate to the desired folder. Menu is checked, enter a numeric value to sort the order of pages Help Desk: helpdesk@ipfw.edu Page 2


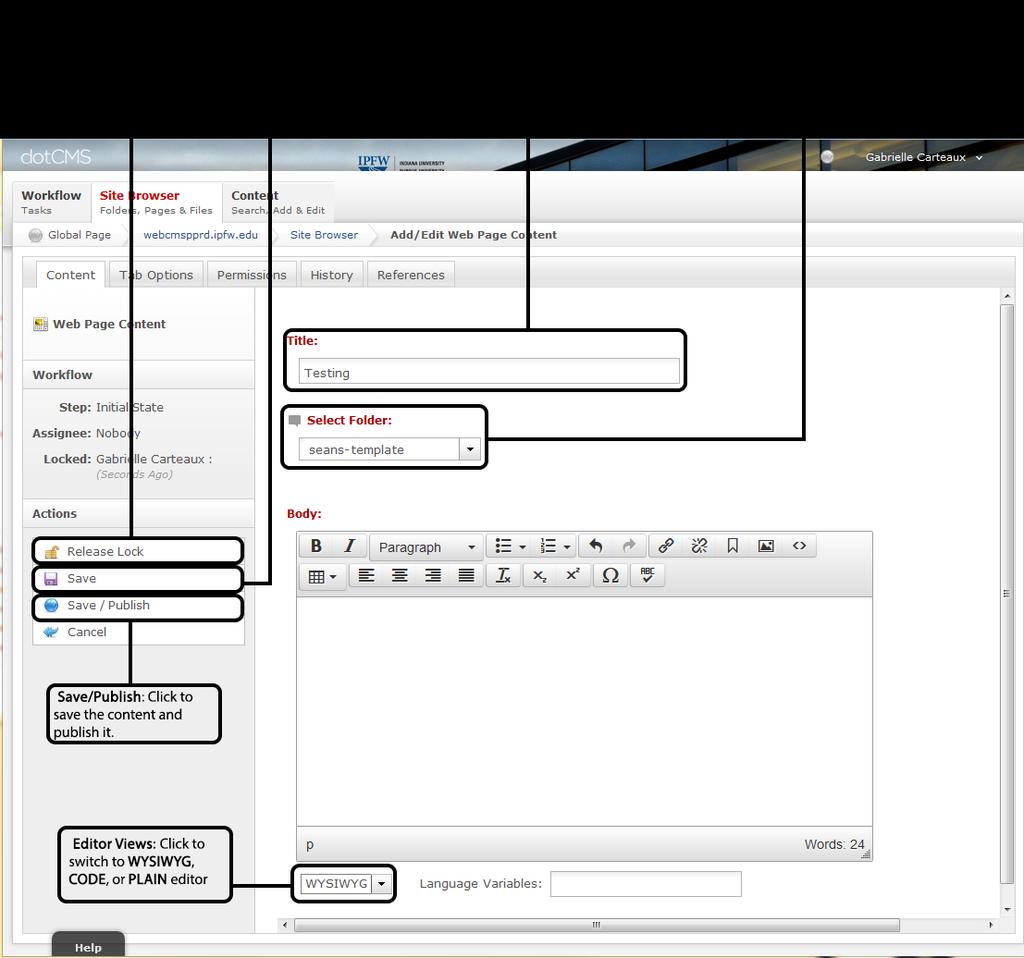
6 Page Contents Adding a New Content Note: A contentlet can be removed from a page and can be reused on other pages. 1. Locate the desired page and double-click it. Click Lock for Editing to enter the page Edit mode. Once you have finished editing content, click Save or Save / Publish in the upper left corner to unlock the page. 2. In the upper right corner, click Add Content > New Content. 3. In the Title field, enter the department acronyms, the content summary or topic, and your username. a. Example: its quick guide username. 4. Click the Select Folder drop-down menu and choose the folder that the page resides in. 5. In the Body text area, type in the text that will be displayed on the page. a. Use headings, bold, italic, indent, bulleted, and numbered lists to format the text. b. Note: DO NOT edit colors, font family, and font size. c. Note: DO NOT copy and paste straight from a rich text editor (e.g., Microsoft Word) or from the Web. 6. To save the content, choose one of the following: a. Save The content will be saved, but not published. b. Save and Publish It will save and publish the content to the Web. i. Note: The contentlet will be automatically visible as soon as the hosting page is published. Reusing an Existing Content Note: When editing a reused contentlet, the changes made will affect the original as well as all reused contentlets. 1. Locate the desired page and double-click it to enter the page Edit mode after clicking Lock for Editing. 2. In the upper right corner, click Add Content > Reuse Content. a. The Search window appears. 3. To search the content, fill out one or more of the following fields: a. Title Enter a part of or whole title of the contentlet. b. Select Folder Click to choose the folder that may contain the contentlet. c. Body If desired, insert word(s) that exist in the body of the content. d. Click Search. 4. Locate the desired content in the Matching Results list. 5. Click Select. Editing Existing Content 1. Locate the desired page and double-click it to enter the page Edit mode. 2. Locate the desired content on the page. 3. In the upper left corner of the content, click Edit Content. 4. On the left side of the page, click Lock for Editing. 5. Edit the desired field(s). 6. On the left side, click Save or Save/Publish. 7. Click Cancel to return back to the page Edit mode. Removing Content 1. Locate the desired page and double-click it and click Lock for Editing. 2. Locate the desired contentlet. Help Desk: helpdesk@ipfw.edu Page 3

. 5. Edit the Advanced Properties. 6. Click Save. Adding a New Tab Contentlet Note: You can add up to 5 tabs on a page. 1.")

7 3. On the upper right corner of the contentlet, click the X button. 4. Re-publish the page. Tabbed Content Note: Tabbed content can only be added on a tab-enable HTML page. You can add a tabenable page when creating or editing an existing page s properties. Creating a Tab-enabled Page 1. Navigate to the desired folder. 2. In the upper right corner, click the Add New drop-down menu and select Page. 3. Fill out the Page/Menu Title and Page URL. 4. Click the Template drop-down list and select a tabbed template, e.g., new.ipfw.edu Silver 2 columns (Left Navigation, Tabbed). 5. Edit the Advanced Properties. 6. Click Save. Adding a New Tab Contentlet Note: You can add up to 5 tabs on a page. 1. Locate the desired tabbed page and doubleclick it. 2. Click Lock for Editing. In the upper right corner, click Add Content > New Content. 3. Edit the Title, Select Folder, and Body fields. 4. On upper left corner, click the Tab Options tab. 5. Enter the Tab Title. a. Note: Text will be shown on the page. 6. Enter the Anchor Link. a. Note: This is the tabbed contentlet s anchor name, e.g., charts (the full URL of the tabbed contentlet will then be softoffice/excel.html#charts). 7. On the left side, click Save or Save / Publish. a. Click Cancel to return back to the page Edit mode. Changing Tab Order Note: The top most contentlet will be the left most tab. 1. Locate the desired contentlet. 2. Click the upward or downward arrow to change the position of the contentlet. Adding Images to a Contentlet Note: All the images must be uploaded and published into dotcms before adding to a contentlet. 1. Navigate to the page to edit. Click Lock for Editing. 2. Create or edit a contentlet. a. For existing content, click Lock for Editing. 3. In the Body text area, place the cursor at the desired location. 4. From the toolbar, click the Insert/Edit Image icon. a. The Insert/Edit Image window appears. 5. On the right of Image source field, click the Browse icon. 6. On the left, use the plus (+) button to locate the images folder, example below: 7. Click the images folder and select the desired image. 8. Enter the Image Description and Title. a. If desired, click the Appearance or the Advanced tab to modify additional image options. 9. Click Insert. 10. If desired, repeat step 2 8 to add more images. 11. Click Save or Save / Publish when finished. Upload Files Uploading Images or Documents Note: All Images should be descriptively Help Desk: helpdesk@ipfw.edu Page 4

8 named, edited, and/or resized before being uploaded (the recommended maximum width of an image is 400px). Names should not start with a numeral or special characters. Note: All PDF and document files should be descriptively named, edited, and accessible before being uploaded. Names should not start with a numeral or special characters. 3. In the File Asset section, click Remove. Single Image or File 1. Navigate to the desired images or documents folder. 2. In the upper right corner, click the Add New drop-down menu and select Image or File a. The Add File window appears 3. Click Select 4. Under File Asset, click Browse 5. Locate and open the desired file 6. Once the file is uploaded, enter a descriptive title for the image or file in the Title field. a. The File Name cannot be changed. 7. Click Save / Publish Multiple Files 1. Navigate to the desired images or documents folder. 2. In the upper right corner, click the Add New drop-down menu and select Multiple Files. a. The Add File window appears. 3. Click Select. 4. Click Select file(s) to upload. 5. Locate and Open the desired file(s). a. To select multiple files, press and hold the Ctrl key and click the desired files. 6. Click Save. Note: Files uploaded this way still need to be published. To do this: 7. Right-click on each new file and select Publish or you can also: a. Double click the files b. Click Lock for Editing. c. In the Title field, enter a descriptive title for the image or file. d. Click Save/Publish. Replacing Existing Files or Images 1. Locate the desired file/image and doubleclick it. a. Note: By default, the uploaded file is locked for editing. 2. On the left side, click Lock for Editing to release the lock. 4. Click Browse to select and Open the new file. 5. When finished, click Save / Publish. Links Note: All links should clearly identify their target. Linking to an External/Internal Page 1. Create or edit a contentlet. a. For existing content, click Lock for Editing. 2. In the Body text area, highlight the desired link text. 3. From the toolbar, click the Insert/Edit Link icon. 4. For an external link: a. In the Link URL field, enter or paste the web page URL. 5. For an internal link: a. In the Link URL field, click the Help Desk: helpdesk@ipfw.edu Page 5

9 Browse icon. icon. 1. In the Body text area, highlight the text that will link to the anchor. 2. From the toolbar, click the Insert/Edit Link icon. b. On the left side, use the + buttons to locate the desired folder. c. Click the folder and select the desired web page. 6. Click the Target drop-down menu and select the desired option. a. For external links, Open in New Window blank is recommended. 7. Enter the link Title. 8. Click Insert. 9. Click Save or Save / Publish when finished. Linking PDFs or Documents Note: All documents should first be uploaded to the server before linking. 1. Create or edit a contentlet. a. For existing content, click Lock for Editing. 2. In the Body text area, highlight the desired text, example: 3. From the toolbar, click the Insert/Edit Link 4. On the right of Link URL field, click the Browse icon. On the left side, use the plus (+) button to locate the desired documents folder. 4. Click the documents folder and select the desired document. 5. Change the Target option if desired. 6. Enter the link Title. 7. Click Insert. 8. Click Save or Save / Publish when finished. Creating an Anchor Link Note: Anchors are used to link to content or to text up or down on the same page. Part 1: Create an Anchor 1. Create or edit a contentlet. a. For existing content, click Lock for Editing. 2. In the Body text area, locate the text to link to and place the cursor to the left of the text. 3. From the toolbar, click the Insert/Edit tag icon. a. The Insert/Edit Anchor window appears. 4. Enter the Anchor Name, click Insert. a. Note: it should be one word only and lowercase. Part 2: Link an Anchor to Text a. The Insert/Edit Link window appears. 3. Click the Anchors drop-down menu, select the desired anchor. 4. Enter the Title. 5. Click Insert. 6. Click Save or Save / Publish when finished. Creating an Link 1. Create or edit a contentlet. a. For existing content, click Lock for Editing. 2. In the Body text area, highlight the desired text. 3. From the toolbar, click the Insert/Edit Link icon. a. The Insert/Edit Link window appears. 4. In the Link URL field, enter mailto: address, e.g., mailto:username@ipfw.edu 5. In the Target field, make sure Open in this window/frame is selected. 6. Enter the Title. 7. Click Insert. 8. Click Save or Save / Publish when finished. Help Desk: helpdesk@ipfw.edu Page 6


10 Editing Code You can edit code if you need to add or adjust certain aspects that you normally wouldn t be able to with the tools already set. Switching to CODE You can go in and edit the HTML code by switching from WYSIWYG to CODE at the bottom left of the content box. Creating Tables Starting a Table 1. Click the Table dropdown. button, a window pops up asking for the number of columns and/or cells you want merged based on where your cursor is at. Split Merged Table Cells: Once pressed, if your cursor is where cells have been joined, it will automatically split the cells back up. Source Code Button This button allows you to view the HTML Source Editor and change the code without exiting the WYSIWYG. Once you click the button, a separate window will pop-up with the Source code. 2. Add in the rows, columns, and details you want. This can be later adjusted by clicking on the Insert/Edit Table button again or by editing the code. 3. Click Insert and begin filling in the cells. Editing the Table There are a few different buttons that allow you to edit certain parts of the table you have created. Insert Row Before/After: Allows you to insert a row before/after the one your cursor is currently in. Insert Column Before/After: Allows you to insert a column before/after the one your cursor is currently in. Merge Table Cells: Once you click this Deleting Rows or Columns To delete rows/columns of a table, you can either: Click one of the Delete Row/Column tables by clicking on the Table dropdown. Or, you can go into the CODE and delete rows, columns, and cells that way. Archiving a Page/Image/File/Link Note: This will not delete the piece of content. Note: When editing some page, there may be an option to Archive on the left panel underneath Lock for Editing, but this does not archive the page. 1. Locate the desired page or other type of content. 2. Right-click the content and select Unpublish. 3. Right-click the content and select Archive. 4. In the Actions window that opens: a. Leave the options listed under Publish as listed. b. Uncheck box listed for Never. Help Desk: helpdesk@ipfw.edu Page 7
11 c. Under Expire, select todays date in the dropdowns as well as a time in the past. For instance, if it is 10:30 am, select 10:15 am. d. Click the dropdown under Push To and select All Receivers e. Click Add next to the dropdown, then click Push. Note: The page disappears but it s not deleted yet. 5. To view archived pages and files, at the lower right corner, click Show Archived. a. All the archived items appear. Deleting an Image/Document/Link Note: All images, documents, and links must be unpublished and archived first. 1. From the Admin Screen, select the Content tab. 2. To search for the desired page or file, select Advanced. 3. From the Type dropdown, select the type of asset. 4. Type in the Title, Folder, URL, or any of the other options listed to narrow the search. 5. From the Show dropdown, select Archived. 6. Click Search. 7. Right click on the desired piece of content and select Delete Contentlet. 8. Click OK in the dialog that pops up. Help Desk: helpdesk@ipfw.edu Page 8
UTAS CMS. Easy Edit Suite Workshop V3 UNIVERSITY OF TASMANIA. Web Services Service Delivery & Support
 Web Services Service Delivery & Support UNIVERSITY OF TASMANIA UTAS CMS Easy Edit Suite Workshop V3 Web Service, Service Delivery & Support UWCMS Easy Edit Suite Workshop: v3 Contents What is Easy Edit
User s guide to using the ForeTees TinyMCE online editor. Getting started with TinyMCE and basic things you need to know!
 User s guide to using the ForeTees TinyMCE online editor TinyMCE is a WYSIWYG (what you see is what you get) editor that allows users a familiar word-processing interface to use when editing the announcement
Joomla! Frontend Editing
 Joomla! Frontend Editing Instructor for this Workshop Web Development School of Arts and Sciences TABLE OF CONTENTS Welcome... 3 What is Joomla?... 3 Joomla Overview Login... 4 How is Joomla! Organized?...
Cascade V8.4 Website Content Management for the Site Manager UMSL
 Cascade V8.4 Website Content Management for the Site Manager UMSL Contents Purpose & How to Use This Guide... 5 Getting Started and Logging In... 5 Login... 5 Dashboard... 5 Notifications... 5 Setting
TinyMCE Users Guide. This user manual will show you all the basics of the TinyMCE editor.
 Introduction TinyMCE is a platform independent web based Javascript HTML WYSIWYG editor. What this means is that it will let you create html content on your web site. TinyMCE supports a lot of Operation
Website Training Manual
 Website Training Manual Version 1.0 9/11/13 Section 1: Manage Users... 3 Adding Users... 3 Managing Users... 3 Section 2: Manage Content... 4 Section 3: Create Content... 5 Featured Slider... 5 Governance...
NYLearns Curriculum Administration:
 NYLearns Curriculum Administration: Creating a Curriculum Map May 2014 2 This page left intentionally blank 3 Contents Signing in to NYLearns... 4 Curriculum Mapping... 6 Creating Curriculum Maps... 7
C1 CMS User Guide Orckestra, Europe Nygårdsvej 16 DK-2100 Copenhagen Phone
 2017-02-13 Orckestra, Europe Nygårdsvej 16 DK-2100 Copenhagen Phone +45 3915 7600 www.orckestra.com Content 1 INTRODUCTION... 4 1.1 Page-based systems versus item-based systems 4 1.2 Browser support 5
Table of Contents. Look for more information at
 OmniUpd ate @ De Anza Qui ck Guide Table of Contents Login... 2 Logout... 2 OmniUpdate Help Center... 2 Editing and Saving a Page... 3 Publishing... 5 View and Revert to Previously Published Page... 5
BHM Website Teacher User Guide
 BHM Website Teacher User Guide How to Login 1. Go to HUhttp://bhmschools.org/userUH 2. Enter your username and password and click Log in How to Change Your Password 1. Go to My Account in your Nav bar
Login: Quick Guide for Qualtrics May 2018 Training:
 Qualtrics Basics Creating a New Qualtrics Account Note: Anyone with a Purdue career account can create a Qualtrics account. 1. In a Web browser, navigate to purdue.qualtrics.com. 2. Enter your Purdue Career
The SBCC Web Publishing Process The process of creating new web pages or editing existing pages within the OmniUpdate system is straightforward.
 Table of Contents Introduction 2 The SBCC Web Publishing Process 2 Staging Server vs. Production Server 2 Roles, Permissions, Levels and Authority 2 Logging In 3 Workflow 3 Dashboard Tab, Content Tab,
Beginner Workshop Activity Guide 2012 User Conference
 Beginner Workshop Activity Guide 2012 User Conference TUESDAY, MARCH 6 2:00PM 5:00 PM Beginner Training Workshop Attendees will learn the end user functions of OU Campus TM. They will learn how to log
Joomla! 2.5.x Training Manual
 Joomla! 2.5.x Training Manual 1 Joomla is an online content management system that keeps track of all content on your website including text, images, links, and documents. This manual includes several
page 1 OU Campus User Guide
 page 1 OU Campus User Guide Logging Into OU Campus page page 2 1. Navigate to a page on your site that you wish to edit. 2. Scroll down to the footer and click the symbol. 3. Enter your OU Campus username
FCKEditor v1.0 Basic Formatting Create Links Insert Tables
 FCKEditor v1.0 This document goes over the functionality and features of FCKEditor. This editor allows you to easily create XHTML compliant code for your web pages in Site Builder Toolkit v2.3 and higher.
In the fourth unit you will learn how to upload and add images and PDF files.
 Introduction Here at SUNY New Paltz, we use the Terminal Four (T4) web content management system (CMS). This puts the power of editing content on our college s webpage in the hands of our authorized users.
WYSIWYG Editor: Users Manual
 WYSIWYG Editor: Users Manual Table of Contents WYSIWYG Editor Overview.... 3 Adding Text... 4 Inserting an Image.... 7 Inserting a File.... 15 Embedding Media.... 21 Inserting an Email Link.... 25 Captiva
Roxen Content Provider
 Roxen Content Provider Generation 3 Templates Purpose This workbook is designed to provide a training and reference tool for placing University of Alaska information on the World Wide Web (WWW) using the
1.0 Overview For content management, Joomla divides into some basic components: the Article
 Joomla! 3.4.x Training Manual Joomla is an online content management system that keeps track of all content on your website including text, images, links, and documents. This manual includes several tutorials
Nauticom NetEditor: A How-to Guide
 Nauticom NetEditor: A How-to Guide Table of Contents 1. Getting Started 2. The Editor Full Screen Preview Search Check Spelling Clipboard: Cut, Copy, and Paste Undo / Redo Foreground Color Background Color
Administrative Training Mura CMS Version 5.6
 Administrative Training Mura CMS Version 5.6 Published: March 9, 2012 Table of Contents Mura CMS Overview! 6 Dashboard!... 6 Site Manager!... 6 Drafts!... 6 Components!... 6 Categories!... 6 Content Collections:
Web Content. Overview. Web Content Mini WYSIWYG Editor
 Web Content Overview Web Content Assets are used for entering HTML-formatted text or media items. They are created and edited via a mini-wysiwyg Editor. Web Content Assets support Dependency Manager tags
Lava New Media s CMS. Documentation Page 1
 Lava New Media s CMS Documentation 5.12.2010 Page 1 Table of Contents Logging On to the Content Management System 3 Introduction to the CMS 3 What is the page tree? 4 Editing Web Pages 5 How to use the
Dreamweaver Basics Outline
 Dreamweaver Basics Outline The Interface Toolbar Status Bar Property Inspector Insert Toolbar Right Palette Modify Page Properties File Structure Define Site Building Our Webpage Working with Tables Working
PBwiki Basics Website:
 Website: http://etc.usf.edu/te/ A wiki is a website that allows visitors to edit or add their own content to the pages on the site. The word wiki is Hawaiian for fast and this refers to how easy it is
What is OU Campus? Log into OU Campus
 OU Campus v10 Content Providers User Guide This document is designed to provide (level 5) Content Providers with basic information needed to do most tasks. Those needing additional information are encouraged
NETZONE CMS User Guide Copyright Tomahawk
 NETZONE CMS User Guide Copyright 2015. Tomahawk 1 Phone: + 64 9 522 2333 Email: getintouch@tomahawk.co.nz Tomahawk 2015 www.tomahawk.co.nz 2 NETZONE CMS USER GUIDE WHAT YOU LL FIND INSIDE LOGGING IN 4
SCHULICH MEDICINE & DENTISTRY Website Updates August 30, Administrative Web Editor Guide v6
 SCHULICH MEDICINE & DENTISTRY Website Updates August 30, 2012 Administrative Web Editor Guide v6 Table of Contents Chapter 1 Web Anatomy... 1 1.1 What You Need To Know First... 1 1.2 Anatomy of a Home
Introduction to the MODx Manager
 Introduction to the MODx Manager To login to your site's Manager: Go to your school s website, then add /manager/ ex. http://alamosa.k12.co.us/school/manager/ Enter your username and password, then click
OUCampus v10. Basic Access and Editing Instructions
 OUCampus v10 Basic Access and Editing Instructions February 2017 Contents Logging on to OU Campus... 1 Check In/Check Out Concept... 1 Editing a Page... 2 Uploading Files... 3 Adding Links... 4 Editing/Removing
FirmSite Control. Tutorial
 FirmSite Control Tutorial 1 Last Updated June 26, 2007 by Melinda France Contents A. Logging on to the Administrative Control Center... 3 Using the Editor Overview:... 3 Inserting an Image... 7 Inserting
QRG: Using the WYSIWYG Editor
 WYSIWYG Editor QRG: Using the WYSIWYG Editor WYSIWYG stands for What You See Is What You Get. The WYSIWYG Editor is the reason you don t need to be an IT Programmer to write content for your web page.
Rich Text Editor Quick Reference
 Rich Text Editor Quick Reference Introduction Using the rich text editor is similar to using a word processing application such as Microsoft Word. After data is typed into the editing area it can be formatted
Cascade User Guide. Introduction. Key System Features. User Interface
 Cascade User Guide Introduction Key System Features User Interface Menus and Moving Through the System Files and Pages Working with Existing Pages File Action Menu Version Control Deleting files Restoring
Google Chrome 4.0. AccuCMS
 Google Chrome 4.0 AccuCMS Outline Contents Google Chrome 4.0... 4 Thank you for choosing Blue Archer... 4 As an AccuCMS user you can:... 4 Getting Started... 4 AccuCMS allows you to:... 4 Logging in to
Zeppelin Website Content Manager User Manual
 Zeppelin Website Content Manager User Manual 1. Introduction Zeppelin Website Content Manager is made for maintaining and editing the content of the website easily. Most of the contents inside the website
Beginners Guide to Snippet Master PRO
 Beginners Guide to Snippet Master PRO This document assumes that Snippet Master has been installed on your site. If not please contact the Bakas IT web team at webreg@bakasit.com.au. Initial Login Screen...
documentation Editing Files and Folders
 Editing Files and Folders documentation The advantage to working with a content management system (CMS) is that we are editing text; no markup code is necessary. In this document we ll discuss: I. Access
Dreamweaver Basics. Planning your website Organize site structure Plan site design & navigation Gather your assets
 Dreamweaver Basics Planning your website Organize site structure Plan site design & navigation Gather your assets Creating your website Dreamweaver workspace Define a site Create a web page Linking Manually
How to Edit Your Website
 How to Edit Your Website A guide to using your Content Management System Overview 2 Accessing the CMS 2 Choosing Your Language 2 Resetting Your Password 3 Sites 4 Favorites 4 Pages 5 Creating Pages 5 Managing
Jack s Coal Fired Pizza
 Jack s Coal Fired Pizza WORDPRESS MANUAL TABLE OF CONTENTS Login... 3 Editing Existing Pages... 4 Adding New Pages... 7 Editing/Adding Text... 8 Creating a Link... 9 Linking to a PDF... 10 Making a Link
Faculty Web Editing. Wharton County Junior College Employee Training Manual
 2015 Wharton County Junior College Employee Training Manual Faculty Web Editing 15 Faculty Web sites are maintained through Omni Updates Campus Content Management Systems as of January 2013. Please address
Mihaylo College Website Content Editing Guide
 Mihaylo College Website Content Editing Guide The following guide will take you through the steps necessary to update website content for https://business.fullerton.edu through the OmniUpdate (OUCampus)
OU EDUCATE TRAINING MANUAL
 OU EDUCATE TRAINING MANUAL OmniUpdate Web Content Management System El Camino College Staff Development 310-660-3868 Course Topics: Section 1: OU Educate Overview and Login Section 2: The OmniUpdate Interface
Overview 3. User ID and Password 4. CMS Login Page 4. CMS Components 4. Responsive Website 5. The Admin Screen 5. Folder Structure 5
 Page 1 of 36 Content Overview 3 User ID and Password 4 CMS Login Page 4 CMS Components 4 Responsive Website 5 The Admin Screen 5 Folder Structure 5 Publish Status of a Page or File 6 Create a Folder 6
Managing Your Website with Convert Community. My MU Health and My MU Health Nursing
 Managing Your Website with Convert Community My MU Health and My MU Health Nursing Managing Your Website with Convert Community LOGGING IN... 4 LOG IN TO CONVERT COMMUNITY... 4 LOG OFF CORRECTLY... 4 GETTING
Content Publisher User Guide
 Content Publisher User Guide Overview 1 Overview of the Content Management System 1 Table of Contents What's New in the Content Management System? 2 Anatomy of a Portal Page 3 Toggling Edit Controls 5
Introduction to Moodle: Creating & Sharing Content
 Introduction to Moodle: Creating & Sharing Content Aim This guide will help to get you started and develop your understanding of how to add, edit and create courses using Moodle. This guide is for Moodle
USING JOOMLA LEVEL 3 (BACK END) OVERVIEW AUDIENCE LEVEL 3 USERS
 OVERVIEW AUDIENCE LEVEL 3 USERS") USING JOOMLA LEVEL 3 (BACK END) OVERVIEW This document is designed to provide guidance and training for incorporating your department s content into to the Joomla Content Management System (CMS). Each
USING JOOMLA LEVEL 3 (BACK END) OVERVIEW This document is designed to provide guidance and training for incorporating your department s content into to the Joomla Content Management System (CMS). Each
Portwalk Place WORDPRESS MANUAL O ROURKE HOSPITALITY MARKETING OROURKEHOSPITALITY.COM
 Portwalk Place WORDPRESS MANUAL TABLE OF CONTENTS Login... 3 Editing Existing Pages... 4 Adding New Pages... 7 Editing/Adding Text... 9 Creating a Link... 10 Linking to a PDF... 11 Making a Link a Button...
Web Manager 2.0 User s Manual Table of Contents
 Web Manager 2.0 User s Manual Table of Contents Table of Contents... 1 Web Manager 2.0 Introduction... 2 Rights and Permissions... 2 User Access Levels... 2 Normal Access... 2 Publisher Access... 2 WM2
Site Owners: Cascade Basics. May 2017
 Site Owners: Cascade Basics May 2017 Page 2 Logging In & Your Site Logging In Open a browser and enter the following URL (or click this link): http://mordac.itcs.northwestern.edu/ OR http://www.northwestern.edu/cms/
MN Studio Website - User Guide
 MN Studio Website - User Guide Version 1.1 MN Studio Website Program 1. Introduction Welcome to the new website program! The MN Studio Website program allows you to create your own website with customized
Using Adobe Contribute 4 A guide for new website authors
 Using Adobe Contribute 4 A guide for new website authors Adobe Contribute allows you to easily update websites without any knowledge of HTML. This handout will provide an introduction to Adobe Contribute
Adding Text and Images. IMCOM Enterprise Web CMS Tutorial 1 Version 2
 Adding Text and Images IMCOM Enterprise Web CMS Tutorial 1 Version 2 Contents and general instructions PAGE: 3. First steps: Open a page and a block to edit 4. Edit text / The menu bar 5. Link to sites,
Editing the Home Page
 Editing the Home Page Logging on to Your Web site 1. Go to https://extension.usu.edu/admin/ 2. Enter your Login and Password. 3. Click Submit. If you do not have a login and password you can request one
How to Request a Site
 Contribute Outline: How to request a site Connection Key Browse to page Edit Page View in Browser Formatting (text, photos ) Undo Insert horizontal line Publish, Save for Later, Cancel Rollback to Previous
WEBSITE USER GUIDE V.4
 WEBSITE USER GUIDE V.4 SEC. 01 SEC. 02 SEC. 03 SEC. 04 SEC. 05 SEC. 06 CASCADE INTERFACE OVERVIEW LOGIN PAGE USER DASHBOARD SITE DIRECTORY EDITING PAGES PAGE EDITOR OVERVIEW STANDARD ROW COMPONENTS EDITING
Documentation > Product Info > Site Manager > 7.3 & 7.4 > Content > Add Content
 Add Content Site Manager Community Extranet - TERMIN... Documentation > Product Info > Site Manager > 7.3 & 7.4 > Content > Add Content Add Content Site Manager Version: 7.3: +. Minimum User Level: Contributor
PowerPoint Tips and Tricks
 PowerPoint Tips and Tricks Viewing Your Presentation PowerPoint provides multiple ways to view your slide show presentation. You can access these options either through a toolbar on your screen or by pulling
How to start as registered user? How to edit a content? How to upload a document (file)?... 8
?... 8") Platform Tutorial This document provides HydroEurope participants with the basic procedures to use the platform and to update the different pages of the website with text and documents. How to start as
Platform Tutorial This document provides HydroEurope participants with the basic procedures to use the platform and to update the different pages of the website with text and documents. How to start as
End-User Reference Guide Troy University OU Campus Version 10
 End-User Reference Guide Troy University OU Campus Version 10 omniupdate.com Table of Contents Table of Contents... 2 Introduction... 3 Logging In... 4 Navigating in OU Campus... 6 Dashboard... 6 Content...
BCI.com Sitecore Publishing Guide. November 2017
 BCI.com Sitecore Publishing Guide November 2017 Table of contents 3 Introduction 63 Search 4 Sitecore terms 66 Change your personal settings 5 Publishing basics 5 Log in to Sitecore Editing 69 BCI.com
Website Creating Content
 CREATING WEBSITE CONTENT As an administrator, you will need to know how to create content pages within your website. This document will help you learn how to: Create Custom Pages Edit Content Areas Creating
Website Administration Manual, Part One
 Website Administration Manual, Part One A Guide to the CMS & Widgets Curry School of Education Website http://curry.virginia.edu The Curry Website Administrators Manual - Part One 2 The CMS The content
Dreamweaver MX Overview. Maintaining a Web Site
 Dreamweaver MX Overview Maintaining a Web Site... 1 The Process... 1 Filenames... 1 Starting Dreamweaver... 2 Uploading and Downloading Files... 6 Check In and Check Out Files... 6 Editing Pages in Dreamweaver...
CMS Training. Web Address for Training Common Tasks in the CMS Guide
 CMS Training Web Address for Training http://mirror.frostburg.edu/training Common Tasks in the CMS Guide 1 Getting Help Quick Test Script Documentation that takes you quickly through a set of common tasks.
Monarch Services Website Quick Guide
 January 2016 Monarch Services Website Quick Guide www.monarchscc.org Credentials Wordpress Login URL: http://www.monarchscc.org/wp-login Login name :Nancya Password: wcs9na! Hosting Login at dreamhost.com
Creating Pages with the CivicPlus System
 Creating Pages with the CivicPlus System Getting Started...2 Logging into the Administration Side...2 Icon Glossary...3 Mouse Over Menus...4 Description of Menu Options...4 Creating a Page...5 Menu Item
UIS Office of Web Services Documentation. WordPress User Guide. WordPress User Guide 8/31/17 Page 1 of 13
 UIS Office of Web Services WordPress User Guide WordPress User Guide 8/31/17 Page 1 of 13 UIS Office of Web Services WordPress User Guide Prepared by Ralph Shank Table of Contents About WordPress 3 Getting
NORTH CAROLINA A&T STATE UNIVERSITY CMS USER GUIDE. A Manual for the Cascade Server Content Management System (CMS)
") NORTH CAROLINA A&T STATE UNIVERSITY CMS USER GUIDE A Manual for the Cascade Server Content Management System (CMS) Table of Contents Chapter 1 - Getting Started... 3 Overview... 3 What is a Content Management
NORTH CAROLINA A&T STATE UNIVERSITY CMS USER GUIDE A Manual for the Cascade Server Content Management System (CMS) Table of Contents Chapter 1 - Getting Started... 3 Overview... 3 What is a Content Management
Creating Teacher Webpages on the New APS WordPress Site
 Creating Teacher Webpages on the New APS WordPress Site TABLE OF CONTENTS INTRODUCTION 3 THE EDITING DASHBOARD 4 CREATING A NEW PAGE 5 EDITING YOUR PAGE 6 1. Page Title 7 2. Toolbar/ toolbar icons 7 3.
FileNET Guide for AHC PageMasters
 ACADEMIC HEALTH CENTER 2 PageMasters have the permissions necessary to perform the following tasks with Site Tools: Application Requirements...3 Access FileNET...3 Login to FileNET...3 Navigate the Site...3
CMS USER GUIDE A MANUAL FOR CASCADE SERVER CONTENT MANAGEMENT SYSTEM (CMS)
") CMS USER GUIDE A MANUAL FOR CASCADE SERVER CONTENT MANAGEMENT SYSTEM (CMS) CMS USER GUIDE A MANUAL FOR CASCADE SERVER CONTENT MANAGEMENT SYSTEM (CMS) BRANDEIS UNIVERSITY LOGIN webedit.brandeis.edu LIVE
CMS USER GUIDE A MANUAL FOR CASCADE SERVER CONTENT MANAGEMENT SYSTEM (CMS) CMS USER GUIDE A MANUAL FOR CASCADE SERVER CONTENT MANAGEMENT SYSTEM (CMS) BRANDEIS UNIVERSITY LOGIN webedit.brandeis.edu LIVE
GENERAL TEMPLATE AREAS
 1 GENERAL TEMPLATE AREAS SIU Headers SIU Headers are created and edited through the main administration of the CMS. Users do not have access edit SIU headers. Logo and Identifier Logo or the College Identifier
Excel Select a template category in the Office.com Templates section. 5. Click the Download button.
 Microsoft QUICK Excel 2010 Source Getting Started The Excel Window u v w z Creating a New Blank Workbook 2. Select New in the left pane. 3. Select the Blank workbook template in the Available Templates
User Guide. Kronodoc Kronodoc Oy. Intelligent methods for process improvement and project execution
 User Guide Kronodoc 3.0 Intelligent methods for process improvement and project execution 2003 Kronodoc Oy 2 Table of Contents 1 User Guide 5 2 Information Structure in Kronodoc 6 3 Entering and Exiting
LEVEL 1 Site Administrator Grants permissions and manages access, manages main homepage.
 USING JOOMLA LEVEL 2 (TRAINING) OVERVIEW This document is designed to provide guidance and training for incorporating your department s content into to the Joomla Content Management System (CMS). Each
Creating Web Pages with SeaMonkey Composer
 1 of 26 6/13/2011 11:26 PM Creating Web Pages with SeaMonkey Composer SeaMonkey Composer lets you create your own web pages and publish them on the web. You don't have to know HTML to use Composer; it
Easy Edit Editing the Public Website
 Easy Edit Editing the Public Website Recommended browser for using the easy edit suite: Firefox Editing a Live Page 2. Click on the edit button 3. Place the page in to safe edit mode Either by clicking
2 Document Manager Lite v5.2 User Guide
 This document was produced by Voloper Creations Inc. 2000 2009 Voloper Creations Inc. All Rights Reserved Brands or product names are trademarks or registered trademarks of their respective holders. The
Introduction to Web Content Management with Echo CI Table of Contents
 Introduction to Web Content Management with Echo CI Table of Contents Introduction to Web Content Management with Echo CI... 1 Table of Contents... 1 Login to EchoCI... 2 The Dashboard... 4 Creating a
Enterprise Application Systems
 INFORMATION TECHNOLOGY Enterprise Application Systems Mt. San Antonio College Information Technology 1100 North Grand Avenue Building 23 Walnut, CA 91789 Help Desk 909.274.4357 Contents Accessing OmniUpdate
FileNET Guide for AHC PageMasters
 PageMasters have the permissions necessary to perform the following tasks with Site Tools: ACADEMIC HEALTH CENTER 2 Application Requirements...3 Access FileNET...3 Log in to FileNET...3 Navigate the Site...3
User s Manual. Beacon Technologies, Inc. 164-B Thatcher Rd. Greensboro, NC beacontechnologies.com
 Beacon Technologies, Inc. 164-B Thatcher Rd. Greensboro, NC 27409 User s Manual beacontechnologies.com Grossmont-Cuyamaca Community College District Version 1.4 January 26, 2015 Table of Contents 1. THE
The content editor has two view modes: simple mode and advanced mode. Change the view in the upper-right corner of the content editor.
 Content Editor The content editor allows you to add and format text, insert equations and hyperlinks, tables, and attach different types of files to content. The editor appears throughout the system as
Introduction to Cascade Server (web content management system) Logging in to Cascade Server Remember me Messages Dashboard Home
 Logging in to Cascade Server Remember me Messages Dashboard Home") Introduction to Cascade Server (web content management system) Last Updated on Jul 14th, 2010 The College of Charleston's web site is being produced using a Content Management System (CMS) called Cascade
Introduction to Cascade Server (web content management system) Last Updated on Jul 14th, 2010 The College of Charleston's web site is being produced using a Content Management System (CMS) called Cascade
WebStudio User Guide. OpenL Tablets BRMS Release 5.18
 WebStudio User Guide OpenL Tablets BRMS Release 5.18 Document number: TP_OpenL_WS_UG_3.2_LSh Revised: 07-12-2017 OpenL Tablets Documentation is licensed under a Creative Commons Attribution 3.0 United
Designing a Web Page Using MS SharePoint Designer Reference Manual
 Designing a Web Page Using MS SharePoint Designer 2007 Reference Manual SHAREPOINT DESIGNER 2007 BASICS 1. Opening SharePoint Designer 2007 application - Click start>all Programs>Microsoft Office>Microsoft
CROMWELLSTUDIOS. Content Management System Instruction Manual V1. Content Management System. V1
 Content Management System Instruction Manual V1 www.cromwellstudios.co.uk Cromwell Studios Web Services Content Management System Manual Part 1 Content Management is the system by which you can change
How to Update Your Site In Wordpress Vetter Facilities
 How to Update Your Site In Wordpress Vetter Facilities SPECIAL NOTES: 1. You will want to use the browser Mozilla Firefox or Google Chrome to edit your Wordpress website. This document covers the following
Introduction. The topics included in this guide are:
 Introduction Caorda Content is a powerful content management tool that allows you to update your web site through a standard Internet web browser. The purpose of this guide is to introduce you to Caorda
WCMS Designing Content
 WCMS Designing Content WCMS Redesign Series: Part II FINAL California State University, Bakersfield Last modified 7/15/2014 Page 2 REVISION CONTROL Document Title: Author: File Reference: CT055 WCMS -
Introduction to Web Content Management with Collage
 Introduction to Web Content Management with Collage Peter Mosinskis Supervisor of Web Services CSU Channel Islands rev. date: November 20, 2009 Table of Contents Login to Collage... 2 Change Your Collage
New website Training:
 New website Training: Table of Contents 1. Logging in and out of the new site. 2. Edit Content a. How to edit content b. Paragraph types c. Adding links d. Adding an image e. Adding a document f. Saving
ADRION PROJECT WEBSITES USER S MANUAL
 ADRION PROJECT WEBSITES USER S MANUAL September 2018 Summary 1. The ADRION Project Website... 3 2. Content instructions... 3 3. Contacts for technical assistance... 3 4. Login... 3 5. Editable contents...
Creating/Modifying Website News Articles
 Creating/Modifying Website News Articles Creating a New Staff News Article 1. Login to the ArSHA Administrator section of the website: http://www.arsha.org/administrator a. Enter your Username and Password.
Microsoft Word 2010 Basics
 1 Starting Word 2010 with XP Click the Start Button, All Programs, Microsoft Office, Microsoft Word 2010 Starting Word 2010 with 07 Click the Microsoft Office Button with the Windows flag logo Start Button,
Broken Pages. Overview
 Broken Pages Overview Authority Level: All user levels. Level 9 and Level 10 administrators will see all broken pages in the report. User levels 0 through 8 will only see broken pages to which they have