Tutorial 1: Essential skills
|
|
|
- Ilene Simpson
- 6 years ago
- Views:
Transcription

1
2 Table of Contents


3 Download items Tutorial data Tutorial PDF Set up a new project Create a new project and scene First, you'll create a new CityEngine project. Steps: 1. Click File > New > CityEngine > CityEngine project. The Select a wizard dialog box appears. 2. Click Next, name your project MyFirstCity, and click Finish. A new project is created and appears in the Navigator (by default, located in the upper left corner of the CityEngine window). The default folders that store your project data, such as assets, rules, and scenes, are already present, though empty. Next, you'll create a new scene. 3. Click File > New > CityEngine > CityEngine scene. The CityEngine Scene dialog box appears. 3

 on your keyboard or from the right mouse button context menu. 2.")
4 Copy rules and assets Later in this tutorial, you'll need rule files and assets for the generation of the building models. You copy these files from the main Tutorial 1: Essential Skills project, which you should already have linked to your workspace. Now you'll copy all necessary files from the downloaded Tutorial 1 project into your new project. Steps: 1. Use copy paste (Windows and Linux: Ctrl-C and Ctrl-V/Mac OS: Command-C and Command -V) on your keyboard or from the right mouse button context menu. 2. Copy the contents of both the assets and rules folders. Your Navigator should look like the following screen shot: 4


5 First street layout Random street grow After the new project has been set up, you re ready to start creating the first street layout in your newly created scene. First, you'll create a street network. Steps: 1. Click the viewport to make it the active window. 2. Click Graph > Grow Streets. The Grow Streets dialog box appears. 3. Keep the default settings for now. 4. Click Apply, and close the dialog box. Approximately 500 streets were created, but you can't see them all in the viewport until you frame the view. 5. Press the A key to frame all objects in the viewport. Your viewport should look similar to the following screen shot: 5


6 Your Scene Editor should now contain a new Streetnetwork layer, containing a network of blocks, graph segments, and shapes. It should look similar to the following screen shot: Navigation and selection Navigation Navigating in the viewport is one of the most essential skills a CityEngine user has to master. This section looks at the different navigation schemes available. Steps: 1. Click Edit > Preferences > General > Navigation Devices > Mouse. The Current Mouse Scheme drop-down menu lists the available schemes of other 3D apps. 6

7 Note: For those who have a 3D Connexion 3D Mouse ( there are specific preferences for that. You'll focus on the default navigation scheme. The options are shown in the following table: Navigation command Windows and Linux keyboard shortcut Mac OS keyboard shortcut Tumble the view Alt+left mouse button Option+ lmb Pan the view Alt+middle mouse button Option+mmb Zoom Alt+right mouse button (or use the mouse wheel) Option+rmb Tip: For efficient navigation of the constant use of the frame key F, use the frame button in the viewport s toolbar. Use the tumble/pan/zoom based navigation as early as possible. After a few minutes, it will become natural to you. Selection To interact and edit the objects in your scene, you need to select them. Start the Selection Tool using the mouse button or (press the Q key). Select the objects by clicking in the viewport. Note: The F9 F12 keys toggle the visibility of the four main object types: Map Layers, Graph Segments, Shapes, and Models. Deactivating the visibility of other object types usually simplifies making proper selection. Selection types The selection types are described in the following table: Selection type Result Single click Selects a single object Right-to-left rectangular selection Selects all objects inside or touching the selection rectangle Left-to-right rectangular selection Selects all objects completely within the selection rectangle The left-to-right rectangular selection is usually used to select tiny objects such as single Street Graph Nodes when there are many objects occupying the same space. Modifier keys The Ctrl and Shift keys toggle the different selection modes. The modes are also listed in the Select Tool submenu in the toolbar. 7
 Select Objects of Same Type Types: shapes, graph nodes Select Objects of Same Group: In the same")
8 Selection context menu Once you have a selection, the right mouse button context menu contains entries with which you can select additional elements. The selection items are described in the following table: Selection mode Selection element(s) Select Objects of Same Type Types: shapes, graph nodes Select Objects of Same Group: In the same block/street Select Objects with Same Rule File Same rule file assigned (on all visible layers) Select Objects with Same Start Rule: Same start rule (on all visible layers) Model generation with rules 3D model generation CityEngine is a procedural modeling application. This means that CityEngine uses rules to generate the 3D model. Assign rules In this tutorial, the rules are already provided. You'll use them now. Steps: 1. Select one block, and change its subdivision parameters in the Inspector from Recursive Subdivision to Offset Subdivision as shown in the following screen shot: 8

.")
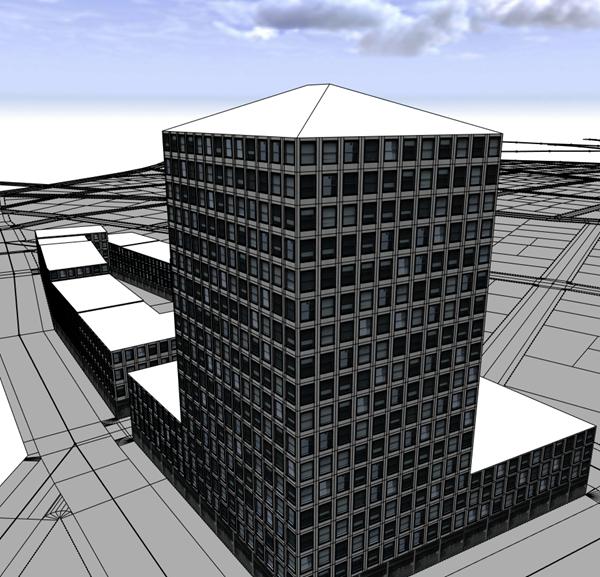
9 For more information on block subdivision and dynamic city layouts, see Tutorial 2: Terrain and dynamic city layouts. 2. Select one shape within the block, and use the context menu to Select Objects of Same Group. 3. Drag and drop the building.cga rule file onto the selected shapes (highlighted orange). After dropping the rule onto the shapes, the model generation is automatically started. Your first buildings appear. Make sure the visibility of models is activated by toggling with F12. 9
 or use the")

.")
10 Generated models can also be deleted in the right mouse button context menu. 4. Select the footprint shape again, and click Ctrl+G (Mac OS: Command+G) or use the Generate button on the toolbar to generate the model on the selected shape. New variations of the buildings can be created by changing the seed value. 5. Use the Update Seed and Generate new Model button on the toolbar or click Ctrl+Shift+G (Mac OS: Command+Shift+G). The following image shows an example of different seed values: 10


11 6. Manually edit the rule s building height parameter in the Inspector: Once you manually change attributes in the Inspector it will become bold and override the definitions of the rule. 7. Reset the attributes to the building.cga rule definitions by right-clicking the arrow next to the attribute in the Inspector and choosing Reset user attributes. Rule editing Explore a rule file CityEngine s rule system uses CGA code, a dedicated scripting language unique to CityEngine. Because CGA is a scripting language, it offers you a generic and flexible tool to create 3D models for all types of cities. From modern to contemporary, from ancient to futuristic, anything s possible. Explore the provided rule you've been using so far. Steps: 1. Open the building.cga rule in the Rule Editor by either double-clicking the CGA rule file in the Navigator or using the Rule File link in the Inspector. 2. Start editing the building.cga rule in the Rule Editor. 11
 The height is now defined as a random value between 15 and 80. 3. Save the rule. 4.")
12 Edit the rule file Steps: 1. Inspect building.cga rule. the Height is defined as a random value between 15 and 25. attr height = rand(15,25) The building has a random height value of Change the random height values in the Rule Editor. attr height = rand(15,80) The height is now defined as a random value between 15 and Save the rule. 4. Regenerate the building by clicking the Update Seed and Generate Models button or pressing Cntrl + Shift + G on your keyboard. 12

13 The building now has a random height value of Note: The reason you use the Update Seed and Generate Models button is because the height is a random value and you need to update the random seed value when regenerating the building. 5. Add roof geometry by adding a new Rule named Roof to the building.cga rule. To do this, do the following: a. Edit the Lot rule so it looks like this: Lot --> b. case shapetype == "LotInner" : Lot. else : extrude(height) comp(f) { side : Facade top: Roof } Add the Roof rule and define the shape as roofhip with an angle of 22.5 degrees.. Roof --> roofhip(22.5) Shape c. 6. Save the rule. Regenerate the building, but this time, click the Generate Models button or press Cntrl + G on your keyboard. By doing this, you will keep the building height at and see the new roof geometry. 13
14 14
Tutorial 2: Terrain and Dynamic City Layouts
 Tutorial 2: Terrain and Dynamic City Layouts Table of Contents Tutorial 2: Terrain and dynamic city layouts................................... 3 2 Tutorial 2: Terrain and dynamic city layouts Download
Tutorial 17: Desert City Tutorial
 Tutorial 17: Desert City Tutorial Table of Contents Tutorial 17: Desert city........................................... 3 2 Tutorial 17: Desert city Download items Tutorial data Tutorial PDF Prerequisites
Tutorial 3: Map control
 Table of Contents........................................... 3 2 Download items Tutorial data Tutorial PDF CGA parameters Cities consist of a large number of objects. Controlling these by setting attributes
Tutorial 8: Mass modeling
 Table of Contents.......................................... 3 2 Download items Tutorial data Tutorial PDF L and U shapes Tutorial setup This tutorial shows how mass models of buildings can be created with
Tutorial 18: Handles. Copyright Esri. All rights reserved.
 Copyright 1995-2015 Esri. All rights reserved. Table of Contents Tutorial 18: Handles............................................ 3 Copyright 1995-2015 Esri. All rights reserved. 2 Tutorial 18: Handles
Autodesk Navisworks Freedom Quick Reference Guide
 WP CAD 00074 March 2012 Guide by Andy Davis Autodesk Navisworks Freedom Quick Reference Guide Quick Reference Guide to Autodesk Navisworks Freedom Opening a Model To open a model, click on the Application
Developing with Esri CityEngine. Gert van Maren, Nathan Shephard, Simon Schubiger
 Developing with Esri CityEngine Gert van Maren, Nathan Shephard, Simon Schubiger Agenda CityEngine fast forward CGA 101 Python Scripting Outlook CityEngine 3D procedural modeling and design solution -
Getting Started with ShowcaseChapter1:
 Chapter 1 Getting Started with ShowcaseChapter1: In this chapter, you learn the purpose of Autodesk Showcase, about its interface, and how to import geometry and adjust imported geometry. Objectives After
A Guide to Autodesk Maya 2015
 A Guide to Autodesk Maya 2015 Written by Mitchell Youngerman Table of Contents Layout of Toolbars...pg 1 Creating Objects...pg 2 Selecting & Deselecting Objects...pg 3 Changing Perspective... pg 4 Transforming
Google LayOut 2 Help. Contents
 Contents Contents... 1 Welcome to LayOut... 9 What's New in this Release?... 10 Learning LayOut... 12 Technical Support... 14 Welcome to the LayOut Getting Started Guide... 15 Introduction to the LayOut
Text box. Command button. 1. Click the tool for the control you choose to draw in this case, the text box.
 Visual Basic Concepts Hello, Visual Basic See Also There are three main steps to creating an application in Visual Basic: 1. Create the interface. 2. Set properties. 3. Write code. To see how this is done,
1.1: Introduction to Fusion 360
 .: Introduction to Fusion 360 Fusion 360 is a cloud- based CAD/CAM tool for collaborative product development. The tools in Fusion enable exploration and iteration on product ideas and collaboration within
Creating Vector Shapes Week 2 Assignment 1. Illustrator Defaults
 Illustrator Defaults Before we begin, we are going to make sure that all of us are using the same settings within our application. For this class, we will always want to make sure that our application
3DCity: Create 3D city features
 3DCity: Create 3D city features Workflow: 3D City Creation Version: 1.0 Date: September 12, 2012 Map templates and workflows are ArcGIS resources that can be used to help create 2D / 3D maps and web map
How to do a Property Search
 How to do a Property Search A Self-Tutorial GIS Services 1401 Marina Way South Richmond, CA 94804 Tel: (510) 621-1298 Fax: (510) 307-8116 1. Navigate to the GIS Mapping Services page. 2. The mapping services
13/02/2008. Users guide RoofCon Viewer
 Users guide RoofCon Viewer Table of contents Users guide RoofCon Viewer... 1 Table of contents... 2 Installation... 3 Select object... 3 Zoom... 3 Measure distance... 3 Toolbar and Drawing preferences...
Tutorial 4: Import streets
 Copyright 1995-2015 Esri. All rights reserved. Table of Contents Tutorial 4: Import streets.......................................... 3 Copyright 1995-2015 Esri. All rights reserved. 2 Tutorial 4: Import
Tutorial 7: Facade modeling
 Table of Contents......................................... 3 2 Download items Tutorial data Tutorial PDF Model the facade structure This tutorial shows how to model a building from a picture and introduces
Climate-Smart New Orleans
 Climate-Smart New Orleans Table of Contents GETTING THERE... 2 Accessing the site... 2 Logging into the site... 2 Navigating the Map... 2 Zoom & Pan... 2 Change the map background... 3 Interacting in the
Editing Multiple Objects. Contents
 Editing Multiple Objects Contents Selecting Multiple Objects Inspecting the Objects Editing the Objects Editing Group Objects Step 1. Selecting the Capacitors Step 2. Changing the Comment String Step 3.
In the first class, you'll learn how to create a simple single-view app, following a 3-step process:
 Class 1 In the first class, you'll learn how to create a simple single-view app, following a 3-step process: 1. Design the app's user interface (UI) in Xcode's storyboard. 2. Open the assistant editor,
Modeling Level Design
 Summary This tutorial has introduced you to several of the tools you can use to make a low-polygon model with editable poly functionality. These tools can be adapted to the task of modeling any low-polygon
StickFont Editor v1.01 User Manual. Copyright 2012 NCPlot Software LLC
 StickFont Editor v1.01 User Manual Copyright 2012 NCPlot Software LLC StickFont Editor Manual Table of Contents Welcome... 1 Registering StickFont Editor... 3 Getting Started... 5 Getting Started...
XnView Image Viewer. a ZOOMERS guide
 XnView Image Viewer a ZOOMERS guide Introduction...2 Browser Mode... 5 Image View Mode...14 Printing... 22 Image Editing...26 Configuration... 34 Note that this guide is for XnView version 1.8. The current
Blender Notes. Introduction to Digital Modelling and Animation in Design Blender Tutorial - week 1 The Blender Interface and Basic Shapes
 Blender Notes Introduction to Digital Modelling and Animation in Design Blender Tutorial - week 1 The Blender Interface and Basic Shapes Introduction Blender is a powerful modeling, animation and rendering
Software Introduction
 Software Introduction B Software Introduction Design Era Universal V11.21 November 2011 Table of Contents Welcome to Stitch/Design Era Universal software.... 1 Basic User Interface... 1 Application button
Introduction Make a plan with tool Rectangle Measurements Toolbar Enter Return Measurements Toolbar Measure Protractor
 Introduction Open SketchUp, and an empty file appears. You are looking at the red-green plane, and the blue axis (vertical) is pointing toward you. By default, you are in the Line tool, as indicated by
GETTING STARTED TABLE OF CONTENTS
 Sketchup Tutorial GETTING STARTED Sketchup is a 3D modeling program that can be used to create 3D objects in a 2D environment. Whether you plan to model for 3D printing or for other purposes, Sketchup
Hardware and Software minimum specifications
 Introduction Unreal Engine 4 is the latest version of the Unreal games development software produced by Epic Games. This software is responsible for titles such as Unreal Tournament, Gears of War and Deus
WAYLAND FREE PUBLIC LIBRARY 3D Design and Printing Tutorial: Create a Keychain
 WAYLAND FREE PUBLIC LIBRARY 3D Design and Printing Tutorial: Create a Keychain Welcome! In this tutorial we will be creating a 3D printed keychain. You will personalize this name tag with text to make
Tutorial 19: VFX Workflows with Alembic
 Tutorial 19: VFX Workflows with Alembic Table of Contents Tutorial 19: VFX workflows with Alembic.................................... 3 2 Tutorial 19: VFX workflows with Alembic Download items Tutorial
PREZI QUICK START GUIDE
 PREZI QUICK START GUIDE What is Prezi? On a mission to end boring presentations and make you a great presenter, Prezi is presentation software, which, unlike slides that literally box you in, lets you
TABLE OF CONTENTS. 03 Getting Started. 05 Installation. 23 Options. 06 Tutorials. 25 Software Update. 26 Support. 13 Main Window
 2 TABLE OF CONTENTS 13 Main Window 03 Getting Started Introduction 13 Introducing Capture Express 03 Toolbar 13 Supported Product Families 03 Preview Area 14 System Requirements 03 Album 15 Control/Statistics
Flair Geometry Editor Part I. Beginners FLUKA Course
 Flair Geometry Editor Part I Beginners FLUKA Course Starting the Geometry Editor Click on icon or from Menu View Geometry Editor or with [F4] shortcut Either start flair with option -g 2 Geometry editor
The Vizard IDE: Inspector
 Show The Vizard IDE: Inspector Inspector is a visual tool for browsing the scene graph of any Viz ard compatible 3d model. Use it to: Identify sub- parts of models so that you can get a handle to and manipulate
3 AXIS STANDARD CAD. BobCAD-CAM Version 28 Training Workbook 3 Axis Standard CAD
 3 AXIS STANDARD CAD This tutorial explains how to create the CAD model for the Mill 3 Axis Standard demonstration file. The design process includes using the Shape Library and other wireframe functions
1 Ctrl + X Cut the selected item. 2 Ctrl + C (or Ctrl + Insert) Copy the selected item. 3 Ctrl + V (or Shift + Insert) Paste the selected item
 Copy the selected item. 3 Ctrl + V (or Shift + Insert) Paste the selected item") Tips and Tricks Recorder Actions Library XPath Syntax Hotkeys Windows Hotkeys General Keyboard Shortcuts Windows Explorer Shortcuts Command Prompt Shortcuts Dialog Box Keyboard Shortcuts Excel Hotkeys
Tips and Tricks Recorder Actions Library XPath Syntax Hotkeys Windows Hotkeys General Keyboard Shortcuts Windows Explorer Shortcuts Command Prompt Shortcuts Dialog Box Keyboard Shortcuts Excel Hotkeys
Autodesk Fusion 360 Training: The Future of Making Things Attendee Guide
 Autodesk Fusion 360 Training: The Future of Making Things Attendee Guide Abstract After completing this workshop, you will have a basic understanding of editing 3D models using Autodesk Fusion 360 TM to
Inspiration Quick Start Tutorial
 Inspiration Quick Start Tutorial 1 Inspiration Quick Start Tutorial This tutorial is a great starting point for learning how to use Inspiration. Please plan on about 45 minutes from start to finish. If
Week 1 The Blender Interface and Basic Shapes
 Week 1 The Blender Interface and Basic Shapes Blender Blender is an open-source 3d software that we will use for this class to create our 3d game. Blender is as powerful as 3d Studio Max and Maya and has
Installing the Software
 Logic User s Guide Note: this is a new version to support the 1.1.0+ software. Please let us know if you can t find what you re looking for http://www.saleae.com/contact Contents Installing the Software...
PLAY VIDEO. Fences can be any shape from a simple rectangle to a multisided polygon, even a circle.
 Chapter Eight Groups PLAY VIDEO INTRODUCTION There will be times when you need to perform the same operation on several elements. Although this can be done by repeating the operation for each individual
PHOTOSHOP WORKSPACE. Interface Overview. Menus. The Tools. Palettes. Presets and Preferences PHOTOSHOP WORKSPACE UNIVERSAL TASKS PHOTO AND VIDEO TASKS
 12/30/03 2:19 PM Page 1 CHAPTER 1 Interface Overview 3 AL Menus RI 13 27 CHAPTER 4 59 ED Palettes CHAPTER 5 87 PRINT TASKS PY R IG HT Presets and Preferences PHOTO AND VIDEO TASKS MA TE CHAPTER 3 The Tools
Adobe illustrator Introduction
 Adobe illustrator Introduction This document was prepared by Luke Easterbrook 2013 1 Summary This document is an introduction to using adobe illustrator for scientific illustration. The document is a filleable
Shape Cluster Photo Written by Steve Patterson
 Shape Cluster Photo Written by Steve Patterson Before After Step 1: Create A New Document Let's begin by creating a new Photoshop document. Go up to the File menu in the Menu Bar along the top of the screen
Working with the Dope Sheet Editor to speed up animation and reverse time.
 Bouncing a Ball Page 1 of 2 Tutorial Bouncing a Ball A bouncing ball is a common first project for new animators. This classic example is an excellent tool for explaining basic animation processes in 3ds
Tutorials. Lesson 3 Work with Text
 In this lesson you will learn how to: Add a border and shadow to the title. Add a block of freeform text. Customize freeform text. Tutorials Display dates with symbols. Annotate a symbol using symbol text.
ARCHITECTURE & GAMES. A is for Architect Simple Mass Modeling FORM & SPACE. Industry Careers Framework. Applied. Getting Started.
 A is for Architect Simple Mass Modeling One of the first introductions to form and space usually comes at a very early age. As an infant, you might have played with building blocks to help hone your motor
Overview of Adobe Fireworks
 Adobe Fireworks Overview of Adobe Fireworks In this guide, you ll learn how to do the following: Work with the Adobe Fireworks workspace: tools, Document windows, menus, and panels. Customize the workspace.
Digital City: Introduction to 3D modeling
 Digital City: Introduction to 3D modeling Weixuan Li, 2017 PART I: Install SketchUp and Introduction 1. Download SketchUp Download SketchUp from their official website: https://www.sketchup.com Go to the
FrontPage Help Center. Topic: FrontPage Basics
 FrontPage Help Center Topic: FrontPage Basics by Karey Cummins http://www.rtbwizards.com http://www.myartsdesire.com 2004 Getting Started... FrontPage is a "What You See Is What You Get" editor or WYSIWYG
Guide to WB Annotations
 Guide to WB Annotations 04 May 2016 Annotations are a powerful new feature added to Workbench v1.2.0 (Released May 2016) for placing text and symbols within wb_view tabs and windows. They enable generation
SketchUp Starting Up The first thing you must do is select a template.
 SketchUp Starting Up The first thing you must do is select a template. While there are many different ones to choose from the only real difference in them is that some have a coloured floor and a horizon
Interactive Presentation Manual
 Interactive Presentation Manual Contents 1. Basic Use 1.1. Master Layout 1.2. Widget Creation 1.3. Widget Customization 1.4. Move Widgets 1.5. Grids 1.6. Saving Your Progress 1.7. Deleting Widgets 1.7.1.
Pre-release User Guide. Version 2.0 August 2015
 Pre-release User Guide Version 2.0 August 2015 Copyright 2015 EagleView Technologies. Copyright 2015 Pictometry International Corp. All rights reserved. No part of this publication may be reproduced, stored
PowerPoint 2016 Building a Presentation
 PowerPoint 2016 Building a Presentation What is PowerPoint? PowerPoint is presentation software that helps users quickly and efficiently create dynamic, professional-looking presentations through the use
Contents. Introduction... 4
 Copyright 2008 Idea Spectrum, Inc. All Rights Reserved. Realtime Landscaping Plus, the Realtime Landscaping Plus logo, Idea Spectrum, and the Idea Spectrum logo are all trademarks of Idea Spectrum, Inc.
Viewer. Release gns-mbh.com
 Viewer Release 2.2.1 gns-mbh.com February 18, 2016 CONTENTS 1 Import Data 3 2 Handle Views 5 3 Control Model Data 9 3.1 Camera Control................................. 9 3.2 Handle Model Data................................
CityEngine: An Introduction. Eric Wittner 3D Product Manager
 CityEngine: An Introduction Eric Wittner 3D Product Manager 2 minute city LegoScript + parameterized instructions + Legos Shapes = Scope and Geometry Shape Operations modify scope and geometry Rule = Sequence
In this tutorial, you will create the model of a chair, as shown in the image below, using the extended primitives and modifiers.
 Office Chair In this tutorial, you will create the model of a chair, as shown in the image below, using the extended primitives and modifiers. Creating the Project Folder Create a new project folder with
House Build Tutorial NAME: GRADE: ARTD 240 3D Modeling & Animation Deborah Ciccarelli, Assistant Professor
 ARTD 240 3D Modeling & Animation Deborah Ciccarelli, Assistant Professor NAME: GRADE: House Build Tutorial Goal: Create a model of a house by referencing drafts of a front and side elevation. Follow the
OpenForms360 Validation User Guide Notable Solutions Inc.
 OpenForms360 Validation User Guide 2011 Notable Solutions Inc. 1 T A B L E O F C O N T EN T S Introduction...5 What is OpenForms360 Validation?... 5 Using OpenForms360 Validation... 5 Features at a glance...
Autodesk Fusion 360: Introduction. Overview
 Overview Fusion 360 is a cloud-based CAD/CAM tool for collaborative product development. The tools in Fusion enable exploration and iteration on product ideas and collaboration within a product development
3DMMVR REFERENCE MANUAL V 0.81
 3DMMVR REFERENCE MANUAL V 0.81 Page 1 of 30 Index: 1.0 System Requirements...5 1.1 System Processor...5 1.2 System RAM...5 1.3 Graphics Card...5 1.4 Operating System...5 2.0 Conventions...6 2.1 Typographic
How to view details for your project and view the project map
 Tutorial How to view details for your project and view the project map Objectives This tutorial shows how to access EPANET model details and visualize model results using the Map page. Prerequisites Login
CHAPTER 1 COPYRIGHTED MATERIAL. Getting to Know AutoCAD. Opening a new drawing. Getting familiar with the AutoCAD and AutoCAD LT Graphics windows
 CHAPTER 1 Getting to Know AutoCAD Opening a new drawing Getting familiar with the AutoCAD and AutoCAD LT Graphics windows Modifying the display Displaying and arranging toolbars COPYRIGHTED MATERIAL 2
SolidWorks Intro Part 1b
 SolidWorks Intro Part 1b Dave Touretzky and Susan Finger 1. Create a new part We ll create a CAD model of the 2 ½ D key fob below to make on the laser cutter. Select File New Templates IPSpart If the SolidWorks
Introduction. Archi is a free, open source, cross-platform tool to create ArchiMate models.
 Version 4.2 Introduction Archi is a free, open source, cross-platform tool to create ArchiMate models. The Archi modelling tool is targeted toward all levels of Enterprise Architects and Modellers. It
Profile Modeler Profile Modeler ( A SuperControl Product )
") Profile Modeler ( A SuperControl Product ) - 1 - Index Overview... 3 Terminology... 3 Launching the Application... 4 File Menu... 4 Loading a File:... 4 To Load Multiple Files:... 4 Clearing Loaded Files:...
Profile Modeler ( A SuperControl Product ) - 1 - Index Overview... 3 Terminology... 3 Launching the Application... 4 File Menu... 4 Loading a File:... 4 To Load Multiple Files:... 4 Clearing Loaded Files:...
Mosaic Tutorial: Advanced Workflow
 Mosaic Tutorial: Advanced Workflow This tutorial demonstrates how to mosaic two scenes with different color variations. You will learn how to: Reorder the display of the input scenes Achieve a consistent
ORGANIZING YOUR ARTWORK WITH LAYERS
 9 ORGANIZING YOUR ARTWORK WITH LAYERS Lesson overview In this lesson, you ll learn how to do the following: Work with the Layers panel. Create, rearrange, and lock layers and sublayers. Move objects between
At the shell prompt, enter idlde
 IDL Workbench Quick Reference The IDL Workbench is IDL s graphical user interface and integrated development environment. The IDL Workbench is based on the Eclipse framework; if you are already familiar
SAPPHIRE Viewer: The Collaboration Tool
 SAPPHIRE Viewer: The Collaboration Tool MiTek SAPPHIRE Viewer is a scaled down version of SAPPHIRE Structure that allows users to open, view, comment on, and print Structure files. This free application
COPYRIGHTED MATERIAL PHOTOSHOP WORKSPACE. Interface Overview 3. Menus 15. The Toolbox 29. Palettes 61. Presets and Preferences 83 WEB TASKS
 PHOTOSHOP WORKSPACE CHAPTER 1 Interface Overview 3 CHAPTER 2 Menus 15 CHAPTER 3 The Toolbox 29 CHAPTER 4 Palettes 61 CHAPTER 5 Presets and Preferences 83 COPYRIGHTED MATERIAL PHOTOSHOP WORK SPACE UNIVERSAL
Schematic Editing Essentials
 Summary Application Note AP0109 (v2.0) March 24, 2005 This application note looks at the placement and editing of schematic objects in Altium Designer. This application note provides a general overview
1st Point. 2nd Point. hold shift & drag along Y. Splines
 Splines STEP 1: open 3DS Max _ from the Command Panel under the Create tab click on Shapes (note: shapes are really Splines) _ under Object Type click on Ellipse STEP 2: Expand the Keyboard Entry tab type
ArcGIS. Desktop. A Selection of Time-Saving Tips and Shortcuts
 ArcGIS Desktop A Selection of Time-Saving Tips and Shortcuts Map Navigation Refresh and redraw the display F5 9.1, Suspend the map s drawing F9 9.1, Zoom in and out Roll the mouse wheel backward and forward.
Producing Project Deliverables: Creating a Plan Set
 Practice Workbook This workbook is designed for use in Live instructor-led training and for OnDemand selfstudy. The explanations and demonstrations are provided by the instructor in the classroom, or in
User Guide. Version January 11, Copyright 2018 Topaz Systems Inc. All rights reserved.
 User Guide pdoc Signer for Android Tablets Version 1.0.6 January 11, 2018 Copyright 2018 Topaz Systems Inc. All rights reserved. For Topaz Systems, Inc. trademarks and patents, visit www.topazsystems.com/legal.
Import / Object modes: 5 Layers for organising your scene are available at the top of the screen.
 LUMION 1 VS LUMION 2 SCENES - In Lumion 2, the sky, clouds, fog, material settings, ambient shadows and reflections have been overhauled, so don't expect your Lumion 1 scenes to look identical when you
Working with PDF s. To open a recent file on the Start screen, double click on the file name.
 Working with PDF s Acrobat DC Start Screen (Home Tab) When Acrobat opens, the Acrobat Start screen (Home Tab) populates displaying a list of recently opened files. The search feature on the top of the
Impress Guide Chapter 11 Setting Up and Customizing Impress
 Impress Guide Chapter 11 Setting Up and Customizing Impress This PDF is designed to be read onscreen, two pages at a time. If you want to print a copy, your PDF viewer should have an option for printing
Press the Plus + key to zoom in. Press the Minus - key to zoom out. Scroll the mouse wheel away from you to zoom in; towards you to zoom out.
 Navigate Around the Map Interactive maps provide many choices for displaying information, searching for more details, and moving around the map. Most navigation uses the mouse, but at times you may also
Basic Concepts. Launching MultiAd Creator. To Create an Alias. file://c:\documents and Settings\Gary Horrie\Local Settings\Temp\~hh81F9.
 Page 1 of 71 This section describes several common tasks that you'll need to know in order to use Creator successfully. Examples include launching Creator and opening, saving and closing Creator documents.
PREPS. Imposition Software Version 8.x. Quick Reference Guide. English
 PREPS Imposition Software Version 8.x Quick Reference Guide English Getting started: The User Interface Use this guide to start using the Kodak PREPS imposition software. For more information and instructions,
Overview of Adobe Fireworks CS6
 Overview of Adobe Fireworks CS6 Lesson topics: Work with the Adobe Fireworks CS6 workspace: tools, Document windows, menus, and panels. Customize the workspace. Change the magnification of a document.
Impress Guide. Chapter 1 Introducing Impress
 Impress Guide Chapter 1 Introducing Impress Copyright This document is Copyright 2007 2014 by the LibreOffice Documentation Team. Contributors are listed below. You may distribute or modify it under the
Game Design Unity Workshop
 Game Design Unity Workshop Activity 1 Unity Overview Unity is a game engine with the ability to create 3d and 2d environments. Unity s prime focus is to allow for the quick creation of a game from freelance
Contents. Introduction... 4
 Copyright Idea Spectrum, Inc. All Rights Reserved. Realtime Landscaping Architect, the Realtime Landscaping Architect logo, Idea Spectrum, and the Idea Spectrum logo are all trademarks of Idea Spectrum,
The purpose of this tutorial is to introduce you to the Construct 2 program. First, you will be told where the software is located on the computer
 Learning Targets: Students will be introduced to industry recognized game development software Students will learn how to navigate within the software Students will learn the basics on how to use Construct
Files Used in this Tutorial
 Generate Point Clouds and DSM Tutorial This tutorial shows how to generate point clouds and a digital surface model (DSM) from IKONOS satellite stereo imagery. You will view the resulting point clouds
Photocopiable/digital resources may only be copied by the purchasing institution on a single site and for their own use ZigZag Education, 2013
 SketchUp Level of Difficulty Time Approximately 15 20 minutes Photocopiable/digital resources may only be copied by the purchasing institution on a single site and for their own use ZigZag Education, 2013
TI-SmartView CE Emulator Software
 TI-SmartView CE Emulator Software for the TI-84 Plus Family This guidebook applies to software version 5.3. To obtain the latest version of the documentation, go to education.ti.com/go/download. Legal
City of La Crosse Online Mapping Website Help Document
 City of La Crosse Online Mapping Website Help Document This document was created to assist in using the new City of La Crosse online mapping sites. When the website is first opened, a map showing the City
Tutorial: Getting Started - Terrain
 Tutorial: Getting Started - Terrain Overview This tutorial teaches you how to apply materials to the terrain, modify the terrain height, and use the vegetation tool to paint trees onto the terrain. * This
Click New Project from the Premiere Pro Welcome screen, or select File > New Project.
 Multi Cam How to guide 1. Create a project Click New Project from the Premiere Pro Welcome screen, or select File > New Project. In the New Project dialog box, enter a name for the project, and click OK
How to use the DuPage County Parcel Viewer Interactive Web Mapping Application.
 How to use the DuPage County Parcel Viewer Interactive Web Mapping Application. Parcel Viewer URL: URL: http://gis.dupageco.org/parcelviewer/ Initial View (And frequently asked questions) Parcel Search
Phoenix Keyboard Shortcuts R2. New additions are highlighted. Keyboard Shortcuts
 New additions are highlighted Keyboard Shortcuts General File Browser Minimize application + D Refresh file list Ctrl + R or F5 Full screen Toggle Tab Cancel Esc Ok and close Return Viewer Undo (redo)
MadCap Mimic. Movie Creation Guide. Version 7
 MadCap Mimic Movie Creation Guide Version 7 Copyright 2013 MadCap Software. All rights reserved. Information in this document is subject to change without notice. The software described in this document
 Page 1 of 8 Tutorial Modeling a Bishop In this lesson you will model a bishop for the chess set. As with the rook, the base of the bishop has already been created. You will add the miter on top of the