PeopleSoft Departmental Student Records Training. Bloomsburg University
|
|
|
- Aron Lee
- 6 years ago
- Views:
Transcription
1 PeopleSoft Departmental Student Records Training Bloomsburg University 1
2 Table of Contents Bloomsburg University Training Notes... 3 Terminology Crosswalk... 3 Term Code Logic... 3 Viewing a Student s Bio/Demo Data... 4 Viewing a Student s Academic Information... 6 Viewing a Student s Schedule... 6 Viewing a Student s Course History... 8 Viewing a Student s Grades Viewing Detailed Academic Data Viewing a Student s Advisor Enrolling a Student using Quick Enroll Using Enrollment Request Search Student Service Indicators and Holds Viewing Service Indicators Adding a Service Indicator Assigning an Advisor to a Student Viewing a Student Enrollment Summary Viewing a Student s Unofficial Transcript Entering Athletic Participation Information Viewing an Instructor Schedule Viewing a Class Roster Searching for Available Facilities Viewing Class Facility Usage
3 Bloomsburg University Training Notes Terminology Crosswalk PeopleSoft Term Institution Academic Career Academic Program Academic Plan Bloomsburg Equivalent/Example Bloomsburg University. In PeopleSoft, this is always identified with the code BLOOM. Undergraduate (UGRD) Graduate (GRAD), Doctoral (DOCT) College (College of Liberal Arts, College of Business) Major (English) Academic Sub-Plan Concentration (Creative Writing) Term Semester (Spring, Summer, Fall); denoted by 4- digit code Term Code Logic Spring 2011: = Millennium 11 = Last two digits year 2 = Term (2 Spring, 4 Summer, 6 Fall) 3


4 Viewing a Student s Bio/Demo Data 1. After logging in through the Portal, click the Campus Community menu item. 2. Next, click the Student Services Ctr (Student) link. 3. You will now be directed to a Search page. Enter the ID of the student you wish to search for in the ID field. 4. You will now see the main page of the Student Services Center. The Student Services Center is a clone of what a student sees when he or she accesses the Student Center. The Student Services Center, however, includes various administrative options that are not available to students. 5. Scroll down the page to view the Personal Information section. In this section, you can use the Demographic Data link to access the student s demographic data. Click the Emergency Contact link to view the student s Emergency Contact information. 6. To view more detailed personal information for this student, scroll to the top of the Student Services Center and click the General Info tab. 7. At the top of the General Info tab, you can see any Service Indicators (or Holds) on the student s record. You can also access any Checklists assigned to the student in the Initiated Checklist section. Scroll down the page to view the student s Student Groups and other personal information. 4


5 8. Further down the page, you can see Student Groups, Personal Data, and National ID. Access to edit this information is limited based on your role within the institution. For more information on any of these fields, or to view a history of changes, click the Edit Student Groups, Edit Personal Data, or Edit National IDs buttons if you have access to these components. 5

6 9. At the bottom of this page you will see Names, Addresses, Phones and Addresses on file for this student. Click the Edit Names, Edit Addresses, Edit Phones or Edit Addresses buttons to view more information about each of these items. Viewing a Student s Academic Information Viewing a Student s Schedule 1. First, click the Campus Community menu item. 2. Next, click the Student Services Ctr (Student) link. 3. You will now be directed to a Search page. Enter the ID of the student you wish to search for in the ID field. 6
7 4. You will now see the main page of the Student Services Center. The Student Services Center is a clone of what a student sees when he or she accesses the Student Center. In the Academics section, you will see the student s schedule in list format. To view a weekly calendar view of the student s schedule, click the Weekly Schedule link. 5. You will now see the schedule in a calendar format. If the student has classes that take place later than 6:00pm, change the time in the End Time field to show these additional classes. To print this schedule, click the Printer Friendly Version link at the bottom right of this screen and print the page as you would with any other web page. 7

8 Viewing a Student s Course History 1. First, click the Campus Community menu item. 2. Next, click the Student Services Center link. 3. You will now be directed to a Search page. Enter the ID of the student you wish to search for in the ID field. 4. You will now see the main page of the Student Services Center. The Student Services Center is a clone of what a student sees when he or she accesses the Student Center. You can use this page to access a Course History for a given student that will allow you to view all classes taken by the student at Bloomsburg University as well as courses that have been transferred in. This page will also display the grades that have been posted for these classes. 5. To access Course History, click the Other Academic drop-down menu in the Academics section. Select Course History and click the Go button ( ). 8
9 6. You will now see the Course History for this student. Here you can see the course, course description, term, grade, units, and status (taken, transferred, or in progress). By default, the courses are arranged alphabetically by course name. To arrange by Term, Grade, Units, Status, or Description, simply click these headings in the grid. You can print this page as you would any webpage. 9

10 Viewing a Student s Grades 1. First, click the Campus Community menu item. 2. Next, click the Student Services Ctr (Student) link. 3. You will now be directed to a Search page. Enter the ID of the student you wish to search for in the ID field. 4. You will now see the main page of the Student Services Center. The Student Services Center is a clone of what a student sees when he or she accesses the Student Center. You can use this page to access a student s Grades. 5. To access Grades, click the Other Academic drop-down menu in the Academics section. Select Grades and click the Go button ( ). 10
11 6. On the Grades page you can see all the grades a student has received for a given term, along with term and cumulative statistics. If you wish to view a different term, click the Change Term button at the top of this screen. 11
12 Viewing Detailed Academic Data 1. First, click the Campus Community menu item. 2. Next, click the Student Services Ctr (Student) link. 3. You will now be directed to a Search page. Enter the ID of the student you wish to search for in the ID field. 4. You will now see the main page of the Student Services Center. The Student Services Center is a clone of what a student sees when he or she accesses the Student Center. You can use this page to access a student s detailed academic information for a particular student. 5. From the Student Services Center, click the Academics tab at the top of the screen. 12
13 6. Once in the Academics tab, you will see detailed program and plan data for this student under the Institution/Career/Program section. You can click the Edit Program Data to see more information about the student s program and plan. Scroll down the page to view more academic information. Keep in mind that access to this button is limited based on your role at Bloomsburg. 13
14 7. In the Term Summary section, you can see information about the current term. To view academic data for a different term, select the desired term from the list on the left. In this section you can see the student s academic level and classes that he or she has enrolled in for this term. You can also access the Quick Enrollment component using the Quick Enrollment link below the student s class list. Scroll down the page to view term statistics. 8. The Statistics section allows you to view term and cumulative statistics. 14
15 Viewing Student Admissions Information 1. First, click the Campus Community menu item. 2. Next, click the Student Services Center link. 3. You will now be directed to a Search page. Enter the ID of the student you wish to search for in the ID field. 4. You will now see the main page of the Student Services Center. The Student Services Center is a clone of what a student sees when he or she accesses the Student Center. You can use this page to access a student s admissions information for a particular student. 5. Click the Admissions tab at the top of the page. 15

16 6. On the Admissions page, you can view information entered on the student s application, such as Program and Plan, Housing Interest, and Financial Aid Interest. 7. Further down the page, you can view the student s progression from prospect, to applicant, to student. 8. At the bottom of this screen, you can see External Education information as well as Test Scores. 16

17 Viewing a Student s Advisor 1. First, click the Campus Community menu item. 2. Next, click the Student Services Center link. 3. You will now be directed to a Search page. Enter the ID of the student you wish to search for in the ID field. 4. On the main Student Services Center page, scroll down to find the Advisor box on the righthand side of the page. This box will display the student s advisor. For more information about this advisor, click the Details link. 17

18 5. On the Details page you can view contact information for the advisor. The advisor s name will appear as a link. To this advisor, click the name link and your default mail client (such as Outlook) will open. 18
19 Enrolling a Student using Quick Enroll 1. There are two ways to access the Quick Enrollment component. a. First, you can access Records and Enrollment > Enroll Students > Quick Enroll a Student from the main menu. If accessing the component through Records and Enrollment, you will see a Search page. On the Search page, enter the student ID number of the student you wish to enroll, as well as the student s Career (Undergraduate or Graduate) and the Term in which you will enroll him or her. If you cannot find the desired term or receive errors, the student must see the Registrar s Office for activation. b. Alternatively, access Student Services Center, click the Academics tab for the student you wish to enroll and click the Quick Enrollment link in the Term Summary section. If accessing the link through the Student Services Center, first select the appropriate term on the left-hand side of the Term Summary section and then click the Quick Enroll link. Note that if you access Quick Enroll through the Student Services Center you will be immediately directed to the Quick Enroll screen. 19
20 2. On the Quick Enroll screen, make sure that the Action drop-down menu is set to Enroll. If you know the four-digit code associated with the desired class section (known as a Class Number), you can enter it into the Class Nbr field. If you do not know this number or wish to view other classes, click the magnifying glass icon next to the Class Number field to enter the Class Search component. 20
21 3. In Class Search, you must first select your subject. Click the Course Subject drop-down menu and select the appropriate subject. Next, in the Course Nbr field you should enter the course number. You can alternatively leave this blank to search for all courses under the given subject. 4. If you wish to view closed classes, uncheck the View Open Classes Only checkbox. Also, if you only wish to select classes in a particular career (Undergraduate or Graduate), you can identify this in the Course Career drop-down menu. 21


22 5. To enter additional search criteria, such as days and times, instructor last names, units, instruction mode, or location, click the Additional Search Criteria link and enter the appropriate search criteria. Click Search. 6. When viewing search results on the Search Results page, be aware that for each course only three sections will initially appear. If there are more than three sections, click the View All Sections link. 22
23 7. The Search Results page will display the meeting times and days as well as the instructor name. If any of these fields display TBA or Staff, the information has not yet been entered into the system. To view more information about the class, such as class description, grading basis, current enrollment and available seats, and enrollment requirements, click the section link for that class (for example, 01-LEC(1068) in the previous illustration). 8. Once the student has selected a class, click the Select Class button for that class. You will now be redirected to Quick Enrollment. 9. A student may encounter errors when he or she tries to enroll; for example, the system will stop a student from enrolling if he or she does not meet the prerequisites for this class. Based on your access, you may be able to override some of these errors using the General Overrides and Class Overrides tabs. Possible overrides include: Closed Class: Select this override under Class Overrides if the class is closed but the student has instructor permission to enter the class. Permission: Select this override under Class Overrides if the class requires departmental or instructor consent and the student has obtained such consent. Requisites: Select this override under General Overrides if the student does not meet the prerequisite for the class but has permission to enroll in it. 10. Once the student is ready for enrollment, you must click the Submit button to initiate this request. If the enrollment was successful, you will see the word Success in the Status field. If this field reads Messages, the enrollment was successful but there may be additional 23


24 information for you about the enrollment process. Click the Messages link to read any messages associated with this particular enrollment. If the Status field reads Errors, the enrollment was unsuccessful. Click the Errors link to read the error associated with this enrollment request. Possible errors include time conflict, unit overload, does not meet prerequisite, and hold on record. Once you correct the error, if possible, you must select Submit again to send another enrollment request. 24
25 11. To view the student s current enrollment, along with dropped classes, click the Study List link on the Quick Enroll page. Using Enrollment Request Search 1. After logging into PeopleSoft, click the Records and Enrollment link. 2. Next, click the Enroll Students menu item. 3. Now click Enrollment Request Search. 4. The Enrollment Request Search page allows you to search for enrollment requests made either administratively or by the student. On the Search page, enter the Institution name (BLOOM). Click Search. 25

26 5. Use the Enrollment Request Search page to view enrollment transactions that have occurred for a particular term in PeopleSoft. You can search by various criteria, such as Enrollment Request Source, Enrollment Request Action, User ID, EmplID or Class Number. 6. You must select a Career (Undergraduate, Graduate, or Doctorate) and a Term. 7. To narrow your results, you can enter additional search criteria, such as Enrollment Request Source (e.g., Self Service, Quick Enroll, or Enrollment Request), User ID, or Class Nbr. You can also select a date range using the Enrollment Action Range section. If you wish to search for all enrollments completed by a particular user, you can enter that person's User ID, or login, into the User ID field. To search for enrollments completed for a particular student, enter the student's ID number into the EmplID field. 8. Once you have entered your search criteria, click the Search link at the top right corner of this page. 9. Your search results will appear at the bottom of this page and will be split amongst several tabs. 26
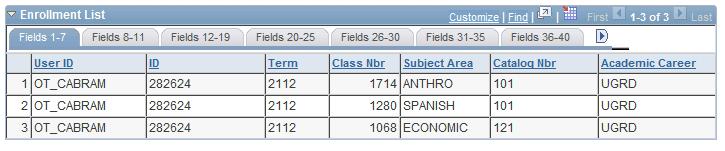
27 10. The Fields 1-7 tab shows User ID, Student ID, Term, Class Number, Subject, Catalog, and Career information for each enrollment transaction. 11. Use the Fields 8-11 tab to view the Enrollment Request ID, Last Update Date/Time, Enrollment Request Source, and Enrollment Requirement Detail Sequence information for each enrollment transaction. 12. On the Fields tab, you can view the Enrollment Request Action and Action Reason, Action Date, Units Taken and Course Count, Repeat Code (if applicable), Grade Input (if applicable), and Grading Basis. 13. Use the Fields tab to view information about Class Permissions, Change to Class Nbr, Drop if Class is Enrolled, Change to Wait List Nbr, and Related Class options from the Enrollment components. 14. Use the Fields tab to view override information for these transactions. 15. Use the Fields tab to view continued override information. 16. The Fields tab displays additional override information continued from the previous tabs. 17. Click the Show Following Tabs icon ( ) to view additional tabs. 18. Use the Fields tab to view Enrollment Requirement Detail Status, Requirement Designations, Requirement Designation Options, and Requirement Designation Grades (if applicable). 19. Finally, use the Fields tab to view Transcript Note ID, Academic Program, and Dynamic Dates Override information. 20. If you wish to view this information in spreadsheet format through Excel, click the small spreadsheet icon ( ) at the top of the Enrollment List section. 27
28 28
29 Student Service Indicators and Holds Viewing Service Indicators 1. First, click the Campus Community menu item. 2. Next, click the Student Services Ctr (Student) link. 3. You will now be directed to a Search page. Enter the ID of the student you wish to search for in the ID field. 4. Service Indicators are indicators in PeopleSoft that allow you to impose holds or identify some special characteristic of a student. A Negative Service Indicator, denoted by a small red No sign at the top of every page on the student s record ( ), indicates that some sort of impact has been imposed on the student. For example, a student may not be able to enroll because they have an outstanding charge on their account. A Positive Service Indicator is denoted by a small red star ( ) and indicates a special characteristic about a student, for example, if the student is a veteran. This service indicator has no effect on the student and is only meant for informational purposes. 29

30 5. Negative service indicators that have some type of hold associated with them will appear in the Holds box on the right-hand side of the Student Services Center. Students view them in the same location within the Student Center. 6. To learn more about a Service Indicator, click the appropriate icon at the top of the page to access the Manage Service Indicators component. 7. To view all service indicators on this page, click the Effect drop-down menu and select All. 8. Click the Code link to learn who placed the service indicator. On the detailed page, you can scroll to the bottom to see what impacts this service indicator imposes upon the student (for example, CENR means that the student may not enroll). 30
31 9. You can also access Service Indicators using the General Info tab on the Student Services Center, or by accessing Campus Community > Service Indicators (Student) > Manage Service Indicators. Adding a Service Indicator 1. First, click the Campus Community menu item. 2. Next, click the Student Services Ctr (Student) link. 3. You will now be directed to a Search page. Enter the ID of the student you wish to search for in the ID field. Click Search. 4. Once on the main Student Services Center click the General Info tab. 5. In the Service Indicators box, click the Edit Service Indicators button. 6. You will now see the Manage Service Indicators page. Note: You can also access Manage Service Indicators by accessing Campus Community > Service Indicators (Student) > Manage Service Indicators. 7. On the Manage Service Indicators page, click the Add Service Indicator link. 31

32 8. On the Add Service Indicator page, you must first select a Service Indicator Code. If it does not default, you should select a Service Ind Reason Code as well. 9. Next, enter a Start Date and/or a Start Term. You must enter a value into one of these two fields, but each service indicator may require you to select one field over another. If you enter an End Date or End Term, the service indicator impact will end on that day or term. In the Assignment Details box, you can enter an Amount and Currency. In the Contact Information box, you can enter a contact person for the student s reference. 32

33 10. Finally, you can enter comments into the Comments field if you wish. 11. In the Services Impacted section, you can view the impacts that this service indicator will carry for the student. Click OK to save this service indicator and apply it to the student s record. 12. To release this service indicator, return to the Manage Service Indicators page, click the Code link for the service indicator, and select the Release button at the top right corner. 33

34 Assigning an Advisor to a Student 1. From the main menu, click the Records and Enrollment link. 2. Next, click the Student Background Information menu item. 3. Now click the Student Advisor link. 4. On the Search page, enter the ID number of the student you are searching for. You can also search by the student s first and last name. Click the Search button. 5. Use the Student Advisor page to assign an individual advisor to a student. 6. If the student already has an advisor assigned, and you are REPLACING/CHANGING the advisor, click on the plus sign to the right of the Academic Institution box (highlighted in blue below), and add a new effective dated row. The newest effective dated row will be used. You don t need to Inactivate the advisor on the old record. 7. If you need to add a 2 nd advisor for a student where both are active at the same time -- then use the plus sign that is on the lower half to the right of the Advisor Role line (highlighted in pink below). 8. The Advisor Role should be set to Advisor. You are required to enter an Academic Career and Academic Program. You also have the ability to enter a specific Academic Plan for this advisor student combination, but this field is optional. 34

35 9. If you know the Academic Advisor s ID number, enter it into the Academic Advisor field. If you do not know the ID number, click the magnifying glass next to this field to search for the advisor by name. 10. Enter the advisor s last name into the Last Name field, and his or her first name into the First Name field. Click Look Up. Click the Select button next to the advisor you are selecting. 11. Once you are redirected to the Student Advisor page, click Save. 35
36 Viewing a Student Enrollment Summary 1. After logging into PeopleSoft, click the Records and Enrollment link. 2. Next, click the Enrollment Summaries menu item. 3. Now click Enrollment Summary. 4. On the Search page, enter the ID number of the student or search for the student by first and last name. Next, enter the Career and Term. Click Search. 5. The Enrollment Summary page will display a student s schedule for a specified term. You can print this page as you would any web page. Only three classes will show at a time; if the student has more than three classes, click the View All link. Alternatively you can view each set of classes individually by using the Next Row button. 6. To view a listing of the student s classes along with the times and days for the class, click the Print Study List link to create this report. Then, click the Report Manager link. 36


37 7. On the Report Manager page, you can monitor the status of the study list report. If the Status does not read Posted, click the Refresh button until you see this status. Once the report is posted, the file name will display as a link. Click this link to view the study list report in PDF format. 8. If you do not see the PDF version of the study list, make sure your pop-up blocker is off. You can print this PDF as you would any other PDF file. 37
38 Viewing a Student s Unofficial Transcript 1. From the main menu, click the Records and Enrollment link. 2. Next, click the Transcripts menu item. 3. Now click the Request Transcript Reports link. 4. On the Search page, click the Add a New Value tab as you are requesting a new transcript for this student. 38
39 5. On the Transcript Request Header page, the Institution should be set to BLOOM. In the Transcript Type field, select UNOFF (Unofficial). The other items on this page can be left at the default values. 6. Now click the Transcript Request Detail tab. 7. On the Transcript Request Detail tab, enter the ID number of the student you are running this unofficial transcript for in the ID field. Once you have entered the ID number, click the Tab button on your keyboard to refresh the page. If you wish to add additional students, click the Add a New Row button ( ) and add the student s ID number. Once you are ready to run this transcript, click the Process Request button. 8. Once the process has run successfully, a View Report link will appear next to each student s ID. Click the View Report link to view the student s unofficial transcript. 39

40 9. The transcript will appear in a separate window as a PDF file. Note that you may need to turn off your pop-up blocker in order to see this report. 10. On the Unofficial Transcript you will be able to view the student s academic record, including all transferred credits that have been posted. 40
 link. 4. Now click the Athletic Participation link. 5. On the Search page, enter the ID number of the student you are searching for.")
41 Entering Athletic Participation Information 1. From the main menu, click the Campus Community link. 2. Next, click the Personal Information (Student) menu item. 3. Click the Participation Information (Student) link. 4. Now click the Athletic Participation link. 5. On the Search page, enter the ID number of the student you are searching for. You can also search by the student s first and last name. Click the Search button. 6. Use the Athletic Participation page to enter athletic participation data to help track an individual's participation at your institution. From the Sport drop-down list, select the sport in which this individual participates. 41

42 7. Use the Effective Date field to define the date when the athletic participation information is valid. For example, a student can begin with a status of Recruited and then become an Active Participant once he or she starts playing on the team. When the person's status changes, you would enter a new row with a new effective date to record the updated information. The field defaults to the current system date, but can be changed if needed. 8. Use the Athletic Participation drop-down list to indicate the level or status of the individual's participation in the specified sport, such as active participant, manager, not recruited, or recruited. 9. Select the Current Participant check box to indicate that this individual currently participates in this sport. Select the NCAA Eligible check box to indicate that the individual is eligible to participate on an NCAA (National Collegiate Athletic Association) team for this sport. 10. When you have finished entering information on this screen, click the Save button. Viewing an Instructor Schedule 1. From the main menu, click the Curriculum Management link. 2. Now click the Instructor/Advisor Information menu item. 3. Click the Instructor Schedule menu item. 4. On the Search screen, enter the ID number of the faculty member you are searching for. You can also search for the faculty member by name in this menu. After entering your criteria, click Search. 5. You will now see the faculty member s schedule in list form, with Class Number, Subject, Catalog Number, Section Number, Component, Class Title, Start and End Time, Meeting Days, Building, and Room. 6. Click the Instructor Schedule 2 tab to see start and end date and session information about each course. 42
43 Viewing a Class Roster 1. From the main menu, click the Curriculum Management link. 2. Now click the Class Roster menu item. 3. Click the Class Roster menu item within this menu. 4. On the Search screen, enter search criteria for the class you are searching for. Make sure that the Academic Institution field displays BLOOM. You are also required to enter a term into the Term field. It is recommended that you use the Class Nbr field, as it will direct you immediately to the class section you want to view without having to view multiple search results. The Class Number is a unique four-digit numeric code assigned to each class section as it is built. If you do not know the Class Number, you can search by Subject Area and Course Number. When you have entered your search criteria, click the Search button. 5. Once on the Class Roster page, you can view the students who have enrolled in your selected class. This page displays the student name, ID number, units, program and plan, and academic level. You can also view meeting information for the class in the Meeting Information box. To view any students who have dropped the class, click the Enrollment Status drop-down menu and select Dropped. Note that this will not be available if the class has not been dropped. To view detail about the class, click the Class Detail button at the top right corner of this page. This page can be printed just as you would print any other web page. To view a different class, click the Return to Search button at the bottom of the screen to search again. 43

44 Searching for Available Facilities 1. From the main menu, click the Curriculum Management menu item. 2. Click the Facility and Event Information link. 3. Click the Search for a Facility link. 4. On the Search page, enter BLOOM into the Academic Institution field. Now click Search. 5. On the Search for a Facility page, you can enter search criteria to find available facilities. First, enter the start and end date and times for your meeting in the Meeting Criteria section. You can also select the day or days of the week the event will take place. 44
45 6. Next, enter a Facility Type (such as auditorium or lecture hall), Room Capacity range, Academic Organization(if applicable), Partition information, Location Code, and Building (if applicable). Once you have entered your search criteria, click the Fetch Facilities button. 7. Next, you can enter a Facility Type (such as auditorium or lecture hall), Room Capacity range, Academic Organization(if applicable), Partition information, Location Code, and Building (if applicable). Once you have entered your search criteria, click the Fetch Facilities button. 8. You will now be directed to the Facility Search Results page, will display the results of your search. 45

46 Viewing Class Facility Usage 1. From the main menu, click the Curriculum Management menu item. 2. Click the Facility and Event Information link. 3. Click the Class Facility Usage link. 4. On the Search page, enter BLOOM into the SETID field. You can also enter or look up a Building in the Building field. Now click Search. You may have to select the room from the search results on this page. 5. On the Class Facility Usage page, enter specific search criteria for the facility you are searching. First enter a Term and then select a Day of the Week. You can also enter a Session. Click the Fetch Class Meetings button to view your search results. 46

47 6. Now you can view the results of your search at the bottom of this page. Your results will show the usage of this particular room during the term and day you have specified, as well as a start and end date for the class and total enrollment. 47
PeopleSoft Faculty Center, Advisor Center & Enrollment. Bloomsburg University
 PeopleSoft Faculty Center, Advisor Center & Enrollment Bloomsburg University 1 Table of Contents Bloomsburg University Training Notes... 3 Terminology Crosswalk... 3 Term Code Logic... 3 View My Schedule
WINGS Faculty Center Guide 12/01/09
 WINGS Faculty Center Guide 12/01/09 Table of Contents Faculty Center... 3 My Schedule... 3 Viewing Exam Schedule... 3 Changing Terms... 4 Displaying Classes... 5 Viewing Weekly Teaching Schedule... 6 Viewing
Table of Contents COURSE OBJECTIVES... 2 LESSON 1: ADVISING SELF SERVICE... 4 NOTE: NOTIFY BUTTON LESSON 2: STUDENT ADVISOR...
 Table of Contents COURSE OBJECTIVES... 2 LESSON 1: ADVISING SELF SERVICE... 4 DISCUSSION... 4 INTRODUCTION TO THE ADVISING SELF SERVICE... 5 STUDENT CENTER TAB... 8 GENERAL INFO TAB... 19 TRANSFER CREDIT
College of Lake County. Student Administration System 9.0 Advisement Process - 19 th /41 st Hour Information Guide
 College of Lake County Student Administration System 9.0 Advisement Process - 19 th /41 st Hour Information Guide September, 2008 STUDENT ADMINISTRATIVE SYSTEM ADVISEMENT PROCESS at19 TH & 41 ST HOUR INFORMATION
FACULTY GUIDE TO PEOPLESOFT SELF SERVICE
 Office of the Registrar FACULTY GUIDE TO PEOPLESOFT SELF SERVICE Contents Introduction... 1 Advisor Center and Faculty Center... 1 Getting Familiar with the Advisor Center... 1 Removing Registration Holds...
The University of New Orleans Web-STAR (PeopleSoft Campus Solutions v 9.0): Basic Advisor Training Manual
: Basic Advisor Training Manual") The University of New Orleans Web-STAR (PeopleSoft Campus Solutions v 9.0): Training Manual 10/19/2010 Training Group 2 Welcome to the module! This module contains the information and tools needed to learn
The University of New Orleans Web-STAR (PeopleSoft Campus Solutions v 9.0): Training Manual 10/19/2010 Training Group 2 Welcome to the module! This module contains the information and tools needed to learn
CAMPUS PORTAL QUICK REFERENCE GUIDE: STUDENT PORTAL
 CAMPUS PORTAL QUICK REFERENCE GUIDE: STUDENT PORTAL 1 CONTENTS How to Set Up Your Portal Web Account... 3 How to Personalize Your Homepage... 4 How to View Holds Applied to Your Portal Account... 4 How
The University of New Orleans Web-STAR (PeopleSoft Campus Solutions v 9.0): Basic Academic Support Training Manual
: Basic Academic Support Training Manual") The University of New Orleans Web-STAR (PeopleSoft Campus Solutions v 9.0): Basic Academic Support Training Manual 10/19/2010 Training Group 2 Basic Academic Support Welcome to the Basic Academic Support
The University of New Orleans Web-STAR (PeopleSoft Campus Solutions v 9.0): Basic Academic Support Training Manual 10/19/2010 Training Group 2 Basic Academic Support Welcome to the Basic Academic Support
Texas A&M University-Texarkana Schedule Planner
 Texas A&M University-Texarkana Schedule Planner Log into Web for Students Select STUDENT tab Click on the REGISTRATION link 1 Click on SCHEDULE PLANNER link You will be redirected to the Schedule Planner
Campus Solutions Self Service: Student Quick Reference Guide
 Campus Solutions Self Service: Student Table of Contents Introduction to Step Sheets... 4 Getting Started in CUNYfirst... 5 Managing Mozilla Firefox Pop Up Blockers for CUNYfirst... 6 Managing Microsoft
Note: Parts of images may be obscured for security reasons.
 Student Enrollment Quick Enroll When an advisee needs an advisor s assistance, enrollment actions may be processed using the Quick Enroll a Student component. Step Note: Parts of images may be obscured
Campus Solutions Advisement Quick Reference Guide
 Campus Solutions Advisement Table of Contents Introduction to Step Sheets... 1 About Your Advisee... 2 View List of Advisees... 3 Send Notifications to Advisees... 4 View Advisee Student Center... 7 View
Student Records. Course Instructions. SLCM_AD_310 Student Records 1. Click Attachments (upper right corner) Print the pdf
 Print the pdf") Student Records SLCM_AD_310 1 of 106 Course Instructions Click Attachments (upper right corner) Click QRC Course Navigation pdf Print the pdf Use the pdf to navigate the course and take the Assessments
Student Records SLCM_AD_310 1 of 106 Course Instructions Click Attachments (upper right corner) Click QRC Course Navigation pdf Print the pdf Use the pdf to navigate the course and take the Assessments
Department Course Scheduling PSv9
 Department Course Scheduling PSv9 classroomsched@uakron.edu Table of Contents Chapter 1: Using the Maintain Schedule of Classes and Schedule New Course Components... 1 Chapter 2: Associated Class... 2
Business Process Guide
 Business Process Guide for Class and Course Permission Overrides 1 TABLE OF CONTENTS Topic Page Purpose...3 Navigation...3 Prerequisites...4 Prerequisites and Assumptions...4 Helpful Hints...4 Terminology...5
Introduction to PeopleSoft Campus Solutions (Student Administration)
") Introduction to PeopleSoft Campus Solutions (Student Administration) Last Revised: 9/23/2011 REVISION CONTROL Document Title: Author: File Reference: Introduction to PeopleSoft Campus Solutions April Grommo
Introduction to PeopleSoft Campus Solutions (Student Administration) Last Revised: 9/23/2011 REVISION CONTROL Document Title: Author: File Reference: Introduction to PeopleSoft Campus Solutions April Grommo
Campus Solutions Self Service: Faculty Quick Reference Guide
 Campus Solutions Self Service: Faculty Table of Contents Introduction to Step Sheets... 1 The Faculty Center... 2 View Teaching Schedule... 3 Enter My Textbooks... 9 View Textbook Summary... 19 View Exam
ecampus 9.2 Faculty Homepage
 1 I. ecampus Features In ecampus 9.2, the ecampus Faculty Homepage features three (3) tiles. The tiles have all the functionalities found on the previous ecampus Faculty Homepage. ecampus 9.2 Faculty Homepage
ADVISING PAGE 1. The University of Akron ADD/CHANGE ADVISOR OR ADVISING COMMITTEE CODE STUDENT ADVISOR PANEL FOR NSO
 ADVISING PAGE 1 ADD/CHANGE ADVISOR OR ADVISING COMMITTEE 1. Navigate to: Records and Enrollment > Student Background Information > Student Advisor 5. If the student does NOT have an advisor or advising
SIS Student Information System
 SIS Student Information System Hebrew Union College Jewish Institute of Religion Student User s Manual (SIS) June 20, 2017 Table of Contents 1. FERPA reminder... 3 2. Locate HUC-JIR websites... 4 3. Introduction
Basics for Student Data Inquiry
 Basics for Student Data Inquiry Table of Contents Basics... 2 Logging in to MyView... 2 Navigating the Menus... 2 Hiding the Main Menu... 3 Searching for a Student... 4 Look up Field Values... 5 Opening
The University of New Orleans Web-STAR (PeopleSoft Campus Solutions v 9.0): Faculty Center Training Manual
: Faculty Center Training Manual") The University of New Orleans Web-STAR (PeopleSoft Campus Solutions v 9.0): Faculty Center Training Manual 10/19/2010 Training Group 2 Faculty Center Training Welcome to the Faculty Center Training module!
The University of New Orleans Web-STAR (PeopleSoft Campus Solutions v 9.0): Faculty Center Training Manual 10/19/2010 Training Group 2 Faculty Center Training Welcome to the Faculty Center Training module!
Academic Advising Basics
 Arizona Board of Regents, 2011 updated 07.11.2010 v.3.0 For information and permission to use our PDF manuals, please contact uitsworkshopteam@listserv.com PDFs available at www.uits.arizona.edu/workshops
My. Butler Instructor Reference Guide
 My. Butler Instructor Reference Guide My.Butler Portal: https://my.butler.edu User ID Password My.Butler has a collection of useful links. They are arranged in four columns, one for PeopleSoft Campus Solutions
PEOPLESOFT ONLINE SERVICES
 PEOPLESOFT ONLINE SERVICES USING THE FACULTY CENTER: How to Log in, View your Schedule, & Download a Class Roster + Go to www.towson.edu; Click on Quick Links + Then click on Towson Online Services 1 +
Campus Solutions: Student Records. Quick Reference Guide
 Campus Solutions: Student Records Table of Contents Unit I: Foundations of Student Records... 9 Unit II: Term Set-up... 10 Chapter 2 - Create and Maintain Terms and Sessions... 11 *Add/Update Term & Session...
ASDS. Draft. The Schedule New Course component enables you to view all courses from the course catalog that can be scheduled.
 Version 1.0 Document Generation Date 2/22/2008 Date Modified 2/22/2008 Last Changed by ASDS Status Draft Scheduling New Classes-022208 Concept The Schedule New Course component enables you to view all
Business Process Guide [AD034] Application Maintenance
![Business Process Guide [AD034] Application Maintenance](/thumbs/74/70469227.jpg "Business Process Guide [AD034] Application Maintenance") Student Administration - Admissions University of Nevada, Las Vegas Graduate College Business Process Guide [AD034] Application Maintenance DOCUMENT INFORMATION Module Author ereference Admissions and
Student Administration - Admissions University of Nevada, Las Vegas Graduate College Business Process Guide [AD034] Application Maintenance DOCUMENT INFORMATION Module Author ereference Admissions and
Faculty Center in SIS
 Overview The Faculty Center can be used to manage all of your class, student and advisee related activities such as: viewing your weekly teaching schedule, viewing class details, searching for classes,
TopNet for Faculty. Faculty Services Tab & Advisors & Student Data Inquiry Tab
 TopNet for Faculty Faculty Services Tab & Advisors & Student Data Inquiry Tab Revised 2015 For Help or Information Contact: Barbara Scheidt Enterprise Systems MMTH 373 270-745-8812 or Barbara.scheidt@wku.edu
SIS Student Information System
 SIS Student Information System Hebrew Union College Jewish Institute of Religion Student User s Manual (SIS) March 26, 2015 Table of Contents 1. FERPA reminder... 3 2. Locate HUC-JIR websites... 4 3. Introduction
Logging into and using MyBC
 Logging into and using MyBC MyBC is Bellin College s Student Information System. This is where you go to register for classes, view your student documents, check your billing, and view your financial aid.
When you are logged into My Siena, you cannot use the Browser s Back and Forward buttons to navigate from one area to another. You need to use the
 When you are logged into My Siena, you cannot use the Browser s Back and Forward buttons to navigate from one area to another. You need to use the tabs at the top of the My Siena page or the links directly
How To: This document covers how to perform several common tasks in eservices from the Student Center. eservices Self Service Help for Students
 This document covers how to perform several common tasks in eservices from the Student Center. How To: Find User ID/Username Forgot My Password Browse Schedule or Course Catalog Enroll Add Classes Enroll
Student Center. CUNYfirst is a new program implemented by CUNY that is meant to replace the old E-sims system.
 Student Center 1. Logging into CUNYfirst CUNYfirst is a new program implemented by CUNY that is meant to replace the old E-sims system. Students can use CUNYfirst for: Registering for classes Viewing their
Class Scheduling- Basics
 Class Scheduling- Basics Oct 2006 Rev 2 Maintain Schedule of Classes Class Scheduling - Basics Class Scheduling- Basics This course explains how to maintain a schedule of classes in PeopleSoft 8.9 Student
eservices Self Service Help for Students
 eservices Self Service Help for Students This document covers how to perform several common tasks in eservices from the Student Center. How To: Find User ID/Username Forgot My Password Text/Email Notification
Job Aid. Scheduling New Classes
 Scheduling New Classes-100507 1. Navigate: Curriculum Management > Schedule of Classes > Schedule New Course 2. Enter your Institution: UMSxx. 3. Enter the desired information into the Term field. 4. Enter
Self Service Student Guide
 Self Service Student Guide (as of 05/24/2018 ) Alamance Community College Student Success Division PO Box 8000 1247 Jimmie Kerr Rd Graham, NC 27253 (336) 506 4270 www.alamancecc.edu Alamance Community
Faculty Portal. Logging In:
 Faculty Portal Logging In: Access the portal via the web address provided by your institution. If your institution is using Active Directory to authenticate, you may not be required to log in at this page.
Peoplesoft MyRIC: RIC Management Center RHODE ISLAND COLLEGE
 RHODE ISLAND COLLEGE Peoplesoft MyRIC: RIC Management Center The information contained herein is intended to be used solely by Rhode Island College and its employees. Last Updated on March 20, 2018 Copyright
Departmental Schedule Validator (DSV) Procedure Manual
 Procedure Manual") Departmental Schedule Validator (DSV) Procedure Manual What is the DSV? Departments use the Departmental Schedule Validator (DSV) application to submit scheduling requests to the Office of the University
Departmental Schedule Validator (DSV) Procedure Manual What is the DSV? Departments use the Departmental Schedule Validator (DSV) application to submit scheduling requests to the Office of the University
REFERENCE GUIDE TO THE STUDENT CENTER MY.CHAPMAN.EDU
 REFERENCE GUIDE TO THE STUDENT CENTER MY.CHAPMAN.EDU Access to the Student Center is provided through the Student Self Service link at my.chapman.edu. Enter your regular Chapman User ID and Password. Click
Departmental Schedule Validator (DSV) Procedure Manual
 Procedure Manual") Departmental Schedule Validator (DSV) Procedure Manual What is the DSV? The Departmental Schedule Validator (DSV) is an application used by departments to submit scheduling requests to the Office of the
Departmental Schedule Validator (DSV) Procedure Manual What is the DSV? The Departmental Schedule Validator (DSV) is an application used by departments to submit scheduling requests to the Office of the
SIS Modernization Faculty (Instructor) Portal Training Guide
 Portal Training Guide") Faculty (Instructor) Portal Training Guide Created on August 2017 Table of Contents Introduction to the New Faculty Portal... 1 Logging into the Faculty Portal... 1 Navigating the Faculty Portal... 5 Using
Faculty (Instructor) Portal Training Guide Created on August 2017 Table of Contents Introduction to the New Faculty Portal... 1 Logging into the Faculty Portal... 1 Navigating the Faculty Portal... 5 Using
Departmental Schedule Validator (DSV) Procedure Manual
 Procedure Manual") Departmental Schedule Validator (DSV) Procedure Manual What is the DSV? The Departmental Schedule Validator (DSV) is an application used by departments to submit scheduling requests to the Office of the
Departmental Schedule Validator (DSV) Procedure Manual What is the DSV? The Departmental Schedule Validator (DSV) is an application used by departments to submit scheduling requests to the Office of the
View Class Roster Using Administrative Page
 View Class Roster Using Administrative Page Begin by navigating to the Class Roster link located at Curriculum Management Class Roster Class Roster You are taken to the Class Roster Search Criteria Screen.
ADDING A NEW CLASS -- OR
 ADDING A NEW CLASS A) If you want to add a new class for a course in a particular term and classes for that course already exist in that term, navigate to Maintain Schedule of Classes to add the new class.
I. What you need to do for one student or student(s) in a single course number:
 in a single course number:") PERMISSIONS FOR CLASS ATTENDANCE, OVER-TALLIES, PREREQUISITE WAIVER, & UNDERGRAD/GRAD COURSES Navigation = Log-in >HR/Campus Solutions >Records and Enrollment >Term Processing> Class Permissions>Class
PERMISSIONS FOR CLASS ATTENDANCE, OVER-TALLIES, PREREQUISITE WAIVER, & UNDERGRAD/GRAD COURSES Navigation = Log-in >HR/Campus Solutions >Records and Enrollment >Term Processing> Class Permissions>Class
Signing on to PeopleSoft
 Signing on to PeopleSoft PeopleSoft is totally web-based, so you access it by using an Internet browser such as Internet Explorer. If you are familiar with browsing web pages, you will find that navigating
Producing Batch Transcripts for Student Groups
 Producing Batch Transcripts for Student Groups OBJECTIVE: Provides an overview for producing and printing batches of transcripts for specific student groups in PeopleSoft. CONTENTS: LESSON 1 CREATING A
Generating Class Permission Numbers
 Generating Class Permission Numbers Prerequisite Training It is expected that prior to beginning this manual/training you will have completed basic navigation training in hereafter referred to as Enroll
Section K: Registration Error Override Request System
 Section K: Registration Error Override Request System 1. REGISTRATION ERROR OVERRIDE SYSTEM... 2 1. 1 INTRODUCTION... 2 1. 2 THE NEW AND IMPROVED SYSTEM... 2 2. CARLETON CENTRAL PAGES... 6 2.1 REGISTRATION
Campus Solutions Campus Community Quick Reference Guide
 Campus Solutions Campus Community Table of Contents Introduction to Step Sheets... 3 Getting Started in CUNYfirst... 4 Managing Microsoft Internet Explorer Compatibility with CUNYfirst... 5 Managing Mozilla
Astra Scheduling Grids
 Astra Scheduling Grids To access the grids, click on the Scheduling Grids option from the Calendars tab. A default grid will be displayed as defined by the calendar permission within your role. Choosing
Student Records Training Level IIA
 ` Student Records Training Level IIA Assigning Overloads... 2 Assigning Student Specific Permissions... 4 Assigning Class Permission Numbers... 6 Changing Classes to Pass/Fail... 8 Adding a Class... 12
MyDegreePath Student Manual
 MyDegreePath Student Manual Last Revised: March 16, 2017 Table of Contents Audits How do I run an audit?... 1 How do I run a what-if audit?... 1 How do I run a what-if audit with a minor?... 3 How do I
Setting up Combined Sections
 Setting up Combined Sections Combining Sections allows you to schedule more than one section of different classes in the same room, at the same time. This is most often done for cross-listed courses, but
HUB: Add a Class Section to a Multiple Component Course Already on the Schedule
 HUB: Add a Class Section to a Multiple Component Course Already on the Schedule We will cover adding additional sections to a course already on the schedule. From the Main Menu, click Curriculum Management
Table of Contents. Contents
 Introduction Welcome to DegreeWorks, the new degree audit and tracking system for Elizabeth City State University. DegreeWorks provides a more accessible, convenient, and organized way for students to
Click the Add a New Value Tab. Click Add. The system will populate the Event ID field with a number after the event request is saved.
 How to login to SIS: SIS-only users go to: https://buckeyelink2.osu.edu/, click on Student Information System (main page), login using your lastname.# and password. Schedule an Event Path: Main Menu Campus
Using Self-Service Course Catalog and Schedule
 Using Self-Service Course Catalog and Schedule Using Self-Service Course Catalog and Schedule Students, instructors, and community members use the self-service Class Search feature to search the schedule
Records and Enrollment Participants Guide
 IBM Cognos Analytics Welcome to Cognos Records and Enrollment Training! Today s objectives include: Gain a Basic Understanding of Cognos Understand University policies on data security including FERPA
Faculty Center in SIS
 Overview The Faculty Center can be used to manage all of your class, student and advisee related activities such as: viewing your weekly teaching schedule, viewing class details, searching for classes,
Parent Student Portal User Guide. Version 3.1,
 Parent Student Portal User Guide Version 3.1, 3.21.14 Version 3.1, 3.21.14 Table of Contents 4 The Login Page Students Authorized Users Password Reset 5 The PSP Display Icons Header Side Navigation Panel
Personal Information
 This document provides an overview of the available to students through My Akron. To access the enrollment appointment information log in to the portal, My Akron, at http://my.uakron.edu with your UANetID
MAUI Final Exam Assignment Needs Submission Instructions for Academic Department Administrators
 MAUI Final Exam Assignment Needs Submission Instructions for Academic Department Administrators 1.) Go to MAUI (Made At the University of Iowa student information system) at http://www.maui.uiowa.edu 2.)
Specifying User Defaults
 Financial Management Human Resources Campus Solutions Specifying User Defaults Business Process Guide Updates Date Action Page(s) 01/31/14 Created 08/30/17 Added disclaimer note 3 Table of Contents Specifying
PEOPLESOFT ONLINE SERVICES
 PEOPLESOFT ONLINE SERVICES USING THE FACULTY CENTER ON MYTUMOBILE: How to Use Class / Catalog Search + Once you are logged into your Faculty Center through your MYTUMOBILE, click on the menu button in
NEW Functionality for Instructor Center Spring 2017
 NEW Functionality for Instructor Center Spring 2017 Beginning in Spring 2017 instructors will see a new area in UAccess Instructor Center where they can enter a student s ID and provide electronic permission
Section K: Registration Override Request System
 Section K: Registration Override Request System 1. REGISTRATION OVERRIDE SYSTEM... 2 1. 1 INTRODUCTION... 2 2. CARLETON CENTRAL PAGES... 3 2.1 INFORMATION PAGE... 3 2.2 REGISTRATION OVERRIDE REQUEST SUMMARY
FACULTY CENTER. 1. CUNYfirst: https://home.cunyfirst.cuny.edu 2. Select: HR/Campus Solutions. 3. Navigate to: Self Service > Faculty Center
 FACULTY CENTER 1. CUNYfirst: https://home.cunyfirst.cuny.edu 2. Select: HR/Campus Solutions 3. Navigate to: Self Service > Faculty Center 4. Click on My Schedule or any of the other Advisor Center information
Tutorial on How to Register online SPRING & J-Term Study Abroad students (with advisor s approval process)
") The AUR online course registration for Spring & J-Term will open on Monday October 22, 2018 (4:00 PM CET) In order to register online, go to the MyAUR webpage (https://www.my.aur.it/ics) and log in with
The AUR online course registration for Spring & J-Term will open on Monday October 22, 2018 (4:00 PM CET) In order to register online, go to the MyAUR webpage (https://www.my.aur.it/ics) and log in with
Student Registration in SIS via One.IU
 Overview You have multiple ways you can register for classes. All of the options for registration are located in Student Center, which is accessed through One.IU. Prior to your registration appointment,
Astra Scheduling Grids
 Astra Scheduling Grids To access the grids, click on the Scheduling Grids option from the Calendars tab. A default grid will be displayed as defined by the calendar permission within your role. Choosing
Process Document Student Records: Enroll Using Quick Enroll
 Version 1.0 Document Generation Date 1/10/2008 Date Modified 1/23/2008 Last Changed by ASDS Status Final Enroll Using Quick Enroll-011008 Concept The Quick Enroll component enables you to enter, update,
Quick Admit Batch Apps_SPD_ Revision Document Generation Date Date Modified Last Changed by aswade, 12/04 Status
 Department Responsibility/Role File Name Quick Admit Batch Apps_SPD_20141204162056 Revision Document Generation Date Date Modified Last Changed by aswade, 12/04 Status 12/4/2014 4:21:00 PM 2/13/2015 9:50:00
SIS STUDENT INFORMATION CENTER
 Using the Self Service Student Center As a student you can: 1. Log Into the System 2. Navigate 3. Add Favorites 4. Add, Drop, or Swap Classes 5. View Your Class Schedule 6. View Grades 7. View Degree Progress
VISUAL SCHEDULE BUILDER (VSB)
") Valdosta State University Visual Schedule Builder Student How-to Guide VISUAL SCHEDULE BUILDER (VSB) is a dynamic, real-time class scheduling tool that allows you to create a schedule based on the courses
Valdosta State University Visual Schedule Builder Student How-to Guide VISUAL SCHEDULE BUILDER (VSB) is a dynamic, real-time class scheduling tool that allows you to create a schedule based on the courses
Table of Contents COURSE OBJECTIVES... 3 LESSON 1: OBTAIN ACCESS TO PEOPLESOFT CS RECORDS... 4 LESSON 2: STUDENT PRIVACY - FERPA...
 Table of Contents COURSE OBJECTIVES... 3 LESSON 1: OBTAIN ACCESS TO PEOPLESOFT CS RECORDS... 4 LESSON 2: STUDENT PRIVACY - FERPA... 6 Discussion... 6 University Policy and Training... 6 Directory Information...
Astra Schedule User Guide Scheduler
 Astra Schedule User Guide 7.5.12 Scheduler 1 P a g e ASTRA SCHEDULE USER GUIDE 7.5.12... 1 LOGGING INTO ASTRA SCHEDULE... 3 LOGIN CREDENTIALS... 3 WORKING WITH CALENDARS... 4 CHOOSING A CALENDAR AND FILTER...
Campus Solutions Faculty Guide Section 2 - Faculty Center
 Financial Management Human Resources Campus Solutions Campus Solutions Faculty Guide Section 2 - Faculty Center Updates Date Action Page(s) 04/13/12 Created 05/14/12 Entire document updated. all 05/15/12
Departmental Schedule Validator (DSV) Procedure Manual
 Procedure Manual") Departmental Schedule Validator (DSV) Procedure Manual Introduction The Departmental Schedule Validator (DSV) is a web based program designed to enhance schedule submission and to automatically check for
Departmental Schedule Validator (DSV) Procedure Manual Introduction The Departmental Schedule Validator (DSV) is a web based program designed to enhance schedule submission and to automatically check for
MyCWU/Campus Solutions Faculty Guide Section 1 Getting Started
 Financial Management Human Resources Campus Solutions MyCWU/Campus Solutions Faculty Guide Section 1 Getting Started Updates Date Action Page(s) 04/13/12 Created 05/03/12 Modified entire document all 08/09/12
What is Advisor Center?
 What is Advisor Center? The Advisor Center is a portal within HUB that provides you a modified view of what students see when they log into HUB. It serves as an online one step shop to access a student
Using ASU Rosters Job Aid
 Using ASU Rosters Job Aid for Roster Contacts Table of Contents OVERVIEW... 3 BECOMING A ROSTER CONTACT:... 3 NAVIGATING TO ASU ROSTERS... 3 METHOD 1 VIA PEOPLESOFT...3 METHOD 2- VIA MYASU...3 SEARCH FOR
FACULTY CENTER CLASS ROSTERS, ING STUDENTS, PERMISSION NUMBERS REFERENCE GUIDE
 FACULTY CENTER CLASS ROSTERS, EMAILING STUDENTS, PERMISSION NUMBERS REFERENCE GUIDE INTRODUCTION The Faculty Center is a one-stop shop for faculty to access information regarding their class schedules,
Frequently Asked Questions for the NCAA Eligibility Center Website for Member Institutions
 Introduction Page: 1. Prospective student-athletes (PSAs) planning to enroll and/or receive a certification for fall 2010 or later will be directed to the new website at www.eligibilitycenter.org. 2. High
Getting Started in CAMS Enterprise
 CAMS Enterprise Getting Started in CAMS Enterprise Unit4 Education Solutions, Inc. Published: 18 May 2016 Abstract This document is designed with the new user in mind. It details basic features and functions
Registration and UC Denver Guide
 Center for Continuing and Professional Education Registration and UC Denver E-mail Guide 1380 Lawrence St, Ste #602 Campus Box 106 P.O. Box 173364 Denver, CO 80217-3364 Office: 303-315-4985 Office Fax:
Campus Solutions CUNYfirst Admissions. Quick-Reference Guide
 Campus Solutions CUNYfirst Admissions Quick-Reference Guide February 25, 2011 Viewing CAS Application Summary... 3 Viewing ASTA Application Summary... 4 Search/Match... 5 Adding an Application Manually...
UDSIS 9.2- Staff who support Faculty
 UDSIS 9.2- Staff who support Faculty These instructions show staff how to view Instructor class rosters and teaching schedules. The staff view of these pages is different than the view of this information
Veterans Custom Documentation
 Veterans Custom Documentation University of Wisconsin - Platteville Created: October 15, 2009 Veterans Custom Documentation Table of Contents Veterans Custom Documentation... 2 Veterans, Use Options...
Course Registration Guide Visiting Students Summer 2018
 Course Registration Guide Visiting Students Summer 2018 How to Register online: step by step Use Internet Explorer or Mozilla Firefox only (the portal is not compatible with Safari, Chrome, etc.) If you
MyRED - Fundamentals. August 5, 2010 Page 1
 Table of Contents Signing into MyRED... 2 Navigation Overview... 2 Page Search... 3 Using Search Pages... 4 Searching for Students... 6 Advanced Search... 6 Viewing Information... 7 New Window... 8 Effective
USING WEBADVISOR. Please note the following term designations below:
 USING WEBADVISOR Before beginning, please make sure that you have checked your current hold status located under the HOLDS heading (as seen below). It is important to check your hold status at least 24
Step 1. Final Grade Roster Submission. IT Department Printed on 05/21/2012 Page 1. Steps to Submit Grades. Step 1. Step 2. Step 3
 /Notes 1. Log into CUNYfirst Enter your username and password AND Click on the Go button icon 2. From the Enterprise Menu, select the HR/Campus Solutions link IT Department Printed on 05/21/2012 Page 1
Onondaga Community College. WebAccess Student Guide. January, 2013
 Onondaga Community College WebAccess Student Guide January, 2013 1 Table of Contents Introduction... 4 How to Get There... 5 Getting Started... 6 User Names and Passwords... 6 Security Question... 7 Change
User ID and Password Information. What is My User ID?
 User's Guide for Campus Connection User ID and Password Information If you are a student, your User ID is a "W" followed by a 7-digit number. Your User ID and Password for Campus Connection were sent to
The American University of Paris - 5, Boulevard de la Tour-Maubourg, Paris. Course Registration Guide Visiting Students Summer 2019
 The American University of Paris www.aup.edu - 5, Boulevard de la Tour-Maubourg, 75007 Paris Course Registration Guide Visiting Students Summer 2019 How to Register online: login-in Use Internet Explorer