Design and Navigation
|
|
|
- Alannah Chandler
- 6 years ago
- Views:
Transcription


1 This document contains information that will help you with creating your website using the Online Presence Builder tool. The website building tool can be found in your control panel, your Online Presence Portal.. Page 0
2 Contents Design and Navigation... 3 Page Design... 3 Page Header Images... 3 Copyright... 3 Domain Name... 3 Favicon... 4 Publishing your Site in Two Steps... 4 Website Name... 4 Logo and Tagline... 4 Creating your Site... 4 Verifying your Website Information... 6 Selecting a Design for your Website... 7 Editing Content Elements... 8 Text and Images... 8 Adding and Formatting Text... 8 Adding Images Table and Lists Section Groups Sections Adding Images to your Gallery Image Options Access Control Adding a Horizontal Line Add Files Forms Text Area Checkboxes Call to Action Button Properties and Layout Form Properties Working with Add-Ons Page 1
3 Free Add-Ons Open Hours Facebook Twitter Displaying YouTube Videos Embedding YouTube Videos Displaying Google Maps Purchased Add-Ons Online Store Market and Promote Appointment Scheduler Optimizing your Search Results (SEO) Introduction Adding Metadata Administration Panels Search Results Entry Viewing Site Statistics Page 2
4 Design and Navigation Page Design The look-and-feel and consistency of your website are two of the most important elements of building a reputable online presence. The design should resonate well to your target audience and should match your existing brand. The rich selection of designs and the variety of page layout options will help you to create a consistent and professional looking website with minimum efforts. Here are a few tips on how to select an appropriate design and page layout for your site: Choose a design that matches the purpose of your site and your target audience. If you web site statistics shows that most of your visitors never go deeper than your home page, there is a chance the design is not appealing to them. Select a design color that matches your established branding. Use a consistent page layout across all pages from your site. Use sections and page columns to structure your information in a visually appealing and readable manner. Page Header Images The page header images are usually the focal point of your page and most visitors use them to quickly figure out if they are on the right page, without reading the page content. Also the page image on the home page is integral part of your design and should be very carefully selected to communicate what your organization does. Your website comes with a large selection of hand-picked stock images, and you can also upload custom images or flash animations. You may also display rotating images or slideshows as page headers. Copyright The copyright statement in your footer helps promote your and related brands, trademarks, copyrights. The website copyright area may display both text and images and therefore may be used to display small banners, logos, or other related visuals. Domain Name The domain name is not just a reference to your website web address; it is a means of further establishing your brand in the mind of the customer. Domains which are easy to spell and memorize may be easily promoted, accessed and referred by word of mouth which helps growing your customer base.. Page 3
5 Favicon The favicon, or site icon, is a small image appearing next to your website URL in the browser address bar. The favicon is also displayed in the user Bookmark (also known as Favorites) menu. Publishing your Site in Two Steps Publishing your site using of the many available themes provides the basis for your online presence and in fact, you don t need to add any customization at all. However, customizing your site allows you to build and expand your brand recognition, while displaying your content in a way that is unique to your online presence. Website Name The first aspect of your brand is your company or website name. It doesn't necessarily have to imply the products you sell, but it does need to be short, catchy, and easy to remember. The website name is filed in the Site Title field in Site Properties and plays an important role for the Search engine optimization of your site. If no logo has been added, the Site Title will be used as logo as well. Logo and Tagline The logo can be a graphic symbol beside your company name or a stand-alone typographic trademark. Together with the tagline, the logo is used to visually identify your organization. Whether they are custom designed or created using the logo manager, the logo and tagline, the following suggestions are recommended: they should be unique and memorable should communicate as much as possible the idea of your business and any advantages you have before competitors should reside at the top left area of your page, since this is where most visitors expect to see them Creating your Site Building your site using one of the available themes is as easy as 1-Verify Information, 2-Select a Design, and 3-Publish. To Add a New Site: From the Portal, click Add New Site.. Page 4
6 The Welcome to Online Presence Builder page opens. Here, you will be guided through the two steps required to publish your site Website Information and Design Selection.. Page 5

7 Verifying your Website Information The Website Info section allows you update information such as address and contact. You will also have the opportunity to choose a name for your Website and select the appropriate category for your business. If you have a company logo, you can upload it here and during the design selection step, you can preview your logo as it fits within one of the themed designs. 1. In the Website Info screen, enter a name for your Website. 2. In the Website Category drop-down, select the category that best represents your business. Selecting a category will provide a relevant images and content specific to your vertical. 3. Verify and update your company information, if needed. 4. Click Next.. Page 6

8 Selecting a Design for your Website The Design Selection screen provides a series of themes to use and the options are based on the category selected in the Website Information screen. If you didn t select a category or you want to change it, you can click the Previous link at the bottom of the screen. Although there are only five themes displayed, you can click the Show More Themes link and the display window expands use the scroll bar to view all options. As the theme images are thumbnail sized images, you can hover a theme of interest to enlarge the view. 1. In the Select a Design screen, browse through the list of available themes. To see more options, click Show More Themes. 2. To enlarge the image, hover over the theme. 3. When you have chosen the theme that best suits your business, click the image. 4. Click Preview. Your Website will open in Edit mode. Here, you have the option of publishing your site with the content added through the theme or you can edit its content and images. The Content Elements section provides guidance on editing text and text links, adding tables and lists, or adding images and image galleries. The Social Media section provide guidance on adding links to your social media pages, such as Facebook, Twitter and YouTube.. Page 7

9 The Search Engine Optimization section provides guidance on how bring online traffic to your site and monitoring viewing statistics. Editing Content Elements Content Elements are additions that you can make to your existing site to enhance or promote ideas or products. There are some common elements such as text blocks and images; however, the editor provides many other element options, as well display options for many of these options. For example, you have some images that you want to publish on your site. With the editor, you can choose to display the images as a gallery or you can present them alongside some descriptive text. You can also add elements such as tables, lists, forms and maps Text and Images The Text and Image editor is used for adding and formatting page elements such as paragraph text, images, text links and HTML Snippets. The text and image editor provides a WSIWYG interface so that you can add content to your site and display your changes dynamically. You can add elements to your site by dragging the desired element from the left hand navigation window and dragging it onto the page. Blue rectangles will show, on mouse-over, all possible locations where the element may be added. When an element is added to your site, the Properties for that element will open on the right-hand side of the window. The Properties dialog provides options to further customize your addition. For example, the following Properties dialog opens for Text elements. Adding and Formatting Text Adding a text element to your site allows you to customize your site by adding content directly, or copy-paste from a document or web page.. Page 8


10 The editor includes all standard formatting options allowing you to further update the appearance of your text. Using this set of icons you can bold, italicize, underline or strike-through a given text piece. Each of these actions also has a keyboard shortcut you may use to facilitate your work - i.e. CTRL + B for bold, CTRL + I for italics. To Add a Text Element 1. From the left-hand navigation bar, click Elements. 2. Expand the Text and images menu. 3. Drag-and-drop the desired element onto the page. The cursor will default to the element you ve added and you can begin typing your content. 4. When complete, click outside of the text box. To Apply Text Formatting To add formatting: Select the word or phrase and click the desired format from the Text Properties dialog. When complete, click outside of the text box. Note : If you copy-paste content from an external source, its styles will automatically be converted to the ones available for your design to ensure a consistent look and feel Applying Styles Text Properties includes many style attributes that, when selected, apply to the paragraph rather than a selected word. The Style dropdown allows you to format your text with a number of pre-defined styles which have been carefully selected to match your website design. The alignment icons allow you to define the positioning of a given paragraph on the page. You can align it to the left, right, center and justify.. Page 9

11 lists. The list icons allow you to create numbered or bulleted The Cut / Copy and Paste icons allow you to easily move content within the text editor. Select the piece you want to cut or copy, click on the respective icon, then position your cursor on the place where you want to move the selected piece and click the Paste icon. You can also perform these functions using keyboard shortcuts. Highlight the desired content and use + X to Cut, + C to Copy, and + V to Paste. The Undo / Redo options allow you to undo or redo the last editing changes which have not yet been saved. Those can be found in the Top Menu bar. The Clear Formatting button strips-off any predefined formatting of a selected text and resets it to plain text. TO APPLY PARAGRAPH STYLES To apply a style, first select the text piece with your cursor, then click on the Style drop-down and select the desired option - e.g. Heading 1. When complete, click outside of the text box. Adding Images Using the Text and Image editor, you can illustrate your text content with images, creating visually attractive articles and presentation pages. To add an image go to Left Menu > Elements and drag-and-drop either Text or Image (if you will want some text to go along with your image) or only Image element. Once added, click on the default image and an Image upload panel will open on the right. TO UPLOAD AN IMAGE 1. From the left-hand navigation bar, click Elements.. Page 10
12 2. Expand the Text and images menu. 3. Drag-and-drop the image element onto the page. Note: Images can be uploaded using one of three methods. Drag & Drop images from local folders, or other web pages into the properties panel. Browse images from the local files on your computer by clicking inside the add image area. Add from URL for an image published on another site. Just copy the address of the image, paste it inside the URL field and click Add Image. Note: Images with a pound sign "#" or a questions mark "?" in their name can only be uploaded through Drag & Drop or URL. Or, switch to the Image Library tab and choose from an array of Stock images. Once you upload an image it will be automatically set to the system default size. Choose from 3 predefined image sizes: small (150px wide), medium (250px wide) and Actual, or define your own (Custom size). Even though an image may be resized, the system maintains the original image so it can be adjusted later. All resized images will appear with enhanced detail on a high resolution retina display. Clicking on an image will open the Image Properties panel to the right. You can change the selected image at any time by clicking on the Change button. Choose Edit and the image will open in an external editor where you apply basic image editing such as crop, flip, rotate, resize, and limited special effects. The Mouse-over caption field allows you to specify some description text related to the image that will appear when a user places their cursor over the image. The rollover captions also have a role for the proper search engine optimization of your website, so it is recommended to add them for key images on your pages. With the last default option, we can choose between three Image Alignment and Text Flow styles for each image. no wrapping left wrap right wrap. Page 11

13 Table and Lists Adding Sections (Tables) to your site is a great way to add structure and organization to your pages. You can create tables using either Columns or Rows as the basis for your layout. Selecting which table design to use is completely dependent on your personal style and the type of content you wish to display. If you re not happy with the layout you can always change the display through the Tabs, Collapsible Rows and Accordions will accommodate a large quantity of content in limited space, or use them to conceal information that belongs on the page, but doesn't need to be compared or viewed simultaneously with other content. You can Add Section Groups anywhere inside the main content area of your site. If you have split your page into several columns, you can also add sections in each of these columns. Section Groups To Add a Section Group, select Elements from the Left Menu, click on Layouts and select the desired Section Group. Drag and drop the element to the Blue rectangles who will appear to indicate the locations where a Section Group can be added.. Page 12


 will open upon the loading of the page Rows are open")
14 Columns are used for creating open, horizontally oriented content areas. Use these as intro sections including highlights from other pages in the site, for filling up space when your page content is scarce, or to make sections stand out more on the page. Tabs allow you to fit a lot of content in limited real estate. With tabbed section groups only one section (tab) may be open at a time. By default the first section (tab) will open upon the loading of the page Rows are open content sections stacked on top of each other in a vertical orientation.. Page 13


15 Collapsible Rows can collapse or expand with a nice animation effect. Specify which individual sections will be collapsed or expanded by default. Accordion will display one section at a time. When one section is opened, all others will automatically collapse with a nice animation effect. By default the first section is opened on load of the page. Vertical Tabs can be opened one at a time. By default the first section (tab) will open upon the loading of the page.. Page 14


16 Sections With the Section Group in place, you will see a predefined section in place. You can start editing the Section according to your needs by updating the Section Caption. Move your mouse pointer over the caption and click the wrench icon in the Side Menu. To add more sections to your Section Group just roll over it. Click on the another Section Options window will open where you can specify Caption. icon displayed on the right, and. Page 15
17 To edit your section group or a single section just roll over the section group / section in Admin mode and click the wrench icon displayed on top right Side Menu. In the Side Menu may also delete, select, copy, etc. your Section Groups or sections.. Page 16

18 Adding Images to your Gallery After you have added an Image Gallery, you may start adding Gallery Images in it. TO ADD A GALLERY IMAGE 1. Roll over the Image Gallery and click the icon on its top right. Green rectangles will denote the locations where an image may be added. Clicking a location will open the Add Image popup.. Page 17
19 2. To upload images locally, select File or Zip from the Source drop-down and then click Browse. Note: If you are adding multiple images, you can compress them into a zip file and upload them at one time. 3. To upload images from the Internet, select URL from the Source drop-down. 4. Enter a description for the image in the Image Caption field. You can choose the display for this text using the Show Caption settings in the Image Properties dialog. Note: If you select the Use image file name as caption checkbox, the file name will be used as a caption. This option is particularly useful when you upload a zip file with properly named images. Image Options Once you have uploaded your images, you can choose how an image will behaves in the site. You can set the following options: The Image Link drop-down allows you to choose what will happen if a visitor clicks on the image. The image can be set to open its enlarged version inside the Large Image Viewer, open a page within the site, or to open an external web page. The Custom Thumbnail option is used for adding specific versions of images which may be in a different resolution than the original. You can use this option only when uploading or editing individual images, and the size settings should be the same as those defined in the Gallery Options dialog. A Sub-gallery automatically creates a new page which can be accessed by clicking the image. If you have uploaded a ZIP file, the sub-gallery page will contain an auto-added Image Gallery with all the images from your archive. Otherwise the sub-gallery page will contain an empty Image Gallery, ready for edit.. Page 18

20 Buttons and Shapes Access Control The Access Control section allows you to define a password, a mailing list or a member group restriction for accessing originals. Only people who know the password or are members of this mailing list or this member group will be able to see the full-size original image. You can specify a password restriction, a restriction by mailing list, a restriction by member group or a combination of these three. This option is useful only if the Keep Original Image check box is checked in the Image Gallery Properties.. Page 19
21 Adding a Horizontal Line You can easily Add Horizontal Lines in the Text and Image Editor to break up content on a page. You can drag-and-drop the element from Left Menu > Elements > Layouts > Horizontal Line. Page 20
22 With the default settings you can change the Line Style and Ornament. Style - it can be Single Line, Double Line, Dotted Line, Dashed Line, Fading Lines and Custom lines. Here are a few examples: Ornament - you are able to select different pre-made ornaments for your Horizontal Lines, or enabling a custom caption text. You can find few of these options displayed below:. Page 21

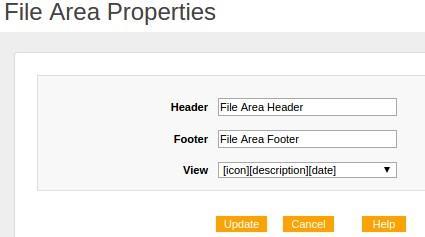
23 File Area File Areas allow you to add files to your site and define the appearance of your file links. TO ADD A FILE AREA: 1. Click Elements, and then expand Buttons & Shapes. 2. Drag-and-drop the File Area element. 3. Select a location and a default File Are element will be added on page. Blue rectangles highlight the locations where a File Area can be added. To view the File Area Properties, roll-over it and click the wheel icon. The Header and the Footer of a file area are the text displayed above and below the file area. In View dropdown you may select the information to be displayed for each file - the file icon, description, size, date and comment. You may also choose to display the files in columns, rather than one below the other. An option for large file icons is also available.. Page 22
24 . Page 23
25 Below is an example of file view: [icon] [description] [size] Add Files To add Files to a File Area roll over the File Area and click the Menu. The Add File popup will be displayed. displayed on bottom of Side In the Source field browse for any *file stored on your local disk. Depending on your file format, you may choose an Icon to be displayed for this file. The text entered as file Description and Comments will only be displayed if the File Area View includes description and comments. *Up to 120MB Except:.exe/.dll/.bat/.sys The file Access Control section displays the options for viewing the Permanent URL, and protection of the file by a common Password or Members Group.. Page 24
26 The Permanent File URL does not change, and is therefore, the ONLY URL that should be used when linking to this file. The Permanent File URL is visible to copy only after the file has been uploaded, and it becomes active once the page has been published. To get the Permanent URL of some file, roll-over the existing file and click the wheel top of Side Menu. Navigate to the Access Control area again and copy the URL. icon on Note: Moving a File Area changes the Permanent URL's of existing files. Be sure to update any references to the original URL's as they will stop working the next time the page where the File Area was originally located is Published. Forms You can add two types of web Forms that can help you interact with your site visitors or gather user information. The Form editor is very similar to the Text and Image editor.. Page 25


27 To add a Form to your website simply click Elements > Forms at the Left Menu and drag-anddrop the element on page. Blue rectangles will appear to indicate the locations where a form may be dropped. There are two ends in the Form editor - Layout and Form Properties. In the Layout you will configure the Form content and the Call To Action Button required for submitting the form. In the Form Properties section you will specify where the form is sent to. Layout - Types of fields, checkboxes and buttons. Page 26

28 1. Text Field. Page 27
29 The Text Field may be used in your form to type text which is fairly short, and does not need to be split in lines. Now click over the Text Field you have added and you will see a set of options displayed in the right pane of the Form editor. Type determines what information users should fill into this field. Text: the text users fill in will appear just as they typed it Password: the text will appear as **** so other users may not see it Hidden: can be used when you need to gather system-related information (like IP or browser used to submit the form) or add data which users should not see. A hidden field will not be visible on the page. File*: visitors can upload image, audio, video and other binary files to your site. When your site visitors submit to the form on your site you will receive an with the information and a clickable link to the "File" they uploaded. Name is used to identify the form field when you need to refer to it anywhere inside the form editor as well as in the entry generated by this form. That is why each form field should have a unique Name. The Width of the text box either by typing a different width number or by just dragging the resize controls of the field text box (the resize controls will appear when you click over the form field). Max Length is the maximum number of symbols this form field can accept. Your form may visually be very short, but it will accept as many symbols as you define in Max Length. Validate As field will let you define the type of content users are required to fill into this form field. If they don't fill in the proper content type - they won't be able to submit the form. E.g your form field may be validated to accept just content type . Thus if some user submits a form with incorrect address (like me@yahoo or meyahoo.com) on trying to submit of the form the user will see a notice to correct the . Most fields in the Form editor have Validate As option. Hint is the text that will appear next to the field when the visitor clicks inside it. You can enter instructions or examples of the content that needs to be entered. Default Value - This value will be pre-filled upon opening of the form and the visitor will be able to change it. The following special strings will be replaced with the corresponding values: $date - Date in format YYYY-MM-DD $date_time - Date and time in format YYYY-MM-DD HH:MM. Page 28

30 $browser_ver - Browser version and type of operating syste $referrer - The page the visitor came from (referrer page) $ip - Visitor's IP address *Files - In order to preserve the files sent via web form, the Form needs to be connected with a Database. Files that become part of the database will use the account storage and will remain accessible as long as they are in the Database. File links that are sent to an do not use account space and therefore will expire in 2 weeks. 2. Text Area The Text Area form field is similar to the text box field but can hold longer, multi-line text. Click over the Text Area field you have in the Form to see its customization options displayed to the right. The options Name, Width, Hint, Validate As and Default Value are identical to those of the Text Field. In addition, here we have:. Page 29

31 Height of the text area - you may change it either by changing the number in the height field or by dragging the text area size controls. Wrap - defines the wrapping of the submitted form field text when displayed in an or forum / blog. Choose Default value to have your browser and mail client (Outlook, etc) wrap the text according to their default settings. Set wrapping Off to disallow the wrapping of the text when it is typed. Choose Physical to display the text in the mail the way it was wrapped in the text area. Choose Virtual to allow the mail client to decide how exactly the text should be wrapped. 3. Checkboxes Checkboxes are used when there is a list of possible options and the user may select any number of choices from them. A stand-alone checkbox may also be used for a single option that. Page 30

32 the user may turn on or off. Checkboxes are available in the Form element found on the Left Menu > Forms. Select the element to see the customization options in the right panel. The checkboxes, just like all other form fields, have a Name which identifies the field in the form template editor as well as in the /blog entry generated by this form. You may consider the Name as the question your users will have to answer by checking or un-checking the checkboxes associated with it. The Value of the checkbox is the answer you will get on your question. I.e if you set the checkbox value to Yes when the users checked this checkbox this means they answered your question affirmatively. If you check the Selected by Default option, your checkbox form field will be initially checked when the users load your form. And finally, if you make a checkbox mandatory users will be required to check it before being able to submit the form. e.g if you want them to agree to your Terms and Conditions before they may submit the form - add an Agreement checkbox and make it Mandatory.. Page 31


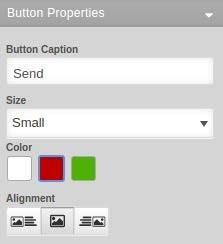
33 4. Call To Action button The Call To Action button is essential to the Form. Without it your users cannot submit the form and it cannot complete its actions. It is automatically added in both the Form and Contact Form elements found on the Left Menu > Elements > Forms. To make it a Call To Action button for sending a form, click on it and from the Link drop-down menu select {Submit Form}. You can create a Form {Reset} button using the same process. Use the editable field in the right panel to change the Caption text the button will display. Call to Action Button Properties and Layout Button Caption: Define the text that will be visible on the button. Size: Choose from three pre-defined button sized - small, medium, large. Color: Choose from three pre-defined colors for the button. Alignment: Specify the button alignment inside the content - left, centered, right.. Page 32
34 . Page 33
 or leave empty. 2.")
35 Form Properties Access the Form Properties by clicking on the Form Settings button on the Right properties l. 1. Next Page: define which page from your site should open after successful submission of the form (it may be a 'Thank You' page for example) or leave empty. 2. Send to To send the content of your form to your use the Send to feature. To Specify the address To which submitted forms should be addressed. We can display customer submitted details by applying $xxxxx$ wildcards for the special values of the corresponding Form Field Name. From Specify the address From which the form will be sent. This can be your own specific address, or we can display customer submitted details by applying $xxxxx$ wildcards for the special values of the corresponding Form Field Name.. Page 34
36 Mail Subject: of the that will be received on submission of the form (like New Information Request). We can display customer submitted details by applying $xxxxx$ wildcards for the special values of the corresponding Form Field Name. Working with Add-Ons Add-ons are plugins that allow you to take your business to the next level. They can help you save time, increase visitor engagement, generate revenue directly from your Online Presence and more! You can activate any of the available Add-Ons, and once activated, they are available under your My Add-Ons section. You can then drag-and-drop the activated Add-On to your site in the same manner as other site elements. Your Online Presence Builder offers two types of Add-Ons: Free and Purchased. For more information, see the Free Add-Ons or Purchased Add-Ons section. TO ACTIVATE AN ADD-ON: 1. Click Add-Ons from the left-hand navigation. 2. Select an Add-On and click Learn More. 3. Click Activate. Free Add-Ons Free Add-Ons can enhance your site by providing important information, such as your business hours, a google map to your location or social media integration. The following Free Add-ons are available: Open Hours Contact Info Facebook Twitter Displaying YouTube Videos Displaying Google Maps. Page 35
37 Open Hours Open Hours allows you to simply setup and display your business open hours on any page of your site. You can select the hours for each day of the week and even use the time split in case your business has a lunch-break. Different display options allow you to control how your visitors will see your open hours. To add the application, make sure it is installed from Left Menu > Add-Ons. Once installed, it can be dragged and dropped on page from Left Menu > Business Info section.. Page 36

38 Once added on page, you can set up the following options: 1. Open Hours days - choose which days to show up as working days 2. Working hours - times at which the business is open 3. Time Split - add time split to selected days - use this option when your business is operating in two different working hours during the selected day. The Open Hours Display Options provide the following options: 1. Week View / Day View - if you want to show the whole working week or only todays' working hours. 2. Make the Days of the week in bold for easier distinction between days/hours. 3. Show Current State - display additional information next to the current day: Open Now - in green text color Closed Now - in red text color Closing Soon - in yellow text color and displayed 30 min before closing Opening Soon - in yellow text color and displayed this 30 min before opening Facebook Facebook Social plugins let you see what your friends have liked, commented on or shared on sites across the web.. Page 37


39 Once you've installed the application it can be applied to any page from the Add-Ons tab on the Left Menu. Like Button The Like Button lets a user share your content with friends on Facebook. When the user clicks the Like button on your site, a story appears in the user's friends' News Feed with a link back to your website. Use this plugin to let your readers help you drive traffic to your website. Send Button. Page 38


40 The Send Button allows users to easily send content to their friends. People will have the option to send your URL in a message to their Facebook friends, to the group wall of one of their Facebook groups, and as an to any address. While the Like Button allows users to share content with all of their friends, the Send Button allows them to send a private message to just a few friends. Use this plugin to let your readers help you drive traffic to your website. Page Plugin With the Page plugin, you can embed components of your Facebook Page right onto your website. Comments Comments Box is a social plugin that enables users to comment on your site using their Facebook profile. Users can post comments also to their wall, so their friends can see what they have commented. Features include moderation tools and distribution. Use this to plugin add Facebook comments to your site. Use this to add Facebook comments to your site. Follow Button. Page 39

41 The Follow button lets a user follow your public updates on Facebook and allows people to subscribe to other Facebook users directly from your site (used to be called the "Subscribe Button"). Use this to let your users follow your public updates on Facebook. Twitter 1. Select your Timeline Source and set the options. You can embed a timeline for Tweets from an individual user, a user's favorites, Twitter lists, or any search query or hashtag. User: You may create an embedded timeline for any public Twitter user Favorites: Like the user timeline, a favorites timeline may be created for any public Twitter user, and displays that user's favorited Tweets. List: The list timeline shows Tweets from a specific list of users. The header of the list widget contains the list name, description, and links to the list creator's profile. Retweets by members of the list are included in the timeline. To create a list timeline you must have either created that list yourself, or subscribe to it. Search and #hashtag: You may create a search timeline for any query or #hashtag. Searches for a single #hashtag feature a simplified header section, and a Tweet #hashtag Tweet box in the footer so that visitors can easily contribute to the conversation directly from your page. Clicking on the #hashtag in the header will open twitter.com search page for that #hashtag. You may also choose to enable safe mode, which will exclude Tweets with common profanity and those marked possibly sensitive from appearing on your website. 2. Click Save changes. 3. Copy & Paste the code into an HTML Snippet on your page. For more information on the Twitter Embedded Timeline widget, please read their developer documentation.. Page 40

42 Displaying YouTube Videos YouTube is a video-sharing website which allows users to upload, view, and share videos, and it makes use of Adobe Flash Video and HTML5 technology to display a wide variety of usergenerated and corporate media video. Use YouTube on your website to: Show customers a video of your products and services Let the world sample a preview of your band's gig Show your friends a memorable experience in your personal site The built-in YouTube Application makes it easy to add this feature to your pages. Just go to Left Menu > Elements > Gallery and drag-and-drop the YouTube application into your site. A blue area on the page will show you the available position to apply the element on page. Once added on page, click inside the element to show the preference panel and set up your YouTube video: 1. In the top text field you can enter directly your YouTube video URL or Search by keyword to browse videos. If you chose to search a keyword - enter the word in the text field and press on the blue "search" button that will appear. Results will be displayed beneath the search window and you can select a video by clicking on it. To save your choice - click outside of the application menu.. Page 41
. 4. You can choose page alignment for the video on page - Left, Center, Right. 5.")

43 2. Choose from three predefined video sizes - Small, Medium and Large. 3. If you don't want to use the default video size, you can set custom dimensions. Simply check the Custom Size checkbox and enter Width and Height (in pixels). 4. You can choose page alignment for the video on page - Left, Center, Right. 5. From the three check-boxes you can choose: Autostart - should your video play automatically once the page is loaded Loop - should your video play repeatedly Show Player Controls - should the built-in YouTube controls be visible Note: YouTube application cannot be added inside a Text and Image element. It is only designed to be added as an individual element. When used in combination with the Section Group you can get very similar layout as if you use Tables inside the Text and Image element.. Page 42

44 Embedding YouTube Videos It is easy to add video files in the Text and Image editor on any page of your site. However, the videos added this way, will not stream - and your site visitors may need to wait until the whole video loads before viewing. Video streaming, on the other hand, allows you to watch a video while it is being delivered by the video provider. To add streaming videos to your site you may host your videos with Youtube, and then integrate those videos on your web page using the HTML Snippet. TO DISPLAY YOUTUBE VIDEO: To start uploading videos with YouTube, sign in to your account or create one. You may also sign in with your Google account. Then, follow these steps to upload videos and integrate them in your site: 1. Click the Upload button in the upper-right corner of any YouTube page. 2. Browse for a video on your computer. Make sure your file is up to 1GB, up to 10 minutes long and its format is supported by YouTube.. Page 43
45 3. Click the Upload Video button to start the upload process or just drag and drop the video file in the designated area. 4. After the video is uploaded, enter title, description, tags, and category for it. The more information you provide, the easier it is for others to find your video. 5. Click the Save changes button to save the updates you've made to the video file.. Page 44


46 TO DISPLAY THE VIDEO IN YOUR WEBSITE: 1. Go to the page with your video and copy the code from the Embed box. Click the Share button. Click the Embed button. Check Use old embed code. Copy the code. 2. Add an HTML Snippet at the location where your YouTube video should appear and paste the code into the snippet box.. Page 45
47 The video will appear on your page like this: To disallow the embedding of your videos on other websites, follow the steps below: 1. From your YouTube account, click the My Uploaded Videos link. 2. Click the Edit Video Info button to the right of your video. 3. Under Sharing Options select No, external sites may NOT embed and play this video. Displaying Google Maps Google Maps offers powerful, user-friendly mapping technology and local business information -- including locations, contact information, and driving directions.. Page 46

48 Use Google map on your website to: Show customers your office location Let the world know where your band's next gig is Inform friends of your new address in your blog The built-in Google Map Application makes it easy to add this feature to your pages. Just click on AddOns on the Left Menu, click + Applications and add the Google Maps Application to your account. Once you've done this, the application will appear in the Add-Ons menu. The Google Maps element is added to a page in the same manner as any other content element. Simply drag-and-drop the Google Maps from the Add-Ons tab and place it on a blue area of the page to apply the map wherever you want it to appear. You can add a description directly and adjust the size and alignment of the map in the options panel that shows to the right. TO ADD A LOCATION: 4. Type in the Address or City or Country. 5. Click the Search button. OR 1. Move the map with the mouse to the desired location. 2. Click on the location.. Page 47

49 Note: Google Maps cannot be added inside a Text and Image editor. It is only designed to be added as an individual element. When used in combination with the Section Group you can get very similar layout as if you use Tables inside the Text and Image editor. Purchased Add-Ons Purchased Add-Ons provide advanced options to further enhance your site and increase visitor engagement. With these Add-Ons, you can create and configure your online store, generate and promote local promotions through daily deals and gift certificates or create and configure an online appointment scheduler. To activate purchased Add-Ons, you can apply Booster points purchased with your plan. Your Booster point information is displayed in the top-right section of Add-Ons. If you have reached your point limit and would like to purchase additional points, a Add Enough Booster Points tile will be displayed rather than an Activate tile.. Page 48


50 TO GET MORE BOOSTER POINTS: 1. From selected Add-on, click Add Enough Booster Points. 2. Review the purchase order. The required amount should auto-populate, based on your selected Add-On. 3. Click Confirm Order. You updated points balance is displayed and you can now activate your Add- On. This section describes the features for the following Add-ons: Online Store. Page 49

51 Local Promotions Appointment Scheduler Online Store Sell Online is a shopping cart, which can be added to your site with just a few steps. With a few clicks, your online store appears on your page and you can begin to add purchasable items. Your customers will enjoy the convenience of checking out securely right from your site, without being redirected elsewhere. We rely on secure Web Services to store all data. These Services are reliable, secure and cost effective. Installing your Online Store You can add your Online Store through the Add-Ons list in the left-hand navigation. Once your store is added, we will walk you through adding your products, verifying currency and location, setting up shipping options and setting up your payment options. Once your store has been set up, you will have the option of sharing your new store on Social Media. TO ACTIVATE YOUR ONLINE STORE : 4. From the left-hand navigation, select Add-ons, and then click Online Store. 5. Click Activate for the Sell Option that best suits your business' needs.. Page 50

52 Sell 12: multi-device display, real-time shipping estimates, unlimited image gallery, multicurrency support, shipping and tax support and order history Sell 100: all of the features from Sell 12 plus a favorites/wish list, e-goods option, realtime shipment tracking, discount coupons and promotions, Social Media integration, customizable notifications, and unfinished order tracking Sell 1000: all of the features in Sell 100 plus handling fees, volume discounts and multitier pricing, additional platform integration and min/max order amount levels Setting up your Store Once you've added the store to your site, a wizard opens, which walks you through adding your products and setting payment and shipment options. 1. Click Let's set up your store.. Page 51

53 2. Start building your product catalog.. Page 52

54 Enter a product name. Enter the price for this product Click Product Image and upload a photo for your item. If you have more products to add, click Add more. When you've uploaded your product images and prices, click Save. Note: When your store is added, it displays a demo catalog. Once you have added your own Products, you can delete the demo catalog 3. Review your geographical information, such as Country, currency and weight settings. You will also add company information here.. Page 53

55 To change these settings, click Edit. If the settings are accurate, click Proceed to next step. Update your company information. This information is used for billing, notifications and for calculating shipping costs. Click Save. 4. Set up Shipping Information.. Page 54

56 If your store is selling physical products, click Set up shipping. You can enable any of the courier-set rates or you can set a custom flat rate. 5. Set up payment options.. Page 55
57 To allow your store to accept PayPal, enter your PayPal address and click Enable PayPal. Congratulations, you have successfully opened your Online Store. You can now share your store on Social Media sites. Market and Promote The Market and Promote plugin allows you to sell Gift Certificates for products and services, and offer Daily Deals for products and services directly from your website. Payments are added to your PayPal account.. Page 56
58 You can activate the plugin from the Add-Ons tile in the left-hand navigation. The Gift Certificates and Daily Deals elements are available under My Add-Ons once activated. For additional configuration options, you can hover over the Gift Certificates/Daily Deal icon and click on the settings (cogwheel) icon. TO ADD A GIFT CERTIFICATE: 1. Click My Add-Ons from the left-hand navigation, and then drag-and-drop the element. 2. Define up to 5 pre-set amounts for gift certificate, a description and fine print if needed. 3. Add a certificate with a custom amount. The custom gift certificate appears with an empty field on the page, where users can insert any amount within the minimum-maximum price range. 4. Add service-based certificates and define the services offered with a certificate. Currency can be changed from Payment Information at the bottom of the screen. The Currency drop-down lets you select from 24 currencies from around the world. Insert the PayPal account to be used for payments.. Page 57
59 Branding you can choose to add a Company Name on the certificate and an image of a logo - either the Site Logo or a Custom Logo. Custom Logo gives you the opportunity to upload a local file or use URL of a logo image. Services tab appears once you check Service-based certificates in Options. Add a service with a name, description, duration, price in currency (currency is selected from Options tab > Payment Information). Rollover an existing service to edit its properties, or delete it from the delete button. Make sure to check the Active check box to make the service available. This is how the Gift Certificate will be displayed on page. To edit the certificate click on cogwheel icon: TO ADD A DEAL. Page 58

60 1. Click on My Add-Ons and then drag-and-drop the element. 2. Insert a title for your custom deal with custom price and value. The Price is what your customer pays, the Value is the value of services he is entitled to receive. Set an expiration for the Daily Deal. 3. Add Details and Fine Print if needed. Payment Information at the bottom asks you to select the PayPal account for payments, and to choose from 24 currencies from the Currency drop-down. Setting the expiration date and time of the Daily Deal adds a counter on the page.. Page 59

61 Check Service based Deal to activate the Services tab. The Services tab contains the services already used for your service-based Gift Certificates, and let s add more services. Make sure to check Active next to a service you want to offer. You can use two stock options for image for the Buy Now button - with square corners and with rounded corners, or you upload a custom image. Add a caption and / or choose from no icon and three stock icons options. Options for Branding include the adding of a Company Name and a Logo. The Logo can be your Site Logo, or a Custom logo with local file or URL of an image. To manage your Gift Certificates and Daily Deals, go to Left Menu > My Add-Ons, hover over the Gift Certificates / Daily Deal icon and click on the cogwheel button. Dashboard displays statistics for Gift certificates and Deals this month - amount of sold, redeemed. The option to display can give you a graphic for Gift Certificates or Deals only. You. Page 60
62 can search by ID. The ID is assigned as soon as a customer selects, generates and purchases a deal / certificate. You can find the IDs in Recent Activity on the Dashboard, and in Manage tab. Recent Activity lists sold items, and contains a link to a preview of the item. In Manage tab, the deals and certificates are arranged by purchase date. The tab lists title of the item, its recipient and balance. Rollover an item to see the options to redeem, edit, print, resend or delete. View Options button allows you to filter by deals, certificates, by deleted deals and certificates, and by fully redeemed certificates and deals. You have a search option. On page, the Gift Certificates appear listed with checkboxes for your customers to select. A Buy Now button opens the options to enter the customer's name and address as well as the name and of the recipient. Your customers can select from 3 stock certificate designs. An optional message can be included. Once the required information is inserted, your clients can choose to Preview the certificate, Proceed to Payment or select to Buy in Store. Note: The design style of the added Gift Certificate list on the page follows the design style of your site.. Page 61

63 Daily Deal on page appears with a Buy Now button you can customize by clicking on the cogwheel icon. The font and design style follows the font and design style of the site. Your customers can choose to buy with simply entering a name and address, or they can buy the deal as a gift. The link 'Buy as a Gift' gives the option to create a gift certificate out of the deal. As with Gift Certificates, customers can Proceed to Payment or choose to Buy in Store. The counter underneath shows time remaining until the Daily Deal expires. Appointment Scheduler The Appointment Scheduler application allows your customers to conveniently book appointments 24/7 directly from your website. Once they submit their contact information the appointment slot is considered booked. Before activating your Appointment Scheduler, compare and select the option that best suits your business needs. You can choose the 1-Staff Member or the Unlimited Staff Member Scheduler. Choosing the Unlimited Staff Scheduler allows your customers to view calendars and book appointments based on staff availability.. Page 62

64 Feature Comparison Table TO ACTIVATE YOUR APPOINTMENT SCHEDULER :. Page 63

65 1. From the left-hand menu, click My Add-Ons. 2. Click Learn More. 3. Activate the Appointment Scheduler that best suits your business needs. 4. Click Confirm. Once installed, you can add the application to your site from My Add-Ons section. Optimizing your Search Results (SEO) Introduction It is often assumed that to create an online presence for your business, art or personal project, it's sufficient to put up a nice-looking, content-rich website. However, if no visitors come to your site all efforts, time and money spent on it will be in vain. Considering that a great part of your traffic may come from search engines, we have outlined the most important tips to help you make your site easily discoverable on the web.. Page 64
66 This tutorial is focused on optimizing your site for organic search results. Maximizing the visibility of your website in organic search results is a continuous process which requires significant involvement and may not bring overnight results. If you need instant results, and have allocated a budget for this, you may want to consider some of the paid search results placement alternatives (such as Google Adwords, adbrite, Microsoft adcenter). Organic search engine optimization is about understanding which elements search engines look for on a page to help determine its relevance to a given search term and making your pages easily discoverable by these elements for the search terms that relate most closely to your content. Search engines store information about an enormous amount of pages they find on the web. The pages are retrieved by spiders (crawlers) and are then analyzed to see what information is worth indexing (storing). Usually this information is extracted from the titles, headings, the first paragraphs of text content and the meta tags. When you run a search query into a search engine, it displays the best matching pages from the indexed ones, based on a specific page ranking criteria. Different search engines use their own methods of indexing and ranking web pages. Most of them, though, rank web pages based on: 1. Website popularity 2. Quality of the website copy 3. Technical information like meta tags, robots and sitemap files Adding Metadata Along with your page content, search engines also go through a number of meta tags to find information for your site. Improving them may significantly increase your page rank. 1. Site Title. The site title is the first and most visible information displayed for each search result entry, and therefore should describe precisely and concisely what the site is about. Tips on creating a good site title: Include some of the keywords you already identified. Limit the title to 5-8 words (the text after that will be cut). Try to remove all unnecessary words like 'and', 'the', 'a', etc. Do not repeat keywords. To change the site title, click Control Panel option on top right in your website Admin and select Site Properties.. Page 65
67 2. Keywords. Keywords inserted in the meta tag area of your site do not play such an important role as they used to. However, some search engines still use this meta info when indexing web pages. Review the keyword list compiled above and follow these rules to pick keywords for each page: Use various keywords. For each page choose keywords that directly relate to the page content. The more important keywords should be filed first. You may enter the keywords for each page inside Page Options administration panel. Site keywords are defined in Site Properties administration panel. If no page keywords are defined - the page will use the site keywords. 3. Description. The description is usually a one-sentence summary of what your site or page is about. The description should be compact (30-40 words) and informative. If the page has no description, the site description will be displayed as page description. If no site description is provided, the search engine will display as description part of your website content. To add description to your pages and site, use the Page Options and Site Properties administration panels.. Page 66

68 Administration Panels. Page 67

69 Search Results Entry Viewing Site Statistics Google Analytics (GA) is a powerful statistics tool providing general and segmented data for your website visitors. With GA, you can obtain information ranging from the total unique hits per page and the number of new vs old visitors to top keywords per page and the success of your goals. All this information may be analyzed and used to improve your website content and content structure, to adjust your marketing activities and eventually drive more and higherquality traffic to your site. In order to integrate GA into your site, follow the steps below: 1. Sign up for GA with your Google Account. If you don't have a Google account, create one by choosing the Sign Up Now link.. Page 68

70 2. On signing in at GA, you'll be prompted to provide the following General Information: Website URL - insert here the domain of your site Account Name - the website name displayed in your Google Analytics reports and dashboard. Page 69

71 In Contact Information list your name and location. In the next step check the confirmation box to agree with the terms and conditions, and then press Create Account button. 3. You'll be directed to the Add Tracking step. You DO NOT need to copy this snippet. Click Save & Finish and you will be directed back to the Overview of your account. From your account Overview, you will be able to view the Web property ID for the site (highlighted in Red). Copy this Web property ID to add to your site.. Page 70

72 Add the Web property ID to your website following these steps: Login to your site and access Control Panel > Site Properties In Site Properties, scroll down to Special Features and click Show Options Choose Google Analytics from the Site Statistics dropdown menu Paste the Web property ID into its field and click Update You will now be able to access and login to your Google Analytics account through your Control Panel > Site Statistics.. Page 71
73 4. Inside your GA account, under the Status column you will see the verification status of your site - it will appear as Unknown ( ) until GA has detected the tracking code you placed on your site. Within 24h the tracking code should be detected and your Status column should display Receiving Data ( ).. Page 72

74 All hits to your website are now displayed inside your GA interface. You may access the complete statistics report in dashboard view by selecting your website from View Reports dropdown.. Page 73
APPLICATION USER GUIDE
 APPLICATION USER GUIDE Application: Online Presence Builder Version: 2.2 Description: This document outlines how to use the Online Presence Builder to publish a content-filled site quickly, add your brand,
Creating an with Constant Contact. A step-by-step guide
 Creating an Email with Constant Contact A step-by-step guide About this Manual Once your Constant Contact account is established, use this manual as a guide to help you create your email campaign Here
While editing a page, a menu bar will appear at the top with the following options:
 Page Editor ===> Page Editor How Can I Use the Page Editor? The Page Editor will be your primary way of editing your website. Page Editor Basics While editing a page, you will see that hovering your mouse
Creating an with Constant Contact. A step-by-step guide
 Creating an Email with Constant Contact A step-by-step guide About this Manual Once your Constant Contact account is established, use this manual as a guide to help you create your email campaign Here
NETZONE CMS User Guide Copyright Tomahawk
 NETZONE CMS User Guide Copyright 2015. Tomahawk 1 Phone: + 64 9 522 2333 Email: getintouch@tomahawk.co.nz Tomahawk 2015 www.tomahawk.co.nz 2 NETZONE CMS USER GUIDE WHAT YOU LL FIND INSIDE LOGGING IN 4
A Guide to Using WordPress + RAVEN5. v 1.4 Updated May 25, 2018
 + v 1.4 Updated May 25, 2018 Table of Contents 1. Introduction...................................................................................3 2. Logging In.....................................................................................4
Lava New Media s CMS. Documentation Page 1
 Lava New Media s CMS Documentation 5.12.2010 Page 1 Table of Contents Logging On to the Content Management System 3 Introduction to the CMS 3 What is the page tree? 4 Editing Web Pages 5 How to use the
TEACHER PAGES USER MANUAL CHAPTER 6 SHARPSCHOOL. For more information, please visit: Chapter 6 Teacher Pages
 SHARPSCHOOL USER MANUAL CHAPTER 6 TEACHER PAGES For more information, please visit: www.customernet.sharpschool.com 0 TABLE OF CONTENTS 1. 2. 3. 4. 5. 6. 7. 8. 9. 10. 11. INTRODUCTION... 1 I. TEACHER PAGE
Swiiit User Guide 09/11/2016
 Swiiit User Guide 09/11/2016 Contents Getting Started... 4 Overview of Main Tools... 5 Webpages... 6 Main pages (Sections)... 6 Rearrange Sections... 6 Subpages... 7 Change the Title of a Webpage... 8
Event Scheduling System 4.0 User Guide
 This document was produced by Voloper Creations Inc. 2000 2009 Voloper Creations Inc. All Rights Reserved Brands or product names are trademarks or registered trademarks of their respective holders. The
How to Edit Your Website
 How to Edit Your Website A guide to using your Content Management System Overview 2 Accessing the CMS 2 Choosing Your Language 2 Resetting Your Password 3 Sites 4 Favorites 4 Pages 5 Creating Pages 5 Managing
Logging Into Your Site
 This training document is meant as a step-by-step guide to creating and delivering a UW-Madison site in the current UW-Madison theme. In this training class, you will learn how to log in to access your
Website Publishing Tool Manual
 Customer Support Website Publishing Tool Manual This is a designed as a definitive guide to all the features and tools available within Website Publishing Tool. Contents Introduction... 4 Adding Content...
Contact at Once Widget..5. Contact Us Widget...5 Contact Info Widget. 6 Dealership Contacts Widget. 6
 Table of Contents Flexible Design Overview. 3 Selecting the Flex Design. 3 Widget Overview. 4 Configuring Widgets..5 Contact at Once Widget..5 Contact Us Widget...5 Contact Info Widget. 6 Dealership Contacts
This document contains information that will help you to create and send graphically-rich and compelling HTML s through the Create Wizard.
 This document contains information that will help you to create and send graphically-rich and compelling HTML emails through the Create Email Wizard. or warranty by AT&T and is subject to change. 1 Contents
How to Edit Your Website
 How to Edit Your Website A guide to using your Content Management System Overview 2 Accessing the CMS 2 Choosing Your Language 2 Resetting Your Password 3 Sites 4 Favorites 4 Pages 5 Creating Pages 5 Managing
Website Training Part 2. Administration of the Website
 Rotary Websites: Websites Club, Website Training Part 2 Administration of the Website Club Admin To login first click here Enter your username and password and then click Log In If you have forgotten your
WEBSITE INSTRUCTIONS. Table of Contents
 WEBSITE INSTRUCTIONS Table of Contents 1. How to edit your website 2. Kigo Plugin 2.1. Initial Setup 2.2. Data sync 2.3. General 2.4. Property & Search Settings 2.5. Slideshow 2.6. Take me live 2.7. Advanced
Creating a Website with Wordpress
 Creating a Website with Wordpress Wordpress Fundamentals Version 1.6 Fayette County Public Schools June 28, 2013 Sow-Foong Hedman Technology Web Team Contents What is Wordpress?... 4 Overview... 4 Key
CREATING AN OUTSTANDING WEBSITE FOR EVERY BUSINESS
 CREATING AN OUTSTANDING WEBSITE FOR EVERY BUSINESS 1.1 Design When designing and building a website today, it s essential for businesses to think about how users will access their website. Research undertaken
Swiiit User Guide 03/09/2015
 Swiiit User Guide 03/09/2015 Contents Getting Started... 4 Overview of Main Tools... 5 Webpages... 6 Main pages (Sections)... 6 Rearrange Sections... 6 Subpages... 7 Change the Title of a Webpage... 8
Administrative Training Mura CMS Version 5.6
 Administrative Training Mura CMS Version 5.6 Published: March 9, 2012 Table of Contents Mura CMS Overview! 6 Dashboard!... 6 Site Manager!... 6 Drafts!... 6 Components!... 6 Categories!... 6 Content Collections:
EventsNow. Getting Started Guide
 EventsNow Getting Started Guide Contents Creating Your First Event... 3 Name Your Event... 3 Add an Event Contact... 3 Add Event Details... 5 Upload Your Logo/Image... 6 Add Tickets... 6 Add Donations...
KW Website: Getting Started Workshop Facilitator Guide
 KW Website: Getting Started Workshop Facilitator Guide Table of Contents WORKSHOP OVERVIEW... 4 WORKSHOP ACTIVITIES... 4 GET READY FOR THE WORKSHOP... 5 Instructor will need:... 5 Each participant will
APPLICATION USER GUIDE. Application: EasySiteWizard PRO Version: 8.7
 APPLICATION USER GUIDE Application: EasySiteWizard PRO Version: 8.7 EasySiteWizard Professional allows you to create a completely customized website in a few simple steps. There are several creative and
Contents. Page Builder Pro Manual
 PRISM Contents 1. Website/Pages/Stripes/Items/Elements... 2 2. Click & Edit, Mix & Match (Drag & Drop)... 3 3. Adding a Stripe... 4 4. Managing Stripes... 5 5. Adding a Page... 7 6. Managing Pages and
WEBSITE INSTRUCTIONS
 Table of Contents WEBSITE INSTRUCTIONS 1. How to edit your website 2. Kigo Plugin 2.1. Initial Setup 2.2. Data sync 2.3. General 2.4. Property & Search Settings 2.5. Slideshow 2.6. Take me live 2.7. Advanced
Digication eportfolio Student s Guide (Last update: 8/2017)
") Digication eportfolio Student s Guide (Last update: 8/2017) 2 Table of Contents Introduction... 1 Creating Your eportfolio... 3 Editing Your eportfolio... 4 Area 1: Top Menu Bar... 6 Area 2: The Main Tabs...
Digication eportfolio Student s Guide (Last update: 8/2017) 2 Table of Contents Introduction... 1 Creating Your eportfolio... 3 Editing Your eportfolio... 4 Area 1: Top Menu Bar... 6 Area 2: The Main Tabs...
Oracle Eloqua s User Guide
 http://docs.oracle.com Oracle Eloqua Emails User Guide 2017 Oracle Corporation. All rights reserved 08-Dec-2017 Contents 1 Emails Overview 6 2 Examples of emails 7 3 Creating emails 19 4 Email authoring
User Guide. Chapter 6. Teacher Pages
 User Guide Chapter 6 s Table of Contents Introduction... 5 Tips for s... 6 Pitfalls... 7 Key Information... 8 I. How to add a... 8 II. How to Edit... 10 SharpSchool s WYSIWYG Editor... 11 Publish a...
2013, Active Commerce 1
 2013, Active Commerce 1 2013, Active Commerce 2 Active Commerce User Guide Terminology / Interface Login Adding Media to the Media Library Uploading an Item to the Media Library Editing the Media Meta
Basic CMS User Guide
 "We create exceptional business solutions for cash-pay healthcare professionals that enable them to realize their full potential." Basic CMS User Guide Version 1.2 3/28/2012 1 Table of Contents Table of
Getting Started Guide. Last updated: 10/2010
 Getting Started Guide Last updated: 10/2010 Contents Creating Your First Event...3 Name Your Event... 3 Add an Event Contact... 3 Add Event Details... 4 Upload Your Logo/Image... 5 Add Tickets... 5 Add
A new clients guide to: Activating a new Studio 3.0 Account Creating a Photo Album Starting a Project Submitting a Project Publishing Tips
 Getting Started With Heritage Makers A Guide to the Heritage Studio 3.0 Drag and Drop Publishing System presented by Heritage Makers A new clients guide to: Activating a new Studio 3.0 Account Creating
Classroom Blogging. Training wiki:
 Classroom Blogging Training wiki: http://technologyintegrationshthornt.pbworks.com/create-a-blog 1. Create a Google Account Navigate to http://www.google.com and sign up for a Google account. o Use your
A PRACTICAL GUIDE TO USING WIX TO BUILD A WEBSITE
 A PRACTICAL GUIDE TO USING WIX TO BUILD A WEBSITE AN AID TO ENABLE STUDENTS TO UNDERSTAND THE FUNDAMENTELS OF WEBSITE DESIGN WITHIN THE FRAMEWORK OF A WEBSITE PROJECT USING WEB DESIGN TOOLS YANNIS STEPHANOU
Modular: Shopify Theme
 Modular: Shopify Theme Table of Contents Introduction 2 Top Bar 2 Header/Branding 3 Main Navigation 3 Backgrounds 4 Global Colors 4 Fonts 4 Home Slideshow 5 Home 6 Collection Pages 6 Product Pages 7 Blog
- 1 - USER MANUAL FOR ONLINE WEBSITE BUILDER. Version 21.x All rights reserved Page 1 of 64
 - 1 - USER MANUAL FOR ONLINE WEBSITE BUILDER Version 21.x Copyright @ 2018. All rights reserved Page 1 of 64 - 2 - Table of Contents 1. LOGIN 2. QUICKSTART WIZARD 2.1 Choosing the design Category for creating
Do It Yourself Website Editing Training Guide
 Do It Yourself Website Editing Training Guide Version 3.0 Copyright 2000-2011 Sesame Communications. All Rights Reserved. Table of Contents DIY Overview 3 What pages are editable using the DIY Editing
GETTING STARTED... 2 PLANNING... 2 BACK UP YOUR WEBSITE... 3 REFRESHING YOUR WEBSITE...
 Contents GETTING STARTED... 2 PLANNING... 2 BACK UP YOUR WEBSITE... 3 REFRESHING YOUR WEBSITE... 3 SETUP YOUR NEW ONLINE PRESENCE SITE... 3 CUSTOMIZING YOUR ONLINE PRESENCE SITE... 7 PREVIEWING YOUR WEBSITE...
LizardThemes.com Free & Premium WordPress Themes. LizardThemes. User Guide. First Edition
 LizardThemes.com Free & Premium WordPress Themes LizardThemes User Guide First Edition Online version: http://lizardthemes.com/documentation/ 2013 Contents Chapter 1 How to start... 3 Chapter 2 Theme Settings...
WPI Project Center WordPress Manual For Editors
 WPI Project Center WordPress Manual For Editors April 17, 2015 Table of Contents Who should use this manual... 3 Signing into WordPress... 3 The WordPress Dashboard and Left-Hand Navigation Menu... 4 Adding
Use this guide to help you rebuild your existing EasySite Wizard website in Online Presence Builder
 Transition Guide from EasySite Wizard to Online Presence Builder Use this guide to help you rebuild your existing EasySite Wizard website in Online Presence Builder 1 Contents Getting Started... 3 Planning...
The Gardens Trust WordPress Manual. thegardenstrust.org. Page: 1
 The Gardens Trust WordPress Manual thegardenstrust.org Page: 1 Login Before you can make any changes to the site, you will need to log in. The login of the site is found at the following URL - http://thegardenstrust.org/wp-admin.
WordPress Manual For Massachusetts Academy of Math and Science
 WordPress Manual For Massachusetts Academy of Math and Science September 19, 2017 Table of Contents Who should use this manual... 4 Signing into WordPress... 4 The WordPress Dashboard and Left-Hand Navigation
Your Cart User Manual v3.6
 Your Cart User Manual v3.6 2 Your Cart User Manual v3.6 Table of Contents Foreword 0 7 Part I Getting Started Overview 11 Part II Categories & Products 1 Manage Categories... Overview 11 Add a New... Category
PRESENCE. RadEditor Guide. SchoolMessenger 100 Enterprise Way, Suite A-300 Scotts Valley, CA
 PRESENCE RadEditor Guide SchoolMessenger 100 Enterprise Way, Suite A-300 Scotts Valley, CA 95066 800-920-3897 www.schoolmessenger.com Contents Contents... 2 Introduction... 3 What is RadEditor?... 3 RadEditor
Preface 3. Typographical Conventions... 3 Feedback Introduction 5. Getting Familiar With Web Presence Builder... 6
 Parallels Panel Contents Preface 3 Typographical Conventions... 3 Feedback... 4 Introduction 5 Getting Familiar With Web Presence Builder... 6 Creating and Editing Websites 8 Importing Sites from SiteBuilder
ADRION PROJECT WEBSITES USER S MANUAL
 ADRION PROJECT WEBSITES USER S MANUAL September 2018 Summary 1. The ADRION Project Website... 3 2. Content instructions... 3 3. Contacts for technical assistance... 3 4. Login... 3 5. Editable contents...
Pinnacle Cart User Manual v3.6.3
 Pinnacle Cart User Manual v3.6.3 2 Pinnacle Cart User Manual v3.6.3 Table of Contents Foreword 0 Part I Getting Started Overview 7 Part II Categories & Products 11 1 Manage... Categories Overview 11 Add
Wordpress Training Manual
 The Dashboard... 2 If this is your first time logging in:... 2 How do I change my password or email address?... 3 Search Engine Optimization (SEO)... 4 SEO for Pages... 4 SEO for Images... 5 Managing Pages...
AGENT123. Full Q&A and Tutorials Table of Contents. Website IDX Agent Gallery Step-by-Step Tutorials
 AGENT123 Full Q&A and Tutorials Table of Contents Website IDX Agent Gallery Step-by-Step Tutorials WEBSITE General 1. How do I log into my website? 2. How do I change the Meta Tags on my website? 3. How
SCHULICH MEDICINE & DENTISTRY Website Updates August 30, Administrative Web Editor Guide v6
 SCHULICH MEDICINE & DENTISTRY Website Updates August 30, 2012 Administrative Web Editor Guide v6 Table of Contents Chapter 1 Web Anatomy... 1 1.1 What You Need To Know First... 1 1.2 Anatomy of a Home
Beginner Workshop Activity Guide 2012 User Conference
 Beginner Workshop Activity Guide 2012 User Conference TUESDAY, MARCH 6 2:00PM 5:00 PM Beginner Training Workshop Attendees will learn the end user functions of OU Campus TM. They will learn how to log
Oracle Eloqua s User Guide
 http://docs.oracle.com Oracle Eloqua Emails User Guide 2018 Oracle Corporation. All rights reserved 11-Jan-2018 Contents 1 Emails Overview 6 2 Examples of emails 7 3 Creating emails 19 4 Email authoring
WordPress A Reference Guide for TU Students Version:
 WordPress A Reference Guide for TU Students Version: 2017.11.17 Adapted from OTS Training s Reference Guide for Faculty/Staff by OTS Student Computing Services scs@towson.edu 410-704-5151 www.towson.edu/scs
USER GUIDE: EDITOR. Drag & drop system: Content Manager Style Editor Add Elements Undo/Redo Save...
 USER GUIDE: EDITOR Drag & drop system:... 2 1. Content Manager... 3 2. Style Editor... 5 3. Add Elements... 6 4. Undo/Redo... 13 5. Save... 13 When we access Zeendo s website editor, we can see a series
Netvibes A field guide for missions, posts and IRCs
 Netvibes A field guide for missions, posts and IRCs 7/2/2012 U.S. Department of State International Information Programs Office of Innovative Engagement Table of Contents Introduction... 3 Setting up your
Contents. Announcer Pro Version 4.6 Page 2 of 35 Version V4.6
 User Guide Contents 1. Introduction... 3 1.1. Getting Started... 3 1.2. Navigation... 4 2. Create a Newsletter... 6 2.1. Confirm Company Details... 6 2.2. Choose Template... 8 2.3. Edit Newsletter... 8
PBwiki Basics Website:
 Website: http://etc.usf.edu/te/ A wiki is a website that allows visitors to edit or add their own content to the pages on the site. The word wiki is Hawaiian for fast and this refers to how easy it is
EPiServer Content Editor s Guide
 EPiServer Content Editor s Guide Contents Getting Started with EPiServer... 19 Logging In... 19 Navigating from the Global Menu... 19 Generic Functions, Toolbar and Panes... 20 Generic Functions... 20
Creating a Website Using Weebly.com (June 26, 2017 Update)
") Creating a Website Using Weebly.com (June 26, 2017 Update) Weebly.com is a website where anyone with basic word processing skills can create a website at no cost. No special software is required and there
Creating a Website Using Weebly.com (June 26, 2017 Update) Weebly.com is a website where anyone with basic word processing skills can create a website at no cost. No special software is required and there
 http://www.weebly.com/ What can I do with Weebly? Create a free website & blog Easy drag and drop interface No technical skills required Dozens of professional designs Free domain hosting Powerful, Drag
REDESIGNING YOUR WEBSITE USING ONLINE PRESENCE BUILDER CUSTOMER USER GUIDE
 REDESIGNING YOUR WEBSITE USING ONLINE PRESENCE BUILDER CUSTOMER USER GUIDE 1 CONTENTS 1 GETTING STARTED...3 2 PLANNING...4 3 BACKING UP YOUR WEBSITE...5 4 REFRESHING YOUR WEBSITE...6 4.1 SETTING UP YOUR
How To Guide. Hannon Hill Corporation for Rowan University
 How To Guide Hannon Hill Corporation for Rowan University Hannon Hill Corporation 3423 Piedmont Road, Suite 520 Atlanta, GA 30305 www.hannonhill.com 678.904.6900 info@hannonhill.com Rowan University: How
Chapter 25. Build Creations with Your Photos
 Chapter 25 Build Creations with Your Photos 2 How to Do Everything with Photoshop Elements How to Create a slide show to show off your images Post your images in web pages Build cards, calendars, and postcards
Mediasation Content Management System 4.0 Users Guide & Training Manual
 Mediasation Content Management System 4.0 Users Guide & Training Manual 2008 Mediasation Web Solutions, Inc. All rights reserved. Mediasation, Inc. CMS 4.0 Users Guide Version: October 2008 Editor: Jaimee
Centricity 2.0 Section Editor Help Card
 Centricity 2.0 Section Editor Help Card Accessing Section Workspace In order to edit your section, you must first be assigned Section Editor privileges. This is done by the Director of your Site, Subsite,
KODAK Software User s Guide. Software Version 9.0
 KODAK Create@Home Software User s Guide Software Version 9.0 Table of Contents 1 Welcome to KODAK Create@Home Software Features... 1-1 Supported File Formats... 1-1 System Requirements... 1-1 Software
page 1 OU Campus User Guide
 page 1 OU Campus User Guide Logging Into OU Campus page page 2 1. Navigate to a page on your site that you wish to edit. 2. Scroll down to the footer and click the symbol. 3. Enter your OU Campus username
Percussion Documentation Table of Contents
 Percussion Documentation Table of Contents Intro to the Percussion Interface... 2 Logging In to Percussion... 2 The Dashboard... 2 Managing Dashboard Gadgets... 3 The Menu... 4 The Finder... 4 Editor view...
Rocket Theme. User Guide
 Rocket Theme User Guide This user guide explains all main features and tricks of multifunctional Rocket WordPress Theme. This information will make your work with the theme even easier and more effective.
introduction what you'll learn
 introduction Jetpack is a plugin made by the same people that made Wordpress. By installing Jetpack you add a variety of useful modules to your Wordpress website. To use Jetpack on your website you need
Frooition Implementation guide
 Frooition Implementation guide Version: 2.0 Updated: 14/12/2016 Contents Account Setup: 1. Software Checklist 2. Accessing the Frooition Software 3. Completing your Account Profile 4. Updating your Frooition
Blue Form Builder extension for Magento 2
 Blue Form Builder extension for Magento 2 User Guide Version 1.0 Table of Contents I) Introduction......5 II) General Configurations....6 1) General Settings.....7 2) ReCaptcha... 8 III) Manage Forms......
Marketing & Back Office Management
 Marketing & Back Office Management Menu Management Add, Edit, Delete Menu Gallery Management Add, Edit, Delete Images Banner Management Update the banner image/background image in web ordering Online Data
How to Use Voicethread
 How to Use Voicethread October 13, 2016 Julie K. Marsh Coordinator for Distance Education and Instructional Design Need Help? Contact Julie at 804-627-5308 or send an email to julie_marsh@bshsi.org Contents
MICROSOFT WORD 2010 BASICS
 MICROSOFT WORD 2010 BASICS Word 2010 is a word processing program that allows you to create various types of documents such as letters, papers, flyers, and faxes. The Ribbon contains all of the commands
Integrating Facebook. Contents
 Integrating Facebook Grow your audience by making it easy for your readers to like, share or send pages from YourWebShop to their friends on Facebook. Contents Like Button 2 Share Button.. 6 Send Button.
Word 2013 Quick Start Guide
 Getting Started File Tab: Click to access actions like Print, Save As, and Word Options. Ribbon: Logically organize actions onto Tabs, Groups, and Buttons to facilitate finding commands. Active Document
VEDATRAK CRM 3.0. User Guide
 VEDATRAK CRM 3.0 User Guide 2 (C) 2006-2012 SUI SOLUTIONS Ltd. All rights reserved. 3 Contents Overview...9 System Requirements...12 Installation Notes...13 Vedatrak Basics...14 User Roles...14 System
DaDaDocs for Dynamics 365. A Guidebook for the DaDaDocs Integration for Dynamics 365
 DaDaDocs for Dynamics 365 A Guidebook for the DaDaDocs Integration for Dynamics 365 DaDaDocs for Dynamics 365 2 Table of Contents Getting Started Mini Toolbar Hyperlink Tool Text Checkmarks Signing Documents
Setting up your Netvibes Dashboard Adding a Blog to your Dashboard
 Cr e a t i ngali s t e ni ngda s hboa r d wi t hne t vi be s Ne t v i be s Table of Contents Introduction... 1 Setting up your Netvibes Dashboard... 2 Adding a Blog to your Dashboard... 2 Adding Twitter
CM Live Deal Documentation
 CM Live Deal Documentation Release 1.3.0-beta CMExtension January 27, 2015 Contents 1 Overview 3 1.1 Technical Requirements......................................... 3 1.2 Features..................................................
ECDL Module 6 REFERENCE MANUAL
 ECDL Module 6 REFERENCE MANUAL Presentation Microsoft PowerPoint XP Edition for ECDL Syllabus Four PAGE 2 - ECDL MODULE 6 (USING POWERPOINT XP) - MANUAL 6.1 GETTING STARTED... 4 6.1.1 FIRST STEPS WITH
Kinetika. Help Guide
 Kinetika Help Guide 1 Hope you enjoy Kinetika theme! 3 Table of Contents Important Links 6 Theme Options - Setting Up Logo 26 Cover Photos 44 Applying Revolution Slider Slides 71 Important Notes 7 Logo
HostPress.ca. User manual. July Version 1.0. Written by: Todd Munro. 1 P age
 HostPress.ca User manual For your new WordPress website July 2010 Version 1.0 Written by: Todd Munro 1 P age Table of Contents Introduction page 3 Getting Ready page 3 Media, Pages & Posts page 3 7 Live
CM Live Deal Documentation
 CM Live Deal Documentation Release 1.5.0-beta CMExtension April 12, 2015 Contents 1 Overview 3 1.1 Technical Requirements......................................... 3 1.2 Features..................................................
Data Asap Introduction Versions Getting Started Prerequisite Preparation Screens MANAGE PROJECTS (Screen 1)...
...") TABLE OF CONTENTS Data Asap Introduction... 2 Versions... 2 Getting Started... 3 Prerequisite... 3 Preparation... 3 Screens... 3 MANAGE PROJECTS (Screen 1)... 3 Load Project Tab... 3 New Project tab...
TABLE OF CONTENTS Data Asap Introduction... 2 Versions... 2 Getting Started... 3 Prerequisite... 3 Preparation... 3 Screens... 3 MANAGE PROJECTS (Screen 1)... 3 Load Project Tab... 3 New Project tab...
Placester Quick Start Guide
 Placester Quick Start Guide Congratulations! You re on your way to building a strong online presence for your real estate business. This Quick Start Guide will walk you through all of the basics for getting
*monthly; log in to your wordpress dashboard and update plugins which are showing prompts to do so.
 *monthly; log in to your wordpress dashboard and update plugins which are showing prompts to do so. TRNA WORDPRESS LOGIN AND EDITING INSTRUCTIONS; 10/17/18 (see end of this document for web developer-level
Advanced Marketing Techniques: Zach Stone, Molly McCormick, Dave Frees, Connie Gray, Karen Martin, and Mischelle Davis
 Advanced Marketing Techniques: Zach Stone, Molly McCormick, Dave Frees, Connie Gray, Karen Martin, and Mischelle Davis You have access to some incredible tools, and Zach, Connie, Molly, Karen, Dave, and
User Manual Contents
 User Manual Contents Accessing MyPortfolio... 2 New Users - Creating an Account... 3 Returning Users - Logging in to Your Account... 5 Resetting Your Password... 6 Updating Your Account/Profile Information...
Vetstreet Web Builder Editor Tool User Guide v2.1. Web Builder. User Guide v2.1
 Web Builder User Guide v2.1 Contact your Account Manager at (888) 799-8387 or email support@vetstreet.com with questions. Page 1 Index... 1 The Editor Tool... 7 Forgot Your Username or Password?... 7 How
DOCUMENTATION OLAM WORDPRESS THEME
 DOCUMENTATION OLAM WORDPRESS THEME INDEX Theme installation 2 Setting up website 3 Sidebars & widgets 5 Working with EDD 8 Working with Unyson 8 Content Elements 9 Media elements 9 Olam elements 10 Creating
Articulate Engage 2013 Tutorial
 How to Access Engage 1. By Launching Engage Directly o You can open Engage directly from the desktop by clicking on the green Engage Icon, which is shown in the top right corner of this manual. 2. By Launching
SnapCMS Website Administration
 SnapCMS Website Administration Author: Luke Moulton Company: Go4 Multimedia Last updated: 13th July, 2007 SnapCMS Version: 5 Content 1. Introduction 1.1 Logging In 1.2 The Admin Navigation Explained 2.
Wix Tutorial 10/2/2015. Prof. María L. Moctezuma
 Wix Tutorial 10/2/2015 Prof. María L. Moctezuma TABLE OF CONTENTS Free Site Basics... 1 Signing Up... 2 Choosing Your Template... 3 Before You Select a Template... 3 Navigating Through Wix's Template
Clients Continued... & Letters. Campaigns Continued To create a Custom Campaign you must first name the campaign and select
 Clients Continued... Campaigns Continued To create a Custom Campaign you must first name the campaign and select what type of campaign it will be. Next you will add letters to your campaign from your letter
Net4 s EasySite Builder
 Net4 s EasySite Builder Introduction Net4 s EasySite Builder Web Presence Builder (further referred to as Builder or editor) is an easy and intuitive means of creating websites for small businesses and