ASP.NET MVC Music Store Tutorial
|
|
|
- Piers Manning
- 6 years ago
- Views:
Transcription

1 ASP.NET MVC Music Store Tutorial Version 0.8 Jon Galloway - Microsoft 4/28/ Licensed under Creative Commons Attribution 3.0 License.
2 ASP.NET MVC Music Store Tutorial Contents Overview... 3 File / New Project... 8 Controllers Adding a HomeController Running the Application Views and ViewModels Using a MasterPage for common site elements Adding a View template Using a ViewModel to pass information to our View More complex ViewModels for Store Browse and Index Adding Links between pages Models and Data Access Querying the Database Store Index using a LINQ Query Expression Store Browse, Details, and Index using a LINQ Extension Method Edit forms and Validation Customizing the Store Manager Index Scaffold View templates Using a custom HTML Helper to truncate text Creating the Edit View Creating the StoreManagerViewModel Writing HTTP-GET Edit Controller Action Creating a Shared Album Editor Template Creating the Edit View Implementing Dropdowns on the Album Editor Template Implementing the HTTP-POST Edit Action Method Adding the Create View Handling Deletion Using Data Annotations for Model Validation Page 1
3 Using MetaData Partial Classes with Entity Framework Adding Validation to our Album Forms Using Client-Side Validation Membership and Authorization Adding the AccountController and Views Adding an Administrative User with the ASP.NET Configuration site Role-based Authorization Registration and Checkout Managing the Shopping Cart business logic The Shopping Cart Controller AJAX Updates using Ajax.ActionLink Showing the Cart summary in the header with RenderPartial Adding in Site style and Conclusion Conclusion Page 2

4 Overview This tutorial is an introduction to ASP.NET MVC 2. We ll be starting slowly, so beginner level web development experience is okay. The application we ll be building is a simple music store. There are three main parts to the application: shopping, checkout, and administration. Visitors can browse Albums by Genre: Page 3

5 They can view a single album and add it to their cart: Page 4
6 They can review their cart, removing any items they no longer want: Proceeding to Checkout will prompt them to login or register for a user account. Page 5


7 After creating an account, they can complete the order by filling out shipping and payment information. To keep things simple, we re running an amazing promotion: everything s free if they enter promotion code FREE! After ordering, they see a simple confirmation screen: Page 6


8 The Administration page shows a list of albums from which Administrators can Create, Edit, and Delete albums: We ll begin by creating a new ASP.NET MVC 2 project in Visual Studio 2010, and we ll incrementally add features to create a complete functioning application. Along the way, we ll cover database Page 7

9 access, list and details views, data update pages, data validation, using master pages for consistent page layout, AJAX for page updates and validation, user membership, and more. You can follow along step by step, or you can download the completed application from You can use either Visual Studio 2010 or the free Visual Web Developer 2010 Express to build the application. You can use either SQL Server or the free SQL Server Express to host the database. The Express tools can be installed using the Web Platform Installer here: File / New Project We ll start by selecting the New Project from the File menu in Visual Studio. This brings up the New Project dialog. We ll select the Visual C# / Web Templates group on the left, then choose the ASP.NET MVC 2 Empty Web Application template in the center column. Name your project MvcMusicStore and press the OK button. Page 8


10 This will create our project. Let s take a look at the folders that are included in our application in the Solution Explorer on the right side. Page 9

11 The Empty MVC 2 Solution isn t completely empty it adds a basic folder structure: ASP.NET MVC makes use of some basic conventions for folder names: Folder Purpose /Controllers Controllers respond to input from the browser, decide what to do with it, and return response to the user. /Views Views hold our UI templates /Models Models hold and manipulate data /Content This folder holds our images, CSS, and any other static content /Scripts This folder holds our JavaScript files /App_Data This folder holds data files which can be read and updated by the application These folders are included even in an Empty ASP.NET MVC application because the framework makes some assumptions based on folder in naming conventions. For instance, controllers look for views in the Views folder by default, so sticking with the basic conventions not only makes it easier for other developers to understand your project, it simplifies your code. ASP.NET MVC makes extensive use of conventions to simplify the development process; we ll point them out as we go. Controllers Controllers run the show in an MVC application, so we ll begin there. We ll want to get our site started with a Home page, so we ll add a Controller to handle the Home page of the site. We ll follow the convention and call it HomeController. Adding a HomeController Right-click the controllers folder and select Add, then Controller Page 10


12 Change the Controller Name to HomeController and press the Add button. This will create a new file, HomeController.cs, with the following code: using System; using System.Collections.Generic; using System.Linq; using System.Web; using System.Web.Mvc; namespace MvcMusicStore.Controllers public class HomeController : Controller // // GET: /Home/ public ActionResult Index() Page 11

13 return View(); To start as simply as possible, let s replace that with a simple method that just returns a string. Let s make two simple changes: Change the method to return a string instead of an ActionResult Change the return statement to return Hello from Home The method should now look like this: public string Index() return "Hello from Home"; Running the Application Now we can run the site. We can do using any of the following: Choose the Debug Start Debugging menu item Click the Green arrow button in the toolbar Use the keyboard shortcut, F5. Page 12
14 Okay, that was pretty quick we created a new website, added a three line function, and we ve got text in a browser. Not rocket science, but we ve got a start. Note: Visual Studio includes the ASP.NET Development Server, which will run your website on a random free port number. In the screenshot above, the site is running at so it s using port Your port number will be different. When we talk about URL s like /Store/Browse in this tutorial, that will go after the port number. Assuming a port number of 26641, browsing to /Store/Browse will mean browsing to Now let s set up a controller for our Store. The store has three levels: The Store Index lists the genres our store carries The Browse page lists all albums in a genre The Details page shows information for a specific album We ll start by adding a new StoreController, just like we created the HomeController. If you haven t already, stop running the application either by closing the browser or selecting the Debug Stop Debugging menu item. Now add a new StoreController: Page 13
 Controller Action, their job is to respond to URL requests and (generally speaking) put content")
15 The new controller will already have an Index method. We ll also need to add methods to handle the two other pages in the store: Browse, and Details. These methods are called Controller Actions, and as you ve already seen with the HomeController Index() Controller Action, their job is to respond to URL requests and (generally speaking) put content on a page. We ll start by changing the StoreController.Index method to return the string Hello from Store.Index() and we ll add similar methods for Browse and Details: using System; using System.Collections.Generic; using System.Linq; using System.Web; using System.Web.Mvc; namespace MvcMusicStore.Controllers public class StoreController : Controller // // GET: /Store/ public string Index() return "Hello from Store.Index()"; // // GET: /Store/Browse public string Browse() return "Hello from Store.Browse()"; // // GET: /Store/Details public string Details() return "Hello from Store.Details()"; Page 14
16 Run the project again and browse to /Store/Details: That s great, but these are just simple strings. Let s make them dynamic, so they take information from the URL and display it in the page output. First we ll change the Details action to read and display an input parameter named ID. // // GET: /Store/Details/5 public string Details(int id) string message = "Store.Details, ID = " + id; return Server.HtmlEncode(message); Run the application and browse to /Store/Details/5. The controller action read the ID from the URL and filled it into the string that we wrote out to the browser: Page 15

17 That was especially easy because ID is a special case. ASP.NET MVC uses a system called routing to map URL values to controller action parameters, and it includes a default route with an ID parameter already set up in all new projects. That s configurable, and we ll look at that more later. We can also read querystring values from a URL without any routing changes. Alter the Browse Controller action to accept and Genre string parameter: // // GET: /Store/Browse/ public string Browse() string message = "Store.Browse, Genre = " + Server.HtmlEncode(Request.QueryString["genre"]); return Server.HtmlEncode(message); Now let s browse to /Store/Browse?Genre=Disco Note: We re using the Server.HtmlEncode utility method to sanitize the user input. This prevents users from injecting Javascript into our View with a link like /Store/Browse?Genre=<script>window.location= </script>. Let s recap what we ve done so far: We ve created a new project in Visual Studio We ve overviewed the basic folder structure of an ASP.NET MVC application We ve learned how to run our website using the ASP.NET Development Server We ve created two Controllers with four Controller Actions which respond to URL requests and return text to the browser Page 16

18 Views and ViewModels Concepts: Views allow us to template content (rather than just writing out strings) Views follow a naming convention: /Controller/Action ViewModels help us to pass information from our Controller Action to our View ActionResult So far we ve just been returning strings from controller actions. That s a great way to get an idea of how controllers work, but it s not how you d want to build a complete web application. We need a way to split our HTML out into a separate template. That s exactly what Views do. Using a MasterPage for common site elements We re going to convert our Home page to use a view, but before we do that we ll want to add a CSS stylesheet and a MasterPage to our site. ASP.NET MasterPages allow us to set a template for common user interface elements that will use across the entire website. These are similar to include files, but a lot more powerful. Since the MasterPage is shared by all pages in the site, we ll create it in the /Views/Shared folder. Expand the Views folder and right-click the Shared folder, then select Add New Item MVC 2 View Master Page. Name it Site.Master and click the Add button. Page 17

19 Since we ll want to reference our Stylesheet on all pages in our site, we ll add a reference to it in our MasterPage. Add a <link> element directly below the <head> tag, so the head of your MasterPage looks like this: <head runat="server"> <link href="/content/site.css" rel="stylesheet" type="text/css" /> <title><asp:contentplaceholder ID="TitleContent" runat="server" /></title> </head> We ll want a header with links to our Home page and Store area on all pages in the site, so we ll add that directly below the opening <div> tag. Our Site.Master now looks like this: <%@ Master Language="C#" Inherits="System.Web.Mvc.ViewMasterPage" %> <!DOCTYPE html PUBLIC "-//W3C//DTD XHTML 1.0 Transitional//EN" " <html xmlns=" > <head runat="server"> <link href="/content/site.css" rel="stylesheet" type="text/css" /> <title><asp:contentplaceholder ID="TitleContent" runat="server" /></title> </head> <body> <div> <div id="header"> <h1>asp.net MVC Music Store</h1> <ul id="navlist"> <li class="first"><a href="/" id="current">home</a></li> <li><a href="/store/">store</a></li> </ul> </div> <asp:contentplaceholder ID="MainContent" runat="server"> </asp:contentplaceholder> Page 18
20 </div> </body> </html> Adding a View template Now we re ready to add a View for the Home page. Change the HomeController Index method to return an ActionResult, and have it return View(), like this: public class HomeController : Controller // // GET: /Home/ public ActionResult Index() return View(); Now we re ready to add the view file to the project. Position the text cursor within the controller action method, the right-click and select Add View. This will bring up the Add View dialog: By default the dialog pre-populates the name of the View to match the action method. Since we ve got a MasterPage set up, it also pre-fills that value for us. Page 19

21 When we click the add button, Visual Studio will create a new Index.aspx view template for us in the \Views\Home directory, creating the folder if doesn t already exist. Both the file name and location are important, since they follow a convention. The directory name, Home, matches the controller, which is named HomeController. The view template name, Index, matches the controller action which will be displaying the view. This allows us to keep our controller code simple since we don t need to specify the name or location of the view as long as we re following the convention. Visual Studio also automatically opens the Index.aspx view template in the code-editor when it is created. Let s update the Title to Home, and change the heading to say This is the Home Page, as shown in the code below: <%@ Page Title="" Language="C#" MasterPageFile="~/Views/Shared/Site.Master" Inherits="System.Web.Mvc.ViewPage" %> <asp:content ID="Content1" ContentPlaceHolderID="TitleContent" runat="server"> Home </asp:content> <asp:content ID="Content2" ContentPlaceHolderID="MainContent" runat="server"> <h2>this is the Home Page</h2> </asp:content> Now let s run the application and see how our changes look on the Home page. Page 20
, because our View template followed the standard naming convention.")
22 Let s review what s changed: The Home Page is using our MasterPage template, so the header content is displaying. The HomeController s Index action method found and displayed the correct View template, even though our code called return View(), because our View template followed the standard naming convention. Using a ViewModel to pass information to our View A View template that just displays hardcoded HTML isn t going to make for very interesting web site. To create a dynamic web site, we ll need to pass information from our controller actions to the view templates. One common technique is to use a ViewModel, which allows us to cleanly package all the information our View template will need to display. We ll first change our Store Index page to list the number of genres we carry, so it looks like this: Page 21

23 We ll create a ViewModel directory to hold our ViewModels by right-clicking the project and selecting Add New Folder, then naming the folder ViewModels. Next, we ll create a ViewModel for our Store Index page. Right-click on the ViewModels folder and select Add Class Page 22


24 Name the class StoreIndexViewModel and press the Add button: We ll add an integer property named NumberOfGenres and a List of strings to handle Genres: using System; using System.Collections.Generic; using System.Linq; using System.Web; namespace MvcMusicStore.ViewModels public class StoreIndexViewModel public int NumberOfGenres get; set; public List<string> Genres get; set; Page 23
25 Note: In case you re wondering, the get; set; notation is making use of C# s auto-implemented properties feature. This gives us the benefits of a property without requiring us to declare a backing field. In order to use the StoreIndexViewModel from our StoreController, we need to add the following line to the top of the StoreController code: using MvcMusicStore.ViewModels; Now we ll change the StoreController s Index action method to return that ViewModel. We ll use Object Initializer syntax to quickly create objects and set their properties with one line of code. // // GET: /Store/ public ActionResult Index() // Create a list of genres var genres = new List<string> "Rock", "Jazz", "Country", "Pop", "Disco" ; // Create our view model var viewmodel = new StoreIndexViewModel NumberOfGenres = genres.count(), Genres = genres ; return View(viewModel); Note: If you re unfamiliar with C#, you may assume that using var means that our viewmodel variable is late-bound. That s not correct the C# compiler is using type-inference based on what we re assigning to the variable to determine that viewmodel is of type StoreIndexViewModel and compiling the local viewmodel variable as a StoreIndexViewModel type, so we get compile-time checking and Visual Studio code-editor support. Next we ll want to add a view, but before we do that we need to build the project so that the Add View dialog knows about our StoreIndexViewModel. You can build the project by selecting the Build Build Solution menu item. Page 24
 and Add View.")

26 Right-click Store.Index() and Add View. Create a strongly-typed view based on StoreIndexViewModel. Page 25
27 Now we ll update the Store Index page to add the NumberOf Genres value. We ll be using the <%: %> syntax (often referred to as code nuggets ) to execute code within our View template. There are two main ways you ll see this used: Code enclosed within <% %> will be executed Code enclosed within <%: %> will be executed, and the result will be output to the page Note: Prior to ASP.NET 4, the <%= %> syntax was used to execute code and write it out to the page. Starting with ASP.NET 4, you should always use the <%: %> syntax instead, since it will automatically HTML Encode the results, similar to how we used Server.HtmlEncode() in our controller action earlier. Note that as soon as you finish typing the period after the word Model, Visual Studio s IntelliSense feature kicks in and supplies you with a list of possible values. You can just select NumberOfGenres off the list rather than typing it in. Next we ll list the Genres in the list with a foreach loop, like this: <ul> <% foreach (string genrename in Model.Genres) %> <li> <%: genrename %> </li> <% %> </ul> Our completed View template is shown below. If you look at the top of the Index page View template, you ll notice that the template inherits a ViewPage of type StoreIndexViewModel. The View engine exposes the page type as a property named Model, so we can access our ViewModel s values using the Model values. <%@ Page Title="" Language="C#" MasterPageFile="~/Views/Shared/Site.Master" Inherits="System.Web.Mvc.ViewPage<MvcMusicStore.ViewModels.StoreIndexViewModel>" %> <asp:content ID="Content1" ContentPlaceHolderID="TitleContent" runat="server"> Index </asp:content> <asp:content ID="Content2" ContentPlaceHolderID="MainContent" runat="server"> <h3>browse Genres</h3> <p>select from <%: Model.NumberOfGenres %> genres:</p> Page 26
28 <ul> <% foreach (string genrename in Model.Genres) %> <li> <%: genrename %> </li> <% %> </ul> </asp:content> Run and click on the Store link. Note that the number of Genres was filled in. More complex ViewModels for Store Browse and Index Now let s take a look at a slightly more complex example with the Store Browse page. This page reads the Genre name from the URL and displays the Genre and a few Albums using the name it was passed, as shown below. Page 27

29 First we ll create some Model classes to represent Genres and Albums. Unlike ViewModels, which are created just to pass information from our Controller to our View, Model classes are built to contain and manage our data and domain logic. We won t have a Genre page in the application, but we ll be using the concept of a Genre repeatedly, so we ll want a model class to manage it. Later on, we ll be hooking our Genre and Album classes to a database, and they ll map directly to database tables. Let s start by creating a Genre class. Right-click the models folder and add a new Genre class and add a string Name property. public class Genre public string Name get; set; Now we ll create an Album class that has a Title and a Genre. public class Album public string Title get; set; public Genre Genre get; set; Our Store Browse page will show one Genre and all the Albums in that Genre. A ViewModel is a great way to expose that information to the view. Let s create a StoreBrowseViewModel (again, right-clicking the ViewModels folder and selecting Add Class). We ll add a using statement to the top of the new StoreBrowseViewModel.cs file to reference our Models folder, then add a Genre property and a List of Albums. Here s how the class looks after our changes: Page 28
30 using System; using System.Collections.Generic; using System.Linq; using System.Web; using MvcMusicStore.Models; namespace MvcMusicStore.ViewModels public class StoreBrowseViewModel public Genre Genre get; set; public List<Album> Albums get; set; Now we re ready to change the Store Browse and Details action methods to use our new ViewModels. We ll start by adding a using MvcMusicStore.Models statement to the using statements list at the top of the controller, then modify the Browse and Details methods to appear as follows: // GET: /Store/Browse/ public ActionResult Browse() string genrename = Server.HtmlEncode(Request.QueryString["genre"]); var genre = new Genre Name = genrename ; var albums = new List<Album>(); albums.add(new Album Title = genrename + " Album 1" ); albums.add(new Album Title = genrename + " Album 2" ); var viewmodel = new StoreBrowseViewModel Genre = genre, Albums = albums ; return View(viewModel); Now that we ve set up our supporting classes, we re ready to build our View template. Right-click on Browse and add a strongly typed Browse view, then a strongly typed Details view: Page 29
31 Now we can modify the Browse page content to display the Genre information, accessing the ViewModel info information: <asp:content ID="Content2" ContentPlaceHolderID="MainContent" runat="server"> <h2>browsing Genre: <%: Model.Genre.Name %></h2> <ul> <% foreach (var album in Model.Albums) %> <li><%: album.title %></li> <% %> </ul> </asp:content> Now that we have these basics down, we can quickly create a Store Details page to display a single album. We could create a StoreDetailsViewModel that holds a single Album, but in this case we ll just return an Album since we re certain that s all our Details view will be displaying. We ll need to add a using statement that references the MvcMusicStore.Models namespace, then we can update our Store Details controller action as follows: // // GET: /Store/Details/5 public ActionResult Details(int id) var album = new Album Title = "Sample Album" ; return View(album); Now right-click on the Store Details controller action method and create a new Details view: Page 30

32 Now we can display the Album title in the Details page. Page Title="" Language="C#" MasterPageFile="~/Views/Shared/Site.Master" Inherits="System.Web.Mvc.ViewPage<MvcMusicStore.Models.Album>" %> <asp:content ID="Content1" ContentPlaceHolderID="TitleContent" runat="server"> Details </asp:content> <asp:content ID="Content2" ContentPlaceHolderID="MainContent" runat="server"> <h2>album: <%: Model.Title %></h2> </asp:content> Adding Links between pages Our Store Index page lists Genres as plain text. We can easily convert those to dynamic links to our Browse page, so clicking on Disco will navigate to /Store/Browse?genre=Disco. We could just hardcode those links, as follows: <ul> <% foreach (string genrename in Model.Genres) %> <li> <a href="/store/browse?genre=<%: genrename %>"><%: genrename %></a> </li> <% %> </ul> That works, but it could lead to trouble later since it relies on a hardcoded string. For instance, if we wanted to rename the Controller, we d need to search through our code looking for links that need to be updated. Page 31
33 Instead, we can make use of an HTML Helper method. ASP.NET MVC includes HTML Helper methods which are available from our View template code to perform a variety of utility tasks just like this. You ll use the Html.ActionLink helper method pretty often, since it makes it easy to build links and takes care of annoying details like making your paths are properly URL encoded. Html.ActionLink has several different overloads to allow specifying as much information as you need for your links. In the simplest case, you ll supply just the link text and the Action method. For example, we can link to /Store/ on the Store Details page with the link text Go to the Store Index using the following call: <%: Html.ActionLink("Go to the Store Index", "Index")%> Note: In this case, we didn t need to specify the controller name because we re just linking to another action within the same controller that s rendering the current view. Our links to the Browse page will need to pass a parameter, though, so we ll use another overload of the Html.ActionLink method that takes five parameters: 1. Link text, which will display the Genre name 2. Controller action name (Browse) 3. Controller name (Store) 4. Route parameter values, specifying both the name (Genre) and the value (Genre name) 5. HTML Attributes for the link in this case we don t need to specify any, so we ll just pass null Putting that all together, here s how we ll write those links to the Browse page: <ul> <% foreach (string genrename in Model.Genres) %> <li> <%: Html.ActionLink(genreName, "Browse", "Store", new genre = genrename, null)%> </li> <% %> </ul> Page 32

34 Models and Data Access Concepts: Use of EntityFramework for data access End-to-end parameter flow: o Parameter passed to Controller Action via Routing o Parameter passed to ViewModel in constructor o ViewModel returned to View via ActionResult Requested data displayed on screen So far, we ve just been passing strings from URLs to Controller actions to Views. That s a great way to lay the foundations, but now we re ready to hook up a database. The tutorial text will cover creating the database using the free SQL Server Express edition, but all our code will also work with the full SQL Server. We ll start by adding an App_Data directory to our project to hold our SQL Server Express database files. App_Data is a special directory in ASP.NET which already has the correct security access permissions for database access. Right-click the project and select Add Add ASP.NET Folder App_Data. Now we ll add our database file. The database file is named MvcMusicStore.mdf and is included in the project downloads. Right-click the new App_Data folder, select Add Existing Item and browse to MvcMusicStore.mdf. Page 33


35 Now that the database has been added to the project, we ll need code to read and write to the database. We ll use Entity Framework data model to handle that. Right-click the Models directory and select Add New Item Data ADO.NET Entity Data Model. Name the data model StoreDB.edmx and press the Add button. The Entity Data Model Wizard first asks if you want to generate a model from a database or create an empty model. Select Generate from database and click the Next button. Page 34


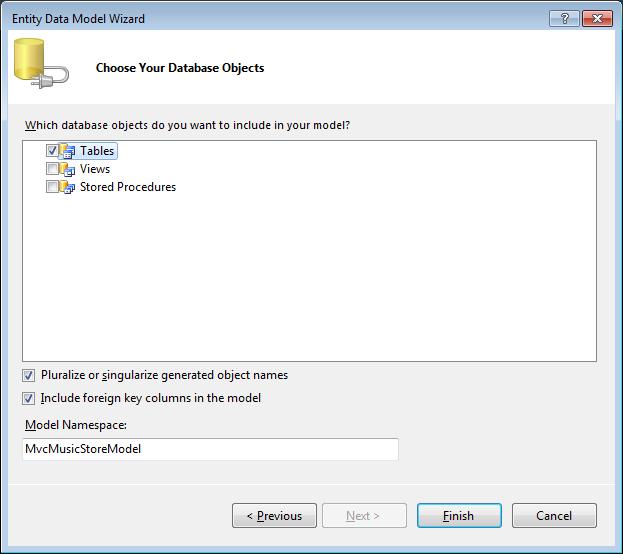
36 Since we re generating our model from a database, we ll need to specify which database we want to use. The wizard s smart enough to see that we ve got a database in our App_Data folder, so it fills in the correct connection information for that database for us, and we can just click the Next button. Check the Tables button and ensure that the Include foreign key columns in the model checkbox is checked. Change the Model Namespace to MvcMusicStore and press the Finish button. Page 35
37 Page 36

38 This brings up an entity diagram for our database. On the music side of things, we re adding Artist to the Genre and Albums concepts we already looked at in the last chapter. Since we re running a store, we re also adding tables for Cart, Order, and OrderDetails. Now that we have a real data model in place, we can delete the Album and Genre model classes we ve been working with. Expand the Models directory, select Album.cs, and press the Delete key. Follow the same steps to delete Genre.cs. Despite having deleted the Albums and Genre class, the project still builds and the pages still work. Page 37


39 Why? Since our database tables have fields which include all the properties we were using in our Album and Genre classes earlier, our Entity Framework data model classes are a drop-in replacement. While the Entity Framework designer displays the entities in a diagram format, they re really just C# classes. Expand the StoreDB.edmx node in the Solution Explorer, and you ll see a file called StoreDB.Designer.cs. To demonstrate that (and because it ll make our code look nicer), we ll rename the object context class from MvcMusicStoreEntities to MusicStoreEntities. Right-click on the class name (MvcMusicStoreEntities) and select Refactor Rename. Change the class name to MusicStoreEntities and press the Apply button. Page 38

40 Querying the Database Now let s change our Store controller actions to call into our database. We ll start by declaring a field on the StoreController to hold an instance of the MusicStoreEntities class, named storedb: public class StoreController : Controller MusicStoreEntities storedb = new MusicStoreEntities(); Store Index using a LINQ Query Expression The MusicStoreEntities class exposes collection class for each table in our database, so we can query our Genre table using LINQ (language integrated query) query expressions. First we ll update our Store Index page to read all Genre names in our database, as shown below: // // GET: /Store/ public ActionResult Index() // Retrieve list of Genres from database var genres = from genre in storedb.genres select genre.name; // Set up our ViewModel var viewmodel = new StoreIndexViewModel() Genres = genres.tolist(), NumberOfGenres = genres.count() ; // Return the view return View(viewModel); No changes need to happen to our View template since we re still returning the same StoreIndexViewModel we returned before, we re just returning live data from our database now. Page 39
41 Store Browse, Details, and Index using a LINQ Extension Method For the Store Browse, we ll demonstrate an alternative to the LINQ query expression syntax we just looked at - LINQ Extension Methods. These both do the same thing under the hood, so you can use whichever syntax seems more natural for a particular query. In this controller action, we re searching for a Genre by name. We only expect one result, since we shouldn t ever have two entries for the same Genre name, so we ll use the Single extension method on the Genre object set, like this: var genre = storedb.genres.single(g => g.name == Disco ); The Single method takes a Lambda expression as a parameter, which specifies that we want a single Genre object such that its name matches the value we ve defined. In the case above, we d be loading a single Genre object with a Name value matching Disco. We ll take advantage of an Entity Framework feature that allows us to specify other related entities we want loaded as well, called Query Result Shaping. We want to load the Albums for the matching Genre, so we ll query from Genres.Include( Albums ) to indicate that we want related albums as well. This is more efficient, since it will retrieve both our Genre and Album data in a single database request. With the explanations out of the way, here s how our updated Browse controller action looks: // // GET: /Store/Browse?Genre=Disco public ActionResult Browse(string genre) // Retrieve Genre from database var genremodel = storedb.genres.include("albums").single(g => g.name == genre); var viewmodel = new StoreBrowseViewModel() Genre = genremodel, Albums = genremodel.albums.tolist() ; return View(viewModel); Running our application and browsing to /Store/Browse?genre=Jazz shows that our results are now being pulled from the database. Page 40
 var album = storedb.albums.single(a => a.")
42 We ll make the same change to our Store Details page, replacing our dummy data with a database query which loads an Album whose ID matches the parameter value. // // GET: /Store/Details/5 public ActionResult Details(int id) var album = storedb.albums.single(a => a.albumid == id); return View(album); Edit forms and Validation In the past chapter, we were loading data from our database for display. In this chapter, we ll be editing data. We ll create a new controller called StoreManagerController. This controller will be handling Create and Update actions, so we ll check the checkbox to Add action methods for Create, Update, and Details scenarios. Page 41
 return View(); // // GET: /StoreManager/Details/5 public ActionResult Details(int id) return")
43 This generates a controller with stub methods for the controller actions we ll be building, with TODO comments filled in to prompt us to put in our application specific logic. public class StoreManagerController : Controller // // GET: /StoreManager/ public ActionResult Index() return View(); // // GET: /StoreManager/Details/5 public ActionResult Details(int id) return View(); // // GET: /StoreManager/Create public ActionResult Create() return View(); // // POST: /StoreManager/Create [HttpPost] public ActionResult Create(FormCollection collection) try // TODO: Add insert logic here return RedirectToAction("Index"); catch return View(); Page 42
44 // // GET: /StoreManager/Edit/5 public ActionResult Edit(int id) return View(); // // POST: /StoreManager/Edit/5 [HttpPost] public ActionResult Edit(int id, FormCollection collection) try // TODO: Add update logic here return RedirectToAction("Index"); catch return View(); We don t need the Details controller action, so we can delete it. Then we ll get to work on building out the other controller actions and views. Customizing the Store Manager Index As in our Store Controller, we ll begin by adding a field on our StoreManagerController to hold an instance of our MusicStoreEntities. public class StoreController : Controller MusicStoreEntities storedb = new MusicStoreEntities(); Now we can get started with the Store Manager Index page. This page will display a list of albums, so the controller action logic will be pretty similar to the Store Index controller action. We ll use LINQ extension methods to retrieve all albums, including Genre and Artist information for display. // // GET: /StoreManager/ public ActionResult Index() var albums = storedb.albums.include("genre").include("artist").tolist(); return View(storeDB.Albums); Page 43
45 Now we can create the view. As before, we ll right-click on the controller action code to bring up the Add View dialog. This view will use the List template and will be strongly-typed to our Album class, as shown below. Scaffold View templates We re making use of the scaffold View template feature to quickly generate a simple View template which lists all fields in our Album model. It s a quick way to get started on a strongly typed view. Rather than having to add in all the fields by hand, we can just modify the generated code. Let s look at the generated list of fields. Oh, and yes, this is using an HTML table. Remember that HTML tables, while a poor choice for site layout, are a perfect fit for displaying tabular data. <table> <tr> <th></th> <th>albumid</th> <th>genreid</th> <th>artistid</th> <th>title</th> <th>price</th> <th>albumarturl</th> </tr> <% foreach (var item in Model) %> <tr> <td> <%: Html.ActionLink("Edit", "Edit", new id=item.albumid ) %> <%: Html.ActionLink("Details", "Details", new id=item.albumid )%> <%: Html.ActionLink("Delete", "Delete", new id=item.albumid )%> </td> <td><%: item.albumid %></td> Page 44
46 <td><%: item.genreid %></td> <td><%: item.artistid %></td> <td><%: item.title %></td> <td><%: String.Format("0:F", item.price) %></td> <td><%: item.albumarturl %></td> </tr> <% %> </table> Note: That this template is following the same coding practices we ve been learning so far using <%: to HTML encode our values, and using Html.ActionLink to generate links to other controller actions. We just want to display Album Title, Artist, and Genre, so we can delete the AlbumId, Price, and Album Art URL columns. The GenreId and ArtistId aren t near as useful as the Artist and Genre Names, so we ll change them to display the linked class properties as follows: <table> <tr> <th></th> <th>title</th> <th>artist</th> <th>genre</th> </tr> <% foreach (var item in Model) %> <tr> <td> <%: Html.ActionLink("Edit", "Edit", new id=item.albumid ) %> <%: Html.ActionLink("Delete", "Delete", new id=item.albumid )%> </td> <td><%: item.title %></td> <td><%: item.artist.name %></td> <td><%: item.genre.name %></td> </tr> <% %> </table> You can run the application and browse to /StoreManager to see the list. Page 45

47 Using a custom HTML Helper to truncate text We ve got one potential issue with our Store Manager Index page. Our Album Title and Artist Name properties can both be long enough that they could throw off our table formatting. We ll create a quick HTML Helper to allow us to easily truncate these and other properties in our Views. Note: This topic is a bit advanced, so if it doesn t make sense to you, don t worry about it. Learning to write your own HTML Helpers can simplify your code, but it s not a fundamental topic that you need to master to complete this tutorial. Add a new directory named Helpers, and add a class to it named HtmlHelpers.cs. Page 46

48 Our HTML Helper will be extending System.Web.Mvc.HtmlHelpers, so we ll need to add a using statement referencing System.Web.Mvc. Our helper class and method must both be static. Other than that, it s pretty simple. using System.Web.Mvc; namespace MvcMusicStore.Helpers public static class HtmlHelpers public static string Truncate(this HtmlHelper helper, string input, int length) if (input.length <= length) return input; else return input.substring(0, length) + "..."; This helper method takes a string and a maximum length to allow. Now we need to let our view know about it by importing the namespace. We do that by using an <%@ Import statement, directly below the <%@ Page %> element, like this: <%@ Page Language="C#" MasterPageFile="~/Views/Shared/Site.Master" Inherits="System.Web.Mvc.ViewPage<IEnumerable<MvcMusicStore.Models.Album>>" %> <%@ Import Namespace="MvcMusicStore.Helpers" %> Now we can use our Truncate helper to ensure that both the Album Title and Artist Name properties are less than 25 characters. The complete view code using our new Truncate helper appears below. Page 47
49 Page Language="C#" MasterPageFile="~/Views/Shared/Site.Master" Inherits="System.Web.Mvc.ViewPage<IEnumerable<MvcMusicStore.Models.Album>>" %> Import Namespace="MvcMusicStore.Helpers" %> <asp:content ID="Content1" ContentPlaceHolderID="TitleContent" runat="server"> Store Manager - All Albums </asp:content> <asp:content ID="Content2" ContentPlaceHolderID="MainContent" runat="server"> <h2>albums</h2> <p> <%: Html.ActionLink("Create New Album", "Create") %> </p> <table> <tr> <th></th> <th>title</th> <th>artist</th> <th>genre</th> </tr> <% foreach (var item in Model) %> <tr> <td> <%: Html.ActionLink("Edit", "Edit", new id=item.albumid ) %> <%: Html.ActionLink("Delete", "Delete", new id=item.albumid )%> </td> <td><%: Html.Truncate(item.Title, 25) %></td> <td><%: Html.Truncate(item.Artist.Name, 25) %></td> <td><%: item.genre.name %></td> </tr> <% %> </table> </asp:content> Now when we view the Store Manager Index, the albums and titles are kept below our maximum lengths. Page 48

50 Creating the Edit View Next we ll create a form to allow editing an album details. It will include text fields for Album Title, Price, and Album Art URL. Additionally, we ll be building dropdowns to allow selecting the Artist and Genre. Page 49
51 Creating the StoreManagerViewModel Editing an Album will require selecting an Artist and a Genre, so we ll create a ViewModel. We can reuse this ViewModel for the Create controller action as well, so we ll call this the StoreManagerViewModel. Create the StoreManagerViewModel class in the ViewModels folder and the following three properties. using System.Collections.Generic; using MvcMusicStore.Models; namespace MvcMusicStore.ViewModels public class StoreManagerViewModel public Album Album get; set; public List<Artist> Artists get; set; public List<Genre> Genres get; set; Writing HTTP-GET Edit Controller Action We ll need two controller actions for our Edit form. When the form is first loaded, we ll be responding to an HTTP-GET request and displaying the Album information. When the user makes a change and clicks the Save button, the form information will be submitted to another controller action that handles the form HTTP-POST request. The HTTP-GET Edit action method retrieves an album by ID, similar to the Store Details action method. We also need a list of Genres and Artists to fill the available values for the dropdown lists, as shown below. // // GET: /StoreManager/Edit/5 public ActionResult Edit(int id) var viewmodel = new StoreManagerViewModel Album = storedb.albums.single(a => a.albumid == id), Genres = storedb.genres.tolist(), Artists = storedb.artists.tolist() ; return View(viewModel); Creating a Shared Album Editor Template The exact same form fields for Album Edit will be needed to handle the Album Create case, so we ll create a Shared Album Editor Template. Page 50

52 We need to create an EditorTemplates folder inside the /Views/Shared folder. First create a new folder and name it EditorTemplates, then add a new View template as shown below. This view will be a little different than the views we ve been creating so far. It will be a Partial View, meaning that it s intended to be displayed inside another view. Name the view Album, select Album for the View data class, set the View content template to Edit, and press the Add button. We ll come back and customize this in a minute, but first we need to include it in the Edit view so we can view it. Page 51
53 Creating the Edit View Create the Album Edit view by right-clicking on the Store Manager HTTP-GET Edit action method and selecting Add View. The Edit form should be strongly typed to the StoreManagerViewModel and should use the Edit content template. The generated Edit View template doesn t include any fields, because none of the properties in our StoreManagerViewModel were simple types like strings and integers. That s fine; we ll use our Album editor template. The Html.EditorFor helper method allows us to specify that we want an Editor for a specific type. In this case, we want an editor for our Album, so pass that in as the first parameter. We re using an overload that allows us to pass in our Artist and Genre lists for the dropdowns, but we ll need to do a little more work on the Album editor template to hook those up. The completed Edit form code appears below. <% using (Html.BeginForm()) %> <%: Html.ValidationSummary(true) %> <fieldset> <legend>edit Album</legend> <%: Html.EditorFor(model => model.album, new Artists = Model.Artists, Genres = Model.Genres) %> <p> <input type="submit" value="save" /> </p> </fieldset> <% %> Page 52
 The list of values for the dropdown, passed as a SelectList The Data Value field which")
54 Now our Edit form will display the Album editor template. Implementing Dropdowns on the Album Editor Template We ll make use of another HTML Helper to create our dropdowns, Html.DropDownList. Let s look at the information we need to pass for the Artist dropdown: The name of the form field (ArtistId) The list of values for the dropdown, passed as a SelectList The Data Value field which should be posted back with the form The Data Text field which should be displayed in the dropdown list The Selected Value which is used to set the dropdown list value when the form is displayed Here s what our call looks like: <%: Html.DropDownList("ArtistId", new SelectList(ViewData["Artists"] as IEnumerable, "ArtistId", "Name", Model.ArtistId))%> Note: The only one on that list that may be a little confusing is the SelectList. Remember how we used the Html.EditorFor call earlier, passing in the select items as the second and third parameters? Those are then passed to the EditorTemplate as ViewData properties. Our completed Album.ascx editor template code appears as follows: <%@ Import Namespace="MvcMusicStore"%> Page 53
%> </p> <p> <%: Html.LabelFor(model => model.price)%> <%: Html.TextBoxFor(model => model.price)%> <%: Html.ValidationMessageFor(model => model.price)%> </p> <p> <%: Html.LabelFor(model => model.albumarturl)%> <%: Html.")
55 Control Language="C#" Inherits="System.Web.Mvc.ViewUserControl<MvcMusicStore.Models.Album>" %> <p> <%: Html.LabelFor(model => model.title)%> <%: Html.TextBoxFor(model => model.title)%> <%: Html.ValidationMessageFor(model => model.title)%> </p> <p> <%: Html.LabelFor(model => model.price)%> <%: Html.TextBoxFor(model => model.price)%> <%: Html.ValidationMessageFor(model => model.price)%> </p> <p> <%: Html.LabelFor(model => model.albumarturl)%> <%: Html.TextBoxFor(model => model.albumarturl)%> <%: Html.ValidationMessageFor(model => model.albumarturl)%> </p> <p> <%: Html.LabelFor(model => model.artist)%> <%: Html.DropDownList("ArtistId", new SelectList(ViewData["Artists"] as IEnumerable, "ArtistId", "Name", Model.ArtistId))%> </p> <p> <%: Html.LabelFor(model => model.genre)%> <%: Html.DropDownList("GenreId", new SelectList(ViewData["Genres"] as IEnumerable, "GenreId", "Name", Model.GenreId))%> </p> Now when we edit an album from within our Store Manager, we see dropdowns instead of Artist and Genre ID text fields. Page 54
56 Implementing the HTTP-POST Edit Action Method The next step is handling form submissions. We ll do that by using an Edit action method which takes an ID (read from the route parameter values) and a FormCollection (read from the HTML Form). This controller action method has three main steps: 1. Load the existing album from the database by the ID passed in the route parameter values 2. Try to update the Model using the values in the FormCollection, using the Controller s builtin UpdateModel method 3. Display the results to the user either redisplay the form in case of an error, or redirect back to the list of albums in case of a successful update // // POST: /StoreManager/Edit/5 [HttpPost] public ActionResult Edit(int id, FormCollection formvalues) var album = storedb.albums.single(a => a.albumid == id); try //Save Album UpdateModel(album, "Album"); storedb.savechanges(); return RedirectToAction("Index"); catch var viewmodel = new StoreManagerViewModel Album = album, Genres = storedb.genres.tolist(), Artists = storedb.artists.tolist() ; return View(viewModel); We use the [HttpPost] attribute to indicate that this form will only respond to the HTTP-POST method, so it is only displayed when a user submits the form. Adding the Create View Since we ve created a shared editor template for the Album type, the create scenario is really easy. First we ll create a controller action method to display a new (empty) Album. // // GET: /StoreManager/Create Page 55
57 public ActionResult Create() var viewmodel = new StoreManagerViewModel Album = new Album(), Genres = storedb.genres.tolist(), Artists = storedb.artists.tolist() ; return View(viewModel); Next we right-click on that method and add a Create View that is strongly-typed to the StoreManagerViewModel. We need to add in our call to Html.EditorFor, just as in the Store Manager Edit form above. <fieldset> <legend>create Album</legend> <%: Html.EditorFor(model => model.album, new Artists = Model.Artists, Genres = Model.Genres )%> <p> <input type="submit" value="save" /> </p> </fieldset> Now the Create form looks just like the Edit form, but with default values. Page 56
 try //Save Album storedb.addtoalbums(album); storedb.")
58 And finally, we need to write our HTTP-POST Create controller action method, which follows the same pattern as our HTTP-POST Edit controller action method. // // POST: /StoreManager/Create [HttpPost] public ActionResult Create(Album album) try //Save Album storedb.addtoalbums(album); storedb.savechanges(); return Redirect("/"); catch //Invalid - redisplay with errors var viewmodel = new StoreManagerViewModel Album = album, Genres = storedb.genres.tolist(), Artists = storedb.artists.tolist() ; Page 57
59 return View(viewModel); There s only one real difference here instead of loading an existing Album and calling UpdateModel, we ll just accept an Album as the Action Method parameter and add it to the Albums list before saving. Handling Deletion Deletion follows the same pattern as Edit and Create, using one controller action to display the confirmation form, and another controller action to handle the form submission. The HTTP-GET Delete controller action is exactly the same as our previous Store Details controller action. // // GET: /StoreManager/Delete/5 public ActionResult Delete(int id) var album = storedb.albums.single(a => a.albumid == id); return View(album); We display a form that s strongly typed to an Album type, using the Delete view content template. The Delete template shows all the fields for the model, but we can simplify that down quite a bit. Page 58
60 <asp:content ID="Content2" ContentPlaceHolderID="MainContent" runat="server"> <h2> Delete Confirmation </h2> <p> Are you sure you want to delete the album titled <strong><%: Model.Title %></strong>? </p> <div> <% using (Html.BeginForm()) %> <input type="submit" value="delete" /> <% %> </div> </asp:content> Now our HTTP-POST Delete Controller Action takes the following actions: 1. Loads the Album by ID 2. Deletes it the album and save changes 3. Redirect to a simple Deleted view template which indicates that the delete was successful [HttpPost] public ActionResult Delete(int id, string confirmbutton) var album = storedb.albums.include("orderdetails").include("carts").single(a => a.albumid == id); // For simplicity, we're allowing deleting of albums // with existing orders We've set up OnDelete = Cascade // on the Album->OrderDetails and Album->Carts relationships storedb.deleteobject(album); storedb.savechanges(); return View("Deleted"); We re using cascading deletes so that deleting an Album will also delete associated OrderDetails and Cart entries. If we didn t do this, attempting to delete an Album which had previously been ordered would fail due to the foreign key relationship in the database. You would need to assess this for your specific business scenario, since in many cases you wouldn t want to allow deleting products which had previously been ordered. To enable cascade deletes, first select the relationship in the Entity Data Model designer. Page 59


61 Now in the properties window, set the OnDelete value for the associated table to Cascade. Using Data Annotations for Model Validation We have a major issue with our Create and Edit forms: they re not doing any validation. We can do things like leave required fields blank or type letters in the Price field, and the first error we ll see is from the database. We can easily add validation to our application by adding Data Annotations to our model classes. Data Annotations allow us to describe the rules we want applied to our model properties, and ASP.NET MVC will take care of enforcing them and displaying appropriate messages to our users. For a simple Model class, adding a Data Annotation is just handled by adding a using statement for System.ComponentModel.DataAnnotation, then placing attributes on your properties, like this: using System.ComponentModel.DataAnnotations; Page 60
62 namespace SuperheroSample.Models public class Superhero [Required] public string Name get; set; public bool WearsCape get; set; The above example makes the Name value a required field. Using MetaData Partial Classes with Entity Framework This is a little more complex in the case of Entity Framework models, since the model classes are generated. If we added Data Annotations directly to our model classes, they would be overwritten if we update our model from the database. Instead, we can make use of metadata partial classes which exist to hold our annotations and are associated with our model classes using the [MetadataType] attribute. For our Album model, we would declare our metadata class as follows. using System.ComponentModel.DataAnnotations; namespace MvcMusicStore.Models [MetadataType(typeof(AlbumMetaData))] public partial class Album // Validation rules for the Album class public class AlbumMetaData // Rules go here Adding Validation to our Album Forms This Album partial class has a MetadataType attribute which points to the AlbumMetaData class for our Data Annotations. We can then annotate our Album model. We ll use the following Data Annotation attributes: Required Indicates that the property is a required field DisplayName Defines the text we want used on form fields and validation messages StringLength Defines a maximum length for a string field Range Gives a maximum and minimum value for a numeric field Bind Lists fields to exclude or include when binding parameter or form values to model properties ScaffoldColumn Allows hiding fields from editor forms Page 61
63 We can handle our validation by adding an Album class to the Models folder with the following code: using System.ComponentModel; using System.ComponentModel.DataAnnotations; using System.Web.Mvc; namespace MvcMusicStore.Models [MetadataType(typeof(AlbumMetaData))] public partial class Album // Validation rules for the Album class [Bind(Exclude = "AlbumId")] public class AlbumMetaData [ScaffoldColumn(false)] public object AlbumId get; set; [DisplayName("Genre")] public object GenreId get; set; [DisplayName("Artist")] public object ArtistId get; set; [Required(ErrorMessage = "An Album Title is required")] [StringLength(160)] public object Title get; set; [DisplayName("Album Art URL")] [StringLength(1024)] public object AlbumArtUrl get; set; [Required(ErrorMessage = "Price is required")] [Range(0.01, , ErrorMessage="Price must be between 0.01 and ")] public object Price get; set; After having added this class, our Create and Edit screen immediately begin validating fields and using the Display Names we ve chosen (e.g. Genre instead of GenreID). Page 62

64 Using Client-Side Validation We can add client-side (AJAX) validation to our forms with just a few lines of code. First we need to include some JavaScript references, either in our site MasterPage or to the specific forms that will be using client-side validation. We ll add the scripts to our Album editor template, like this: <%@ Import Namespace="MvcMusicStore"%> <%@ Control Language="C#" Inherits="System.Web.Mvc.ViewUserControl<MvcMusicStore.Models.Album>" %> <script src="/scripts/microsoftajax.js" type="text/javascript"></script> <script src="/scripts/microsoftmvcajax.js" type="text/javascript"></script> <script src="/scripts/microsoftmvcvalidation.js" type="text/javascript"></script> Now we use the Html.EnableClientValidation helper method to turn on client-side validation. For the both the Create and Edit view templates, add that call directly above the Html.BeginForm call, like so: <h2>create</h2> <% Html.EnableClientValidation(); %> <% using (Html.BeginForm()) %> Page 63
65 <fieldset> <legend>create Album</legend> <%: Html.EditorFor(model => model.album, new Artists = Model.Artists, Genres = Model.Genres )%> <p> <input type="submit" value="save" /> </p> </fieldset> <% %> That s all that s required to set up client-side validation. Now all fields are checked in the browser before being submitted to our controller actions. Membership and Authorization Our Store Manager controller is currently accessible to anyone visiting our site. Let s change this to restrict permission to site administrators. Adding the AccountController and Views One difference between the full ASP.NET MVC 2 Web Application template and the ASP.NET MVC 2 Empty Web Application template is that the empty template doesn t include an Account Controller. We ll add an Account Controller by copying a few files from a new ASP.NET MVC application created from the full ASP.NET MVC 2 Web Application template. Create a new ASP.NET MVC application using the full ASP.NET MVC 2 Web Application template and copy the following files into the same directories in our project: 1. Copy AccountController.cs in the Controllers directory 2. Copy AccountModels in the Models directory 3. Create an Account directory inside the Views directory and copy all four views in Change the namespace for the Controller and Model classes so they begin with MvcMusicStore. The AccountController class should use the MvcMusicStore.Controllers namespace, and the AccountModels class should use the MvcMusicStore.Models namespace. The updated solution should look like the following: Page 64


66 Adding an Administrative User with the ASP.NET Configuration site Before we require Authorization in our website, we ll need to create a user with access. The easiest way to create a user is to use the built-in ASP.NET Configuration website. Launch the ASP.NET Configuration website by clicking following the icon in the Solution Explorer. This launches a configuration website. Click on the Security tab on the home screen, then click the Enable roles link in the center of the screen. Page 65
67 Next, click on the Create user link on the left side. Page 66

68 Fill in the user information fields on the left, select the Administrator role for this user, and click the Create User button. Page 67

69 At this point, you should see a message indicating that the user was created successfully. You can close the form. Role-based Authorization Now we can restrict access to the StoreManagerController using the [Authorize] attribute, specifying that the user must be in the Administrator role to access any controller action in the class. [Authorize(Roles = "Administrator")] public class StoreManagerController : Controller // Controller code here Note: The [Authorize] attribute can be placed on specific action methods as well as at the Controller class level. Now browsing to the Store Manager brings up a Log On dialog: Page 68

70 After logging on with our new Administrator account, we re able to go to the Album Edit screen as before. Registration and Checkout We ll allow users to place albums in their cart without registering, but they ll need to register as guests to complete checkout. The shopping and checkout process will be separated into two controllers: a ShoppingCart Controller which allows anonymously adding items to a cart, and a Checkout Controller which handles the checkout process. First we ll create the ShoppingCartViewModel class. It has two properties: a list of Cart items, and a decimal value to hold the total price for all items in the cart. using System.Collections.Generic; using MvcMusicStore.Models; namespace MvcMusicStore.ViewModels public class ShoppingCartViewModel public List<Cart> CartItems get; set; public decimal CartTotal get; set; Page 69
71 Managing the Shopping Cart business logic Next, we ll create the ShoppingCart class in the Models folder. The ShoppingCart model handles data access to the Cart table, but as well as handles the business logic to for adding and removing items from the shopping cart. Since we don t want to require users to sign up for an account just to add items to their shopping cart, we will assign users a temporary unique identifier (using a GUID, or globally unique identifier) when they access the shopping cart. We ll store this ID using the ASP.NET Session class. Note: The ASP.NET Session is a convenient place to store user-specific information which will expire after they leave the site. While misuse of session state can have performance implications on larger sites, our light use will work well for demonstration purposes. The ShoppingCart class exposes the following methods: AddToCart takes an Album as a parameter and adds it to the user s cart. Since the Cart table tracks quantity for each album, it includes logic to create a new row if needed or just increment the quantity if the user has already ordered one copy of the album. RemoveFromCart takes an Album ID and removes it from the user s cart. If the user only had one copy of the album in their cart, the row is removed. EmptyCart removes all items from a user s shopping cart. GetCartItems retrieves a list of CartItems for display or processing. GetCount retrieves a the total number of albums a user has in their shopping cart. GetTotal calculates the total cost of all items in the cart. CreateOrder converts the shopping cart to an order during the checkout phase. GetCart is a static method which allows our controllers to obtain a cart object. It uses the GetCartId method to handle reading the CartId from the user s session. The GetCartId method requires the HttpContextBase so that it can read the user s CartId from user s session. Here s the complete ShoppingCart class: using System; using System.Collections.Generic; using System.Linq; using System.Web; namespace MvcMusicStore.Models public partial class ShoppingCart MusicStoreEntities storedb = new MusicStoreEntities(); string shoppingcartid get; set; public const string CartSessionKey = "CartId"; Page 70
72 public static ShoppingCart GetCart(HttpContextBase context) var cart = new ShoppingCart(); cart.shoppingcartid = cart.getcartid(context); return cart; public void AddToCart(Album album) var cartitem = storedb.carts.singleordefault( c => c.cartid == shoppingcartid && c.albumid == album.albumid); if (cartitem == null) // Create a new cart item cartitem = new Cart AlbumId = album.albumid, CartId = shoppingcartid, Count = 1, DateCreated = DateTime.Now ; storedb.addtocarts(cartitem); else // Add one to the quantity cartitem.count++; // Save it storedb.savechanges(); public void RemoveFromCart(int id) //Get the cart var cartitem = storedb.carts.single( cart => cart.cartid == shoppingcartid && cart.recordid == id); if (cartitem!= null) if (cartitem.count > 1) cartitem.count--; else storedb.carts.deleteobject(cartitem); storedb.savechanges(); public void EmptyCart() Page 71
73 var cartitems = storedb.carts.where(cart => cart.cartid == shoppingcartid); foreach (var cartitem in cartitems) storedb.deleteobject(cartitem); storedb.savechanges(); public List<Cart> GetCartItems() var cartitems = (from cart in storedb.carts where cart.cartid == shoppingcartid select cart).tolist(); return cartitems; public int GetCount() int? count = (from cartitems in storedb.carts where cartitems.cartid == shoppingcartid select (int?)cartitems.count).sum(); return count?? 0; public decimal GetTotal() decimal? total = (from cartitems in storedb.carts where cartitems.cartid == shoppingcartid select (int?)cartitems.count * cartitems.album.price).sum(); return total?? decimal.zero; public int CreateOrder(Order order) decimal ordertotal = 0; var cartitems = GetCartItems(); //Iterate the items in the cart, adding Order Details for each foreach (var cartitem in cartitems) var orderdetails = new OrderDetail AlbumId = cartitem.albumid, OrderId = order.orderid, UnitPrice = cartitem.album.price ; storedb.orderdetails.addobject(orderdetails); Page 72
74 ordertotal += (cartitem.count * cartitem.album.price); //Save the order storedb.savechanges(); //Empty the shopping cart EmptyCart(); //Return the OrderId as a confirmation number return order.orderid; // We're using HttpContextBase to allow access to cookies. public String GetCartId(HttpContextBase context) if (context.session[cartsessionkey] == null) if (!string.isnullorwhitespace(context.user.identity.name)) // User is logged in, associate the cart with there username context.session[cartsessionkey] = context.user.identity.name; else // Generate a new random GUID using System.Guid Class Guid tempcartid = Guid.NewGuid(); // Send tempcartid back to client as a cookie context.session[cartsessionkey] = tempcartid.tostring(); return context.session[cartsessionkey].tostring(); // When a user has logged in, migrate their shopping cart to // be associated with their username public void MigrateCart(string username) var shoppingcart = storedb.carts.where(c => c.cartid == shoppingcartid); foreach (Cart item in shoppingcart) item.cartid = username; storedb.savechanges(); The Shopping Cart Controller The Shopping Cart controller has three main purposes: adding items to a cart, removing items from the cart, and viewing items in the cart. It will make use of two additional classes: a Page 73
75 ShoppingCartViewModel and a ShoppingCart model class. As in the StoreController and StoreManagerController, we ll add a field to hold an instance of MusicStoreEntities. Here s the complete StoreManager controller class. The Index and Add Controller actions should look very familiar. The Remove and CartSummary controller actions handle two special cases, which we ll discuss next. using System.Linq; using System.Web.Mvc; using MvcMusicStore.Models; using MvcMusicStore.ViewModels; using System.Collections.Generic; using System.Collections.Specialized; namespace MvcMusicStore.Controllers public class ShoppingCartController : Controller MusicStoreEntities storedb = new MusicStoreEntities(); // // GET: /ShoppingCart/ public ActionResult Index() var cart = ShoppingCart.GetCart(this.HttpContext); // Set up our ViewModel var viewmodel = new ShoppingCartViewModel CartItems = cart.getcartitems(), CartTotal = cart.gettotal() ; // Return the view return View(viewModel); // // GET: /Store/AddToCart/5 public ActionResult AddToCart(int id) // Retrieve the album from the database var addedalbum = storedb.albums.single(album => album.albumid == id); // Add it to the shopping cart var cart = ShoppingCart.GetCart(this.HttpContext); cart.addtocart(addedalbum); // Go back to the main store page for more shopping return RedirectToAction("Index"); Page 74
76 // // AJAX: /ShoppingCart/RemoveFromCart/5 [HttpPost] public ActionResult RemoveFromCart(int id) // Remove the item from the cart var cart = ShoppingCart.GetCart(this.HttpContext); // Get the name of the album to display confirmation string albumname = storedb.carts.single(item => item.recordid == id).album.title; // Remove from cart. Note that for simplicity, we're // removing all rather than decrementing the count. cart.removefromcart(id); // Display the confirmation message var results = new ShoppingCartRemoveViewModel Message = Server.HtmlEncode(albumName) + " has been removed from your shopping cart.", CartTotal = cart.gettotal(), CartCount = cart.getcount(), DeleteId = id ; return Json(results); // // GET: /ShoppingCart/CartSummary [ChildActionOnly] public ActionResult CartSummary() var cart = ShoppingCart.GetCart(this.HttpContext); ViewData["CartCount"] = cart.getcount(); return PartialView("CartSummary"); AJAX Updates using Ajax.ActionLink We ll next create Shopping Cart Index page that is strongly typed to the ShoppingCartViewModel and uses the List View template using the same method as before. However, instead of using an Html.ActionLink to remove items from the cart, we ll use Ajax.ActionLink: <%: Ajax.ActionLink("Remove from cart", "RemoveFromCart", new id = item.recordid, new AjaxOptions OnSuccess = "handleupdate" )%> This method works very similarly to the Html.ActionLink helper method, but instead of posting the form it just makes an AJAX callback to our RemoveFromCart. The RemoveFromCart returns a JSON Page 75
77 serialized result, which is automatically passed to the JavaScript method specified in our AjaxOptions OnSuccess parameter handleupdate in this case. The handleupdate Javascript function parses the JSON results and performs four quick updates to the page using jquery: 1. Removes the deleted album from the list 2. Updates the cart count in the header 3. Displays an update message to the user 4. Updates the cart total price Page Title="" Language="C#" MasterPageFile="~/Views/Shared/Site.Master" Inherits="System.Web.Mvc.ViewPage<MvcMusicStore.ViewModels.ShoppingCartViewModel>" %> <asp:content ID="Content1" ContentPlaceHolderID="TitleContent" runat="server"> Shopping Cart </asp:content> <asp:content ID="Content2" ContentPlaceHolderID="MainContent" runat="server"> <script src="/scripts/microsoftajax.js" type="text/javascript"></script> <script src="/scripts/microsoftmvcajax.js" type="text/javascript"></script> <script src="/scripts/jquery min.js" type="text/javascript"></script> <script type="text/javascript"> function handleupdate(context) // Load and deserialize the returned JSON data var json = context.get_data(); var data = Sys.Serialization.JavaScriptSerializer.deserialize(json); // Update the page elements $('#row-' + data.deleteid).fadeout('slow'); $('#cart-status').text('cart (' + data.cartcount + ')'); $('#update-message').text(data.message); $('#cart-total').text(data.carttotal); </script> <h3> <em>review</em> your cart: </h3> <p class="button"> <%: Html.ActionLink("Checkout >>", "AddressAndPayment", "Checkout")%> </p> <div id="update-message"></div> <table> <tr> <th>album Name</th> <th>price (each)</th> <th>quantity</th> <th></th> </tr> <% foreach (var item in Model.CartItems) %> <tr id="row-<%: item.recordid %>"> <td> Page 76
78 <%: Html.ActionLink(item.Album.Title, "Details", "Store", new id = item.albumid, null)%> </td> <td> <%: item.album.price %> </td> <td> <%: item.count %> </td> <td> <%: Ajax.ActionLink("Remove from cart", "RemoveFromCart", new id = item.recordid, new AjaxOptions OnSuccess = "handleupdate" )%> </td> </tr> <% %> <tr> <td>total</td> <td></td> <td></td> <td id="cart-total"> <%: Model.CartTotal %> </td> </tr> </table> </asp:content> Showing the Cart summary in the header with RenderPartial We want to expose the number of items in the user s shopping cart across the entire site, and we can do that by using a PartialView. As shown previously, the ShoppingCart controller includes a CartSummary action method which returns a PartialView: // // GET: /ShoppingCart/CartSummary [ChildActionOnly] public ActionResult CartSummary() var cart = ShoppingCart.GetCart(this.HttpContext); ViewData["CartCount"] = cart.getcount(); return PartialView("CartSummary"); We can then include the cart summary in our Site master using the Html.RenderAction method: <% Html.RenderAction("CartSummary", "ShoppingCart"); %> Page 77

79 RenderAction requires us to specify the Action Name ( CartSummary ) and the Controller Name ( ShoppingCart ). Adding in Site style and Conclusion Since we started by adding a Site master page and built our site using clean markup, we can easily update the site look and feel. We ll update the site appearance by copying the Site.css and Images folder, both in the Content folder, with the completed site design files included in the download. Now browsing the site shows our update design: Page 78
MVC CRUD. Tables: 1) Dinners (First Table)
 Dinners (First Table)") Tables: First create one database and name it NerdDinner. Now run following code to generate tables or create by your own if you know how to create and give relationship between two tables. 1) Dinners
Tables: First create one database and name it NerdDinner. Now run following code to generate tables or create by your own if you know how to create and give relationship between two tables. 1) Dinners
MVC :: Understanding Views, View Data, and HTML Helpers
 MVC :: Understanding Views, View Data, and HTML Helpers The purpose of this tutorial is to provide you with a brief introduction to ASP.NET MVC views, view data, and HTML Helpers. By the end of this tutorial,
MVC :: Understanding Models, Views, and Controllers
 MVC :: Understanding Models, Views, and Controllers This tutorial provides you with a high-level overview of ASP.NET MVC models, views, and controllers. In other words, it explains the M, V, and C in ASP.NET
MVC :: Preventing JavaScript Injection Attacks. What is a JavaScript Injection Attack?
 MVC :: Preventing JavaScript Injection Attacks The goal of this tutorial is to explain how you can prevent JavaScript injection attacks in your ASP.NET MVC applications. This tutorial discusses two approaches
Babu Madhav Institute of information technology 2016
 Course Code: 060010602 Course Name: Web Development using ASP.NET MVC Unit 1 Short Questions 1. What is an ASP.NET MVC? 2. Write use of FilterConfiguration.cs file. 3. Define: 1) Model 2) View 3) Controller
Bringing Together One ASP.NET
 Bringing Together One ASP.NET Overview ASP.NET is a framework for building Web sites, apps and services using specialized technologies such as MVC, Web API and others. With the expansion ASP.NET has seen
CST272 Getting Started Page 1
 CST272 Getting Started Page 1 1 2 3 4 5 6 8 Introduction to ASP.NET, Visual Studio and C# CST272 ASP.NET Static and Dynamic Web Applications Static Web pages Created with HTML controls renders exactly
TRAINING GUIDE. Rebranding Lucity Web
 TRAINING GUIDE Rebranding Lucity Web Rebranding Lucity Web Applications In this booklet, we ll show how to make the Lucity web applications your own by matching your agency s style. Table of Contents Web
Pro ASP.NET MVC 2 Framework
 Pro ASP.NET MVC 2 Framework Second Edition Steven Sanderson Apress TIB/UB Hannover 89 133 297 713 Contents at a Glance Contents About the Author About the Technical Reviewers Acknowledgments Introduction
SharePoint 2010 Site Owner s Manual by Yvonne M. Harryman
 SharePoint 2010 Site Owner s Manual by Yvonne M. Harryman Chapter 9 Copyright 2012 Manning Publications Brief contents PART 1 GETTING STARTED WITH SHAREPOINT 1 1 Leveraging the power of SharePoint 3 2
Table Basics. The structure of an table
 TABLE -FRAMESET Table Basics A table is a grid of rows and columns that intersect to form cells. Two different types of cells exist: Table cell that contains data, is created with the A cell that
Dreamweaver MX The Basics
 Chapter 1 Dreamweaver MX 2004 - The Basics COPYRIGHTED MATERIAL Welcome to Dreamweaver MX 2004! Dreamweaver is a powerful Web page creation program created by Macromedia. It s included in the Macromedia
MVC :: Understanding Controllers, Controller Actions, and Action Results
 MVC :: Understanding Controllers, Controller Actions, and Action Results This tutorial explores the topic of ASP.NET MVC controllers, controller actions, and action results. After you complete this tutorial,
5 Years Integrated M.Sc. (IT) 6th Semester Web Development using ASP.NET MVC Practical List 2016
 6th Semester Web Development using ASP.NET MVC Practical List 2016") Practical No: 1 Enrollment No: Name: Practical Problem (a) Create MVC 4 application which takes value from browser URL. Application should display following output based on input no : Ex. No = 1234 o/p
Practical No: 1 Enrollment No: Name: Practical Problem (a) Create MVC 4 application which takes value from browser URL. Application should display following output based on input no : Ex. No = 1234 o/p
NerdDinner Step 1: File->New Project
 1 P a g e NerdDinner Step 1: File->New Project [This is step 1 of a free "NerdDinner" application tutorial that walks-through how to build a small, but complete, web application using ASP.NET MVC. We'll
5 Snowdonia. 94 Web Applications with C#.ASP
 94 Web Applications with C#.ASP 5 Snowdonia In this and the following three chapters we will explore the use of particular programming techniques, before combining these methods to create two substantial
Developing ASP.NET MVC 5 Web Applications. Course Outline
 Developing ASP.NET MVC 5 Web Applications Course Outline Module 1: Exploring ASP.NET MVC 5 The goal of this module is to outline to the students the components of the Microsoft Web Technologies stack,
Developing ASP.Net MVC 4 Web Application
 Developing ASP.Net MVC 4 Web Application About this Course In this course, students will learn to develop advanced ASP.NET MVC applications using.net Framework 4.5 tools and technologies. The focus will
20486: Developing ASP.NET MVC 4 Web Applications
 20486: Developing ASP.NET MVC 4 Web Applications Length: 5 days Audience: Developers Level: 300 OVERVIEW In this course, students will learn to develop advanced ASP.NET MVC applications using.net Framework
COURSE 20486B: DEVELOPING ASP.NET MVC 4 WEB APPLICATIONS
 ABOUT THIS COURSE In this course, students will learn to develop advanced ASP.NET MVC applications using.net Framework 4.5 tools and technologies. The focus will be on coding activities that enhance the
20486: Developing ASP.NET MVC 4 Web Applications (5 Days)
") www.peaklearningllc.com 20486: Developing ASP.NET MVC 4 Web Applications (5 Days) About this Course In this course, students will learn to develop advanced ASP.NET MVC applications using.net Framework
www.peaklearningllc.com 20486: Developing ASP.NET MVC 4 Web Applications (5 Days) About this Course In this course, students will learn to develop advanced ASP.NET MVC applications using.net Framework
Introducing Models. Data model: represent classes that iteract with a database. Data models are set of
 Models 1 Objectives Define and describe models Explain how to create a model Describe how to pass model data from controllers to view Explain how to create strongly typed models Explain the role of the
Course Outline. ASP.NET MVC 5 Development Training Course ASPNETMVC5: 5 days Instructor Led. About this Course
 ASP.NET MVC 5 Development Training Course ASPNETMVC5: 5 days Instructor Led About this Course ASP.NET MVC 5 is Microsoft's last MVC release based on both the.net Framework or.net Core 1.0 for building
Developing ASP.NET MVC 4 Web Applications
 Developing ASP.NET MVC 4 Web Applications Course 20486B; 5 days, Instructor-led Course Description In this course, students will learn to develop advanced ASP.NET MVC applications using.net Framework 4.5
Apex TG India Pvt. Ltd.
 (Core C# Programming Constructs) Introduction of.net Framework 4.5 FEATURES OF DOTNET 4.5 CLR,CLS,CTS, MSIL COMPILER WITH TYPES ASSEMBLY WITH TYPES Basic Concepts DECISION CONSTRUCTS LOOPING SWITCH OPERATOR
DOT NET SYLLABUS FOR 6 MONTHS
 DOT NET SYLLABUS FOR 6 MONTHS INTRODUCTION TO.NET Domain of.net D.N.A. Architecture One Tier Two Tier Three Tier N-Tier THE COMMON LANGUAGE RUNTIME (C.L.R.) CLR Architecture and Services The.Net Intermediate
Working with Controllers
 Controller 1 Objectives 2 Define and describe controllers Describe how to work with action methods Explain how to invoke action methods Explain routing requests Describe URL patterns Working with Controllers
Course 20486B: Developing ASP.NET MVC 4 Web Applications
 Course 20486B: Developing ASP.NET MVC 4 Web Applications Overview In this course, students will learn to develop advanced ASP.NET MVC applications using.net Framework 4.5 tools and technologies. The focus
Professional ASP.NET MVC 4
 Professional ASP.NET MVC 4 Galloway, J ISBN-13: 9781118348468 Table of Contents FOREWORD xxvii INTRODUCTION xxix CHAPTER 1: GETTING STARTED 1 A Quick Introduction to ASP.NET MVC 1 How ASP.NET MVC Fits
Developing ASP.NET MVC 4 Web Applications
 Developing ASP.NET MVC 4 Web Applications Duration: 5 Days Course Code: 20486B About this course In this course, students will learn to develop advanced ASP.NET MVC applications using.net Framework 4.5
Visual Studio Course Developing ASP.NET MVC 5 Web Applications
 Visual Studio Course - 20486 Developing ASP.NET MVC 5 Web Applications Length 5 days Prerequisites Before attending this course, students must have: In this course, students will learn to develop advanced
COPYRIGHTED MATERIAL A QUICK INTRODUCTION TO ASP.NET MVC. by Jon Galloway
 1 by Jon Galloway WHAT S IN THIS CHAPTER? Understanding ASP.NET MVC An overview of ASP.NET MVC 5 How to create MVC 5 applications How MVC applications are structured This chapter gives you a quick introduction
ASP.NET MVC Training
 TRELLISSOFT ASP.NET MVC Training About This Course: Audience(s): Developers Technology: Visual Studio Duration: 6 days (48 Hours) Language(s): English Overview In this course, students will learn to develop
SharpShooter Reports.Web Getting Started (ASP.NET Web Application)
") SharpShooter Reports.Web Getting Started (ASP.NET Web Application) Last modified on: March 19, 2012 Table of Content Table of Content... 2 System Requirements... 3 Introduction... 3 Implementation... 3
SharpShooter Reports.Web Getting Started (ASP.NET Web Application) Last modified on: March 19, 2012 Table of Content Table of Content... 2 System Requirements... 3 Introduction... 3 Implementation... 3
Customizing DAZ Studio
 Customizing DAZ Studio This tutorial covers from the beginning customization options such as setting tabs to the more advanced options such as setting hot keys and altering the menu layout. Introduction:
Techniques for Optimizing Reusable Content in LibGuides
 University of Louisville From the SelectedWorks of Terri Holtze April 21, 2017 Techniques for Optimizing Reusable Content in LibGuides Terri Holtze, University of Louisville Available at: https://works.bepress.com/terri-holtze/4/
Developing ASP.NET MVC 5 Web Applications
 Developing ASP.NET MVC 5 Web Applications Course 20486C; 5 days, Instructor-led Course Description In this course, students will learn to develop advanced ASP.NET MVC applications using.net Framework tools
Index. Bower, 133, 352 bower.json file, 376 Bundling files, 157
 Index A Action results. See Controllers Actions. See Controllers Application model, 986 action constraints, 1000 Areas. See Routing Arrow functions. See Lambda expressions ASP.NET Core MVC (see Model View
CHAPTER 1: GETTING STARTED WITH ASP.NET 4 1
 FOREWORD INTRODUCTION xxv xxvii CHAPTER 1: GETTING STARTED WITH ASP.NET 4 1 Microsoft Visual Web Developer 2 Getting Visual Web Developer 3 Installing Visual Web Developer Express 3 Creating Your First
DOT NET Syllabus (6 Months)
") DOT NET Syllabus (6 Months) THE COMMON LANGUAGE RUNTIME (C.L.R.) CLR Architecture and Services The.Net Intermediate Language (IL) Just- In- Time Compilation and CLS Disassembling.Net Application to IL
DOT NET Syllabus (6 Months) THE COMMON LANGUAGE RUNTIME (C.L.R.) CLR Architecture and Services The.Net Intermediate Language (IL) Just- In- Time Compilation and CLS Disassembling.Net Application to IL
20486 Developing ASP.NET MVC 5 Web Applications
 Course Overview In this course, students will learn to develop advanced ASP.NET MVC applications using.net Framework tools and technologies. The focus will be on coding activities that enhance the performance
Hellerstein/Olston. Homework 6: Database Application. beartunes. 11:59:59 PM on Wednesday, December 6 th
 Homework 6: Database Application beartunes Due @ 11:59:59 PM on Wednesday, December 6 th Overview For this assignment, you ll be implementing portions of a database-backed web application using Ruby on
Ad Banner Manager 8.1 User Guide. Ad Banner Manager 8.1
 Ad Banner Manager 8.1 User Guide Ad Banner Manager 8.1 User Guide... 1 Introduction... 6 Installation and configuration... 6 Upgrading... 6 Installation Steps... 7 Setting Page Permissions for the BannerAdvertisers
Microsoft Developing ASP.NET MVC 4 Web Applications
 1800 ULEARN (853 276) www.ddls.com.au Microsoft 20486 - Developing ASP.NET MVC 4 Web Applications Length 5 days Price $4290.00 (inc GST) Version C Overview In this course, students will learn to develop
10267A CS: Developing Web Applications Using Microsoft Visual Studio 2010
 10267A CS: Developing Web Applications Using Microsoft Visual Studio 2010 Course Overview This instructor-led course provides knowledge and skills on developing Web applications by using Microsoft Visual
Using Development Tools to Examine Webpages
 Chapter 9 Using Development Tools to Examine Webpages Skills you will learn: For this tutorial, we will use the developer tools in Firefox. However, these are quite similar to the developer tools found
CONVERSION TRACKING PIXEL GUIDE
 Conversion Tracking Pixel Guide A Step By Step Guide to Installing a conversion tracking pixel for your next Facebook ad. Go beyond clicks, and know who s converting. PRESENTED BY JULIE LOWE OF SOCIALLY
One of the fundamental kinds of websites that SharePoint 2010 allows
 Chapter 1 Getting to Know Your Team Site In This Chapter Requesting a new team site and opening it in the browser Participating in a team site Changing your team site s home page One of the fundamental
COPYRIGHTED MATERIAL. Starting Strong with Visual C# 2005 Express Edition
 1 Starting Strong with Visual C# 2005 Express Edition Okay, so the title of this chapter may be a little over the top. But to be honest, the Visual C# 2005 Express Edition, from now on referred to as C#
SelectSurvey.NET Developers Manual
 Developers Manual (Last updated: 5/6/2016) SelectSurvey.NET Developers Manual Table of Contents: SelectSurvey.NET Developers Manual... 1 Overview... 2 Before Starting - Is your software up to date?...
For your convenience Apress has placed some of the front matter material after the index. Please use the Bookmarks and Contents at a Glance links to
 For your convenience Apress has placed some of the front matter material after the index. Please use the Bookmarks and Contents at a Glance links to access them. Contents at a Glance About the Author...
Table of contents. DMXzone Ajax Form Manual DMXzone
 Table of contents Table of contents... 1 About Ajax Form... 2 Features in Detail... 3 The Basics: Basic Usage of Ajax Form... 13 Advanced: Styling the Default Success and Error Message Sections... 24 Advanced:
Static Webpage Development
 Dear Student, Based upon your enquiry we are pleased to send you the course curriculum for PHP Given below is the brief description for the course you are looking for: - Static Webpage Development Introduction
Implementing a chat button on TECHNICAL PAPER
 Implementing a chat button on TECHNICAL PAPER Contents 1 Adding a Live Guide chat button to your Facebook page... 3 1.1 Make the chat button code accessible from your web server... 3 1.2 Create a Facebook
20486C: Developing ASP.NET MVC 5 Web Applications
 20486C: Developing ASP.NET MVC 5 Web Course Details Course Code: Duration: Notes: 20486C 5 days This course syllabus should be used to determine whether the course is appropriate for the students, based
Course Outline. Developing Web Applications with ASP.Net MVC 5. Course Description: Pre-requisites: Course Content:
 Developing Web Applications with ASP.Net MVC 5 Course Description: The Model View Controller Framework in ASP.NET provides a new way to develop Web applications for the Microsoft.NET platform. Differing
Bruce Moore Fall 99 Internship September 23, 1999 Supervised by Dr. John P.
 Bruce Moore Fall 99 Internship September 23, 1999 Supervised by Dr. John P. Russo Active Server Pages Active Server Pages are Microsoft s newest server-based technology for building dynamic and interactive
Website Development Lecture 18: Working with JQuery ================================================================================== JQuery
 JQuery What You Will Learn in This Lecture: What jquery is? How to use jquery to enhance your pages, including adding rich? Visual effects and animations. JavaScript is the de facto language for client-side
E-Commerce Web Application
 E-Commerce Web Application Documentation Jonathan Ellis Summary and Requirements DigitalX is a shop for music, movies, and video games in Auckland. The old website of DigitalX was developed using PHP and
SQL Server. Management Studio. Chapter 3. In This Chapter. Management Studio. c Introduction to SQL Server
 Chapter 3 SQL Server Management Studio In This Chapter c Introduction to SQL Server Management Studio c Using SQL Server Management Studio with the Database Engine c Authoring Activities Using SQL Server
1. I NEED TO HAVE MULTIPLE VERSIONS OF VISUAL STUDIO INSTALLED IF I M MAINTAINING APPLICATIONS THAT RUN ON MORE THAN ONE VERSION OF THE.
 CUSTOMER PAIN POINTS 1. I NEED TO HAVE MULTIPLE VERSIONS OF VISUAL STUDIO INSTALLED IF I M MAINTAINING APPLICATIONS THAT RUN ON MORE THAN ONE VERSION OF THE.NET FRAMEORK. THAT S TAKING UP SPACE ON MY HARDDRIVE
1 Build Your First App. The way to get started is to quit talking and begin doing. Walt Disney
 1 Build Your First App The way to get started is to quit talking and begin doing. Walt Disney Copyright 2015 AppCoda Limited All rights reserved. Please do not distribute or share without permission. No
Developing ASP.NET MVC 4 Web Applications
 Developing ASP.NET MVC 4 Web Applications Código del curso: 20486 Duración: 5 días Acerca de este curso In this course, students will learn to develop advanced ASP.NET MVC applications using.net Framework
PlayerLync Forms User Guide (MachForm)
") PlayerLync Forms User Guide (MachForm) Table of Contents FORM MANAGER... 1 FORM BUILDER... 3 ENTRY MANAGER... 4 THEME EDITOR... 6 NOTIFICATIONS... 8 FORM CODE... 9 FORM MANAGER The form manager is where
PlayerLync Forms User Guide (MachForm) Table of Contents FORM MANAGER... 1 FORM BUILDER... 3 ENTRY MANAGER... 4 THEME EDITOR... 6 NOTIFICATIONS... 8 FORM CODE... 9 FORM MANAGER The form manager is where
We aren t getting enough orders on our Web site, storms the CEO.
 In This Chapter Introducing how Ajax works Chapter 1 Ajax 101 Seeing Ajax at work in live searches, chat, shopping carts, and more We aren t getting enough orders on our Web site, storms the CEO. People
Justin Jones 21 st February 2013 Version 1.1 Setting up an MVC4 Multi-Tenant Site
 Setting up an MVC4 Multi-Tenant Site Contents Introduction... 2 Prerequisites... 2 Requirements Overview... 3 Design Structure (High Level)... 4 Setting Up... 5 Dynamic Layout Pages... 15 Custom Attribute
CST272 Getting Started Page 1
 CST272 Getting Started Page 1 1 2 3 5 6 8 10 Introduction to ASP.NET and C# CST272 ASP.NET ASP.NET Server Controls (Page 1) Server controls can be Buttons, TextBoxes, etc. In the source code, ASP.NET controls
Unifer Documentation. Release V1.0. Matthew S
 Unifer Documentation Release V1.0 Matthew S July 28, 2014 Contents 1 Unifer Tutorial - Notes Web App 3 1.1 Setting up................................................. 3 1.2 Getting the Template...........................................
20486-Developing ASP.NET MVC 4 Web Applications
 Course Outline 20486-Developing ASP.NET MVC 4 Web Applications Duration: 5 days (30 hours) Target Audience: This course is intended for professional web developers who use Microsoft Visual Studio in an
VIDEO 1: WHAT ARE THE SMART CONTENT TOOLS? VIDEO 2: HOW DO YOU CREATE A SMART CTA?
 VIDEO 1: WHAT ARE THE SMART CONTENT TOOLS? Hello again! I m Angela with HubSpot Academy. Now that you have a contextual marketing strategy in place with segmentation and personalization, you re ready to
Using Dreamweaver CC. Logo. 4 Creating a Template. Page Heading. Page content in this area. About Us Gallery Ordering Contact Us Links
 Using Dreamweaver CC 4 Creating a Template Now that the main page of our website is complete, we need to create the rest of the pages. Each of them will have a layout that follows the plan shown below.
Designing the staging area contents
 We are going to design and build our very first ETL mapping in OWB, but where do we get started? We know we have to pull data from the acme_pos transactional database as we saw back in topic 2. The source
Chapter 10. Database Applications The McGraw-Hill Companies, Inc. All rights reserved. McGraw-Hill
 Chapter 10 Database Applications McGraw-Hill 2010 The McGraw-Hill Companies, Inc. All rights reserved. Chapter Objectives Use database terminology correctly Create Windows and Web projects that display
More reading: A series about real world projects that use JavaServer Faces:
 More reading: A series about real world projects that use JavaServer Faces: http://www.jsfcentral.com/trenches 137 This is just a revision slide. 138 Another revision slide. 139 What are some common tasks/problems
Client Side JavaScript and AJAX
 Client Side JavaScript and AJAX Client side javascript is JavaScript that runs in the browsers of people using your site. So far all the JavaScript code we've written runs on our node.js server. This is
Using Dreamweaver CC. 6 Styles in Websites. Exercise 1 Linked Styles vs Embedded Styles
 Using Dreamweaver CC 6 So far we have used CSS to arrange the elements on our web page. We have also used CSS for some limited formatting. In this section we will take full advantage of using CSS to format
Using Code Templates in DDE by Julian Robichaux, panagenda originally published on socialbizug.org, July 2013
 Using Code Templates in DDE by Julian Robichaux, panagenda originally published on socialbizug.org, July 2013 One of the freebies that came with integrating Domino Designer with the Eclipse platform (DDE)
the NXT-G programming environment
 2 the NXT-G programming environment This chapter takes a close look at the NXT-G programming environment and presents a few simple programs. The NXT-G programming environment is fairly complex, with lots
1. Please, please, please look at the style sheets job aid that I sent to you some time ago in conjunction with this document.
 1. Please, please, please look at the style sheets job aid that I sent to you some time ago in conjunction with this document. 2. W3Schools has a lovely html tutorial here (it s worth the time): http://www.w3schools.com/html/default.asp
Quick.JS Documentation
 Quick.JS Documentation Release v0.6.1-beta Michael Krause Jul 22, 2017 Contents 1 Installing and Setting Up 1 1.1 Installation................................................ 1 1.2 Setup...................................................
2013, Active Commerce 1
 2013, Active Commerce 1 2013, Active Commerce 2 Active Commerce User Guide Terminology / Interface Login Adding Media to the Media Library Uploading an Item to the Media Library Editing the Media Meta
Adding content to your Blackboard 9.1 class
 Adding content to your Blackboard 9.1 class There are quite a few options listed when you click the Build Content button in your class, but you ll probably only use a couple of them most of the time. Note
Grading Rubric Homework 1
 Grading Rubric Homework 1 Used Git, has many commits, over time, wrote appropriate commit comments, set up Git correctly with git config Cloning repository results in a working site, no broken links, no
SharePoint SITE OWNER TRAINING
 SharePoint SITE OWNER TRAINING Contents Customizing Your Site... 3 Editing Links...4 Give the site a new look...5 Changing Title, Description, or Logo...6 Remove the Getting Started Icons...6 Adding Apps
Developing Ajax Applications using EWD and Python. Tutorial: Part 2
 Developing Ajax Applications using EWD and Python Tutorial: Part 2 Chapter 1: A Logon Form Introduction This second part of our tutorial on developing Ajax applications using EWD and Python will carry
Table of contents. DMXzoneUniformManual DMXzone
 Table of contents Table of contents... 1 About Uniform... 2 The Basics: Basic Usage of Uniform... 11 Advanced: Updating Uniform Elements on Demand... 19 Reference: Uniform Designs... 26 Video: Basic Usage
Microsoft Expression Web Quickstart Guide
 Microsoft Expression Web Quickstart Guide MS-Expression Web Quickstart Guide Page 1 of 24 Expression Web Quickstart Guide (20-Minute Training) Welcome to Expression Web. When you first launch the program,
ASP.NET MVC 5. Nemanja Kojic, MScEE
 ASP.NET MVC 5 Nemanja Kojic, MScEE 1 What is MVC? Model-View-Controller (MVC) Standard Architectural Pattern Separation of concerns: model, view, controller 2 of 114 ASP.NET MVC Framework An alternative
10264A CS: Developing Web Applications with Microsoft Visual Studio 2010
 10264A CS: Developing Web Applications with Microsoft Visual Studio 2010 Course Number: 10264A Course Length: 5 Days Course Overview In this course, students will learn to develop advanced ASP.NET MVC
avenue.quark TUTORIAL
 avenue.quark TUTORIAL Table of Contents Table of Contents Introduction 3 Preparing to Use avenue.quark 5 Using Rule-Based Tagging 6 Viewing Extracted XML Content 12 Adding a Rule to a Tagging Rule Set
A Guide to CMS Functions
 2017-02-13 Orckestra, Europe Nygårdsvej 16 DK-2100 Copenhagen Phone +45 3915 7600 www.orckestra.com Contents 1 INTRODUCTION... 3 1.1 Who Should Read This Guide 3 1.2 What You Will Learn 3 2 WHAT IS A CMS
Book IX. Developing Applications Rapidly
 Book IX Developing Applications Rapidly Contents at a Glance Chapter 1: Building Master and Detail Pages Chapter 2: Creating Search and Results Pages Chapter 3: Building Record Insert Pages Chapter 4:
Creating Pages with the CivicPlus System
 Creating Pages with the CivicPlus System Getting Started...2 Logging into the Administration Side...2 Icon Glossary...3 Mouse Over Menus...4 Description of Menu Options...4 Creating a Page...5 Menu Item
A Quick-Reference Guide. To access reddot: https://cms.hampshire.edu/cms
 Using RedDot A Quick-Reference Guide To access reddot: https://cms.hampshire.edu/cms For help: email reddot@hampshire.edu or visit http://www.hampshire.edu/computing/6433.htm Where is... Page 6 Page 8
CS 200. Lecture 05. Database Introduction. Database Introduction. CS 200 Spring Monday, June 3, 2013
 CS 200 Lecture 05 1 Miscellaneous Notes Abbreviations aka also known as DBMS DataBase Management System mutatis mutantis with the necessary changes having been made Warning! FileMaker databases often become
Introducing Databases
 12 Introducing Databases WHAT YOU WILL LEARN IN THIS CHAPTER: What a database is and which databases are typically used with ASP.NET pages What SQL is, how it looks, and how you use it to manipulate data
This document explains how to obtain a direct link from within an existing Facebook page to the hotel s booking
 How to link Facebook with the WuBook Booking Engine! This document explains how to obtain a direct link from within an existing Facebook page to the hotel s booking engine page at WuBook via the WuBook
Introduction to Dreamweaver CS3
 TUTORIAL 2 Introduction to Dreamweaver CS3 In Tutorial 2 you will create a sample site while you practice the following skills with Adobe Dreamweaver CS3: Creating pages based on a built-in CSS page layout
What s new in ASP.NET 3.5? Mike Ormond Developer & Platform Group Microsoft Ltd
 What s new in ASP.NET 3.5? Mike Ormond Developer & Platform Group Microsoft Ltd Mike.Ormond@microsoft.com http://mikeo.co.uk What we ll look at... ASP.NET AJAX Data Access Silverlight ASP.NET Futures Release
CS Multimedia and Communications REMEMBER TO BRING YOUR MEMORY STICK TO EVERY LAB!
 CS 1033 Multimedia and Communications REMEMBER TO BRING YOUR MEMORY STICK TO EVERY LAB! Lab 06: Introduction to KompoZer (Website Design - Part 3 of 3) Lab 6 Tutorial 1 In this lab we are going to learn