Introduction. Paradigm Publishing. SNAP for Microsoft Office SNAP for Our Digital World. System Requirements
|
|
|
- Beverley Gibson
- 5 years ago
- Views:
Transcription
1 Introduction Paradigm Publishing Paradigm understands the needs of today s educators and exceeds the demand by offering the latest technological advancements for coursework settings. With the success of programs such as SNAP, Paradigm is recognized as a leader in textbook publishing. SNAP for Microsoft Office 2010 Regardless of delivery method whether a course is taught entirely in the classroom, taught as an onlineclassroom hybrid course, or taught completely online SNAP for Microsoft Office 2010 provides instructors with an easy-to-use learning management system and students with sophisticated and innovative learning tools. SNAP is an on-line training and assessment courseware that gives you tools to enhance your students learning, assess their success in understanding the skills being taught, organize and view their assessment results, and easily communicate with them. SNAP for Our Digital World Our Digital World (ODW) content within SNAP is grouped and scheduled by function (file upload, concept exam, Flash animation, etc.) The CORE content is placed appropriately throughout the course duration, with additional content scheduled based on the course length. There is more ODW content available than can be expected to be used in a single course. It is up to instructors to decide which activities should be included. System Requirements What You Need on Your Computer to Run SNAP 2010 The following are the minimum system requirements for using SNAP 2010 on your computer:
2 Operating System: Windows XP (SP3), Windows Vista (SP1), or Windows 7 Broadband Internet Connection: Minimum 128kbps connection to the Internet Web Browser: Internet Explorer 7 or higher (32-bit version only), Firefox 3.6 or higher, Chrome 11 or higher Any popup blocking software disabled for JavaScript enabled Cookies enabled Security: Firewall(s) configured to allow data transfer to and from Screen Resolution: 1280 x 800 with 16 bit color Tutorials: Adobe Flash Player Version 9 or higher Skill Exams: Microsoft Office 2010 with Word, Excel, PowerPoint and Access (not Office Web Apps) Microsoft Office 2010 Service Pack 1 (SP1).NET framework SNAP skill exam player (installed by Check Configuration utility) Document Assessments: Microsoft Office 2010 with Word, Excel, PowerPoint and Access (not Office Web Apps) Microsoft Office 2010 The SNAP skill exam items and document assessments require the Microsoft Office 2010 with Word, Excel, PowerPoint and Access applications to be installed on your computer. This product is available for college students to purchase online at a significant discount. To purchase the Microsoft Office Professional Academic version online click here. NOTE: Office Web Apps, the Microsoft Office 2010 browser-based application is not supported by SNAP. It lacks most of the features found in the desktop version of Office and will not work with SNAP skill exams and assessments. Microsoft.NET 3.5 The Microsoft.Net 3.5 Framework is a utility required by the SNAP product for skill exams. Most computers will already have this installed. If your computer does not, running the SNAP Check Configuration utility should install it. Click to view the version(s) of.net installed on your computer. Or you can download and install it yourself for free by clicking here. Disclaimers: While every effort will be made to support future browser platforms and computer operating systems, Paradigm Publishing cannot guarantee future compatibility. Check Configuration Utility 1. Go to the SNAP portal website: 2. Click the Check Configuration button on the SNAP login page to install the SNAP Player (required for Skill Exams and Performance Evaluations).


3 The configuration wizard will: Check for Microsoft.NET Framework 3.5 SP1 and install if not found. Install the SNAP Player. 3. Click the Run button when the File Download box appears.


4 4. Click the Run button when the security warning is displayed. 5. If Microsoft.NET Framework 3.5 SP1 is not installed, the following notification will be displayed. 6. Click the Next button when the Install Wizard is displayed.
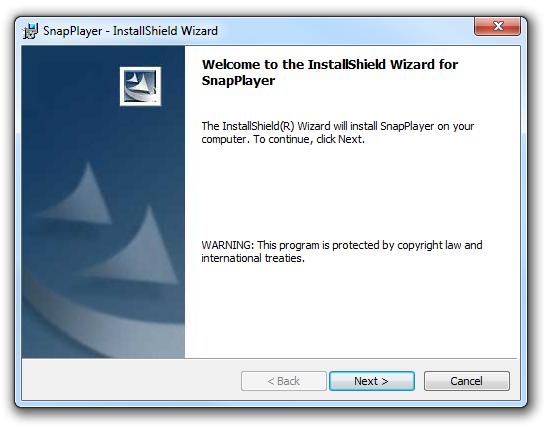
5

6 7. Click the Install button on the next screen. Note: You will now be prompted for Administrative privileges to install the SNAP Player. If you do not have Administrative privileges, please contact your computer or lab administrator. 8. When the Install Wizard is finished, click the Finish button to exit the configuration wizard. Access Your SNAP Account When an instructor has made the decision to try SNAP, a sales representative will create an instructor profile and send an containing the SNAP Login Name and Password. Login to SNAP 1. Go to the SNAP website: 2. Enter your login name. 3. Enter your password. 4. Click the GO button.

7 Student Registration To register with the SNAP website, students use the activation code provided with their textbook purchase and an enrollment key that is provided by the instructor. The enrollment key for a course or section can be found by clicking the Administration tab and the Sections link in the course navigation pane. SNAP Help Information SNAP provides you with a variety of sources to get help and information. Many How-Tos and Video Demos can be found here. Click Help in the upper right corner, next to Logout and Account, to display the SNAP Help page. Click the information icon to display Help information about a particular section or function on the page. Click the Instructor User s Guide link at the bottom of the page to display a comprehensive Instructor User's Guide.
8 Click the FAQs & User Guide PDFs link at the bottom of the page to display a list of Frequently Asked Questions with answers. SNAP Navigation The first page, or landing page, after logging in to SNAP, is the Home page. There are four tabs at the top of each page: Home, Scheduling, Grades, and Administration. Home The Home page displays scheduled assignments and added resources for a course. Students see activities on the Assignments page in three different font colors based on attempts remaining. Titles in blue have not been attempted. Titles in green have been attempted and have at least one attempt available. Titles in black have been attempted and have no remaining attempts. Note: If you are teaching more than one course, the course navigation pane will contain a course header for each course. Clicking a course header will display content specific to that course. In the image below, the course "Office Applications" has been selected, and links related to that course are being displayed. When located on the Home tab for a course, the course navigation pane displays the following links: All Tutorials: Displays all of the tutorials that are available for the course. All Activities: Displays all scheduled activities for the course. Always Available: Displays activities that have been set to always be available to students. Current Activities: Displays the activities that are scheduled and available to the students for the current week. Future Activities: Displays activities that have been scheduled for future weeks. Past Activities: Displays activities that were scheduled for previous weeks.
9 Scheduling The Scheduling section displays scheduled activities and contains functionality to add or schedule course content. Note: If you are teaching more than one course, the course navigation pane will contain a course header for each course. Clicking a course header will display content specific to that course. In the image below, the course "Office Applications" has been selected, and links related to that course are being displayed. When located on the Scheduling tab for a course, the course navigation pane displays the following additional links: Tutorials: Displays all of the tutorials that are available for the course and provide functionality for scheduling tutorials. Skill Exams: Provides the functionality for scheduling an existing exam, adding a new exam, or copying an existing exam. Concept Exams: Provides the functionality for scheduling an existing exam, adding a new exam, or copying an existing exam. Document Assessments: Provides the functionality for scheduling an existing Document Assessment or creating a new Document Assessment. Performance Evaluations: Provides the functionality for scheduling an existing Performance Evaluation. Assignments: Provides the functionality for scheduling an existing assignment and adding a new assignment. Home: Displays the content and menu options visible on the Home tab. o o o o o Always Available: Displays activities that have been set to always be available to students. All Activities: Displays all activities that have been scheduled for the course. Current Activities: Displays the activities that are scheduled and available to the students for the current week. Future Activities: Displays activities that have been scheduled for future weeks. Past Activities: Displays activities that were scheduled for previous weeks. Grades

10 The Grades section displays grades for a course and contains functionality such as editing grades, organizing grades into categories, specifying the weight each grade category contributes to the final grade, setting up the grade letter schema, and managing assignments. Note: If you are teaching more than one course, the course navigation pane will contain a course header for each course. Clicking a course header will display grades specific to that course. See the Grades section for more information. Administration The Administrative section includes functionality to manage SNAP courses, such as adding courses and sections, enrolling participants, and viewing activity reports for a course or section. Note: If you are teaching more than one course, the course navigation pane will contain a course header for each course. Clicking a course header will display content specific to that course. In the image below, the course "Office Applications" has been selected, and links related to that course is being displayed. When located on the Administration tab for a course, the course navigation pane displays the following options:

11 Course: Displays information about the selected course, such as course title, course duration, and course textbook(s), and provides the functionality to add, copy, or delete a course. Sections: Displays course sections for a selected course and the enrollment key for each section. Provides the functionality to change the enrollment key and to add, copy, or delete a section. Participants: Displays available roles, how many are assigned to each role, and provides the functionality to enroll existing users in the SNAP system to a course or section. Message Students: Displays a list of students, with the option to send them a message (to their SNAP registered account). Reports: Provides the functionality to create and download various reports for a course or section. Additional SNAP Links At the very top of the SNAP portal are three links: Help, Logout, and Account. Help: The Help page contains help manuals and videos for the SNAP website. Logout: Clicking the Logout link will log a user out of the SNAP website. Account: The Account section includes features that enable instructors to view and edit contact information, view recent forum posts and blog entries, and view activity reports. See the SNAP Account section for information on how to manage your account. Your SNAP Account Administration On the Account section of the SNAP portal, instructors can view and edit profile information, view and edit recent forum posts, manage blog entries, and view activity reports. An intuitive interface enables quick and easy editing of contact information and a way to change the assigned password.
 that is used for each course. Most recent access date and time to the SNAP webpage.")
12 View Profile View Profile To view the current Profile settings, click the Account link in the upper right corner of the page, next to Help and Logout. The Profile screen is displayed. The information displayed includes: Contact information and address. Course enrollment. Textbook(s) that is used for each course. Most recent access date and time to the SNAP webpage. Course membership.
13 Change Password To change password, 1. Click the Account link in the upper right corner of the page, next to Help and Logout. 2. Click the Change password button. 3. On the next screen, enter the current password. 4. Enter the new password. 5. Enter the new password again. 6. Click the Save changes button. Unenroll From a Course Note: If you unenroll from a course, you will no longer be able to access that course. 1. Click the Account link in the upper right corner of the page.

14 2. Click the Unenroll me from (course name) button. Edit Profile To edit profile information, 1. Click the Account link in the upper right corner of the page. 2. Click the Edit Profile tab. 3. Edit the profile information.
15 Note: Name and address are not editable fields. Please contact to make these changes. 4. Click the Update profile button. Building a Course SNAP 2010 offers two methods to build a course. The Course Builder can automatically schedule course content for you based on your chosen texts and course length, or you can elect to start with a blank template and schedule your course content yourself. In this section you will also be shown how to Copy an Existing Course, where to find your Enrollment Key and how to Enroll Participants. Creating Your First Course After logging into your Instructor account for the first time, you'll want to build your first course. This section show you how to utilize the Course Builder to automatically schedule your course content for you, and explain how to organize your course content yourself.

16 The very first time you log into your SNAP account, assuming your Account Manager has not created a course for you, you will see the below message. Course Builder SNAP 2010 has a feature named Course Builder that can save you a lot of time when it comes to building a course. The Course Builder allows you to choose what books you are using, and schedules material based on your course length. To start the Course Builder process: 1. Click Administration on the far right. 2. Click New, located in the top center part of the page. 3. In Step 1 of 3 of the Course Builder, you are asked for the course title, course short name, course start date and the name(s) of your section(s).

17 The course title is the text that appears in the left pane when viewing your SNAP account, and the course short name is the text that appears in the folder tab icon just to the left of the course title, when viewing a specific course. In the below example, Marquee Office 2010 is the course title, and mo2010 is the course short name. Both are visible to Instructors and Students. To add a section, click the Add button, and enter the next section name. When you are satisfied with your settings, click the Next button at the bottom of the page. 4. In Step 2 of 3, you are given the option to choose what text(s) your class utilizes. Select the box next to the appropriate text(s), then scroll down and click the Next button.
18 Note: Some combinations of texts are not available. 5. In Step 3 of 3, you are asked to choose a course length, and also to decide if you want the Course Builder to schedule your course content for you, or if you wish to schedule the content yourself.
19 If your course length is not one of the options, choose the length closest to the actual length. You can make adjustments later. When you are satisfied with your selections, click the Create Course button in the lower right corner. Note: If the option to allow the Course Builder to schedule your content for you is grayed out, it means that the combination you have chosen is not compatible with this feature. This might be because you have chosen a book with a large amount of content, and a short course length 6. You will now be asked to confirm your course settings. Look them over, make any necessary changes, and click the Continue button.
20 7. Depending on your settings, the Course Builder will not take a minute or two while it builds your course. When it is finished, you will see a confirmation message on your screen. Your new course will now appear on the left pane. Scheduling Course Content Yourself If you can't find the course structure you are looking for with the Course Builder, scheduling content yourself is a great option. For example, if you are teaching an open enrollment course, where students come and go, and work at their own pace, you might consider scheduling every item as Always Available, and grouping it into modules or topics. See the following sections for more detailed information on how to schedule individual items. 1. Scheduling Tutorials 2. Scheduling Skill Exams 3. Scheduling Concept Exams 4. Scheduling Document Assessments 5. Scheduling Performance Evaluations 6. Scheduling My Assignments 7. Our Digital World Content Here are other useful links to customize your course.

21 1. Organizational Features 2. Forums 3. Adding Labels 4. Composing a Text Page 5. Linking to a File or Web Page 6. Compose a Web Page SNAP 2010 also has a feature available to help speed up the scheduling process. Group Scheduling allows you to quickly modify a group of scheduled items at once. Copying an Existing Course You may wish to copy an existing course, which can be a huge time saver. This procedure is detailed below. Video Tutorial: How to Copy a Course and Assign the Course to a Different Instructor On the left pane, choose the course you wish to copy. 1. Click the Administration button on the far left. 2. Click the Copy button in the top center part of the page. 3. Select the activities from this existing course that you wish to copy over to your new course.
22 When you are satisfied with your selections, scroll down to the bottom and choose Continue. The Course Files drop down should be left at No. 4. You will now be asked to update your course settings. Change the course name if you would like, and change the course start date if the date is different. Finally, choose your course duration. When you are satisfied with your settings, click Continue at the bottom. 5. SNAP will now take a moment or two to copy your course. When the course copy is complete, you will see a confirmation message.
23 The copied course will now appear on the left pane. Enrollment Key In order for your students to enroll in your course, they will need an Enrollment Key. Enrollment Keys are unique to each SNAP section. If you have a course with two sections, each section will have a unique Enrollment Key. How to Find an Enrollment Key To find your Enrollment Keys, click on the course you wish to look up the key for. Then: 1. Click on the Administration button on the far right. 2. Click on the Sections link in the left pane. 3. The table you see in the middle of your screen will show you the name(s) of your section(s) and the corresponding Enrollment Key(s).
24 In this example, the Enrollment Key is example-enrollment-key. Your students will use this, along with their Activation Code, to register for your class. How to Change an Enrollment Key If you wish to change your Enrollment Key, to something easier for you and your students to remember, follow the steps to Find your Enrollment Key above, then: 1. Click the section title link, or your unique Enrollment Key link, either will take you to a screen where you can edit your Section Title and Enrollment Key. 2. Make any necessary changes, and click Save Changes. Enroll Participants It is easy to enroll a participant into a course or section. This feature is particularly useful to provide more advanced privileges to graduate students, to enroll non-editing instructors or when a student changes sections or when a student is enrolled in more than one SNAP course. Note, however, that the participant must already exist in the SNAP system to be enrolled into a section. View Demo: How to Move a Student from One Section to another Section View Demo: How to Move a Student from One Course to another Course Enroll Students If you are teaching more than one course, select a course from the course navigation pane on the left side of the page. SNAP displays the links specific to that course.
25 To enroll students to a course or section, 1. Click the Administration tab. 2. Click the Participants link in the course navigation pane. 3. Click one of the role links in the Role column. The options for course roles are Instructor, Non-editing Instructor, and Student. o 4. If, for Instructors example, you have chose full control the Students, over the you course, can and move can a student make any intochanges, your course including by dragging changing and dropping schedules their for name activities from the and Available editing grades. Students box on the right to the Students box on the left. o Non-editing Instructors can view the course and grades, but cannot make changes to the To remove students, drag and drop names from the Students box on the left to the Available Students course. box on the right. o Students are limited to what you have scheduled for them.
26 If the name of a student does not appear in the Available Students box, enter a student name in the Search Available Students box or Search All Users box.
27 Course Management In this section you will learn about the many organizational features of SNAP, as well as information you'll need to successfully administrate your course. Course Organization SNAP 2010 includes numerous organizational features to help save you time, and improve the look and flow of your course. Video Demo: Scheduling Tab Overview
28 The above video demo goes over: 1. Rearranging weekly activities using drag and drop feature. 2. Group Scheduling feature. 3. Updating labels. 4. Unscheduling Activities. 5. Adding resources. 6. Preview, reschedule, and report on activities from the Scheduling tab. For more information on each feature, see the Resources and Group Scheduling sections. Resources There are five types of resources available through the SNAP 2010 website that enable instructors to add more teaching material to the course content page: Forum A forum is a place for instructors and students to interact. Instructors can add a forums to selected weeks or schedule the forum to be always available. Insert a label A label is a way to add text to the content area of a course. Labels can be used as headers for topics or modules, or to give quick instructions to students. Compose a text page A text page resource is a simple page written using plain text. Text pages do not contain any formatting or images, but can be a good place to add additional information or instructions. Link to file or web site A link resource enables instructor to add a link to an external resource or to an uploaded file. Compose web site A web site resource enables instructors to include web pages to the course content page. Modify a Resource From the Scheduling tab for a course, instructors can edit a resource by clicking the Edit icon, delete a resource by clicking the delete icon, or rearrange the order of resources by dragging and dropping the resource box. Forum
29 This page provides information about how to add and modify Forum and Discussion Topics. Add a Forum If you are teaching more than one course, select a course from the course navigation pane on the left side of the page. SNAP displays the links specific to that course. To add a Forum, 1. Click the Scheduling tab. 2. Click the All Activities link in the course navigation pane. 3. Select Forum from a Add a resource dropdown list. 4. Enter a Forum name. 5. Specify a Forum type. 6. Enter a Forum introduction in the web-based editor.
30 7. Specify the type of Forum subscription. Subscribers will be sent copies of every post in that forum (posts are sent about 30 minutes after the post was first written). Students can usually choose whether or not they want to be subscribed to each forum. However, if you choose to force subscription on a particular forum then all course users will be subscribed automatically, even those that enroll at a later time. This is especially useful in the News forum and in forums towards the beginning of the course (before everyone has worked out that they can subscribe to these s themselves). If you choose the option "Yes, initially" then all current and future course users will be subscribed initially but they can unsubscribe themselves at any time. If you choose "Yes, forever" then they will not be able to unsubscribe themselves. Note how the "Yes, initially" option behaves when you update an existing forum: Changing from "Yes, initially" to "No" will not unsubscribe existing users, it will only affect future course users. Sim-
31 ilarly changing later to "Yes, initially" will not subscribe existing course users but only those enrolling later. 8. Specify an option for read tracking. If 'read tracking' for forums is enabled, users can track read and unread messages in forums and discussions. The instructor can choose to force a tracking type on a forum using this setting. There are three choice for this setting: Optional [default]: students can turn tracking on or off for the forum at their discretion. On: Tracking is always on. Off: Tracking is always off. 9. Specify a maximum attachment size for uploaded files. 10. Specify whether posts should be rated and whether the ability to rate posts should be restricted to a date range. 11. Specify whether there should be a restriction for the number of posts a student can post.
32 Students will be blocked from posting after a given number of posts in a given period, and as they approach that number, they'll be warned that they are approaching the threshold. Setting either the warn threshold to 0 will disable warnings, and setting the block threshold to 0 will disable blocking. If blocking is disabled, warnings will automatically be disabled. None of these settings affect teacher's posting 12. Select when the forum should be available and whether the forum should be visible to students. 13. Click the Save changes button. View a Forum If you are teaching more than one course, select a course from the course navigation pane on the left side of the page. SNAP displays the links specific to that course. To view a Forum, 1. Click the All Activities link in the course navigation pane. 2. Click on a Forum title link. 3. Click on a Forum discussion topic to view a discussion. The selected Forum discussion is displayed:
33 Modify Forum View To modify how discussion topic replies appear, select an option in the Display replies... drop-down list. Edit a Forum If you are teaching more than one course, select a course from the course navigation pane on the left side of the page. SNAP displays the links specific to that course. To edit a Forum, 1. Click on the Scheduling tab. 2. Click the All Activities link in the course navigation pane. 3. Click on the Update icon next to a Forum title. 4. Modify the Forum settings. For more detail, see the Add a Forum section on this page. 5. Click the Save changes button. Delete a Forum If you are teaching more than one course, select a course from the course navigation pane on the left side of the page. SNAP displays the links specific to that course. To delete a Forum, 1. Click on the Scheduling tab.

34 2. Click the All Activities link in the course navigation pane. 3. Click on the Delete icon next to a Forum title. 4. Click the Yes button. Add a Discussion Topic If you are teaching more than one course, select a course from the course navigation pane on the left side of the page. SNAP displays the links specific to that course. To add a Discussion Topic, 1. Click the All Activities link in the course navigation pane. 2. Click on a Forum title link. 3. The selected Forum is displayed. 4. Click the Add a new discussion topic button.
35 5. Specify a post title in the Subject textbox. 6. Enter the post in the web-based text editor. 7. Specify whether or not to send copies of post made to the discussion topic. Optional: To include a file attachment, click the Browse... button and navigate to a file on your computer. 8. Click the Post to forum button. Edit a Discussion Topic If you are teaching more than one course, select a course from the course navigation pane on the left side of the page. SNAP displays the links specific to that course. To edit a Discussion Topic, 1. Click the All Activities link in the course navigation pane. 2. Click on a Forum title link. 3. The selected Forum is displayed. 4. Click on a Discussion Topic title link. The Discussion Topic is displayed.
36 5. Click the Edit link. 6. Modify the post in the web-based text editor. Optional: Change the post title in the Subject textbox. Optional: Specify whether or not to send copies of post made to the discussion topic. Optional: To include a file attachment, click the Browse... button and navigate to a file on your computer. 7. Click the Save changes button. Reply to a Discussion Topic If you are teaching more than one course, select a course from the course navigation pane on the left side of the page. SNAP displays the links specific to that course. To reply to a Discussion Topic,
37 1. Click the All Activities link in the course navigation pane. 2. Click on a Forum title link. 3. The selected Forum is displayed. 4. Click on a Discussion Topic title link. The Discussion Topic is displayed. 5. Specify a post title in the Subject textbox. 6. Enter the post in the web-based text editor. 7. Specify whether or not to send copies of post made to the discussion topic. Optional: To include a file attachment, click the Browse... button and navigate to a file on your computer. 8. Click the Post to forum button.
38 Move a Discussion Topic If you are teaching more than one course, select a course from the course navigation pane on the left side of the page. SNAP displays the links specific to that course. To move a Discussion Topic, 1. Click the All Activities link in the course navigation pane. 2. Click on a Forum title link. 3. The selected Forum is displayed. 4. Click on a Discussion Topic title link. The Discussion Topic is displayed. 5. Select an option in the Move this discussion to... dropdown list.

39 Delete a Discussion Topic If you are teaching more than one course, select a course from the course navigation pane on the left side of the page. SNAP displays the links specific to that course. To delete a Discussion Topic, 1. Click the All Activities link in the course navigation pane. 2. Click on a Forum title link. 3. The selected Forum is displayed. 4. Click on a Discussion Topic title link. The Discussion Topic is displayed. 5. Click the Delete link. 6. Click the Yes button. Frequently Asked Questions
40 Can I modify student posts? Yes. Instructors can edit and delete student posts. How do I change the maximum file attachment size? See the Edit a Forum section on this page. There is an option that enables instructors to change the file attachment size limit. Insert a Label If you are teaching more than one course, select a course from the course navigation pane on the left side of the page. SNAP displays the links specific to that course. 1. Click the Scheduling tab. 2. Select Insert a label from the Add a resource dropdown list. 3. On the next screen, enter a name. 4. Enter a brief summary. 5. Enter the text to appear in the label in the web-based editor. For example, the text Required Reading might be useful to add above a list of links to external web pages or above a text file that lists reading material. 6. Specify whether the resource should open in the same window or in a new browser window. 7. Specify whether the resource should be visible or hidden to students. This option is useful if an instructor would like to make resources visible on an ongoing basis. 8. Click the Save changes button.
41 Compose a Text Page If you are teaching more than one course, select a course from the course navigation pane on the left side of the page. SNAP displays the links specific to that course. 1. Click the Scheduling tab. 2. Select Compose a text page from the Add a resource dropdown list. 3. Enter a name. 4. Enter a brief summary. 5. Add text in the Full text box. The text entered into the Full text box is the text that becomes visible when students click on the file name on the course content page. It is possible to paste text from another application, such as MS Word, or from any other location. The option exists to add formatting, such as html formatting, to create nice-looking web pages. 6. Specify whether the resource should open in the same window or in a new browser window. 7. Specify whether the resource should be visible or hidden to students. This option is useful if an instructor would like to make resources visible on an ongoing basis. 8. Click the Save changes button. Link to a File or Web Site If you are teaching more than one course, select a course from the course navigation pane on the left side of the page. SNAP displays the links specific to that course. 1. Click the Scheduling tab.
42 2. Select Link to a file or web site from the Add a resource dropdown list. 3. Enter a name. 4. Enter a brief summary. 5. Enter the link to the file or web site. To select a file or upload a file, click the Choose or upload file button, on the next screen, select the choose link beside a file that has already been uploaded or upload a file first and then select the choose link. A link will be created to a file stored on the SNAP content system. To search for a website, click the Search for Web page button. This will open up a new browser window and display the Google search engine start page. When the web page has been located, copy the URL from the address bar and paste it into the Location textbox. 6. Specify whether the resource should open in the same window or in a new browser window. 7. Specify whether the resource should be visible or hidden to students. This option is useful if an instructor would like to make resources visible on an ongoing basis. 8. Click the Save changes button. Compose a Web Page If you are teaching more than one course, select a course from the course navigation pane on the left side of the page. SNAP displays the links specific to that course. 1. Click the Scheduling tab.

43 2. Select Compose web site from the Add a resource dropdown list. 3. Enter a name. 4. Enter a brief summary. 5. Create the web page in the web-based editor. The editor provides a word-processor interface embedded in your Web page to allow instructors to edit text in an intuitive way, and produces normal HTML code. There are many different formatting options included with the editor that enables instructor to use templates, to add tables, to add links, and to add images. 6. Specify whether the resource should open in the same window or in a new browser window. 7. Specify whether the resource should be visible or hidden to students. This option is useful if an instructor would like to make resources visible on an ongoing basis. 8. Click the Save changes button. Group Scheduling The SNAP 2010 Learning Management System (LMS) includes a Group Scheduling function. Description Group Scheduling The SNAP 2010 Learning Management System (LMS) now includes a Group Scheduling function. Instructors can select a group of activities from the LMS Scheduling assignments page and either unschedule the selected activities, schedule the selected activities as Always Available, or assign them to a specific week in the course. This is a useful feature when moving an entire weeks worth of activities from one week to another. Instructors can easily accommodate snow days or other circumstances that require rescheduling a group of activities. How to Group Schedule Activities

44 Instructors can select a group of activities from the SNAP Scheduling assignments page and either unschedule the selected activities, schedule the selected activities to be Always Available, or assign them to a specific week in the course. Group Schedule Activities If you are teaching more than one course, select a course from the course navigation pane on the left side of the page. SNAP displays the links specific to that course. 1. Click on the Scheduling tab. 2. Click on the All Activities link in the course navigation pane. 3. Scroll to the week from which the activities will be moved. 4. Check the box to the right of all of the activities within the current week that are to be moved. 5. Select the destination week from the Change Week drop down list.

45 The system will automatically move the selected activities to the bottom of the destination week and re-display the Web page. In the new destination week the individual items can be dragged to a specific order of appearance. Course Administration On the Administration pages, instructors can view and edit details about their courses, such as course title, start date, course duration, and course textbook(s). The Administrative section also enables instructors to add, copy, and delete courses and sections, to enroll participants into sections, and to view activity reports for course sections. Courses Add a Course Please see our Building a Course section for information on creating a new course using the Course Builder, or Scheduling Course Content Yourself Copy a Course Please see our Copy an Existing Course section for more information on how to copy a course. Delete a Course If you are teaching more than one course, select a course from the course navigation pane on the left side of the page. SNAP displays the links specific to that course. 1. Click the Administration tab.
46 2. Click the Delete tab. A warning message is displayed. o To continue with the course deletion, click the Yes button. o To cancel the course deletion, click the No button. Sections Add a Section If you are teaching more than one course, select a course from the course navigation pane on the left side of the page. SNAP displays the links specific to that course. 1. Click the Administration tab. 2. Click the Section link in the course navigation pane.
47 3. Click the New tab. 4. On the next screen, enter a name for the section. 5. Make note of the Enrollment Key, or change it to something more relevant to your course. 6. [Optional] Choose a section to copy the settings from. By default, this option is left at None (do not copy). 7. Click the Create Section button. Copy a Section If you are teaching more than one course, select a course from the course navigation pane on the left side of the page. SNAP displays the links specific to that course. 1. Click the Administration tab. 2. Click the Section link in the course navigation pane.

48 3. Click the Copy tab. 4. Select the section you wish to copy, then enter the name of the new section you are creating, and create the Enrollment Key (or leave it as the automatically generated key). 5. Click the Create Section button.
49 Delete a Section If you are teaching more than one course, select a course from the course navigation pane on the left side of the page. SNAP displays the links specific to that course. 1. Click the Administration tab. 2. Click the Section link in the course navigation pane. 3. Click the Delete tab. 4. On the next screen, select a radio button next to an existing section. 5. Click the Delete Section button.

50 Recover a Deleted Section If you are teaching more than one course, select a course from the course navigation pane on the left side of the page. SNAP displays the links specific to that course. 1. Click the Administration tab. 2. Click the Section link in the course navigation pane. 3. Click the Recover tab.

51 4. If you have a previously deleted section that can be recovered, you will see a list of sections available to be recovered. If you have not deleted a section, you will receive a message stating there are no sections to recover. Note: The name of the section will appear as "Recover group #." This field is editable. Change this to your desired section name. 5. Select the check box next to the section you wish to recover, and click Recover. Enrollment Key In order for your students to enroll in your course, they will need their unique Enrollment Key. This key is unique to each SNAP section. If you have a course with two sections, each section will have a unique Enrollment Key. How to Find an Enrollment Key To find your Enrollment Keys, click on the course you wish to look up the key for. Then: 1. Click on the Administration button on the far right.
52 2. Click on the Sections link in the left pane. 3. The table you see in the middle of your screen will show you the name(s) of your section(s) and the corresponding Enrollment Key(s). In this example, the Enrollment Key is example-enrollment-key. Your students will use this, along with their Activation Code, to register for your class. How to Change an Enrollment Key If you wish to change your Enrollment Key, to something easier for you and your students to remember, follow the steps to Find your Enrollment Key above, then: 1. Click the section title link, or your unique Enrollment Key link, either will take you to a screen where you can edit your Section Title and Enrollment Key.

53 2. Make any necessary changes, and click Save Changes. Enroll Participants It is easy to enroll a participant into a course or section. This feature is particularly useful to provide more advanced privileges to graduate students, to enroll adjunct faculty or when a student changes sections or when a student is enrolled in more than one SNAP course. Note, however, that the participant must already exist in the SNAP system to be enrolled into a section. View Demo: How to Move a Student from One Section to another Section View Demo: How to Move a Student from One Course to another Course Enroll Students If you are teaching more than one course, select a course from the course navigation pane on the left side of the page. SNAP displays the links specific to that course. To enroll students to a course or section, 1. Click the Administration tab. 2. Click the Participants link in the course navigation pane. 3. Click one of the role links in the Role column.

54 The options for course roles are Instructor, Non-editing Instructor, and Student. o 4. If, for Instructors example, you have chose full control Students overas theyour course, role, and you can can make move any a student changes, into including your course changing by draggingschedules and dropping for activities their name andfrom editing the grades. Available Students box on the right to the Students box on o the Non-editing left. Instructors can view the course and grades, but cannot make changes to the course. To remove students, drag and drop names from the Students box on the left to the Available Students o Students box on are the limited right. to what you have scheduled for them. If the name of a student does not appear in the Available Students box, enter a student name in the Search Available Students box or Search All Users box.
55 Message Students If you are teaching more than one course, select a course from the course navigation pane on the left side of the page. SNAP displays the links specific to that course. 1. Click the Administration tab. 2. Click the Message Students link under Participants.


56 3. A table with the courses participants is generated. In the Select column on the far right, check the students you want to send a message to. Alternatively, if you have a long list, there is a Select all button at the bottom. Once you are satisfied with your selections, click the With selected users... dropdown at the bottom, and change it to Add / Send Message.

57 4. On the Message course users page, compose your message. This message will be sent to the s of the selected participants. You can review your currently selected users at the bottom right. 5. Once your message is complete, click Preview. You will be shown how your message will appear with your formatting applied. If you are satisfied, click Send, otherwise click Edit to continue to edit your message. Reports
58 SNAP enables instructors to view and download reports that provide detailed information on course participation and activity. View Reports If you are teaching more than one course, select a course from the course navigation pane on the left side of the page. SNAP displays the links specific to that course. 1. Click the Administration tab. 2. Click on Reports in course navigation pane. 3. In the Choose which logs you want to see: section are a collection of dropdown lists that are used to filter the content of a report. Instructors can filter the report by course, section, participants, date, activities, and actions, and then view the resulting report in the Browser, or export as an Excel format.

59 4. Click the Get these logs button. Additional options on the Reports page include: View a log of activity for the past hour. View an activity report. The activity reports can be filtered by module, by time, and by role. View statistics for the course. View Student Information If you are teaching more than one course, select a course from the course navigation pane on the left side of the page. SNAP displays the links specific to that course. 1. Click the Grades tab. The Grades tab is displayed.


60 2. Click on a name in the Student column. A filtered view of the grades page is displayed. 3. Click on the selected student name in the Student column. The Student Profile tab is displayed.
 - enables an instructor to remove the student from a course. Login as - enables an instructor to log in to the student's account.")
61 Options include: o o o Change password - enables an instructor to change the password for the student. View Demo: Change Student Password Unenroll me from (a course) - enables an instructor to remove the student from a course. Login as - enables an instructor to log in to the student's account. Instructors can also view the forum posts, blog entries, and activity report for the selected student by selecting one of the tabs at the top of the screen. Admin Reporting The SNAP 2010 Learning Management System (LMS) includes an Admin Reporting feature.
62 Description and Features Description A designated Admin instructor or group of Admin instructors can receive detailed reports on student progress both for their own students and all students at their school(s). The reports can be output as PDF documents or XLS files. The reports extract student grades using a date range and aggregate them by school, course, sections, instructors, and textbook. By selecting specific schools from a predefined list, Admin instructors can view several different report types. This information is sent to the Admin instructor s via a Web link. The reports provide data about student points earned compared to student points available. This data is available by individual activity name or summarized by student, section, course, or school. Admin Reporting Features Available only to instructors selected by their sales rep. Rep can provide the Admin instructor with a list of schools to select from. Schools can have more than one Admin instructor. Admin instructors need a SNAP 2010 profile but are not required to have an active course. Admin profiles do not expire. Note: This feature is not available to all Instructors. Please request this feature by contacting your Local Account Manager. Requesting Reports To access admin reports, 1. Log into SNAP as an instructor and select your course. 2. Click the Administration tab. 3. Click the Admin Reporting link in the course navigation pane.

63 4. Your should be shown in the send results to box. 5. Select a From and To date range. 6. Use the check boxes to select an individual report. 7. Select the check box next to your school(s).
64 8. Click the Get Reports button. Depending on the size of the data collected, in a few moments your requested report will arrive in your . Tutorials Tutorials are interactive on-screen lessons linked to corresponding chapters of specific Paradigm textbooks on Microsoft Office 2010 and computer concepts. Tutorials are comprised of audio-enhanced, hands-on demonstrations, and review exercises that enable students to apply the skills demonstrated in the tutorial.

65 Preview a Tutorial Preview an Unscheduled Tutorial If you are teaching more than one course, select a course from the course navigation pane on the left side of the page. SNAP displays the links specific to that course. 1. Click on the Home tab. 2. Click on the All Tutorials link in the course navigation pane. 3. Click on a Tutorial link.


66 4. On the Launch Tutorial screen, information about the selected tutorial is displayed: The textbook associated with the tutorial. The level and section associated with the tutorial. The full title of the tutorial. 5. Select the Launch this Tutorial with Audio checkbox to include audio with the tutorial. Note: Not all Tutorials include audio.

67 6. Click the Launch Tutorial button. 7. Follow the directions to work through the tutorial. Tutorial Navigation Click the Next button to move to the next screen of the tutorial. Click the Previous button to move to a previous screen of the tutorial. Click the Restart button to restart the tutorial. Click the Audio button to turn the audio on or off. o Note: You must have selected the Launch this Tutorial with Audio checkbox for this option to work. 8. Click the Exit button to close the tutorial. Preview a Scheduled Tutorial If you are teaching more than one course, select a course from the course navigation pane on the left side of the page. SNAP displays the links specific to that course. 1. Click on the Home tab. 2. Select an option from the course navigation pane to locate scheduled activities.

68 3. Click on a Tutorial link. For more information, see step 4 of the Preview Unscheduled Tutorial section of this page. Schedule a Tutorial View Demo: How to Schedule Tutorials If you are teaching more than one course, select a course from the course navigation pane on the left side of the page. SNAP displays the links specific to that course.

69 1. Click on the Scheduling tab. 2. Click on the Tutorials link in the course navigation pane. 3. Click on a Schedule this link.
70 Common Module Settings 4. Select the sections for which the tutorial should be made available. 5. Specify whether the tutorial should be visible or not by selecting either Show or Hidden in the Visible dropdown list. The default is Show. Timing 6. Provide information about when the tutorial should be made available. The two options are: Always Available or schedule a date and time for when the tutorial will be available and when it will become unavailable. Grades
71 7. Enter the maximum points available for the tutorial. 8. Specify how to grade the tutorial. Options include practice and highest grade. 9. Enter decimal digits in grades. This option helps to set the number of decimal digits allowed in the grade scores. This option does not affect the internal calculations and rounding of grades. 10. Click the Save changes button at the bottom. Skill Exams Skill Exams are comprised of interactive questions in which students perform a task using a Microsoft Office 2010 application. Skill Exams effectively test students comprehension and skills using the actual application they are learning, rather than a simulation of that application. Preview a Skill Exam If you are teaching more than one course, select a course from the course navigation pane on the left side of the page. SNAP displays the links specific to that course. 1. Click the Scheduling tab. 2. Click on Skill Exams link in the course navigation pane.
72 3. Click on a Skill Exam link. The selected Skill Exam information page is displayed.

73 4. Click the Preview tab. The selected Skill Exam preview page is displayed.

74 Note: The example image shown on the Preview page will reflect what browser you are using. The above example is for Internet Explorer Click on the Launch Exam button. 6. Depending on what browser is being used, follow the example image on the Preview page. In the above example, for Internet Explorer 9, the Open button would be selected. Note: If an instance of the Microsoft Office application used in the exam is already open, a message box will appear to ask you to close the application before the exam can begin. 7. The Microsoft Office application used in the Skill Exam opens and displays in the top portion of the window. Information about the exam, such as the problem statement, navigation buttons, and status information is displayed below the application window. 8. Follow the directions displayed in blue text in the lower portion of the window. 9. Use the directions to perform the actions in the application window.
75 Exam Information
76 Exam Navigation If more than one attempt is allowed for each skill item, a status box displays number of attempts completed and number of attempts allowed for each skill item. If a time limit is used: A floating timer window will be displayed with a countdown. When the timer has run out, the exam is submitted automatically. Note: If a student spends more than 60 seconds over the allotted time then the exam is automatically graded zero. If a time limit is not used: A time elapsed window is displayed to inform the student of how much time has passed since he or she started the exam. Click the Reset button to reset the application window. The application window will revert to how it appeared when the exam question, or step, started. Below the question number that you are on are three important features The View All button (left button that looks like a list) will display a list of questions on the current exam, and give you the option to jump to any question at any point. The Detail button on the right will show you the problem statement in a popup window if you prefer to view it that way. The number beneath these buttons is the version of the SnapPlayer you are using. Select the Auto Reset checkbox to reset the application window when the Click Answer button is clicked. If this option is not selected, you can click the Reset button to reset the application window. This setting can be changed at any time.

77 Click the Check Answer button to see if the step, or question, has been answered correctly. If the answer is correct, the Check Answer button will display the text Correct, and the exam will progress to the next section step. If more than one attempt is allowed for each skill item, and the answer is incorrect, the Check Answer button will display the text Incorrect, and the exam will progress to the next section step, and an attempt will be added to the attempt status field. Click the Next button to move to the next question. Click the Previous button to move to a previous incomplete step. Note: Once a question has been answered correctly, it is no longer possible to navigate back to that question. Click the Exit button to exit the exam. A dialog box is displayed that asks if you are ready to exit the exam. Click the Yes button to submit your answers or click the No button to continue the exam.
78 10. When all of the questions have been answered, an Exam Complete message will display and the exam window will close. 11. The exam information page is displayed. Based on the settings, the exam information page will display the grade on the page tab and for each attempt: the attempt number, the date and time the attempt was completed, and some feedback about how well the student did on the exam. If more than one attempt is allowed for the exam, the page will display a Re-attempt exam button. If the exam was closed before each question had been answered, the page will display a Continue the last attempt button. Schedule a Skill Exam View Demo: How to Create and Schedule Skill Exams If you are teaching more than one course, select a course from the course navigation pane on the left side of the page. SNAP displays the links specific to that course. 1. Click the Scheduling tab. 2. Click the Skill Exams link in the course navigation pane.

79 3. Select a skill exam and click its Schedule this link. 4. Leave the Schedule by dropdown at the top left on sections. If you want the scores to go to the grade book, this is required. Note: The option to select Students in... is available to you should you need to change the schedule for one individual student due to extenuating circumstances. General Exam Settings Optional: Rename the exam by entering a new name in the Exam Name textbox.
 or student(s) for which the exam should be available.")
80 Optional: Include a brief Introduction for the exam. Students will see the introduction when clicking on the exam from the course content page. Common Module Settings 5. Specify the section(s) or student(s) for which the exam should be available. If the Section option was selected in the Schedule by dropdown list, select the section(s) for which the exam should be made available. If the Students option was selected in the Schedule by dropdown list, select the student(s) for which the exam should be made available.

81 6. Specify whether the exam should be Visible. The default is Show. Exam Timing 7. Provide information about when the exam should be made available. Always available - If this option is selected the exam will be available for the duration of the course. Open and Close Exam - Specify a date and time for when the exam will be available and for when the exam will become unavailable. 8. Provide information about a Time limit for the exam. By default, exams do not have a time limit, which allows students as much time as they need to complete the exam. To use a time limit, uncheck the Disabled checkbox and specify the number of minutes in the time limit textbox. If you specify a time limit, SNAP does several things to ensure that exams are completed within that time: o Javascript support in the browser becomes mandatory and this allows the timer to work correctly. o A floating timer window is shown with a countdown. o When the timer has run out, the exam is submitted automatically with the answers that have been provided up to that point.
82 o If a student manages to cheat and spends more than 60 seconds over the allotted time the exam is automatically graded zero. 9. Specify whether the Exam expires. If checked, this option will force the termination of a skill exam when the close date and time have been reached. This option will override the exam time limit if a student begins an exam with less time available to finish the exam. Work up to that point is saved and graded. 10. Specify whether to use a Time delay between exam attempts. Time delay between first and second attempt - Select one of the options to set a time delay between the first and the second exam attempt. Time delay between later attempts - Select one of the options to set a time delay between later exam attempts. Exam Attempts 11. Specify the number of exam Attempts allowed. Options include unlimited attempts and 1-6 attempts. 12. Specify the number of Attempts per skill item. This option sets how many times students can attempt a skill item. 13. Specify whether or not to Shuffle questions. This option shuffles the order in which the questions appear on the page.
83 14. Specify whether to Allow students to resume attempts. If checked, and scheduling and timing permits, students can pause a skill exam then resume the exam on the same or a different computer. The system will save all work to this point, freeze the timer, and halt the exam. The student may resume the exam and finish the attempt. Exam Grades 15. Enter the Maximum Grade points available for the exam. This option allows an instructor to set how many points an exam is worth. For example, if there are 5 skill items on a 10 point exam, each item will be worth 2 points. The default value is Specify the Grading method for the exam. Practice - The practice option does not register the grade of exam attempts in the gradebook. Highest grade - The highest grade option registers the best grade out of all exam attempts in the gradebook. Average grade - The average grade registers the average (simple mean) grade of all exam attempts in the gradebook. First attempt - The first attempt registers the grade gained on the first exam attempt and the grade of later attempts are ignored. Last attempt - The last attempt registers the last exam attempt in the gradebook. 17. Enter Decimal digits in grades. This option set the number of decimal digits allowed in the grade scores. This option does not affect the internal calculations and rounding of grades.
84 Exam Help 18. Specify whether or not to Allow help window. If checked, the SNAP Player will prevent a student from using the Office application s Help feature to solve a skill item. Students may review 19. Specify what material Students may review. Later, while the exam is still available - Specify what information students will be able to review when the exam is still available. After the exam has been closed - Specify what information students will be able to review when the exam is no longer available. Options for the type of information students may review include view responses, scores, correct answers, and feedback. Exam Security Optional: Specify whether to Require Proctor Code. Students must enter that proctor code correctly to be able to take the exam. Overall Feedback Optional: Provide Overall feedback. The overall feedback is text that is shown to a student after they have completed an exam attempt. The text that is shown will depend on the grade of the exam attempt. For example, if the following grade boundaries are defined:
85 Grade boundary: 100% Feedback: Well done Grade boundary: 40% Feedback: Please study this week's work again... Grade boundary: 0% Then students who score between 100% and 40% will see the "Well done" message and students who score between 39.99% and 0% will see the other message. The grade boundaries define ranges of grades and each feedback string is displayed to scores within the appropriate range. The grade boundaries can be specified as a percentage or as a number. If your exam is out of 10 marks, a grade boundary of 7 means 7/10 or better. 20. Click the Save changes button. Create a Skill Exam View Demo: How to Create and Schedule Skill Exams
86 If you are teaching more than one course, select a course from the course navigation pane on the left side of the page. SNAP displays the links specific to that course. 1. Click the Scheduling tab. 2. Click the Skill Exams link in the course navigation pane. 3. Click on the New Exam tab in the upper right corner of the page. 4. On the next screen, enter a name for the exam. 5. Select a textbook chapter from the Skill Questions Bank dropdown list. The available questions titles are displayed.

87 To view more details about each question, select the Show Skill description in the Skill list checkbox. To preview a question, click the magnifying glass icon. The questions can be sorted alphabetically, by chapter, or by Skill ID. 6. Click on the Add to exam icon (the two left pointing angle brackets) to transfer questions from the available questions to the exam. Or, select multiple textboxes, and click the Add Selected to Exam button. To add a number of random questions to the exam, enter an integer value in the Add Random Questions textbox and click the Go button. To reorder questions in the exam, click the up and down arrow icons. To remove a question, click the Remove icon.

88 7. Enter the maximum points available for the exam in the Maximum grade textbox. 8. Make certain all of the points add up to the value entered in the Maximum grade textbox. 9. Click the Save changes button. Edit a Skill Exam If you are teaching more than one course, select a course from the course navigation pane on the left side of the page. SNAP displays the links specific to that course. Note: If a student has taken the exam the items cannot be removed from the exam. 1. Click the Scheduling tab. 2. Click on Skill Exams link in the course navigation pane.
89 3. Click on a Skill Exam link in the Exam Title column. 4. Click the Edit tab. The Edit tab is displayed.

90 The options displayed on the Edit tab are the same as the options displayed when clicking the New Exam tab. For more information, see the Create a Skill Exam page. 5. Modify the exam settings. 6. Click the Save changes button. Copy a Skill Exam To copy a Skill Exam, If you are teaching more than one course, select a course from the course navigation pane on the left side of the page. SNAP displays the links specific to that course. 1. Click the Scheduling tab. 2. Click on Skill Exams link in the course navigation pane.
91 3. Click the Copy Exam tab. 4. On the next screen, select an option from the Copy Exam from dropdown list. 5. If you chose to copy an exam from one of your course, choose the course then choose the exam. Choosing Shared Exam in my school, Snap built-in Exams or All Shared Exams will produce a list of available exams to copy. The new Skill Exam is added to the Skill Exams page. Share a Skill Exam SNAP enables instructors to share Skill Exams with other instructors at the same school.
92 If you are teaching more than one course, select a course from the course navigation pane on the left side of the page. SNAP displays the links specific to that course. 1. Click the Scheduling tab. 2. Click the Skill Exams link in the course navigation pane. 3. Click the share link next to the exam name to make that exam available to other instructors.
93 The share link changes to unshare. To make the exam unavailable to other instructors, click the unshare link. Unschedule a Skill Exam If you are teaching more than one course, select a course from the course navigation pane on the left side of the page. SNAP displays the links specific to that course. 1. Click the Scheduling tab. 2. Click the Skill Exams link in the course navigation pane. 3. On the next screen, click an unschedule icon.
94 Delete a Skill Exam To delete a Skill Exam, 1. Click the Scheduling tab. 2. Click the Skill Exam link in the course navigation pane. 3. On the next screen, click a Delete icon.
95 4. On the next screen, click the Yes button to delete the exam. Click the No button to cancel the deletion. View Skill Exam Reports View Skill Exam Reports If you are teaching more than one course, select a course from the course navigation pane on the left side of the page. SNAP displays the links specific to that course. 1. Click the Scheduling tab. 2. Click on Skill Exams link in the course navigation pane.

96 3. Click on a Skill Exam link. 4. Click the Reports tab or click on the attempts link in the Attempts column. On the next screen, a list of student attempts is displayed. Click the Download in Excel format button to download the student results in Excel file format.


97 Override Grade for a Skill Exam Question Skill Exams are graded automatically but instructors have the option to override the grade for a question. 1. Click on a link in the Started on, Completed, or Grade column to view a student attempt. The student attempt is displayed. If the student has made more than one attempt, instructors can view another attempt by clicking a number link in the Attempts row. Further down on the page, information about each question is displayed. Click a Show Details link to view more information about the result or about alternate methods.

98 2. Click the Make comment or override score link to change the grade for the skill item. The Make comment or override score popup box is displayed.
99 3. Enter an optional comment in the Comment textbox. 4. Enter a grade in the Grade textbox. 5. Click the Save button. Concept Exams Concept Exams are comprised of true/false, multiple-choice, or other kinds of objective questions that test the student s knowledge of computer concepts and the specific program he or she is learning. Instructors can also create and add their own concept questions. Preview a Concept Exam If you are teaching more than one course, select a course from the course navigation pane on the left side of the page. SNAP displays the links specific to that course. 1. Click the Scheduling tab. 2. Click on Concept Exams link in the course navigation pane.
100 The Concept Exam information page is displayed. 3. Click on a Concept Exam link. 4. Click the Preview tab. The Concept Exam Preview page is displayed. The exam is displayed as a student would see it. As an instructor you can take the exam, however the results are not saved.
101 Schedule a Concept Exam View Demo: How to Create and Schedule Concept Exams If you are teaching more than one course, select a course from the course navigation pane on the left side of the page. SNAP displays the links specific to that course. 1. Click the Scheduling tab. 2. Click on Concept Exams link in the course navigation pane. 3. Click on a Schedule this link. 4. Select to schedule by section or to schedule by students in a section by selecting an option in the Schedule by dropdown list.
102 General Optional: Rename the exam by entering a new name for the exam. Optional: Include a brief introduction for the exam. Common Module Settings 5. If the Section option was selected in the Schedule by dropdown list, select the sections for which the exam should be made available. If the Students option was selected in the Schedule by dropdown list, select the students for which the exam should be made available. 6. Specify whether the exam should be visible or not by selecting either Show or Hidden in the Visible dropdown list. The default is Show. Timing 7. Provide information about when the exam should be made available. The two options are: Always available or specify a date and time for when the exam will be available and when it will become unavailable. 8. Provide information about time limits for the exam. By default, exams do not have a time limit, which allows students as much time as they need to complete the exam. To use a time limit, uncheck the Disable checkbox and specify the number of minutes in the Time limit textbox. If you do specify a time limit, then SNAP does several things are done to try and ensure that exams are completed within that time: o Javascript support in the browser becomes mandatory - this allows the timer to work correctly. o A floating timer window is shown with a countdown. o When the timer has run out, the exam is submitted automatically with whatever answers have been filled in to that point. o If a student manages to cheat and spends more than 60 seconds over the allotted time then the exam is automatically graded zero.
103 Optional: Specify a time delay between first and second attempt. Optional: Specify a time delay between later attempts. Attempts 9. Specify how many exam attempts should be allowed. Display 10. Specify the number of questions that will be displayed on each page of the exam. Note: It is strongly suggested that if the exam is long or if it there is no time limit, that the number of questions per page be set to a finite number. 11. Specify whether the order of questions should be shuffled. 12. Specify whether components of the questions (such as multiple choices) should be shuffled within the questions.
104 Grades 13. Enter the maximum points available for the exam. 14. Specify how to grade the exam. Options include practice, highest grade, average, first attempt, and last attempt. 15. Enter decimal digits in grades. This option helps to set the number of decimal digits allowed in the grade scores. This option does not affect the internal calculations and rounding of grades. Students may review 16. Specify what material students may review immediately after the exam has been completed. Options include view responses, scores, answers, and feedback. 17. Specify what material students may review while the exam is still available. Options include view responses, scores, answers, and feedback. 18. Specify what material students may review after the exam has been closed. Options include view responses, scores, answers, and feedback. Security Optional: Provide an optional proctor code students must enter to be able to take the exam. Overall feedback Optional: Provide additional feedback.
105 19. Click the Save changes button. Create a Concept Exam View Demo: How to Create and Schedule Concept Exams Create a Concept Exam If you are teaching more than one course, select a course from the course navigation pane on the left side of the page. SNAP displays the links specific to that course. 1. Click the Scheduling tab. 2. Click the Concept Exams link in the course navigation pane.

106 3. Click the New Exam tab. 4. On the next screen, enter a name for the exam. 5. Select a textbook or textbook chapter from the Concept Questions Bank dropdown list. The available questions titles are displayed. To view more details about each question, select the Show Answers too (correct answer bolded) checkbox.

107 6. Click on the Add to exam icon (the two left pointing angle brackets) to transfer questions from the available questions to the exam. Or, select multiple textboxes, and click the Add Selected to Exam button. To add a number of random questions to the exam, enter an integer value in the Add Random Questions textbox and click the Go button. To reorder questions in the exam, click the up and down arrow icons. To remove a question, click the Remove icon. 7. Enter the maximum points available for the exam in the Maximum grade textbox. 8. Make certain all of the points add up to the value entered in the Maximum grade textbox. 9. Click the Save changes button. Add Custom Questions To create your own questions,

108 1. Select Custom in the Concept Questions Bank dropdown list. 2. Select a question type from the Create new question dropdown list. Question Options Multiple Choice: Students choose from multiple answers. Short Answer: Students enter a word or phrase. There may be several possible correct answers, with different grades. Answers may or may not be case sensitive. Numerical: From the student perspective, a numerical question looks just like a short-answer question. The difference is that numerical answers are allowed to have an accepted error. This allows a continuous range of answers to be set. True/False: Students selects from two options: True or False. Matching: A list of sub questions is provided, along with a list of answers. The students must "match" the correct answers with each question. Embedded Answers (Cloze): These very flexible questions consist of a passage of text (in SNAP format) that has various answers embedded within it, including multiple choice, short answers and numerical answers. Random Short-Answer Matching: From the student perspective, this looks just like a Matching question. The difference is that the sub questions are drawn randomly from Short Answer questions in the current category. Random: A Random question in a quiz is replaced by a randomly-chosen question from the category selected. Description: This is not a real question. It simply prints some text (and possibly graphics) without requiring an answer. This option can be used to provide some information about a group of questions. Calculated: Calculated questions offer a way to create individual numerical questions by the use of wildcards that are substituted with individual values when the quiz is taken. Essay: Students write an answer in essay format. 3. Specify the maximum grade for the exam.
109 Optional: Specify whether to use page breaks. 4. Click the Save changes button. Edit a Concept Exam If you are teaching more than one course, select a course from the course navigation pane on the left side of the page. SNAP displays the links specific to that course. To edit a Concept Exam, 1. Click the Scheduling tab. 2. Click on Concept Exams link in the course navigation pane. 3. Click on a Concept Exam link.
110 4. Click the Edit tab. Exams cannot be edited after the first student has taken the exam. The options displayed on the Edit tab are the same as the options displayed when clicking the New Exam tab. For more information, see the Create a Concept Exam page. 5. Modify the exam settings. 6. Click the Save changes button. Copy a Concept Exam To copy a Concept Exam, If you are teaching more than one course, select a course from the course navigation pane on the left side of the page. SNAP displays the links specific to that course. 1. Click the Scheduling tab.

111 2. Click on Concept Exams link in the course navigation pane. 3. Click the Copy Exam Tab. 4. On the next screen, select an option from the Copy Exam from dropdown list. 5. If you chose to copy an exam from one of your course, choose the course then choose the exam. Choosing Shared Exam in my school, Snap built-in Exams or All Shared Exams will produce a list of available exams to copy. The new Concept Exam is added to the Concept Exam page. Share a Concept Exam

112 SNAP enables instructors to share Conecept Exams with other instructors at the same school. If you are teaching more than one course, select a course from the course navigation pane on the left side of the page. SNAP displays the links specific to that course. 1. Click the Scheduling tab. 2. Click the Concept Exams link in the course navigation pane. 3. Click the share link next to the exam name to make that exam available to other instructors.
113 The share link changes to unshare. To make the exam unavailable to other instructors, click the unshare link. Unschedule a Concept Exam If you are teaching more than one course, select a course from the course navigation pane on the left side of the page. SNAP displays the links specific to that course. 1. Click the Scheduling tab. 2. Click the Concept Exam link in the course navigation pane. 3. On the next screen, click an unschedule icon.
114 Delete a Concept Exam To delete a Concept Exam, 1. Click the Scheduling tab. 2. Click the Concept Exam link in the course navigation pane.
115 3. On the next screen, click a Delete icon. 4. On the next screen, click the Yes button to delete the exam. Click the No button to cancel the deletion.

116 View Concept Exam Reports View Concept Exam Reports If you are teaching more than one course, select a course from the course navigation pane on the left side of the page. SNAP displays the links specific to that course. 1. Click the Scheduling tab. 2. Click on Concept Exams link in the course navigation pane.

117 3. Click on a Concept Exam link. 4. Click the Reports tab or click on the attempts link in the Attempts column. On the next screen, a list of student attempts is displayed. Click the Download in Excel format button near the bottom of the page to download the student results in Excel file format. Override Grade for a Concept Exam Question

118 Concept Exams are graded automatically but instructors have the option to override the grade for a question. 1. Click on a link in the Started on, Completed, or Grade column to view a student attempt. The student attempt is displayed. If the student has made more than one attempt, instructors can view another attempt by clicking a number link in the Attempts row. Further down on the page, information about each question is displayed. 2. Click the Make comment or override score link to change the grade for the skill item. The Make comment or override score popup box is displayed.
119 3. Enter an optional comment in the Comment textbox. 4. Enter a grade in the Grade textbox. 5. Click the Save button. Document Assessment Document Assessments are exercises that enable students to practice or demonstrate the skills they are learning by working with documents in Office. Instructors can schedule existing Document Assessments or create their own Document Assessments. Preview a Document Assessment Preview a Document Assessment If you are teaching more than one course, select a course from the course navigation pane on the left side of the page. SNAP displays the links specific to that course.
120 1. Click the Scheduling tab. 2. Click the Document Assessments link in the course navigation pane. The Document Assessments provided with the textbook are displayed on the page. 3. Click a Document Assessment link.

121 The Document Assessment information page is displayed. Click on the file document link in the Download column to open or save the assignment file. Click on the Instructions link in the View column to open or save the instruction file. Directions on how to interpret a student's Document Assessment result can be found on this page, and also in our Review a Document Assessment section. The Model Answer is available for you to review at the bottom of the page. Complete a Document Assessment Video Demo: How to Complete a Document Assessment 1. Read the instructions visible at the top of the screen. 2. Read the Instructions file that can be accessed by clicking the Instructions link in the View column.
122 3. Download the assessment file by clicking the link in the Download column. 4. Follow the instructions to modify the downloaded file. 5. Upload the modified file to the Document Assessment information page. Upload a Document Assessment 1. Click the Browse... button. 2. Locate the modified document on their computer. 3. Click the Upload Assessment button. Based on the settings the instructor specifies during the scheduling of a Document Assessment, students may be able to review the answer key and the result document. For more information about how to make a Document Assessment available to students, see the Schedule A Document Assessment page. To find out more about student attempts, see the View Document Assessment Reports page. Schedule a Document Assessment View Demo: How to Create and Schedule Document Assessments If you are teaching more than one course, select a course from the course navigation pane on the left side of the page. SNAP displays the links specific to that course. 1. Click the Scheduling tab. 2. Click the Document Assessments link in the course navigation pane.
123 The Document Assessments provided with the textbook are displayed on the page. 3. Decide which Document Assessment you wish to schedule. Click on the Schedule this link, in the Schedule column. 4. Select to schedule by section or to schedule by students in a section by selecting an option in the Schedule by dropdown list.
124 Common Module Settings 5. If the Section option was selected in the Schedule by dropdown list, select the sections for which the exam should be made available. If the Students option was selected in the Schedule by dropdown list, select the students for which the exam should be made available. 6. Specify whether the exam should be visible or not by selecting either Show or Hidden in the Visible dropdown list. The default is Show. Timing 7. Provide information about when the exam should be made available. The two options are: Always available or specify a date and time for when the exam will be available and when the exam will become unavailable. Grades 8. Specify the number of attempts allowed. 9. Enter a maximum grade for the exam. 10. Specify how to grade the exam. Options include Practice, Highest Grade, Average Grade, First Attempt and Last Attempt. Students may review 11. Specify what material students may review while the assessment is still available.
125 Options include Submitted Document, Result Document, Answer Key and Feedback. 12. Specify what material students may review after the assessment has been closed. Options include Submitted Document, Result Document, Answer Key and Feedback. 13. Click the Save changes button. Create a Document Assessment Instructors also have the option to create their own Document Assessments. Document Assessments allow students hands-on practice at performing tasks by following a list of instructions and using a personalized template. Students upload their finished documents to be graded. When the assessment has been created, instructors can configure the assessment to allow multiple or single attempts and be either practice or graded. When graded, you can establish the grade as the highest grade attained on all attempts, the average grade of all attempts, the grade attained on the first attempt, or the grade attained on the last attempt. Each attempt is automatically marked, and you can choose whether to show the student their responses, scores, and the correct answers along with feedback. For information about how to make a Document Assessment available to students, see the Schedule a Document Assessment page. View Demo: How to Create and Schedule Document Assessments Create a Document Assessment If you are teaching more than one course, select a course from the course navigation pane on the left side of the page. SNAP displays the links specific to that course. To create a Document Assessment, 1. Click the Scheduling tab. 2. Click the Document Assessments link in the course navigation pane.
126 The Document Assessments page is displayed. 3. Click the New Assessment tab. 4. Enter a title for the new Document Assessment. 5. Add the necessary files.

127 Required files: Base File: The starting document that students should see when the Document Assessment begins. This is the document that the students download, modify, and upload for grading. Answer File: The final document after all of the desired modifications have been made. Optional files: Instruction File: A document that contains instructions for completing the assessment. Answer Key File: A document that describes the grading criteria. o A sample answer key: 6. Click the Add Assessment button. The next step is to make the Document Assessment available to students. For more information see the Schedule a Document Assessment page.
128 Review a Document Assessment What does the SNAP Document Assessment score mean? 1. The SNAP Document Assessment Checker calculates the number of differences between the beginning Download document (base file) and the Model Answer. 2. The SNAP Document Assessment Checker calculates the number of differences between the student s uploaded file and the Model Answer. 3. The SNAP Document Assessment Checker divides #2 from #1, subtracts this amount from 1.00, and represents this score as a percentage. In addition to a percentage score, the SNAP Document Checker generates a Results file that shows what is different about the Model Answer when compared against the student s file. How do Instructors review a document assessment? Watch Tutorial Word Document Assessment Review Watch Tutorial Excel Document Assessment Review Watch Tutorial PowerPoint Document Assessment Review Getting Started 1. Click on Grades 2. Click on Document Assessments 3. Click on the name of the document assessment 4. Click on the "# Students made # Attempts" 5. Click on the student's name to see all of the documents submitted Word Results File - How do I interpret the Results File of a Word Document Assessment? STEP 1: Download and Open Instruction file, Result file, Answer Key and Submitted file On the Document Assessment Reports screen, in the Uploaded Files column, click the Document Assessment that you wish to review. You will now see the Document Assessment Info screen. In the View column, click Instructions to display the Instructions that were to be followed in preparing the Submitted File. You may want to print the instructions for ease of reference. In the Download column, right-click Result and save the Results File on your computer desktop. Also in the Download column, right-click Submitted File and save the Submitted File on your computer desktop. STEP 2: Compare Results file and Submitted file Open both the Results File and the Submitted File, and follow these instructions to view them side by side on your computer screen:
129 In the Results File, select the View tab and then the View Side by Side button. If you see this dialog box, select the Submitted File. You should now see the Results File and Submitted File side by side. In both the Results File and the Submitted File, select the Home tab and then select the Show/Hide button in the Paragraph group. (This button is colored gold when it is selected.) Selecting the Show/Hide button will reveal nonprinting formatting characters that need to match those in the Model Answer. The Results file shows the Model Answer with tracked changes and marginal notes indicating how the Model Answer differs from the Submitted File. For each difference illustrated in the Results File, refer to the Instructions to see specifically what the student was supposed to do to make the Submitted File match the Model Answer. STEP 3: Interpret the Results File, using the Answer Key and Model Answer For more help interpreting the Results File, click the Answer Key in the Download column of SNAP s Document Assessment Info screen. The Answer Key provides a detailed markup of the Model Answer with annotations on each change requested by the Instructions. To see the actual Model Answer with all its formatting and text settings, click the file link that follows the instruction Download Model Answer: You can then compare the Submitted File line by line against the Model Answer to see how the two documents differ. (NOTE: The Model Answer is available only when you have selected the Info tab for the Document Assessment.) Excel Results File - How do I interpret the Results File of an Excel Document Assessment? STEP 1: Download and Open Instruction file, Result file, Answer Key and Submitted file On the Document Assessment Reports screen, in the Uploaded Files column, click the Document Assessment that you wish to review. You will now see the Document Assessment Info screen. In the View column, click Instructions to display the Instructions that were to be followed in preparing the Submitted File. You may want to print the instructions for ease of reference. In the Download column, right-click Result and save the Results File on your computer desktop. Also in the Download column, right-click Submitted File and save the Submitted File on your computer desktop. STEP 2: Compare Results file and Submitted file Open both the Results File and the Submitted File, and follow these instructions to view them both on your computer screen: In the Results File, select the View tab and then the View Side by Side button. If you see this dialog box, select the Submitted File. You should now see the Results File and Submitted File on your screen..
130 The Results file shows pink highlighting on the cells in the Student File that are different from the Model Answer. The highlighted cells are not formatted. (NOTE: The Results File is not a version of the Student File and does not contain the formatting of the Student File; it simply shows which cells in the Student File are different from those same cells in the Model Answer.) Clicking the Comment field label for a pink cell opens a yellow box that lists all the changes that the Instructions called for in that cell. (HINT: If you cannot see all the text in the yellow Comment box, click the Review tab, and then click the Edit Comment button.) If a step is listed in the Comment box, this does not necessarily mean the step was completed incorrectly. The Comment box lists all the steps required to modify the cell. Use the Comments box as a tool to help you determine which step or steps were completed incorrectly, and refer to the Instructions to see the requested changes in context. (NOTE: If a cell is highlighted in pink or green but does not have an accompanying yellow box, that means the Instructions did not call for a change in that cell but something was changed anyway.) STEP 3: Interpret the Results File, using the Answer Key and Model Answer For more help interpreting the Results File, click the Answer Key in the Download column of SNAP s Document Assessment Info screen. The Answer Key provides a detailed markup of the Model Answer with annotations on each change requested by the Instructions. To see the actual Model Answer with all its formatting and text settings, click the file link that follows the instruction Download Model Answer: You can then compare the Submitted File line by line against the Model Answer to see how the two documents differ. (NOTE: The Model Answer is available only when you have selected the Info tab for the Document Assessment.) PowerPoint Results File - How do I interpret the Results File of a PowerPoint Document Assessment? STEP 1: Download and Open Instruction file, Result file, Answer Key and Submitted file On the Document Assessment Reports screen, in the Uploaded Files column, click the Document Assessment that you wish to review. You will now see the Document Assessment Info screen. In the View column, click Instructions to display the Instructions that were to be followed in preparing the Submitted File. You may want to print the instructions for ease of reference. In the Download column, right-click Result and save the Results File on your computer desktop. Also in the Download column, right-click Submitted File and save the Submitted File on your computer desktop. STEP 2: Compare Results file and Submitted file Open both the Results File and the Submitted File, and follow these instructions to view them both on your computer screen: In the Results File, select the View tab and then the Arrange All button. You should now see the Results File and Submitted File on your screen. The Results file highlights the slides or sections of slides where there is a difference between the Submitted File and the Model Answer.
131 Clicking the Comment field label on a highlighted slide opens a box describing in general how the Submitted File is different. Refer to the Instructions to find out specifically what should have been done to the Submitted File. STEP 3: Interpret the Results File, using the Answer Key and Model Answer For more help interpreting the Results File, click the Answer Key in the Download column of SNAP s Document Assessment Info screen. The Answer Key provides a detailed markup of the Model Answer with annotations on each change requested by the Instructions. To see the actual Model Answer with all its formatting and text settings, click the file link that follows the instruction Download Model Answer: You can then compare the Submitted File line by line against the Model Answer to see how the two documents differ. (NOTE: The Model Answer is available only when you have selected the Info tab for the Document Assessment.) View Document Assessment Reports When students have completed Document Assessments, those attempts will appear on the Document Assessments page. To view information about Document Assessment attempts, If you are teaching more than one course, select a course from the course navigation pane on the left side of the page. SNAP displays the links specific to that course. 1. Click the Scheduling tab. 2. Click the Document Assessments link in the course navigation pane.


132 The Document Assessments page is displayed. 3. Click the Reports tab. The Report tab for the Document Assessment is displayed.


133 Click the Download in Excel format button near the bottom of the page to download information about the student attempts in Excel file format. Click on a link in the Uploaded on or Grade column to view information about the attempts submitted by a student. o Information about each student attempt is displayed. Click the Submitted File link in the Download column to view a file the student has uploaded. Click the Result link to open a document that shows the differences between the submitted file and the model answer. Results files show results in different formats, based on the application being used. For Word document assessments, text shown without any color background is prepared correctly. Text shown with a light red background is incorrect in some way. In that instance, the document also shows what the correct text would look like, shown with a light green background.
134 For Excel document assessments, cells that contain incorrect content are shaded in light red. The relevant instructions for making the cell match the corresponding cell in the model answer are shown as a comment, which you can view by clicking the color triangle in the upper-right corner of the cell. For PowerPoint document assessments, mistakes are shown in comments. Comment background colors tell if the comment is for the slide (yellow), slide layout (blue), or slide master (red). Click the Answer Key link to open an annotated file that contains information about each step required to modify the document. The Submitted Document is the file that a student has uploaded for evaluation. No changes have been made to this document, it is the exact file that the student uploaded. SNAP 2010 Performance Evaluations The latest additions to the SNAP 2010 content are Performance Evaluations (PE). PEs are activities that allow students to update live Microsoft Office files of Word, Access, PowerPoint, and Excel. They consist of end-of-chapter activities that assess the students knowledge of the entire chapter. Preview a Performance Evaluation View Demo: SNAP 2010 Performance Evaluations If you are teaching more than one course, select a course from the course navigation pane on the left side of the page. SNAP displays the links specific to that course. 1. Click the Scheduling tab. 2. Click the Document Assessments link in the course navigation pane.

135 3. Click on a Performance Evaluation link. The selected Performance Evaluation information page is displayed. If the Performance Evaluation is not scheduled, you will see the below message, with the option to Preview or Schedule. 4. Click the Preview tab. 5. Click on the Launch Exam button.

136 6. Depending on what browser is being used, follow the example image on the Preview page. In the above example, for Internet Explorer 9, the Open button would be selected. Note: If an instance of the Microsoft Office application used in the exam is already open, a message box will appear to ask you to close the application before the exam can begin. The Microsoft Office application used in the Performance Evaluation opens and displays in the top portion of the window. Information about the exam, such as the problem statement, navigation buttons, and status information is displayed below the application window. For more information on how the SnapPlayer works, see the SnapPlayer section of our Preview a Skill Exam page. Schedule a Performance Evaluation View Demo: SNAP 2010 Performance Evaluations If you are teaching more than one course, select a course from the course navigation pane on the left side of the page. SNAP displays the links specific to that course. 1. Click the Scheduling tab.

137 2. Click the Document Assessments link in the course navigation pane. 3. Click on a Schedule this link in the Schedule column. 4. Select to schedule by section or to schedule by students in a section by selecting an option in the Schedule by dropdown list.
138 Common Module Settings 5. If the Section option was selected in the Schedule by dropdown list, select the sections for which the evaluation should be made available. If the Students option was selected in the Schedule by dropdown list, select the students for which the evaluation should be made available. 6. Specify whether the evaluation should be visible or not by selecting either Show or Hidden in the Visible dropdown list. The default is Show. Evaluation Timing 7. Provide information about when the evaluation should be made available. Always available - If this option is selected the evaluation will be available for the duration of the course. Open and Close Performance Evaluation - Specify a date and time for when the evaluation will be available and for when the evaluation will become unavailable. 8. Provide information about a Time limit for the evaluation. By default, evaluations do not have a time limit, which allows students as much time as they need to complete the evaluation. To use a time limit, uncheck the Disabled checkbox and specify the number of minutes in the time limit textbox. If you specify a time limit, SNAP does several things to ensure that evaluations are completed within that time: o Javascript support in the browser becomes mandatory and this allows the timer to work correctly. o A floating timer window is shown with a countdown.
139 o o When the timer has run out, the evaluation is submitted automatically with the answers that have been provided up to that point. If a student manages to cheat and spends more than 60 seconds over the allotted time the evaluation is automatically graded zero. 9. Decide if the Performance Evaluation attempts should be automatically closed at the Close time. Attempts 10. Specify the number of evaluation Attempts allowed. Options include unlimited attempts and 1-6 attempts. 11. Specify whether to Allow students to resume attempts. If checked, and scheduling and timing permits, students can pause a skill evaluation then resume the evaluation on the same or a different computer. The system will save all work to this point, freeze the timer, and halt the evaluation. The student may resume the evaluation and finish the attempt. 12. Specify the Grading method for the evaluation. Practice - The practice option does not register the grade of evaluation attempts in the gradebook. Highest grade - The highest grade option registers the best grade out of all evaluation attempts in the gradebook. Average grade - The average grade registers the average (simple mean) grade of all evaluation attempts in the gradebook. First attempt - The first attempt registers the grade gained on the first evaluation attempt and the grade of later attempts are ignored. Last attempt - The last attempt registers the last evaluation attempt in the gradebook.


140 13. Enter Decimal digits in grades. This option set the number of decimal digits allowed in the grade scores. This option does not affect the internal calculations and rounding of grades. Students may review 14. Specify what material Students may review. As soon as the Performance Evaluation closes - Specify what information students will be able to review immediately after they finish an attempt. Later, while the Performance Evaluation is still available - Specify what information students will be able to review when the evaluation is still available. After the Performance Evaluation has been closed - Specify what information students will be able to review when the evaluation is no longer available. Options for the type of information students may review include view responses, scores, correct answers, and feedback. Security Optional: Specify whether to Require Proctor Code. Students must enter that proctor code correctly to be able to take the evaluation.
141 Overall Feedback Optional: Provide Overall feedback. The overall feedback is text that is shown to a student after they have completed an evaluation attempt. The text that is shown will depend on the grade of the evaluation attempt. For example, if the following grade boundaries are defined: Grade boundary: 100% Feedback: Well done Grade boundary: 40% Feedback: Please study this week's work again... Grade boundary: 0% Then students who score between 100% and 40% will see the "Well done" message and students who score between 39.99% and 0% will see the other message. The grade boundaries define ranges of grades and each feedback string is displayed to scores within the appropriate range. The grade boundaries can be specified as a percentage or as a number. If your evaluation is out of 10 marks, a grade boundary of 7 means 7/10 or better.
142 15. Click the Save changes button. Edit Step Points Note: In order to edit the step points for a specific Performance Evaluation, the evaluation first needs to be scheduled. See our Schedule a Performance section for instructions on how to complete this task. Each step in the performance evaluation activity has a default grade value; initially this is set to one point. Instructors can override the default point value. This allows instructors to place grading emphasis on particular skills. Edit Step Points To edit the step points in a performance evaluation, If you are teaching more than one course, select a course from the course navigation pane on the left side of the page. SNAP displays the links specific to that course. 1. Click on the Scheduling tab.


143 2. Click on the Performance Evaluations link in the course navigation pane. 3. Click on a Performance Evaluation link. 4. Click the Edit tab. 5. Edit the step point values by entering a different value in one or more of the textboxes.

144 6. Click the Save changes button. Assignments Instructors can easily create tasks for students to prepare digital content in a specific format and to upload the document to the server. Typical Assignments include essays, projects, and reports. Create an Assignment View Demo: How to Create and Schedule File Upload Assignments If you are teaching more than one course, select a course from the course navigation pane on the left side of the page. SNAP displays the links specific to that course. 1. Click the Scheduling tab.
145 2. Click the Assignments link in the course navigation pane. The Document Assessments page is displayed. 3. Click on the New Assignment tab. 4. Select to schedule by section or to schedule by students in a section by selecting an option in the Schedule by dropdown list. General
146 Enter a name for the new assignment. Common Module Settings 5. If the Section option was selected in the Schedule by dropdown list, select the sections for which the exam should be made available. If the Students option was selected in the Schedule by dropdown list, select the students for which the exam should be made available. 6. Specify whether the exam should be visible or not by selecting either Show or Hidden in the Visible dropdown list. The default is Show. 7. Add a description of the assignment in the Description textbox. Grades 8. Enter the maximum points available for the assignment. 9. Specify whether SNAP should prevent late submissions. Upload a single file 10. Specify whether students should be able to resubmit a file. 11. Specify whether to send an alert when students submit a file for an assignment. 12. Specify the maximum file size. 13. Click the Save changes button. Preview and Schedule an Assignment View Demo: How to Create and Schedule File Upload Assignments If you are teaching more than one course, select a course from the course navigation pane on the left side of the page. SNAP displays the links specific to that course. 1. Click the Scheduling tab.
147 2. Click the Assignments link in the course navigation pane. The Assignments page is displayed. 3. Click on an Assignment link. The Assignment Preview page is displayed.
148 4. Click on the Schedule tab. 5. For more detail, see the Create an Assignment page. Edit an Assignment To edit an Assignment, If you are teaching more than one course, select a course from the course navigation pane on the left side of the page. SNAP displays the links specific to that course. 1. Click the Scheduling tab. 2. Click on Assignments link in the course navigation pane. 3. Click on an Assignment link.
149 4. On the next screen, click the Schedule tab. 5. For more detail, see the Create an Assignment page. Unschedule an Assignment To unschedule an Assignment, If you are teaching more than one course, select a course from the course navigation pane on the left side of the page. SNAP displays the links specific to that course. 1. Click the Scheduling tab. 2. Click the Assignment link in the course navigation pane.
150 3. On the next screen, click an unschedule icon. Delete an Assignment To delete an Assignment, 1. Click the Scheduling tab.

151 2. Click the Assignment link in the course navigation pane. 3. On the next screen, click a Delete icon. 4. On the next screen, click the Yes button to delete the exam. Click the No button to cancel the deletion.
152 View and Grade Assignment Reports View Assignment Reports If you are teaching more than one course, select a course from the course navigation pane on the left side of the page. SNAP displays the links specific to that course. To view a Assignment attempts, 1. Click the Scheduling tab. 2. Click on Assignments link in the course navigation pane. The Assignments page is displayed.
153 3. Click on an Assignment link. The Assignment Preview page is displayed. 4. Click the Reports tab. On the next screen, a list of student attempts is displayed.

154 Click a document link in the Last modified column to view or save a file submitted by a student. Grade an Assignment 1. To grade an assignment, click on a Grade link in the Status column. The grade assignment popup window is displayed.

155 Click the link to open or save the file submitted by the student. 2. Select a grade from the Grade dropdown list. 3. Provide an optional comment in the texbox. 4. Click the Save changes button. Grade Multiple Assignments 1. Select the Allow quick grading checkbox near the bottom of the page. 2. Click the Save preferences button. The Assignment Reports table is updated to allow grading more than one student at a time.

156 3. Select a grade from the dropdown list in the Grade column. 4. Enter an optional comment in the textbox in the Comment column. 5. Click the Save all my feedback button. Our Digital World Our Digital World: Introduction to Computing combines online activities and textbook resources to create an innovative hybrid learning product that appeals to today s students. Graded Activities The pages in this section describe how to view the result of student interaction with an activity and how to assign a grade or override an existing grade. Some of the activities on the Our Digital World (ODW) Companion website, such as those that involve uploading files or posting blog entries, need to be graded manually by the instructor. Other activities, such as the quizzes and the concept check activities, are graded automatically by the learning management system. For most of the activities that are automatically graded, students are allowed unlimited attempts. For those activities, the highest earned score will be posted to the Grades section of the ODW website and on the individual activity pages.
157 Instructors have the option to modify existing grades from the Grades section of the OWD website and to assign or modify grades on individual activity pages. It is a good idea to assign grades to students' activities on their individual activity pages because these pages contain information about how each student interacted with the activity. Instructors can also include feedback to the student on some of the activity pages. See the Grades section to learn how to modify grades for more than one student at a time. See the Activities section to find out more about the exercises on the ODW website. Uploaded Files This page describes how to view and grade an uploaded file. Some activities require students to upload a file to be graded manually by the instructor. View Uploaded Files To view files that have been uploaded for an activity by students: 1. Select a course name header from the Course navigation pane. Optional: Filter the Activity navigation pane by selecting a chapter from the Course navigation pane. 2. Select the assigned activity from the Activity navigation pane. 3. Click the Reports tab. 4. Click a file name in the Last Modified (Student) column.
158 5. Click the Open button in the popup dialog box. The dialog box will depend on what browser you are using. The file will open using the software that was used to create the file. Grade an Uploaded File To grade a file that has been uploaded by a student: 1. Select a course name header from the Course navigation pane. Optional: Filter the Activity navigation pane by selecting a chapter from the Course navigation pane. 2. Select the assigned activity from the Activity navigation pane. 3. Click the Reports tab. 4. Review the submitted file (see the View Uploaded Files page). To Grade One Student at a Time 1. Click the Grades link in a student row.


159 2. Enter a grade from the Grade drop-down list. Optional: Enter a comment in the Comment textbox. 3. Click the Save changes button. To Grade More Than One Student at a Time 1. Select the Allow quick grading checkbox.

160 2. Click the Save preferences button. 3. Select a grade from the Grade drop-down list. Optional: Enter a comment in the Comment textbox. 6. Click the Save all my feedback button. Frequently Asked Questions What do students see? After the instructor has provided a grade or a comment, the student can view this feedback on the activity page.
161 A student can also view his or her grades in the Grades section of the website but comments are only visible on the activity page. Can students upload more than one file? Yes. If a student would like to replace a file, he or she can upload another file and the newly uploaded file would replace the old file. To upload multiple files, students can place the files in a zipped folder and then upload the zipped folder. Can I restrict access to an activity that requires students to upload a file? No. It is not possible to restrict access to an activity. Students have the option to upload a file at any time and the most recently uploaded file is the file that will be available to the instructor. However, you can download student files at a particular date and time and disregard later submissions. Quizzes This page describes how to view details about a Quiz attempt and how to override an existing grade. Some activities require students to take a Quiz. Quizzes are graded automatically. Students can take the Quiz an unlimited number of times, but only the highest score is reported in the Grades section and the activity page. Instructors have the option to modify existing Quiz grades and to provide feedback. View Quiz Attempts After students completed each Quiz attempt, information about the Quiz attempt will become available on the activity page. 1. Select a course name header from the Course navigation pane. Optional: Filter the Activity navigation pane by selecting a chapter from the Course navigation pane. 2. Select the assigned activity from the Activity navigation pane. 3. Click the Reports tab. The Reports tab provides the following information for each attempt: Section Student name Date and time the student started the attempt
162 Date and time the student completed the attempt Duration of the attempt Grade - points earned out of total points available The option to Delete attempts. To Delete the attempt, select the check box and choose Delete in the With Selected dropdown list at the bottom. Modify the View of Quiz Attempts On the Reports tab, the view of the attempts can be modified by selecting different display options. Filter Attempts by Category There are four filters available for attempt data: Show students with attempts only Show students with no attempts only Show all students Show all attempts 1. Select an option from the drop-down list.
163 2. Click the Go button. Show or Hide Score Details To show or hide the score received for each question: 1. Check or uncheck the Show score detail checkbox. 2. Click the Go button. Make a Comment or Override a Score Instructors have the option to modify a Quiz attempt grade. To view details about a Quiz attempt: 1. Select a course name header from the Course navigation pane. Optional: Filter the Activity navigation pane by selecting a chapter from the Course navigation pane. 2. Select the assigned activity from the Activity navigation pane. 3. Click the Reports tab. 4. Click a date and time or a grade link in the table to view a Quiz attempt.
164 The Score details page provides the following information: Student name Number of attempts Date and time the student started and completed the attempt Duration of the attempt Raw score Grade Further down on the Score details page are the Quiz questions, information about whether each question was answered correctly or not, and the grade given to each answer.
165 5. Click the Make comment or override score link. 6. Change the point value at the bottom. Optional: Include a comment. 7. Click the Save button. Download Information about the Quiz Attempts To download the information from the Quiz attempts table as an Excel document: 1. Select a course name header from the Course navigation pane. Optional: Filter the Activity navigation pane by selecting a chapter from the Course navigation pane. 2. Select the assigned activity from the Activity navigation pane. 3. Click the Reports tab. 4. Click the Download in Excel format button. Frequently Asked Questions What if I want to modify the score for the entire Quiz? See the Edit Grades section to find out how to change the score for an entire Quiz rather than for an individual question. Can I restrict access to a Quiz?
166 No. It is not possible to restrict access to a quiz. However, you can use the date and time stamp of each student attempt, which is visible on the Reports tab on the individual activity page, to determine which attempt to include in your grading. Multiple Choice This page describes how to view details about a Quiz attempt and how to override an existing grade. See the Multiple Choice page in the Concept Check section for more information about Multiple Choice activities. Multiple Choice activities are graded automatically, but instructors have the option to modify grades and provide feedback to students. View Multiple Choice Attempts To view information about the Multiple Choice attempts that have been completed by students in a course: 1. Select a course name header from the Course navigation pane. Optional: Filter the Activity navigation pane by selecting a chapter from the Course navigation pane. 2. Select the assigned activity from the Activity navigation pane. 3. Click the Reports tab. The Reports tab provide the following information for each attempt: Section Student name Date and time the student started the attempt Date and time the student completed the attempt Duration of the attempt Grade - points earned out of total points available Score details - points received per question
167 Modify the View of Multiple Choice Attempts On the Reports tab, the view of the attempts can be modified by selecting different display options. Filter Attempts by Category There are four filters available for attempt data: Show students with attempts only Show students with no attempts only Show all students Show all attempts 1. Select an option from the drop-down list. 2. Click the Go button. Show or Hide Score Details To show or hide the score received for each question: 1. Check or uncheck the Show score detail checkbox. 2. Click the Go button.
168 Make a Comment or Override a Score Instructors have the option to modify grades for Multiple Choice attempts. To view details about a Multiple Choice attempt: 1. Select a course name header from the Course navigation pane. Optional: Filter the Activity navigation pane by selecting a chapter from the Course navigation pane. 2. Select the assigned activity from the Activity navigation pane. 3. Click the Reports tab. 4. Click a date and time link in the table to view details about an attempt. The Score details page provides the following information: Student name Number of attempts Date and time the student started and completed the attempt Duration of the attempt

169 Raw score Grade Further down on the Score details page are the Multiple Choice quiz questions, information about whether each question was answered correctly or not, and the grade given to each answer. 5. Click the Make comment or override score link. 6. Change the point value at the bottom. Optional: Include a comment. 7. Click the Save button. Download Information about the Multiple Choice Quiz Attempts To download the information from the Multiple Choice attempts table as an Excel document: 1. Select a course name header from the Course navigation pane. Optional: Filter the Activity navigation pane by selecting a chapter from the Course navigation pane. 2. Select the assigned activity from the Activity navigation pane. 3. Click the Reports tab.
170 4. Click the Download in Excel format button. Frequently Asked Questions What if I want to modify the score for the entire Multiple Choice quiz? See the Edit Grades section to find out how to change the score for an entire Multiple Choice quiz rather than to change the score for an individual question. Can I restrict access to a Multiple Choice activity? No. It is not possible to restrict access to an activity. However, you can use the date and time stamp of each student attempt, which is visible on the Reports tab on the individual activity page, to determine which attempt to include in your grading. Word Puzzle This page describes how to view student Word Puzzle attempts. See the Word Puzzle page in the Concept Check section for more information. The grade for a Word Puzzle activity can only be modified from the Grades section on the Our Digital World (ODW) Companion website. See the Grades section for more detail. View Word Puzzle Attempts To view information about student Word Puzzle attempts: 1. Select a course name header from the Course navigation pane. Optional: Filter the Activity navigation pane by selecting a chapter from the Course navigation pane. 2. Select the assigned activity from the Activity navigation pane. 3. Click the Reports tab.

171 The Reports tab provide the following information for each attempt: Student name The highest score, expressed as a percentage Number of attempts Date and time of the most recently submitted attempt A Show details link To view additional information about an attempt, click the Show details link. The Word Puzzle details page displays the following information: The questions as they appeared in the activity The correct answers to the questions The answers provided by the student Whether the provided answers were correct or incorrect
172 To hide the details for the most recently submitted Word Puzzle for a student, click the Show details link again. Frequently Asked Questions How do I modify the grade for a Word Puzzle? The grade for a Word Puzzle can only be modified from the Grades section on the Our Digital World (ODW) Companion website. See the Gradessection for more detail. Can I restrict access to a Word Puzzle activity? No. It is not possible to restrict access to an activity. However, you can use the date and time stamp of each student attempt, which is visible on the Reports tab on the individual activity page, to determine which attempt to include in your grading. Matching This page describes how to view details about a Matching activity attempt and override an existing grade. See the Matching page in the Concept Check section for more information. Matching activities are graded automatically. Students can attempt them an unlimited number of times and the highest score is reported in the Grades section of the Our Digital World (OWD) Companion website and on the activity page. Instructors have the option to modify existing Matching grades and to provide feedback. View Matching Attempts When a student has attempted a Matching activity, information about the attempt will become available on the activity page. To view submitted Matching attempts: 1. Select a course name header from the Course navigation pane. Optional: Filter the Activity navigation pane by selecting a chapter from the Course navigation pane. 2. Select the assigned activity from the Activity navigation pane. 3. Click the Reports tab.
173 The Reports tab provide the following information for each attempt: Section Student name Date and time the student started the attempt Date and time the student completed the attempt Duration of the attempt Grade - points earned out of total points available Modify the View of Matching Quiz Attempts On the Reports tab, the view of the attempts can be modified by selecting different display options. Filter Attempts by Category There are four filters available for attempt data:

174 Show students with attempts only Show students with no attempts only Show all students Show all attempts 1. Select an option from the drop-down list. 2. Click the Go button. Show or Hide Score Details To show or hide the score received for each question: 1. Check or uncheck the Show score detail checkbox. 2. Click the Go button. Make a Comment or Override a Score Instructors have the option to modify a grade for a Matching attempt. To view details about a Matching attempt: 1. Select a course name header from the Course navigation pane. Optional: Filter the Activity navigation pane by selecting a chapter from the Course navigation pane. 2. Select the assigned activity from the Activity navigation pane. 3. Click the Reports tab. 4. Click a date and time link in the table to view a quiz attempt.
175 The Score details page provides the following information: Student name Number of attempts Date and time the student started and completed the attempt Duration of the attempt Raw score Grade Further down on the Score details page are the Matching quiz questions, the choices selected, and the total grade provided for the exercise.

176 5. Click the Make comment or override score link. 6. Change the point value. Optional: Include a comment.
177 7. Click the Save button. Download Information about the Matching Attempts To download the information from the Matching attempts table as an Excel document: 1. Select a course name header from the Course navigation pane. Optional: Filter the Activity navigation pane by selecting a chapter from the Course navigation pane. 2. Select the assigned activity from the Activity navigation pane. 3. Click the Reports tab. 4. Click the Download in Excel format button. Frequently Asked Questions What if I want to modify the score for the entire Matching activity? See the Edit Grades section to find out how to change the score for an entire Matching quiz rather than for an individual question. Can I restrict access to a Matching activity? No. It is not possible to restrict access to an activity. However, you can use the date and time stamp of each student attempt, which is visible on the Reports tab on the individual activity page, to determine which attempt to include in your grading. Label It This page describes how to view student Label It attempts. See the Label It page in the Concept Check section for more information on the Label It activity. The grade for a Label It activity can only be modified from the Grades section on the Our Digital World (ODW) Companion website. See the Grades section for more detail. View Label It Attempts
178 To view information about the Label It attempts of students in a course: 1. Select a course name header from the Course navigation pane. Optional: Filter the Activity navigation pane by selecting a chapter from the Course navigation pane. 2. Select the assigned activity from the Activity navigation pane. 3. Click the Reports tab. The Reports tab provide the following information for each Label It attempt: Student name Highest score, expressed as a point value out of total points available Number of attempts Date and time of the most recently submitted attempt A Show details link To view additional information about a Label It attempt, click a Show details link. The Label It details page display the following information: The questions as they appeared in the activity The correct answers to the questions The answer provided by the student Whether the provided answers were correct or incorrect
179 To hide the details for a Label It attempt, click the Show details link again. Frequently Asked Questions How do I modify the grade for a Label It exercise? The grade for a Label It activity can only be modified from the Grades section on the Our Digital World (ODW) Companion website. See the Grades section for more detail. Can I restrict access to a Label It activity? No. It is not possible to restrict access to an activity. However, you can use the date and time stamp of each student attempt, which is visible on the Reports tab on the individual activity page, to determine which attempt to include in your grading. Arrange It This page describes how to view student Arrange It attempts. See the Arrange It page in the Concept Check section for more information. The grade for an Arrange It activity can only be modified from the Grades section on the Our Digital World (ODW) Companion website. See the Grades section for more detail. View Arrange It Attempts To view information about student Arrange It attempts: 1. Select a course name header from the Course navigation pane. Optional: Filter the Activity navigation pane by selecting a chapter from the Course navigation pane.
180 2. Select the assigned activity from the Activity navigation pane. 3. Click the Reports tab. The Reports tab provides the following information for each Arrange It attempt: Student name Highest score, expressed as a point value out of total points available Number of attempts Date and time of the most recently submitted attempt A Show details link To view information about an Arrange It attempt, click a Show details link. The Arrange It details page displays the following information: The questions as they appeared in the activity The correct answers to the questions The answer provided by the student Whether the provided answers were correct or incorrect
181 To hide the details for an Arrange It attempt, click the Show details link again. Frequently Asked Questions How do I modify the grade for an Arrange It attempt? The grade for an Arrange It activity can only be modified from the Grades section on the Our Digital World (ODW) Companion website. See the Grades section for more detail. Can I restrict access to an Arrange It activity? No. It is not possible to restrict access to an activity. However, you can use the date and time stamp of each student attempt, which is visible on the Reports tab on the individual activity page, to determine which attempt to include in your grading. Can I select which activities are available in a course? The activities have been designed to minimize the need for instructors to create additional content. It should not be necessary for an instructor to modify the activities content, and there is no functionality in the ODW Companion website to enable such modification. It is up to instructors to communicate to their students which activities are important and which activities will have an impact on their grades. Activities The pages in this section describe the activities on the Our Digital World (ODW) Companion website, such as how to preview or participate in an activity and how that activity is perceived by students. See the Graded Activities section to find out how to view the result of student interaction with an activity and how to assign a grade or override an existing grade. To find out how to modify grades for more than one student at a time, see the Course Grades section. CORE Activities versus Optional Activities In the Grades section of the ODW Companion website, a distinction is made between CORE activities and optional activities. CORE activities are labeled as such in the Activity navigation pane and in the activity page header. CORE activities are those that are related to the core competencies of the textbook and thus are given more emphasis. Take a Survey

182 This page provides information about how to view a Survey and its results, how to download the results as an Excel document, and how to delete a Survey response to allow an instructor or student to re-take the Survey. View Survey Results To view Survey results submitted by students in a course: 1. Select a course name header from the Course navigation pane. Optional: Filter the Activity navigation pane by selecting a chapter from the Course navigation pane. 2. Select a Survey from the Activity navigation pane. The Reports tab is the first screen that displays after you select a Survey. The Reports tab contains information about how many students have completed the Survey as well as a summary of the responses.
183 A list of Survey submissions displays near the bottom of the Reports screen. Download Survey Results To download the Survey results: 1. Select a course name header from the Course navigation pane. Optional: Filter the Activity navigation pane by selecting a chapter from the Course navigation pane. 2. Select a Survey from the Activity navigation pane. The Reports tab is the first screen that displays after you select a Survey. 3. Click the Download in Excel format button located near the bottom of the screen. Delete a Survey Response To delete a Survey response to enable a student or an instructor to retake the Survey: 1. Select a course name header from the Course navigation pane. Optional: Filter the Activity navigation pane by selecting a chapter from the Course navigation pane. 2. Select a Survey from the Activity navigation pane. The Reports tab is the first screen that displays after you select a Survey.

184 3. Select the checkbox next to the name of the student or instructor whose Survey response you want to delete. You may delete multiple Survey responses at the same time by selecting multiple checkboxes. 4. Click the Delete button. Preview a Survey To preview a Survey: 1. Select a course name header from the Course navigation pane. Optional: Filter the Activity navigation pane by selecting a chapter from the Course navigation pane. 2. Select a Survey from the Activity navigation pane. The Reports tab is the first screen that displays after you select a Survey. Click the Preview tab. 4. Fill out the Survey, then click the Click to Continue button at the bottom. 6. A Survey completion note will be displayed:
185 7. Click the Continue button. The Survey response is added to the statistics summary on the Reports tab. Frequently Asked Questions What do students see? Before a student completes a Survey, the student view of the Survey and the instructor view of the Survey (via the Preview tab) are the same. After a student submits a Survey, the student view of the Survey will change to let the student know that the Survey has been submitted. The student then gains access to the most recent Survey results.
 Companion website, instructor Survey responses are recorded and included with the student Survey results.")
186 Why is my response to the Survey included with the results? Unlike many of the other activities on the Our Digital World (OWD) Companion website, instructor Survey responses are recorded and included with the student Survey results. See Delete a Survey Response to find out how to delete an instructor's or a student's Survey response. Some of my students would like to re-take the Survey. How might I help them with that? To enable an instructor or a student to re-take a Survey, you must first delete his or her existing response. See Delete a Survey Response for more information.
187 Ethics and Technology Blog This page describes how to post a response and edit an entry to an Ethics and Technology blog. The Ethics and Technology Blog can be used to generate interest in a topic and to encourage class discussion. Please note that the Blog entries are not graded; there is no facility for instructors to enter a grade for student participation. Note:Blog assignments usually have three default entries already posted. These default entries cannot be edited by the instructor. Post a Response To post a new Blog response entry: 1. Select a course name header from the Course navigation pane. Optional: Filter the Activity navigation pane by selecting a chapter from the Course navigation pane. 2. Select an Ethics and Technology Blog topic from the Activity navigation pane. 3. Click the Post a response button near the bottom of the page. The Blog entry form will become visible:
188 4. Enter a Post Title. 5. Type your response in the Post Entry box. 6. Click the Add Entry button. Each new Blog entry will be added to the bottom of the page. Edit an Entry To edit a Blog entry: 1. Select a course name header from the Course navigation pane. Optional: Filter the Activity navigation pane by selecting a chapter from the Course navigation pane. 2. Select an Ethics and Technology Blog topic from the Activity navigation pane.
189 3. Click the Edit this entry link next to the title of the Blog entry you want to edit. 4. Make the changes to the post title or the post entry. 5. Click the Save changes button. Note: Only instructors can modify a Blog entry. When a student has added an entry, the student cannot go back and edit that post. Frequently Asked Questions What do students see? The student view and the instructor view of the Blog page are essentially the same. The only difference between the student and instructor views is that instructors have access to an Edit this entry link beside each post title. This link will not appear beside the titles of the default posts.
190 Note: Only instructors can modify a Blog entry. When a student has added an entry, the student cannot go back and edit that post. See Edit an Entry for more information. How do I provide a grade for student Blog entries? There is no facility for entering grades for Blog entries. A student contacted me about not being able to edit a Blog entry. How might I help this student? When a student has added a Blog entry, the student cannot go back and edit that entry. See Edit an Entry for more information. Take the Next Step Take the Next Step activities help to reinforce the student's understanding of topics in the textbook. Flash Movie This page describes how to view a Flash Movie and how to preview a Flash Movie quiz. Flash Movie activities require students to view a movie and then to answer some questions about the movie. View a Flash Movie To view a Flash Movie: 1. Select a course name header from the Course navigation pane. Optional: Filter the Activity navigation pane by selecting a chapter from the Course navigation pane. 2. Select a Flash Movie activity from the Activity navigation pane. The Info tab displays immediately after you select a Flash Movie activity.
191 To view the movie, click on the link in the description. 3. The movie will open in another browser tab or window. Click the Play button to view the Flash Movie.
192 - Click the Restart Tutorial button to rewind the Flash Movie. - Click the Replay Scene button to rewind the current Flash slide.

193 - Click the Continue button to move to the next Flash slide.
194 Preview a Flash Movie Quiz Each Flash Movie is followed by a brief concept quiz. To preview a Flash Movie quiz: 1. Select a course name header from the Course navigation pane. Optional: Filter the Activity navigation pane by selecting a chapter from the Course navigation pane. 2. Select a Flash Movie activity from the Activity navigation pane. 3. Click the Preview tab. If you would like to clear the quiz form at any time, click the Start again button.
195 4. When you have completed the quiz, click the Submit all and finish button. A dialog box will appear to ask if you are ready to submit your answers. 5. Click OK in the popup dialog box to indicate that you are ready to submit your answers. 6. After you submit your answers, a quiz attempt summary will display with the following information: Date and time the attempt was started Date and time the attempt was completed Duration of the attempt Raw score Grade Note: An instructor's quiz attempts will not be stored by the learning management system. Frequently Asked Questions What Do Students See? What students see when they look at a Flash Movie is similar to what instructors see on the Info tab. The main difference between the student and instructor views is that students have access to an Attempt exam now button below the Flash Movie area.
196 Students will see and experience a quiz attempt much like an instructor would. After the exam has been submitted, the student will see a quiz attempt summary that displays the following information: Date and time the attempt started Date and time the attempt was completed Duration of the attempt Raw score Grade Whether the questions were answered correctly Note: Students may submit multiple quiz attempts. The highest earned score will be recorded by the learning management system and displayed on the Grades page. If a student has completed one or more quiz attempts, the button on the activity page will change to read Re-attempt exam. Students will see information about his or her previous quiz attempts, such as the number of attempts and the date the attempts were completed, below the Flash Movie area. The instructor view of the Flash MovieInfo tab does not display information about individual attempts. To find out more about what instructors see on the Reports tab of a Flash Movie activity page, see the Graded Activities section. The highest grade is listed below the Flash Movie area and in the student view of the Grades section of the Our Digital World (ODW) Companion website. Can I edit or make changes to the Flash Movies? No. There is no option for instructors to make changes to the Flash Movies. Can students preview a Flash Movies without taking the Quiz? Yes. Students can preview a Flash Movie an unlimited number of times before taking the quiz for that movie. If I take a Flash Movie quiz, will the results be stored by the learning management system? No. An instructor's quiz attempts will not be stored by the learning management system. Hands-on This page describes how to view and upload a file to a Hands-on activity.
197 Hands-on activities require students to conduct research and to upload a file with their research findings or require students to match labels with images. For information about how to view and grade a student file, see the Uploaded Files page in the Graded Activities section. View a Hands-on Activity To view a Hands-on activity: 1. Select a course name header from the Course navigation pane. Optional: Filter the Activity navigation pane by selecting a chapter from the Course navigation pane. 2. Select a Hands-on activity from the Activity navigation pane. Flash Drag and Drop To complete a Hands-on activity that requires you to drag and drop: 1. Select a course name header from the Course navigation pane. Optional: Filter the Activity navigation pane by selecting a chapter from the Course navigation pane. 2. Select a Flash Drag and Drop Hands-on activity from the Activity navigation pane. The Preview tab is the first screen that displays after you select a Hands-on activity. 3. Click and drag the terms or images to their correct locations on the screen.

198 - To clear the boxes and to start over, click the Restart button. - To finish without saving the attempt, click the Exit button. 4. To submit your answers, click the Submit button. 5. After you submit your responses, the final grade will be displayed. Note: Grades for instructor attempts will not be added to the Grades section of the website. How to Upload a File Some Hands-on assignments require the participant to upload a file.

199 Instructors can upload a file to the Our Digital World (ODW) Companion website, but the uploaded file will only be available to the instructor. To upload a file: 1. Select a course name header from the Course navigation pane. Optional: Filter the Activity navigation pane by selecting a chapter from the Course navigation pane. 2. Select a Hands-on activity from the Activity navigation pane. The Preview tab is the first screen that displays after you select a Hands-on activity. 3. Click the Browse button. 4. Select a file in the Select a file to upload dialog box and click Open. 5. Click the Upload this file button. Once the file has been successfully uploaded to the page, a link to the file will appear. To upload another file, repeat the steps above. Students follow the same process to upload a file.
200 Frequently Asked Questions What Do Students See? The student view is identical to what instructors see on the Preview tab of a Hands-on activity page. Can students upload more than one file? Yes. If a student would like to replace a file, he or she can upload another file and the newly uploaded file would replace the old file. To upload multiple files, students can place the files in a zipped folder and then upload the zipped folder. Can I edit or make changes to the Hands-on activities? No. There is no option for instructors to make changes to the Hands-on activities. Can I add my own Hands-on activities content? No. There is no option for instructors to add their own content to the Hands-on activities. If I upload a file to the Our Digital World (ODW) Companion website will that file be available to students? No. The uploaded file will only be available to the instructors in the course. Interview This page describes how to view and upload a file to an Interview activity. Interview assignments require students to conduct an interview and then submit a podcast or transcript of it. For information about how to view and grade a student podcast or transcript, see the Uploaded Files page in the Graded Activities section. View an Interview Activity To view an Interview activity for a course: 1. Select a course name header from the Course navigation pane. Optional: Filter the Activity navigation pane by selecting a chapter from the Course navigation pane. 2. Select an Interview activity from the Activity navigation pane. The Preview tab is the first screen that displays after you select an Interview activity.
201 How to Upload a File Instructors can upload a file to the Our Digital World (ODW) Companion website, but the uploaded file will only be available to the instructor. To upload a file: 1. Select a course name header from the Course navigation pane. Optional: Filter the Activity navigation pane by selecting a chapter from the Course navigation pane. 2. Select an Interview activity from the Activity navigation pane. The Preview tab is the first screen that displays after you select an Interview activity. 3. Click the Browse button. 4. Select a file in the Select a file to upload dialog box and click Open. 5. Click the Upload this file button. Once the file has been successfully uploaded to the page, a link to the file will appear. To upload another file, repeat the steps above. Students follow the same process to upload a file. Frequently Asked Questions What Do Students See? The student view of an Interview activity page is identical to what instructors see on the Preview tab. Can students upload more than one file?
202 Yes. If a student would like to replace a file, he or she can upload another file and the newly uploaded file would replace the old file. To upload multiple files, students can place the files in a zipped folder and then upload the zipped folder. Can I edit or make changes to the Interview activities? No. There is no option for instructors to make changes to the Interview activities. Can I add my own Interview activities content? No. There is no option for instructors to add their own content to the Interview activities. If I upload a file to the Our Digital World (ODW) Companion website will that file be available to students? No. The uploaded file will only be available to the instructors in the course. Presentations This page describes how to view and upload a file to a Presentation activity. Presentations require students to conduct research and upload a presentation to the Our Digital World (ODW) Companion website. For information about how to grade a student Presentation, see the Uploaded Files page in the Graded Activities section. View a Presentation Activity To view a Presentation activity page for a course: 1. Select a course name header from the Course navigation pane. Optional: Filter the Activity navigation pane by selecting a chapter from the Course navigation pane. 2. Select a Presentation activity from the Activity navigation pane. The >Preview tab is the first screen that displays after you select a Presentation activity. How to Upload a File Instructors can upload a file to the Our Digital World (ODW) Companion website, but the uploaded file will only be available to the instructor. To upload a file:
203 1. Select a course name header from the Course navigation pane. Optional: Filter the Activity navigation pane by selecting a chapter from the Course navigation pane. 2. Select a Presentation activity from the Activity navigation pane. The Preview tab is the first screen that displays after you select a Presentation activity. 3. Click the Browse button. 4. Select a file in the Select a file to upload dialog box and click Open. 5. Click the Upload this file button. Once the file has been successfully uploaded to the page, a link to the file will appear. To upload another file, repeat the steps above. Students follow the same process to upload a file. Frequently Asked Questions What Do Students See? The student view of a Presentation activity page is identical to what instructors see on the Preview tab. Can students upload more than one file? Yes. If a student would like to replace a file, he or she can upload another file and the newly uploaded file would replace the old file. To upload multiple files, students can place the files in a zipped folder and then upload the zipped folder. Can I edit or make changes to the Presentation activities? No. There is no option for instructors to make changes to the Presentation activities. Can I add my own Presentation activities content? No. There is no option for instructors to add their own content to the Presentation activities.
204 If I upload a file to the Our Digital World (ODW) Companion website will that file be available to students? No. The uploaded file will only be available to the instructors in the course. Research This page describes how to view a Research activity. Research activities require students to conduct research and submit a document to the Our Digital World (ODW) Companion website or to complete a brief quiz. For information about how to view and grade a student file, see the Uploaded Files page in the Graded Activities section. View a Research Activity Quiz To view a Research quiz activity for a course: 1. Select a course name header from the Course navigation pane. Optional: Filter the Activity navigation pane by selecting a chapter from the Course navigation pane. 2. Select a Research activity from the Activity navigation pane. 3. Click the Preview tab. Note: An instructor's quiz attempts will not be stored by the learning management system. To clear the quiz form at any time, click the Start again button. 4. When you have completed the quiz, click the Submit all and finish button. A dialog box will appear to ask if you are ready to submit your answers.
205 5. Click OK in the popup dialog box to submit your answers. 6. A quiz attempt summary will be displayed with the following information: Date and time the attempt started Date and time the attempt was completed Duration of the attempt Raw score Grade How to Upload a File Instructors can upload a file to the Our Digital World (ODW) Companion website, but the uploaded file will only be available to the instructor. To upload a file: 1. Select a course name header from the Course navigation pane. Optional: Filter the Activity navigation pane by selecting a chapter from the Course navigation pane. 2. Select a Research activity from the Activity navigation pane. 3. Click the Browse button.
206 4. Select a file in the Select a file to upload dialog box and click Open. 5. Click the Upload this file button. Once the file has been successfully uploaded to the page, a link to the file will appear. To upload another file, repeat the steps above. Students follow the same process to upload a file. Frequently Asked Questions What Do Students See? The student view of a Research activity is identical to what instructors see on the Preview tab. Can students upload more than one file? Yes. If a student would like to replace a file, he or she can upload another file and the newly uploaded file would replace the old file. To upload multiple files, students can place the files in a zipped folder and then upload the zipped folder. Can I edit or make changes to the Research activities? No. There is no option for instructors to make changes to the Research activities. Can I add my own Research activities content? No. There is no option for instructors to add their own content to the Research activities. If I upload a file to the Our Digital World (ODW) Companion website will that file be available to students? No. The uploaded file will only be available to the instructor. If I take a Research Activities Quiz, will the results be stored by the learning management system? No. An instructor's quiz attempts will not be stored by the learning management system. Team Planning This page describes how to view and upload a file for a Team Planning activity.
207 Team Planning activities require students to participate in a group activity and submit the final result by uploading a file. For information about how to view and grade a student file, see the Uploaded Files page in the Graded Activities section. View a Team Planning Activity To view a Team Planning activity for a course: 1. Select a course name header from the Course navigation pane. Optional: Filter the Activity navigation pane by selecting a chapter from the Course navigation pane. 2. Select a Team Planning activity from the Activity navigation pane. The Preview tab is the first screen that displays after you select a Team Planning activity. How to Upload a File Instructors can upload a file to the Our Digital World (ODW) Companion website, but the uploaded file will only be available to the instructor. To upload a file: 1. Select a course name header from the Course navigation pane. Optional: Filter the Activity navigation pane by selecting a chapter from the Course navigation pane. 2. Select an Team Planning activity from the Activity navigation pane. The Preview tab is the first screen that displays after you select a Team Planning activity. 3. Click the Browse button.
208 4. Select a file in the Select a file to upload dialog box and click Open. 5. Click the Upload this file button. Once the file has been successfully uploaded to the page, a link to the file will appear. To upload another file, repeat the steps above. Students follow the same process to upload a file. Frequently Asked Questions What Do Students See? The student view of a Team Planning activity is identical to what instructors see on the Preview tab. Can students upload more than one file? Yes. If a student would like to replace a file, he or she can upload another file and the newly uploaded file would replace the old file. To upload multiple files, students can place the files in a zipped folder and then upload the zipped folder. Can I edit or make changes to the Team Planning activities? No. There is no option for instructors to make changes to the Team Planning activities. Can I add my own Team Planning activities content? No. There is no option for instructors to add their own content to the Team Planning activities. If I upload a file to the Our Digital World (ODW) Companion website will that file be available to students? No. The uploaded file will only be available to the instructors in the course. Team Presentation This page describes how to view and upload a file for a Team Presentation activity. Team Presentations require students to conduct research as a team and upload a short presentation to the Our Digital World (ODW) Companion website.
209 For information about how to grade a student file, see the Uploaded Files page in the Graded Activities section. View a Team Presentation Activity To view a Team Presentation activity for a course, 1. Select a course name header from the Course navigation pane. Optional: Filter the Activity navigation pane by selecting a chapter from the Course navigation pane. 2. Select a Team Presentation activity from the Activity navigation pane. The Preview tab is the first screen that displays after you select a Team Presentation activity. How to Upload a File Instructors can upload a file to the Our Digital World (ODW) Companion website, but the uploaded file will only be available to the instructor. To upload a file: 1. Select a course name header from the Course navigation pane. Optional: Filter the Activity navigation pane by selecting a chapter from the Course navigation pane. 2. Select an Team Presentation activity from the Activity navigation pane. The Preview tab is the first screen that displays after you select a Team Presentation activity. 3. Click the Browse button.
210 4. Select a file in the Select a file to upload dialog box and click Open. 5. Click the Upload this file button. Once the file has been successfully uploaded to the page, a link to the file will appear. To upload another file, repeat the steps above. Students follow the same process to upload a file. Frequently Asked Questions What Do Students See? The student view of a Team Presentation activity is identical to what instructors see on the Preview tab. Can students upload more than one file? Yes. If a student would like to replace a file, he or she can upload another file and the newly uploaded file would replace the old file. To upload multiple files, students can place the files in a zipped folder and then upload the zipped folder. Can I edit or make changes to the Team Presentation activities? No. There is no option for instructors to make changes to the Team Presentation activities. Can I add my own Team Presentation activities content? No. There is no option for instructors to add their own content to the Team Presentation activities. If I upload a file to the Our Digital World (ODW) Companion website will that file be available to students? No. The uploaded file will only be available to the instructors in the course. Tutorial This page describes how to view and upload a file for a Tutorial activity. Tutorial activities involve working through a tutorial, completing the assignment, and uploading a file of the work for instructors to grade. For information about how to view and grade a student file, see the Uploaded Files page in the Graded Activities section. View a Tutorial activity To view a Tutorial activity for a course: 1. Select a course name header from the Course navigation pane. Optional: Filter the Activity navigation pane by selecting a chapter from the Course navigation pane.
211 2. Select a Tutorial activity from the Activity navigation pane. The Preview tab is the first screen that displays after you select a Tutorial activity. How to Upload a File Instructors can upload a file to the Our Digital World (ODW) Companion website, but the uploaded file will only be available to the instructor. To upload a file: 1. Select a course name header from the Course navigation pane. Optional: Filter the Activity navigation pane by selecting a chapter from the Course navigation pane. 2. Select an Tutorial activity from the Activity navigation pane. The Preview tab is the first screen that displays after you select a Tutorial activity. 3. Click the Browse button. 4. Select a file in the Select a file to upload dialog box and click Open. 5. Click the Upload this file button. Once the file has been successfully uploaded to the page, a link to the file will appear. To upload another file, repeat the steps above. Students follow the same process to upload a file. Frequently Asked Questions
212 What Do Students See? The student view of a Tutorial activity is identical to what instructors see on the Preview tab. Can students upload more than one file? Yes. If a student would like to replace a file, he or she can upload another file and the newly uploaded file would replace the old file. To upload multiple files, students can place the files in a zipped folder and then upload the zipped folder. Can I edit or make changes to the Tutorial activities? No. There is no option for instructors to make changes to the Tutorial activities. Can I add my own Tutorial activities content? No. There is no option for instructors to add their own content to the Tutorial activities. If I upload a file to the Our Digital World (ODW) Companion website will that file be available to students? No. The uploaded file will only be available to the instructors in the course. Video This page describes how to view a Video and how to preview a Video quiz. Video activities involve viewing a video and then completing answering a few questions about the video. See the Quizzes page in the Graded Activities section to find out more about how to view and modify the grades for quizzes. View a Video To view a Video activity page for a course: 1. Select a course name header from the Course navigation pane. Optional: Filter the Activity navigation pane by selecting a chapter from the Course navigation pane. 2. Select a Video activity from the Activity navigation pane.

213 3. Click the link to the Video. The video opens in a new tab or window, and begins to play automatically. - Click the Pause button to pause the video. - Click the Stop button to stop the video. - Click the Play button to resume a stopped or paused video. - To rewind the video, drag the playhead to the left; to fast-forward the video, drag the playhead to the right.
214 - To change the volume, drag the volume bar with the cursor. Drag to the left to decrease the volume and to the right to increase the volume. Preview a Video Quiz Each Video activity page contains a brief concept quiz. To preview a Video quiz for a course: 1. Select a course name header from the Course navigation pane. Optional: Filter the Activity navigation pane by selecting a chapter from the Course navigation pane. 2. Select a Video activity from the Activity navigation pane. The Info tab displays immediately after you select a Video activity. 3. Click the Preview tab. Note: Quiz attempts by instructors will not be stored by the learning management system. To clear the quiz form at any time, click the Start again button. 4. When you have completed the quiz, click the Submit all and finish button.
215 A dialog box will appear to ask if you are ready to submit your answers. 5. Click OK in the popup dialog box to submit your answers. 6. A quiz attempt summary will display with the following information: Date and time the attempt started Date and time the attempt was completed Duration of the attempt Raw score Grade Frequently Asked Questions What Do Students See? The student view of a Video activity page is identical to what instructors see on the Info tab. Can I edit or make changes to the Video activities or Quizzes? No. There is no option for instructors to make changes to the Video activities or Quizzes. Can I add my own Video activities content? No. There is no option for instructors to add their own content to the Video activities. If I upload a file to the Our Digital World (ODW) Companion website will that file be available to students? No. The uploaded file will only be available to the instructors in the course. If I take a Video Activities Quiz, will the results be stored by the learning management system?
216 No. An instructor's quiz attempts will not be stored by the learning management system. Concept Check The pages in this section describe the Concept Check activities, which are activities designed to help students test their understanding of a textbook chapter. The Concept Check activities are graded automatically, but instructors have the option to override existing grades. See the Graded Activities section to find out more about how to view and modify the grades for Concept Check activities. Multiple Choice This page describes how to preview a Multiple Choice activity. See the Multiple Choice page in the Graded Activities section to find out how to view and modify the grades for these activities. Multiple Choice activities involve answering questions related to a textbook chapter. In the Multiple Choice activity illustrated in the image below, students provide an answer for each question by selecting one of the options by clicking a radio button. Preview a Multiple Choice Activity To preview a Multiple Choice activity for a course: 1. Select a course name header from the Course navigation pane. Optional: Filter the Activity navigation pane by selecting a chapter from the Course navigation pane.

217 2. Select a Multiple Choice activity from the Activity navigation pane. The Info tab displays immediately after you select a Multiple Choice activity. 3. Select the Preview tab. Note: Quiz attempts by instructors will not be stored by the learning management system. The answers are provided by selecting one of the options by clicking a radio button. To clear the quiz form at any time, click the Start again button. 4. When you have completed the quiz, click the Submit all and finish button. A dialog box will appear to ask if you are ready to submit your answers.
218 5. Click OK in the popup dialog box to submit your answers. 6. A quiz attempt summary will display with the following information: Date and time the attempt started Date and time the attempt was completed Duration of the attempt Raw score Grade Frequently Asked Questions What Do Students See? The student view of a Multiple Choice activity page is similar to what instructors see on the Info page. The difference between the student view and the instructor view is that students have access to an Attempt exam now button. Students click the Attempt exam now button to begin the activity. After their answers have been submitted, the student will see an attempt summary page that displays information about the quiz such as which questions were answered correctly, the raw score, and the grade. After each attempt, the student's view of the activity page will be modified to display the date and time that each attempt was completed and the highest achieved grade for the activity. After the first attempt, the button on the activity page will change from Attempt exam now to Re-attempt exam. Can I edit or make changes to the Quizzes? No. There is no option for instructors to make changes to the Multiple Choice quizzes. If I take a Multiple Choice quiz, will the results be stored by the learning management system?
219 No. An instructor's quiz attempts will not be stored by the learning management system. Word Puzzle This page describes how to preview a Word Puzzle activity. See the Word Puzzle page in the Graded Activities section to find out more about how to view and modify the grades for this activity. Word Puzzle activities involve typing in words provided with their description. In the Word Puzzle activity illustrated in the image below, students are asked to enter a word for each description. Points are awarded for each correct entry. Preview a Word Puzzle Activity To preview a Word Puzzle activity for a course: 1. Select a course name header from the Course navigation pane.
220 Optional: Filter the Activity navigation pane by selecting a chapter from the Course navigation pane. 2. Select a Word Puzzle from the Activity navigation pane. The Preview tab is the first screen that displays after you select a Word Puzzle activity. 3. Click the Preview button.

221 4. Click the Start Game button. The word puzzle will begin immediately.

222 5. To move the insert cursor, click a description from the Across or Down menu, or click one of the squares in the horizontal or vertical rows. 6. Enter alphabetic letters until all of the words in the puzzle have been added. To clear the Word Puzzle, click the Start Over button at the bottom. 7. To submit your answers to the activity, click the Submit button at the bottom. 8. A brief summary page will display. This summary shows the grade for the Word Puzzle attempt. 9. Click the Continue link or wait a moment to be taken back to the Word Puzzle activity page. Note: Grades for instructor attempts will not be added to the Grades section of the website. Frequently Asked Questions What Do Students See?
223 The student view of a Word Puzzle activity page is similar to what instructors see on their Info tab. The difference between the student view and the instructor view is that students have access to a Start button rather than a Preview button. After their answers have been submitted, students will be able to see their highest achieved score on the Word Puzzle page and the Grades page. Students will also be able to see the date and time that the most recent attempt was completed. Can a student save a Word Puzzle activity and return to it later? No. A Word Puzzle activity can be cancelled by navigating away from the page. Only the highest score is stored and recorded by the learning management system. Instructors can see how many attempts have been made by a student from the Report tab of the activity page. Matching This page describes how to preview a Matching activity. See the Matching page in the Graded Activities section to find out more about how to view and modify the grades for this activity. Matching activities involve matching terms with images or their descriptions. In the Matching activity illustrated in the image below, students are asked to select a word from a dropdown list that corresponds with the description to the left. Points are awarded for each correct match between term and description. Preview a Matching Activity To preview a Matching activity for a course:

224 1. Select a course name header from the Course navigation pane. Optional: Filter the Activity navigation pane by selecting a chapter from the Course navigation pane. 2. Select a Matching activity from the Activity navigation pane. The Info tab displays immediately after you select a Matching activity. 3. Click the Preview tab. 4. Select a word from each of the drop-down lists until a word has been selected to match each description. Note: Quiz attempts by instructors will not be stored by the learning management system. To clear the Matching activity, click the Start again button. 4. When you have completed the quiz, click the Submit all and finish button. A dialog box will appear to ask if you are ready to submit your answers.

225 5. Click OK in the popup dialog box to submit your answers. 6. A quiz attempt summary will display with the following information: Date and time the attempt started Date and time the attempt was completed Duration of the attempt Raw score Grade Frequently Asked Questions What Do Students See? The student view of a Matching activity page is similar to what instructors see on the Info tab. The difference between the student view and the instructor view is that students have access to an Attempt exam now button. After their answers have been submitted, students will be able to see their highest achieved score on the Matching page and on the Grades page. Students will also be able to see the date and time that the most recent attempt was completed. After the first attempt, the button on the activity page will change from Attempt exam now to Re-attempt exam. Can a student save a Matching activity and return to it later?
226 Yes. If a student does not click the Submit all and finish button, he or she can return and complete the Matching activity at a later time. Information about each attempt is stored by the learning management system and can be viewed from the Report tab of the activity page. Label It This page describes how to preview a Label It activity. See the Label It page in the Graded Activities section to find out more about how to view and modify the grades for this activity. Label It activities involve labeling images or descriptions. In these activities, students drag and drop terms so that they match with images or descriptions. In the Label It activity illustrated in the image below, students are asked to label the images. The exercise is completed by dragging and dropping each of the terms on the left into the gray boxes in the middle. Points are awarded for each correct match between label and image. Preview a Label It Activity To preview a Label It activity for a course: 1. Select a course name header from the Course navigation pane.

227 Optional: Filter the Activity navigation pane by selecting a chapter from the Course navigation pane. 2. Select a Label It activity from the Activity navigation pane. 3. Click the Preview button. 4. Click and drag and drop a term to a gray box until all of the terms have been placed into the gray boxes. The goal in this exercise is to label the images on the right correctly. - To clear the boxes and to start over, click the Restart button.
228 - To finish without saving the attempt, click the Exit button. 5. To submit your answers, click the Submit button. 6. After you submit your responses, the final grade will be displayed. Note: Grades for instructor attempts will not be added to the Grades section of the website. Frequently Asked Questions What Do Students See? Students see a page similar to what instructors see on the Info tab of a Label It activity page. The difference is that students have access to a Start button rather than a Preview button. The Label It activity works exactly the same for a student as it does for an instructor. However, an instructor's score will not be recorded by the learning management system. After the answers have been submitted, a feedback page will appear to tell the student that the answers were successfully submitted and report his or her grade. If the student goes back to the Label It activity page, he or she will be able to see submission feedback such as the date, time, and grade of the latest submission. Can a student save a Label It activity and return to it later? No. A Label It activity can be cancelled by navigating away from the page or by clicking the Quit Activity button. Only the highest score is stored and recorded by the learning management system. Instructors can see how many attempts have been made by a student from the Report tab of the activity page. Arrange It This page describes how to preview an Arrange it activity. See the Arrange It page in the Graded Activities section to find out more about how to view and modify the grades for this activity. Arrange It activities involve arranging words or sentences into a particular sequence. The words are placed into order by dragging and dropping them into gray boxes.
229 In the Arrange It activity illustrated in the image below, students are asked to describe the steps of the booting process. This exercise is completed by dragging and dropping each of the terms on the left into the gray boxes on the right. Points are awarded for each correct placement in the sequence. Preview an Arrange It Activity To preview an Arrange It activity for a course: 1. Select a course name header from the Course navigation pane. Optional: Filter the Activity navigation pane by selecting a chapter from the Course navigation pane. 2. Select an Arrange It activity from the Activity navigation pane. 3. Click the Preview button.
230 4. Click to select a term and then drag and drop the term to a gray box until all of the terms have been arranged in the correct order in the gray boxes. - To clear the boxes and to start over, click the Restart button. - To finish without saving the attempt, click the Exit button. 5. To submit your answers, click the Submit button. 6. After you submit your responses, the final grade will be displayed. Note: Grades for instructor attempts will not be added to the Grades section of the website. Frequently Asked Questions
231 What Do Students See? The student view of an Arrange It activity page is similar to what instructors see on the Info tab. The difference is that students have access to a Start button rather than a Preview button. The Arrange It activity works exactly the same for a student as it does for an instructor. However, an instructor's score will not be recorded by the learning management system. After the answers have been submitted, a feedback page will appear to let the student know that the answers were successfully submitted and report the final grade. If the student goes back to the Arrange It activity page, he or she will see submission feedback such as the date, time, and grade of the latest submission. Can a student save an Arrange It activity and return to it later? No. An Arrange It activity can be cancelled by navigating away from the page or by clicking the Quit Activity button. Only the highest score is stored and recorded by the learning management system. Instructors can see how many attempts have been made by a student from the Report tab of the activity page. Projects This page describes how to view and upload a file for a Project activity and how to preview a Wiki Project. Projects are available in two versions: individual and group. Project results are either submitted as a file or provided in a Wiki. Each textbook chapter contains a Wiki project. A Wiki is a type of software that allows users to create and edit content collaboratively. To learn more about Wikis, see section 7.6 in the Our Digital World (ODW) textbook. For information about how to grade a student file, see the Uploaded Files page in the Graded Activities section. View a Project To view a Project activity for a course: 1. Select a course name header from the Course navigation pane. Optional: Filter the Activity navigation pane by selecting a chapter from the Course navigation pane. 2. Select a Project from the Activity navigation pane. The Preview tab is the first screen that displays after you select a Project.
232 How to Upload a File Instructors can upload a file to the Our Digital World (ODW) Companion website, but the uploaded file will only be available to the instructor. To upload a file: 1. Select a course name header from the Course navigation pane. Optional: Filter the Activity navigation pane by selecting a chapter from the Course navigation pane. 2. Select an Project activity from the Activity navigation pane. The Preview tab is the first screen that displays after you select a Project. 3. Click the Browse button. 4. Select a file in the Select a file to upload dialog box and click Open. 5. Click the Upload this file button. After the file has been successfully uploaded to the page, a link to the file will appear. To upload another file, repeat the steps above. Students follow the same process to upload a file. Preview a Wiki Project To preview a Wiki project for a course: 1. Select a course name header from the Course navigation pane.
233 Optional: Filter the Activity navigation pane by selecting a chapter from the Course navigation pane. 2. Select a Wiki project from the Activity navigation pane. Frequently Asked Questions What Do Students See? When students access a Project page, they see the same view that instructors see on the Preview tab of that Project page. The Wiki activity page looks and works the same for students as it does for instructors. Can students upload more than one file? Yes. If a student would like to replace a file, he or she can upload another file and the newly uploaded file would replace the old file. To upload multiple files, students can place the files in a zipped folder and then upload the zipped folder. Class Conversation Topics This page describes how to post and edit an entry for a Class Conversation Topics activity page. The Class Conversation Topics involve reading a text and posting a response. There is no grade for Class Conversation Topics activities recorded and stored by the learning management system. Post a Response To post a response to a Topic for a course: 1. Select a course name header from the Course navigation pane. Optional: Filter the Activity navigation pane by selecting a chapter from the Course navigation pane. 2. Select a Topic from the Activity navigation pane. 3. Click the Post a response button to display the Add an Entry form. The Add an Entry Form:
234 4. Enter a Post Title. 5. Type your post in the Post Entry field. 6. Click the Add Entry button. Each new entry will be added to the bottom of the topic page. Edit an Entry To edit a response: 1. Select a course name header from the Course navigation pane. Optional: Filter the Activity navigation pane by selecting a chapter from the Course navigation pane. 2. Select a Topic from the Activity navigation pane.

235 3. Click the Edit this entry link beside the title of the post you want to edit. 4. Edit the entry. Note: Students cannot edit an entry after it has been submitted. 5. Click the Save Changes button. Frequently Asked Questions What Do Students See? Students see the same thing instructors see when they visit a Class Conversation Topic. Students can see posts that instructors add to a Topic. A student contacted me about not being able to edit a Blog entry. How might I help this student?

236 Students cannot edit a response once it has been submitted. Instructors have editing privileges and can edit a student's posting. See Edit an Entry section of this page for more information. Spotlight on the Future Podcast This page describes how to listen to a podcast and how to upload a file to a Spotlight on the Future Podcast activity page. The Spotlight on the Future Podcast requires students to listen to a podcast (an audio file), consider a list of questions, and submit a file with answers to those questions to the Our Digital World (ODW) Companion website. For information about how to view and grade a student file, see the Uploaded Files page in the Graded Activities section. Listen to a Podcast To listen to a Spotlight on the Future Podcast: 1. Select a course name header from the Course navigation pane. Optional: Filter the Activity navigation pane by selecting a chapter from the Course navigation pane. 2. Select a Spotlight on the Future Podcast from the Activity navigation pane. The Preview tab is the first screen that displays after you select a Spotlight on the Future Podcast.
237 3. Click the Play button. - To stop the podcast, click the Pause button. - To rewind the podcast, drag the playhead to the left; to fast-forward the podcast, drag the playhead to the right. How to Upload a File Instructors can upload a file to the Our Digital World (ODW) Companion website, but the uploaded file will only be available to the instructor. To upload a file: 1. Select a course name header from the Course navigation pane. Optional: Filter the Activity navigation pane by selecting a chapter from the Course navigation pane. 2. Select a Spotlight on the Future Podcast activity from the Activity navigation pane. The Preview tab is the first screen that displays after you select a Spotlight on the Future podcast. 3. Click the Browse button. 4. Select a file in the Select a file to upload dialog box and click Open.
238 5. Click the Upload this file button. After the file has been successfully uploaded to the page, a link to the file will appear. To upload another file, repeat the steps above. Students follow the same process to upload a file. Frequently Asked Questions What Do Students See? Students see a page that is similar to what that the instructor sees on the Preview tab of the Spotlight on the Future Podcast page. After an instructor has provided a grade or optional comment, the student can view this feedback on the Spotlight on the Future Podcast page. Can students upload more than one file? Yes. If a student would like to replace a file, he or she can upload another file and the newly uploaded file would replace the old file. To upload multiple files, students can place the files in a zipped folder and then upload the zipped folder. If I upload a file to the Our Digital World (ODW) Companion website will that file be available to students? No. The uploaded file will only be available to the instructors in the course. Grades SNAP automatically stores scored work in the SNAP Grades section. In the Grades section for a course, instructors can: Add grade categories and grade items to the Grades section. Specify how assignments are organized in the grades page. Specify how the grade items appear to instructors and to students. View grade details and download grades in various formats. Hide a grade category for instructors and students until a later time. Change the grade letter schema to mirror grading policies of an academic institution. Specify grading method. View Grades
239 If you are teaching more than one course, select a course from the course navigation pane on the left side of the page. SNAP displays the links specific to that course. 1. Click the Grades tab. The Grades page is displayed. Note: Until at least one grade from one student has been submitted for the course, no grade will be displayed on the ViewGrades page. Click a name in the Student column to filter the grades table to show only grades for that student. Click the selected student's name one more time to View Student Information. Download Grades If you are teaching more than one course, select a course from the course navigation pane on the left side of the page. SNAP displays the links specific to that course. 1. Click the Grades tab.

240 The Grades page is displayed. Note: Until at least one grade from one student has been submitted for the course, no grade will be displayed on the Grades page. 2. Click the Download in Excel format button or the Download in text format button. 3. Depending on your browser, follow the on-screen pop-ups to save the file. Edit Grades If you are teaching more than one course, select a course from the course navigation pane on the left side of the page. SNAP displays the links specific to that course. 1. Click the Grades tab. 2. Click the Edit tab.
241 The row below each category heading displays the maximum points available for that activity and a textbox where instructors can add a grade. Select a value from the Current Grade Category dropdown list to view grades for another grade category. 3. Place the cursor in the applicable textbox and enter a grade value. 4. Click the Save Grade Changes button. Grade Preferences The Grades Preferences tab enable instructors to modify how grades appear in the Grades section of the website. Edit Grade Preferences To edit the grade preferences for a course, If you are teaching more than one course, select a course from the course navigation pane on the left side of the page. SNAP displays the links specific to that course. 1. Click the Grades tab.
242 2. Click the Preferences tab. 3. Enter grade preferences by selecting options from the available dropdown lists. Options Display Weighted Grades: Options include whether weighted grades are hidden, visible to instructors only, or visible to everyone. Display Points: Options include whether points are hidden, visible to instructors only, or visible to everyone. Display Percents: Options include whether grades in percents are hidden, visible to instructors only, or visible to everyone. Display Letter Grades: Options include whether letter grades are hidden, visible to instructors only, or visible to everyone. Letter Grade: Options include whether to use percent or to use weighted grades to determine letter grades. Reprint Headers: Options include none and 1 to 100. Show Hidden Items: Options include yes or no. The options selected on the Preferences tab are reflected on the View page. 4. Click the Save Preferences button to save changes.

243 Set Grade Categories Grade categories are used to organize how grades appear on the Grades screen. Edit Grade Categories To edit the settings for a grade item on the Set Categories screen, If you are teaching more than one course, select a course from the course navigation pane on the left side of the page. SNAP displays the links specific to that course. 1. Click the Grades tab. 2. Click the Set Categories tab. 3. On the Set Categories tab, instructors can change the grade category for an existing grade item, specify whether a grade item is graded on a curve, and whether a grade item should be considered extra credit. Note: The Curve To field will change the denominator when calculating a students score. If a 10 point assignment is Curved To 5 points, students will keep their score, but the denominator will change from 10 to Click the Save Changes button to save changes.
244 Add a Grade Category To add a grade category, If you are teaching more than one course, select a course from the course navigation pane on the left side of the page. SNAP displays the links specific to that course. 1. Click the Grades tab. 2. Click the Set Categories tab. 3. Enter a grade category title in the Add Category textbox. 4. Click the Add Category button. Delete a Grade Category To delete a grade category, If you are teaching more than one course, select a course from the course navigation pane on the left side of the page. SNAP displays the links specific to that course. 1. Click the Grades tab. 2. Click the Set Categories tab.
245 3. Select a grade category title in the Delete Category dropdown list. 4. Click the Delete Category button. Set Grade Weights The Set Weights tab enables instructors to modify the weight of each grade category toward the final grade in a course. If you are teaching more than one course, select a course from the course navigation pane on the left side of the page. SNAP displays the links specific to that course. To set grade weights for a course, 1. Click the Grades tab. 2. Click the Set Weights tab. Options include changing the weight associated with a grade category, whether to drop the lowest score in a grade category, whether a grade category can contain bonus points, and whether a grade category is visible or not.

246 3. Edit the values and click the Save Changes button. Set Grade Letters The default grade letter settings uses a plus and minus letter grade system. It is possible to create a new range system that better corresponds with the grading policies of your school or university. If you are teaching more than one course, select a course from the course navigation pane on the left side of the page. SNAP displays the links specific to that course. To change the range for grade letters, 1. Click the Grades tab. 2. Click the Set Grade Letters tab.
247 3. Modify the existing settings by entering new grade letters and grade values. 4. Click the Save Changes button. Manage Assignments Add a New Assignment In addition to the Scheduling tab, instructors can add a new assignment for a course from the Manage Assignments tab. Managed assignments are graded activities that are managed and graded by the instructor, examples include attendance, special projects, and other work not included in the SNAP content. View Demo: How to Create a Managed Assignment in the Grade Book If you are teaching more than one course, select a course from the course navigation pane on the left side of the page. SNAP displays the links specific to that course. 1. Click the Grades tab.
248 2. Click the Manage Assignments tab. 3. Enter a title in the Assignment Name textbox. Optional: Provide a brief description of the assignment in the Description textbox. 4. Specify a grade category for the new grade item by selecting an item from the Category dropdown list. 5. Enter the available points for the new assignment in the Points textbox. 6. Click the Add Assignment button. See the Edit Grades section for information on how to enter scores for activities. Delete an Existing Assignment After creating an assignment, you may want to remove it. You can do so by: 1. Click the Grades tab.

249 2. Click the Manage Assignments tab. 3. At the bottom, you will now see the option to delete an assignment. Use the Select an Assignment to delete dropdown to choose the assignment you wish to remove. Once you are satisfied with your selection, click Delete Assignment. SNAP END USER LICENSE AGREEMENT Paradigm Publishing, Inc. ( Paradigm ) grants the End User (herein defined as any person who downloads the files associated with SNAP Training and Assessment product, hereafter referred to as the Program ) permission to use both the files and content of the Program. By doing so the End User acknowledges that Paradigm holds all benefits of copyright in the aforementioned Product. The End User further agrees that the Product will not be copied, sold for profit, or redistributed in any manner to any third party for any reason whatsoever without the express written consent of Paradigm. The End User agrees that Paradigm, at its sole discretion, with or without cause, may revoke this permission at any time. By using the enclosed password to enter SNAP, the End User acknowledges having read and understood the terms of the User License and hereby agrees that they will comply with the terms of the End User License.
Introduction. Paradigm Publishing. SNAP for Microsoft Office SNAP for Our Digital World
 Introduction Paradigm Publishing Paradigm understands the needs of today s educators and exceeds the demand by offering the latest technological advancements for coursework settings. With the success of
CONTENTS... 1 OVERVIEW OF SIMNET...
 CONTENTS CONTENTS... 1 OVERVIEW OF SIMNET... 3 COMPUTER REQUIREMENTS... 3 OPTIMIZING YOUR COMPUTER TO RUN SIMNET ONLINE... 3 Changing Pop-Up Blocker Setting... 3 Changing Screen Resolution Settings...
MOODLE MANUAL TABLE OF CONTENTS
 1 MOODLE MANUAL TABLE OF CONTENTS Introduction to Moodle...1 Logging In... 2 Moodle Icons...6 Course Layout and Blocks...8 Changing Your Profile...10 Create new Course...12 Editing Your Course...15 Adding
To access your TITANium courses, login to your University portal and click on the TITANium tab.
 Below is a list of seven very basic skills to get your course open. 1. Access your TITANium courses. FDC TITANium Guides Seven Basic Skills to Get Your Course Open To access your TITANium courses, login
Our Digital World Online Companion Second Edition - Rep Guide
 Our Digital World Online Companion Second Edition - Rep Guide June 30, 2012 Description The Our Digital World Online Companion, Second Edition, (ODW2e) is a hybrid tool designed to work directly with the
D2L: An introduction for FACULTY
 D2L: An introduction for FACULTY REAL. AMAZING. UNIT 1: Introduction to Desire2Learn... 1 WHAT IS D2L... 1 GETTING LOGGED IN TO D2L... 1 UWP PORTAL PAGE... 2 COMPLETING YOUR PROFILE... 2 WHAT IS THE LOCKER...
The Course Navigator also allows instructors to assess students' work, track progress, download results, and view upcoming events.
 Introduction About the Course Navigator This Web-based learning management system enhances students' understanding of core Exploring Electronic Health Records content through flashcards, quizzes, and activities,
1. Go to https://online.national.edu/ 2. Click the link at the bottom that says Please click here for a System Check before you log in.
 Desire 2 Learn User Guide Desire 2 Learn User Guide Using the System Check Quick Link You can use the quick link on the entry page of the online classroom for a general test of your computer s preparedness
Moodle Documentation Student Handbook
 2017 Moodle Documentation Student Handbook Office of Academic Affairs Ari Ben Aviator, Inc. DBA Aviator College of Aeronautical Science & Technology 1/1/2017 TABLE OF CONTENTS AVIATOR LMS - MOODLE HELP
Rutgers. A How-To Guide for Instructors
 Moodle @ Rutgers A How-To Guide for Instructors 7/30/2012 Prepared by the Department of Instructional Technology & elearning Solutions (ITeS) CA/NJDS, Room B725 Page 2 Table of Contents Required Software...
Blackboard 5. Instructor Manual Level One Release 5.5
 Bringing Education Online Blackboard 5 Instructor Manual Level One Release 5.5 Copyright 2001 by Blackboard Inc. All rights reserved. No part of the contents of this manual may be reproduced or transmitted
Adobe Connect: Overview
 Adobe Connect: Overview Table of Contents Table of Contents... 1 Overview of Adobe Connect... 2 Recommended Use... 2 Roles and Privileges... 2 Menu Bar... 3 Prepare Room and Upload Content... 4 Create
Instructor Manual Contents
 Instructor Manual Contents Welcome to egrade Plus...1 The Roles Within egrade Plus...1 Master Course Instructor...1 Class Section Instructor...2 Navigating egrade Plus...2 Using the Universal Navigation
Visual Guide to Online Campus
 Contents Course Navigation... 2 Avatars..3 Text Editor... 4 Accessing Assignments... 6 Accessing Assessments... 9 Accessing and Participating in Discussions... 12 Discussion Forums and Threads... 14 Creating
1. To access the Course settings page, click Edit settings in the Administration block.
 Course Management Managing Course Design Configuring Course Settings The course setting page contains all of the important options for your course such as making the course available to students, and enabling
Wisdom Master Pro (v2.0) User Guide for Students
 User Guide for Students") (v2.0) User Guide for Students e-campus Homepage 4 Log in to e-campus 6 Personal Area 6 I. My Courses... 6 II. My Portal... 12 III. My Profile... 16 IV. My Assignments... 18 V. My Tests... 19 VI. My Learning...
(v2.0) User Guide for Students e-campus Homepage 4 Log in to e-campus 6 Personal Area 6 I. My Courses... 6 II. My Portal... 12 III. My Profile... 16 IV. My Assignments... 18 V. My Tests... 19 VI. My Learning...
Table of Contents Tutorials for Faculty... 3 Creating a News Item... 3 Syllabus... 3 Uploading Your Syllabus... 3 Update Your Syllabus
 Table of Contents Tutorials for Faculty... 3 Creating a News Item... 3 Syllabus... 3 Uploading Your Syllabus... 3 Update Your Syllabus... 3 Email... 4 Send an Email to the Entire Class... 4 Send Email
CourseWorks Quick Start
 Introduction CourseWorks Quick Start CourseWorks (aka Sakai ) is the university's new course management system, which allows instructors to develop and maintain course Web sites. With CourseWorks, instructors
Student User Guide. Introduction
 Student User Guide Introduction About the Course Navigator This web-based learning management system enhances students understanding of core course content through flashcards, quizzes, activities, and
Introduction to Blackboard
 Blackboard 9.1: Student Guide Introduction to Blackboard Logging into Blackboard Blackboard Blackboard is an integrated set of web-based tools for course management and delivery. Requirements For web-based
Student Guide INTRODUCTION TO ONLINE RESOURCES
 Student Guide INTRODUCTION TO ONLINE RESOURCES Date: 08. June. 2017 By: Technical Support Team STUDENT GUIDE southwales.unicaf.org 1)Introduction...4 2)Student Panel (SIS)...4 2.1)Student Panel (SIS) Login...4
Admissions & Intro to Report Editing Participants Guide
 IBM Cognos Analytics Admissions & Intro to Report Editing Participants Guide Welcome to Cognos - Admissions and Introduction to Report Editing! Today s objectives include: Gain a Basic Understanding of
Introduction to Moodle
 Introduction to Moodle Preparing for a Moodle Staff Development Session... 2 Logging in to Moodle... 2 Adding an image to your profile... 4 Navigate to and within a course... 6 Content of the basic template
Student Guide INTRODUCTION TO ONLINE RESOURCES
 Student Guide INTRODUCTION TO ONLINE RESOURCES Date: 12. March. 2018 By: Technical Support Team Table of Contents 1) Introduction 3 2) Student Panel (SIS) 3 2.1) Student Panel (SIS) Login 3 2.1.1) Definitions
Guide for K-6 Teachers
 Guide for K-6 Teachers 2009 Houghton Mifflin Harcourt Publishing Company. All rights reserved. Houghton Mifflin Harcourt and its logo are trademarks of Houghton Mifflin Harcourt Publishing Company. Microsoft
Student Guide. By UNICAF University
 vnhgfj Student Guide By UNICAF University 1 2 Table of Contents 1) Introduction... 5 2) Student Panel (SIS)... 5 2.1) Student Panel (SIS) Login... 5 2.1.1) Definitions... 5 2.1.2) Registration Email...
STUDENT HELP & WALKTHROUGH
 STUDENT HELP & WALKTHROUGH 2015 Jones & Bartlett Learning, LLC, An Ascend Learning Company Contents What are the browser and system requirements for running Navigate 2? 3 Why does Navigate 2 run a System
Getting Started. 1 Check your . Typically, sent from (Note: You may need to check your junk/spam folder).
.") Q U ICKSTART G U ID E Getting Started How to Setup Account 1 Check your email. Typically, sent from noreply@edvance360.com. (Note: You may need to check your junk/spam email folder). 2 Select the link
Q U ICKSTART G U ID E Getting Started How to Setup Account 1 Check your email. Typically, sent from noreply@edvance360.com. (Note: You may need to check your junk/spam email folder). 2 Select the link
Parent Student Portal User Guide. Version 3.1,
 Parent Student Portal User Guide Version 3.1, 3.21.14 Version 3.1, 3.21.14 Table of Contents 4 The Login Page Students Authorized Users Password Reset 5 The PSP Display Icons Header Side Navigation Panel
Canvas Instructor Quickstart Guide
 Canvas Instructor Quickstart Guide Canvas Instructor Quickstart Guide 1 Canvas Instructor Quickstart Guide 1.1 1.2 1.3 1.4 1.5 1.6 1.7 1.8 1.9 1.10 1.11 1.12 1.13 1.14 1.15 1.16 1.17 1.18 1.19 1.20 1.21
Vanier Moodle Basics 2 Statement of Competencies and Competency Elements. Statement of the Competencies
 Vanier Moodle Basics 2 Statement of Competencies and Competency Elements Workshop Description This workshop will introduce you to the basic elements of Vanier s DecClic Moodle. It will teach you how to
education portal Atheneo
 education portal Atheneo Student Navigation Orientation Guide 256 Seaboard Lane Suite G-101 Franklin, TN 37067 615.771.7706 Fax: 615.250.9415 www.knowledgeelements.com ONLINE LEARNING APTITUDE ASSESSMENT
Getting Started Guide
 Getting Started Guide for education accounts Setup Manual Edition 7 Last updated: September 15th, 2016 Note: Click on File and select Make a copy to save this to your Google Drive, or select Print, to
Introduction to the SAM Student Guide 4. How to Use SAM 5. Logging in the First Time as a Pre-registered Student 5 Profile Information 7
 Contents Introduction to the SAM Student Guide 4 How to Use SAM 5 Logging in the First Time as a Pre-registered Student 5 Profile Information 7 Logging into SAM as a New User 9 Forgot Password 14 Grace
School Installation Guide ELLIS Academic 5.2.6
 ELLIS Academic 5.2.6 This document was last updated on 2/16/11. or one or more of its direct or indirect affiliates. All rights reserved. ELLIS is a registered trademark, in the U.S. and/or other countries,
D2L Fundamentals Faculty Support Guide
 D2L Fundamentals Faculty Support Guide D2L Services West Chester University of Pennsylvania www.wcupa.edu/d2l 610-436-3350, option 2 Anderson Hall, room 2 d2l@wcupa.edu v10.5 July 2015 Contents NAVIGATING
Student User Guide for PsychPortal Psychology Tenth Edition In Modules
 Student User Guide for PsychPortal Psychology Tenth Edition In Modules Myers Getting Started with PsychPortal for Myers Psychology 10e In Modules Table of Contents Overview... 1 Getting Help... 1 System
In this tutorial, you will learn how to perform basic tasks for setting up a course site in Moodle.
 Curriculum and Instructional Materials Center 1-800-654-4502 www.okcimc.com 1: INTRO TO MOODLE WELCOME TO THE INTRO TO MOODLE TRAINING ACTIVITY! In this tutorial, you will learn how to perform basic tasks
CANVAS OBSERVER GUIDE
 CANVAS OBSERVER GUIDE This work is licensed under a Creative Commons Attribution-NonCommercial-ShareAlike License Table of Contents Introduction...3 What is the Observer role?...4 How can I use Canvas
TRAINER MOODLE QUICK GUIDE
 TRAINER MOODLE QUICK GUIDE Update 2-2018 Maine Roads to Quality Professional Development Network PO Box 9300, 34 Bedford Street, Portland, ME 04104 1-888-900-0055 www.muskie.usm.maine.edu/maineroads Table
Quick Start Guide for Teachers
 Quick Start Guide for Teachers LOGGING IN 1. Navigate to www-k6.thinkcentral.com. 2. Select your state, district, and school. 3. To make subsequent logins easier, check Remember My Organization (optional).
ASTRA USER GUIDE. 1. Introducing Astra Schedule. 2. Understanding the Data in Astra Schedule. Notes:
 ASTRA USER GUIDE 1. Introducing Astra Schedule Astra Schedule is the application used by Academic Space Scheduling & Utilization to schedule rooms for classes and by academic colleges, schools, and departments
Introduction to Cognos Participants Guide. Table of Contents: Guided Instruction Overview of Welcome Screen 2
 IBM Cognos Analytics Welcome to Introduction to Cognos! Today s objectives include: Gain a Basic Understanding of Cognos View a Report Modify a Report View a Dashboard Request Access to Cognos Table of
How will you design your course and organize your material? Consider
 Blackboard TM 9.1 Tools How will you design your course and organize your material? Consider Content Areas: add your syllabus, course documents such as handout, related Websites, assignments, and other
SCHOOLOGY OVERVIEW Getting Started
 SCHOOLOGY OVERVIEW Getting Started Publication: September 18, 2017 Table of Contents INTRODUCTION... 2 GETTING STARTED... 2 HOMEPAGE... 2 RECENT ACTIVITY... 2 GRADES AND ATTENDANCE... 3 CALENDAR... 3 Create
View the Advisor Case Load Self Service Report
 IBM Cognos Analytics View the Advisor Case Load Self Service Report The Advisor Case Load Self Service report will give you information about the students in your case load. The following is a guide on
Faculty Training. Blackboard I Workshop Bobbi Dubins
 Faculty Training Blackboard I Workshop Bobbi Dubins Table of Contents Introduction... 2 blackboard.allegany.edu... 2 Overview of Features:... 2 Using Blackboard... 3 Changing Your Password... 3 How to
Desire2Learn eportfolio
 This training guide will provide you with the skills to create and manage an online repository for storing your digital artefacts and experiences. can be used by students and academics alike, to record
Records and Enrollment Participants Guide
 IBM Cognos Analytics Welcome to Cognos Records and Enrollment Training! Today s objectives include: Gain a Basic Understanding of Cognos Understand University policies on data security including FERPA
OpenSpace provides some important benefits to you. These include:
 Cengage Education A member of Open Colleges Welcome to OpenSpace OpenSpace is our virtual campus. It is our online space for students, tutors and staff to interact. It provides you with a secure, interactive
Student User Guide for BioChemPortal Biochemistry: A Short Course, 2e
 Student User Guide for BioChemPortal Biochemistry: A Short Course, 2e Tymoczko Getting Started with BioChemPortal for Tymoczko, Biochemistry: A Short Course, 2e Table of Contents Overview... 1 Getting
Records and Enrollment Participants Guide
 IBM Cognos Analytics Welcome to Cognos Records and Enrollment Training! Today s objectives include: Understand University policies on data security including FERPA Understand which package/report to use
CompClass Solo User Guide for Instructors
 CompClass Solo User Guide for Instructors CompClass Solo User Guide for Instructors Table of Contents Overview... 1 Online Help... 1 System Requirements... 2 Adopting CompClass... 2 Student Access to CompClass...
Canvas Instructor Quickstart Guide
 Canvas Instructor Quickstart Guide Canvas Instructor Quickstart Guide 1 Canvas Instructor Quickstart Guide 1.1 1.2 1.3 1.4 1.5 1.6 1.7 1.8 1.9 1.10 1.11 1.12 1.13 1.14 1.15 1.16 1.17 1.18 1.19 1.20 1.21
Discussion Settings Options
 Discussions Discussions is where you will participate in class discussions with your classmates. Once a discussion is posted, every student in the class will be able to read the comments. Once you post
Remote Access Synchronization DL Parent
 Remote Access Synchronization DL Parent 205 Distance Learning Features Switched-On Schoolhouse 2008 School Edition has two optional distance learning features available: SOS Remote Access and SOS Synchronization.
Getting Started with Moodle 2.0
 Getting Started with Moodle 2.0 Note: Please use Mozilla Firefox if you are working on a Mac 1. Login to Moodle 2. How to Access a Course 3 Edit your Profile Information 4. Add a Personal photo 5. Disable
ACADEMIC TECHNOLOGY SUPPORT
 ACADEMIC TECHNOLOGY SUPPORT D2L : Introduction A Guide for Instructors ats@etsu.edu 439-8611 www.etsu.edu/ats Table of Contents Introduction...1 Objectives... 1 Logging In to D2L...1 My Home... 2 The Minibar...
Student User Guide for StatsPortal The Basic Practice of Statistics, Fifth Edition
 Student User Guide for StatsPortal The Basic Practice of Statistics, Fifth Edition Moore Getting Started with StatsPortal for Moore, The Basic Practice of Statistics, 5e Table of Contents Getting Help...
WebEx Training Center Tutorial
 UNC CHARLOTTE WebEx Training Center Tutorial Getting Started Guide Center for Teaching & Learning Last Updated: Summer 2016 Contents Introduction... 2 Minimum System Requirements... 2 How to Get a WebEx
Installing Switched-On Schoolhouse 2007
 1 Installation & Setup Installing Switched-On Schoolhouse 2007 Switched-On Schoolhouse 2007 (SOS) is easy to install on your computer because most of the installation components install themselves. Before
Argosy University Online Programs, Version 7.0. digital bookshelf. Student User Guide
 Argosy University Online Programs, Version 7.0 digital bookshelf Student User Guide 1 Take your ebooks with you! Download the Bookshelf app. If you own an iphone, ipad, or ipod Touch, you can download
Moodle Documentation for Students (v.3.4)
") Moodle Documentation for Students (v.3.4) Moodle Documentation for Students (v.3.4) GSC STAFF Moodle Documentation for Students (v.3.4) by GSC Staff is licensed under a Creative Commons Attribution-ShareAlike
Moodle Documentation for Students (v.3.4) Moodle Documentation for Students (v.3.4) GSC STAFF Moodle Documentation for Students (v.3.4) by GSC Staff is licensed under a Creative Commons Attribution-ShareAlike
User Guide for Students
 User Guide for Students 2017-2018 About this Guide This guide was prepared by the Department of Distance Education & Instructional Technology at Black River Technical College in order to provide students
Welcome to MyKangan! A how to guide for student. Welcome to MyKangan. A How to guide for students
 Welcome to MyKangan A How to guide for students May 2015 Contents Welcome to MyKangan... 1 Logging in... 2 Accessing MyKangan via the Student Portal ONSITE... 2 Accessing MyKangan via the Student Portal
Pearson Inform 5.1. User Guide. Basic Navigation. Date: 1/26/2010. Copyright 2009 Pearson Education, Inc. or its affiliate(s).
.") Pearson Inform 5.1 User Guide Basic Navigation Date: 1/26/2010 Copyright 2009 Pearson Education, Inc. or its affiliate(s). All rights reserved. No part of this publication may be reproduced or transmitted
Pearson Inform 5.1 User Guide Basic Navigation Date: 1/26/2010 Copyright 2009 Pearson Education, Inc. or its affiliate(s). All rights reserved. No part of this publication may be reproduced or transmitted
2013/14. ita`leem A Student Guide
 2013/14 ita`leem A Student Guide E-learning Unit, Centre for Professional Development (CPD), International Islamic University Malaysia, Level 2, Education Building, P.O. Box 10, 50728 Kuala Lumpur, Malaysia.
Center for Faculty Development and Support. Google Docs Tutorial
 Center for Faculty Development and Support Google Docs Tutorial Table of Contents Overview... 3 Learning Objectives... 3 Access Google Drive... 3 Introduction... 4 Create a Google Document... 4 Upload
Frequent Asked Questions for Students. What is CourseWorks? CourseWorks is Columbia University s course management and collaborative system.
 Frequent Asked Questions for Students What is CourseWorks? CourseWorks is Columbia University s course management and collaborative system. What Does CourseWorks offer? Tools for more flexibility for instructors
Student User Guide for GeneticsPortal Introduction to Genetic Analysis Tenth Edition Griffiths, Wessler, Carroll, and Doebly
 Student User Guide for GeneticsPortal Introduction to Genetic Analysis Tenth Edition Griffiths, Wessler, Carroll, and Doebly Getting Started with GeneticsPortal for Griffiths, Wessler, Carroll, and Doebley
CONTENTS. What is Moodle? Logging in to Moodle Introducing the Workspace Customising the Workspace... 8
 Moodle Training March 2012 Material produced by the VLE Group (Monash University) and elearning Services (Faculty of Medicine, Nursing and Health Sciences, Monash University) vle.monash.edu/supporttraining/learnbytech/moodle/
Student User Manual December 2017
 Student User Manual December 2017 Contents Introduction to the SAM Student Guide 4 How to Use SAM 5 Logging in the First Time as a Pre-registered Student 5 Profile Information 8 Logging into SAM as a New
Google Drive. Lesson Planet
 Google Drive Lesson Planet 2014 www.lessonplanet.com Introduction Trying to stay up to speed with the latest technology can be exhausting. Luckily this book is here to help, taking you step by step through
CANDIDATES GUIDE TO USING TASKSTREAM
 CANDIDATES GUIDE TO USING TASKSTREAM Contents: A. How to set up a Taskstream Account B. How to self enroll into a course C. How to add work to your DRF D. How to submit work for review E. How to submit
MiniBase Workbook. Schoolwires Centricity2
 MiniBase Workbook Schoolwires Centricity2 Table of Contents Introduction... 1 Create a New MiniBase... 2 Add Records to the MiniBase:... 3 Add Records One at a Time... 3 Import Records:... 4 Deploy the
Instructor User Guide for BioPortal Molecular Biology
 Instructor User Guide for BioPortal Molecular Biology Cox, Doudna, and O Donnel Getting Started with BioPortal for Cox, Doudna, and O Donnel, Molecular Biology Table of Contents Overview... 1 Online Help...
This handbook contains directions on using tools and resources in WebAccess at CSM.
 WebAccess Handbook This handbook contains directions on using tools and resources in WebAccess at CSM. Contents Logging in to WebAccess... 2 Setting up your Shell... 3 Docking Blocks or Menus... 3 Course
Our Digital World Online Companion Second Edition Instructor Guide
 Our Digital World Online Companion Second Edition Instructor Guide June 30, 2012 Description The Our Digital World Online Companion, Second Edition, (ODW2e) is a hybrid tool designed to work directly with
eportfolio Support Guide
 eportfolio Support Guide D2L Services West Chester University of Pennsylvania www.wcupa.edu/d2l 610-436-3350, option 2 Anderson Hall, room 20 d2l@wcupa.edu v10.3 September 2014 1 CONTENTS EPortfolio Basics
Advisor Case Load Self Service Participants Guide
 IBM Cognos Analytics Advisor Case Load Self Service Participants Guide Welcome to Advisor Case Load Self Service Training! Today s objectives include: Gain a Basic Understanding of Cognos Know the Available
Houghton Mifflin Harcourt and its logo are trademarks of Houghton Mifflin Harcourt Publishing Company.
 Guide for Teachers Updated September 2013 Houghton Mifflin Harcourt Publishing Company. All rights reserved. Houghton Mifflin Harcourt and its logo are trademarks of Houghton Mifflin Harcourt Publishing
Guide Campus Global. Participant profile. Barcelona,
 Guide Campus Global Participant profile Barcelona, GENERAL INFORMATION 3 HOW TO ACCESS 4 GLOBAL CAMPUS FUNCTIONALITIES 7 1. AT THE TOP 7 2. MENU TO THE LEFT 9 THE GLOBAL CLASSROOM 11 1. GENERAL VIEW 11
KnowlegeTrack User Guide Standard User
 Standard User Standard User Page 1 Standard User Introduction: The Learning portal is designed to manage the subscription and enrollment in the courses, and to provide community features to all of the
ONLINE LEARNING MOODLE INSTRUCTIONS FOR STUDENTS TAFENSW.EDU.AU
 ONLINE LEARNING MOODLE INSTRUCTIONS FOR STUDENTS TAFENSW.EDU.AU welcome CONTENTS TECHNICAL REQUIREMENTS FOR USING MOODLE 4 LOGGING INTO YOUR MOODLE COURSE 5 WELCOME TO YOUR STUDY EDITING YOUR MOODLE PROFILE
Blackboard 1: Course Sites
 Blackboard 1: Course Sites This handout outlines the material covered in the first of four workshops on teaching with Blackboard. It will help you begin building your Blackboard course site. You will learn
Instructor User Guide for EnviroPortal Environmental Science: Foundations and Applications Friedland, Relyea, & Courard-Hauri
 Instructor User Guide for EnviroPortal Environmental Science: Foundations and Applications Friedland, Relyea, & Courard-Hauri Getting Started with EnviroPortal for Friedland, Relyea, & Courard-Hauri Environmental
Student User Guide Table Of Contents
 Student User Guide Table Of Contents Getting Started... 1 Using myitlab... 1 Getting Started in myitlab... 1 Contacting myitlab Student Support... 1 myitlab System Requirements... 1 Logging in to myitlab...
Blackboard 9.1
 Blackboard 9.1 http://mybb.gvsu.edu Logging into Blackboard... 2 User Management... 2 Course Site Overview... 2 Edit Mode On/OFF... 3 ****Activate your class site... 4 Announcements... 4 File Names...
Student User Guide for StatsPortal Introduction to the Practice of Statistics, Sixth Edition
 Student User Guide for StatsPortal Introduction to the Practice of Statistics, Sixth Edition Moore Getting Started with StatsPortal for Moore, Introduction to the Practice of Statistics, 6e Table of Contents
Health Library Instructor Resources on thepoint
 Health Library Instructor Resources on thepoint Instructor Ancillary User Manual Document revision: 1.1 Table of Contents Table of Contents... 2 Chapter 1: Welcome to your resources on thepoint! 3 Section
Blackboard for Faculty: Grade Center (631) In this document:
 In this document:") 1 Blackboard for Faculty: Grade Center (631) 632-2777 Teaching, Learning + Technology Stony Brook University In this document: blackboard@stonybrook.edu http://it.stonybrook.edu 1. What is the Grade Center?..
1 Blackboard for Faculty: Grade Center (631) 632-2777 Teaching, Learning + Technology Stony Brook University In this document: blackboard@stonybrook.edu http://it.stonybrook.edu 1. What is the Grade Center?..
ITaP Confluence Guide. Instructions for Getting Started with Confluence a Purdue
 ITaP Confluence Guide Instructions for Getting Started with Confluence a Purdue This instruction set was developed by ITaP for instructor and student use. For comments, suggestions, correction, etc. please
Your Computer. Tonight s Collaborate Session will begin at 7pm AEST.
 Your Computer Tonight s Collaborate Session will begin at 7pm AEST. While you re waiting please make sure your audio is working run the audio setup wizard located under the tools setting Your Computer:
Desire2Learn. Student Guide. Information Technology Services. Outreach and Distance Learning Technologies
 Desire2Learn Student Guide Information Technology Services Outreach and Distance Learning Technologies Copyright 2013 - KSU Department of Information Technology Services This document may be downloaded,
The Paperless Classroom with Google Docs by - Eric Curts
 The Paperless Classroom with Google Docs by - Eric Curts Table of Contents Overview How to name documents and folders How to choose sharing options: Edit, Comment, and View How to share a document with
2013 EDITION. V-Camp Student. Guide. INTERACTIVE GUIDE Use the buttons shown below to navigate throughout this interactive PDF BACK
 V-Camp Student Guide INTERACTIVE GUIDE Use the buttons shown below to navigate throughout this interactive PDF BACK 03 EDITION V-Camp Student Guide Table of Contents Unit : Table of Contents...iii How
Student User Guide for D2L 10.3 Discussions. 2. Finding and reading discussion posts and threads
 Student User Guide for D2L 10.3 Discussions 1. Accessing Discussions Click Communication Tools > Discussions on the course navbar. 2. Finding and reading discussion posts and threads Once a discussion
An overview of Moodle blocks
 An overview of Moodle blocks Academic Advisers When you click on the link in the Academic Advisers block it will display information about the students enrolled on your current Moodle course. You can change
ADMINISTRATOR S GUIDE
 ADMINISTRATOR S GUIDE 1 CONTENTS GMETRIX V5.0 SYSTEM REQUIREMENTS... 4 ADMINISTRATOR S GUIDE... 4 UNDERSTANDING THE ADMINISTRATOR S PANEL... 4 VIEWING AND EDITING ACCESS CODES... 7 CREATING GROUPS... 8
CompClass User Guide for Students The Bedford Handbook, Seventh Edition. Hacker
 CompClass User Guide for Students The Bedford Handbook, Seventh Edition Hacker Getting Started with CompClass for The Bedford Handbook, Seventh Edition Table of Contents Overview... 1 Getting Help... 1