MT+ Beneficiary Guide
|
|
|
- Damon Shepherd
- 5 years ago
- Views:
Transcription
1 MT+ Beneficiary Guide Current version MT implemented on 11/04/16 Introduction... 2 How to get access... 3 Login... 4 Automatic notifications... 8 Menu and Navigation... 9 List functionalities Project Details How to manage organisations How to manage contacts How to manage mobilities for KA1 and KA3 projects How to manage activities for KA2 projects How to complete and submit the beneficiary report
2 Introduction What is the Mobility Tool+? Mobility Tool+ is an Information System that allows Erasmus+ Beneficiary Organisations to access and manage their project's information, request individual participants' reports and submit final reports to their National Agencies. Erasmus+ National Agencies also use Mobility Tool+ to monitor and validate the projects information entered by Beneficiary Organisations at any time from anywhere. Mobility Tool+ is designed, developed and maintained by the European Commission being used by Erasmus+ Beneficiary Organisations and National Agencies involved in decentralised projects. What are KA1 and KA3 mobilities? Each Erasmus+ key action is divided into different action types depending on the intended programmes objectives and target groups. Activity types therein further divide such action types into homogeneous groups of participants encoded as mobilities within Mobility Tool. Mobilities represent the sending of a particular individual from an origin country to a destination country typically within the set of Erasmus+ programme countries. Depending on the activity type concerned each participant in an Erasmus+ mobility is entitled to receive funds for travel, individual support, special needs, exceptional costs, etc. Mobility tool allows Beneficiary Organisations to manage all this information in a coherent and meaningful manner. What about KA2 Strategic Partnerships? Strategic partnerships' projects are also supported by Mobility Tool. Although not managing pure mobilities such projects need to be managed in terms of the outcomes and results they produce especially for those projects mostly concerned with development of innovation. Therefore Mobility Tool provides all needed functionality to create and manage a KA2 project allocation of funds for project management and implementation, transnational project meetings, intellectual outputs and associated multiplier events and individuals participating in learning, teaching and training activities, the latter mostly relevant for projects targeting exchanges of practices. The filling in and submission of final report by Beneficiary Organisations and subsequent validation by National Agencies is also available for KA2. What are the different roles involved? The management of the project and its contents is the responsibility of the Beneficiary Organisation users. Contacts defined in the electronic application form as contact persons and legal representatives for the applicant/beneficiary organisation will automatically have access to their corresponding projects in Mobility Tool+ This happens when the project's data is submitted from NAs Project Management System. National Agency users can also have access to Mobility Tool+ for monitoring and validation purposes. 2
3 How to get access How to get access to the mobility tool o Contact person from the beneficiary or coordinating organisation o Incorrect address for contact person o National Agency User How to get access to the mobility tool Contact person from the beneficiary or coordinating organisation Those persons who are indicated as the project contract person of the beneficiary or coordinating organisation in the NAs Project Management System will automatically be given access to MT+. This is usually the same details as entered in the application form, unless changed during the selection process. The address associated with this contact person will receive the notification from the system once the project is created in the Mobility Tool. This contact person will be able to create new contacts with or without access to edit the project details in MT+. Incorrect address for contact person If the incorrect address is used for the project contact person, the National Agency should change the address in the NAs Project Management System and resend the data to MT+. National Agency User Contact your local MT+ National Agency Administrator (NA Admin) to gain access. If there is no NA Admin please create an issue in NAUAM to nominate a user as a MT+ National Agency Administrator. 3
. Select the \"External\" domain. The correct domain must be chosen before logging in.")
4 Login This page explains how to log in to MT+ using ECAS. An notification will be sent to the project contact on creation of the project in the mobility tool. Select the "External" domain. Log In. Password lost? Create a new ECAS account. Help (Frequently asked questions). Select the "External" domain. The correct domain must be chosen before logging in. The correct domain for those working in the National Agency or those indicated as the project contact of the beneficiary or coordinating organisation must choose the domain External. To change the domain as External, click the CHANGE IT button. 4

5 A list of several options will appear. Select the External domain. Log In. Enter your ECAS Username or your address and your ECAS Password. This must be the same address as used by the notification informing you of your access. If you do not use the same address, you will not gain access to the project information. Once you entered your ECAS Username and Password, click the LOGIN! button. 5

6 Password lost? If you have lost your ECAS Password or you need to create a new one, click the hyperlink Lost your password? and follow the instructions. Create a new ECAS account. In order to create a new ECAS account, click on the Create an account hyperlink and follow the instructions. 6

7 Help (Frequently asked questions). If you need help or need to check the frequently asked questions, click the Help hyperlink. 7
8 Automatic notifications Notifications by default will be sent to the project contact of the beneficiary organisation as indicated in the NAs Project Management System. The person who receives notifications can be changed in MT+ by indicating another contact from the beneficiary organisation as the Preferred contact. The notification by default is sent out in English and may also be sent out in the language of the National Agency if the translation of interface has been done for that language. Creation of project in the Mobility Tool On creation of a project in MT+, a notification will be sent to the project contact person of the beneficiary organisation. The notification provides instructions on how to login in to MT+ using ECAS. If you do not have an ECAS account follow the instructions to register in ECAS first. Project Update When the project data has been updated in MT+, a similar message to the one below will be sent to the project contact. The project contact is indicated as the Preferred contact in MT+ and can be changed to another contact of the beneficiary organisation. 8

9 Menu and Navigation Home page. Difference between the link to projects for KA1 & KA3 and for KA2. Difference between the tabs for KA1 & K3 and for KA2. Home page. Explanation and illustration Once logged to the tool, the home page is displayed as follows: 1. The Project List window is displayed. 2. The system allows you choosing amongst a list of different languages and changing the language of the interface. 3. At the top middle of the screen, details of who is connected to the tool are identified. 4. A sub-window, which provides a definition of the Mobility tool, is displayed. 5. The project references are sorted depending on the programme and listed by the Grant Agreement No. 6. For KA2 projects, the type of access you have for the project will be indicated next to the project reference. 9

10 Difference between the link to projects for KA1 & KA3 and for KA2. Explanation and illustration Access to the KA1 or KA3 projects is different than for the KA2 projects. 1. When a KA2 project is clicked from the Project List, the system opens a new browser page. Note that projects concerning KA2 are highlighted in blue. 2. When a KA1 or KA3 project is clicked from the Project List, the system opens the project directly in the same browser page. 10
11 Difference between the tabs for KA1 & K3 and for KA2. Explanation and illustration The tabs for KA1 & KA3 are different than for the KA2. The Tabs for KA1 & KA3 are displayed in a structure that organizes the mobilities management inside the Mobilities tab. The Tabs for KA2 are displayed in a structure that splits different activities and management options between various tabs. 11

12 List functionalities This page explains the common list functionality that are seen throughout MT+, for example the Organisations and Contacts tabs. The icons used to sort or export the list remain the same for each screen as well as the icons to edit, delete and view the list item. Search. Selection. Export. View. Edit. Delete. Back to list. Search. In order to find information quickly in each tab of the menu, type, for example, the name of the organisation in the Search field. The result will appear in the list. Selection. The Selection option allows you selecting or de-selecting all detail lines. 12


13 By clicking on the radio button, you can select following options: All, NONE or inverse. In the example below, the option All is selected. Depending on the tab, where you select data, the button Delete records appears. 13

14 Export. The Export button allows you exporting your selection and choosing a format amongst the three following options: PDF File, XLS file or CSV file. In the example below the PDF File format has been clicked. A pop-up message will appear allowing you to open the pdf file. 14
15 View. To view the details of a line, click the view icon. Edit. To edit the details line, click the pencil icon. A window showing details will open. Here the fields can be edited. 15

16 Delete. To delete the details line, click the bin icon. Back to list. In order to get back to the list of details, click the back to list button. You will be redirected to the list of detail line(s). 16

17 Project Details "Project Details" page. Changes to "Project Details". "Project Details" page. Explanation and illustration Once you click on the project's Grant Agreement No from the MT+ homepage, a new screen will open displaying the Project Details. The key details of the project are structured in the following fields: Context information, National Agency, Project information, Beneficiary Organisation information and Project Access. The screen also presents History information, giving details of the creation of the project in MT+, last update and person (or system) that updated the project last. Note that the tabs listing Project Details for KA1 & KA3 are different than for KA2 projects, however, the content fields are the same. See more information about the differences in the Project Details screen interface for KA1 & KA3 and for KA2 projects in the page Menu and Navigation. 17
18 Changes to "Project Details". Explanation and illustration The project details such as: the Project Title, the National ID, the Start and End of Project cannot be changed in the tool. To request changes to these project details, please contact your National Agency. It is possible to add and remove Contacts, Mobilities and Participants, as well as to edit the current Budget information. See more information about editing details in various How-to pages of the guide. 18
 should first be updated there before the National Agency will be able to adjust the details in the NAs Project")
19 How to manage organisations For most key actions the organisation details can not be changed in MT+ but should follow the process of an amendment. Organisation details that are entered into URF (URF and Participant Protal guide) should first be updated there before the National Agency will be able to adjust the details in the NAs Project Management System. Once changes have been applied, the updated data will be sent to MT+. The contact person of the beneficiary or coordinating organisation will receive a notification once the updated information is sent to MT+. Open the list of "Organisations". View organisation details. Organisation details are not updated?. Edit organisation details. Open the list of "Organisations". From the list of tabs, click on the Organisations menu item. The list of Organisations will appear. 19

20 View organisation details. Click on the view icon to open Organisation Details screen. Organisation details are not updated?. The organisation details for most key actions will be updated as a result of an amendment request and should first be updated in URF and then by the NA in the NAs Project Management System. 20

 of the organisation.")
21 Edit organisation details. For certain Key actions e.g. KA103 and KA107 additional organisation details can be added. These "host" organisations can be managed by the beneficiary organisation. In this case additional icons will be present on screen to allow editing (pencil icon) or deletion (bin icon) of the organisation. Please note that you can not delete an organisation if it is associated to a mobility or activity. 21

22 How to manage contacts The project contact as indicated in the application form will automatically receive an when the project is created in the Mobility Tool+. The project contact can create additional users for the organisations. Edit access can be given to other contacts of the coordinating or beneficiary organisation. View access to the project can also be given for KA2 projects. Quick steps 1. Click the project reference. 2. Click the "Contacts" menu item. 3. Click the "+Create" button. 4. Fill in the details o 4.1. Select the organisation. o 4.2. Allow access to project? o 4.3. Indicate as "Preferred Contact"? o 4.4. Indicate as "Legal Representative"? o 4.5. Contact details are the "Same as Organisation"? 5. Click on "Save". 6. Click on Delete icon. Detailed steps 1. Click the project reference. Click on the project reference to open a project. 22


23 2. Click the "Contacts" menu item. The list of contacts appears. The full list of project contacts as entered in the application form will be entered here. 23

24 3. Click the "+Create" button. To add a new contact click on the "+Create" button and complete the contact details. 24
25 4. Fill in the details Select the organisation. Select the organisation from the drop down list. This will affect the check boxes that are active. The Legal representative check box is not active for the beneficiary organisation. Only once the contact is indicated in the NAs Project Management System as a legal representative, the box will be checked Allow access to project? Depending on the organisation you select, several Access to Project options (check boxes) may be available. Check the box the option to allow the contact edit or no access to the project details in MT+. For KA1 and KA3 projects, it is only possible to allow contacts of the Beneficiary organisations edit access. For KA2 projects (excluding those as indicated as schools only) a contact from a participating organisation may be provided access to view the project but will not have access to edit the project details. For KA201 indicated as schools only the participant organisations contacts can be given access to view the coordinator's project. The contacts from the coordinating organisation can be given access to view all participating organisations' projects. 25
26 4.3. Indicate as "Preferred Contact"? Checking the box Preferred Contact will highlight the contact, in the organisation list, as the preferred person for that organisation. There can only be one preferred contact per organisation. For the beneficiary organisation the preferred contact will receive the automatic notifications when the project data is updated in the NAs Project Management System and resubmitted to MT+ by the National Agency. By default this is the project contact as outlined in the application form but may be changed to a newly created contact for the beneficiary contact person in MT Indicate as "Legal Representative"? Please note that the legal representative details cannot be adjusted in MT+. To adjust the legal representative details please follow the amendment process. Legal representative check box is not active. Only once the contact is indicated in the NAs Project Management System as a legal representative, the box will be checked Contact details are the "Same as Organisation"? Click on "Same as Organisation" to copy the organisation address and phone details to the contact's details. 26
27 5. Click on "Save". To save the data, click the "Save" button. 6. Click on Delete icon. Click on the bin icon to delete a contact. Please note that the legal representative cannot be deleted. 27
28 How to manage mobilities for KA1 and KA3 projects What are KA1 and KA3 mobilities? Each Erasmus+ key action is divided into different action types depending on the intended programmes objectives and target groups. Activity types therein further divide such action types into homogeneous groups of participants encoded as mobilities within Mobility Tool. Mobilities represent the sending of a particular individual from an origin country to a destination country typically within the set of Erasmus+ programme countries. Depending on the activity type concerned each participant in an Erasmus+ mobility is entitled to receive funds for travel, individual support, special needs, exceptional costs, etc. Mobility tool allows Beneficiary Organisations to manage all this information in a coherent and meaningful manner. Videos not available in pdf, word or print format These videos add here for this chapter can not be printed. All of these videos but were made available to the National Agencies last year to be distributed via their own channels. How to add a mobility Length of video Version of Tool Comments 7min 03sec MT This video was created using screenshots from MT Deviations from the current screen layout and that of this older version may be noted but the basic functionality remains the same. This process describes the steps to be performed by a beneficiary user in order to add a mobility using the interface of MT+. The scenario used in this video demo is based on the addition of mobility for a higher education project KA103, for activity type Student mobility for studies between programme countries. Some fields are only relevant for KA103. Fields, which are required for other action types or activity types, will be missing from this scenario. 28

29 Video URL: How to add a mobility QR code: 29

30 How to export and import mobilities using xls or xlsx Quick steps 1. Click the "Mobilities" tab. 2. Select "Import - Export" option. 3. Click the "Export XLS" or the "Export XLSX" button. 4. Click the "Save File" radio button. 5. Click on "OK". 6. Enter a name in the "File name" field. 7. Click on "Save". 8. Double-click to open the file. 9. Update the list of Mobilities. 10. Click on "Import". 11. Select your document. 12. Click on "Open". 13. Check the "Import Status". 14. Click the blue hyperlink when the file is exported. Detailed steps 1. Click the "Mobilities" tab. Click on the Mobilities tab of the project. 30

31 2. Select "Import-Export" option. In the drop-down list, click the Import - Export option. 3. Click the "Export XLS" or the "Export XLSX" button. Depending on the Excel file format, click the Export XLS or the Export XLSX button. In this case, we will click the Export XLS button. 31

32 4. Click the "Save File" radio button. A pop-up window appears. Click the Save File radio button. 5. Click on "OK". Once you have clicked the Save File radio button, click on the OK button. 32


33 6. Enter a name in the "File name" field. Enter the name of the report in the File name field. 7. Click on "Save". Click the Save button. 33


34 8. Double-click to open the file. To open, double-click on the file. 9. Update the list of Mobilities. In the Excel spreadsheet, you can update the list of Mobilities if necessary. To understand how to complete the list of mobilities see the How to export and import mobilities with CSV. Specific instructions for CSV, such importing the file using the From text wizard is not applicable for xls/xlsx nor saving as CSV. If you export as xls or xlsx the file can be saved as xls or xlsx. 34

35 10. Click on "Import". To import your file in MT+, click the Import button. 35

36 11. Select your document. Then select your Excel file. 12. Click on "Open". Click on the Open button. 36

37 13. Check the "Import Status". The Excel file will be automatically imported. The status details of the import is shown in the Import Status section. 14. Click the blue hyperlink when the file is exported. When the file is imported, the status is 'Successfully imported X mobilities'. If required, click the blue hyperlink to open the file just imported. 37
38 How to export and import mobilities Length of video Version of Tool Comments 10min 16sec MT This video was created using screenshots from MT Deviations from the current screen layout and that of this older version may be noted but the basic functionality remains the same. This process describes the steps to be performed by a beneficiary user in order to add a mobility using the interface of MT+. The scenario used in this video demo is based on the addition of mobility for a higher education project KA103, for activity type Student mobility for studies between programme countries. Some fields are only relevant for KA103. Fields, which are required for other action types or activity types, will be missing from this scenario. Video URL: How to export and import mobilities QR code: 38
39 How to view the error log 39

40 Quick steps 1. Open your project. 2. Click the "Mobilities" tab. 3. Select "Import-Export". 4. Click the "View Error Log" button. 5. Click the error lines. 6. Click the "Close" button. Detailed steps 1. Open your project. Open your project by clicking on the reference number. 40

41 2. Click the "Mobilities" tab. Click on the tab or on the arrow of the Mobilities tab, to expand the menu. 3. Select "Import-Export". Select the Import-Export option. 41

42 4. Click the "View Error Log" button. In the Import Status zone, click the View Error Log blue button. A pop-up window will appear with: 1. The reference number of the project in the header and the total number of errors. 2. The error details lines with the number of the error found. 42
43 5. Click the error lines. Click on the first error line to see the error details and the custom messages. To close the details, click again on the first error line or click the second error line. Note: when the first error line is clicked, it is not possible to click the next error line at the same time. You are only allowed to open one at a time. In the example below, two errors have been detected. Those two organisations are not allowed to be a sending organisation for this mobility. 43
44 6. Click the "Close" button. Click the Close button to close the error log. 44
45 How to read the error log Length Version of Tool Comments 5min MT This video was created using screenshots from MT Deviations from the current screen layout and that of this older version may be noted but the basic functionality remains the same. This process describes the steps to be performed by a beneficiary user in order to add a mobility using the interface of MT+. The scenario used in this video demo is based on the addition of mobility for a higher education project KA103, for activity type "Student mobility for studies between programme countries". Some fields are only relevant for KA103. Fields which are required for other action types or activity types, will be missing from this scenario. Video URL: How to read the error log QR code: 45
46 How to work with CSV Length Version of Tool Comments 6min 24 sec MT This video was created using screenshots from MT Deviations from the current screen layout and that of this older version may be noted but the basic functionality remains the same. This process describes the steps to be performed by a beneficiary user in order to add a mobility using the interface of MT+. The scenario used in this video demo is based on the addition of mobility for a higher education project KA103, for activity type "Student mobility for studies between programme countries". Some fields are only relevant for KA103. Fields, which are required for other action types or activity types, will be missing from this scenario. Video URL: How to work with CSV QR code: 46

47 How to manage activities for KA2 projects What about KA2 Strategic Partnerships? Strategic partnerships' projects are also supported by Mobility Tool. Although not managing pure mobilities such projects need to be managed in terms of the outcomes and results they produce especially for those projects mostly concerned with development of innovation. Therefore Mobility Tool provides all needed functionality to create and manage a KA2 project allocation of funds for project management and implementation, transnational project meetings, intellectual outputs and associated multiplier events and individuals participating in learning, teaching and training activities, the latter mostly relevant for projects targeting exchanges of practices. The filling in and submission of final report by Beneficiary Organisations and subsequent validation by National Agencies is also available for KA2. Project Data When the project is created in MT+, project information is populated under the various tabs, such as organisations and contacts. The budget approved can be viewed from the budget tab. Details of the activities for Project Management and Implementation (PMI), Intellectual Outputs (IO), Multiplier Events (ME) and Learning, Teaching and training activities (LTT) are listed but do not contain the cost values for these activities. These items can be edited under the respective tabs. These items may be updated by the National Agency as a result of Amendment request or check of grant beneficiary. Most cost values are calculated automatically in these screens after the number of participants or distance band is entered. 47
48 The Central Rates Web service is responsible for the validation and calculation of such costs as the travel grant, individual support, organisational support, linguistic support, course fees unit, all top-ups and total amounts. This allows to keep validation rules and calculation formulas harmonised across different IT systems. Most tabs open to a list view, displaying the activities or items. In many cases, the activities when opened or edited may contain additional lists of items such as participating organisations, attendees or resources. Likewise, when creating new items, you may notice that first the basic information such as title or location should be saved and only then will it be possible to add the list of participants or organisations. The functionality for these lists are explained in the section List functionalities. How to complete the details is explained under the various How to pages. Who can manage or view the project? For KA2 projects by default the person who is indicated in the application form as the project contact of the coordinating organisation, will have access to view and edit the project details. Partner contacts may also be given view access to the project. For KA201 indicated as schools only, the organisations contacts may have view or edit access to their projects and view access to the coordinators project. The coordinating organisation's contacts may have view access to all partner organisations. Project Management and Implementation The Project Management and Implementation screen allows to record costs for project management activities such as: planning, finances, coordination and communication between partners. Quick steps 1. Click on the project reference. 2. Click on the Project Management and Implementation tab. 3. Select the participating organisation. 4. Click on the pencil (Edit) icon and enter the Total (Adjusted) amount. 5. Click on the save icon. 6. Add a comment. 48

49 Detailed steps 1. Click on the project reference. From the homepage click on the project reference to open the project. 49

50 2. Click on the Project Management and Implementation tab. 50

51 3. Select the participating organisation. Select the organisation for which the PMI costs are being allocated. This section contains information about the contributions to the participating organisations' activities such as project management (planning, finances, coordination and communication between partners, etc.) according to the specific project contracted duration. All additional information will have to be added by editing the selected PMI item. The total approved amount for this item can be viewed at the bottom of the screen and in the budget summary screen. The total adjusted amount for all organisations should not be greater than the approved amount. For school to school only projects only the beneficiary organisation will be listed here. 51

52 4. Click on the pencil (Edit) icon and enter the Total (Adjusted) amount. Enter manually the total PMI contribution to the activities of the specified organisation: 52

53 5. Click on the save icon. 53

54 6. Add a comment. Add a comment if the amount is different than the total calculated amount taking into consideration the maximum allowed amount. Click on Save. MT+ KA2 Transnational Project Meetings This page explains how to add the details for a new Transnational Project Meeting. Transnational project meetings are events organised by one of the project's participating organisations with the purpose of project implementation and coordination. The screen functionality allows to list the transnational project meetings, with the number of participants per meeting and its associated cost amounts also per meeting. 54

55 Quick steps 1. Click on the project reference. 2. Open the "Transnational Project Meetings tab". 3. Click the "+Create" button. 4. Fill in the meeting details. 5. To save the details and to add participants, click the "Save" button. 6. The participants section appears. 7. Click the "+Create" button to add a Participants Form. 8. Fill in the details. 9. Click the "Save" button. 10. The "Participants" list appears. 11. Click on "Back to list" to return to the previous screen. 12. Click the edit icon. 13. Click on delete icon to delete. Detailed steps 1. Click on the project reference. From the homepage of Mobility Tool click on the project reference to open the project. 55


56 2. Open the "Transnational Project Meetings tab". The Transnational Project Meetings or TPM's entered into the NAs Project Management System will not appear in this list, on project creation and will not be updated. The total approved for TPMs can be viewed under the Budget tab. These entries will have to be added along with the number of attendees and total cost for each meeting. The attendees numbers should be grouped according to the travelling distance or distance band and costs. If the project is a "KA201 - Strategic partnerships for school education" flagged as "Only schools?" the sending organisation is always the Beneficiary Organisation. 3. Click the "+Create" button. To create a new meeting indicating its specific objectives within the more general purpose of project coordination and implementation, click on the +Create button. 56
 and change the start date and the end date.")
57 4. Fill in the meeting details. Complete the details (blank fields) as applicable for the meeting. Add a meeting title, select the receiving organisation (receiving country and receiving city will be filled in automatically) and change the start date and the end date. The meeting must fall between the project start and end date indicated on the Details tab. For S2S projects the sending organisation can only be the beneficiary organisation. After filling in all the mandatory fields the "Cancel" and "Save" button will appear. The receiving organisation cannot be the same as the sending organisation in a given meeting. An exception is made in the following case: The receiving organisation is allowed to also send their own participants and pay them for travel expenses if the travel distance is at least 100 km (>= 100 km). 57


58 5. To save the details and to add participants, click the "Save" button. 6. The participants section appears. The section "Participants" appears. From this list you can create a new entry for a participant or group of participants. The participants should be grouped according to the distance band. 58
59 7. Click the "+Create" button to add a Participants Form. To create an attendance list including a clear identification of all attendants for each meeting, click the +Create button. 59

60 8. Fill in the details. The fields "Sending Country" and "Sending City" are automatically filled based on the details of the organisation selected in the meeting details. Fill in the "Distance Band" field. If the distance band is not known, click on the Link to distance calculator. From the moment the distance band is calculated, the Grant per participant, Total (Calculated) and Total (Adjusted) fields will be automatically filled. 9. Click the "Save" button. 60

61 10. The "Participants" list appears. After clicking on save, you are returned to the previous window. The newly added details appear in a line, in the participants list. Click on the create button to add additional entries for participants if required. 61


62 11. Click on "Back to list" to return to the previous screen. 12. Click the edit icon. If you require to make changes click on the pencil icon to edit. 62
63 13. Click on delete icon to delete. If you require to remove an entry, click on the dustbin icon to delete it. To view without editing click on the view icon. Intellectual Outputs This page explains how to manage the list of Intellectual Outputs in MT+. Intellectual outputs represent the project's tangible results such as curricula, pedagogical materials, open education resources (OER), IT tools, analyses, studies, methods and others. The screen allows the beneficiary to list the project's exact set of realised intellectual outputs. It also allows to detail the cost of their production, according to the different types of resources required to produce it. Quick steps 1. Click on the project reference. 2. Open the menu item "Intellectual Outputs". 3. Click on "+Create". 4. Complete the details of the new Intellectual Output. 5. Click on "Save". 6. Click "+Create" to add the organisation details. 7. Select the organisation and complete the details. 8. Click on "Save". 9. View the organisation's cost. 10. Edit an Intellectual Output. 11. Delete an Intellectual Output. 63
64 Detailed steps 1. Click on the project reference. From the homepage click on the project reference to open the project. 64

65 2. Open the menu item "Intellectual Outputs". The Details screen appears and when the Intellectual Outputs tab is clicked the information entered into the NAs Project Management System will appear in this list. The amount for the different staff categories is not entered and must be added for each Intellectual Output, which is automatically created by the system. The total approved for the Intellectual Outputs is visible under the Budget tab. Note, for School to School only the Intellectual Outputs for the beneficiary organisation will appear. 3. Click on "+Create". Once in the Intellectual Output tab, if a new Intellectual Output is required, click on the +Create button. 65
66 4. Complete the details of the new Intellectual Output. Fill in the blank fields. The start and end dates for Intellectual Outputs must always be within the project duration's start and end dates as specified on the Details tab. Note: For 2014 projects a "Output Type" field appears and "Available Media" fields are not appearing. For 2015 projects a "Output Type" field is not appearing and "Available Media" fields are appearing. 66

67 5. Click on "Save". To save the information, click the Save button. 6. Click on "+Create" to add the organisation details. The Intellectual Output Details screen appears, completed with the details received from the NAs Project Management System. Click on +Create to add the details of the organisation. 67


68 7. Select the organisation and complete the details. Select an organisation and complete the details as applicable for the Intellectual Output. When filling the fields for No. Of Working Days, both Daily Rate and Total (Calculated) fields will be filled in automatically for each Staff Category. Note that one and only one of the organisations within a given Intellectual Output must be flagged as "Leading". 8. Click on "Save". Click on the Save button to save the data and return to the list view of the current Intellectual Outputs. 68

69 9. View the organisation's cost. After clicking on Save, the current Intellectual Output screen appears. The organisation's cost just entered for that intellectual output will be displayed at the bottom of the screen. For School to School it will only be possible to add one line for the beneficiary organisation. To return to the list of all Intellectual Outputs, click on back to list. 69
 appears.")
70 10. Edit and Intellectual Output. To modify an Intellectual Output, click the pencil icon. Note - For 2014 projects, the column Total (Adjusted) appears. 11. Delete an Intellectual Output. To delete an Intellectual Output, click the bin icon. Note - For 2014 projects, the column Total (Adjusted) appears. 70

71 Multiplier Events This page explains how to manage the list of Multiplier Events in MT+. Multiplier Events are national and transnational conferences, seminars and other events organised with the purpose of disseminating the intellectual outputs produced by the project. The costs incurred in the organisation of such multiplier events can be financially supported. Quick steps 1. Click on the project reference. 2. Click on the menu item "Multiplier Events". 3. Click the "+Create" button. 4. Fill in the details. 5. Click on "Save". 6. Click on "+Create" to create the Budget. 7. Fill in the details. 8. Click on "Save". 9. Check the "Total (Calculated)" amount and click on "Back to list". 10. "Edit" a Multiplier Event. 11. "Delete" a Multiplier Event. Detailed steps 1. Click on the project reference. In the homepage click on the project reference in order to open the project. 71


72 2. Click on the menu item "Multiplier Events". The list of Multiplier Events is displayed. The items in the list can be edited and new ones can be added. The list will show all Multiplier Events, which have been entered into the NAs Project Management System, but will not contain all details. The Multiplier Event item must be edited in order to add the costs and number of participants. 3. Click the "+Create" button. In order to create a new Multiplier Event, click the +Create button. For school-to-school projects, only the Multiplier Events for the beneficiary organisation can be created. 72

73 4. Fill in the details. Complete the details as applicable for the event. For Multiplier Events, which are not automatically created from the NAs Project Management System, select predefined Event Identification codes ranging from E1 to E999 from the drop-down list. Note that the maximum allowed amount for all Multiplier Events within a project is 30,000 and that at least one Intellectual Output must be selected per Multiplier Event. The start and end dates for an event must always be within the project duration as specified in the project Details tab. In case there is a need to change these dates, it should be done in the NAs Project Management System. 73

74 5. Click on "Save". To save the data, click the Save button. 6. Click on "+Create" to create the Budget. In order to create the Budget detail line for this activity, click the +Create button. 74
75 7. Fill in the details. Fill in the Organisation, Country of Organisation fields. Enter the number of Local Participants and the number of International Participants. Grant Rate per Local Participant, Grant Rate per International Participant and Totals fields will be populated automatically. Note that one and only one organisation must be flagged as Leading within each Multiplier Event. Below you can find an example of the screen as it was for the version MT+ 2.2, for 2014 KA2 projects. The Event and corresponding Budget details were in the same screen. This screen is not available anymore. All data that you have input for in this former release is still available in your project, but the screen has been adapted as explained above. The only missing element is the Country of Venue. Please complete this field for all Multiplier Events of your project before submit a beneficiary report. 75
76 76

77 8. Click on "Save". Once all the details have been filled in, click on the Save button. 77


78 9. Check the "Total (Calculated)" amount and click on "Back to list". Check the Total (Calculated) amount and click on Back to list to go back to the list of the events. 78
79 10. "Edit" a Multiplier Event. To edit an event, click the pencil icon. 11. "Delete" a Multiplier Event. To delete an event, click on the bin icon. 79
80 Learning, Teaching and Training Activities This page explains how to manage the list of Learning, Teaching and Training Activities in MT+. A strategic partnerships' project can optionally include transnational learning, teaching and training activities for which support for travel, subsistence and linguistic preparation can be given. These activities must be justified by the added value that they bring to the project's achievements. Quick steps 1. Click on the project reference. 2. Open the menu item "Learning, Teaching and Training Activities". 3. Click the "+Create" button. 4. Fill in the details. 5. Click on "Save". 6. Add a participant. 7. Fill in the "Participant" details. 8. Use the "compact view" button if necessary. 9. Click on "Save". 10. Click on "back to list". 80


81 Detailed steps 1. Click on the project reference. In the homepage click on the project reference in order to open the project. It will open in a new browser tab. 2. Open the menu item "Learning, Teaching and Training Activities". The Details page opens. When you click the Learning, Teaching and Training Activities or LTT tab, the list will show all LTTs, which have been entered into the NAs Project Management System. These items will need to be edited in order to add the additional information of number of participants and costs. 81


82 3. Click the "+Create" button. In order to create a new Learning Teaching and Training Activity, click on the +Create button. 4. Fill in the details. The activity section will appear. Note that the list of participants can be added only after the activity section is completed. Fill in the activity details (blank fields) as applicable. Note - For 2014 Projects, the Field field does not appear. 82

83 5. Click on "Save". To save the details of the activity, click the Save button. The list of participants can now be added. 6. Add a participant. To add a participant, click the +Create button in the Participants section. 83
 as applicable for the participants.")
84 7. Fill in the "Participant" details. Complete the details (blank fields) as applicable for the participants. Note - For 2015 Projects, the field EU Mobility Total Grant (adjusted) has been removed. 84

 only appears for 2014 projects.")
85 8. Use the "compact view" button if necessary. If necessary, use the compact view button. This will reduce the screen view so that only the most relevant and mandatory fields are displayed. In order to expand the view, click again. Note - For 2014 Projects, Grant not Required (Travel Grant) and Grant not Required (Individual Support) check boxes do not appear. The field EU Mobility Total Grant (adjusted) only appears for 2014 projects. In case the project is a KA201 - Strategic Partnerships for school education and is flagged as Only schools (or KA219), the sending organisation is always the Beneficiary Organisation. 85
86 9. Click on "Save". To save the participant details for the activity, click on the Save button. 86


87 10. Click on "back to list". After clicking on Save, the details of the participant will appear in the Participants list. Use the list icons in order to edit or delete the details. To return to the list view of all Learning, Teaching and Training Activities, click on back to list. 87

88 Special Needs Support Participants with special needs are entitled to extra financial support within the scope of a strategic partnerships project. Quick steps 1. Click on the project reference number. 2. Click the menu item "Special Needs Support". 3. Click the "+Create" button. 4. Fill in the "Special Needs Details". 5. Click on "Save". 6. Edit "Special Needs Support". 7. Delete "Special Needs Support". Detailed steps 1. Click on the project reference number. In the homepage click on the project reference in order to open the project. It will open in a new browser tab. 88

89 2. Click the menu item "Special Needs Support". The Details page appears. Click the Special Needs Support menu item to see the list, which has been entered into the NAs Project Management System. These entries can be edited in order to add additional information. 3. Click the "+Create" button. In order to add a cost line for Special Needs Support, click the +Create button. The value Approved Budget (by National Agency) may be set to zero, if the project is for call year 2014 and the project data was submitted to MT+ before MT In this case please check the budget screen for the value for this item that has been approved by the National Agency. 89
90 4. Fill in the "Special Needs Details". The Special Needs Details window appears. Fill in the details (blank fields) as applicable. 90

91 5. Click on "Save". To save the data, click the Save button. After clicking on save, the details line will now appear in the list of Special Needs Support. 91
92 6. Edit "Special Needs Support". To edit a line of Special Needs Support, click the pencil icon, update the data and click on Save. 7. Delete "Special Needs Support". To delete a line of Special Needs Support, click the bin icon. 92
93 Exceptional Costs This page explains how to manage the "Exceptional Costs" in MT+. Exceptional costs include but are not limited to sub-contracting and purchase of goods/services. If exceptional costs are added, a comment must be entered on the budget screen. Quick steps 1. Click on the project reference. 2. Click the menu item "Exceptional Costs". 3. Click the "+Create" button. 4. Fill in the details. 5. Click on "Save". 6. Add a comment in the "Budget" tab. Detailed steps 1. Click on the project reference. On the homepage click on the project reference in order to open the project. It will open in a new browser tab. 93

 may be set to zero, if the project is for call year 2014 and the project data was")
94 2. Click the menu item "Exceptional Costs". After the Details page of the project opens, click on the menu item Exceptional Costs. 3. Click the "+Create" button. In order to create a new details line, click on the +Create button. The value Approved Budget (by National Agency) may be set to zero, if the project is for call year 2014 and the project data was submitted to MT+ before MT In this case please check the budget screen for the value for this item that has been approved by the National Agency. 94
95 4. Fill in the details. Fill in the details (blank fields) as applicable. Note - For 2014 Projects, the Total (Adjusted) field appears. 95

96 5. Click on "Save". To save the data, click the Save button. After saving, the details line will now appear in the list. 96

97 6. Add a comment in the "Budget" tab. To add a comment in relation to all exceptional costs on the Budget screen, click on the Budget tab, add the comment and click the Save button. 97

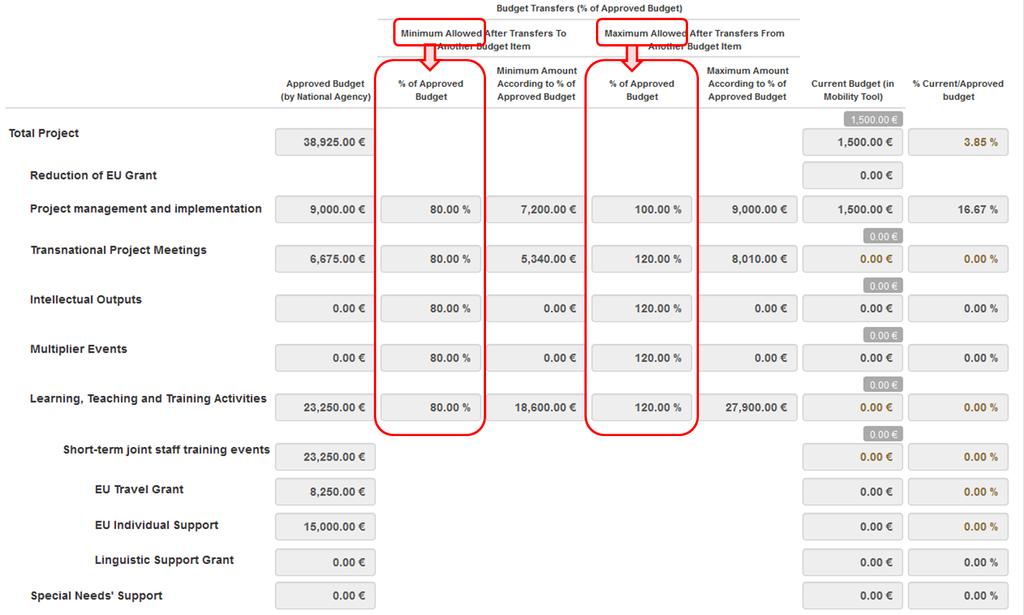
98 MT+ KA2 Budget Approved Budget (by National Agency) and Current Budget (in Mobility Tool). Allowed budget transfers between budget items. Maximum and minimum percentage allowed for the transfer. Budget for Learning, Teaching and Training Activities. Budget for Exceptional Costs and Exceptional Cost Guarantee. Reduction of EU Grant. Approved Budget (by National Agency) and Current Budget (in Mobility Tool). Explanation and illustration The budget summary screen provides an overview of the approved budget as entered into the NAs Project Management System. This can be seen in the column Approved Budget (by National Agency). The column Current Budget (in Mobility Tool) reflects the total for each activity and budget item as entered under each tab of the Mobility Tool: Project management and implementation Transnational Project Meetings Intellectual Outputs Multiplier Events Learning, Teaching and Training Activities Special Needs' Support Exceptional Costs Exceptional Cost Guarantee 98
99 99

100 Allowed budget transfers between budget items. Explanation and illustration Transfer between budget items is allowed but only as indicated in the table below: Maximum and minimum percentage allowed for the transfer. Explanation and illustration Where transfer is allowed from or to a budget item, the maximum and minimum percentage allowed is displayed. Also, both the minimum value and the maximum value are automatically calculated and displayed here. If these limits are exceeded the cell will display in orange and the amount should be adjusted under the appropriate tab for that budget item. If the amount is different than the approved budget but within the allowed limits it will be displayed in red. The highlight in red is only for information and will not block any functionality. 100
101 101


102 Budget for Learning, Teaching and Training Activities. Explanation and illustration Learning Teaching and Training Activities budget item is further divided into the activity types. 102

103 Budget for Exceptional Costs and Exceptional Cost Guarantee. Explanation and illustration The Exceptional Costs and Exceptional Cost Guarantee both have comments fields. A comment should be entered and saved, if either items have costs entered. Reduction of EU Grant. Explanation and illustration After the National Agency has processed the final report the total amount by which the current budget can be reduced may be entered if necessary by the NA into the field Reduction of EU Grant. 103
MT+ Beneficiary Guide
 MT+ Beneficiary Guide Introduction... 2 How to get access... 3 Login... 4 Automatic notifications... 8 Menu and Navigation... 9 List functionalities... 12 Project Details... 18 How to manage organisations...
MT+ Beneficiary Guide
 MT+ Beneficiary Guide Current version MT+ 2.5.0 implemented on 10/08/16 Introduction... 2 How to get access... 3 Login... 4 Automatic notifications... 8 Menu and Navigation... 9 List functionalities...
Quick Start Guide To Mobility Tool+ For Key Action 1 School Staff Mobility Projects Version 1
 Quick Start Guide To Mobility Tool+ For Key Action 1 School Staff Mobility Projects Introduction This step by step guide has been produced by the UK National Agency to help beneficiaries of Key Action
[Type text] [Type text] [Type text] Erasmus+ Project Results Platform Guide for Beneficiaries
![[Type text] [Type text] [Type text] Erasmus+ Project Results Platform Guide for Beneficiaries](/thumbs/76/73229184.jpg "[Type text] [Type text] [Type text] Erasmus+ Project Results Platform Guide for Beneficiaries") [Type text] [Type text] [Type text] Erasmus+ Project Results Platform 18/10/2017 1 Guidelines for Beneficiaries Current version E+PRP v. 3.7.2 released on 5 October 2017 This document is aimed at providing
[Type text] [Type text] [Type text] Erasmus+ Project Results Platform 18/10/2017 1 Guidelines for Beneficiaries Current version E+PRP v. 3.7.2 released on 5 October 2017 This document is aimed at providing
SALTO E&T website User manual
 SALTO E&T website User manual salto-et.net Second edition Last updated (01/02/2019) 1 / 34 Table of contents 1. Aims and objectives of the TCA Resource Centre... 4 2. Before use... 5 3. Structure of SALTO
How to complete and submit the beneficiary report
 How to complete and submit the beneficiary report This page describes the steps to be taken to complete and submit the beneficiary report. The steps described follow the example of using a project for
Participant Portal quick guide
 Participant Portal quick guide Click to expand the table of contents... How to register an organisation What to do if a similar organisation is found How to add a document How to register an organisation
PROSPECT USER MANUAL
 PROSPECT USER MANUAL 1 Table of Contents 1. INTRODUCTION...3 1.1 WHAT IS PROSPECT?... 3 2. BEFORE STARTING: TIPS TO HELP YOU WITH YOUR APPLICATION...4 3. ACCESSING AND SUBMITTING AN APPLICATION WITH PROSPECT...5
Mobility Tool Guide for Beneficiaries of Leonardo da Vinci programme
 EUROPEAN COMMISSION Directorate-General for Education and Culture Lifelong Learning: policies and programme Coordination of the "Lifelong learning" programme Mobility Tool Guide for Beneficiaries of Leonardo
Guidelines for completing WEB application for KA347 - Dialogue between young people and policy makers. Update 17/03/2017
 Guidelines for completing WEB application for KA347 - Dialogue between young people and policy makers Update 17/03/2017 EUROPEAN COMMISSION Directorate-General for Education, Youth, Sport and Culture European
ERASMUS+ Technical guidelines for completing electronic PDF Forms: KA201, KA202, KA203 and KA204 Call For actions managed by National Agencies
 ERASMUS+ Technical guidelines for completing electronic PDF Forms: KA201, KA202, KA203 and KA204 Call 2018 For actions managed by National Agencies Version 1 of 01/02/2018 Table of Contents INTRODUCTION...
Quick guide to the SmartSimple on-line portal (making an application)
") EPA Research Programme 2014-2020 Quick guide to the SmartSimple on-line portal (making an application) POWERED BY SMARTSIMPLE Disclaimer Please read this document carefully prior to using the on-line portal.
EPA Research Programme 2014-2020 Quick guide to the SmartSimple on-line portal (making an application) POWERED BY SMARTSIMPLE Disclaimer Please read this document carefully prior to using the on-line portal.
EPA Research Programme EPA s Online Grant Application & Project Management Portal
 EPA Research Programme 2014-2020 EPA s Online Grant Application & Project Management Portal QUICK GUIDE TO MAKING AN APPLICATION April 2018 Version 3 Powered by SmartSimple The EPA Research Programme is
Mobility Tool Guide for Beneficiaries of the Erasmus programme FINLAND
 EUROPEAN COMMISSION Directorate General for Education and Culture Lifelong Learning: policies and programme Coordination of the "Lifelong learning" programme Mobility Tool Guide for Beneficiaries of the
ereports User Guide How to complete and submit a Project Report using ereports
 ereports 1.1.0 User Guide How to complete and submit a Project Report using ereports TABLE OF CONTENTS A - TECHNICAL REQUIREMENTS... 3 B - OVERVIEW OF THE PROCESS... 6 STEP 1: ACCESS THE PARTICIPANT PORTAL...
PADOR HELP GUIDE FOR CO-APPLICANTS
 PADOR HELP GUIDE FOR CO-APPLICANTS WHAT IS PADOR?... 1 WHO CAN REGISTER IN PADOR?... 1 WHY register my organisation in PADOR? Is registration obligatory?... 2 WHEN to register? When to update an account?...
Erasmus+ Linguistic Support: Licence Management System for Beneficiaries User Guide 1.0
 Erasmus+ Linguistic Support: Licence Management System for Beneficiaries User Guide 1.0 Date 30/09/2014 Version 1.0 Author Service Provider Revised by European Commission Approved by Public Beneficiary
Course Collect user manual 11/08/2014 V1.0
 11/08/2014 V1.0 Copyright Published by: UCAS Rosehill New Barn Lane Cheltenham GL52 3LZ UCAS 2014 All rights reserved. UCAS is a registered trade mark. UCAS, a company limited by guarantee, is registered
IRMA Researcher User Guide v2 DRAFT. IRMA Researcher User Guide
 IRMA Researcher User Guide v2 IRMA Researcher User Guide IRMA Researcher User Guide 1. Overview 1.01 What is IRMA? 1.02 What are the Benefits? 1.03 ISLHD Research and IRMA 2. Key Terms in IRMA 2.01 Coversheets
Annex II: Example on how to fill section D and E of the application form
 Annex II: Example on how to fill section D and E of the application form This example should only demonstrate the logic behind the forms. It is not taken from a real application or complete. Figures are
Fulbright Distinguished Awards in Teaching Program Partner Organization Application Manual. Institute of International Education
 Fulbright Distinguished Awards in Teaching Program Partner Organization Application Manual Institute of International Education 2015-2016 Contents International Application...3 Overview...3 Login for Applicants...3
People. Processes. Integrating Globally.
 People. Processes. Integrating Globally. Course: isupplier for Suppliers Table of Contents Table of Contents Course Introduction...4 L1: Vendor Registration... 6 Register for isupplier using SteelTrack
pplication Producer User Guide Information & Network Technology Errors & Omissions Information & Network Technology BUSINESS INSURANCE TECHNOLOGY
 BUSINESS INSURANCE TECHNOLOGY pplication Information & Network Technology Errors & Omissions Information & Network Technology Producer User Producer Guide User Guide Table of Contents I. Introduction..
CONCUR REQUEST GUIDE. For Delegates/Travelers
 CONCUR REQUEST GUIDE For Delegates/Travelers A comprehensive guide for the delegate and traveler users of Arkansas State University s Concur Request System Nikki Turner Created 01/15/2018 Contents INTRODUCTION...
Classification: Public ANZ TRANSACTIVE GLOBAL USER GUIDE
 Classification: Public ANZ TRANSACTIVE GLOBAL USER GUIDE 03 2015 CONTENTS PURPOSE 3 Users in ANZ Transactive Global 4 Function Roles and Data Roles 4 GETTING STARTED IN ANZ TRANSACTIVE GLOBAL 5 ANZ Transactive
IRMA Human Ethics Researcher User Guide
 IRMA Human Ethics Researcher User Guide IRMA Researcher User Guide 1. Overview 1.01 What is IRMA? 1.02 What are the Benefits? 1.03 ISLHD Research and IRMA 2. Key Terms in IRMA 2.01 Coversheets 2.02 Templates
WELCOME to Qantas Group isupplier
 WELCOME to Qantas Group isupplier A manual for suppliers Welcome to our isupplier help manual. You re receiving this manual as you are one of our preferred suppliers with access to the isupplier Portal.
Depending on the modules that have been implemented by your company, you may have access to the following information:
 Employee Self Service (ESS) User Quick Reference Guide Introduction to ESS The Employee Self Service (ESS) Application is a web-based application that gives you access to information from your employee
Overview... Page 2. eform Access... Page 3. eform Portal Navigation... Page 4-7. How to Start a Travel Diary eform... Page 8
 Travel Diary eform Work Instructions Contents Overview... Page 2 eform Access... Page 3 eform Portal Navigation... Page 4-7 How to Start a Travel Diary eform... Page 8 Personal Details... Page 9-10 Travel
ISUPPLIER PORTAL USER MANUAL ADERP VERSION 1.0
 ISUPPLIER PORTAL USER MANUAL ADERP VERSION 1.0 Contents Contents... i Oracle isupplier Portal Overview...1 Recommended Browsers and Settings...2 Advanced Settings...2 Turn-off pop-up blocker or Allow pop-up
Easy Survey Creator: User s Guide
 Easy Survey Creator: User s Guide The Easy Survey Creator software is designed to enable faculty, staff, and students at the University of Iowa Psychology Department to quickly and easily create surveys
Membership Portal Manual
 Membership Portal Manual Table of Contents Login... 4 Contact Tab... 6 Contact Information Dropdown...6 Features on the Contact Information Dropdown... 6 Account Information Dropdown...6 Features on the
Erasmus+ Linguistic Support: Licence Management System
 Erasmus+ Linguistic Support: Licence Management System for National Agencies User Guide 15.0 Date 15/12/2016 Version 15.0 Author Service Provider Public National Agencies Page 1 Table of Contents 1. INTRODUCTION...
The WellComm Report Wizard Guidance and Information
 The WellComm Report Wizard Guidance and Information About Testwise Testwise is the powerful online testing platform developed by GL Assessment to host its digital tests. Many of GL Assessment s tests are
Adobe Captivate Monday, February 08, 2016
 Slide 1 - Slide 1 MT+ How to export and import mobilities In this demo you will see how to export the template or the list of existing mobilities, an explanation of the format of the CSV file how to use
Illinois Department of Public Health EGrAMS Instructional Guide: Application Entry and Submission
 Illinois Department of Public Health EGrAMS Instructional Guide: Entry and Submission Once your User Profile has been activated, please follow the steps outlined below to initiate the grant, complete the
Guide to EST data input for beneficiaries
 Guide to EST data input for beneficiaries Comenius school partnerships Comenius Regio Leonardo da Vinci Partnerships Grundtvig Learning Partnerships Grundtvig Senior Volunteering projects Contents 1. Introduction...3
Amendments to Grant Agreements To LIFE projects from 2012 onwards (ie that were submitted via eproposal) Must be done via eproposal
 Must be done via eproposal") Amendments to Grant Agreements To LIFE projects from 2012 onwards (ie that were submitted via eproposal) Must be done via eproposal Guidance Document Table of contents 1. EPROPOSAL TOOL... 3 1.1. CREATE
Amendments to Grant Agreements To LIFE projects from 2012 onwards (ie that were submitted via eproposal) Must be done via eproposal Guidance Document Table of contents 1. EPROPOSAL TOOL... 3 1.1. CREATE
European Research Council Executive Agency ERCEA WEB EVALUATION TOOL. Expert USER'S GUIDE
 European Research Council Executive Agency ERCEA WEB EVALUATION TOOL Expert USER'S GUIDE Contents 1. Introduction... 4 2. How to access to Web Eva... 4 3. How to navigate in the main screen... 5 3.1 How
CONCUR REQUEST GUIDE. For Approvers/Travelers
 CONCUR REQUEST GUIDE For Approvers/Travelers A comprehensive guide for approver and traveler users in Arkansas State University s Concur Request System Nikki Turner Updated July 2018 Contents INTRODUCTION...
User Guide. Trade Finance Global. For customers using Guarantees. October nordea.com/cm OR tradefinance Name of document 5/8 2015/V1
 User Guide Trade Finance Global For customers using Guarantees October 2015 nordea.com/cm OR tradefinance Name of document 2015/V1 5/8 Table of Contents 1 Trade Finance Global (TFG) - Introduction... 4
EU Login Version 1 7 March 2017
 EU Login Version 1 7 March 2017 EUROPEAN COMMISSION EU Login Version 1 7 March 2017 Directorate-General for Education, Youth, Sport and Culture 2017 EN Table of Contents Table of Contents... 4 1. What
Isi Net User Manual for Bank customers
 1 Table of Contents 1 Introduction and overview... 4 1.1 Isi Net User Types... 4 1.2 Accessing the Isi Net service... 5 1.2.1 User Login... 5 1.2.2 User Logout... 7 1.3 User Interface... 7 1.3.1 Menus...
User Guide Create isupplier Supplier Charges
 CALIFORNIA RESOURCES CORPORATION AND ITS AFFILIATES (COLLECTIVELY, CRC) OVERVIEW This User Guide aims to describe how to electronically submit supplier charges (field tickets and/or invoices) against a
Bidvest Bank Personal Internet Banking User Manual
 Bidvest Bank Personal Internet Banking User Manual October 2016 Contents 1. INTRODUCTION... 4 1.1 Applying for Internet Banking... 4 2. MAINTAIN YOUR USERNAME, PASSWORD AND PIN... 5 2.1 Forgotten username...
ADERP ISUPPLIER PORTAL USER MANUAL VERSION 1.2
 ADERP ISUPPLIER PORTAL USER MANUAL VERSION 1.2 Document Control Change Record 4 Date Author Version Change Reference 12-Dec-2016 DOF 1.0 08-Feb-2017 DOF 1.1 Updated with new URL links 23-Mar-2017 DOF 1.2
I-SUPPLIER MODULE. isupplier Module
 I-SUPPLIER MODULE isupplier Module Authored by: Kiran Katti Version: 1.1 Date: 06-January-2015 Table of Contents Terms Used in the User Manual:... 2 Introduction to isupplier... 4 Requirements/Software
PRISM - FHF The Fred Hollows Foundation
 PRISM - FHF The Fred Hollows Foundation MY WORKSPACE USER MANUAL Version 1.2 TABLE OF CONTENTS INTRODUCTION... 4 OVERVIEW... 4 THE FHF-PRISM LOGIN SCREEN... 6 LOGGING INTO THE FHF-PRISM... 6 RECOVERING
ATS Questionnaire Management Interface (QMI) School Administrator Manual
 School Administrator Manual") 2014 ATS Questionnaire Management Interface (QMI) School Administrator Manual 1 Table of Contents QMI: BATCH PAGE...3 LOGGING IN TO THE QUESTIONNAIRE MANAGEMENT INTERFACE...4 SEARCHING FOR EXISTING BATCHES...5
2014 ATS Questionnaire Management Interface (QMI) School Administrator Manual 1 Table of Contents QMI: BATCH PAGE...3 LOGGING IN TO THE QUESTIONNAIRE MANAGEMENT INTERFACE...4 SEARCHING FOR EXISTING BATCHES...5
PROMAS MANUAL FOR APPLICANTS
 PROMAS MANUAL FOR APPLICANTS - Registration for Call for Proposals - Manage User Rights - Filling in Application Form - Submission of Application - View Grant Contract Version: 1.0. 1.8.2018 TABLE OF CONTENTS
TRAVEL AND EXPENSE CENTER REPORTS USER GUIDE
 TRAVEL AND EXPENSE CENTER REPORTS USER GUIDE Please note: This user guide is intended for online use, and has a number of embedded links. Printing of these documents is discouraged, as they are updated
KIAS - Kansas Integrated Accountability System
 Quick Start Guide for LEA Users Discipline Data Collection 2018 Leader Services Introduction This document will explain how LEAs can use the Kansas Integrated Accountability System (KIAS) to complete the
Volunteering Database User Guide
 Volunteering Database User Guide V2. 09/207 Contents Page. Contents 2. Introduction 3. Getting ready to use the Volunteering Database 4. Top Tips! 5. Registering for an ECAS account 9. Logging in to the
Placement Administration and Support System (PASS) User Guide. System Version January 2018 (v9)
 User Guide. System Version January 2018 (v9)") Placement Administration and Support System (PASS) User Guide System Version 2.0 22 January 2018 (v9) Placement Administration and Support System (PASS) User Guide System Version 2.0 22 January 2018 Contents
Placement Administration and Support System (PASS) User Guide System Version 2.0 22 January 2018 (v9) Placement Administration and Support System (PASS) User Guide System Version 2.0 22 January 2018 Contents
Web Forms: Erasmus+ & ESC How to complete the form
 Web Forms: Erasmus+ & ESC How to complete the form When completing the form, there are certain elements that are common in every section. This page covers these basic functionalities and highlights the
Erasmus+ Support: Licence Management System for Beneficiaries User Guide 18.0
 Erasmus+ Support: Licence Management System for Beneficiaries User Guide 18.0 Date 28/11/2017 Version 18.0 Author Service Provider Public Beneficiary Institutions/Organisations Page 1 Table of Contents
Monitoring Information System. General Description, Completion & Submission of AF & Progress report. Ioanna Kalaitzoglou
 Monitoring Information System General Description, Completion & Submission of AF & Progress report Ioanna Kalaitzoglou (ikalaitzoglou@mnec.gr) General Secretariat for Investments and Development Ministry
ActivePay CARDHOLDER GUIDE
 ActivePay CARDHOLDER GUIDE PNC - ACTIVEPAY CARDHOLDER TRAINING MANUAL TABLE OF CONTENTS Accessing the PNC ActivePay Web Application 2 Self Registration for Cardholders.. 3 Forgotten Username or Password
Hewlett Packard Enterprise Smart Quote
 Hewlett Packard Enterprise Smart Quote User Guide for Reseller Table of contents 1 Introduction to Smart Quote... 3 1.1 What is Smart Quote?... 3 1.2 Who will use Smart Quote?... 3 1.3 Do I require a special
Welcome to the Introduction to e-snaps Features and Functions navigational guide.
 Welcome to the Introduction to e-snaps Features and Functions navigational guide. This navigational guide provides information on the features and functions of an online system referred to as e-snaps.
Training Manual for Researchers. How to Create an Online Human Ethics Application
 Training Manual for Researchers How to Create an Online Human Ethics Application What is in this document This manual is intended to provide general tips on using functionality specific to QUEST online
Technical Guidance to BAMOS. An introduction to the beneficiary and applicants interface (BA) of the monitoring system of Interreg Baltic Sea Region
 of the monitoring system of Interreg Baltic Sea Region") Technical Guidance to BAMOS An introduction to the beneficiary and applicants interface (BA) of the monitoring system of Interreg Baltic Sea Region Version 2.1, drafted by Robert Schulz, as of 8 June 2017
Technical Guidance to BAMOS An introduction to the beneficiary and applicants interface (BA) of the monitoring system of Interreg Baltic Sea Region Version 2.1, drafted by Robert Schulz, as of 8 June 2017
Classroom Practice Labs Administration Portal User Guide
 gtslearning.com Classroom Practice Labs Administration Portal User Guide Contents User Guide... 1 Accessing the portal... 1 User Administration... 2 Creating Users accounts (Individually)... 3 Amend an
AS A VISITOR TO THE OPENDATA PLATFORM (ODP) YOU HAVE ACCESS: To browse and view datasets that are marked public.
 YOU HAVE ACCESS: To browse and view datasets that are marked public.") Visitor Guide 2 PREFACE The African Development Bank (AfDB) and the International Monetary Fund (IMF) have collaborated to provide an Open Data Platform (ODP) for African countries and regional organizations.
Visitor Guide 2 PREFACE The African Development Bank (AfDB) and the International Monetary Fund (IMF) have collaborated to provide an Open Data Platform (ODP) for African countries and regional organizations.
Terra Dotta Manual for Reviewers
 Terra Dotta Manual for Reviewers Table of Contents Accessing the OSU GO Application System... 3 Defining Terminology... 3 Phases of the Application vs. Statuses... 4 Application Statuses... 4 Application
Ethical Review Manager. Applicant User Guide
 Ethical Review Manager Applicant User Guide Last Updated: June 2017 Introduction The Ethical Review Manager (ERM) System has been designed to enable applications for ethical approval to conduct research
ERASMUS+ Technical guidelines for completing electronic PDF Forms: KA102 and KA116 Call For actions managed by National Agencies
 ERASMUS+ Technical guidelines for completing electronic PDF Forms: KA102 and KA116 Call 2018 For actions managed by National Agencies Version 1 of 18/12/2017 Table of Contents INTRODUCTION... 4 PREPARATION...
ASX Clear (Futures) Static Data Portal User Manual ETD only Clearing Participants
 Static Data Portal User Manual ETD only Clearing Participants") ASX Clear (Futures) Static Data Portal User Manual ETD only Clearing Participants Table of Contents 1. CLEARING PARTICIPANT ETD ONLY... 4 1.1. INTRODUCTION... 4 1.1.1. Purpose of ASX Clear (Futures) Static
ASX Clear (Futures) Static Data Portal User Manual ETD only Clearing Participants Table of Contents 1. CLEARING PARTICIPANT ETD ONLY... 4 1.1. INTRODUCTION... 4 1.1.1. Purpose of ASX Clear (Futures) Static
Contents. 1. Introduction to the Online Expenses System Expense Claim Administration Overview Entering Expense Claims...
 Contents 1. Introduction to the Online Expenses System... 2 2. Expense Claim Administration Overview... 4 3. Entering Expense Claims... 6 4. Expense Claim Submission... 11 5. Expense Claim Approval...
Admissions & Intro to Report Editing Participants Guide
 IBM Cognos Analytics Admissions & Intro to Report Editing Participants Guide Welcome to Cognos - Admissions and Introduction to Report Editing! Today s objectives include: Gain a Basic Understanding of
Certify User Guide CREATING & SUBMITTING EXPENSE REPORTS
 Certify User Guide CREATING & SUBMITTING EXPENSE REPORTS Copyright 2018 All Rights Reserved This version is current as of July 1, 2018 For continuously updated instructions, please visit our Help Center
STUDY ASSISTANT. Adding a New Study & Submitting to the Review Board. Version 10.03
 STUDY ASSISTANT Adding a New Study & Submitting to the Review Board Version 10.03 Contents Introduction... 3 Add a Study... 3 Selecting an Application... 3 1.0 General Information... 3 2.0 Add Department(s)...
Administrator Quick Guide
 1 Administrator Quick Guide Login Screen The first page employees will see when visiting their training site is the login screen. This is where employees must enter their username and password to access
ECAT_Admin User Manual for Licence Holders
 ECAT_Admin User Manual for Licence Holders Last update by the EU Ecolabel Helpdesk: November 2015 Table of Contents Introduction... 2 Chapter 1: Basic steps... 3 1.1 ECAT_Admin Account set up (first time
PRogramme Information and Activity Management Operational System (PRIAMOS) Frequently Asked Questions (FAQ)
 Frequently Asked Questions (FAQ)") PRogramme Information and Activity Management Operational System (PRIAMOS) Frequently Asked Questions (FAQ) the PRIAMOS USM Team HOME-JUST-PRIAMOS-USM@ec.europa.eu Page 1 of 17 Frequently Asked Questions
PRogramme Information and Activity Management Operational System (PRIAMOS) Frequently Asked Questions (FAQ) the PRIAMOS USM Team HOME-JUST-PRIAMOS-USM@ec.europa.eu Page 1 of 17 Frequently Asked Questions
Cost Centre Categorisation User Guide
 Cost Centre Categorisation User Guide Table of contents Process overview... 1 Accessing the application and downloading the spreadsheet... 2 Adding filters... 4 Using the filters... 5 Adding/updating owner
ACTIVE Net Insights user guide. (v5.4)
") ACTIVE Net Insights user guide (v5.4) Version Date 5.4 January 23, 2018 5.3 November 28, 2017 5.2 October 24, 2017 5.1 September 26, 2017 ACTIVE Network, LLC 2017 Active Network, LLC, and/or its affiliates
ACTIVE Net Insights user guide (v5.4) Version Date 5.4 January 23, 2018 5.3 November 28, 2017 5.2 October 24, 2017 5.1 September 26, 2017 ACTIVE Network, LLC 2017 Active Network, LLC, and/or its affiliates
Vendor Registration and Training
 Vendor Registration and Training Bid Express Registration Guide Bid Express Vendor Guide February 2015 Prepared By Address: 5700 SW 34th Street, Suite 1235, Gainesville, Florida 32608-5371 Web: www.infotechfl.com
SETUP GUIDE PPP FOR PPP USERS PLANT PROTECTION PRODUCTS VERSION 0.4
 SETUP GUIDE FOR PPP USERS VERSION 0.4 PPP PLANT PROTECTION PRODUCTS TABLE OF CONTENTS 1. INTRODUCTION... 3 2. STEP 1: CREATING YOUR ECAS ACCOUNT... 4 3. STEP 2: REQUESTING ACCESS TO THE APPLICATION...
Mintel Oxygen. User s Guide
 Mintel Oxygen User s Guide Welcome to Mintel Oxygen. This user guide will show you everything you need to know to access and utilize the wealth of information available from Mintel Oxygen. The Mintel program
Planning User Manual
 Planning 11.1.2 User Manual Budget Office May 2011 Hyperion Planning/Workspace/Reports Hyperion Planning Overview.... 3 Logging In.... 3 Setting User Preferences.... 3 Workspace Logging In..4 Navigating
ACER Online Assessment and Reporting System (OARS) User Guide
 User Guide") ACER Online Assessment and Reporting System (OARS) User Guide January 2015 Contents Quick guide... 3 Overview... 4 System requirements... 4 Account access... 4 Account set up... 5 Create student groups
ACER Online Assessment and Reporting System (OARS) User Guide January 2015 Contents Quick guide... 3 Overview... 4 System requirements... 4 Account access... 4 Account set up... 5 Create student groups
Quick Data Entry Guide
 Quick Data Entry Guide 1 Contributing to the V3P database (data entry) This quick data entry guide provides an overview of the data submission procedure to the V3P database. Before submitting data, please
ECHA Accounts Manual for Industry Users
 1 ECHA Accounts Manual ECHA Accounts Manual for Industry Users 2 ECHA Accounts Manual Changes to this document Version Changes Date 1.0 First release September 2014 2.0 Update December 2014 3.0 Update
igrants User Manual igrants User Training Manual Office of Superintendent of Public Instruction Updated: July 17, 2015 Contact Us
 Office of Superintendent of Public Instruction igrants User Training Manual igrants User Manual Updated: July 17, 2015 Contact Us Email: igrants@k12.wa.us Phone: (360) 725.4956 Table of Contents General
International Partnerships System
 International Partnerships System User Guide Version 1.0 Contents Chapter One - Introduction... 1 How to use this guide... 1 Application Purpose... 1 How to get help... 1 Online resources... 1 University
Non-Public Travel Requests Public User Documentation
 Public User Documentation Created May 27, 2016 Revised: December 6, 2016 Version: 1 Mission Statement To equip our students to achieve success in a global society by implementing an effective and rigorous
daa isupplier User Guide
 daa isupplier User Guide December 2017 Contents Prerequisites... 3 Introduction... 4 1.1 Registration... 6 1.2 Login... 6 1.3 Basic Overview of the isupplier Portal Homepage... 7 1.4 Purchase Order Acceptance
Volunteering Database User Guide
 Volunteering Database User Guide V2. 09/207 Contents Page. Contents 2. Introduction 3. Getting ready to use the Volunteering Database 4. Top Tips! 5. Registering for an EU Login account 9. Logging in to
SmartSeminars User Guide
 SmartSeminars User Guide Copyright 1998-2006, E-Z Data, Inc. All Rights Reserved No part of this documentation may be copied, reproduced, or translated in any form without the prior written consent of
Digital Library Coordinator Guide
 Version 1.2 3 October 2014 This quick guide is intended to provide brief instruction in how state, district and school assessment Coordinators can use the Open Source Administration and Registration Tools
Access the PNC ActivePay website at: https:\\www.pncactivepay.com
 Access the PNC ActivePay website at: https:\\www.pncactivepay.com 1 2 3 4 1. Login to ActivePay by entering your assigned USERNAME, PASSWORD (new user, Welcome1), and ORGANIZATION ID is WKUGROUP. 2. Click
Guide for Candidates: Online Progress Reports
 Guide for Candidates: Online Progress Reports What is Quest Quest is our comprehensive research management system used to administer and support research activity at Victoria University. All Progress Reports
Wire & Internal Transfers
 Wire & Internal Transfers USER GUIDE Transfer funds easily and securely. Convenience. Transfer money between accounts at Union Bank and different banks domestically and internationally. Ease. Say goodbye
Studentpad. Landlord User Guide. A guide to using the Studentpad software for Landlords.
 Studentpad Landlord User Guide A guide to using the Studentpad software for Landlords. Studentpad Landlord User Guide Table of Contents Introduction... 3 Logging In... 3 Home... 4 The Layout... 4 Alerts,
Welcome to CalJOBS Training! In this training, we will review the individual registration process, as well as the Title I application.
 Welcome to CalJOBS Training! In this training, we will review the individual registration process, as well as the Title I application. This section of the training will cover the following: Completing
Welcome to the Introduction to e-snaps Features and Functions instructional guide.
 Welcome to the Introduction to e-snaps Features and Functions instructional guide. This instructional guide provides information on the features and functions of an online system referred to as e-snaps.
InPlace Student User Guide
 Logging in InPlace Student User Guide Your InPlace account is created after you enrol in your first placement course. Until then you will not be able to log in to the system. Activation of your account
UNOPS esourcing vendor guide. A guide for vendors to register on UNGM, and submit responses to UNOPS tenders in the UNOPS esourcing system
 A guide for vendors to register on UNGM, and submit responses to UNOPS tenders in the UNOPS esourcing system Version: 1.4 By: UNOPS Procurement Group Date: 1 November 2017 TABLE OF CONTENTS 1. Purpose
Web Report Library User Guide
 Web Report Library User Guide Prepared for: Finance & Administration Budget Administrators Updated On: 3/19/2015 7:55:00 AM 1 Table of Contents 1. Request Access to the Web Report Library (WRL)...... 3