Revision History Overview Feature Summary Modern Selling Experience Enterprise Platform Differentiate
|
|
|
- Isabella Adams
- 5 years ago
- Views:
Transcription


1
2 TABLE OF CONTENTS Revision History 3 Overview 3 Feature Summary 3 Modern Selling Experience 4 Oracle Alta UI Enhancements 4 Enterprise Platform 12 Product Eligibility 12 Subscription Ordering 21 Migration Center Enhancements 25 BMQL Enhancements to Support JOIN Clauses 29 Single Select Pick List Enhancements 31 Document Designer Enhancements 35 Integrated Solutions 46 Oracle Contract Cloud 46 Microsoft Dynamics 365 Integration 50 OAuth-Based REST API Authentication with IDCS Integration 56 Commerce Cloud Integration Enhancements 59 Differentiate 62 System Configuration Enhancements 63 Additional CPQ Cloud Enhancements 67 Pre-Upgrade Considerations 68 Post-Upgrade Considerations 69 2
3 REVISION HISTORY This document will continue to evolve as existing sections change and new information is added. All updates appear in the following table: Date Feature Notes 14 FEB 2018 Commerce Cloud Integration Enhancements Document updated. Revised feature description. 14 FEB 2018 Product Eligibility Document updated. Revised feature description. 14 FEB 2018 Single Select Pick List Enhancements Document updated. Revised feature description. 18 JAN 2018 Created initial document. OVERVIEW Oracle Configure, Price, and Quote (CPQ) Cloud enables companies to streamline the entire opportunity-toquote-to-order process, including product selection, configuration, pricing, quoting, ordering, and approval workflows. CPQ Cloud provides a flexible, scalable, enterprise-ready solution ideal for companies of all sizes that sell products and services across direct, indirect, and e-commerce sales channels. This guide outlines the information you need to know about new or improved functionality in Oracle CPQ Cloud 18A and describes any tasks you might need to perform for the update. Each section includes a brief description of the feature, the steps you need to take to enable or begin using the feature, tips or considerations that you should keep in mind, and the resources available to help you. SECURITY & NEW FEATURES We would like to remind you if your system has modified security structures you may need to advise your security administrator of new features you would like to take advantage of. To assist you Appendix A provides a listing of the new features and the security attributes needed to employ the new features when you have decided to implement them. GIVE US FEEDBACK We welcome your comments and suggestions to improve the content. Please send us your feedback at cpqcloud_documentation_us_grp@oracle.com. FEATURE SUMMARY 3
4 Action Required to Enable Feature Feature Automatically Available End User Action Required Oracle Service Administrator Request Action Required Required Modern Selling Experience Oracle Alta UI Enhancements Enterprise Platform Product Eligibility Subscription Ordering Migration Center Enhancements BMQL Enhancements to Support JOIN Clauses Single Select Pick List Enhancements Document Designer Enhancements Integrated Solutions Oracle Contract Cloud Microsoft Dynamics 365 Integration OAuth-Based REST API Authentication with IDCS Integration Commerce Cloud Integration Enhancements Differentiate System Configuration Enhancements Additional CPQ Cloud Enhancements Pre-Upgrade Considerations Post-Upgrade Considerations MODERN SELLING EPERIENCE Leverage the rich interface and interactive capabilities available in CPQ Cloud to provide an intuitive selling experience using the Oracle Alta UI enhancements available in the 18A release. ORACLE ALTA UI ENHANCEMENTS Alta UI is a design system that delivers modern, simple, and more engaging UIs across Oracle's web-based and mobile applications. Alta is the new standard for Oracle applications and Oracle Cloud-based services. 4
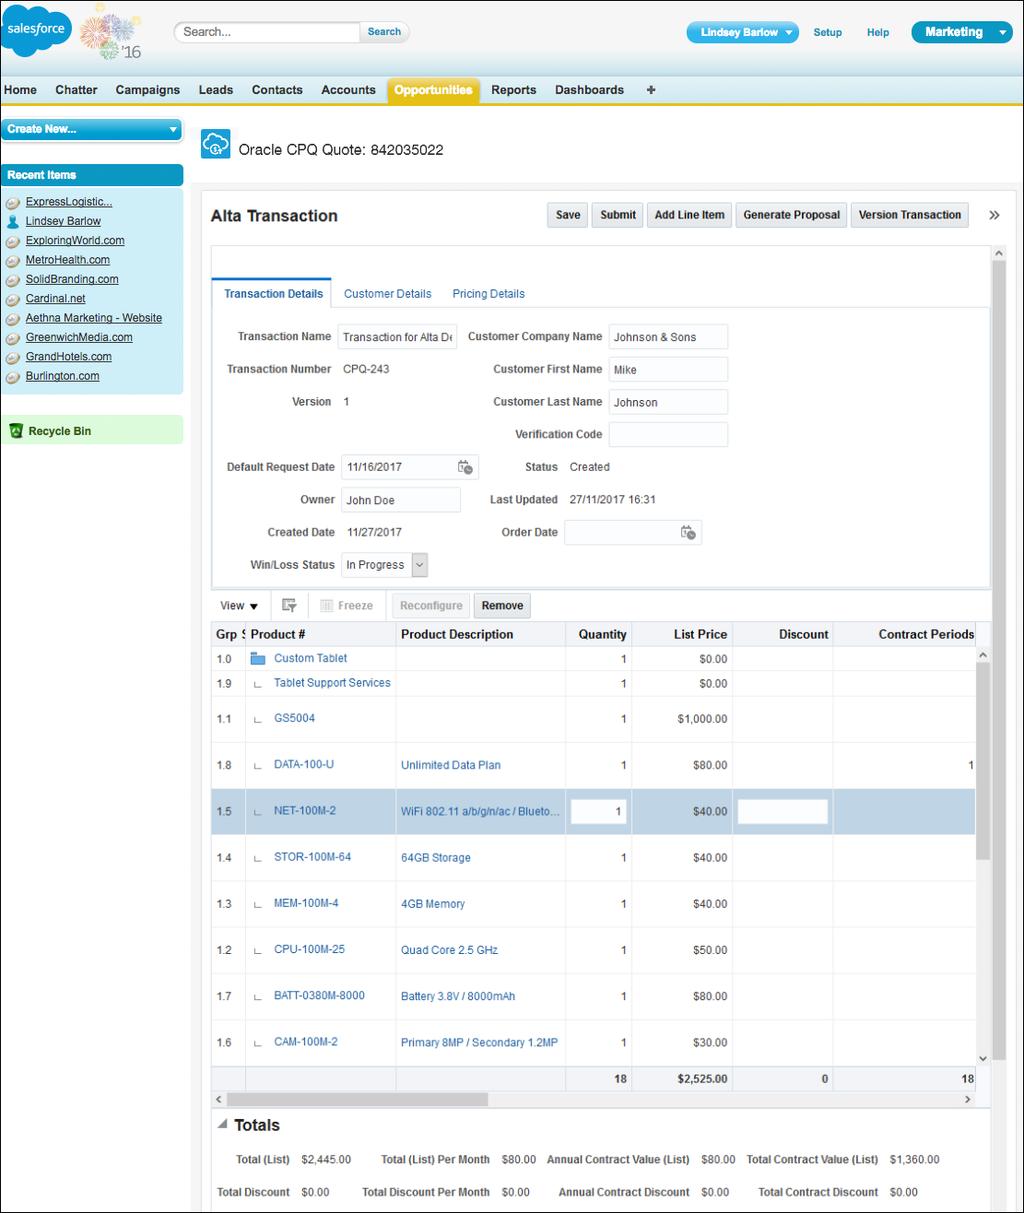
5 Introduced in CPQ Cloud 2017 R2, the Alta Responsive Transaction UI provides sales users with an improved user experience by focusing on fewer elements and a cleaner design aimed at accelerating performance and information delivery. As part of continuing improvements to the Alta Responsive Transaction UI, the following enhancements are supported in CPQ Cloud Release 18A: Use Salesforce to create, clone, and open Transactions Experience full Tree-table functionality in the Line Item table Use updated Panel settings in Layout Editor Interact with Subscription Ordering Use Salesforce to Create, Clone, and Open Transactions In CPQ Cloud Release 18A, the Alta Transaction UI is fully supported with Salesforce integrations. Sales users can view the Alta Responsive Transaction UI within the Salesforce iframe. From Salesforce, users can create, edit, or copy an Alta Responsive Transaction. IMPORTANT: The Alta Responsive UI functionality available in Salesforce works in the same way as the functionality available with the legacy desktop UI. Users of the Alta Responsive UI will gain improvements to the Transaction interface, including: Responsive Behavior, Improved Scrolling, Column Sorting, Column Resizing, Column Freezing, and Line Item Filtering. 5
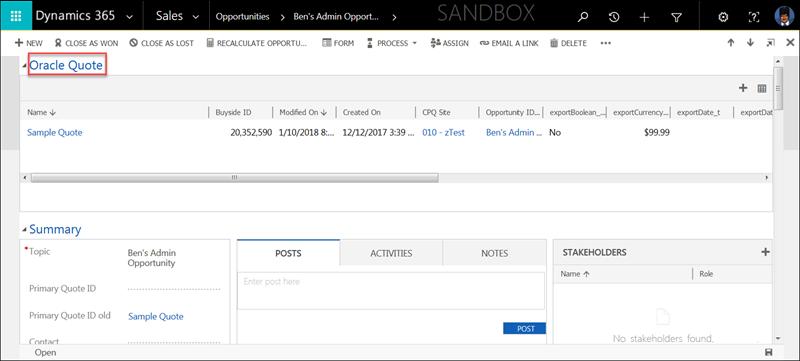
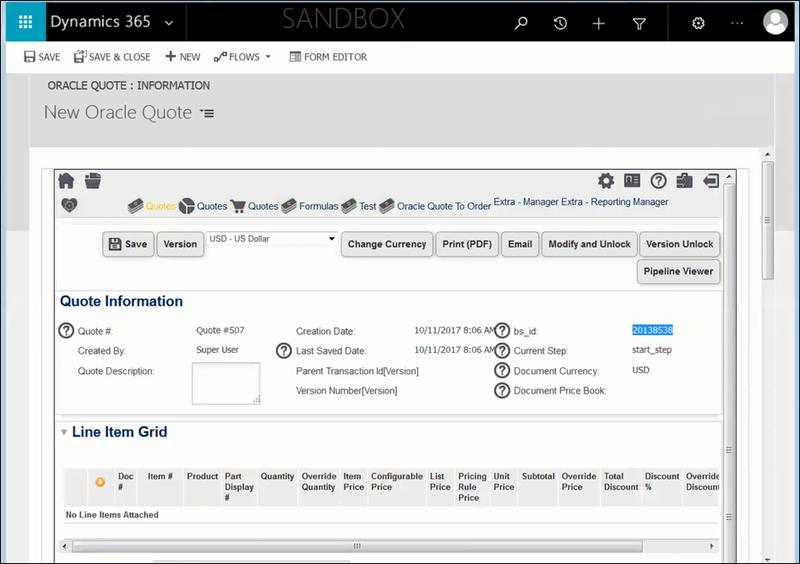
6 Alta Responsive Transaction UI in Salesforce Classic CREATE A QUOTE FROM A SALESFORCE INTEGRATED SITE USING THE ALTA RESPONSIVE UI At the Salesforce opportunity level, sales users can view a list of CPQ Cloud quotes and interactions and delete existing quotes from an opportunity. By clicking New Oracle Quote, sales users can create a new quote using the Oracle Alta Responsive Transaction UI. 6
7 CPQ Cloud Quotes and Actions EDIT A QUOTE At the Salesforce opportunity level, sales users can click Edit next to an existing quote to open the quote in the new Alta Responsive UI. They can then edit the quote, save changes to the quote, and submit the modified quote. Sales users can also add Line Items to the Line Item Grid, reconfigure existing Line Items, edit existing attribute values, save new or modified Line Items, and delete new or existing Line Items. Line Item Grid COPY A QUOTE FROM A SALESFORCE INTEGRATED SITE At the Salesforce opportunity level, sales users can select an existing CPQ Cloud quote and click Clone Quote to make a copy. Sales users can then edit and save the copied quote. IMPORTANT: A new Transaction ID is created for each copied quote. IMPORTANT: Sales users can add, edit, or remove Line Items from a copied quote. IMPORTANT: The date and user name of a copied quote reflects the current user and date. Experience Full Tree-Table Functionality in the Line Item Table 7
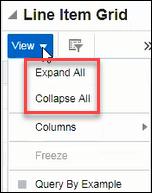
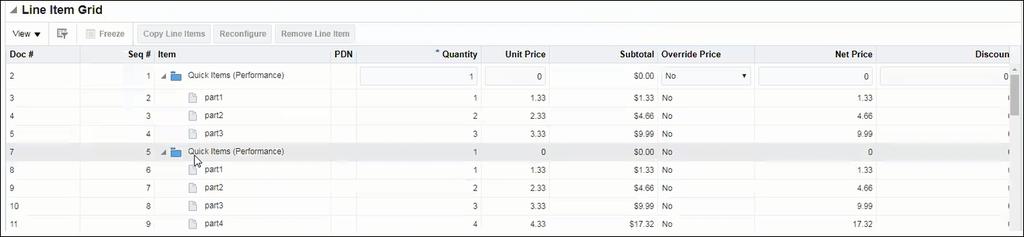
8 The Line Item table in the Alta Responsive Transaction UI now includes full Tree-table functionality. Sales users can expand and collapse models and system configurations. In addition, they can sort and filter Transaction Lines while preserving the tree hierarchy. VIEW A HIERARCHICAL DISPLAY OF MODELS AND PARTS IN THE LINE ITEM GRID When the Oracle Alta Responsive Transaction UI is enabled, a hierarchical display of models and parts now displays in the Line Item Grid. The hierarchy structure allows sales users to more easily view model and part relationships. Hierarchical Display of Models and Parts EPAND AND COLLAPSE MODELS IN THE LINE ITEM GRID Use the Expand All and Collapse All options in the View menu to toggle the visibility of the parts within a model, allowing for convenient viewing of the Line Items at a high level or a more detailed level. Expand All and Collapse All Options When a sales user selects Collapse All from the View menu, a high level view of models in the Line Item Grid displays. Collapse All Example When Expand All is selected from the View menu, a more detailed view of models and their parts display in the Line Item Grid. 8
9 Expand All Example SORT LINE ITEM GRID COLUMNS Sort columns by clicking a column header and choosing the ascending or descending sort option. As shown below, the sorting occurs inside the model. Sort Options in Column Header FILTER LINE ITEM GRID COLUMNS In CPQ Cloud Release 18A, sales users can filter Line Item Grid columns using the Query By Example (QBE) filter on the Line Item Toolbar. Click the filter icon to enable the Line Item Toolbar. Enter the desired filter criteria into the Line Item Toolbar. Criteria can be entered into several fields to filter results across multiple columns. Press enter to activate the filter. Click the pencil eraser icon, on the left side of the Line Item Toolbar, to clear the filter. 9
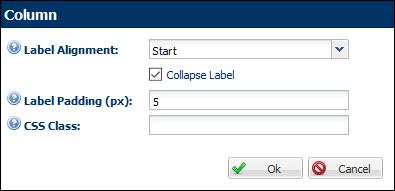
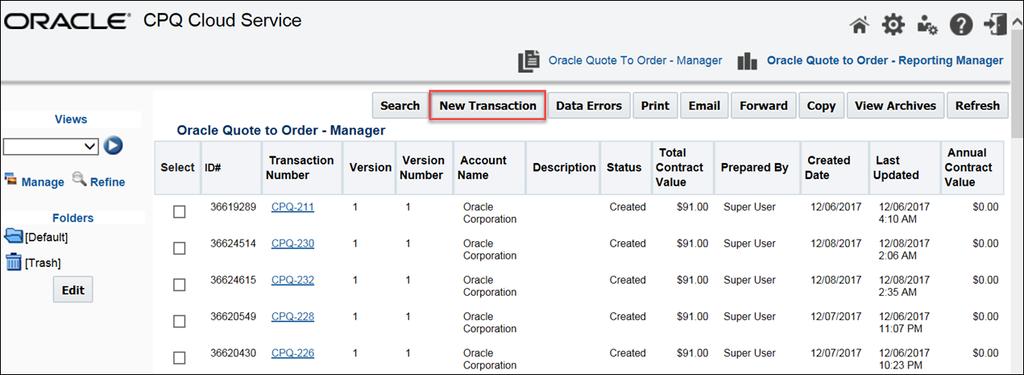
10 Query By Example Filter Use Updated Panel Settings in Layout Editor CPQ Cloud Release 18A updates the Layout Editor, allowing administrators to select the placement and visibility of labels beside the input field. Label Alignment: In the Column settings, Label Alignment options include Top and Start to support Right-to-Left and Left-to-Right languages and guide whether the label is to the left or right of the input. Top: Places the label above the input field. Start: Places the label at the start of the input field. Collapse Label: Checking this box hides all of the labels and collapses the label area, showing only the input fields. Column Settings Interaction with Subscription Ordering The Alta Transaction UI now supports interaction with Subscription Ordering and can now launch the Customer Assets page, allowing sales users to add asset-based products to a Transaction. Complete the following steps: 1. Open CPQ Cloud. 2. Navigate to Transaction Manager. 10
11 Transaction Manager 3. Click New Transaction. The Transaction page opens. Transaction Page with Customer Assets Button STEPS TO ENABLE For instructions on how to enable this feature, refer to the Alta Responsive Layout topic in the CPQ Cloud Administration Online Help. TIPS AND CONSIDERATIONS Consider the following tips when using the Release 18A Oracle Alta UI enhancements: In prior releases, a Tab Display option (Horizontal or Vertical) displayed in Layout Editor, allowing administrators to specify how tabs displayed in a specific panel when the Alta Responsive Transaction UI was enabled. Since the display of vertical tabs is not supported unless an icon is displayed, the Tab Display option is no longer available in Layout Editor when the Alta Responsive Transaction UI is enabled. Tabs in a panel always display horizontally. For a list of Oracle Alta UI limitations, refer to the Alta Responsive Layout topic in the CPQ Cloud Administration Online Help. KEY RESOURCES 11
12 Refer to the CPQ Cloud Administration Online Help for additional information. ENTERPRISE PLATFORM Cater to the need by large, complex enterprises for a robust, integrated, and performant platform using the following CPQ Cloud 18A features: Product Eligibility Subscription Ordering Enhancements Migration Center Enhancements BMQL Enhancements to Support JOIN Clauses Single Select Pick List Enhancements Document Designer Enhancements Integrated Solutions Oracle Contract Cloud Integration Microsoft Dynamics 365 Integration OAuth Based REST API Authentication with IDCS Integration PRODUCT ELIGIBILITY Customers can add parts to a Transaction in a variety of ways including via Recommended Item Rules, BOM Mapping Rules, Part Search, Multi-Part Search, Quick Keys, and REST API calls. In CPQ Cloud Release 18A, administrators can use Eligibility Rules to define the parts available to specific customers, geographies, or channels consistently across all of these methods. When customers add a part to a Transaction using any of the available methods, they can only view and add the parts available to them. CPQ Cloud Release 18A allows administrators to do the following: View a list of Eligibility Rules Default columns on Eligibility Rules List page Add or edit an Eligibility Rule Delete Eligibility Rules Deploy Eligibility Rules Bulk upload Eligibility Rules Migrate Eligibility Rules View a List of Eligibility Rules CPQ Cloud Release 18A includes an Eligibility Rules option on the Admin Home page. Administrators can use this option to open the Eligibility Rules List page and view a list of existing Eligibility Rules. Administrators can also use the page to add, edit, delete, or deploy Eligibility Rules. Complete the following steps: 1. Open the Admin Home page. 12
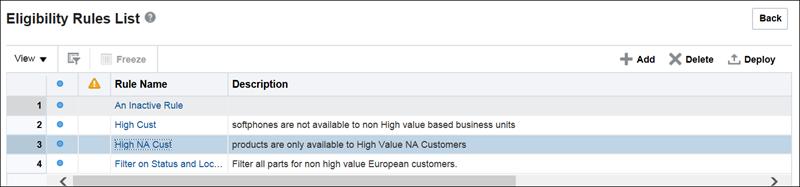
13 2. Under Products, select Eligibility Rules. Eligibility Rules Option on Admin Home Page 3. The Eligibility Rules List page opens. Each Eligibility Rule name is a link to its detail page. In the following example, there are three active Eligibility Rules on the CPQ Cloud site. Eligibility Rules List Page IMPORTANT: The first column provides a sequentially numbered list of each Eligibility Rule in the table. IMPORTANT: The second column contains blue bullets to indicate Eligibility Rules that are either not yet deployed or were modified after deployment. IMPORTANT: The third column displays a warning icon when the Eligibility Rule is invalid. IMPORTANT: Click Deploy to deploy selected Eligibility Rules. Administrators can select one or more Eligibility Rules, which are highlighted when selected. IMPORTANT: Click Back to return to the Admin Home page. Default Columns on Eligibility Rules List Page The following table identifies the columns that, by default, are visible and hidden on the Eligibility Rules List page. Administrators can use the View menu to modify the visible and hidden columns. Columns Visible By Default Columns Hidden By Default Notes The Process column only displays a value when one or more Commerce attributes are 13
14 Columns Visible By Default Columns Hidden By Default Rule Name Process Description Modified Date Start Date Last Deployed Date End Date Rule Type Notes included in the Eligibility Rule. Administrators can set up an Eligibility Rule with no reference to Commerce. When this occurs, the Eligibility Rul can be applied across multiple processes. Active Add or Edit an Eligibility Rule Use the Eligibility Rule Detail page to add an Eligibility Rule. Complete the following steps: 1. Navigate to the Admin Home page. 2. Under Products, select Eligibility Rules. The Eligibility Rules List page opens. To edit an existing Eligibility Rule, select the name of an existing Eligibility Rule to open the Eligibility Rule Detail page. 3. Click Add to create a new Eligibility Rule. The Eligibility Rule Detail page opens. Eligibility Rule Detail Page 4. Enter a Name for the Eligibility Rule. The name is reflected in the page name, replacing the default "Rule Name Unspecified"
15 5. The Variable Name field auto-populates upon clicking in or tabbing to the field. If an administrator enters a duplicate variable name, an error message will display upon saving the Eligibility Rule. The administrator must correct the variable name. Eligibility Rule Detail Page with Rule Name and Variable Name Populated 6. Enter a description, if desired. 7. If desired, select a Start Date and End Date reflecting the effective dates of the Eligibility Rule. 8. In the Type drop-down, select a rule type. Available: When the condition is satisfied, the selected parts are available. Not Available: When the condition is satisfied, the selected parts are not available. 9. The Active checkbox is selected by default, indicating the Eligibility Rule is available on the CPQ Cloud site. 10. Under the Condition heading, select one of the following options: Always True: The Eligibility Rule is always applied. The parts available in Recommended Items, Quick Key, Part Search, Shopping Cart, Favorites, Configuration and Commerce SOAP APIs, and BOM items are determined by deployed Eligibility Rules and part custom field filters. Simple: Define the condition using data source attributes, which are displayed in the attribute dropdown menu for the condition and include User Attributes, System Attributes, Commerce attributes, Configuration attributes, and Account attributes. The Eligibility Rule fires when the condition is met. 11. From the Process Condition area grid, select the Commerce process whose attributes will display in the Selection area grid. The Eligibility Rule only applies to the Commerce process when one or more of the processes' attributes are included in the rule. 12. Use the Selection area to specify criteria for filtering parts. All: If the condition evaluates to true, all parts are included. None: If the condition evaluates to true, no parts are included. 15
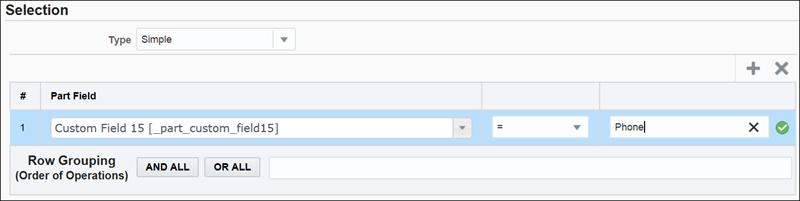
16 Simple: Allows administrators to specify the parameters to use for filtering parts. Selection Grid 13. Click Save. 14. Click Close to return to the Eligibility Rules List page. View a Sample Eligibility Rule In the following example, an administrator uses a simple condition to restrict the availability of a product using the "Customer Location" and "Customer Status" attributes. As a result, the product is only available to High Value customers located in North America. The administrator then uses the Selection area of the Eligibility Rule Detail page to specify the part selection. 16
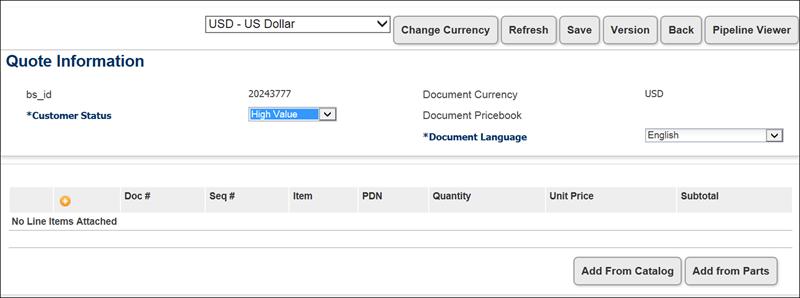
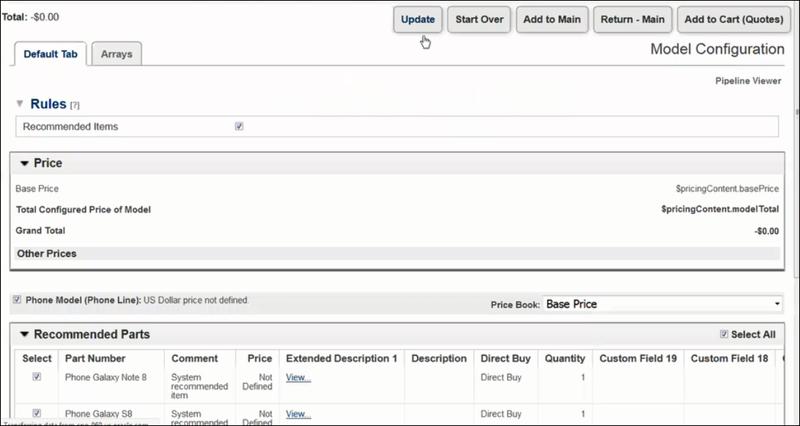
17 Sample Eligibility Rule with Simple Condition In the following example, the Eligibility Rule is applied when a sales user in the US creates a new Transaction for a customer with a High Value status. New Quote for Customer with High Value Status The sales user then clicks Add from Catalog to configure a model to add to the Transaction. 17
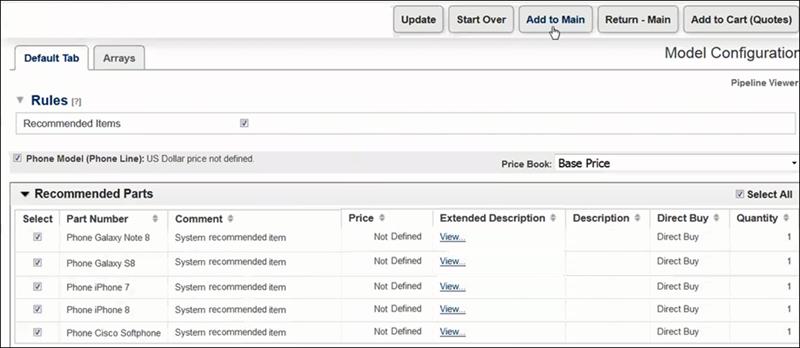
18 Model Configuration Page Active Eligibility Rules are executed and a list of parts are displayed in the Recommended Items window. The sales user can add available parts to the Transaction. In the following example, all of the listed parts are available. When a part is unavailable, a red displays next to the part. Model Configuration Page with Recommended Parts Delete One or More Eligibility Rules Administrators can use the Eligibility Rules List page to select one or more Eligibility Rules to delete. Selected rows display as highlighted rows. Complete the following steps: 1. Open the Admin Home page. 2. Under Items, select Eligibility Rules. The Eligibility Rules List page opens. 18
19 3. Select one or more Eligibility Rules to delete. Eligibility Rules List Page with Eligibility Rule Selected 4. Click Delete. The Eligibility Rule is removed from the Eligibility Rules List page. Deploy Eligibility Rules Like many elements in CPQ Cloud, Eligibility Rules require deployment. Administrators can deploy Eligibility Rules from the Eligibility Rules List page and the Eligibility Rules Detail page. Bulk Upload and Download Eligibility Rules Administrators can use Bulk Data Services to add, update, and delete Eligibility Rules. They can upload or download Eligibility Rules using ML. During bulk upload, an error displays when more than one rule exists with the same variable name, any required field or action is missing, or extra columns exist. On the Download Category List page (Admin > Bulk Service > Download), an Eligibility Rule option exists and allows administrators to select the Eligibility Rules to download. After selecting the Eligibility Rule option and clicking Next, administrators can specify the selection criteria. 19
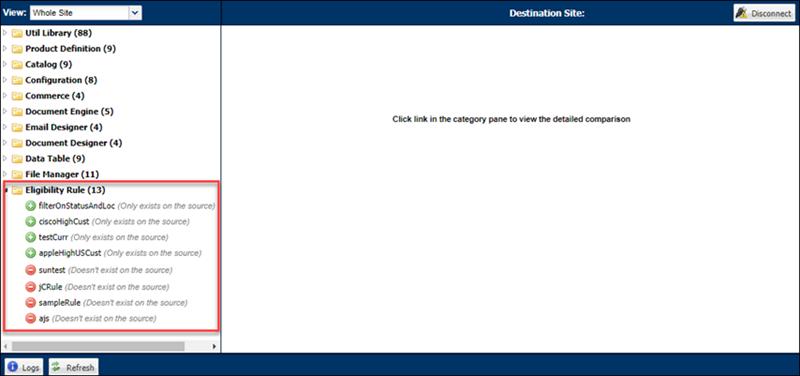
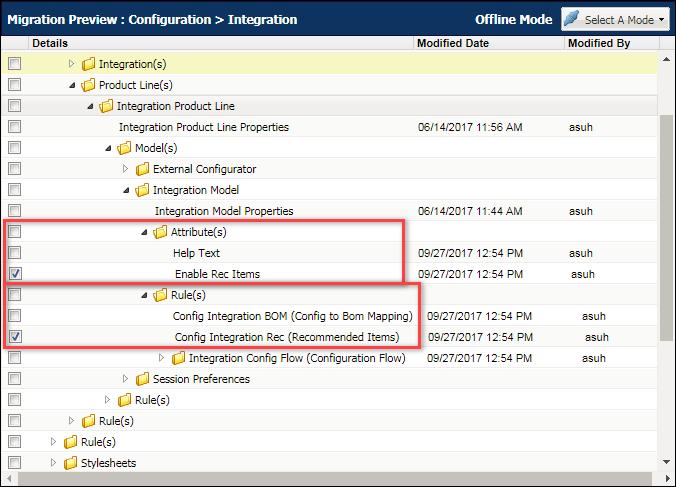
20 Download Category List with Eligibility Rules as Option Migrate Eligibility Rules The Migration Center is the user interface where all migration takes place within CPQ Cloud. In CPQ Cloud Release 18A, "Eligibility Rule" displays as a migration component in the Content pane. Administrators can migrate deployed Eligibility Rules as independent entities and include Eligibility Rules in a migration package using the Migration Center functionality available in prior releases. In addition, they can view the granular differences between an Eligibility Rule on the source and target site. 20
21 Eligibility Rules in the Migration Center IMPORTANT: If an attribute used in an Eligibility Rule condition is not on the target site but is used in an Eligibility Rule on the source site, administrators will receive a warning but can migrate the Eligibility Rule. STEPS TO ENABLE The Product Eligibility feature is automatically available on CPQ Cloud 18A sites. TIPS AND CONSIDERATIONS Consider the following tips when using Product Eligibility Rules: Eligibility Rules are supported in Configuration SOAP APIs and Transaction REST APIs. Translation is supported for Eligibility Rules. The Configuration UI and the CPQ Cloud commerce UI used for editing Transactions show executed Eligibility Rules in the Pipeline Viewer. KEY RESOURCES CPQ Cloud Administration Online Help SUBSCRIPTION ORDERING Introduced in CPQ Cloud 2017 R2, the Alta Responsive Transaction UI provides sales users with an improved user experience by focusing on fewer elements and a cleaner design aimed at accelerating performance and information delivery. As part of continuing improvements, CPQ Cloud Release 18A allows customers to use Subscription Ordering when the Alta Responsive Transaction UI is enabled. The following Subscription Ordering functionality is available: Reconfigure an asset-based BOM model to update an order prior to fulfillment Access Customer Assets page from Alta Transaction UI to perform Modify, Suspend, Resume, Terminate, and Renew actions 21
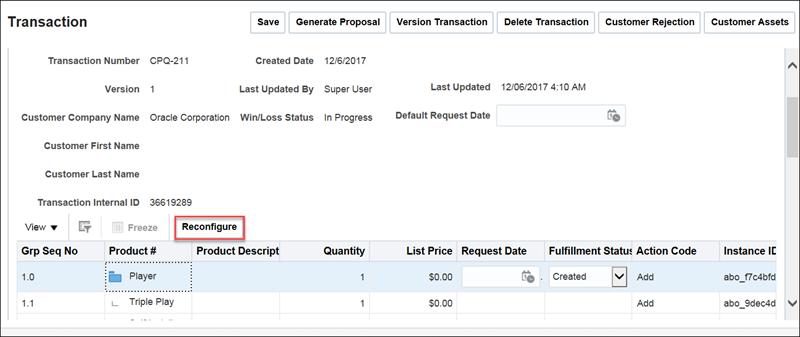
22 IMPORTANT: The Subscription Ordering functionality available when the Alta Responsive Transaction UI is enabled works in a similar manner to the functionality available in the legacy UI. Users gain improvements to the layout components, including: Improved Scrolling, Column Sorting, Column Resizing, Column Reordering, Column Freezing, and Line Item Filtering. For additional information, refer to the Alta Responsive Layout topic in the CPQ Cloud Administration Online Help. Reconfigure an Asset-Based BOM Model to Update an Order Prior to Fulfillment Sales users can use the Reconfigure action to update an asset-based BOM model in an order prior to fulfillment. In CPQ Cloud Release 18A, this functionality is available when the Alta Responsive Transaction UI is enabled. Complete the following steps: 1. Open CPQ Cloud. 2. Navigate to Transaction Manager. 3. Click a specific Transaction Number. The Transaction page opens. 4. Select a specific asset-based BOM model from the line item grid. The Reconfigure button becomes enabled. Transaction Page with Reconfigure Button IMPORTANT: CPQ Cloud Release 18A does not support the ability to reconfigure an asset-based child BOM model from the line item grid when the Alta Responsive Transaction UI is enabled. 5. Click Reconfigure. The Model Configuration page opens. 6. Reconfigure the BOM model, as desired. 22
23 Reconfigure BOM Model from Model Configuration Page 7. Click Update to save changes. 8. Click Save to return to the Transaction page. Access Customer Assets Page from Alta Transaction UI to perform Modify, Suspend, Resume, Terminate, and Renew Actions CPQ Cloud Release 18A allows sales users to perform the Modify, Terminate, Suspend, Resume, and Renew actions from the Customer Assets page when the Alta Responsive Transaction UI is enabled. Complete the following steps: 1. Open CPQ Cloud. 2. Navigate to Transaction Manager. 3. Click New Transaction. 4. In the Default Request Date field, select a future date. The date selected represents the date the asset will be modified, terminated, suspended, resumed, or renewed. 5. Click Customer Assets. The Customer Assets page opens and displays active assets associate with the customer at the specified Request Date. 23
24 Customer Assets Page with Active Assets Associated with Customer 6. Select the asset to modify, terminate, suspend, resume, or renew. 7. Click the associated action button. Customer Assets Page with Modify, Terminate, Suspend, Resume, and Renew Buttons IMPORTANT: Click Modify to open the Configuration page and modify the selected subscription. IMPORTANT: Click Terminate to end the subscription of the selected asset. The end date of the asset becomes the date the customer requested the subscription termination. IMPORTANT: Click Suspend to change the status of active assets to Suspend. The suspend date is taken from the Transaction. IMPORTANT: Click Resume to change the status of a Suspended asset to Active. IMPORTANT: Click Renew to renew a subscription. An asset continues to remain Active after performing a Renew action. The renew date is taken from the Transaction. IMPORTANT: Click Back to return to the Transaction page for the current Transaction. STEPS TO ENABLE To uptake the Alta Responsive Transaction UI, customers who have implemented Subscription Ordering must download and import the ABO package available with CPQ Cloud Release 18A. For additional information, refer to Document ID on My Oracle Support. TIPS AND CONSIDERATIONS 24
25 The ability to create a Follow-On Order using the Alta Responsive Transaction UI is not supported in CPQ Cloud Release 18A. KEY RESOURCES CPQ Cloud Administration Online Help CPQ Cloud Asset Based Ordering Implementation Guide MIGRATION CENTER ENHANCEMENTS In Release 18A, CPQ Cloud delivers the following enhancements to expand the functionality and flexibility of the CPQ Cloud Migration Center. Granular Migration of Product Family, Line, and Model Elements - In 2017 R2, CPQ introduced granular migration of Configuration product families, product lines, and models. CPQ Cloud Release 18A extends this functionality by supporting the migration of Configuration elements within product families, product lines, and models. Cancel In-Progress Migrations - This feature provides the functionality to cancel in-progress migrations and allows administrators to abort a large migration rather than waiting for it to finish and reverting to a snapshot. Cross Version Migration - This feature allows partners to develop and distribute CPQ content to other major versions of CPQ with compatible features. Cross Version Migration reduces the requirement to maintain multiple version-specific packages. By removing the version restriction, packages become a more valuable feature. Granular Migration of Product Family, Line, and Model Elements In prior releases, administrators were limited to migrating Configuration data at the product family, product line, or model level. Now, administrators can select individual elements within a Product Family, Product Line, or Model by clicking into a Product Family and using checkboxes to indicate their selection. 25
26 Details Pane Showing Expanded Product Family, Product Line, and Model Elements SUPPORTED ELEMENTS This enhancement supports migration of elements between sites, addition or removal of elements from packages, and the ability to de-select elements when importing a migration package. The following table indicates which elements are supported for migration. Supported Elements Within All Product Families Product Family Details Within a Product Family Within a Product Line Product Line Details Model Details Associated Files Bill of Materials Within a Model BOM Mappings Configurable Attribute Calculators Configurable Attributes Configuration Flows Constraints 26
27 External Configurations Hiding Attributes Integrations Prices Recommendations Recommended Items Rule Summaries Search Flows Stylesheets IMPORTANT: If necessary dependencies are not included in the migration, the migration may fail. IMPORTANT: As in other migration scenarios, administrators can undo the migration of granular objects by performing a rollback. For additional information, refer to the Rollbacks and Snapshots topic in the CPQ Cloud Administration Online Help. Cancel In-Progress Migration Migrations can take varying lengths of time depending on the size and complexity of an implementation. In prior releases, there was no way to stop the migration once a migration was initiated. CPQ Cloud 18A provides the ability to cancel in-process migrations. When a migration is processing, a Cancel button is available to the user. When a migration is cancelled, a partial migration will occur. The site will remain in the same state as if the migration failed at its current step. Objects that have been deployed will stay deployed and objects that have not been deployed will be reverted. Perform the following steps to cancel an in-progress migration: 1. Navigate to the Admin Home page. Migration Logs 2. Click Logs in the Utilities section. The Migration Logs page opens. 27
28 Migration Logs 3. Click Cancel. A confirmation pop-up window will open. 4. Click OK. IMPORTANT: As in other migration scenarios, administrators can undo the migration by performing a rollback. For additional information, refer to the Rollbacks and Snapshots topic in the CPQ Cloud Administration Online Help. Cross Version Migration Cross Version Migration allows partners to develop and distribute CPQ content to other major versions of CPQ with compatible features. When an administrator attempts to upload a migration package: The upload fails when the package is from a higher major version than the Site version. The package uploads as expected when the package is from the same major version as the Site version. Compatibility is validated as follows when a package version is from a lower major version than the Site version: If the package is from a version after or the same as the compatible version, the package will upload as expected. If the package is from a version prior to the compatible version, the package upload will fail. Compatibility is shown when a package is uploaded. A green checkmark indicates the package is compatible, a red indicates the package is incompatible. Incompatible versions will also display an "Incompatible Version" message. For example: In the following image, an Incompatible Version message is displayed for the Package Migration item. 28
29 Incompatible Version STEPS TO ENABLE No steps are required to enable this feature. BMQL ENHANCEMENTS TO SUPPORT JOIN CLAUSES CPQ Cloud Release 18A provides BMQL JOIN clause functionality. BMQL now supports ANSI Standard SQL syntax for JOIN clauses, standard aliasing is now supported in SELECT and FROM clauses, and the existing ORDER BY operation has been enhanced to allow joined columns. Support ANSI Standard SQL Syntax for JOIN Clause This feature supports the ANSI standard SQL syntax for JOIN clauses. A JOIN clause combines rows from two or more tables, based on a related column between them. BMQL supports the following JOIN types: INNER JOIN returns records that have matching values in the referenced tables. LEFT OUTER JOIN returns all records from the left table, and matched records from the right table. RIGHT OUTER JOIN returns all records from the right table, and matched records from the left table. JOIN TWO TABLES Administrators can join tables using SELECT statements containing FROM and JOIN clauses. The JOIN clause can reference multiple columns from either table. For example: the following statement returns records from "Products" and "Orders" tables that have matched data in the "ProductId" field. SELECT Order.OrderId, Products.ProductId, Products.Name, Products.UnitPrice FROM Products INNER JOIN Orders ON P IMPORTANT: At least one joined column must be indexed otherwise errors will occur. JOIN MULTIPLE TABLES JOIN clauses can also be used to join multiple tables. For example: the following statement uses LEFT OUTER JOIN and INNER JOIN to return from "Products", "Orders", and "Customers" tables. SELECT Orders.OrderId, Products.ProductId, Products.Name, Products.CustomerFilter, Customers.Name, Orders.Price FRO DOTTED NOTATION 29
30 Dotted notation is used to select specific fields from different tables. If the column name is unique, just the column name can be referenced without using dotted notation. For example: the following statement references the unique "Name" column. SELECT Orders.OrderId, Products.ProductId, Name, Products.UnitPrice FROM Products INNER JOIN Orders ON Products.P IMPORTANT: Even though unique names can be used without dotted notation, best practice is to use dotted notation whenever two or more tables are referenced in a BMQL query. Enhanced ORDER BY Operation Previously, BMQL only supported ORDER BY clauses in simple queries without dotted notation. CPQ Cloud 18A enhances the ORDER BY clause to support JOIN clauses, statements with dotted notation, and statements without dotted notation that reference unique columns in BMQL. ORDER BY SUPPORT FOR JOIN CLAUSE ORDER BY clauses now support BMQL RIGHT OUTER JOIN, LEFT OUTER JOIN, and INNER JOIN. For example: the following statement sorts the returned JOIN results using the "Price" column. SELECT Orders.OrderId, Products.ProductId, Products.Name, Products.UnitPrice, Orders.Quantity, Orders.Price FROM Pro ORDER BY WITH DOTTED NOTATION Columns can be sorted using the ORDER BY clause and dotted notation. For example: the following statement sorts the returned JOIN results in descending order using the "Product " table "ProductId" column. SELECT Orders.OrderId, Products.ProductId, Products.Name, Products.UnitPrice, Orders.Quantity, Order.Price FROM Prod IMPORTANT: ORDER BY can be used without dotted notation if the column name is unique. IMPORTANT: An error message is generated when a column is specified in ORDER BY without dotted notation and that column name exists in more than one table being referenced in the BMQL query. SORT BY COLUMNS Multiple columns can be sorted using the ORDER BY clause. For example: the following statement sorts the returned JOIN results by "Orders.CustomerId", then "Orders.Date" in descending order. SELECT Orders.OrderId, Orders.CustomerId, Products.ProductId, Products.Name, Products.UnitPrice, Orders.Quantity, Ord Alias Support for SELECT and FROM Clauses CPQ Cloud 18A provides ANSI SQL JOIN support with aliasing in SELECT and FROM clauses. SQL aliases are used to give a table or a column a temporary name. Aliases are often used to make column names more readable. Aliases only exist for the duration of the query. For example: the following statement the column names for the returned results table will be renamed as "emplastname" instead of "T1.lastname", etc. SELECT Orders.OrderId, Orders.CustomerId, Products.ProductId, Products.Name, Products.UnitPrice, Orders.Quantity, Ord STEPS TO ENABLE 30
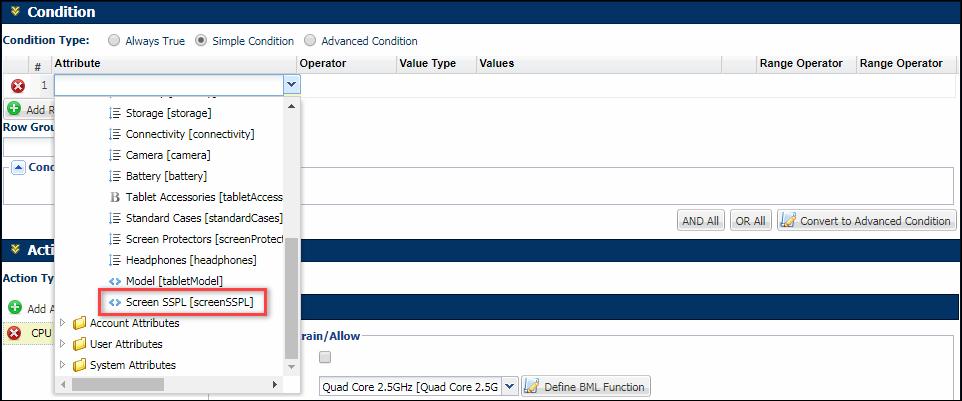
31 BMQL Enhancements to Support JOIN Clauses are automatically available on CPQ Cloud 18A sites. KEY RESOURCES Refer to the CPQ Cloud Administration Online Help for additional information. SINGLE SELECT PICK LIST ENHANCEMENTS A Single Select Pick List (SSPL) is an attribute type created in Configuration for Text, Integer, and Float data types. Administrators manage the domain of values for a Single Select Pick List attribute within a defined resource (e.g. Data Tables or Configuration arrays). As part of continuous improvements to Single Select Pick Lists, administrators can now use SSPL attributes as Simple Condition and Advanced Condition inputs for Configuration rules. Administrators can also reference SSPL attributes when defining BML Functions for Configuration rule Actions. This enhancement supports Recommendations, Constraints, Hiding Attributes, Prices, Bill of Materials, Recommended Items, and Configuration Flows. IMPORTANT: Single Select Pick Lists are not supported in Item Mapping conditions for BOM Mapping rules. As in prior releases, rules enable the customer to set specific configuration information for their products. For example: Rules can be used to suggest configuration values to buyers, hide Configuration attributes from certain user types, recommend items to buyers, prevent buyers from selecting constrained values of configuration attributes, and display additional price information. When administrators set up a Configuration rule, they define the condition that specifies when a rule should run. There are three options: Always True, Simple Condition, and Advanced Condition. "Always True" will fire the rule automatically because a specific condition does not need to be met. "Simple Condition" will fire the rule based on condition attribute values defined by the administrator. "Advanced Condition" will fire the rule based on an advanced function written with BML. Use SSPL Attributes in Simple Condition Inputs for Configuration Rules In CPQ Cloud 18A, administrators can use Single Select Pick List attributes in Simple Condition inputs for Configuration rules. Complete the following steps to define a Simple Condition using a SSPL attribute: 1. Navigate to the Admin Home page. 2. Under Products, click Catalog Definition. The Supported Products page opens. 3. From the Navigation menu, select the appropriate rule type. 4. Click List. The appropriate rule list page opens. 5. Click Add. The new rule type page opens. 6. In the Name field, enter a name for the rule. 7. Click in the Variable Name field to auto-populate the field. 8. Select Simple Condition as the Condition Type. 31
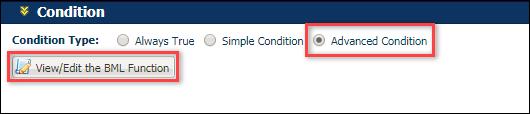
32 9. Click Add Row. 10. In the Attribute field, select the SSPL attribute to define as a condition for the rule. Select SSPL Attribute as a Simple Condition Input 11. Select the Operator. 12. Select the Value Type. 13. Type the condition value in the Values field. IMPORTANT: Operators for text SSPLs are Equals, Not Equals, Starts With, Not Starts With, Ends With, Not Ends With, Contains, and Not Contains. Operators for integer and float SSPLs are>, >=, <, <=, Equals and Not Equals. IMPORTANT: When the Value Type is "Attribute", Values can be another SSPL attribute. Use SSPL Values in Advanced Condition Inputs for Configuration Rules In CPQ Cloud 18A, administrators can use Single Select Pick List attributes in Advanced Condition inputs for Configuration rules. The advanced function is meant for complex condition logic. Complete the following steps to define an Advanced Condition using a SSPL attribute: 1. Navigate to the Admin Home page. 2. Under Products, click Catalog Definition. The Supported Products page opens. 3. From the Navigation menu, select the appropriate rule type. 4. Click List. The appropriate rule list page opens. 5. Click Add. The new rule type page opens
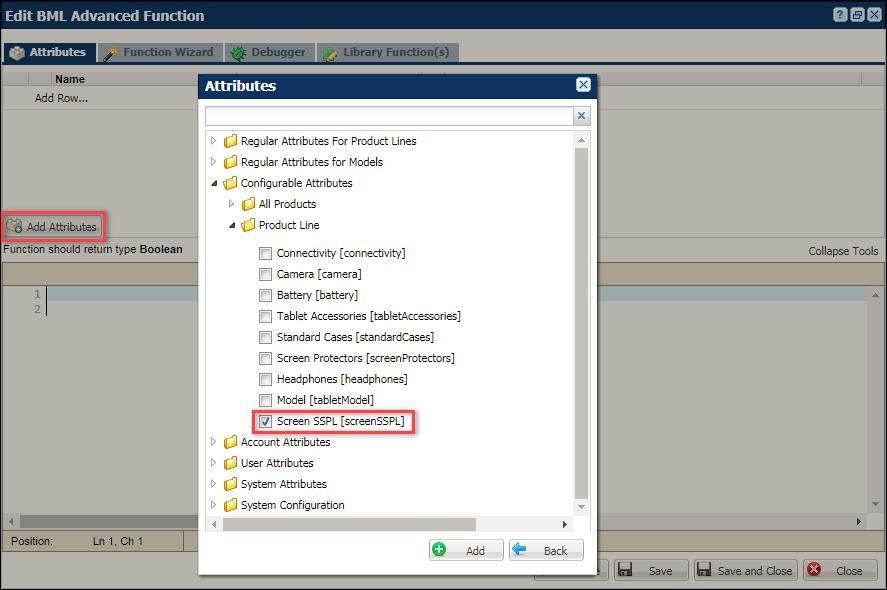
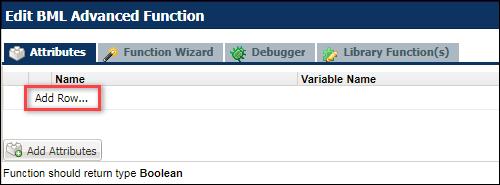
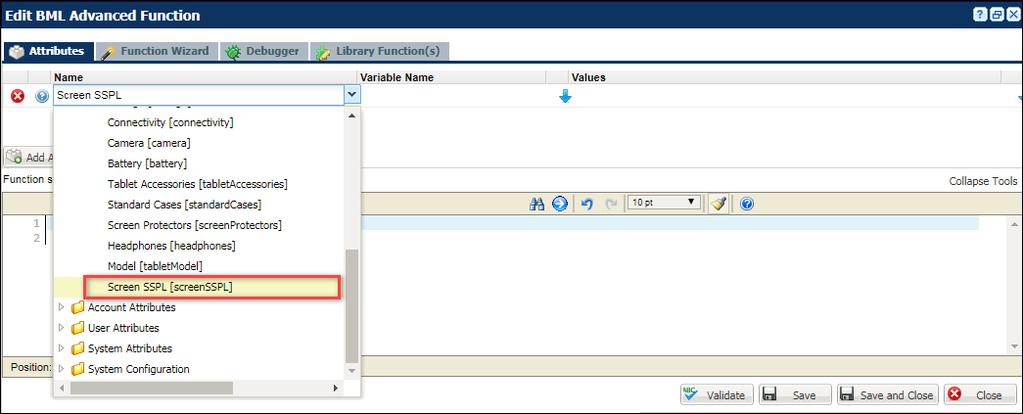
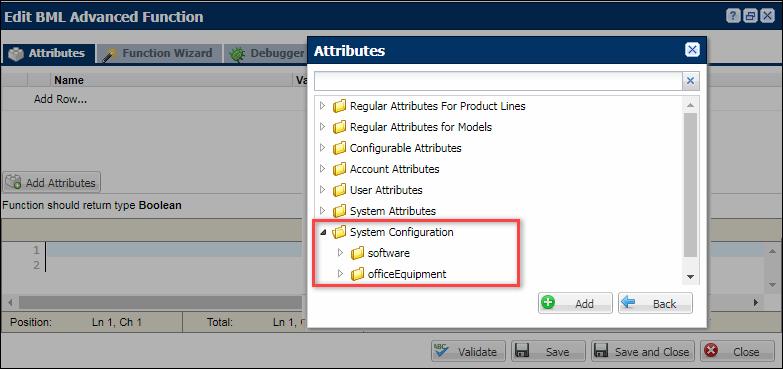
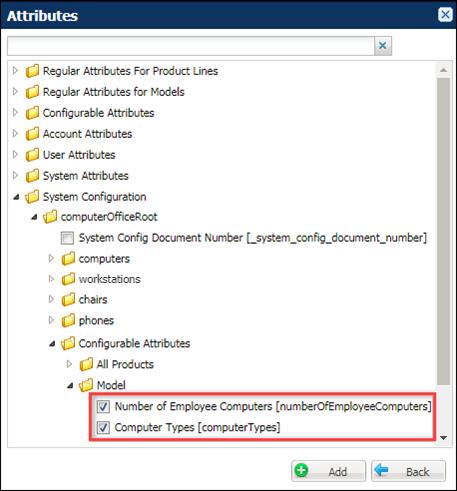
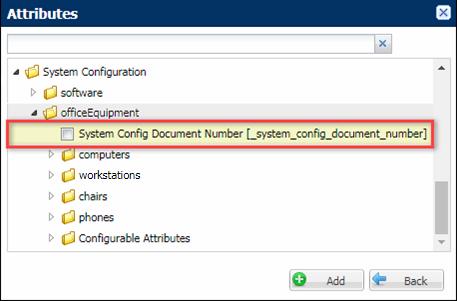
33 6. In the Name field, enter a name for the rule. 7. Click in the Variable Name field to auto-populate the field. 8. Select Advanced Condition as the Condition Type. Access BML Function Editor for Advanced Condition 9. Click View/Edit the BML Function to access the Function Editor. 10. Choose one of the following options to select SSPL attributes: "Add Attributes" Option Click Add Attributes, and then choose the appropriate Single Select Pick List from the Attributes pop-up. Select SSPL Attribute from 'Add Attributes' Pop-up Window "Add Row" Option Click Add Row in the BML Function Editor. 33
34 Add Attributes Row Click inside the Name field, and then choose the appropriate Single Select Pick List attribute from the drop-down menu. Select SSPL Attribute from 'Name' Field Drop-down Menu Use SSPL Attributes in Advanced BML Functions for Configuration Rule Actions The functionality to select SSPL attributes within Advanced BML Functions is also available for Configuration rule Actions. When an administrator selects Define BML Function within a Configuration rule Action the BML Function Editor will open. The administrator then selects Add Attributes or Add Row to select SSPL attributes to use in the BML script. Refer to Step 10 in the Use SSPL Values in Advanced Condition Inputs for Configuration Rules section to view examples. STEPS TO ENABLE Single Select Pick List enhancements are automatically available on CPQ Cloud 18A sites. TIPS AND CONSIDERATIONS Consider the following tips when using the Single Select Pick List enhancements. Single Select Pick Lists are not supported in Item Mapping conditions for BOM Mapping rules. KEY RESOURCES Refer to the CPQ Cloud Administration Online Help for additional information. 34
35 DOCUMENT DESIGNER ENHANCEMENTS Document Designer is a drag and drop tool for creating and administering document templates. As part of continuing improvements to Document Designer, the following enhancements are available in CPQ Cloud Release 18A: Dynamically Embed External Documents Nested Tables Additional Document Designer e-signature Attributes Dynamically Embed External Documents In prior releases, administrators used the Document Designer Embed Document element to merge content from external PDF documents and content from RTE/HTML attributes with the output document. While sufficient for document merging when conditional logic is at the Transaction header level, limitations occur when factoring in Transaction line items.for example: Administrators could only merge one document using the Embed Document element. As a result, they were required to put a condition on each instance of the element to ensure the document was merged only when the condition was true, which is usually to validate if a certain product is present in the Transaction. CPQ Cloud Release 18A simplifies the process by allowing administrators to merge multiple external documents with the output document using a Document Map Attribute option in the Embed Document element. By dynamically embedding a document on the Transaction line item level, customers can select documents to include in the output file based on the products in the current Transaction. DISPLAY EMBEDDED DOCUMENT REFERENCES IN TRANSACTION Administrators can use a single select menu, multi-select menu, text area, or text field to display embedded document references in a Transaction. When setting up a single select menu or a multi-select menu to display embedded document references in a Transaction, the URL value comes from the variable name of the single select or multi-select menu. A unique variable name is required. As a result, administrators cannot enter more than one document with the same URL. URLs within the Commerce attribute in use have a semi-colon delimiter. The document URLs are merged from the text or menu attribute and all documents present in the attribute are merged with the output file. IMPORTANT: Files from File Manager are listed in the following format: FILEMANAGER#<file_name.pdf>. Multiple files are separated by a semicolon. IMPORTANT: Only PDF files are supported and should be present in the setup. Merging occurs only for PDF formats and fails for other formats, such as DOC. 35
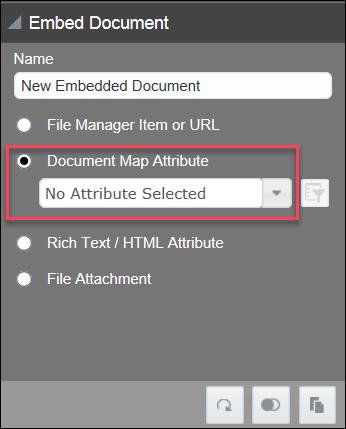
36 Multi-Select Menus Displaying Embedded Document References on Transaction Line Item Level ADD A DOCUMENT MAP ATTRIBUTE If sales representatives want to send a customer information about products in a Transaction, they can do so by adding a single Embed Document element with a Document Map Attribute to a Document Designer template. This allows them to preview and produce multiple documents based on one Document Map Attribute populated in the Transaction. In prior releases, administrators had to embed multiple Embed Document elements in the layout and apply conditions to each to achieve the same functionality. Administrators must add an Embed Document element with a Document Map Attribute to a Document Designer template. The Document Map Attribute must reference a text or menu attribute at the Transaction line item level. To accomplish this, a Document Map Attribute option is available in the Embed Document panel. By default, the drop-down menu displays only Transaction attributes of the Text and Menu type. From the dropdown menu, administrators must select a specific attribute to include in the template. 36
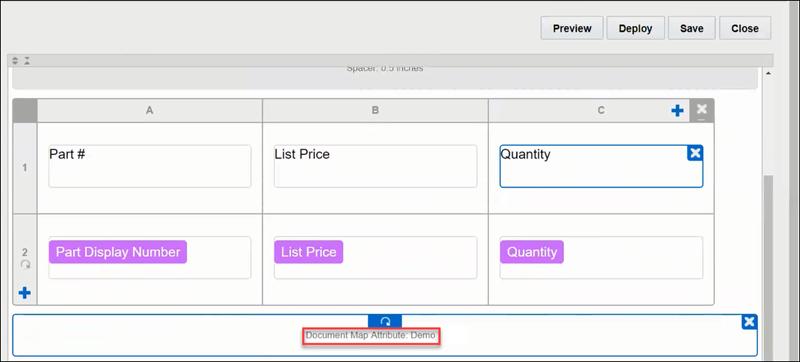
37 Document Map Attribute Option in Embed Document Panel The following screenshot shows a Document Map Attribute (below the table) as it appears in Document Editor. Document Map Attribute in Document Editor IMPORTANT: If an Embed Document element is properly placed inside a looped section, the Document Map Attribute will also display Transaction line attributes of the Text and Menu type. IMPORTANT: When an Embed Document element contains a Document Map Attribute that is a Transaction line attribute, administrators can drag and drop the Embed Document element inside other looped sections. IMPORTANT: Administrators can copy and paste a section containing a Document Map Attribute. 37
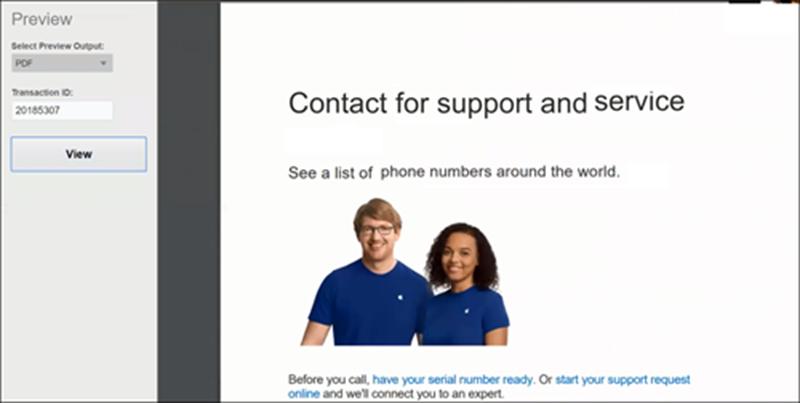
38 IMPORTANT: Administrators can copy and paste a section containing a Document Map Attribute. IMPORTANT: A Custom Variable is available in the Document Map Attribute drop-down. Once selected, a text field opens and allows the entry of a global SL variable. Only one SL variable is allowed, but it can contain multiple documents as long as they are separated by a semicolon. Unsupported file types (everything other than PDF) are ignored. FILTER THE DOCUMENT MAP ATTRIBUTE As shown below, a filter for the Document Map Attribute is available in the Embed Document panel. Document Map Attribute Filter Upon clicking the filter button, a Conditional dialog opens and allows administrators to apply a condition to the Document Map Attribute. This narrows the number of documents merged in the output file and when previewing the output file in Document Designer. When no filter is applied, the output file will contain everything from the related Commerce text or menu attribute. Conditional Dialog 38
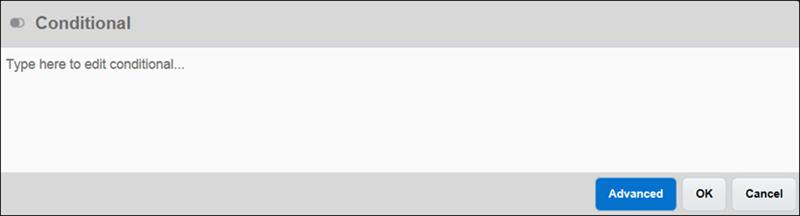
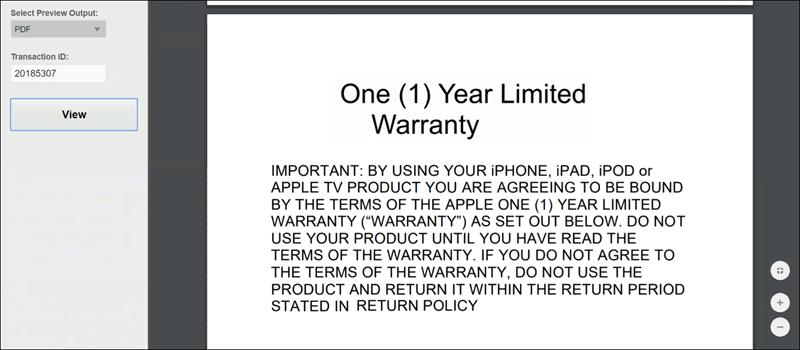
39 IMPORTANT: The filter allows administrators to use a new "_currentindexvalue" variable in the filter. Like any SL, it must have a "$" before the variable name. For example: $_currentindexvalue IMPORTANT: The variable is not visible or available outside of the Document Map Attribute filter. VIEW OUTPUT FILE Administrators can view the Document Designer output file containing the merged external documents when previewing the output file. Any filter applied to the Document Map Attribute is reflected in the merged output file. Sample Output File - Warranty Document Embedded in Transaction Sample Output File - Extended Warranty Document Embedded in Transaction 39
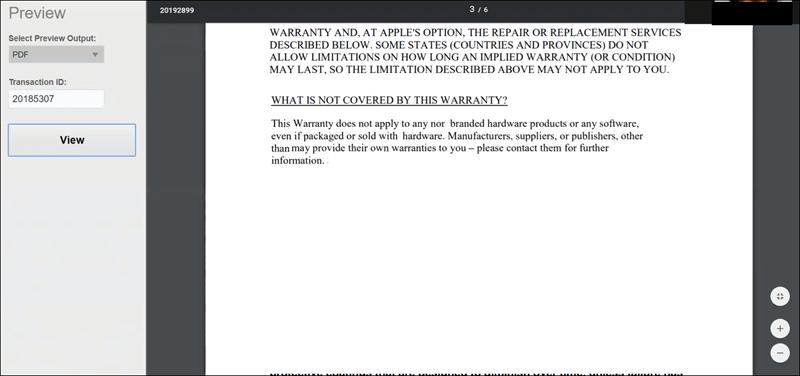
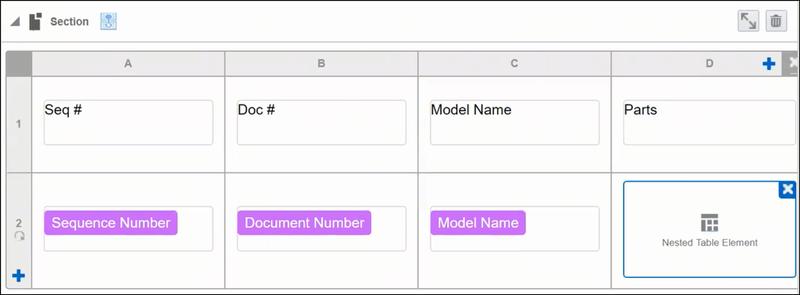
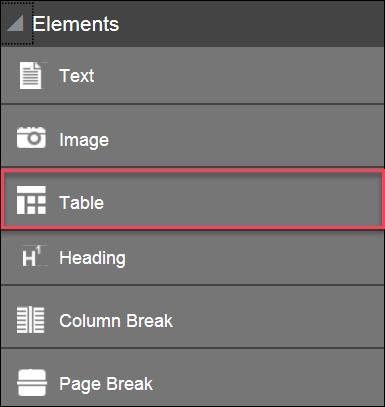
40 Sample Output File - Contact Document Embedded in Transaction Nested Tables Add nested tables within tables, enabling the display of hierarchical information in the output document. For example: Using nested tables, customers can create a quote format that includes a table within a table structure. They can create a table of configurations, where each configuration displays a table of products grouped and sub-totaled by product type (e.g. hardware, software, maintenance). Nested Table in Document Editor IMPORTANT: Nested tables are available in both Document Designer and Designer. ADD A NESTED TABLE Administrators can add a nested table within a table by selecting a table cell and performing one of the following actions: Double click the Table element in the Elements pane Drag the Table element from the Elements pane to a cell within an existing table Click the Table icon on the Palette 40
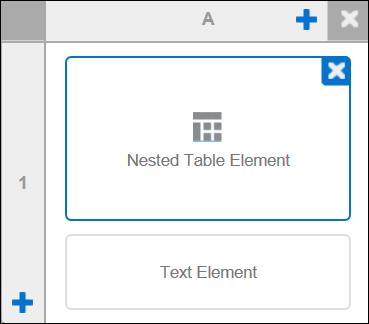
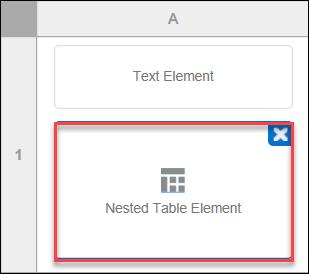
41 Table Element in Elements Pane Table Icon in Document Editor Palette Once a nested table is added, the parent cell populates with "Nested Table Element" text. 41
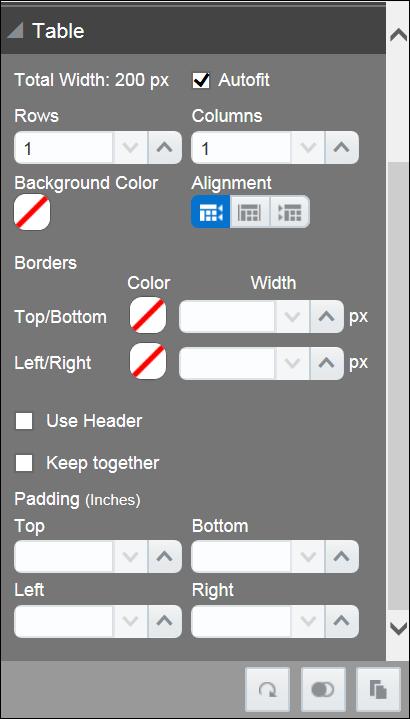
42 Nested Table Element in Parent Cell IMPORTANT: After merging parent table cells, administrators can add a nested table. IMPORTANT: Multiple nested tables are allowed in a single table cell. IMPORTANT: Nesting a table inside another nested table is not supported. IMPORTANT: Administrators can delete a nested table by hovering over it and clicking on the displayed. IMPORTANT: Administrators can move a nested table to another cell of the parent table. EDIT NESTED TABLE PROPERTIES Administrators can open a nested table for editing by double clicking the Nested Table Element. This opens the Table pane where administrators can edit the table properties. 42
43 Table Properties IMPORTANT: Nested tables inherit the properties of their parent table, including Background Color and Borders. IMPORTANT: The Autofit setting is a default setting for both nested tables and their parent table. Oracle recommends enabling the Autofit setting on the nested table to prevent the nested table's content from overflowing and cutting out from the output document if the total column width exceeds the parent cell's column width. VIEW A NESTED TABLE IN FULL VIEW MODE 43
44 Administrators can view a nested table in Full View Mode by double clicking the Nested Table Element. Double Click Parent Cell to Open Full View Mode Exit Full View Mode by Clicking Link IMPORTANT: "Section" (referenced above) refers to the default name of the section where the nested table is located. The name changes to whatever the administrator names the section. IMPORTANT: If a parent table is located in the header, footer, or body of the template, the link will reflect this. For example: Header > Table > Nested Table. IMPORTANT: In Full View Mode, administrators can delete a nested table by hovering over it and clicking on the displayed "". IMPORTANT: Administrators can exit Full View Mode and return to the parent table by clicking the link or the Return to Layout icon (both outlined above in red). APPLY CONDITIONS AND LOOPS TO A NESTED TABLE Administrators can loop over and apply conditions to nested tables. 44
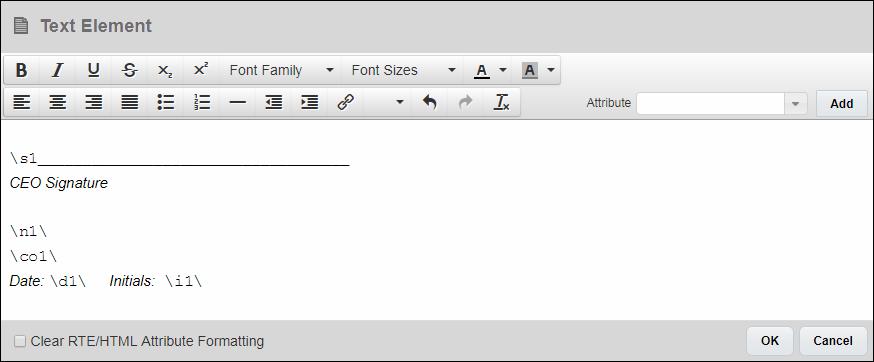
45 IMPORTANT: Administrators can create a simple or advanced loop over a nested table in Document Designer. Only simple loops over nested tables are supported in Designer. IMPORTANT: Creating a loop over a nested table looks and operates the same as creating a loop over a parent table. Additional Document Designer e-signature Attributes Previously CPQ Cloud - DocuSign Integration only supported the signature tags. CPQ Cloud 18A provides support for additional esignature tags defined in DocuSign. This allows customers to define standard and custom tags (e.g. Name, Company, Date Signed, Initials, etc.). Each tag defined in the DocuSign application has associated anchor text, which can be placed in a Document Designer Text Element. When a signature is requested and the document is sent to DocuSign, DocuSign interprets the anchor tags as the locations where a user can provide the relevant information. For example: the following image illustrates anchor text for Name \n1\, Company \co1\,date Signed \d1\, and Initials \i1\, where "1" represents the signer number. Document Designer Text Element with Additional esignature Tags STEPS TO ENABLE The Document Designer enhancements are automatically available on CPQ Cloud 18A sites. TIPS AND CONSIDERATIONS Consider the following tips when using the enhancements available in CPQ Cloud 18A. When using nested tables, the parent cell displays "!" in the top left corner when the nested table contains errors. When administrators create documents using nested tables and the nested table content exceeds the page size, the content is clipped in the resulting DOC document. The DOC recipient can select the table, go to table properties, and select "Allow row to break across" in row settings to show the clipped content. This applies to both the nested table and the parent table. KEY RESOURCES CPQ Cloud Administration Online Help 45
Oracle CPQ Cloud Release 18B. What s New
 Oracle CPQ Cloud Release 18B What s New TABLE OF CONTENTS Revision History 3 Overview 3 Feature Summary 3 CPQ Cloud Overview 4 Modern Selling Experience 5 Line Item Grid Enhancements 5 Accessibility Enhancements
Oracle CPQ Cloud Release 18C. What s New
 Oracle CPQ Cloud Release 18C What s New TABLE OF CONTENTS Revision History 3 Overview 3 Feature Summary 3 Oracle CPQ Cloud 4 Modern User Experience 4 JET Responsive Transaction UI 5 Accessibility Enhancements
Oracle CPQ Cloud. What s New in 2017 R1
 Oracle CPQ Cloud What s New in 2017 R1 May 2017 1 TABLE OF CONTENTS REVISION HISTORY... 5 OVERVIEW... 6 Give Us Feedback... 6 RELEASE FEATURE SUMMARY... 7 MODERN SELLING EXPERIENCE... 8 DEAL NEGOTIATION...
Management Reports Centre. User Guide. Emmanuel Amekuedi
 Management Reports Centre User Guide Emmanuel Amekuedi Table of Contents Introduction... 3 Overview... 3 Key features... 4 Authentication methods... 4 System requirements... 5 Deployment options... 5 Getting
Oracle Express CPQ for Salesforce.com. What s New in Summer 15
 Oracle Express CPQ for Salesforce.com What s New in Summer 15 8 June 2015 TABLE OF CONTENTS OVERVIEW... 3 Give Us Feedback... 3 POST-UPGRADE REQUIREMENTS... 3 PRE-UPGRADE TESTING... 4 RELEASE FEATURE SUMMARY...
Adobe Document Cloud esign Services. for Salesforce Version 17 Installation and Customization Guide
 Adobe Document Cloud esign Services for Salesforce Version 17 Installation and Customization Guide 2015 Adobe Systems Incorporated. All rights reserved. Last Updated: August 28, 2015 Table of Contents
User Guide. Web Intelligence Rich Client. Business Objects 4.1
 User Guide Web Intelligence Rich Client Business Objects 4.1 2 P a g e Web Intelligence 4.1 User Guide Web Intelligence 4.1 User Guide Contents Getting Started in Web Intelligence 4.1... 5 Log into EDDIE...
Oracle CPQ Cloud. What s New in 2015 R2
 Oracle CPQ Cloud What s New in 2015 R2 December 2015 Revised: February 2016 TABLE OF CONTENTS REVISION HISTORY... 4 OVERVIEW... 5 RELEASE FEATURE SUMMARY... 6 EASY ADMINISTRATION... 7 Single Select Pick
Oracle Adapter for Salesforce Lightning Winter 18. What s New
 Oracle Adapter for Salesforce Lightning Winter 18 What s New TABLE OF CONTENTS REVISION HISTORY... 3 OVERVIEW... 4 RELEASE FEATURE SUMMARY... 5 PRE-UPGRADE CONSIDERATIONS... 6 POST-UPGRADE REQUIREMENTS...
Oracle CPQ Cloud. What s New in 2016 R2
 Oracle CPQ Cloud What s New in 2016 R2 December 2016 Revised: March 2017 TABLE OF CONTENTS REVISION HISTORY... 4 OVERVIEW... 5 Give Us Feedback... 5 RELEASE FEATURE SUMMARY... 6 MODERN SELLING EXPERIENCE...
Using Sitecore 5.3.1
 Using Sitecore 5.3.1 An End-User s Guide to Using and Administrating Sitecore Author: Sitecore Corporation Date: December 12, 2007 Release: Rev. 1.0 Language: English Sitecore is a registered trademark.
Oracle Policy Automation The modern enterprise advice platform
 Oracle Policy Automation The modern enterprise advice platform Release features and benefits (November 2017) v1.01 Program agenda 1 2 3 Overview of Oracle Policy Automation New features in release For
Oracle CPQ Cloud for Salesforce.com
 Oracle CPQ Cloud for Salesforce.com What's New in Spring 15 9 March 2015 TABLE OF CONTENTS TABLE OF CONTENTS... 2 OVERVIEW... 3 POST-UPGRADE REQUIREMENTS... 3 RELEASE FEATURE SUMMARY... 4 CONFIGURATION...
Oracle Express CPQ for Salesforce.com. What s New in Spring 16
 Oracle Express CPQ for Salesforce.com What s New in Spring 16 February 2016 Revised: June 2016 TABLE OF CONTENTS REVISION HISTORY... 3 OVERVIEW... 4 Give Us Feedback... 4 POST-UPGRADE REQUIREMENTS... 5
File: SiteExecutive 2013 Core Modules User Guide.docx Printed September 30, 2013
 File: SiteExecutive 2013 Core Modules User Guide.docx Printed September 30, 2013 Page i Contact: Systems Alliance, Inc. Executive Plaza III 11350 McCormick Road, Suite 1203 Hunt Valley, Maryland 21031
Microsoft How to Series
 Microsoft How to Series Getting Started with EXCEL 2007 A B C D E F Tabs Introduction to the Excel 2007 Interface The Excel 2007 Interface is comprised of several elements, with four main parts: Office
QRG: Using the WYSIWYG Editor
 WYSIWYG Editor QRG: Using the WYSIWYG Editor WYSIWYG stands for What You See Is What You Get. The WYSIWYG Editor is the reason you don t need to be an IT Programmer to write content for your web page.
2013, Active Commerce 1
 2013, Active Commerce 1 2013, Active Commerce 2 Active Commerce User Guide Terminology / Interface Login Adding Media to the Media Library Uploading an Item to the Media Library Editing the Media Meta
Selectica Contract Lifecycle Management. Release Notes. Selectica CLM Release 6.1. January 2014 v3.0
 Selectica Contract Lifecycle Management Release Notes Selectica CLM Release 6.1 January 2014 v3.0 Selectica CLM R.6.1 Release Notes Introduction... 3 Notable Changes... Error! Bookmark not defined. Certification
User Manual. Administrator s guide for mass managing VirtueMart products. using. VM Mass Update 1.0
 User Manual Administrator s guide for mass managing VirtueMart products using VM Mass Update 1.0 The ultimate product management solution for VirtueMart! Contents Product Overview... 3 Feature List...
Modern Requirements4TFS 2018 Release Notes
 Modern Requirements4TFS 2018 Release Notes Modern Requirements 3/7/2018 Table of Contents 1. INTRODUCTION... 3 2. SYSTEM REQUIREMENTS... 3 3. APPLICATION SETUP... 3 GENERAL... 4 1. FEATURES... 4 2. ENHANCEMENT...
A Guide to Quark Author Web Edition 2015
 A Guide to Quark Author Web Edition 2015 CONTENTS Contents Getting Started...4 About Quark Author - Web Edition...4 Smart documents...4 Introduction to the Quark Author - Web Edition User Guide...4 Quark
BeetleEye Application User Documentation
 BeetleEye Application User Documentation BeetleEye User Documentation 1 Table of Contents Welcome to the BeetleEye Application... 6 Overview... 6 Navigation... 6 Access BeetleEye... 6 Update account information...
DocuSign for Salesforce User Guide v6.1.1 Published: July 10, 2015
 DocuSign for Salesforce User Guide v6.1.1 Published: July 10, 2015 Copyright Copyright 2003-2015 DocuSign, Inc. All rights reserved. For information about DocuSign trademarks, copyrights and patents refer
Oracle Exam 1z0-436 Oracle BigMachines CPQ Cloud Service 2016 Implementation Essentials Version: 6.1 [ Total Questions: 77 ]
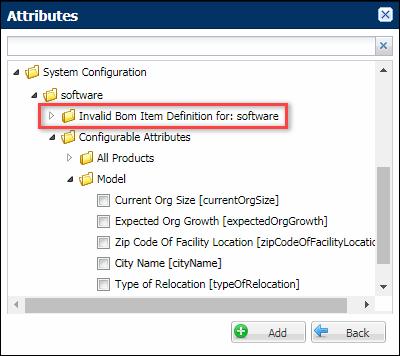
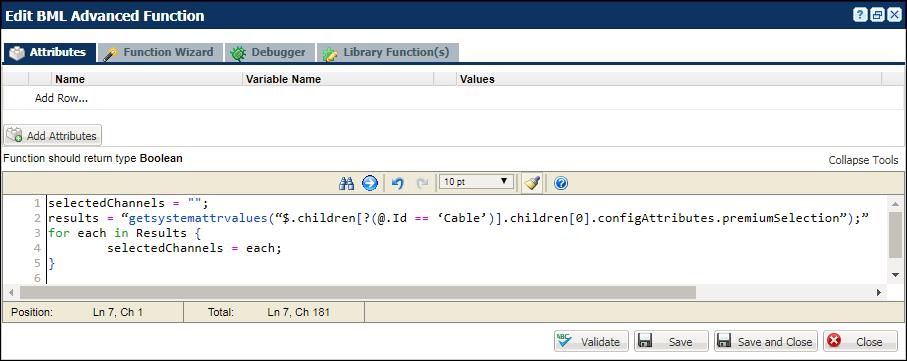
![Oracle Exam 1z0-436 Oracle BigMachines CPQ Cloud Service 2016 Implementation Essentials Version: 6.1 [ Total Questions: 77 ]](/thumbs/95/124579973.jpg "Oracle Exam 1z0-436 Oracle BigMachines CPQ Cloud Service 2016 Implementation Essentials Version: 6.1 [ Total Questions: 77 ]") s@lm@n Oracle Exam 1z0-436 Oracle BigMachines CPQ Cloud Service 2016 Implementation Essentials Version: 6.1 [ Total Questions: 77 ] Question No : 1 How do you restrict a user from a manually adding or
s@lm@n Oracle Exam 1z0-436 Oracle BigMachines CPQ Cloud Service 2016 Implementation Essentials Version: 6.1 [ Total Questions: 77 ] Question No : 1 How do you restrict a user from a manually adding or
UTAS CMS. Easy Edit Suite Workshop V3 UNIVERSITY OF TASMANIA. Web Services Service Delivery & Support
 Web Services Service Delivery & Support UNIVERSITY OF TASMANIA UTAS CMS Easy Edit Suite Workshop V3 Web Service, Service Delivery & Support UWCMS Easy Edit Suite Workshop: v3 Contents What is Easy Edit
Embarcadero PowerSQL 1.1 Evaluation Guide. Published: July 14, 2008
 Embarcadero PowerSQL 1.1 Evaluation Guide Published: July 14, 2008 Contents INTRODUCTION TO POWERSQL... 3 Product Benefits... 3 Product Benefits... 3 Product Benefits... 3 ABOUT THIS EVALUATION GUIDE...
SpringCM Release Notes. January 2018
 SpringCM Release Notes January 2018 Contents Announcements... 3 Global Navigation header coming in 2018... 3 Redefining the Admin and User Experiences... 4 Workflows... 4 E-Signature Changes... 4 Enhancements...
TABLE OF CONTENTS DOCUMENT HISTORY
 ORACLE TABLE OF CONTENTS DOCUMENT HISTORY 5 UPDATE 18B 5 Revision History 5 Overview 5 Optional Uptake of New Features (Opt In) 6 Update Tasks 6 Feature Summary 7 Core Sales Force Automation 9 Accounts,
Visual Workflow Implementation Guide
 Version 30.0: Spring 14 Visual Workflow Implementation Guide Note: Any unreleased services or features referenced in this or other press releases or public statements are not currently available and may
Colligo Engage Outlook App 7.1. Connected Mode - User Guide
 7.1 Connected Mode - User Guide Contents Colligo Engage Outlook App 1 Benefits 1 Key Features 1 Platforms Supported 1 Installing and Activating Colligo Engage Outlook App 2 Checking for Updates 3 Updating
A Guide to Quark Author Web Edition October 2017 Update
 A Guide to Quark Author Web Edition 2015 - October 2017 Update Contents Getting Started...1 Smart Documents...1 Introduction to the Quark Author Web Edition User Guide...1 Quark Author Web Edition configuration...1
User Guide. Version Exago Inc. All rights reserved.
 User Guide Version 2016.2 2016 Exago Inc. All rights reserved. Exago Reporting is a registered trademark of Exago, Inc. Windows is a registered trademark of Microsoft Corporation in the United States and
GOOGLE APPS. If you have difficulty using this program, please contact IT Personnel by phone at
 : GOOGLE APPS Application: Usage: Program Link: Contact: is an electronic collaboration tool. As needed by any staff member http://www.google.com or http://drive.google.com If you have difficulty using
Kendo UI. Builder by Progress : Using Kendo UI Designer
 Kendo UI Builder by Progress : Using Kendo UI Designer Copyright 2017 Telerik AD. All rights reserved. December 2017 Last updated with new content: Version 2.1 Updated: 2017/12/22 3 Copyright 4 Contents
BCI.com Sitecore Publishing Guide. November 2017
 BCI.com Sitecore Publishing Guide November 2017 Table of contents 3 Introduction 63 Search 4 Sitecore terms 66 Change your personal settings 5 Publishing basics 5 Log in to Sitecore Editing 69 BCI.com
Griffin Training Manual Grif-WebI Introduction (For Analysts)
") Griffin Training Manual Grif-WebI Introduction (For Analysts) Alumni Relations and Development The University of Chicago Table of Contents Chapter 1: Defining WebIntelligence... 1 Chapter 2: Working with
Griffin Training Manual Grif-WebI Introduction (For Analysts) Alumni Relations and Development The University of Chicago Table of Contents Chapter 1: Defining WebIntelligence... 1 Chapter 2: Working with
RSA WebCRD Getting Started
 RSA WebCRD Getting Started User Guide Getting Started With WebCRD Document Version: V9.2.2-1 Software Version: WebCRD V9.2.2 April 2013 2001-2013 Rochester Software Associates, Inc. All Rights Reserved.
General Training Curriculum
 General Training Curriculum Table of Contents 1.0 Getting Started 1.1 What is MODX? 1.2 Browser Support 1.3 How Do I Log In? 2.0 MODX Dashboard 2.1 What is a Dashboard? 2.2 Global Top Menu Bar 2.2.0 MODX
Contents. Add a Form Element to a Group Box Add a Field to a Form... 22
 Workflow Design Guide Version 17 November 2017 Contents About This Guide... 7 Workflows and Forms Overview... 7 Security Permissions for Workflows and Forms... 8 Search for a Workflow Design, Workflow
Creating Interactive PDF Forms
 Creating Interactive PDF Forms Using Adobe Acrobat X Pro for the Mac University Information Technology Services Training, Outreach, Learning Technologies and Video Production Copyright 2012 KSU Department
A PRACTICAL GUIDE TO USING WIX TO BUILD A WEBSITE
 A PRACTICAL GUIDE TO USING WIX TO BUILD A WEBSITE AN AID TO ENABLE STUDENTS TO UNDERSTAND THE FUNDAMENTELS OF WEBSITE DESIGN WITHIN THE FRAMEWORK OF A WEBSITE PROJECT USING WEB DESIGN TOOLS YANNIS STEPHANOU
7. Apply a Range of Table Features
 Word Processing 5N1358 7. Apply a Range of Table Features Contents Apply a Range of Table Features Including: 1. Creating Tables... 1 2. Resizing... 4 3. Merging Cells... 5 4. Inserting or Deleting columns
See What's Coming in Oracle CPQ Cloud
 See What's Coming in Oracle CPQ Cloud Release 2015 R1 Release Content Document 1 TABLE OF CONTENTS ORACLE CPQ CLOUD... 3 End User Enhancements... 3 Desktop Performance Enhancements... 3 Easy Administration...
Creating & Modifying Tables in Word 2003
 Creating & Modifying Tables in Word 2003 This bookl LaTonya Motley Trainer / Instructional Technology Specialist Staff Development 660-6452 Table of Contents Overview... 1 Inserting Tables... 1 Using Pre-Set
SureClose Product Line March 12, 2010 Release Notes SureClose Product Line Release Notes 1
 SureClose Product Line March 12, 2010 Release Notes 5.7.8.25.7.8.2 SureClose Product Line Release Notes 1 Overview... 3 Post-Installation Considerations... 3 Features and Functionality... 5 New in This
Oracle CPQ Cloud for Salesforce.com
 Oracle CPQ Cloud for Salesforce.com What's New in Summer 14 11 July 2014 TABLE OF CONTENTS TABLE OF CONTENTS... 2 OVERVIEW... 3 RELEASE FEATURE SUMMARY... 4 UPDATING PERMISSION SETS... 5 STEP BY STEP INSTRUCTIONS...
SAP BusinessObjects Live Office User Guide SAP BusinessObjects Business Intelligence platform 4.1 Support Package 2
 SAP BusinessObjects Live Office User Guide SAP BusinessObjects Business Intelligence platform 4.1 Support Package 2 Copyright 2013 SAP AG or an SAP affiliate company. All rights reserved. No part of this
08/10/2018. Istanbul Now Platform User Interface
 08/10/2018 Contents Contents...5 UI16... 9 Comparison of UI16 and UI15 styles... 11 Activate UI16... 15 Switch between UI16 and UI15...15 UI16 application navigator... 16 System settings for the user
Shopping Cart: Queries, Personalizations, Filters, and Settings
 Shopping Cart: Queries, Personalizations, Filters, and Settings on the Shopping Cart Home Page Use this Job Aid to: Learn how to organize the Shopping Cart home page so that it is easier to use. BEFORE
Asset Arena InvestOne
 Asset Arena InvestOne 1 21 AD HOC REPORTING 21.1 OVERVIEW Ad Hoc reporting supports a range of functionality from quick querying of data to more advanced features: publishing reports with complex features
Excel Select a template category in the Office.com Templates section. 5. Click the Download button.
 Microsoft QUICK Excel 2010 Source Getting Started The Excel Window u v w z Creating a New Blank Workbook 2. Select New in the left pane. 3. Select the Blank workbook template in the Available Templates
Contents. Properties: Field Area Fields Add a Table to a Form... 23
 Workflow Design Guide Version 18 February 2018 Contents About This Guide... 7 Workflows and Forms Overview... 7 Security Permissions for Workflows and Forms... 8 Search for a Workflow Design, Workflow
Report Designer Report Types Table Report Multi-Column Report Label Report Parameterized Report Cross-Tab Report Drill-Down Report Chart with Static
 Table of Contents Report Designer Report Types Table Report Multi-Column Report Label Report Parameterized Report Cross-Tab Report Drill-Down Report Chart with Static Series Chart with Dynamic Series Master-Detail
INTRODUCTION... 1 UNDERSTANDING CELLS... 2 CELL CONTENT... 4
 Introduction to Microsoft Excel 2016 INTRODUCTION... 1 The Excel 2016 Environment... 1 Worksheet Views... 2 UNDERSTANDING CELLS... 2 Select a Cell Range... 3 CELL CONTENT... 4 Enter and Edit Data... 4
See What's Coming in Oracle Express CPQ for Salesforce.com
 See What's Coming in Oracle Express CPQ for Salesforce.com Summer 15 Release Content Document 1 TABLE OF CONTENTS OVERVIEW... 3 GENERAL... 3 Basic Setup Page... 3 CONFIGURATION... 4 Blueprint Groups...
User Guide Product Design Version 1.7
 User Guide Product Design Version 1.7 1 INTRODUCTION 3 Guide 3 USING THE SYSTEM 4 Accessing the System 5 Logging In Using an Access Email 5 Normal Login 6 Resetting a Password 6 Logging Off 6 Home Page
Layout and display. STILOG IST, all rights reserved
 2 Table of Contents I. Main Window... 1 1. DEFINITION... 1 2. LIST OF WINDOW ELEMENTS... 1 Quick Access Bar... 1 Menu Bar... 1 Windows... 2 Status bar... 2 Pop-up menu... 4 II. Menu Bar... 5 1. DEFINITION...
DocVerify E-Signature Salesforce Application How to Create a New E-Signature Document. Versions 4.0 and above.
 DocVerify E-Signature Salesforce Application How to Create a New E-Signature Document Versions 4.0 and above www.docverify.com Table of Contents Prerequisites... 3 Step 1 (E-Signature Tab):... 4 Step 2
IHS Enerdeq Desktop International Training Guide
 IHS > Decision Support Tool IHS Enerdeq Desktop International Training Guide May 2009 Version 1.5.2 2009 IHS, All Rights Reserved. All trademarks belong to IHS or its affiliated and subsidiary companies,
User Documentation. Administrator Manual.
 User Documentation Administrator Manual Proposal Software 1140 US Highway 287, Suite 400-102 Broomfield, CO 80020 USA Tel: 203.604.6597 www.proposalsoftware.com Table of Contents Open the WebPro Viewer...
Center for Faculty Development and Support Making Documents Accessible
 Center for Faculty Development and Support Making Documents Accessible in Word 2007 Tutorial CONTENTS Create a New Document and Set Up a Document Map... 3 Apply Styles... 4 Modify Styles... 5 Use Table
ScholarOne Abstracts. Review Administrator Guide
 ScholarOne Abstracts Review Administrator Guide 17-October-2018 Clarivate Analytics ScholarOne Abstracts Review Administrator Guide Page i TABLE OF CONTENTS Select an item in the table of contents to go
RSA WebCRD Getting Started
 RSA WebCRD Getting Started User Guide Getting Started with WebCRD Document Version: V8.1-3 Software Version: WebCRD V8.1.3 June 2011 2001-2011 Rochester Software Associates, Inc. All Rights Reserved. AutoFlow,
Content Author's Reference and Cookbook
 Sitecore CMS 7.2 Content Author's Reference and Cookbook Rev. 140225 Sitecore CMS 7.2 Content Author's Reference and Cookbook A Conceptual Overview and Practical Guide to Using Sitecore Table of Contents
Electronic Grants Administration & Management System - EGrAMS
 Electronic Grants Administration & Management System - EGrAMS Introduction EGrAMS is an enterprise-wide web-based scalable, configurable, business rule driven and workflow based end-to-end electronic grants
Oracle Learn Cloud. What s New in Release 15B
 Oracle Learn Cloud What s New in Release 15B 10 July 2015 TABLE OF CONTENTS OVERVIEW... 3 RELEASE FEATURE SUMMARY... 3 BI REPORTING BETA CUSTOM REPORTING CAPABILITIES... 5 Terminology... 5 New User Permission...
Nintex Reporting 2008 Help
 Nintex Reporting 2008 Help Last updated: Thursday, 24 December 2009 1 Using Nintex Reporting 2008 1.1 Chart Viewer Web Part 1.2 Importing and Exporting Reports 1.3 Import Nintex report page 1.4 Item Level
SharePoint List Booster Features
 SharePoint List Booster Features Contents Overview... 5 Supported Environment... 5 User Interface... 5 Disabling List Booster, Hiding List Booster Menu and Disabling Cross Page Queries for specific List
Expense: Process Reports
 Expense: Process Reports User Guide for Standard Edition Applies to these SAP Concur solutions: Expense Professional/Premium edition Standard edition Travel Professional/Premium edition Standard edition
Printable Help. The complete text of the MLS Online Help
 Printable Help The complete text of the MLS Online Help Updated June 12, 2017 Table of Contents Table of Contents 2 Accessing the MLS 11 Access Edge MLS from a Mobile Device 11 Log On or Off the MLS 11
EXCEL 2003 DISCLAIMER:
 EXCEL 2003 DISCLAIMER: This reference guide is meant for experienced Microsoft Excel users. It provides a list of quick tips and shortcuts for familiar features. This guide does NOT replace training or
Quick Start Guide. Version R94. English
 Custom Reports Quick Start Guide Version R94 English December 12, 2016 Copyright Agreement The purchase and use of all Software and Services is subject to the Agreement as defined in Kaseya s Click-Accept
Reporter Tutorial: Intermediate
 Reporter Tutorial: Intermediate Refer to the following sections for guidance on using these features of the Reporter: Lesson 1 Data Relationships in Reports Lesson 2 Create Tutorial Training Report Lesson
SmartView. User Guide - Analysis. Version 2.0
 SmartView User Guide - Analysis Version 2.0 Table of Contents Page i Table of Contents Table Of Contents I Introduction 1 Dashboard Layouts 2 Dashboard Mode 2 Story Mode 3 Dashboard Controls 4 Dashboards
Quark XML Author for FileNet 2.5 with BusDocs Guide
 Quark XML Author for FileNet 2.5 with BusDocs Guide CONTENTS Contents Getting started...6 About Quark XML Author...6 System setup and preferences...8 Logging in to the repository...8 Specifying the location
Kona ALL ABOUT FILES
 Kona ALL ABOUT FILES February 20, 2014 Contents Overview... 4 Add a File/Link... 5 Add a file via the Files tab... 5 Add a file via a conversation, task, or event... 6 Add a file via a comment... 7 Add
S-Drive User Guide v1.27
 S-Drive User Guide v1.27 Important Note This user guide contains detailed information about S-Drive usage. Refer to the S-Drive Installation Guide and S-Drive Advanced Configuration Guide for more information
If you have questions or need assistance in any way, please contact MicroEdge Technical Support.
 AngelPoints Advanced Reporting Users Guide 2017 Advanced Reporting leverages existing technologies current employed in GIFTS Online to provide AngelPoints users with a new and more robust environment to
Administrative Training Mura CMS Version 5.6
 Administrative Training Mura CMS Version 5.6 Published: March 9, 2012 Table of Contents Mura CMS Overview! 6 Dashboard!... 6 Site Manager!... 6 Drafts!... 6 Components!... 6 Categories!... 6 Content Collections:
Colligo Engage Outlook App 7.1. Offline Mode - User Guide
 Colligo Engage Outlook App 7.1 Offline Mode - User Guide Contents Colligo Engage Outlook App 1 Benefits 1 Key Features 1 Platforms Supported 1 Installing and Activating Colligo Engage Outlook App 3 Checking
INDEX. Drop-down List object, 60, 99, 211 dynamic forms, definition of, 4 dynamic XML forms (.pdf), 80, 89
, 80, 89") A absolute binding expressions, definition of, 185 absolute URL, 243 accessibility definition of, 47 guidelines for designing accessible forms, 47 Accessibility palette definition of, 16 specifying options
A absolute binding expressions, definition of, 185 absolute URL, 243 accessibility definition of, 47 guidelines for designing accessible forms, 47 Accessibility palette definition of, 16 specifying options
Adding Text and Images. IMCOM Enterprise Web CMS Tutorial 1 Version 2
 Adding Text and Images IMCOM Enterprise Web CMS Tutorial 1 Version 2 Contents and general instructions PAGE: 3. First steps: Open a page and a block to edit 4. Edit text / The menu bar 5. Link to sites,
Managing Content with AutoCAD DesignCenter
 Managing Content with AutoCAD DesignCenter In This Chapter 14 This chapter introduces AutoCAD DesignCenter. You can now locate and organize drawing data and insert blocks, layers, external references,
The fastest way to get a signature. DocuSign Desktop Client. v3.0. User Guide
 The fastest way to get a signature. DocuSign Desktop Client v3.0 User Guide Stick-eTabs, DocuSign Professional, the DocuSign logo, The fastest way to get a signature., and DocuSign are trademarks or registered
SAS Web Report Studio 3.1
 SAS Web Report Studio 3.1 User s Guide SAS Documentation The correct bibliographic citation for this manual is as follows: SAS Institute Inc. 2006. SAS Web Report Studio 3.1: User s Guide. Cary, NC: SAS
Sage Estimating (SQL) v17.12
 v17.12") Sage Estimating (SQL) v17.12 Getting Started Guide October 2017 This is a publication of Sage Software, Inc. 2017 The Sage Group plc or its licensors. All rights reserved. Sage, Sage logos, and Sage product
Sage Estimating (SQL) v17.12 Getting Started Guide October 2017 This is a publication of Sage Software, Inc. 2017 The Sage Group plc or its licensors. All rights reserved. Sage, Sage logos, and Sage product
Quark XML Author October 2017 Update for Platform with Business Documents
 Quark XML Author 05 - October 07 Update for Platform with Business Documents Contents Getting started... About Quark XML Author... Working with the Platform repository...3 Creating a new document from
Supplier Contract Management for Agencies Core-CT Finance Upgrade Implementation
 Supplier Contract Management for Agencies Core-CT Finance Upgrade Implementation March 2018 For Classroom Training Use Only Introduction Supplier Contract Management for Agencies Welcome to Supplier Contract
Imagine. Create. Discover. User Manual. TopLine Results Corporation
 Imagine. Create. Discover. User Manual TopLine Results Corporation 2008-2009 Created: Tuesday, March 17, 2009 Table of Contents 1 Welcome 1 Features 2 2 Installation 4 System Requirements 5 Obtaining Installation
User Manual For SmartRoom Managers
 User Manual For SmartRoom Managers Table of Contents 1.0 Login 2.0 Confidentiality Agreement 3.0 Software Installation 4.0 Dashboard 5.0 Document Review and Index Maintenance 5.1 View by Index 5.1.1 Index
To change the shape of a floating toolbar
 Modifying toolbars You can change the size of toolbar buttons and reposition, add, or delete toolbar buttons. You can also change the toolbar name and turn tooltips on and off. An important item to note-
University of Pittsburgh Communications Services. Basic Training Manual Drupal 7
 University of Pittsburgh Communications Services Basic Training Manual www.shrs.pitt.edu Drupal 7 Table of Contents Users... 3 Log In... 3 Log Out... 3 What is a Content Management System?... 4 What are
OU EDUCATE TRAINING MANUAL
 OU EDUCATE TRAINING MANUAL OmniUpdate Web Content Management System El Camino College Staff Development 310-660-3868 Course Topics: Section 1: OU Educate Overview and Login Section 2: The OmniUpdate Interface
Kendo UI Builder by Progress : Using Kendo UI Designer
 Kendo UI Builder by Progress : Using Kendo UI Designer Notices 2016 Telerik AD. All rights reserved. November 2016 Last updated with new content: Version 1.1 3 Notices 4 Contents Table of Contents Chapter
AutoCAD 2009 User InterfaceChapter1:
 AutoCAD 2009 User InterfaceChapter1: Chapter 1 The AutoCAD 2009 interface has been enhanced to make AutoCAD even easier to use, while making as much screen space available as possible. In this chapter,
Creating Web Pages with SeaMonkey Composer
 1 of 26 6/13/2011 11:26 PM Creating Web Pages with SeaMonkey Composer SeaMonkey Composer lets you create your own web pages and publish them on the web. You don't have to know HTML to use Composer; it
Query Studio Training Guide Cognos 8 February 2010 DRAFT. Arkansas Public School Computer Network 101 East Capitol, Suite 101 Little Rock, AR 72201
 Query Studio Training Guide Cognos 8 February 2010 DRAFT Arkansas Public School Computer Network 101 East Capitol, Suite 101 Little Rock, AR 72201 2 Table of Contents Accessing Cognos Query Studio... 5
Using the IDEF0 Diagram in Innoslate
 Using the IDEF0 Diagram in Innoslate This document discusses how to use the IDEF0 Diagram in Innoslate. Contents IDEF0 Entities...2 IDEF0 Relationships...2 IDEF0 Interactions...3 Adding an Action...3 Adding
USER GUIDE MADCAP FLARE Tables
 USER GUIDE MADCAP FLARE 2018 Tables Copyright 2018 MadCap Software. All rights reserved. Information in this document is subject to change without notice. The software described in this document is furnished