CellaVision Proficiency Software
|
|
|
- Brooke Goodman
- 5 years ago
- Views:
Transcription
1 CellaVision Proficiency USER S MANUAL 2.3
2
3 CellaVision Proficiency Preface CellaVision is a trademark of CellaVision AB. All other trademarks used in this document are property of their respective owners. No part of this document or the products it describes may be reproduced or transmitted by any means or in any form without prior consent in writing from CellaVision AB. Article No.: PM Revision: Copyright 2018 CellaVision AB. All rights reserved. Headquarter: CellaVision AB Mobilvägen 12 SE Lund Sweden Phone +46 (0) Fax +46 (0) User s Manual PM i
4 CellaVision Proficiency 1 INTRODUCTION General Description and Intended Use About this User s Manual Help EXAMINER GETTING STARTED Logging in Retrieving the Password Customizing the Workspace CREATING, MANAGING AND EVALUATING TESTS The TESTS Tab Creating a New Test Monitoring Ongoing Tests Viewing Test Results Exporting Test Results Attaching a Test Conclusion Deleting Tests VERIFYING AND MANAGING SLIDES Uploading Slides The SLIDES Tab Managing Slides Verifying Slides Adding or Editing Slide Comments Marking Slides as Done Deleting Slides ADDING AND MANAGING PARTICIPANTS The PARTICIPANTS Tab Adding Participants Filtering the Participant List Managing Participants Setting Lab Supervisor Privileges Deleting Participants SETTINGS Editing Account Information Adding Participants Renewing a License Managing User-defined Classes TROUBLESHOOTING No Slides Shown in Wizard Step Missing Slides in Wizard Step No Participants Shown in Wizard Step No Results Available in Test Results View ii PM User s Manual
5 CellaVision Proficiency 3 PARTICIPANT GETTING STARTED Logging in Retrieving the Password TAKING A TEST The TESTS Tab Viewing a Test Verifying Slides Signing Slides VIEWING TEST RESULTS Definitions Opening a Completed Test The Results View Test Summary WBC Classes WBC Cells RBC Characteristics Test Conclusions APPENDIX A BUTTONS AND SYMBOLS A.1 General A.2 Buttons A.3 Symbols APPENDIX B RECOMMENDED WORKFLOW APPENDIX C CALCULATIONS APPENDIX D GLOSSARY INDEX User s Manual PM iii
6
7 CellaVision Proficiency INTRODUCTION 1 INTRODUCTION 1.1 General Description and Intended Use The CellaVision Proficiency is a tool for education and proficiency testing of manual blood cell differentials in laboratories. There are two types of users in the CellaVision Proficiency : Examiner and Participants. The Examiner performs the testing and education by creating and managing Participants, correct classifications and tests. The Examiner can view the results of all Participants. Participants can view their own results and compare them to the correct result, the majority result, or anonymized fellow Participant results. 1.2 About this User s Manual This User s Manual will guide you step-by-step through the operation of the CellaVision Proficiency (also referred to as the software), aiming for an efficient way to give you a good understanding and knowledge of the program and its features. References are made to appendices providing additional information. Some self-explaining dialogs have been left out in the text. Typographical convention: Names of keys and on-screen objects are presented in bold; e.g.click Print. 1.3 Help A help button is located in the top right-hand corner. Click it to open a window containing links to the following help resources: Online version of this manual FAQ The Help window can be opened or closed at any time and does not affect the current state of work. Additional resources can be found at cellavision-proficiency.com. User s Manual PM
8 EXAMINER CellaVision Proficiency 2 EXAMINER The following chapters are intended for the Examiner. A Participant cannot access these parts of the program. 2.1 GETTING STARTED Logging in 1. Open Internet Explorer and go to 2. Enter your /username and password. 3. Click Log in. If more than one account are associated with the login credentials a drop-down menu will be shown after logging in where the desired account can be chosen Retrieving the Password 1. In the login screen click the Forgot password? link. 2. Enter your address and click Reset password. 3. A new password will be sent to this address Customizing the Workspace The first log-in to a CellaVision Proficiency account prompts the Customize your account window to open. Take a minute to: Choose a new password to replace the temporary password. Set the preferred Language for the user interface. Check that the address is correct. Account settings can be changed at any time later in the SETTINGS tab. See 2.5 SETTINGS for more information. 2 PM User s Manual
. It also displays a list of all tests that are currently either under Construction (2), Ongoing (3) or Completed (4).")
9 CellaVision Proficiency EXAMINER 2.2 CREATING, MANAGING AND EVALUATING TESTS The TESTS Tab 1. Create a new test 2. Under construction 3. Ongoing 4. Completed 5. Detailed view The TESTS tab is the starting point for creating a new test (1). It also displays a list of all tests that are currently either under Construction (2), Ongoing (3) or Completed (4). You can sort the list by clicking any of the column headers. You can also filter the list on category, by clicking the filter button next to the column header. Click on the column headers to sort the list. Test results can be accessed from this tab by double-clicking on a completed test. See also Viewing Test Results for more information. Click on any test in the list to view more detailed information in the detailed view (5) Under Construction Tests A test stays under construction until the creation of the test is finished and the test is distributed to the Participants. Double-click on an under construction test to continue working on it. Under construction tests are not visible to the Participants. User s Manual PM
. 2.2.1.")
. Double-click on a completed test to view the results (see also 2.2.4 Viewing Test Results). 2.2.2 Creating a New Test 1.")
10 EXAMINER CellaVision Proficiency Ongoing Tests Once test creation is finished the test is flagged as ongoing and becomes visible to its Participants. Participants can now classify and/or characterize cells. Double-click on an ongoing test to view the Participants progress (see also Monitoring Ongoing Tests) Completed Tests A test is flagged as completed when one of the following applies: The completion date of the test has been reached. All Participants have completed and signed all slides in the test. The test is manually set to completed by the Examiner (see also Stop an Ongoing Test). Double-click on a completed test to view the results (see also Viewing Test Results) Creating a New Test 1. Enter a test name and click Create. 2. Select one or more slides in the Available slides list. You can sort the list by clicking any of the column headers. You can also filter the list on category or lab, by clicking the filter button next to the column header. If no slides are shown click on the SLIDES tab and follow instructions (see also No Slides Shown in Wizard Step 1 and Missing Slides in Wizard Step 1. 4 PM User s Manual

11 CellaVision Proficiency EXAMINER Note: A maximum of 20 slides can be added per test. Tests can only include slides with either peripheral blood or body fluid samples, but not both. 3. Click to add the selected slides to the test and then click Next to proceed to Step 2 of the wizard. 4. Select one or more Participants in the Available Participants list. You can sort the list by clicking any of the column headers. You can also filter the list on lab, region or country, by clicking the filter button next to the column header. If no participants are shown click on the PARTICIPANTS tab and add Participants (see also No Participants Shown in Wizard Step 2). 5. Click to add the selected participants to the test and then click Next. 6. Choose the test preferences (see Test Settings for more information) and then click Next. User s Manual PM

12 EXAMINER CellaVision Proficiency 7. Review the test to ensure that the correct slides and Participants were added and the correct preferences were set. 8. Click Finish to distribute the test to all Participants. A notification will be sent to all Participants who have an address associated with their account. Participants with no address need to be notified manually. 6 PM User s Manual

13 CellaVision Proficiency EXAMINER Create a New Test Using a Completed Test as Template 1. Go to the TESTS tab and click the completed test you want to use as a template for the new test. 2. In the detailed view of that test click. 3. Enter a test name of the new test and click Save. The new test is now in Under construction. 4. Double click on the under construction test. 5. Follow the steps in the wizard in the same way as when creating a new test, see Creating a New Test Test Settings User s Manual PM
14 EXAMINER CellaVision Proficiency Test Duration Automatically close this test on Do not set an automatic completion date Visible Information Show patient information Make reference cells available Show additional slide data Give early access to results Specify an end date using the calendar. At the end of the chosen day the test will close automatically independent of the Participants progress and be flagged as completed. Test end dates will be visible to the Participants. Note: If a test closes before all Participants have verified all slides it will reduce the data available for the results statistics. Any slide a Participant has not completed will be excluded from the results for that particular Participant. End dates of ongoing tests can be extended as described in Extending the Test End Date. If no end date is set the test will be flagged as completed as soon as all Participants have verified all slides. If checked, patient information associated with a slide (if available) will be visible to all Participants. See Add or Edit Patient Information for more information. If checked, Participants are able to open reference cell libraries whilst they are verifying slides. If no reference cells are available this setting is disabled. See White Blood Cell Classification, Create WBC Reference Libraries for more information. If checked, additional data associated with a slide (if available) will be visible to all Participants. See Add or Delete Additional Slide Data for more information. If checked, individual Participants who have completed the test will be able to view their results even before the test is completed by the entire group. Early access results only show that particular Participants results compared to the Examiner results. No results from fellow Participants are shown. 8 PM User s Manual

15 CellaVision Proficiency EXAMINER Test Comment Write a test comment Add a comment about the test. Test comments are visible to all Participants taking this test. Test Category Choose a test category Assign the test to a category. This can make it easier for you to find the test in the list. The category is not visible to the participants taking the test Monitoring Ongoing Tests 1. Progress bar 2. Progress grid 3. Filter 4. Sort View an Ongoing Test Double-click on an ongoing test in the TESTS tab to view its progress. Progress Bar The progress bar (1) indicates how many Participants have completed the test. Participants are only classed as having completed the test once they have verified and signed all slides. User s Manual PM
16 EXAMINER CellaVision Proficiency Progress Grid The progress grid (2) shows which slides each individual Participant has completed. Participants are shown on the y-axis and slides on the x-axis of the progress grid. Sort and filter Choose to sort (4) the progress grid on names, completed or not completed. Filter the bar chart using the drop-down menus(3) Stop an Ongoing Test Stop an ongoing test at any time by clicking End test now. This will immediately close the test for all Participants, independent of their progress. Once stopped, the test is flagged as completed and its results will be available for viewing. See also Viewing Test Results on how to access test results. Note: Closing a test before all Participants have verified all slides will reduce the data available for the results statistics. Any slide a Participant has not completed will be excluded from the results for that particular Participant. Note: Once a test has been stopped it cannot be returned to an ongoing status Extending the Test End Date 1. Go to the TESTS tab and click on an ongoing test. 2. In the detailed view of that test click on the date underneath Test end date. 3. Enter a new date and click Save. Note: The test end date can never be set to a more recent date than the previous end date. It is only possible to extend the test end date if a test end date has been set from the beginning Add Participants to an Ongoing Test 1. Go to the TESTS tab and double click on an ongoing test. 2. Click Add participants. 3. Add participants in the same way as when creating a new test, see Creating a New Test. 4. Click OK. 10 PM User s Manual
17 CellaVision Proficiency EXAMINER Viewing Test Results Definitions Examiner Result The Examiner result is the WBC classification and/or RBC characterization performed by the Examiner. Majority Result For WBC, it is the cell class assigned to a particular cell by the majority of Participants. For RBC, it is the characterization grade chosen by the majority of Participants. If the majority cannot be decided unanimously one of the cell classes/ characterizations is at random used as majority. Reference The reference is either the Examiner result or Majority result depending on the selection made by the viewer. WBC Agreement WBC Agreement shows how well the Participant's classification agrees (percentage) with the reference. RBC Agreement The RBC Agreement shows how well the Participant s characterization agrees (percentage) with the reference Opening a Completed Test In the TESTS tab double-click on a completed test to open the results view. User s Manual PM
18 EXAMINER CellaVision Proficiency The Results View 1. Results view navigation 2. Test conclusion report 3. Test comment 4. Slide list 5. Additional slide data 6. Slide comments 7. Slide counter Results View Navigation In the results view the test results are automatically compiled to show: A summary of results. WBC classification statistics on a class level. WBC classification statistics on a cell level. RBC characterization statistics. Click the results view navigation tabs to browse the results. Slide List The slides list (4) shows all slides in the test that contribute to the current results view. Include and exclude slides from the results by clicking on the slide. Hold down CTRL or SHIFT whilst clicking to select multiple slides. Only results from selected slides (i.e. highlighted in blue) are presented. If additional slide data (5) exist for a slide the additional slide data icon will be shown next to the slide in the slide list. Click on the icon to view the additional slide data. If one or more slide comments (6) exist for a slide the comment icon will be shown next to the slide in the slide list. Click on the comment icon to open a window with all comments. 12 PM User s Manual


19 CellaVision Proficiency EXAMINER Slide Counter The slide counter (7) shows how many slides are currently selected and contributing to the shown results Test Summary 1. Bar chart 2. Compare to 3. Agreement percentages 4. Individual result comments 5. Infographics Click the Summary of results tab to see an overview of how Participants performed in the test. Bar Chart The bar chart (1) shows the average WBC and RBC agreement for each Participant displayed as percentage values. The higher the agreement the better a Participant is considered to have performed in the test. Switch between using either the Examiner or Majority result as a reference for the agreement using the radio buttons in the Compare to (2) box. The Agreement percentages (3) box shows the values used for drawing the bars in the bar chart. Sort the bar chart using the drop-down menu. Filter the bar chart using the drop-down menus. User s Manual PM
20 EXAMINER CellaVision Proficiency Infographics The infographics (5) displays the following key metrics of the test: Total Participant number. Average WBC and RBC agreement for all Participants compared to the reference selected in the Compare to box (Examiner or Majority result). Highest and lowest WBC and RBC agreements compared to the reference selected in the Compare to box (Examiner or Majority result). Individual result comment You can provide feedback to each participant by writing an individual result comment. This comment will apply to the whole test and it will only be visible for that particular participant. To write an individual result comment, click the Individual result comment (4) button for that participant, type a comment in the dialog box that appears and then click Save. You ll find the Individual result comment buttons (4) on the Test summary tab, under Agreement percentages WBC Classes Click the WBC classes tab to see the results of WBC classification on a class level. Switch between Examiner and Majority in the Compare to box to change the reference classifications. Switch between showing One participant - all cell classes and One cell class - all participants in the Display box to show different views of the data. 14 PM User s Manual

21 CellaVision Proficiency EXAMINER One Participant - All Cell Classes When selecting One participant - all cell classes the selected Participant s classification results are shown as a total number of cells per cell class compared to the reference classification. Each cell class is shown with a top and bottom bar. The top bar (dark grey) shows the total number of cells classified to this class by the reference. The bottom bar shows the total number of cells classified to this class by the Participant. The blue part of the bar indicates the number of cells where the Participant and reference agreed on the classification. The orange part indicates where they disagreed. Change Participant using the drop down menu in the Display box. User s Manual PM
 shows the reference result. The following bars show the Participant results.")
22 EXAMINER CellaVision Proficiency One Cell Class - All Participants When selecting One cell class - all participants the total number of cells classified to the selected cell class by all Participants as well as the reference is shown. The top bar (dark grey) shows the reference result. The following bars show the Participant results. The blue part of the bar indicates the number of cells where the Participant and reference agreed on the classification. The orange part indicates where they disagreed. Change cell class using the drop down menu in the display box WBC Cells Click the WBC cells tab to see the results of WBC classification on a cell level. 16 PM User s Manual
 tab in the side panel to see which WBCs caused the most classification disagreements.")
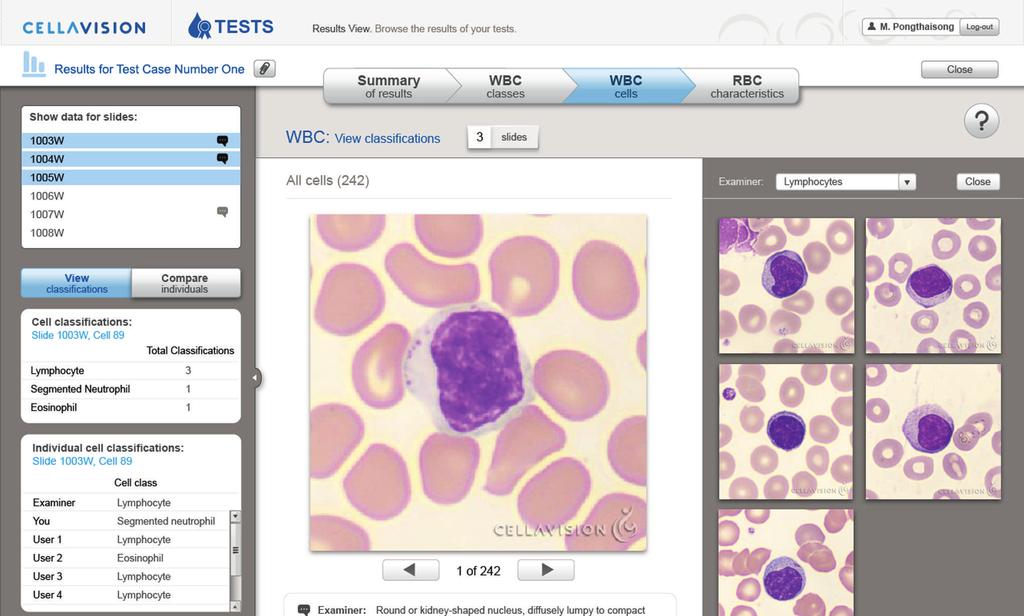
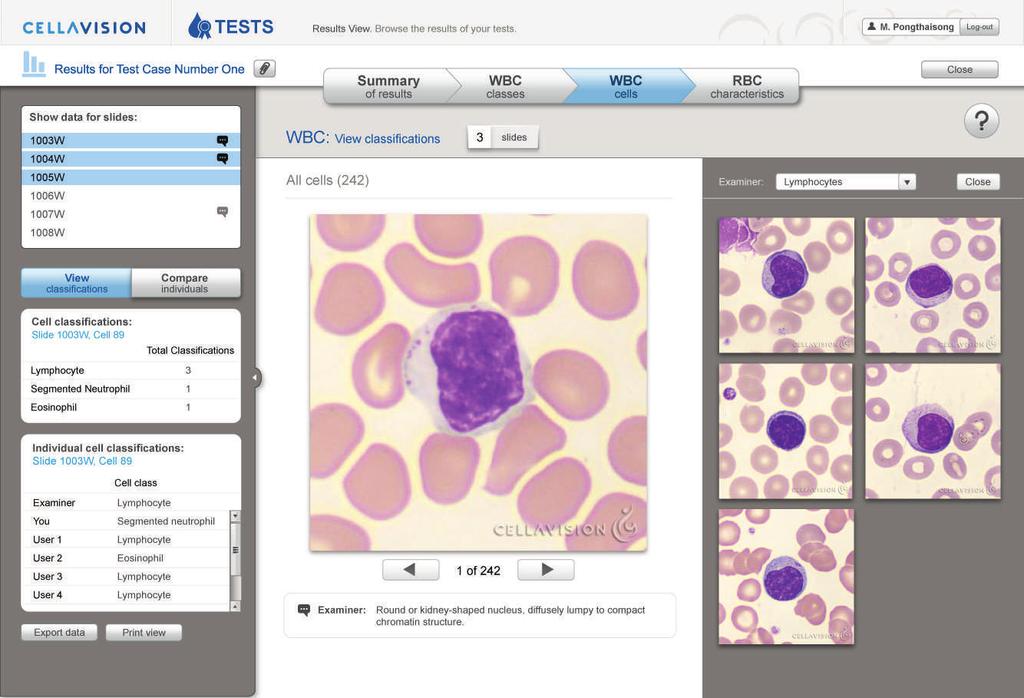
23 CellaVision Proficiency EXAMINER View Classifications 1. View classifications 2. Main view 3. Cell classifications 4. Individual cell classifications Click on the View classifications (1) tab in the side panel to see which WBCs caused the most classification disagreements. All cells from the currently selected slides are compiled and shown in the main view (2), starting with the cell that has the highest number of disagreements. The total number of cells in the current list is shown in brackets next to the heading All cells above the cell image. The Cell classifications (3) box shows the cell classes and number of total classifications to each cell class for the currently shown cell. It also shows which slide the cell originates from. The Individual cell classifications (4) box shows how the Examiner and each Participant classified the cell. Use the arrow buttons underneath the cell or the arrow keys on the keyboard to go through all the cells. The cells are sorted so that the cells with highest number of different classifications are shown first. User s Manual PM
 tab in the side panel to see how the WBC classification results compare between each individual Participant and a chosen reference.")
24 EXAMINER CellaVision Proficiency Compare Individuals 1. Compare individuals 2. Main view 3. Compare 4. Comparison results Click on the Compare individuals (1) tab in the side panel to see how the WBC classification results compare between each individual Participant and a chosen reference. Change the Participant or the reference using the drop-down menus in the Compare (3) box. The first two columns in the Comparison results (4) table show the number of cells the two selected individuals have classified to each class. The third column shows the number of cells where the classification differs between the two individuals. Sort WBC classes with the most disagreements to the top of the list by clicking on the table headers in the Comparison results (4) table. Click on a cell class name to show cell images with disagreements in the main view (2). The two differing classifications are shown above the cell image. Use the arrow buttons underneath the cell image or the arrow keys on the keyboard to go through all disagreements of that class. Cell comments (if available) are shown underneath the cell image. 18 PM User s Manual

25 CellaVision Proficiency EXAMINER Showing Examiner Cells Click Open Cell Class to show all cells for that slide that were classified to this class by the Examiner. Use the drop-down menu to change to a different class. Note: Examiner cells are not to be confused with WBC reference libraries. Cells from WBC reference libraries can be compiled from many different slides and serve as examples for their particular cell class (see Create WBC Reference Libraries for more information) RBC Characteristics Click the RBC characteristics tab to see the results of RBC characterization. Switch between Examiner and Majority in the Compare to box to change the reference characterization. The table shows the Examiner, Majority and Participants characterization grades for the different morphologies. Cells with an orange background color indicate where the characterization differs from the reference. The stronger the orange color the greater the deviation. Click Show RBC image to bring up the RBC image. Click outside of the image to close it. Note: RBC characterization results can only be viewed for one slide at a time. User s Manual PM
26 EXAMINER CellaVision Proficiency Exporting Test Results The Summary of results, WBC classes and RBC characteristics tabs allow exporting of the presented data to a CSV file. 1. In the TESTS tab double-click on a completed test to open it. 2. In the side panel click Export data. 3. Choose a location to save the file and click Save Attaching a Test Conclusion Test Conclusions are reports created externally by the Examiner. 1. Save a test conclusion as either a PDF file, Microsoft Word document or TXT, JPG, PNG, GIF or BMP-file. The maximum allowed file size is 3MB. Only one test conclusion can be added per test. 2. In the TESTS tab click on the completed test relevant to the test conclusion to so that test is highlighted. 3. In the detailed view of that test click Attach conclusion. 4. Navigate to the file. 5. Click OK. Deleting a Test Conclusion Click (Delete) next to the test conclusion link Deleting Tests 1. In the TESTS tab click on any test to bring up the test information in the detailed view. 2. Click (Delete) to delete the test. Note: Deleting an ongoing or completed test will remove it from all associated Participant accounts. Deleting a completed test will also delete its results. 2.3 VERIFYING AND MANAGING SLIDES Uploading Slides The CellaVision Proficiency accepts slides from the following CellaVision databases: CellaVision Processing Database CellaVision Export Database CellaVision Competency Database 20 PM User s Manual
27 CellaVision Proficiency EXAMINER Step 1: Preparation 1. Go to the computer running the CellaVision Remote Review and open Internet Explorer. 2. Navigate to 3. Log in to your CellaVision Proficiency account. 4. Click on the SLIDES tab. 5. If you haven t already installed the Transfer Tool, install it by clicking Get the Transfer Tool, running the transfertool_installer.exe and then following the instructions on the screen. Note: Administrator privileges are required to install the Transfer Tool. Step 2: Export 1. Start the Transfer Tool and select the database containing the slides (orders) to transfer. 2. Log in to that database. 3. Mark the orders that you want to transfer by doing one of the following: Select the check box next to the Order ID of the orders you want to import. Select more than one orders in the list and then click Mark all highlighted. To select a consecutive group of orders, click the first order, press and hold down the Shift key, and then click the last order. To select non-consecutive orders, press and hold down the Ctrl key, and then click each order that you want to select. Select the check box in the column header to mark all orders. Orders that have already been marked for transfer in a CellaVision DM are indicated by the (Mark for Transfer Tool) icon. The option to mark orders for transfer is only available in CellaVision DM version 4.0 or higher. Right-click in the order list view to mark an order for transfer. 4. Click Transfer in the Transfer selection panel to the right. 5. Select a location on the hard-drive and save the files. User s Manual PM

28 EXAMINER CellaVision Proficiency Step 3: Upload 1. In the CellaVision Proficiency navigate to the SLIDES tab and click Upload slides. 2. Navigate to the previously saved slide files and select one or more slides for upload. 3. Click Open. The slides may take a few minutes to upload. Note: No patient identification information is transferred with the slides. All transferred cell images are copies from the original The SLIDES Tab 1. Slide list 2. Detailed view Navigate to the SLIDES tab to: Upload slides to your CellaVision Proficiency account. View and manage uploaded slides. Verify slides. Slides are automatically grouped into distinct slide lists (1) according to their sample type. Detailed View Click on a slide in a slide list to view the detailed view (2) of that slide. 22 PM User s Manual
29 CellaVision Proficiency EXAMINER Managing Slides Slide States Done Empty field Slide has not been marked as done but all cells are classified. Slide is marked as done (optional step). Slide contains unclassified cells. Locked Empty field Slide is not being used in an ongoing or completed test and is not locked. Slide is locked. Verification cannot be changed and the slide cannot be deleted Sort and filter You can sort the list by clicking any of the column headers. You can also filter the list on laboratory or category, by clicking the filter button next to the column header Edit the Slide Identifier 1. Click on a slide in the slide list to focus the detailed view to that slide. 2. Click on the slide identifier in the detailed view. 3. Edit the identifier and click Save Assign slide to lab or category 1. Click on a slide in the slide list to focus the detailed view to that slide. 2. In the detailed view, you can choose a lab from the Lab list and a category from the Category list. To add a new category or lab, or to rename an existing, click the Add or edit button Add or Edit Slide Notes Slide notes are only visible to the Examiner and serve as an internal memo about that slide. 1. Click on a slide in the slide list to focus the detailed view to that slide. 2. Click on Add note or, if a slide note already exists, on the note itself. 3. Add or edit the note. User s Manual PM
30 EXAMINER CellaVision Proficiency 4. Click Save to save the change or Cancel to return the slide note to its previous state Add or Edit Patient Information 1. Click on a slide in the slide list to focus the detailed view to that slide. 2. Click on Add information or, if patient information already exists, on the information itself. 3. Add or edit the information. 4. Click Save to save the change or Cancel to return the patient information to its previous state Add or Delete Additional Slide Data 1. Click on a slide in the slide list to focus the detailed view to that slide. 2. Click Upload file in the detailed view. 3. Navigate to the files on the hard drive and click Open. A link to the file is generated in the detailed view. The file format must be either a PDF file, Microsoft Word document or TXT, JPG, PNG, GIF or BMP file. The maximum allowed file size is 3MB and only two files can be added per slide. 4. Click on a link to open it. The file will open in an program suitable for that file type. 5. To delete additional slide data click on (Delete) next to the link. Note: Additional slide data is only visible to the Participants if the setting Show additional slide data is selected in the test creation wizard Verifying Slides Opening a Slide for Verification In the SLIDES tab double-click on a slide to verify it. 24 PM User s Manual
 the side panel.")
31 CellaVision Proficiency EXAMINER The Verification View 1. WBC/RBC navigation 2. Collapse/Expand 3. Main view WBC/RBC Navigation Switch between WBC and RBC (1) verification using the tabs. When a slide has no RBC only the WBC tab is shown and vice versa. Collapse/Expand Click on the arrow to collapse/expand (2) the side panel. Main View The main view (3) shows either the WBC images of the currently selected classes or the RBC image Adjust Image Brightness and Color 1. Click. 2. Adjust the sliders. 3. Click Save. Clicking Reset will restore the default settings. User s Manual PM
32 EXAMINER CellaVision Proficiency White Blood Cell Classification General Workflow 1. Click on the WBC tab. 2. Click on a WBC class in the side panel to show a gallery of all cells classified to that class in the main view. When using the two-class layout, left-click on a class to open it in the left gallery and right-click on a class to open it in the right gallery. Use the drop-down menu in an open WBC class gallery to switch between classes. 3. If necessary, re-classify cells by dragging and dropping them from one open class gallery to another or from an open class gallery to a class in the side panel. Select multiple cells at once by pressing CTRL or SHIFT. Note: It is not possible to re-classify cells from slides that are locked. Note: It is possible to add user-defined WBC classes. See also Managing Userdefined Classes for more information. Customize the Layout Switch between a one-class, two-class or all-classes layout using the Layout Toggle buttons. Increase or decrease the size of the cell images using the Zoom Slider. 26 PM User s Manual
33 CellaVision Proficiency EXAMINER Magnify Individual WBC 1. Double-click on a cell. 2. Use the mouse-wheel to change the zoom level. 3. Use the arrow keys to move to other cells in the gallery. 4. Click Close to close the magnified view. Add or Edit Cell Class Comments You can add cell class comments to any WBC cell class. These comments will not be visible for the participants until after the test is completed. 1. Click the cell class that you want to add a comment to, and then click the Add comment button. 2. In the Add comment dialog, type your comment and then click Save. Add or Edit Individual Cell Comments 1. Double-click on a cell. 2. Click in the comment box underneath the magnified cell and write a comment. 3. Click Save to save the comment. 4. Click Close to close the magnified view. Cells with comments are marked by a comment icon in the top right corner. Cell Marker The cell marker is a square marking the cell for identification. Click show/hide the square. to Split WBC 1. Right-click on a cell and choose Split cell from the menu. 2. Click on the center of all individual cells to mark them. 3. Click OK to split the cell. The new cells are added to the same class as the original cell. User s Manual PM
34 EXAMINER CellaVision Proficiency Delete WBC Delete cells by dragging them to the Trash class in the side panel or by choosing Trash from the right-click menu. Deleted cells are not visible for Participants. Retrieve deleted cells by opening the Trash class and dragging cells from the Trash class to another cell class. Create WBC Reference Libraries 1. Right-click on the cell that should be used as a reference for that class. 2. Select Add as reference cell from the right-click menu. To view reference libraries: 1. Switch to either the one-class or two-class layout. 2. Open the cell class of interest. 3. Click Reference cells. The reference cell gallery for that class will open as a separate gallery. To delete cells from reference libraries: 1. Right-click on a cell. 2. Select Delete from the menu. Note: Reference libraries will be available to Participants if specified during test creation. Only reference cells created before the test is created will be shown to Participants. See Test Settings for more information. 28 PM User s Manual
 (100x objective and a 22mm ocular).")
35 CellaVision Proficiency EXAMINER Red Blood Cell Characterization 1. RBC tab 2. Zoom slider 3. Magnified area General Workflow 1. Click on the RBC (1) tab. 2. Zoom in to the RBC image using either the mouse wheel or the zoom slider (2). The RBC image corresponds to the area of 8 microscopic high power fields (HPF) (100x objective and a 22mm ocular). Note: Be aware that RBC images captured using a CellaVision Image Capture System can be of different magnifications. 3. Move around the image by clicking and dragging it. 4. Double-click anywhere on the RBC image to magnify that area. Move the mouse around the RBC image to move the position of the magnified area (3). Click again to close it. 5. Grade the RBC morphology using the radio buttons in the side panel. If required, reset all morphologies grades to a normal level by clicking Report all as normal. User s Manual PM
36 EXAMINER CellaVision Proficiency RBC Characterization Grades 0 Normal level 1 Morphology is present at a low level 2 Morphology is present at a moderate level 3 Morphology is present at a high level Using the Ruler In the top left-hand corner of the RBC image there is a cross-shaped ruler that represents 14 μm across. Click on the ruler and drag it to the desired area in the RBC image. The ruler automatically scales up or down according to the zoom level of the RBC image Adding or Editing Slide Comments 1. In the SLIDES tab double-click on a slide to open the verification view. 2. Click (Comment) next to the slide identifier. 3. Add or edit the comment and click Save Marking Slides as Done To remember which slides are ready to be used in tests they can be marked with a check mark by clicking in the verification view. Note: This can only be done if there are no unidentified cells Deleting Slides 1. In the SLIDES tab click on any slide to bring up the slide information in the detailed view. 2. Click (Delete) to delete the slide. Note: Slides that are currently included in tests are locked and cannot be deleted. 30 PM User s Manual
 shows all Participants in the account.")
. 2.4.2 Adding Participants 2.4.2.1 Add Participants Manually 1.")
37 CellaVision Proficiency EXAMINER 2.4 ADDING AND MANAGING PARTICIPANTS The PARTICIPANTS Tab 1. Participant list 2. Detailed view Participant List The participant list (1) shows all Participants in the account. It also shows the number of ongoing and completed tests for each Participant. Detailed View Click on a Participant in the participant list to view the detailed view (2) Adding Participants Add Participants Manually 1. Click on Add participants. User s Manual PM
38 EXAMINER CellaVision Proficiency 2. Enter First name and Last name of the Participant. If available, enter the Participant's address to enable account notification and test status s to be sent. Enter Lab, Region and Country. 3. Select the print checkbox if the account information of the newly created Participants should be printed. 4. Click Create. An listing all newly created Participants will be sent to the Examiner. Participants where an address was provided will also receive an containing their account information. Note: The number of available Participants that can be added is determined by the license type. See on how to increase Participant seats Add Participants Via CSV File Upload CSV File Guidelines 1. Arrange the column as shown in the table. 2. Ensure that the maximum number of free Participant seats is not exceeded. 3. Save the file as a.csv file Filtering the Participant List You can sort the participants in the list by clicking any column header. You can also filter the participants by lab, region, or country by clicking the Filter symbol next to the category you want to filter by (for example Lab), and then clicking one of the values in the list Managing Participants Click on a Participant in the participant list to focus the detailed view to that Participant Edit Participant Location 1. Click Edit next to Location. 2. Enter Lab, Region and Country and click OK Reset Participant Password 1. Click Reset next to Password. 2. A new password is automatically generated and ed to the Examiner. 32 PM User s Manual

39 CellaVision Proficiency EXAMINER Note: Passwords can only be reset for Participants that have no address associated with their account. Participants with addresses can reset their password from within their own account Setting Lab Supervisor Privileges 1. In the PARTICIPANTS tab click on any Participant to focus the detailed view to that Participant. 2. Click (Set Lab Supervisor Privileges). 3. Choose Lab, Region or Country to allow the Lab Supervisor to view test results with Participant names within the selected category Deleting Participants 1. In the PARTICIPANTS tab click on any Participant to focus the detailed view to that Participant. 2. Click the Delete button to delete the Participant Deleting Multiple Participants 1. In the PARTICIPANTS tab click. 2. Select the checkbox next to the participants you want to delete. 3. Click OK. User s Manual PM

40 EXAMINER CellaVision Proficiency 2.5 SETTINGS Click on the SETTINGS tab to manage your account and customize the workspace Editing Account Information 1. Under Account information you can edit your name, and organization. 2. To change your password, click Change. 3. To change the language, pick a language from the list Adding Participants 1. Purchase an extension license from your local vendor. 2. Under Account information in the License section click Add users. 3. Enter the product key from your extension license and click Unlock. 4. Review the license details and click Activate Renewing a License 1. Purchase a license from your local vendor. 2. Under Account information in the License section click Renew license. 3. Enter the product key from your extension license and click Unlock. 4. Review the license details and click Activate. 34 PM User s Manual

41 CellaVision Proficiency EXAMINER Managing User-defined Classes 1. In the Classes box select either Peripheral blood or Body fluid samples. 2. Under Manage user-defined classes click on either the WBC, non-wbc or RBC tab. 3. Enter the name of the new class and click Create. Editing User-defined Classes 1. Click on the class. 2. Edit the class name. 3. Click Save. Deleting User-defined Classes Click (Delete) next to the class to delete it. All cells of a deleted class are automatically moved to the Unidentified class and need to be re-classified. Affected slides will be marked with in the SLIDES tab. Note: User-defined cell classes that are used in a test cannot be deleted. 2.6 TROUBLESHOOTING No Slides Shown in Wizard Step 1 1. Navigate to the SLIDES tab. User s Manual PM
42 EXAMINER CellaVision Proficiency 2. Upload slides to your CellaVision Proficiency (see also Uploading Slides). 3. Return to the TESTS tab and double-click on the respective under construction test to continue setup Missing Slides in Wizard Step 1 Slides containing un-classified cells cannot be included in tests and are marked with in the SLIDES tab. To make these slides available for tests: 1. Navigate to the SLIDES tab. 2. Double-click on the slide in question. 3. Classify all WBC in the Unidentified class. See also Verifying Slides for more information No Participants Shown in Wizard Step 2 1. Navigate to the PARTICIPANTS tab. 2. Click Add particpants or Import CSV file and add Participants. 3. Return to the TESTS tab and double-click on the respective under construction test to continue setup (see also 2.4 ADDING AND MANAGING PARTICIPANTS) No Results Available in Test Results View The following scenarios can cause no results to be shown: The test was completed early and no Participant completed the selected slides. Nobody completed the test. If possible, select a different slide or a different Participant to see results. If no results are available for any of the slides it is likely that an ongoing test was manually stopped before any slides could be completed. See Stop an Ongoing Test for more information. 36 PM User s Manual

43 CellaVision Proficiency PARTICIPANT 3 PARTICIPANT The following chapters are intended for the Participant. An Examiner cannot access these parts of the program. 3.1 GETTING STARTED Logging in 1. Open Internet Explorer and go to 2. Enter your /username and password. 3. Click Log in Retrieving the Password 1. In the login screen click the Forgot password? link. 2. Enter your address and click Reset password. 3. A new password will be sent to this address. Note: If no address is associated with your account, please contact your Examiner. User s Manual PM
 and Completed (2) tests set by the examiner. 3.2.1.1 Test Completion Dates Test completion dates (3) are shown as the second date next to the test name.")
44 PARTICIPANT CellaVision Proficiency 3.2 TAKING A TEST The TESTS Tab 1. Ongoing 2. Completed 3. Test completion dates 4. Test comments 5. Test results 6. Individual result comment available 7. Test conclusion available 8. Account settings The TESTS tab lists all Ongoing (1) and Completed (2) tests set by the examiner Test Completion Dates Test completion dates (3) are shown as the second date next to the test name. If a completion date is given a test must be completed before that date Test Comments Test comments (4) are the examiners descriptions of the tests. You can point to the test comment to see all of it Individual Result Comments The individual result comments (6) icon indicates that the examiner has written an individual comment for you on your test results. You can read this comment in the Test summary Results Status (Hourgass Icon) before a completed test indicates that the test results (5) are not yet available. 38 PM User s Manual
 window opens. 2.")

45 CellaVision Proficiency PARTICIPANT (Early access icon) before a completed test indicates that results are available but not all Participants in the test group have yet completed the test. Test results from fellow Participants will not be shown Account Settings 1. Click on the user name in the top right corner. The Account settings (6) window opens. 2. Click on the text box next to to edit your address. 3. Click on Change next to Password: to customize your password. 4. Select the language for the user interface using the drop down menus. 5. Click Save to save your changes Viewing a Test Opening a Test Double-click on an ongoing test. Each test contains one or more slides that need to be verified and signed in order to complete the test. User s Manual PM
46 PARTICIPANT CellaVision Proficiency Test Comment The Test comment is the examiners description of the test Slide States Unsigned slide. The verification of this slide is not yet complete and the slide has not yet been signed. Signed slide. Verification of this slide is complete and the slide has been signed. Note: To complete a test all slides must be signed Slide Information Click on a slide to obtain more information about that slide at the bottom of the page. Slide Comment 1. Click Add comment. 2. Add or edit the comment. 3. Click Save to save the change or Cancel to return the comment to its previous state. Note: Slide comments are visible to the Examiner. Additional Slide Data Additional slide data is sometimes provided and gives information to help correctly classify and characterize the cells. Click on the link to open the file. It will open in a program suitable for that file type Verifying Slides Opening a Slide for Verification In the test overview page double-click on a slide to verify it. 40 PM User s Manual
 verification using the tabs. When a slide has no RBCs only the WBC tab is shown and vice versa.")
47 CellaVision Proficiency PARTICIPANT The Verification View 1. WBC/RBC navigation 2. Collapse/Expand 3. Main view 4. WBC cell class comment 5. Sign slide WBC/RBC Navigation Switch between WBC and RBC (1) verification using the tabs. When a slide has no RBCs only the WBC tab is shown and vice versa. Collapse/Expand Click on the arrow to collapse/expand (2) the side panel. Main View The main view (3) shows either the WBC images of the currently selected classes or the RBC image. Add or Edit Cell Class Comments You can add cell class comments to any WBC cell class. These comments will be visible for the examiner after the test is completed. 1. Click the cell class that you want to add a comment to, and then click the Add comment button. 2. In the Add comment dialog, type your comment and then click Save. Sign Slide Button Click Sign Slide (4) to sign the slide when verification is complete. User s Manual PM
48 PARTICIPANT CellaVision Proficiency Adjust Image Brightness and Color 1. Click 2. Adjust the sliders. 3. Click Save. Clicking Reset will restore the default settings White Blood Cell Classification General Workflow 1. Click on the WBC tab. When starting WBC classification all cells will be listed in the Unidentified class. 2. Click on a WBC class in the side panel to show a gallery of all cells classified to that class in the main view. When using the two-class layout, left-click on a class to open it in the left gallery and right-click on a class to open it in the right gallery. Use the drop-down menu in an open WBC class gallery to switch between classes. 3. Classify cells by dragging and dropping them from one open class gallery to another or from an open class gallery to a class in the side panel or by rightclicking on a cell and selecting a class from the menu. Select multiple cells at once by pressing CTRL or SHIFT. 4. Continue until all cells are classified. Customize the Layout Switch between a one-class, two-class or all-classes layout using the layout toggle buttons. Increase or decrease the size of the cell images using the zoom slider. 42 PM User s Manual

49 CellaVision Proficiency PARTICIPANT Magnify Individual WBC 1. Double-click on a cell. A magnified version of that cell will open. 2. Use the mouse-wheel to change the zoom level. 3. Use the arrow keys to move to other cells in the gallery. 4. Click Close to close the magnified view. Add or Edit Individual Cell Comments 1. Double-click on a cell. A magnified version of that cell will open. 2. Click in the Comment box underneath the magnified cell and write a comment. 3. Click Save to save the comment. 4. Click Close to close the magnified view. Cells with comments are marked by a comment icon in the top right corner. Add or Edit Cell Class Comments You can write specific comments for a WBC cell class in the classification view so that you can get a better overview on the comments when reviewing the result. Cell Marker The cell marker is a square that surrounds the cell for identification. Click to show/hide the square. WBC Reference Libraries 1. Switch to either the one-class or two-class layout. 2. Open the cell class of interest. 3. Click Reference cells. The reference cell gallery for that class will open as a separate gallery. Note: Reference libraries are only available if specified so by the Examiner. User s Manual PM
 (100x objective and a 22mm ocular).")
50 PARTICIPANT CellaVision Proficiency Red Blood Cell Characterization 1. RBC tab 2. Zoom slider 3. Magnified area 4. Report all as normal General Workflow 1. Click on the RBC (1) tab. 2. Zoom in to the RBC image using either the mouse wheel or the zoom slider (2). The RBC image corresponds to the area of 8 microscopic high power fields (HPF) (100x objective and a 22mm ocular). Note: Be aware that RBC images captured using a CellaVision Image Capture System can be of different magnifications. 3. Move around the image by clicking and dragging it. 4. Double-click anywhere on the RBC image to magnify that area. Move the mouse around the RBC image to move the position of the magnified area (3). Click again to close it. 5. Grade the RBC morphology using the radio buttons in the side panel. If required, reset all morphologies grades to a normal level by clicking Report all as normal (4). 44 PM User s Manual

51 CellaVision Proficiency PARTICIPANT RBC Characterization Grades 0 Normal level 1 Morphology is present at a low level 2 Morphology is present at a moderate level 3 Morphology is present at a high level Using the Ruler In the top left-hand corner of the RBC image there is a cross-shaped ruler that represents 14 μm across. Click on the ruler and drag it to the desired area in the RBC image. The ruler automatically scales up or down according to the zoom level of the RBC image Signing Slides Signing a slide indicates that the verification of that slide is completed. 1. Double-click on a slide to open it for verification. 2. Classify all WBC's until there are no cells left in the unidentified class and characterize the RBC image. The Sign slide button activates. 3. Click Sign slide. Signed slides are indicated in the test overview page by a check mark. See also Slide States for more information. Note: Once a slide has been signed it is no longer possible to change verification. 3.3 VIEWING TEST RESULTS Definitions Examiner result The Examiner result is the WBC classification and/or RBC characterization performed by the Examiner Majority result For WBC, it is the cell class assigned to a particular cell by the majority of Participants. For RBC, it is the characterization grade chosen by the majority of Participants. User s Manual PM
52 PARTICIPANT CellaVision Proficiency If the majority cannot be decided unanimously one of the cell classes/ characterizations is at random used as majority Reference The reference is either the Examiner result or Majority result depending on the selection made by the viewer WBC Agreement WBC Agreement shows how well the Participant's classification agrees (percentage) with the reference RBC Agreement The RBC Agreement shows how well the Participant s characterization agrees (percentage) with the reference Opening a Completed Test In the TESTS tab double-click on a completed test to open the results view The Results View 1. Results view navigation 2. Test conclusion report 3. Test comment 4. Slide list 5. Additional slide data 6. Slide comments 7. Slide counter Results View Navigation Click the results view navigation (1) tabs to browse the results. Test results are automatically compiled to show: A summary of results. WBC classification statistics on a class level. WBC classification statistics on a cell level. RBC characterization statistics. 46 PM User s Manual
 are presented.")
53 CellaVision Proficiency PARTICIPANT Collapse/Expand Click on the arrow to collapse/expand (2) the side panel Slide list The slides list (3) shows all slides included in the test. Include and exclude slides from the results by clicking on the slide. Hold down CTRL or SHIFT whilst clicking to select multiple slides. Only results from selected slides (i.e. highlighted in blue) are presented Additional slide data If additional slide data (4) exist for a slide the additional slide data icon be shown next to the slide in the slide list. Click on the icon to view the additional slide data. will Slide comments If one or more slide comments (5) exist for a slide the comment icon will be shown next to the slide in the slide list. Click on the comment icon to open a window with all comments Slide counter The slide counter (6) shows how many slides are currently selected and contributing to the shown results Test Summary 1. Bar chart 2. Compare to 3. Agreement percentages 4. Individual result comment 5. Infographics User s Manual PM
54 PARTICIPANT CellaVision Proficiency Click the Summary of results tab to see an overview of how Participants performed in the test. Participant names are anonymized, but your results are indicated by You Bar Chart The bar chart (1) shows the average WBC and RBC agreement for each Participant displayed as percentage values. The higher the agreement the better a Participant is considered to have performed in the test. Switch between using either the Examiner or Majority result as a reference for the agreement using the radio buttons in the Compare to (2) box. The Agreement percentages (3) box shows the values used for drawing the bars in the bar chart. Sort the bar chart using the drop-down menu. Filter the bar chart using the drop-down menus Individual result comment If the examiner has written an individual comment on your test results, you can click the Individual result comment icon (4) to read the comment. You ll find the Individual result comment icon on the Test summary tab, under Agreemet percentages Infographics The infographics (5) display the following key metrics of the test: Total Participant number. Average WBC and RBC agreement for all Participants compared to the reference selected in the compare to box (Examiner or Majority result). Highest and lowest WBC and RBC agreements compared to the reference selected in the Compare to box (Examiner or Majority result) WBC Classes Click the WBC classes tab to see the results of WBC classification on a class level. Switch between Examiner and Majority in the compare to box to change the reference classifications. Switch between showing One participant - all cell classes and One cell class - all participants in the Display box to show different views of the data. 48 PM User s Manual

55 CellaVision Proficiency PARTICIPANT One participant - all cell classes When selecting One participant - all cell classes your classification results are shown as a total number of cells per cell class compared to the reference classification. Each cell class is shown with a top and bottom bar. The top bar (dark grey) shows the total number of cells classified to this class by the reference. The bottom bar shows the total number of cells classified to this class by you. The blue part of the bar indicates the number of cells where you and reference agreed on the classification. The orange part indicates where you disagreed. User s Manual PM

56 PARTICIPANT CellaVision Proficiency One cell class - all participants When selecting One cell class - all participants the total number of cells classified to the selected cell class by all Participants as well as the reference is shown. The top bar (dark grey) shows the reference result. The following bars show the Participant results. The blue part of the bar indicates the number of cells where the Participant and reference agreed on the classification. The orange part indicates where they disagreed. Change cell class using the drop down menu in the Display box WBC Cells Click the WBC cells tab to see the results of WBC classification on a cell level. 50 PM User s Manual
 tab in the side panel to see which WBCs caused the most classification disagreements.")
57 CellaVision Proficiency PARTICIPANT View Classifications 1. View classifications 2. Main view 3. Cell classifications 4. Individual cell classifications Click on the View classifications (1) tab in the side panel to see which WBCs caused the most classification disagreements. All cells from the currently selected slides are compiled and shown in the main view (2), starting with the cell that has the highest number of disagreements. The total number of cells in the current list is shown in brackets next to the heading All cells above the cell image. The Cell classifications box (3) shows the cell classes and number of total classifications to each cell class for the currently shown cell. It also shows which slide the cell originates from. The Individual cell classifications (4) box shows how the Examiner and each Participant classified the cell. Use the arrow buttons underneath the cell to click through all cells. The cells are sorted so that the cells with highest number of different classifications are at the beginning of the list. User s Manual PM
58 PARTICIPANT CellaVision Proficiency Compare Individuals 1. Compare individuals 2. Main view 3. Compare 4. Disagreement results Click on the Compare individuals (1) tab in the side panel to see how the WBC classification results compare between you and a chosen reference. Change the reference using the drop-down menu in the Compare (3) box. The first two columns in the Disagreement results (4) table show the number of cells you and the reference classified to each class. The third column shows the number of cells where the classification differs. Sort WBC classes with the most disagreements to the top of the list by clicking on the table headers in the Disagreement results (4) table. Click on a cell class name to show cell images with disagreements in the main view (2). The two differing classifications are shown above the cell image. Use the arrow buttons underneath the cell image to click through all disagreements of that class. Cell comments (if available) are shown underneath the cell image Showing Cell Libraries Click Open cell class to show all cells for that slide that were classified to this class by the Examiner. Use the drop-down menu to change to a different class. 52 PM User s Manual


59 CellaVision Proficiency PARTICIPANT RBC Characteristics Click the RBC characteristics tab to see the results of RBC characterization. Switch between Examiner and Majority in the compare to box to change the reference characterization. The table shows the Examiner, Majority and Participants characterization grades for the different morphologies. Cells with an orange background color indicate where the characterization differs from the reference. The stronger the orange color the greater the deviation. Click Show RBC image to bring up the RBC image. Click outside of the image to close it. Note: RBC characterization results can only be viewed for one slide at a time Test Conclusions Test conclusions are reports created externally by the Examiner and may be attached to the result of a test. 1. Double-click on a completed test in the TESTS tab to open the results. 2. A button next to the test name indicates that a test conclusion is available. 3. Click on the button. The test conclusion will open in a program that supports that file type. User s Manual PM
CellaVision. Ola Andersson Peter Wilson. Siemens Belgium
 CellaVision Ola Andersson Peter Wilson Siemens Belgium CellaVision in short Headquarters in Lund, Sweden Around 80 employees globally Market support offices in the Nordic countries, the US, Canada, Japan,
KODAK Software User s Guide
 KODAK Create@Home Software User s Guide Table of Contents 1 Welcome to KODAK Create@Home Software Features... 1-1 Supported File Formats... 1-1 System Requirements... 1-1 Software Updates...1-2 Automatic
OpenForms360 Validation User Guide Notable Solutions Inc.
 OpenForms360 Validation User Guide 2011 Notable Solutions Inc. 1 T A B L E O F C O N T EN T S Introduction...5 What is OpenForms360 Validation?... 5 Using OpenForms360 Validation... 5 Features at a glance...
Multi-NVR Manager. Quick Start Configuration Usage
 Multi-NVR Manager Quick Start Configuration Usage 2014. All rights are reserved. No portion of this document may be reproduced without permission. All trademarks and brand names mentioned in this publication
SMART Meeting Pro PE 4.1 software
 Help us make this document better smarttech.com/feedback/170973 SMART Meeting Pro PE 4.1 software USER S GUIDE Product registration If you register your SMART product, we ll notify you of new features
SMART Meeting Pro 4.2 personal license USER S GUIDE
 smarttech.com/docfeedback/170973 SMART Meeting Pro 4.2 personal license USER S GUIDE Product registration If you register your SMART product, we ll notify you of new features and software upgrades. Register
Working with Pages... 9 Edit a Page... 9 Add a Page... 9 Delete a Page Approve a Page... 10
 Land Information Access Association Community Center Software Community Center Editor Manual May 10, 2007 - DRAFT This document describes a series of procedures that you will typically use as an Editor
RITIS Training Module 4 Script
 RITIS Training Module 4 Script Welcome to the Regional Integrated Information System or RITIS Module 04 CBT. To begin, select the start button or press Shift+N on your keyboard. This training module will
DataCollect Administrative Tools Supporting DataCollect (CMDT 3900) Version 3.0.0
 Version 3.0.0") Administrator Manual DataCollect Administrative Tools Supporting DataCollect (CMDT 3900) Version 3.0.0 P/N 15V-090-00054-100 Revision A SKF is a registered trademark of the SKF Group. All other trademarks
Administrator Manual DataCollect Administrative Tools Supporting DataCollect (CMDT 3900) Version 3.0.0 P/N 15V-090-00054-100 Revision A SKF is a registered trademark of the SKF Group. All other trademarks
Avigilon Control Center Web Client User Guide
 Avigilon Control Center Web Client User Guide Version: 4.12 Standard PDF-WEBCLIENT-S-E-Rev2 Copyright 2013 Avigilon. All rights reserved. The information presented is subject to change without notice.
IGSS 13 Configuration Workshop - Exercises
 IGSS 13 Configuration Workshop - Exercises Contents IGSS 13 Configuration Workshop - Exercises... 1 Exercise 1: Working as an Operator in IGSS... 2 Exercise 2: Creating a new IGSS Project... 28 Exercise
KMnet Viewer. User Guide
 KMnet Viewer User Guide Legal Notes Unauthorized reproduction of all or part of this guide is prohibited. The information in this guide is subject to change for improvement without notice. We cannot be
NETWORK PRINT MONITOR User Guide
 NETWORK PRINT MONITOR User Guide Legal Notes Unauthorized reproduction of all or part of this guide is prohibited. The information in this guide is subject to change for improvement without notice. We
Using IPACS Webserver:
 Using IPACS Webserver: Logging On: The IPACS Webserver can be accessed from any PC with internet connectivity. 1. Open Internet Explorer or your internet service provider. 2. Type the IPACS web address
Center for Faculty Development and Support. Google Docs Tutorial
 Center for Faculty Development and Support Google Docs Tutorial Table of Contents Overview... 3 Learning Objectives... 3 Access Google Drive... 3 Introduction... 4 Create a Google Document... 4 Upload
MultiSite Suite: Accounts Payable
 MultiSite Suite: Accounts Payable User s Manual version 6 Copyright & Trademarks Copyright Notice and Trademarks 2010 MultiSite Systems, All rights reserved. Microsoft, Windows, Excel, and Outlook are
Podium Plus Data Analysis Software. User Manual. SWIS10 Version
 SWIS10 Version Issue 1.10 February 2005 Contents 1 Introduction 6 1.1 What is Podium Plus? 6 1.2 About This Manual 6 1.3 Typographical Conventions 7 1.4 Getting Technical Support 7 2 Getting Started 8
Legal Notes. Regarding Trademarks KYOCERA MITA Corporation
 Legal Notes Unauthorized reproduction of all or part of this guide is prohibited. The information in this guide is subject to change without notice. We cannot be held liable for any problems arising from
KODAK Software User s Guide. Software Version 9.0
 KODAK Create@Home Software User s Guide Software Version 9.0 Table of Contents 1 Welcome to KODAK Create@Home Software Features... 1-1 Supported File Formats... 1-1 System Requirements... 1-1 Software
Akkadian Console 4.0
 Akkadian Console 4.0 User Guide Copyright and Trademarks: I. Copyright: This website and its content is copyright 2015 Akkadian Labs, LLC. All rights reserved. Except with the prior written permission
User Guide DYMO Label TM v.8
 User Guide DYMO Label TM v.8 Copyright Trademarks 2012-2015 Sanford, L.P. All rights reserved. Revised 9/6/2016. No part of this document or the software may be reproduced or transmitted in any form or
[ Getting Started with Analyzer, Interactive Reports, and Dashboards ] ]
![[ Getting Started with Analyzer, Interactive Reports, and Dashboards ] ]](/thumbs/88/117545107.jpg "[ Getting Started with Analyzer, Interactive Reports, and Dashboards ] ]") Version 5.3 [ Getting Started with Analyzer, Interactive Reports, and Dashboards ] ] https://help.pentaho.com/draft_content/version_5.3 1/30 Copyright Page This document supports Pentaho Business Analytics
Version 5.3 [ Getting Started with Analyzer, Interactive Reports, and Dashboards ] ] https://help.pentaho.com/draft_content/version_5.3 1/30 Copyright Page This document supports Pentaho Business Analytics
Numbers Basics Website:
 Website: http://etc.usf.edu/te/ Numbers is Apple's new spreadsheet application. It is installed as part of the iwork suite, which also includes the word processing program Pages and the presentation program
Solution Composer. User's Guide
 Solution Composer User's Guide January 2014 www.lexmark.com Contents 2 Contents Overview...4 Understanding the basics...4 System recommendations...5 Building custom solutions...6 Getting started...6 Step
Instructions for Ki67 Reproducibility Study Phase 3: Core Biopsies
 Instructions for Ki67 Reproducibility Study Phase 3: Core Biopsies Version: July 17, 2014 NOTE: It may be easier you for you to read these instructions in their entirety first. Although they appear long,
Welcome to the Investor Experience
 Welcome to the Investor Experience Welcome to the Black Diamond Investor Experience, a platform that allows advisors to customize how they present information to their clients. This document provides important
CLIQ Web Manager. User Manual. The global leader in door opening solutions V 6.1
 CLIQ Web Manager User Manual V 6.1 The global leader in door opening solutions Program version: 6.1 Document number: ST-003478 Date published: 2016-03-31 Language: en-gb Table of contents 1 Overview...9
EOS MOVIE Utility Ver. 1.5
 ENGLISH Software for Playing, Merging and Movies EOS MOVIE Utility Ver. 1.5 Content of this Instruction Manual 1D C 1D X Mk II 1D X 5DS/5DS R 5D Mk III 6D 7D Mk II 70D EMU is used for EOS MOVIE Utility.
User guide. PRISMAdirect Order processing
 User guide PRISMAdirect Order processing Copyright 2016, Océ All rights reserved. No part of this work may be reproduced, copied, adapted, or transmitted in any form or by any means without written permission
Working with Actions Stratum.Viewer 6
 Working with Actions Stratum.Viewer 6 Getting Started Access to Actions Accessing Actions Functionality Introduction to Actions Quick Start Set up an Action Tasks Add an Email Action Add a File Share Action
Turning Point Response System and Turning Point Anywhere
 What s in the TurningPoint Clicker Case? Each TurningPoint Clicker Case should have two primary components: USB input receiver (1) Clickers (30) How to Test the Response Devices Click TurningPoint AnyWhere
AvePoint Online Services for Partners 2
 AvePoint Online Services for Partners 2 User Guide Service Pack 1 Issued June 2017 Table of Contents What s New in this Guide...4 About...5 Submitting Documentation Feedback to AvePoint...6 Browser Support
14 July Ver CRView V3 User Guide. 1 P a g e
 Ver. 080707 CRView V3 User Guide 1 P a g e Contents Copyright notice... 3 Trademarks... 3 System requirements... 4 Required hardware... 4 Recommended hardware... 4 Installing CRView... 5 Installing from
User Guide. Trade Finance Global. For customers using Guarantees. October nordea.com/cm OR tradefinance Name of document 5/8 2015/V1
 User Guide Trade Finance Global For customers using Guarantees October 2015 nordea.com/cm OR tradefinance Name of document 2015/V1 5/8 Table of Contents 1 Trade Finance Global (TFG) - Introduction... 4
DOCUMENTUM D2. User Guide
 DOCUMENTUM D2 User Guide Contents 1. Groups... 6 2. Introduction to D2... 7 Access D2... 7 Recommended browsers... 7 Login... 7 First-time login... 7 Installing the Content Transfer Extension... 8 Logout...
Bombardier Business Aircraft Customer Services. Technical Publications. SmartPubs Viewer 3.0 User Guide. Updated January 2013 [2013]
![Bombardier Business Aircraft Customer Services. Technical Publications. SmartPubs Viewer 3.0 User Guide. Updated January 2013 [2013]](/thumbs/90/103657167.jpg "Bombardier Business Aircraft Customer Services. Technical Publications. SmartPubs Viewer 3.0 User Guide. Updated January 2013 [2013]") Bombardier Business Aircraft Customer Services Technical Publications SmartPubs Viewer 3.0 User Guide Updated January 2013 [2013] Table of Contents Application Views... 5 Collection View... 5 Manual View...
Bombardier Business Aircraft Customer Services Technical Publications SmartPubs Viewer 3.0 User Guide Updated January 2013 [2013] Table of Contents Application Views... 5 Collection View... 5 Manual View...
Imagine. Create. Discover. User Manual. TopLine Results Corporation
 Imagine. Create. Discover. User Manual TopLine Results Corporation 2008-2009 Created: Tuesday, March 17, 2009 Table of Contents 1 Welcome 1 Features 2 2 Installation 4 System Requirements 5 Obtaining Installation
Login: Quick Guide for Qualtrics May 2018 Training:
 Qualtrics Basics Creating a New Qualtrics Account Note: Anyone with a Purdue career account can create a Qualtrics account. 1. In a Web browser, navigate to purdue.qualtrics.com. 2. Enter your Purdue Career
New User Orientation PARTICIPANT WORKBOOK
 New User Orientation PARTICIPANT WORKBOOK INTEGRATED SOFTWARE SERIES New User Orientation PARTICIPANT WORKBOOK Version 2.0 Copyright 2005 2009. Interactive Financial Solutions, Inc. All Rights Reserved.
Working with Mailbox Manager
 Working with Mailbox Manager A user guide for Mailbox Manager supporting the Message Storage Server component of the Avaya S3400 Message Server Mailbox Manager Version 5.0 February 2003 Copyright 2003
Creating a Website with Publisher 2016
 Creating a Website with Publisher 2016 Getting Started University Information Technology Services Learning Technologies, Training & Audiovisual Outreach Copyright 2017 KSU Division of University Information
IBM Notes Client V9.0.1 Reference Guide
 IBM Notes Client V9.0.1 Reference Guide Revised 05/20/2016 1 Accessing the IBM Notes Client IBM Notes Client V9.0.1 Reference Guide From your desktop, double-click the IBM Notes icon. Logging in to the
you choose and by the roles the users are allowed to fulfill within the system. Finances Enter the monthly savings and costs for the project.
 Oracle Instantis EnterpriseTrack Quick Reference Guide for Release 8.5 Create a Proposal From the Top Navigation Bar, click Create Proposals/Charters. Enter all the required fields and click Save to save
OptionPower 3.2. for Office 2007 STARTUP GUIDE. Interactive Audience Response Systems
 OptionPower for Office 2007 3.2 STARTUP GUIDE Interactive Audience Response Systems OptionPower for Office 2007 3.2 STARTUP GUIDE 2008 Option Technologies Interactive This document is the copyrighted and
Odyssey File & Serve. Review Queue User Guide Release 3.11
 Odyssey File & Serve Review Queue User Guide Release 3.11 OFS-FS 200 3375 v.1 June 2015 COPYRIGHT AND CONFIDENTIALITY Copyright 2015 Tyler Technologies, Inc. All rights reserved. All documentation, source
Compliance Document Manager User Guide
 Compliance Document Manager User Guide Contents OVERVIEW... 3 SYSTEM REQUIREMENTS... 3 VENDORMATE PASSWORD REQUIREMENTS... 3 LOGIN... 4 THE HOME SCREEN... 5 BA Screening... 5 BA Oversight... 5 My Screening
Ringtail Basics. Quick Start Guide
 Ringtail Basics Quick Start Guide Ringtail 8 brings a new level of simplicity, ease of use, and efficiency to document review. The following pages walk through scenarios, based on common tasks, to show
A new clients guide to: Activating a new Studio 3.0 Account Creating a Photo Album Starting a Project Submitting a Project Publishing Tips
 Getting Started With Heritage Makers A Guide to the Heritage Studio 3.0 Drag and Drop Publishing System presented by Heritage Makers A new clients guide to: Activating a new Studio 3.0 Account Creating
Microsoft Office Publisher
 Microsoft Office 2007- Publisher Opening Microsoft Publisher Using the Start Menu, click on All Programs and navigate to the Microsoft Office folder. Click on Microsoft Office Publisher 2007. Choosing
Colony Counting User Manual A D I V I S I O N O F S Y N O P T I C S L T D
 ProtoCOL Colony Counting User Manual S Y N B I O S I S A D I V I S I O N O F S Y N O P T I C S L T D All possible care has been taken in the preparation of this publication, but Synoptics Limited accepts
OpenDrive Wordpress Plugin Guide
 OpenDrive Wordpress Plugin Guide Version 1.0.4 OpenDrive Online storage, backup and cloud content management Contents 1. Drive:... 3 1.1 Drive... 3 1.2 Working with files... 4 1.2.1 Work with a particular
BUCKVIEW Advanced. User Guide
 BUCKVIEW Advanced User Guide Inside This Manual I. Inside This Manual... 2 II. Viewing and Managing Your Images... 3 Manage Image Folders...5 Manage Sites...6 Manage Locations...10 Erase Memory Card...14
version 7.6 user manual
 version 7.6 user manual 2 Copyright JAVS 1981-2014 Table of Contents Introduction... 4 Getting Started... 5 Login... 5 JAVS Publisher 7 Overview... 6 Search Tool Overview... 7 Search Tool-Detailed Operation...
OpenDrive Wordpress Plugin Guide
 OpenDrive Wordpress Plugin Guide Version 2.0.1 OpenDrive Online storage, backup and cloud content management Contents 1. Drive 3 1.1 Drive... 3 1.2 Working with files... 4 1.2.1 Work with a particular
Quick Start Guide for Administrators and Operators Cyber Advanced Warning System
 NSS Labs Quick Start Guide for Administrators and Operators Cyber Advanced Warning System Introduction to the Cyber Advanced Warning System and RiskViewer... 1 Activating Your Account... 2 Adding a New
KYOCERA Net Viewer 5.3 User Guide
 KYOCERA Net Viewer. User Guide Legal Notes Unauthorized reproduction of all or part of this guide is prohibited. The information in this guide is subject to change without notice. We cannot be held liable
JITs Portal. User Manual
 JITs Portal User Manual November 2017 JITs Portal 1 Table of Contents Chapter 1 Introduction... 2 1.1 What is the JITs Portal?...3 1.2 User Guide structure...4 Chapter 2 Working with the JITs Portal...
Computer learning Center at Ewing. Course Notes - Using Picasa
 1st January 2014 Computer learning Center at Ewing Course Notes - Using Picasa These course notes describe the content of the Using Picasa course. The course notes are based on Picasa 3. This course material
Working with PDF s. To open a recent file on the Start screen, double click on the file name.
 Working with PDF s Acrobat DC Start Screen (Home Tab) When Acrobat opens, the Acrobat Start screen (Home Tab) populates displaying a list of recently opened files. The search feature on the top of the
Certify User Guide CREATING & SUBMITTING EXPENSE REPORTS
 Certify User Guide CREATING & SUBMITTING EXPENSE REPORTS Copyright 2018 All Rights Reserved This version is current as of July 1, 2018 For continuously updated instructions, please visit our Help Center
myabb/my Control System End User Manual
 myabb/my Control System End User Manual Table of Contents General... 3 User Manual Conventions... 3 My Control System... 4 Introduction... 4 Customer roles in myabb/my Control System... 4 How to login
Electronic Appraisal Delivery (EAD) Portal. FHA EAD Lender Admin Guide
 Portal. FHA EAD Lender Admin Guide") Electronic Appraisal Delivery (EAD) Portal FHA EAD Lender Admin Guide Last Updated: October 2015 FHA EAD Lender Admin Guide Page 2 of 95 Version 1.3.1 TABLE OF CONTENTS INTRODUCTION... 5 WHAT IS THE ELECTRONIC
Electronic Appraisal Delivery (EAD) Portal FHA EAD Lender Admin Guide Last Updated: October 2015 FHA EAD Lender Admin Guide Page 2 of 95 Version 1.3.1 TABLE OF CONTENTS INTRODUCTION... 5 WHAT IS THE ELECTRONIC
My Reviewers User Manual Series
 My Reviewers User Manual Series Version 4.1 Student Guide Table of Contents Getting Started... 2 Logging in to the My Reviewers tool... 2 Navigating the site... 2 Uploading a Document... 3 Viewing Teacher
Solo 4.6 Release Notes
 June9, 2017 (Updated to include Solo 4.6.4 changes) Solo 4.6 Release Notes This release contains a number of new features, as well as enhancements to the user interface and overall performance. Together
KYOCERA Net Viewer User Guide
 KYOCERA Net Viewer User Guide Legal Notes Unauthorized reproduction of all or part of this guide is prohibited. The information in this guide is subject to change without notice. We cannot be held liable
CounselLink Reporting. Designer
 CounselLink Reporting Designer Contents Overview... 1 Introduction to the Document Editor... 2 Create a new document:... 2 Document Templates... 3 Datasets... 3 Document Structure... 3 Layout Area... 4
Photo Gallery. Photo Gallery. Photo Gallery Name. Photo Gallery Body Text. Images. Image Title. Page 1 of 5
 Name Body Text Images Image Page 1 of 5 Create a New To create a new, sign into your website. Navigate to Structure Taxonomy Image Galleries Add Term. Name Description Name Name of the gallery. Description
User Guide. Web Intelligence Rich Client. Business Objects 4.1
 User Guide Web Intelligence Rich Client Business Objects 4.1 2 P a g e Web Intelligence 4.1 User Guide Web Intelligence 4.1 User Guide Contents Getting Started in Web Intelligence 4.1... 5 Log into EDDIE...
Creating Interactive PDF Forms
 Creating Interactive PDF Forms Using Adobe Acrobat X Pro for the Mac University Information Technology Services Training, Outreach, Learning Technologies and Video Production Copyright 2012 KSU Department
Educator s Guide to IO Education (formerly BaselineEdge)
") Educator s Guide to IO Education (formerly BaselineEdge) Can be used with any browser: Chrome (for Windows), Safari, Firefox or Internet Explorer. Browser versions will need to be kept up to date. 1. Logging
Educator s Guide to IO Education (formerly BaselineEdge) Can be used with any browser: Chrome (for Windows), Safari, Firefox or Internet Explorer. Browser versions will need to be kept up to date. 1. Logging
WEB TIME SUPERVISOR GUIDE
 Revised 02/23/2018 WEB TIME SUPERVISOR GUIDE CLIENT RESOURCE PAYLOCITY.COM TABLE OF CONTENTS Web Time... 3 Home... 15 Employees... 28 Reports... 130 Web Kiosk Setup... 132 Glossary... 156 Index... 158
IT Essentials v6.0 Windows 10 Software Labs
 IT Essentials v6.0 Windows 10 Software Labs 5.2.1.7 Install Windows 10... 1 5.2.1.10 Check for Updates in Windows 10... 10 5.2.4.7 Create a Partition in Windows 10... 16 6.1.1.5 Task Manager in Windows
The walkthrough is available at /
 The walkthrough is available at https://downloads.openmicroscopy.org/presentations/2018/gbi-sydney / Description We will demonstrate a number of features of the OMERO platform using an OMERO server based
Innovative Solutions - Technical Excellence. API ImageViewer. Virtual Microscopy. API ImageViewer Instructions
 Innovative Solutions - Technical Excellence API ImageViewer Virtual Microscopy API ImageViewer Instructions Table of Contents Overview... 3 Getting Started Selecting the Result Form... 4 Selecting the
Océ Posterizer Pro Designer. POP into retail. User manual Application guide
 - Océ Posterizer Pro Designer POP into retail o User manual Application guide Copyright copyright-2010 Océ All rights reserved. No part of this work may be reproduced, copied, adapted, or transmitted in
3.2 Circle Charts Line Charts Gantt Chart Inserting Gantt charts Adjusting the date section...
 / / / Page 0 Contents Installation, updates & troubleshooting... 1 1.1 System requirements... 2 1.2 Initial installation... 2 1.3 Installation of an update... 2 1.4 Troubleshooting... 2 empower charts...
Perceptive Data Transfer
 Perceptive Data Transfer User Guide Version: 6.5.x Written by: Product Knowledge, R&D Date: September 2016 2015 Lexmark International Technology, S.A. All rights reserved. Lexmark is a trademark of Lexmark
Quick Start Guide (V1.03) UD.6L0201B1064A01
 UD.6L0201B1064A01") ivms-4200 PCNVR Quick Start Guide (V1.03) UD.6L0201B1064A01 Thank you for purchasing our product. If there is any question or request, please do not hesitate to contact the dealer. This manual applies
ivms-4200 PCNVR Quick Start Guide (V1.03) UD.6L0201B1064A01 Thank you for purchasing our product. If there is any question or request, please do not hesitate to contact the dealer. This manual applies
Corel Ventura 8 Introduction
 Corel Ventura 8 Introduction Training Manual A! ANZAI 1998 Anzai! Inc. Corel Ventura 8 Introduction Table of Contents Section 1, Introduction...1 What Is Corel Ventura?...2 Course Objectives...3 How to
User Manual. perfectionlearning.com/technical-support
 User Manual perfectionlearning.com/technical-support 1 User Manual Accessing Math X... 3 Login... 3 Forgotten Password... 3 Navigation Menu... 4 Logout... 4 Admin... 5 Creating Classes and Students...
Using Sitecore 5.3.1
 Using Sitecore 5.3.1 An End-User s Guide to Using and Administrating Sitecore Author: Sitecore Corporation Date: December 12, 2007 Release: Rev. 1.0 Language: English Sitecore is a registered trademark.
Table of Contents... ii. GO AHEAD BRING YOUR OWN DEVICE TO WORK... 1 Requirements... 1
 Table of Contents... ii GO AHEAD BRING YOUR OWN DEVICE TO WORK... 1 Requirements... 1 1: Use AT&T Toggle Applications on an iphone or ipad... 1 AT&T Toggle... 2 Set up Work Email within AT&T Toggle...
Griffin Training Manual Grif-WebI Introduction (For Analysts)
") Griffin Training Manual Grif-WebI Introduction (For Analysts) Alumni Relations and Development The University of Chicago Table of Contents Chapter 1: Defining WebIntelligence... 1 Chapter 2: Working with
Griffin Training Manual Grif-WebI Introduction (For Analysts) Alumni Relations and Development The University of Chicago Table of Contents Chapter 1: Defining WebIntelligence... 1 Chapter 2: Working with
TransUnion Healthcare Solutions Portal User Guide
 TransUnion Healthcare Solutions Portal User Guide HSP.transunion.com February 16, 2018 Version 2.30 2017 TransUnion LLC All Rights Reserved No part of this publication may be reproduced or distributed
User Guide for Explorer Users
 User Guide for Explorer Users Version 2015.1 Hubble Suite (Edition 2) Document Information....................................................... 1 Notices.........................................................................
Enrollment Operator Guide. Avigilon Access Control Manager System Version
 Enrollment Operator Guide Avigilon Access Control Manager System Version 5.12.0 2018, Avigilon Corporation. All rights reserved. AVIGILON, the AVIGILON logo, ACCESS CONTROL MANAGER, ACM, and ACM VERIFY
Receipt Gallery. Receipt Gallery Instructions. Page 1 of 11
 Page 1 of 11 Receipt Gallery The Receipt Gallery is accessible from the main menu (via the ereceipts button) and the Add Expenses panel and contains all the emailed receipt images sent to receipt@chromefile.com,
ORACLE RDC ONSITE RESEARCH COORDINATOR TRAINING
 ORACLE RDC ONSITE RESEARCH COORDINATOR TRAINING TRAINING REQUIREMENTS RDC system training is designed and conducted for access to OnSite. Additional RDC training will be provided on a per study basis by
User Manual instantolap
 User Manual instantolap Version 2.7.0 15.12.2010 Page 2 / 213 instantolap User Manual 2.7.0 instantolap User Manual 2.7.0 Page 3 / 213 Copyright Copyright (C) 2002-2010 Thomas Behrends Softwareentwicklung
CyberLink. U Webinar. User's Guide
 CyberLink U Webinar User's Guide Copyright and Disclaimer All rights reserved. To the extent allowed by law, U Webinar IS PROVIDED AS IS, WITHOUT WARRANTY OF ANY KIND, EITHER EXPRESS OR IMPLIED, INCLUDING
Table of Contents... ii. GO AHEAD BRING YOUR OWN DEVICE TO WORK... 1 Requirements... 1
 Table of Contents... ii GO AHEAD BRING YOUR OWN DEVICE TO WORK... 1 Requirements... 1 1: Use AT&T Toggle Applications on an iphone or ipad... 1 AT&T Toggle... 2 Set up Work Email within AT&T Toggle...
Technical Publications 1View
 Technical Publications 1View 1View User Guides Overview... 2 Homepage... 4 Subscription Management... 5 Table of Contents (TOC)... 6 Navigation... 8 Search... 11 Linking... 13 Order List... 14 Graphic
User Guide. Product: GreenFolders. Version: 3.8
 User Guide Product: GreenFolders Version: 3.8 Release Date: October 2014 GreenFolders 3.8 User Guide Introduction Table of Contents 1 Introduction... 6 2 General Information... 7 2.1 Login Procedure...
Getting Started Guide
 Getting Started Guide for education accounts Setup Manual Edition 7 Last updated: September 15th, 2016 Note: Click on File and select Make a copy to save this to your Google Drive, or select Print, to
Impress Guide Chapter 11 Setting Up and Customizing Impress
 Impress Guide Chapter 11 Setting Up and Customizing Impress This PDF is designed to be read onscreen, two pages at a time. If you want to print a copy, your PDF viewer should have an option for printing
ezimagex2 User s Guide Version 1.0
 ezimagex2 User s Guide Version 1.0 Copyright and Trademark Information The products described in this document are copyrighted works of AVEN, Inc. 2015 AVEN, Inc. 4595 Platt Rd Ann Arbor, MI 48108 All
Fusion. CBR Fusion MLS Level 1 Core Functions. Class Handout
 Fusion 1 CBR Fusion MLS Level 1 Core Functions Class Handout GETTING STARTED IN FUSION Logging On and Off To log on to Fusion MLS: 1. Type your user name in the User ID box. 2. Type your password in the
PM4 + Partners Knowledge Articles
 PM4 + Partners Knowledge Articles Customizing your PM4+ user experience r 1 November 30, 2108 PM4+ Partners Workspace - customize your experience Page 2 Contents Customizing Your Workspace... 1 Customizing
Specification Manager
 Enterprise Architect User Guide Series Specification Manager How to define model elements simply? In Sparx Systems Enterprise Architect, use the document-based Specification Manager to create elements
Calendar & Buttons Dashboard Menu Features My Profile My Favorites Watch List Adding a New Request...
 remitview User Guide 1 TABLE OF CONTENTS INTRODUCTION... 3 Calendar & Buttons... 3 GETTING STARTED.... 5 Dashboard.... 7 Menu Features... 8 PROFILE.... 10 My Profile... 10 My Favorites... 12 Watch List...