Colour Set-up Version 7.1
|
|
|
- Nigel Johns
- 5 years ago
- Views:
Transcription
1 1 of 35 Colour Set-up Version 7.1 REVISION HISTORY Date Rev Description Author Approved 4/07/14 G Various updates including Win8. CW/FMC/DMG 26/05/15 G Updated to include ICC Profiles NM
2 2 of 35 Table of Contents 1 Printer Components Installing Printer Components in Cabinet Installing Ink cartridges Setting up paper tray Epson Driver Set-up Epson Printer Preferences Print Head Alignment Installing and using SliceIT and other software Installing the Logitech software for the web-cams Setting ICC Profile 2D Printer Scalers, Duplex and Knife Alignment Printer State Running a Colour Part Running the 2D printer and 3D printer Colour Builds Faults... 34

3 3 of 35 1 Printer Components The printer supplied with the colour system is a standard Epson 310N or 510N printer, however a number of modifications have been made to improve its duplex image registration and output tray capacity. (Note that the only difference between the 310 and 510 printers is that the duplex unit comes installed on the 510 printer. Mcor supply the duplex unit for all 310 printers). The components of the system are shown in figure below. Along with these components is the table used to house the unit. The duplex unit comes packaged separately with the 310N. The printer and the Iris are designed to now function only with Mcor ink. The Mcor ICC profile is directly tied to Mcor ink. Use of other ink will result in colour penetration problems and possible 2D printer issues which will not be covered by warranty. Mcor Ink Epson Printer 310 or 510 High Capacity paper capture tray Duplex unit Ejector Plate Extra Long USB Cable

4 4 of 35 2 Installing Printer Components in Cabinet Locate the 2D printer against the two dowel pins, one at the rear corner and one at the side, as shown above. If the printer has a separate duplex unit attach it now and run the power and usb cables through the cabinet.

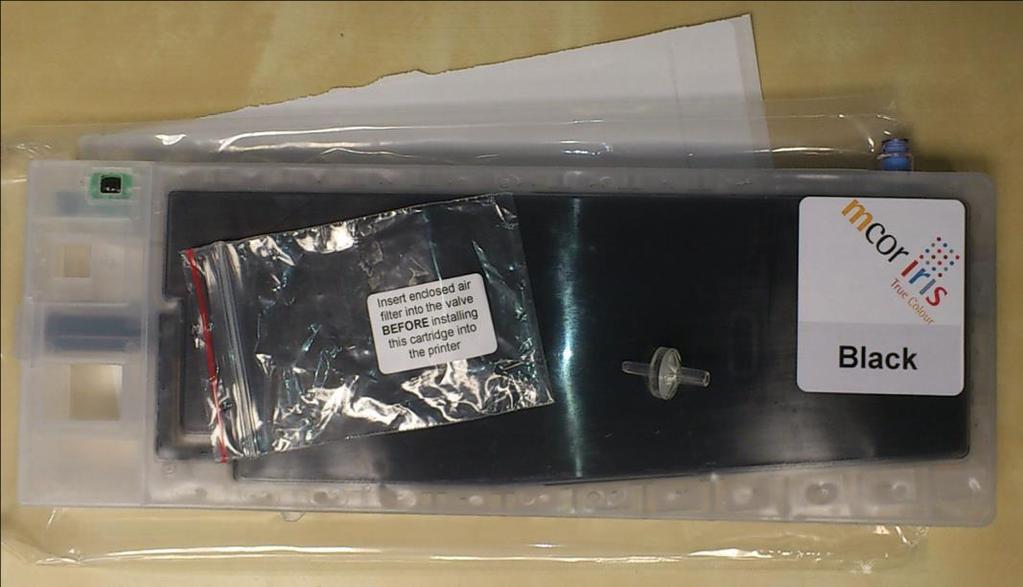
5 5 of 35 Modified paper tray with Ejector Guides Ejection Plate High capacity catch tray in position. Place the ejection plate into position at the exit of the 2D printer paper feed. Place the high capacity catch tray in position under the shelf on which the 2D printer sits. This is aligned to receive the pages off of the ejection plate straight in to the tray, as shown above. 3 Installing Ink cartridges The Mcor ink Cartridges are installed in the following manner.
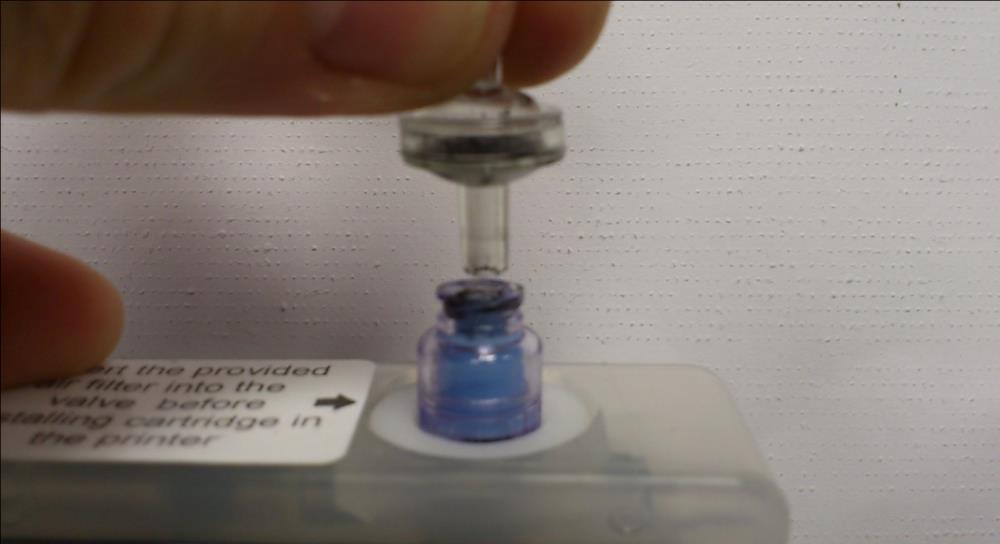
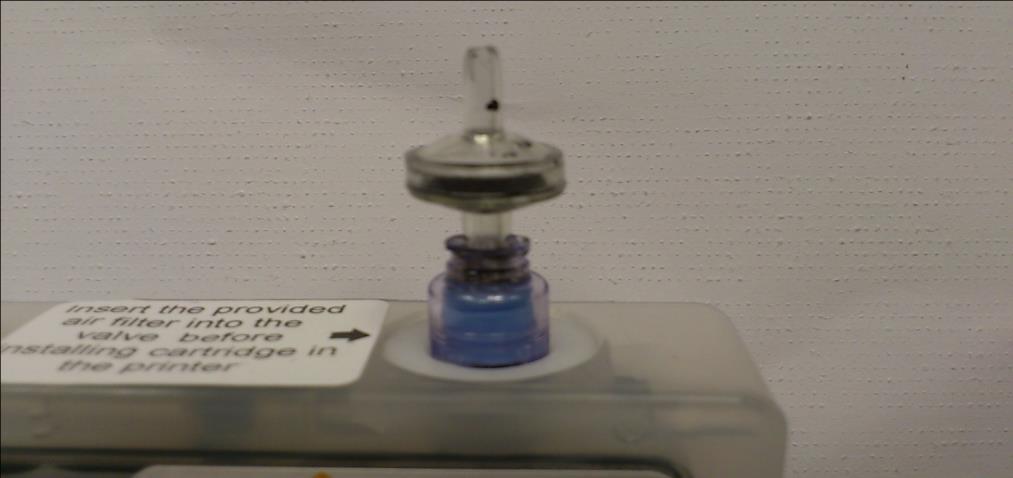
6 6 of 35 Note that only Mcor should be used in this printer. Use of other ink including Epson original ink constitutes a breach of contract and voids the warranty. Remove the cartridge from its protective package and install the air vent into the air inlet port, with the cartridge upright. Push the larger side of the air vent into the inlet port and press down. The internal foam pad should move down breaking the air tight seal. Be cautious as some ink may come out due to pressure in the cartridge. All air vents must be in place before installation to the printer. The air vent allows air into the cartridge as the printer draws the ink out. Try not to squeeze the sides of the cartridge as this may cause ink to rise up in to the vent. This can later dry and prevent airflow. If this happens please either replace the vent or pierce the blocked vent with a pin to allow airflow. These cartridges are completely full of ink. There is no need to prime them but should check for an air bubble from transit and ensure that this is away from the lower feed channel. Carefully insert the cartridge into the printer taking care not to damage either of the microchips on either side of the cartridge. Repeat for the remaining cartridges. Once all of the cartridges are installed, move the select lever on the printer, located to the right of the cartridges, to the locked position. Note that when you power up the printer the very first time the ink lines are completely empty. It can take up to 10 minutes to fully charge these lines with ink. (This time should be spent installing all of the software, starting with the Epson software, then SliceIT and ColourIT and finally the webcam software. Note that the 3D printer does not have to be powered up to run the web cameras; they run off of usb power from the computer. See Section 8). The Ink level detection no longer works on the printer, it is the responsibility of the user to ensure that the cartridges are NEVER allowed to run empty. If this happens ink will dry on the inside of the nozzles causing a permanent blockage. There is no solution for this. When the ink gets to the bottom of the front of the cartridge it must be replaced.
7 7 of 35

8 8 of 35 The image above shows the Epson Maintenance tray, located at the bottom right hand side of the 2D printer. This tray is an Epson consumable and periodically needs replacing. Mcor do sell this unit, but it can also be sourced locally from Amazon or e Bay or indeed local office suppliers. The Epson part number for this is T Setting up paper tray The Epson printer comes with a modified paper tray to improve the duplex printing registration. The Mcor modification reduces the possibility of the page being fed at an angle (skew). It allows for far more control of the feeding of the paper into the printer. This is set up in the following way. First loosen the two screws on the bottom of the tray. Move the inner paper tray to the left and insert at least 250 but no more that 400 sheets into the paper tray.
.")
9 9 of 35 On the left side of the inner paper tray fold a page in two and place it between the side wall of the inner tray and the edge of the pages, see below. (not between the Epson tray and the stack of paper.). Single sheet of paper folded in half to form a shim Next Angle the paper tray and tap on its side so that the inner tray is a tight fit on the pages. (This is creating a 0.2mm gap to allow for tolerances in paper and stacking). Once complete tighten the screws on the under side of the tray and remove the folded page. Tighten each screw partially going back and forth until each is secure. Remove the folded page slowly. There should be even friction along its complete length, otherwise the tray is skewed. 5 Epson Driver Set-up Once the Printer has been set-up, we can install the Epson driver from the enclosed CD. It is important to install the printer as a USB printer. The printer is designed to be used as either a USB or as a network printer, but for our purposes it will only work properly as a USB printer as it gives us complete control of the printing preferences and prevents another document or image from been added to our stack. During the installation process you will be asked to connect the printer, follow the on-screen instructions and use the USB port.

10 1 of 35 0 The disc should auto-run to this pop-up window. Close the browser window that may open once your selection has been made. The next option is the user agreement followed by the image on the next page which allows you to select the USB connection. The software can also be downloaded from the Epson website.

11 1 of 35 1 The Epson software is currently only fully compatible with Win 7. If installing the software on a windows 8.0 or 8.1 machine you will receive the following error message, select Run the program without getting help as no solution will be available. We are currently unaware of any actual issue when running this printer with SliceIT on a Windows 8.0 or 8.1 computer.

12 1 of Epson Printer Preferences In order for the colour on the Iris to be the best it can be the Epson printer must be configured correctly. Failure to follow these steps will result in issues with the colour on a model. First of all on the main tab, select your paper size, then select Graphic mode, 2-Sided printing to Auto and leave Orientation as portrait.

13 1 of 35 3 Next go to the page layout tab and click on Adjust Print Density


14 1 of 35 4 This will open another window, Print Density Adjustment. Set the Print density to 0% and the increased drying time to 0 sec

15 1 of 35 5 Next move to the Advanced tab. Under Colour Management, select ICM and select Off (No colour adjustment). The colour correction will be made in SliceIT. Then click on the Save settings button. Set the name of this configuration to Mcor Default and save. In the Short cuts tab select Mcor Default and click OK. This will set this configuration as default. In the device manager please also make this Epson printer the default printer for your computer. At this stage the printer is set-up and the software installed, a test page may have been printed. We now need to carry out a nozzle check to see if the ink has gotten to all nozzles. Before we use the Epson Nozzle Check utility it is

16 1 of 35 6 best to purge some ink through the system using the Mcor Technologies 4 Colour Test Page. This page has four solid rectangles, one in each colour and allows for a heavy deposition of ink thus priming the ink nozzles. It will also verify that the ink cartridges have been installed in the correct position. (It is on the next page and also available as a single page PDF. If printing from here ensure that when you print you only print the current page ). The next step is to open the Epson preferences, from devices and printers or Epson print utility from the notification tray. Under maintenance tab you can print out a nozzle check. You can also print out a nozzle check sheet directly from the printer.
17 1 of 35 7 Yellow Cyan Print using default Mcor Epson settings Black Magenta Once selected the nozzle check will open a new dialogue window, see below.


18 1 of 35 8 Once printed the dialogue will explain what a good nozzle check looks like. Note: If there are issues refer to the Epson user manual for assistance. You may need to carry out a nozzle cleaning procedure. Check that each line is printed with no or very few missing parts. If large gaps are repeatedly in the same location, cleaning is required.

19 1 of 35 9 Typically small breaks which are individual and isolated will not affect an Mcor 2D print as the Mcor process applies more ink. If they are repeatable then they may cause a problem. If there are any breaks in adjacent lines forming a large block of missing ink, and this is repeatable, then you must use the Mcor Technologies nozzle cleaning document to purge the relevant head. (This process involves printing a complete page of unmixed colour. This prevents wasting the other inks and also prevents filling up of the maintenance tray). When complete, check the nozzles again and repeat process if necessary. If the problem persists, do this up to 3 times, then as per the manufacturer s recommendations, power down the printer for at least 6 hours or ideally overnight. (This information is on pages of the Epson manual). Note that sometimes gaps in a nozzle check can be as a result of poor head alignment. Thus if difficulty arises it may be best to re-perform the head alignment procedure and begin repeat the nozzle check. 7 Print Head Alignment To align the print heads we use the Align Print Head feature in the Epson Maintenance tab. The following steps detail the alignment process: Choose the Align print head option.


20 2 of 35 0 Make sure that the printer has at least two sheets of paper in the tray and click next. Wait for the first alignment page to print out. This will be the vertical alignment page. When the page is printed out enter the number of the best aligned pattern from each row.


21 2 of 35 1 Click continue, you will be asked to insert another sheet of paper. Insert one page if the tray is empty and click continue. Wait for the second alignment page to print out. Like before, when the page is printed out enter the number of the best aligned pattern. Click Finish to finish the alignment.
22 2 of 35 2 This may have to be repeated if either alignment is very bad. 8 Installing and using SliceIT and other software Install SliceIT per 3D printer user / operational manual. At this stage you can install the Mcor Technologies ICC profile or your own if you wish. The Mcor ICC profile is available on the USB memory stick that shipped with the Iris. You may wish to also install ColourIt at this point and send the request to Deskartes for a license. Installation instructions are also in the 3D printer operational manual. You can also install the web camera software. 8.1 Installing the Logitech software for the web-cams The 3D Printer comes with 2 installed web cams to aid in customer support. The 2 web-cams are connected internally in the machine to a USB hub and then to the output USB connector seen at the rear of the machine. Before these webcams can be used by SliceIT we first have to install the driver software that comes with the machine. Download the software from the Logitech website as per the user manual or from here if no manual is available: Select web-camera, C310 and download the relevant software for your operating system. (Win 7 or Win 8). Run the software Sometimes the Operating system will try to install software / drivers for the web-camera automatically as it detects them. Try to avoid this. When requested, insert USB cable from the rear of the 3D into the PC It is permissible (and indeed necessary) to allow the operating system to install drivers and software to run the USB hub. This process must be allowed to finish before continuing the web-camera software installation. A message will be displayed at the bottom right hand side of your screen saying Your device is ready to use. Select the custom installation. There are known issues running these cameras off of USB 3.0 ports. The computer may need to be shut down and restarted to enable both

23 2 of 35 3 cameras. It is easier to run the cameras off of USB 2.0 depending on the operating system and computer architecture.
 Then select Logitech")

24 2 of 35 4 This is the view for Win 7. (see next page for Win 8) Then select Logitech Web-cam Drives and Logitech Web-cam software, there is no need for the motion detection or video effects.

25 2 of 35 5 For Win 7 (see next page for Win 8).

26 2 of 35 6 To view the live feed from the cameras select Quick Capture Note that the web-cameras are powered from the computer not from the machine. There is no need to have power on the machine to check the cameras. The usb cable powers an internal usb hub and the 2 cameras.

27 2 of 35 7 Once the web-cam software has been installed check that the 2 internal cameras are pointing in the correct location. Switch between views by clicking on the Logitech HD webcam highlighted below right. Below shows the approximate view from the electrical enclosure and the approximate view from the Paper-feed enclosure.


28 2 of 35 8 With the web-cam installed you can then install VLC player (or similar). These players are used to view the videos that are created by the web-cams. VLC is particularly good as it has a slow motion viewing function.

29 2 of 35 9 Note that if the web-cams are being viewed through a web-cam viewer, e.g. Logitech software, then SliceIT cannot record at the same time. It is recommended to have the viewer closed in order to record any faults. The alternative is to view live images of the build using the web-cam software. The record webcam preference can be turned on / off in SliceIT, Help, Preferences. 9 Setting ICC Profile 2D Printer Scalers, Duplex and Knife Alignment When a new Printer is installed, it is required to be set-up on site. The set-ups required are for the XY scalers, duplex page alignment and the image to knife alignment. The procedures for the below tests can be found in SliceIT Help, Colour (Iris only) section. ICC Profile The ICC profile corrects for colour inaccuracies between the image displayed on screen in the RGB space and printed on the printer in the CYMK space. They can also be used to account for the difference in colour as a result of tinted paper, post processes or ink types.

30 3 of 35 0 Mcor provide a standard profile which has been created using Mcor Ink and a white unbleached paper. Customers may wish to create their own using a colorimeter such as Colour Monkey. To apply an ICC Profile to the software first open the 2D Printer settings from the ribbon in the SliceIT window as shown in the image below. Once the window is open you will be presented with a list of options including a section titled ICC Profile in which there will be a blank space for the file path of the ICC Profile. This can be seen on the following page. To select the location of the ICC profile click on the box with the three dots ( ) and a new window will open which contains a file browser. Select the appropriate file from its position on your hard drive or network. NOTE: The selected ICC profile will automatically be added to the SliceIT Workspace.


31 3 of 35 1 Once the location is selected the user must ensure to select the Set Profile option the above menu. The user should then receive a pop up message which can be seen below.
32 3 of D Printer XY Scalers Each 2D printer will have slight variations in its X and Y axis accuracy. In order to produce accurate parts this error has to be corrected in Slice IT. The SliceIT help has a detailed discussion on how to check the XY scalers under Slice-IT->Help->Help Contents->Colour(IRIS only)->colour Settings-> 2D Printer XY Scalers Duplex Page Alignment Once the 2D Printer X and Y axis scaler have been set-up we then need to set the duplex alignment. Note that in order to allow the ink to penetrate through a page we print out our pages in duplex (both sides), because of this it is very important that the top and bottom images are aligned, this is performed by the duplex alignment test. The SliceIT help has a detailed discussion on how to run this test under Slice-IT->Help->Help Contents Colour(IRIS only)->colour Settings-> How to Calibrate the 2D Printer Duplex Values Image To Knife Alignment Note that in order to make good quality parts it is important that the knife cuts are aligned to the image on the page. Note that for each machine, this relationship will be different, with this in mind we have to create a 3D printer profile which stores the offset values for the X and Y axis so that the knife will be aligned to the image. SliceIT help has a discussion about the 3D printer profile Slice-IT->Help->Help Contents Colour(IRIS only)->colour Settings-> How to Create a 3D Printer Profile To set up the image to knife alignment follow the instruction outlined in the SliceIT help Slice-IT->Help->Help Contents Colour(IRIS only)->colour Settings-> How to Set Image to Knife offsets
33 3 of Printer State Note that in order to prolong the life of the 2D printer nozzles, it is recommended to leave the 2D printer plugged in at all the time. This will reduce the chances of the nozzles drying out and clogging. In prolonged periods of inactivity the printer may go in to Power Save mode and then automatically shut down depending on the model and firmware version. When shutting down, the printer clears the nozzles thus preventing any blockages. This is similar to powering down a pc as opposed to pulling out the plug and causing an improper shutdown. In Power Save / Sleep Mode the machine uses 3.5W. When shut down and still plugged in it uses W depending on supply. We would also recommend that the auto-clean function is turned off. This can be found in the menu of the 2D printer. From the LCD Ready prompt, press the right arrow to get the menu. Then Menu, Maintenance, Auto-cleaning, Off. 11 Running a Colour Part To run a part do the following steps. Run the printer nozzle check and make sure all nozzles are clear. Open the model to be made in Slice-IT and generate layers. Under the 2D Printer Settings menu make sure that the correct 3D printer profile has been selected, the 2D printer X and Y scalers are correct and Duplex Offsets are correct. Load the paper into the paper tray Install the capture tray Under preferences turn off the duplex check, this will reduce the likelihood of the build stopping. Read Duplex is only used when carrying out a 2D calibration. Start the 2D print job, when the first page has been printed out check the duplex alignment, by making sure the bottom image 3 corner boxes are inside the top image 3 corner boxes. If not then the Duplex alignment set-up may have to be repeated. When the 2D print job is complete, we first load a single plain sheet of paper and then load the remaining paper into the paper tray of the 3d printer and start the 3d print job.
34 3 of 35 4 Note if it is required to print out a page during the 3d build then open the same project in another instance of SliceIT and print the desired page. 12 Running the 2D printer and 3D printer Note that due to the time required to print out the pages it is recommend that the 3D and 2D printers are run concurrently. This can be done by opening one instance of SliceIT and pre-printing the 2D pages. After about 50 to 100 pages a second instance of SliceIT can be opened to start the 3D printer working. As the 2D printer is faster than the 3D printer once the pre-printing is finished for the first build the following build can be printed while the 3D printer is finishing which ensures that the following build is ready to go and there is no delay in operation. 13 Colour Builds Faults There are two unique faults that can occur during colour builds. 1. Pages out of sequence: In this error the pages may and been loaded in the wrong order. Note that the 3D printer reads the page number encoded into the bar code and can detect if the pages are out of sequence. If this occurs the printer will stop and ask the user to check the page sequence. 2. Page Could not be feed: In this error the page could not be feed into the build area. If this occurs then the printer will stop and ask the user to print a new page. If the printer is already running a 2D printer job at this point then the user will have to cancel the print job and print out the required page. Once the requested page has been printed then the user can go back and continue the original print job. If a Jam occurs in the Epson printer then the most reliable way to clear the fault is as follows. First from the SliceIT window cancel the 2D printer job. Then open the Operating systems printer dialogue and cancel any print jobs that are not currently been printed, Do not cancel the current print job in the print dialogue. Follow the message on the 2d Printer LCD screen to clear the fault, note this make take a few attempts and cause a few pages to be printed. Once the fault has been cleared and the 2D printer says ready then remove any incorrect printed pages from the
35 3 of 35 5 capture tray and resume the print job. You may need to stop and restart the print spooler. This can be accessed from windows search for services then go to Print spooler, right click on it and stop / restart.
MP240 / MP245 MP260 / MP268 MP480 / MP486 SIMPLIFIED SERVICE MANUAL
 MP240 / MP245 MP260 / MP268 MP480 / MP486 SIMPLIFIED SERVICE MANUAL QY8-13BV-000 Rev. 00: June 2008 Canon Inc. (1/13) TABLE OF CONTENTS 1. LIST OF ERROR DISPLAY / TROUBLESHOOTING 1-1. Operator Call Errors
PrismJET DTx Quick Start Guide
 PrismJET DTx Quick Start Guide The following items are included in an accessory kit for your printer: USB Cable 110V Power Cord JetPRO 13/JetCUT Setup DVD User Guide CD Phillips Screwdriver Unpacking the
AstroJet TM M2 Quick Start Guide
 AstroJet TM M2 Quick Start Guide Step 1 Remove Printer and Accessories from packaging. Place Printer on a flat, even surface. Step 2 Remove Service Station Transport Tab 1. Open Top Cover. 2. Open Print
Installing the Printer Software
 4 Printing Your First Page Attaching the Paper Support 7 1 Checking the Printer 6 2 Plugging in the Printer 3 Installing the Ink Cartridges 5 Installing the Printer Software Connecting the Printer 4012581-00
USING ABSOLUTE BLACK INKS FOR MAKING SCREEN POSITIVES ON THE EPSON STYLUS PRO 7700, 7890, 7900, 9700, 9890, & 9900
 USING ABSOLUTE BLACK INKS FOR MAKING SCREEN POSITIVES ON THE EPSON STYLUS PRO 7700, 7890, 7900, 9700, 9890, & 9900 The following instructions explain how the i2i Absolute Black ink for making screen positives
Printing Your First Page. Attaching the Paper Support. Plugging in the Printer. Checking the Printer
 Printing Your First Page Attaching the Paper Support Checking the Printer Plugging in the Printer Installing the Ink Cartridges Installing the Printer Software Connecting the Printer 4011307 XXX-00 Attaching
Manual for MantraJet 1100 CD/DVD auto-printer
 Manual for MantraJet 1100 CD/DVD auto-printer Rev 1.03 September 7, 2010 Table of contents Specifications...3 Unpacking MantraJet 1100...4 Quick installation reference MantraJet 1100...7 Installation of
REFILLABLE CARTRIDGE SYSTEM FOR THE EPSON STYLUS PRO 7800 & 9800
 REFILLABLE CARTRIDGE SYSTEM FOR THE EPSON STYLUS PRO 7800 & 9800 Thank you for purchasing an Ink2image bulk ink feed system. You have just taken the first step to enjoying the cost saving and superior
Home... 3 Identify Product Parts... 5 Control Panel Buttons and Lights... 7 Load Paper... 9 Load Paper for Documents... 9 Load Envelopes...
 Home.................................................................. 3 Identify Product Parts..................................................... 5 Control Panel Buttons and Lights............................................
Clearing paper jams. Identifying paper jam areas. Printing. Using color. Paper handling. Maintenance. Troubleshooting. Administration.
 By carefully selecting print media and loading them properly, you should be able to avoid most paper jams. If jams do occur, follow the steps outlined in this section. 1 To resolve the paper jam messages,
ip3600 / ip3680 SIMPLIFIED SERVICE MANUAL
 ip3600 / ip3680 SIMPLIFIED SERVICE MANUAL QY8-13BW-000 Rev. 00: August 2008 Canon Inc. (1/17) TABLE OF CONTENTS 1. LIST OF ERROR DISPLAY / TROUBLESHOOTING 1-1. Operator Call s (Alarm LED Lit In Orange)
WorkForce Pro WP-4090 User's Guide
 WorkForce Pro WP-4090 User's Guide Contents WorkForce Pro WP-4090 User's Guide... 9 Product Basics... 10 Printer Parts Locations... 10 Printer Parts - Top... 11 Printer Parts - Back... 12 Printer Parts
Printers and Scanners
 Printers and Scanners Printer Types Dot Matrix An impact printer that transfers characters by striking a pattern (from a matrix) through an inked ribbon and onto paper. The most common number of pins on
Calibration Guide. Software Interface Introduction. In Control Pad Tab. Add: add print file. Setting: set parameters and calibrate
 Calibration Guide Software Interface Introduction In Control Pad Tab Add: add print file Setting: set parameters and calibrate Online: online / offline switch Home: carriage goes to home position Down
Before you can use the machine, you must set up the hardware. Please read this Quick Setup Guide for the correct setup procedure.
 FAX-2480C Quick Setup Guide Before you can use the machine, you must set up the hardware. Please read this Quick Setup Guide for the correct setup procedure. Setting Up the Machine Setup is Complete! Keep
Contents XP-830 User's Guide Product Basics Wi-Fi or Wired Networking... 38
 XP-830 User's Guide Contents XP-830 User's Guide... 15 Product Basics... 16 Using the Control Panel... 16 Control Panel Buttons and Lights... 17 Using the LCD Screen... 18 Adjusting Control Panel Position...
Unpack the machine and its components. Cassette/Multi-purpose tray
 Set-Up Sheet Thank you for purchasing the Canon imageclass D320. To get your machine ready for use, please follow the instructions in this Set-Up Sheet before referring to any other documentation. Unpack
MX-8000 User Manual MX Rev
 MX-8000 Rev. 070202 Greeting Thank you for purchasing PAITEC USA products. This manual is prepared to provide guidelines on how to properly operate and maintain MX-8000. Copyright Any of the contents should
ABCDE ABCDE ABCDE ABCDE ABCDE. Print quality and troubleshooting guide. Page 1 of 5
 Page 1 of 5 Print quality and troubleshooting You can solve many print quality problems by replacing a supply or maintenance item that has reached the end of its intended life. Check the operator panel
Quick Start Guide EPSON TM-C3400. SecurColor Color Ink-jet printer Item# UEPS. 1) Quick Install Guide ) Initial Ink Charge 7
 Quick Install Guide ) Initial Ink Charge 7") EPSON TM-C3400 SecurColor Color Ink-jet printer Item# UEPS 1) Quick Install Guide 2-6 2) Initial Ink Charge 7 3) Quick Reference Sheet for pc/nametag recommended print settings recommended print settings
EPSON TM-C3400 SecurColor Color Ink-jet printer Item# UEPS 1) Quick Install Guide 2-6 2) Initial Ink Charge 7 3) Quick Reference Sheet for pc/nametag recommended print settings recommended print settings
Learning about the printer...5. Loading paper and specialty media...9
 Quick Reference Contents Learning about the printer...5 Using the printer control panel...5 Understanding the printer control panel light sequences...6 Loading paper and specialty media...9 Setting the
Artisan 1430 User's Guide
 Artisan 1430 User's Guide Artisan 1430 User's Guide Welcome to the Artisan 1430 User's Guide. Product Basics See these sections to learn about the basic features of your product. Printer Parts Locations
Table of Contents. Unpacking and Inspection Setup Loading the Media Mount the Printer on the Wall... 16
 WPL25/WHC25 Table of Contents Unpacking and Inspection... 1 Setup... 5 Loading the Media... 6 Mount the Printer on the Wall... 16 LED and Button Functions... 17 Troubleshooting... 18 Unpacking and Inspection
Start Here. Unpack. 1 Make sure you have these items: 2 Remove all the packing materials and tape.
 Epson Stylus Pro 3880 Start Here Unpack 1 Make sure you have these items: Printer Power cord CD-ROM User's Guide Ink cartridges Rear sheet guide Limited Warranty Warning: The printer weighs about 43 pounds
MantraJet 1100 CD/DVD autoprinter Operator s manual
 MantraJet 1100 CD/DVD autoprinter Operator s manual Rev 1.00 May 7, 2008 Table of contents 1. Specifications.. Page 2 2. Unpacking you MantraJet 1100 Page 3 3. Using your autoprinter for the first time.
00-SFXM750.book Page 1 Friday, August 18, :30 PM. Quick Reference Guide 701P DocuPrint M750/M760
 00-SFXM750.book Page 1 Friday, August 18, 2000 1:30 PM Quick Reference Guide 701P31954 DocuPrint M750/M760 00-SFXM750.book Page 2 Friday, August 18, 2000 1:30 PM 00-SFXM750.book Page iii Friday, August
Loading paper and specialty media Learning about the printer. Stop all printer activity. 7 Back button Return to the previous screen.
 Quick Reference Use the 6 Stop or Cancel button To Stop all printer activity. Loading paper and specialty media Learning about the printer Using the printer control panel 0 Use the 9 To Display View the
HP C6463A Two-Sided Printing Module User s Guide
 User's Guide HP C6463A Two-Sided Printing Module for use with the HP PhotoSmart P1000/P1100 Color InkJet Printer Table of Contents Overview............................................................................................
K Service Source. Color StyleWriter 2200
 K Service Source Color StyleWriter 2200 K Service Source Basics Color StyleWriter 2200 Basics Overview - 1 Overview The Color StyleWriter 2200 is a desktop color bubblejet printer for personal use. It
CONTINUOUS INK SUPPLY SYSTEM INSTALLATION INSTRUCTION FOR EPSON Workforce printer
 CONTINUOUS INK SUPPLY SYSTEM INSTALLATION INSTRUCTION FOR EPSON Workforce 630 635 840 845 530 545 645 7510 7010 7520 60 3520 3540 printer Caution: Please keep ink reservoirs on the same level as the printer.
Edition notice. Edition: June 2000
 Edition notice Edition: June 2000 The following paragraph does not apply to any country where such provisions are inconsistent with local law: LEXMARK INTERNATIONAL, INC., PROVIDES THIS PUBLICATION AS
Unpacking and Installing the Flora 2512 UV Printer. Steps 1: Unscrew the 10mm bolts holding the top. Then remove the top and put in a safe place.
 Unpacking and Installing the Flora 2512 UV Printer Steps 1: Unscrew the 10mm bolts holding the top. Then remove the top and put in a safe place. Step 2: Unscrew 10mm bolts holding the end panels. On the
imagine. print. create. Edible Printing Insights SET UP AND TROUBLE SHOOTING GUIDE
 imagine. print. create. Edible Printing Insights SET UP AND TROUBLE SHOOTING GUIDE Warranty 1 Edible Printing System Warranty All printing systems are benefitted by a 12-month warranty that commences on
PIXUS ip8600 PIXMA ip8500 SERVICE MANUAL
 PIXUS ip8600 PIXMA ip8500 SERVICE MANUAL Revision 0 QY8-13A5-000 COPYRIGHT 2004 CANON INC. CANON PIXUS ip8600/pixma ip8500 082004 XX 0.00-0 Scope This manual has been issued by Canon Inc., to provide the
Display Manual for icube 2 and 3
 Display Manual for icube 2 and 3 Instructions for icube 2: - After switching on the mains switch appears this welcome-site. The print-engine is in the process of priming to get ready. - If switching off
WF-7110 User's Guide
 WF-7110 User's Guide Contents WF-7110 User's Guide... 9 Product Basics... 10 Setting Up the Control Panel... 10 Control Panel Buttons and Lights... 10 Status Icons... 11 Setting a Password and Locking
Getting Started. Read Me First. series. Photo Printer
 Photo Printer series Getting Started Read Me First Make sure to read this manual before using the printer. Please keep it in hand for future reference. Contents 1 Preparation 2 Turn the Power On 3 Install
Chapter 11: Printers. IT Essentials v6.0. ITE v6.0 1
 Chapter 11: Printers IT Essentials v6.0 ITE v6.0 1 Chapter 11 - Sections & Objectives 11.1 Common Printer Features Explain the purpose and characteristics of different types of printers. 11.2 Installing
3D Printing Getting Started!
 ARCHITECTURE & LANDSCAPE ARCHITECTURE 3D Printing Getting Started! White filament is free to students for academic use. Where do I buy filament? NORTH DAKOTA STATE UNIVERSITY www.makerbot.com/store www.ultimachine.com/pla
Lexmark X642 Troubleshooting Guide
 Lexmark X642 Troubleshooting Guide Online technical support Technical support is available on our Lexmark Web site at www.lexmark.com. Checking an unresponsive printer If the printer is not responding,
KM-4800w. Installation Guide
 KM-4800w Installation Guide TABLE OF CONTENTS page 1 Installation Requirements 2 2 Unpacking 3 2. 1 Unpacking 3 2. 2 Confirmation of Accessories 5 3 Leveling the Machine 7 4 Setup of the Roll Deck 9 5
Quick Reference Guide Important Adjustment Program Utilities for Your Fast T-Jet 3
 Quick Reference Guide Important Adjustment Program Utilities for Your Fast T-Jet 3 (User s of Windows Vista OS- The Adjustment Program described in here and in Chapter 7 of your User s Manual must be run
ET User's Guide
 ET-16500 User's Guide Contents ET-16500 User's Guide... 13 Your Ink Tank System... 14 Product Basics... 15 Using the Control Panel... 15 Control Panel Buttons and Lights... 16 Status Icons... 17 Status
HGR-2488 Prism Installation Instructions
 HGR-2488 Prism Installation Instructions These installation instructions are applicable to the following models: TASCAM 2488 MK1 (original model) TASCAM 2488 MK II TASCAM 2488 NEO Page 1 of 8 Important
User Guide. Set Up & Start Up Basic Copier Operations Key Operator Functions
 User Guide Set Up & Start Up Basic Copier Operations Key Operator Functions Toshiba America Business Solutions, Inc. 2006 Training and Dealer Development SET UP & START UP Turning the System On Turning
Datacard CR500 Instant Issuance System. User Reference Guide. July Rev B
 Datacard CR500 Instant Issuance System User Reference Guide July 2015 527495-001 Rev B Datacard CR500 User Reference Guide The CR500 Instant Issuance System Contents The CR500 Instant Issuance System The
Important! Save the box and shipping materials for transporting the MultiPASS in the future.
 Step 1: Unpack the MultiPASS 1. Carefully remove all items from the box. Remove these items from the documentation package: Quick Start Guide, the Canon Creative for MultiPASS CD-ROM, Registration card,
Technical Information Bulletin
 The MZ Series program has been upgraded to V3.16. Please read this bulletin thoroughly before upgrading your MZ Printer. This program is now downloadable from the RISO web site at the following address...
WF-6530 User's Guide
 WF-6530 User's Guide Contents WF-6530 User's Guide... 15 Product Basics... 16 Using the Control Panel... 16 Control Panel Buttons and Lights... 17 Status Icon Information... 18 Status Button Information...
Xerox Nuvera Quick Start Cards
 October 2015 702P03887 Xerox Nuvera Quick Start Cards Xerox Nuvera 100/120/144/157 EA Production System Xerox Nuvera 100/120/144 MX Production System Table of Contents Supplies Provides information about
Use the To. 4 Keypad Enter numbers, letters, or symbols on the printer. Stop all printer activity. 6 Indicator light Check the status of the printer.
 Quick Reference Learning about the printer Using the control panel Use the To 4 Keypad Enter numbers, letters, or symbols on the printer. 5 Stop or Cancel button Stop all printer activity. 6 Indicator
Product Parts Front view... 2 Rear view... 2 Inside the product... 3 Scanner parts... 3 Control panel... 4
 Table of Contents Product Parts Front view................................................................. 2 Rear view.................................................................. 2 Inside the product...........................................................
subli-trans XPRES SG 3110DNw Dye Sublimation Printer System Instruction Manual Last Updated: 14 October 2014
 subli-trans XPRES SG 3110DNw Dye Sublimation Printer System Instruction Manual Last Updated: 14 October 2014 Printing Equipment Supplies Training Services Table of Contents Table of Contents... 2 Cartridge
How do I troubleshoot printing issues with Best Practice Software?
 How do I troubleshoot printing issues with Best Practice Software? This FAQ is intended to answer common questions about troubleshooting printing issues with Best Practice Software. Printing Problems If
Contents L4160 User's Guide Product Basics Wi-Fi Networking... 30
 L4160 User's Guide Contents L4160 User's Guide... 11 Product Basics... 12 Using the Control Panel... 12 Control Panel Buttons and Lights... 13 Status Icon Information... 13 Entering Characters on the
Scroll through menus or move between screens and menu options. Increase the numeric value of an option or setting being displayed. Save settings.
 Quick Reference Learning about the printer Use the 5 Right arrow button To Scroll through menus or move between screens and menu options. Increase the numeric value of an option or setting being displayed.
Before you can use the machine, you must set up the hardware. Please read this Quick Setup Guide for the correct setup procedure.
 FAX-2480C Quick Setup Guide Before you can use the machine, you must set up the hardware. Please read this Quick Setup Guide for the correct setup procedure. Setting Up the Machine Setup is Complete! Keep
Océ User manual. Océ CS2024. Quick Start Guide
 Océ User manual Océ CS2024 Quick Start Guide Océ Technologies B.V. Copyright 2005, Océ-Technologies B.V. Venlo, The Netherlands. All rights reserved. No part of this work may be reproduced, copied, adapted,
virtual families repair wall virtual families repair wall
 Virtual families repair wall. Note Virtual families repair wall change the print quality settings Load with the top down and the find the solution to common printer problems. Printer does not pull paper
 Must read this before installation Important instructions about your CISS system R260 R280 R380 1. If your printer is brand new you must first install the original cartridges that came with your printer.
hp photosmart 7150 basics guide
 hp photosmart 7150 basics guide control panel The following table is a quick reference guide to the buttons that appear on your printer s control panel. CANCEL RESUME POWER contents 1 get started.........................................
DOT MATRIX PRINTER SP6000 SERIES
 DOT MATRIX PRINTER SP6000 SERIES Hardware Manual < Approval: CEL > Trademark acknowledgments SP6000 : Star Micronics Co., Ltd. Notice All rights reserved. Reproduction of any part of this manual in any
Afinia Label L901 Label Printer Quick Start Guide
 Afinia Label L901 Label Printer Quick Start Guide Ver. 1.1 Page 2 Step 1 Remove Printer and Accessories from packaging Items included: Printer USB cable One ink set (CMYKK) Quick Start Guide Network cable
Quick Reference. ineo 3300P
 ineo 3300P Contents 1 Learning about the printer... 3 Using the printer control panel... 3 Understanding the printer control panel light sequences... 4 2 Loading paper and specialty media... 9 Setting
MultiPASS F50 Setup Instructions
 MultiPASS F50 Setup Instructions Step 1: Unpack the F50 MFP 1. Carefully remove all items from the box. Step 2: Set up the F50 MFP 1. Remove shipping tape and protective shipping materials. 2. Open the
Ink Cartridge and Print Head Maintenance Manual
 Ink Cartridge and Print Head Maintenance Manual Hewlett Packard D135/145/155/175 CP1160/Color Copier 610 And other printers with similar cartridge design. Contents Page 3 4 5 6 7 8 9 10 12 15 21 25 26
WorkForce WF-7510/WF-7520 User's Guide
 WorkForce WF-7510/WF-7520 User's Guide Contents WorkForce WF-7510/WF-7520 User's Guide... 13 Product Basics... 14 Setting Up the Control Panel... 14 Control Panel Buttons and Lights... 14 Adjusting Control
ABCDE ABCDE ABCDE ABCDE ABCDE. Print quality and troubleshooting guide. Page 1 of 5
 Page 1 of 5 Print quality and troubleshooting Many print quality problems can be solved by replacing a supply or maintenance item that is approaching the end of its intended life. Check the operator panel
Contents XP-702 User's Guide Product Basics Selecting Wireless Network Settings From the Control Panel Loading Paper...
 XP-702 User's Guide Contents XP-702 User's Guide... 13 Product Basics... 14 Setting Up the Control Panel... 14 Control Panel Buttons and Lights... 14 Adjusting Control Panel Position... 15 Changing LCD
DVR101 HD DASH CAM & 12MP CAMERA
 DVR101 HD DASH CAM & 12MP CAMERA GENERAL - Display: 3 HD LCD - Chipset: Novatek 96223 - Image Sensor: SC1143, 1.0M CMOS - Outputs: USB - PC Interface: USB - Power Supply: 12/24V Cig. Lead Charger - Input
Lexmark Z51. Color Jetprinter. User s Guide for OS/2
 Lexmark Z51 Color Jetprinter User s Guide for OS/2 First Edition (October 1998) The following paragraph does not apply to any country where such provisions are inconsistent with local law: LEXMARK INTERNATIONAL,
Contents XP-620 User's Guide Product Basics Wi-Fi Networking... 32
 XP-620 User's Guide Contents XP-620 User's Guide... 13 Product Basics... 14 Using the Control Panel... 14 Control Panel Buttons and Lights... 14 Using the LCD Screen... 15 Adjusting Control Panel Position...
DIMATIX Printer Tutorial and Operating Instructions
 DIMATIX Printer Tutorial and Operating Instructions The Operating Principle: The DIMATIX printer is suited to use unusual fluids such as protein solutions or conductive polymers as ink materials. These
Installing the Dye Sublimation Printing System
 Installing the Dye Sublimation Printing System Instructions for Epson D120 Printer ArTainium UV+ D120 Bulk Ink Feeder ITec Economy Heat Press STX11 / STX20 Index Page Contents 1 Contact Information 2 Unpacking
Control-panel messages
 Control-panel messages Control panel message Description Recommended action 10.32.YY UNAUTHORIZED SUPPLY Unauthorized supply in use A new, non-hp supply has been installed. This message appears until you
Chapter 1 - Introduction and Installation ScreenWriter 4 Printer
 Chapter 1 - Introduction and Installation ScreenWriter 4 Printer Fig. 1.1 ScreenWriter 4 Printer The ScreenWriter 4 is designed for high-end silk-screen and graphics applications. Standard density and
EPSON Stylus NX530 User's Guide
 EPSON Stylus NX530 User's Guide Contents EPSON Stylus NX530 User's Guide... 11 Product Basics... 12 Setting Up the Control Panel... 12 Control Panel Buttons and Lights... 12 Adjusting Control Panel Position...
Interpret control-panel messages
 Interpret control-panel messages Control-panel message types Four types of control-panel messages can indicate the status of or problems with the product. Message type Status messages Warning messages
VarioPrint Jobmanual
 Océ VarioPrint 2090 Jobmanual o VarioPrint 2090 3 4 A B C 5 2 D 6 1 7 Printer parts 1 2 3 4 5 6 7 Left front door Printer top left cover Output trays Upper output tray Finisher front door Paper trays Front
A+ Certification Guide. Chapter 11 Printers
 A+ Certification Guide Chapter 11 Printers Chapter 11 Objectives Printing fundamentals. Laser printers Inkjet printers Thermal printers Impact printers. Printer Installation and Configuration Printer Maintenance
QUICK START GUIDE. Android or Windows Tablet. 1 Tower PC. Mount the RazorGage to your Own Table. Assembling the RazorGage ST with RazorGage Table
 QUICK START GUIDE Android or Windows Tablet If you have a Tablet Style Interface (PC or Android) then skip this step. 1 Mount monitor and attach legs to control tower using hardware provided and place
HP Deskjet 1510 series
 HP Deskjet 1510 series Table of contents 1 HP Deskjet 1510 series Help... 1 2 Get to know the HP Deskjet 1510 series... 3 Printer parts... 4 Control panel features... 5 Status light... 6 Auto-Off... 9
C935 Series. Maintenance Guide
 C935 Series Maintenance Guide April 2007 www.lexmark.com Contents...3 Cleaning the exterior of the printer...3 Storing supplies...3 Conserving supplies...3 Checking the status of supplies...4 Checking
Quick Reference Guide. ineo 3301P
 ineo 3301P Contents 1 Learning about the printer... 3 Using the printer control panel... 3 Understanding the colors of the Sleep button and indicator lights... 4 Setting the paper size and type... 5 Configuring
MC-2984-V1.00. Troubleshooting. Advanced Guide. Basic Guide. Describes the summary of this product. Describes the detailed function of this product.
 ip4600 series On-screen Manual Стр. 1 из 396 стр. How to Use This Manual Printing This Manual MC-2984-V1.00 Basic Guide Describes the summary of this product. Advanced Guide Describes the detailed function
K Service Source. StyleWriter
 K Service Source StyleWriter K Service Source Basics StyleWriter Basics Introduction - 1 Introduction The StyleWriter is a serial bubble jet ink-on-demand printer. The StyleWriter prints up to 1/3 page
Getting Started. Read Me First. series. Photo Printer
 Photo Printer series Getting Started Read Me First Make sure to read this manual before using the printer. Please keep it in hand for future reference. Symbols Used in This Document Instructions including
Epson Stylus Photo 1410 Reference Guide 3 About Your Printer 3 About Exif Print 4 About Your Software 4 Printer Parts 5 Loading Paper 7 Single Sheets
 Epson Stylus Photo 1410 Reference Guide 3 About Your Printer 3 About Exif Print 4 About Your Software 4 Printer Parts 5 Loading Paper 7 Single Sheets 7 Envelopes 12 Special Papers 15 Printing with Windows
Start Here. Remove all tape and lift display. Locate components USB
 HP Photosmart 2600/2700 series all-in-one User Guide Start Here 1 USB Important: Do not connect the USB cable until this guide instructs you to or the software may not install properly. If you have problems
The Pro/Classic Series Printhead angle can be set between 0 and 90. Common settings are shown below. 192/32 1 Print Head
 Pro/Classic Series Printhead Instructions 2464-172 Rev. H Getting Started Head Angle The Pro/Classic Series Printhead angle can be set between 0 and 90. Common settings are shown below. 90 32-39 27 352/32
X940e, X945e. Maintenance Guide
 X940e, X945e Maintenance Guide July 2010 www.lexmark.com Contents...3 Storing supplies...3 Checking the status of supplies...3 Checking the status of supplies from the control panel... 3 Printing a menu
VJ-1638/1638W OPERATION MANUAL ERRATA
 Some contents of the Operation Manual are changed. Make sure the following list shown below. TIP The content of this documents are being based on the firmware version later than 2.04 Chapter Item Description
Quick Start Guide. Chapter 1 : Setting the Machine. Unpack the machine and its components. Check that you have the following: Machine
 Quick Start Guide READ THIS FIRST Thank you for purchasing Canon Color imageclass MF8180c. To get your machine ready for use, please follow the instructions in this document before referring to any other
Getting Started. Read Me First. series. Canon Inkjet Premium Photo Printer. 1 Preparation...P.1. Install the Print Head... P.3
 Canon Inkjet Premium Photo Printer series 1 Preparation...P.1 Getting Started Read Me First Symbols Used in This Document Prohibited actions. Instructions including important information. In this guide,
ABCDE ABCDE ABCDE. Print quality guide. Isolating print quality problems. Print irregularities. Print quality guide
 Page 1 of 8 Print quality guide Many print quality problems can be solved by replacing a supply or maintenance item that is approaching the end of its intended life. Check the printer control panel for
WF-5690 User's Guide
 WF-5690 User's Guide Contents WF-5690 User's Guide... 15 Product Basics... 16 Using the Control Panel... 16 Control Panel Buttons and Lights... 17 Status Icon Information... 18 Status Button Information...
Epson Stylus TX430W User's Guide
 Epson Stylus TX430W User's Guide Contents Epson Stylus TX430W User's Guide... 11 Product Basics... 12 Setting Up the Control Panel... 12 Control Panel Buttons and Lights... 12 Adjusting Control Panel
Printer Driver. User Guide. Macintosh
 Card Photo Printer CP-100/CP-10 Printer Driver User Guide Macintosh 1 Contents Safety Precautions...4 Read This First...5 About the Manuals...5 Printing Flow Diagram...6 About the Connection Cable...7
Personal 3D Printer. Quick Start Guide. See Inside for Use and Safety Information
 EKOCYCLE TM Personal 3D Printer Quick Start Guide See Inside for Use and Safety Information The USB Mass Storage Device Contains the User Guide and Quick Start Guide in other Languages Congratulations
Ambir ImageScan Pro 930u. Quick Start Guide. High Speed Document Scanner with UltraSonic Misfeed Detection. Ver 1.0
 Ambir ImageScan Pro 930u TM High Speed Document Scanner with UltraSonic Misfeed Detection www.ambir.com Ver 1.0 Ambir ImageScanPro TM 930u Table of Contents Box Contents Installation and Setup Loading